

Fisher & Paykel aquasmart Installation Instructions And User Manual

E[ectdc Shock Hazard
Read and follow the iMPORTANT SAFETY iNSTRUCTiONSoutJined in this
User Guide before operating this appliance, pages 3 - 5o
FaHur÷to do so can result in death, e[ectdc shock fire or iniury to personso
Please Note: to obtain maximum efficiency, your Aqu_,Sm(_rt '_' washer has the ability to learn and
adapt to the [oca[ environment. This may take several wash cycles, therefore maximum energy
efficiency may not be achieved unti[ a number of wash cycles have been completed.
This usually takes about 5 cycles.
Franqais Page 55 - 106
As an ENERGY STAR_ Partner Fisher & Payke[ has determined
that this product meets ENERGY STARe guidelines for energy efficiency.
Int_'oduction
Important safety instructions
Installation instructions
Water supply
Before you do your first wash
Getting started quickly
Aqu_Sm_rt _'_controls
Aquc_Sm_t saf,,ty features
* , T_4 S
The unlqueAquaSmar8 wa_,:h
Sorting and loading
Fabric softener
Bleach
Wash cycles
Regular Heavy
Delicate, Sheets Easy Iron
BulkX Allergy
Whites BasketClean,ToweB
Rinse& Spin,R;nse,Sp;n
Wash cycle options
Customizing wash cycles
Changing preset options
Cadng for your AquaSmay_ wa:her
Before you call for service
Solving operating problems
Solving wash problems
How to get service
2
3
6
7
10
14
16
18
19
20
21
24
25
26
27
27
28
29
30
31
32
35
36
42
44
46
48
50
52
SAVE THESEINSTRUCTIONS
fhe modelsshown in thisUser,Guidemoynot LyecJvoi/oUeinoll rn_rkets¢;nd¢;re
su_bje_t to_hon_e_t orgytime.For_urrentdet_;//sot9outr_}ode/_ndspe_/t;cotion
ovo//ob///O/inyourcountG p/essevisitour/oco/w@s/tf_//st_,don thebackcov¢_r
or contoctyour localfishier& PoykHd_ol_<
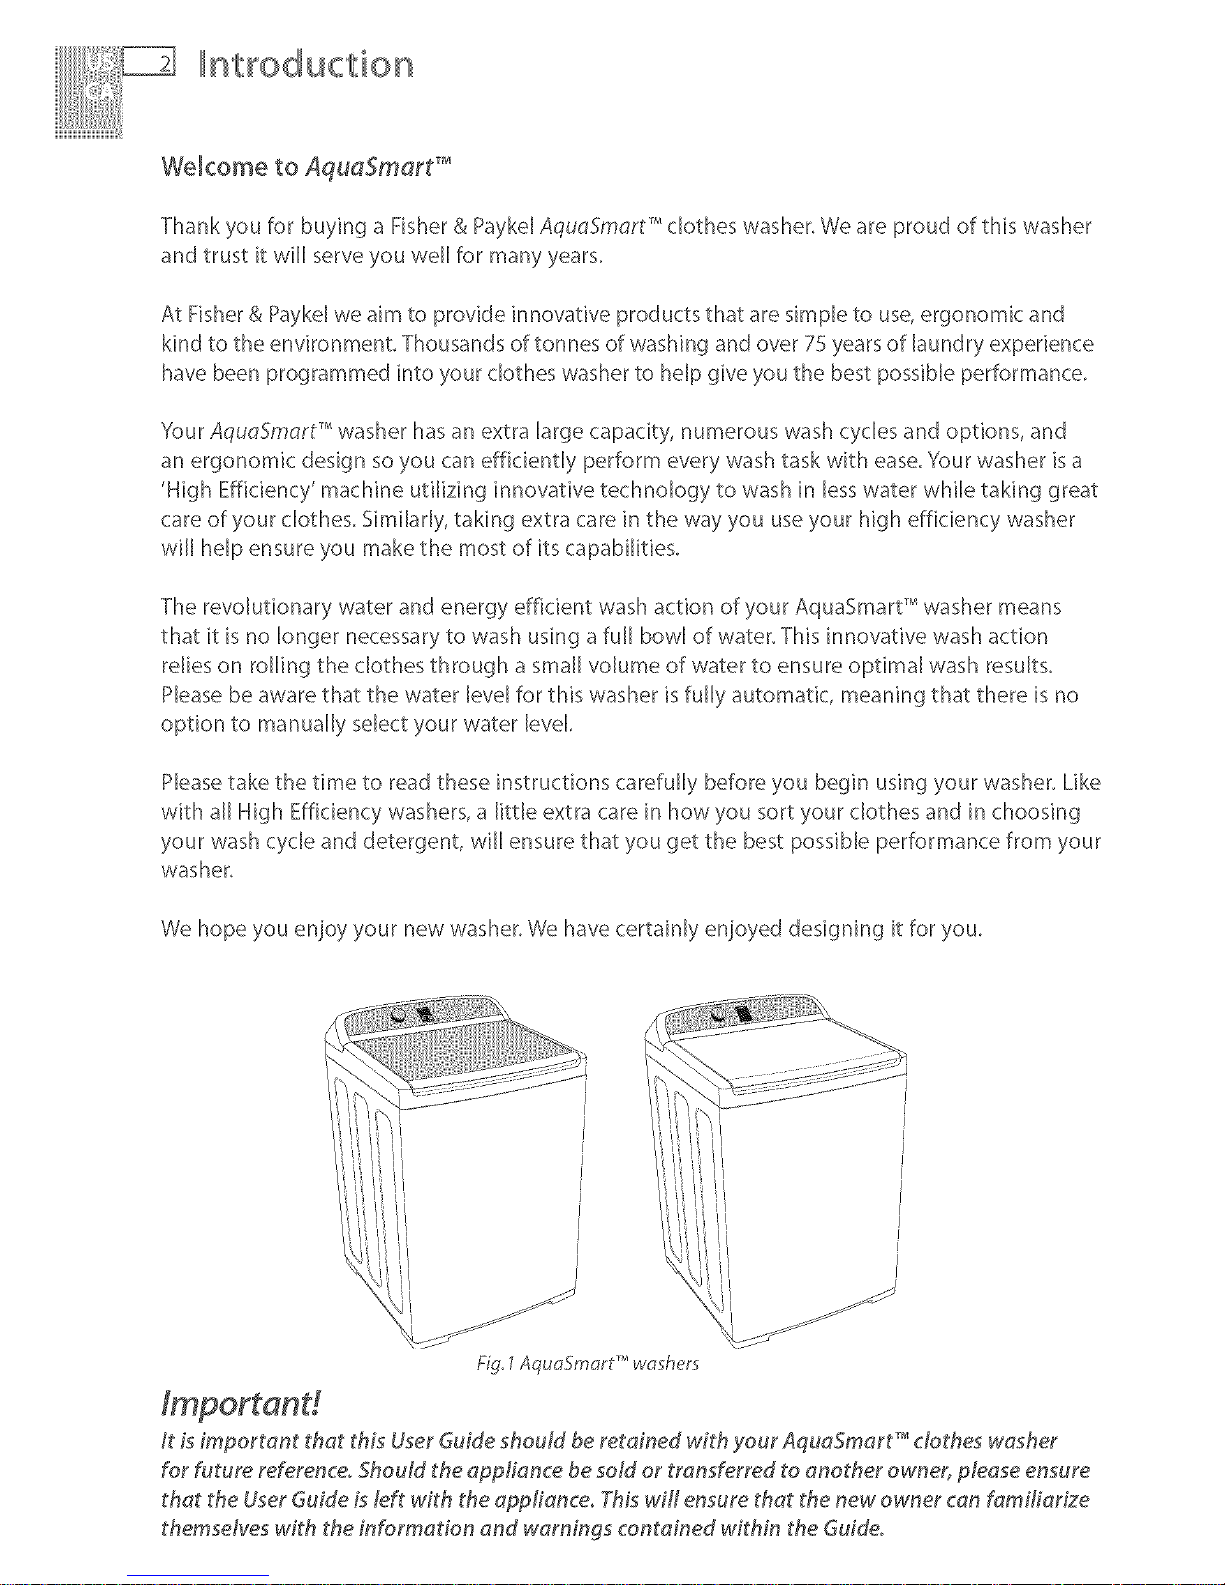
Welcome to AquaSmart _'
Thank you for buying a Fisher & Paykel AquaSm_,rt ''_'clothes washer. We are proud of this washer
and trust it will serve you weBBfor many years.
At Fisher & Paykel we aim to provide innovative products that are simple to use, ergonomic and
kind to the environment. Thousands of tonnes of washing and over 75 years of laundry experience
have been programmed into your clothes washer to help give you the best possible performance.
Your AquaSmort TM washer has an extra large capacity, numerous wash cycles and options, and
an ergonomic design so you can efficiently perform every wash task with ease. Your washer is a
'High Efficiency' machine utilizing innovative technology to wash in less water while taking great
care of your clothes. Similarly, taking extra care in the way you use your high efficiency washer
will help ensure you make the most of its capabilities.
The revolutionary water and energy efficient wash action of your AquaSmart ''¢washer means
that it is no longer necessary to wash using a full bowl of water. This innovative wash action
relies on rolling the clothes through a small volume of water to ensure optimal wash results.
Please be aware that the water level for this washer is fully automatic, meaning that there is no
option to manually select your water level
Please take the time to read these instructions carefully before you begin using your washer. Like
with all High Efficiency washers, a little extra care in how you sort your clothes and in choosing
your wash cycle and detergent, will ensure that you get the best possible performance from your
washer.
We hope you enjoy your new washer. We have certainly enjoyed designing it for you.
Fig, 1AquaSmart T'_washers
It is important that this User Guide should be retained with your AqueSmart TM clothes washer
for future reference, 5houtd the appliance be sold or transferred to another owner, please ensure
that the User Guide is to# with the appflanceo This wifl ensure that the new owner can famiflar#e
themselves with the information and warnings contained within the Guideo
mportant safety instructions
Read all safety information before using
Many washersare located near a gasdryer or awater heater in the home,
Risk ef Fire Hazard
For your safety the information in this manual must be folbwed to minimize
the risk of fire or explosion or to prevent property damage, persona_ injury
or loss of I:feo
Do not store or use gasoline or other flammaMe vapors and Hquids in the
vicinity of this or any other app_ianceo
hstaHation and service must be performed by a qualified installer, service
agency or the gas supplier.
What to do if you smell gas
DO NOTtryto light any appliance.
DO NOT touch an electrical switch; do not use any phone in your building.
Clear the room, building or area of all occupants.
Immediately call your gas supplier from your neighbor's phone.
Follow the gas supplier's instructions.
If you cannot reach your gas supplier, call the fire department.
Water heater safety
Under certain conditions Hydrogen gas may be produced in a water heater that has not been
used for two weeks or more,
HYDROGENGASCAN BEEXPLOSIVEUNDERTHESECIRCUMSTANCES°
If the hot water has not been used for two weeks or more, prevent the possibility of damage or
injury by turning on all hot water faucets and allowing them to run for several minutes before
using any electrical appliance which is connected to the hot water system, This will allow any
hydrogen gas to escape. Since the gas is flammable, do not smoke or use an open flame or
appliance during this process,
SAVE X_ESEINSR_UCTIONS
mportant safety instructions
Risk of Fire, £[ectric Shock and Injury to Persons Hazards
Follow the safety precautions outlined in this User Guide.
Failure to do so can result in death, e[ectdc shock, fire or injury to persons.
o Readaft instructions before using the @pfiance.
o Usethis appliance on!y for its intended purpose asdescribed in this UserGuide.
o This washermust beproperly instafied and tocated in accordance with the installation
instructions before it is used.
o This washermust beproperly grounded to conform with aft governing codesand ordinances°
Follow details in the Installation instructions.
o Do not install or store washer where it wilt beexposed to temperatures below freezing or exposed
to the weather.
o Connect to a properly rated, protected and seed power supply circuit to avoid electrical overload°
o Connect to adequate plumbing and drain facilities asdescribed in the installation instructions.
o Turnoff water faucets when the washer isnot in useto relieve pressure on hosesand valvesand
to minim#e leakages ira hose or valveshould break or rupture.
o Do not repair or replaceany part of the app#ance or attempt any servicing unlessspecifically
recommended in this UserGuide or inpublished userrepair instructions that you understand, and
haveskills to carry out.
o Whendisconnecting the appfiance pug by the plug rather than the cord or junction of cord to
avoid damage to the cord or junction of the cord and plug.
o Makesure that the cord islocated so that it will not bestepped on, tripped over or otherwise
subject to damage or stress°
o Keepaft laundry aids (such asdetergents, bleach, fabric sofener, etcJ out of the reach of children,
preferably in a lockedcabinet. Observe all warnings on container labels to avoid personal injury,
o Do not tamper with the controls.
o Keepthe area around/underneath your appliance free #om the accumulation of combustible
materials, such as tint, paper, rags, chemicals,etc.
o Keepthe floor around your appliance clean and dry to reduce the possib_ity ofdippingo
o Never reach into the washer if the tub or agitator is moving.
o Beforetoading, untoadingoraddingdothes, pressSTARTiPAUSEandwaituntifthewasherhas
completely stopped before opening the lid,
SAVE THESE INSTRUCTIONS
mportant safety instructions
diose supervision is necessary ff this appliance is used by or near children° De not allow children
to play inside or on, or with this appliance or any discarded appliance.
o Dispose of discarded appliances and shipping/packing materials property. Before discarding a
washec or removing from service, remove the washer lid.
o Do not leave the washer lid up during the cycle. The washer wifl not function. Tostart, close lid
and press START/PAUSEo
o Do not wash or dry articles that have been cleaned in, washed in, soaked in, or spotted with
combustible or explosive substances (such as wax, oit, paint, gasoline, degreasers, dry_cteaning
solvents, kerosene, etc.) which give off vapors that could ignite or explode. Do not add these
substances to the wash water. Do not use these substances around your washer and/or dryer
during operation, as they give off vapors that could ignite or explode.
o The laundry process can reduce the flame retardancy offabricso To avoid such a resut5 the
garment manufacturer's care instructions should be followed very carefuflyo
o Do not mix chlorine bleach with ammonia or acid such as vinegar and/or rust remover. Mixing
can produce a toxic gas which may cause death.
o Never climb on or stand on the washer top or lid.
o Do not wash fibregtass articles in your washer. Skin #ritadon could result from the remaining
particles that may be picked up by clothing during subsequent washer use.
o To minimize the possibility of electric shock, unplug this appliance from the power supp!y or
disconnect the washer at the household distribution panel by removing the fuse or switching off
the circuit breaker before attempting any maintenance or cleaning.
o Note: pressing the POWER button does NOT disconnect the appliance #ore the power suppty,
even though the fights are out.
o Do not @erate this appliance if it is damaged, matfunctionin¢ pardafly disassembled or has
missing or broken parts, including a damaged cord or plug.
o Do not operate this appliance if the lid has been incorrecdy fitted°
o ffyou are using an extension cord or a portable electrical outlet device (eg multi-socket outlet
bo_, ensure that it is positioned so that it does not come into contact with water or moisture°
o For grounding instructions and warnings related to this appfiance ptease refer to the relevant
sections of pages 6 and 13 of this User Guide.
SAVE THESE INSTRUCTIONS

Installation instructions
Before you begin - read these instructions completely and carefully°
Electric Shock Hazard
Read and follow the IMPORTANT SAFETY INSTRUCTIONS outlined in this
User Guide before operating this appliance, pages 3 - 5o
Improper connection of an equipment-groundin 9 conductor can result in a
risk of e_ectric shock° Check with a qualified ÷_ectrician or serviceman if you
are in doubt as to whether the appliance is property groundedo
Do not rood@ the plug provided with the appliance - if it wi/not fit the
outlet, have a proper outlet instaled by a qualified e_ectriciano
Failur@to do so can result in death, electric shock fire or injury to persons°
Observe aH governing codes and ordinances°
Installation Requirements
Location
Your washer must be installed on firm flooring to minimize vibration during spin cycles. Concrete
flooring [sbest, but wood base [s surf[dent providing the floor support meets FHA standards.
Your washer should not be installed on rugs, carpet or exposed to the weather.
Water Temperature
Your cold water should not exceed 95_'F(35_'C) or your hot water exceed 149°F (65°C).
Temperatures above this mat,' damage your washer.
Shut Off Valves
Both hot and cold shut-off valves (faucets) should be available in the laundry area.
Drain
Water mat.' be drained into a standpipe or tub/sink.The standpipe must be 1Y_"(38 mm)
minimum interior diameter and must be open to the atmosphere.
Electrical
This appliance must be supplied with 110V - 120V, 60Hz electrical supply and connected to an
individual, properly grounded branch circuit, protected by a 15 or 20 amp circuit breaker or time
delay fuse.
iiiliiii+I+i+ I+++illi¸IIIIIIIiiiiii IIIIIIIIIIIIiiiiiiiiiiiiii¸Iili¸1111111!i+ililiiiiiiiiiilll_i1!7I
Installation instructions
= Water supply
Thiswashermustbe plumbedinto bothahotandcoldwatersupplyor it wUlnotworkcorrectly.
Please ensure that hot++ hot and cold water are connected to the washer, i
= If ),ou have an uncontrolled water-heating source {eg a wet back or solar heating) ),ou should
have a tempering device fitted.This will ensure the hot water temperature remains within
safe limits. For the most suitable type of tempering device we recommend you contact a local
plumber or r:flumbing supply merchant.
= Inlet Water Static Pressure: Min. Spsi (34kPa)to Max. lSOpsi(1MPa)isrequired, ii
= Minimum flow rate from the faucet supplying the clothes washer should be greater than
1+ gallons/rain (6 liters/rain)(assumes ½"(12.7 ram)diameter pipes), iiii!!!
o +++°+°+ !ii+i
Regularly check that your standpipe or tub/sink is free from lint or other obstructions, which +
+ayaffecthow>.'ourwasherwor+sor+aycauseflooding $
: In multi-storey apartments or any upper floor, the washer should be installed on floor equipped !ili
with+adrain, i}I
: Draining must comply with local by-,aws. ++++++++
+o++:w°++++to s
7ii///i
° This clothes washer is not intended for use by young children or infirm persons without +i+i++i
supervision. +ilii
° Please supervise young children to ensure they do not play with this clothes washer. +i++!+;++
+mportend ++
++yo,+e,+++++o=+e++io+<o+++o+++o+++++ee+e<++i<++o,+++e+e<e+m,++i-+o<+e+o,+++ I1ili!!
Accessories and spa+'e pa+'ts +++2i
Available from your Fisher & Paykel Dealer or Authorized Service Center. +}++1
Drain Hose Extension Part No. 425627p +i+++++!+11++1
PowerCord _fthePowerCordof>,'ourclotheswasher_sda+aged_toustb+ ii
replaced by a Fisher & Paykel Authorized Service Agent, as it ++++!'++i+
+snotastandardpowercord. t+ii
++++++++++++++++++++++++++++++++++++++++++++++++++++++++++++++++++++++++++++++++++++++++++++++++++++++++++++++++++++++++++++++++++++++++++++++++++++++++++++++++++++++++++++++++++++++++++++++++++++++++++++++++++++++++++++++++++++++++++++++++++++++++++++++++++++++++++++++++++++++++++++++++++++++++++++++++++++++++++++++++++++++++++++++++++++++++++++++++++++++++++++++++++++++++++++++++++++++++++++++++++++++++++++++++++++++++++++++++++++++++++++++++++++++++++++++++++++++++++++++++++++++++++++++++++++++++++++++++++++++++++++++++++++++++++++++++++++++++++++++++++++++++++++++++++++++++++++++++++++++++++++++++++++++++++++++++++++++++++++++++++++++++++++++++++++++++++++++++++++++++++++++++++++++++++++++++++++++++++++++++++++++++++++++++++++++++++++++++++++++++++++++++++++++++++++++++++++++++++++++++++++++++++++++++++++++++++++++++++++++++++++++++++++++++++++++++++++....
Installation instructions
To ensure the best performance from your new AquaSmart _'
clothes washer please follow the instructions below.
Removing the packaging
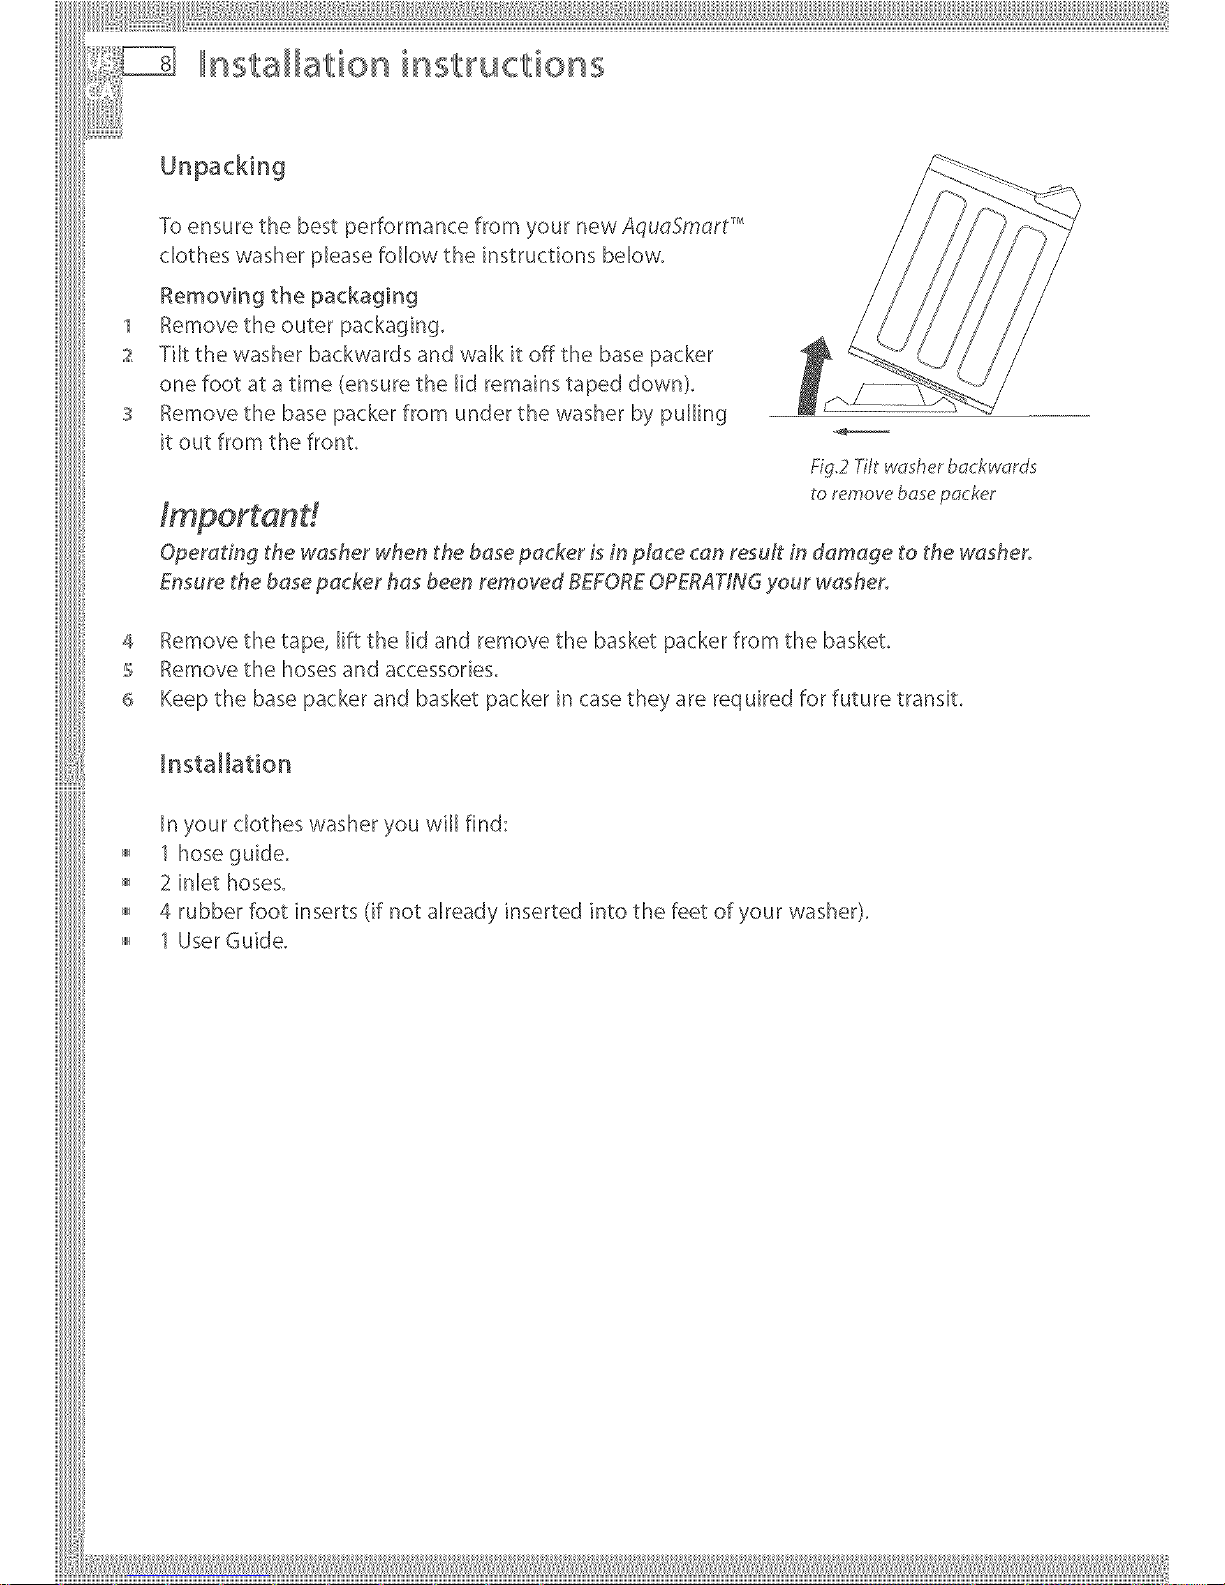
Remove the outer packaging.
Tilt the washer backwards and walk it off the base packer
one foot at a time (ensure the lid remains taped down).
Remove the base packer from under the washer by pulling
it out from the front.
Operating the washer when the base packer is in place can resutt in damage to the washer.
Ensure the base packer has been removed BEFORE OPERATING your washer.
4 Remove the tape, lift the lid and remove the basket packer from the basket.
s Removethe hoses and accessories.
_5 Keep the base packer and basket packer in case they are required for future transiL
Installation
In your clothes washer you will find:
= 1 hose guide.
= 2 inlet hoses.
= 4 rubber foot inserts (if not already inserted into the feet of your washer).
= 1 User Guide.
iiiliiii,I,I li,_,lliiIIIIIIIiiiiii IIIIIIIIIIIIiiiiiiiiiiiiii¸Iili11111111¸!Iiliii///i!li/:i:11!i'
Installation instructions
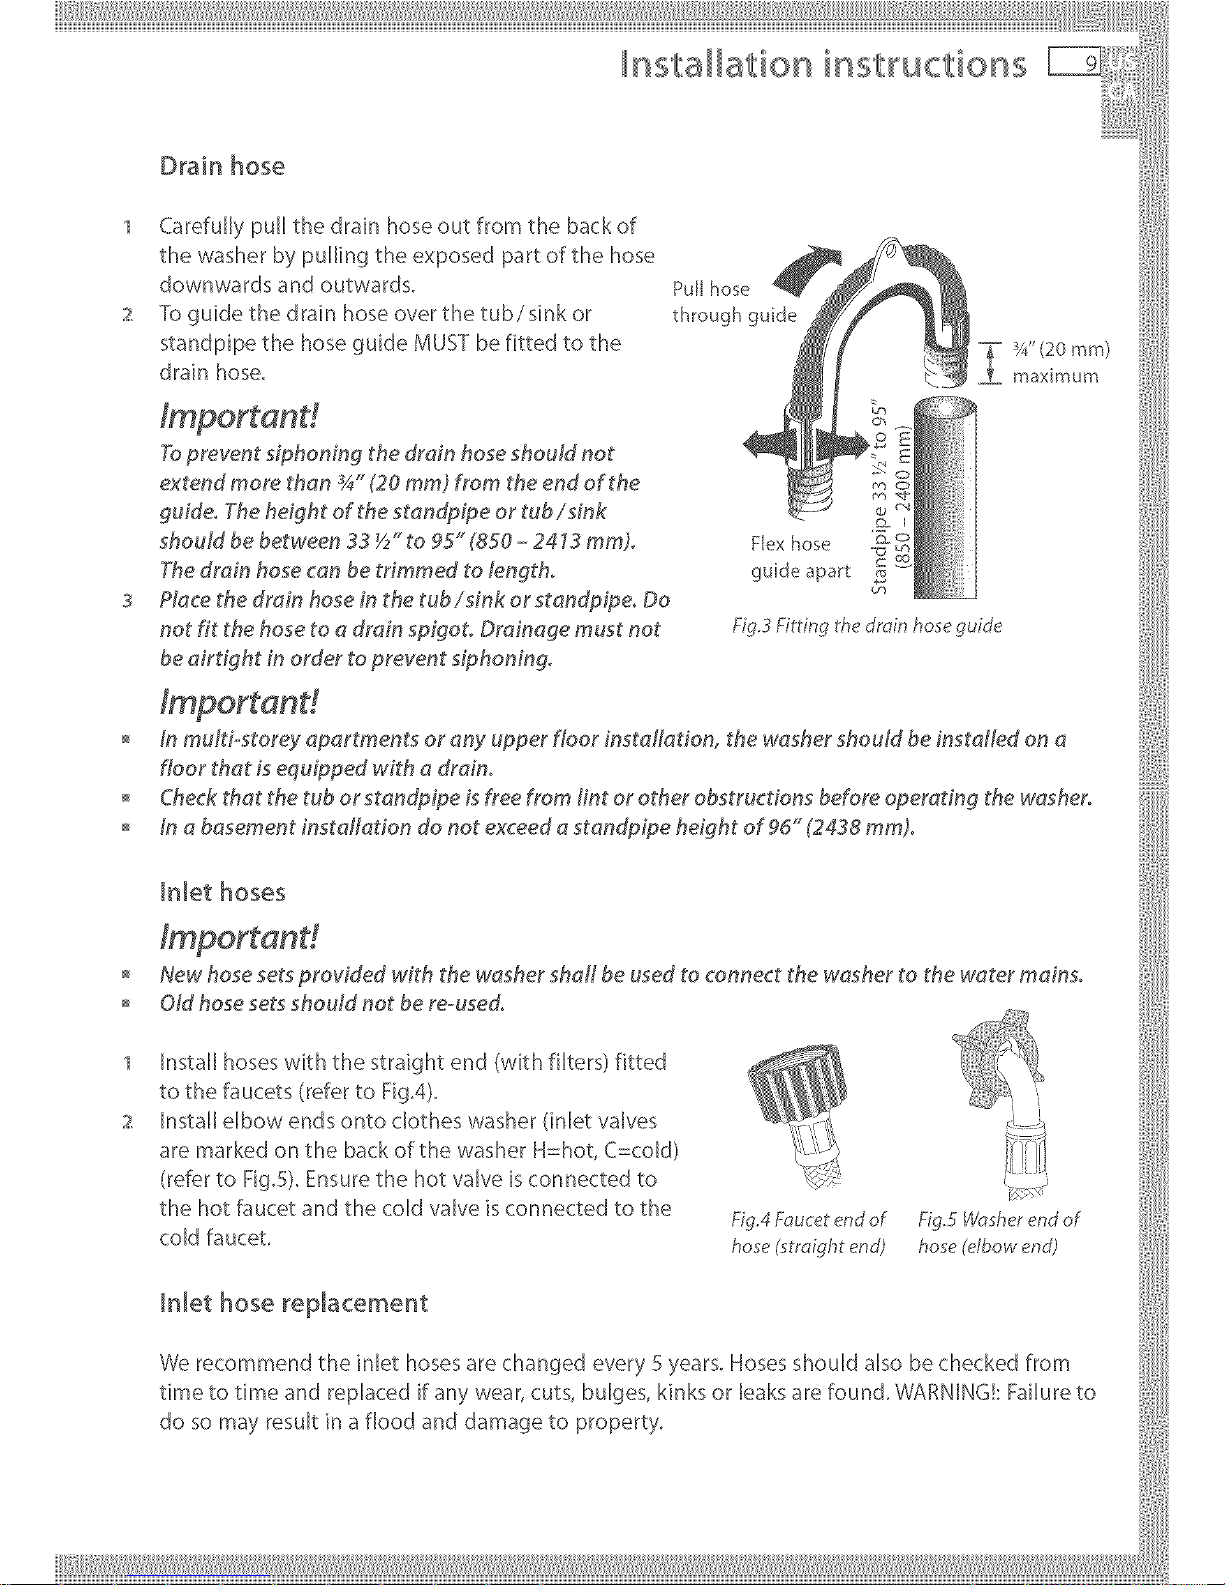
Dra_nhose
,_Carefu,ypu,thedra_nhoseoutfromthebackof
thewasherbypu,,ngthooxposedpartofthehoso
downwardsandoutwards. P=,hoso_ __
2 Toguidethedrainhoseoverthetub/sinkor through guide _[ _
standpipe the hose guide MUST be fitted to the _[ _T w'(20 ram)
drain hose. _! _ . _-_:_. , maximum
Important!
2 E
Topreventsiphoningthedrainhoseshouldnot _11__ I
extend more than _" (20 mm) from the end of the
guide,heightofthestandpipeortubJsin
shoutd be between 33 ½" to gS" (850- 2413 mm)o Flex hose _-_
The drain hose can be trimmed to tengtho guide _p_t _
3 Place the dram hose m the tub/sink or standp_peo Do
notfitthehosetoadrainspigot._rainagemustnot F_g.3F_ng_h_o'_ho_g_o'_
beairtightinordertopreventsohoning.
= Importand
in mu#i-storey apartments or any upper floor instaflation, the washer shoutd be installed on a
f_oorthatise_uippedwithadrain.
o Check that the tub or standpipe is free from tint or other obstructions before operating the washer. ....
o in a basement installation do not exceed a stan@ipe height of 96" (2438 mm,L
nnlethoses
o Importand
New hose sets provided with the washer shaft be used to connect the washer to the water mains.
° Oidhosesetsshou,dnothere-used. [
1 Install hoses with the straight end (with filters) fitted
to the faucets (refer to FigA). '%_&_ i '_
2 nsta e bow ends onto c othes washer ( net va ves '_ _!_._, :
/ l\ ¢
are marked on the back of the washer H=hot, C=cold) _,'.">'_ _:]_][I
(refer to Fig.S). Ensure the hot valve is connected to _:_(' i: :_
the hot faucet and the cold valve is connected to the Fig4 Faucetendof Fig_ 14!.asher:_:"_ndof
coldfaucet. _o_h_no'i _o_+,'bow_J_
Inlet hose replacement
We recommend the inlet hoses are changed every 5 ),'ears. Hoses should also be checked from
time to time and replaced if an)' wear, cuts, bulges, kinks or leaks are found. WARNING!: Failure to
do soma)'resultinafloodanddamageto pror_ert),.
nsta ation instructions
Leveling instructions
It is IMPORTANTto level the machine to ensure good spin performance and effective
detergent and fabric softener dispensing,
A spirit level is provided with your machine. Use this to level your machine, placing it bottom
side down in the locations specified below (ensure the surfaces are clean). The machine is
level when the bubble sits in the center, within the two lines.
Your washer is equipped with self-locking feet to ensure they do not move once you have
leveled your machine. To adjust the feet, tip the washer back or forward to locate the foot you
wish to adjust, pull down gently and then twist to move it up or down to the required level.
Repeat if necessary.
After/evefing, the corners of the washer
shou!d be dear of the floor (by at/east
_" (t0 ram) and the machine must not rock
in any direct/on.
1 If not already installed, fit the rubber inserts
into all 4 feet on the base of the machine.
2 Extend all 4 feet by three full turns before
moving the machine to its final position.
3 Move the machine to its final position using
the top corners to manoeuvre the product
into place {do not push against the center
front of the machine). We recommend a
minimum clearance of _"(20 ram) each
side and 2" (50 ram) at the rear of the
machine.
4 With the lid closed, place the spirit level at
the center back of the lid (near the control
panel). If not level, pull the machine out
and adjust the rear feet until the machine is
level side to side when in position.
5 Open the lid. Place spirit level on the flat
surface on the left side, inline with the
center of the bowl. If necessary, adjust the
front left foot until the machine is level.
S_
Spirit level
I FigdLevding-Step 1&2 l
Fig.7 Levering - Step 4
Fig.8 Levering - Step S

iiiliiii,I=I li=_=lliiIIIIIIIiiiiii IIIIIIIIIIIIiiiiiiiiiiiiii¸Iili111111111111111¸Iliii!I:ii!i_
Installation instructions
withthecenterofthebowl,Ifnecessary,
adjustthefrontrightfootuntilthemachine
is level, and does not rock, There should Spirt level
be equal weight on both front feet so that
neither can be turned by hand when the
machine isinposition,
7 Place the spirit level at the center front of
the topdeck, forward of the lid lock slot, Fig.9I:evding.- Step 8
Check the machine is level. Adjust the front i
feet again if necessary, Move the spirit level
aroundtoallpositionsoncemore,checking
the machine is level in all areas, Check the
d
back, or corner to corner, i]il _
li
Importand % '!L'_"-Y" jy':_
mo_o__epo=Jtio_yo._w_,h_. Sp_rt_ovo_ _ _t
• ffmoving or tmnspordng your washer in Fig.10I:evding - StelJ7
be_orehando [
Installation instructions
Completing your installation
= Turn on the water and check all hose connections for leaks. Make sure there are no kinks in the
hoses. Check the hose connections for leaks again after 24 hours.
= Uncoil the power cord, remove and discard the plastic pin cover, and plug into wall socket and
turn the power on.
Installation test cycle
Your washer must be correctly installed before use. Check the machine's installation and
operation using the following procedure:
1 Touch POWER to activate your washer.
2 Touch both the KEYLOCK and OPTIONS buttons at the same time, and hold for three seconds.
s Touch START/PAUSE to start the installation test cycle.
4 The machine will beep to signal the end of the installation test cycle. Any faults will be displayed
on the screen {refer to the back of this User Guide to help identify faults). If you need further
assistance, please contact a Fisher & Paykd Customer Care Representative. Refer to page 52 for
contact details.
Note: if there are no faults found, the washer will automatically turn off at the end of the
installation test cycle.
Clothes washer safety
° This clothes washer is not intended for use by persons (including children) with reduced
physical, sensory or mental capabilities, or lack of experience and knowledge, unless they have
been given supervision or instruction concerning use of the appliance by a person responsible
for their safety.
= The lid will be locked from the start of the cycle until the cycle is complete for safety reasons.lo
open the lid during operation, you must touch START/PAUSE.
= Supervise children at all times to ensure they do not play with the washer.
= The only user-removable parts of the washer are the inlet hoses and dispenser funnels. No other
parts are designed to be removed by anyone other than a Fisher & Paykel Authorized Service
AgenL
ff you ere using an extension cord or a portable e/ectrica/ out/et device (eg mu/d socket out/et
box), ensure that it ispositioned sothat it doesnot come into contact with water or moisture,
iiiliiii,I=I li=_=lliiIIIIIIIiiiiii IIIIIIIIIIIIiiiiiiiiiiiiii¸Iililliil/liiiillll/iiil!li_il=!ilii'
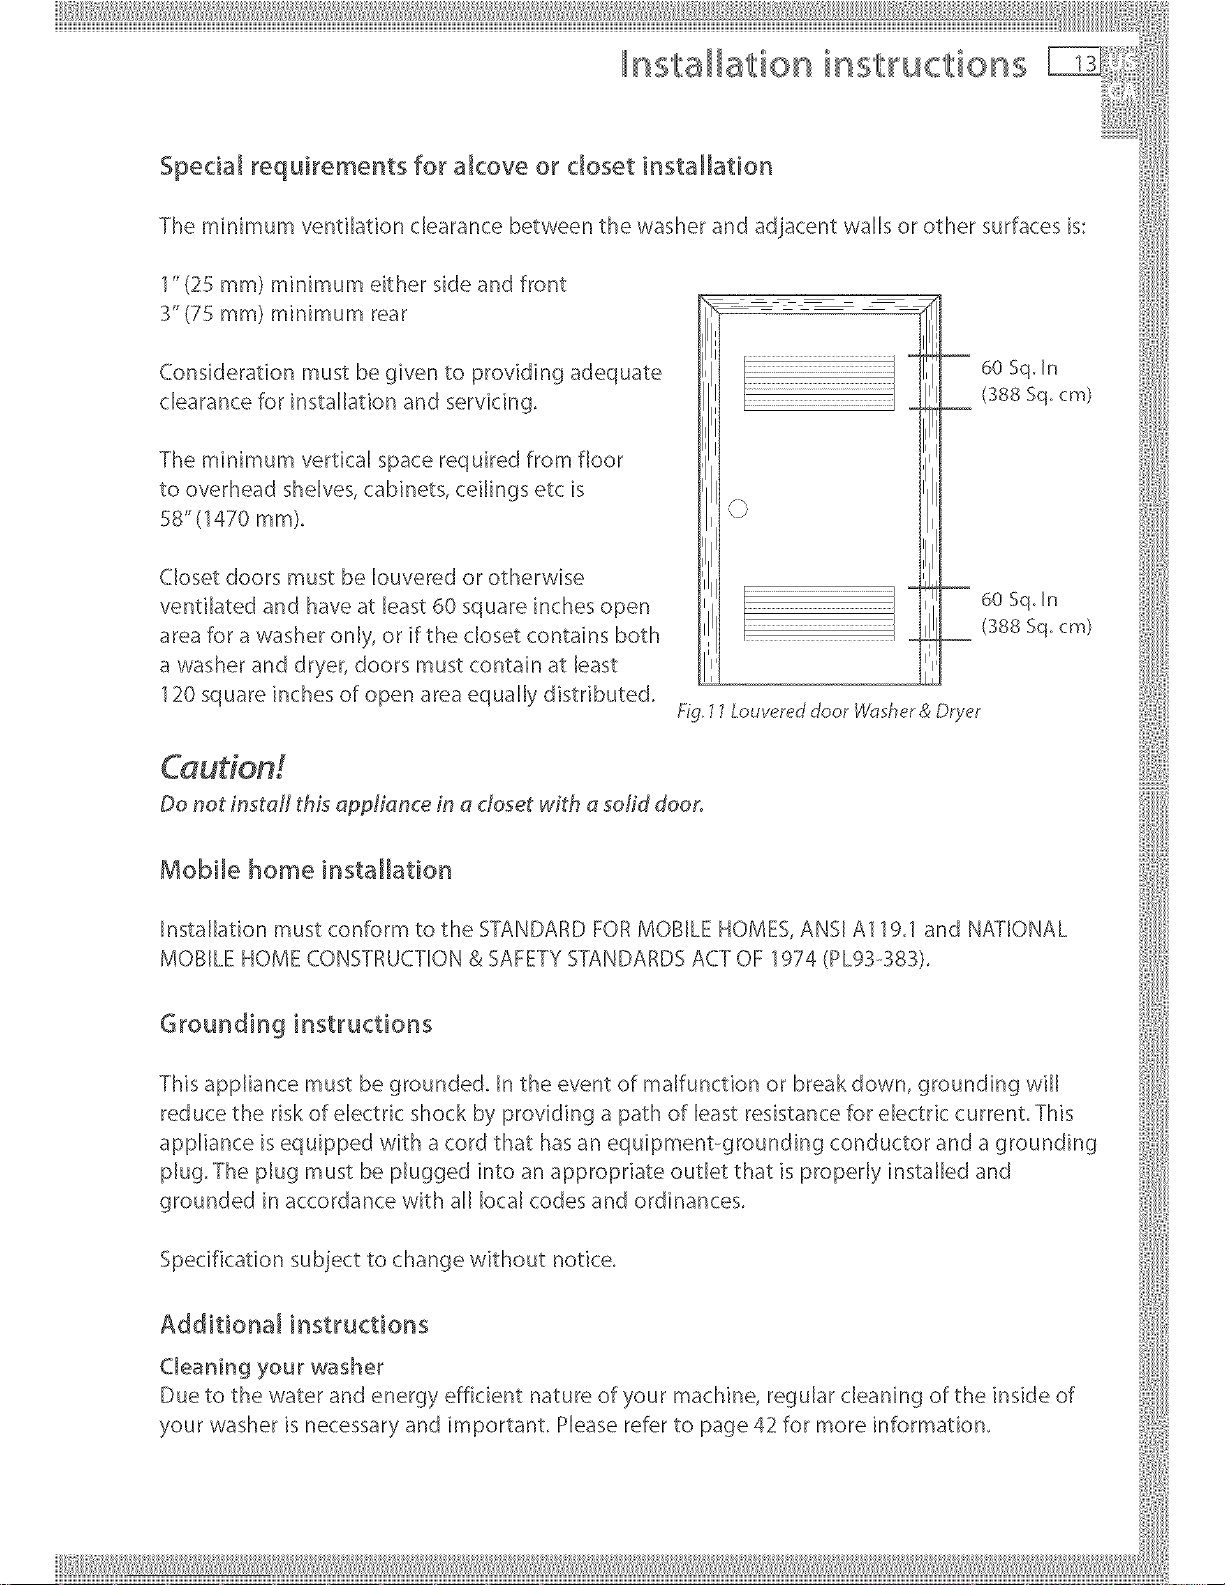
Installation instructions
The minimum ventilation clearance between the washer and adjacent walls or other surfaces is:
1" (25 ram) minimum either side and front
m r, mumrear
Considerationmustbeg_ventoprovidingad<uate _0_._o
I I I t t (388Sq cm) ....
I I I I
Them_n_mumvert_caBspacerequiredfromfBoor [ t I [
tooverheadshelves,cabinets,ceU_ngsetc_s [ I,, I I [
58"11470mml, iiii"-J iii
aosetdoorsmustbemouveredorotherwise II
60 Sq In
ventilatedand have atleast60 square inchesopen [ j _ J [ "
. _ _ _ _ (388Sq crn)
area for a washer only', or if the closet contains both " d:ii
a washer and dryer, doors must contain at least i[
120 square inches of open area equally distributed, _ .......
Hg, 7 7LouYered door vvdcsner d: L)rye_
Do not install this appliance in a closet with a solid door.
Mobile home installation
Installation must conform to the STANDARD FOR MOBILE HOMES ANSI Al19.1 and NATIONAL }:
MOBILE HOME CONSTRUCTION & SAFETY STANDARDS ACT OF 1974 (PL9::_-::_83). /;:
Grounding instru¢tions
This appliance must be grounded. [n the event of malfunction or break down, grounding ,,,,'ill
reduce the risk of electric shock by providing a path of least resistance for electric current This i
appliance [s equipped with a cord that has an equipment-grounding conductor and a grounding
plug. The [)lug must be [)lugged into an appropriate outlet that is properly installed and
grounded in accordance with all local codes and ordinances. ;:
Spedf_cat_onsubiecttochangew_thoutnotice.
Additional instru{::tions i:
Cle=ohgyo°_wo_he_
Due to the water and energy efficient nature of }.'our machine, regular cleaning of the inside of
),'our washer is necessary and important Please refer to page 42 for more information,
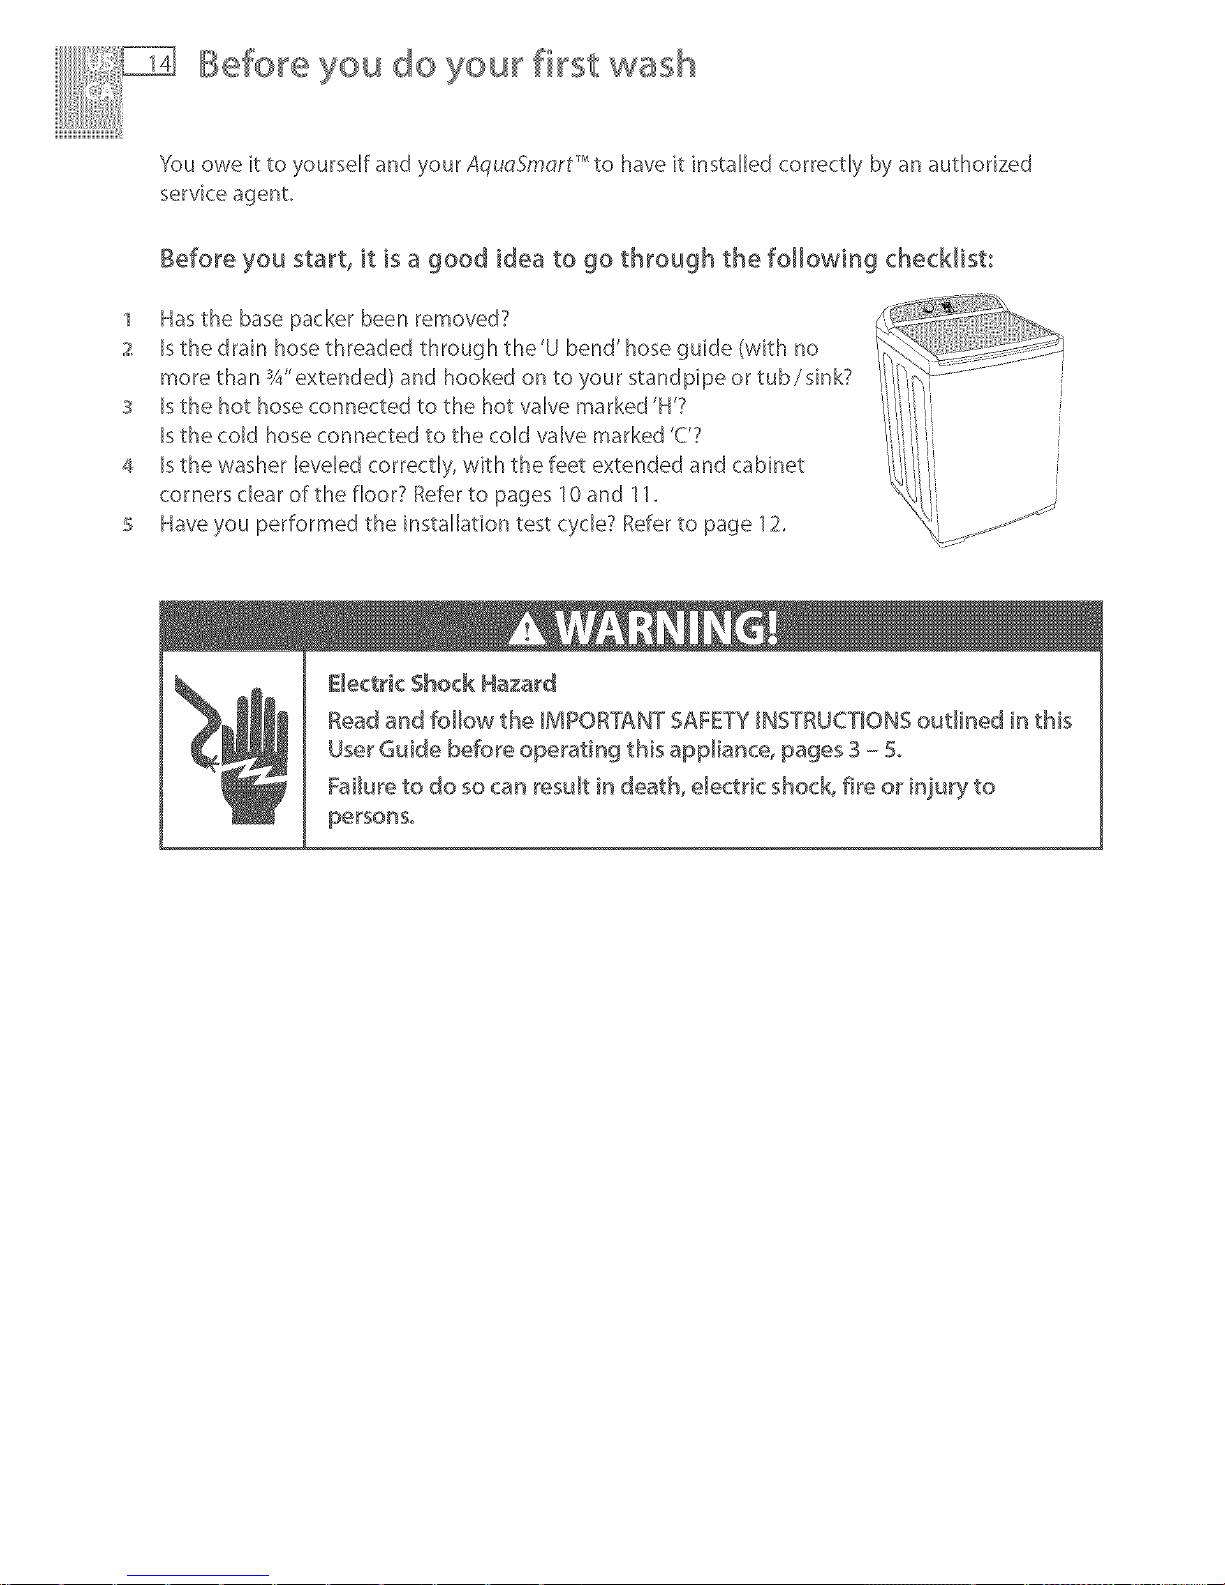
Before you do your first wash
You owe it to yoursdf and your AquoSmort _' to have it installed correctly by an authorized
service agent.
Before you start, Jt is a good idea to go through the following checklist:
1 Has the base packer been removed?
2 Is the drain hose threaded through the'U bend' hose guide (with no
more than sa"extended) and hooked on to your standpipe or tub/sink7
s Is the hot hose connected to the hot valve marked'H'?
Is the coM hose connected to the coM valve marked 'C'?
a Is the washer levded correctly, with the feet extended and cabinet
corners dear of the floor? Refer to pages 10 and 11.
s Have you performed the installation test cycle? Refer to page 12,
Electric Shock Hazard
Read and follow the IMPORTANT SAFETY_NSTRUCTIONSoutlined in this
User Guide before operating this appliance, pages 3 - 5o
Failure to do so can result in death, electric shocB fire or injury to
persons°
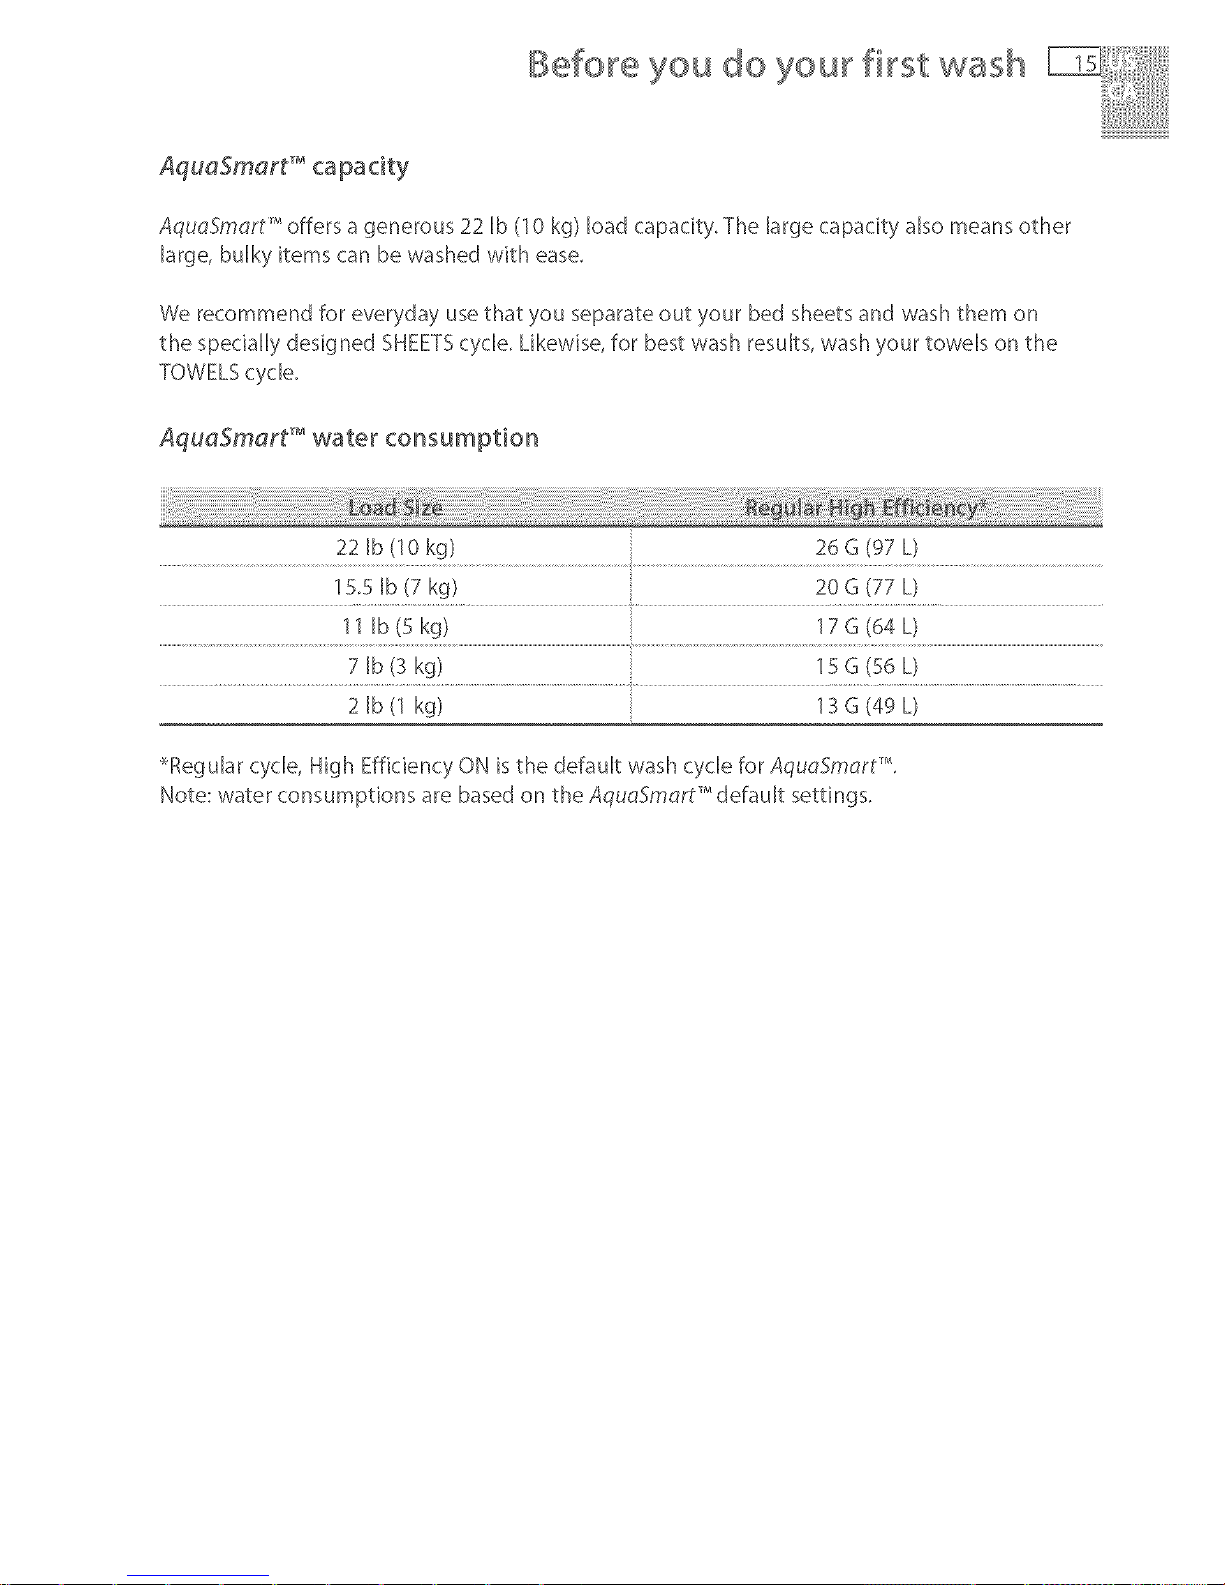
Before you do your first wash
AquoSmart _'offers a generous 22 Ib (10 kg) load capacity. The large capacity also means other
large, bulky items can be washed with ease.
We recommend for everyday use that you separate out your bed sheets and wash them on
the specially designed SHEETScycle, Likewise, for best wash results, wash your towels on the
TOWELS cycle,
AqueSmart TM water consumption
22 Ib (10 kg) 26 G (97 L)
15,5 Ib (7 kg) 20 G (77 L)
11 Ib (S kg) 17 G (64 L)
7 Ib (S kg) 15 G (56 L)
2 Ib (1 kg) 13 G (49 L}
_Regular cycle, High Efficiency ON is the default wash cycle for AquoSmort _'.
Note: water consumptions are based on the AquoSmort _'default settings.
Gettin 9 started quickly
It is important to sort your clothes, particularly separating white/light colors from dark colors, as
well as separating out bed sheets and washing them on the SHEETS cycle and washing towels on
the TOWELS cycle. Refer to pages 21 - 23 for more details on sorting and loading.
Close bra clasps, do up zippers and check pockets.
Don't wrap sheets around the basket like a snake, place them in as loose parcels to the side of
the low profile agitator, and in layers around the basket.
Place your clothes directly into the wash basket.
Your AquaSmort TM has been designed for use with High Efficiency (HE) detergent only.
AquoSmart ''_'offers a detergent dispenser for your convenience, located on the front, left hand
side of the top deck.
For the correct detergent dose, please follow the manufacturer's directions, outlined on the
detergent package.
Pour the detergent into the detergent dispenser.
For more information on detergent, fabric softener or bleach please refer to pages 24 - 26.
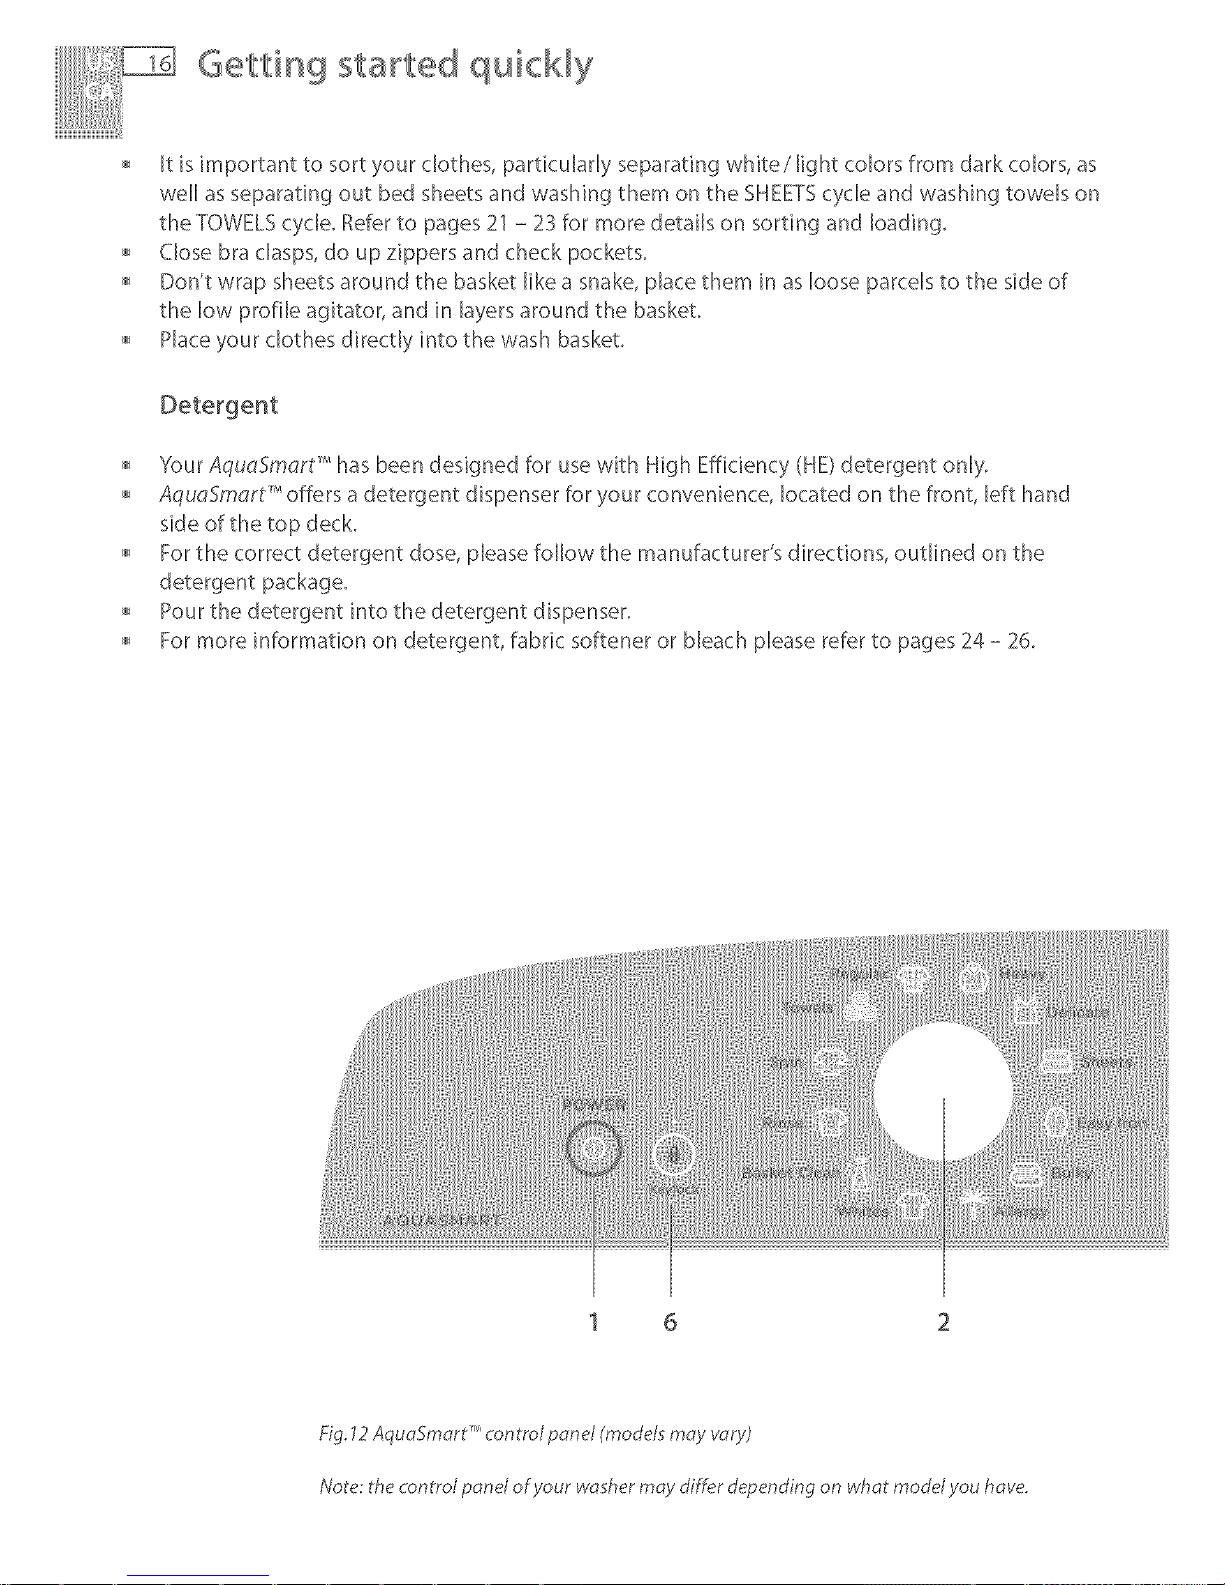
1 6
Fig. 12 AquaFmart T'_control panel (models may vary)
Note: the contmI panel of your washer may differ depending on what modd you have.
 Loading...