

Page 1
Indoor/Outdoor Digital Wireless
Camera with Receiver
Model D575
USER'S MANUAL
Page 2

©2010 Lehigh Consumer Products, LLC
All rights reserved. Distributed by Lehigh Consumer Products, LLC, Macungie, PA 18062. Due to
continuing product development, the product inside the packaging may look slightly different than
the one on the package.
Lehigh Consumer Products, LLC is a subsidiary of Jarden Corporation (NYSE: JAH). To obtain
warranty service, contact the Consumer Affairs Division at 1-800-323-9 005, Monday through
Friday, 7:30am-5:00pm, Central Standard Time.
Made in China
M08-0241-000
Page 3

Table of Contents
Safety ...............................................................................................................................1
Safety Precautions ...........................................................................................................................1
FCC Compliance .............................................................................................................................1
Disposal ........................................................................................................................................... 2
Getting to Know Your D575 Camera System................................................................3
Check Package Contents.................................................................................................................. 3
Digital Wireless Camera.................................................................................................................. 4
Digital Wireless Receiver................................................................................................................ 4
Remote Control................................................................................................................................ 5
Display Screen Icons ....................................................................................................................... 6
Setting Up Your D575 Camera System..........................................................................7
General Precautions......................................................................................................................... 7
Installing the Camera....................................................................................................................... 7
Installing the Receiver..................................................................................................................... 8
Operating Menus.............................................................................................................9
Main Menu Operation...................................................................................................................... 9
Camera Setup................................................................................................................................... 9
Camera ON/OFF...................................................................................................................... 9
Camera Brightness................................................................................................................. 10
Pairing.................................................................................................................................... 10
Resolution.............................................................................................................................. 11
Recorder Setup............................................................................................................................... 11
Alarm Period.......................................................................................................................... 11
Motion Detection Record Period........................................................................................... 12
SD Card Overwrite ................................................................................................................ 12
Event List....................................................................................................................................... 13
System Setup ................................................................................................................................. 14
Quad Display ......................................................................................................................... 14
Scan Period............................................................................................................................ 15
System Clock......................................................................................................................... 15
SD Card Format..................................................................................................................... 16
TV Format.............................................................................................................................. 16
Set to Factory Default............................................................................................................17
System Version.............................................................................................................................. 17
Page 4

Table of Contents
Model D575 User's Manual
Troubleshooting............................................................................................................18
Technical Information...................................................................................................20
Warranty.........................................................................................................................21
Product Limited Warranty..............................................................................................................21
Warranty Exclusions...................................................................................................................... 21
Obtaining Service .......................................................................................................................... 22
Page 5

SAFETY PRECAUTIONS
Do not drop, puncture, or disassemble the camera.
Never tug on the power adapter. Use the plug to remove it from the wall.
Use the device with care. Avoid pressing hard on the camera or receiver body.
Do not expose the camera to high temperatures.
For your own safety, avoid using the camera when there is a storm or lightning.
Use the device with care. Avoid pressing hard on the camera body.
Do not crush or damage the power cable.
FCC COMPLIANCE
Safety
This device complies with Part 15 of the FCC Rules. Operation is subjected to the
following two conditions: (1) this device may cause harmful interference, and (2) this
device must accept any interference received, including interference that may cause
undesired operation.
This equipment has been tested and found to comply with limits for a Class B digital
device, pursuant to Part 15 of the FCC Rules. These limits are designed to provide
reasonable protection against harmful interference in residential installations. This
equipment generates, uses, and can radiate radio frequency energy and, if not installed and
used in accordance with the instructions, may cause harmful interferen ce to radio
communications.
However, there is no guarantee that interference will not occur with a pa rticular
installation. If this equipment does cause interference to radio or television equipment
reception, which can be determined by turning the equipment off and on, the user is
encouraged to try to correct the interference by the following measures:
Reorient or relocate the receiving antenna.
Increase the separation between the equipment and the receiver.
Connect the equipment into an outlet on a circuit different from that to which the
received is connected.
Consult the dealer or an experience radio/TV technician for help.
Notice: Changes or modifications to the product could void the user's
authority to operate the product.
1
Page 6

Safety
Model D575 User's Manual
DISPOSAL
These symbols indicate that it is prohibited to dispose of these batteries
in the household waste. You can take spent batteries that can no longer be
charged to the designated collection points in your community.
2
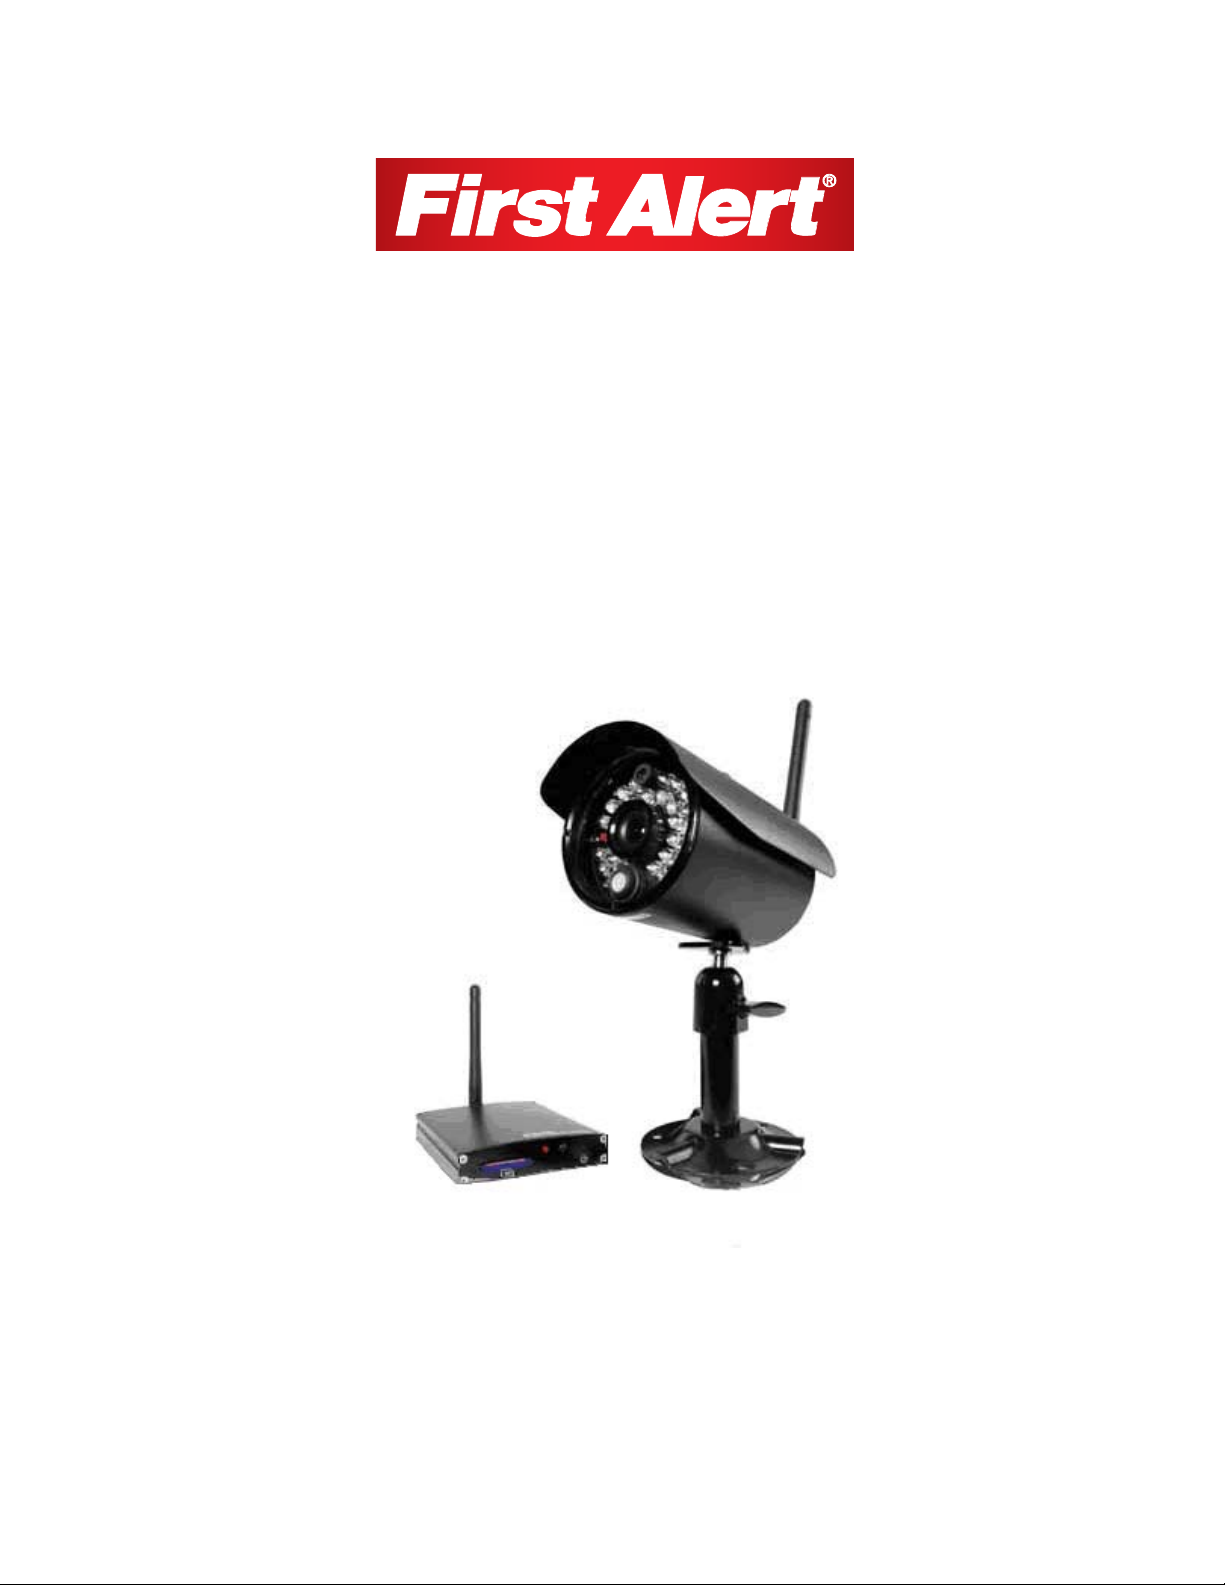
Page 7

r
Getting to Know Your
D575 Camera System
Congratulations on purchasing your First Alert Security Camera product. First Alert has
been helping families and businesses stay safe for over 50 years. By having a First Alert
Security Camera, you’re taking the first step in protecting your home or business from
damage or theft. We’re watching, even when you’re not.
CHECK PACKAGE CONTENTS
After unpacking the carton, check the contents for damage. Contact your supplier or dealer
immediately if any part is missing or damaged.
Digital Wireless Receiver with Antenna (1)
Digital Wireless Camera with Antenna (1)
Power Supply (2)
Camera Stand (1)
Mounting Kit (1)
AV Cable (1)
2GB SD Card (1)
Remote Control (1)
Manual (1)
camera
receive
camera stand
3
Page 8

Getting to Know Your D575 Camera System
Model D575 User's Manual
DIGITAL WIRELESS CAMERA
1 Antenna 5 Link LED 9 Pairing Key
2 EDS 6 PIR 10 Power Jack
3 Power LED 7 IR LED 11 Microphone
4 Camera Lens 8 Camera Stand 12 Power Supply
DIGITAL WIRELESS RECEIVER
1 Antenna 4 SD Card Slot 7 Power Button
2 DC IN 5 Power LED/RED LED 8 Remote Control
3 AV OUT 6 IR Sensor 9 Power Supply
4
Page 9

Getting to Know Your D575 Camera System
Model D575 User's Manual
REMOTE CONTROL
12
3
5
8
9
4
6
7
8
7
Press to Start/Stop manual recording
1
2
3
4
Unable to record without an SD card
Enter Event List directly; press OK to select video file; use
Play/Pause function when viewing video files
Press OK to delete video files you selected
In view mode, up to four display images are available cameras at
one time
Audio is unavailable in QUAD Mode
5
6
7
8
9
OK
Press MENU button to exit Play/Pause Mode
Press to turn on the Motion Detection
In Menu Mode, move between the sub-menu selections
In View Mode, switch channel
In Play Mode, rewind/fast forward
In QUAD Mode, [Hot keys take you through channels 1-4]
In Menu Mode, move between initial menu selections
In View Mode, audio volume down/up
In Play Mode, rewind/fast forward
Press button to confirm the selections and changes
5
Page 10

Getting to Know Your D575 Camera System
Model D575 User's Manual
DISPLAY SCREEN ICONS
Note: Screen icon hides after 10-second idle time.
Signal Indicator
1
REC
FULL
ERR
SD
32.2GB
Channel Indicator
Motion Detection and Recording Indicator (ON)
Motion Detection Alarm Indicator (ON)
Recording Indicator (blinking)
No SD Card
SD Card Full
SD Card Error
SD Card Locked
SD Card Overwrite (ON)
SD Card Indicator
SD Card Storage Room Indicator
Camera Brightness
System Volume
HH:MM:SS
HH:MM:SS
YR:MO:DAY
System Time
Record Time
Year/Month/Day
6
Page 11

Setting Up Your
D575 Camera System
GENERAL PRECAUTIONS
Use only the power supply provided with the system.
Unplug the power supply when the system is not in use for extended periods.
Do not place any of the equipment near a radiator, vent, or other place where it
might be exposed to heat, moisture, dust, vibrations, or strong magnetic fields.
Do not attempt to repair the camera. Contact a qualified technician or the dealer for
service. Any change or modification may damage the equipment and invalidate the
warranty.
When installing the camera, follow manufacturer’s advice when using power tools,
steps, ladders, etc. and wear suitable protective equip ment (e.g., safety goggles)
when drilling holes. Before drilling holes through a ceiling, check for hidden
electricity cables and water pipes
INSTALLING THE CAMERA
1 Select the position for the camera and secure the camera stand.
Screws and anchors are supplied. Use an appropriate screw type for the mounting surface.
2 Screw the camera onto the bracket.
7
Page 12

Setting Up Your D575 Security System
Model D575 User's Manual
3 Adjust camera to the proper view angle. Make sure the lens is upright relative to your
subject. Tighten the thumb bolt.
4 Screw the antenna into place on the rear of the camera. Adjust the antenna to an
upright position.
INSTALLING THE RECEIVER
1 Connect the power cable to the DC IN of the receiver.
2 Plug the power adapter into the electrical outlet.
3 Connect the AV cable phone jack to AV OUT of the receiver.
4 Connect the two RCA jacks to the TV AV IN.
Yellow = Video, White = Audio
5 Press POWER button to turn ON the receiver.
8
Page 13

Operating Menus
This chapter provides information about the menu screens. The screens are used to control
the various functions of the DVR system. The user selects options from a series of menus and
executes the actions by using the keypad on the remote control.
MAIN MENU OPERATION
The Main Menu display when the system is powered up. Use this menu to access:
Camera Setup
Recorder Setup
Event List
System Setup
CAMERA SETUP
Access the Camera Setup menu from the Main Menu. Use thi s menu to turn the ca mera
on/off and adjust image brightness, pairing, resolution, and quality.
CAMERA ON/OFF
1. Use
to select a camera.
2. Press
to turn camera ON/OFF.
Make sure available cameras are set ON for SCAN or QUAD mode.
9
Page 14

Operating Menus
Model D575 User's Manual
CAMERA BRIGHTNESS
1
1. Use
to select a camera.
2. Press
3. Use
PAIRING
1. Use
2. Press
3. Within 60-second countdown, press LINK on the camera cable. Image will
to display Camera Brightness bar.
to adjust Brightness.
to select a camera.
to start system countdown from 60 seconds.
display when pairing is complete.
10
Page 15

Operating Menus
Model D575 User's Manual
RESOLUTION
1. Use
to select Resolution between 640x480 and 320x240.
2. Press
to confirm.
Resolution will affect recording file size. System can support longer
recording time for QVGA resolution and low image quality.
RECORDER SETUP
Access the Recorder Setup menu from the Main Menu. Use this menu to set the alarm an d
motion detection record periods, and to overwrite the SD card.
Recorder Setup
OK
ALARM PERIOD
Alarm Period
Motion Detection
SD Card Overwrite
1. Use
to select a different Alarm Period for motion detection: OFF, 5 sec,
10 sec, or 15 sec. (Default setting is 5 sec.)
2. Press
to confirm.
Press any button to mute when motion detection alarm is activated.
11
Page 16

Operating Menus
Model D575 User's Manual
MOTION DETECTION RECORD PERIOD
1. Use
10 sec, or 15 sec. (Default setting is 5 sec.)
to select a different Motion Detection Record Period: OFF, 5 sec,
2. Press
to confirm.
Motion detection will be disabled for 5 seconds after motion detection
recording or alarm stops.
SD CARD OVERWRITE
1. Use
2. Press
to select ON/OFF. (Default setting is ON.)
to save and exit.
Newly recorded file will overwrite original files when SD card memory
is full. SD card storage room indicator on LCD flashes a red warning
with 0.0G.
12
Page 17

Operating Menus
Model D575 User's Manual
EVENT LIST
Access the Event List menu from the Main Menu.
Play Mode
1. Press
2. Continue to press
3. Press
to enter Record Folder.
to Play/Pause file.
to fast forward (2x, 4x, 8x, 16x); press to fast reverse (2x, 4x, 8x);
press MENU to Stop/Exit.
4. Press
5. Press
or to adjust playback volume.
to Play/Pause or .
6. Press MENU once to stop; twice to return to Event List; four time to return to
Menu.
Event List
1. Press DEL on remote control to enter deletion mode.
2. Use
3. Press
to delete the selected file or delete all files.
and select green button to delete or red button to exit without
deleting.
4. Press
to delete or exit.
13
Page 18

Operating Menus
Model D575 User's Manual
SYSTEM SETUP
Access the System Setup menu from the Main Menu. Use this menu to select quad display,
scan period, system clock, SD card format, TV format, factory default settings, and system
version.
QUAD DISPLAY
1. Use
2. Press
to select Quad display ON/OFF.
to confirm the change.
3. Turn all available channels ON before changing to Quad mode.
4. To exit the Quad display, press directional keys to enter single channel.
= CAM1; = CAM2;
= CAM3; = CAM4
Quad mode is recommended when the system is equipped with more than
1 PIR camera. System will only record the displayed channel, not the Quad
view.
14
Page 19

Operating Menus
Model D575 User's Manual
SCAN PERIOD
1. Use
to change Scan Time interval: OFF, 5 sec, 10 sec, or 15 sec.
2. Press
This function is available for multi-camera systems. Only camera of current
display can be triggered during scan time. Recommended scan time is 5 sec.
Scan Time turns off when CH+, CH-, or REC is selected for manual scan
or record.
SYSTEM CLOCK
1. Press
2. Press to change the System Clock.
3. Press
to confirm the change.
to change Clock: Year, Month, Day, Hours, and Minutes.
to confirm the settings.
15
Page 20

Operating Menus
Model D575 User's Manual
SD CARD FORMAT
1. Press
2. Press
to select SD Card Format screen.
Start
and press to format card.
Make sure SD card is unlocked.
For first time use, it is strongly recommended to format the SD card.
TV FORMAT
1. Use
to select TV Format: NTSC or PAL. (Default is NTSC)
For use in North America, the TV format should always be set at NTSC.
16
Page 21

Operating Menus
Model D575 User's Manual
SET TO FACTORY DEFAULT
1. Press
2. Press
to select Factory Default screen.
Start
and press to reset the system to factory default settings.
SYSTEM VERSION
Cam1
Cam2
Cam3
Cam4
----
----
----
----
----
1. Press
to select System Version screen.
For factory use only.
17
Page 22

Troubleshooting
Problem Possible Causes Remedies
System message
shows “No Signal”
Low or unstable
signal
No power supply to
camera
Channel is not synched
up to camera
Service out of range Move the camera closer to the receiver.
Signal is blocked If possible, remove major obstacles in
Antenna direction is
limited
Signal has been blocked If possible, remove major obstacles in
Strong radio signal
nearby
If camera power status indicator light is off,
check power adapter and power cable
connection.
Move the camera closer to the receiver, and
connect the camera to the desired channel. Go
to “Camera Setup” in the Menu. Use the
“Pairing” sub-menu to connect the camera to
the receiver.
between the camera and the receiver. Or,
relocate the camera to another location.
Adjust the camera antenna and receiver
position
between the camera and receiver. Or, relocate
the camera to another location.
Keep WIFI router away from the camera
and/or receiver.
Channel(s)
disappear during
auto or manual scan
Dim or overly bright
image at night time
Recording does not
work
Motion detection
does not work
Strong electromagnetic
interference nearby
Scan channel(s) has been
turned OFF
Low light vision distance
is too short/too far
No SD Card Insert SD Card.
SD Card locked Unlock the SD Card.
Motion Detection record
time is set to OFF
Keep active appliances such as hair dryers,
heat fans, air conditioners, water pumps, or
microwave ovens away from the camera
and/or receiver.
Go to Menu; turn ON the channel(s).
Adjust the camera to have the view fit the
ideal distance: 15 to 24 feet.
Always set Motion Detection record period to
5 sec, 10 sec, or 15 sec.
18
Page 23

Troubleshooting
Model D575 User's Manual
Audio feedback Camera and receiver are
too close
The camera has a high sensitivity
microphone. Keep the camera at least 10 feet
away from the receiver. If the camera must be
within 10 feet of the receiver, keep the
volume down.
Poor image quality Interference Place the camera and/or receiver antenna at a
new angle or readjust its position to make an
improvement.
Remove obstacles between the camera and
receiver that might affect the signal (e.g.,
furniture, cabinets, and walls).
Relocate the camera closer to the receiver.
19
Page 24

GENERAL
Operating Power 5V
Remote Control Included
Technical Information
4 Camera Multi-View Yes (additional cameras sold separately)
Wireless Range 750 ft
Frequency 2.4 GHz
Transmission Channels 40
CAMERA
Operating Temperature 14°F - 122°F
Indoor/Outdoor Both
Dimensions 4.7” x 2.8” x 2.7”
(camera & stand)
Image Sensor CMOS
Viewing Angle 56 degrees
Audio Range 16 ft
Color Yes
Infrared LEDs 27
Night Vision Distance 40 ft
RECEIVER
Dimensions 4.1” x 2.9” x 0.7”
Data Storage Type 2GB SD Card
HCSD Compatible 32GB
STORAGE DATA MANAGEMENT
SD Card Capacity 640 x 480 (VGA) 320 x 240 (QVGA)
1G 110 Minutes 165 Minutes
2G 250 Minutes 350 Minutes
8G 1070 Minutes 1450 Minutes
16G 2170 Minutes 2960 Minutes
20
Page 25

Warranty
PRODUCT LIMITED WARRANTY
BRK Brands, Inc., (“BRK”) the maker of First Alert® brand products warrants that for a
period of one year from the date of purchase (the “Warranty Period”), this product will be
free from defects in material and workmanship. BRK, at its sole option, will repair or
replace this product or any component of the product found to be defective during the
Warranty Period. Replacement or repair will be made with a new or remanufactured
product or component. If the product is no longer available, replacement may be made
with a similar product of equal or greater value. This is your exclusive warranty.
This warranty is valid for the original retail purchaser only from the date of initial retail
purchase and is not transferable. In order to obtain warranty service, y ou must keep the
original sales receipt and proof of purchase in the form of the UPC code from the pack age.
BRK dealers, service centers, or retail stores selling BRK products do not have the right t o
alter, modify or any way change the terms and conditions of this warranty.
WARRANTY EXCLUSIONS
Parts and Labor: 1 year limited (warranted parts do not include bulbs, LEDs, and batteries)
This warranty does not apply to bulbs, LEDs, and batteries supplied with or forming part
of the product.
This warranty is invalidated if non- BRK accessories are or have been used in or in
connection with the product or in any modification or repair is made to the product.
This warranty does not apply to defects or damages arising by use of the product in other
than normal (including normal atmospheric, moisture and humidity) conditions or by
installation or use of the product other than in strict accordance with the instructions
contained in the product owner’s manual.
This warranty does not apply to defects in or damages to the product caused by (i)
negligent use of the product, (ii) misuse, abuse, neglect, alteration, repair or improper
installation of the product, (iii) electrical short circuits or transients, (iv) usage not in
accordance with product installation, (v) use of replacement parts not supplied by BRK,
(vi) improper product maintenance, or (vii) accident, fire, flood or other Acts of God.
This warranty does not cover the performance or functionality of any computer software
included in the package with the product. BRK makes no warranty that the software
provided with the product will function without interruption or otherwise be free of
anomalies, errors, or “Bugs.” This warranty does not cover any costs relating to removal or
replacement of any product or software installed on your computer.
BRK reserves the right to make changes in design or to make additions to or improvements
in its products without incurring any obligations to modify any product which has already
been manufactured. BRK will make every effort to provide updates and fixes to its
21
Page 26

Warranty
Model D575 User's Manual
software via its website. This warranty does not cover any alteration or damage to any
other software that may be or may become resident on the users system as a result of
installing the software provided. This warranty is in lieu of other warranties, expressed or
implied, and BRK neither assumes nor authorizes any person to assume for it any other
obligation or liability in connection with the sale or service of the product. In no event
shall BRK be liable for any special or consequential damages arising from the use of the
product or arising from the malfunctioning or non-functioning of the product, or for any
delay in the performance of this warranty due to any cause beyond its control.
BRK does not make any claims or warranties of any kind whatsoever regarding the
product’s potential, ability, or effectiveness to prevent, minimize, or in any way affect
personal or property damage or injury. BRK is not responsible for any personal damage,
loss, or theft related to the product or to its use for any harm, whether physical or mental
related thereto. Any and all claims or statements, whether written or verbal, by
salespeople, retailers, dealers, or distributors to the contrary are not authorized by BRK,
and do not affect this provision of this warranty.
BRK’s responsibility under this, or any other warranty, implied or expressed, is limited to
repair, replacement or refund, as set forth above. These remedies are the sole and exclusive
remedies for any breach of warranty. BRK is not responsible for direct, special, incidental,
or consequential damages resulting from any breach of warranty or under any other legal
theory including but not limited to, loss profits, downtime, goodwill, damage to or
replacement of equipment and property and any costs of recovering, reprogramming or
reproducing any program or data stored in or used with a system containing the product
accompanying software.
BRK does not warrant the software will operate with any other software except that whi ch
is indicated. BRK cannot be responsible for characteristics of their party hardware or
software which may effect the operation of the software included.
Except to the extent prohibited by applicable law, any implied warranty of merchantability
or fitness for a particular purpose is limited in duration to the duration of the above
Warranty Period. Some states, provinces, or jurisdictions do not allow the exclusion or
limitation of incidental or consequential damages or limitations on how long an implied
warranty lasts, so the above limitations or exclusion may not apply to you. This warranty
gives you specific legal rights, and you may also have other rights that vary from state to
state, or province to province, or jurisdiction to jurisdiction.
OBTAINING SERVICE
If service is required, do not return the product to your retailer. In order to obtain warranty
service, contact the Consumer Affairs Division at 1-800-323-9005, 7:30 AM – 5:00 PM
Central Standard Time, Monday through Friday. To assist us in serving you, please have
the model number and date of purchase available when calling.
After contacting the Consumer Affairs Division and it is determined that the product
should be returned for Warranty Service, please mail the product to: Lehigh, 2834
Schoeneck Rd, Macungie, PA 18062-9679.
22
 Loading...