


ELECTRIC OVEN
FSF 650
35685-5601 |
INSTRUCTION BOOKLET |
GB |

 Important Safety Information
You MUST read these warnings carefully before installing or using the oven. If you need assistance, contact our Customer Care Department on 08705 950950
Installation
•This oven must be installed by qualified personnel to the relevant British Standards.
•This oven is heavy. Take care when moving it.
•Remove all packaging, both inside and outside the oven, before using the oven.
•Do not attempt to modify the oven in any way.
Child Safety
•This oven is designed to be operated by adults. Do not allow children to play near or with the oven.
•The oven gets hot when it is in use. Children should be kept away until it has cooled.
Maintenance and Cleaning
•Onlycleanthisoveninaccordancewiththeinstructions.
•The oven should be kept clean at all times. A build-up of fats or other foodstuffs could result in a fire, especially in the grill pan.
•Never use steam or high pressure steam cleaners to clean the appliance.
•Always allow the oven to cool down and switch off the electrical supply before carrying out any cleaning or maintenance work.
Service
•This oven should only be repaired or serviced by an authorisedServiceEngineerandonlygenuineapproved spare parts should be used.
During Use
•This oven is intended for domestic cooking only. It is not designed for commercial or industrial purposes.
•Appliances become very hot with use, and retain their heat for long periods after use. Care should be taken to avoid touching heating elements inside the oven.
•Never line any part of the oven with aluminium foil.
•Do not allow heatproof cooking material, e.g. roasting bags, to come into contact with oven elements.
•Never place plastic or any other material which may melt in or on the oven.
•Do not place sealed cans or aerosols inside the oven. They may explode if they are heated.
•Do not hang towels, dishcloths or clothes from the oven or its handle.
•Do not use this oven if it is in contact with water and never operate it with wet hands.
•Take great care when heating fats and oils as they will ignite if they become too hot.
•Always use oven gloves to remove and replace food in the oven.
•Ensure that all control knobs are in the OFF position when not in use.
•Do not leave cookware containing foodstuffs, e.g. fat or oil in or on the oven in case it is inadvertently switched ON.
•When using other electrical appliances, ensure the cable does not come into contact with the hot surfaces of the oven.
 Environmental Information
•After installation, please dispose of the packaging with due regard to safety and the environment.
•Whendisposingofanoldappliance,makeitunusable, by cutting off the cable. Remove any door catches, to prevent small children being trapped inside.
Keep this instruction book for future reference and ensure it is passed on to any new owner.
2

Contents
For the User |
|
For the Installer |
|
Important Safety Information |
2 |
Installation |
17 |
Description of the Oven |
4 |
Electrical Connection |
17 |
Controls |
5 |
Building In |
18 |
Before the First Use |
5 |
|
|
Electronic programmer |
6 |
|
|
Using the Oven |
8 |
|
|
Hints and Tips |
8 |
|
|
The Fan Oven |
9 |
|
|
Grilling |
11 |
|
|
Defrosting |
12 |
|
|
Cleaning the Oven |
13 |
|
|
Replacing the Oven Light |
14 |
|
|
Something not working |
15 |
|
|
Service and Spare Parts |
15 |
|
|
Customer Care |
16 |
|
|
Guarantee Conditions |
16 |
|
|
Guide to use the instructions
The following symbols will be found in the text to guide you throughout the Instructions:
 Safety Instructions
)Step by step instructions for an operation Hints and Tips
Environmental information
This appliance complies with the following E.E.C.
Directives:
*73/23 - 90/683 (Low VoltageDirective); *93/68(General Directives);
*89/336(ElectromagneticalCompatibilityDirective) and subsequent modifications.
3

Description of the Oven
2 3 |
4 |
5 |
6 |
1
|
|
1. |
Control Panel |
|
|
2. |
Thermostat Control Indicator |
|
7 |
3. |
Mains on Indicator |
|
4. |
Thermostat Control Knob |
|
|
8 |
||
|
5. |
Electronic programmer |
|
|
|
||
|
9 |
6. |
Oven Function Control Knob |
|
7. |
Grill |
|
|
|
||
|
|
8. |
Oven light |
10 |
|
9. |
Oven fan |
|
10. |
Rating plate |
|
|
|
Oven accessories
Grill/roasting |
Grill trivet |
pan |
|
Anti-tip shelf (x 2)
Removable
handles
4

Controls
Oven Function Control Knob
Oven light - The oven light will be on without any cooking function.
Inner grill element only - Can be used for grilling small quantities.
Full Grill - The full grill element will be on.
- |
Fan cooking/Defrost Setting |
|
Defrost Setting - This setting is intended to |
|
assist in thawing of frozen food. Ensure that |
|
the thermostat knob is in the 'OFF' position. |
Fan cooking - This allows you to roast or roast and bake simoultaneously using any shelf, without flavour transference.
Mains on indicator
The mains on light will come on when the oven function control knob is set.
Thermostat Control Knob (°C)
Turn the thermostat control knob clockwise to select temperatures between 50°C and MAX.
Thermostat Control Indicator
The thermostat control indicator will come on when the thermostat control knob is turned. The indicator will remain on until the correct temperature is reached. It will then cycle on and off to show the temperature is being maintained.
The Safety Thermostat
This oven is provided with a safety thermostat. In case of malfunctioning of the main thermostat, and consequent overheating, the safety device will stop the power supply to the appliance. If this happens, call your local Service Force Centre. Under no circumstances should you attempt to repair the appliance yourself.
Before the First Use
Remove all packaging, both inside and outside the oven, before using the oven.
Before first use, the oven should be heated without food. During this time, an unpleasant odour may be emitted. This is quite normal.
The oven will work only if the time of day has been set.
)1. Set the time of day with the electronic programmer (see chapter "Electronic Programmer").
2.Switch the oven function control knob to fan cooking
 .
.
3.Set the thermostat control knob to MAX.
4.Open a window for ventilation.
5.Allow the oven to run empty for approximately 45 minutes.
This procedure should be repeated with the grill function for approximately 5-10 minutes.
FO 2824
50
MAX
100
200  150
150
FO 2673
5

Electronic programmer
4
5 |
|
|
|
|
|
|
|
|
|
7 |
1. |
Push button for selecting a function |
||||
|
|
|
|
|
|
|
|
|
2. |
Decrease control button “ |
|
|
” |
|||
|
|
|
|
|
|
|
|
|
||||||||
|
|
|
|
|
|
|
|
|
|
|
||||||
6 |
|
|
|
|
|
|
|
|
|
|
8 |
|
|
|||
|
|
|
|
|
|
|
|
|
3. |
Increase control button “ |
” |
|||||
|
|
|
|
|
|
|
|
|
||||||||
|
|
|
|
|
|
|
|
|
|
|
|
|||||
|
|
|
|
|
|
|
|
|
|
|
|
|||||
|
|
|
|
|
|
|
|
|
|
|
|
4. |
Display |
|
|
|
|
|
|
|
|
|
|
|
|
|
|
|
5. |
“Cooking Duration” indicator |
|||
|
|
|
|
|
|
|
|
|
|
|
|
|||||
|
|
|
|
|
|
|
|
|
|
|
|
6. |
“End of cooking” indicator |
|
|
|
2 |
1 |
3 |
|
FO 2571 |
7. |
“Minute minder” indicator |
|
|
||||||||
|
|
|
|
|
|
|||||||||||
|
|
|
|
|
|
|
|
|
|
|
|
8. |
“Time of day” indicator |
|
|
|
The oven will work only if the time of day has been set.
However, the oven can also be operated without any programme.
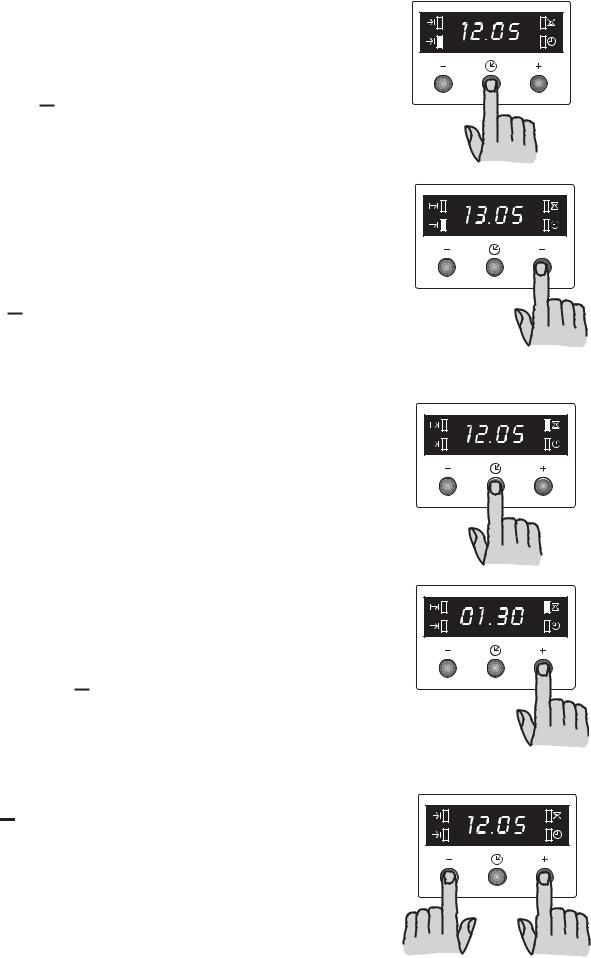
Setting the time of day 
When the power supply is switched on, or after a power failure, the “Time of day” indicator  will flash on the display.
To set the correct time of day:
1.Press button “ ” or “ ”.
2.After the setting is carried out, wait for 5 seconds: the “Time of day”
indicator  will go out and the display will show the set time. The appliance is ready for use.
To reset the correct time of day:
1.Press button  repeatedly to select the “Time of day” function. The relevant indicator will start flashing. Then proceed as described above. The time of day can only be reset if no automatic function (cook duration
 or end of cooking
  ) has been set.
“Cooking Duration” function 

This function allows the oven to automatically switch off at the end of a programmed cooking duration time. Place food in the oven, select a cooking function and adjust the cooking temperature. Press button repeatedly to select the “Cooking Duration” function. The relevant indicator
 will start flashing. Then, proceed as follows:
To set the duration time:
1.Press button “ ” or “ ”.
2.After the setting is carried out, wait for 5 seconds: the "Cooking Duration" indicator 
 will come on and the display will revert to the time of day.
3.When cooking time is over, the oven will be switched off automatically and an acoustic alarm will be heard, while the indicator will start flashing. Turn the oven function and the thermostat control knob to zero.
To switch off the acoustic alarm, press any button.
NOTE: turning the acoustic alarm off will reset the oven to manual, and if the oven function and the thermostat knobs are not set to zero the oven will start to heat again.
To cancel the duration time:
1. Press button  repeatedly to select the “Cooking Duration” function. The relevant indicator
 will flash and the display will show the remaining cooking time.
2.Press button “ ” until the display shows “0:00”. After 5 seconds the indicator will go out and the display will revert to the time of day.
6
“End of cooking” function 
With this function, you can set the oven to switch off automatically when a programmed end of cooking time is over. Placefood in the oven, select a cooking function and adjust the cooking temperature. Press button repeatedly to select the “End of cooking” function. The relevant indicator
 will start flashing. Then, proceed as follows:
To set the End of cooking time:
1.Press button “ ” or “ ”.
2.After the setting is carried out, wait for 5 seconds: the “End of cooking” indicator 
 will come on and the display will revert to the time of day.
3.When cooking time is over, the oven will be switched off automatically and an acoustic alarm will be heard, while the indicator will start flashing. Turn the oven function and the thermostat control knob to zero.
To switch off the acoustic alarm, press any button. NOTE: turning the acoustic alarm off will reset the oven to manual, and if the oven function and the thermostat knobs are not set to zero the oven will start to heat again.
To cancel the End of cooking time:
1.Press button  repeatedly to select the “End of cooking” function. The relevant indicator
  will flash and the display will show the programmed End of cooking time.
2.Press button “ ” until the display shows the current time of day. The programmer will beep and the indicator will go out.
“Cooking duration” 
 and “End of cooking time”
  combined
The functions “Cooking duration” and “End of cooking time” can be used simultaneously to set the oven to switch on and off automatically at a later time.
1.With the “Cooking duration” function
 (carry out the cooking duration setting as described in the relevant chapter) set the duration time. Then, press button
  : the display will show the programmed setting.
2.With the “End of cooking time” function  (carry out the End of cooking setting as described in the relevant chapter) set the end of cooking time. The relevant indicators will come on and the display will show the time of day. The oven will switch on and off according to the set programmes.
“Minute minder” function 
The minute minder alarm will sound at the end of a timed period, but THE OVEN WILL REMAIN ON, if it is in use.
To set the minute minder:
1.Press button repeatedly to select the “Minute minder” function. The relevant indicator
  will start flashing.
2.Then, press button “ ” or “ ” (maximum: 2 hours, 30 minutes).
3.After the setting is carried out, wait for 5 seconds: the “Minute minder” indicator  will come on.
4.At the end of the timed period, the indicator will start flashing and an acoustic alarm will be heard. To switch off the acoustic alarm, press any button.
To cancel the minute minder:
1.Press button repeatedly to select the “Minute minder” function. The relevant indicator
  will flash and the display will show the remaining time.
2.Press button “ ” until the display shows “0:00”. After 5 seconds the indicator will go out and the display will revert to the time of day.
How to switch off the display
1.Press two or three programmer push buttons simultaneously and keep them pressed for about 5 seconds. The display will switch off.
2.To switch on the display, press any button.
The display can be switched off only if no other functions have been set.
7
 Loading...