

Page 1

Page 2

The car is equipped with a CONNECT Nav+ system designed according to the specific features of the passen-
ger compartment with a customised design which matches the style of the dashboard.
The system is installed in an ergonomically convenient position for the driver and the passenger; the graphic on
the front panel helps to quickly identify the controls and makes them easier to use.
In order to deter thefts, the device is provided with a special protection system and may only be used on the
car where it was originally fitted.
The interface language of the system is that in use in the country where the car is registered. Contact a Fiat
Dealership to change the language or the voice (male/female) at a later time.
Read the following instructions carefully and keep the instructions at hand at all times (e.g. in the oddment
compartment).
Enjoy.
IMPORTANT For the CONNECT Nav+ navigator function,
use the original CD supplied with your car
or other CDs of the same make.
Page 3

Page 4

CONNECT Nav+
TIPS, CONTROLS
AND GENERAL
INFORMATION
TIPS........................................................ 4
CONTROLS ........................................ 8
GENERAL INFORMATION ........... 13
Important instructions
and road safety ................................... 13
Switching the system
on and off.............................................. 14
Antitheft protection .......................... 14
Configuration....................................... 14
AUDIO
Volume adjustments........................... 15
Audio adjustments ............................ 15
Radio mode ......................................... 16
CD mode ............................................ 19
CD changer mode.............................. 21
CD charger .......................................... 22
MP3 mode ........................................... 23
............................................... 15
...........................
AUDIO FUNCTIONS ................ 24
Jukebox function................................. 24
4
MOBILE TELEPHONE
Introduction......................................... 26
Alphanumeric codes ......................... 28
How to insert the SIM card ............. 29
How to enter the PIN code............. 29
How to make a call ........................... 30
How to call a service number.......... 30
How to answer a call ........................ 31
How to reject a call .......................... 31
Directory ............................................. 31
Text messages (SMS) ......................... 33
Bluetooth system................................ 34
bCONNECT SERVICES
“SOS” function .................................... 35
“Emergency” function........................ 35
“Breakdown” function ...................... 36
– Emergency and breakdown
calls..................................................... 36
Infomobility services .......................... 37
............. 26
.......... 35
– “Connect” function ....................... 37
– “Breakdown” function ................... 38
– “Operator services” function....... 38
– “Messages received” function ..... 38
– Traffic information ......................... 38
– Information on centres of
interest .............................................. 39
– Generic information ...................... 39
VOICE CONTROLS
NAVIGATOR
CD-ROM drive ................................... 44
Main menu............................................ 44
Select destination .............................. 45
Guidance options................................ 46
TMC traffic info................................... 47
Map ....................................................... 49
VIDEO FUNCTION ..................... 51
................................. 43
.................. 40
3
Page 5

TIPS, CONTROLS AND GENERAL INFORMATION
TIPS
ROAD SAFETY
We recommend that you learn to
use the various car radio and navigator functions (for example, storing stations) before starting to drive.
WARNING
Excessively high volume
while you are driving may
endanger your life and that of
others. Always adjust the volume so
you are able to hear the surrounding noises (for example, horns,
ambulances, police cars, etc.).
RECEPTION CONDITIONS
Reception conditions change constantly while driving. Reception may be
disturbed near mountains, buildings or
bridges especially when you are far
away from the broadcaster’s transmitter.
IMPORTANT When receiving
traffic information, there may be an increase in volume with respect to normal.
MAINTENANCE AND CARE
The constructive structure of the radio and navigation system guarantees
a long life without any need for particular maintenance. In the case of damage, contact a Fiat Dealership.
The following precautions will ensure fully efficient operation of the radio
and navigation system:
– the monitor may be scratched and
damaged by liquid detergents and UV
radiation;
– the device could be damaged
beyond repair if fluids penetrate inside.
Use a clean, dry, antistatic, soft cloth
to clean the front panel and the display
only. Cleaning and polishing products
could damage the surface.
4
Page 6
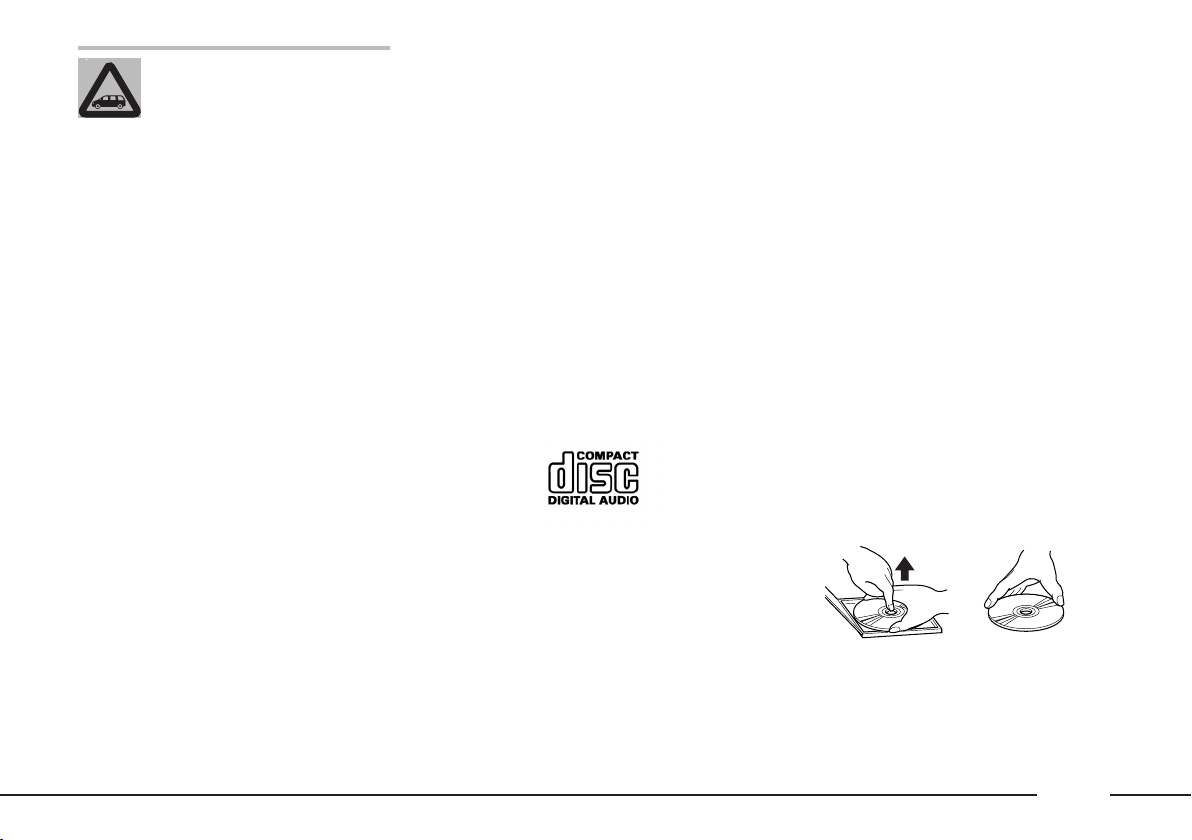
Proper way to hold
the compact disc
Removing the disc
Be careful not to scratch
the display with sharp or rigid objects. Avoid touching it
with your fingers. Do not press on
the display when cleaning it.
NOTES
– Contact a Fiat Dealership only
for repairs to the radio and navigation
system, if required.
– The display may take some time to
reach optimal brightness in the event
of particularly low temperatures.
– The overheat protection device of
the system may trip if the car is parked
for a long time and the outside temperature is high. The system will start
working again when the temperature
in the passenger compartment returns
to acceptable levels.
CD
When using the audio CD player, remember that dirt or scratches on a CD
may make it skip and cause poor playback quality. The same things may happen if the CDs are bent.
IMPORTANT Do not use 8-cm
audio CDs or MP3 CDs even with a
specific adapter. This type of disk may
damage the system.
To achieve optimal playing conditions, we recommend the following:
– Only use audio CDs with the following trademark:
– Carefully clean each CD with soft
cloth. Remove fingerprints and dust.
Hold the CD from the edges and clean
it from the middle to the edges.
– Do not use chemical cleaning products (e.g. antistatic products, sprays,
or thinners) to prevent damage to the
CD surface.
– After playing a CD, put it back it
case to prevent marks and scratches
which could make it skip during playback.
– Keep CDs away from direct sunlight, high temperatures and prolonged
humidity to prevent bending them.
– Do not stick labels or write on the
recorded side of a CD.
To extract a CD from its case, press
onto the middle of the case and lift the
CD holding it from its edges.
5
Page 7
Always only hold a CD from its ed-
No
Ball-point pen
Roughness
ges. Never touch the surface.
Use a soft cloth and sweep the CD
from the middle towards the edge to
remove fingerprints and dust.
New CDs may be rough along the
edges. The device may not work properly and playback may skip in this case. Rub the edge with a ballpoint pen
or the like to make the edges of the
CD smooth.
IMPORTANT Do not use commercially available protective sheets for
CDs or disks with stabilisers as these
could get stuck in the internal mechanism and damage the disk.
IMPORTANT If a copy protected
CD is used, it may take a few seconds
before the system will start to play it.
In addition, due to the proliferation of
new and different protective methods,
it cannot always be guaranteed that
the CD player will play every protected disk. The presence of a copy protection system is often written in very
small, difficultly legible print on the cover of the CD itself. Possible wording
includes “COPY CONTROL”,
“COPY PROTECTED”, “THIS CD
CANNOT BE PLAYED ON A
PC/MAC”. Symbols such as the following may be used:
The symbol used to identify audio
CDs is often missing from the disk and
the cover of a copy protected CD:
6
Page 8
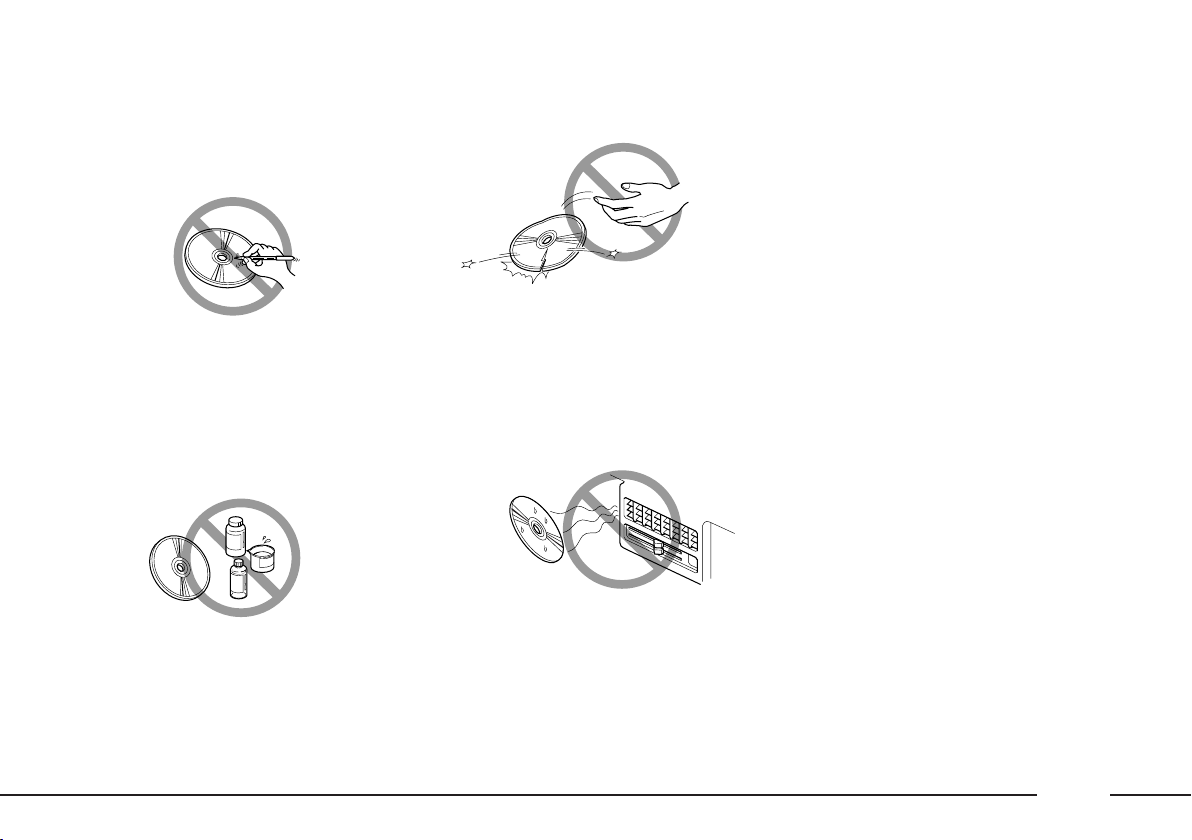
No
No
No
Errato
Notes on CDs
Do not stick labels onto the surface
of a CD. Do not write on the surface
of a CD with pencils or pens.
Do not use very damaged, cracked
or deformed CDs.
INTRODUCTION
The CONNECT Nav+ system es-
sentially consists of:
– a keypad on the front panel and
two knobs (encoders);
– controls on the central unit and re-
mote controls on the steering wheel;
– electronic control unit inside the
dashboard.
Do not use stain removers, antistatic sprays or thinners to clean a CD.
Use of such CD may damage the
player. Keep CDs away from direct
sunlight and all sources of heat.
The system interface is the multifunctional display used by all integrated components.
Unavailable functions will appear shaded on the display and cannot be operated.
7
Page 9
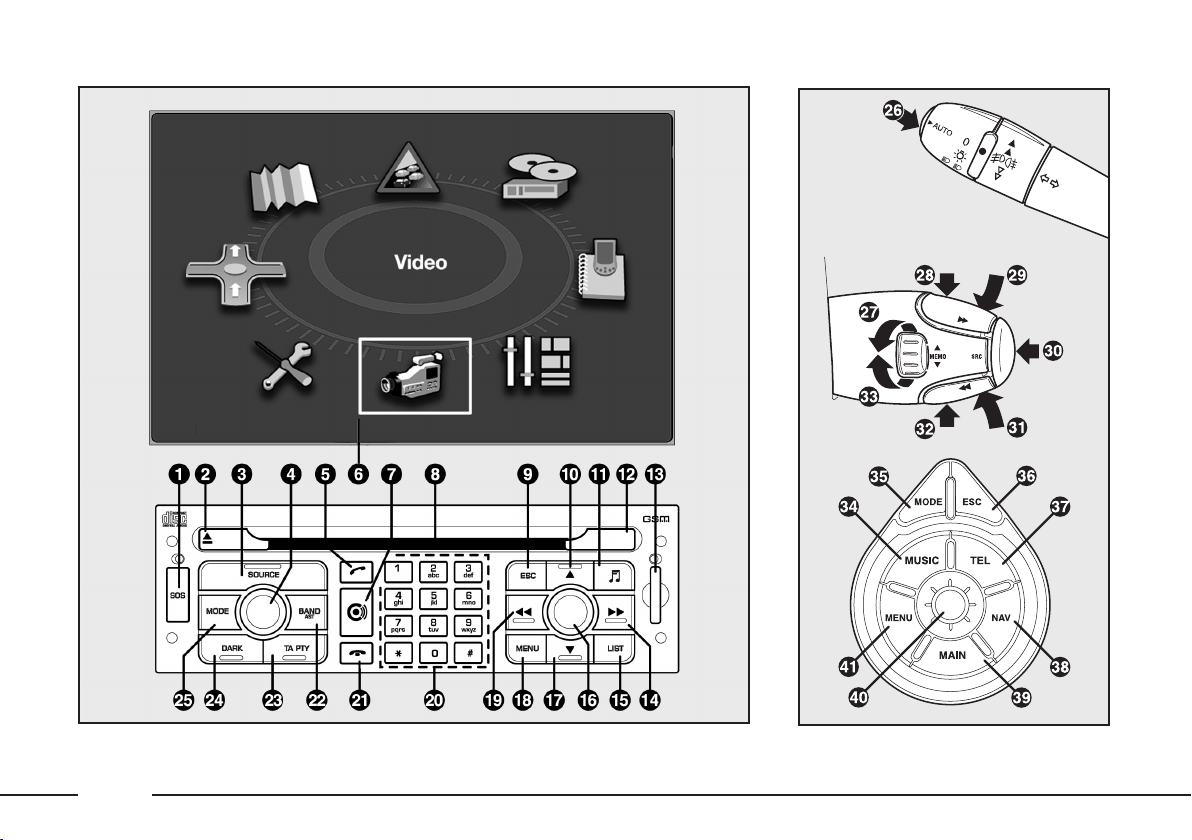
CONTROLS
F0B0284m F0B0280m
fig. 1
8
Page 10

Some controls have multiple functions which depend on the active system mode. The activated function in some cases
depends on how long the button is pressed as shown in the following table:
Key Short press (less than 1 second) Long press (over 1 second)
1 SOS
2
3 SOURCE
4
5
6
7
8
9 ESC
10
11
˚
£
•
N
Display emergency call menu
(medical emergency, breakdown, etc.).
Eject audio CD audio or navigation CD-ROM.
Select mode: radio, CD, CD changer.
System on/off.
Turn: adjust volume and audio settings
(treble, bass, balance, fader, loudness).
Telephone mode.
Dial set number.
Answer incoming call.
CONNECT Nav+ comprised system
multifunctional display
bCONNECT mode.
CD compartment/housing.
Quit selection menu or go from a submenu to a
higher level menu.
Radio mode: tune radio in 50 kHz (in FM) or 1 kHz (in
AM) steps to the next radio station from the
currently tuned station.
CD changer mode: select next CD.
Sound settings.
–
–
–
–
–
–
–
–
–
Show active mode general information.
–
9
Page 11

Key Short press (less than 1 second) Long press (over 1 second)
12
13
14
15 LIST
˜
IR port.
SIM card housing adapter.
Radio mode: tune radio to the next station;
press twice: switch from LO mode to DX mode.
CD mode: go to next track.
CD changer mode: go to next track.
Radio mode: show receivable radio stations in
alphabetical order.
CD mode: show track list contained on CD.
MP3 mode: show folder list contained on CD.
CD mode: fast forward by one track.
–
–
–
16
17
18 MENU
19
20
21
O
÷
Ô
10
Turn: select function.
Press: confirm selected functions.
Radio mode: tune radio in 50 kHz (in FM) or 1 kHz (in
AM) steps to the previous radio station from the currently tuned station.
CD changer mode: select previous CD.
Access to function menus.
Radio mode: tune radio to the previous station;
press twice: switch from LO mode to DX mode.
CD mode: go to previous track.
CD changer mode: go to previous track.
Radio mode: recall preset station (1 – 6)
Telephone mode: dial telephone number (1 – 12).
CD changer mode: select CD (1 – 6).
Reject incoming call.
Hang up current call.
–
–
Show help menu.
CD mode: fast backward by one track.
Store current station (1 – 6).
–
Page 12

Key Short press (less than 1 second) Long press (over 1 second)
22 BND AST
23 TA/PTY
24 DARK
Select frequency band FM1 – FM2 – FMAST
(autostore) – AM.
TA (Traffic Announcements): automatic
reception of traffic announcements.
Press once: partial dimming of display.
Press twice: dimming of display.
Press three times: normal display brightness.
Automatic station store (in FMAST band).
PTY (Type Program): activate search filter
according to broadcasting station category.
–
25 MODE
26
27 MEMO
28
29
30 SRC
31
32
33 MEMO
˜
÷
Change current display.
Voice controls
Anticlockwise:
Radio mode: previous preset station.
CD changer mode: select previous CD.
Radio mode: manual tuning next station.
CD mode: select next track
Audio section: volume up.
Pressed with button 31: mute function
Select mode: radio, CD, CD changer.
Audio section: volume down.
Pressed with button 29: mute function
Radio mode: manual tuning previous station.
CD mode: select previous track
Clockwise.
Radio mode: next preset station.
CD changer mode: select next CD
–
Navigation mode: repeat last voice message
(supplied by system).
–
–
–
–
–
–
–
11
Page 13

Key Short press (less than 1 second) Long press (over 1 second)
34 MUSIC
35 MODE
36 ESC
37 TEL
38 NAV
39 MAIN
40
41 MENU
Audio settings: treble, bass, balance, fader, loudness automatic volume adjustment
according to speed.
Change current display.
Quit selection menu or go from a submenu to a higher
level menu.
Telephone mode.
Navigation mode.
Go to main menu.
Turn: select function.
Press: confirm selected function.
Access function menus.
–
–
–
–
–
–
–
Show help menu.
12
Page 14

GENERAL INFORMATION
IMPORTANT INSTRUCTIONS
FOR USE AND ROAD
SAFETY
The Connect Nav+ system allows to
easily control the main car functions.
Read the following instructions to
avoid endangering yourself and other
system users:
– maintain full control of the car while using the Connect Nav+ system. If
in doubt when selecting a function,
stop the car before proceeding.
– do not use the mobile telephone in
the proximity of explosive substances.
The navigation system allows to reach your destination indicating changes
of route employing the data stored on
the navigation CD-ROM.
The system calculates the route
taking all stored road data into account and recommends the best route. Traffic conditions, unexpected detours and other problems cannot be
taken into consideration.
Respect the highway code regardless
of the navigation system instructions.
The navigation system will calculate a
new route if you decide not to follow
the recommended route instructions.
IIMPORTANT Do not use 8-cm
audio CDs or MP3 CDs even with a
specific adapter. This type of disk may
damage the system.
WARNING
The navigation system is
designed to assist the driver and to suggest the best route
to reach the programmed destination using voice and graphic
messages. The suggestions supplied by the navigation system do
not exonerate the driver from driving the car responsibly and respecting the highway code as well
as other road traffic dispositions.
The driver is always and only responsible for road safety.
13
Page 15
SWITCHING THE SYSTEM
ON/OFF
The system will be switched on when
the key is switched to the M position.
The system will be switched off when
the key is turned to the S position.
With the key at S, press knob (4) to
operate the system for 20 minutes only
to protect the battery charge.
ANTITHEFT PROTECTION
The CONNECT Nav+ system is
provided with an automatic antitheft
system which does not need to be
operated by the user.
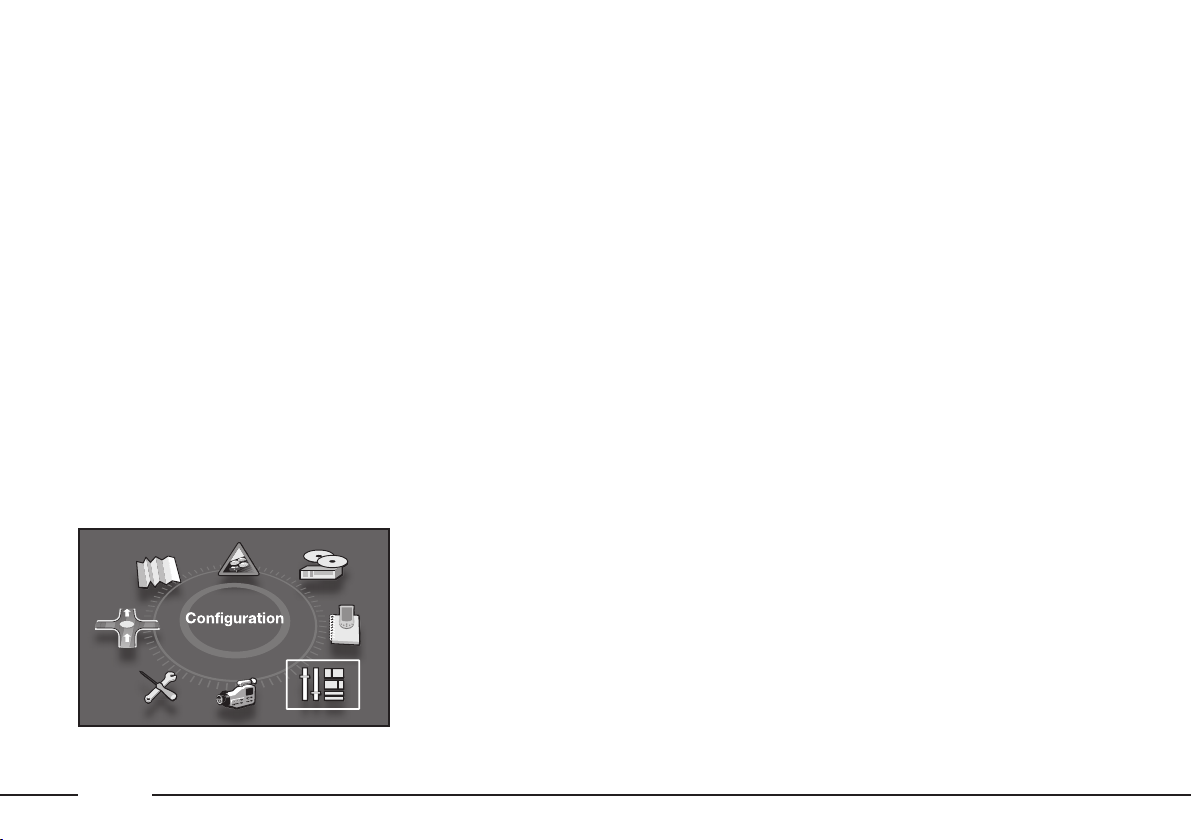
CONFIGURATION
Press MENU (18); turn and press
the knob (16 – 40) to select the
CONFIGURATION function - fig. 2.
The following settings may be accessed:
– “Display configuration”: turn and
press the knob (16 – 40) to select and
confirm. This function is used to change the display colour, adjust brightness,
set the date and time and set the unit
of measure.
– “Sound”: turn and press the knob
(16 – 40) to select and confirm. This
function is used to adjust the voice
control volume, set the voice synthesis parameters and switch the auxiliary
input (RCA socket) located in the
oddment compartment on and off.
F0B1005g
– “Select language”: turn and press
the knob (16 – 40) to select and confirm. This function is used to select the
required language.
– “Define vehicle parameters”: turn
and press the knob (16 – 40) to select
and confirm. This function may be
used switch some vehicle parameters
on and off. The parameters change according to the version (e.g. parking
sensors, etc.).
fig. 2
14
Page 16

AUDIO
With the key at M, the audio section
may be switched on and off by pressing the knob (4).
VOLUME ADJUSTMENT
Turn the knob (4) clockwise to turn
the radio volume up and anticlockwise to turn it down.
AUDIO SETTINGS
Sound settings (BASS/ TREBLE), balance (BAL), fader (FAD), loudness
(LOUD), automatic volume and type
of sound (musical ambiance) may be
adjusted. The balance and fader functions emphasise the sound from the
left/right and the front/rear speakers.
The loudness function is used to
emphasise the bass and treble tone
when the volume is low. To access the
audio settings function, repeatedly
press
treble (TREB), loudness (LOUD), fader (FAD), balance (BAL), automatic
volume and sound type (musical ambience).
(11) to adjust bass (BASS),
The system will deactivate the audio
adjustment system after a few seconds
if no action is performed or if the ESC
(9 - 36) is pressed after making the
setting.
IMPORTANTThe bass and treble
settings are source specific. They may
be adjusted separately in RADIO, CD
or CD changer mode.
Bass settings (BASS)
When the message “BASS” appears
on the display, turn the knob (4) to
adjust the setting as follows:
– “BASS -9” for setting bass to minimum level;
– “BASS 0” for setting bass to medium level;
– “BASS +9” for setting bass to maximum level.
Treble setting (TREB)
When the message “TREB” appears
on the display, turn the knob (4) to
adjust the setting as follows:
– “TREB -9” for setting treble to minimum level;
– “TREB 0” for setting treble to medium level;
– “TREB +9” for setting treble to
maximum level.
Loudness function (LOUD)
This function allows to automatically emphasise bass and treble settings
when the volume is low. Simply turn
the knob (4) to switch the function on
and off.
15
Page 17

Front/rear balance (Fader)
When the message “FAD” appears
on the display:
– turn the knob (4) clockwise to
enhance the sound from the front
speakers;
– turn the knob (4) anticlockwise to
enhance the sound from the rear
speakers.
Right/left balance (Balance)
When the message “BAL” appears
on the display:
– turn the knob (4) clockwise to
enhance the sound from the right
speakers;
– turn the knob (4) anticlockwise to
enhance the sound from the left
speakers.
Automatic volume correction
This function is used to automatically adjust the volume according to the
vehicle speed. Simply turn the knob
(4)) to switch the function on and off.
Musical ambiance
This function is used to set the required ambiance (classical/jazz/rock/
pop/techno/vocal/none).
Select the required sound using the
knob (16 - 40) and press the knob to
confirm.
After making the required settings,
turn and press the knob (16 - 40) to
select and confirm the setting and go
back to the previous menu.
RADIO MODE
Listening to the radio
Select radio mode and repeatedly
press SOURCE (3) or SRC (30) to
display “Radio”.
Frequency band selection
Press BAND/AST (22) to select the
frequency bands: FM1, FM2, FMAST or
AM.
16
Page 18

Automatic station search
Briefly press ÷ (19) or ˜ (14)
to select either the previous or the
next station.
Hold the button corresponding the
chosen direction pressed to change
frequency continuously.
Tuning will stop at the first receiveable station when the button is released.
Only the stations transmitting traffic information will be selected if the
TA function is on.
Station search is firstly run with “LO”
sensitivity (most powerful stations)
and then with “DX” sensitivity
(weaker stations).
To perform a search with “DX” sensitivity directly, press ÷ (19) or
˜ (14) twice.
Manual station search
Briefly press
the button corresponding the chosen
direction pressed to change frequency
continuously. Tuning will end as soon
as the button is released.
Manual stations store
Proceed as follows to manually store stations:
– tune to the required station;
– press one of the buttons from 1 to
6 (20) and hold the button pressed
until you hear the acoustic tone.
Automatic FM station store
(Autostore)
Hold BAND/AST (22) pressed to
activate the “Autostore” function.
When this function is on, the radio will
automatically store the six FM band
stations with the strongest signal.
▲ (10) or ▼ (17). Hold
The message “FMAST” will appear
on the display during automatic tuning.
The stations will be automatically saved under buttons from 1 to 6 of keypad (20). After saving, the radio will
be automatically tuned to the first station in the FMAST band, corresponding to the frequency stored under selection button 1 of keypad (20).
Each station is stored only one. Regional programmes may be stored twice.
The system will work as follows
when the Autostore function is on:
– all other functions are off when Autostore starts;
– Autostore is stopped when the
source is changed (radio, CD, CD
changer) during the function;
– volume adjustments will not appear on the display.
17
Page 19

IMPORTANT If Autostore cannot
find six strong stations only the stations found will be stored.
IMPORTANT When the Autostore function is activated, the stations
that were previously stored in the
FMAST band are deleted.
The message “TA” appears on the display when the TA function is on. The
wording “TA” will appear shaded in
grey if the function is not available on
the tuned display. All traffic announcements will have higher priority over
any only sound system use (RADIO,
CD or CD Changer).
PTY (Type Program) function
The PTY function (where present)
may be used to give higher priority to
stations broadcasting specific programme types. The PTY function includes emergency messages and various topics (music, news, etc.).
TA (Traffic Announcement)
function
Press TA/PTY (23) to switch the
function on and off.
Traffic announcements may be recei-
ved with the TA function on.
When a traffic announcement is
broadcast, the radio will automatically tune to the station broadcasting the
announcement. The radio will switch
back to the audio source being played
when the traffic announcement is
over.
18
IMPORTANT The volume of traffic announcements is independent
from the normal playing volume of the
sound system. The volume may be
adjusted using the knob during playback. This setting will be stored and
used for the next traffic announcement. Press TA/PTY (23) while receiving a traffic announcement to stop
the announcement and switch the TA
function off.
IMPORTANT The PTY function is
available on the FM band only.
Proceed as follows to access the PTY
program list:
– Hold the TA/PTY (23) button
pressed. The PTY programme list will
appear on the display.
– Turn the knob (16 - 40) to scroll
the list.
– Select the programme type and
press the knob (16 - 40) to confirm.
The message “PTY” will appear on
the “Radio” page when the PTY function is on.
Page 20

PTY programme list:
– News
– Information
– Services
– Sport
– Education
– Drama
– Culture
– Science
– Entertainment
– Pop music
– Rock music
– Easy listening
– Light classics
– Other music
– Weather
– Economics
– Children
– Current affairs
– Religion
– Phone in
– Travel & Touring
– Leisure & hobby
– Jazz music
– Country music
– National music
– Oldies music
– Folk music
– Documentary.
The previously tuned station will be
selected if there are no available stations with the selected programme type. Select a programme type or ESC
(9 - 36) to quit the PTY programme
list.
EON (Enhanced Other
Networks) function
This function connects the stations
belonging to a network. The function
allows to receive traffic announcement
or PTY programmes broadcast by a
station belonging to the same network
as the tuned station. This service is automatically activated when TA or PTY
is selected.
LIST function
This function displays a list of the receiveable local stations with the strongest signal. Press LIST (15) to switch the function on. Turn and press the
knob (16 - 40) to select and confirm
the required station.
CD MODE
To guarantee best sound playback,
we recommend using original CDs. If
CD-R/RW are used, we recommend
using good quality media that are burned at the slowest speed possible.
19
Page 21

IMPORTANT Do not use 8-cm
audio CDs or MP3 CDs even with a
specific adapter. This type of disk may
damage the system.
Playback will start automatically after
a CD is correctly inserted (printed side facing upwards).
Press SOURCE (3) if a CD is already inserted in the player and you
are listening to another source: playback will start automatically.
How to extract a CD
Press ˚ (2) to extract the CD.
How to select a track
Proceed as follows to select a track:
– briefly press ˜ (14) to select
the next track;
– briefly press ÷ (19) to go back
to the beginning of the current track;
press if again to select the previous
track.
Fast search
Hold ˜ (14) or ÷ (19) press
to play the CD tracks at fast speed
either forwards or backwards. Release the button to return to normal
playback speed.
CD mode menu
Repeatedly press MODE (25 - 35)
to display audio mode.
Press (16 - 40) until the following
menu appears on the display:
– “Activate random”: select the function to play the CD tracks in random
order. The message RDM will appear
on the display when the function is on.
Press the knob (16 - 40) and select
“Deactiv. random” and confirm to switch the function off.
– “Activate Introscan”: select and confirm this function to play all tracks from
the beginning in the order they appear
on the CD. Press the knob (16 - 40),
select “Deactivate Introscan” and confirm to switch the function off.
20
Page 22

– “Program tracks”: this function is
used to play the tracks on the CD. Select and confirm the function. A keypad
will appear on the display for entering
the number of tracks to be programmed: “reset” cancels all selected tracks,
“delete” cancels the last selected track,
“OK” confirms the selection.
LIST function
This function is used to display the list of tracks on the CD. Press LIST
(15) while playing a CD to activate the
function. Turn and press the knob (16
- 40) to select and start playback.
CD CHANGER MODE
(where provided)
(not compatible with MP3 CDs)
To guarantee best sound playback,
we recommend using original CDs. If
CD-R/RW are used, we recommend
using good quality media that are burned at the slowest speed possible.
IMPORTANT Do not use 8-cm
audio CDs even with a specific adapter. This type of disk may damage the
system.
Select radio mode and repeatedly
press SOURCE (3) o SRC (30) to
select CD changer mode.
How to select a CD
Press buttons from 1 to 6 on the
keypad (20) to select the required
CD.
How to select a track
Proceed as follows to select a track
on a CD in the CD changer:
– briefly press ˜ (14) to select
the next track;
– briefly press ÷ (19) to play the
current track from the beginning and
press it again to go to the previous
track.
Fast track search
(forward/backward)
Hold ˜ (14) or ÷ (19) press
to play the CD tracks at fast speed
either forwards or backwards. Release the button to return to normal
playback speed.
CD changer mode menu
Repeatedly press MODE (25 - 35)
to display audio mode.
Press (16 - 40) until the following
menu appears on the display:
21
Page 23

– “Activate random”: this function
is used to play the tracks on the selected CD in random order.
– “Activate Introscan”: this function
is used to listen to the beginning of all
the tracks on the selected CD.
– “Activate repeat”: allows to listen
to the last played track.
CD CHARGER
How to extract the changer
The CD charger is fitted inside the
oddment compartment on passenger
side - fig. 3. The changer may container up to six CD.
Proceed as follows to access the
charger:
– open the oddment compartment
on passenger side;
– open the sliding hatch A-fig. 4.
– press CD charger eject button
B-fig. 4.
How to insert a CD in the
charger
Proceed as follows to insert the CDs
in the charger:
– pull the tab D-fig. 5 to open one
of the six charger compartments C;
– insert the CD with the printed si-
de and label facing upwards;
– close the compartment;
– repeat the procedure for the other
CDs.
How to introduce the CD
changer
Proceed as follows to insert the CD
changer in the device:
– Introduce charger C-fig. 6 into the
CD changer device and push it until
you hear the click.
– Close the sliding hatch A-fig. 6.
F0B0214m
fig. 5
fig. 3
22
F0B0199m
fig. 4
F0B0213m
F0B0215m
fig. 6
Page 24

MP3 MODE
IMPORTANT Do not use 8-cm au-
dio CDs or MP3 CDs even with a specific adapter. This type of disk may damage the system. Playback will start immediately after inserting a CD with the
printed side facing upwards. Press
SOURCE (3) is a CD is already inser-
ted in the player and you are listening
to another source: playback will start
automatically.
How to extract a CD
Press ˚ (2) to extract the CD.
How to select a folder
Proceed as follows to select a folder:
– press N to select the next folder;
– press O to select the previous fol-
der.
How to select a track
Proceed as follows to select a track:
– briefly press ˜ (14) to select
the next track;
– briefly press ÷ (19) to go back
to the beginning of the current track;
press if again to select the previous
track.
CD mode menu
Repeatedly press MODE (25 - 35)
to display AUDIO mode.
Press (16-40) until the following me-
nu appears on the display:
– “Activate Random”: select the
function to play the CD tracks in random order. The message RDM will appear on the display when the function
is on. Press the knob (16 - 40) and select “Deactiv. random” and confirm to
switch the function off.
– “Activate Introscan”: select and confirm this function to play all tracks from
the beginning in the order they appear
on the CD. Press the knob (16 - 40),
select “Deactivate Introscan” and confirm to switch the function off.
– “Activate repeat”: select and confirm the function to play the last track
again (repeat track).
LIST function
This function is used to display the list of folders on the CD. Press LIST
(15) while playing a MP3 CD to activate the function. Turn and press the
knob (16 - 40) to select the list of
tracks in the folder. Turn and press
the knob (16 - 40) to select and start
playback.
23
Page 25

AUDIO FUNCTIONS
Press MENU (18 - 41) to access the
general menu. Select “AUDIO
FUNCTIONS” fig. 7 by pressing and
turning the knob (16 - 40) to access
the following menus:
– Radio favourites;
– CD, Jukebox favourites;
– Copy CD to Jukebox;
– Stop the copy;
– Jukebox.
Radio favourites
Turn and press the knob (16 - 40) to
select and confirm this function and
access the following functions:
– “Activate RDS mode”: turn and
press the knob (16 - 40) to select and
confirm this function for displaying various information, including the tuned
station name, the alternative reception
frequencies, automatic traffic announcements and thematic programmes selected using the PTY function.
– “Activate regional mode”: turn and
press the knob (16 - 40) to select and
confirm turning to local (regional) stations only.
– “Activate radio text”: this function
is used to display RDS data on the tuned frequency.
F0B1003g
JUKEBOX FUNCTION
How to copy a CD to the
hard disk
Insert a CD and press MENU (18
– 41).
Turn knob (16 - 40) to select “Audio functions” and press the knob to
confirm; select and confirm the “CD”
function and then “Copy CD to jukebox” to call up the following menu:
– “Copy complete CD”
– “Multiple selection”
– “Current album”
– “Current track”
Turn and press the knob (16 – 40)
to select and confirm the “Complete
CD copy” function. The entire audio
CD or MP3 is copied to the hard disk.
fig. 7
24
Page 26

During the album copying step, the
albums already copied to the hard disk and the CD cannot be played.
The system will automatically compact the CD in MP3 format if the
tracks are not already in MP3 format.
Hold SOURCE (3) pressed to start
copying the CD.
Turn and press the knob (16 – 40)
select “Stop the copy” to stop.
How to rename an album
Press MENU (18 – 41) and select
“Audio functions” by turning and pressing the knob (16 – 40).
Select the “Jukebox” function and
then “Jukebox management” by turning and pressing the knob (16 – 40).
Select the album to be renamed by
turning the pressing the knob (16 –
40).
Select “Rename” and use the alphanumeric keypad to assign a new
name to the selected album.
Select “OK” by turning the knob (16
– 40) and press to confirm.
Playing the jukebox
Repeatedly press SOURCE (3) to
select the “Jukebox” function.
Press LIST (15), turn and press the
knob (16 – 40) to select the tracks.
25
Page 27

MOBILE TELEPHONE
The CONNECT Nav+ system is
equipped with a free-hands GSM Dual
Band mobile telephone.
The GSM (Global System for Mobile
Communication) standard is currently used in many countries and offers
excellent coverage: contact your telephone operator for more information
on the areas currently covered by the
GSM network and those which will be
available in the future.
The system consists of a microphone
(free-hands function) located near the
front ceiling light and a set of speakers. The system is completed by remote controls on the steering wheel
for easier access to functions.
INTRODUCTION
The mobile telephone is provided
with the following functions for easier
use:
– PIN (Personal Identification Number) for preventing unauthorised use
of the telephone
– How to change the PIN code
– how to activate/deactivate the PIN
code prompt when the system is
switched on
– how to answer or reject incoming
calls
– how to make a telephone call
– emergency calls (also without SIM
card and without entering the PIN
code)
– how to read the telephone numbers stored on the SIM card
– how to add a new telephone number to the SIM card
– how to delete a telephone number
from the SIM card
– how to access the last call list for
easily calling the most frequently called
numbers
– how to access the last calls list
– how to manage SMS (Short Message
Service) text messages for receiving and
sending short messages
– how to manually dial a number
– how to adjust the reception volume.
26
Page 28

Proceed as follows to access the tele-
phone menu:
– Press MENU (18 - 41);
– Select the “TELEMATICS” fig. 8
icon and press the knob (16 - 40) to
confirm. The following menu will appear on the display:
– Call
– Directory
– Telephone functions
– Messages
– Turn the knob (16 - 40) to select
“Telephone functions” and press the
knob to confirm to access the following
functions:
“Network”: this function is used to
select the network search mode and
display the available networks.
“Length of calls”: the total call time
and the time since the last reset will
appear on the display. Select and confirm the “Reset” option to reset the
counter.
“Safety”: the following menu will appear on the display:
• Manage PIN code: this function is
used to activate, deactivate or edit the
PIN code.
• Delete call and SMS list: this function is used to delete the list of calls
and text messages sent and received;
F0B1004g
“Telephone options”: the following
setup menu will appear on the display:
• Configure calls: this function is
used to send your number and automatically answer all incoming calls;
• Ring options: this function is used
to set the call and text message ring
tone;
• Calls diversion to mail box number: this function is used to set the
telephone number where to divert
calls.
fig. 8
27
Page 29

ALPHANUMERIC CODES
Buttons Associated characters
1 1 / white space
2 2 / A B C 2 / a b c 2
3 3 / D E F 3 / d e f 3
4 4 / G H I 4 / g h i 4
5 5 / J K L 5 / j k l 5
6 6 / M N O 6 / m n o 6
7 7 / P Q R S 7 / p q r s 7
8 8 / T U V 8 / t u v 8
9 9 / W X Y Z 9 / w x y z 9
0 0 / + (long press)
##
* * / delete previous character (long press)
28
Page 30

HOW TO INSERT A
SIM CARD
Insert a SIM card to make the telephone operative and to access the
telephone functions.
Press and release the button over
the adapter (13) and extract the
adapter; insert the SIM card following
the instructions from on the card itself; then insert the adapter in the specific seat.
The PIN prompt will appear if the
SIM card is inserted correctly.
Press and release the button over
the adapter to remove the SIM card
(13); then remove the SIM card.
IMPORTANT Extracting the SIM
code while the telephone is working
may cause temporary problems. In this
case, normal operation of the telephone may be restored by switching
the engine off and back on.
HOW TO ENTER THE PIN
CODE
IMPORTANT The PIN code (Per-
sonal Identification Number) prevents
unauthorised use of the functions activated by inserting a SIM code.
The PIN code consists of a variable
number of digits (from four to eight).
Enter the code using the keypad on
the front of the device and press the
knob (16 - 40) to confirm.
Asterisks (*) will appear on the display instead of the entered digits.
Select “Correct” with the knob (16
- 40) to correct the PIN code; press
to delete the last entered digit.
IMPORTANT The SIM card will
be locked if an incorrect PIN code is
entered three times in sequence. Enter the PUK (Pin Unlocking Key) and
the new PIN to unlock the device.
The device will start searching for the
network straight after entering the
PIN code. The main telephone functions will appear on the display. The
name of the network access supplier
will appear on the display after connection is established.
How to deactivate the
PIN code prompt
Press MENU (18 - 41) and use the
knob (16 - 40) to select and confirm
“TELEMATICS” fig. 8.
Again with the knob (16 - 40), select
“Telephone functions”, “Manage PIN
code” and then “Modify PIN code”;
the system will at this point prompt
you to enter the new code; select OK
when you have finished.
29
Page 31

HOW TO MAKE A CALL
Press £ (5): the following menu will
appear on the display:
– Dial
– Directory
– Call list
– Mail box.
How to dial a telephone
number
Proceed as follows to dial a tele-
phone number:
– turn and press the knob (16 - 40)
to select and confirm the “Dial” function; dial the number using the alphanumeric keypad;
– press £ (5) to make the call.
How to select a number from
the directory
Proceed as follows:
– turn and press the knob (16 - 40)
to select and confirm the “Agenda”
function to access the list of numbers
stored in the directory;
– turn the knob (16 - 40) to select
the number and then press £ (5) to
make the call.
How to select a number from
the call list
Turn and press the knob (16 - 40) to
select and confirm the “Call list” function to access the list of numbers
stored in the directory;
Turn the knob (16 - 40) to select the
number and then press £ (5) to make
the call.
Mail box
Turn and press the knob (16 - 40) to
select and confirm the “Mail box”
function to access the voice mail management menu.
HOW TO CALL AN
EMERGENCY NUMBER
Follow the instructions shown in the
previous paragraph to make an emergency call (e.g.: # xxxxxx ) in accordo con la Norma ETSI GSM 02.03.
30
Page 32

HOW TO ANSWER A CALL
DIRECTORY
• Consult or modify the file
Press £ (5) or turn knob (16 - 40)
or SRC (30) to answer a call; press
(21) to SRC (30) to hang up.
Ô
HOW TO REJECT A CALL
Press Ô(21) or turn and press the
knob (16 - 40) to select “NO” when
the “Reply?” message appears.
Up to 400 records may be saved in
four separate directories: User 1, User
2, User 3 and User 4.
Turn and press (16 - 40) to select
the “Directory” function. The following menu will appear on the display:
– Managing directory files
– Configure directory
– Select a directory
Managing directory files
The function is used to add, edit or
delete a record (name) from the directory.
Use the knob (16 - 40) to select the
“Managing directory files” function.
The following menu will appear on the
display:
• Consult or modify the file
• Add a file
• Delete a file
• Delete all files.
Use the knob (16 - 40) to select the
item. The stored records will appear
on the display.
Each record may be customised by
adding a voice recognition string, a
text note, an address, a telephone
number and an email.
Press the central graphic button “,”
to enter a voice recognition string.
Select “Note” to display the window
containing the text note related to the
selected record; select “Modify” to access an “Editor” for editing the note.
Select “Address” to enter the address related to the selected record.
Select “Number” to add or edit the
telephone number of the selected
record.
Select “e-mail” to access an editor
“Editor” for storing the e-mail address
related to the selected record.
31
Page 33

• Add a file
Use the knob (16 - 40) to select the
item. A window will appear on the display where to enter a new directory
record or edit an existing record. Proceed as follows:
– use the knob (16 - 40) to select
and confirm “Add” to create a new
record;
– use the knob (16 - 40) to select
and confirm “Consult” to edit a existing record.
• Delete a file
Use the knob (16 - 40) to select this
item. This function is used to delete a
previously stored record from the directory.
• Delete all files
Use the knob (16 - 40) to select this
item. This function is used to delete all
the pr eviously stored record from the
directory.
Configure directory
This function is used to select which
of the four directories to be displayed
and to assign a customised name to
each directory to display when the system is started.
Use the knob (16 - 40) to select the
“Directory configuration” function.
The following menu will appear on the
display:
• Select a directory
• Name directory
• Select starting directory.
• Select directory
Use the knob (16 - 40) to select and
confirm the item. Select and confirm
the required directory: User 1, User
2, User 3 or User 4.
This selection will apply to the next
system start-up.
• Name directory
Use the knob (16 - 40) to select and
confirm this item and rename the directory and assign a customised name.
• Select starting directory
This function is used to select which
directory to display when the system
is started. Use the knob (16 - 40) to
select and confirm this item. The four
available directories will appear on the
display. Select the required directory
and press OK to confirm.
32
Page 34

TEXT MESSAGES
(SMS - Short Message Service)
A tone will be heard (if the text ring
option is active) when a text message
is received and the message “Do you
wish to read the new text message?”
will appear on the display. Select and
confirm “YES” to read the message
immediately by turning and pressing
the knob (16 - 40); otherwise select
“NO” or press ESC (9 - 36).
Use the knob (16- 40) to select the
“Text messages (SMS)” function. The
following menu will appear on the display:
• Received text messages reading
• Sending a text message
• SMS writing
• Delete list of text messages.
• Received text messages
reading
Use the knob (16 - 40) to select and
confirm the item and access the stored
message list. Use the knob to select
and read the required message.
Use the “Delete” function if required
to delete each message.
• Sending a text message
Use the knob (16 - 40) to select and
confirm this item and send a previously
stored or written text message.
Select the required message, select
“Send” and either dial or select the
number where to send the message
from the directory.
• SMS writing
Use the knob (16 - 40) to select and
confirm this item. The alphanumeric
keypad will appear on the display. Select and confirm one character at a
time to write the text. When you have
completed the message, select and
confirm OK.
• Delete list of text messages
Use the knob (16 - 40) to select and
confirm this item and delete all the
stored text messages.
33
Page 35

BLUETOOTH SYSTEM
(where provided)
Bluetooth technology allows wireless
communication without any electrical
connections between your mobile
phone and the hands-free set on the
vehicle.
The Bluetooth services offered
depend on your phone provider,
your SIM card and compatibility
between the devices used; check
the available services in your mobile phone user handbook and
with your service provider.
WARNING
For safety reasons, the
Bluetooth connection procedure between the mobile phone
and the hands-free system must be
carried out only with the vehicle
parked and the ignition key turned
to M.
To activate the Bluetooth function,
proceed as follows:
– press MENU (18 - 41);
– Select the “TELEMATICS” icon by
turning and pressing knob (16 – 40).
– select “BLUETOOTH FUNCTIONS” by turning and pressing knob
(16 – 40).
the following menu will appear:
– “Activation mode”: allows selection of the following functions: “deactivated” (the system is deactivated and
allows the use only of the internal
phone), “active and visible” (Bluetooth system active and visible to all
phones), “active and not visible” (Bluetooth system active but not visible to
the other phones); activate the required function by turning/pressing
knob (16 – 40).
– “List connected phones”: shows a
list of previously connected phones
(up to 10); turn/press knob (16 - 40)
to select the required phone, then select and confirm “CONNECT”
– “Change name of radiophone”: allows you to alter the name of the vehicle system displayed.
– “Authentication code”: allows you
to change/record the selected authentication code (code preset by the
manufacturer: 0000).
– “Radiophone synchronisation mode”:
allows you to synchronise the contact
list and the list of calls between the
phone and vehicle system; the synchronisation procedure could take a
few minutes.
34
Page 36

bCONNECT SERVICES
IMPORTANT NOTES
“112” is the emergency number to call
wherever this service is available worldwide. You can make a 112 emergency
call also if the SIM card is not present.
The system will enter the PIN code
if services are provided (if the code
was not previously entered).
The mobile telephone must be working and correctly powered to make an
emergency call. The service may not
be available following an accident or
damage to the car.
The bCONNECT services may be
activated to subscribers upon request.
The corresponding functions will be
available to subscribed users only. You
will receive instructions on how to activate and deactivate bCONNECT
services when you subscribed.
“SOS” FUNCTION
The 112 emergency call request will
appear on the display if the services
are not active and SOS (1) is pressed
for approximately two seconds.
You can make a 112 emergency call
also if the SIM card is not present.
“EMERGENCY CALL”
FUNCTION
The medical emergency call request
will appear on the display if the services are active and SOS (1) is
pressed for approximately two seconds. Select “YES” to send the medical emergency request message to the
bCONNECT operator along with
car coordinates to allow positioning.
If no option is selected, the message
will be forwarded after approximately 10 seconds.
To stop the function, simply hold the
SOS (1) button pressed for approxi-
mately 8 seconds.
IMPORTANT The medical emergency number cannot be programmed
by the user.
35
Page 37

“BREAKDOWN”
FUNCTION
The breakdown call request will appear on the display if the services are
active and CONNECT (7) is pressed
for approximately two seconds.
Select “YES” to send the breakdown
message to the bCONNECT operator along with the car coordinates to
allow positioning. If no option is selected, the message will be forwarded after approximately 10 seconds.
To stop the function, simply hold the
CONNECT (7) button pressed for
approximately 8 seconds.
This system allows to call the required service if the breakdown or
medical emergency call message was
not successfully sent. The call can only be made if the area is covered by the
GSM service.
The 112 emergency call request will
appear on the display if the service
centre cannot be contacted.
IMPORTANT The breakdown
number cannot be programmed by the
user.
Medical emergency
and breakdown requests
All activated functions (except for
telephone functions) will be deactivated by during an emergency call.
These conditions will be maintained
for the entire time the emergency call
is in progress.
IMPORTANT All emergency requests will be sent. The bCONNECT
operator may not manage to call you
back if you receive or make a call after
sending an emergency request because
you telephone will be engaged.
A message will appear on the display
for approximately 7 seconds after
sending a request.
36
Page 38

If the service request cannot be sent
for any reason, a message prompting
you to call the centre will appear (*)
and ask for the required service will appear. The operative centre will not be
able to position the car in this case.
(*) The call is normally made to a toll-free
number. The user will be charged if the call is
made while the user is roaming.
INFOMOBILITY SERVICES
Press the CONNECT (7) button to
open a page for accessing the following services and functions:
• Connect (*)
• Breakdown (*)
• Operator services
• Received messages
This page may alternatively be accessed by pressing MENU (18) and
select the telematics icon. The
bCONNECT (*) services are available to subscribers. The functions will
be deactivated and a specific message
will appear on the display if the user is
not subscribed. The stored data may
be consulted at any time even after
your bCONNECT subscription expires.
“Connect” function
Turn and press the knob (16 - 40) to
select the function. The system will
send the information request.
A telephone connection will be established when the bCONNECT request is received. Ask the operator for
the information you require once the
telephone connection is established.
A warning message will appear on
the display if the connection cannot be
established.
Some information may be provided
directly by the operator while other
information may be sent by text messages regardless of the activated mode.
37
Page 39

The message will be displayed directly over the current display in a
window. The functions “Save”,
“Delete”, “Guide” (if the message contains geographic indications) and “Call”
(if the message contains a telephone
number) will appear. Select “Save” to
save the message or “Delete” to
delete the message from the display
and the memory.
Select “Guide” to automatically display the point on the map as destination in the navigation system. The message will be automatically stored in this
case.
Select “Dial” to make the system automatically dial the telephone number
contained in the message (the message
will be saved).
If a sequence of messages is received,
the system will open a specific window
for each message for saving, deleting,
displaying on the map and dialling the
telephone number.
“Breakdown” function
Press the CONNECT (7) button
for approximately two seconds to activate this function.
“Operator services” function
These are the functions offered by
the GSM operator using the SIM card.
“Messages received” function
This function is used to read the received and stored messages (the function is activated when at least one
message is stored).
Up to 300 messages may be stored.
The system will inform you that the
memory is nearly full when approximately 280 messages are stored, suggesting you to delete some: the new
messages will be written over the old
300 messages.
Each message is identified by an icon
according to its its type (closed envelope = new message; open envelope
= read message).
38
Page 40

Select the “Messages received” by
turning and pressing the knob (16 -
40) to confirm to access the single
messages of the list which may contain
traffic information, points of interest
or weather information; scroll the list
until the message you want appears.
Press the knob (16 - 40) to show it on
the display.
Traffic information
The “\” icon identities messages
containing traffic information (e.g. road
works, accidents, etc.). When a message contains geographic information
for point positioning, the options
“Delete” and “Map” will also appear
on the display.
Select and confirm “Delete” using
the knob (16 - 40) and delete the message from the list. “Guide” is used to
automatically display the point of interest on the map and select is destination of the navigation system. The
“Dial” option (where present) can be
used to call the number shown in the
message.
Select and confirm “Delete” by
means of the knob (16 - 40) to delete
a message from the list. The “Map”
functions displays the map showing the
point of interest contained in the message.
Information on centres
of interest
The “<” icon identifies messages
containing information on points of interest and generic information.
The “Delete”, “Guide” and “Dial”
function will be available when this
message is shown on the display.
Generic information
The “<” icon also identifies messages
containing generic information (weather conditions, etc.).
Only the “Delete” option will appear
on the display when one of these messages not containing geographic information is shown on the display. This
option may be used to delete the message from the list.
39
Page 41

VOICE CONTROLS
The voice controls are used to control the main system functions using
your voice only. Press (26) on the end
IMPORTANT A double tone will
be heard if the system does not understand the voice message.
Utter “What can I say?” to show the
list of available voice controls that the
system is capable of recognising.
of the left stalk to activate the voice
control system.
VOICE CONTROL LIST
st
1
level controls 2ndlevel controls 3rdlevel controls
Help
Cancel
Call
Stop
no
yes
previous
what can I say
display
guide to
stop
next
delete
radio
cd player
help
cancel
help
map
navigator
trip computer
what can I say
telephone
help
cancel
auto store
list
memory
memory
memory
memory
previous
what can I say
next
help
cancel
random
1 - 6
help
cancel
what can I say
40
Page 42

st
1
level controls 2ndlevel controls 3rdlevel controls
cd player
cd changer
navigator
telephone
sms
list
track number
track number
track number
track number
previous track
next track
what can I say
repeat
scan
help
cancel
disk number
disk number
disk number
disk number
previous disk
next disk
random
list
track number
track number
track number
track number
previous track
next track
what can I say
repeat
scan
help
cancel
stop
what can I say
address book
restart
help
cancel
what can I say
address book
service
service
service
service
service
display
help
cancel
read
what can I say
1 - 20
help
cancel
what can I say
1 - 7
help
cancel
what can I say
1 - 20
help
cancel
what can I say
help
cancel
messages
recall
what can I say
41
Page 43

How to associate a voice
control to a directory record
The system may be used to record
a voice control associated to a name
in the directory.
This function allows to call a number
in the directory to which a voice control is associated (e.g.: “Call” / “Name
to which the voice control is associated”).
To record a voice control, select
“Consult” by turning and pressing the
knob (16 - 40) and then select “Directory file management”.
Select and confirm the recording button which appears using the knob
(16 - 40) and follow the instructions
will appear on the display.
42
Page 44

NAVIGATOR
The CONNECT Nav+ navigator is
designed to help you reach your destination using visual and acoustic instructions. The navigator is quick, easy
and safe to use. Above all, it is flexible because it allows to recall previously programmed destinations and
reference points, such as hotels, monuments, public buildings, service stations.
The car is positioned by the GPS
(Global Positioning System) installed
aboard. The GPS is equipped with an
antenna and a reception module integrated in the system.
WARNING
The navigation system is
designed to assist the driver and to suggest the best route
to reach the programmed destination using voice and graphic
messages.
The suggestions supplied by the
navigation system do not exonerate the driver from driving the car
responsibly and respecting the
highway code as well as other
road traffic dispositions. The driver is always and only responsible
for road safety.
IMPORTANT NOTES
– Satellite navigation GPS reception
may be hindered by trees, high buildings, multilevel car parks and tunnels.
– The GPS system needs a few minutes to initialise again after disconnecting the battery.
– The GPS system needs a few minutes to determine the new car position if the car is moved with the engine not running and the system off
(e.g. on a breakdown truck).
The on-board system will use information from the gyroscope and the
wheel sensor for temporarily processing data if satellite information is
not available.
– Do not put metallic or damp objects over the GPS satellite antenna.
43
Page 45

The instantaneous position of the car
is identified using the navigation CDROM and is shown on the map on the
display. The system may take a few
seconds to display the maps when accessing data from the CD-ROM.
– The navigation system requires
travelling for approximately 100 kilometres during first use or when the
tyres are changed in order to be precise.
– The system may temporarily detect an inexact position if wheel grip
comes repeatedly less (e.g. slipping on
ice).
– The position may not be detected
accurately during precision calibration.
The navigation function is fully managed by the CONNECT Nav+ system.
The only operations required consist
in changing the navigation CD-ROM
to load the maps of another area or
updated maps.
CD-ROM DRIVE
The navigation CD-ROM drive is
found on the front of the CONNECT
Nav+ system and is used also as CD
player. Consequently, you cannot play
an audio CD while a navigation CDROM is inserted in the drive.
Repeat last voice information
Press button (26) on the left lever
for longer than two seconds to repeat
the last voice message generated by
the system.
MAIN MENU
Press MENU (18 - 41) to access the
main menu fig. 9.
Select the “Navigation” icon by turning and pressing the knob (16 - 40)
to access the navigation menu:
– Select destination
– Journey leg and route
– Guidance options
– Stop guidance (*).
(*) Only when navigation is running.
F0B1000g
44
fig. 9
Page 46

SELECT DESTINATION
Use the knob (16 - 40) to select the
“Select destination” function. The following menu will appear on the display:
– Enter an address
– Enter GPS coordinates
– Directory
– Previous destinations.
Enter an address
This function is used to select an ad-
dress and use it as point of destination.
Use the alphanumeric keypad to enter the name of the required town, the
street and the house number.
Turn the knob (16 - 40) to select the
characters and press the knob to enter them.
If you make a mistake, turn and press
the knob (16 - 40) to select the
“Change” function to delete the last
selected letter.
Select the “List” function by turning
and pressing the knob (16 - 40): a list
of locations whose name starts with
the first selected letter will appear.
This function may be used to select a
location from the list by turning and
pressing the knob (16 - 40).
The “Intersection” function may be
selected on the house number page to
enter a crossroad with the previously selected street as destination. Enter
the town, the street and the house
number, then turn and press the knob
(16 - 40) to select “OK”.
IMPORTANT Navigation may be
started only by entering the name of
the town, without specifying the street
or the house number. In this case, the
navigation system will guide you to the
centre of the selected town.
45
Page 47

Enter the town, the street and the
house number and select:
– “OK”: to confirm the address and
access the “Navigation” function and
start navigating;
– “Save”: to store the address and
make it available later;
– “Position”: to view the current address.
Directory – Previous
destinations
The addresses selected for navigation
may be saved in the “Directory” and
“Previous destinations” menu.
Proceed as follows to select one of
these addresses as destination:
– turn and press the knob (16 - 40)
to select and confirm the “Directory” or “Previous destinations” functions;
– select an address by turning the
pressing the knob (16 - 40);
– turn and press the knob (16 - 40)
to select and confirm “OK” function
to start navigating to the selected address.
GUIDANCE OPTIONS
Select “Guidance options” by turning and pressing the knob (16 - 40).
The following menu will appear on the
display:
– Define calculation criteria
– Set speech synthesis
– Map data base description
– Delete previous destinations.
46
Page 48

Define calculation criteria
Use the knob (16 - 40) to select and
confirm the item: a window will appear on the display for selecting the
criteria to be adopted to calculate the
required route:
– Fastest route
– Shortest route.
It is also possible to select whether
to include toll roads and ferries.
Set speech synthesis
The function is used to activate, deactivate and adjust the volume of voice
indications supplied by the syste during navigation. Use the knob (16 - 40)
to select and confirm this item: a
graphic scale indicating the volume will
appear on the display. This value may
be varied using the knob (16 - 40).
The “Activate” and “Deactivate”
functions selected by means of the
knob (16 - 40) are used to switch the
voice indications on and off.
Map data base description
This function is used to display information about the CD-ROM inserted in the CD drive.
Delete previous destinations.
This function is used to delete the
last stored addresses.
TRAFFIC INFO TMC
Press the MENU (18 - 41) button
to access the main menu fig. 10.
Select “TRAFFIC INFO” icon by
pressing and turning the knob (16 -
40) to access the following menus:
– “Read traffic messages” : select and
confirm this function by pressing and
turning the knob (16 - 40) to display
the list of received messages containing traffic info TMC.
F0B1002g
fig. 10
47
Page 49

– “Filter traffic information”: turn and
press the knob (16 - 40) to access the
following menu for selecting the type
of information to be received:
– “Geographic filter”
– “Road information”
– “Urban/city information”
– “Message announcement parameters”: Select this function by pressing
and turning the knob (16 - 40) to access the following menus:
– “Message reading”
– “Show new messages”
– “Select TMC station”: Select this
function by pressing and turning the
knob (16 - 40) to access the following menus:
– “Automatic TMC”
– “Manual TMC”
– “TMC station list”
“Geographic filter”
Turn and press the knob (16 - 40) to
select and confirm this function and
access the following menu:
– “Vehicle surroundings”
– “Location surroundings”
Select and confirm “Vehilce surroundings” by turning and pressing the
knob (16 - 40) to obtain information
on the surroundings of the current vehicle position.
Select and confirm “Location surroundings” by turning and pressing the
knob (16 - 40) to obtain information
on the surroundings of the current geographic location.
“Road information”
Select and confirm “Road information” by turning and pressing the knob
(16 - 40) to select the required information: “Traffic info”, “Closed
streets”, “Dimensional limts”, “Conditions of the road”, “Weather and
visibility”.
Turn and press the knob (16 - 40)
to select and switch reception on and
off.
48
Page 50

“Urban/city information”
Select and confirm “Urban/city information” by turning and pressing the
knob (16 - 40) to select the required
information: ”Parking”, “Local transport information”, “Events”.
Turn and press the knob (16 - 40) to
select and switch reception on and off.
MAP
Proceed as follows to access the map
menu: press MENU (18 - 41), select
“MAP” fig. 11 and press the knob (16
- 40) to confirm. The following message will appear on the display:
– Map orientation
– Map details
– Map display
– Move the map
Move the map
Use the knob (16 - 40) to select and
confirm this item. The map may be
moved in the four directions using the
buttons
▲ (10), ▼ (17), ˜ (14),
÷ (19). Turn the knob (16 - 40) to
zoom in and out.
F0B1001g
fig. 11
49
Page 51

Map orientation
Turn the knob (16 - 40) to select
and confirm this item and orient the
map in two different ways:
– “North direction”: the map is
shown with north up and the cursor
moves on the map;
– “Vehicle direction”: the cursor is
positioned in tihe middle of the map
and the map moves automatically according to the direction of advancement of the car.
– “3D view”: this function is used to
view the map in three dimensions.
Map details
Use the knob (16 - 40) to select and
confirm this item for selecting services
(hotels, restaurants, sports centres,
etc.) from a list and display their position directly on the map.
Map display
The map view (full screen or in window) may be selected in navigation
mode.
Select and confirm “Full screen map”
by turning and pressing the knob (16
- 40) to view the map full screen.
Select and confirm “Map in window”
by turning and pressing the knob (16
- 40) to view the map in a window.
50
Page 52

VIDEO FUNCTION
The AUDIO-VIDEO A-fig. 12 socket for connecting a camera to the
CONNECT Nav+ system is located
in the oddment compartment. This
connection may be used to view previously filmed pictures directly on the
system display.
The video function may only be
used when the car is not moving.
Press the MENU (18 - 41) button
to access the general menu. Select the
“VIDEO” fig. 13 icon by turning and
pressing the knob (16 - 40) to access
the following menus:
– “Activate video mode”: select and
confirm this function by rotating and
pressing the knob (16 - 40) to show
filmed pictures.
F0B0293m
– “Video parameters”: select and
confirm this function by turning and
pressing the knob (16 - 40) and access
the format, brightness, colour and
contrast adjustment menus.
F0B1006g
fig. 12
fig. 13
51
Page 53

After activating video mode, press
the right knob (16 - 40) to access the
following menus:
– “Display formats”: select and confirm this function by turning and pressing the knob (16 - 40) to select the
format (16/9 or 4/3).
– “Adjust luminosity”: turn and press
the knob (16 - 40) to select and confirm to select the brightness adjustment scale.
– “Set contrast”: turn and press the
knob (16 - 40) to select and confirm
to select the contrast adjustment
scale.
– “Deactivate video mode”: select
and confirm this function by rotating
and pressing the knob (16 - 40) to
stop viewing filmed pictures.
– After making the required settings,
select and confirm “OK”, turn and
press the knob (16 - 40) to select and
confirm the setting and go back to the
previous menu.
52
Page 54

NOTES
53
Page 55

54
Page 56

55
Page 57

Customer Services - Technical Services - Service Engineering
Largo Senatore G. Agnelli, 5 - 10040 Volvera - Torino (Italia)
Fiat Group Automobiles S.p.A.
Print n. 603.83.757 - 10/2008 - 2ndEdition
Page 58

 Loading...