

Page 1

Page 2

The car can be fitted satellite NAVIGATOR built into the sound system or with infotelematic
CONNECT system designed in accordance with the specific features of the passenger compartment and
with a personalised design that blends with the styling of the dashboard.
Both systems are installed in a user-friendly position for the driver and passenger, and the graphics on
the front panel makes it easy to quickly locate the controls which facilitates the use of them.
To increase safety against theft, the set is fitted with a protection system that allows the use of it only
on the car on which it was fitted originally.
The pages that follow contain the instructions for use, which we advise you to read carefully and
always keep within reach (e.g. in the glove compartment).
So, enjoy your reading and have a good journey.
IMPORTANT For the navigation system only use the original CD provided with the car or in any case
other CDs of the same brand.
Page 3

2
CONNECT NAV
NAVIGATOR
NNAAVVIIGGAATTOOR
R
USEFUL ADVICE ........................................................ 4
SECURITY ...................................................................... 6
GENERAL ........................................................................ 6
CODE CARD.................................................................. 6
ENTERING THE SECURITY CODE ........................ 6
TECHNICAL SPECIFICATIONS ........................ 8
CONTROLS .................................................................. 10
OPERATION .................................................................. 12
SWITCHING THE NAVIGATOR
SYSTEM ON/OFF ........................................................ 12
SELECTING THE FUNCTION ................................ 12
ADJUSTING THE VOLUME ...................................... 13
DISPLAY .......................................................................... 14
ADJUSTING THE SOUND ........................................ 15
RADIO .............................................................................. 16
LISTENING TO THE RADIO .................................... 16
SELECTING THE WAVEBAND .............................. 16
TUNING TO FM STATIONS .................................... 16
STORING THE STATIONS ...................................... 17
TMC-STORE AUTOMATIC STORAGE ................ 18
RDS FUNCTION .......................................................... 19
RDS-REG FUNCTION ................................................ 20
PTY FUNCTION .......................................................... 21
TA FUNCTION ............................................................ 22
TMC FUNCTION ........................................................ 22
SCAN FUNCTION ...................................................... 23
SHARX FUNCTION .................................................... 24
RADIOTEXT FUNCTION .......................................... 24
TIM FUNCTION .......................................................... 25
COMPACT DISC (CD) .............................................. 27
INSERTING AND EJECTING A CD ........................ 27
PLAYING A CD ............................................................ 28
CD FUNCTIONS .......................................................... 28
SELECTING NEXT/PREVIOUS TRACKS ................ 29
SCANNING TRACKS .................................................. 29
RANDOM PLAYBACK ................................................ 29
SCANNING ALL TRACKS ON A CD .................... 30
REPEATING THE CD TRACKS ................................ 30
PROGRAMMING THE TRACK SEQUENCE ........ 31
SATELLITE NAVIGATION .................................... 33
ROUTE GUIDANCE .................................................... 33
DESTINATION ENTRY .............................................. 33
SPECIAL DESTINATION ENTRY.............................. 41
USING STORED DESTINATIONS .......................... 44
STORING THE CURRENT POSITION .................. 45
ACTIVE NAVIGATION .......................................... 46
ROUTE GUIDANCE .................................................... 46
INTERRUPTING NAVIGATION .............................. 47
CHANGING THE SOUND SOURCE .................... 48
TUNING THE RADIO ................................................ 48
NO MAP NAVIGATION ............................................ 48
Page 4

3
CONNECT NAV
NAVIGATOR
BASIC SETTINGS (SETUP) .................................. 63
OPENING THE SETUP MENU ................................ 63
ADJUSTING THE DISPLAY ...................................... 63
ADJUSTING POWER-ON, TA
ANNOUNCEMENT, MESSAGE ................................ 65
SETTING THE CLOCK .............................................. 67
SELECTING THE LANGUAGE ................................ 69
GPS STATUS .................................................................. 70
SECURITY ...................................................................... 71
RESETTING DEFAULT SETTINGS .......................... 72
DYNAMIC TRAVEL GUIDE ...................................... 49
TOURIST GUIDE INFORMATION ........................ 50
ROUTE LIST .................................................................. 51
DESTINATION MEMORY ........................................ 51
STORING STORED DESTINATIONS .................... 52
DELETING STORED DATA ...................................... 53
ENTERING AND EDITING
DESTINATION SHORT NAMES ............................ 54
GPS STATUS AND POSITION
INFORMATION ............................................................ 55
AVOIDING TAILBACKS DURING
NAVIGATION .............................................................. 55
LOCKING A ROUTE SECTION
WITHIN A ROUTE LIST ............................................ 56
CUSTOMISING THE ROUTE .................................. 57
DEFINING THE CAR’S POSITION ........................ 58
RECEIVING TRAFFIC ANNOUNCEMENTS
DURING NAVIGATION ............................................ 60
SWITCHING VOICE MESSAGES
ON AND OFF .............................................................. 60
SWITCHING THE LAST 10
DESTINATIONS MEMORY ON AND OFF .......... 60
SWITCHING ROUTE TIME
INFORMATION ON AND OFF .............................. 61
MANUAL POSITION INDICATION ...................... 61
NAVIGATION SIMULATION .................................. 62
Page 5

4
CONNECT NAV
NAVIGATOR
IMPORTANT WARNINGS
FOR USE AND FOR DRIVING
SAFETY
The Satellite Navigator is an integrated system which allows to easily
operate the major functions of your
car.
To avoid hazardous situations for
yourself and other road users when
using the Satellite Navigator you
should take the following advice:
– the navigation system must be used
keeping full control of the car. If in
doubt, stop the car to carry out the
various operations;
– serious accidents can be caused by
distractions or by not following the
flow of traffic;
– get to know the sound/navigation
system and its controls before
starting off;
– enter the destination only when
the car is stationary;
– close the front panel when travel-
ling.
The navigation system will guide you
to your destination and indicate variations to the route stored on the navigation CD. This is because the system
takes traffic information into account
when calculating to recommend the
best route possible. The system, however, cannot consider traffic conditions, sudden interruptions or other
problems.
The navigation system assists the driver during the trip and recommends
the best route to be followed to reach
the preset destination by means of
voice and graphic instructions.
IMPORTANT The suggestions
provided by the navigation system do
not lessen the driver’s responsibility
when driving the car to observe the
highway code and the traffic signs.
Road safety is always and only the sole
responsibility of the driver.
All manoeuvres must be made respecting the highway code regardless
of the advice provided by the navigation system. The navigation system will
compute a new route and provide instructions should you detour from the
recommended route.
UUSSEEFFUULLAADDVVIICCE
E
Page 6

5
CONNECT NAV
NAVIGATOR
CARE AND MAINTENANCE
The construction of the system ensures long operation without the need
for particular maintenance operations.
In the event of failures, contact a
Fiat Dealership.
Clean the front panel with a soft, antistatic cloth only. Detergents and polishes could damage the surface.
Handle the display with care. The use
of sharp objects could scratch and
damage the display.
Clean the display with a soft, clean
and dry cloth. Do not use solvents as
they could corrode and damage the
display.
COMPACT DISC
If you are using a CD player, remember that dirt or marks on the CD
can cause skipping or bad sound quality in playback. The same will occur if
the CD is bent.
For optimal playback:
– only use CDs with the following
trademark:
– clean each CD carefully. Remove
fingerprints and dust with a soft cloth.
Hold the CD at the edge and clean
from the centre outwards;
– never use chemical products (e.g.
sprays, antistatic products or thinners). These products could damage
the CD surface;
– after use, put the CDs back in their
cases to avoid marking or scratching
the discs. This would cause skips in
playback;
– do not leave discs in direct sunlight
or expose them to high temperatures
or moisture for a long time to avoid
bending them;
– do not stick labels or write on the
recorded side of a CD.
Be careful not to knock
the display with pointed
or hard objects and avoid
touching with hands. Do not
press on the display when cleaning and in case of breakage do not
touch the fluid coming out. In
case of contact with the skin,
wash immediately with water
and soap.
Page 7
6
CONNECT NAV
NAVIGATOR
SSEECCUURRIITTY
Y
GENERAL
The satellite navigator is equipped
with a four-digit secret security code.
This ensures that the system cannot
be used if it is removed from the dashboard (i.e. stolen).
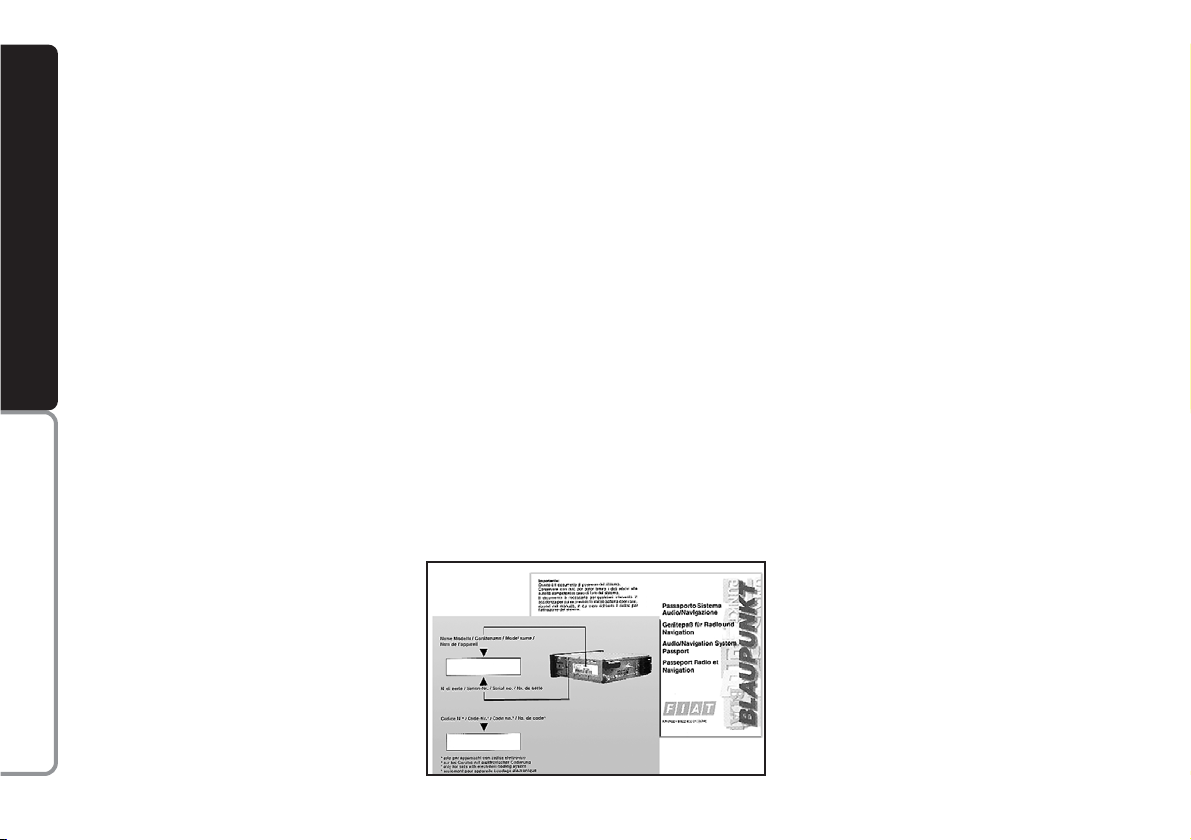
CODE CARD
This card fig. 3 certifies that you are
the owner of the satellite navigation
system. The model, serial number and
secret code are printed on the card.
IMPORTANT Keep the card in a
safe place. You will need the information to report theft to the police. The
card is required whenever the battery
or power supply is disconnected. You
will need to enter the secret code after reconnecting the battery or the
power supply.
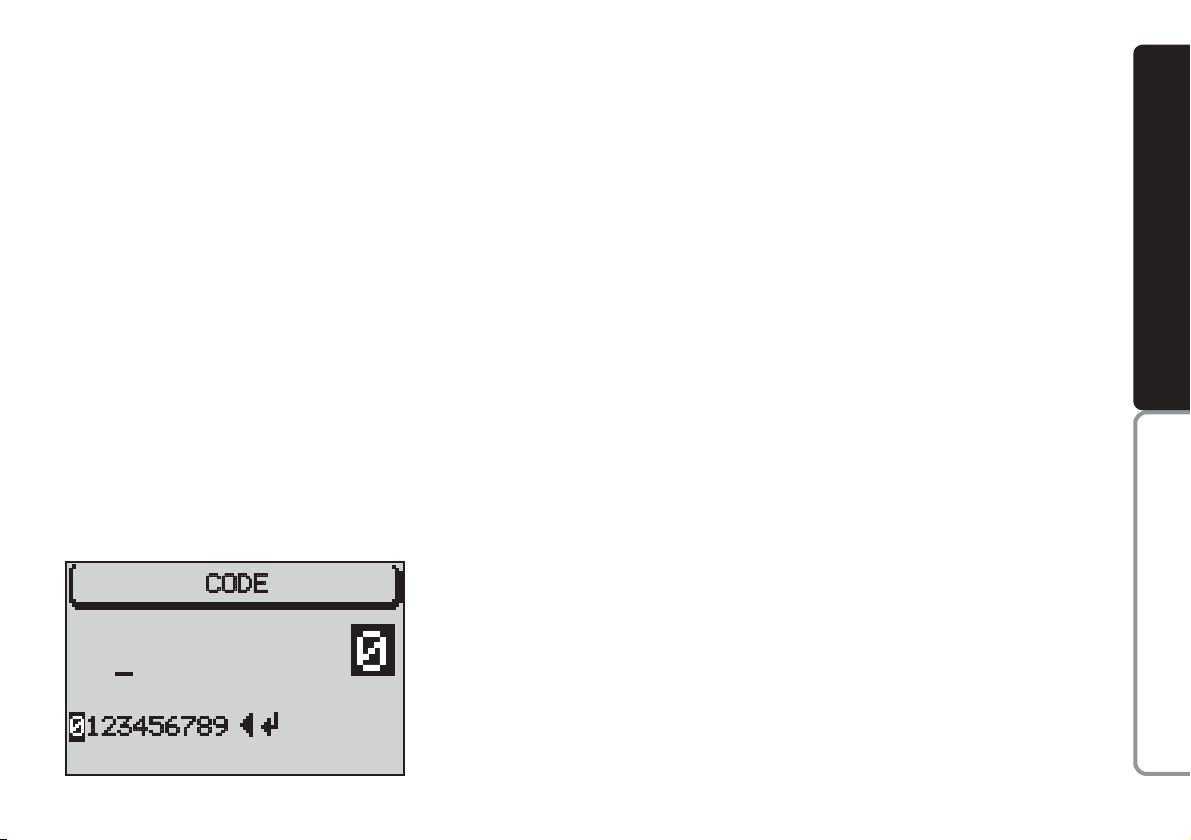
ENTERING THE SECURITY
CODE
Enter the security code when you
switch the sound/navigation system on
after cutting off the power supply (disconnecting the battery, removing the
device, blown fuse, etc.) fig. 4.
Proceed as follows to enter the security code:
1) select the first code digit by turn-
ing the knob/button (11)
2) confirm the first digit by pressing
the knob/button (11)
fig. 3
F0E3093g
Page 8
7
CONNECT NAV
NAVIGATOR
3) continue with the other three dig-
its to complete the security code.
Proceed as follows if you make a mis-
take:
1) position the cursor on
¯
fig. 4 by
turning the knob/button (11)
2) press the knob/button (11) to
confirm.
When the code is complete, position
the cursor on symbol
j
and confirm
with the knob/button (11). The device
will switch to radio mode.
IMPORTANT You can repeat
code entry if you make a mistake. The
device will however lock out for one
hour after the third attempt to prevent entering the code by attempts.
Keep the sound/navigation system on
for on hour before entering the code
again. The timeout (always one hour)
will start from zero again if the battery
is disconnected during this period of
time.
fig. 4
F0E3094g
Deactivating/activating
the security code
The security code can be deactivat-
ed, see
SECURITY
in the
BASIC SETTINGS
chapter.
Deactivating/activating
the security led
The security led can be deactivated,
see
SECURITY
in the
BASIC SETTINGS
chap-
ter.
Page 9

8
CONNECT NAV
NAVIGATOR
The sound/navigation system has a
power output max of 4 x 18W. The
functions and specifications are illustrated in the following paragraphs.
RADIO SECTION
– PLL tuning (Phase Locked Loop) in
the FM/MW wavebands.
– RDS (Radio Data System) with TA
(Traffic Announcement), EON (Enhanced Other Network), Radiotext
(information on the type of programme or broadcast piece name display), REG (Regional Programmes)
functions.
– (Radio Data System) alternative
frequency tuning.
– Automatic/manual station tuning.
– Manual storage of 24 stations: 18
in FM waveband (6 in FM1, 6 in FM2
and 6 in FMT) and 6 in MW waveband.
– Preselection scanning.
– PTY function: for displaying radio
station programme type (if broadcast),
e.g. POP, ROCK etc.
– SHARX function: for reducing FM
interference.
– SCAN function: for scanning all stations which can be received in the selected frequency waveband.
– TIM function (Traffic Information
Memory): automatic vocal storage of
14 traffic messages having max. overall length equal to or lower than 4 minutes
– TMC function (Traffic Message
Channel): for listening to traffic message channels
– AUTOSTORE function: automatic storage of 6 stations in the devoted FM band.
– Automatic Stereo/Mono selection.
CD SECTION AND
CD
CHANGER
(where fitted)
– Select track (forwards/backwards).
– Fast play (forwards/backwards).
– MIX function: random track play-
back.
– SCAN function: for playing ten sec-
onds of each track on the CD.
– REPEAT function: for repeating the
track.
– Programmable track sequence.
TTEECCHHNNIICCAALLSSPPEECCIIFFIICCAATTIIOONNS
S
For installation and respective connections,
contact Fiat Dealership
exclusively.
Page 10
9
CONNECT NAV
NAVIGATOR
AUDIO SECTION
– Separate bass/treble settings.
– Right/left and front/rear channel
balance.
– Automatic LOUDNESS function.
SATELLITE NAVIGATION
SECTION
– Voice messages for the route to
be followed.
– Driving advice, distance and
probable time required to reach the
destination on the display.
– Possibility of entering special or
different destinations.
– Possibility of storing destinations.
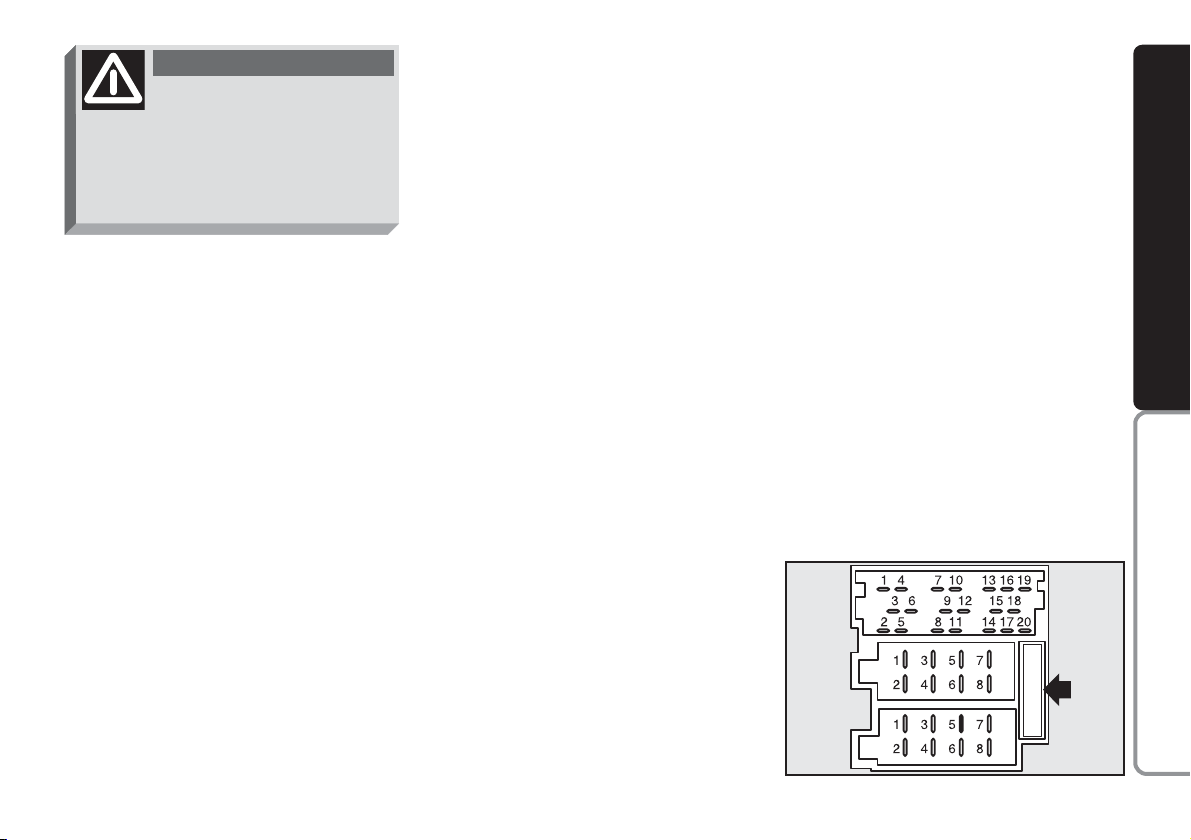
Fuses
The Satellite/Navigation system is
protected by a 10A fuse fig. 5.
fig. 5
F0E0309m
Multimedia CDs contain
sound and data tracks.
Playing these CDs can cause noise
loud enough to jeopardise road
safety and damage final stages and
speakers.
WARNING
Page 11
10
CONNECT NAV
NAVIGATOR
fig. 6
F0E0356m
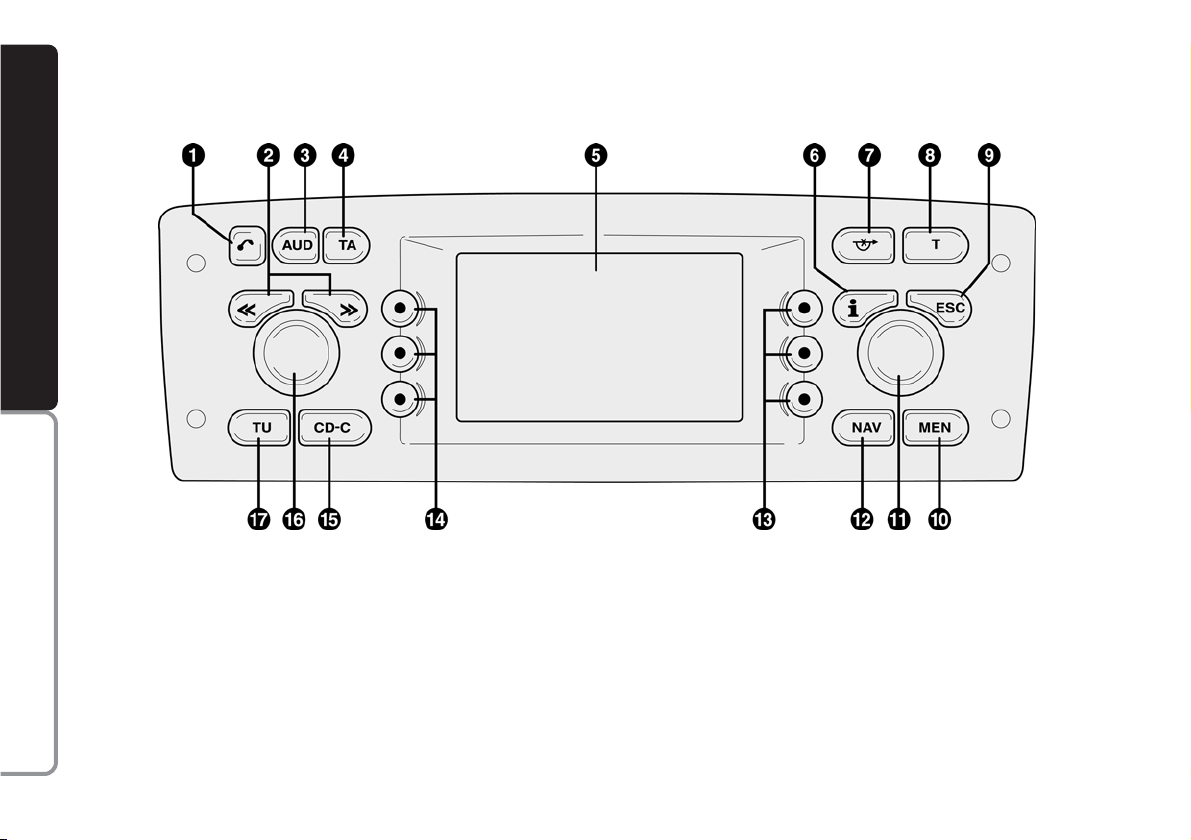
CCOONNTTRROOLLS
S
1 -Tbutton to open the front
2 -
ù§
switch. The functions of
this switch depend on the menu and
type of operation
3 - AUD button to open the sound
menu
4 - TA button to switch the RDS-TA
(Traffic Announcement) function on
and off
5 - Display
6 - Info i button
a)press this button when travelling to
repeat the last navigation voice message
and display the active destination
b) to display the full menu items end-
ing with “…”
Page 12
11
CONNECT NAV
NAVIGATOR
7 -
k
button to switch the “EVITA
INGORGO” (TRAFFIC AHEAD) (alternative route) function on
8 - T button to switch the TIM (Traf-
fic Information Memory) and TMC
(Traffic Message Channel) functions on
9 - ESC button
a) to quit the menu without saving
data
b) to go back to the previous screen/
menu
10 - MEN button to switch the set-
up menu on
11 - Knob/button
a) turn to select the items on the dis-
play
b) press to confirm the selection
(OK button)
c) press for longer than two seconds
to display 2-D or 3-D icons with active navigation and to confirm entered
data.
12 - NAV to switch the navigation
function on
13 - Multiple function buttons
,
menu specific
14
- Multiple function buttons
,
menu specific
15 - CD-C to switch the CD (if an
audio CD is inserted) or the CD
CHANGER
function on
16 - Knob/button
a) turn to adjust the volume and
switch to Mute
b) prolonged press (about 2 sec-
onds) to switch the sound/navigation
system on and off
c) short press (less than 2 seconds):
MUTE
17 - TU to switch the radio on
18 - Compact Disc slot
19 - Flashing led indicating the CD
slot
20 - Compact Disc eject button
fig. 7
F0E0357m
Page 13

12
CONNECT NAV
NAVIGATOR
OOPPEERRAATTIIOON
N
SWITCHING THE
NAVIGATOR SYSTEM
ON AND OFF
Press the knob/button (16) for ap-
proximately one second to switch the
sound/navigation system on. The
sound system will automatically switch
to the last active sound source at the
previously selected volume.
IMPORTANT The sound source is
usually played at the last selected volume when the system is switched off
and back on. However, if the volume
was higher than the preset volume, the
sound source will be played at the preset volume.
To set the power-on volume, see
“Adjusting power-on, TA announcement, message” in the “Basic settings”chapter.
Switching on and off when
the engine is not running
The sound/navigation system can al-
so be operated when the engine is not
running (ignition key at STOP).
Press the knob/button (16) for ap-
proximately one second.
IMPORTANT The device will au-
tomatically be switched off when the
ignition key is at STOP after approximately one hour to safeguard the car
battery. Start the engine to reset the
timeout.
SELECTING THE FUNCTION
Proceed as follows to select the re-
quired function:
– press TU (17) for Radio;
– press CD-C (15) for CD or CD
CHANGER
(where fitted);
– press NAV (12) to switch on the
navigation function.
The specific main menu/screen will
appear for each selected source.
Page 14
13
CONNECT NAV
NAVIGATOR
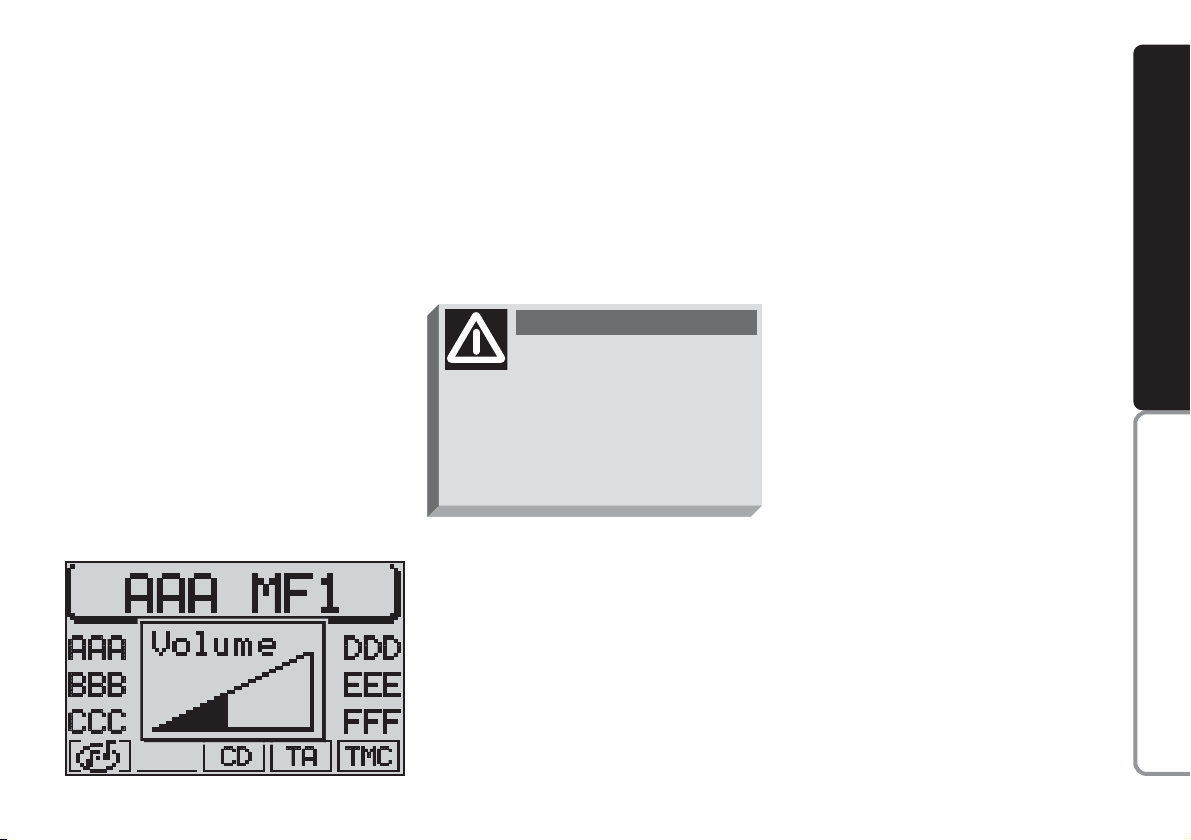
ADJUSTING THE VOLUME
To turn the volume up: turn the
knob/button (16) clockwise.
To turn the volume down: turn the
knob/button (16) anticlockwise.
The volume is graphically shown on
the display during the adjustment
(sound source main menu only) fig. 8.
IMPORTANT The volume of a
navigation voice message can be
changed, regardless of the basic sound
source volume.
Automatic muting during
a phone call
If a cellular phone is fitted, the
sound/navigation system volume will
be automatically muted during the call
and the telephone symbol will appear
on the display.
If the phone call is made when the active navigation function is on, the display continues to show driving info and
voice messages stay active.
fig. 8
F0E3021g
If you drive with the volume
too high you put both your
own life and that of others in jeopardy. You should adjust the volume
so that you can hear noises from
outside the car (e.g. horns, ambulance/ police sirens, etc.).
WARNING
Page 15
14
CONNECT NAV
NAVIGATOR
DISPLAY fig. 9
The display will switch to night-time
operation (reversed colours) when
the side/taillights are switched on. This
function can be switched off if you
need to travel in daytime with the
headlights on (see “Adjusting the display” in the “Basic settings” chapter).
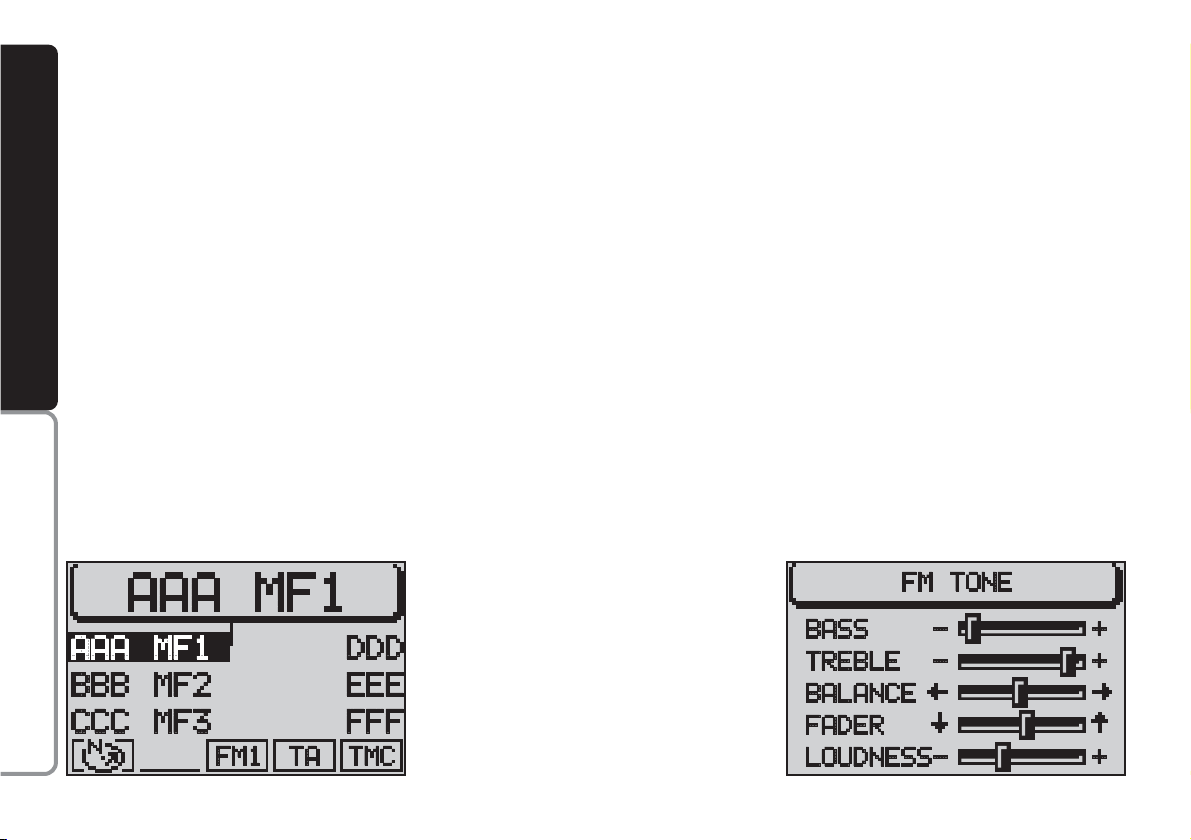
ADJUSTING THE SOUND
(AUD MENU)
The “bass” and “treble” can be separately adjusted for each sound
source. The Balance, Fader and Loudness settings are in common for all
sources.
Proceed as follows to adjust the
sound:
IMPORTANT Should the car be
fitted with the Bose HI-FI system,
Loudness cannot be adjusted.
1) go to the required sound source
(Radio, CD or CD
CHANGER
where fit-
ted) with the TU (17), CD-C (15) buttons
2) press the AUD button (3) to dis-
play the sound menu for adjusting the
sound fig. 10
3) turn the knob/button (11) to se-
lect the required menu item
fig. 9
F0E3095g
fig. 10
F0E3096g
Page 16
15
CONNECT NAV
NAVIGATOR
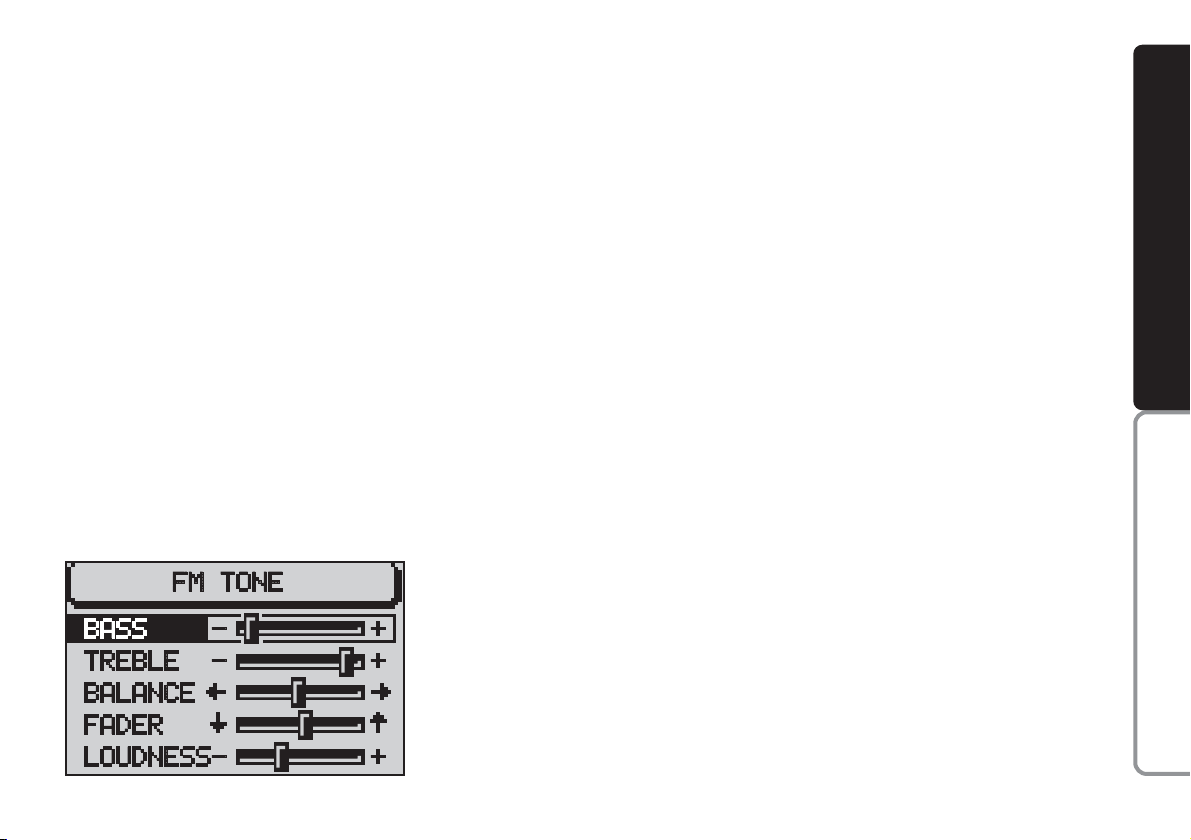
4) press the knob/button (11) to
confirm and highlight the setting to be
adjusted “BASSI” (BASS), “ACUTI”
(TREBLE), etc.) fig. 11
5) turn the knob/button (11) to ad-
just, as required.
To store the edited values, press
the knob/button (11).
To return to the previous menu
without storing the edited values,
press the ESC button (9).
IMPORTANT The display will au-
tomatically return to the previous
menu if no button is pressed for
longer than 30 seconds.
fig. 11
F0E3097g
Page 17
16
CONNECT NAV
NAVIGATOR
RRAADDIIO
O
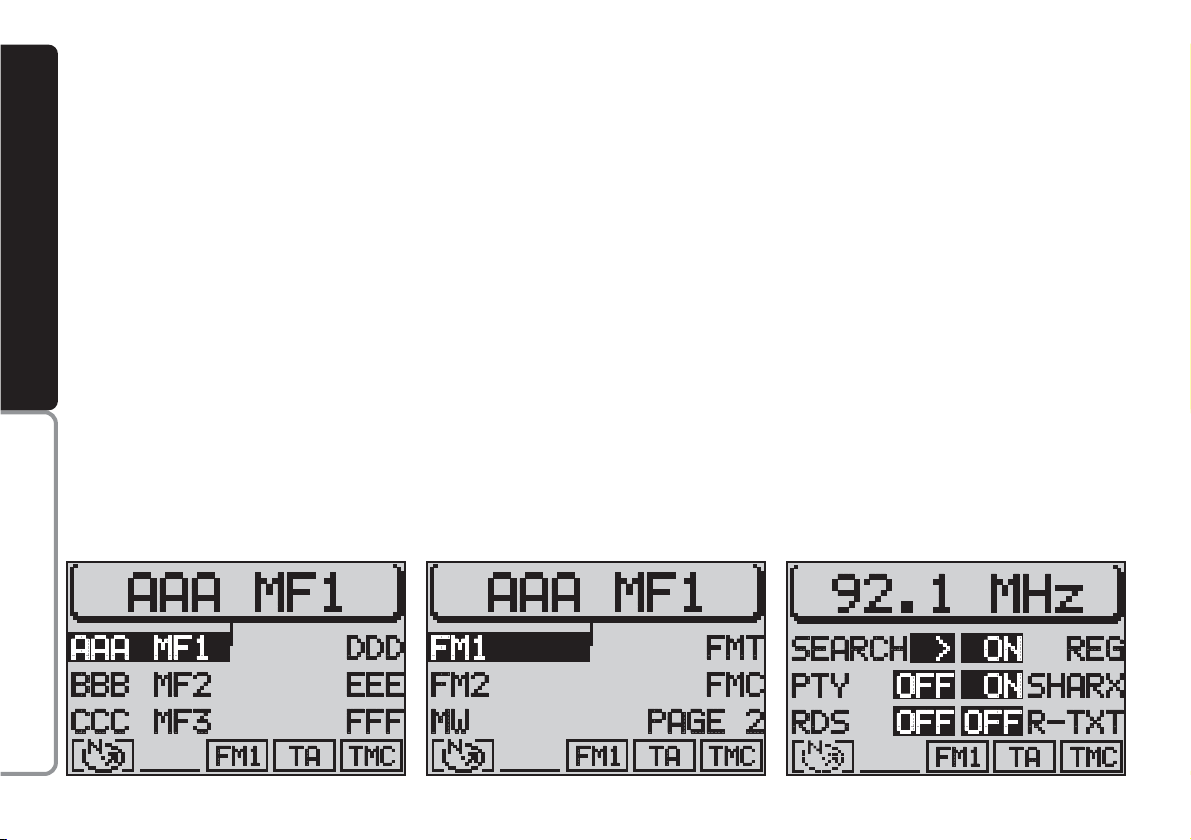
LISTENING TO THE RADIO
The main Radio menu will appear af-
ter pressing the TU button (17)
fig. 12. The station tuned to before
switching the sound/navigation system
off and the six stations available in the
waveband will appear in the upper row
of the display. With the exception of
the AUDIO menu, the presence of an
audio or navigation CD, the tuning
waveband and the TA or TMC status
will always appear in the lower row of
the display.
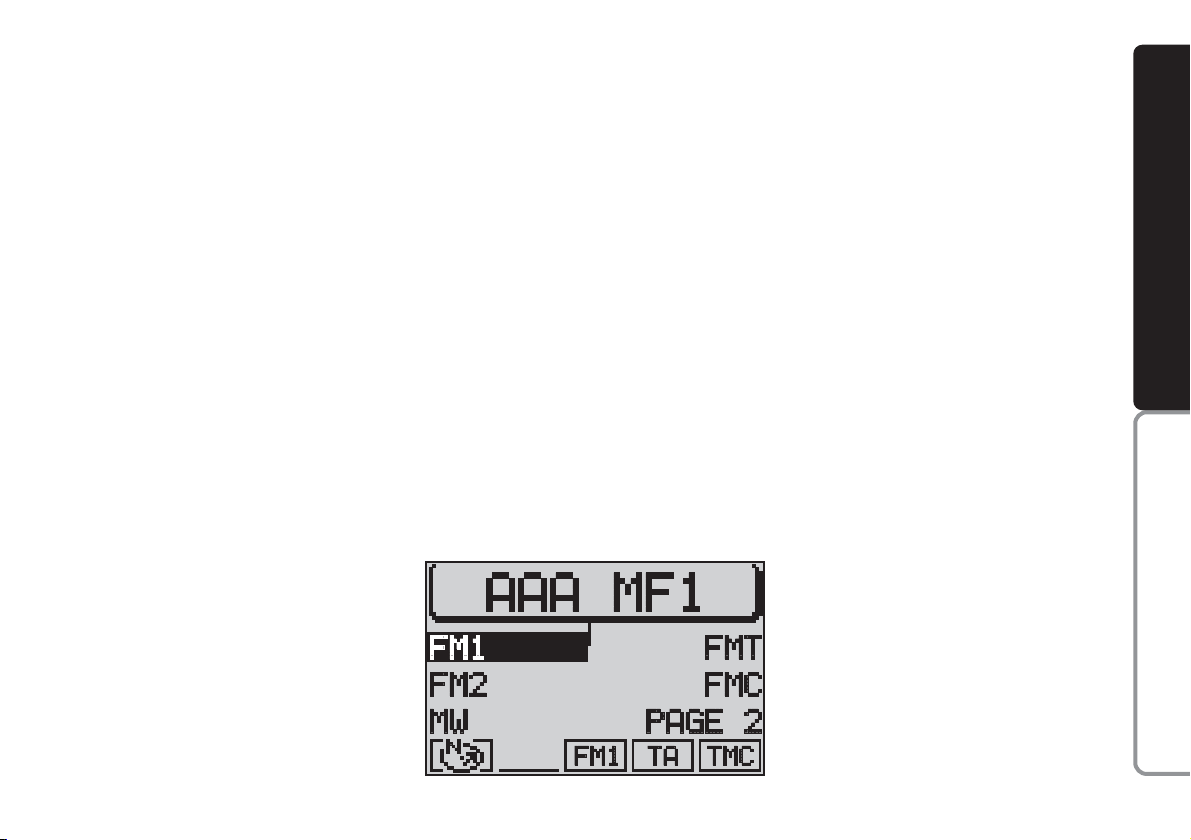
SELECTING
THE WAVEBAND
The device receives stations in the
FM and MW frequencies fig. 13. Press
the TU button (17) to select the required waveband in Radio mode.
Tuning to radio stations
The multiple function buttons
(13
and 14) are used to select preset stations (press briefly) and to store other stations (press longer).
TUNING TO FM STATIONS
Automatic tuning
1) Press the MEN button (10) in Ra-
dio mode to display the Radio menu
fig. 14
2) press the (14) button next to
CERCA (SEARCH) until “
$
” or “§”
appear (the default setting is “§”).
3) press either
§
or ùon switch
(2) to start the station search.
fig. 12
F0E3095g
fig.13
F0E3000g
fig. 14
F0E3102g
Page 18
17
CONNECT NAV
NAVIGATOR
IMPORTANT Only stations
broadcasting traffic announcements
will be stored when the TA function
is on (TP message on the display).
Manual tuning
To manually tuning to a station, pro-
ceed as follows:
1) switch the RDS function off (see
RDS FUNCTION in this chapter) to
display the frequencies
2) in Radio mode, press the MEN
button (10), the Radio menu will appear on the display fig. 14
3) press the (14) button next to
CERCA (SEARCH) until
§
appears
4) press either
§
or
ù
on the
switch (2) to start the manual station
search.
The frequency will gradually change
in 100 kHz steps in the FM waveband
and in 9 kHz steps in the MW waveband.
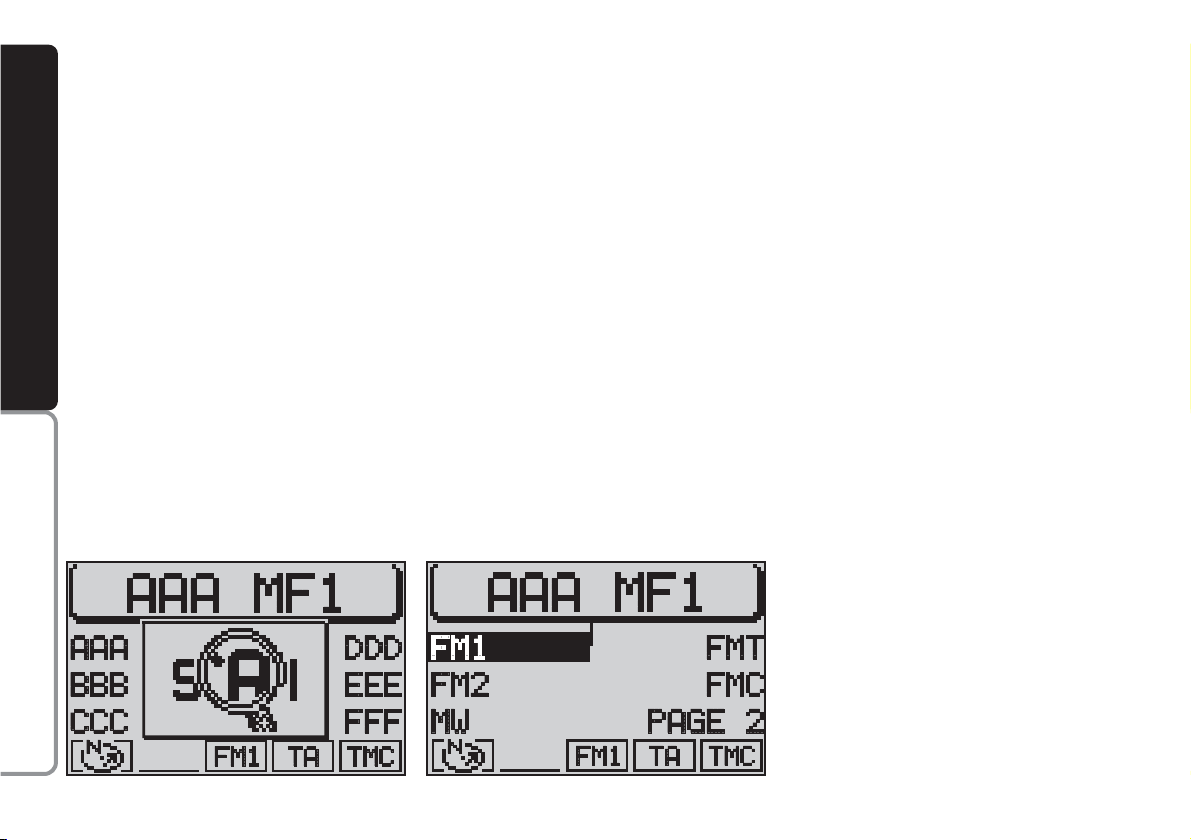
STORING THE STATIONS
Up to 24 FM stations in the fours
wavebands (FM1, FM2, FMT and FMC)
and six MW stations can be stored.
Manual storage
Proceed as follows to manually store
the stations:
1) in Radio mode, press the TU button (17). The Radio functions menu
will appear on the display fig. 15
2) select the required FM storage
waveband, i.e. FM1, FM2, FMT, FMC
or the MW waveband with button
(13) or button (14). The system will
automatically return to the main radio
menu as soon as the selection is made
3) tune the station with button
§
or ùon switch (2)
4) press button (13) or (14) corre-
sponding to the selected waveband
and hold it pressed until the volume is
muted (stored done signal). The frequency or the name of the stored station will appear on the display under
the selected position.
fig. 15
F0E3000g
Page 19

18
CONNECT NAV
NAVIGATOR
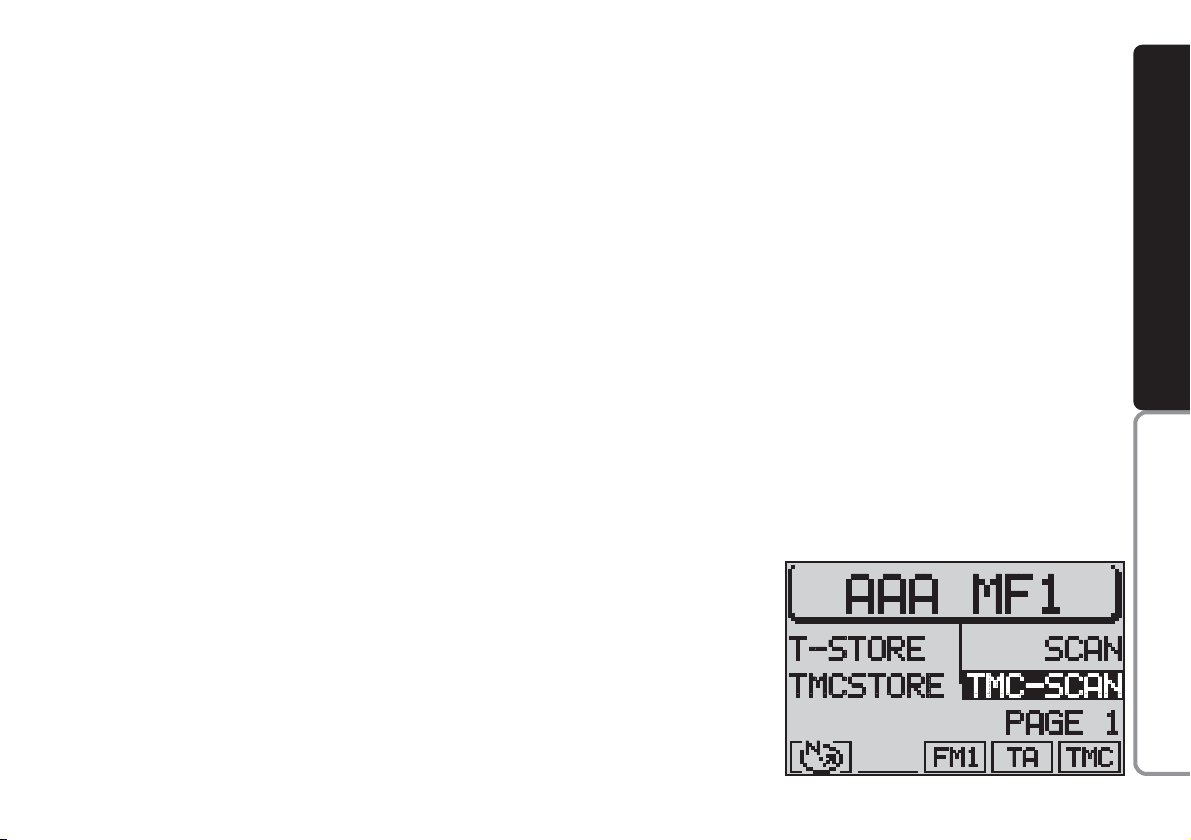
2) press the (13) button next to
PAGINA 2 (PAGE) 2
3) press the (14) button next to
T-STORE fig. 16
When the Travelstore function is on,
the upper row of the display will show
the operation progress in percentage.
At the end of the storage procedure,
the system will automatically switch
over to the FMT waveband and the
stored stations will be played for a
short while.
TMC-STORE
AUTOMATIC STORAGE
The system can automatically store
the six strongest stations broadcasting in the area that you are travelling
in, in the FMC storage waveband.
IMPORTANT The TMC-STORE
function will replace the previously
stored stations in the FMC waveband.
IMPORTANT The TMC-STORE
function can be activated only if the
navigation CD relevant to the country
that you are travelling in has been inserted once at least.
1) in Radio mode, press the TU button (17). The Radio function menu will
appear on the display fig. 17
2) press the (13) button next to
PAGINA 2 (PAGE) 2
3) press the (14) button next to TMCSTORE fig. 17
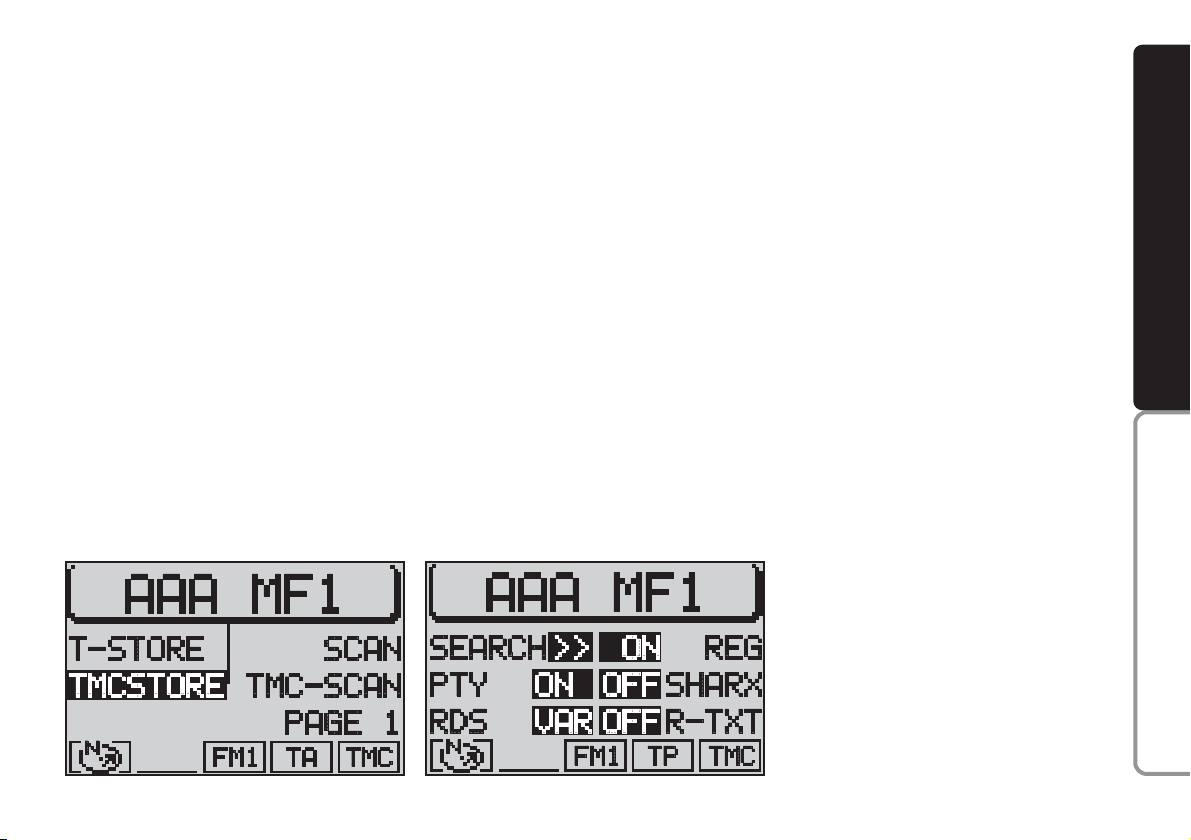
T-STORE (Travelstore)
automatic storage
The system can automatically store
the six strongest stations in the FMT
storage waveband.
IMPORTANT The T-STORE function will replace the previously stored
stations.
Proceed as follows to start the TSTORE automatic storage procedure:
1) in Radio mode, press the TU but-
ton (17). The Radio function menu will
appear on the display
fig. 16
F0E3004g
Page 20
19
CONNECT NAV
NAVIGATOR
When the Travelstore function is on,
the upper row of the display will show
the operation progress in percentage.
At the end of the storage procedure,
the stations stored in the FMC waveband will be played for a short while,
then the radio will tune automatically
to the first stored station.
IMPORTANT Automatic station
storage through the TMC-STORE
function could require a long time
since scanning of TMC stations that
can be received in the frequency range
is performed.
RDS FUNCTION
(RADIO DATA SYSTEM)
The Radio Data System is a service
provided by radio stations to facilitate
FM waveband tuning.
The RDS allows - for enabled stations - automatic tuning to the best
frequency of the selected station (alternative frequency function). This
means that you can listen to the station without retuning when you
change area. Obviously, the station
must be received in the area that you
are travelling in.
Furthermore, the RDS displays the
station name (Program Service function, up to eight characters) and the
traffic announcement status: the
sound/navigation system will seek the
best frequency of the required station.
fig. 17
F0E3005g
fig. 18
F0E3001g
Page 21

20
CONNECT NAV
NAVIGATOR
RDS-REG FUNCTION
At certain times of the day, some stations broadcast different regional programmes. When the function is off and
you are tuned to a regional station in
a certain area, you will receive a new
regional programme when entering a
new area.
Switching on and off
Tune to FM and proceed as follows
to switch the RDS-REG function on:
1) in Radio mode, press the MEN
button (10). The Radio menu fig. 19
will appear on the display
2) press the button (13) next to REG.
The message ON or OFF will appear.
The default setting is OFF (i.e. the function is not active). When the function
is on, the system will change the frequency only when the current frequency can no longer be received.
Switching on and off
Proceed as follows to use the RDS:
1) in Radio mode, press the MEN
button (10). The Radio menu fig. 18
will appear on the display
2) repeatedly press the button (14)
next to the RDS message to select the
required operations (VAR, FIX or
OFF) (the default setting is VAR) described below:
FIX Switches the Radio RDS func-
tion on. Since some stations
use RDS to broadcast advertisements in addition to the
station name, you can decide
to display only the station
name.
VAR Basic setting with which the
Radio RDS function is fully active. Advertising will also be
shown on the display.
OFF Switches the RDS function off.
Stations are tuned to by indicating the frequency on the
display (example: 87.5). Under
this condition also the TA
function is off.
Page 22
21
CONNECT NAV
NAVIGATOR
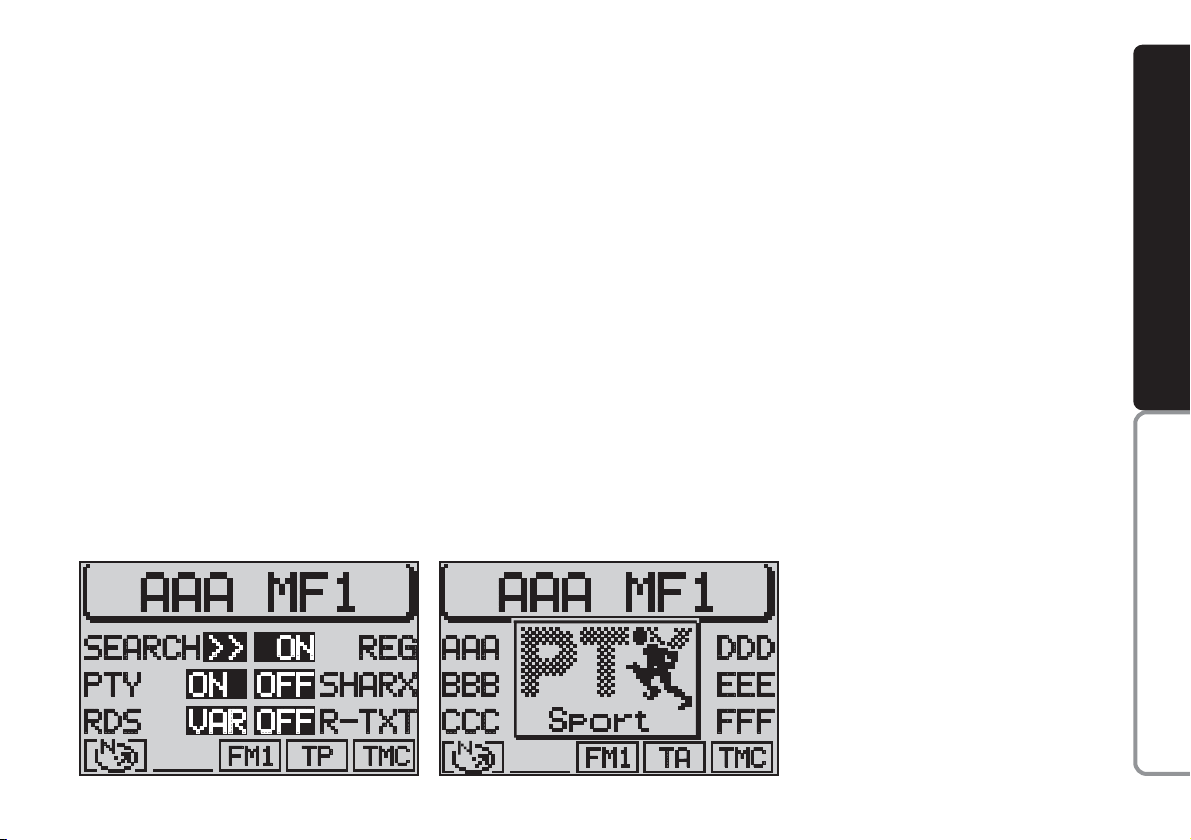
PTY FUNCTION
(PROGRAM TYPE)
PTY is an RDS function. The stations
use PTY to broadcast the contents of
their programmes (POP, ROCK, etc.)
to help you make your choice.
The programme contents will appear
for a few seconds when the PTY function is on and a new station is tuned
to. The contents will not be displayed
if the station does not use the PTY
function.
Switching on and off
Proceed as follows to switch the PTY
function on and off:
1) in Radio mode, press the MEN
button (10). The Radio menu will appear on the display fig. 19
2) press button (14) next to PTY.
The message ON or OFF will appear.
The default setting is ON.
The PTY message fig. 20 will appear
when tuning to a radio station when
the function is on.
Alarm messages
When the PTY function is on, the
system can receive alarm messages
(example: weather conditions). In this
case, the warning message will appear
on the display and the announcement
will be made at the volume set for traffic announcements.
To stop the alarm message, press either MEN (10) or ESC (9).
fig. 19
F0E3001g
fig. 20
F0E3003g
Page 23

22
CONNECT NAV
NAVIGATOR
TA FUNCTION
(TRAFFIC
ANNOUNCEMENT)
This function can be switched on on-
ly in Radio mode in the FM waveband.
When listening to the CD source,
the CD changer (where fitted) or
when the navigation system is on and
the TA button (4) is pressed, the radio will switch to the FM waveband in
background and activate the TA function. This will not change the sound
source and the message “TA” will appear on the display.
When the TA function is on, you can
listen to traffic announcements even
when the CD player or CD changer
(where fitted) is on or in navigation
mode. The system will automatically
switch to the station broadcasting the
traffic announcement. At the end of
the announcement, the sound navigation system will automatically return
to the previous source.
Press the TA button (4) to switch
the TA function off.
IMPORTANT In Radio mode, with
the TA function on, a beep will be
heard if you leave the area where the
station broadcasting traffic announcements can be received. In this case, an
automatic TP (Traffic Program) search
will be started.
Interrupting traffic
announcements
When the TA function is on, press
either TA (4) or MEN (10) or change
station to interrupt the traffic announcement.
TMC FUNCTION
(TRAFFIC MESSAGE
CHANNEL)
The TMC function is used to receive
traffic information which is then
analysed by the sound/navigation system in order to “guide” the driver to
the required preset destination.
Since only some stations are enabled
to provide the TMC function, it is possible that traffic information in certain
areas cannot be received.
When the “Dynamic travel guide”
function is on (see “Dynamic travel
guide” in chapter “Navigation”), the
sound/navigation system will tune automatically to a TMC station.
Page 24
23
CONNECT NAV
NAVIGATOR
The “TMC” message will appear in
the lower row of the display when a
TMC station is selected.
Up to six TMC stations can be
stored in the FMC storage waveband
(see paragraph “Automatic storage of
TMC stations (TMC-Store)” on next
pages):
through this function it is therefore
possible to store the six strongest stations broadcasting in the area that you
are travelling in.
SCAN TMC function
This function is used to scan all the
stations that can be received in the
FMC waveband.
Proceed as follow to start the SCAN
TMC search:
1) in Radio mode, press the TU but-
ton (17). The Radio function menu
fig. 15 will appear on the display
2) press button (13) next to PAGI-
NA 2 (PAGE 2)
3) press button (13) next to TMC-
SCAN fig. 21
The search will start and the SCAN
TMC in progress will appear on the
display.
Press the ESC button (9) to end the
SCAN TMC function or to play a
found station. The SCAN search will
stop at the last station.
SCAN FUNCTION
The SCAN function is used to scan
all the stations which can be received
in the waveband. Each station will be
played for ten seconds. The SCAN
function will end automatically after
running a complete search. If the TA
function is on, the system will only include stations broadcasting traffic announcements in the search (the TP
symbol will appear in the lower row
of the display).
Proceed as follows to start the
SCAN search:
1) in Radio mode, press the TU but-
ton (17). The Radio function menu will
appear on the display
2) press button (13) next to PAGI-
NA 2 (PAGE 2)
3) press button (14) next to SCAN.
The search will start and the message
SCAN will appear on the display during the search fig. 22.
Press ESC button (9) to end the
SCAN function. The search will stop
at the last station.
fig. 21
F0E3007g
Page 25
24
CONNECT NAV
NAVIGATOR
SHARX FUNCTION
(FM interference reduction)
Occasional interference in the signals
can occur when tuned to FM radio stations caused by stations broadcasting
on very close frequencies. The
SHARX function reduces such interference.
Switching on and off
Proceed as follows to switch the
SHARX function on and off:
1) in Radio mode, press the MEN
button (10). The Radio functions menu
fig. 23 will appear on the display
2) press button (13) next to SHARX.
The message ON or OFF will appear.
The default setting is ON.
RADIOTEXT FUNCTION
(R-TXT)
The Radiotext is a service provided
by certain RDS stations. In addition to
the station name this function provides
also information on the programme
being broadcast or shows the title of
the piece of music being played.
Switching on and off
Proceed as follows to switch the Ra-
diotext function on and off:
1) in Radio mode, press the MEN
button (10). The Radio functions
menu fig. 23 will appear on the display
2) press button (13) next to R-TXT.
The message ON or OFF will appear.
The default setting is OFF.
When the display shows the message
“Radiotext” and you want to change
station, proceed as follows:
1) in Radio mode, press the TU but-
ton (17) or either the (13) or (14) button. The Radio functions menu - excluding the Radiotext function - will appear on the display
2) change station: the Radiotext func-
tion, if available, will appear on the display
fig. 22
F0E3008g
fig. 23
F0E3001g
Page 26

25
CONNECT NAV
NAVIGATOR
TIM FUNCTION
(TRAFFIC INFORMATION
MEMORY)
The device is provided with vocal
digital memory. Up to 14 traffic messages having max. overall length equal
to or lower than 4 minutes can be
stored automatically.
According to the length of the new
traffic messages, the oldest ones are
cleared.
IMPORTANT Traffic messages
longer than four minutes are recorded partly only. In this case the message
OVERFLOW will appear on the display.
When a new traffic message arrives
while you are listening to a TIM message, the latter one is stopped and the
new arrived message is transmitted.
Storing traffic messages
Traffic messages are stored automatically when listening to TA stations
or when the TIM function is on with
the device off.
Messages can be stored for 1 hour
or 12 hours (see next paragraph
“Choosing how long to store traffic
messages“).
If listening to a station not broadcasting traffic info, switching the device
off with the TIM function on will start
automatically the search for a TA station.
Choosing how long to store
traffic messages
With the device on, proceed as follows to choose how long to store traffic messages:
1) press the T button (8). The Traf-
fic menu fig. 24 will appear on the display
2) press button (14) next to TIM un-
til the required indication is displayed:
2H = the message will be stored for
two hours; 24H = the message will be
stored for 24 hours; OFF (to switch
the function off)
IMPORTANT When the Traffic
menu is displayed, the TIM function
can be switched on/off by pressing the
T button (8) for over 2 seconds.
fig. 24
F0E3009g
Page 27

26
CONNECT NAV
NAVIGATOR
When switching the device off, the
message “GOODBYE” will appear on
the display together with the traffic
message storage time previously selected.
Listening to stored traffic
messages
Proceed as follows:
1) press the T button (8). The Traf-
fic menu fig. 24 will appear on the display
2) press button (13) next to TIM-IN-
FO. The last stored message has the
highest number (14) and will be played
first; then all the other messages will
be played in decreasing sequence. The
display will also show the time of arrival of the message being played.
Once the message playing procedure
is over, the system will automatically
switch over to the last selected sound
source (Radio, CD or CD changer).
Proceed as follows to listen to the last
selected sound source (Radio, CD or
CD changer) without playing all traffic
messages:
– press T (8) or ESC (9)
Displaying TMC traffic
messages
The device can also display the traffic messages broadcast with the TMC
function (See paragraph “TMC (Traffic Message Channel)” in this chapter).
This type of messages is used by the
satellite sound/navigation system “to
guide” the driver to the required preset destination (see “Dynamic travel
guide” in chapter “Navigation”).
To display TMC traffic messages pro-
ceed as follows:
1) press the T button (8)
2) press button (13) next to TIM-IN-
FO. The displayed message number
and the number of stored messages
will appear in the upper row of the display. The last received message is identified by the lowest number (1)
3) select one of the stored messages
using the knob/button (11)
4) after reading the required mes-
sage/s, press T (8) or ESC (9) to quit.
IMPORTANT TMC messages re-
ferring to roads distant more than 100
km from the actual car position, are
not processed by the TMC function.
Page 28
27
CONNECT NAV
NAVIGATOR
CCOOMMPPAACCTTDDIISSCC((CCDD)
)
Audio CDs can be played with the in-
ternal CD player or with the CD
CHANGER
(where fitted).
During CD playback, either the track
number and the playing time, or the
track number only, will appear on the
display (according to the settings, see
CD
FUNCTIONS
in this chapter).
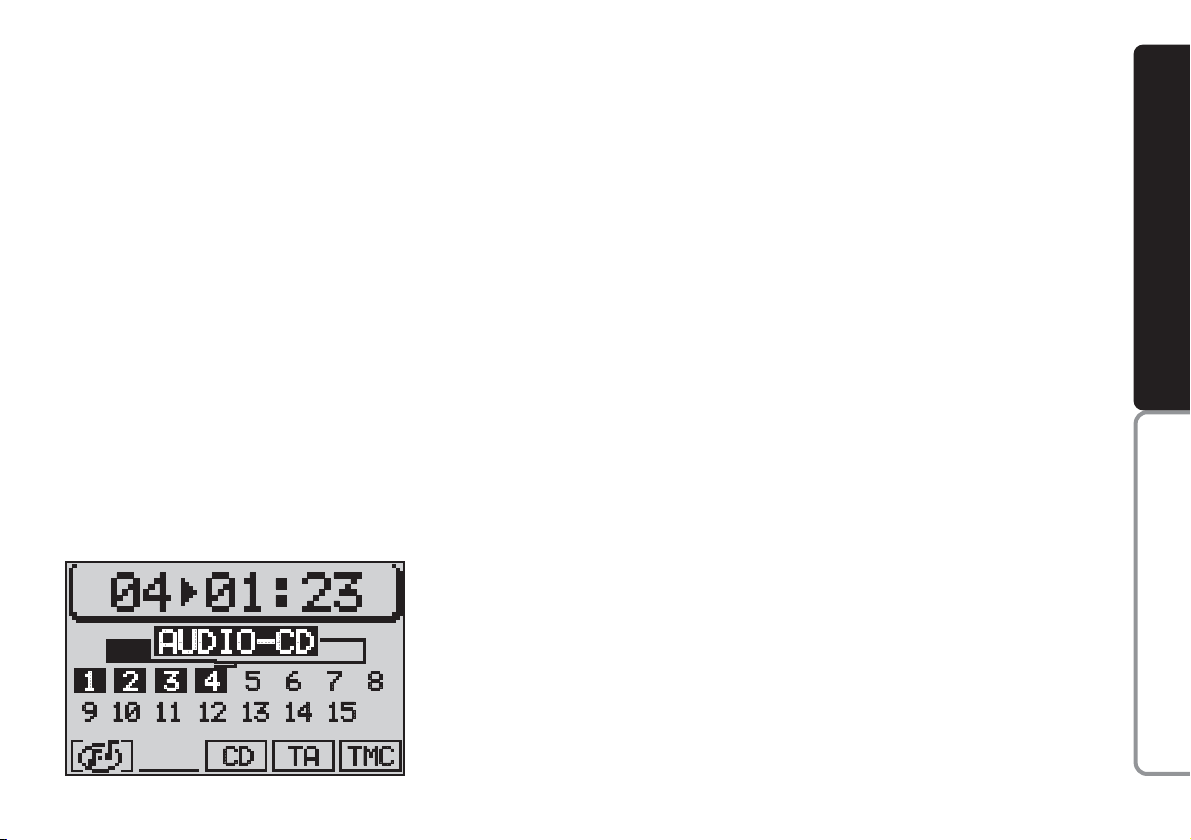
The main CD menu fig. 25 shows
the number of the tracks on the CD
and the track being played is highlighted. A graphic symbol progressively
indicating the playing time will appear
under the track.
A symbol indicating the audio CD,
the CD programmed sequence, the
current sound source (CD), and the
TA and TMC functions status will appear in the lower row of the display.
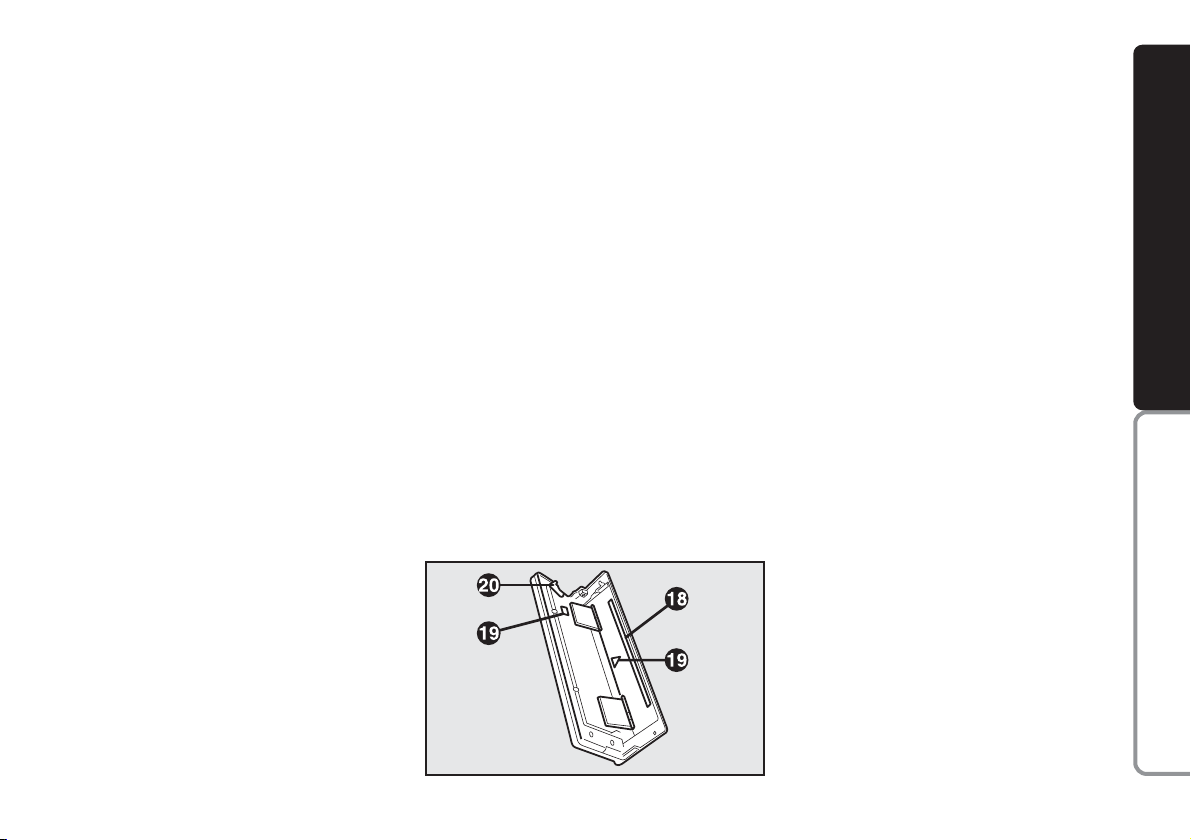
INSERTING AND EJECTING
A CD
Proceed as follows to insert a CD:
1) press button
T
(1) to open the
front panel
2) press button
ı
(18) to eject an in-
serted CD, if any
3) place the audio CD with the la-
bel facing upwards in the groove on
the open front panel edge
4) delicately push the CD in the slot
until the automatic mechanism takes
the CD into the player
5) close the front panel.
Proceed as follows to eject the CD:
1) press button
T
(1) to open the
front panel
2) press button
ı
(18) on the inner
side of the front panel (see chapter
“Controls”). The CD will be ejected
to half of its diameter
3) take the CD from the slot and re-
move it completely
4) close the front panel.
IMPORTANT Only open the front
panel to insert and eject a CD. A beep
will be heard if the front panel is left
open longer than 30 seconds. Close
the front panel to stop the warning signal.
fig. 25
F0E3010g
Page 29
28
CONNECT NAV
NAVIGATOR
PLAYING A CD
(INTERNAL PLAYER)
Playback will start automatically as
soon as a CD is inserted.
If you are using another source and
a CD is inserted in the internal player,
press the CD-C button (15). The main
CD menu fig. 25 will appear on the
display and the CD playback will start.
CD FUNCTIONS
Proceed as follows if the last source
was the CD
CHANGER
(where fitted)
and there are one or more audio CDs
inside:
1) go to the CDC functions menu by
pressing the CD-C button (15). The
CD functions menu will appear on the
display fig. 26
2) press the button (13) next to CD
to open the main CD menu fig. 25.
CD playback will start automatically.
IMPORTANT A warning message
will appear on the display if no CD is
inserted in the player or if a navigation
CD-ROM is inserted and played by
mistake.
IMPORTANT A lock symbol
S
will
appear in front of CD function menu
if there is no audio CD in the internal CD player.
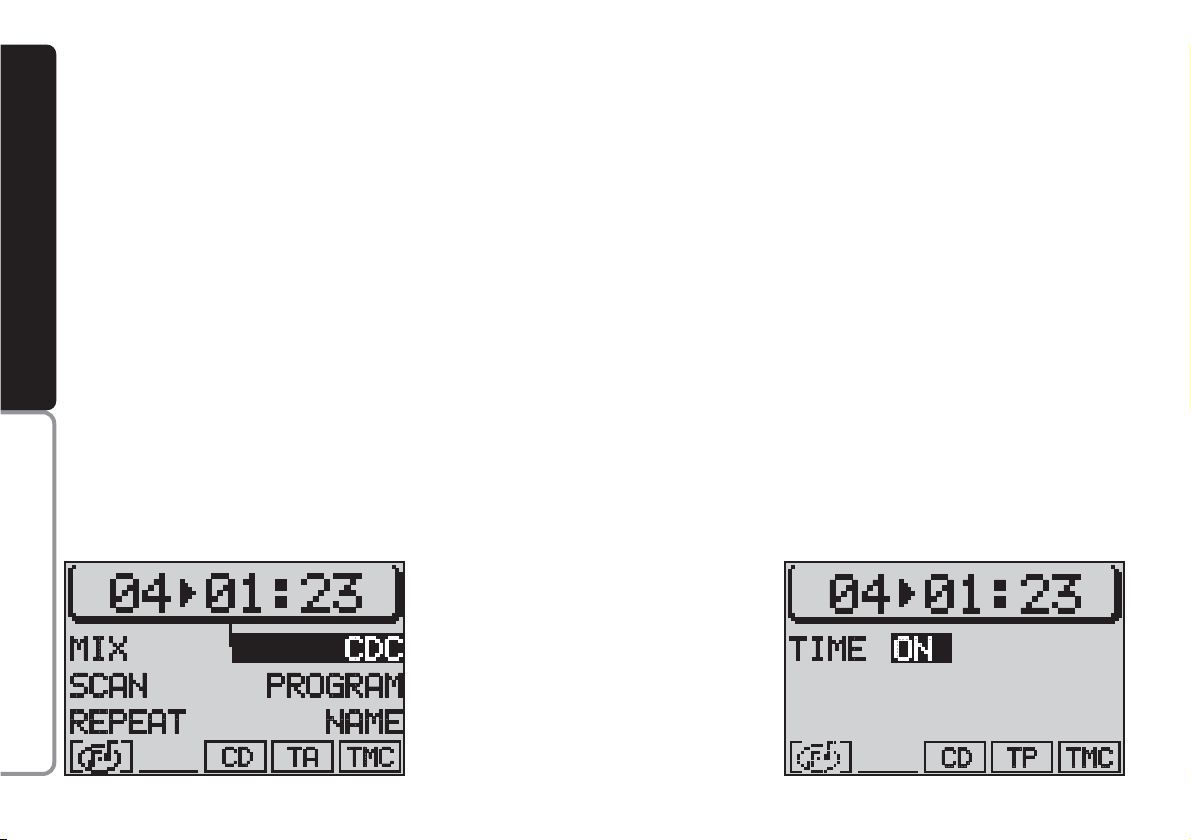
Switching the track playing
time/number display on and off
Proceed as follows to display the
played track number and the playing
time:
1) press the MEN button (10). The
CD menu will be displayed
2) press button (13) next to TIME
fig. 27. The message ON or OFF will
appear. The default setting is ON.
fig. 26
F0E3011g
fig. 27
F0E3012g
Page 30

29
CONNECT NAV
NAVIGATOR
Receiving traffic information
To switch the traffic announcement
function on and off (see “TA function”
in the previous chapter) when listening to a CD: briefly press the TA button (4). The TA symbol will either appear (on) or disappear (off) in the lower row of the main CD menu.
SELECTING NEXT/PREVIOUS
TRACKS
To select next tracks: briefly press
the
§
button on switch (2). Press the
§
button on switch (2) as soon as the
last track is reached to return to the
first track on the CD.
Press the
ù
button on switch (2)
to repeat the track playback or to select a previous track. Press the
ù
button on switch (2) again as soon as
the first track on the CD is reached to
return to the last track on the CD.
SCANNING TRACKS
If you want to listen to a certain part
of the track being played, you can scan
the track: hold
ù
or §on switch (2)
pressed during playback. The track will
be scanned forwards or backwards.
IMPORTANT The display will re-
turn to the main CD function after approximately 30 seconds if no operations are carried out in the CD functions menu.
RANDOM PLAYBACK (MIX)
Proceed as follows to play the CD
tracks in random order:
1) in CD mode, press the CD-C but-
ton (15). The CD functions menu
fig. 28 will appear on the display
2) press the button (14) next to
MIX.
Press the button (14) next to MIX
again to switch the function off.
The MIX function will end automatically if the SCAN function is switched
on.
Press ESC (9) to return to the previous screen.
fig. 28
F0E3013g
Page 31

30
CONNECT NAV
NAVIGATOR
SCANNING ALL TRACKS
ON A CD (SCAN)
Proceed as follows to listen to the
first part of each track on the CD:
1) in CD mode, go to the CD func-
tions menu by pressing the CD-C button (15). The CD functions menu
fig. 29 will appear on the display
2) press button (14) next to SCAN.
Press the button (14) next to SCAN
again to switch the function off.
The SCAN function will automatical-
ly end if the MIX is switched on.
Press ESC (9) to return to the pre-
vious screen.
REPEATING THE CD
TRACKS (REPEAT)
The REPEAT function can be used to
repeat a track.
Proceed as follows to switch the RE-
PEAT function on:
1) in CD mode, select the track with
buttons
ù
or §on switch (2)
2) go to the CD functions menu by
pressing the CD-C button (15). The
CD functions menu fig. 30 will appear
on the display
3) press the button (14) next to RE-
PEAT to highlight it.
The track is repeated until the REPEAT function is switched off. The
message RPT will appear in the lower row of the main CD menu. Press
the CD-C button (15) and the button
(14) next to REPEAT again to switch
the REPEAT function off.
The REPEAT function will end automatically when either the SCAN or
MIX functions are switched on.
Press ESC (9) to return to the previous screen.
fig. 29
F0E3014g
fig. 30
F0E3015g
Page 32

31
CONNECT NAV
NAVIGATOR
PROGRAMMING
THE TRACK SEQUENCE
You can programme your favourite
track sequence and skip the tracks you
do not like.
Setting the required sequence
Proceed as follows to set the required sequence:
1) in CD mode, go to the CD func-
tions menu by pressing the CD-C button (15). The CD functions menu fig.
31 will appear on the display
2) press the button (13) next to
PROGRAM to open the CD programming menu fig. 32
3) select the first track required with
buttons
ù
or §on switch (2) or by
pressing button (13) next to SKIP
fig. 32.
IMPORTANT The tracks can on-
ly be programmed in order (example:
1, 4, 7 etc. and not 3, 1, 4 etc.).
4) press the button (13) next to
ADD to add the first track to the sequence
5) select the following track in the
sequence with buttons
ù
or §on
switch (2) or by pressing button (13)
next to SKIP
6) after selecting the track, press but-
ton (13) next to ADD to add it to the
sequence.
Repeat the procedure for all the
tracks to be added to the sequence.
The programmed sequence will be
stored even after removing the CD
from the player.
Deleting tracks from
the sequence
Proceed as follows to delete the
tracks from the sequence:
1) in CD mode, go to the CD func-
tions menu by pressing the CD-C button (15). The CD functions menu
fig. 31 will appear on the display
2) press button (13) next to PRO-
GRAM to open the CD programming
menu fig. 32
3) select the track to be deleted with
buttons
ù
or §on switch (2)
4) press button (13) next to SKIP.
fig. 31
F0E3019g
fig. 32
F0E3020g
Page 33

32
CONNECT NAV
NAVIGATOR
Running/stopping the track
sequence
After entering the required track se-
quence, press button (13) next to
RUN fig. 32.
The sequence will start from the last
selected track and the message TPM
will appear on the display.
To stop a sequence without deleting
it, press button (13) next to RUN.
Deleting a single track
sequence
Proceed as follows to delete a pro-
grammed track sequence:
1) in CD mode, go to the CD func-
tions menu by pressing the CD-C button (15). The CD functions menu
fig. 31 will appear on the display
2) press button (13) next to PRO-
GRAM to open the CD programming
menu fig. 32
3) press button (14) next to CLR
PRG.
Clearing all stored sequence
Proceed as follows to delete all the
stored sequences:
1) in CD mode, go the CD functions
menu by pressing the CD-C button
(15). The CD functions menu fig. 31
will appear on the display
2) press button (13) next to PRO-
GRAM to open the CD programming
menu fig. 32
3) press button (14) next to CLR
ALL
4) select SI (YES) with the knob/but-
ton (11) at the confirmation message
5) press the knob/button (11) to
confirm.
Page 34

33
CONNECT NAV
NAVIGATOR
SSAATTEELLLLIITTEENNAAVVIIGGAATTIIOON
N
The Satellite Navigator will help you
reach destinations rapidly and safely.
After switching the navigation function
on, voice messages will guide you to
your destination. Driving advice, distances and probable time required to
reach the destination will be shown on
the display.
The car’s position is defined on the
basis of the electronic speedometer
signal, of a gyroscope and of the signals transmitted by the GPS (Global
Positioning System) satellites.
The sound/navigation system compares the data against the maps stored
on the navigation CD-ROM and calculates both the position and the
routes to reach the destination.
ROUTE GUIDANCE
Proceed as follows:
1) insert the CD ROM specific to the
country you are travelling in
2) press the NAV button (12). The
main navigation menu will be started
fig. 33
3) enter the destination.
DESTINATION ENTRY
Possible destinations include:
– town;
– town centre or district in a city;
– street;
– house number (if contained in the
navigation CD data);
– intersection;
special destinations can also be en-
tered:
– motorway junctions;
– railway stations;
– airports;
– hospitals, etc.
fig. 33
F0E3033g
fig. 34
F0E3034g
Page 35

34
CONNECT NAV
NAVIGATOR
Proceed as follows to enter a destination:
1) select INS. DEST. (DEST. ENTRY)
in the main navigation menu with
knob/ button (11) fig. 34. Press the
knob/ button to confirm
2) select CITTÀ (CITY) with the
knob/button (11) and press the knob/
button to confirm fig. 35. The destination entry editing menu will be
opened.
Destination entry with the
editing menu (Speller) fig. 36
The editing menu consists of five sec-
tions:
1 - list of symbols, letters, spaces,
special characters and digits
2 - editing list with the first item
matching letters in the editing field
3 - editing field (writing area)
4 - magnifying glass indicating the se-
lected character.
5 - pilot symbols
Destination name entry fig. 36
Proceed as follows to enter a name
in the editing menu:
1) position the cursor on the re-
quired character by turning the
knob/button (11)
2) confirm the selected character by
pressing the knob/button (11). The selected character will be displayed in
the editing field 3.
When a character is selected, for ex-
ample letter
O
4, the first item in a
list of destinations starting with the letter will automatically be displayed.
Other letters in the destination name
can be entered to speed up the search.
fig. 35
F0E3035g
fig. 36
F0E3036g
Page 36

35
CONNECT NAV
NAVIGATOR
To display the list directly, place the
cursor on the symbol jand press
knob/button (11) or hold knob/button
(11) pressed for longer than two seconds.
On the other hand, when after en-
tering the name the required item in
the editing list appears in field 2, position the cursor on symbol
j
and
press knob/button (11) or hold
knob/button (11) pressed for longer
than two seconds to display the list of
destinations in alphabetical order.
Entering special characters
Proceed as follows if you have to
form a destination name using special
characters that are not present on the
display (e.g.: Ä,Ö,Ü):
1) use knob/button (11) to place the
cursor on symbol (up/down scrolling
arrow)
2) press knob/button (11)
Each press on knob/button (11) will
correspond to a new special character entry.
Deleting characters
Proceed as follows to delete a character entered by mistake:
1) position the cursor by turning the
knob/button (11), on symbol
¯
2) press the knob/button (11) or
ESC (9).
Selecting a destination
from the list
Proceed as follows to select a desti-
nation from the list:
1) turn the knob/button (11) to se-
lect the required destination
2) confirm the destination by press-
ing the knob/button (11).
Scrolling the list fig. 37
Since only five lines can be displayed,
some lists are split into several
screens. In this case, an arrow
will
appear on the bottom right-hand side
to indicate that the list continues.
To scroll the list, turn the knob/but-
ton (11) in the required direction.
Page 37

36
CONNECT NAV
NAVIGATOR
A scrolling arrow or will appear on the penultimate line (from the
bottom or from the top). Turn the
knob/button (11) to display the other lines in the list.
Scrolling lists page by page
The longer lists can be scrolled page
by page to seek your destination
faster.
Proceed as follows:
1) turn knob/button (11) to position
the cursor on the arrow in lower
right-hand side of the display
2) press knob/button (11) to confirm
the page change. In this way, the following screen will be shown and the
cursor will remain on the arrow
3) once you have reached the re-
quired page, select as required and
confirm by pressing the knob/button
(11).
“CITTÀ” (CITY) destination
entry
Proceed as follows to enter a town:
1) select INS. DEST. (DEST. ENTRY)
in the main navigation menu with the
knob/button (11)
2) confirm the selection by pressing
the knob/button (11)
3) select CITTÀ (CITY) with the
knob/button (11) fig. 38
4) confirm the selection by pressing
the knob/button (11). The destination
entry menu will be opened
5) position the cursor on the re-
quired character by turning the
knob/button (11)
fig. 37
F0E3037g
fig. 38
F0E3038g
Page 38

37
CONNECT NAV
NAVIGATOR
6) confirm the selected character by
pressing the knob/button (11). The selected character is displayed in the
editing field 3-fig. 36
7) repeat the procedure for the oth-
er letters in the name
8) when entering the name, the list
of destinations matching the entered
letters will appear in the editing list 2-
fig. 36
9) position the cursor on the symbol
j
and press the knob/button (11) or
hold the knob/button (11) pressed for
longer than two seconds. The alphabetical list of destinations will appear
10) turn the knob/button (11) to
seek the required town destination
name in the editing list
11) confirm the destination by press-
ing the knob/button (11).
Press ESC (9) to not confirm the
destination and return to the editing
menu (Speller) fig. 36.
After selecting the destination, the
sound/navigation system offers the following options: VIA (STREET), CENTRO (CENTRE), DINTORNI DEST.
(DEST. SURROUND)
IMPORTANT Only the options
for which data is available on the navigation CD are offered. A lock symbol
S
will appear next to the unavailable
options.
“VIA” (STREET) The destination
street can be entered. This option depends on the size of the town and data stored on the navigation CD.
Confirm the street. The entering
procedure will continue with the following options:
– CONTINUA (CONTINUE): select
this item to continue;
– INCROCIO (INTERSECTION):
select this item to define an intersection with the previously selected
street as a destination. In this case, an
alphabetical list where to select the required intersection will be displayed;
– NUMERO CIVICO (HOUSE
NUMBER): select this item to define a
house number on the previously selected street as a destination.
“CENTRO” (CENTRE) The town
centre or district (for larger cities) can
be entered as a destination.
Page 39

38
CONNECT NAV
NAVIGATOR
“DINTORNI DEST.” (DEST.
SURROUND) Special destinations can
be directly selected, such as motorways, railway stations, shopping centres, etc. in the surroundings of the
town
The system will automatically return
to the main navigation menu after the
entry.
Select AVVIA NAVIGAZ. (ROUTE
GUIDANCE) and confirm by pressing
the knob/button (11).
The system will calculate the route
in a few seconds and start providing
visual instructions (drawings) and
voice messages to guide you to your
destination.
Press ESC (9) to return to the previous menu.
“VIA” (STREET) destination
entry
You can specify a street as a destination in the previously selected town
as follows:
1) select INS. DEST. (DEST. ENTRY)
in the main navigation menu with the
knob/button (11)
2) confirm the selection by pressing
the knob/button (11)
3) select VIA (STREET) by the
knob/button (11) fig. 39 to open the
street entry editing menu fig. 40
4) confirm the selection by pressing
the knob/button (11). The destination
entry menu will be opened
5) position the cursor on the re-
quired character by turning the
knob/button (11)
6) confirm the selected character by
pressing the knob/button (11). The selected character will appear in the
editing field
7) continue for the other letters in
the name
8) when entering the name, the list
of destinations matching the entered
letters will appear in the editing list
fig. 39
F0E3039g
fig. 40
F0E3042g
Page 40

39
CONNECT NAV
NAVIGATOR
9) position the cursor on the symbol
j
and press the knob/button (11) or
hold the knob/button (11) pressed for
longer than two seconds. The alphabetical list of destinations will appear
on the display
10) turn the knob/button (11) to
seek the required street name in the
editing list
11) confirm the destination by press-
ing the knob/button (11).
IMPORTANT Only the options
for which data is available on the navigation CD are offered. A lock symbol
S will appear next to the unavailable
options.
Press ESC (9) to return to the pre-
vious menu.
“NUMERO CIVICO” (HOUSE
NUMBER) destination entry
Proceed as follows to reach a house
number:
1) enter the street number as described previously
2) select NUMERO CIVICO
(HOUSE NUMBER) with the
knob/button (11) fig. 41. The list of
available house numbers will appear
on the display fig. 42
3) position the cursor on the re-
quired number by turning the
knob/button (11)
4) confirm the number by pressing
the knob/button (11). The selected
number will be highlighted on the display
5) confirm the destination by press-
ing the knob/button (11) for longer
than two seconds.
IMPORTANT Only the options
for which data is available on the navigation CD are offered. A lock symbol
S
will appear next to the unavailable
options.
Press ESC (9) to return to the pre-
vious menu.
fig. 41
F0E3040g
fig. 42
F0E3041g
Page 41

40
CONNECT NAV
NAVIGATOR
“INCROCIO”
(INTERSECTION)
destination entry
Proceed as follows to reach an in-
tersection:
1) enter the street name as de-
scribed above
2) select INCROCIO (INTERSECTION) with the knob/button (11)
fig. 41. The intersection list will be
displayed fig. 43.
IMPORTANT If the list includes
more than 5 names, see “Destination
name entry” in this chapter to speed
up the search.
3) position the cursor on the re-
quired intersection by turning the
knob/button (11)
4) confirm the intersection by press-
ing the knob/button (11).
IMPORTANT Only the options
for which data is available on the navigation CD are offered. A lock symbol
S
will appear next to the unavailable
options.
Press ESC (9) to return to the pre-
vious menu.
“CENTRO O QUARTIERE
URBANO” (TOWN CENTRE)
destination entry
Proceed as follows to reach town
centre:
1) select INS. DEST (DEST. ENTRY)
in the main navigation menu with the
knob/button (11) fig. 44.
2) confirm the selection by pressing
the knob/button (11). The destination
entry menu will be opened
fig. 43
F0E3043g
fig. 44
F0E3034g
Page 42

41
CONNECT NAV
NAVIGATOR
3) select CENTRO (CENTRE) with
the knob/button (11) fig. 45. The
town entry editing menu will appear
on the display (see “Città (City) destination entry” in this chapter).
IMPORTANT If the list includes
more than 5 names, see ”Destination
name entry” in this chapter.
4) enter the town and confirm with
the knob/button (11). The list of town
centres and districts will appear on the
display
5) position the cursor on the required town centre by turning the
knob/button (11)
6) confirm the selection by pressing
the knob/button (11). The selected
town centre will be highlighted on the
display
7) confirm the destination by press-
ing the knob/button (11).
IMPORTANT Only the options
for which data is available on the navigation CD are offered. A lock symbol
S
will appear next to the unavailable
options.
Press ESC (9) to return to the pre-
vious menu.
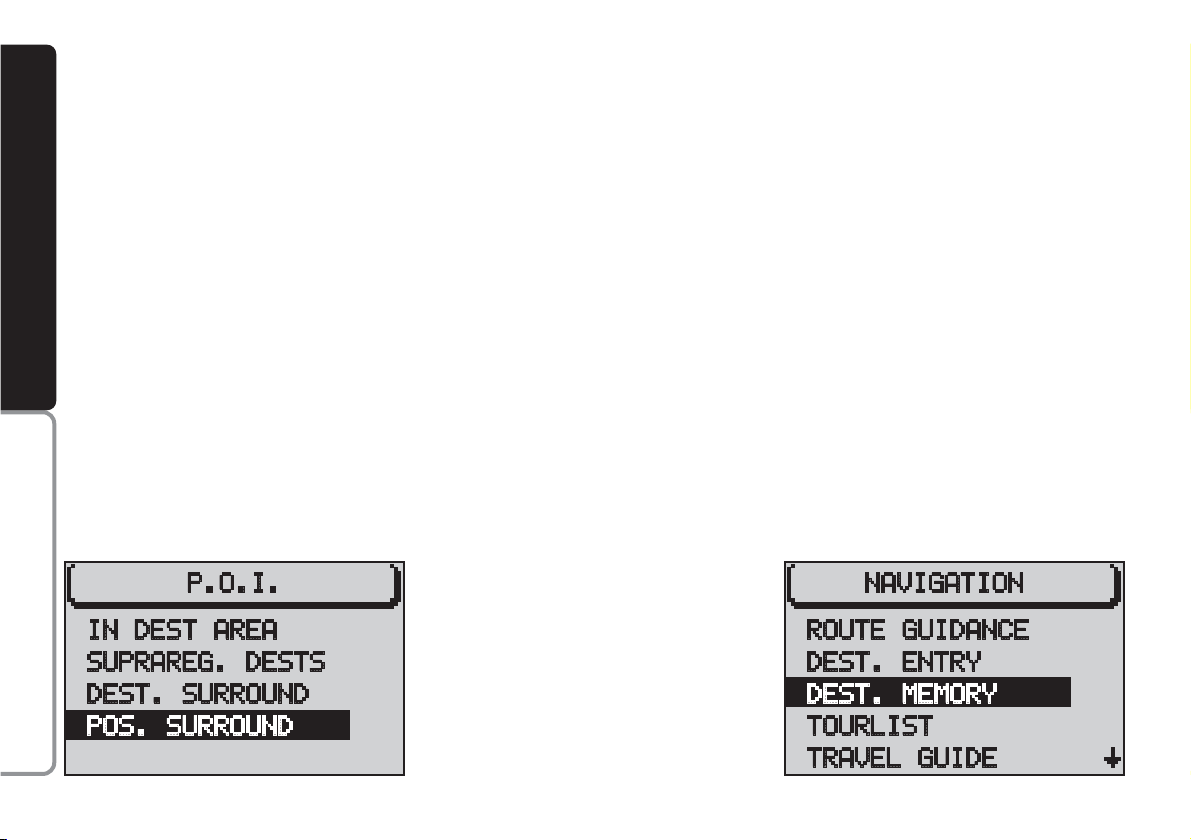
SPECIAL DESTINATION
ENTRY
These are destinations contained in
directories in alphabetical order and
include motorways, railway stations,
shopping centres, service stations,
parking areas, etc.
Special destinations can be sought in
four different ways:
– CITTÀ (IN DEST. AREA): displaying the special destinations related to
the previous selection;
– DEST. EXTRAREG. (SUPRAREG.
DETS) (supraregional destinations):
displaying special destinations in other locations with respect to the selected destination. The directories only refer to the country on the CD;
– DINTORNI DEST. (DEST. SURROUND) (destination surroundings):
displaying special destinations (example: sports grounds, etc.) in the area
surrounding the previously selected
destination;
– DINT. POS. ATT. (POS. SURROUND.) (position surroundings):
displaying special destinations near the
current position of the car.
IMPORTANT You will need to
have entered a destination: CITTÀ
(CITY) or VIA (STREET), CENTRO
(CENTRE) or INCROCIO (INTERSECTION) to have access to the directories.
fig. 45
F0E3044g
Page 43

42
CONNECT NAV
NAVIGATOR
“CITTÀ” (IN DEST AREA)
entry
Proceed as follows:
1) select INS. DEST. (DEST. ENTRY)
in the main navigation menu with the
knob/button (11) fig. 46
2) confirm the selection by pressing
the knob/button (11). The destination
entry menu will be started
3) select DEST. SPECIALI (P.O.I.)
with the knob/button (11) fig. 47. The
special destinations menu will be
opened
4) position the cursor on CITTÀ (IN
DEST AREA) fig. 48 by turning the
knob/button (11)
5) confirm the selection by pressing
the knob/button (11). The directory
list will be displayed
6) turn the knob/button (11) to seek
the required destination in the list
7) confirm the destination by press-
ing the knob/button (11).
Press ESC (9) to return to the pre-
vious menu.
“DEST. EXTRAREG.”
(SUPRAREG. DESTS) entry
Proceed as follows:
1) select INS. DEST. (DEST. ENTRY)
in the main navigation menu with the
knob/button (11)fig. 46
2) confirm the selection by pressing
the knob/button (11). The destination
entry menu will be opened
3) select DEST. SPECIALI (P.O.I.)
with the knob/button (11) fig. 47. The
special destination menu will be
opened
fig. 46
F0E3034g
fig. 47
F0E3045g
fig. 48
F0E3046g
Page 44

43
CONNECT NAV
NAVIGATOR
4) position the cursor on DEST. EXTRAREG. (SUPRAREG. DESTS)
fig. 49 by turning the knob/button
(11)
5) confirm the selection by pressing
the knob/button (11). The directory
list will be displayed
6) turn the knob/button (11) to seek
the required destination in the list
7) confirm the destination by pressing the knob/button (11).
Press ESC (9) to return to the pre-
vious menu.
“DINTORNI DEST.”
(DEST. SURROUND) entry
Proceed as follows:
1) select INS. DEST. (DEST. ENTRY)
in the main navigation menu with the
knob/button (11) fig. 46
2) confirm the selection by pressing
the knob/button (11). The destination
entry menu will be opened
3) select DEST. SPECIALI (P.O.I.)
with the knob/button (11) fig. 47. The
special destinations menu will be
opened
4) position the cursor on DIN-
TORNI DEST. (DEST. SURROUND)
fig. 50 by turning the knob/button
(11)
5) confirm the selection by pressing
the knob/button (11). The directory
list will be displayed
6) turn the knob/button (11) to seek
the required destination in the list
7) confirm the destination by press-
ing the knob/button (11).
Press ESC (9) to return to the pre-
vious menu.
“DINT. POS. ATT.“
(POS. SURROUND) entry
Proceed as follows:
1) select INS. DEST (DEST. ENTRY)
in the main navigation menu with the
knob/button (11) fig. 46
fig. 49
F0E3047g
fig. 50
F0E3048g
Page 45
44
CONNECT NAV
NAVIGATOR
2) confirm the selection by pressing
the knob/button (11). The destination
entry menu will be opened
3) select DEST. SPECIALI (P.O.I.)
with the knob/button (11) fig. 47. The
special destinations menu will be
opened
4) position the cursor on DINT.
POS. ATT. (POS. SURROUND) fig.
51 by turning the knob/button (11)
5) confirm the selection by pressing
the knob/button (11). The directory
list will be displayed
6) turn the knob/button (11) to seek
the required destination in the list
7) confirm by pressing the knob/but-
ton (11).
Press ESC (9) to return to the pre-
vious menu.
USING STORED
DESTINATIONS
You can use previously stored destinations. Three memory categories
are offered:
– ULTIME 10 (LAST 10 MEMORY):
the last ten navigation destinations.
The destinations are automatically entered in the LAST 10 memory when
the LAST 10 option in the DSC NAVI
navigation menu is on. See “Destination memory” in the “Active navigation”;
– INS. POS. ATT. (POSITION
MARK): car position is stored and can
be selected as a destination;
– ORDINE ALFAB. (ALPH. SORTING) (alphabetical sorting): the destinations are stored in alphabetical order;
– ORDINE MANUALE (MANUAL
SORTING): the destinations are
shown in the previously set order.
Proceed as follows to use a previously stored destination:
1) press the NAV button (12) to dis-
play the main navigation menu
2) select MEMORIA DEST. (DEST.
MEMORY) with the knob/button (11)
fig. 52
fig. 51
F0E3049g
fig. 52
F0E3050g
Page 46

45
CONNECT NAV
NAVIGATOR
3) confirm the selection by pressing
the knob/button (11). The destination
memory menu will be opened fig. 53
4) position the cursor on the required destination by turning the
knob/button (11)
5) confirm the destination by pressing the knob/button (11).
Press ESC (9) to return to the pre-
vious menu.
STORING THE CURRENT
POSITION
Proceed as follows to store the cur-
rent position of the car:
1) select MEMORIA DEST. (DEST.
MEMORY) in the main navigation
menu with the knob/button (11)
2) confirm the selection with the
knob/button (11). The destination entry menu will be opened
3) select INS. POS. ATT. (POSI-
TION MARK) with the knob/button
(11) fig. 54
4) confirm the destination with the
knob/button (11).
IMPORTANT This procedure can
only be carried out if a navigation CD
is inserted.
Press ESC (9) to return to the pre-
vious menu.
fig. 53
F0E3051g
fig. 54
F0E3052g
Page 47

46
CONNECT NAV
NAVIGATOR
AACCTTIIVVEENNAAVVIIGGAATTIIOON
N
ROUTE GUIDANCE
Active navigation requires an entered
destination (see
DESTINATION ENTRY
in
the
SATELLITE NAVIGATION
chapter) and
route operations settings.
Proceed as follows:
1) press the NAV button (12). The
main navigation menu will appear on
the display fig. 55
2) select AVVIA NAVIGAZ.
(ROUTE GUIDANCE) by turning the
knob/button (11)
3) press the knob/button (11) to dis-
play the route guidance menu fig. 56.
The system will start computing the
route. The calculation can take several seconds according to the distance.
During this time the message CALC
or RECALC will appear on the display
(the latter if a previous route guidance
is on). The distance to be travelled to
reach the destination will be shown
under the time.
The name of the street which you
are travelling along or the street you
will need to turn on will appear in the
upper row of the route guidance
menu.
IMPORTANT If you leave the in-
dicated route, the sound/navigation
system will display the message OFF
ROAD or OFF MAP (in the case of insufficient positioning data).
The route guidance instructions are
shown on the display.
The instructions can be displayed in
2-D fig. 56 or 3-D fig. 57.
fig. 55
F0E3053g
fig. 56
F0E3054g
fig. 57
F0E3055g
Page 48

47
CONNECT NAV
NAVIGATOR
When the CD
CHANGER
(where fitted) is on, the number of the current
CD, the track name or number and
the track playing time are shown on
the display.
The message “PHONE” will appear
on the display when the telephone
Mute function is on.
INTERRUPTING
NAVIGATION
Proceed as follows to interrupt nav-
igation:
1) press the ESC button (9) or enter
a new destination. When pressing ESC
(9), a navigation interruption confirmation message will appear on the display fig. 58.
2) select SI (YES) by turning the knob/
button (11)
3) press the knob/button (11) to
confirm the selection.
IMPORTANT The navigation da-
ta will be stored for 30 minutes if the
system is switched off during active
navigation. The navigation will start
again during this period. After 30 minutes you will need to restore the
route guidance data.
Press the knob/button (11) for ap-
proximately three seconds until the instruction changes to select the required option.
The distance before the turning point
and the time required to reach the
destination or the forecasted arrival
time are shown on the display (see
SWITCHING ROUTE TIME INFORMATION ON
AND OFF
in this chapter).
Furthermore, the traffic announcement status (TA function) and the
TMC status (Traffic Message Channel)
are shown on the display.
The active sound source is shown on
the display along with the name or the
frequency of the station tuned to (see
RDS FUNCTION
in the
RADIO
chapter).
fig. 58
F0E3056g
Page 49

48
CONNECT NAV
NAVIGATOR
TUNING THE RADIO
You can tune the radio directly dur-
ing active navigation by pressing one
of the buttons (13 or 14).
IMPORTANT You need to have
stored stations under the multiple
function buttons (13 or 14) in order
to do this (see
STORING STATION
in the
RADIO
chapter).
CHANGING THE
SOUND SOURCE
You can change the sound source
during active navigation in any moment
by pressing the TU button (17) or the
CD-C button (15). The main radio,
CD or CD
CHANGER
(where fitted)
menu will appear on the display, accordingly.
Press NAV (12) to return to active
navigation.
NO MAP NAVIGATION
NO MAP navigation is carried out
when the navigation CD is removed
after entering the destination and
starting navigation. The internal CD
player can be used during NO MAP
navigation for sound playback.
The message NO MAP will appear
when the NO MAP function is on
along with the straight distance to the
destination.
IMPORTANT It may take the
sound/navigation system several minutes to correctly restore the car positioning data when the navigation CD
is reinerted. During this time, the message OFF ROAD or OFF MAP will appear on the display (the latter for insufficient positioning data).
Page 50

49
CONNECT NAV
NAVIGATOR
DYNAMIC TRAVEL GUIDE
(where fitted)
When the “DYnamic travel guide”
function is on, the satellite sound/navigation system analyses and processes the traffic messages to compute the
route.
Traffic messages are broadcast by
RDS stations with TMC service (Traffic Message Channel).
Proceed as follows to activate the
“Dynamic travel guide” function:
1) during “Route guidance” press the
MEN button (10). The main navigation
menu will appear on the display fig. 59
2) turn the knob/button (11) to select OPZIONI PERC. (ROUTE OPTION)
3) press the knob/button (11) to select PERCORSO (ROUTE) fig. 60
4) press repeatedly the knob/button
(11) until DINAMIC (DYN.) is displayed
5) press the knob/button (11) to se-
lect CONTINUA (CONTINUE)
6) press the knob/button (11).
The system returns to “Route guidance” (see “Route guidance” in this
chapter) and settings stay unvaried until another setting is performed.
IMPORTANT To activate the “Dy-
namic travel guide” during the “Route
guidance”, the satellite sound/navigation system tunes to a TMC station.
Should there be no TMC station
stored on the FMC waveband, TMC
station scanning will be started. Scanning may take several minutes since it
is performed on the whole frequency
range. During this period the radio is
off.
fig. 59
F0E3060g
fig. 60
F0E3059g
Page 51

50
CONNECT NAV
NAVIGATOR
TOURIST GUIDE
INFORMATION
(where fitted)
You can access tourist information
during navigation.
1) Press the NAV button (12). The
main navigation menu will appear on
the display fig. 61;
Tourist information on the destinations can be recalled when using a navigation CD.
Information is contained in directories on the following topics: accomodation, restaurants, tourist information, amusements, etc…
The guide name will appear in the
main navigation menu if there is only
one guide on the CD. Proceed as follows:
1) Press the NAV button (12). The
main navigation menu will appear on
the display fig. 59
2) select the tourist guide (e.g. MERI-
ANscout) in the main navigation menu
by turning the knob/button (11)
If more than one guides are available
on the CD, the list of guides will appear on the display. Proceed as follows:
1) select the required tourist guide
by pressing the knob/button (11)
2) confirm the selection by pressing
the knob/button (11)
3) enter the name of the town for
which information is required with
editing menu under SELEZIONE LOCALITÀ (DEST. ENTRY) (see “Destination entry” in the “Satellite navigation” chapter).
Press ESC (9) to return to the previous menu.
fig. 61
F0E3068g
Page 52

51
CONNECT NAV
NAVIGATOR
2) select MEMORIA DEST. (DEST.
MEMORY) by turning the knob/button (11) fig. 64
3) confirm the selection by pressing
the knob/button (11). The MEMORIA
DEST. (DEST. MEMORY) menu will
appear on the display fig. 64
4) select MEMORIZZA DEST. (SAVE
DEST.) by turning the knob/button
(11) fig. 65
5) confirm the selection by pressing
the knob/button (11). The complete
name of the entered destination is suggested as a name.
Press ESC (9) to return to the previous menu.
ROUTE LIST
The display can show the route list
LISTA PERCORSO (TOURLIST) computed by the sound/navigation system.
Proceed as follows to display this information:
1) Press the NAV button (12). The
main navigation menu will appear on
the display
2) select LISTA PERCORSO
(TOURLIST) by turning the knob/button (11) fig. 62
3) confirm the selection by pressing
the knob/button (11). The list of available routes will appear on the display
fig. 63.
Press ESC (9) to return to the pre-
vious menu.
DESTINATION MEMORY
Destinations (current or previous)
can be stored and customised with a
short name.
Proceed as follows to store the required destination in the destination
memory:
1) press the NAV button (12) to
open the main navigation menu fig. 62
fig. 62
F0E3057g
fig. 63
F0E3058g
fig. 64
F0E3050g
Page 53

52
CONNECT NAV
NAVIGATOR
Entering and editing
destination names
Proceed as follows to edit or enter
a name in the destination memory:
1) press the NAV button (12) to
open the main navigation menu fig. 61
2) select MEMORIA DEST. (DEST.
MEMORY) by turning the knob/button (11) fig. 64
3) confirm the selection by pressing
the knob/button (11). The MEMORIA
DEST. (DEST. MEMORY) menu will
appear on the display
4) select MODIFICA NOME (EDIT
MEMORY) by turning the knob/button (11) fig. 66
5) confirm the selection by pressing
the knob/button (11), The editing
menu will appear on the display
6) position the cursor on the re-
quired character by turning the
knob/button (11)
7) confirm the selected character by
pressing the knob/button (11). The selected character will be displayed in
the editing field. Repeat the last two
operations to complete the name
8) confirm the selection by pressing
the knob/button (11) for longer than
two seconds or by selecting the j
symbol and pressing the knob/button
(11).
Press ESC (9) to return to the previous menu.
STORING STORED
DESTINATIONS
You can sort the destination memory list. This list can be recalled when
entering the destination.
Proceed as follows for storing:
1) press the NAV button (12) to
open the main navigation menu
2) select MEMORIA DEST. (DEST.
MEMORY) by turning the knob/button (11) fig. 67
fig. 65
F0E3104g
fig. 66
F0E3098g
fig. 67
F0E3050g
Page 54

53
CONNECT NAV
NAVIGATOR
3) confirm the selection by pressing
the knob/button (11). The MEMORIA
DEST. (DEST. MEMORY) will appear
on the display
4) select CANC. DEST. (CLEAR
DEST.) by turning the knob/button
(11) fig. 69 and press the knob/but-
ton to confirm. The following options
will appear on the display:
– CANC. ULTIME 10 (LAST 10):
delete the last ten destinations;
– DEST. SINGOLA (SINGLE DEST.):
delete a single destination;
– TUTTE LE DEST. (ALL DESTS):
delete all destinations.
3) confirm the selection by pressing
the knob/button (11). The MEMORIA
DEST. (DEST. MEMORY) menu will
appear on the display
4) select ORDINA DEST. (SORT
DEST.) by turning the knob/button
(11) fig. 68
5) confirm the selection by pressing
the knob/button (11)
6) select the destination to be moved
by turning the knob/button (11)
7) confirm the selected destination
by pressing the knob/button (11)
8) move the destination to the new
position by turning the knob/button
(11)
9) confirm the new position by
pressing the knob/button (11) for
longer than two seconds.
Press ESC (9) to return to the pre-
vious menu.
DELETING STORED DATA
The last ten stored destinations, single destinations or all destination in
memory can be deleted.
IMPORTANT A navigation CD
must be inserted in the drive to clear
the memory.
Proceed as follows:
1) press the NAV button (12) to
open the main navigation menu
2) select MEMORIA DEST. (DEST.
MEMORY) by turning the knob/button (11) fig. 64
fig. 68
F0E3101g
fig. 69
F0E3099g
Page 55

54
CONNECT NAV
NAVIGATOR
5) select the required option (LAST
10, SINGLE DEST., ALL DESTS) and
confirm by pressing the knob/button
(11). The memory will be automatically cleared for the first two options.
Continue as follows for the third option:
6) select the destination to be delet-
ed by turning the knob/button (11)
7) confirm the selection by pressing
the knob/button (11)
8) select CANCELLA (CLEAR) (to
delete) or ANNULLA (NO) (not to
delete) with the knob/button (11).
Press ESC (9) to return to the pre-
vious menu.
ENTERING AND EDITING
DESTINATION SHORT
NAMES
Proceed as follows to edit or enter
a short name in the destination memory:
1) press the NAV button (12) to
open the main navigation menu
2) select MEMORIA DEST.
(DEST.MEMORY) by turning the
knob/button (11)
3) confirm the selection by pressing
the knob/button (11). The MEMORIA
DEST. (DEST. MEMORY) menu will
appear on the display
4) select CAMBIARE METE (MOD-
IFY DEST.) by turning the knob/button (11) fig. 70
5) confirm the selection by pressing
the knob/button (11). The list of
stored destinations in alphabetical order will appear on the display
6) select the destination name to be
changed by turning the knob/button
(11). The editing menu (speller) will
appear on the display
7) position the cursor on the re-
quired character by turning the
knob/button (11)
8) confirm the selected character by
pressing the knob/button (11). The selected character will be displayed in
the editing field
9) repeat the above procedure to
complete the name
10) position the cursor on symbol j
and press the knob/button (11) or
press the knob/button (11) for longer
than two seconds.
fig. 70
F0E3100g
Page 56

55
CONNECT NAV
NAVIGATOR
GPS STATUS AND POSITION
INFORMATION
Proceed as follows to display information concerning the number of GPS
satellites which can be received and
the car position:
1) press the NAV button (12). The
main navigation menu will be displayed
2) select INFO GPS (GPS STATUS)
by turning the knob/button (11)
3) confirm the selection by pressing
the knob/button (11).
Press ESC (9) to return to the previous menu.
AVOIDING TAILBACKS
DURING NAVIGATION
The sound/navigation system can detour tailbacks or road interruptions
during navigation.
IMPORTANT Only the options
for which data is available on the navigation CD are offered. A lock symbol
S
will appear next to the unavailable
options.
Proceed as follows:
1) press the
k
button (7). The IM-
POSTAZIONI (SETTINGS) menu will
appear on the display fig. 71
2) position the cursor on INGOR-
GO DAVANT (TRAFFIC AHEAD)
with the knob/ button (11). The INGORGO DAVANTI (TRAFFIC
AHEAD) menu will appear and the
cursor moves next to FINO (TO)
fig. 72
3) press the knob/button (11)
4) position the cursor on DA
(FROM) with the knob/button (11)
5) indicate from which distance with
respect to your position to start the
detour with the knob/button (11)
6) position the cursor on FINO (TO)
with the knob/button (11)
fig. 71
F0E3064g
fig. 72
F0E3065g
Page 57

56
CONNECT NAV
NAVIGATOR
LOCKING A ROUTE
SECTION WITHIN A
ROUTE LIST
You can lock single road sections
along the calculated route. This function is very useful when you receive
information on heavy traffic, works in
progress, etc. along your calculated
route.
Proceed as follows:
1) press the
k
button (7). The IM-
POSTAZIONI (SETTINGS) menu will
appear on the display fig. 71
7) indicate at which distance with re-
spect to your position to end the detour with the knob/button (11)
8) select OK with the knob/button
(11). Press the knob/button (11) to
confirm. The route guidance menu will
appear on the display and the new
route is recalculated. The message
NEW CALC. will appear on the display
Proceed as follows to switch the
function off:
1) press the
k
button (7). The IM-
POSTAZIONI (SETTINGS) menu will
appear on the display fig. 71
2) position the cursor on INGORGO
DAVANT (TRAFFIC AHEAD) with
the knob/ button (11). The INGORGO DAVANTI (TRAFFIC AHEAD)
menu will appear and the cursor
moves next to FINO (TO)
3) press the knob/button
4) select ELIMINA (CLEAR) by the
knob/button (11)
5) confirm the selection by pressing
the knob/button (11). The route will
be recalculated.
2) position the cursor on MODIFICA
PERC. (MODIFY ROUTE) fig. 73 with
the knob/ button (11). The route list
where to lock a section will appear on
the display
IMPORTANT Long routes in
which single short sections cannot be
locked are marked with symbol “+”.
To display short route sections, select
items marked with symbol “+” and
hold the knob/button pressed for
longer than two seconds.
Short route sections which are not
divided are marked with symbol“-”.
Route sections that cannot be locked
(since an alternative route cannot be
selected), are marked with symbol
S
.
fig. 73
F0E3077g
Page 58

57
CONNECT NAV
NAVIGATOR
3) select the first route section you
want to delete from the list (it is better to select a long route) with the
knob/button (11)
4) press the knob/button (11): a ring
will be displayed in front of the selected route
5) turn the knob/button (11) until se-
lecting the last route to delete from
the list (it is better to select a long
route)
6) press the knob/button (11). The
main navigation menu will appear on
the display and a new route is calculated. The message NEW CALC will
appear on the display.
Proceed as follows to delete/edit the
route section:
1) press the
k
button (7). The IM-
POSTAZIONI (SETTINGS) menu will
appear on the display fig. 71
2) position the cursor on MODIFI-
CA PERC. (MODIFY ROUTE) with
the knob/ button (11) fig. 73: the display will show the clear or change options:
– select ELIMINA (CLEAR) to delete
a route section. The main navigation
menu will appear on the display and a
new route is calculated. The message
NEW CALC will appear on the display.
– select CAMBIA (CHANGE) to
modify a route section and repeat the
operations specified above in points
3), 4), 5) and 6)
CUSTOMISING THE ROUTE
Routes can be customised at any moment, even during navigation by entering the following parameters:
– PERCORSO (ROUTE): you can
choose between the fastest or shortest route or select the “Dynamic travel guide” DINAMIC (DYN.) with TMC
(see “Dynamic travel guide” in this
chapter). When this function is on, all
the other options (AUTOSTR. (MOTORWAY), TRAGHETTI (FERRY)
and PEDAGGIO (TOOL)) are not displayed. The satellite sound/navigation
system tunes automatically to a TMC
station and computes the fastest/
shortest route on the basis of the traffic messages;
– AUTOSTR. (MOTORWAY): during navigation, you can choose
whether to use motorways;
– TRAGHETTI (FERRY): you can
choose whether to use ferries;
– PEDAGGIO (TOOL): you can exclude toll roads from the route.
Page 59

58
CONNECT NAV
NAVIGATOR
Proceed as follows to select the
route options:
1) press the MEN button (10) in the
main navigation menu or in the route
guidance menu to open the navigation
setup menu
2) select OPZIONI PERC. (ROUTE
OPTION) by turning the knob/button
(11)
3) confirm the selection by pressing
the knob/button (11). The OPZIONI
PERC. (ROUTE OPTION) menu will
appear on the display fig. 74
4) position the cursor on the re-
quired option with the knob/button
(11)
5) press the knob/button (11) to
change the setting.
Proceed as follows to quit the route
option menu:
1) press the ESC button (9). The dis-
play will return to the navigation setup menu. Alternatively, position the
cursor on CONTINUA (CONTINUE) with the knob/button (11) fig. 75
2) confirm the selection by pressing
the knob/button (11). The main navigation menu will be displayed.
IMPORTANT The sound/naviga-
tion system will automatically calculate
a new route when the settings are
changed during active navigation. The
route options will be active until they
are changed again.
DEFINING THE
CAR’S POSITION
This function can be used to display
the current position of the car (example: the name of the street you are
driving along) and the north-up indication. Route guidance will be interrupted when the function is on.
Proceed as follows to define the current position:
1) press the NAV button (12) to
open the main navigation menu
2) select LOCALIZZAZIONE (LO-
CATING) by turning the knob/button
(11) fig. 76
fig. 74
F0E3058g
fig. 75
F0E3066g
fig. 76
F0E3069g
Page 60

59
CONNECT NAV
NAVIGATOR
3) confirm the selection by pressing
the knob/button (11).
Press ESC (9) to end the function
and return to the main navigation
menu.
Storing the position
Proceed as follows to store the cur-
rent position:
1) press the MEN button (10) to
open the navigation setup menu
2) select INS. POS. ATT. (POSI-
TION MARK) by turning the
knob/button (11) fig. 77
3) confirm the selection by pressing
the knob/button (11). Select NOME
(NAME) with the knob/button. The
editing menu for naming the position
will appear on the display fig. 78
4) position the cursor on the re-
quired character by turning the
knob/button (11)
5) confirm the selection by pressing
the knob/button (11). The selected
character will appear in the editing
field
6) confirm the short name by press-
ing the knob/button (11) for longer
than two seconds
7) repeat the operation for the oth-
er characters
8) confirm the name by pressing the
knob/button (11) for longer than two
seconds or by selecting the
j
symbol
and confirming.
IMPORTANT This procedure can
only be carried out with a navigation
CD inserted in the drive.
The entered name will automatically be transferred to the destination
memory.
Proceed as follows if you do not
want to assign a short name to the
current position:
1) select CONTINUA (CONTIN-
UE) with the knob/button (11) instead
of NOME (NAME) (as described
above)
2) confirm the selection by pressing
the knob/button (11). The display will
return to the main menu without saving the name.
fig. 77
F0E3067g
fig. 78
F0E3070g
Page 61

60
CONNECT NAV
NAVIGATOR
RECEIVING TRAFFIC
ANNOUNCEMENTS DURING
NAVIGATION
You can listen to traffic announcements during navigation. This option
can be switched on and off regardless
of the sound source.
Press the TA button (4) to switch
the function on and off.
SWITCHING VOICE
MESSAGES ON AND OFF
Route guidance consists of voice
messages. The voice messages provide
information on the distances to be
travelled before turning.
The voice messages can be switched
on and off:
1) press the MEN button (10) to
open the navigation setup menu
2) select LINGUA (LANGUAGE) by
turning the knob/button (11) fig. 79
3) press the knob/button (11) to dis-
play ON (voice messages on) or OFF
(voice messages off). The default setting is ON.
SWITCHING THE
LAST 10 DESTINATIONS
MEMORY ON AND OFF
The last ten destinations can be
stored. With this function, you can automatically store the last ten destinations.
Proceed as follows to switch the last
ten destination memory on and off:
1) press the MEN button (10) in the
main navigation menu or in the route
guidance menu to open the navigation
setup menu
2) select ULTIME 10 (LAST 10) by
turning the knob/button (11) fig. 80
fig. 80
F0E3072g
fig. 79
F0E3071g
Page 62

61
CONNECT NAV
NAVIGATOR
3) press the knob/button (11) to dis-
play ON or OFF. The default setting
is ON.
SWITCHING ROUTE TIME
INFORMATION ON AND OFF
The time required to reach the des-
tinations can be displayed.
Proceed as follows to switch the
route time information on and off:
1) press the MEN button (10) in the
main navigation menu or in the route
guidance menu to open the navigation
setup menu
2) select INFO TEMP (TIME INFO)
by turning the knob/button (11)
fig. 81
3) press the knob/button (11) to se-
lect
Q
(route time information on)
or R(clock and time of arrival on).
Press ESC to switch the function off
and return to the main navigation
menu (9)
MANUAL POSITION
INDICATION
The current position of the car can
be input manually when the GPS signal cannot be received.
To manually indicate the current position:
1) press the MEN button (10) in the
main navigation menu or in the route
guidance menu to open the navigation
setup menu
2) select POS. ATT. MAN. (MAN.
POSITION) by turning the knob/button (11) fig. 82
3) confirm the selection by pressing
the knob/button (11). The editing
menu will appear on the display. Fill
in the required data in the following
order: town, street, intersection (see
“Destination entry” in the “Satellite
navigation” chapter)
fig. 81
F0E3073g
fig. 82
F0E3074g
Page 63

62
CONNECT NAV
NAVIGATOR
4) when you have finished defining
the position, press the knob/button
(11) for longer than two seconds to
confirm or select the (j) symbol and
confirm. The main navigation menu
will appear on the display.
IMPORTANT Certain road inter-
sections (e.g. straight road intersection
with loop road) are not suitable for indicating the car position.
NAVIGATION SIMULATION
The sound/navigation system can
simulate a trip. The device simulates
navigation by providing realistic visual
instructions, voice messages and
acoustic signals.
Proceed as follows to start a simulation:
1) enter a destination (see “Destina-
tion entry” in the “Satellite navigation”
chapter)
2) press the MEN button (10) in the
main navigation menu or in the route
guidance menu to open the navigation
setup menu
3) select DIMOSTRAZIONE (NAVI
SIMULAT.) by turning the knob/button (11) fig. 83
4) confirm the selection by pressing
the knob/button (11). The simulation
will be started
5) select GIRO TURISTICO (TRAV-
EL GUIDE) or DEST. SINGOLA (SINGLE DEST.) in the main navigation
menu with the knob/button (11)
6) press the knob/button (11) to
start the route guidance simulation.
The message “DEMO” fig. 84 will appear on the display.
IMPORTANT The simulation will
automatically end when the set destination is reached or when a real navigation is started.
IMPORTANT If GPS positioning is
not possible, enter the position by
hand. NO MAP navigation is not possible during the simulation.
fig. 83
F0E3075g
fig. 84
F0E3076g
Page 64

63
CONNECT NAV
NAVIGATOR
BBAASSIICCSSEETTTTIINNGGSS((SSEETTUUPP)
)
The IMPOSTAZIONI (SETTINGS)
menu allows to adjust the sound/navigation system settings to your needs.
Furthermore, special functions can be
adjusted by means of the various
source-specific DSC menus.
OPENING THE SETTINGS
(SETUP) MENU
The IMPOSTAZIONI (SETTINGS)
menu can be opened from the main
menus of the various functions. Use
the following buttons to open the
main menus:
•
press the TU button (17) to open
the radio function main menu;
•
press the CD-C button (15) to
open the CD or CD changer (where
fitted) function main menu;
•
press the NAV button (12) to open
the main navigation menu.
When the display shows the main
menu of one of the sound sources or
a function menu is displayed, press
twice the MEN button (10): the IMPOSTAZIONI (SETTINGS) menu will
appear on the display fig. 85
If sound source IMPOSTAZIONI
(SETTINGS) menu or NAVIGAZIONE (NAVI. MENU) menu is
displayed, press the MEN button (10)
to display the IMPOSTAZIONI (SETTINGS) menu.
The display will show a list of options
in the IMPOSTAZIONI (SETTINGS)
menu fig. 85.
Proceed as follows to set and select
options in the list:
1) position the cursor on the re-
quired list option turning the
knob/button (11)
2) confirm the selection by pressing
the knob/button (11).
Press ESC (9) to return to the pre-
vious menu.
ADJUSTING THE DISPLAY
You can switch the automatic
switchover to night-time vision on and
off, adjust brightness and contrast
(separately for day and night) in the
IMPOSTAZIONI (SETTINGS) menu.
Furthermore, you can adjust the angle
of vision for the route instructions on
the display.
fig. 85
F0E3078g
Page 65

64
CONNECT NAV
NAVIGATOR
5) press the knob/button (11) to se-
lect ON or OFF. The default setting is
ON.
Repeat the procedure to switch the
automatic switchover function back
on.
Press ESC (9) to return to the previous menu.
Angle of vision
Proceed as follows to adjust the angle of vision of the display:
1) open the IMPOSTAZIONI (SET-
TINGS) menu fig. 85 as shown above
2) select DISPLAY by turning the
knob/button (11)
3) press the knob/button (11) to
confirm the selection
Automatic night-time
display switchover
Proceed as follows to switch the automatic night-time display switchover
function off:
1) open the IMPOSTAZIONI (SET-
TINGS) menu fig. 85 as shown above
2) select DISPLAY by turning the
knob/button (11)
3) press the knob/button (11) to
confirm the selection
4) select GIORNO/NOTTE (DAY/
NIGHT) by turning the knob/button
(11) fig. 86
4) select ANGOLO (ANGLE) by
turning the knob/button (11) fig. 86
5) press the knob/button (11) to
confirm the selection
6) turn the knob/button (11) to ad-
just the angle of vision
7) press the knob/button (11) to
confirm the setting made.
Press ESC (9) to return to the pre-
vious menu.
fig. 86
F0E3082g
Page 66

65
CONNECT NAV
NAVIGATOR
Adjusting display brightness
Proceed as follows to adjust display
brightness:
1) Open the IMPOSTAZIONI (SET-
TINGS) menu fig. 85 as described
above
2) Select DISPLAY by turning the
knob/button (11)
3) Press the knob/button (11) to
confirm the selection
4) Select LUMINOSITÀ (BRIGHT-
NESS) by turning the knob/button (11)
fig. 86
5) press the knob/button (11) to
confirm the selection
6) select GIORNO (DAY) or
NOTTE (NIGHT) by turning the
knob/button (11) to adjust brightness
7) press the knob/button (11) to
confirm the setting.
Press ESC (9) to return to the previous menu.
ADJUSTING POWER-ON, TA
ANNOUNCEMENT,
MESSAGE
The power-on volume (ACCENS.)
(POWER-ON), the minimum traffic
announcement volume (TA-MIN), the
minimum volume for voice messages
and warnings (NAV-MIN) can be set
in the IMPOSTAZIONI (SETTINGS)
menu.
IMPORTANT The system volume
overrides the IMPOSTAZIONI (SETTINGS) volume when it is higher than
the minimum setup volume.
Adjusting the fade effect
Proceed as follows to adjust the fade
effect:
1) open the IMPOSTAZIONI (SET-
TINGS) menu fig. 85 as described
above
2) Select DISPLAY by turning the
knob/button (11)
3) press the knob/button (11) to
confirm the selection
4) select SPECIAL by turning the
knob/button (11) fig. 87
5) press the knob/button (11) to se-
lect one of the three different fade effects. Default setting is 0.
fig. 87
F0E3083g
Page 67

66
CONNECT NAV
NAVIGATOR
IMPORTANT The minimum vol-
ume is a form of limitation. If the volume was lower than the minimum setup volume when the system was
switched off this will override the IMPOSTAZIONI (SETTINGS) volume. If
on the other hand the volume was
higher, the minimum volume will be
valid.
Proceed as follows to adjust the vol-
ume:
1) Open the IMPOSTAZIONI (SET-
TINGS) menu fig. 85 as shown above
2) Select VOLUME fig. 88 by turn-
ing the knob/button (11)
3) Press the knob/button (11) to
confirm the selection
4) Turn the knob/button (11) to se-
lect the required option fig. 89:
– ACCENS. (POWER-ON) (power-
on volume);
– TA-MIN (minimum TA traffic an-
nouncement volume);
– NAVI-MIN (minimum navigation
message volume);
– TELEFONO (PHONE) (min.
phone volume)
5) Press the knob/button (11) to
confirm the selection
6) Adjust the setting by turning the
knob/button (11)
7) press the knob/button (11) to
confirm the selection.
Press ESC (9) to return to the previous menu.
fig. 89
F0E3084g
fig. 88
F0E3085g
If you drive with the volume
too high you put both your
own life and that of others in jeopardy. You should adjust the volume
so that you can hear noises from
outside the car (e.g. horns, ambulance/ police sirens, etc.).
WARNING
Page 68

67
CONNECT NAV
NAVIGATOR
SETTING THE CLOCK
The IMPOSTAZIONI (SETTINGS)
menu can be used to switch the summer time on and off, adjust the clock
format (12 hours/24 hours) and set
the time zone referred to Central European Time (MEZ). These settings
are required by the sound/navigation
system to calculate the discrepancy
between system time and GPS transmitted time and, consequently, calculate the actual navigation time.
Selecting the time format
Proceed as follows to select the time
format (12 or 24 hour clock):
1) open the IMPOSTAZIONI (SET-
TINGS) menu fig. 85 as shown above
2) select OROLOGIO (CLOCK) by
turning the knob/button (11)
3) press the knob/button (11) to
confirm the selection
4) select IMPOSTAZIONI (SET-
TINGS) menu by turning the
knob/button (11)
5) select FORMATO ORA (TIME
FORMA) by turning the knob/button
(11) fig. 90
6) press the knob/button (11) to
confirm the selection
7) select the format (12 or 24 hours)
by pressing the knob/button (11)
8) press the knob/button (11) for
longer than two seconds to confirm
the selection.
Press ESC (9) to return to the pre-
vious menu.
fig. 90
F0E3087g
Page 69

68
CONNECT NAV
NAVIGATOR
Selecting the time zone
Proceed as follows to change the
time zone:
1) open the IMPOSTAZIONI (SET-
TINGS) menu fig. 85 as shown above
2) select OROLOGIO (CLOCK) by
turning the knob/button (11)
3) press the knob/button (11) to
confirm the selection
4) select IMPOSTAZIONI (SET-
TINGS) by turning the knob/button
(11)
5) select FUSO ORARIO (TIME
ZONE) by turning the knob/button
(11) fig. 90
6) press the knob/button (11) to
confirm the selection
7) turn the knob/button (11) to set
the time zone (example: –2, –1, 0, +1,
+2, etc.)
8) confirm the selection by pressing
the knob/button (11).
Press ESC (9) to return to the previous menu.
Switching summer time
on and off
The system will automatically switch
to summer time when the function is
on. Proceed as follows to switch summer time on and off:
1) open the IMPOSTAZIONI (SET-
TINGS) menu fig. 85 as shown above
2) select OROLOGIO (CLOCK) by
turning the knob/button (11)
3) press the knob/button (11) to
confirm the selection
4) select IMPOSTAZIONI (SET-
TINGS) by turning the knob/button
(11)
5) select ORA LEGALE (SUMMER
TIME) by turning the knob/button (11)
fig. 90
6) press the knob/button (11) to dis-
play summer time ON or OFF.
The system time will be automatically
adjusted. The message ON or OFF according to the selection will appear on
the display.
Switching the main time
on and off
Proceed as follows to switch the
main time function on and off:
1) open the IMPOSTAZIONI (SET-
TINGS) menu fig. 85 as shown above
2) select OROLOGIO (CLOCK)
fig. 91 by turning the knob/button
(11)
3) press the knob/button (11) to
confirm the selection
4) select OROL. PRINCIP. (MAIN
CLOCK) by turning the knob/button
(11)
5) press the knob/button (11) to select ON or OFF
fig. 91
F0E3086g
Page 70

69
CONNECT NAV
NAVIGATOR
Switching the time status
on and off
Proceed as follows to switch the
time status function on and off:
1) open the IMPOSTAZIONI (SET-
TINGS) menu fig. 85 as shown above
2) select OROLOGIO (CLOCK) by
turning the knob/button (11)
3) press the knob/button (11) to
confirm the selection
4) select VISUALIZZA (DISPLAY) by
turning the knob/button (11)
5) press the knob/button (11) to se-
lect ON or OFF
Setting the exact time
manually
Proceed as follows to set manually
the exact time (e.g.: when no GPS
satellite signal is received):
1) open the IMPOSTAZIONI (SET-
TINGS) menu fig. 85 as shown above
2) select OROLOGIO (CLOCK) by
turning the knob/button (11)
3) press the knob/button (11) to
confirm the selection
4) select IMPOSTAZIONI (SET-
TINGS) by turning the knob/button
(11)
5) select ORA SISTEM. (SYS. TIME)
by turning the knob/button (11)
6) press the knob/button (11) to
confirm the selection: hours are displayed with reverse writing
7) turn the knob/button (11) to set
hours
8) press the knob/button (11) to
confirm the selection: minutes are displayed with reverse writing
9) turn the knob/button (11) to set
minutes
10) press the knob/button (11) to
confirm the selection
SELECTING THE LANGUAGE
You can select the language for messages on the display. “Metric” (distances in kilometres) and “imperial”
(distances in miles) versions are offered for English
1) open the IMPOSTAZIONI (SET-
TINGS) menu fig. 85 as shown above
2) select LINGUA (LANGUAGE) by
turning the knob/button (11)
3) press the knob/button (11) to
confirm the selection. A list of available languages will be displayed
IMPORTANT For certain countries (e.g. Denmark, Sweden and Portugal), the voice messages related to
Navigation are in English whereas displayed messages are written in the language of each country.
Page 71

70
CONNECT NAV
NAVIGATOR
GPS STATUS (INFO GPS)
Proceed as follows to display the
number of GPS satellites which can be
received and the car position:
1) press the NAV button (12) to
open the main navigation menu
2) press the MEN button (10) to
open the IMPOSTAZIONI (SETTINGS) menu
3) select INSTALLAZIONE (IN-
STALL) by turning the knob/button
(11) fig. 96
4) select the required language by
turning the knob/button (11)
5) confirm the selection by pressing
the knob/button (11).
A new language will be loaded. At the
end of the loading operation with a
CD inserted in the drive a confirmation voice message will be heard.
The device will return to the IMPOSTAZIONI (SETTINGS) menu.
4) press the knob/button (11) to
confirm the selection. The INSTALLAZIONE (INSTALL) menu will appear on the display fig. 97
5) select INFO GPS (GPS STATUS)
by turning the knob/button (11)
6) confirm the selection by pressing
the knob/button (11).
Press ESC (9) to return to the pre-
vious menu.
fig. 92
F0E3080g
fig. 93
F0E3088g
Page 72

71
CONNECT NAV
NAVIGATOR
SECURITY
Activating/deactivating
the security code
The security code can be activated
and deactivated by selecting SICUREZZA (SAFETY) in the IMPOSTAZIONI (SETTINGS) menu.
When the protection is on, the device
can only be switched on by entering
a safety code after disconnecting the
battery (see
ENTERING THE SECURITY
CODE
in the
SECURITY
chapter).
IMPORTANT This is the only
theft-prevention countermeasure of the system. We recommend you activate the security
code.
Proceed as follows to activate/deactivate the code:
1) press the NAV button (12) to
open the main navigation menu
2) press the MEN button (10) to
open the IMPOSTAZIONI (SETTINGS) menu
3) select SICUREZZA (SAFETY) by
turning the knob/button (11) fig. 94
4) press the knob/button (11) to
confirm the selection
5) select CODICE (CODE) by turn-
ing the knob/button (11)
6) press the knob/button (11) to se-
lect ON or OFF. The default setting is
OFF (security code off). In any case,
enter the security code
7) select
j
by turning the knob/but-
ton (11)
8) press the knob/button (11) to
confirm the selection.
Activating/deactivating
the security led
The security led can be activated/deactivated in the CODICE-SETUP
(CODE-SETUP) menu. Proceed as follows:
1) press the NAV button (12) to
open the main navigation menu
2) press the MEN button (10) to
open the IMPOSTAZIONI (SETTINGS) menu
3) select SICUREZZA (SAFETY) by
turning the knob/button (11) fig. 94
4) press the knob/button (11) to
confirm the selection
5) select LED by turning the
knob/button (11)
6) press the knob/button (11) to se-
lect ON or OFF. The default setting is
ON (security led active).
fig. 94
F0E3081g
Page 73

72
CONNECT NAV
NAVIGATOR
RESETTING
DEFAULT SETTINGS
To reset the sound/navigation system
default settings:
1) press the NAV button (12) to
open the main navigation menu
2) press the MEN button (10) to
open the IMPOSTAZIONI (SETTINGS) menu
3) select RESET by turning the
knob/button (11) fig. 100
4) press the knob/button (11) to
confirm the selection.
There are three situations (A, B
and C). The screens will appear on the
display accordingly:
Situation A) With a navigation CD
inserted. A reset (clear) message will
appear on the display. The destination
memory and the route options will be
deleted.
Proceed as follows to clear the mem-
ory:
1) select SI (YES) by turning the
knob/button (11)
2) press the knob/button (11) to
confirm the selection.
To keep the memory content:
1) select NO by turning the knob/
button (11)
2) press the knob/button (11) to
confirm the selection.
The system will automatically go to
the following question if there is no
navigation CD inserted.
Situation B) A CD sound setting
deletion message will appear on the
display.
Proceed as follows to clear the memory:
1) select SI (YES) by turning the
knob/button (11)
2) press the knob/button (11) for
longer than two seconds to confirm
the selection.
To keep the memory content
1) select FINE (END) by turning the
knob/button (11)
2) press the knob/button (11) for
longer than two seconds to confirm
the selection.
fig. 95
F0E3091g
Page 74
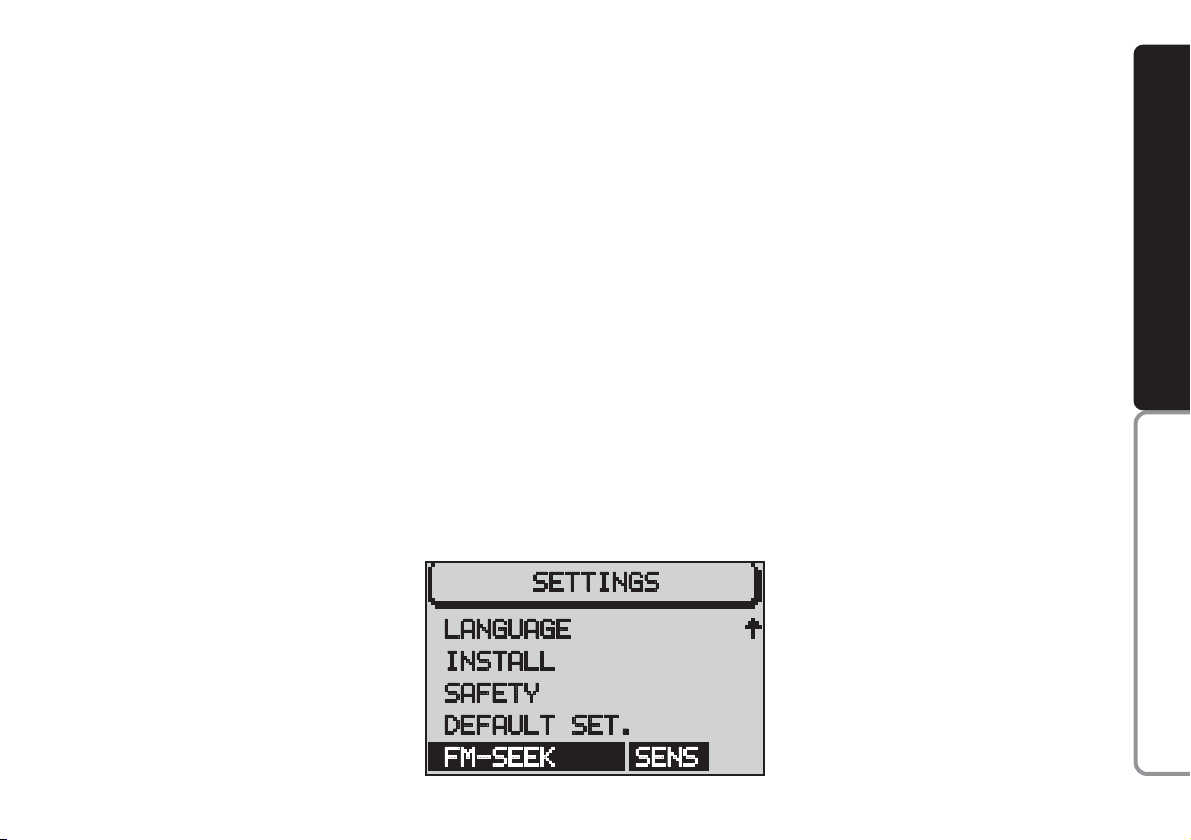
73
CONNECT NAV
NAVIGATOR
4) select BEST or SENS. by pressing
the knob/button (11). The default setting is BEST.
BEST: only stations with excellent reception are sought (i.e. no disturbance). Use this function when travelling in an area with a large number of
broadcasters.
SENS: all the stations are sought. Use
this function when travelling in an area
with a small number of broadcasters.
Setting tuner sensitivity
With this function it is possible to
change the set the sensitivity of automatic radio station searching.
Proceed as follows:
1) press the NAV button (12) to
open the main navigation menu
2) press the MEN button (10) to
open the IMPOSTAZIONI (SETTINGS) menu
3) select FM-SEEK by turning the
knob/button (11) fig. 101
Situation C) Finally, a IM-
POSTAZIONI (SETTINGS) menu option and sound volume deletion message will appear on the display.
Proceed as follows to clear the
memory:
1) select SI (YES) by turning the
knob/button (11)
2) press the knob/button (11) for
longer than two seconds to confirm
the selection.
To keep the memory content:
1) select NO by turning the knob/
button (11)
2) press the knob/button (11) for
longer than two seconds to confirm
the selection.
IMPORTANT In all three cases, se-
lect SI (YES) to reset (clear) the memory. The system will automatically
switch off and on again.
IMPORTANT Select NO in any
case to automatically return to the IMPOSTAZIONI (SETTINGS) menu.
fig. 96
F0E3090g
Page 75

74
CONNECT NAV
NAVIGATOR
GENERAL INFORMATION ............................................ 77
ADVICE........................................................................................ 78
ROAD SAFETY ........................................................................ 78
RADIOFREQUENCY ............................................................ 78
RECEPTION/TRANSMISSION CONDITIONS .............. 78
CARE AND MAINTENANCE ............................................ 79
COMPACT DISCS .................................................................. 79
CONTROLS .............................................................................. 80
CONTROLS ON STEERING WHEEL .............................. 82
OPERATION ............................................................................ 84
SWITCHING THE CONNECT NAV ON/OFF ............ 84
SELECTING FUNCTIONS .................................................. 84
ADJUSTING THE VOLUME ................................................ 85
DISPLAY .................................................................................... 85
ADJUSTING THE SOUND .................................................. 86
RADIO ........................................................................................ 87
LISTENING TO THE RADIO .............................................. 87
SELECTING THE WAVEBAND ........................................ 88
TUNING TO FM STATIONS .............................................. 88
STORING STATIONS .......................................................... 90
SCAN FUNCTION ................................................................ 92
CCOONNNNEECCTTNNaav
v
RDS FUNCTION .................................................................... 93
REG FUNCTION .................................................................... 93
PTY FUNCTION...................................................................... 93
TA FUNCTION ...................................................................... 94
TMC FUNCTION .................................................................. 95
SHARX FUNCTION .............................................................. 96
R-TXT FUNCTION .............................................................. 96
TIM FUNCTION...................................................................... 97
COMPACT DISC PLAYER (CD) .................................. 99
INSERTING AND EJECTING A CD ................................ 99
PLAYING A CD ...................................................................... 100
CD FUNCTIONS .................................................................. 100
SELECTING NEXT/PREVIOUS TRACKS ........................ 101
SCANNING TRACKS .......................................................... 101
MIX FUNCTION...................................................................... 102
SCAN FUNCTION.................................................................. 102
REPEAT FUNCTION.............................................................. 102
PROGRAM FUNCTION ...................................................... 103
CD NAME FUNCTION ........................................................ 104
CD CHANGER - CDC (where fitted) .......................... 106
INSERTING AND EJECTING A CD ................................ 106
PLAYING A CD WITH THE INTERNAL CD PLAYER 107
PLAYING A CD WITH THE CD Changer ...................... 107
TURNING ON THE CD CHANGER .............................. 108
Page 76

75
CONNECT NAV
NAVIGATOR
SELECTING NEXT/PREVIOUS TRACKS ...................... 110
SCANNING TRACKS ........................................................ 111
MIX FUNCTION ................................................................ 111
SCAN FUNCTION .............................................................. 112
REPEAT FUNCTION .......................................................... 112
PROGRAM FUNCTION .................................................... 113
CD NAME FUNCTION...................................................... 115
SATELLITE NAVIGATION .......................................... 117
ROUTE GUIDANCE .......................................................... 117
ENTERING THE DESTINATION .................................. 118
ENTERING SPECIAL DESTINATIONS ........................ 125
USING STORED DESTINATIONS ................................ 128
STORING THE CURRENT POSITION ........................ 129
ACTIVE NAVIGATION .................................................. 130
ROUTE GUIDANCE .......................................................... 130
STOPPING NAVIGATION .............................................. 131
CHANGING THE AUDIO SOURCE ............................ 132
TUNING THE RADIO ...................................................... 132
NO MAP NAVIGATION .................................................. 132
DYNAMIC TRAVEL GUIDE ............................................ 133
TOURIST GUIDE INFORMATION ................................ 134
ROUTE LIST .......................................................................... 135
DESTINATION MEMORY ................................................ 135
STORING STORED DESTINATIONS .......................... 136
DELETING STORED DATA ............................................ 137
ENTERING AND EDITING DESTINATION
SHORT NAMES .................................................................... 138
GPS STATUS AND POSITION INFORMATION ...... 139
AVOIDING TAILBACKS DURING NAVIGATION .. 139
LOCKING A ROUTE SECTION WITHIN
A ROUTE LIST ...................................................................... 140
CUSTOMISING THE ROUTE .......................................... 142
DEFINING THE CAR POSITION .................................. 143
RECEIVING TRAFFIC ANNOUNCEMENTS
DURING NAVIGATION .................................................. 144
SWITCHING VOICE MESSAGES ON AND OFF ...... 145
SWITCHING THE LAST 10 DESTINATION
MEMORY ON AND OFF .................................................. 145
SWITCHING ROUTE TIME
INFORMATION ON AND OFF .................................... 146
MANUAL POSITION INDICATION ............................ 146
NAVIGATION SIMULATION .......................................... 147
TARGA INFOMOBILITY SERVICES ........................ 148
GENERAL INFORMATION .............................................. 148
ENABLING PHONE/SIM CARD ...................................... 149
ENTERING THE TARGA INFOMOBILITY NUMBER 150
ENTERING THE PERSONAL NUMBER ........................ 151
RESET ...................................................................................... 152
CONNECT NAV USE ........................................................ 152
“MEDICAL ADVICE” SERVICE ........................................ 153
“ROAD ASSISTANCE” SERVICE...................................... 155
INFOMOBILITY SERVICES .............................................. 156
Page 77

76
CONNECT NAV
NAVIGATOR
“FOLLOW ME” FUNCTION ............................................ 157
RECALLING THE PHONE CODE NUMBER .............. 162
RECALLING THE PHONE “STATE” FUNCTION .... 162
DISPLAYING AVAILABLE SIM PROFILES .................... 163
TELEPHONE .......................................................................... 164
GENERAL INFORMATION .............................................. 164
TURNING THE PHONE ON .......................................... 164
ENTERING THE PIN CODE ............................................ 164
CHANGING THE PIN CODE ........................................ 165
SIM CARD UNLOCKING ................................................ 166
VOLUME ADJUSTMENT .................................................. 166
SELECTING PHONE NUMBERS .................................... 167
SELECTING A NUMBER
IN THE PHONE BOOK .................................................... 169
INCOMING CALLS ............................................................ 170
TELEPHONE CALLS TO FOREIGN COUNTRIES .... 171
SELECTING THE NETWORK ........................................ 172
PHONEBOOK ...................................................................... 176
MESSAGES (SMS) ................................................................ 178
BASIC SETTINGS .............................................................. 183
OPENING THE SETTINGS MENU ................................ 183
ADJUSTING THE DISPLAY .............................................. 183
ADJUSTING POWER-ON, TA ANNOUNCEMENT
MESSAGE ................................................................................ 185
SETTING THE CLOCK ...................................................... 187
SELECTING THE LANGUAGE ........................................ 189
GPS STATUS ........................................................................ 190
SECURITY .............................................................................. 191
RESETTING DEFAULT SETTINGS ................................ 192
ANTITHEFT PROTECTION SYSTEM .................. 195
GENERAL INFORMATION .............................................. 195
CODE CARD ........................................................................ 195
ENTERING THE SECURITY CODE .............................. 195
TECHNICAL DATA .......................................................... 197
RADIO .................................................................................... 197
COMPACT DISC PLAYER AND CD CHANGER .... 197
AUDIO .................................................................................... 198
SATELLITE NAVIGATION ................................................ 198
TARGA INFOMOBILITY SERVICES ................................ 198
TELEPHONE ........................................................................ 198
SYSTEM TECHNICAL DATA .......................................... 199
Page 78

77
CONNECT NAV
NAVIGATOR
The Connect Nav system with integrated sound system and telephone
complies with safety rules issued by
competent government bodies and organizations.
The telephone integrated with the
sound system works on the basis of
GSM mobile telephone standards.
Such standards determine the use of
cellular phones in Europe and other
countries, but they have been extended also to other world countries
(e.g. VDE DIN 0848).
With this telephone it is possible to
make the same telephone connections
which can be made with a portable
cellular phone. In order to make a
telephone call it is necessary to have a
SIM card and to be in a place served
by the Dual Band network, with
enough sign field intensity.
Emergency calls
In order to guarantee the maximum
safety, the telephone is set so that the
“Emergency 112” call can always be
activated, even if the SIM card is not
inserted in the slot.
The telephone can make and receive
calls when the Connect Nav system is
on, when the vehicle is in an area
served by a GSM 900/1800 network
and when the field intensity is sufficient. That is why connection cannot
be assured in every condition. Do not
rely only on the radio telephone for
vital emergency calls, as in case of request for medical assistance.
GGEENNEERRAALLIINNFFOORRMMAATTIIOON
N
Page 79

78
CONNECT NAV
NAVIGATOR
AADDVVIICCE
E
Carefully respect rules and regulation
determining the use of telephones inside cars. Telephone calls when driving
shall only be made in case of emergency and using the voice commands.
Anyway you are advised to park the
car and to use the telephone only
when the car is stationary.
RADIOFREQUENCY
The telephone is certified on the basis of GSM standards and complies
with safety value limitations for protection against radiofrequency radiations.
The telephone use can alter medical
equipment functions (hearing aids,
pace maker, etc.) if not adequately
protected.
Always turn the telephone off when
it is forbidden to use it or in areas with
high explosion danger such as filling
stations, chemical plants and near explosive agents or blasting charges.
ROAD SAFETY
You are recommended to learn how
to use the different functions of the
Connect Nav and in particular of the
radio (e.g. storing stations) before
starting to drive.
RECEPTION/TRANSMISSION
CONDITIONS
Reception conditions (for the radio)
or reception/transmission conditions
(for the telephone) change constantly when driving. Reception can be disturbed by the presence of mountains,
buildings, bridges, particularly when far
away from the broadcaster receiver
or the radio link for the telephone.
Too high a volume when
driving can put the driver’s
life at risk and that of other people.
Therefore the volume should always be adjusted in such a way that
it is always possible to hear noises
of the surrounding environment
(e.g. horns, ambulance, police
sirens, etc.).
WARNING
Page 80

79
CONNECT NAV
NAVIGATOR
CARE AND MAINTENANCE
The structure of the system ensures
long years of operation with no need
for particular maintenance. In the
event of a fault, contact
Alfa Romeo Au-
thorised Services
.
Clean the front panel and display only using a soft, dry antistatic cloth.
Cleaning and polishing products may
damage the surface.
Treat the display with care. Do not
use pointed or hard objects which
might scratch and damage it.
Clean the display with a soft, clean
and dry cloth. Do not use solvents
which might corrode and damage the
display.
COMPACT DISCS
If a Compact Disc is used on the
Sound system, remember that the
presence of dirt or marks on Compact
Discs may cause skipping when playing and poor sound quality. The same
happens if Compact Discs are bent by
accident.
To obtain optimum playing conditions we give the following advice:
– only use Audio Compact Disc with
the brand:
– carefully clean all Compact Discs of
any fingerprints and dust using a soft
cloth. Support Compact Discs on the
edges and clean from the centre outwards;
– never use chemical products for
cleaning (e.g. spray cans, antistatics or
thinners) as they might damage the
surface of Compact Discs;
– after listening to them put Compact Discs back in their boxes to avoid
marking or scoring which would cause
skipping when playing;
– do not expose Compact Discs to
direct sunlight, high temperatures or
damp for prolonged lengths of time to
prevent them from bending;
– do not stick labels or write on the
recorded surface of Compact Discs.
Be careful not to knock
the display with pointed
or hard objects and avoid
touching with the hands. Do not
press on the display when cleaning. If it gets broken, do not touch
the fluid which might come out.
In case it gets in contact with the
skin, wash it immediately with
water and soap.
Page 81

80
CONNECT NAV
NAVIGATOR
CCOONNTTRROOLLS
S
fig. 1
F0E0400m
Page 82

81
CONNECT NAV
NAVIGATOR
1-T
button to open the front
2 -
ù§
selector. The functions
of this selector depend on the menu
and type of operation of the Connect
Nav
3 - AUD button to open the sound
menu
4 - TA button to switch the RDS-TA
(Traffic Announcement) function on
and off
5 - Display
6
-
Info i button
a) press this button when travelling
to repeat the last navigation voice
message and display the active destination
b) to fully display menu options end-
ing with “…”
7 -
•
: button to access the Telem-
atic Services run by Targa Infomo-
bility
8 -
T
key to display the TRAFFIC
menu including: TIM (Traffic Information Memory) and TMC (Traffic Message Channel) (instructions to detour
queues)
9 - ESC button
a) to quit the menu without saving
data
b) to go back to the previous screen/
menu
10 - MEN key to display the setup
menu
11 - Knob/button
The knob/button performs the fol-
lowing functions:
a) turn to select the items on the dis-
play
b) press to confirm the selection
(OK button)
c) press for longer than two seconds
to display 2-D or 3-D icons with active navigation and to confirm entered
data.
12 - NAV to switch the navigation
function on
13 - Multifunction keys
, the
function of these keys depends on the
menu
14 - Multifunction keys , the func-
tion of these keys depends on the
menu
15
- Key £: to turn the telephone
on, with access to the following
options:
a
) to accept incoming calls
b
) to end the call in progress
16 - Knob/button
The knob/button performs the fol-
lowing functions:
a) turn to adjust the volume and
switch to Mute
b) prolonged press (about 2 sec-
onds) to switch the sound/navigation
system on and off
c) brief press (less than 2 seconds):
Mute
17 - SRC: key: to choose the oper-
ating audio source: Radio, CD or CD
Changer (CD-C) (where fitted)
Page 83

82
CONNECT NAV
NAVIGATOR
21 (fig. 3) - GSM module with slot
(A) to insert SIM card.
To insert the SIM card: fit the SIM
card with the contact surfaces downwards and the side with the oblique
cut on the front side and on the left
side in the SIM card compartment;
push the SIM card until it clicks into
place.
To eject the SIM card: to eject the
SIM card press it slightly and guide it.
The GSM module bears a label showing how to insert and eject the SIM
card correctly.
18 - fig. 2
-
Compact Disc slot
19 - fig. 2
-
Compact Disc eject but-
ton
20 - fig. 2
-
Led indicating that the
(audio or navigation) CD is inserted in
the slot
CONTROLS ON STEERING
WHEEL fig. 4
The main functions of the sound system are repeated on the steering
wheel, which facilitates control.
Volume adjustment (+ and –)
Press button “+” (B) to increase volume and button “–” (B) to decrease
it as specified in paragraph “Volume adjustment”.
Function identical to that of knob
“VOL” set on the radio.
fig. 2
F0E0357m
fig. 3
F0E0407m
Page 84

83
CONNECT NAV
NAVIGATOR
Mute function (z)
Press button “z” (C) to turn on/off
this function that brings automatically
the volume to zero. When this function is on the display shows “MUTE”.
Function identical to that of button
“z” set on the radio.
Selecting Radio, CD or
CD Changer
Press repeatedly button “SRC” (A)
to cyclically select Radio, CD or
CD Changer (if present).
Button “SRC” (A) function is iden-
tical to that of the “SRC” button set
on the radio.
Setting Radio or CD (ôand ó)
Buttons “
ô
” (D) and “ó” (D) imple-
ment three different functions according to the operating mode selected
through button “SRC” (A) Radio,
CD or CD Changer (if present).
Button functions are identical to the
functions of buttons “
N
” and “O” set
on the radio, as concerns the following functions.
1) Radio function: tuning
Press button “
ô
” or “ó” to select
stations in the required band.
2) Selecting the track
(previous/next)
Press “ô” briefly to play the next
track on the CD or “ó” to play the
previous track.
Hold the button pressed to select
the track.
Press “
ó
” if the track has been playing for longer than three seconds to
play the track again from the beginning.
In this case, press the button twice to
play the previous track.
fig. 4
F0E0302m
Page 85

84
CONNECT NAV
NAVIGATOR
OOPPEERRAATTIIOON
N
Switching on and off
with engine off
The Connect Nav can also be oper-
ated when the engine is not running
(ignition key at STOP).
Press the knob/button (16) for ap-
proximately one second.
IMPORTANT The device will au-
tomatically be switched off when the
ignition key is at STOP after approximately one hour to safeguard the car
battery. Start the engine to reset the
timeout.
SELECTING FUNCTIONS
To select the required audio source,
proceed as follows:
– press SRC (17);
– turn the knob/button (16) to select
the required operating mode (Radio
or CD-Changer).
To start navigation, press NAV (12).
The specific main menu/screen will
appear for each selected source.
To access the phone mode, press
£
(15) button.
To access the Targa Infomobility
services, press
•
(7) button.
SWITCHING
THE CONNECT Nav ON/OFF
To turn the Connect Nav on, keep
the knob/button (16) pressed for
about 1 second. The sound system will
automatically switch to the last active
sound source at the previously selected volume.
IMPORTANT The sound source is
usually played at the last selected volume when the system is switched off
and back on. However, if the volume
was higher than the preset volume, the
sound source will be played at the preset volume.
To set the power-on volume, see
“Adjusting power-on, ta, announcements, message and volume” in “Basic
settings ” section.
Page 86

85
CONNECT NAV
NAVIGATOR
ADJUSTING THE VOLUME
To turn the volume up: turn the
knob/button (16) clockwise.
To turn the volume down: turn
the knob/button (16) anticlockwise.
The volume is graphically shown on
the display during the adjustment (audio source main menu only) fig. 5.
IMPORTANT The volume of a
navigation voice message can be
changed, regardless of the basic sound
source volume.
DISPLAY fig. 6
The display will switch to night-time
operation (reversed colours) when
the side/taillights are switched on
fig. 7. This function can be switched
off if you need to travel in daytime
with the headlights on (see “Adjusting
the display” in section “Basic settings”.
fig. 5
F0E3021g
fig. 6
F0E3095g
fig. 7
F0E3221g
If you drive with the volume
too high you put both your
own life and that of others in jeopardy. You should adjust the volume
so that you can hear noises from
outside the car (e.g. horns, ambulance/ police sirens, etc.).
WARNING
Page 87

86
CONNECT NAV
NAVIGATOR
fig. 9
F0E3097g
ADJUSTING THE SOUND
(AUD Menu)
The “bass” and “treble” can be separately adjusted for each sound
source. The Balance, Fader and Loudness settings are in common for all
sources.
Proceed as follows to adjust the
sound:
1) press SRC (17) to display the SRC
menu
2) turn the knob/button (11) to se-
lect the required audio source (Radio,
CD or CD Changer, where fitted)
3) press AUD (3) to display the au-
dio menu for adjusting the sound
fig. 8
4) turn the knob/button (11) to se-
lect the required menu option
5) press the knob/button (11) to
confirm and select the function to be
adjusted (“BASS”, “TREBLE”, etc…)
fig. 9
6) turn the knob/button (11) to ad-
just, as required
IMPORTANT If the car is fitted
with Bose HI-FI system, Loudness
function cannot be adjusted fig. 10.
To store the edited values, press the
knob/button (11).
To return to the previous menu
without storing the edited values,
press the ESC button (9).
IMPORTANT The display will au-
tomatically return to the previous
menu if no button is pressed for
longer than 30 seconds.
fig. 10
F0E3222g
fig. 8
F0E3096g
Page 88

87
CONNECT NAV
NAVIGATOR
LISTENING TO THE RADIO
Proceed as follows:
1) press SRC (17)
2) turn the knob/button (11) to se-
lect Radio fig. 11, press ESC (9) if a
CD is inserted in the CD-Changer
3) press the knob/button (11) to
confirm the selection.
The main Radio menu fig. 12 is dis-
played and the radio tunes to the last
station selected before switching off.
The station tuned to before switching the system off and the six stations
available in the waveband will appear
in the upper row of the display.
With the exception of the AUDIO
menu, the presence of an audio or
navigation CD, the tuning waveband
(es. FM1), TA or TMC state are always
displayed at the bottom of the display.
SELECTING
THE WAVEBAND
The device receives stations in the
FM and MW frequencies fig. 13. Press
SRC (17) to select the required waveband in Radio mode.
Tuning to radio stations
The multiple function buttons (13
and 14) are used to select preset stations (press briefly) and to store other stations (press longer).
RRAADDIIO
O
fig. 11
F0E3170g
fig. 12
F0E3095g
fig. 13
F0E3000g
Page 89

88
CONNECT NAV
NAVIGATOR
Manual tuning
To manually tuning to a station, proceed as follows:
1) switch the RDS function off (see
“RDS function” in this chapter) to display the frequencies
2) in Radio mode, press the MEN
button (10), the Radio menu will appear on the display fig. 14
3) press key (14) relevant to
SEARCH until $ is displayed
4) press § or ù on selector (2) to
start station search.
The frequency will gradually change
in 100 kHz steps in the FM waveband
and in 9 kHz steps in the MW waveband.
TUNING TO FM STATIONS
Automatic tuning
1) Press the MEN button (10), in Ra-
dio mode to display the Radio menu
fig. 14
2) press key (14) relevant to
SEARCH until the required option
“$”, or “§” is displayed (the default
setting is “§”).
3) press § or ù on selector (2)
to start the station search.
IMPORTANT Only stations
broadcasting traffic announcements
will be stored when the TA function
is on (TP message on the display).
STORING STATIONS
Up to 24 FM stations in the fours
wavebands (FM1, FM2, FMT and FMC)
and six MW stations can be stored.
Manual storage
Proceed as follows to manually store
the stations:
1) in Radio mode, press SRC (17)
button. The Radio functions menu will
appear on the display fig. 15
fig. 14
F0E3102g
fig. 15
F0E3000g
Page 90

89
CONNECT NAV
NAVIGATOR
2
) select the required FM storage
waveband, i.e. FM1, FM2, FMT, FMC
or the MW waveband with button
(13) or (14).;The system will automatically return to the main radio
menu as soon as the selection is made
3
) tune the station with button
§
or ùon selector (2)
4
) press button (13) or (14) corresponding to the selected waveband
and hold it pressed until the volume is
muted (stored done signal). The frequency or the name of the stored station will appear on the display under
the selected position.
T-STORE automatic storage
The system can automatically store
the six strongest stations in the FMT
storage waveband.
With TA function (Traffic Announcement) on, only the stations
with the strongest signal (broadcasting traffic bulletins) are stored.
IMPORTANT The T-STORE function will replace the previously stored
stations.
Proceed as follows to start the TSTORE automatic storage procedure:
1) in Radio mode, press SRC (17).
The Radio function menu will appear
on the display
2) press the (13) button next to
PAGE 2
3) press key (14) to display T-
STORE fig. 16
When the Travelstore function is on,
the upper row of the display will show
the operation progress in percentage.
At the end of the storage procedure,
the system will automatically switch
over to the FMT waveband and the
stored stations will be played for a
short while.
fig. 16
F0E3004g
Page 91

90
CONNECT NAV
NAVIGATOR
3) press (14) to display TMCSTORE
fig. 17
When Travelstore function is on, the
upper row of the display will show the
operation progress in percentage.
At the end of the storage procedure,
the stations stored in the FMC waveband will be played for a short while,
then the radio will tune automatically
to the first stored station.
IMPORTANT Automatic station
storage through the TMCSTORE function could require a long time since
scanning of TMC stations that can be
received in the FMC frequency range
is performed.
SCAN FUNCTION
The SCAN function is used to scan
all the stations which can be received
in the waveband. Each station will be
played for ten seconds. The SCAN
function will end automatically after
running a complete search. If the TA
function is on, the system will only include stations broadcasting traffic announcements (the TA or TP symbol
will appear in the lower row of the display).
Automatic storage
TMCSTORE
The system can automatically store
the six strongest stations broadcasting in the area that you are travelling
in, in the FMC storage waveband.
IMPORTANT The TMCSTORE
function will replace the previously
stored stations in the FMC waveband.
IMPORTANT The TMCSTORE
function can be activated only if the
navigation CD (featuring TMC info in this case TMC is written on the CD
cover) relevant to the country that
you are travelling in has been inserted once at least.
To start TMCSTORE proceed as follows:
1) in Radio mode, press SRC (17):
the display will show the Radio function menu fig. 17
2) press the (13) button next to
PAGE 2
fig. 17
F0E3005g
Page 92

91
CONNECT NAV
NAVIGATOR
To start the SCAN function, proceed
as follows:
1) in Radio mode, press SRC (17),
the display will show the Radio functions menu fig. 15
2) press button (13) next to PAGE 2
3) press (13) relevant to SCAN
fig. 18: scanning is started and during
scanning the display will show SCAN
fig. 19
Press ESC (9) to end the SCAN function. The search will stop at the last
station.
TMC-SCAN function
This function is used to scan all the
stations that can be received in the
FMC waveband.
Proceed as follow to start the TMCSCAN search:
1) in Radio mode, press SRC (17):
the display will show the Radio functions menu fig. 15
2) press the (13) button next to
PAGE 2
3) press button (13) next to TMC-
SCAN fig. 20
The search will start and TMCSCAN in progress will appear on the
display.
Press ESC button (9) to end the
TMC-SCAN function or to play a
found station. The search will stop at
the last station.
fig. 18
F0E3006g
fig. 19
F0E3008g
fig. 20
F0E3007g
Page 93

92
CONNECT NAV
NAVIGATOR
RDS FUNCTION
(Radio Data System)
The Radio Data System is a service
provided by radio stations to facilitate
FM waveband tuning.
The RDS allows - for enabled stations
- automatic tuning to the best frequency of the selected station (alternative frequency function). This means
that you can listen to the station without retuning when you change area.
Obviously, the station must be received
in the area that you are travelling in.
Furthermore, the RDS displays the
station name (Program Service function, up to eight characters) and the
traffic announcement status: the system will seek the best frequency of the
required station.
Switching on and off
Proceed as follows to use the RDS:
1) in Radio mode, press MEN (10).
The display will show the Radio menu
fig. 21
2) repeatedly press the button (14)
next to the RDS message to select the
required operations (VAr, FIX or
OFF) (the default setting is VAR) described below:
FIX Switches the Radio RDS func-
tion on. Since some stations
use RDS to broadcast advertisements in addition to the
station name, you can decide
to display only the station
name.
VAR Basic setting with which the
Radio RDS function is fully active. Advertising will also be
shown on the display.
OFF Switches the RDS function
off. Stations are tuned to by
indicating the frequency on
the display (example: 87.5).
Under this condition also the
TA function is off.
fig. 21
1F0E3001i
Page 94

93
CONNECT NAV
NAVIGATOR
REG FUNCTION
At certain times of the day, some stations broadcast different local (regional) programmes. When the function is off and you are tuned to a local station in a certain area, you will
receive a new local programme when
entering a new area.
Switching on and off
Tune to FM and proceed as follows
to switch the REG function on:
1) in Radio mode, press MEN (10),
the display will show the Radio menu
fig. 22
2) press the button (13) next to
REG. The message ON or OFF will
appear. The default setting is OFF (i.e.
the function is not active). When the
function is on, the system will change
the frequency only when the current
frequency can no longer be received.
PTY FUNCTION
(Program Type)
PTY is an RDS function. The stations
use PTY to broadcast the contents of
their programmes (POP, ROCK, etc.)
to help you make your choice.
The programme contents will appear
for a few seconds when the PTY function is on and a new station is tuned
to. The contents will not be displayed
if the station does not use the PTY
function.
Switching on and off
Proceed as follows to switch the PTY
function on and off:
1) in Radio mode, press MEN (10)
the display will show the Radio menu
fig. 22
2) press button (14) next to PTY.
The message ON or OFF will appear.
The default setting is ON.
PTY fig. 23 will be displayed when
tuning to a radio station when the
function is on.
fig. 22
F0E3001g
fig. 23
F0E3003g
Page 95

94
CONNECT NAV
NAVIGATOR
TA FUNCTION
(Traffic Announcement)
This function can be switched on only in Radio mode in the FM waveband.
When listening to the CD source,
the CD changer (where fitted) or
when the navigation system is on and
the TA button (4) is pressed, the radio will switch to the FM waveband in
background and activate the TA function. This will not change the sound
source and the message “TA” will appear on the display.
When the TA function is on, you can
listen to traffic announcements even
when the CD player or CD changer
(where fitted) is on or in navigation
mode. The system will automatically
switch to the station broadcasting the
traffic announcement. At the end of
the announcement, the system will automatically return to the previous
source.
Press the TA button (4) to switch
the TA function off.
IMPORTANT In Radio mode, with
the TA function on, a beep will be
heard if you leave the area where the
station broadcasting traffic announcements can be received. In this case, an
automatic TP (Traffic Program) search
will be started.
Interrupting traffic
announcements
When the TA function is on, press
either TA (4) or MEN (10) or change
station to interrupt the traffic announcement.
Alarm messages
When the PTY function is on, the
system can receive alarm messages
(example: weather conditions). In this
case, the warning message will appear
on the display and the announcement
will be made at the volume set for traffic announcements.
To stop the alarm message, press either MEN (10) or ESC (9).
Page 96

95
CONNECT NAV
NAVIGATOR
Through this function it is therefore
possible to store the six strongest stations broadcasting in the area that you
are travelling in.
Displaying TMC stored
messages
To display TMC traffic messages,
proceed as follows:
1) press the T button (8)
2) use the knob/button (11) to se-
lect TIM/TMC fig. 24
3) press the knob/button (11) to
confirm the selection
4) press key (13) relevant to T-IN-
FO fig. 25
TMC FUNCTION
(TRAFFIC MESSAGE
CHANNEL)
The TMC function is used to receive
traffic information which is then
analysed by the system in order to
“guide” the driver to the required preset destination.
Since only some stations are enabled
to provide the TMC function, it is possible that traffic information in certain
areas cannot be received.
When the “Dynamic travel guide”
function is on (see “Dynamic travel
guide” in chapter “Navigation”), the
system will tune automatically to a
TMC station.
The “TMC” message will appear in
the lower row of the display when a
TMC station is selected.
Up to six TMC stations can be
stored in the FMC storage waveband
(see paragraph “Automatic storage of
TMCSTORE”).
The display will show the last traffic
message. The upper line will show the
message number and the number of
stored messages.
Number 1 always indicates the last
message.
5) use the knob/button (11) to se-
lect one of the messages
6) after reading the required traffic
message, press T (8) or ESC (9) to
quit
IMPORTANT TMC messages referring to roads distant more than 100
km from the current car position, are
not processed by the TMC function.
fig. 25
F0E3214g
fig. 24
F0E3216g
Page 97

96
CONNECT NAV
NAVIGATOR
SHARX FUNCTION
Occasional interference in the signals
can occur when tuned to FM radio stations caused by stations broadcasting
on very close frequencies. The
SHARX function reduces such interference.
Switching on and off
Proceed as follows to switch the
SHARX function on and off:
1) in Radio mode, press MEN (10),
the display will show the Radio functions menu fig. 26
2) press button (13) next to
SHARX. The message ON or OFF will
appear. The default setting is ON.
R-TXT FUNCTION
R-TXT option enables to receive and
display text messages provided by certain RDS stations. In addition to the
station name this function provides also information on the programme being broadcast or shows the title of the
piece of music being played.
Switching on and off
Proceed as follows to switch the Radiotext function on and off:
1) in Radio mode, press MEN (10):
the display will show the Radio menu
fig. 26
2) press (13) relevant to R-TXT. The
message ON or OFF will appear. The
default setting is OFF.
When the display shows the message
“Radiotext” and you want to change
station, proceed as follows:
1) in Radio mode, press the TU but-
ton (17) or either the (13) or (14)
button. The Radio functions menu excluding the Radiotext function - will
appear on the display
2) change station: the Radiotext
function, if available, will appear on the
display
fig. 26
F0E3001g
Page 98

97
CONNECT NAV
NAVIGATOR
TIM FUNCTION
The device is provided with vocal
digital memory. Up to 14 traffic messages having max. overall length equal
to or lower than 4 minutes can be
stored automatically.
According to the length of the new
traffic messages, the oldest ones are
cleared.
IMPORTANT Traffic messages
longer than four minutes are recorded partly. In this case the message
OVERFLOW will appear on the display.
When a new traffic message arrives
while you are listening to a TIM message, the latter one is stopped and the
new arrived message is transmitted.
Storing traffic messages
Traffic messages are stored automatically when listening to TA stations
or when the TIM function is on with
the device off.
Messages can be stored for 2 hours
or 24 hours (see next paragraph
“Choosing how long to store traffic
messages“).
If listening to a station not broadcasting traffic info, switching the device
off with the TIM function on will start
automatically the search for a TA station.
Choosing how long to store
traffic messages
With the device on, proceed as follows to choose how long to store traffic messages:
1) press T (8) to display the Traffic
menu fig. 25
2) use the knob/button (11) to select TIM/TMC fig. 27, then press the
knob/button (11) to confirm
fig. 27
F0E3216g
Page 99

98
CONNECT NAV
NAVIGATOR
3) press (14) relevant to TIM fig. 28,
until the required indication is displayed 2H = the message will be
stored for 2 hours; 24H = the message will be stored for 24 hours or
OFF (function off)
IMPORTANT When the Traffic
menu is displayed, the TIM function
can be switched on/off by pressing the
T button (8) for over 2 seconds.
When switching the device off, the
message “GOODBYE” will appear on
the display together with the traffic
message storage time previously selected.
Listening to stored
traffic messages
Proceed as follows:
1) press T (8) to display the Traffic
menu fig. 25
2) use the knob/button (11) to select TIM/TMC fig. 27, then press the
knob/button (11) to confirm
3) press (13) relevant to TIM-INFO.
The last stored message has the highest number (14) and will be played
first; then all the other messages will
be played in decreasing sequence. The
display will also show the time of arrival of the message being played.
Once the message playing procedure
is over, the system will automatically
switch over to the last selected sound
source (Radio, CD or CD Changer).
To listen to the last selected sound
source (Radio, CD or CD Changer)
without playing all traffic messages,
press T (8) or ESC (9) button.
fig. 28
F0E3214g
Page 100

99
CONNECT NAV
NAVIGATOR
CCOOMMPPAACCTTDDIISSCCPPLLAAYYEERR((CCDD)
)
A symbol indicating the audio CD,
the CD programmed sequence, the
current sound source (CD), and the
TA and TMC functions status will appear in the lower row of the display.
INSERTING AND
EJECTING A CD
Proceed as follows to insert a CD:
1) press button T (1) to open the
front panel
2) press button ı(19) to eject an in-
serted CD, if any
3) place the audio CD with the la-
bel facing upwards in the groove on
the open front panel edge
4) delicately push the CD in the slot
until the automatic mechanism takes
the CD into the player
5) close the front panel.
Audio CDs can be played with the internal CD player or with the CDChanger (where fitted).
During CD playback, either the track
number and the playing time, or the
track number only, will appear on the
display (according to the settings, see
“CD functions” in this section).
The main CD menu fig. 29 shows
the number of the tracks on the CD
and the track being played is highlighted. A graphic symbol progressively
indicating the playing time will appear
under the track.
CD playing will then start automati-
cally. The display will show the main
CD menu fig. 29.
Proceed as follows to eject the CD:
1) press button T (1) to open the
front panel
2) press button ı (19) on the inner
side of the front panel (see section
“Controls”). The CD will be ejected
to half of its diameter
3) take the CD from the slot and re-
move it completely
4) close the front panel.
IMPORTANT Only open the front
panel to insert and eject a CD. A beep
will be heard if the front panel is left
open longer than 30 seconds. Close
the front panel to stop the warning signal.
fig. 29
F0E3010g
 Loading...