

Page 1
CAMPERVAN RENTAL
TURKEY
USER MANUAL
(COMFORT PLUS MODEL)
Yeşilbahçe Mah. 1472 Sk. 4B/11 ANTALYA ● Phn :+90 (242) 316 08 30
email: [email protected] www.letsgocamper.com
Page 2
VEHICLE SPECIFICATIONS - COMFORT (2-4 BERTH)
Vehicle : Fiat
Model : Ducato Maxi
Engine power : 2287cc JTD
Engine Fuel : Euro Diesel
Transmission : Manuel
Vehicle Length : 6363 mm
Vehicle Width : 2050 mm
Bedding for : 4 Adults ( 2 double )
Bed Dimensions : (1.95mx1.35m - Visco) , (1.80mx1.20m)
Toilet : Cassette
Water Tank : 130 lt
Waste Water Tank: 140 lt
Air conditioning : Rear Cabin 220V - Driver Cabin 12V
Fridge / Freezer : 90 lt (12V - 220V) / Yes
Battery : 1 x 100A Gel Battery
Power inverter : 150 Watt
Awning : 4.00m - Fiamma F65 manuel
Break system : ABS
Shower Hot Water Supply: 220 V
Gas Stove : 2 burner
Heating Eberspacher 2 kw: Eberspacher 2 kw
Boiler - Hot Shower: 10lt - 220 V
Gas bottle : 2x3kg
Kettle : 220V
Pillows & Duvets: Yes
Sheets : Yes
Cooking Utensils: Yes
Cutleries : Yes
Road map : Yes
Electronic toll collection system (unlimited): Yes
Electric Water Pump: Yes
Radio/CD/TV/Aux/USB/Bluetooth/SD: Yes / Yes / Yes / Yes / Yes / Yes / Yes
Rear view camera: Yes
Electrical step : Yes
Internal Walk-Through Access: Yes
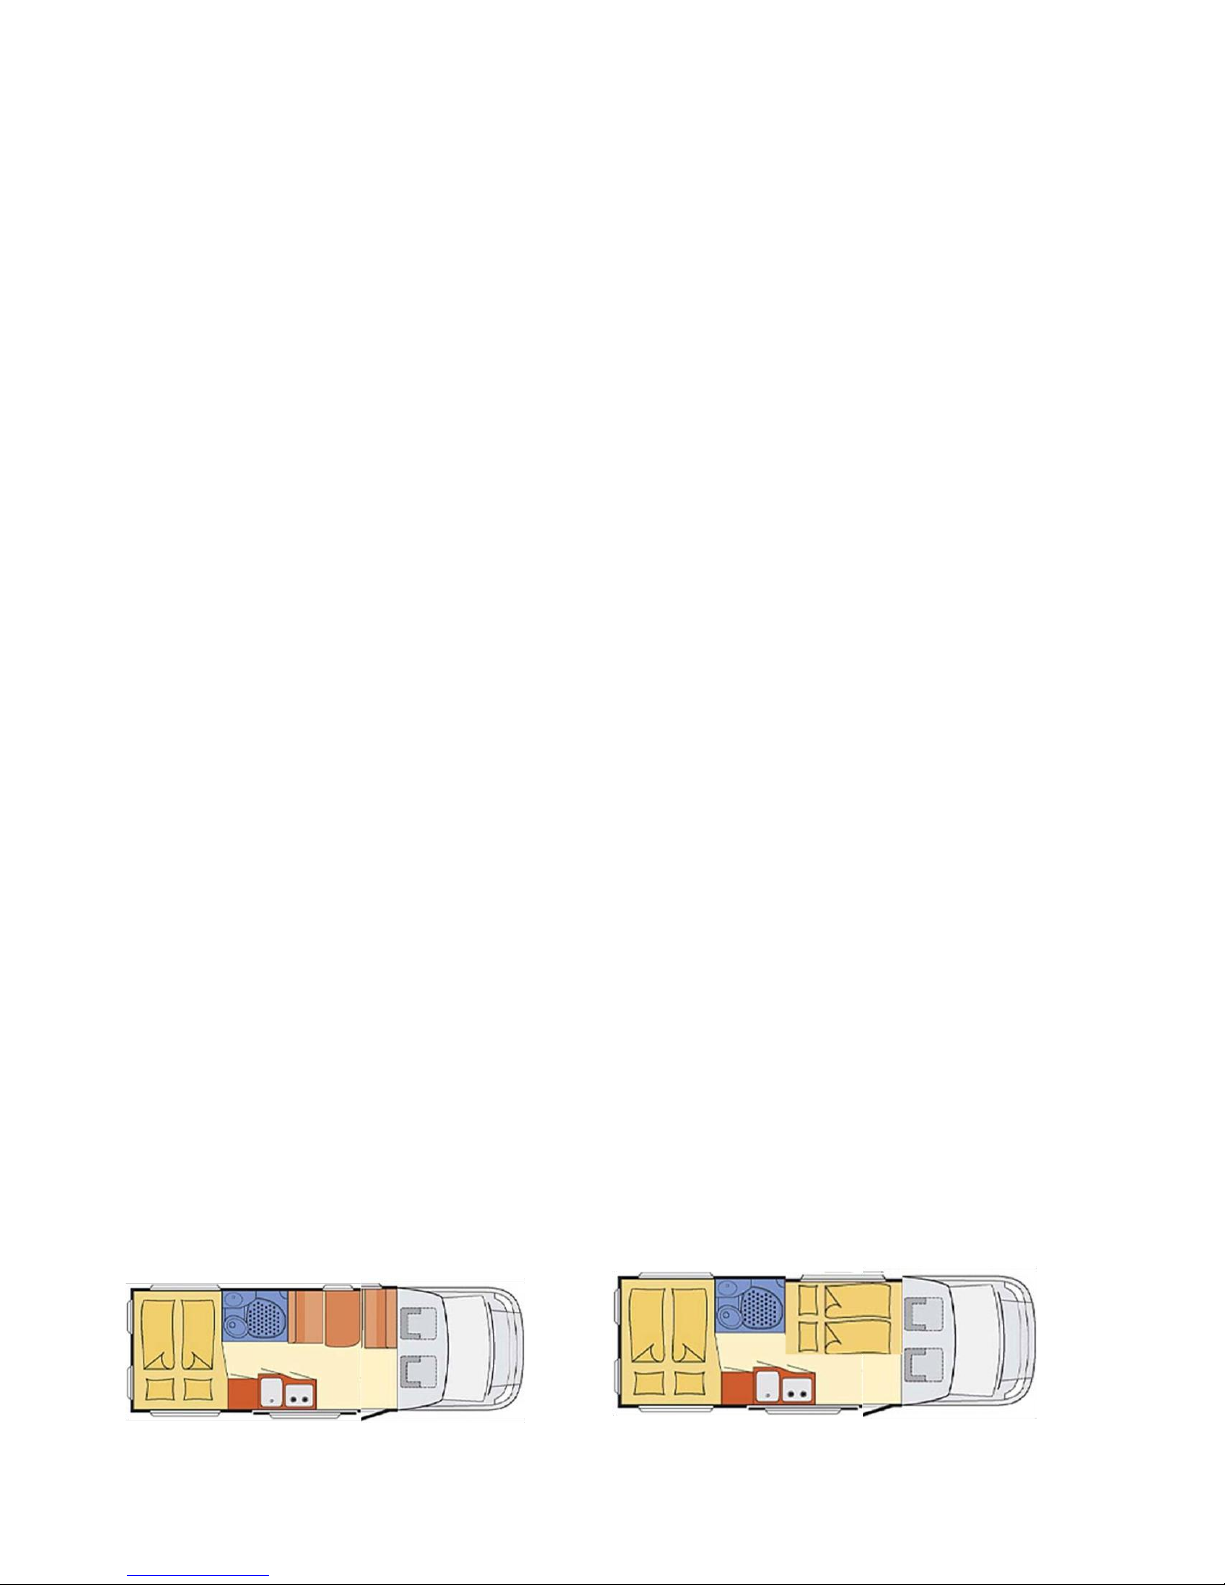
Day Layout Night Layout
Page 3

Pre-Start Checks
There are a lot of items that need to be safely stowed before driving the vehicle.
Please follow this checklist – it starts at the back, and works forward through the vehicle.
1. Electrical step closed
2. Gas off.
3. Boiler vent cover on.
4. Mains connection cover latched, and cable stowed.
5. Table stowed.
6. Toilet valve closed, and lid down
7. Shower rose on the floor of the cubicle.
8. No loose items on worktop around sink.
9.Sunlight and window closed.
10. Bathroom door closed.
11. Fridge: contents secure and door locked.
12. All cupboard latches fully engaged (in).
13. Work surfaces clear of loose items.
14. Cooker lid down (with anti rattle towel in place).
15. Windows locked (At motorway speed, the wind can rip windows off their hinges)
16. Clean water tank does it need filling?
17. Wastewater tank: Does it need emptying?
18. Toilet: Does it need emptying?
19. Remember the extra length; be prepared to run wide on corners.
Page 4

Driving a large vehicle
Although it appears big, the van is actually not much wider than an ordinary
car. The biggest difficulty is in judging the extra length.
Steering: The rear wheels are significantly further back from the driver
than in a normal car. As a result it is very easy to turn too soon and have
the rear wheels bump over the kerb, or worse, to scrape the side of the van
against something. The trick is to turn later, running wider on corners and
at junctions.
The seats have height adjustment at the front and back, and the steering
column moves in and out.
There are four mirrors, all separately electrically adjustable. Set the
bottom mirrors so you can see the rear wheels in relation to the curb on
one side, and the white line at the centre of the road.
Reversing: Ask your passenger to walk ahead to guide you. Tell them to
stand where they can see you in the mirrors, so you can see them – and
avoid running them over(!).
Remember to use all six gears.
Passengers must remain seated with seat belts fastened whenever the
vehicle is moving.
The Height (2.7m) is written on a label at the top of the windscreen
remember the extra height.
Parking: the vehicle is too tall to fit in most multi-storey car parks, and
longer than most on-street parking bays
Height: 2,650mm, Width: 2,050mm, Length: 5,995mm, Max Gross Weight: 3500kg
Page 5
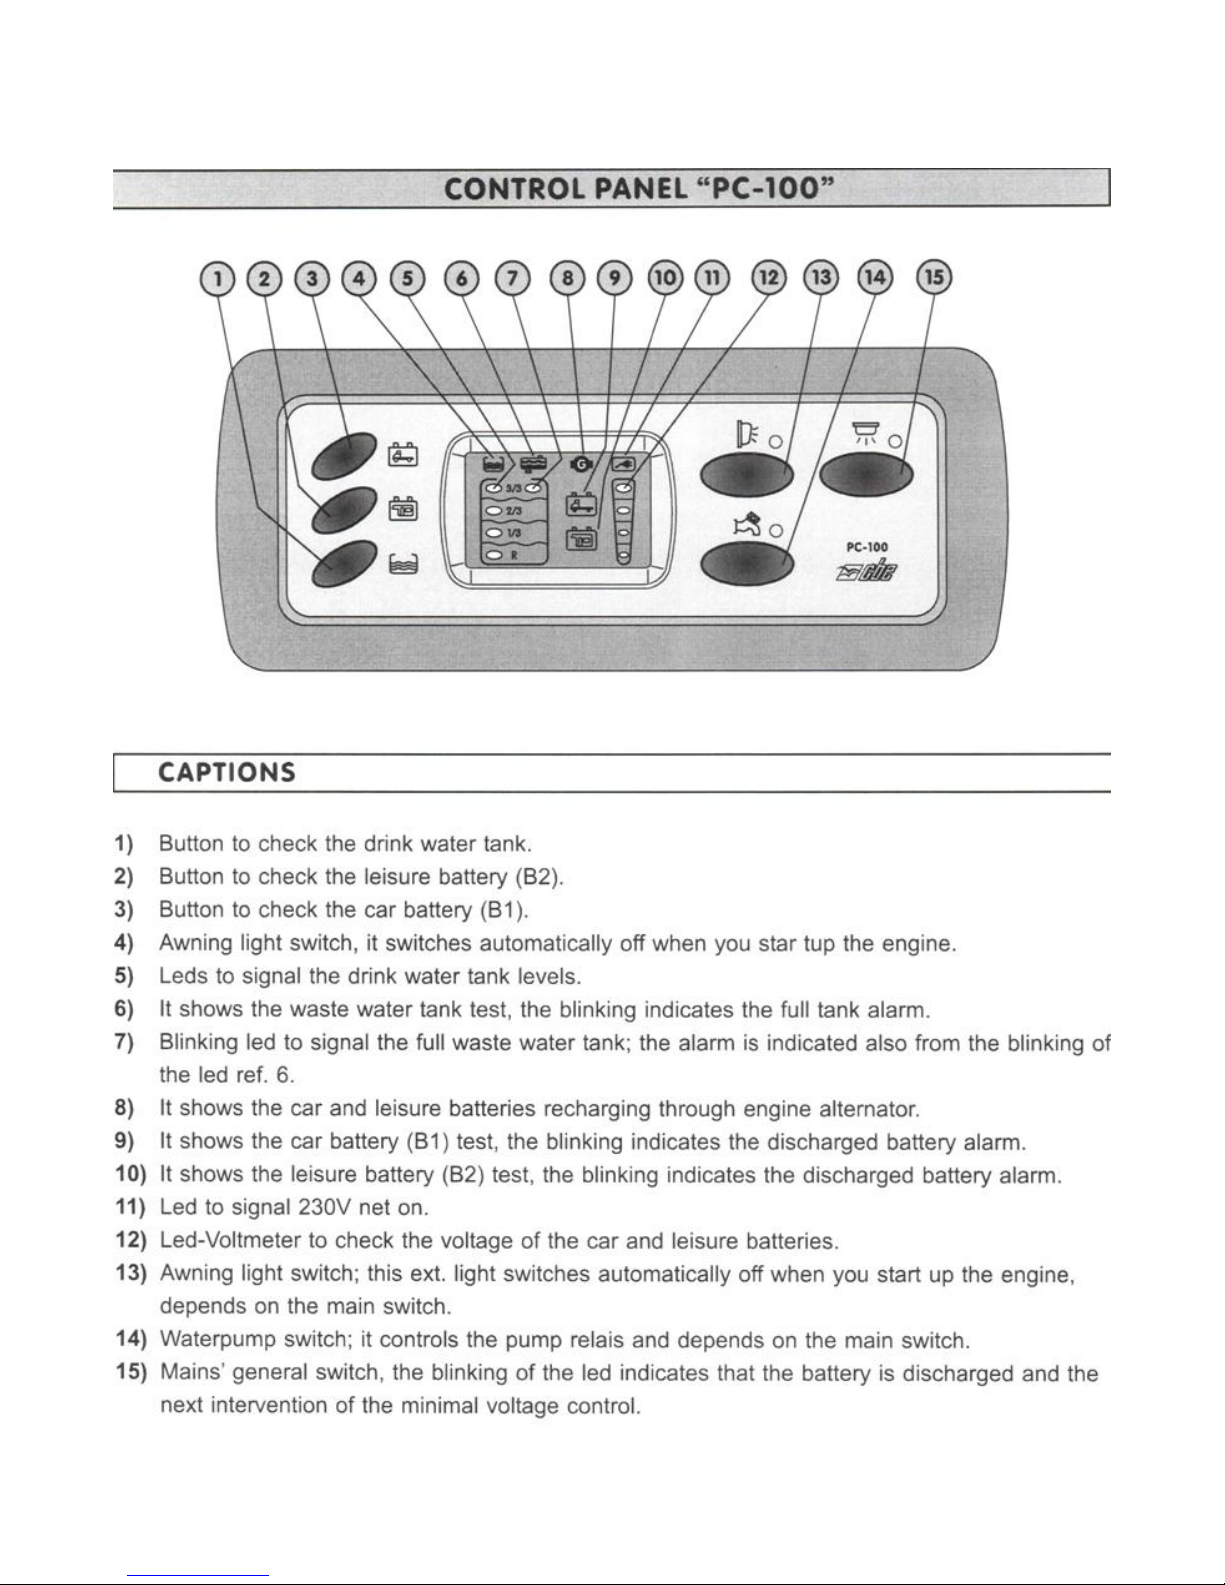
There is a control panel above the passenger’s head.
Page 6
No Smoking
There is no smoking inside the van. We have also had problems when smokers have
stood outside the door or under the awning. It seems the wind has taken the smoke
into the van where it has adhered to the soft furnishings leaving a very unpleasant
odour for the next users. Smokers tend to under estimate how pervasive cigarette
smoke is.
Fire Prevention
Frying pan or grill fires are probably the greatest risk in a caravan.
Don’t try and carry a burning pan outside as the flames may blow back onto your arms.
Use a wet tea towel.
Cover flames entirely.
Switch off heat, and leave covered until cool.
• There is a small fire extinguisher under the driver’s seat and inside the first air kit bag in the
luggage room.
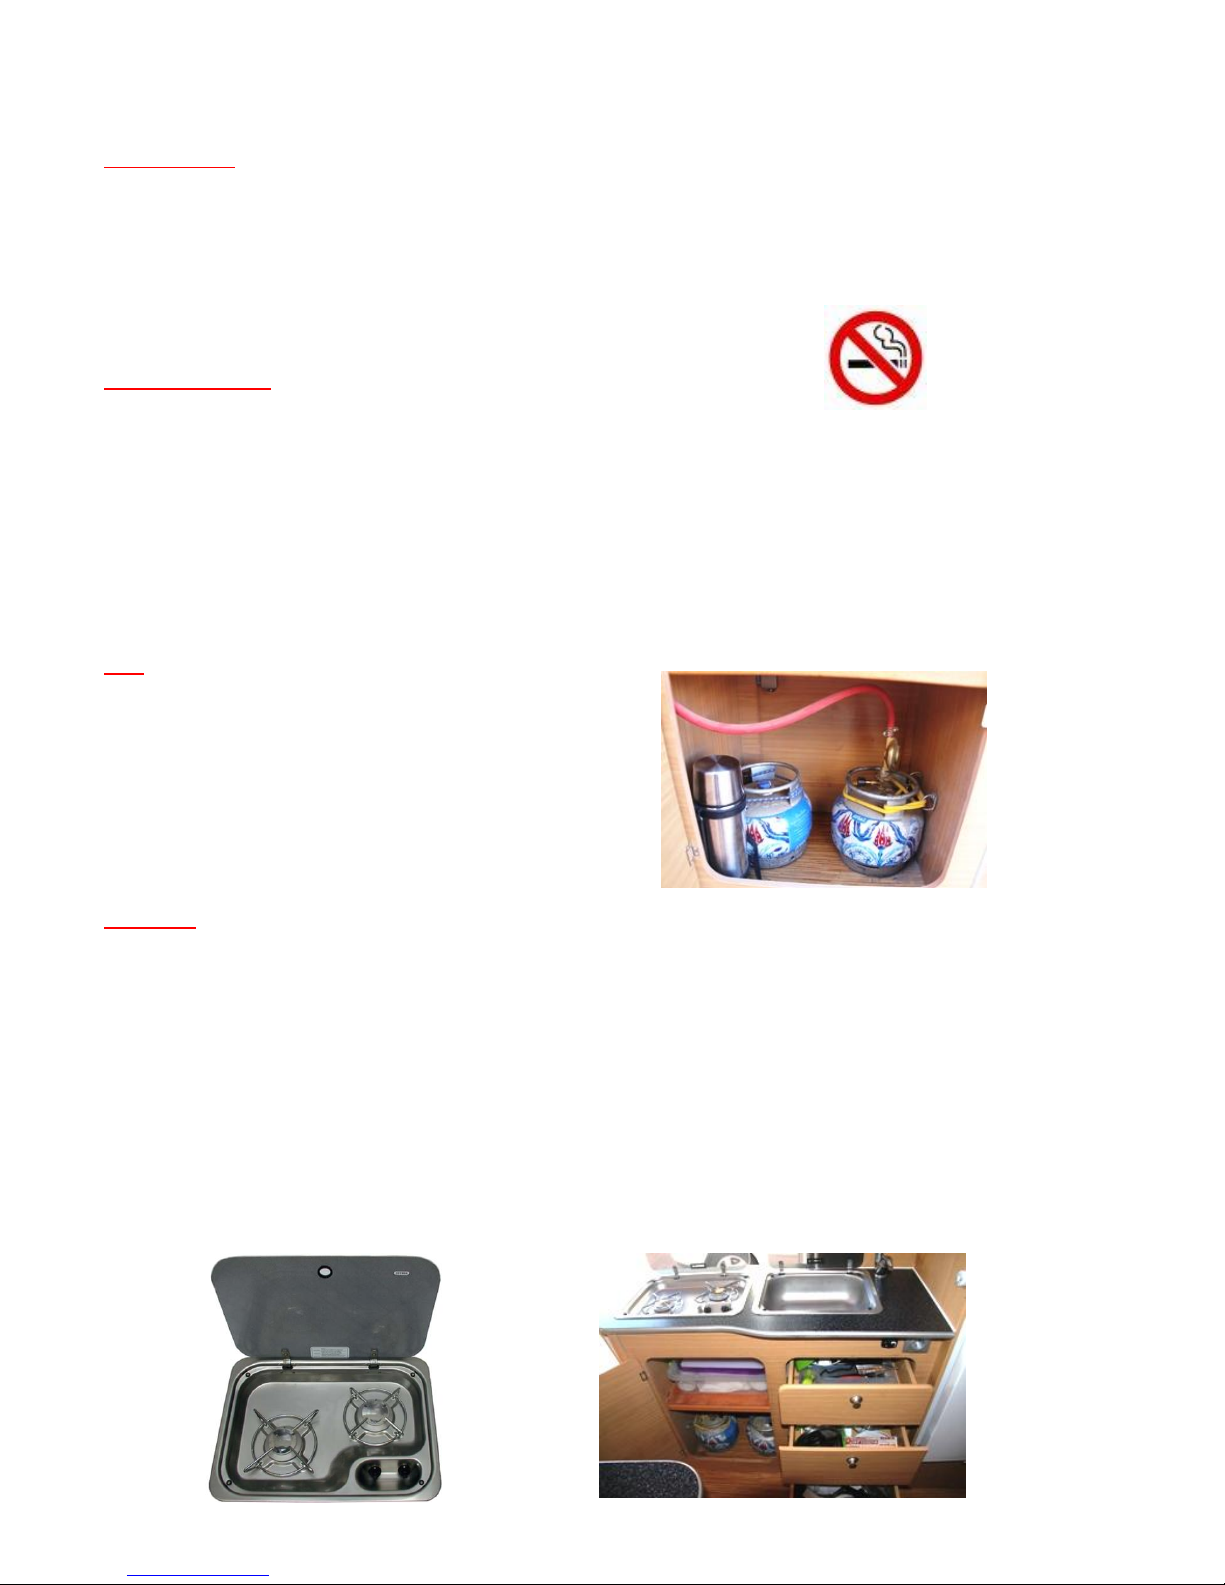
Gas
Under the cooker is the gas compartment.
The gas is switched on and off using a valve
on the cylinder.
The gas must be off when driving, and it is
illegal to have it on in petrol filling stations and
ferries.
COOKER
The lid of the cooker should be always raised before use, and not lowered until the hob
has cooled.
1. Open the gas-bottle valve.
2. Turn the control knob of the relevant burner from the off-position (0-mark),
anticlockwise to maximum. (High flame).
3. Push the knob in and hold it in this position.
4. Ignite the burner with a match or other suitable ignition device.
5. If the burner ignites the knob can be released after approximately 10 seconds.
6. The knob may now be set to the required burner position.
Page 7
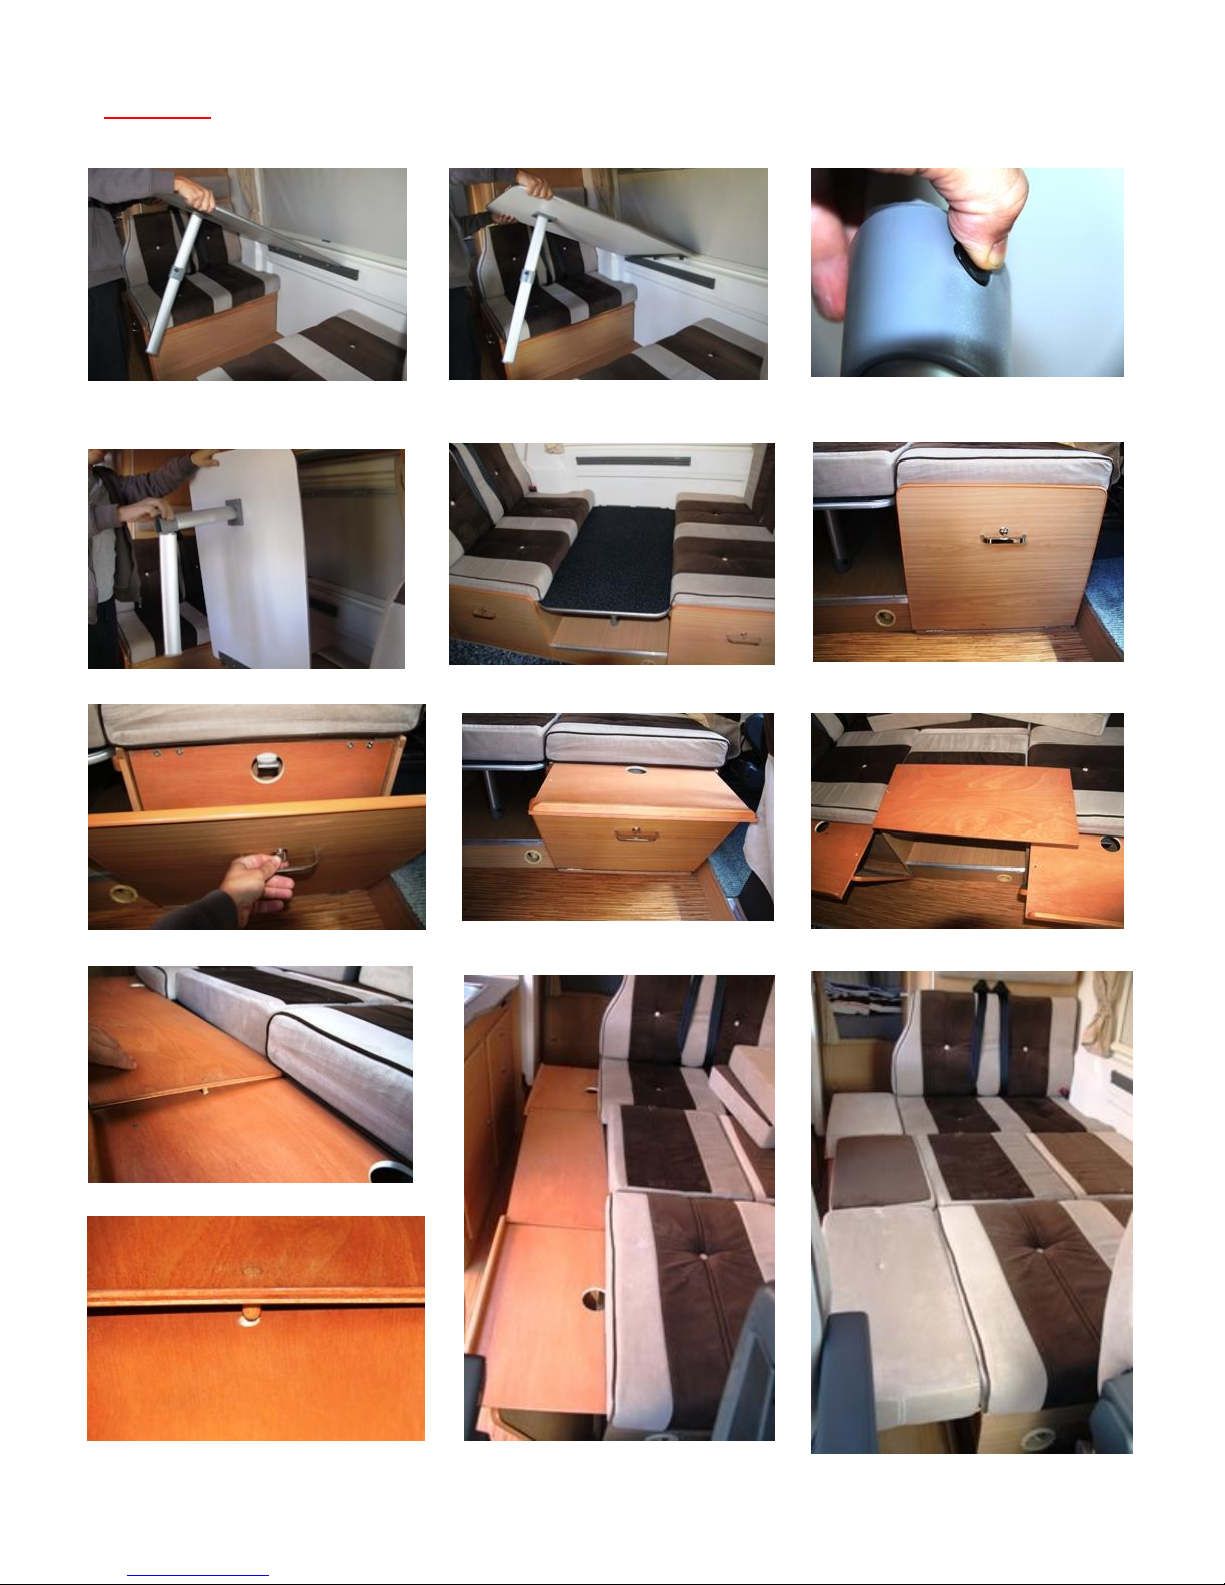
Front Bed
Page 8
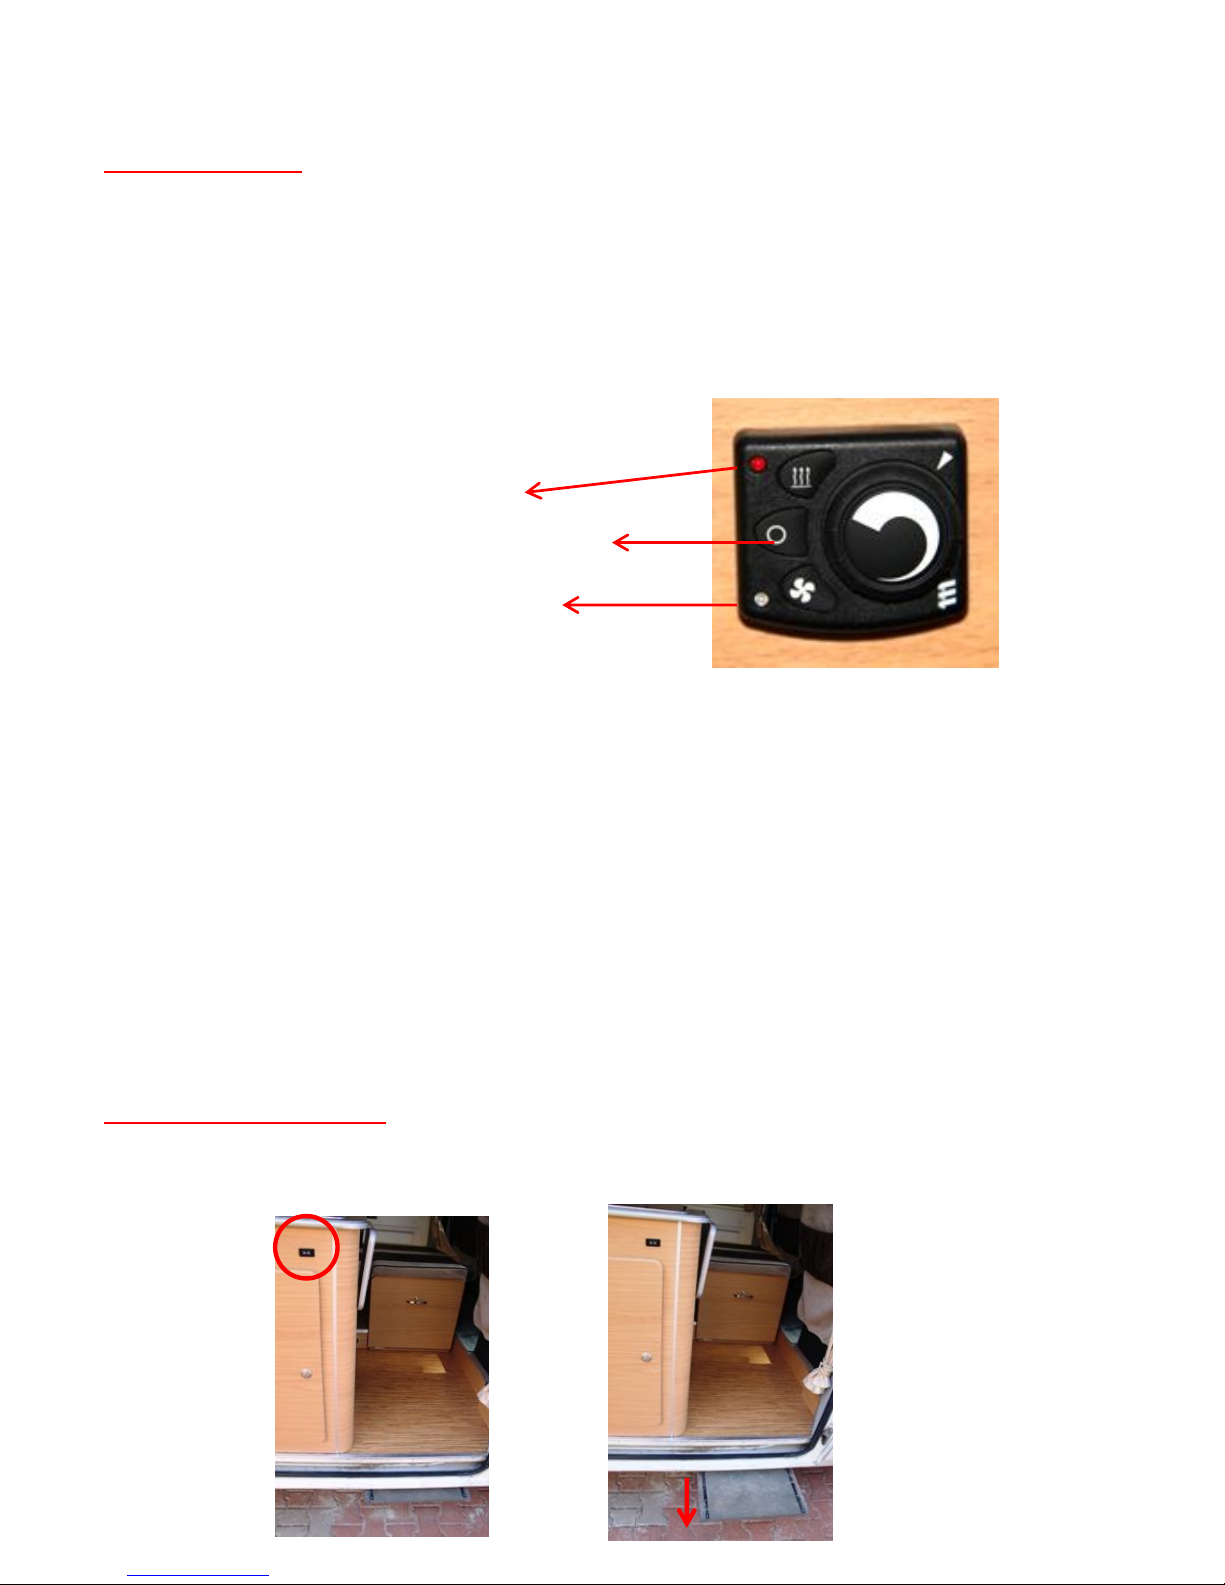
Central Heating
Hot air is blown out of vents at floor level from Eberspacher Airtronic D2
diesel-fuelled heater. The temperature is adjusted using a thermostat.
Fuel is taken from same diesel tank as the engine.
Temperature preselection control knob
• Left-hand end stop approx. 8°C
- small amount of heat
• Right-hand end stop approx. 34°C
- large amount of heat
Heater
Red LED - Operation check for heater
Switch off (not in combination with mini clock)
Ventilator
Blue LED - operation check for ventilator
Stand-Alone Mini-Controller
Start Heater - Heating Mode
Use the button to start the heater in heating mode (continuous operation). You can adjust
the required temperature with the control knob . If the heater is in heating mode, the red LED
lights up as a check.
Start Heater - Ventilation Mode
Use the button to start the heater in ventilation mode (continuous operation). The control
knob has no function in ventilation mode. If the heater is in ventilation mode, the blue LED
lights up as a check.
Switch off Heater
Use the button to switch off the heater. Heater or ventilation mode is terminated and the
corresponding LED goes out.
Heating mode is terminated with after run.
Electrically Operated Step
The step is controlled by a switch revealed when the sliding door is opened. Keep the
step swept free of grit to avoid it jamming on retraction.
Page 9
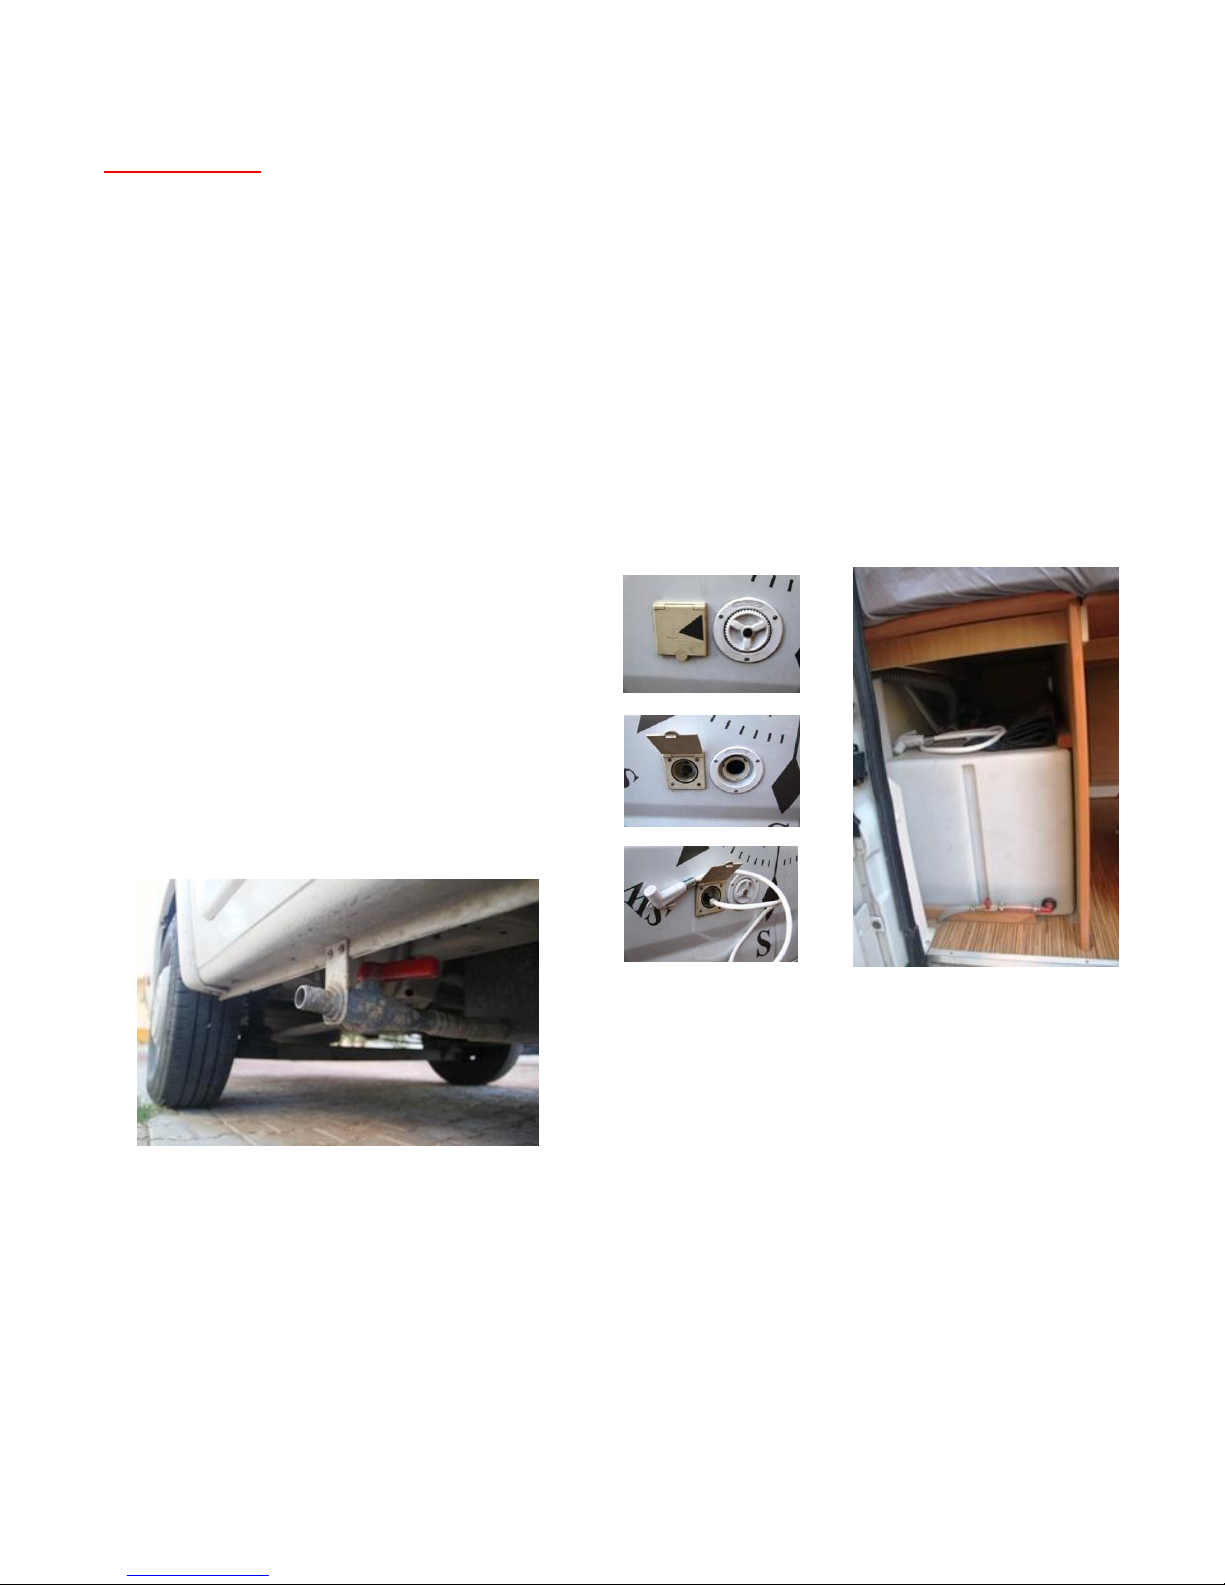
Water Tanks
The van has storage tanks for clean water and waste “grey” water. Grey water is
exclusively what has gone down the drains of the sinks or shower. The toilet is a
completely different system.
Clean water is not suitable for drinking without boiling. A separate bottle of drinking
water should be carried for that purpose.
The clean water tank is filled through a filler on the right side of the vehicle, using a
hose stored in the luggage compartment.
Water is electrically pumped from the tank to the taps, shower, and toilet flush.
Water tank levels are indicated on the electrical control panel.
Empty the waste-water tank over a
designated drainage point. The outlet is
roughly in-board of the boiler vent, and it
drains best if the vehicle is level or facing
downhill. Pull the handle as shown.
Try to avoid putting fat and solid
material down the drain. It accumulates
in the tank and causes bad smells.
Page 10
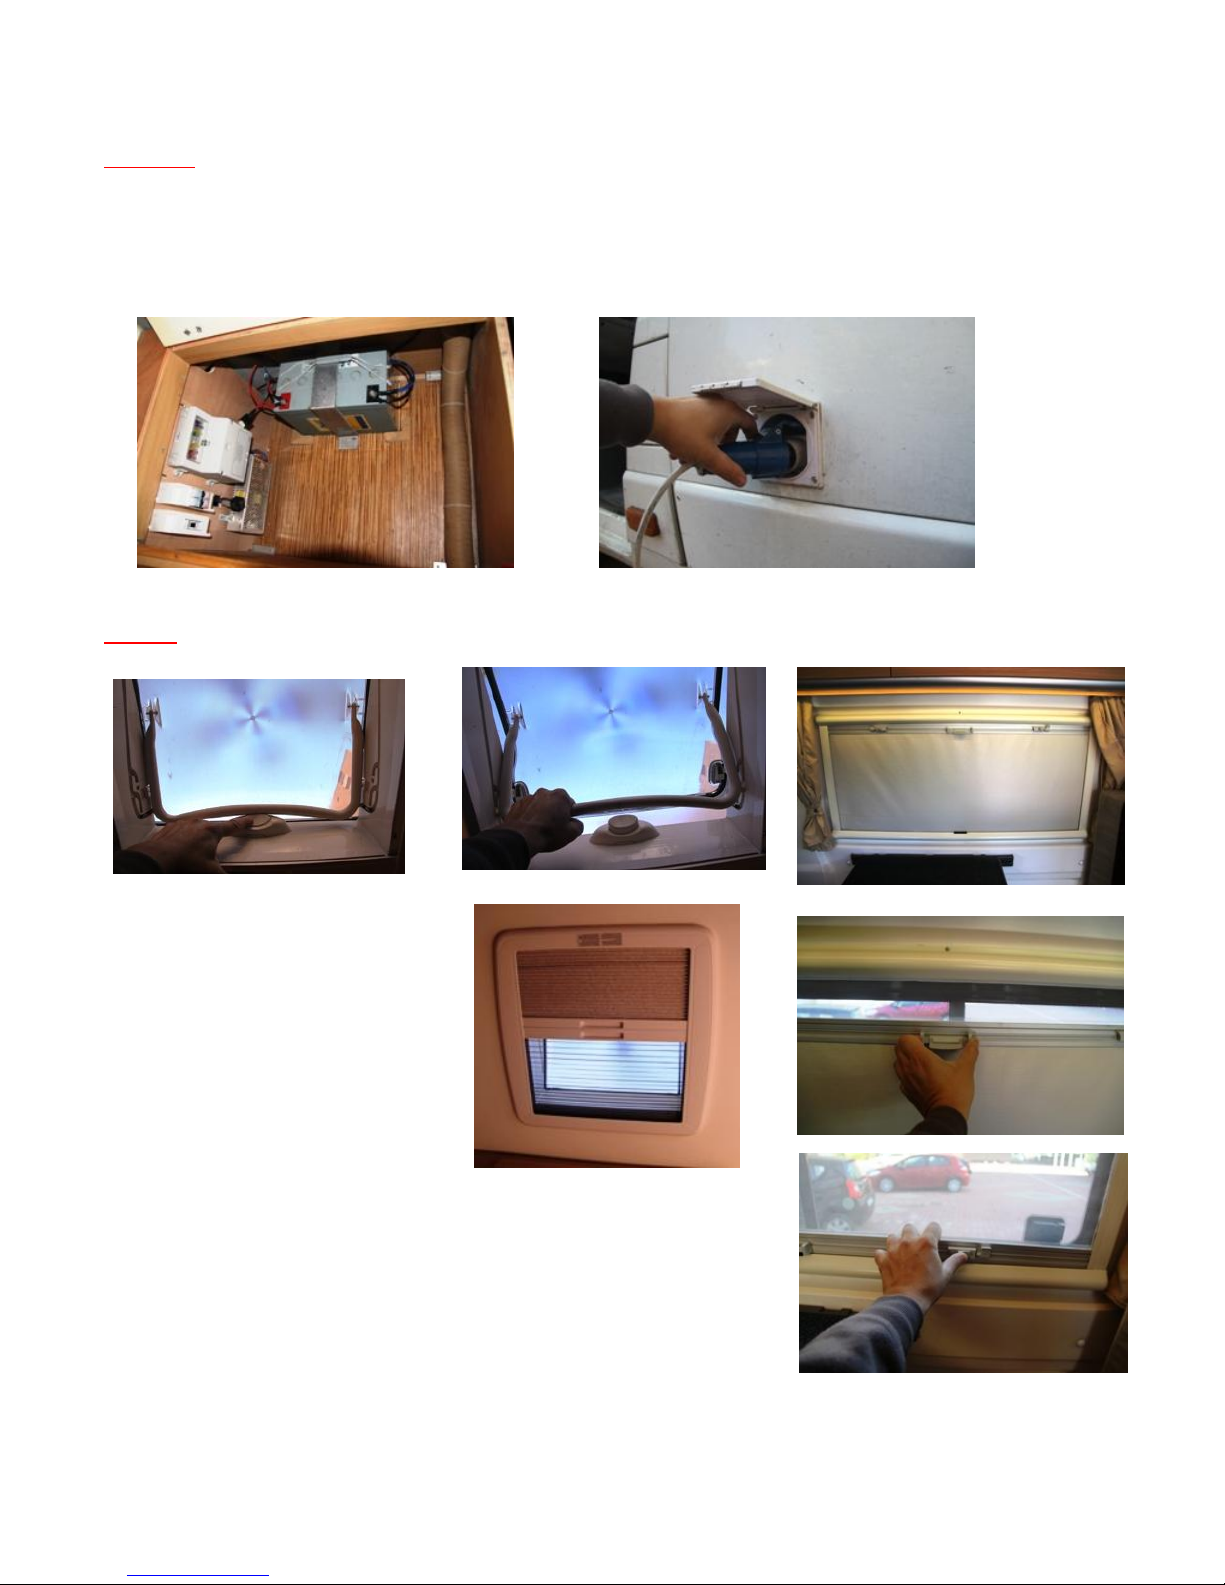
Electrics
The van has an additional “leisure battery” which feeds all the appliances in the living
area:- interior lights, water pump, electrical outlets, fridge, control panel, toilet flush.
It also has a 16amp mains input on the left side. This is connected using the 25 metre long
cable stowed in the luggage compartment.
Blinds
The windows and roof lights all
have blinds forprivacy at night,
and to exclude the heat from
the sun during the day.
The side windows in the living
area generally have fly-screens
that roll down from the top,
and blackout blinds that roll up
from the bottom. The springs on the upward moving blinds are
quite strong, and it is actually easier to first pull down the fly
screen and hook it onto the blind.
Raising the blind is then assisted by the spring on the flyscreen.
Squeeze the side buttons to move the blind.
The roof-lights have similar opposing blinds and fly-screens,
Page 11
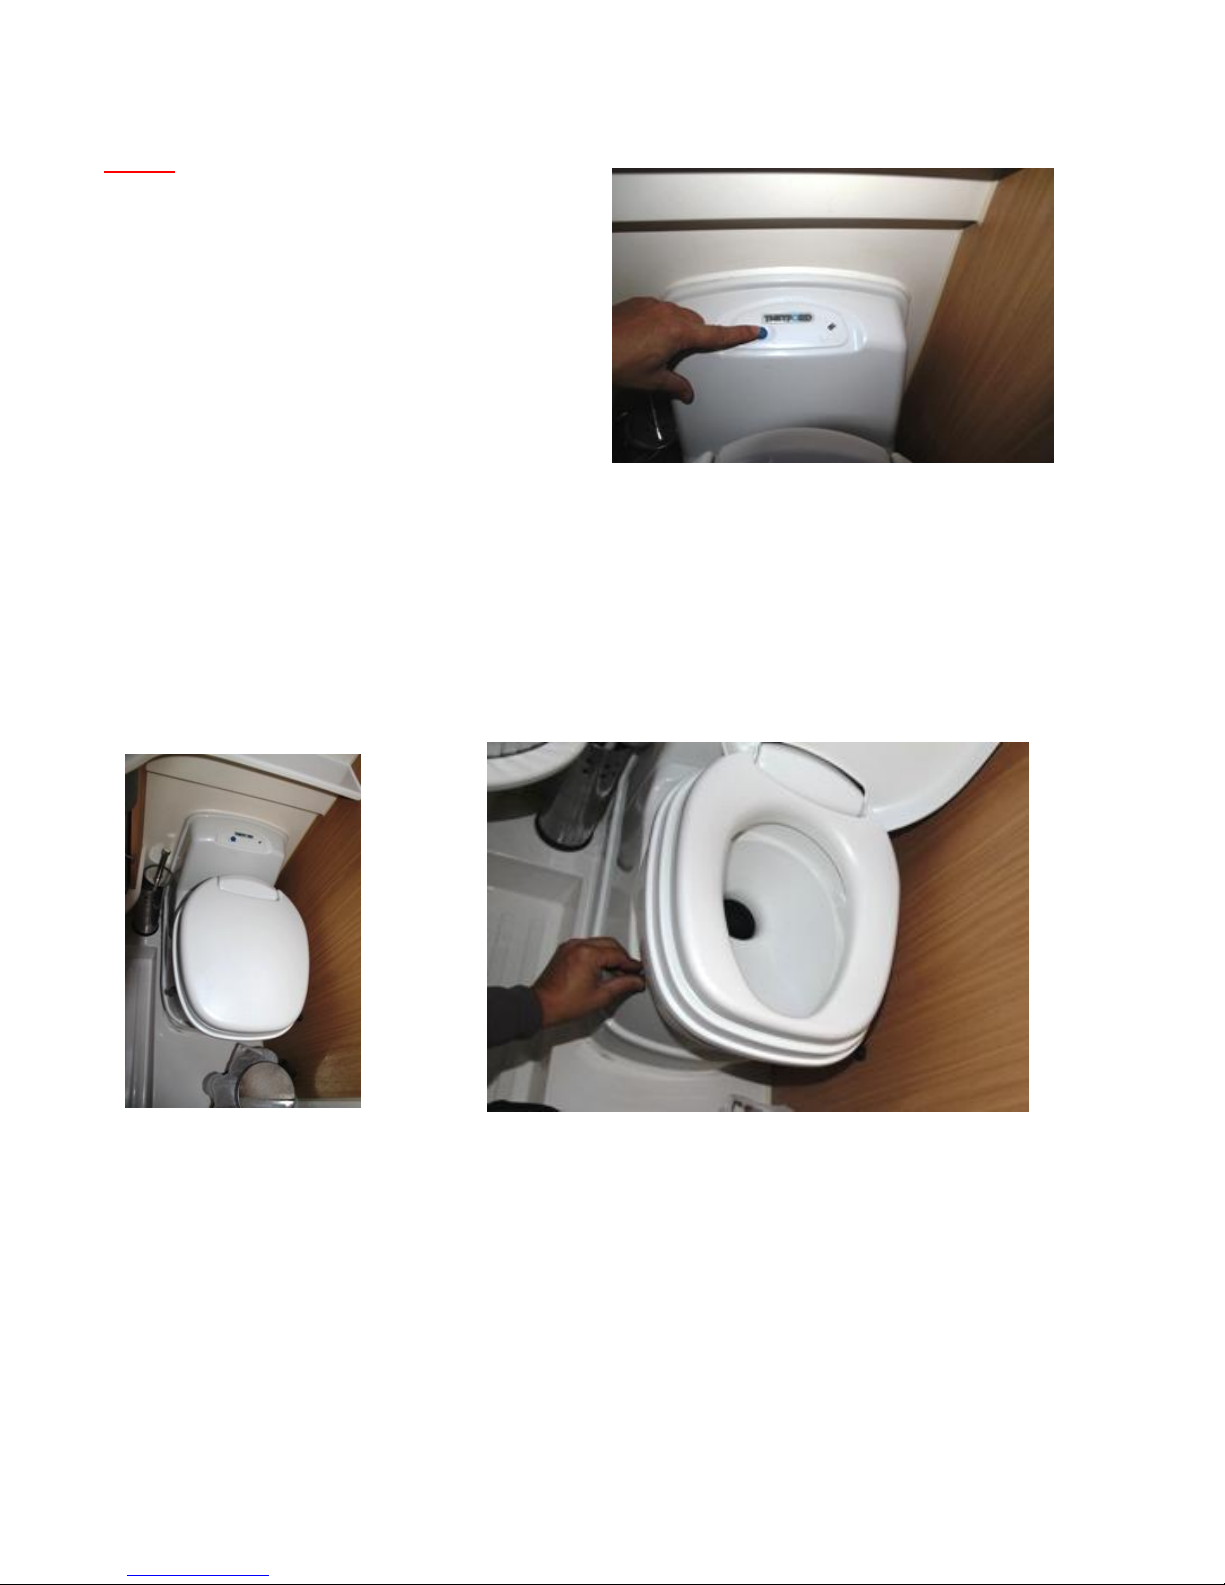
Toilet
The toilet has an electric flush, so turn on
the water pump first.
The whole toilet bowl can swivel to make a
little more elbow room.
Wet the bowl with a brief press of the blue
button.
The outlet from the toilet bowl is normally
closed with a black sealing “blade”. This is
moved out of the way by sliding the lever at
the base, towards the front of the van.
After use, flush the toilet using the blue button, and close the disk by pushing the lever
backwards.
A red warning light shows when the toilet tank is nearly full. See details of emptying at
the back of this guide. Spare fluid is kept beside the toilet, and a 1-litre bottle is provided
for measuring the water to be added.
Never added more fluid through the bowl of the toilet. It must always be added through
the tank filler cap.
Page 12
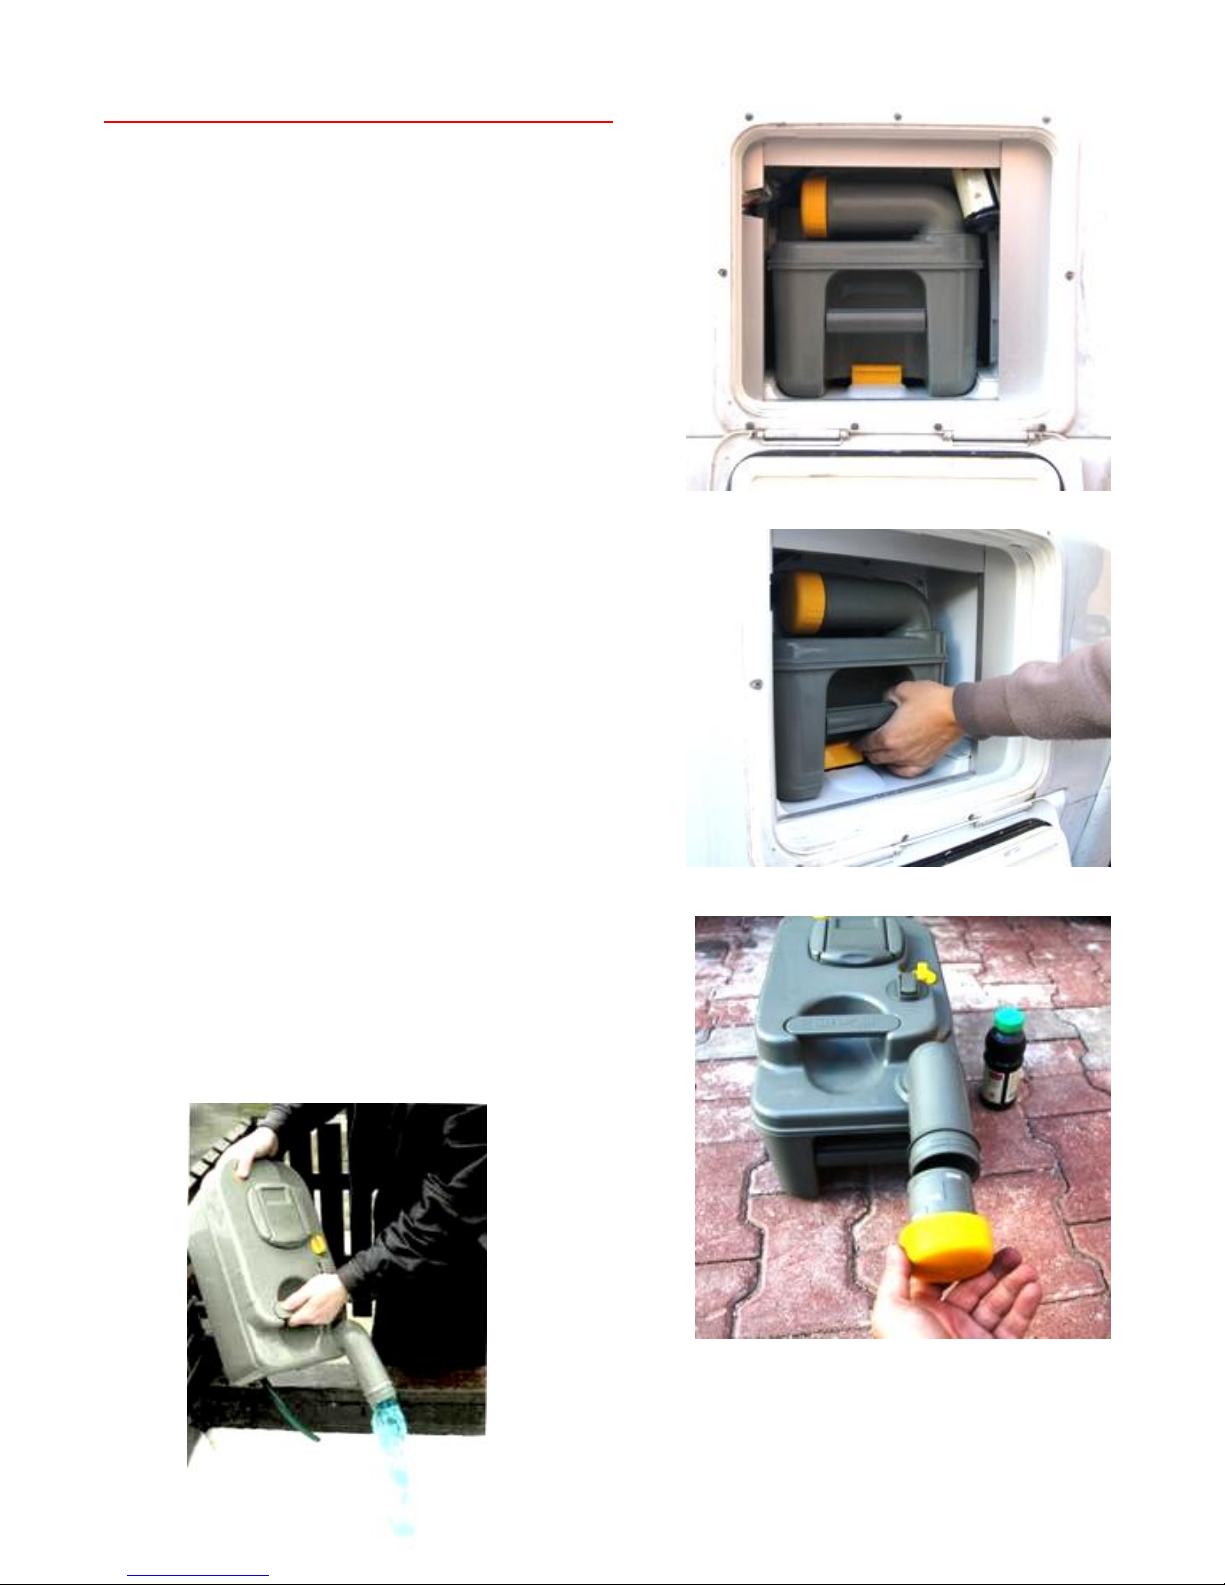
Emptying Toilets with Removable Tanks
Modern campervans have a cassette toilet
that seals the waste tank between uses, and
keepsit sealed for when you need to dispose
of its contents. This emptying operation is
done from outside the campervan with
minimal fuss.
1. Make sure that the slide valve
in the bottom of the toilet pan is
completely closed.
2. Move outside and open the
rear doors.
3. Grip the yellow release latch
and withdraw the grey tank.
4. At the disposal point, swivel the
neck around, remove the
yellow cap, and pour away the
contents whilst holding the air
vent button (4) depressed – to
avoid splashing.
5. Rinse the tank with clean water
until it runs clear.
6. Use the yellow cap to measure
75ml of toilet fluid into the tank.
7. Top up with 1,5 litres of water
Page 13
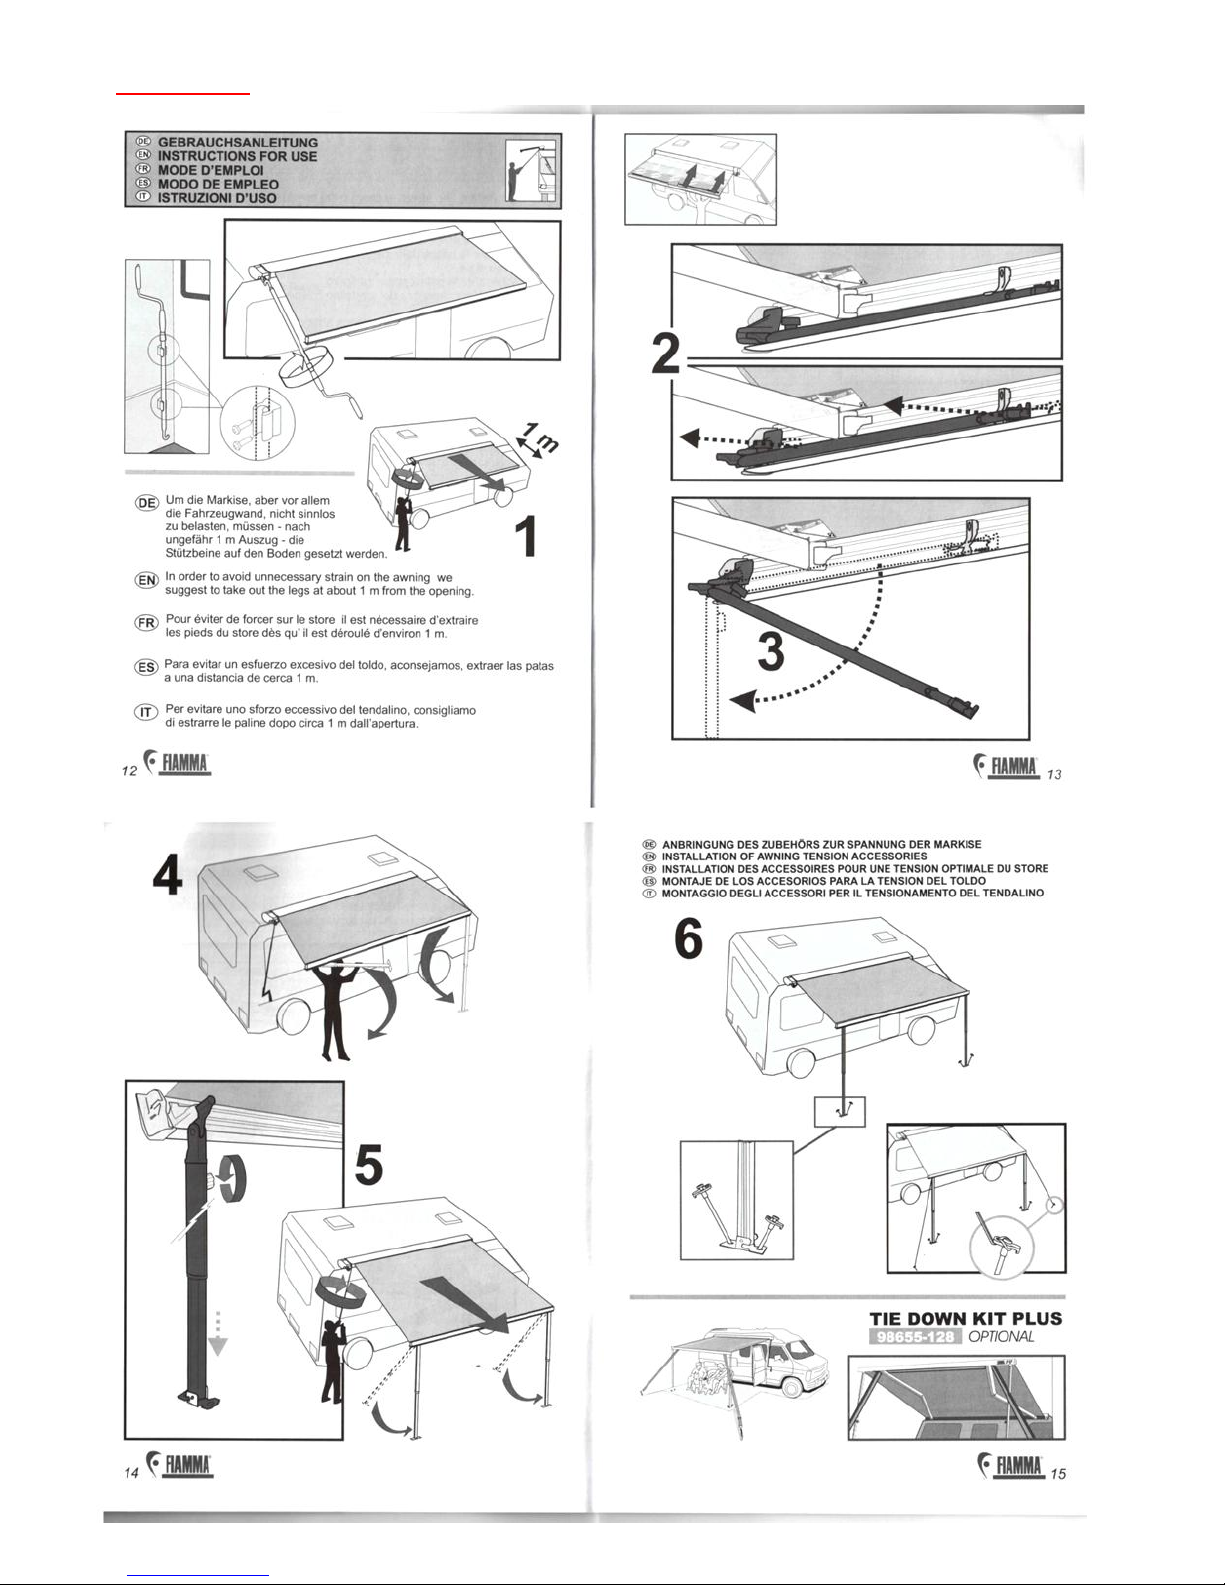
Awning
Page 14
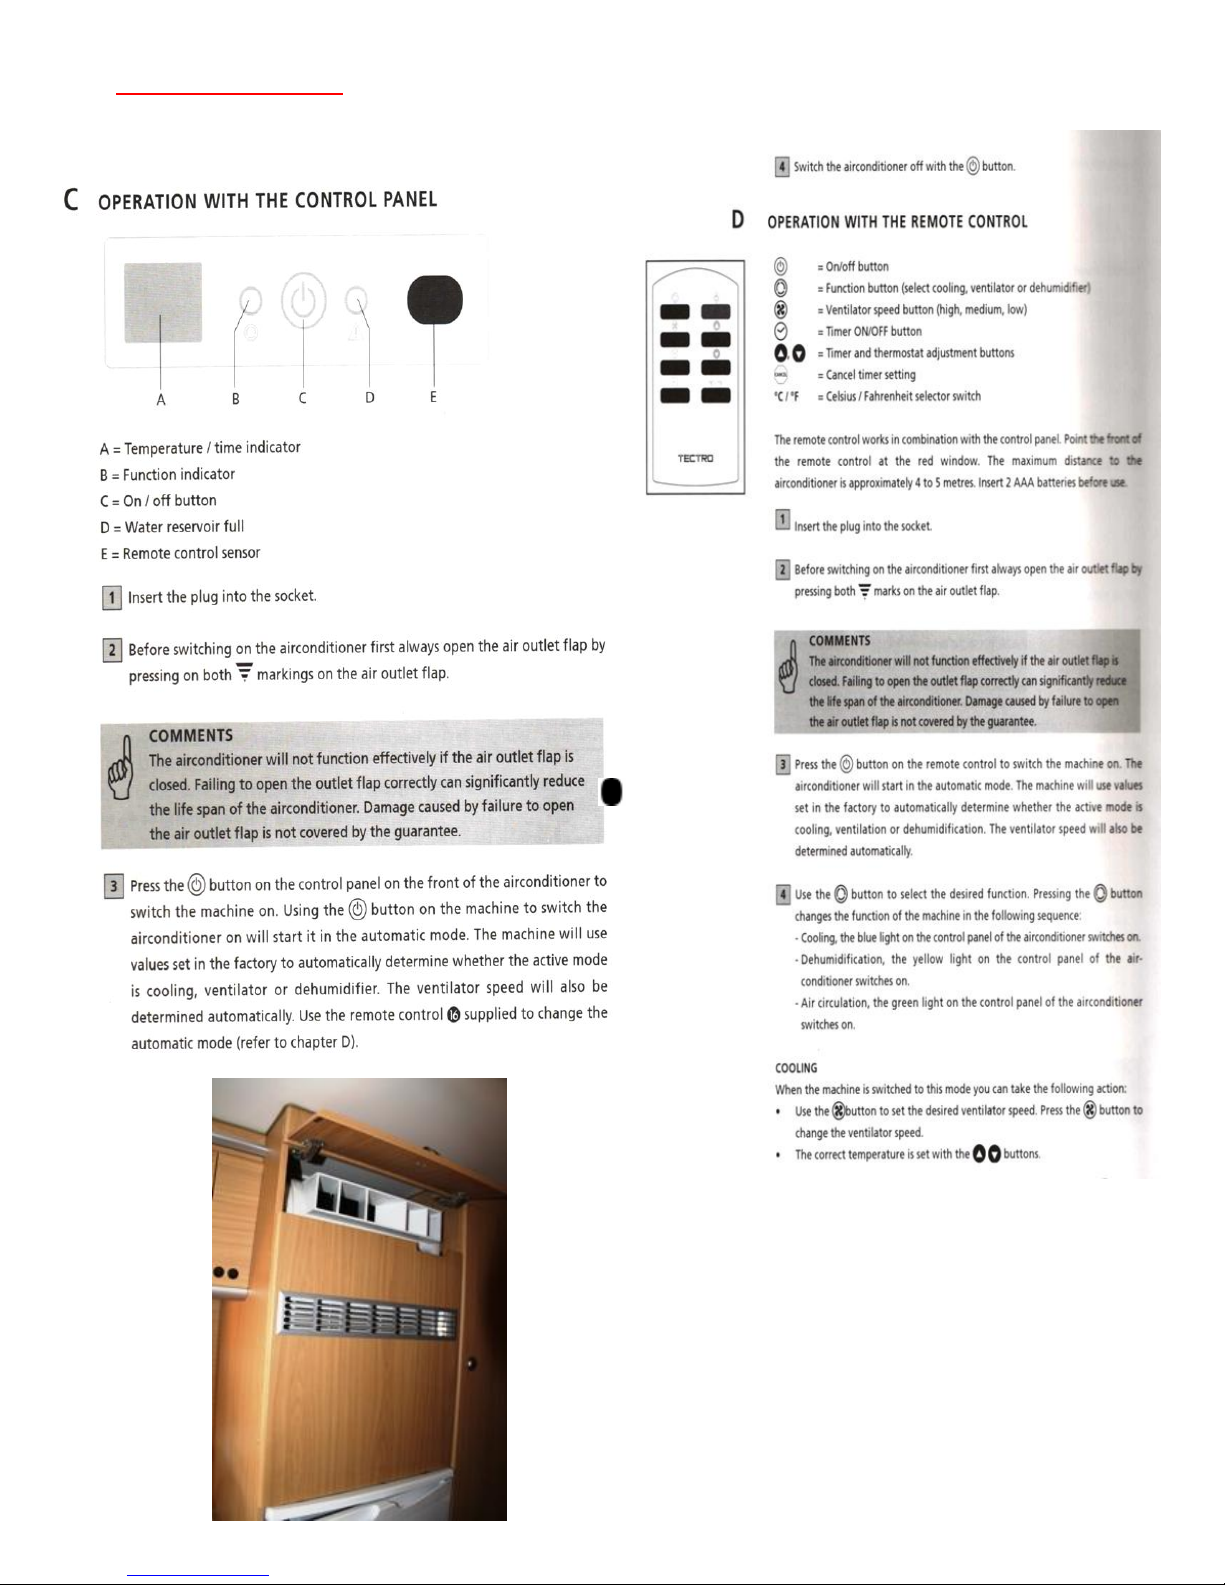
Air Condition
Page 15
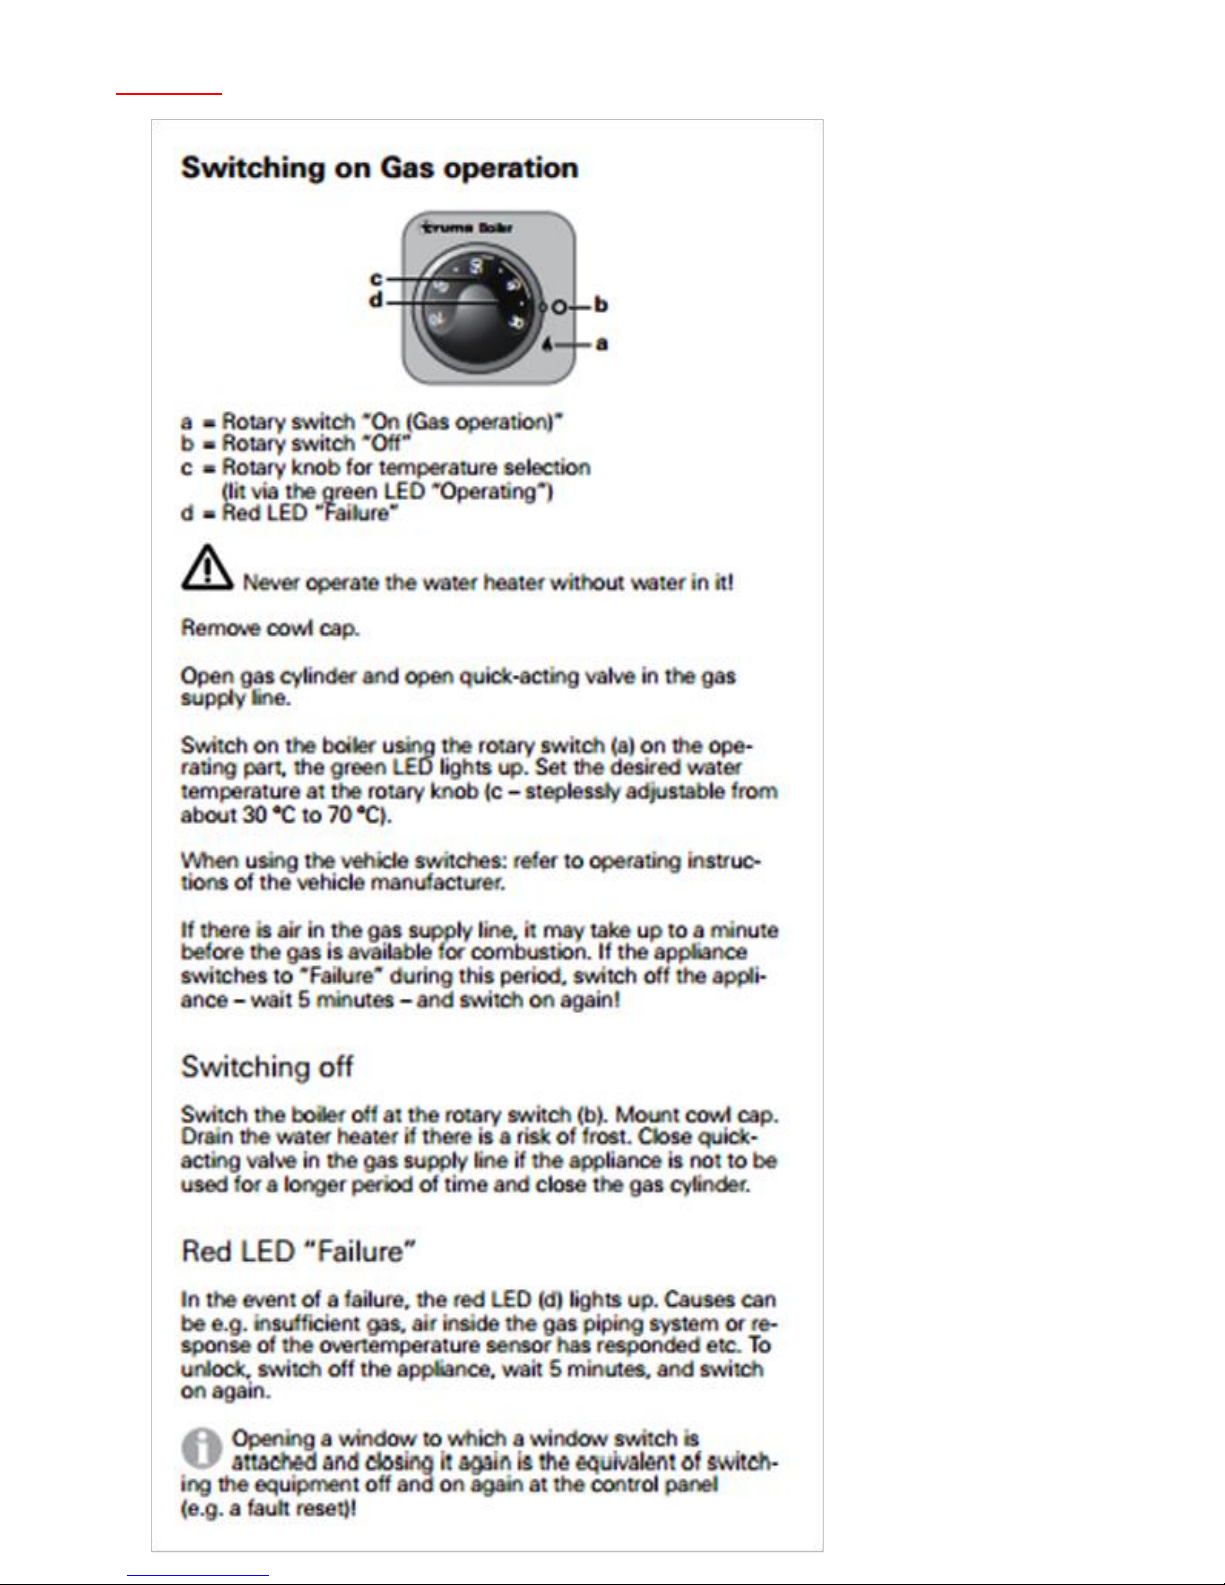
Boiler
 Loading...