

Page 1

Page 2

CONTENTS
FM/M/L RDS FUNCTION RADIO, TAPE
PLAYER AND EXTERNAL CD PLAYER
PAGE
INTRODUCTION . . . . . . . . . . . . . . . . . . . 2
USEFUL ADVICE . . . . . . . . . . . . . . . . . . . . 4
DESCRIPTION OF CONTROLS . . . . . . . . 7
OPERATION . . . . . . . . . . . . . . . . . . . . . . . 10
TROUBLE SHOOTING . . . . . . . . . . . . . . . 26
TECHNICAL INFORMATION . . . . . . . . . 28
1
Page 3

INTRODUCTION
The Fiat barchetta is fitted with a fixed sound sys-
tem presenting the following features:
• RADIO SECTION
– PLL tuning (FM/MW/LW frequency bands)
– RDS (Radio Data System) with TA (Traffic Announcement) - PTY NEWS (Programme Type
News) - EON (Enhanced Other Network) - REG
(Regional Programme) functions.
– RDS alternative frequency tuning.
– Automatic/manual station tuning.
– Manual storage of 24 stations: 18 in FM band (6
in FM1, 6 in FM2 and 6 in FM3) and 6 in MW band.
– Automatic storage (AUTOSTORE function) of
6 stations.
– DX function (Distant: increased sensitivity in
searching for radio stations).
– Automatic Stereo/Mono selection.
• TAPE SECTION
– Autoreverse
– Tape fast forward and rewind
– Automatic recognition and equalisation of Cr/Me
tapes with consequent optimisation of sound.
– Pause function.
– Last/next track search function.
– Repeat function (repeats last track).
– Blank Skip function.
– Scan tracks on tape (forward) function.
2
Page 4

– DOLBY B (noise reduction circuit) (*)
• AUDIO SECTION
(*) The DOLBY noise reduction device is made under licence from the Dolby Laboratories Licensing Corporation. DOLBY and double D symbol are registered trademarks of the Dolby Laboratories Licensing Corporation.
• CD PLAYER SECTION
(where fitted)
– Disc selection (last/next)
– Track selection (last/next)
– Fast forward and fast backward
– Pause function
– Repeat function (repeats last track or CD)
– CD Scan (scans tracks on selected CD or all
CD’s)
– Random (plays tracks on selected CD or all CD’s
in random order)
– Separate bass/treble settings
– Right/left and front/rear channel balance
– Loudness function
– Mute function (for “cassette” and “compact
disc” functions, only)
– Pre-set volume for TA, ALARM (Emergency)
and PTY-NEWS functions
– Sound system muting when cellular phone is in
use
3
Page 5

USEFUL ADVICE
ROAD SAFETY
You should learn how to use the various functions
(e.g. storing the stations, etc.) before trying to do it
while driving.
If you drive with the volume too high you put both
your own life and that of others in jeopardy. You
should adjust the volume so that you can hear noises from outside the car (e.g. horns, ambulance/police
sirens, etc.).
RECEPTION CONDITIONS
Reception conditions vary all the time while the
car is moving. Reception may be effected by mountains, buildings or bridges, especially when you are a
long way from the broadcasting transmitter of the
station you are listening to.
CARE AND MAINTENANCE
The basic structure of the audio system ensures
long-term operation without the need for any particular maintenance. Get in touch with a Fiat Deal-
ership if anything goes wrong.
Only clean the front panel with a soft, anti-static
cloth. Cleaning or polishing agents could damage the
surface.
TAPES
For optimal playback:
– Do not use bad quality tapes, misshapen cassettes or cassettes with the labels coming unstuck.
– Do not leave the tape in the player when not in
use.
– Do not introduce any other object in the tape
deck.
4
Page 6

– Do not leave tapes in direct sunlight or expose
them to excessive heat or moisture.
– Put cassettes back into their boxes after use.
– Dirt on the player head from tapes can, in time,
reduce treble during playback. We recommend you
clean the head periodically with a specific head cleaner tape (non abrasive).
– Ideally, use C–60 tapes. Do not use tapes longer
than C–90 to ensure constant, optimal playback.
Moreover, longer tapes are very thin and can easily
break.
– Avoid using cassettes with slack tape, especially
C–90 tapes. The tape could come out of the cassette
and block the mechanism. However, if the player detect slack tape or similar problems, the cassette will
be ejected automatically.
– Do not lubricate cassette mechanism.
– Do not touch the player head with magnetic or
hard objects.
CD
If you are using a CD player, remember that dirt or
marks on the CD can cause skipping or bad sound
quality in playback. The same will occur if the CD is
bent.
For optimal CD playback:
5
Page 7

USEFUL ADVICE
– Only use CD carrying the following trademark:
– Clean each CD carefully. Remove fingerprints
and dust with a soft cloth. Hold the CD from its
edge and clean from the centre outwards.
– Never use chemical products (e.g. sprays, antistatic products or thinners). These products could
damage the CD surface.
– After use, put the CD’s back in their cases after
use to avoid marking or scratching the discs. This
would cause skips in playback.
– Do not leave discs in direct sunlight or expose
them to high temperatures or moisture for a long
time to avoid bending them.
– Do not stick labels or write on the recorded side
of a CD.
6
Page 8
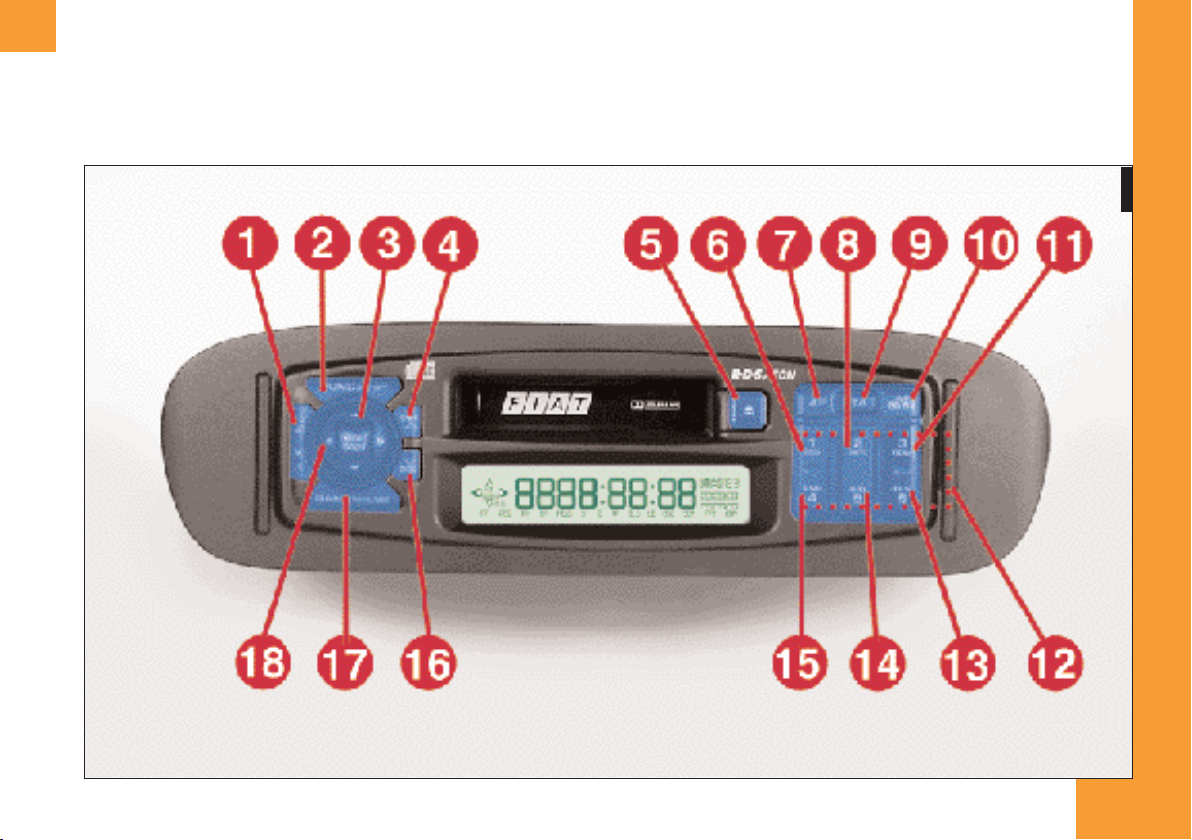
DESCRIPTION OF CONTROLS
P5S10014
fig. 1
7
Page 9

DESCRIPTION
OF CONTROLS
1. Audio mode button (A-M)
Loudness button (LOUD)
2. On/Off button (POWER)
Radio, Tape, CD button (FUNC)
3. Volume, treble, fader adjustment button
(up/down) (O/N)
4. Next disc button (DISC UP) [I]
5. Eject tape button (EJECT) (˚) [J]
6. Scan tape/CD (SCAN) [J], [I]
7. Alternative frequency button, RDS REG
function (AF)
8. Repeat tape/CD track button (RPT) [J],
[I]
9. Traffic announcement function button, preset volume for TA, ALARM and PTY-
NEWS (TA) [K]
10. Automatic station storage button (AS) [K]
PTY NEWS function button
11. Random CD track function button (RDM)
[I]
12. Pre-set station button [K]
13. Skip blank tape function button (BLS) [J]
14. Mute sound system (MUTE) [J
Play/pause tape/CD (˙/ II) [J], [I]
15. Dolby NR B function button (BNR) [J]
16. Last disc button (DISC DN) [I]
], [I]
8
Page 10

17. Band selection button, manual tuning
(BAND) [K]
Change tape side button (PROG) [J]
CD Changer magazine button (MAG) [I]
KEY
[K]: In radio mode
18. Bass, balance, manual/automatic tuning, distant/locale search, tape fast forward/reverse,
next/last tape/CD track, CD fast forward/reverse buttons (left/right) (G and H) [J],
[K], [I]
[J]: In tape player mode
[I]: In CD mode
NOTE:
Various functions and settings can be made by pressing the up/down [3] and left/right [18] buttons. This
operation is called the “Alpha-Touch Controller”
function.
9
Page 11

OPERATION
MAIN OPERATIONS
IMPORTANT Turn the volume down before
turning the sound system off. Sound quality will be
perfect and the sound system will not be damaged
when you turn it back on.
Turning the sound system on and adjusting the vol-
ume
1. Press the (POWER) button [2] to turn the
sound system on. Press the (POWER) button for at
least one second to turn the sound system off.
2. Press the function button (FUNC) [2] to select
Radio, Tape and CD functions cyclically as follows:
Radio ➞ Tape ➞ CD ➞ Radio
The message “NO CASS” will appear if there is
no tape in the player.
The message “NO DISC” will appear if there is
no CD in the magazine or if the CD player is not
connected.
3. Press the up/down buttons [3] to adjust the vol-
ume.
N: to turn volume up
O: to turn volume down
Audio adjustments
1. Press the audio mode (A-M) [1] to select the
mode required. The mode changes each time the
(A-M) button is pressed as follows:
BASS / TREB (bass / treble) ➞ BAL / FAD (balance / fader) ➞ previous mode.
2. Adjust bass and treble with the left/right and the
up / down buttons [18], [3].
<Bass adjustment>
G: Decrease bass
H: Increase bass
10
Page 12

<Treble adjustment >
N: Increase treble
O: Decrease treble
3. Adjust balance and fader with the left/right and
up / down buttons [18], [3].
<Balance adjustment >
G: Increase left speaker sound
H: Increase right speaker sound
<Fader adjustment >
N: Increase front speaker sound
O: Increase rear speaker sound
Mute
This function will automatically turn the volume
down to zero.
Press the MUTE [14]. The sound will disappear
and the message “MUTE” will appear on the display. Press the MUTE button again to turn the function off.
This function is operating in “cassette” or “compact disc” modes only.
RADIO FUNCTIONS
Loudness
Keep the loudness button (LOUD) [1] pressed
for longer than 2 seconds to activate/deactivate this
function. The message “LD” will appear on the display when the function is on.
Listening to the radio
1. Press the function button (FUNC) [2] to select
radio mode.
Press the BAND button [17] to select the reception band FM (FM1, FM2, FM3) ot AM (MW /
LW). The band will change each time the button is
pressed as follows:
11
Page 13

OPERATION
FM1 ➞ FM2 ➞ FM3 ➞ AM ➞ FM1
(FM band is split into three sections FM1, FM2,
FM3 with the same reception range to allow the
pre-setting of 18 fm stations).
2. Press the right or left button [18]. Tuning will
automatically stop at the frequency of a station (automatic tuning).
Automatic tuning
There are two types of automatic tuning: distant
(DX), tuning in to all the stations which can be re-
ceived, and local, tuning into the stations with the
strongest signals only.
Distant automatic tuning (DX)
1. Press the BAND button [17] to select the
band.
2. Press the right or left button [18].The message
“DX” will appear on the display. Tuning will auto-
matically stop at a station frequency.
Local automatic tuning
1. Press the BAND button [17] to select the
band.
2. Press the right or left button [18] for longer
than 1 second. The message LO will appear on the
display. Tuning will automatically stop at a station
frequency.
Manual tuning
1. Press the BAND button [17] to select the
band.
2. Press the BAND button [17] for longer than 2
seconds.
12
Page 14

3. The message MAN will appear on the display
and manual tuning is possible.
4. Press the left /right buttons [18] to tune to the
stations
The system will return automatically to automatic
tuning after 7 seconds.
Manual station storage
24 stations (6 each in the FM1, FM2, FM3, AM
bands) can be stored as follows:
Automatic storage
1. Press the BAND button [17] to select the
band.
2. Press the AS button [10]. for 2 seconds or
more. Strong signals will be automatically stored in
pre-set memory. If less than 6 strong stations are
available, the previously stored stations will be kept
for the pre-set buttons where no new stations can
be stored.
Recalling pre-set stations
1. Press the BAND button [17] to select the
band.
2. Press the left/right buttons [18] to tune to the
station to be stored.
3. Press the pre-setting button [12] where to
store the station for 2 seconds or more.
Note: When storing a station, the station previ-
ously stored for that button will be deleted.
1. Press the BAND button [17] to select the
band.
2. Press the pre-set buttons [12] to select the required station.
13
Page 15

OPERATION
RDS FUNCTIONS
RDS (Radio Data System)
The radio must be tuned to FM to access the RDS
functions.
The RDS system gives you automatic tuning to the
optimal frequency of the RDS-enabled stations being
listened to (AF function). You can therefore continue to listen to the station without having to alter the
frequency when you change the area. Obviously the
station you are listening to must be picked up in the
area you are travelling through.
If the signal is very weak and/or if the reception is
bad, the sound system will mute for a few seconds
while seeking an alternative frequency for the station. If this occurs frequently, we recommend turning the AF function off.
If an RDS station can non longer be picked up in
your current position and the AF function is on, the
message AF on the display will flash. As soon as correct reception is restored, “AF” will stop flashing.
The RDS will also display the name of the station
you are listening to (PS function).
Alternative frequency search (AF function)
Press the AF button [7] to activate/deactivate the
function. When the function is on, the message AF
will appear (or flash) on the display.
If reception worsens, the message “AF” will start
flashing and the device will attempt to tune to an alternative frequency. If the switch-over is not possible, the message “SEARCH” will appear on the
display and the sound system will tune to the current
station before starting the search.
14
Page 16

REG function (regional programmes)
The REG function can only be used when the AF
function is on.
The REG function (regional programmes) tunes to
local (regional) stations only. Press the AF button [7]
for longer than 2 seconds to turn the function on/off.
The message “REG” will appear on the display
when the function is on.
1. Press one of the pre-set buttons [12] to recall a
regional station.
2. If the station reception is not optimal, press the
same pre-set button [12] and the radio will tune to
a regional station.
TA (Traffic Announcement) function
With this function, you can:
If you are listening to a regional station and the
function is off, the regional station of the new area
will be picked up as you change area.
The REG function is not active when receiving a
national station.
Manual tuning to regional stations
This function is available only when regional stations are received, with AF function on and RDS
function off. Follow this procedure:
– Automatically search only the FM-RDS stations
enabled to broadcast traffic announcements. The
message “TP” will appear on the display when you
are tuned to one of these stations.
– Receive traffic announcements while you are listening to a tape or CD.
15
Page 17

OPERATION
To start the function, press the TA button [9]. If
the initial station is not enabled to provide traffic announcements (the message “TP” will not appear on
the display), the radio will automatically tune to the
closest station broadcasting traffic announcements
and the message “TA” will appear on the display.
Note: If no RDS TA stations can be received, the
system will continue the search indeterminately. To
stop the search, press the TA button [9] again.
If, on the other hand, a station has been found, the
system will turn to TA stand-by until the traffic announcement starts. In this case, the message TRA
INFO followed by PS (Programme Service name)
will appear on the display.
The playback of a CD or tape will be interrupted
to allow to listen to traffic announcements broadcast
by an RDS TA station.
Press the TA button [9] during traffic announcement broadcasting to stop listening to the announcement and the system will return to TA
stand-by mode.
To memorise stations with the TP function on,
follow the storage procedure described in the paragraph “Manual station storage”.
Alternatively to manual storage, press the AS button [10] for 2 seconds or more to automatically
store the stations with the TP function on (see “Automatic storage”).
To turn the function off, press the TA button [9]
again.
EON (Enhanced Other Network) function
Circuits grouping stations enabled to broadcast
traffic announcements (NEWS) are available in
some countries.
16
Page 18

In this case, the station programme enabled to
broadcast traffic announcements you are listening to
will be temporarily interrupted whenever traffic announcements are broadcast by other stations in the
network.
This function may not be available is some countries/regions.
You can adjust the PTY-NEWS station volume
as required, according to the procedure shown in
the next paragraph. The volume, consequently, can
change when the function is turned on/off.
Note: PTY-NEWS broadcasts are not available
in all countries. In TA stand-by, the RDS TA stations have priority over PTY-NEWS stations.
PTY-NEWS function
This function tunes to a PTY programme broad-
casting NEWS.
Tune the sound system to FM band and press the
NEWS button [10] to turn the function on. The
message “NEWS” will appear on the display.
Reception of the tuned station will be temporarily
interrupted and a PTY NEWS station will be
played. Press the NEWS button [10] again to return to the previous station.
Emergency messages will interrupt all other operations. They can only be received from RDS sta-
tions. The message “ALARM” will appear on the
display and the message can be listened to.
To delete the “ALARM” broadcasts, press the
AF button [7].
17
Page 19

OPERATION
Pre-setting TA, emergency (ALARM) and
PTY-NEWS functions volume
You can adjust the volume for TA, ALARM and
PTY-NEWS functions as required.
During TA, ALARM and PTY-NEWS broadcasts, the sound system volume will automatically
adapt to the pre-set volume level.
The factory setting is TA VOL 9.
Volume will not change if it is set to a higher level
during TA, ALARM and PTY-NEWS broadcasts.
If it is set to a level, it will change to the volume set
with the following procedure:
1. Press the TA button [9] for more than 2 seconds. If the volume is not adjusted within the following 7 seconds, the display will automatically return to
radio mode.
2. To adjust the volume, use the up/down buttons
[3].
3. Press the TA button [9] to end the procedure.
TAPE PLAYER OPERATION
Insert a tape in the desk facing rightwards. Play-
back will start automatically.
Correct equalisation of the player will be performed according to the type of tape used (e.g.
chromium or metal tapes).
At the end of the tape, the other side of the tape
will be played automatically.
To change tape side before the end, press the
PROG button [17].
18
Page 20

Playing an inserted tape
H: Press this button to fast forward the tape
Press the FUNC button [2] to select tape mode.
Playback will start automatically.
Pause function
Press the play / pause button [14] to stop playback
temporarily. Press it again to start playback again.
Ejecting a tape
Press the eject button [5], to eject the tape auto-
matically.
The system will switch to radio mode automatical-
ly 4 seconds after pressing the eject button.
Fast forward/reverse
Press the left / right button [18].
G:Press this button to rewind the tape.
The radio will be turned on while the tape is being
fast forwarded/rewound.
Last/next track search (Auto Program
Control function)
Press the left/right button [18] twice.
H: Press this button twice to go to the beginning
of the next track
G: Press this button twice to return to the beginning of the track being played. Press the button again
to go to the beginning of the last track.
During automatic search, the radio will be played.
19
Page 21

OPERATION
Scanning tape tracks (forward)
Press the SCN button [6] to play the first 10 seconds of each track on the tape. The message
“SCAN” will appear on the display. Press the SCN
button [6] again to stop the scan.
Repeat track
Press the RPT button [8] to play the last track
again. The message “RPT” will appear on the display. To quit this mode, press the RPT button again
[8].
Dolby B noise reduction function
Press the Dolby B NR [15] to start the function.
The message “B NR” will appear on the display.
Press the button again to turn the function off.
Skip blank tape function
This function will skip blank tape sections lasting
for longer than 12 seconds and automatically start
playing the next recorded section.
To turn the function on, press the BLS button
[13] until the message “BLS” appears on the display. Press the button again to turn the function off.
Note:
In some cases, the following functions may not
work correctly:
– next/last track search
– track scan
– repeat track
– skip blank tape.
20
Page 22

This can be caused by:
CD PLAYER
– low level recordings (weak sounds and not per-
fect recording)
– tapes containing conversations
– tapes with blank sections lasting less than 12 sec-
onds
– tapes with long periods of silence in the record-
ings
– tapes without blank sections (e.g. live record-
ings)
– tapes with a lot of noise in the blank sections
The sound system can be connected to a compatible CD player (CD Changer).
Loading the CD magazine
Make sure that label A-fig. 3 is the right way up,
otherwise the CD player will not work.
The magazine can hold up to six discs.
Fitting the disc magazine in the player
Open flap fig. 2.
21
Page 23

OPERATION
Insert CD magazine fig. 4 completely into the
player with the label (see arrows) facing upwards.
Close the flap after having inserted the CD loader,
to prevent dust or other small objects from getting
into the player.
P5S10015
fig. 3
22
fig. 2
P5S10011
P5S10012
fig. 4
Page 24

Removing the disc magazine from the player
Pause
Open flap fig. 2. Press eject button A-fig. 2 on the
player. The magazine will be partially ejected.
Pull out the magazine carefully.
Close the sliding door.
Removing CD’s from the magazine
Pull out the CD’s one at a time, by pressing the
lever next to each CD.
Playback
Press the FUNC button [2] to select CD mode.
The system will start playing the first CD in the magazine.
Press the play /pause button [14] to temporally in-
terrupt playback. Press it again to start playback.
Disc selection
Press the next disc button [4]: The discs will be selected in the following order each time the button is
pressed: 1➞ 2 ➞ 3 ➞ 4 ➞ 5 ➞ 6 ➞ 1 …
Alternatively, press the last disc button [16]: to select discs in the following order: 1➞ 6 ➞ 5 ➞ 4 ➞
3 ➞ 2 ➞ 1…
Track selection
Press the left / right button [18].
H: Press this button twice to go to the beginning
of the next track.
G: Press this button twice to go to the beginning
of the track being played. Press this button again to
go the previous track.
23
Page 25

OPERATION
Fast forward/fast backward
Keep the left/right button [18] pressed.
G: fast backward
H: fast forward
Hold the button pressed for longer than 1 second
to advance at a speed equal to 3 times normal speed.
Hold the button pressed for longer than 3 seconds
to advance at a speed equal to 30 times normal
speed.
Scan tracks on selected CD
Press the SCN button [6] to play the first 10 seconds of each track on the selected CD. The message
“SCAN” will appear on the display. Press the SCN
button [6] again to stop the scan.
The scan will start from the next track with re-
spect to the one being played.
Scan tracks on all CD’s
Press the SCN button [6] for more than 2 seconds to play the first 10 seconds of all the discs in
the player. The messages “DISC” and “SCN” will
appear on the display. Press the SCN button [6]
again to stop the scan.
The scan will start from the next track with respect to the one being played.
Repeat track
Press the RPT button [8] to play the track several times. The message “RPT” will appear on the dis-
play. Press the RPT button[8] again to end this
mode.
24
Page 26

Repeat CD
Hold the RPT button [8] pressed for more than 2
seconds to play the last CD several times. The messages “DISC” and “RPT” will appear on the display. Press the RPT button [8] again to end this
function..
Random tracks
Press the RDM button [11] pto play all the tracks
on the selected CD in random order. The message
“RDM” will appear on the display. Press the RDM
button [11] again to end this function.
Random tracks on all CD’s
Hold the RDM button [11] pressed for more than
2 seconds to play all the tracks on the CD’s in the
player in random order. The messages “DISC” and
“RDM” will appear on the display. To end this function, press the RDM button [11] again.
Select magazine
This function can only be used if the CD player can
house one than one magazine. The next magazine is
selected each time the MAG button is pressed [17]
OTHER FUNCTIONS
Sound muting during cellular phone use
(where fitted)
The message “TEL” will appear on the display to
indicate an incoming message and the sound system
will be muted. Muting ends and system returns to
normal operation as soon as the telephone is hung
up.
25
Page 27

TROUBLESHOOTING
Problem
The sound
system cannot
be switched on
(or no sound
is produced)
The sound quality
has become poor
Cause
A fuse has blown
The player head is dirty
Solution
Replace the old fuse with a new fuse of the
same amperage
Clean the player head with a cleaning cassette, etc.
26
Page 28

This unit is equipped with a set of self-test functions to protect the system. The user will be informed of errors by means of the
following messages. Solve the problem as shown in the following procedures.
Error display
Procedure
Error in the CD Changer mechanism (the disc cannot be changed, ejected, etc.)
➞ The CD Changer mechanism is probably damaged. Contact your local
dealer.
The pick-up is out of focus during playback due to scratches on the disc,
etc.
The CD contents cannot be read, probably because the disc has been inserted upside down.
The cassette is jammed during insertion or ejection.
➞ Remove the cause jamming the cassette.
If you cannot solve the problem, turn the sound system off and contact a Fiat Dealership.
27
Page 29

TECHNICAL
INFORMATION
Max. power: 4 x 30 W
Frequency response: 30 ÷ 20,000 Hz
Aerial
The vehicle is equipped with a manual telescopic
aerial on the rear right side.
Electrically-operated aerial
The sound system is wired for a fully automatic
electrically-control aerial (optional)
The switching voltage for the aerial is to be found
on contact 5 of the sound system (see figure).
Switching voltage: +12 V, max. current 0.5 A
Speakers
The sound system consists of the following two
separate way system:
– 2 two cone speakers Ø 165 each with a power
of 60 W.
– 2 fluid iron tweeter speakers each with a power
of 60 W.
Fuses
The sound system has a protective fuse of 10A
fig. 5 located behind the radio.
P5S00929
28
fig. 5
Page 30

Print n. 603.47.453 - VI - 2001 - 2ndEdition - Printed by Satiz - Turin (Italy)
Coordinamento Editoriale Satiz - Torino
Page 31

Fiat Auto S.p.A.
Direzione Qualità - Assistenza Tecnica
10040 Volvera - Torino (Italia) - Largo Senatore G. Agnelli, 5
Page 32

 Loading...