

Fiamma CARAVANSTORE Series Installation And Use Instructions And Warnings
fiamma.com
Markise
Awning
Store
Toldo
Tendalino
Montage und
DE
Gebrauchsanleitung
Installation and
EN
use instructions
Instructions de montage et
FR
mode d’emploi
Instrucciones de montaje y uso
ES
Istruzioni di montaggio e uso
IT
Fiammastore
Verpackungsinhalt
fiamma.com
Fiammastore
Markisen
DE
Montage und
Gebrauchsanleitung
Awnings
EN
Installation and
use instructions
Stores
FR
Instructions de montage et
mode d’emploi
Toldos
ES
Instrucciones de montaje y uso
Tendalini
IT
Istruzioni di montaggio e uso
DE
FR
Contenu de l’emballage
IT
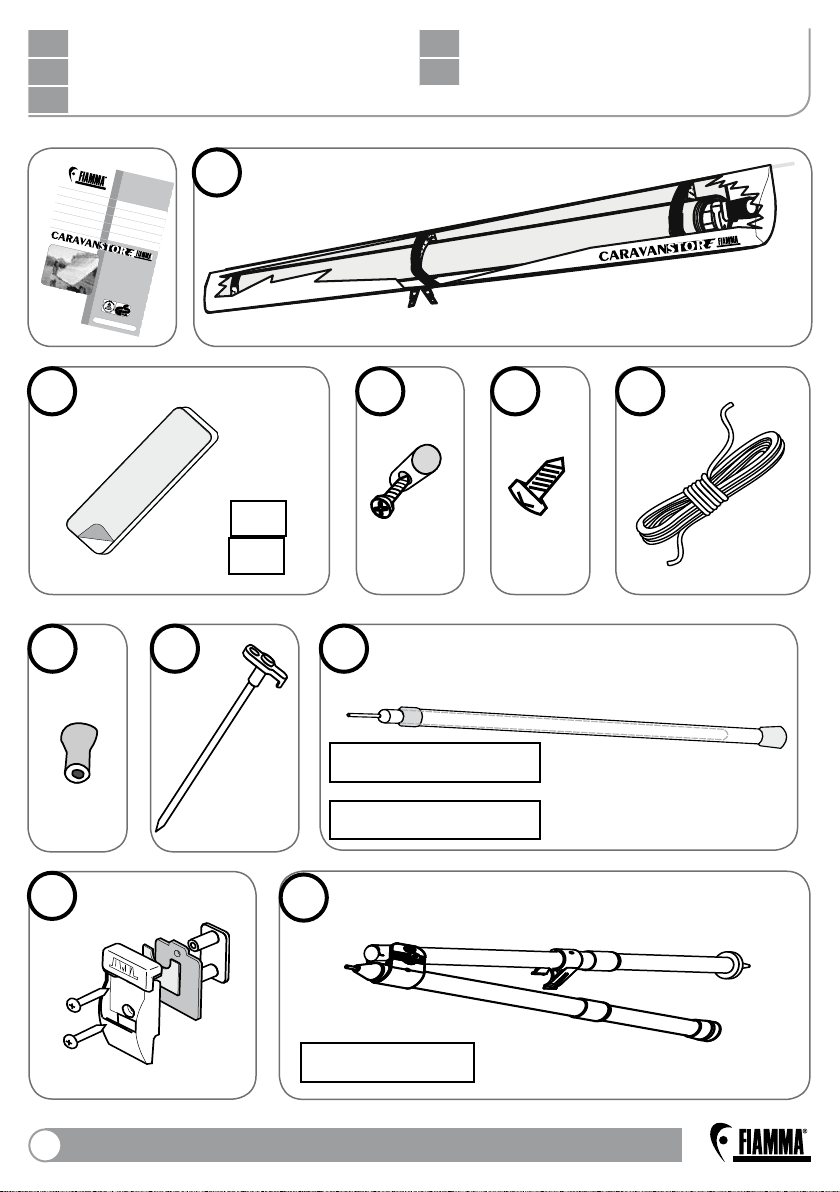
Contenuto dell’imballo
A
Package contents
EN
ES
Contenido del embalaje
1x
B
H
2x
EDC
1x
410
2x
440
GF
I
RAFTER CARAVANSTORE
2x2x
Standard 410-440
4x
Optional 190-360
L
CARAVANSTORE SUPPORT LEG
2x
1x
2x
2
Standard 440
Fiammastore
1x
Kontrolle bei der Übernahme
DE
FR
Contrôle à la réception
IT
Controllo al ricevimento
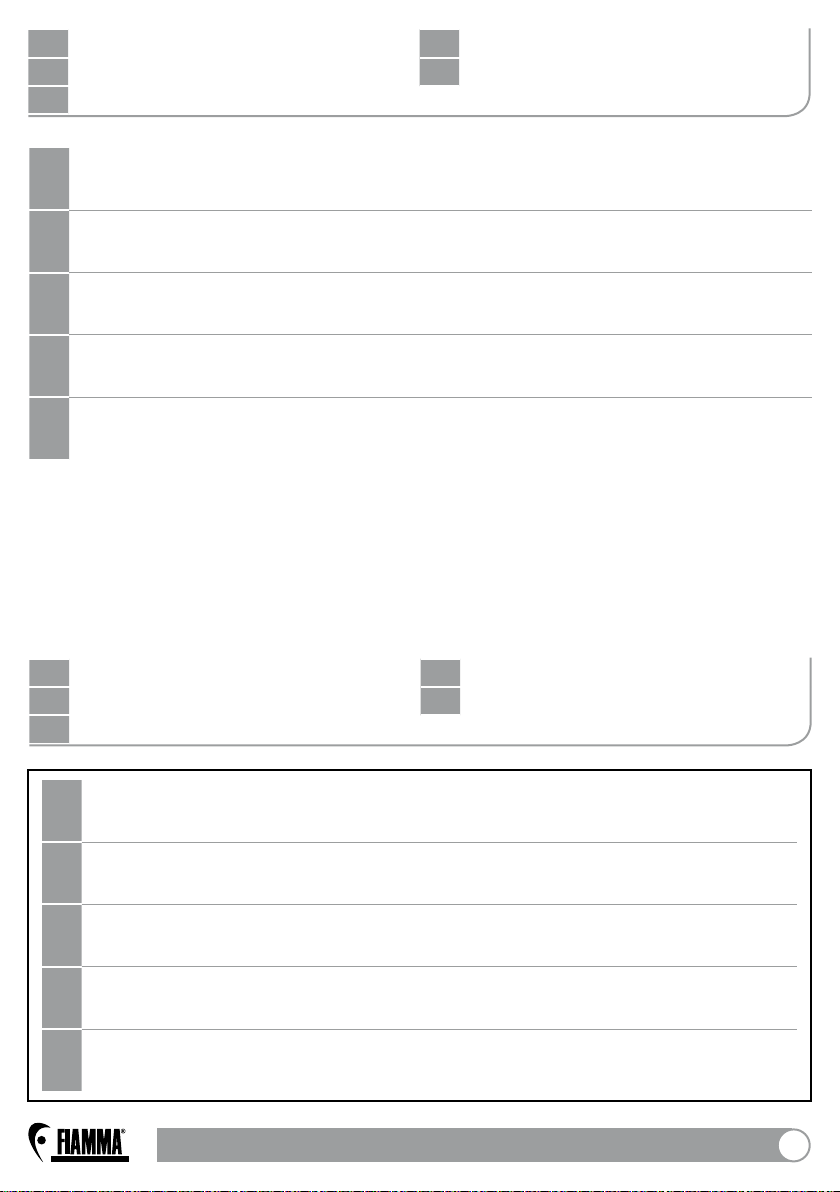
Bitte kontrollieren Sie, ob alle Einzelteile einwandfrei sind oder eventuell während dem
DE
Transport beschädigt wurden. Wenden Sie sich in diesem Falle bitte an den Händler.
Check that nothing has been damaged or deformed during the transport.
EN
In case of damage contact the dealer.
Contrôler qu’aucune pièce ne soit cassée ou déformée suite au transport.
FR
En cas contraire, contacter le revendeur.
Controlar que ningún detalle se haya roto o deformado durante el transporte.
ES
En este caso contactar al revendedor.
Controllare che nessun particolare sia rotto o deformato a causa di errori di
IT
trasporto. In questo caso contattare il rivenditore.
Goods receipt inspection
EN
ES
Control al recibimiento
Montageanleitung
DE
FR
Instructions de montage
IT
Istruzioni di montaggio
Um die Markise optimal nutzen zu können, lesen Sie bitte die Bedienungsanleitung
DE
aufmerksam durch und bewahren Sie sie zur späteren Verwendung gut auf.
To use the awning in the best way, read the user’s instructions carefully and
EN
keep them on hand for consultation in the future.
Pour tirer le meilleur parti de votre store, nous vous invitons à lire attentivement
FR
les notices d’emploi et à les conserver pour toute consultation ultérieure.
Para usar el toldo en lo mejor de los modos, os invitamos a leer atentamente
ES
las instrucciones de uso, guardandolas en caso de necesidad.
Per utilizzare al meglio il tendalino, vi invitiamo a leggere attentamente le
IT
istruzioni d’uso e a conservarle in caso di necessità.
Installation instructions
EN
ES
Instrucciones de montaje
Fiammastore
3

Montageanleitung
DE
FR
Instructions de montage
IT
Istruzioni di montaggio
Installation instructions
EN
ES
Instrucciones de montaje
A
1
DE
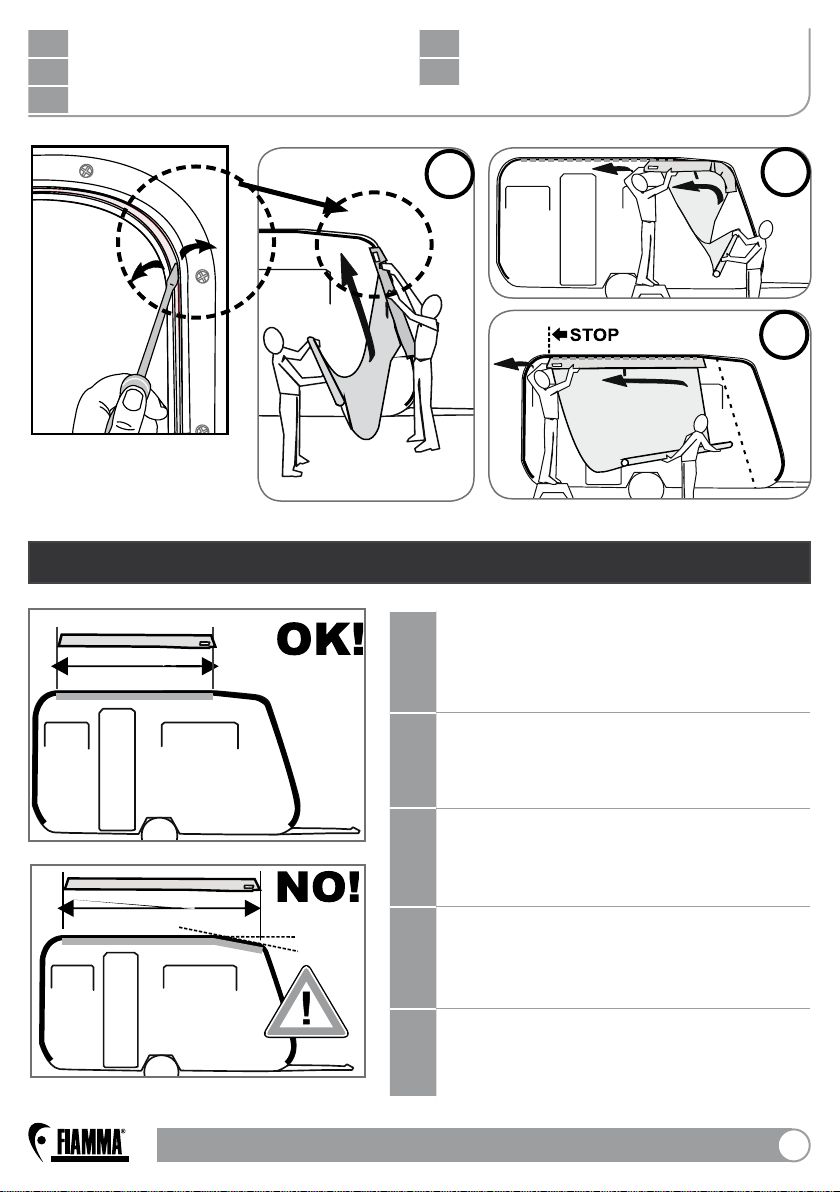
Das Tuch komplett ausrollen.
EN
Completely unroll the fabric.
FR
Dérouler complètement la toile.
ES
Desenrollar completamente la lona.
IT
Srotolare completamente il telo.
Wir empfehlen, die folgende Abläufe
DE
zu zweit auszuführen.
We recommend the following
EN
operations are carried out by 2
people.
Nous vous conseillons d’effectuer
FR
les operations suivantes en 2
personnes.
Aco sejamos efectuar las siguientes
ES
operaciones en 2 personas.
Consigliamo di effettuare le fasi
IT
seguenti in 2 persone.
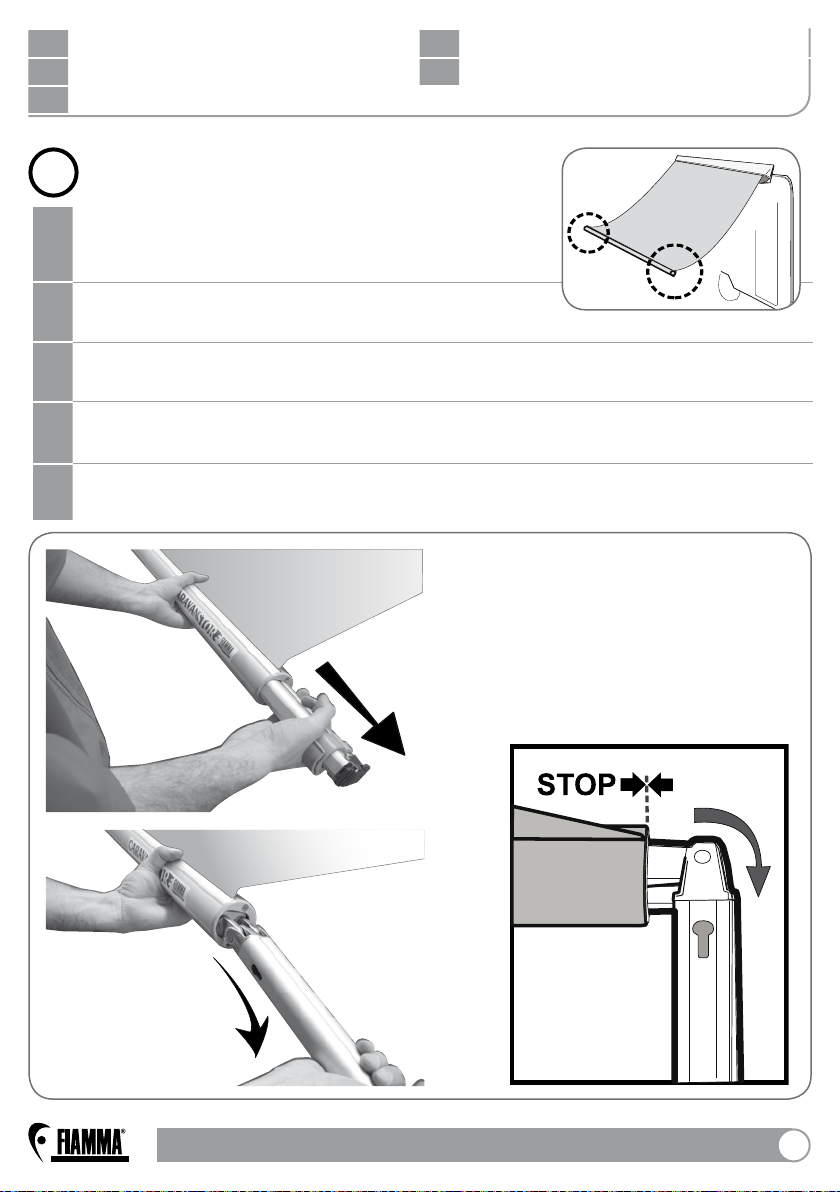
2
IMPORTANT WICHTIG CUIDADO IMPORTANTE
Das Kederschienenende leicht
DE
weitern, bei Bedarf auch entsprechend in der Rundung vornehmen.
Widen the opening and the curved
EN
parts of the caravan rail.
Elargissez le rail à l’ouverture et au
FR
niveau des zones courbes.
Ampliar la parte inicial y las partes
ES
curvas de la canalina.
Allargare la canalina all’imbocco
IT
ed in corrispondenza delle curve.
4
Fiammastore
Montageanleitung
DE
FR
Instructions de montage
IT
Istruzioni di montaggio
Installation instructions
EN
ES
Instrucciones de montaje
IMPORTANT WICHTIG CUIDADO IMPORTANTE
3
Vergewissern Sie sich immer bei
Anbringung der Markise, dass die
DE
Schiene geradlinig und der Keder
komplett im Innern angebracht ist.
Install the Caravanstore checking that the
EN
awning rail is straight (horizontal position)
and that the beading is fully inserted.
4
5
Procédez à l’installation du store en
vérifiant que le rail soit en position
FR
horizontale et que la baguette soit
complètement insérée à l’intérieur
Montar siempre el toldo asegurándose
que la canalina esté derecha y que la
ES
cabilla haya sido puesta completamente
dentro de ella.
Montare sempre il tendalino accertandosi
IT
che la canalina sia dritta e il tondino sia
completamente messo al suo interno.
Fiammastore
5
DE
Stossdämpfer
FR
Absorbeur de choc
IT
Assorbitore d’urto
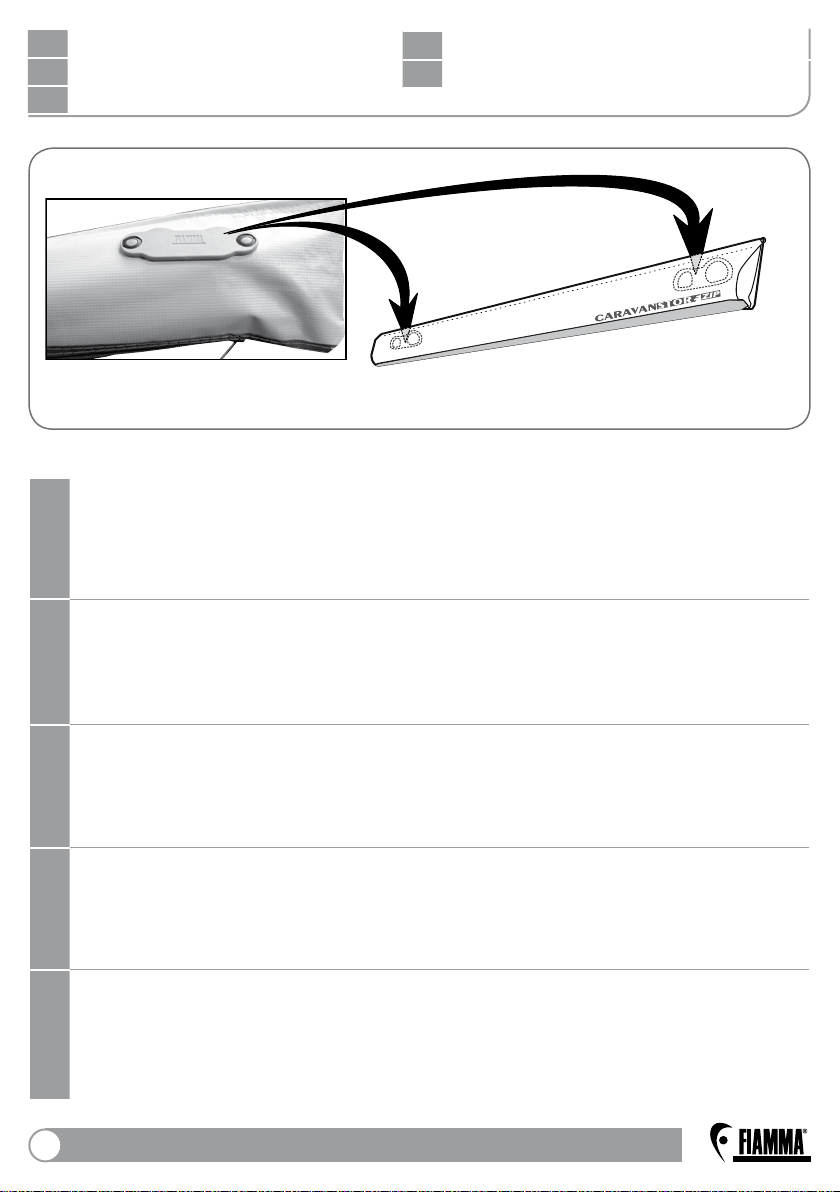
Die Markise enthält serienmässig 2 Stossdämfper, welche in Position der Rafter,
bei Anbringung der Rafter Caravanstore oder Caravanstore Support Leg,
DE
angebracht werden. Es wird empfohlen, die im Lieferumfang enthaltenen
Stossdämpfer (B) hinten am Markisensack anzubringen.
EN
Shock absorber
ES
Absorbedor de golpe
The awning comes standard with 2 Shock Absorbers fixed at the points of
support of the Rafters ; if you need to put the Rafter Caravanstore or the
EN
Caravanstore Leg Support, we suggest you to fix the the standard delivered (B)
Shock Absorbers on the back of the bag.
Le store est équipé de série de 2 Absorbeurs de Choc fixés en correspondance
des zones d’appui du tendeur de toile Rafter. En cas d’installation du Rafter
FR
Caravanstore ou du Caravanstore Support Leg, nous vous conseillons
d’appliquer sur l’arrière de la housse les Absorbeurs de Choc (B) en dotation.
El toldo viene de serie con 2 amortiguadores fijados a nivel de los soportes de
los Rafter, si es necesario poner el Caravanstore Rafter o la Caravanstore
ES
Supoort Leg, se recomienda la aplicación de los amortiguadores (B)
suministrados de serie en la parte trasera de la bolsa.
Il tendalino ha di serie i 2 assorbitori d’urto fissati in corrispondenza degli
appoggi Rafter; in caso si debba mettere il Rafter Caravanstore o Caravanstore
IT
Support Leg, consigliamo di applicare posteriormente sulla sacca gli assorbitori
d’urto (B) in dotazione.
6
Fiammastore

DE
Stossdämpfer
FR
Absorbeur de choc
IT
Assorbitore d’urto
B
EN
Shock absorber
ES
Absorbedor de golpe
DE
Stossdämpfer.
EN
Shock absorber.
FR
Absorbeur de choc.
ES
Absorbedor de golpe.
IT
Assorbitore d’urto per il Rafter.
CARAVANSTORE 410 CARAVANSTORE 440
Fiammastore
7
Montageanleitung
DE
FR
Instructions de montage
IT
Istruzioni di montaggio
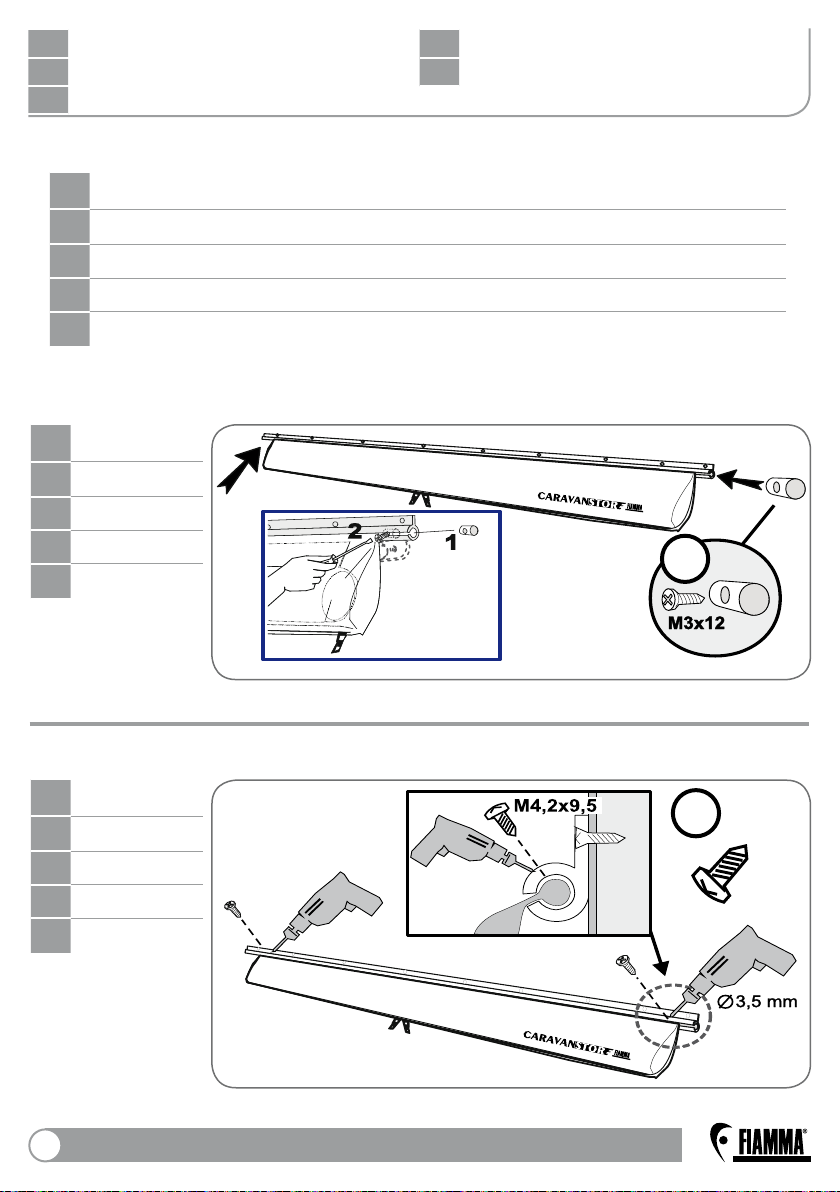
DE
Befestigungsmöglichkeit der Markise an der vorhandenen Kederschiene.
EN
Solution to fix the awning to the existing awning rail.
FR
Possibilté de fixation du store au rail du véhicule.
ES
Modalidad de fijación del toldo a la canalina.
IT
Modalità di fissaggio del tendalino alla canalina esistente.
DE
EN
FR
ES
IT
Möglichkeit
Option 1
Possibilté 1
Modalidad 1
Modalità 1
1
Installation instructions
EN
ES
Instrucciones de montaje
C
DE
EN
FR
ES
IT
8
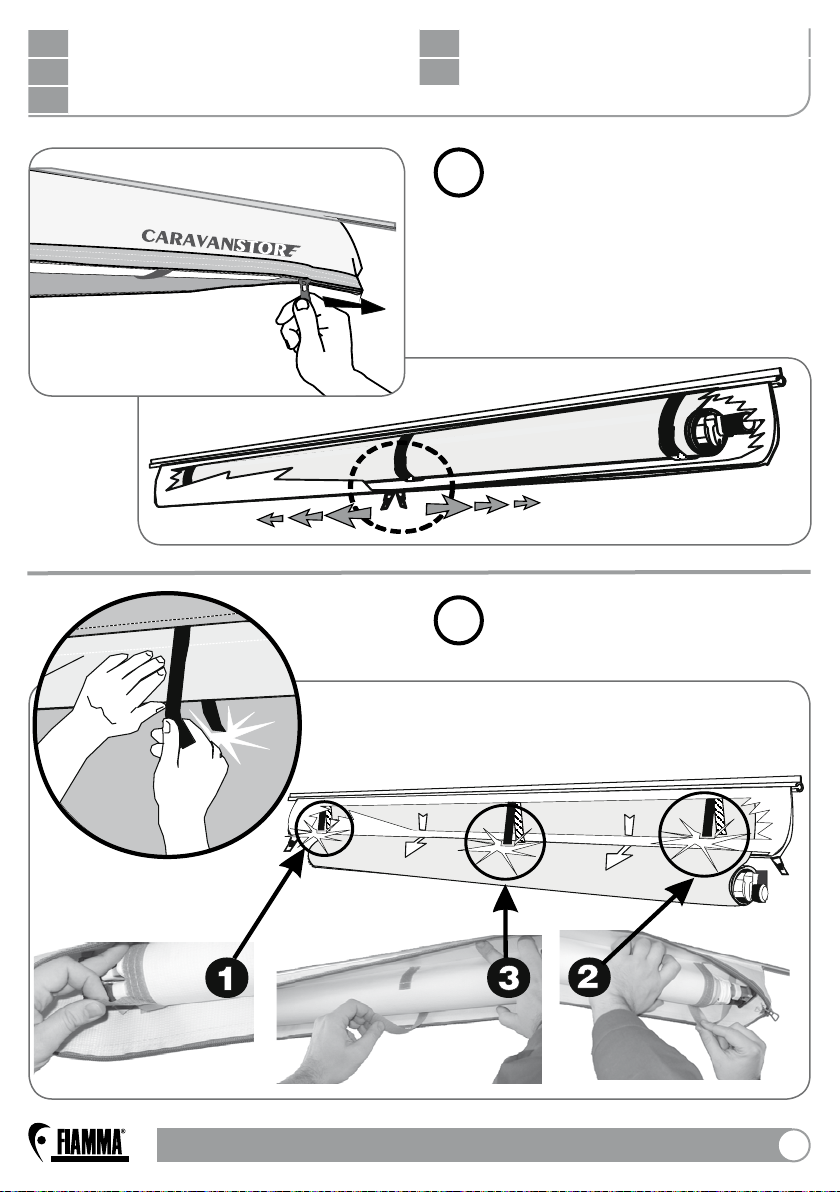
Möglichkeit
Option 2
Possibilté 2
Modalidad 2
Modalità 2
2
D
Fiammastore
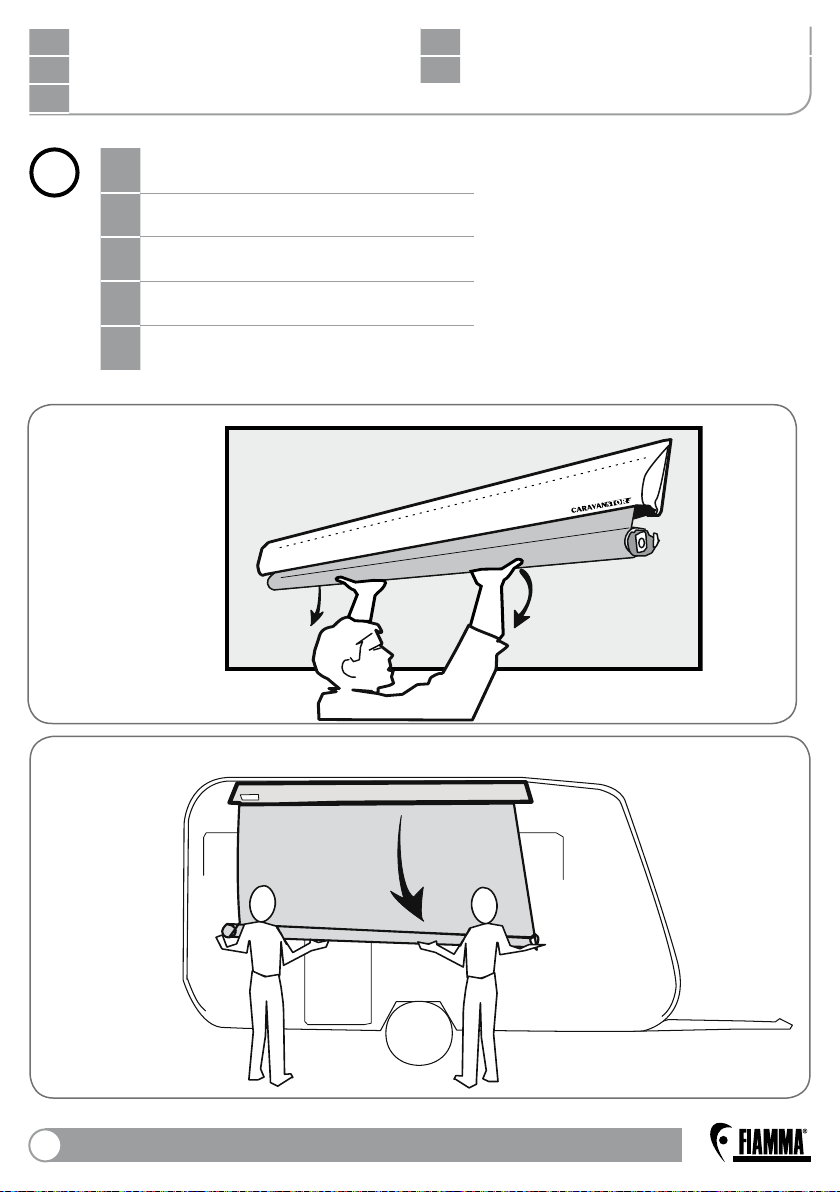
Gebrauchsanleitung
DE
FR
Mode d’emploi
IT
Istruzioni d’uso
Instructions for use
EN
ES
Instrucciones de montaje
1
2
Fiammastore
9
Gebrauchsanleitung
DE
FR
Mode d’emploi
IT
Istruzioni d’uso
DE
3
Das Tuch komplett ausrollen.
EN
Completely unroll the fabric.
FR
Dérouler complètement la toile.
ES
Desenrollar completamente la lona.
IT
Srotolare completamente il telo.
Instructions for use
EN
ES
Instrucciones de montaje
10
Fiammastore
Gebrauchsanleitung
DE
FR
Mode d’emploi
IT
Istruzioni d’uso
Instructions for use
EN
ES
Instrucciones de montaje
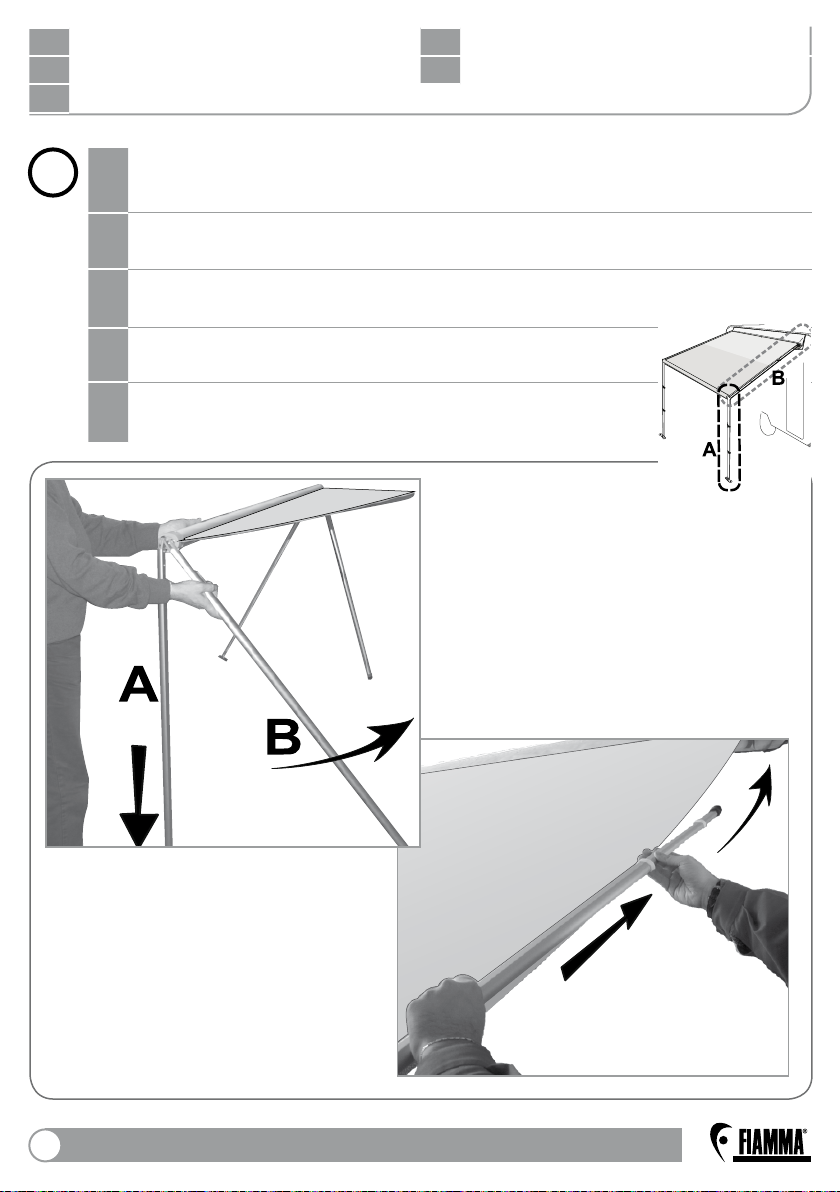
4
Die Stützfüsse komplett ausziehen und zusammen,
DE
durch Drehen des Stiftes und ohne Kraftaufwand,
absenken.
Pull the legs completely out, and, lower them together
EN
to the ground simply by turning on pins and without forcing.
Extraire complètement les pieds d’appui, les baisser en direction du sol en les
FR
faisant tourner simplement sur les pivots, sans forcer.
Extraer las patas completamente y, juntas, bajarlas a la tierra solo girándolas sobre
ES
los pernios sin forzar.
Estrarre le paline completamente e, insieme, abbassarle a terra ruotandole
IT
semplicemente sui perni e senza forzare.
B
A
Fiammastore
C
11
Gebrauchsanleitung
DE
FR
Mode d’emploi
IT
Istruzioni d’uso
Instructions for use
EN
ES
Instrucciones de montaje
5
Den Stützfuss A festhalten, dabei den Rafter B anheben und ausziehen, bis
DE
das Rafterende in die Kunststoffauflage (Spannarmauflage) fest aufliegt.
Keeping the leg A still, lift and extend the Rafter B till inserting it in the
EN
plastic housing.
Maintenez immobile le pied A, soulevez et étendez le Rafter B jusqu’à ce
FR
qu’il s’insère dans l’emplacement en plastique
Manteniendo la pata A parada, levantar y extender el
ES
Rafter B hasta introducirlo en el kit soporte rafter de plástico.
Tenendo ferma la palina A, sollevare ed estendere il
IT
Rafter B fino all’inserimento nella sede in plastica.
12
Fiammastore
 Loading...