

Page 1
User’s Guide and Operator Instructions
MBS-1221 Multi Beverage Combination Brewer for Coffee, Iced Tea, Hot Tea
PATENTS:https://www.fetco.com/pl,pages,patents,74.html
February 2023 P202 REV002
fetco.com
FETCO Commercial Beverage Equipment
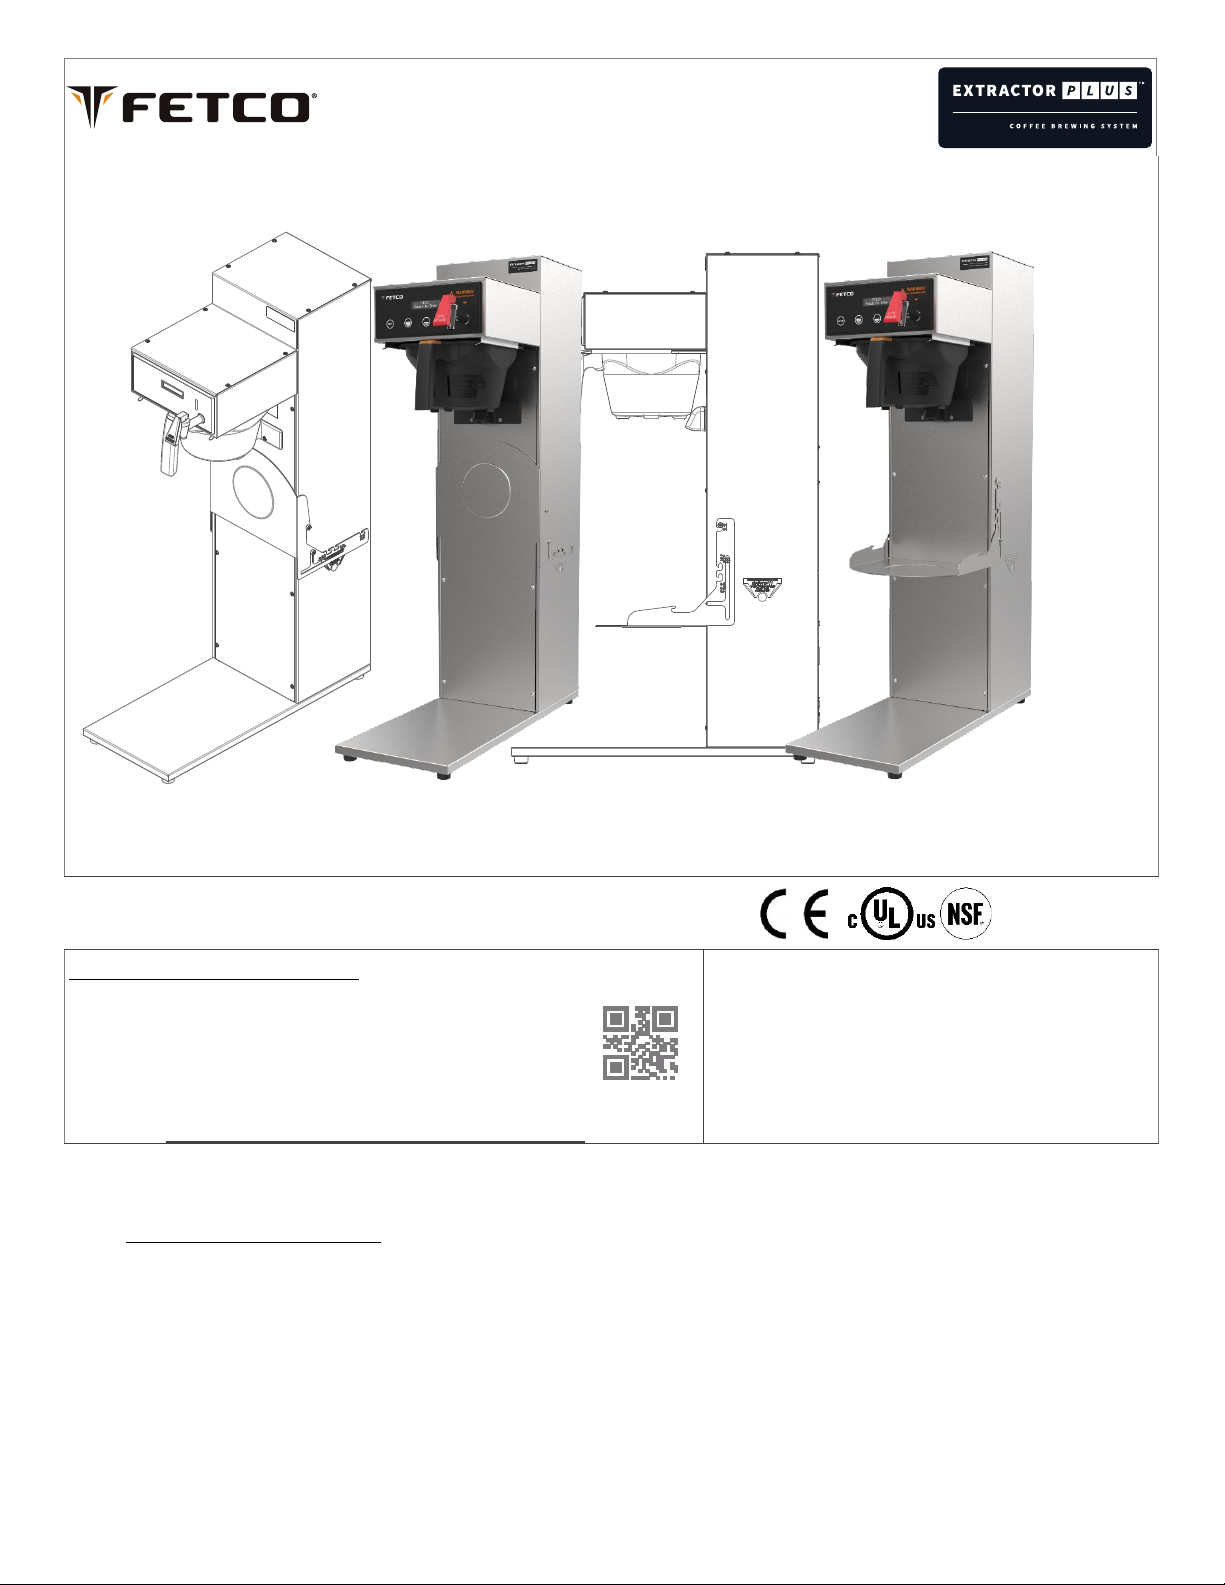
FETCO MBS 1221-with brew shelf and MBS122S (not shown)
CONTACT INFORMATION
FETCO® FOOD EQUIPMENT TECHNOLOGIES COMPANY
600 ROSE ROAD
LAKE ZURICH • IL • 60047-0429 • USA
INTERNET: www.fetco.com
©2021 FOOD EQUIPMENT TECHNOLOGIES COMPANY
Multi Beverage Brewer: MBS-1221
PHONE: (800) 338-2699 (US & CANADA)
(847) 719-3000 (All Countries)
FAX: (847) 719-3001
EMAIL:[email protected]
[email protected] (to order parts and equipment)
[email protected] (all service queries)
TABLE OF CONTENTS
Specifications and Requirements ................................... 2
Starting The Brew ........................................................... 4
Enter Programming ........................................................ 4
Exit Programming & Save .............................................. 4
A PROGRAM ................................................................. 6
B GENERAL ................................................................... 7
C SERVICE INPUTS ...................................................... 8
D SERVICE OUTPUTS .................................................. 8
E CALIBRATION ............................................................ 9
F SERVICE MENU ....................................................... 10
F ERROR CODES ....................................................... 11
G COUNTERS ............................................................. 12
H SAVE & EXIT ............................................................ 13
Operator Training ......................................................... 14
Inlet & Dilution Valve Notes ......................................... 16
Wiring Diagram ............................................................ 18
Parts Diagrams ............................................................ 21
Small Spray Head Assembly ....................................... 27
Hot Water Faucet Relocation Instructions ................... 29
Page 2
Specifications and Requirements
Water Requirements:
Electrical: Supplied with 120V cord & plug
Water inlet fitting Dual Water Inlet Connector Assembly is
included (page 16) tterminates to a 1/4 inch male flare
User adjustable to 220-240 volt terminal block
Pressure: 20-75 psig, (138-517kPa) 1½gpm/(5.7lpm)
For Iced tea: brewer is factory calibrated to a non-fluctuating
stable water supply pressure at 45 psi.
Tank Temperature, as set by factory:
Water supply: (Optimal) 100-150TDS
All beverage equipment must use filtered water
Brew Volume-Coffee: Full Batch 2.20 liters
Iced Tea Dilution Ratio: 1:4 factory set brew to water
Brew Volume-Iced Tea: Full Batch 11.40 liters/3 gallons
Brew batch and dilution ratio user adjustable
Total Brew Cycle—Factory default setting (Batch 1): 5 minutes=[3:30 minute brew time + 1:30 minute drip delay]
Iced Tea-(Batch 3) 4:30 minutes=[3:00 minute brew time + 1:30 minute drip delay] Batch 2 may be set for either
Brew-Process parameters are user controllable for: Brew Volume, Brew Time, Prewet Percent and Delay,
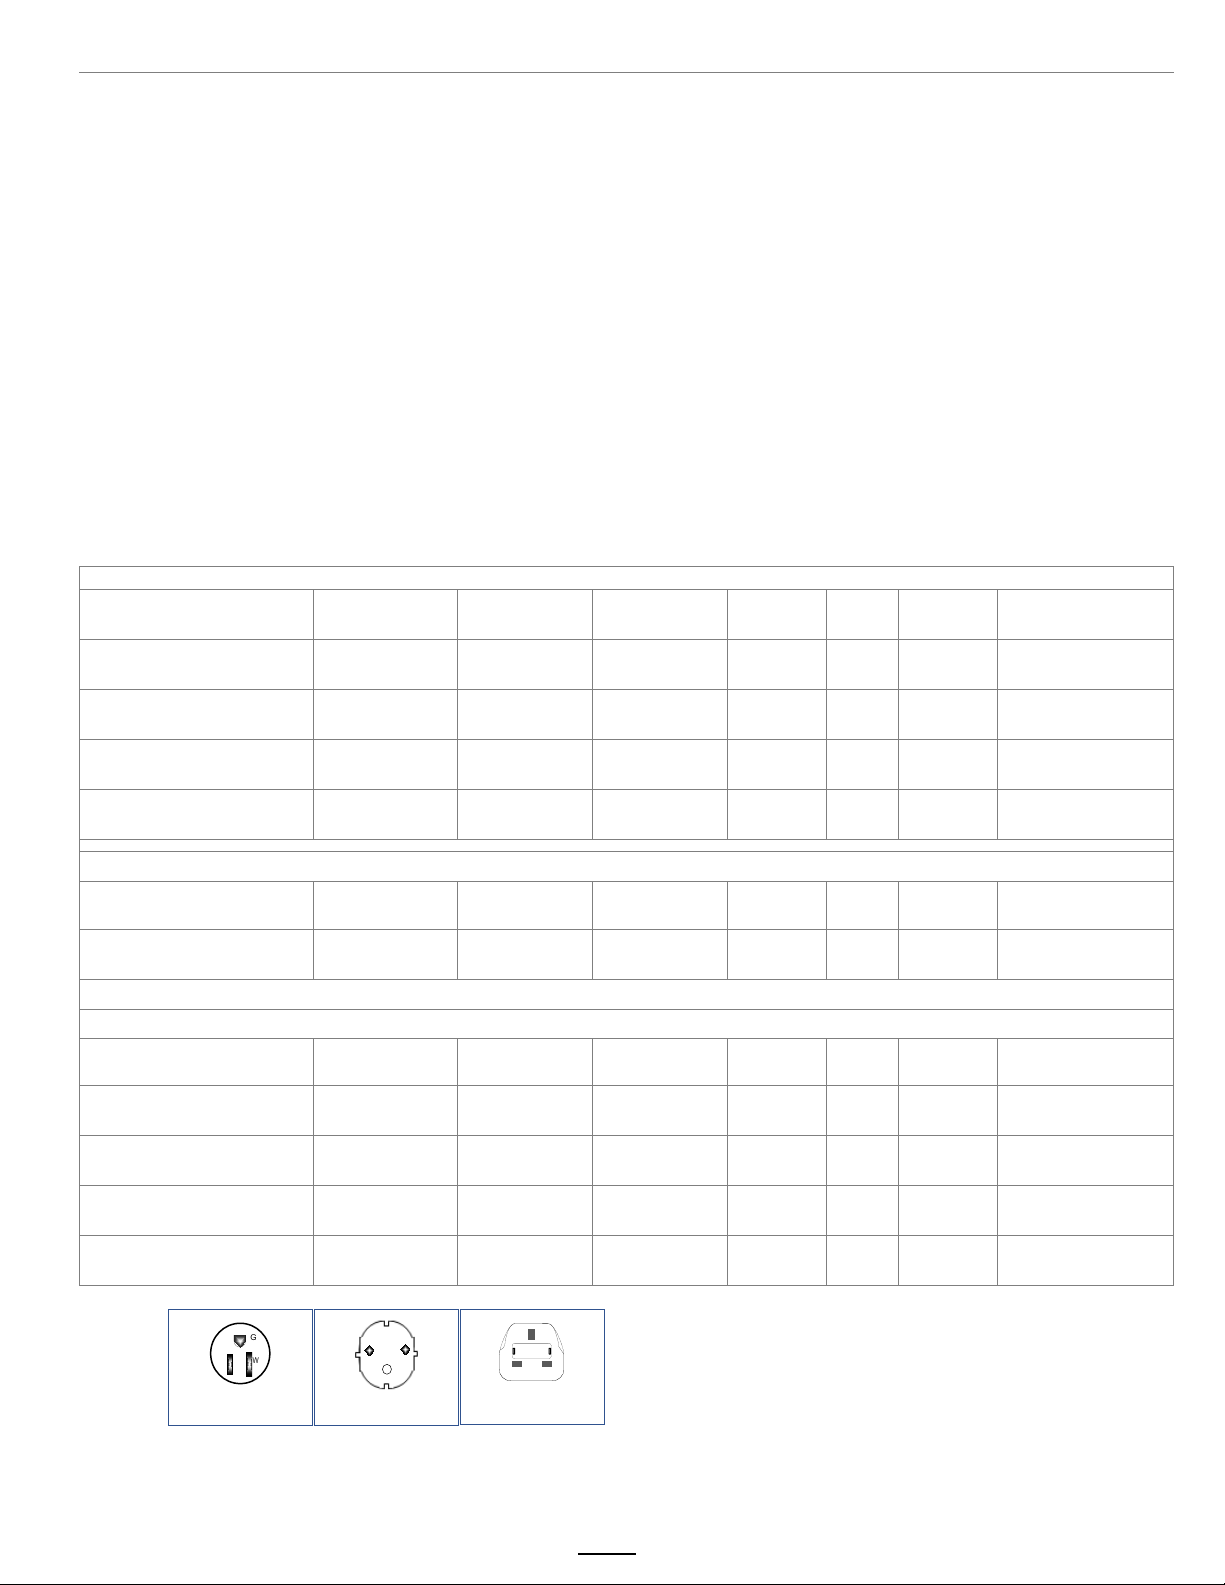
Electrical Specifications for domestic-dual voltage Standard height with brew shelf
SKU
Model description
Electrical
Connection
Heater
Configuration
Amp
Draw
M001
Plastic tea
Metal coffee
M001
Metal tea
Plasic coffee
M1221US-1X117-PM001
Domestic-Dual Voltage
NEMA 15-5P
Terminal Block
Plastic tea
Plastic coffee
1 X 1.7 kW
1 X 3.0 kW
100-120
200-240
1.3-1.8
2.2-3.1
12.3-14.7
10.9-13.0
4.4 gal/16.5 liters
6-7 gal/22-21 liters
M1221US-1X117-MM001
Domestic-Dual Voltage
NEMA 15-5P
Terminal Block
Plastic tea
Metal coffee
1 X 1.7 kW
1 X 3.0 kW
100-120
200-240
1.3-1.8
2.2-3.1
12.3-14.7
10.9-13.0
4.4 gal/16.5 liters
6-7 gal/22-21 liters
Electrical Specifications for domestic-dual voltage Short version - no brew shelf
SKU
Model description
Electrical
Connection
Heater
Configuration
Amp
Draw
M122SUS-1X117-PM001
Domestic-Dual Voltage
NEMA 15-5P
Terminal Block
Plastic tea
Plastic coffee
1 X 1.7 kW
1 X 3.0 kW
100-120
200-240
1.3-1.8
2.2-3.1
12.3-14.7
10.9-13.0
4.4 gal/16.5 liters
6-7 gal/22-21 liters
Factory
Electrical
Connection
Heater
Configuration
Amp
Draw
Plastic tea
Plastic coffee
M1221NM-1X117-PM001
DUAL VOLTAGE
NEMA 15-5P
Terminal Block
Plastic tea
Plastic coffee
1 X 1.7 kW
1 X 3.0 kW
100-120
200-240
1.3-1.8
2.2-3.1
12.3-14.7
10.9-13.0
4.4 gal/16.5 liters
6-7 gal/22-21 liters
Plastic tea
Metal coffee
Plastic tea
Metal coffee
BS 1363A UK
G
W
Plug Configuration
“Schuko" CEE 7/7 PLUG
200°F (93°C) inside water tank (at sea level)
Iced Tea Batch Temperature-user adjustable
200°F-207°F-/ 93°-98°C
User adjustable to up to 0.85 gallon/3.25 liters per brew
Factory setting adds 2.4 gallons of cold water to 0.6
gallon brew for a 1:4 ratio Iced tea
User adjustable to up to 4.9 gallon/18.7 liters per brew
(2.3liter brew/9.1 liter dilution)
Dilution volume is user adjustable from 0-4Gal;0-15.2L
Drip Delay, Tea Batch Temperature, Dilution Volume and Dilution Timing (with brew or after brewing)
M1221US-1A117-P
M1221US-1A117-M
NEMA 15-5P
NEMA 15-5P
Brew Basket
1 X 1.7 kW 120 1.7 14.7 4.4 gal/16.5 liters
1 X 1.7 kW 120 1.7 14.7 4.4 gal/16.5 liters
Brew Basket
Voltage KW
Voltage KW
Brew Volume/Hour
Brew Volume/Hour
supplied with 120 volt NEMA 5-15 cord and plug. Dual voltage brewers may be field converted to 200-240 volts-see pages 13 and 19
International
SKU
M1221IN-1B130-PM005 CEE 7/7
M1221CE-1B130-PM005 CEE 7/7
M1221CE-1B130-PM006 UK1-13P
Brew Basket
Voltage KW
1 X 3.0 kW 200-240 2.1-3.0 10.9-13.0 4.4 gal/16.5 liters
1 X 1.7 kW 230 2.8 12.5 4.4 gal/16.5 liters
1 X 1.7 kW 230 2.8 12.5 4.4 gal/16.5 liters
NEMA 5-15P
Export Only 250V 16 A
Export Only 250V 13 A
Go to fetco.com for the latest versions of all information Page 2 User Guide & Operator instructions MBS-1221 P202Re0August 2021
Brew Volume/Hour
Page 3
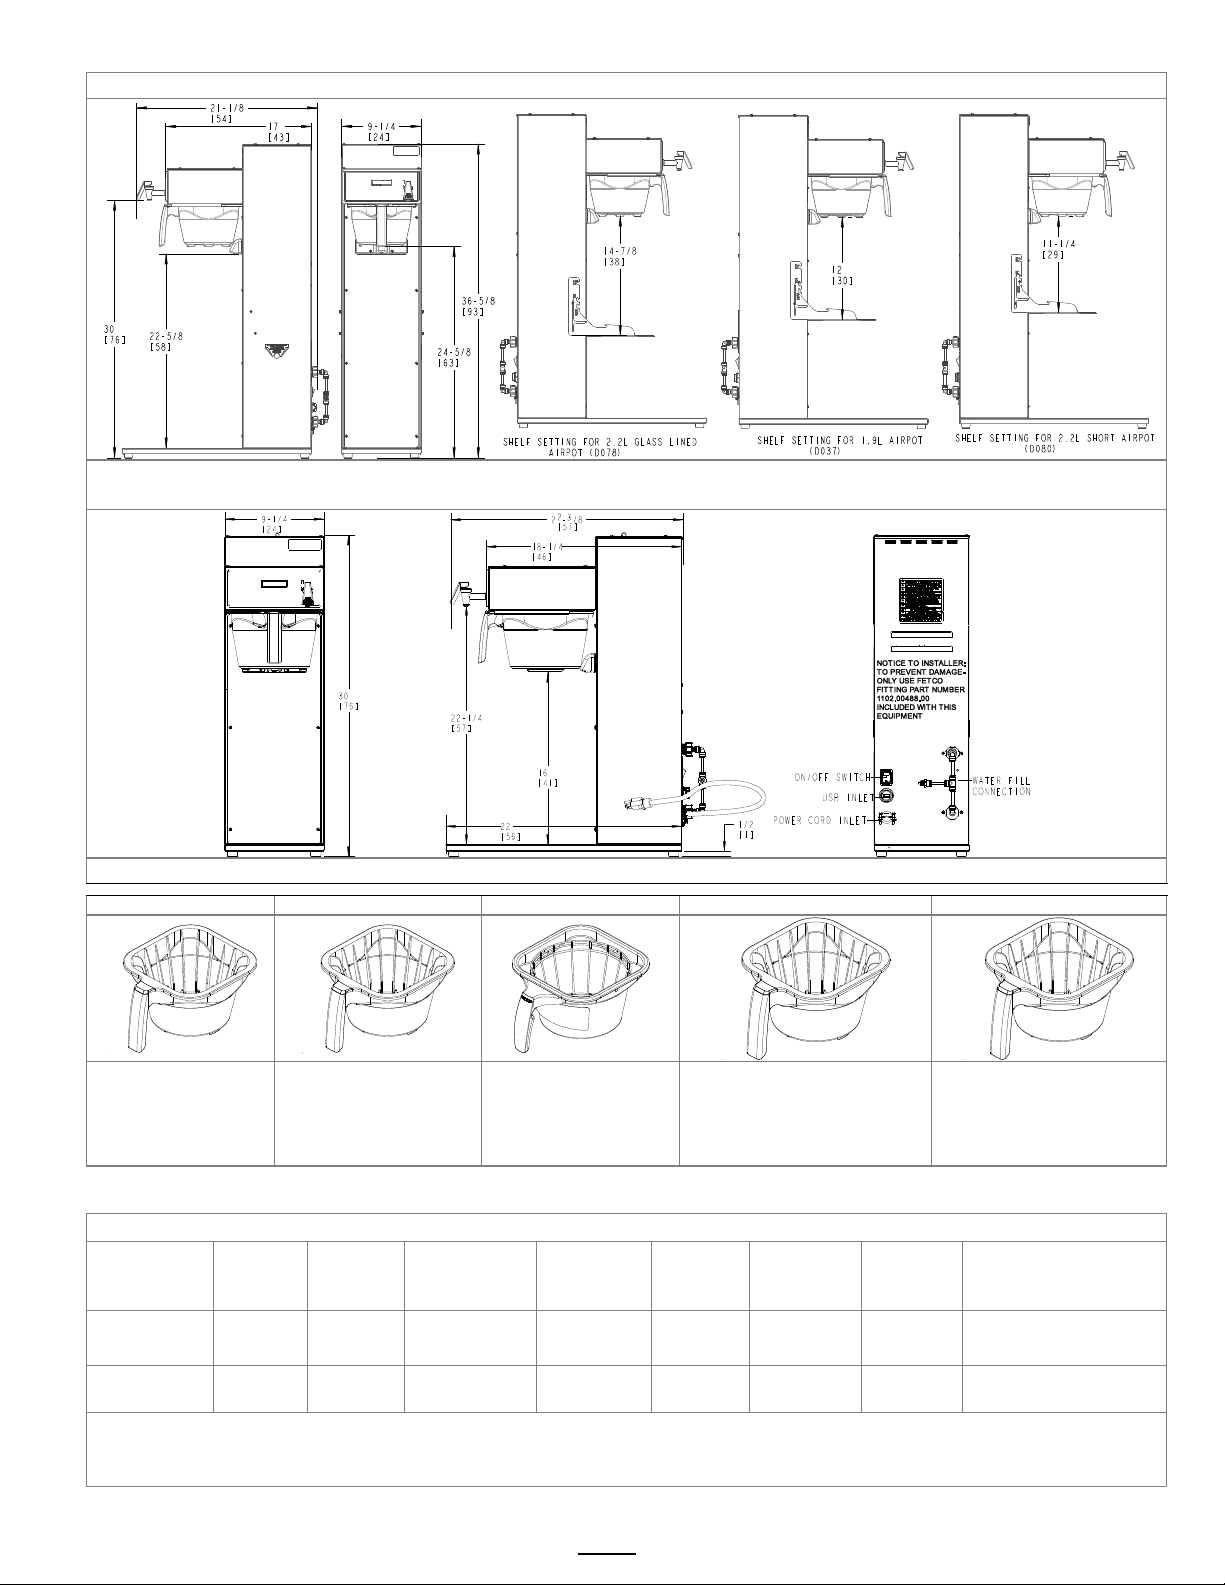
Rough-In Drawings
MBS-1221 Side MBS-1221 Front Adjustable shelf positions for different sizes and types of air pots
MBS-1221 Short only MBS-Short-1221 Front MBS-Short-1221 Side Back side- All equipment
MBS-1200 plastic brew basket
MBS-1200 plastic brew basket
MBS-1200 metal brew basket
MBS-1200 SHORT plastic brew basket
MBS-1200 SHORT plastic brew basket
Green plug:for tea
FETCO# F002 or 13” X 5
Brown plug:for coffee
FETCO# F002 or 13” X 5
Black handle:for coffee
FETCO# F002 or 13” X 5
Green plug:for tea
FETCO# F001 or 15” X 5 ½
Brown plug:for coffee
FETCO# F001 or 15” X 5 ½
Weights and Capacities
Water
capacity
MBS-1221
Short
30 in
762 mm
9 1/4 in
235 mm
18 1/4 in
464 mm
2.7 gallon
10.1 L
33bs.
15 kg
57 lbs.
25.9 kg
48 lbs.
21.8 kg
27” x 11.5” x 39”
681mmX292X991mm
Calibrated for
3 gal 11.4 liter Iced Tea (Batch 3)
Coffee dose calibrated for 120g/4.2oz
Tea dose range: 70-113 gram/2.5-4.0 oz
13”X5”basket 0.140” orifice
Plastic # B014140G2BK
Coffee Filter
13”X5”basket 0.218” orifice
Plastic #B014218BN2BK
Coffee Filter
13”X5”basket 0.218” orifice
Stainless steel B003218B1
Coffee Filter
16”X6”basket 0.140” orifice
Plastic # B015140G2BK
Coffee Filter
16”X6”basket 0.218” orifice
Plastic #B015280BN2BK
Coffee Filter
Dispenser
Model
MBS-1221
Brewer
Height Width Depth
37 in
940 mm
9 1/4 in
235 mm
17 in
440 mm
2.2 L/74 oz/0.58gal Coffee air pot (Batch 1)
Go to fetco.com for the latest versions of all information Page 3 User Guide & Operator instructions MBS-1221 P202Re0August 2021
tank
2.7 gallon
10.1 L
Empty
Weight
35bs.
15.9 kg
Filled
Filled
Weight
Weight
60 lbs.
27.2 kg
Shipping
Weight
50 lbs.
22.7 kg
Shipping
Dimensions
27” x 11.5” x 39”
681mmX292X991mm
Range: 100-140 gram 3.5-4 ounce dose
Page 4
STOP
EXIT
H NO +
Starting The Brew
1. Turn the power switch “ON”.
For safety- do not remove brew basket until drip-out is complete.
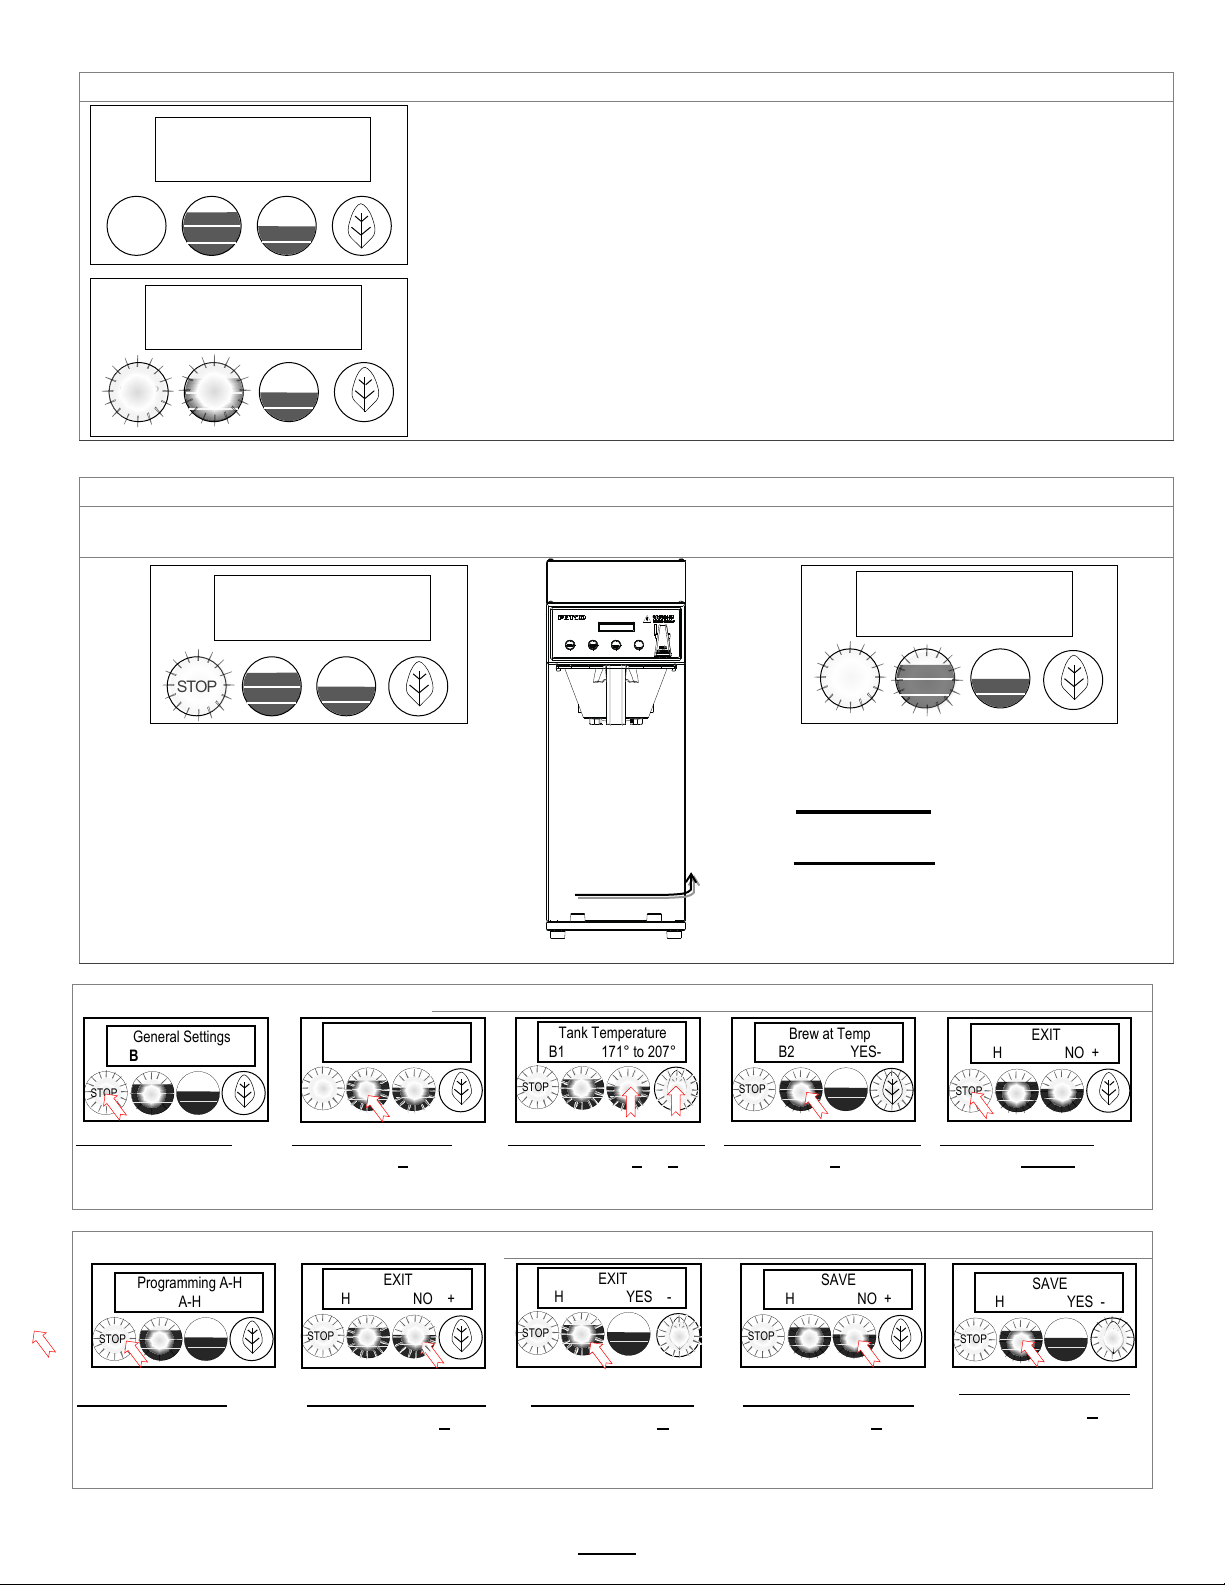
Enter Programming
There are 7 menu groups-A-F plus EXIT (G).
See the following pages for the batch parameter definitions and all settings for the brewer
Enter Programming to Make Changes
Section B –“General Settings” to change tank temperature shown below
Enter Programming-Press
screen appears
From the “B” screen
Screen (default is 200°)
From Tank Temp screen
temperature
From Tank Temp screen
General Settings or SAVE
To SAVE and EXIT
button to
to screen two below
Exit Programming & Save
Control Setting Changes
Press
To SAVE and EXIT
OPERATING MODE
STOP
General Settings
B
STOP
Brew at Temp
B2 YES-
STOP
EXIT
H NO +
STOP
Programming A-H
A-H
STOP
EXIT
H YES -
STOP
SAVE
H NO +
SAVE
H YES -
STOP
STOP
FETCO
STOP
STOP BUTTON
↓
ON/OFF switch
is located on
lower right on
back of brewer
STOP
Tank Temperature
B1 200°F+-
STOP
Tank Temperature
B1 171° to 207°
Ready to Brew
Brewing
4:40[C]5:45[IT]
2. Prepare a brew basket with the correct size filter and appropriate amount of coffee or tea.
3. Slide the brew basket completely into the rails.
4. Place a clean, empty, preheated dispenser under the brew basket.
5. Select a batch & hold the corresponding BREW button in for 1 second to start
6. -STOP button will illuminate, Brew Selector button will illuminate
-Countdown time will display. Default time setting is 5:00 (coffee) 6:45 (iced tea
-Selected BREW button will slowly pulsate to indicate brew is in progress.
-All other BREW buttons for that brew head will be unlit.
7. When the brew cycle is finished,
STOP button will extinguish and the BREW button will continue to pulsate to indicate DRIP
will display to show the 1.30 (one and one-half minutes) drip delay setting.
This indicates that coffee may still be dripping from the brew basket
MBS-1221
Ver.2.0a.201221
TO ENTER PROGRAMMING
1-Turn brewer “OFF” from power switch
2-Turn power switch to “ON”
…Screen will initialize and then
display digital process notifications
3-After Initialization- “STOP” Lamp turns on
4-Quickly press “STOP” button (no need to hold)
STOP button until the
General Settings (“B”)
Press button 1 to toggle
to the Tank Temperature
From any screen-
STOP button until the
EXIT (“H”) screen
appears
Go to fetco.com for the latest versions of all information Page 4 User Guide & Operator instructions MBS-1221 P202Re0August 2021
From the “H” screen
Press button 2 to
toggle to the EXIT-YES
screen
Toggle buttons 2 or 3 to
select the desired
From EXIT screen
Press button 1 to
toggle to the SAVE
screen
When brewer is In PROGRAMMING MODE
-the screen will display:
See the following pages for batch parameter definitions
Press button 1 to toggle
to the next selection in
From SAVE screen
Press button 2 to
toggle to the SAVE-
YES screen
Batch Program
A
STOP
|BATCH PRG|
|A (or B-F) |
-Illuminated LED indicates active keypad positions
and all settings for the brewer
Press the STOP
the “H” screen. Proceed
STOP
Press button 1 to
SAVE your changes
and EXIT to
Page 5
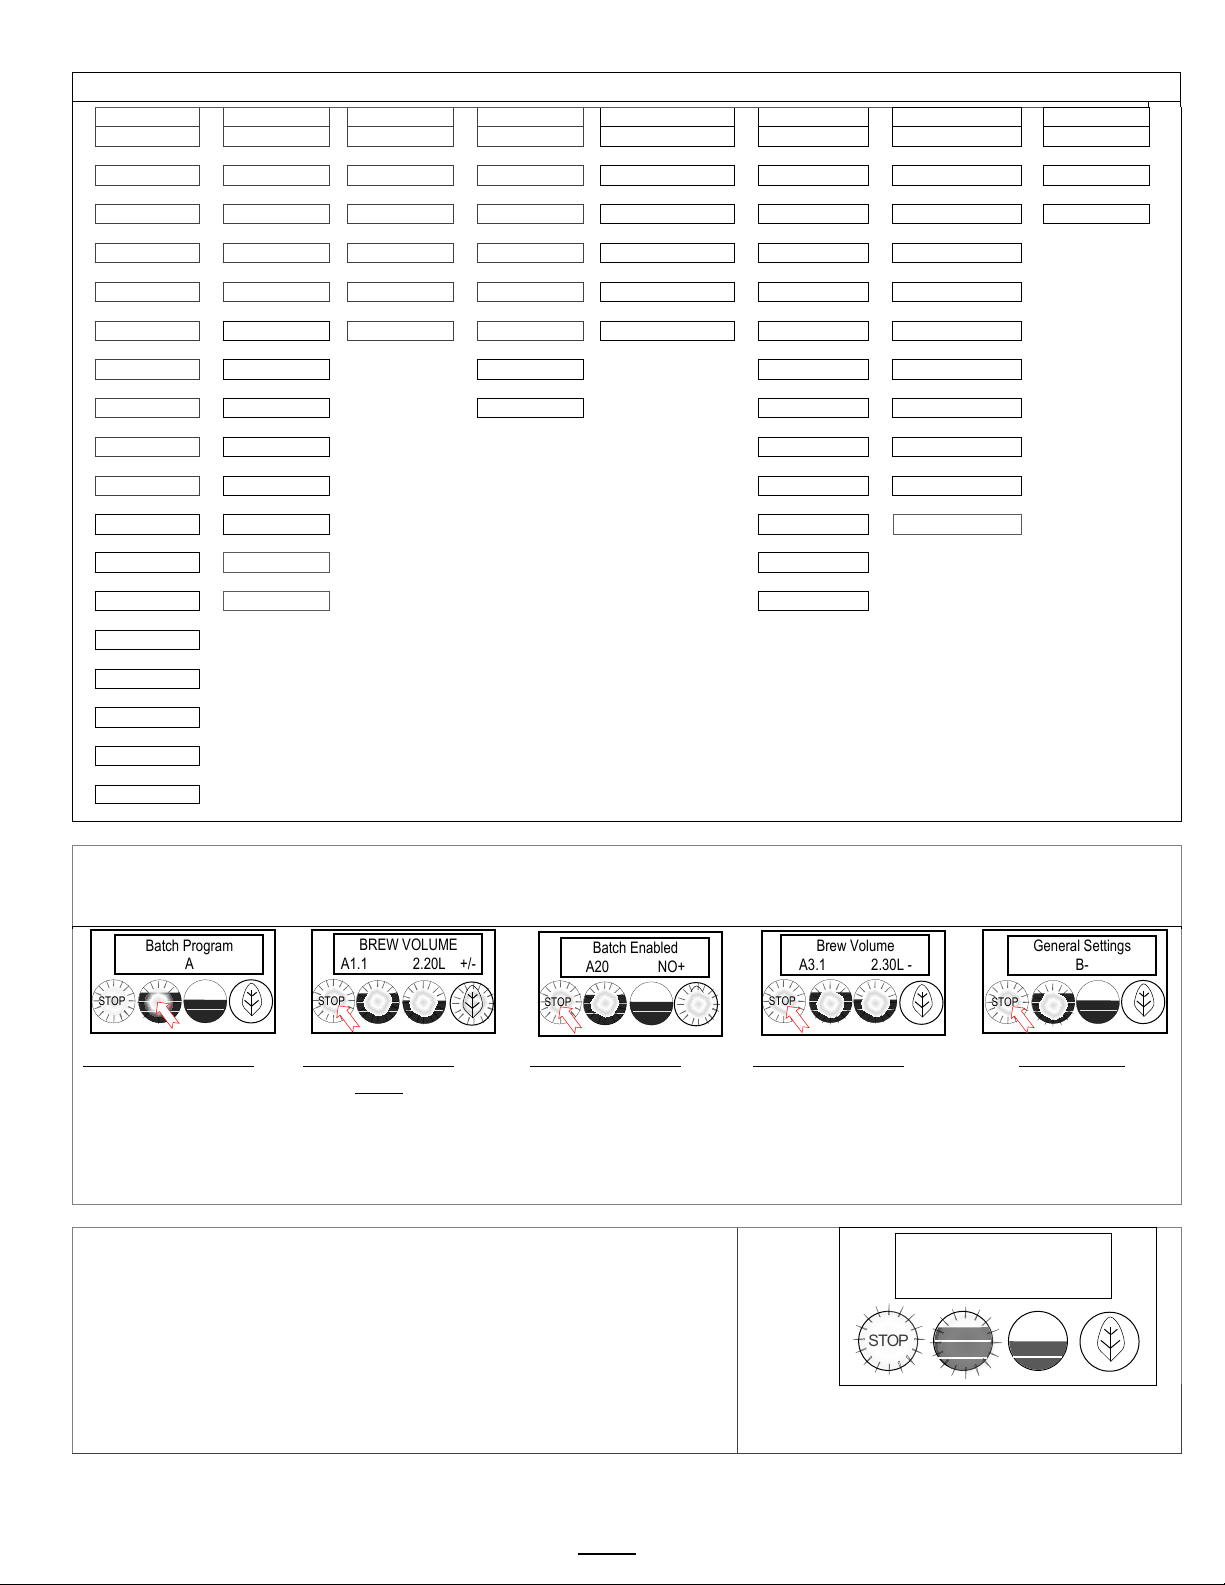
Programing Menu Layout
A10 to A70
B10-B40
C10-C50
D10-D90 E10-E70
F10-F120
G1-G15
H10-H11
Batch Parameters
General Settings
Service Inputs
Service Outputs
Calibration
Service Menu
Counters
Exit and Save
| | | | | | |
|
A11
Brew Volume
B1
Tank Temperature
C1
LLC Probe
D1
Heater SSR
E1
Ready Temp. Offset
F1
Firmware Ver.
G1
Filter Used
H1
Save Changes
| | | | | | |
|
A12
Brew Time
B2
Brew at Temp
C2
Basket Sensor
D2
Fill Valve
E2
LLC Sensitivity
F2
Bootloader Ver.
G2
Filter Life
H2
EXIT?
| | | | | | |
A13
Prewet Percent
B4
Show Tank Temp
C4
Tank Temperature
D4
Brew Valve
E3
Slow Flow Compensate
F3
Select Model
G3
Filter Reset
| | | | | | |
A14
Prewet Delay
B5
Units of Temp
C5
USB Drive
D8
Basket Lock
E5
Brew Flow
F5
Option BB Lock
G4
Counter Reset
| | | | | | |
A16
Drip Delay
B6
Units of Volume
C6
Keyboard Test
D10
Dilute Valve
E9
Dilute Flow
F8
Backup to USB
G5
Choose Counter
| | | | |
A20
Batch (2) Enabled
B7
Customer Name
D12
LCD Brightness %
F9
Restore from USB
G10
Brewer Volume [LT]
| | | | |
A31
Brew Volume
B8
Customers Name
D13
LED Brightness %
F10
Restore Defaults
G11
Brewer Volume [R]
| | | |
A32
Brew Time
B9
Demo Mode
F11
Error Log
G14
Rt Brews [LT]
| | | |
A33
Prewet Percent
B10
Eco Mode
F12
Erase Error Log
G15
Rt Brews [R]
| | |
A36
Drip Delay
B11
Eco Idle Time
F13
Service Phone#
See Page 10!
| | |
A37
Dilute Mode
B12
Eco Idle Temp
F15
Override Rt BBS
| | |
A37
Dilute Delay
B13
Filter Life
F17
Override Rt BBL
|
A37
Dilute Volume
|
A39
Batch Temp
|
A90
Copy Batch
|
A91
Copy Batch: From
|
A92
PASTE: To
The A menus [A1-3] correspond to batch buttons [1-3] on the touch panel
Menu positions A1 & A3 are permanent. Menu A2 can be removed by operator if desired
From A PRG screen
From A11 screen
(A1 is permanent)
From A20 screen
changes as required
From A30 screen
To continue
by pressing the STOP button (1x for A20;2x for A30).
STOP
BATCH
BATCH
BATCH
STOP
Batch Program
A
STOP
BREW VOLUME
A1.1 2.20L +/-
STOP
Brew Volume
A3.1 2.30L -
STOP
General Settings
B-
STOP
Batch Enabled
A20 NO+
Access the A menus to PROGRAM & make changes to individual menu recipes. Menu settings can be copied
Press button 1 to go
to the A menu access
screen
.
View and change settings for the brew recipes from the “A” screens with
the controls in PROGRAMMING.
The batch A1 position is permanent and cannot be disabled
To access programming steps A20 and A30
Batch programming steps A20 or A30 will not display from step A10
Programming for steps A20 and A30 are accessed from any step in A10
Press STOP to scroll to
A20. Batch A20 can
be configured to be
Tea or Coffee
RECIPE Location map
Press STOP to
scroll to the third
batch in the “A”
menus. Make any
Press STOP to scroll
through COPY and
further to remaining
programming keys.
DISPLAY
Press STOP to scroll
through sections
See SAVE & EXIT in
previous table
Batch Program
A
STOP
A1
(permanent)
A2
(selectable)
A3
Go to fetco.com for the latest versions of all information Page 5 User Guide & Operator instructions MBS-1221 P202Re0August 2021
Page 6
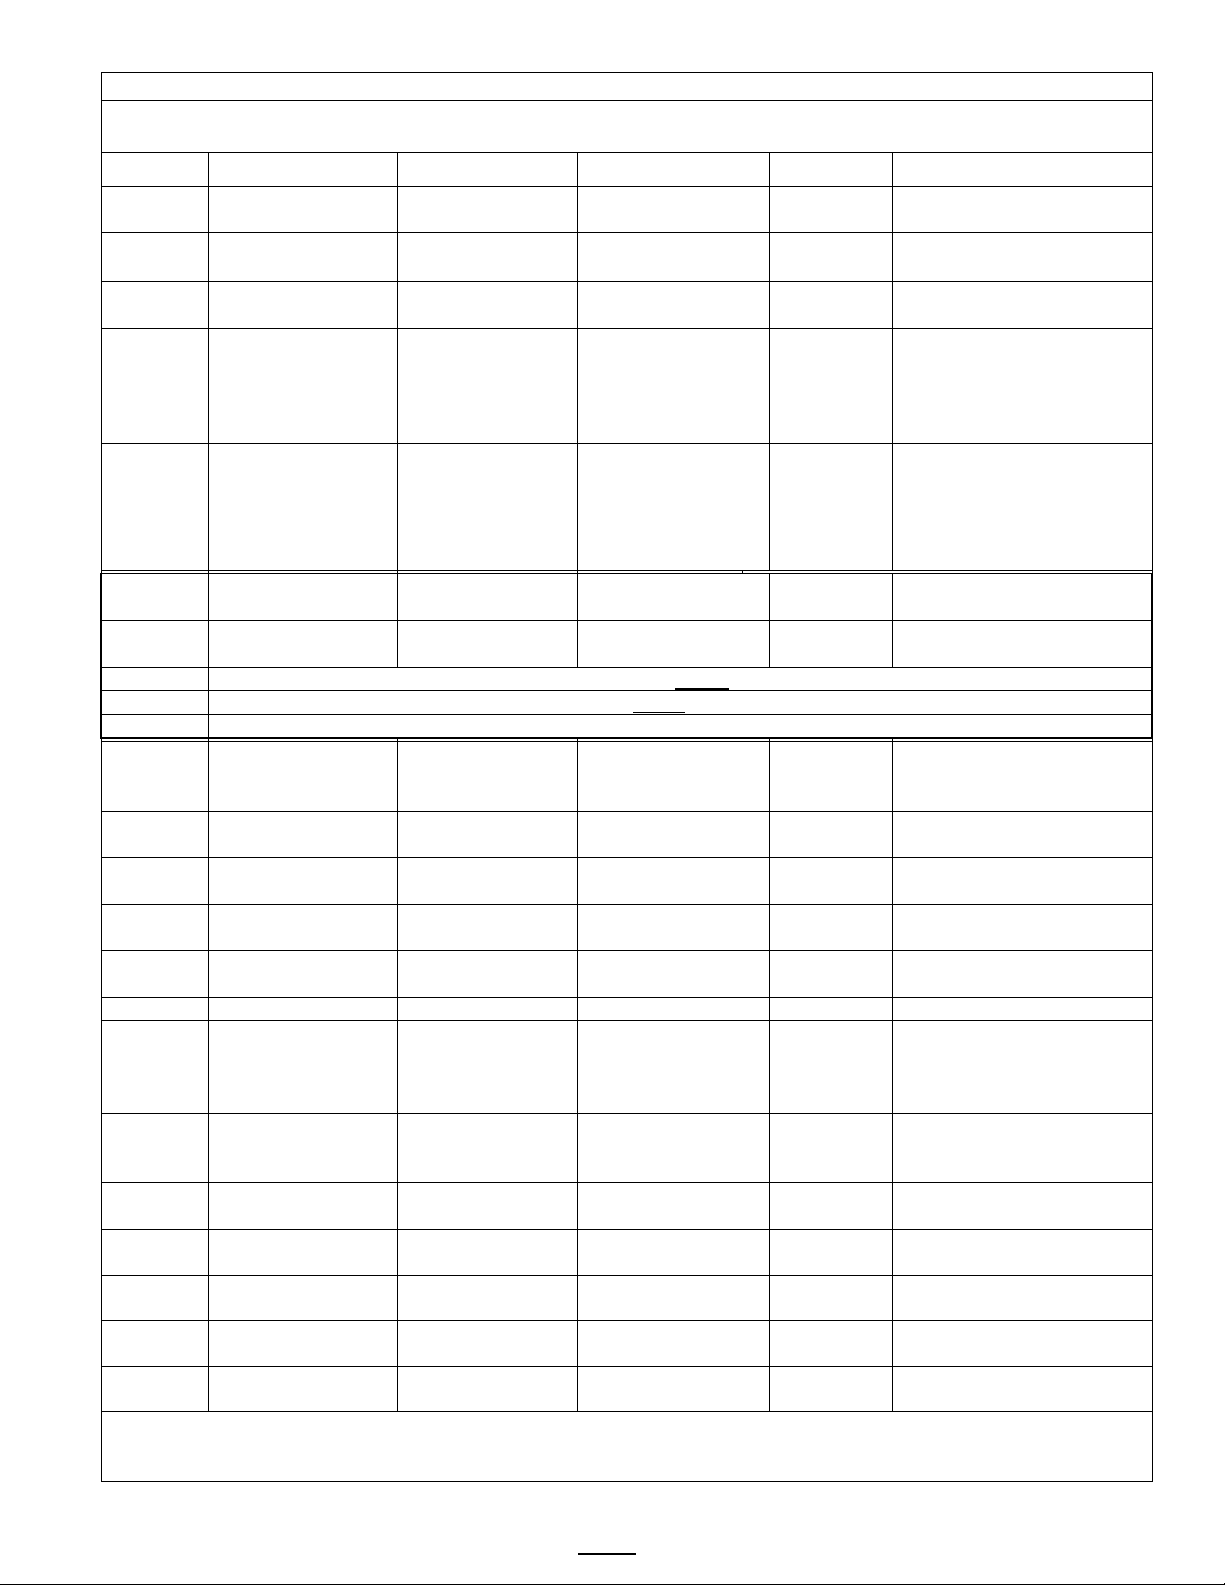
A PROGRAM
Menu Features: Batch Parameters
The settings below are shown for the first batch and third bottons on the brewer. Second batch is user optional.
See how to access all A menus on the previous page. Below are the brew settings for default A1 & A3 batches
A11
[Coffee]
2.20liters
0.58gal
0.95 to 4.0L
0.25 to 1.06 gal
0.05L
0.01G
Unit software is in liters;
Can convert to gallon
Brew Time
(MIN:SEC)
Default total brew time is
5:00 minutes
Percentage of total brew
volume
The time between
ONLY if Prewet >0:00
Time brew basket should
pressed during brew †
A20
[User Set]
Batch Enabled
A20 NO +
Appears only
when enabled
Selectable by user to be
an additional batch setting
“COFFEE"
Will set brewer to COFFEE presets as in A10-A20 (above) Middle button will activate and illuminate.
“TEA”
Will set brewer to TEA presets as in A30-A39 (below) Middle button will activate and illuminate.
“OFF”
Middle button will be inactive and will be unlit.
Batch Enabled
NO +
Batches may be
rewritten or deactivated
2.30liters
0.58gal
0.95 to 4.0L
0.25 to 1.06 gal
0.05L
0.01G
Unit software is in liters;
converts to gallon
Default total brew time is
5:00 minutes
Percentage of total brew
volume
Prewet Delay
(see A14 above)
Time between prewetting
and start of brew cycle.
A36
Drip Delay
1:30 mm:ss
0:30 – 6:00 min.
10 sec
See Note A16
NORMAL: Dilution after
the brew cycle
Pause after brew to begin
add sweetener
9.1 liters
2.4 gallons
0:00 –15:15 liters
0:00 –4:0 gallons
0.05L
0.01G
Unit software is in liters;
converts to gallon
204°F
95.6°C
200°F-207°F
93°-96°C
1°F
1°C
Activates only wen brewer
is in Tea Brewer mode
A90
Copy Batch
A91
Copy From
A92
(PASTE TO)
A10 (Left Batch COFFEE) and A30 (Right Batch TEA) cannot be disabled.
† DRIP DELAY will not activate when STOP is pressed within 5 seconds of starting a brew time
POSITION Program Items Factory set Default Programming Range Increments Notes
Batch Volume
A12
3:30 minutes 2:00 – 12:00 15 sec
A13 Prewet Perc. 0% 0.00 – 25.0% 1%
Prewet Delay
A14
(Pause after prewet
completes)
0% [1:00 Min] [0:10 – 5:00] 10 sec
A16 Drip Delay 1:30 mm:ss 0:30 – 6:00 min. 10 sec
NO OFF/Coffee/or Tea Select Batch presets below
A20 Batch Type
A30
[Iced Tea]
A30 YES -
YES
(Active)
OFF/Coffee/Tea See below
Middle and Bottom
Batch on
batches A2,A3
A31 Batch Volume
or off
prewetting and start of
brew cycle.
This feature appears
remain in place during final
drip-out
Drip delay remains “ON”
for 2:00 minutes if STOP is
individually enabled,
A32 Brew Time 3:00 minutes 2:00 – 12:00 15 sec
A33 Prewet Percent 0% 0.00 – 25.0% 1%
A34
A37 Dilution Mode Normal Normal/Fast
A37 Dilution Delay 0.10 0:00 –12:00 min 10 sec
0% [1:00 Min] [0:10 – 5:00] 10 sec
the brew is completed
FAST: Dilution is during
dilution. Often used to
A37 Dilution Volume
A39 Batch Temp
Copy From Batch 1 + A91 1 (1-6) Select recipe to copy
Paste To Batch? 1 + A92.1 (1-6) Select where to paste
A20 middle batch may be set for coffee or tea or disabled.
.
Go to fetco.com for the latest versions of all information Page 6 User Guide & Operator instructions MBS-1221 P202Re0August 2021
Page 7
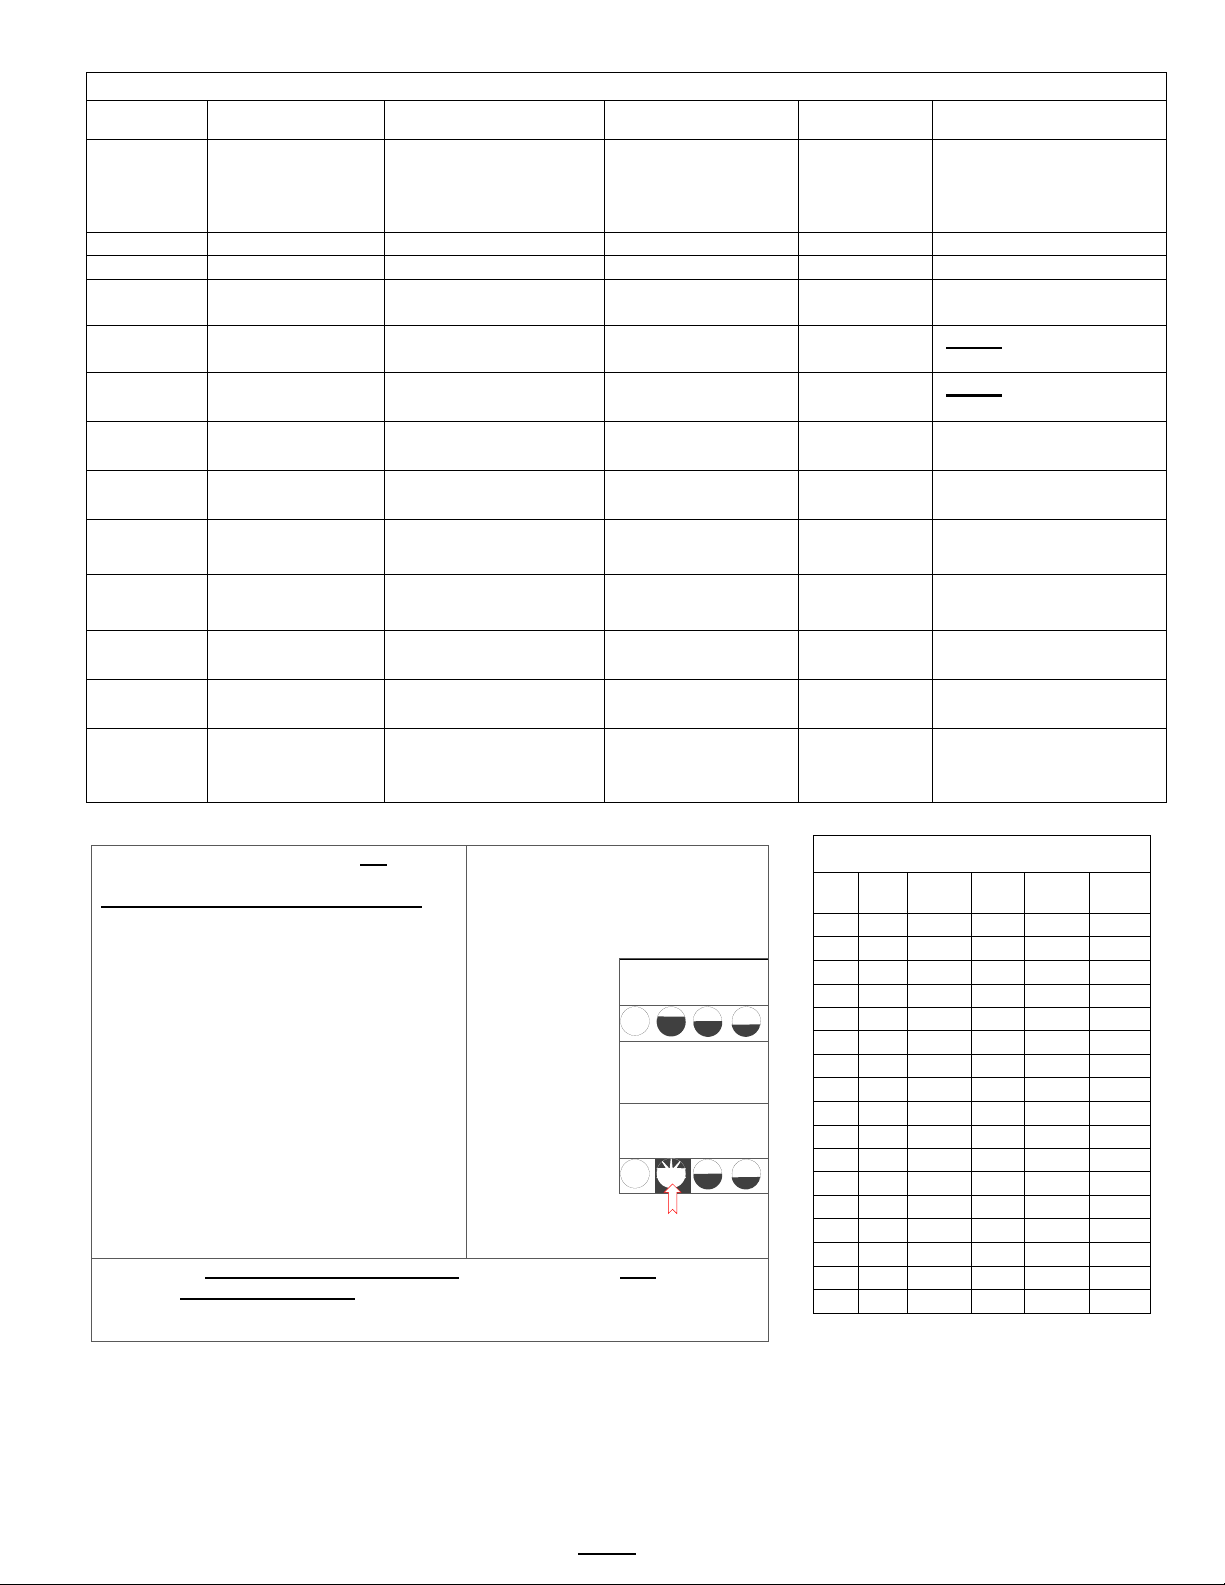
B GENERAL
Brewer Operation Control Settings, Adjust Brew Flow Rate
POSITION Program Items Factory set Default Programming Range Increments Notes
200°F-or-93°C
default
B2
Brew at Temp.
“YES”
ON/OFF
YES/NO
SEE NOTE BELOW
B3
Batch Temp
OFF
ON/OFF
ON/OFF
For tea brew menu
Show Tank
Temperature
To display HW tank
temperature on screen
Units of Measure
TEMPERATURE
NOTE: Overwrites user
settings (see page 9)
Units of Measure
VOLUME
NOTE: Overwrites user
settings
Scroll with batch
keys
Demonstrates the controls for
components in demo mode
If Selected: Lowers hot water
time of inactivity
Water filter life is accessed in
change water filter
BREW AT TEMPERATURE DEFINITIONS
DEFAULT: BREW AT TEMP: “ON”
illuminate until the hot water tank reaches the
will display
setpoint
Hot water tank not at
HEATING
160°F
USER SELECTABLE OPTION: BREW AT TEMP: OFF
Chart to correct for altitude for boiling point
in tank water temperature.
0 0 205
212.0
96
100.0
500
152
205
211.0
96
99.5
1000
305
200
210.1
93
98.9
2000
610
200
208.1
93
97.8
2500
762
200
207.2
93
97.3
3000
914
200
206.2
93
96.8
3500
1067
197
205.3
92
96.3
4000
1219
195
204.3
91
95.7
4500
1372
194
203.4
90
95.2
5000
1524
194
202.4
90
94.7
5500
1676
193
201.5
89
94.2
6000
1829
192
200.6
89
93.6
6500
1981
191
199.6
88
93.1
7000
2134
190
198.7
87
92.6
7500
2286
188
197.8
86
92.1
8000
2438
187
196.9
86
91.6
8500
2591
185
196.0
85
91.1
B1 Tank Temp.
B4
B5
B6
NOTE:
Units are Celsius by
YES YES/NO
° Fahrenheit Fahrenheit/Celsius C/F
L LITERS Liters/Gals/Ounces L/Gal/Oz
170° to 207°F
77° to 97°C
1.0°F
0.5°C
Chart to correct for high
altitude below
(see page 9)
B7 Customer Name Off NO or YES For name on screen
B7 Customer Name (only if above is “ON)
B9 Demo Mode OFF DEMO ON/OFF
B10 Eco Mode Off ON/OFF YES/NO
B11
B12
Eco Idle Time
(turns on if B10 active)
Eco Idle Temp
(turns on if B10 active)
1Hr 1-6 hours 1 hour
169°F 158-176°F 1 degree
A-Z;a-z;0-9 16 characters total
training. Disables all
tank temperature after preset
Time of inactivity to go into
ECO Mode
Temperature that hot water
tank is lowered to
B13 Filter Life OFF ON/OFF YES/NO
(FACTORY DEFAULT FOR BREWER)
“BREW at TEMP:
-Batch will not start if tank temperature
is below set point.
-Display will show “HEATING”
and hot water tank temperature
The “BREW START” entry buttons will not
selected temperature.
Notifications shown on screen:
TEXT: HEATINGTank above 87°C/189°Fwill allow brew at low temperature.
Extracted tea flavor may be affected
TEXT: L. HEATTank above 76°C/169°Fwill allow brew at low temperature.
Tea flavor will be noticeably affected
(Not recommended) Unit will operate at reduced temperature
Allows brewing at any temperature above 169°F/76°C
Go to fetco.com for the latest versions of all information Page 7 User Guide & Operator instructions MBS-1221 P202Re0August 2021
Tank temp
STOP is not lit
& BREW START
buttons not lit.
and are disabled
Batch menu
button(s ) will
illuminate and
“READY”
on screen when hot
water tank
temperature is at
brew temp setpoint.
STOP
.
FETCO
Ready to Brew
STOP
G-Counters. This is user set
and will display indicator to
[ft] [m]
Suggested
Setting[°F]
Boiling
point[°F]
Suggested
Setting[°C]
Boiling
point [°C]
Page 8
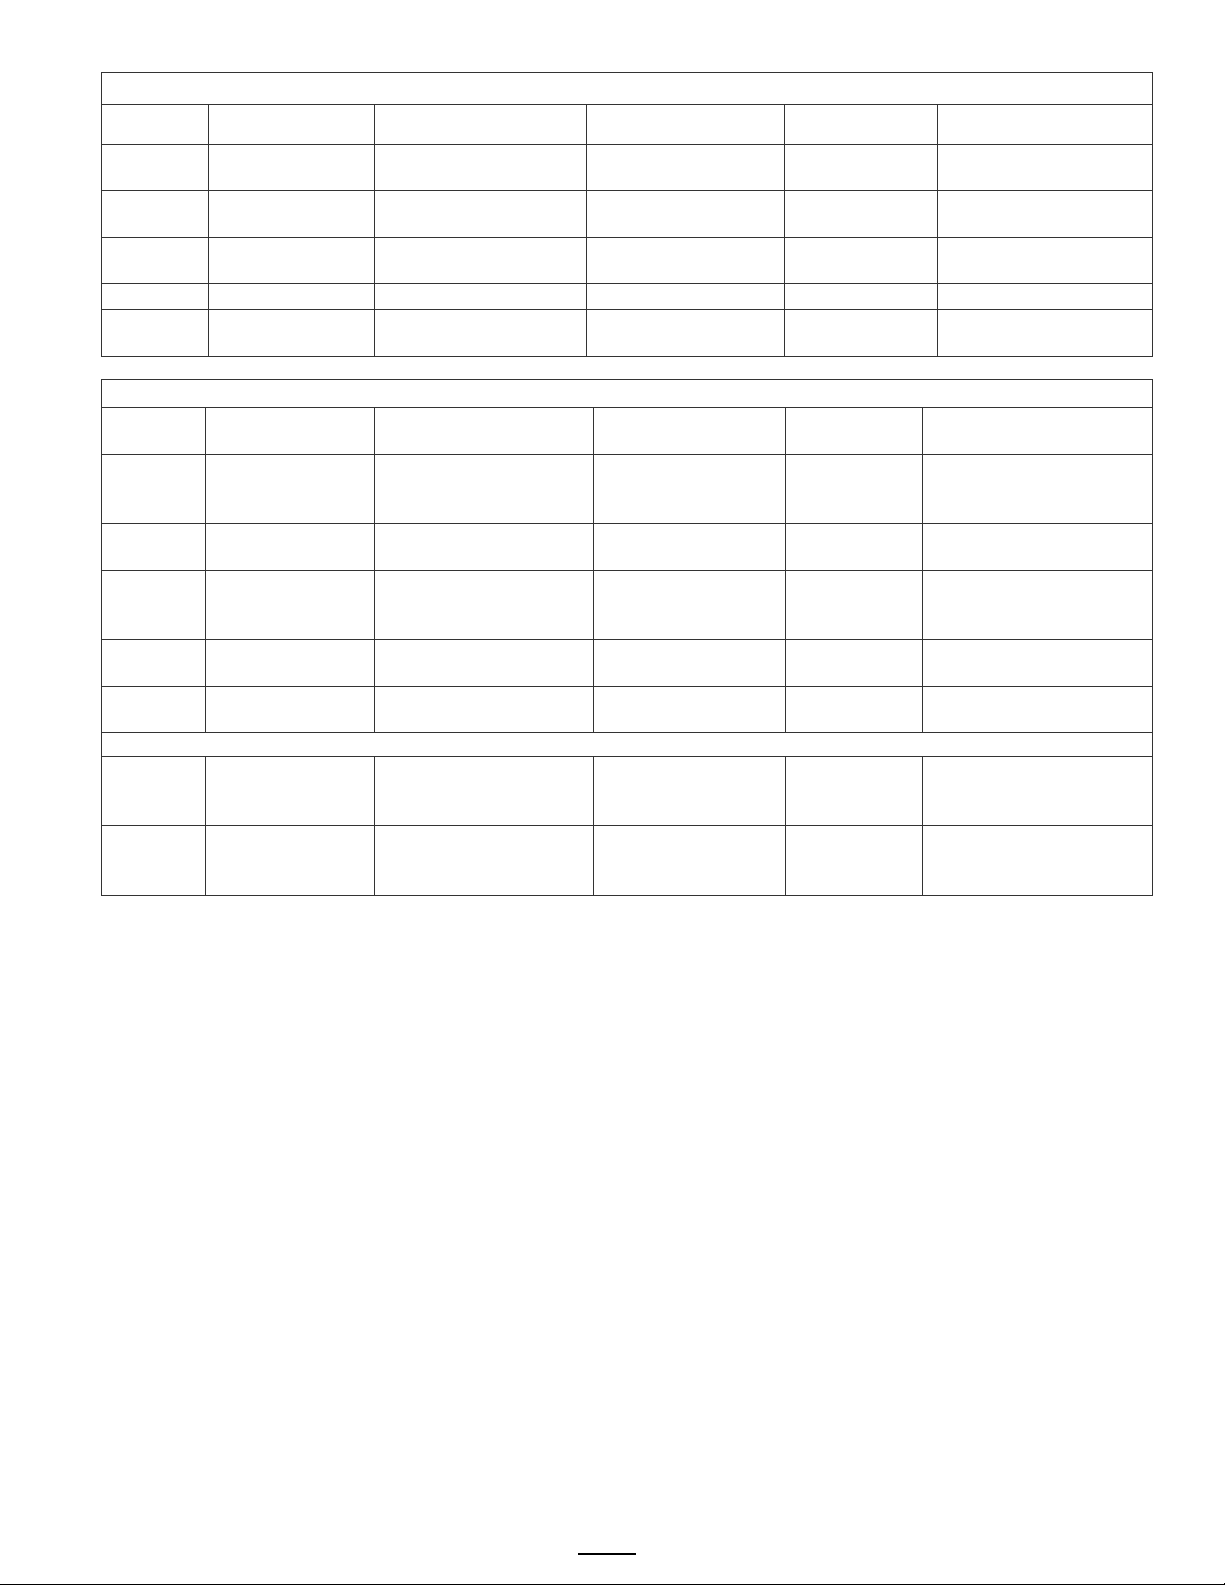
C SERVICE INPUTS
Brewer Sensors and Keypad
POSITION Program Items Factory set Default Programming Range Increments Notes
LLC Probe
continuity
TDS tank reading
(water resistance)
≈850- LOW
≈1600-HIGH
Brew Basket
Sensor
Tank
Temperature
Hot water tank
temperature
C5
USB Drive
NO
Checks buttons
under membrane
Follow directions on
the screen
D SERVICE OUTPUTS
Test Valves and Heaters; Set screen brightness
Programming
Range
Energizes Heater(s)
Service use only.
Press button 2 to test
(button 1 stops test)
Activates valve
Default is 10 sec.
Toggle +/-
OFF or ON
Runs valve to verify flow.
under brew basket.
Toggle +/-
OFF or ON
Toggle +/-
OFF or ON
Single series displays right side only Left Valve display is only for twin side brewer.
Adjust LCD screen
LEDs under buttons
Adjust LED button
the screen display LCD
C1
C2
C4
C6 Keyboard Test Calibrate
POSITION Program Items Factory set Default
D1
D2 Fill Valve Test
D4 Brew Valve Test (Press to test)
D8 Basket Lock (Press to test)
D10 Dilute Valve (Press to test)
Heater SSR
Test
Direct read
Direct read YES or NO
Direct read
Press button 2 to test
(button 1 stops test)
Default is 10 sec..
Activates heater
Activates valve
Default is 10 sec.
Nominal values
Actual values
YES/NO
Increments Notes
Toggle +/-
OFF or ON
Toggle +/-
OFF or ON
WARNING!
Press To Test
NOTE: Have container
Press To Test
Press To Test
D12 LCD Brightness Brightness=90% 20-100% 5%
D13 LED Brightness Brightness=60% 20-100% 5%
.
brightness only-Not for
brightness only-Not for
Go to fetco.com for the latest versions of all information Page 8 User Guide & Operator instructions MBS-1221 P202Re0August 2021
Page 9
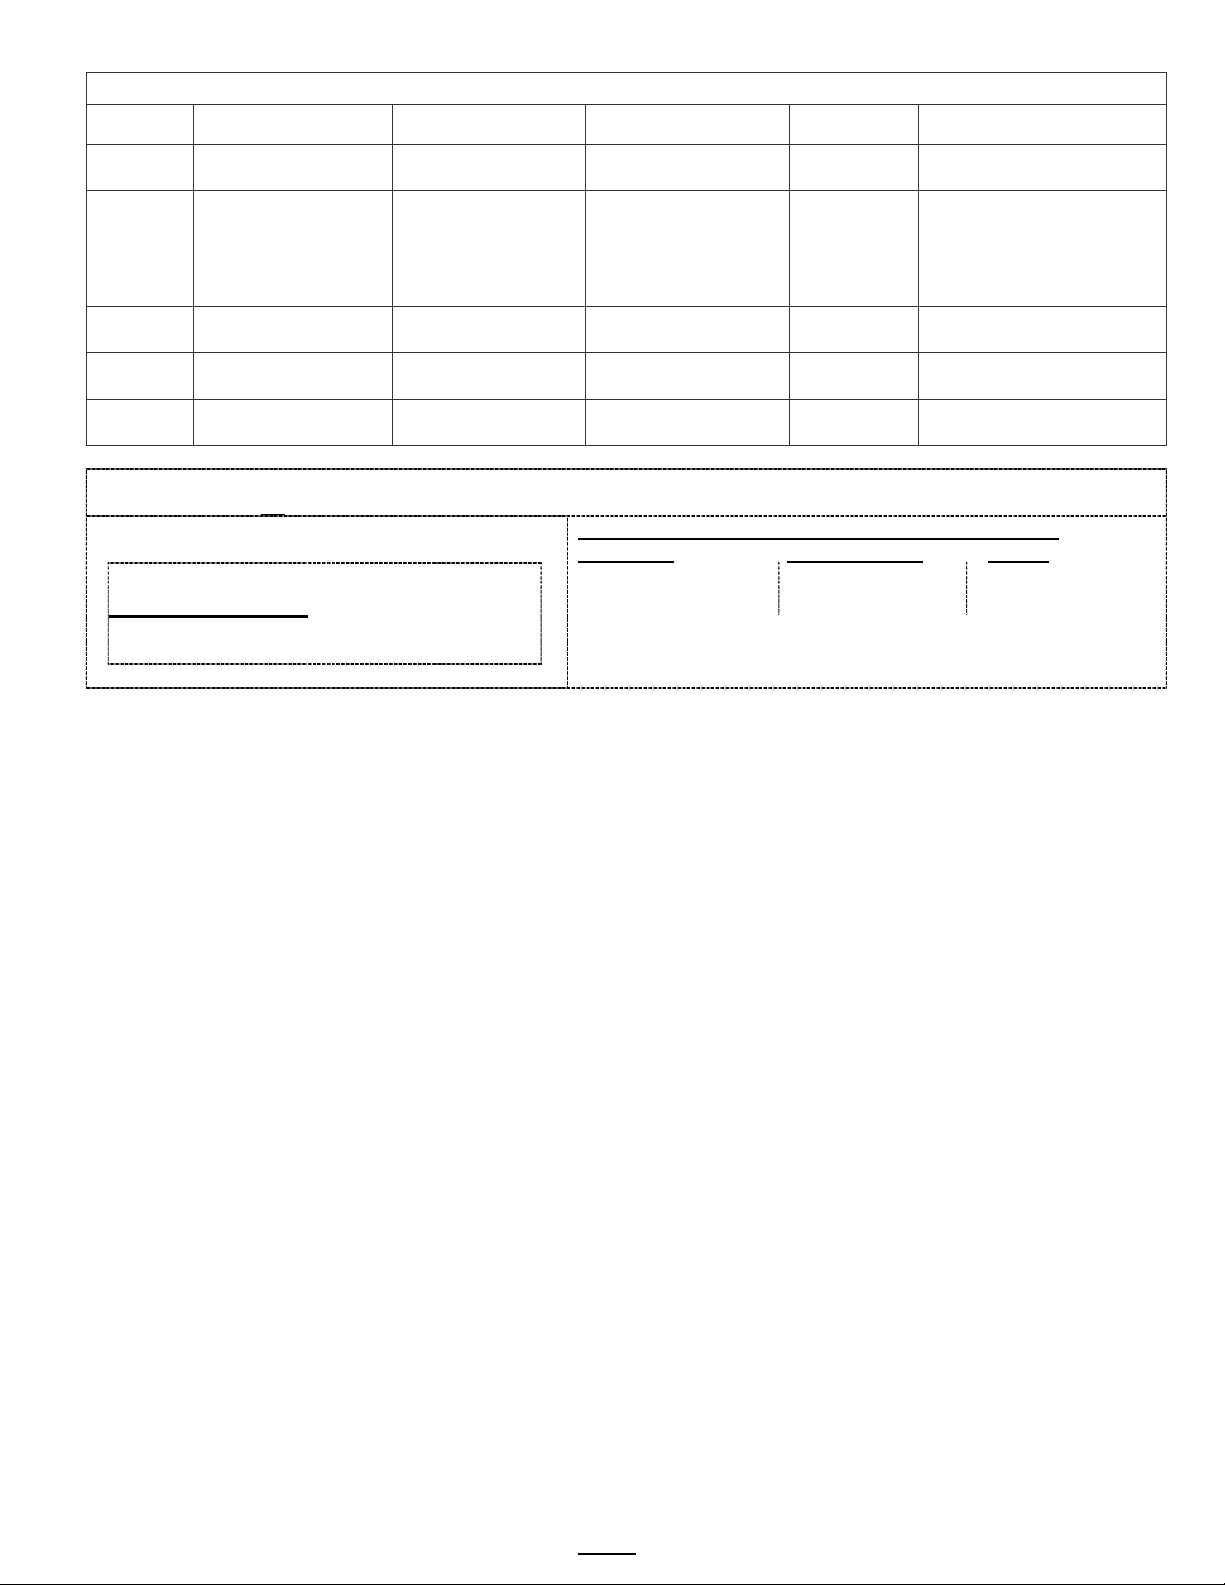
E CALIBRATION
Brewer Sensors and Keypad
POSITION Program Items Factory set Default Programming Range Increments Notes
-3°F
-2°C
-2° to -10°F
-1° to -5° C
1°F
1°C
Compensates output to
measured temperature
Liquid level control
pure water.
Slow flow rate
from supply
Toggle +/-
YES or NO
Trims fill system for low
supply or Flojet use
1.30-1.90Liter
0.34-0.52G
0.05L
0.013G
1.75-3.30Liter
0.46-0.86G
0.05L
0.013G
Use this formula to compensate for minor discrepancies in actual volume versus programmed volume.
See “PROGRAM” E5 For valve settings and calibration. Factory set brew valve flow rates are in liter/min
Default Brew Valve Flow Rate—MBS-1221 Brewers
MBS-1220
Oz/L/G/minute
Range
ACTUAL VOLUME
X
CURRENT
SETTING
=
NEW
SETTING
Brew Valve FR
54/160/0.42
45oz-64oz
Dilute Valve FR
86oz/2.55L/0.67G
38oz-112oz
PROGRAMMED
VOLUME
Use the formula above to determine the correct setting
E1 Ready Temp. Offset
NORMAL
E2 LLC Sensitivity
E3
E5 Brew valve flow rate: 1.60L/54oz/0.42G
E9 Dilute valve flow 2.55L/0.67G
(“NORMAL” for
most water)
OFF OFF/ON
HIGH
(Biased for reverse
osmosis water or
very pure water)
Set FR lower to increase volume, set higher to decrease volume.
NORMAL
HIGH
sensitivity.
High,1300Ω is for reverse
osmosis water or very
Adjusts flow rate
Adjusts flow rate
Go to fetco.com for the latest versions of all information Page 9 User Guide & Operator instructions MBS-1221 P202Re0August 2021
Page 10
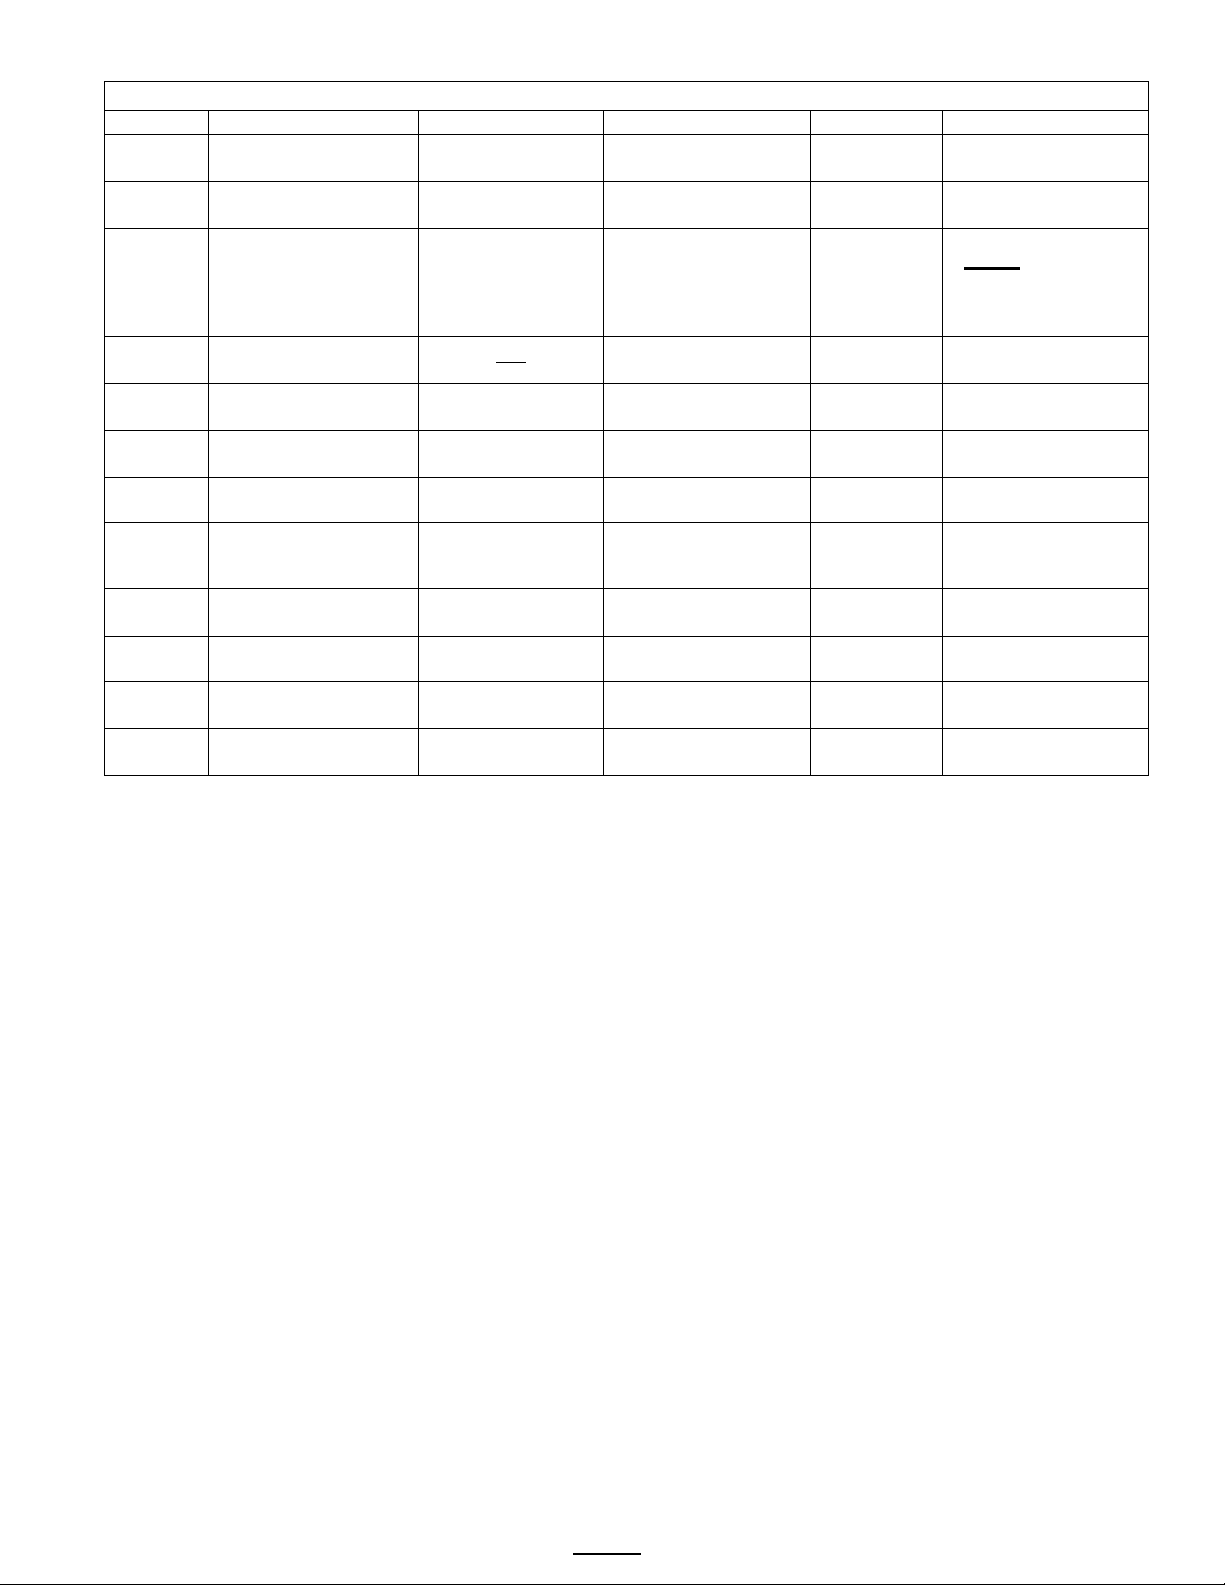
F SERVICE MENU
Software & Code View and Settings
POSITION
Program Items
Factory set Default
Programming Range
Increments
Notes
F1 Display Firmware
Displays current
version [4/2021]
Displays current
version [4/2021]
CBS
CBS
CBS
CBS
CBS
M
TBS
Enables brew
basket lock
Saves
settings
Applies settings
from USB
Insert USB
Will need reboot
1: ; 2: ;3:;4: ;5: ;6:
LAST six errors only
Toggle +/-
YES or NO
FACTORY USE ONLY.
DO NOT RESET
Toggle +/-
YES or NO
Disables brew
basket sensor
Toggle +/-
YES or NO
Disables brew
basket lock
2.1.210323
F2 Display Bootloader
F3 Select Model
2.0.210317
MBS-1221
Will need reboot
Scroll to brewer
model Save & Exit
-1221
-1231, CBS-1232
-1241, CBS-1242
-1251, CBS-1252
-1261, CBS-1262
BS-1221, MBS-1251
-1221, TBS-1222
NOTE: Overwrites
all user settings
(See below)
F5 Option BB Lock NO NO or YES
F8 Backup to USB Follow prompts
F9 Restore From USB
Insert blank USB
F10 Restore Defaults NO NO/YES Reset to factory
F11 Error Log
Lists up to six
codes, in order
1=Newest/6=Oldest
Newest=first
Oldest=last
See Error Code
Chart for references
F12 Erase Error Log NO +
F13 Service Phone # Service
F15 Override Rt BBS NO NO/YES
F17 Override Rt BBL NO NO/YES
Go to fetco.com for the latest versions of all information Page 10 User Guide & Operator instructions MBS-1221 P202Re0August 2021
Page 11
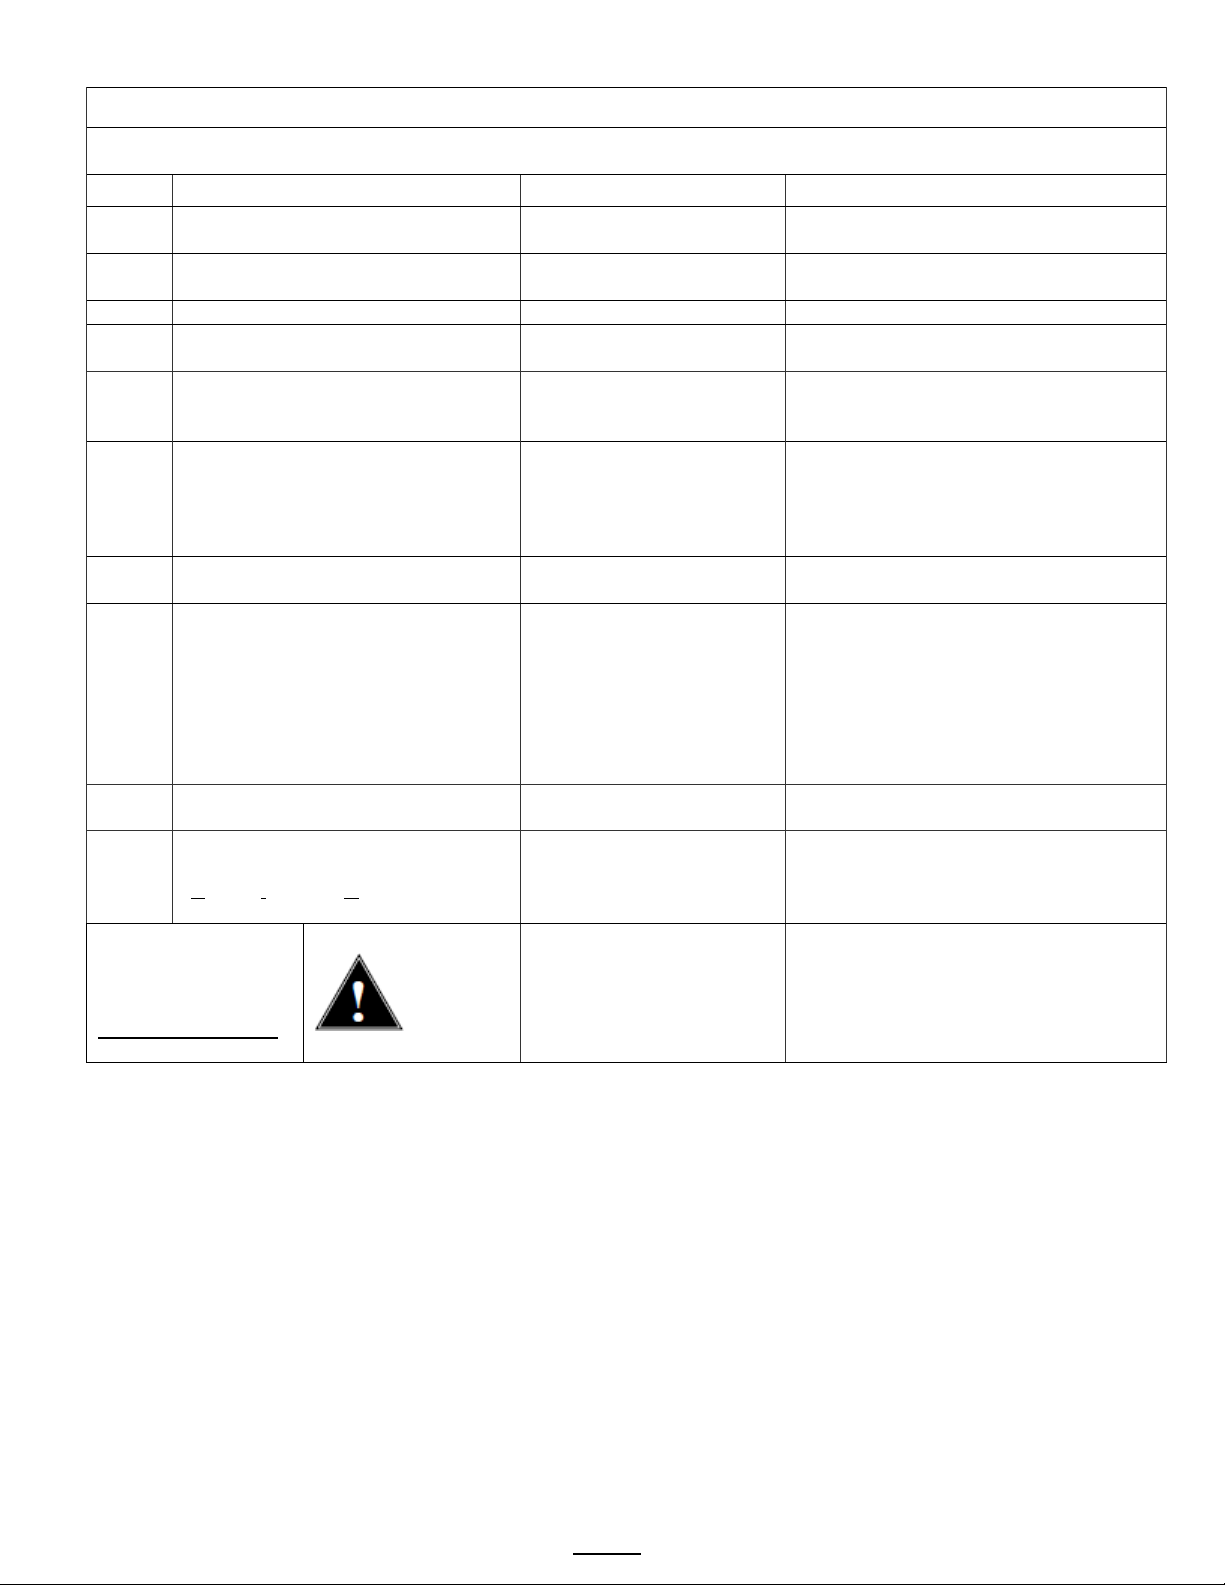
F ERROR CODES
DO NOT CLEAR ERROR CODES UNTIL ERROR IS IDENTIFIED AND CORRECTED
Contact factory or specialized personnel for error codes
Code Description Possible Cause Corrective Action
Software error-error on start up or
corrupted software
Improper start-up or
shutdown
Internal flash corrupted
internal data memory malfunction
Error found in cyclic
redundancy check CRC
Restart, if still fault: reload software
If not corrected: replace board
050
Short-circuit in temperature probe
Probe failure.
Replace probe.
Bad probe connection, or
probe failure.
Check all connections. Replace probe if
necessary.
Initial Fill Error.
expected after powering up.
Water supply flow rate is
water line kinked or closed.
Reboot machine. If persists-investigate
filter, kinked line, stuck fill valve)
Water supply flow rate to
(SEE PAGE 16)
Check water supply line. Flow should
replace fill valve
Heater is on, temperature
is not rising/dropping
High elevation correction. Bad heaters
or temperature probe or position
1) Failure of SSR, high
“heating”)
1)Test and check SSRs, high limit
tank, especially during “heating”.
Heater is off and heating
SSR is stuck “ON”
Check ohms on heater (15-60Ω). SSR
may be stuck in ON mode-replace SSR.
Usually from longer than
service
Brew basket must be in
001
002
051 Open temperature probe.
100
Initial fill time took longer than
Error on refill-.
101
Tank did not refill within expected
time.
200 Heating flatline-Tank is boiling
If the hot water tank heaters are
turned on during a heating cycle and
201
tank temperature is not increasing
according to software logic and the
tank temperature is below setpoint
202 Heater Shorted or Stuck SSR
too low, fill valve is stuck,
hot water tank is too low,
or fill valve stuck or
damaged
limit, temperature probe, or
heating element.
2) Water being removed by
hot water faucet during
heating (control displays
Restart, if still fault: reload software
cause of low flow rate. (Clogged water
be 20-75 psig, (138-517kPa)
>1gal/3.8L/min Investigate cause of low
flow rate. If the flow rate is in range-
devices temperature probe. Check
heating elements with current clamp,
replace if necessary.
2)Advise staff to refrain from taking
large amounts of water from hot water
255
Keyboard [HID] error
(Human Interface Device)
NO
BSKT
Insert Brew Basket
10 seconds’ contact. Or
faulty reassembly after
Restart, if still fault: reload software. If
mechanical: replace module
place
This is a
SAFETY FEATURE
Insert brew basket into brewer rails to
enable brewer
Go to fetco.com for the latest versions of all information Page 11 User Guide & Operator instructions MBS-1221 P202Re0August 2021
Page 12
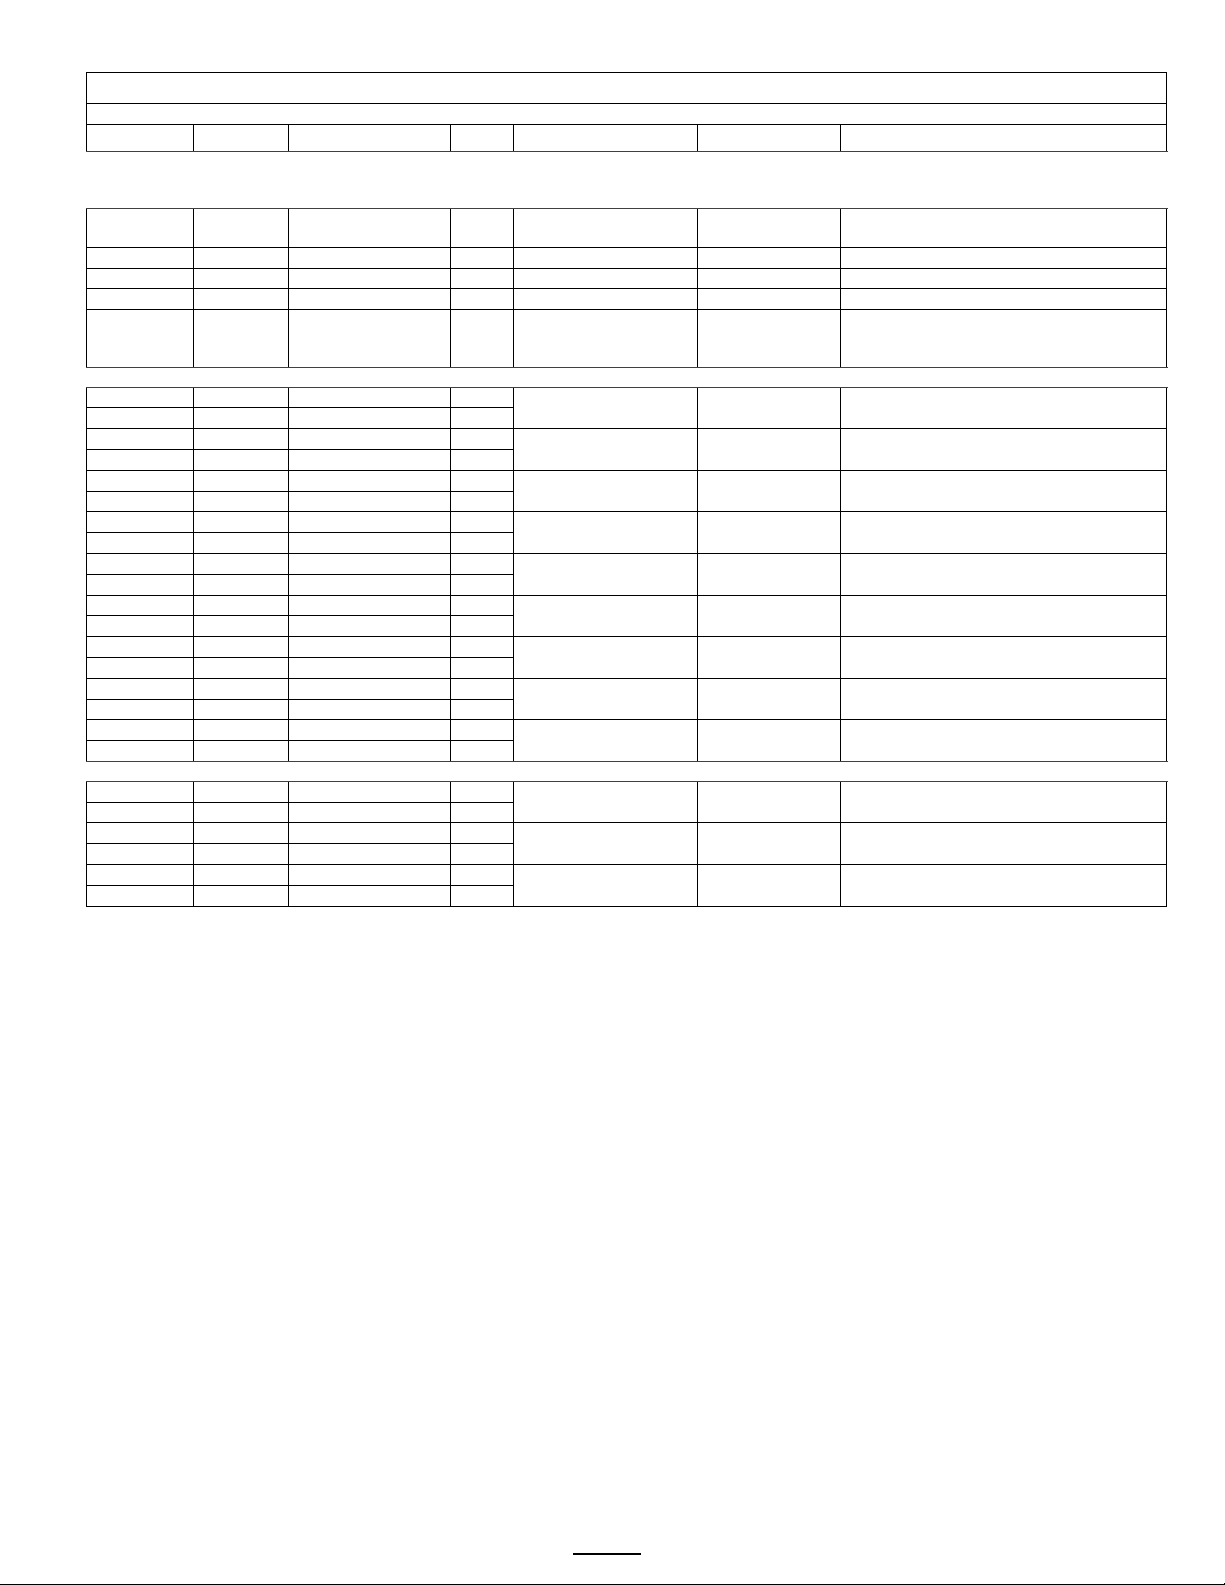
G COUNTERS
Brewer Usage, Water Filter Usage, and Statistics
ROLE: [LT]=Permanent total for lifetime of machine [R]=operator resettable [User]=Input needed from operator
Position
Counter
Program items
Role
Information
Increments
Notes
G1-G3 are for water filter maintenance. Filter Life readings (G1, G2, G3) must be activated in B13 GENERAL if they are not visable and the
equipment has a water filter.
All beverage equipment must use filtered water and filter cartridges must be monitored for quality
Amount of water passed through external
water filter. For filter life
G2
A, S, B
Filter Life
[User]
10,000Liters 2,625Gal
25 gal 100 L
Upload published life of filter
G3
A, S, B
Filter Reset
[User]
NO
Toggle +/- ,Y or N
Reset when replacing external water filter
G4
A, S, B
Counter Reset
[User]
NO
Toggle +/- ,Y or N
Resets all resettable counters to zero
Basic=B
Statistical=S
Stored brewer component activity..
counters are located.
G20-G55 component use cycles and volumes handled. Available in ADVANCED counter only (G5)
G20
A
Fill Cycles
[LT]
Hot water tank refill
cycles
G21
A
Fill Cycles
[R]
G22
A
Fill Volume
[LT]
Total volume of water
for all brews
G23
A
Fill Volume
[R]
G28
A
Rt Brew Cycles
[LT]
Right brew valve
operation on/off
G29
A
Rt Brew Cycles
[R]
G30
A
Rt Brew Volume
[LT]
Right brew valve
flow through volume
G31
A
Rt Brew Volume
[R]
G44
A
Rt Dilute Cycles
[LT]
G45
A
Rt Dilute Cycles
[R]
G46
A
Rt Dilute Volume
[LT]
Dilutes valve flow
through volume
G47
A
Rt Dilute Volume
[R]
G50
A
Rt BBL Cycles
[LT]
Right brew basket lock
operation on/off
Totalized cycles of brew basket lock
operation
G51
A
Rt BBL Cycles
[R]
G52
A
Heater Cycles
[LT]
ON/OFF switching for
heating elements
G53
A
Heater Cycles
[R]
G54
A
Heater On Time
[LT]
Total ON time for
heating element
G55
A
Heater On Time
[R]
G80-G91 See illustration below for batch button positions Available in STATISTICAL counter only (G5)
G80
S
Batch 10 Cycles
[LT]
Menu button selection
and activation count
G81
S
Batch 10 Cycles
[R]
G82
S
Batch 20 Cycles
[LT]
Menu button selection
and activation count
G83
S
Batch 20 Cycles
[R]
G84
S
Batch 30 Cycles
[LT]
Menu button selection
and activation count
G85
S
Batch 30 Cycles
[R]
G1 A, S, B Filter Used [User] 0G Gallons/Liters
G5 A, S, B Choose Counter Factory set to BASIC
Count Count Totalized cycles of valve operation
Advanced=A
Count Cycles of hot water tank refill
Gallons/Liters Quantity of water for brews
Count Totalized cycles of valve operation
Gallons/Liters Totalized volume through right valve
Gallons/Liters Totalized volume through dilute valve
Count
Count Totalized cycles of heater switching
Hour Totalized heater ON time in hours
Count Total brews-left side top button
Count Total brews-left side middle button
Count Total brews-left side bottom button
See column 2, Counters, to identify where
Go to fetco.com for the latest versions of all information Page 12 User Guide & Operator instructions MBS-1221 P202Re0August 2021
Page 13
STOP
EXIT
H NO +
H SAVE & EXIT
Saving changes and exiting PROGRAMMING
TO EXIT PROGRAMMING & HOW TO SAVE CONTROL SETTING CHANGES
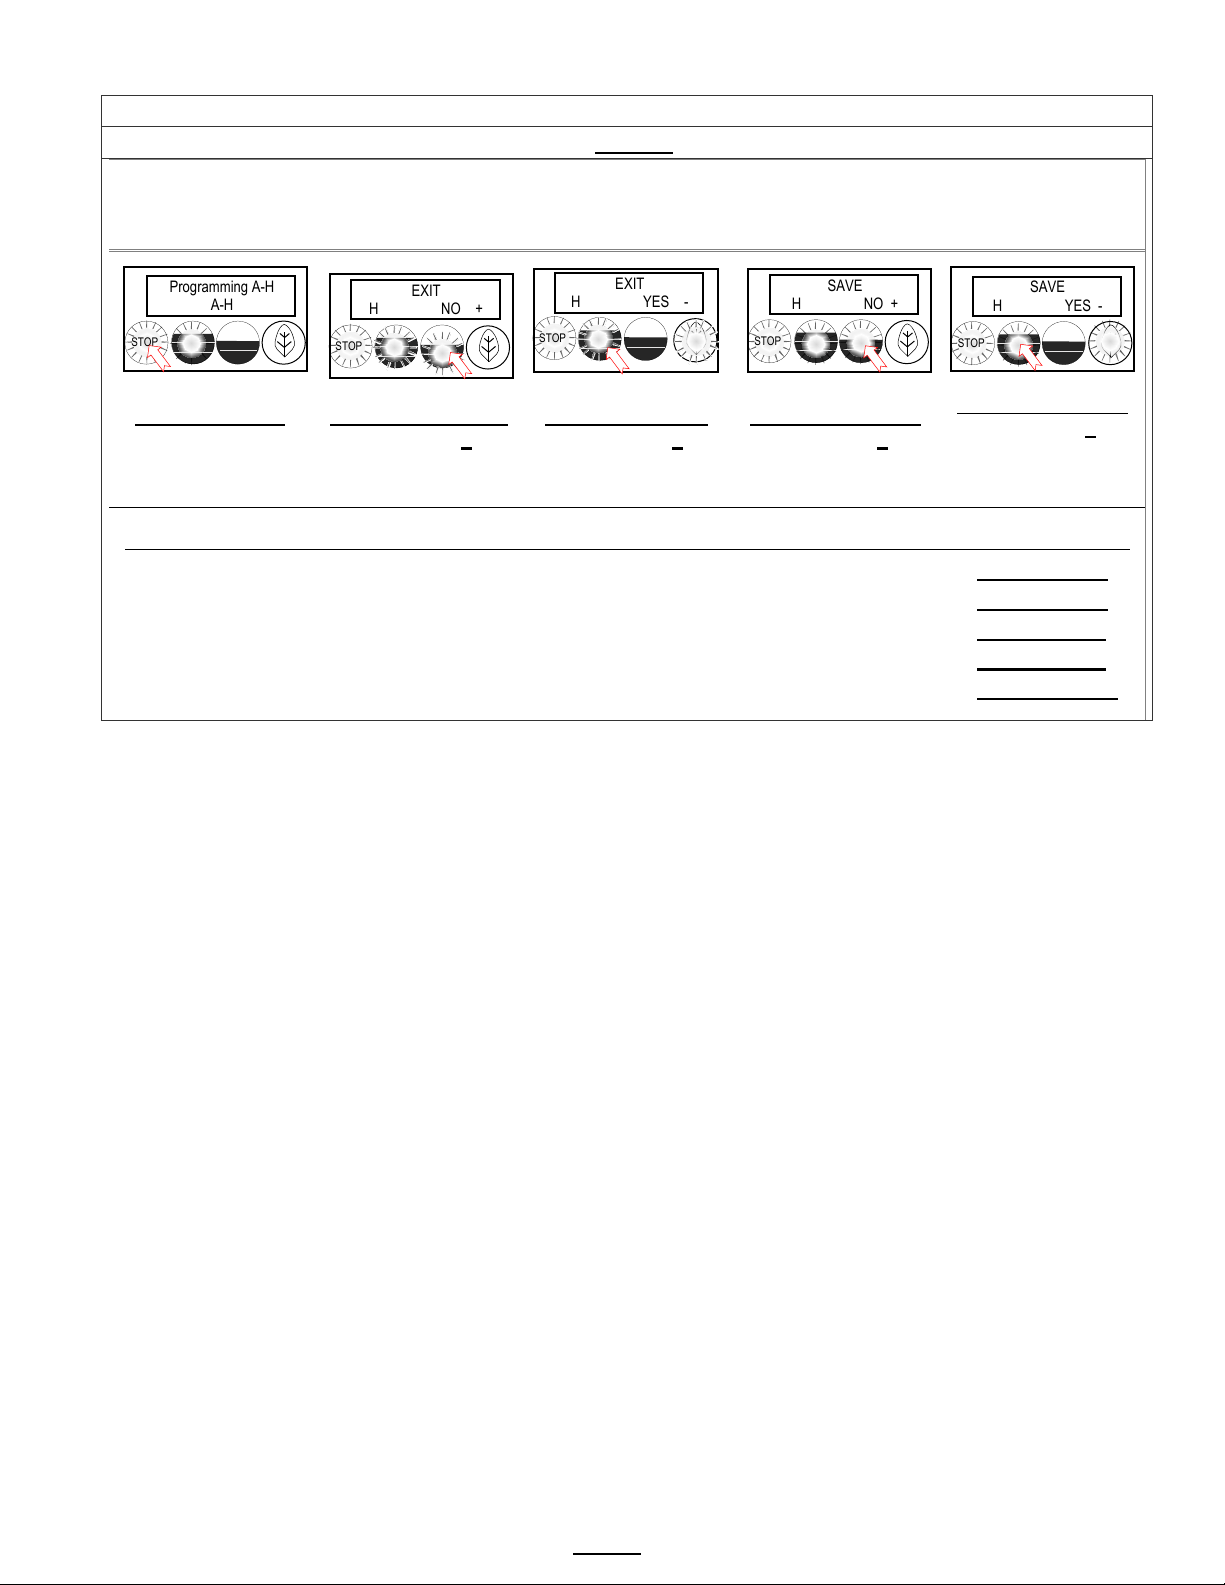
A convenient way to access the steps is to remember to scroll to EXITYES and to SAVE YES
To SAVE and EXIT
OPERATING MODE
STOP
Programming A-H
A-H
STOP
EXIT
H YES -
STOP
SAVE
H NO +
STOP
SAVE
H YES -
The brewer will save changes only from the “H” menu. DO NOT reboot brewer or toggle ON/OFF-exit as below.
HOW TO SAVE CHANGES AND EXIT-The brewer is in PROGRAMMING mode.
From any screen-
Press STOP button
until the EXIT (“H”)
From the “H” screen
Press button 2 to
toggle to the EXIT-
screen appears
NOTE: User Settings will be erased and overwritten to factory default settings by the following five programming changes
1) When setting or changing units of display for the tank temperature (F Fahrenheit or C Celsius). (SETTING B4)
2) When setting or changing units of display for the volume (L liters, G gallons). (SETTING B5)
3) When setting brewer model The software sets equipment to brewer defaults (SETTING F3)
4) When loading from USB (Reprograms settings) (SETTING F9)
From EXIT screen
Press button 1 to
toggle to the SAVE
YES screen
screen
From SAVE screen
Press button 2 to
toggle to the SAVE-
YES screen
Press button 1 to
SAVE your changes
and EXIT to
5) When restoring defaults (Reloads to defaults ) (SETTING E10)
Go to fetco.com for the latest versions of all information Page 13 User Guide & Operator instructions MBS-1221 P202Re0August 2021
Page 14
Operator Training
Review the operating procedures with whoever will be using the brewer.
Pay particular attention to the following areas:
1. Always pre-heat the dispensers before the first use of each day by filling them halfway with hot water and letting
them stand for at least 5 minutes.
2. Do not remove the brew basket from a coffee brewer until it has stopped dripping.
3. Make sure the dispenser is empty before brewing into it.
4. Show how to attach covers, close, and or secure the dispensers for transporting.
5. Show the location and operation of the water shut off valve as well as the circuit breaker for the brewer.
6. Steam from the tank will form condensation in the vent tubes. This condensation will drip into and then out of the
brew baskets. Up to 1/4 cup/118cc discharging overnight is possible. Place an appropriate container under each
brew basket when not in use.
7. We recommend leaving the power to the brewer on overnight. The water tank is well insulated and very little
electricity is used to keep the tank hot. Leaving the brewer in the “ON” position will also avoid delays at the beginning
of shifts for the brewer to reach operating temperature.
Cleaning & Maintenance
After Each Brew:
1. Dispose of grounds and rinse brew basket.
2. Never strike a brew basket or hit it against a hard surface.
This will damage the brew cone, and may damage the brew basket support rails
3. Rinse dispensers before reuse.
Every Day:
1. Wash brew basket with hot sudsy water.
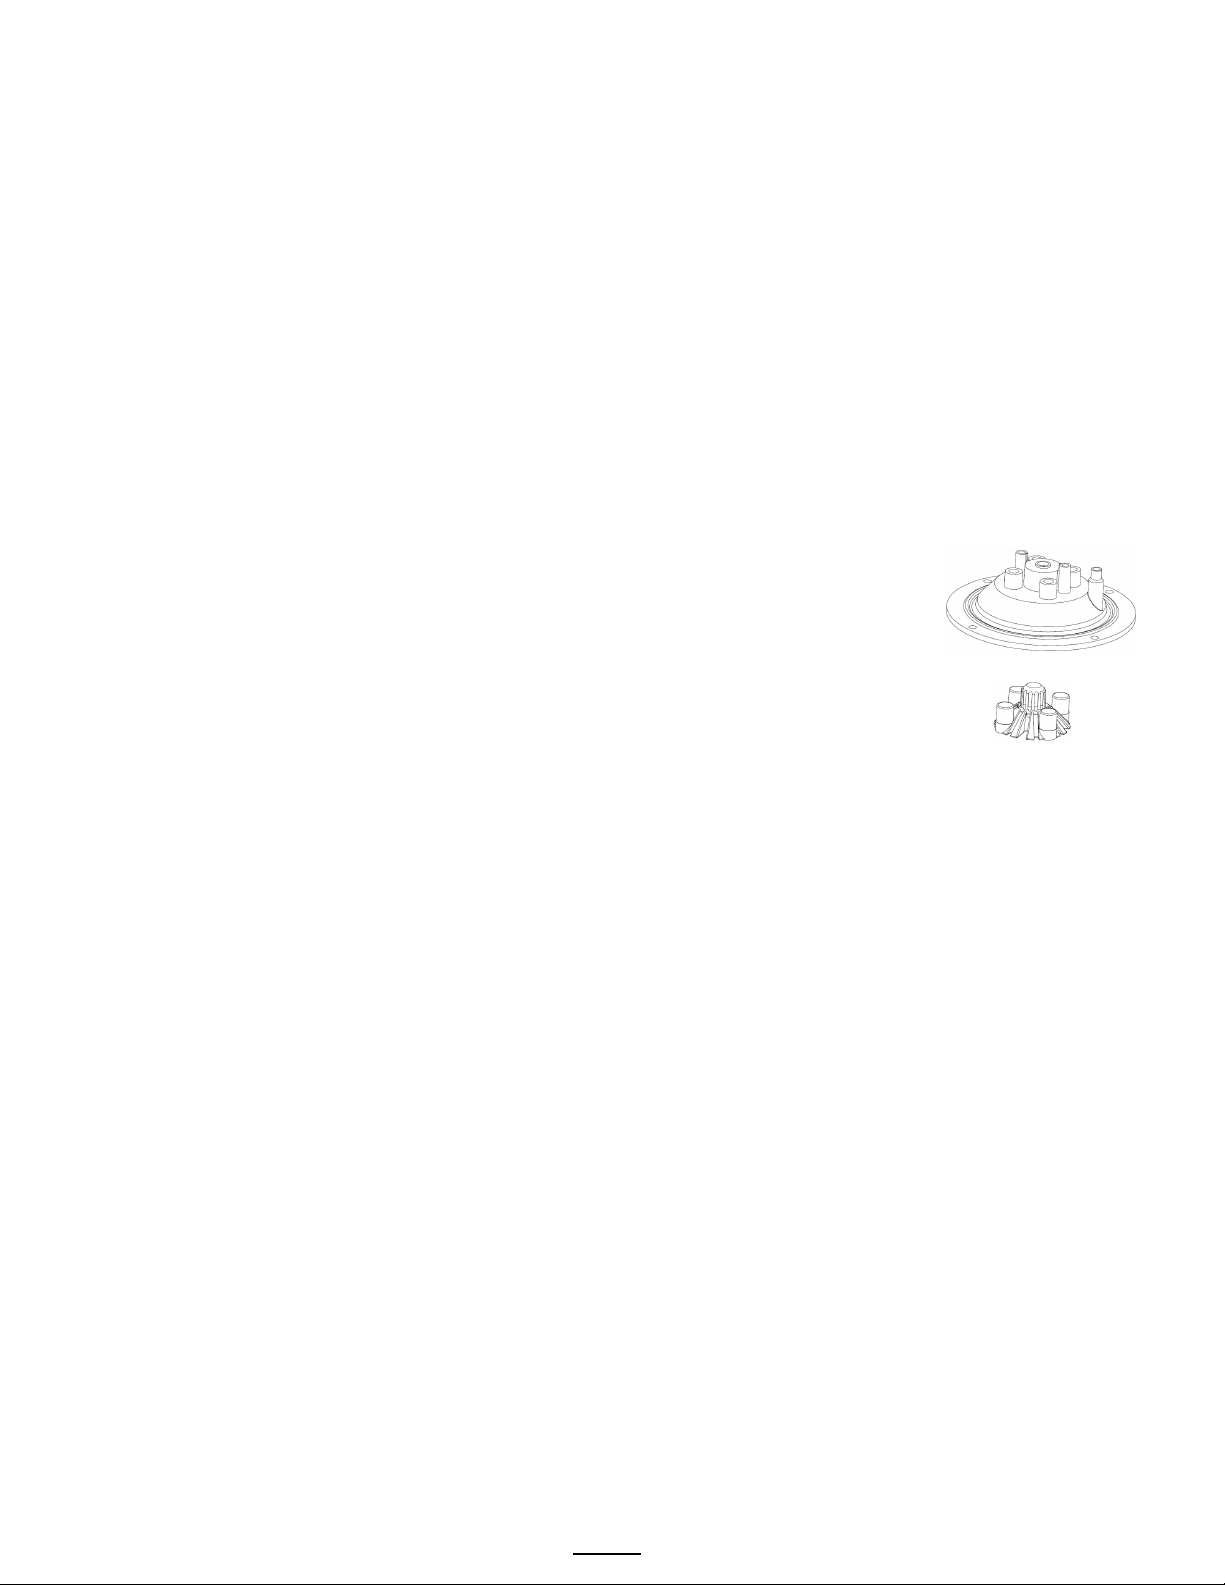
2. Pull CSD from the spray head, it is magnetically attached. Use gloves or a heavy towel.
Wash off any film and reattach. Use vinegar if limescale filming is present.
3. Clean dispensers with hot suds water and a brush, rinse and air dry.
4. Use only a soft cloth and hot suds on the outside to avoid scratches. Never use abrasives that will scratch surface.
Weekly
1. Use a commercial coffee dispenser cleaner such as URNEX™, TABZ™, DIP-IT™ or Squeak 'n Clean™.
2. Carefully Follow the instructions supplied with the cleaning product
3. Never use spray cleaners, solvent, solvent based cleaner or petroleum based polish anywhere on dispensers
Warning
1. Turn off power before any cleaning procedure, including wiping the exterior for appearance reasons.
2. Dry the exterior, especially the face panel, before turning on power.
3. Do not apply any type of spray cleaner on the face panel of this equipment.
4. Never use solvent or solvent-based cleaner or petroleum based polish anywhere on this equipment.
5. Dry the face of the touch pad before turning on power
6. Do not electrically energize this equipment or attempt operation without all covers in place and all screws fastened.
7. Unplug machine before disassembly or servicing.
Safety Notes
1. Professional installation is required. This appliance is manufactured only for commercial use
2. Operational requirements and maintenance for commercial cooking appliances differ from household appliances.
3. Operators must be trained for this equipment and must understand the use, maintenance and hazards.
4. Access to the service area is restricted to persons having safety/hygiene knowledge and practical experience of the
coffee brewer. This appliance must be installed in locations where it can be overseen by adult trained personnel.
5. Do not attempt to move hot beverage equipment once it is filled. Drain equipment before moving.
6. FETCO commercial coffee brewers prepare large amounts of coffee or tea in a single batch using very hot water
7. Commercial coffee brewers provide very hot water from the spray head, brew basket and faucet when it is pulled.
8. Coffee brewers may continue to dispense very hot water from the mechanically operated faucet after the electronic
touchpad is completely disabled by turning off the power switch on the lower back of the unit or unplugging the unit.
9. For safety, the brewer control locks the brew basket for 6.0 minutes after starting the brew.
10. Never attempt to defeat the factory set (default) time that the brew basket is locked for safety from start of brew.
Keep these instructions for training and future reference.
Go to fetco.com for the latest versions of all information Page 14 User Guide & Operator instructions MBS-1221 P202Re0August 2021
Page 15

(For Qualified Service Technicians Only)
General:
1. If not installed correctly by qualified personnel, the brewer will not operate properly, and damage may result.
2. Utilize only qualified beverage equipment service technicians for service and installation.
3. Always have an empty dispenser under spray head of all brewing equipment-including when at idle
4. Damages resulting from improper installation are not covered by the warranty and will void the warranty.
Below are the key points to consider before installation:
Electrical:
1. All CBS_Series brewers require an electrical ground wire. Installation without grounding is dangerous.
2. Note Equipotentiality Terminal, if present,
of equipment or of a system to the same potential, not necessarily being the earth (ground) potential, e.g. for local bonding.)
(To identify the terminals which, when connected together, bring the various parts
3. Verify voltages, polarity, circuits, and circuit breaker access before attaching equipment.
4. Brewers in this series wire differently in regard to a neutral wire. Review the wire diagrams.
5. The electrical diagram is located in the User’s Guide and online at www.fetco.com.
6. Make sure of the tight grounding of the equipment and use the external ground bolt.
7. The installation must comply with applicable federal, state, and local codes having jurisdiction at your location.
Check with your local inspectors to determine what codes will apply.
See wiring diagrams for connections
Plumbing:
1. North America: All installations must comply with applicable federal, state, or local plumbing codes.
2. All Others: The water and waste piping and connections shall comply with the International Plumbing Code,
International Code Council (ICC), or to the Uniform Plumbing Code (IAPMO).
3. Install a backflow prevention device. Most municipalities require a recognized backflow preventer
Usable on all hot beverage and cold beverage equipment is a WATTS® SD-2 or SD-3.
WATTS spring loaded double check valve models are accepted by most zoning authorities.
The check valve should be as close to the water supply inlet of the beverage equipment as possible
4. All beverage equipment must use a water filter. A finishing carbon filter is preferred
5. Install the filter unit after a water shutoff valve and in a position to facilitate filter replacement.
6. The water line and newly installed filter cartridge must be flushed thoroughly prior to connecting it to the brewer to
prevent debris from contaminating the machine
7. Verify that the water line will provide a flow rate of at least 1½gpm/(5.7lpm) per minute and the water pressure is
between 20-75 psig (138-517kPa) before making any connections. TBS-1221 / TBS-122Dis factory calibrated to a
stable, non-fluctuating water supply pressure at 45 psi
8. Only use the supplied factory dual valve adaptor to attach water supply line to both brewer fittings
9. See Page 16 The supplied fitting is a 1/4” flare. Other fittings may be substituted for the flare fitting.
10. Hand tighten the factory fitting when connecting the stub on the brewer. This will reduce stress on the internal
connections and reduce the possibility of leaks developing after the install has been completed See Page 16
Tank Drain
The water tank must be drained before maintenance procedures, and when the unit is to be relocated or shipped.
Drain is for service use only and must not be permanently connected. NOTE: Never plumb a water line to the drain.
1. Disconnect power and water to unit. DANGER: Ensure that all utility connections to the brewer are broken.
2. Move the unit near a sink or obtain a container large enough to hold four gallons of water.
Note: The hot water tank holds up to 2¾ gallons/10.1liters.
3. Remove the front panel and tank cover and allow the tank to cool to a safe temperature
4. The tank drain line and clamp are located inside-under the hot water tank. Pinch the drain line clamp to close
5. Locate the fill valve against the back wall, using pliers, loosen the hose clamp and move it back over the tube.
Note Do not loosen the hose clamp to the bottom of the hot water tank
6. Crimp the tube an inch or two away from the drain plug to prevent water from flowing and pull it off the valve.
7. Pull the tube end out of the brewer and position over sink or bucket.
8. Release the crimped tube and hose clamp and allow the water to flow into the sink or container.
9. Reverse steps 4-8 when service is complete. Ensure pinch clamp is open and hose clamps are in place.
Go to fetco.com for the latest versions of all information Page 15 User Guide & Operator instructions MBS-1221 P202Re0August 2021
Page 16
Brewer Setup
Inlet & Dilution Valve Notes
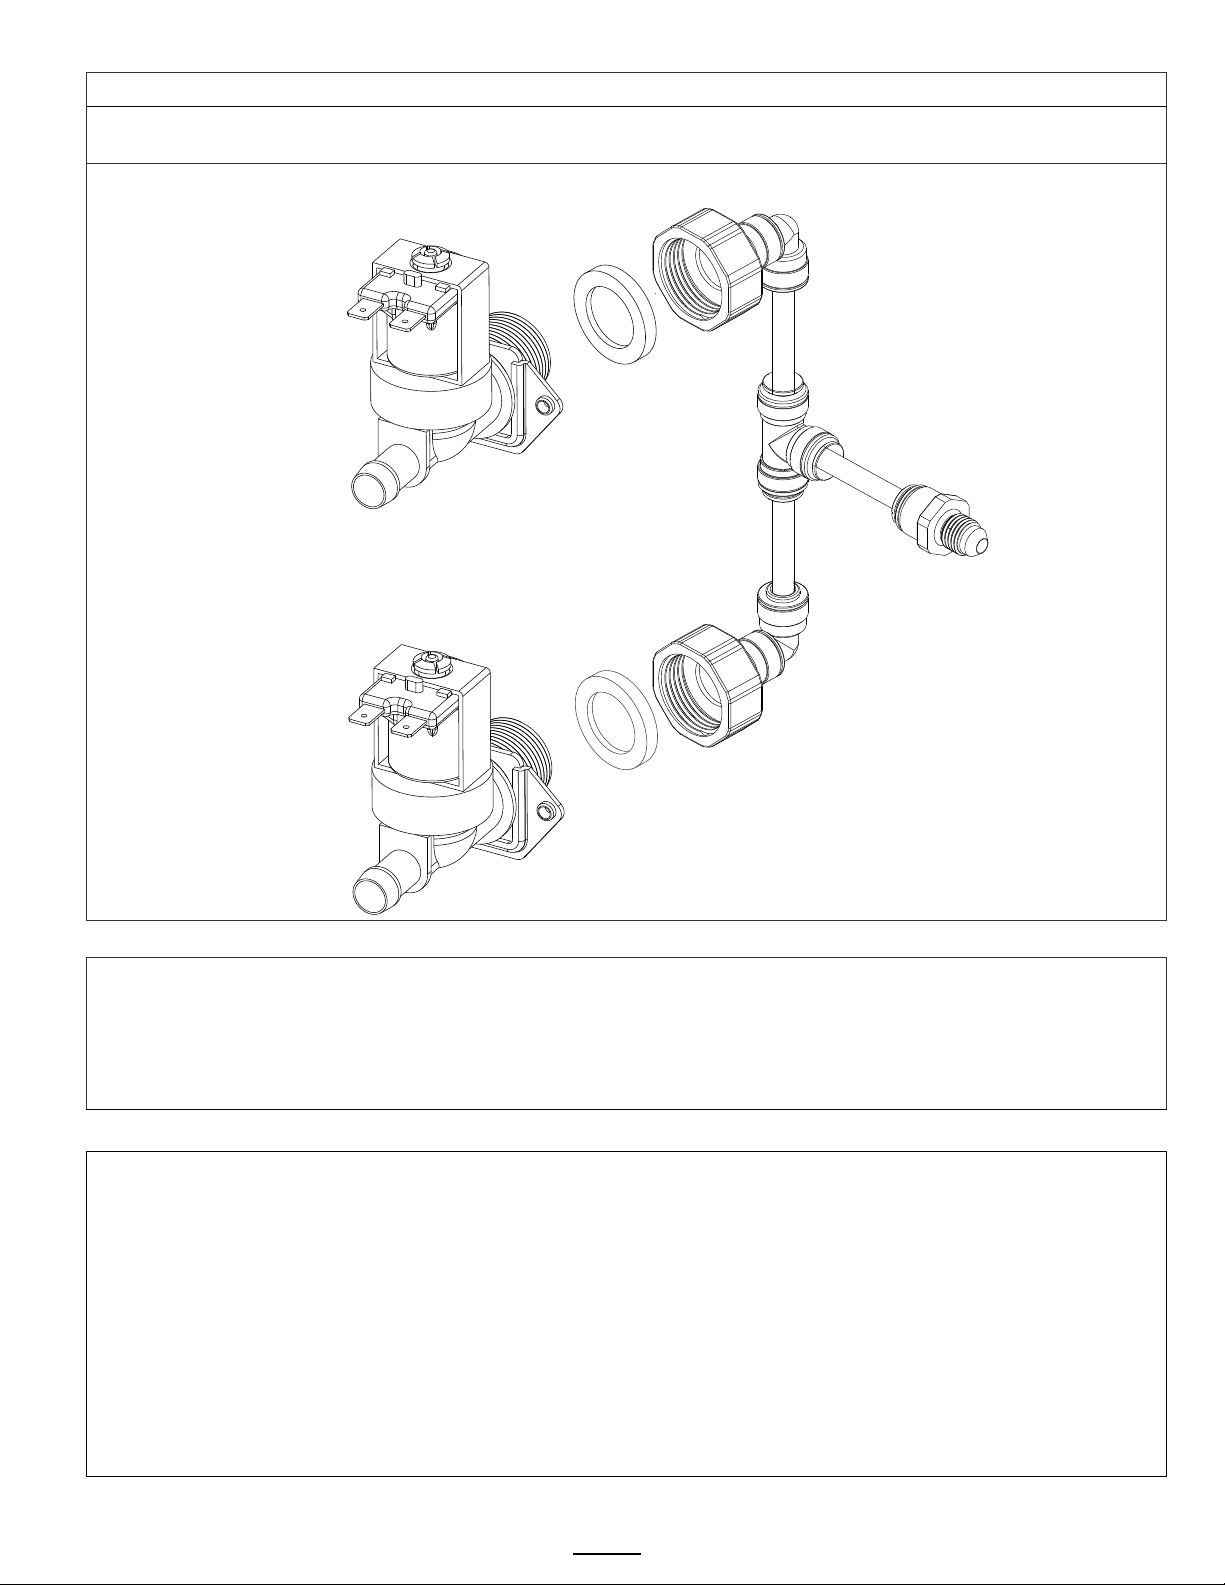
Attach factory supplied Dual Water Inlet Connector Assembly. Install on each valve -Inlet and Dilution
Check that rubber washer is in adapter. Hand tighten only-and, if necessary, 1/4 turn with wrench
Part 1102.00488.00 Dual Water Inlet Connector Assembly
TO PREVENT DAMAGE AND INSURE PROPER EQUIPMENT OPERATION
valve
↑
1/4" Quick Connect X 1/4" Flare Adapter
with another connection.
Dilution valve
↑
FETCO
Inlet valve
Rubber washer
(Included with adapter)
Rubber washer
(Included with adapter)
This may be removed and replaced
↓
FETCO
Install the adapter on the two valves first before attaching water line. Adapter is included in the carton.
Use of any other connector to valve will damage the valve
The valve threads are 3/4" BSP MALE THREAD and are not 3/4 garden hose fittings.
DO NOT use USA dishwasher water adapter or USA washing machine adapter for this connection.
The threads on any of these USA adapters are unusable for the valve
adapter
The inlet valve thread is 3/4 INCH BSP (British Standard Pipe).
This valve is not a standard USA washing machine or dishwasher thread (¾” GHT)
-Use only the 1102.00488.00 plumbing adaptor kit included with this equipment.
-Use the washers included in adaptor kit
-Plumber’s tape is not recommended for the adapter to valve connection
-Hand tighten adapter on valve with gasket, then very lightly wrench 1/4 turn to set
-DO NOT SUBSTITUTE FITTINGS FOR CONNECTING TO WATER SUPPLY
Damage to inlet valve from improper installation will void the warranty
NOTE: DO NOT PLUMB TANK DRAIN. DRAIN IS FOR SERVICE AND MAINTENANCE ONLY.
Go to fetco.com for the latest versions of all information Page 16 User Guide & Operator instructions MBS-1221 P202Re0August 2021
Page 17
Installation safety and hygiene directions-For International and CE equipment
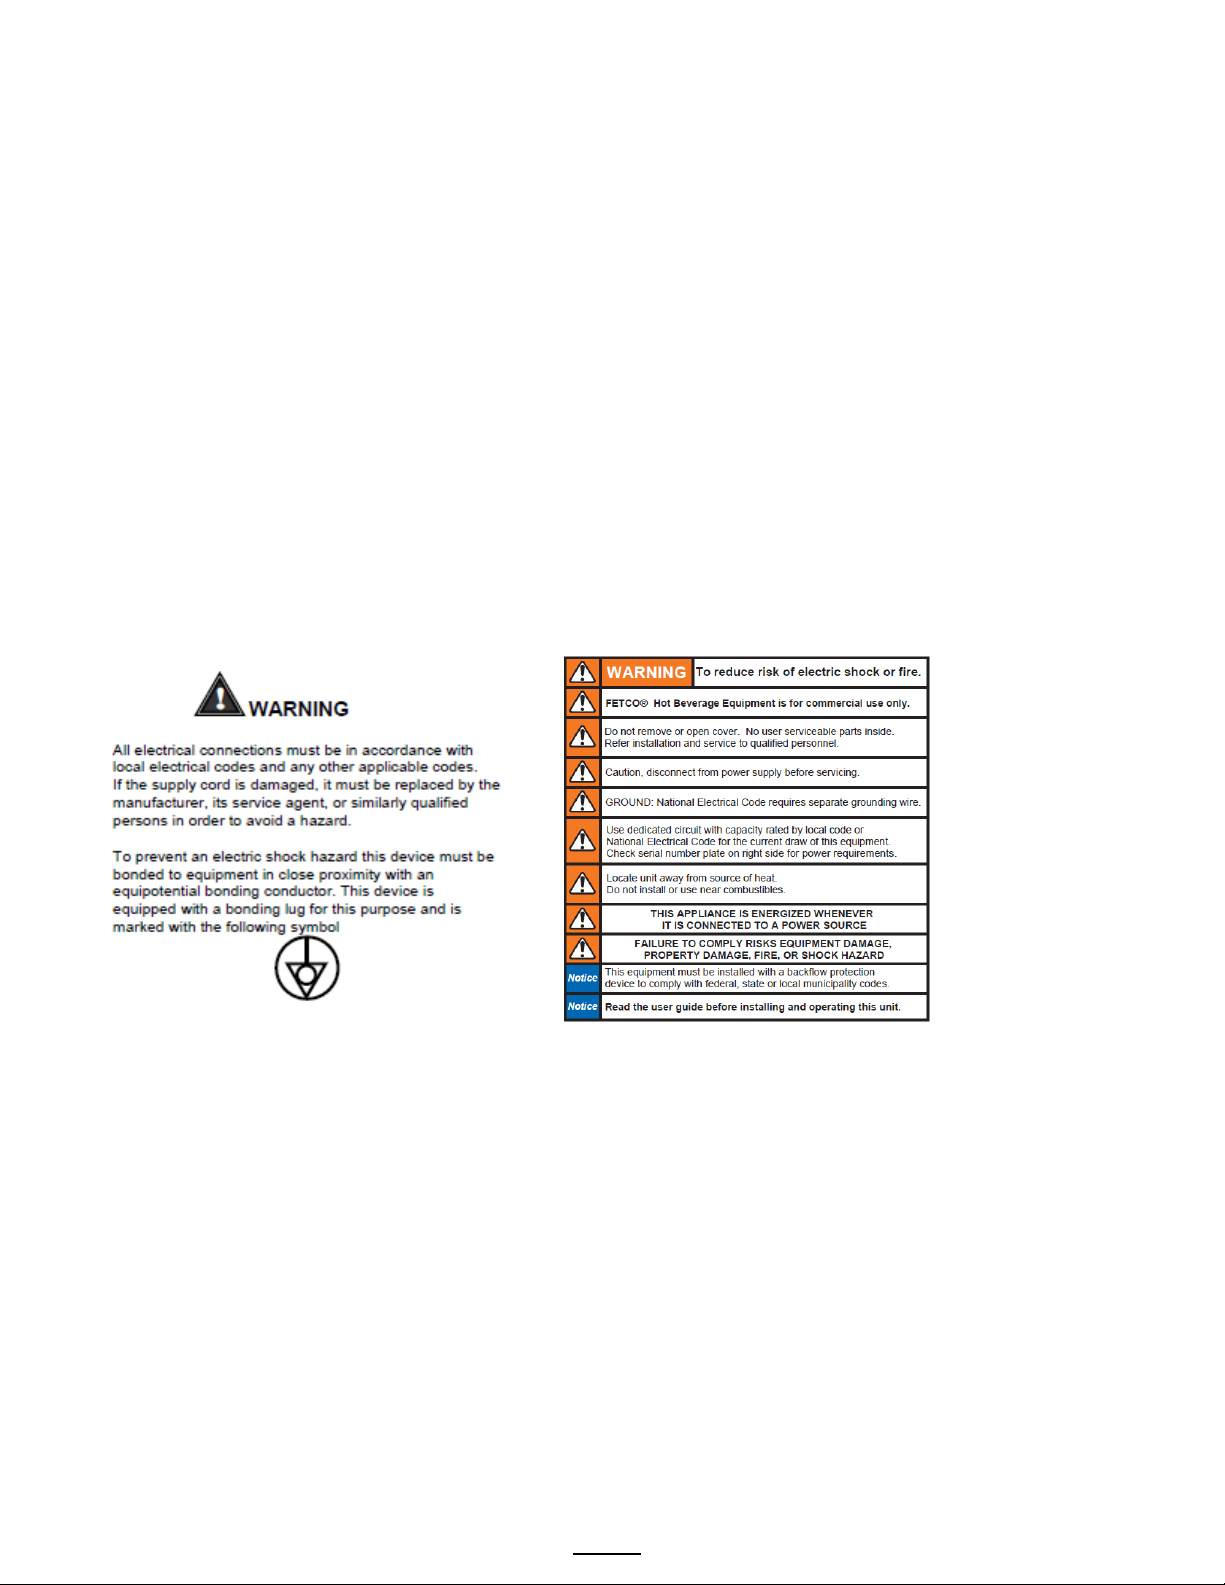
Labels and
(1046.00035.00)
1. Access to the service area is restricted to persons having safety/hygiene knowledge and practical experience of the coffee
brewer. This appliance must be installed in locations where it can be overseen by trained personnel.
2. For proper operation, this appliance must be installed indoors where the temperature is between 10°C/50°F to 35°C/95°F.
Drain and remove all liquid from equipment and lines if exposed to freezing temperatures.
3. All commercial cooking equipment, including this unit, is not intended for use by children or persons with reduced physical,
sensory, or mental capabilities. Ensure proper supervision of children and keep them away from the unit.
4. Children should be supervised to ensure that they do not play hot beverage equipment.
5. This unit must be installed and serviced by qualified personnel only.
6. Installation must conform to all local electrical and plumbing codes. Installation by unqualified personnel will void the unit
warranty and may lead to electric shock or burn, as well as damage to unit and/or its surroundings.
7. If the power cord requires repair or replacement-it must be performed by the manufacturer or authorized service personnel
with the specified cord only from the manufacturer in order to avoid a hazard.
8. Review the dimensions for the unit and verify that it will fit properly in the space intended for it. Verify that the counter or
table will support the total weight of the brewer and dispensers when filled (See: Technical Data).
9. Place the brewer on the counter or stand. When the brewer is in position, level it front to back as well as side-to-side by
adjusting the legs.
10. Brewers will need a sturdy supported surface for operation. Do not move brewers when filled.
11. Do not tilt appliance more than 10° to insure safe operation.
12. Unit is for protected indoor use only. Do not steam clean or use excessive water on unit.
13. This unit is not “jet-proof” construction. Do not pressure wash or use jet spray to clean this unit.
14. The unit is not waterproof-do not submerge or saturate with water.
Equipment exposed to flood and contaminated must not be used due to electrical and food safety.
Do not operate if unit has been submerged or saturated with water.
warnings for hot
beverage
equipment
For BACK PANEL
of equipment
Go to fetco.com for the latest versions of all information Page 17 User Guide & Operator instructions MBS-1221 P202Re0August 2021
Page 18
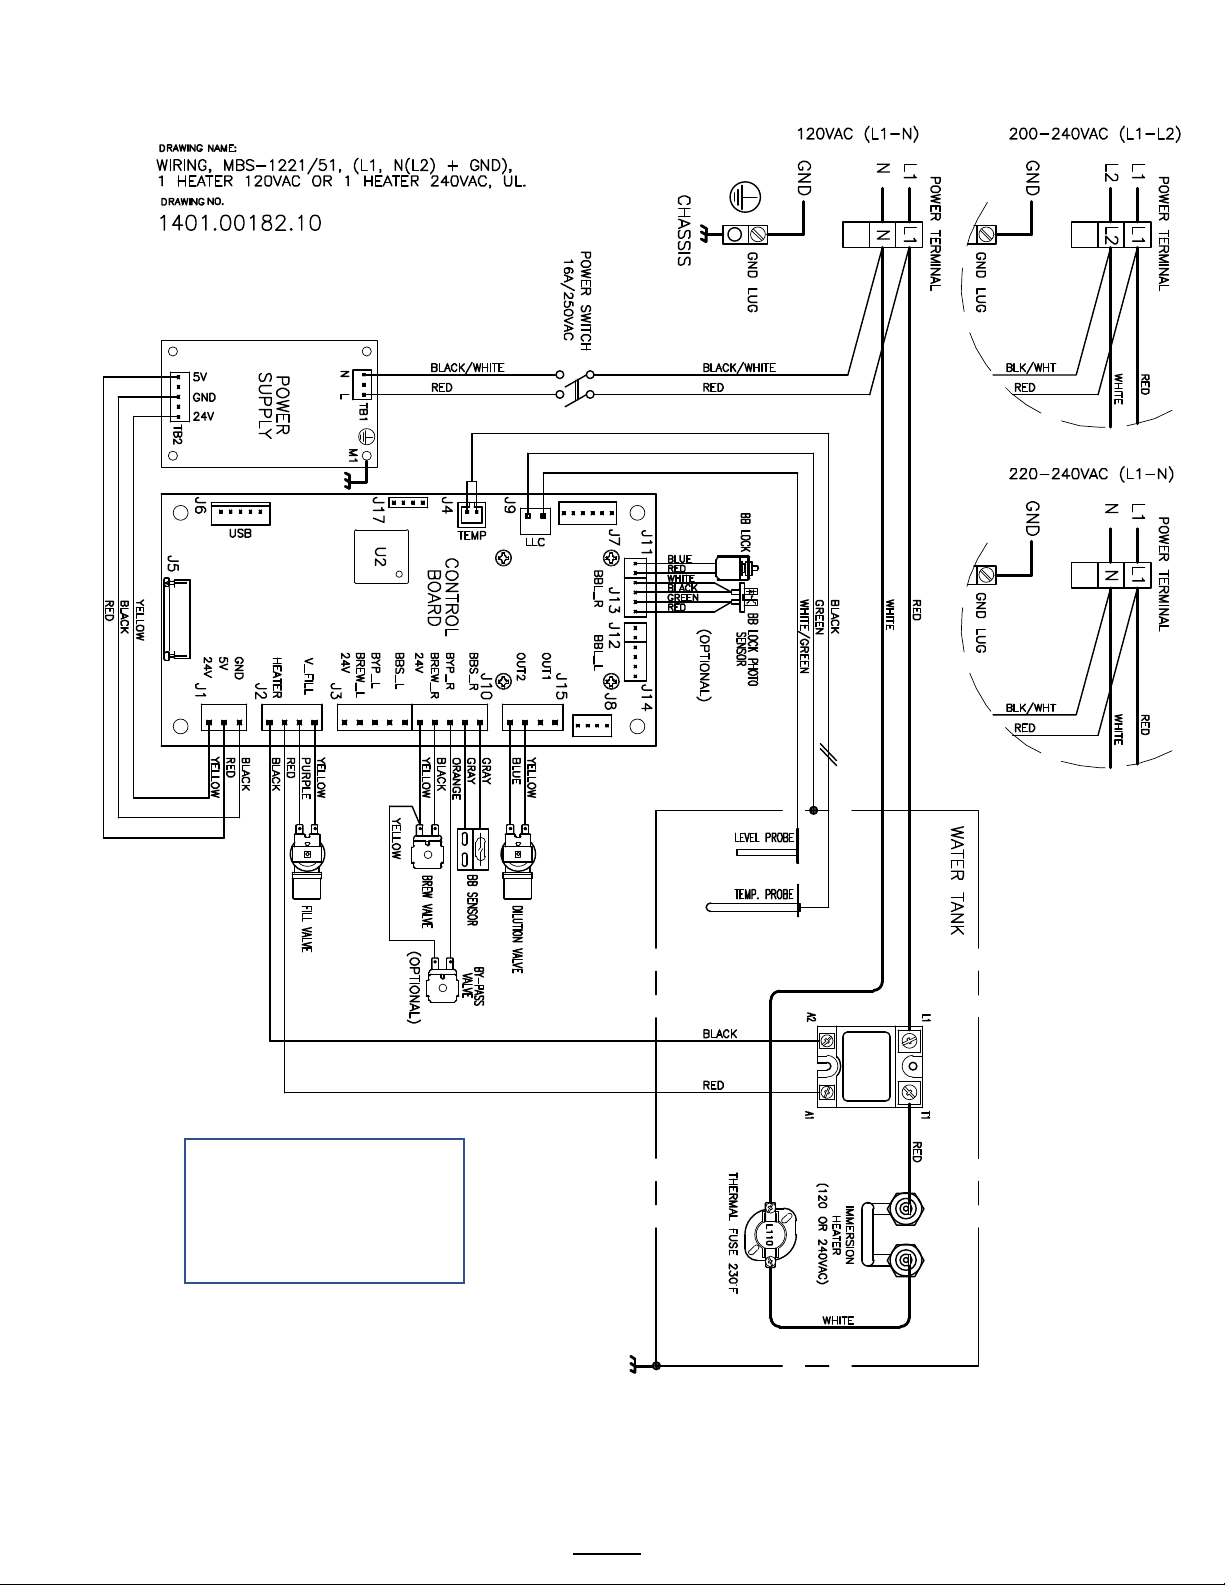
Wiring Diagram
SSR
SKU M1221 Dual Voltage Models
1401.00182.01
M1221IN-1B130 series
M1221KS-1B130 series
M1221US-1A117 series
Go to fetco.com for the latest versions of all information Page 18 User Guide & Operator instructions MBS-1221 P202Re0August 2021
Page 19
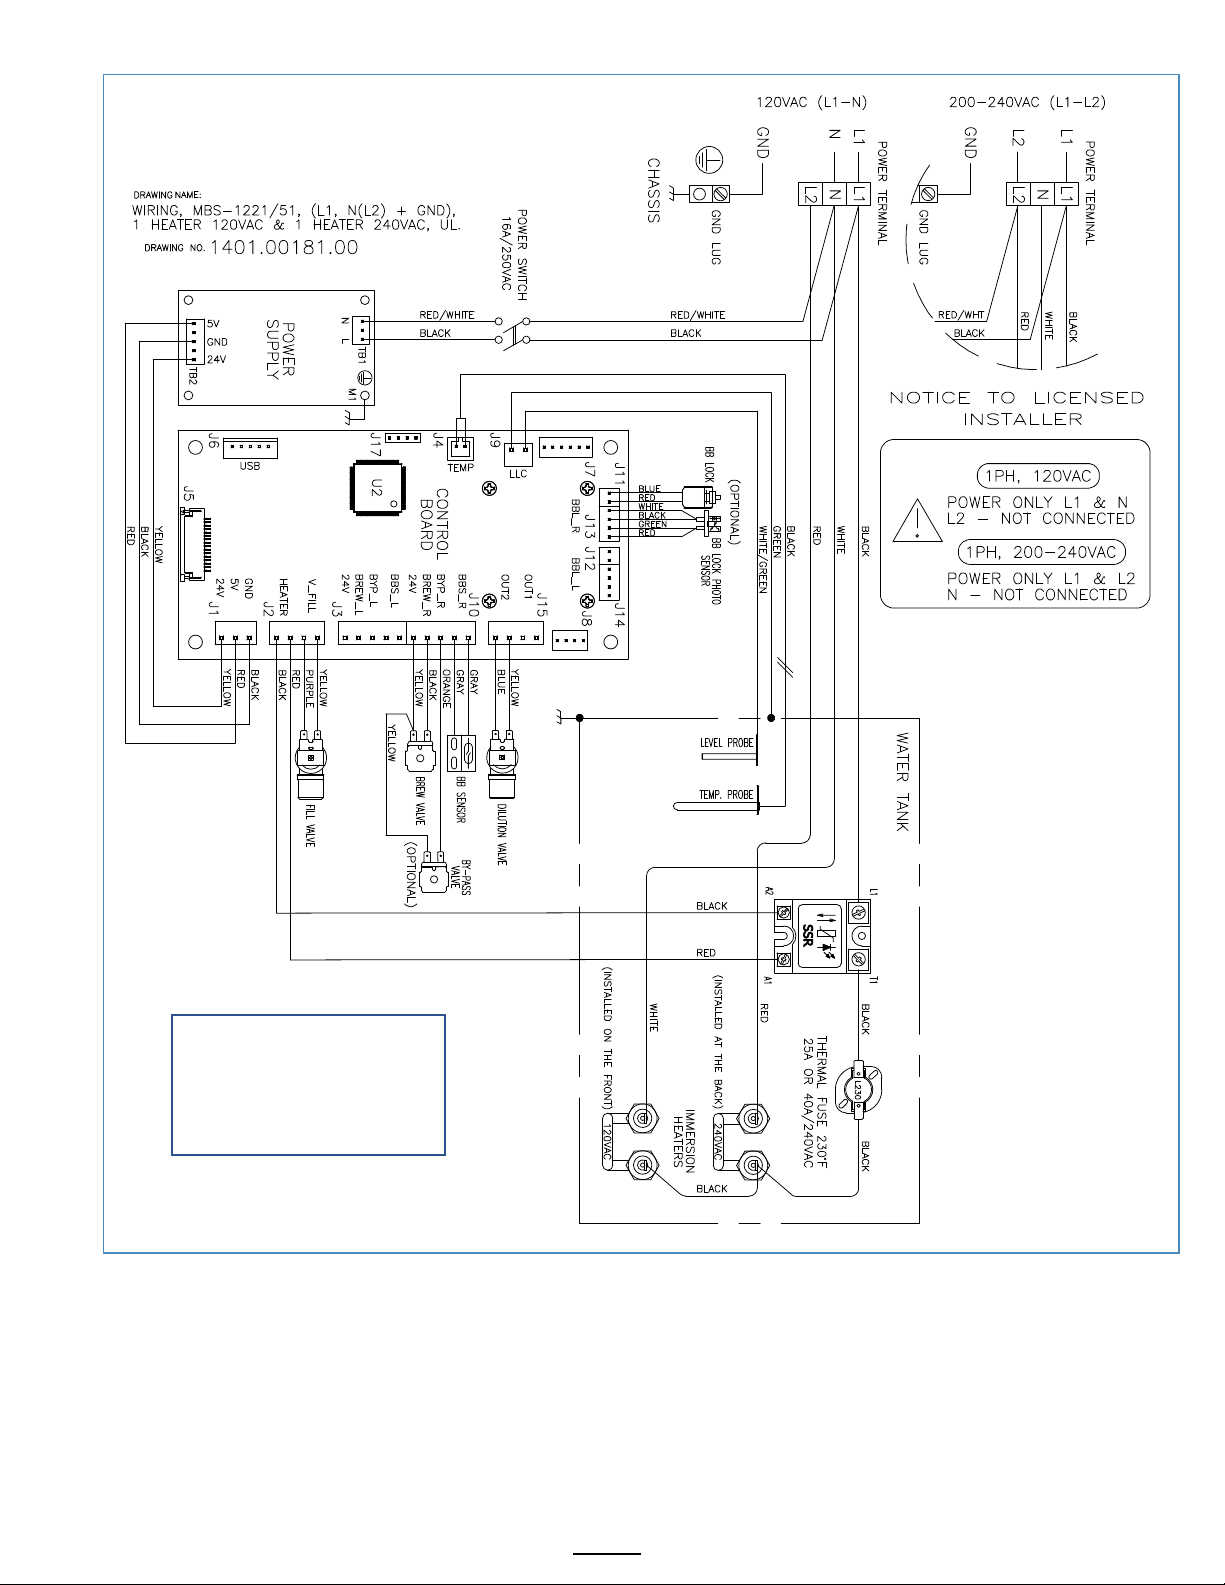
SKU M1221
-1X models
with 2 heaters
120 or 240 volt
1401.00181.00
M1221NM
M1221US
-1X117 series
-1X117 series
Go to fetco.com for the latest versions of all information Page 19 User Guide & Operator instructions MBS-1221 P202Re0August 2021
Page 20
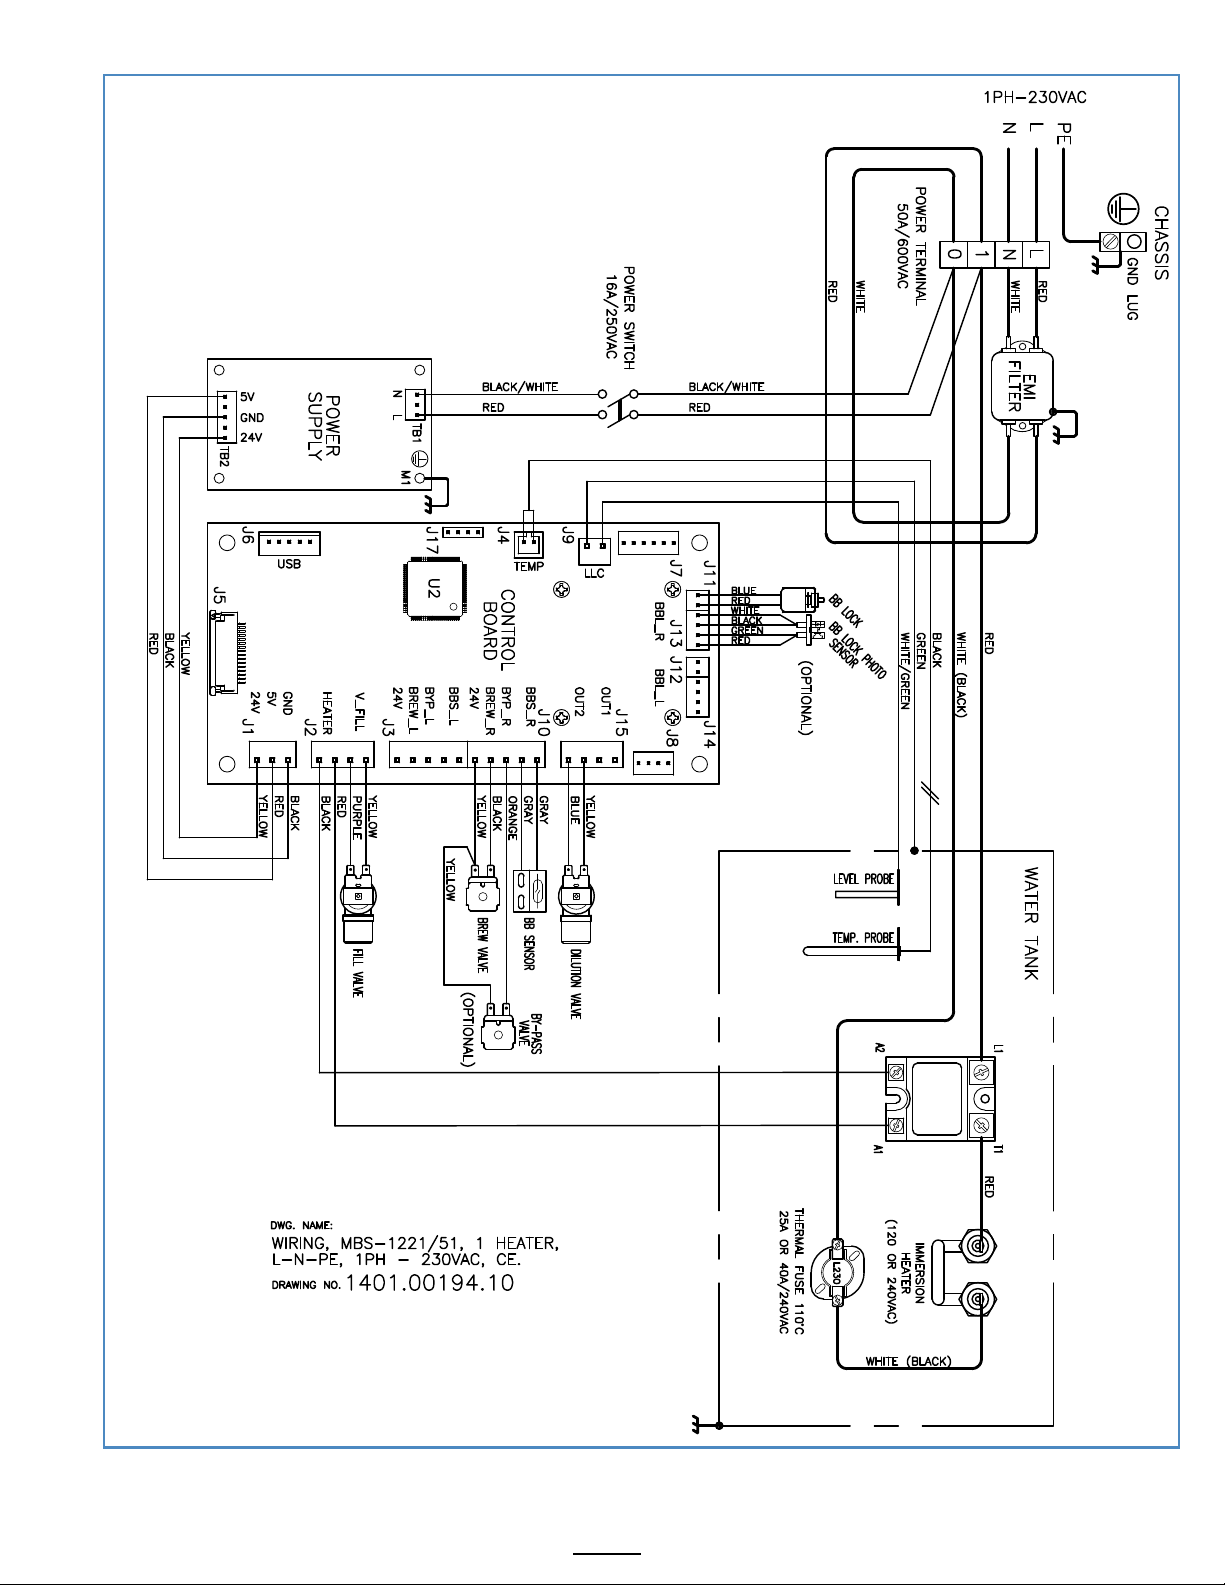
SSR
SKU M1221 CE models
Go to fetco.com for the latest versions of all information Page 20 User Guide & Operator instructions MBS-1221 P202Re0August 2021
Page 21
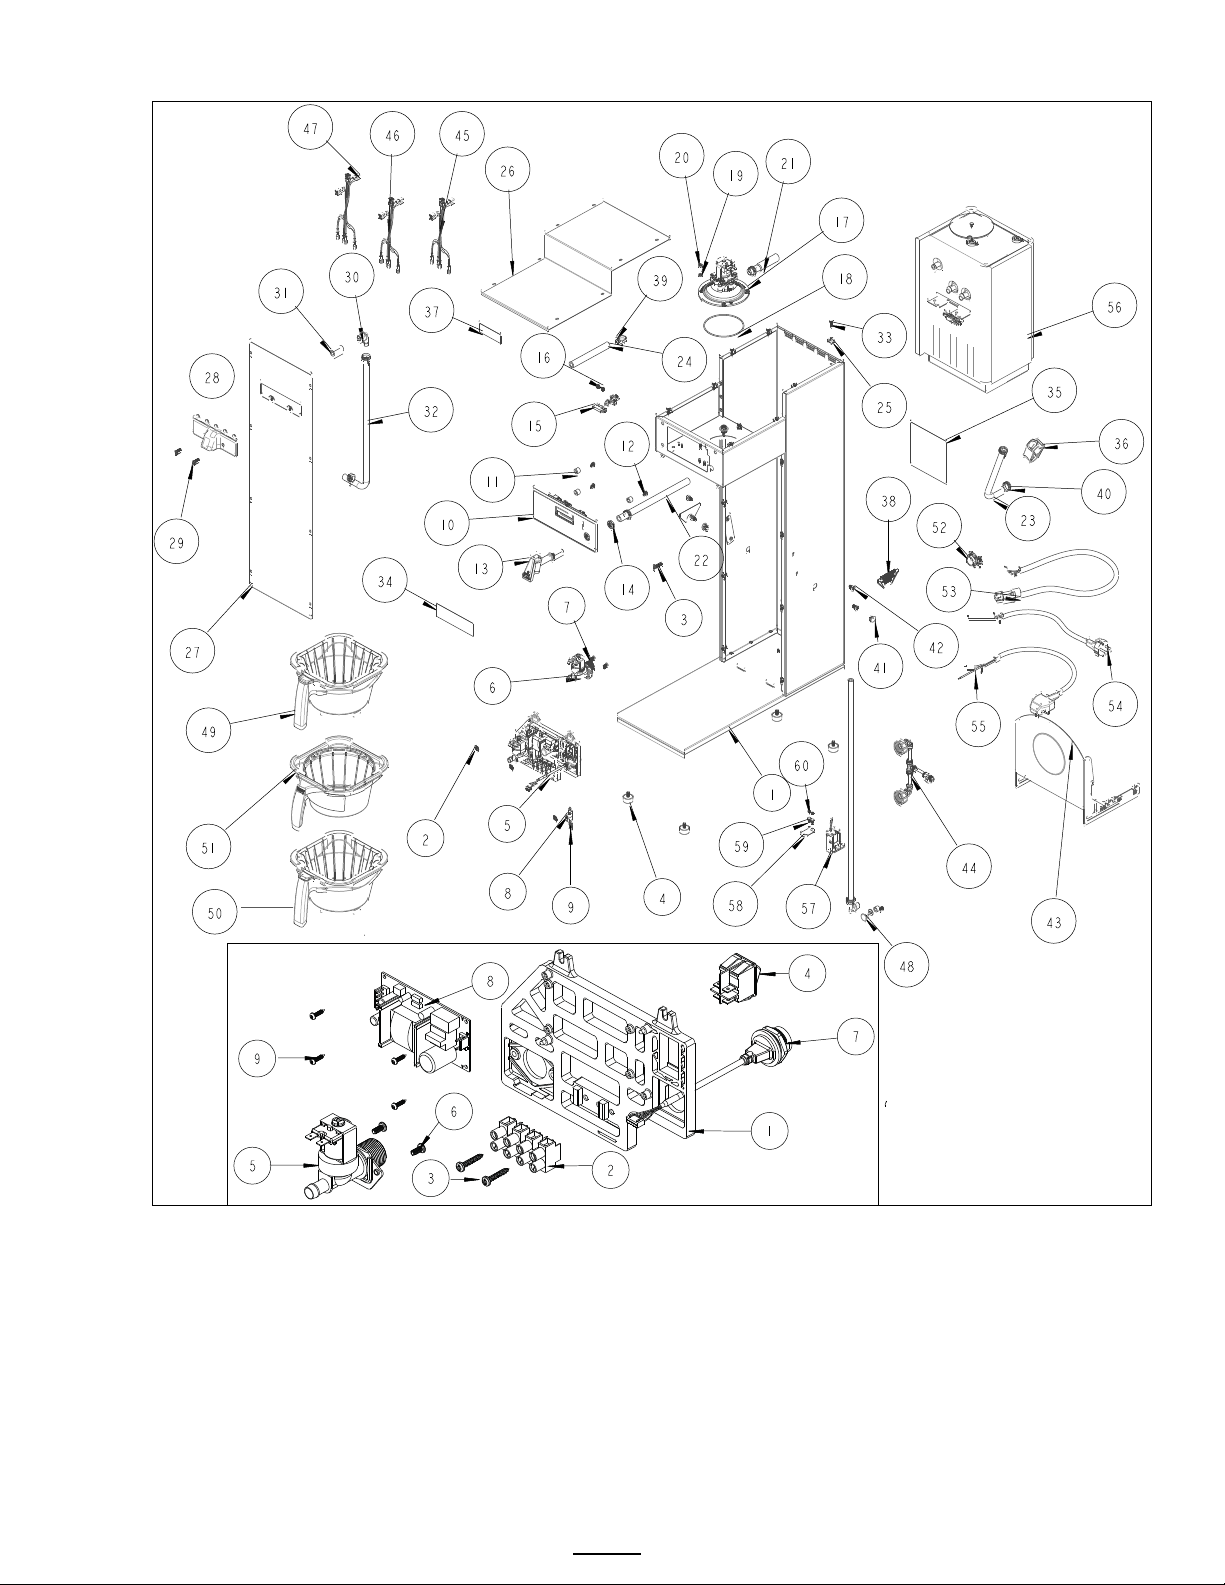
Parts Diagrams
Drawing Number
1101.00581.00
REFE RENCE
#5 Above
Drawing Number
1102.00457.00
Go to fetco.com for the latest versions of all information Page 21 User Guide & Operator instructions MBS-1221 P202Re0August 2021
Page 22

ITEM
Qty
PART NO
DESCRIPTION MBS-1221 Drawing number 1101.00581.00
1 1 1111.00110.00
WELDMENT BODY, MBS-1221
2 7 1084.00051.00
NUT, HEX LOCKWASHER, #8-32, 18-8 ST. STL.
3 1 1082.00082.00
SCREW, PHILLIP HD., 8-32 THREAD
4 4 1073.00021.00
FOOT, RUBBER, 1/4-20
5 REF
1
Reference
ELECTRICAL COMPONENT LATTICE, CBS-1200 [P/N 1102.00457.00]
5-1 1 1023.00360.00
ELECTRICAL MOUNTING LATTICE, AIR POT
5-2 1 1052.00023.00
EUROSTRIP HE16 TERM. BLOCK, 4 POLE, 63 AMP, 18-8 AWG
5-3 2 1082.00056.00
SCREW, #8-11 X 1" PAN HD PHIL, THREAD FORMING
5-4 1 1058.00024.00
SWITCH, POWER, DOUBLE POLE, 16A, 125/250 VAC
5-5 1 1057.00043.00
SOLENOID VALVE, 5.5L/min, 180 DEG, 24VDC
5-6 2 1082.00010.00
SCREW, PAN HD. PHIL. MACH., M4x10 ZINC-PLATED
5-7 1 1058.00055.00
USB CONNECTOR
5-8 1 1052.00001.00
POWER SUPPLY, 90-264VAC/24VDC, 1.8A
5-9 4 1082.00132.00
SCREW, PAN HD. PHIL. THREAD-FORMING, #4-20x5/16"LG.
6 1 1057.00059.00
VALVE, 0.66 GPM BRN FLOW REG, 180DEG/24VDC
7 2 1082.00010.00
SCREW, PAN HD. PHIL. MACH., M4x10 ZINC-PLATED
8 1 1065.00009.00
GROUND LUG CONNECTOR, 14-2 AWG, ALUMINUM
9 1 1044.00012.00
LABEL GROUND, CE
10 1 1102.00485.00
ASSEMBLY, FRONT PANEL, MBS-1220
11 3 1023.00361.00
SPACER, UNTHREADED, 1/2"OD X 3/8" LONG
12 3 1082.00115.00
SCREW, #6 x 3/8" LG., SLOTTED HEX HD. WASHER
13 1 1071.00055.00
FAUCET, HOT WATER, PSC-BR-8, WITH FLAT AND STEM
14 1 1084.00048.00
JAM NUT, 1/2-20 UNF, NICKEL PLATED BRASS
15 1 1102.00113.00
SWITCH, REED, ASSEMBLY
16 2 1029.00006.00
NUT, FINGER KNURLED, #4-40
17 1 1102.00203.01
ASSEMBLY, SPRAY HOUSING, DSVP11 DESIGN, NO VENT
18 1 1024.00063.00
O-RING, 3 15/16" x 3/32" CS, DASH # 154, BUNA-N, DURO-A50
19 4 1083.00010.00
WASHER, #10 SCREW W/NEOPRENE-BONDED SEAL
20 4 1084.00006.00
NUT, 8-32 18-8 HEX MACHINE SCREW
21 1 1024.00065.00
CONNECTOR, SILICONE, TANK TO BREW VALVE
22 1 1025.00039.00
TUBE, 5/8" OD X 3/8 ID X 10" LG, DRAIN
23 1 1025.00058.00
TUBE, 9/16"OD X 5/16"ID X 25.00"LG
24 1 1025.00046.00
TUBE, 5/8" OD X 3/8" ID X 5.0" LG, DOUBLE VALVE
25
19
1084.00011.00
NUT, CLIP ON (J-NUT), #6-32, 22-20 GA., BLK-PH FINISH
26 1 1001.00425.00
TOP COVER, CBS-1221
27 1 1112.00548.00
WELDMENT FRONT COVER, MBS-1221
28 1 1023.00397.00
FAUCET, DILUTION, SINGLE, BLACK
29 2 1082.00058.00
SCREW, # 8-32 X 5/8, FLAT HD, PH, 18-8 SS
30 1 1023.00183.00
FITTING, ELBOW, GROMMET, .375"
31 1 1025.00022.00
TUBE, 5/8"OD X 3/8"ID X 1.25LG., BY-PASS
32 1 1025.00068.00
TUBE, 9/16"OD X 5/16"ID X 21.75"LG
33
16
1082.00017.00
SCREW, TRUSS HD. PHIL. MACHINE, # 6-32 X 1/2 LG.
34 1 1046.00003.00
LABEL, CSD WARNING, 1.5" X 5.0"
35 1 1046.00035.00
LABEL, WARNING "TO REDUCE RISK OF ELECTRIC SHOCK OR FIRE"
36 1 1086.00009.00
CLAMP, 3/4" MAX TUBE OD FLOW CONTROL
37 1 1041.00033.00
BLACK EXTRACTOR PLUS LABEL, LASER ENGRAVED
38 2 1046.00006.00
LABEL, WARNING, "HOT WATER FAUCET"
39 1 1086.00002.00
CLAMP, HOSE, SIZE "G" NYLON
40 6 1086.00003.00
UNICLAMP, 15.9 HOSE OD CLAMP
41 2 1086.00047.00
CAP PLUG, PANEL, 15/32 ID x 5/8 OD, TBS-2111
42 4 1082.00134.00
SHOULDER SCREW, LOCKING, #10-32 X 1/4"
43 1 1001.00451.00
SHELF, UNIVERSAL, MBS-1221
44 1 1102.00488.00
ASSEMBLY, DUAL WATER INLET CONNECTOR
45 1 1402.00113.00
WIRE HARNESS ADDITION, POWER SUPPLY GROUND
46 1 1402.00118.00
WIRE HARNESS, MBS-1221, HIGH AMP
47 1 1402.00119.00
WIRE HARNESS, MBS-1221, LOW AMP
48 1 1000.00140.00
KIT, HOT WATER FAUCET OPTION, MBS
49 1 B014218BN2BK
BREW BASKET ASSY, BLACK, 13" X 5", 0.218" DIA HOLE, BROWN PLUG
50 1 B014140G2BK
BREW BASKET ASSY, BLACK, 13" X 5", 0.140" DIA HOLE, GREEN PLUG
51 1 B003218B1
BREW BASKET ASSY, 13" X 5", .218 DIA HOLE, BLACK HANDLE
52 1 1086.00008.00
CONNECTOR, CLAMP, NON-METALLIC CABLE, 3/4"
53 1 1063.00016.00
POWER CORD, 120VAC W/NEMA 5-15P PLUG (N. America-Mexico)
54 1 1063.00030.00
CORD PWR, 16A/250VAC, EU1-16P PLUG, W/O CONNECTORS, CE
55 1 1063.00034.00
CORD, POWER, 13A 250VAC, 2.5M LG., UK
56 1 1104.00190.00
TANK ASSEMBLY, CBS/MBS-1221, 1.7kW/120VAC OR 3.2kW/240VAC
57 1 1102.00219.00
ASSEMBLY, BB LOCKER, 24VDC
58 1 1003.00259.00
BRACKET, BREW BASKET LOCK COVER
59 2 1083.00011.00
WASHER, #8 SCREW SIZE, INTERNAL TOOTH LOCK
60 2 1084.00010.00
NUT, HEX, #6-32, UNDERSIZED, ZINC PLATED
Go to fetco.com for the latest versions of all information Page 22 User Guide & Operator instructions MBS-1221 P202Re0August 2021
Page 23
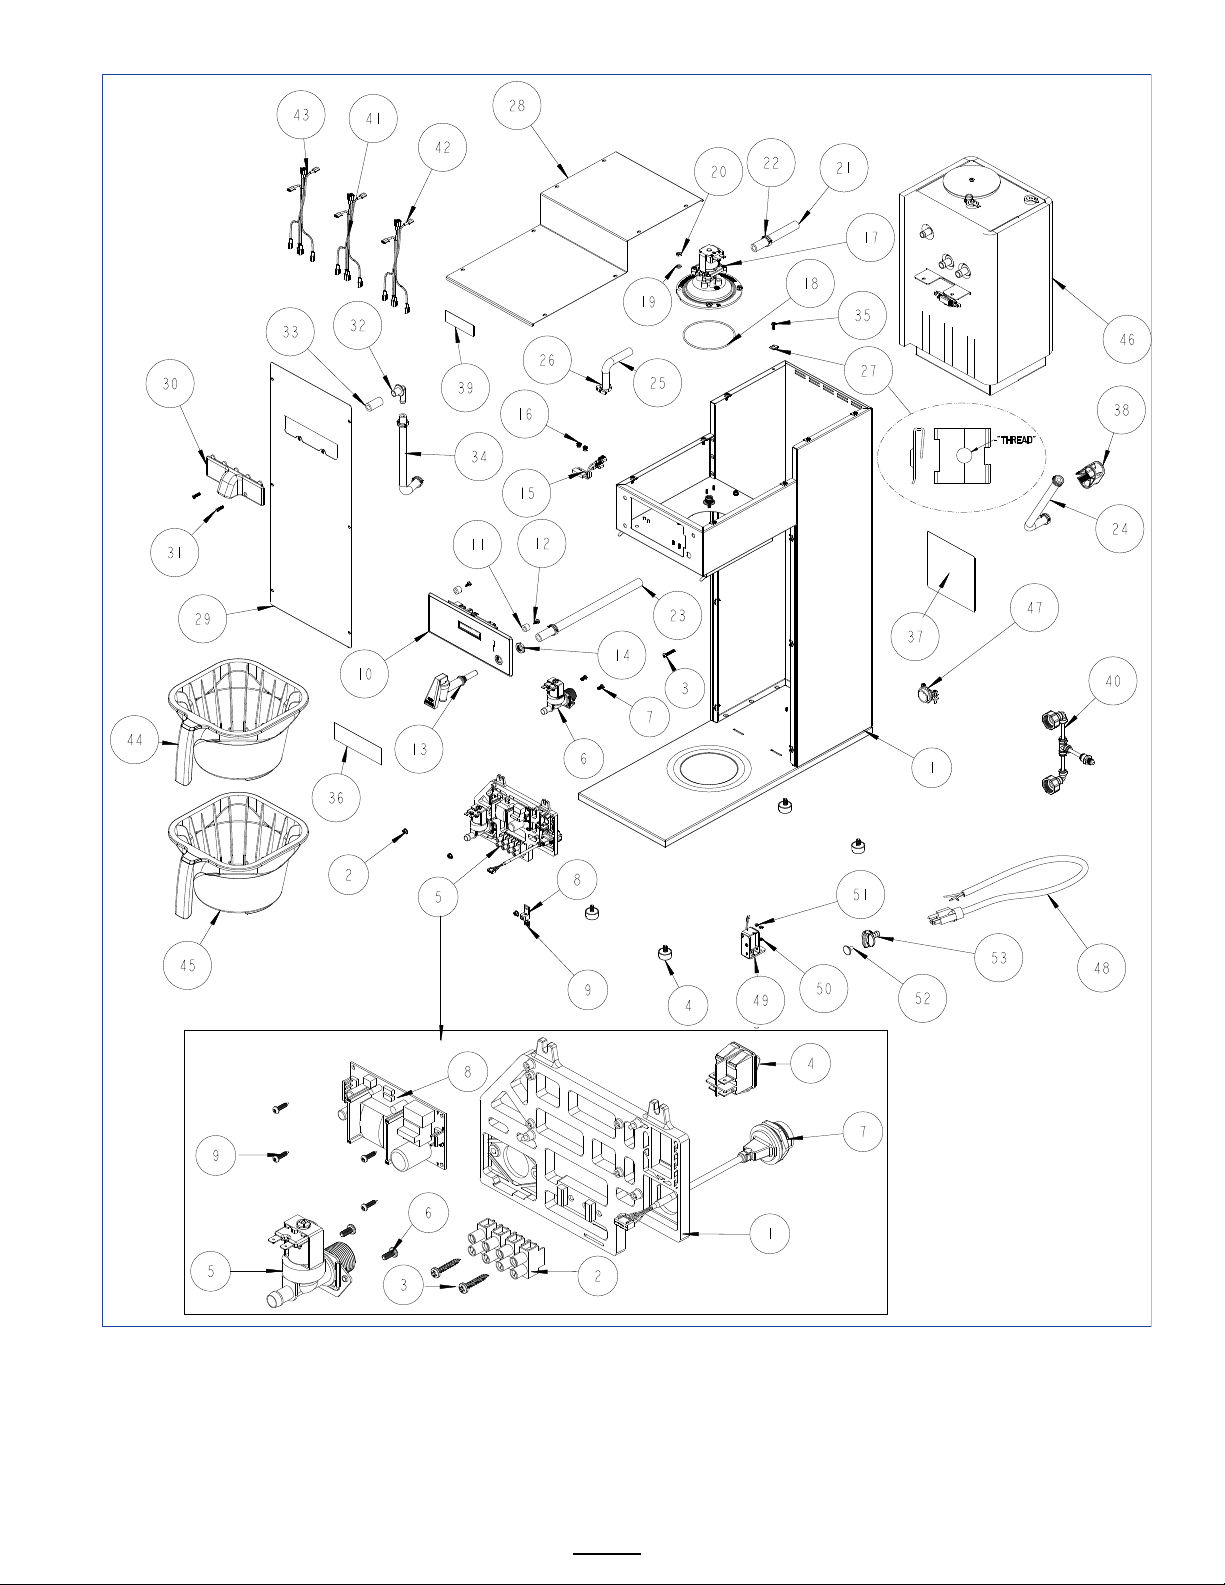
REFE RENCE
#5 Above
Drawing Number
1102.00457.00
Drawing
1101.00589.00
MBS -1221 Short
P/N1084. 00011.00
J-Nut
#27
Go to fetco.com for the latest versions of all information Page 23 User Guide & Operator instructions MBS-1221 P202Re0August 2021
Page 24

ITEM
Qty
PART NO
DESCRIPTION Drawing number 1101.00589.00 MBS-122S SHORT ONLY
1
1
1111.00113.00
WELDMENT BODY, MBS-122S, SHORT
2
7
1084.00051.00
NUT, HEX LOCKWASHER, #8-32, 18-8 ST. STL.
3
1
1082.00082.00
SCREW, PHILLIP HD., 8-32 THREAD
4
4
1073.00021.00
FOOT, RUBBER, 1/4-20
5REF
1
Reference
ELECTRICAL COMPONENT LATTICE, CBS-1200
5-1 1 1023.00360.00
ELECTRICAL MOUNTING LATTICE, AIR POT
5-2 1 1052.00023.00
EUROSTRIP HE16 TERM. BLOCK, 4 POLE, 63 AMP, 18-8 AWG
5-3 2 1082.00056.00
SCREW, #8-11 X 1" PAN HD PHIL, THREAD FORMING
5-4 1 1058.00024.00
SWITCH, POWER, DOUBLE POLE, 16A, 125/250 VAC
5-5 1 1057.00043.00
SOLENOID VALVE, 5.5L/min, 180 DEG, 24VDC
5-6 2 1082.00010.00
SCREW, PAN HD. PHIL. MACH., M4x10 ZINC-PLATED
5-7 1 1058.00055.00
USB CONNECTOR
5-8 1 1052.00001.00
POWER SUPPLY, 90-264VAC/24VDC, 1.8A
6
1
1057.00080.00
FILL VALVE, SINGLE, 180 DEG, 24VDC, (2.1-2.5L/min INLET FLOW)
7
2
1082.00010.00
SCREW, PAN HD. PHIL. MACH., M4x10 ZINC-PLATED
8
1
1065.00009.00
GROUND LUG CONNECTOR, 14-2 AWG, ALUMINUM
9
1
1044.00012.00
LABEL GROUND, CE
10
1
1102.00485.00
ASSEMBLY, FRONT PANEL, MBS-1220
11
3
1023.00361.00
SPACER, UNTHREADED, 1/2"OD X 3/8" LONG
12
3
1082.00115.00
SCREW, #6 x 3/8" LG., SLOTED HEX HD. WASHER
13
1
1071.00055.00
FAUCET, HOT WATER, PSC-BR-8, WITH FLAT AND STEM
14
1
1084.00048.00
JAM NUT, 1/2-20 UNF, NICKEL PLATED BRASS
15
1
1102.00113.00
SWITCH, REED, ASSEMBLY
16
2
1029.00006.00
NUT, FINGER KNURLED, #4-40
17
1
1102.00203.01
ASSEMBLY, SPRAY HOUSING, DSVP11 DESIGN, NO VENT
18
1
1024.00063.00
O-RING, 3 15/16" x 3/32" CS, DASH # 154, BUNA-N, DURO-A50
19
4
1083.00010.00
WASHER, #10 SCREW W/NEOPRENE-BONDED SEAL
20
4
1084.00006.00
NUT, 8-32 18-8 HEX MACHINE SCREW
21
1
1025.00013.00
TUBE, 5/8"OD X 3/8"ID X 4.5"LG
22
6
1086.00003.00
UNICLAMP, 15.9 HOSE OD CLAMP
23
1
1025.00110.00
TUBE DRAIN, 5/8"OD X 3/8"ID X 10" LG.
24
1
1025.00058.00
TUBE, 9/16"OD X 5/16"ID X 25.00"LG
25
1
1025.00061.00
TUBE, 9/16'OD X 5/16"ID X 2.75"LG
26
1
1086.00002.00
CLAMP, HOSE, SIZE "G" NYLON
27
14
1084.00011.00
NUT, CLIP ON (J-NUT), #6-32, 22-20 GA., BLK-PH FINISH
28
1
1001.00455.00
TOP COVER, MBS/TBS-1200, LARGE
29
1
1112.00550.00
WELDMENT FRONT COVER, MBS-122S, SHORT
30
1
1023.00397.00
FAUCET, DILUTION, SINGLE, BLACK
31
2
1082.00058.00
SCREW, # 8-32 X 5/8, FLAT HD, PH, 18-8 SS
32
1
1023.00183.00
FITTING, ELBOW, GROMMET, .375"
33
1
1025.00022.00
TUBE, 5/8"OD X 3/8"ID X 1.25LG., BY-PASS
34
1
1025.00071.00
TUBE, 9/16"OD x 5/16"ID x 16.75"LG.
35
14
1082.00017.00
SCREW, TRUSS HD. PHIL. MACHINE, # 6-32 X 1/2 LG.
36
1
1046.00003.00
LABEL, CSD WARNING, 1.5" X 5.0"
37
1
1046.00035.00
LABEL, WARNING "TO REDUCE RISK OF ELECTRIC SHOCK OR FIRE"
38
1
1086.00009.00
CLAMP, 3/4" MAX TUBE OD FLOW CONTROL
39
1
1041.00033.00
BLACK EXTRACTOR PLUS LABEL, LASER ENGRAVED
40
1
1102.00488.00
ASSEMBLY, DUAL WATER INLET CONNECTOR
41
1
1402.00113.00
WIRE HARNESS ADDITION, POWER SUPPLY GROUND
42
1
1402.00118.00
WIRE HARNESS, MBS-1221, HIGH AMP
43
1
1402.00119.00
WIRE HARNESS, MBS-1221, LOW AMP
44
1
B015280BN2BK
BREW BASKET ASSY BLACK, 16" X 6", 0.280" DIA HOLE, BROWN PLUG
45
1
B015140G2BK
BREW BASKET ASSY BLACK, 16" X 6", 0.140" DIA HOLE, GREEN PLUG
46
1
1104.00190.00
TANK ASSEMBLY, CBS/MBS-1221, 1.7kW/120VAC OR 3.0kW/240VAC
47
1
1086.00008.00
CONNECTOR, CLAMP, NON-METALLIC CABLE, 3/4"
48
1
1063.00016.00
POWER CORD, 120VAC W/NEMA 5-15P PLUG
49
1
1102.00219.00
ASSEMBLY, BB LOCKER, 24VDC
50
2
1083.00011.00
WASHER, #8 SCREW SIZE, INTERNAL TOOTH LOCK
51
2
1084.00010.00
NUT, HEX, #6-32, UNDERSIZED, ZINC PLATED
52
1
1023.00399.00
HOT WATER PLUG & CONNECTOR
53
1
1023.00147.00
PLUG, TANK SERVICE DRAIN FOR 18 GA AND UP BODY
Go to fetco.com for the latest versions of all information Page 24 User Guide & Operator instructions MBS-1221 P202Re0August 2021
Page 25
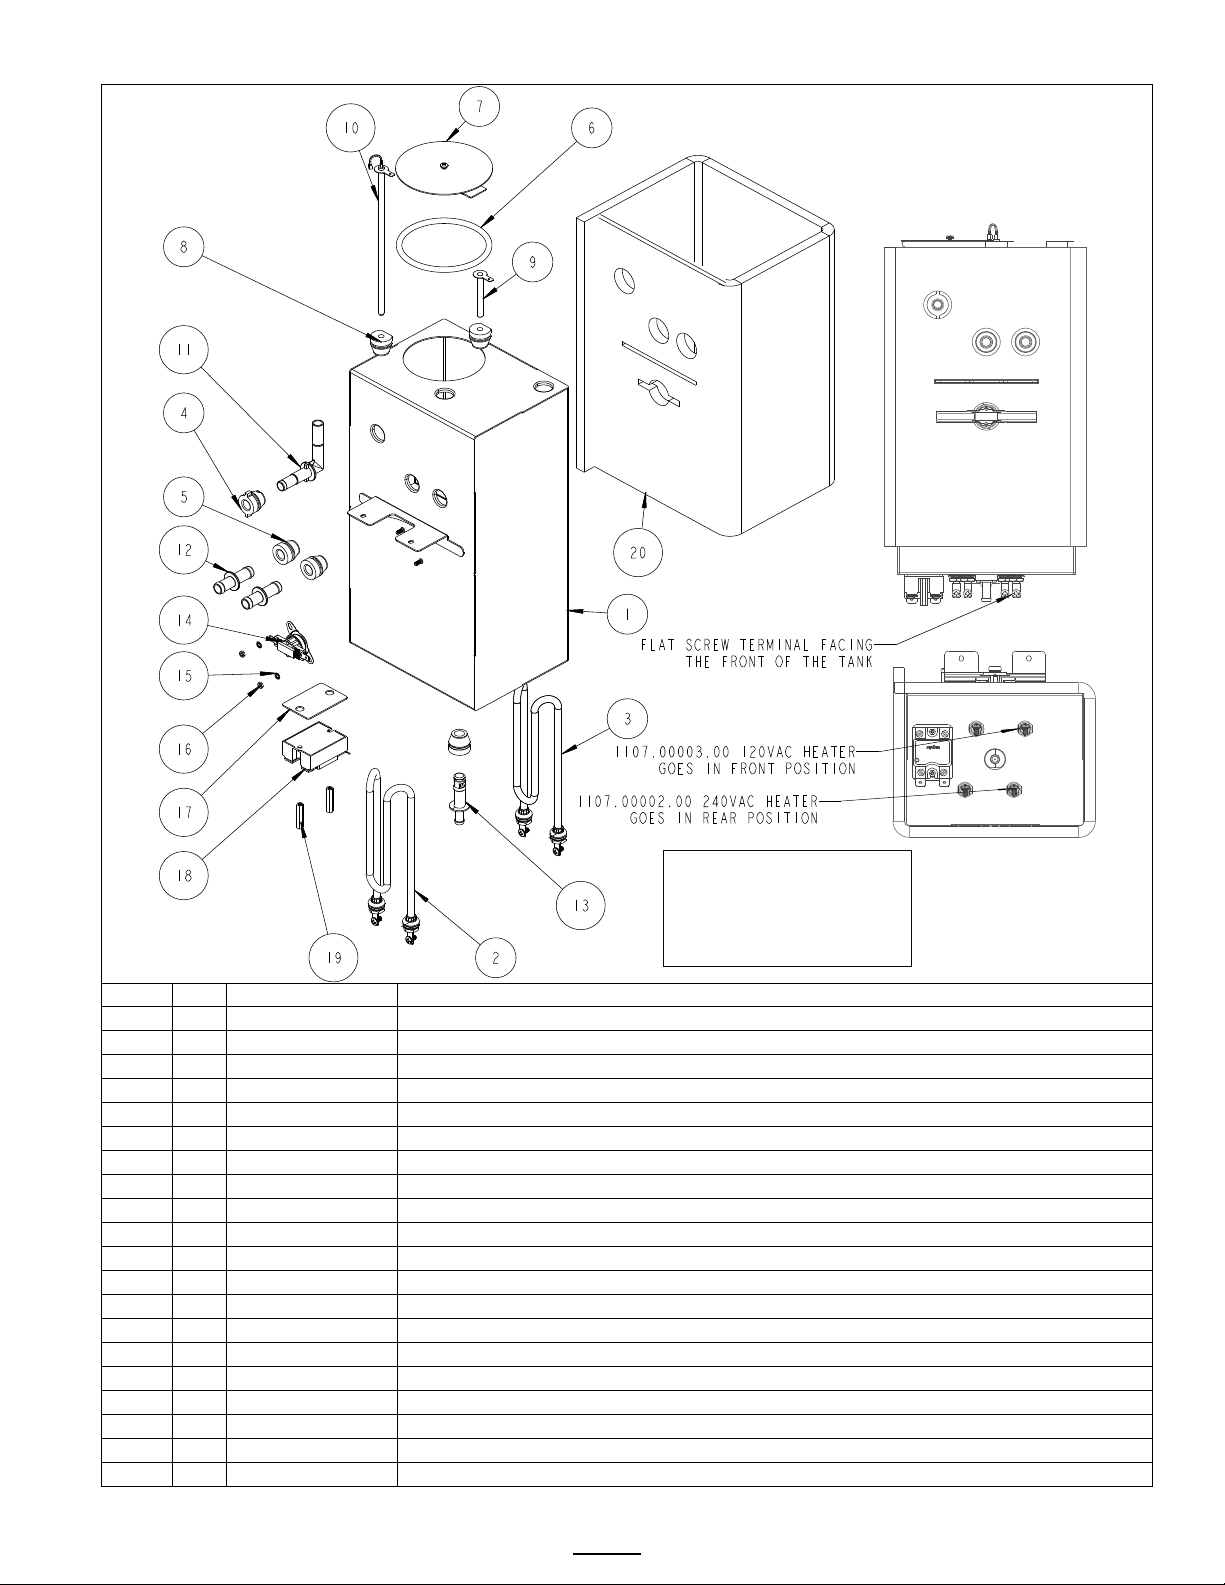
ITEM
Qty
PART NO
DESCRIPTION Hot Water Tank CBS-1221 Drawing number 1104.00190.00
1 1 1114.00167.00
WELDMENT, TANK, CBS-1221, 2 HEATERS
2 1 1107.00003.00
HEATER ASSY, IMMERSION 1700W/120VAC
3 1 1107.00002.00
HEATER ASSY, IMMERSION 3000W/240VAC
4 1 1024.00111.00
GROMMET, SILICONE, W/ POSITION TABS
5 3 1024.00050.00
GROMMET, SILICONE, 11.4mm ID
6 1 1024.00007.00
O-RING, DASH #344, TANK COVER
7 1 1102.00207.00
TANK COVER ASSEMBLY, TBS-2121
8 3 1024.00062.00
GROMMET, SHORT, SILICONE, LEVEL AND TEMP PROBE
9 1 1112.00002.00
PROBE WELDMENT, WATER LEVEL 2.25" LG
10 1 1102.00161.00
PROBE ASSEMBLY, TEMP. AND LLC, 8" LONG
11 1 1023.00362.00
FITTING VENT, ELBOW, .375" X .375", SELF POSITIONING
12 2 1023.00167.00
FITTING, STRAIGHT, GROMMET, .500"
13 1 1023.00166.00
FITTING, COLD WATER INLET, GROMMET DESIGN
14 1 1053.00051.00
THERMOSTAT, SINGLE SHOT, 240V/25A
15 2 1083.00009.00
WASHER, #6 SCREW , INTL TOOTH LOCKWASHER
16 2 1084.00010.00
NUT, HEX, #6-32, UNDERSIZED, ZINC PLATED
17 1 1003.00140.00
ALUMINUM BRACKET FOR SSR
18 1 1052.00033.00
RELAY, SOLID STATE, 50A/480VAC, W/BUILD IN VARISTOR
19 2 1081.00042.00
STANDOFF, 1/4" HEX
20 1 1022.00112.00
TANK INSULATION, CBS-1221
Drawing 1104.00190.00
CBS/MBS -1221 Hot Water Tank
Two Heater Design
1 X 1.7 kW 120 Vo l t
1 X 3.0 kW 240
Vo lt
Go to fetco.com for the latest versions of all information Page 25 User Guide & Operator instructions MBS-1221 P202Re0August 2021
Page 26
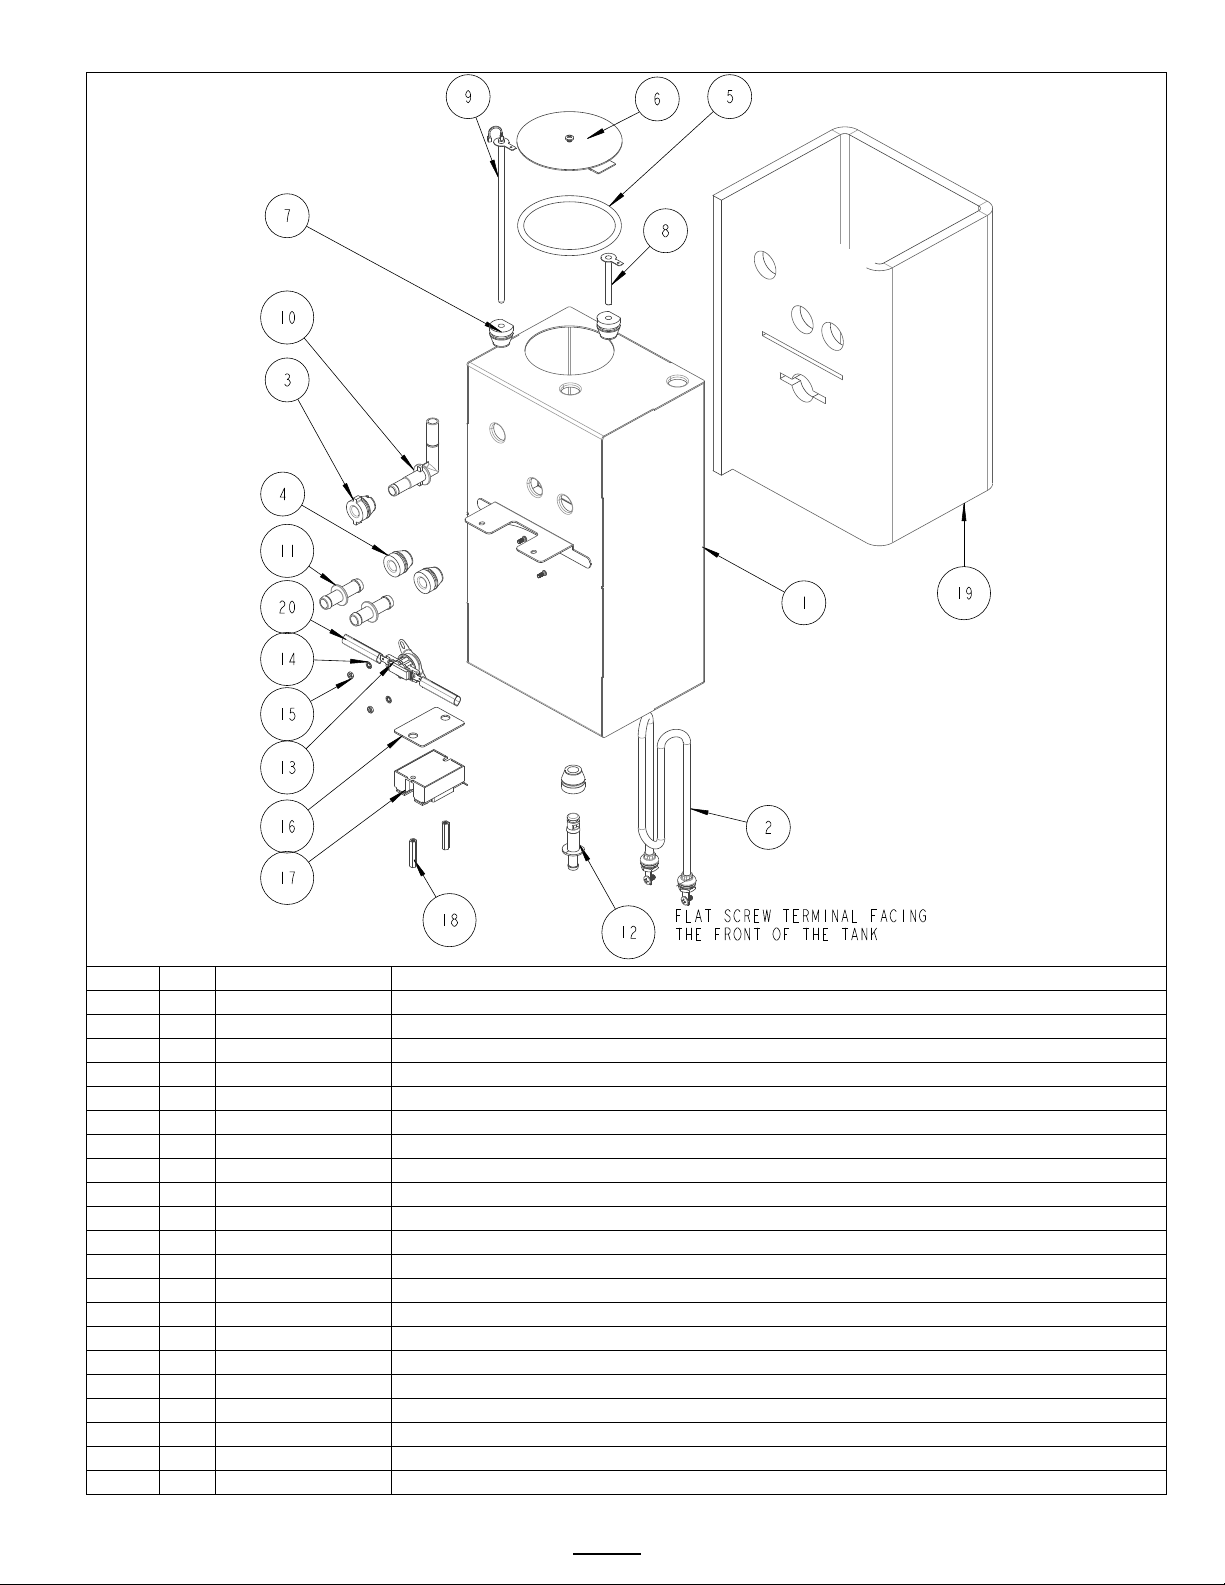
ITEM
Qty
PART NO
DESCRIPTION Hot water tank drawing numbers 1104.00203.00 & 1104.00204.00
1 1 1114.00173.00
WELDMENT, TANK, CBS/MBS-1221, ONE HEATER
2 1 1107.00002.00
HEATER ASSY, IMMERSION 3000W/240VAC (1104.00203.00)
2 1 1107.00003.00
HEATER ASSY, IMMERSION 1700W/120VAC (1103.00304.00)
3 1 1024.00111.00
GROMMET, SILICONE, W/ POSITION TABS
4 3 1024.00050.00
GROMMET, SILICONE, 11.4mm ID
5 1 1024.00007.00
O-RING, DASH #344, TANK COVER
6 1 1102.00207.00
TANK COVER ASSEMBLY, TBS-2121
7 2 1024.00062.00
GROMMET, SHORT, SILICONE, LEVEL AND TEMP PROBE
8 1 1112.00002.00
PROBE WELDMENT, WATER LEVEL 2.25" LG
9 1 1102.00161.00
PROBE ASSEMBLY, TEMP. AND LLC, 8" LONG
10 1 1023.00362.00
FITTING VENT, ELBOW, .375" X .375", SELF POSITIONING
11 2 1023.00167.00
FITTING, STRAIGHT, GROMMET, .500"
12 1 1023.00166.00
FITTING, COLD WATER INLET, GROMMET DESIGN
13 1 1053.00051.00
THERMOSTAT, SINGLE SHOT, 240V/25A
14 2 1083.00009.00
WASHER, #6 SCREW , INTL TOOTH LOCKWASHER
15 2 1084.00010.00
NUT, HEX, #6-32, UNDERSIZED, ZINC PLATED
16 1 1003.00140.00
ALUMINUM BRACKET FOR SSR
17 1 1052.00033.00
RELAY, SOLID STATE, 50A/480VAC, W/BUILD IN VARISTOR
18 2 1081.00042.00
STANDOFF, 1/4" HEX
19 1 1022.00112.00
TANK INSULATION, CBS-1221
20 2 1022.00032.00
SLEEVE, Ø.50 x 2.0" LG. x 1.50" SLOT
TANK ASSEMBLY 1104.00204.00
1 X 1.7kW/120V
TANK ASSEMBLY 1104.00203.00
1 X 3.2kW/240V
Go to fetco.com for the latest versions of all information Page 26 User Guide & Operator instructions MBS-1221 P202Re0August 2021
Page 27
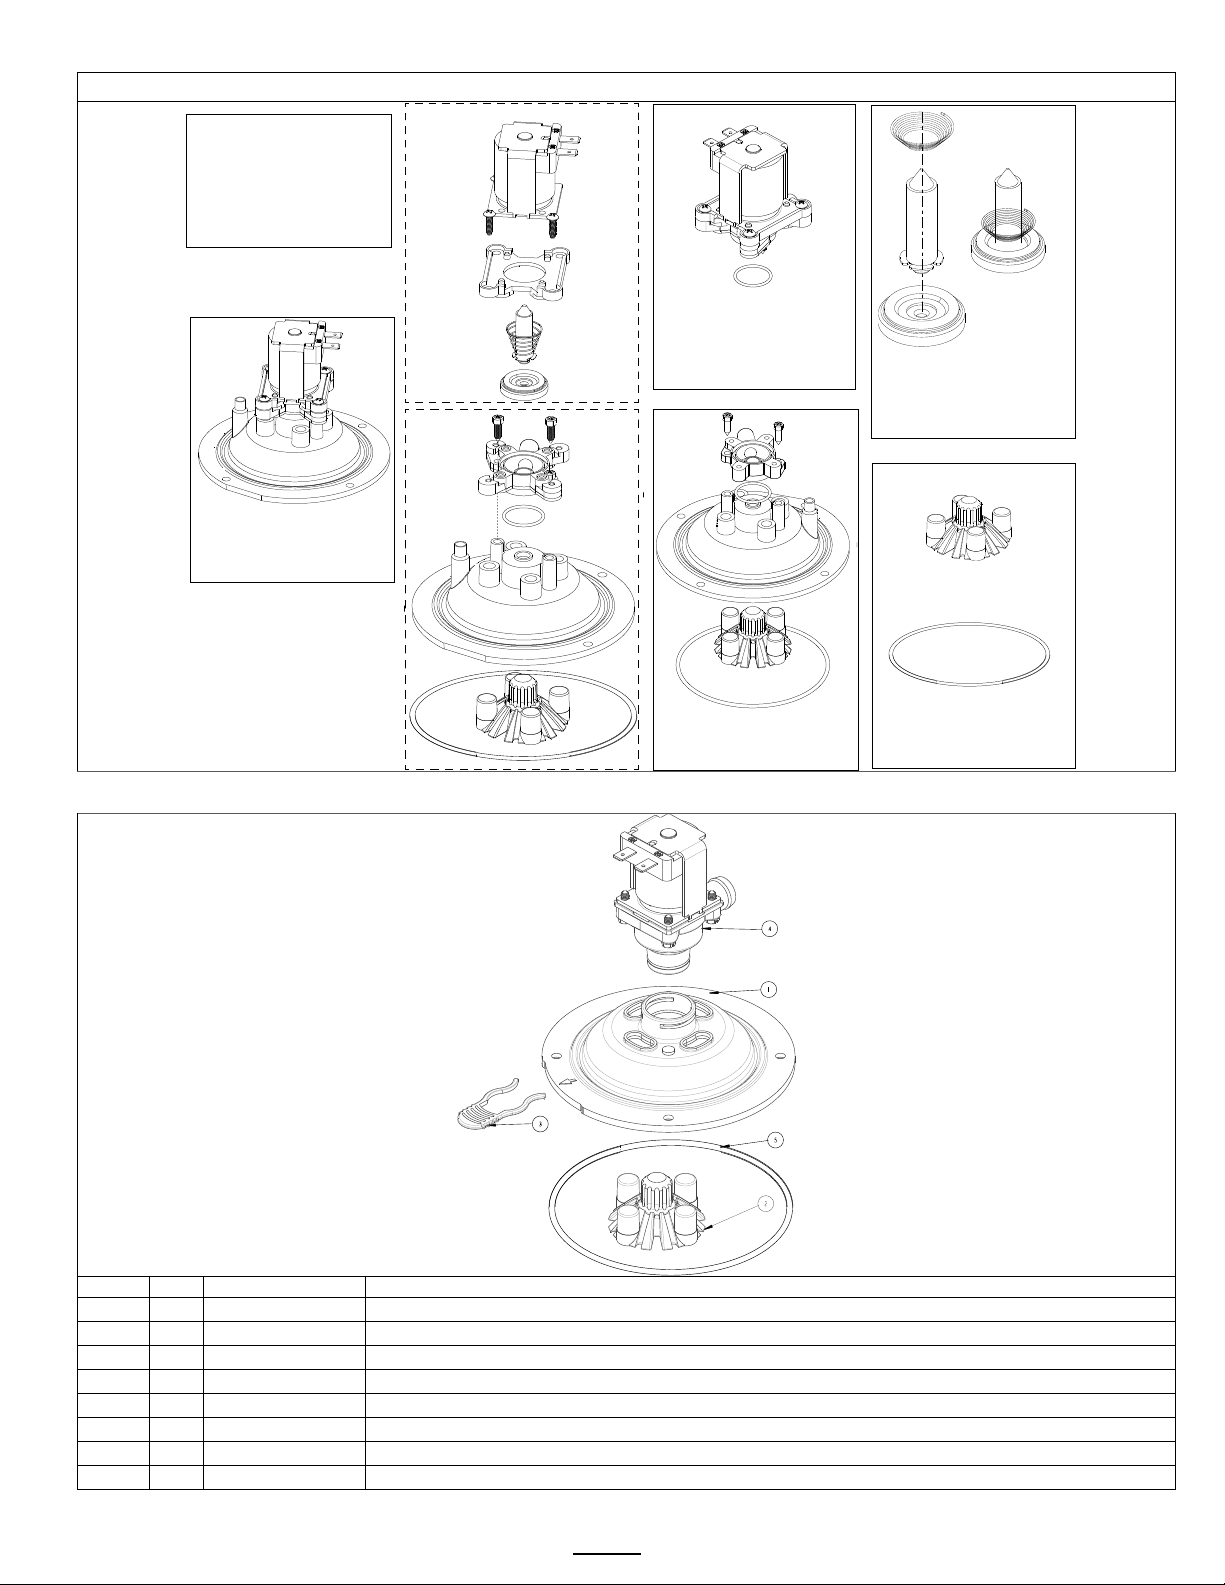
Small Spray Head Assembly
CBS-1221 Part #16 pages 15-16 (Check your equipment to determain your type)
Small Spray Assembly Parts List-alternate version (Check your equipment to determain your type)
ITEM
Qty
PART NO
DESCRIPTION Drawing number 1101.00569.00
1 1 1000.00142.00
BASE, QUICK CONNECT SPRAY HEAD, RETROFIT
2 1 1102.00479.00
ASSEMBLY, CASCADE SPRAY DOME, NEXT GEN, ORANGE
3 1 1023.00342.00
QUICK CONNECT CLIP
4 1 1057.00076.00
VALVE ASSEMBLY, COMPLETE, NG, DELTROL(interchangeable with 1057.00078.00)
4 1 1057.00078.00
VALVE ASSEMBLY, COMPLETE, NG, RPE (interchangeable with 1057.00076.00)
5 1 1024.00063.00
O-RING, 3 15/16" x 3/32" CS, DASH # 154, BUNA-N, DURO-A50
NS
4
1083.00010.00
WASHER, #10 SCREW W/NEOPRENE-BONDED SEAL
NS
4
1084.00006.00
NUT, 8-32 18-8 HEX MACHINE SCREW
Part #1000.0097.00
Complete, assem bled
24 vol t val ve ki t
with o-ring
Part # 1102-00203.01
Complete 24volt spray housing
factory assembled
1024.00063.00 Spray hous ing
O
-RING, 3 15/16" x
3/32"
CS, DASH # 154, DURO-A50
1102.00019.00 Small
cascading spray dome, red
Part #1000.0098.00
Valve rebuild kit contains
spring, plunger and diaphragm
.
Kit
as assembl ed
Small spray dome parts breakdown
FET CO 24 volt small spray dome is
found on some m odels of
CBS-1200, M BS-1200, TBS-1200
all model s
CBS-1131V+, CBS -1132V+
CBS-1141V+, CBS -1142
V+
Par t #1000.00142.00
Small spray hous ing kit w ith o-ring
and cascading spr ay dome
P/N 1102.00456.00
Quick connect s prayhead
CBS-1200 Series
Go to fetco.com for the latest versions of all information Page 27 User Guide & Operator instructions MBS-1221 P202Re0August 2021
Page 28
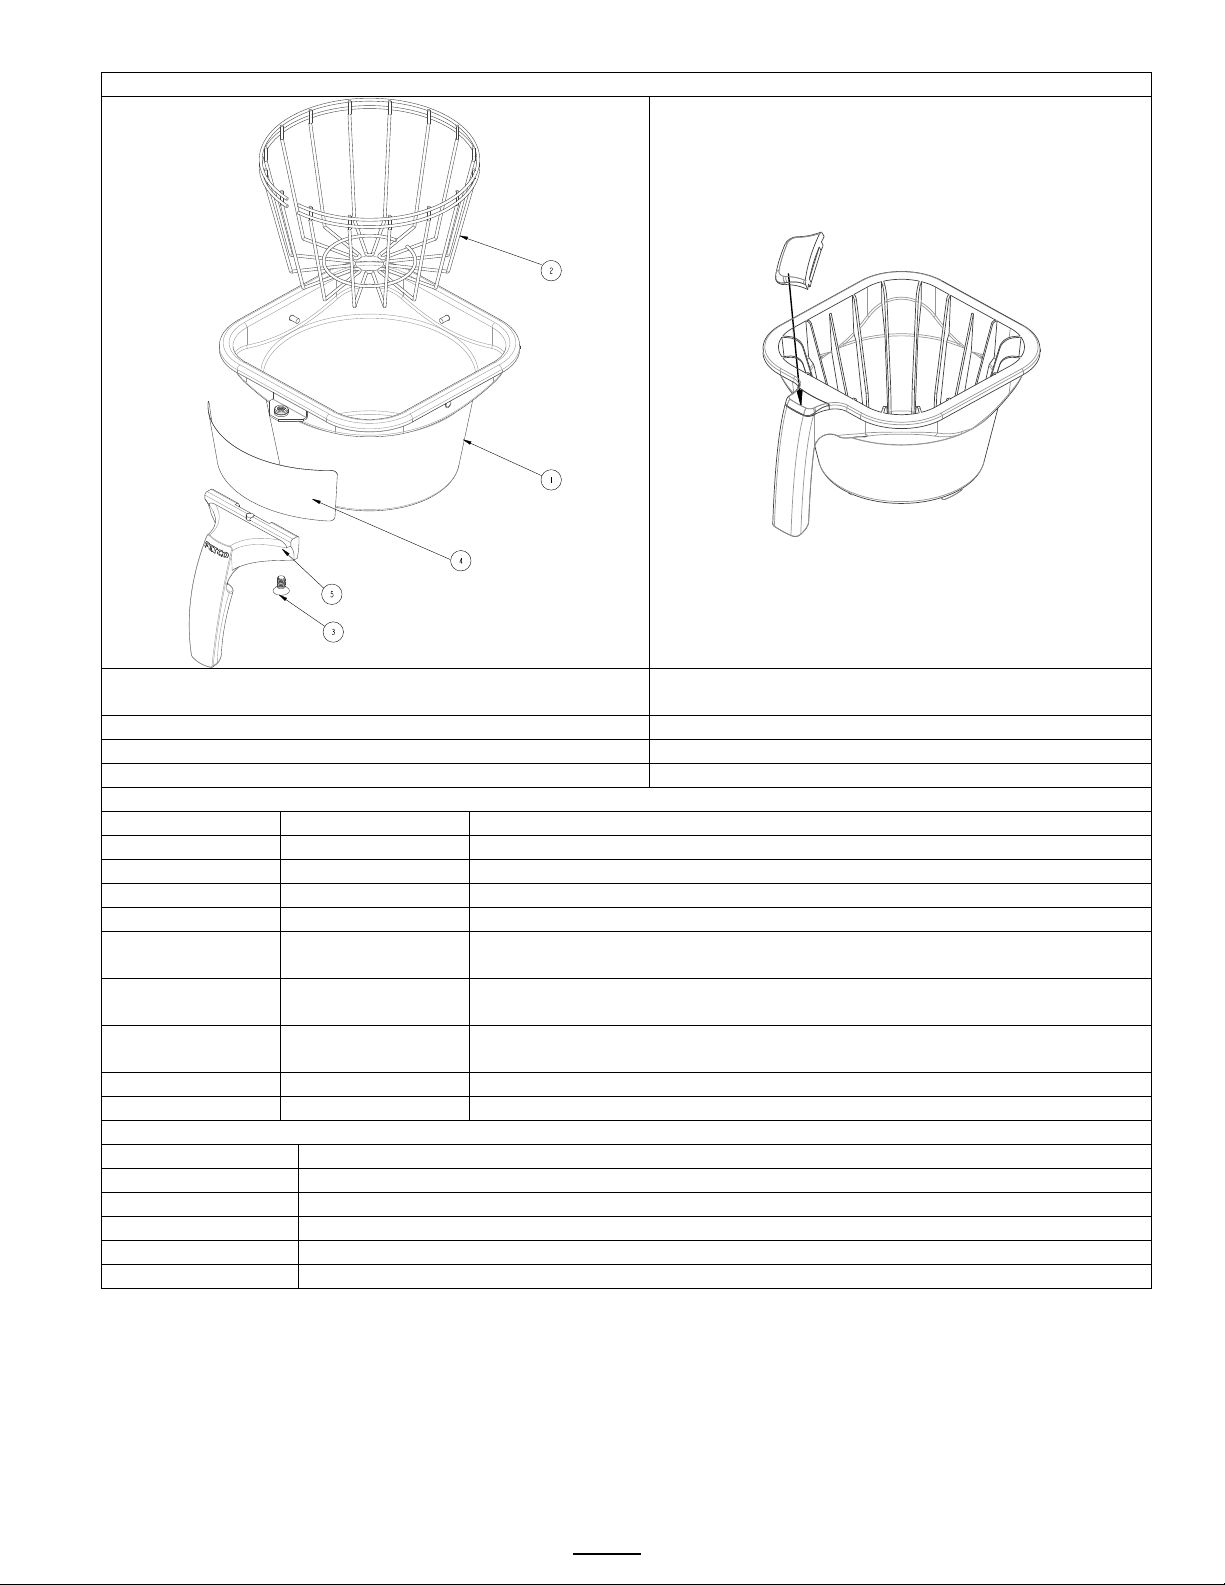
Brew Basket Parts
B003218B1 Stainless Steel Brew Basket For Coffee
MBS 1220 regular plastic brew baskets
B014218BN2BK (coffee)
B014140G2BK(tea)
Parts for stainless steel brew basket only
1
1112.00128.00
BB WLDMNT, 13"X5", W/ Ø5.5MM (.218) HOLE
2
1009.00006.00
BASKET, WIRE, 13" X 5", CBS-2040'S
3
1082.00040.00
SCREW, FLAT HD. PHIL. W/NYLON PATCH, 1/4-20 X .50
4
1046.00025.00
LABEL, BREW BASKET WARNING, GRAY
5
1102.00064.00
HANDLE W/MAGNET ASSEMBLY, BLACK RUBBER
Optional colored handle
HANDLE W/MAGNET ASY, RED
Optional colored handle
HANDLE W/MAGNET ASY, GREEN
Optional colored handle
HANDLE W/MAGNET ASY, ORANGE
Plugs for plastic brew basket handles
1023.00191.00
PLUG, BB HANDLE, GREEN
1023.00190.00
PLUG, BB HANDLE, RED
1023.00180.00
PLUG, BB HANDLE, BLUE
1023.00192.00
PLUG, BB HANDLE, ORANGE
1023.00194.00
PLUG, BB HANDLE, BLACK
1023.00195.00
PLUG, BB HANDLE, BROWN
Handle plug for plastic
brew basket only
% 1102.00065.00
1102.00066.00
1102.00067.00
Go to fetco.com for the latest versions of all information Page 28 User Guide & Operator instructions MBS-1221 P202Re0August 2021
Page 29
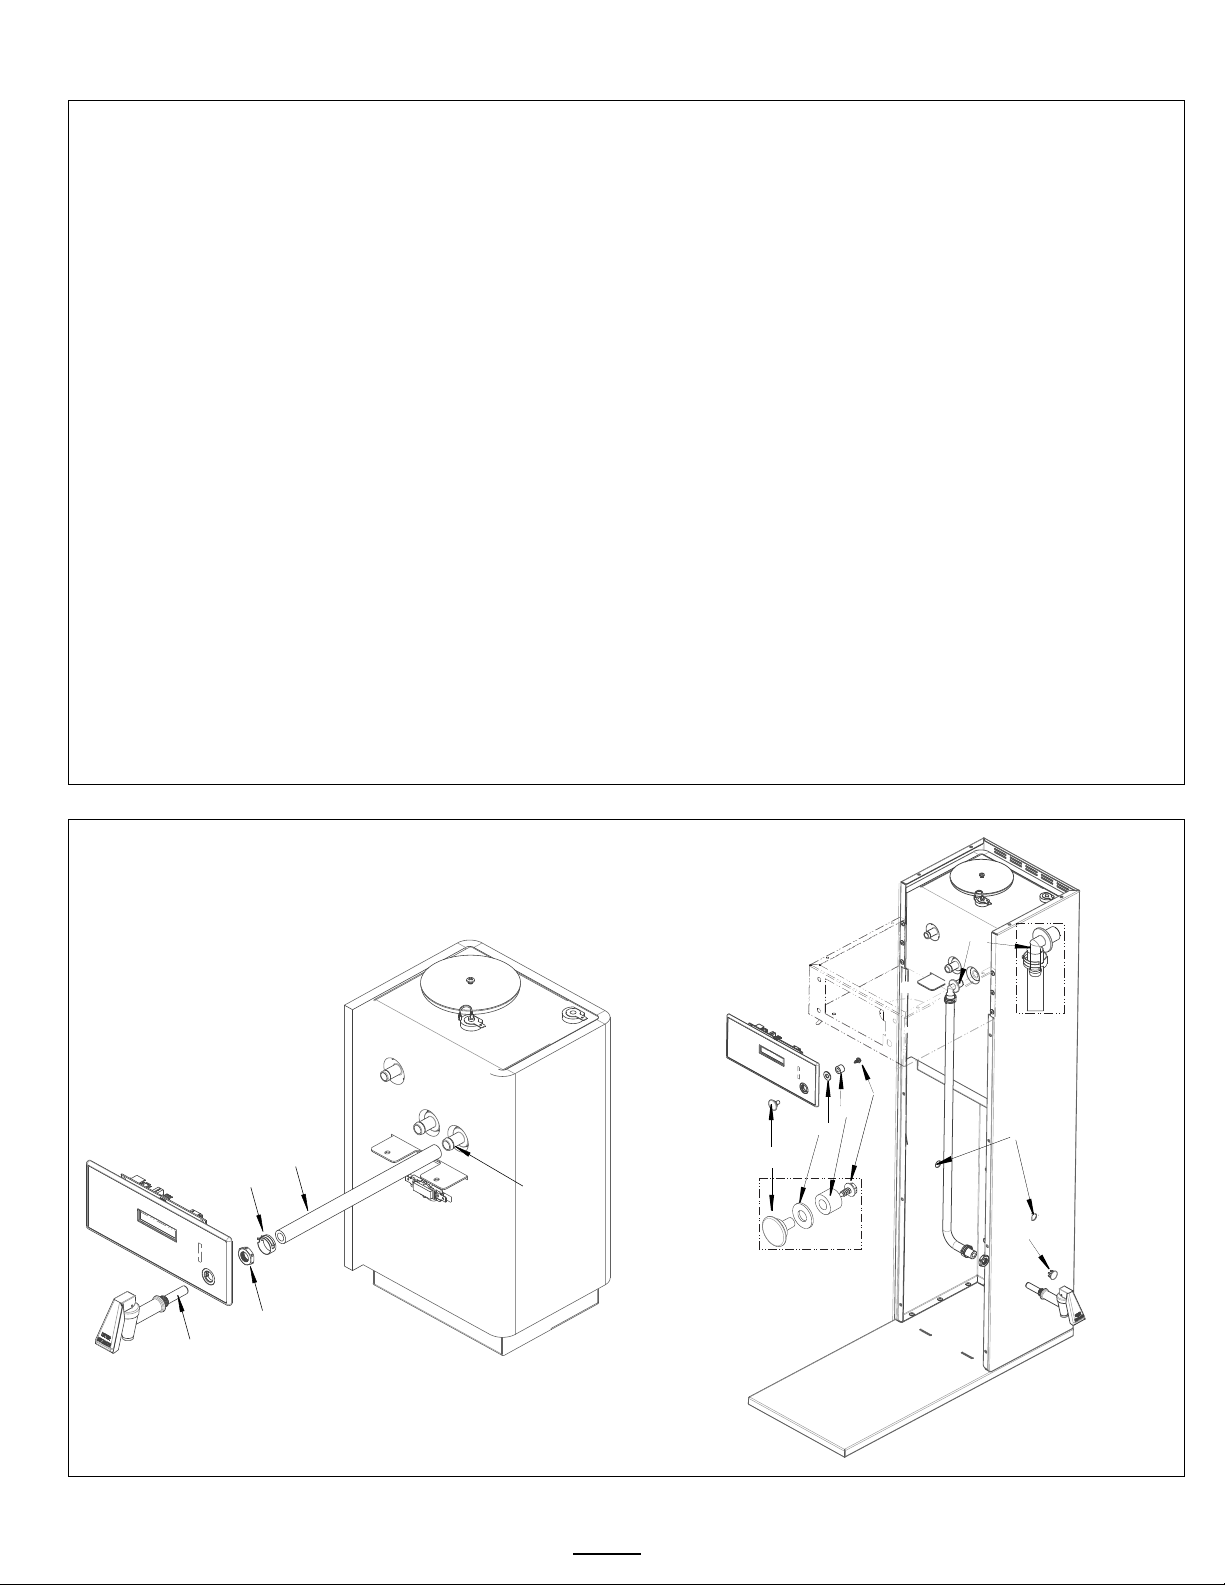
Hot Water Faucet Relocation Instructions
WARNING! All work to be performed by qualified personnel familiar with hot beverage equipment repair
Ilustration 1: Factory default faucet connection
Ilustration 2: User side mounted faucet connection
Straight tank
f itting
Front f aucet
connetor tube
Clamp
Backer nut
Faucet spud
Hot water tank
(inside brewer enclos ure)
HOT WATER PLUG
& CONNECTOR
SPACER
SCREW
WASH ER
Enclosure
plug
Faucet port
Angled tank
fitting
Hot water t ank
The FETCO MBS brewer hot water faucet may be relocated from the front to the right or left side using kit 1000.00140.00
Brewer Setup
1. Relocation of the hot water faucet is best performed before the MBS-1221 is installed.
2. If relocating the hot water faucet for a working installed MBS-1221 - disconnect the water and electrical lines and
completely drain the hot water tank.
3. Remove the universal brewer shelf and front and top covers to access the hot water and internal connections.
Remove the factory installed hot water faucet and install front panel plug
1. Review Illustration 1 below. Remove the tube and tank fitting from the hot water tank
2. Pull the clamp back from the faucet tube fitting and unscrew the backer nut to remove the faucet.
3. Place the hot water plug into the opening, place washer and spacer from the back and install screw.
NOTE: WARNING: The plug and spacer must be installed into the front panel opening.
Installing the relocation faucet
Review Illustration 2: User side mounted faucet connection
1. Select side to install the side faucet, right or left side as desired. Remove the enclosure plug from that side.
2. Install the faucet and tighten the backer nut .
3. Push the angled tank fitting into the hot water tank where the original straight fitting was located.
4. Bring the faucet connector tube to the side where the faucet will be relocated.
5. Check that the clamp is on the tube and push the faucet tube on the faucet tube fitting and tighten the clamp on the
tube fitting
6. Inspect all connections that they are intact and clamped over the fittings.
7. Reinstall water and power connections, turn brewer “ON: and inspect for leaks.
8. Reattach covers
Go to fetco.com for the latest versions of all information Page 29 User Guide & Operator instructions MBS-1221 P202Re0August 2021
Page 30
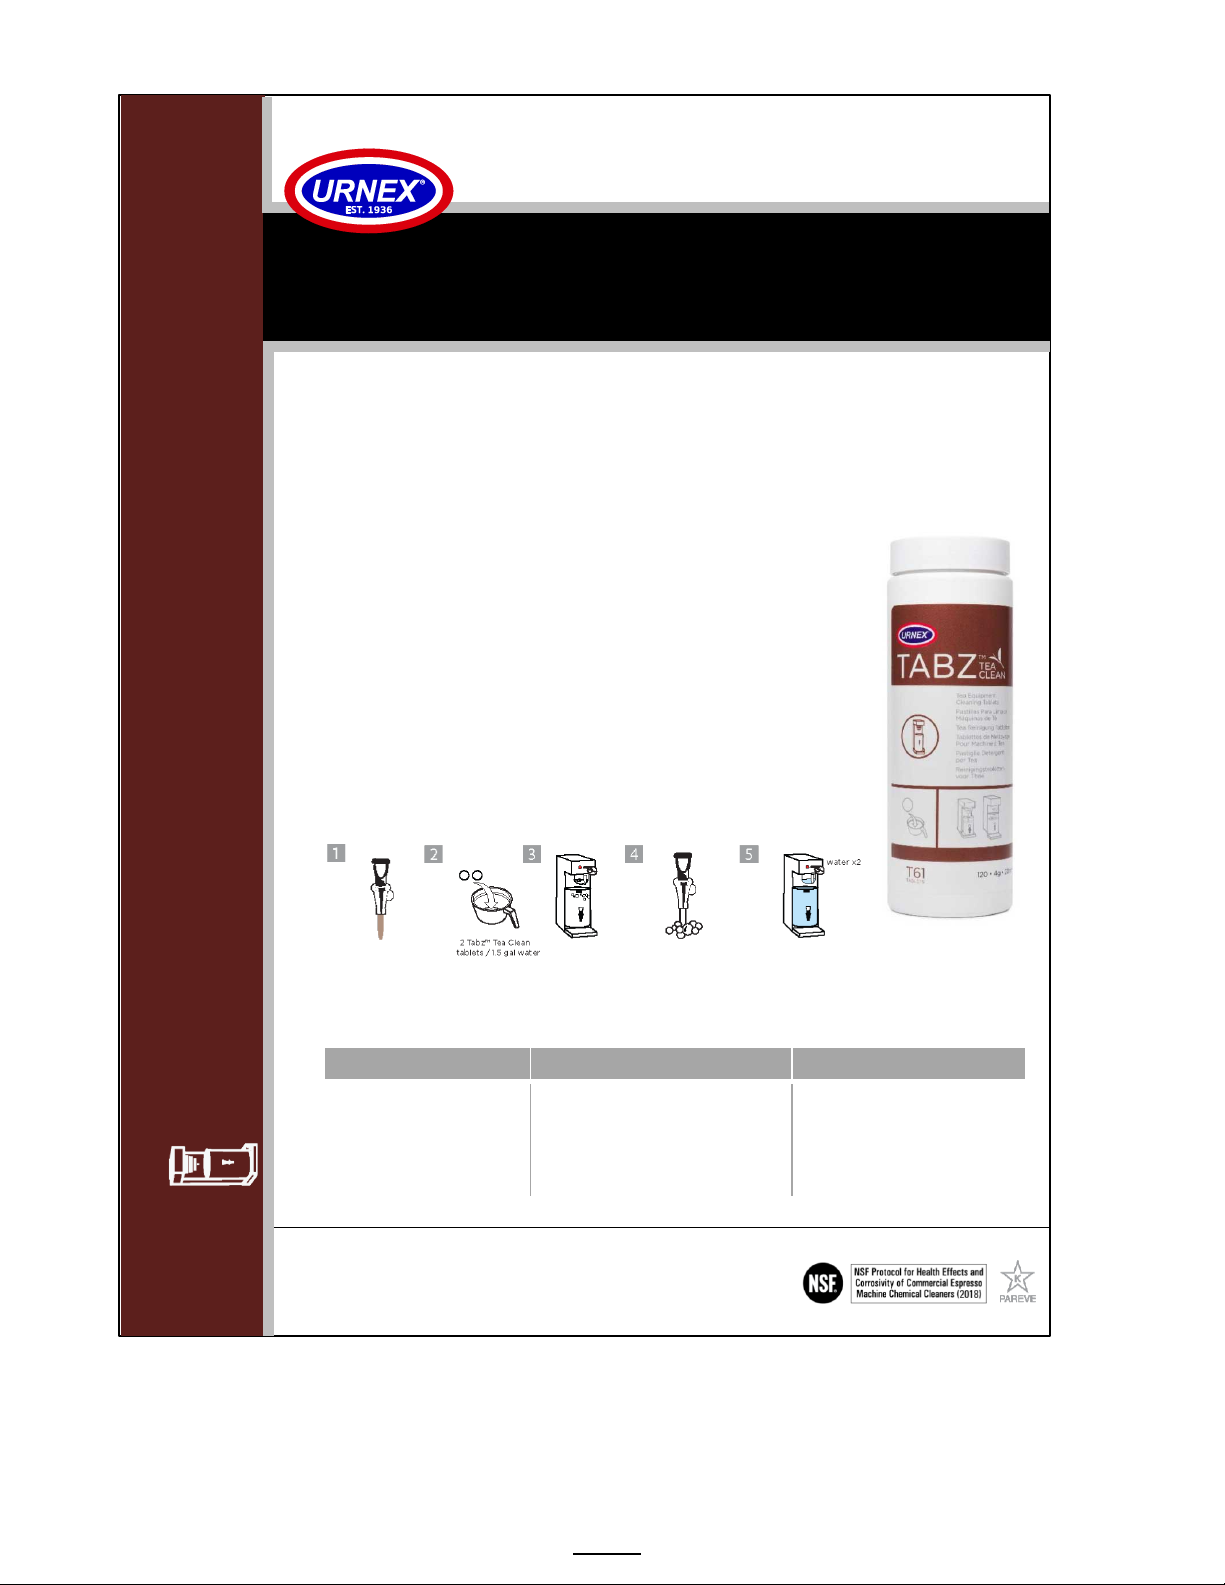
T
HE URNEX SYSTE
M
Urnex Br
ands
, LLC
700 Exec
utive B
lvd | Elmsford
, NY 10523
USA
Tel: +1-914-963-2042 Fax: +1-914-963-2145
info@urn
ex.com
| www.urnex.
com
T E A
Instructions For Use:
Case and Palle
t Inform
ation:
UNIT CASE PALLET
Code : 15-T61-UX12 0
Inne r UPC: 7546316037
57
Conten ts
: 120 tb
lt jar
(4.0 g x 20 mm)
Per case: 12 jars
Code: 15-T61 -UX12 0-12
Barcod e: 107546316
03754
I
nches (Lx
W x H): 11 .25
x 8.50 x
8.50
Centimeters: 28 .6 x 21 .6 x 21.6
Weight: 14.6 lbs (6.6 kg)
Per Pallet: 102 cases
Layou t: 6 layers of 17 ca
ses
Weight:
1,525 l bs (692 k
g)
Height: 57 in. (1.45 m)
YR
O
G
E
T
A
C
E
R
AC
®
X
EN
R
U
TABZ
T
E
A CLEAN TAB L E T S
T
e a
B r e w e r Cle aner
BEH
IND EV E RY GREA T CU P
™
™
• Cleans brew basket and serving vessel in one simple
step.
•
Specially formulated for the removal of tea stains from
tea brewers.
• Regular cleaning ensures fresh tasting b rewed tea and
properly maintained brewing equipment.
• Tablet form for easy and controlled dosing helps
reduce waste an
d reduc
e operator error.
Go to fetco.com for the latest versions of all information Page 30 User Guide & Operator instructions MBS-1221 P202Re0August 2021
 Loading...