

Page 1
FESTOOL GmbH
Wertstrasse 20
D-73240 Wendlingen
Tel.: 07024/804-0
Telefax: 07024/804-608
E-Mail: info@tts-festool.com
Originalbedienungsanleitung/Ersatzteilliste 4 - 9
Original operating manual/Spare parts list 10 - 15
Notice d’utilisation d’origine/Liste de pièces de rechange 16 - 21
Manual de instrucciones original/Lista de piezas de repuesto 22 - 27
Istruzioni per l’uso originali/Elenco parti di ricambio 28 - 33
Originele gebruiksaanwijzing/Lijst met reserveonderdelen 34 - 39
Originalbruksanvisning/Reservdelslista 40 - 44
Alkuperäiset käyttöohjeet/Varaosaluettelo 45 - 49
Original brugsanvisning/Reservedelsliste 50 - 54
Originalbruksanvisning/Reservedelsliste 55 - 59
Manual de instruções original/Lista de peças sobresselentes 60 - 65
Оригинал Руководства по эксплуатации/Перечень запасных частей 66 - 71
Originál návodu k obsluze/Seznam náhradních dílù 72 - 76
Oryginalna instrukcja eksploatacji/Lista części zamiennych 77 - 82
RAS 180.03 E-HR
468094_001
Page 2
1-7
1-6
1-5
1-1
1
1-4
1-3 1-2
2-1
1
2-2
2
2-3
3
2
4
SW 24
Page 3
RUSTOFIX RAS 180.03 E-HR
Table of contents
1 Symbols
2 Technical data
3 Machine features
4 Intended use
5 Safety instructions
5.1 General safety instructions
5.2 Machine-related safety instructions
5.3 Emission levels
6 Commissioning
7 Machine settings
7.1 Electronics
7.2 Changing the brushes
7.3 Adjusting the texture depth
7.4 Dust extraction
8 Working with the machine
9 Service and maintenance
10 Disposal
11 Accessories
12 Warranty
13 Declaration of Conformity
The specifi ed illustrations are at the begin-
ning of this operating manual.
3 Machine features
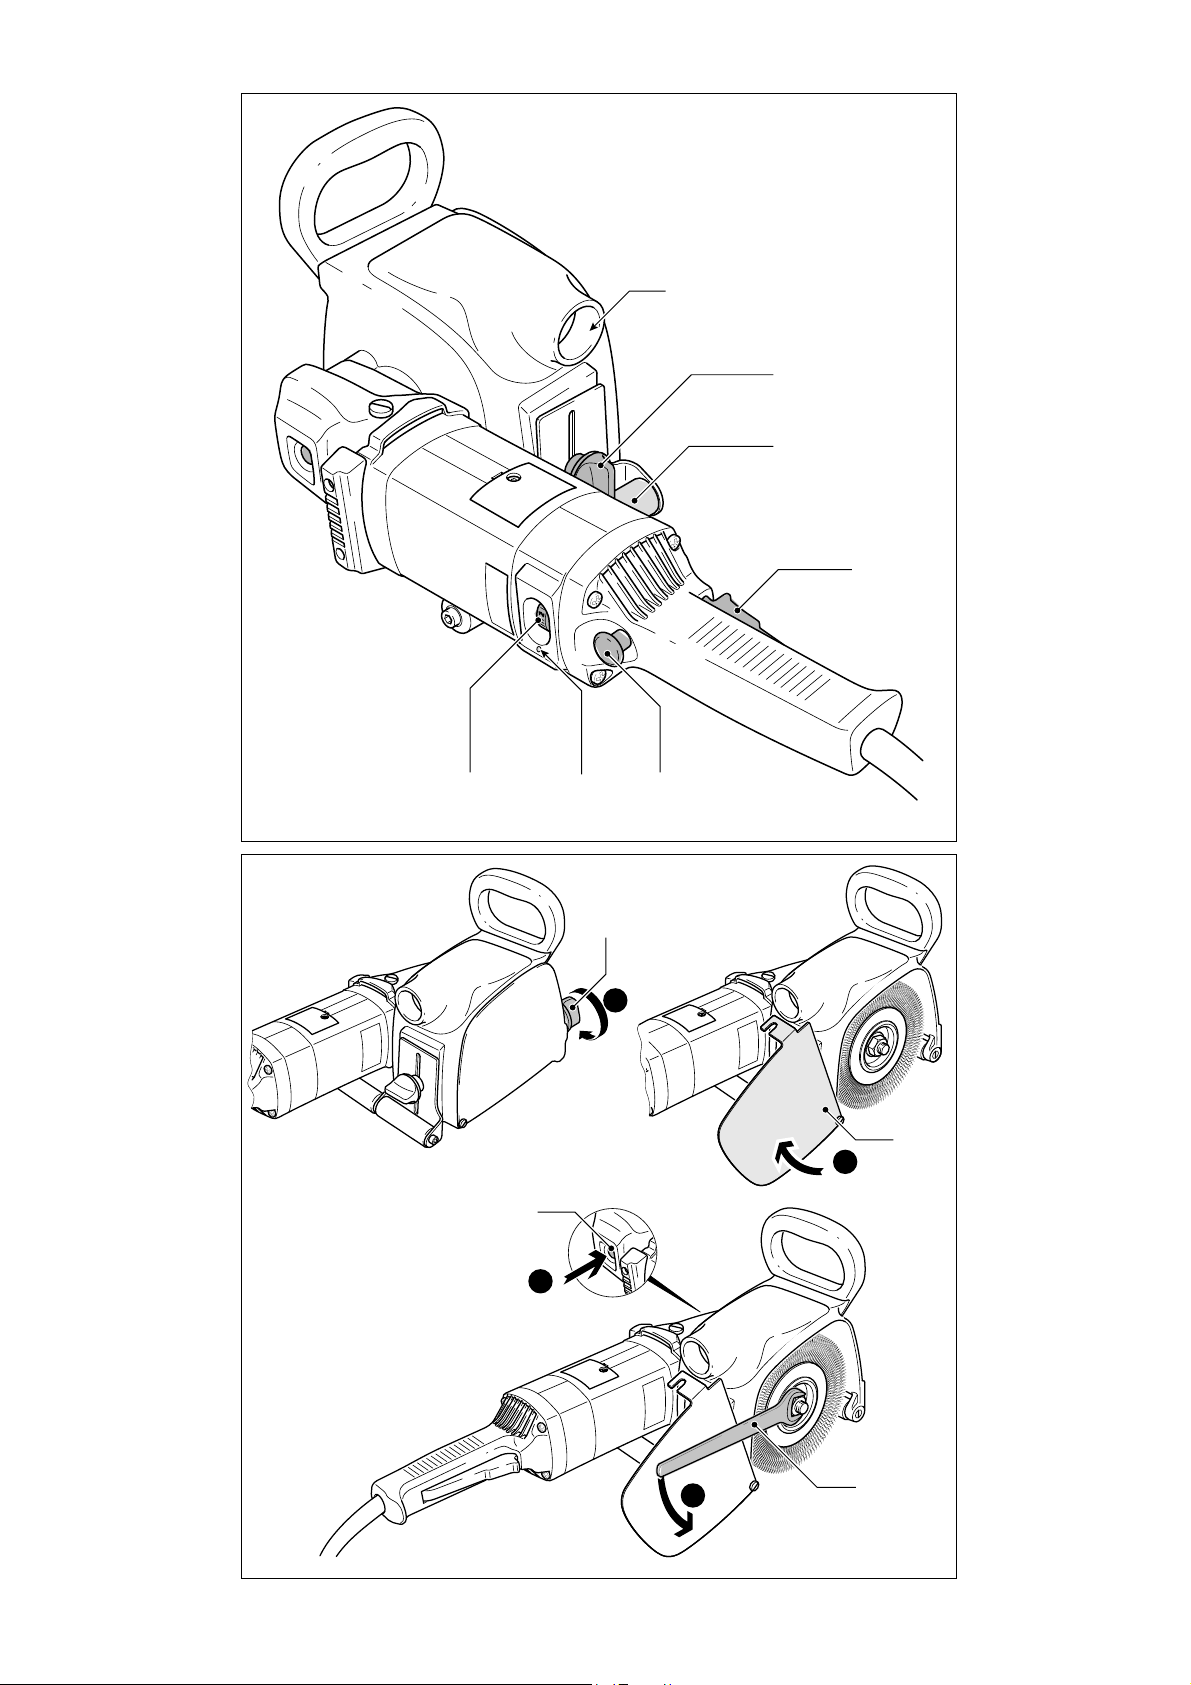
[1-1] On/off switch
[1-2] Switch-on lock
[1-3] LED
[1-4] Speed control
[1-5] Support roller
[1-6] Depth adjustment wheel
[1-7] Extractor connector
4 Intended use
According to specifi cations, the machine
is designed to brush and texture wooden
surfaces.
The user bears the responsibility for damage
and accidents caused by improper use.
5 Safety instructions
5.1 General safety instructions
- Before using the machine, carefully read
all of the attached safety instructions and
the operating manual.
- Keep all of the accompanying documents
and pass on the documentation if the machine changes ownership.
- Never allow children to use the machine.
1 Symbols
Warning of general danger
Electric shock
Read the operating instructions/
notes
2 Technical data
Power consumption 1500 W
Rotational speed 800 – 4000 rpm
Tool dia. 150 mm
Spindle thread M 14
Dust extractor connection diameter 27
mm
Protection class / II
Weight 7.5 kg
5.2 Machine-related safety in-
structions
- This machine is designed for brushing.
Please read all of the safety information,
instructions, illustrations and descriptions
delivered with the machine. If the following instructions are not observed, this
can result in an electric shock, fi re and/or
serious injury.
- Work such as roughing, polishing or abrasive cutting must not be carried out with
this machine. Performing tasks for which
the machine is not designed can create
hazards and lead to injury.
- Never use accessories that were not specially developed and designed for this
machine. Just because an accessory part
can be fi tted on your machine does not
guarantee danger-free operation.
- The permissible rotational speed of the
accessory must be at least as high as the
10
Page 4

maximum speed specifi ed on the machine.
Accessories that rotate faster than the
permissible level can rupture.
- The outside diameter and the thickness of
the accessory must be within the specifi ed
size range of the machine. Accessories
with incorrect dimensions cannot be suffi ciently protected or controlled.
- The bore diameter of discs, fl anges, sup-
port plates and all other accessories must
fi t the machine spindle exactly. Accessories with an unsuitable diameter are out
of round, vibrate excessively and lead to
loss of control.
- Do not use damaged accessories. Check
accessories such as wire brushes for loose
or broken wires before using. Every time
the machine is dropped, check the machine
and accessories for damage, or install undamaged accessories. Following the check
and assembly of accessories, ensure that
all persons are beyond the rotating range
of the tool and run the machine for one
minute at maximum speed. Damage accessories usually break completely during
this test time.
- Wear personal protective equipment. Depending on the application, use a shield
or protective goggles. If practical, wear a
dust mask, ear protection, safety gloves
and a work apron suitable to protect
against impact or small sanding or workpiece parts. The protective goggles must
be capable of blocking fl ying debris caused
by the various work operations. The dust
mask or device must be capable of fi ltering
particles generated during work. Continuous exposure to loud noise can cause loss
of hearing.
- Ensure that persons standing near the
machine are at a safe distance from the
work area. All persons in the work area
must wear personal protective equipment.
Parts of the workpiece or broken accessories can fl y off and cause injury outside
the immediate work area.
- Keep the power cable away from rotating parts. If you lose control, the power
cable could be cut or become stuck and
your hand or arm could be drawn into the
rotating parts.
- Never set the machine down until the tool
has stopped completely. Turning tools can
catch on the storage area, causing you to
lose control of the machine.
- Never allow the machine to operate while
carrying it at your side. The rotating tool
can catch on your clothing by accident and
cause serious cutting injuries.
- Clean the cooling air openings on your
machine on a regular basis. The cooling
air fan sucks the dust into the machine
and excessive deposits of metal dust can
result in electrical hazards.
- Never operate the machine near combustible materials. Sparks can ignite these
materials.
- Never use tools that have to be liquidcooled. Water and other liquid coolants can
cause potentially fatal electric shocks.
Cause and prevention of kickbacks
A kickback is a sudden reaction to jamming
or catching of a rotating disc, a support
plate, a brush or other accessory. Jamming
or catching results in a rapid standstill of
the rotating accessory, whereby, as a counter-reaction, an out-of-control machine is
accelerated around the jamming point in
a direction of rotation opposed to the accessory. If, for example, a sanding disc is
jammed or caught by the workpiece, the disc
circumference can dig into the workpiece
surface at the jamming point, causing the
disc to be expelled. The disc can either fl y
towards or away from the user, depending
on the direction of rotation of the disc at the
jamming point.
This can also cause sanding discs to break.
A kickback is the result of misuse of the
machine and/or incorrect method of work
or operation and can be avoided by closely
observing the following precautionary measures.
- Always hold the machine fi rmly and po-
sition your body and arm such that you
can control any kickback force. Always
use the additional handle, if included in
the delivery, to ensure optimum control
over kickbacks or reaction torques during
start-up. The user can control reaction torques or kickbacks if suitable precautionary
measures are taken.
- Never place your hands near rotating tools.
Tools can kick back over your hand.
- Never position your body in the area in
which the machine moves in the event of
11
Page 5

a kickback. A kickback accelerates the machine in the direction of rotation opposed
to the disc at the jamming point.
- Take particular care when working in corners, on sharp edges, etc. Take care to
prevent the machine from jumping back or
getting caught. Corners, sharp edges or a
jump back tend to cause the rotating tool
to catch, thus leading to a loss of control
or a kickback.
- Never install a chainsaw or saw blades
with teeth to cut wood. Such blades often
cause kickback and loss of control.
Special safety instructions for brush-
ing
- Remember that the brush may scatter
wires in all directions during normal use.
Do not place the brush under excessive
strain and risk breaking the wires. Wires
can easily penetrate thin clothing and
skin.
- If the wire brushes require a protective
cover during use, prevent the wire brush/
disc from making any kind of contact with
the protective cover. The working and centrifugal forces that occur during operation
may increase the diameter of the wire
brushes/discs.
5.3 Emission levels
Levels determined in accordance with EN
60745 are typically:
Sound pressure level 84 dB(A)
Noise level 95 dB(A)
Measuring uncertainty allowance K = 4 dB
Measured acceleration 3 m/s
The noise produced during work
may damage your hearing.
Always use ear protection.f
WARNING
2
6 Commissioning
Risk of accident if the machine is operated using unauthorised voltages or
frequencies.
- The mains voltage and the frequency of
the power source must correspond with
the specifi cations on the machine’s name
plate.
- In North America, only Festool machines
with a voltage specifi cation of 120 V/60
Hz may be used.
The tool is fi tted with an on/off switch [1-1]
with switch-on lock [1-2]. Press the switchon lock to release the switch. Pressing and
holding the switch-on lock briefl y after the
machine starts locks the switch while the
motor is running. The motor switches off
when you press the on/off switch again.
WARNING
7 Machine settings
Risk of accident, electric shock
Always pull the plug out of the socket
f
before performing any type of work on
the machine.
7.1 Electronics
The machine features full-wave electronics
with the following features:
Smooth start-up
The electronically controlled smooth startup ensures that the machine starts up joltfree.
Speed control
You can regulate the rotational speed steplessly between 800 and 4000 rpm using the
adjusting wheel [1-4].
The following table serves as a guideline to
help you select the best electronics setting
for the working material. The transition between each speed setting is smooth.
WARNING
12
Page 6

Processed material
Working procedure
Rustic texture
on wood (LD 85) 3 - 5
Brushing
wood (KB 80) 2 - 3
Brushing
stained parts (BG 85) 2 - 3
Constant speed
The preselected motor speed remains constant through electronic control. This ensures a uniform cutting speed even when
under load.
Overload safety device
In extreme applications, the current consumption may far exceed the permitted
nominal value. A "safety coupling" integrated
in an electronic overload safety device
switches off the motor and prevents it from
burning out. Motor operation resumes immediately after the load is relieved.
Temperature cut-out
To protect against overheating (burning out
of motor), an electronic temperature monitoring system has been installed. Prior to
reaching a critical motor temperature, the
safety electronics switches off the motor.
After a cooling time of approx. 3-5 minutes,
the machine can be operated again at full
load. The machine requires less time to cool
down when idling.
Electronics
setting
7.2 Changing the brushes
Loosen the screw [2-1].
f
Swivel the silver cover [2-2] down.
f
Press and hold the spindle lock [2-3] and
f
unscrew the hexagon nut (size 24) on the
brush.
Insert a different brush.
f
Tighten the hexagon nut to secure the
f
brush and then close the silver cover.
For brushes LD 85 and BG 85, use the
L
accompanying centring disc.
7.3 Adjusting the texture depth
Set the required texture depth using the
f
thumbwheel [1-6].
7.4 Dust extraction
Breathing in dust damages the
respiratory passage.
Always connect the machine to a dust
f
extractor.
When performing work that generates
f
dust, always wear a dust mask.
You can connect a Festool extractor to the
extractor connector [1-7]. The extractor
hose in the Festool extractor is 27 mm in
diameter.
CAUTION
LED indicator
The rotary sander is fi tted with an electronic
adjusting wheel and a green and red LED [13]. A green lit LED indicates that the rotary
sander is operating in normal mode. A red
lit LED indicates that the motor is operating
at approx. 70% overload. The overload or
temperature cut-out switches off the motor
if overloaded for longer periods.
However, alternately fl ashing green and red
LEDs indicate that the brushes are completely worn (remaining working hours max.
10 hours). In this case, have an authorised
after-sales service workshop replace the
carbon brushes the next day. Always replace
these brushes with special carbon brushes
available in pairs otherwise the LED indicators will not work.
8 Working with the ma-
chine
The RUSTOFIX gives beams or wooden panelling a rustic texture.
Working method
After the fi rst working procedure with the
wire brush LD 85, protruding fi bres give the
wooden surface a rough feel. In the second
working procedure, plastic bristles KD 80
sand the textured surface to lend a smooth
fi nish.
fAlways guide the machine evenly and in
the direction of the grain.
fHold the machine with both hands to en-
sure safe guidance.
fDo not overload the machine by pressing
with excessive force! The best results are
achieved with moderate application pressure.
13
Page 7

fMaintain the speed specifi ed. (see Chapter
7.1)
Use the correct brush for the relevant
working procedure:
Working procedure
Texturing Rustilon brush LD 85
Intermediate sanding
Smoothing Rustilon brush BG 85 (si-
Note
• Do not use the KD 80 brush with plastic
bristles for texturing. The brush is not
suitable for heavy-duty texturing.
• The BG 85 is the only brush suitable for
processing stained or oiled parts. All other
brushes will be damaged.
Brush
(standard wire brush)
Rustilon brush KB 80
(plastic bristles)
sal bristles)
9 Service and mainte-
nance
EU only: European Directive 2002/96/EC
stipulate that used electric power tools must
be collected separately and disposed of at
an environmentally responsible recycling
centre.
11 Accessories
Use only original Festool accessories and
Festool consumable material intended for
this machine because these components
are designed specifi cally for the machine.
Using accessories and consumable material
from other suppliers will most likely affect
the quality of your working results and limit
any warranty claims.
Machine wear or your own personal workload
may increase depending on the application.
Protect yourself and your machine, and
preserve your warranty claims by always using original Festool accessories and Festool
consumable material!
The order numbers of the accessories and
tools can be found in the Festool catalogue or
on the Internet under "www.festool.com".
Risk of accident, electric shock
f
Always pull the plug out of the socket
before performing any type of work on
the machine.
All maintenance and repair work which
f
requires the housing to be opened must
only be carried out by an authorised
service workshop.
To ensure constant air circulation, always
keep the ventilation openings clean and free
of blockages.
The machine is equipped with self-disconnecting special carbon brushes. If they are
worn, power is interrupted automatically
and the machine comes to a standstill (see
Chapter "Electronics").
WARNING
10 Disposal
Do not throw the power tool in your household waste! Dispose of the machine, accessories and packaging at an environmentallyresponsible recycling centre! Observe the
valid national regulations.
12 Warranty
For our tools, we give warranty for material
and production defects in accordance with
the locally applicable legal provisions, but
in any case for at least 12 months. Within
the EU member states, the warranty period
is 24 months (verifi cation through invoice
or delivery note). Damage caused by the
operator, natural wear, overloading, incorrect handling or through the use of the
equipment not specifi ed in the operating
manual, or damage which was known at the
time of purchase, is not covered by the warranty. Furthermore, damage caused by the
use of non-original Festool accessories and
consumable material (e.g. sanding pads)
is also excluded. Complaints can only be
recognised if the tool is returned while still
assembled to the supplier or an authorised
Festool Customer Service workshop. Keep
the operating manual, safety instructions,
spare parts list and purchase receipt in a
safe place. Otherwise the respective, current warranty conditions of the manufacturer
shall apply.
14
Page 8

Note
Due to continuous research and development work, we reserve the right to make
changes to the technical content of this
documentation.
13 Declaration of Conform-
ity
We declare under sole responsibility that this
product complies with the following norms
or normative documents:
EN 60 745, EN 55 014, EN 61 000 in accordance with the regulations stipulated
in Directives 98/37/EC (until 28 Dec.
2009), 2006/42/EC (from 29 Dec. 2009),
2004/108/EC.
Dr. Johannes Steimel
Head of research and development
Festool GmbH, Wendlingen, Germany
15
 Loading...