

Page 1

Getting the Most from Festool Sanders
Text and photos by Jerry Work
It is always fun to watch visitors who come into my small gallery and studio
as they approach the fine furniture I design and hand craft. Unlike those
who stand back to look at flat art or sculpture, when looking at furniture
most people move quickly to a piece and invariably move their hands
across the surface while they take in the piece with their eyes from up
close. They might pause
to ask if it is OK to touch
the pieces first, but once
they know they can, the
tactile urge takes over.
At some point the question
is always asked, “what
kind of finish do you use?”
It does not make any difference if it is a flat oil
based finish or a highly
polished mirror-like finish,
they seem to think the
silky tactile feel is somehow accomplished by the
application of a magic
elixir.
While the choice of finish
material is important to
achieving the desired
overall look and feel, the
far more important factor
is how the raw wood was
prepared before the application of the finish material. And, that is what this manual is all about.
Page 2

I thought long and hard about how best to organize this discussion. The sanders are
the machines which move the abrasive in a defined manner. The abrasives themselves
do all the cutting and shaping. However, in the process of cutting and shaping they also
produce a great deal of dust which can be quite harmful for the operator.
Festool wisely developed these three systems to work together: the sander, the abrasives and the dust collection components. Used together these not only make the
sanders more efficient and productive for the user but also greatly reduce the dangerous airborne particulate matter, making the work far safer and healthier and the tools
more pleasant to use day in and day out.
Finally, to make matters a bit more potentially confusing, as we come to understand
these different systems, there are at least three major standards by which the “grit” on
the sanding media are measured. So what is called 1000 grit by one standard is called
800 by another and 500 by still another “standard!”
All of these are important to getting the most from Festool sanders so I decided to organize this manual by first talking about the differences between the three grit “standards,” then talking about the dust collection systems and how they work together with
the sanders, then talking about the differences between the several different kinds of grit
media supplied by Festool, and then, finally, talking about the sanders themselves.
So, let’s go......
Page 3

Three Different Grit “Standards”
GRIT COMPARISION CHART
MICRON US CAMI
FEPA 'P'
(Festool)
JAPAN JIS
500 36 36 36
430 40
410 40
350 50 40
320 50
300 50
270 60
260 60
250 60
210 70
197 80
192 80
177 80
156 100
149 90
140 100
127 120 100
116 120
97 150 120
93 150
78 180 180 150
66 220 220 180
60 240 240
52 240 280 280
46 320 320
42 280
40 360 360
35 320 400 400
30 500
28 360 500
25 600 600
21 400 800 700
18 500 1000 800
15 600 1200 1000
13 800 1500 1200
10 1000 2000 1500
8 1200 2500 2000
7 2500
6 3000
and all.
In building fine furniture more than 50%
of one’s time goes into sanding, final assembly, buffing and polishing. The sanding part alone can take more than twice
the amount of time that it
took to machine all the
component parts of
the piece. Yet,
sanding processes,
tools and materials
are seldom as
carefully chosen as
are the machines
that cut the wood
components in the
first place.
Sanding, after all,
is just using some
kind of hard material to abrade the
surface fibers of
the wood, shearing
them off to leave a
smooth feel to the
surface. Simple to
say, but hard to do
well. As you
abrade the surface
you also scratch
the surface. If
those scratch
marks are large
enough, they will
detract from, not add to the appearance
of the final product.
So, the trick is to learn how to use smaller
and smaller particles of the hard material
to remove the larger scratches and leave
smaller and smaller scratches until they
no longer are visible and to do so in such
a way that the entire surface of the finished piece is uniformly treated, corners
Initially, this work was done laboriously by
hand by scooping up naturally occurring
small rock particles (sand) and rubbing
them over the surface with animal skins
or cloth. Later, means were found
to adhere the sand to a paper
or cloth backing and what
we today call “sandpaper”
was born. That is where it
started, but far from where
it ended.
What we call “sandpaper”
today rarely is either really
sand in the way we normally think of sand nor is it
necessarily paper. The
abrasive particles can be
anything from natural materials like garnet and
diamonds that have been
carefully processed to be
as even in particle size as
possible to manmade materials like aluminum oxide
or silicone carbide engineered with a very high
uniformity in particle size.
The backing material can
be various kinds of paper
derivatives or various
kinds of cloth materials or
manmade screens or
combinations of all three.
There may also be other materials added
to the abrasive surface like soaps and
waxes (called “stearates”) to help prevent
loading of the paper with small particles
of wood fibers and the resins that naturally occur in the wood.
Page 4

To add to the confusion surrounding
“sandpaper,” there are three different
“standards” applied to describing the size
of the abrasive particles. The US grades
are called “CAMI,” the European grades
including the Festool sanding media are
identified as “FEPA” and in Japan the
grades are identified as “JIS.”
The table on the previous page lists how
these different size grades relate one to
another with the actual size of the particles measured in microns. In coarser
grades they are quite close, but as you
move to the finer grades the differences
become greater.
It is not as important to know these differences as it is to recognize how the abrading materials you are using have been
graded. This is important because in order to achieve a desired very smooth final
finish you need to progressively “sand”
the finish with finer and finer grits before
you apply the finish and often afterwards
as well. You don’t want to be inadvertently jumping back and forth between
grading standards or you could be moving from a finer to a coarser grit without
realizing it.
Dust Control With Festool Sanders
All Festool sanders feature built-in dust
ports to which a vacuum or dust collector
can be attached. These dust ports lead
to pads which have a series of holes cut
in them. The Festool sandpapers have
matching holes cut in them so the vast
majority of the sanding dust is pulled
through the holes and out through the
dust port into the vacuum or dust collector without spilling out into the open air,
and therefore into the operator’s lungs.
Festool sanders
which use round
abrasives feature a unique
pattern of eight
smaller holes
around the outside edge of the
pad and paper
plus one larger
hole in the center of the pad
and paper.
Here is a picture of a typical Festool
round sanding material in the 150mm diameter size. The photo shows the back
of the material which has printed on it the
type (which we will discuss in a moment)
and grade (P180 in this case.) All Festool
sanders and supplied sanding media use
a hook-and-loop style of fastening which
means you can remove and reattach the
sanding material repeatedly and quickly.
For the sanders which use the round media, vacuum is drawn through the dust
collector port which is routed to the outer
eight holes. The center hole aligns with
specially designed air inlet ports in the
backing plates. This allows air to be
drawn in through the center hole and
then pulled out to outer holes bringing
with this air stream most of the sanding
particles. As a result Festool sanders are
Note the 9 hole pattern on the
pads on these two Festool
Rotex sanders
Page 5

very efficient in collecting sanding dust at
the point it is created.
Festool Dust Extractors
Festool supplied dust collectors (they
use the term “extractor”) like the CT 22
model shown below are very efficient
vacuums designed to work as a system
First, the Festool dust collectors come in
several sizes. The smallest is called the
CT Mini while the larger units are called
CT xx where xx refers to the collection
capacity of the internal bag. A CT 22 has
with all of the Festool sanders and cutting
tools. Combined with the 9 hole vent pattern in the round pad sanders, and the
variety of hole patterns in the other sanders, this potent team keeps the air around
the sanding area much cleaner and safer
for the person operating the sander.
Since human safety is such an important
topic with respect to sanding, let’s take a
few moments to look in more detail at
how the Festool sanders and dust collectors work together.
a 22 liter (5.8 gallon) capacity, A CT 33
has a 33 liter (8.7 gallon) capacity and so
on.
The CT Mini pictured above has a 10 liter
(2.6 gallon) capacity and hose/cord storage built into the top of the unit. As with
all the other Festool dust collectors, it can
utilize hoses of
different diameters for different
tasks. It comes
with a 27mm
(~1”) hose but
larger diameter
hoses can also
be connected if
need be.
Unlike the other
Festool dust
collectors, the
CT Mini opens
Page 6
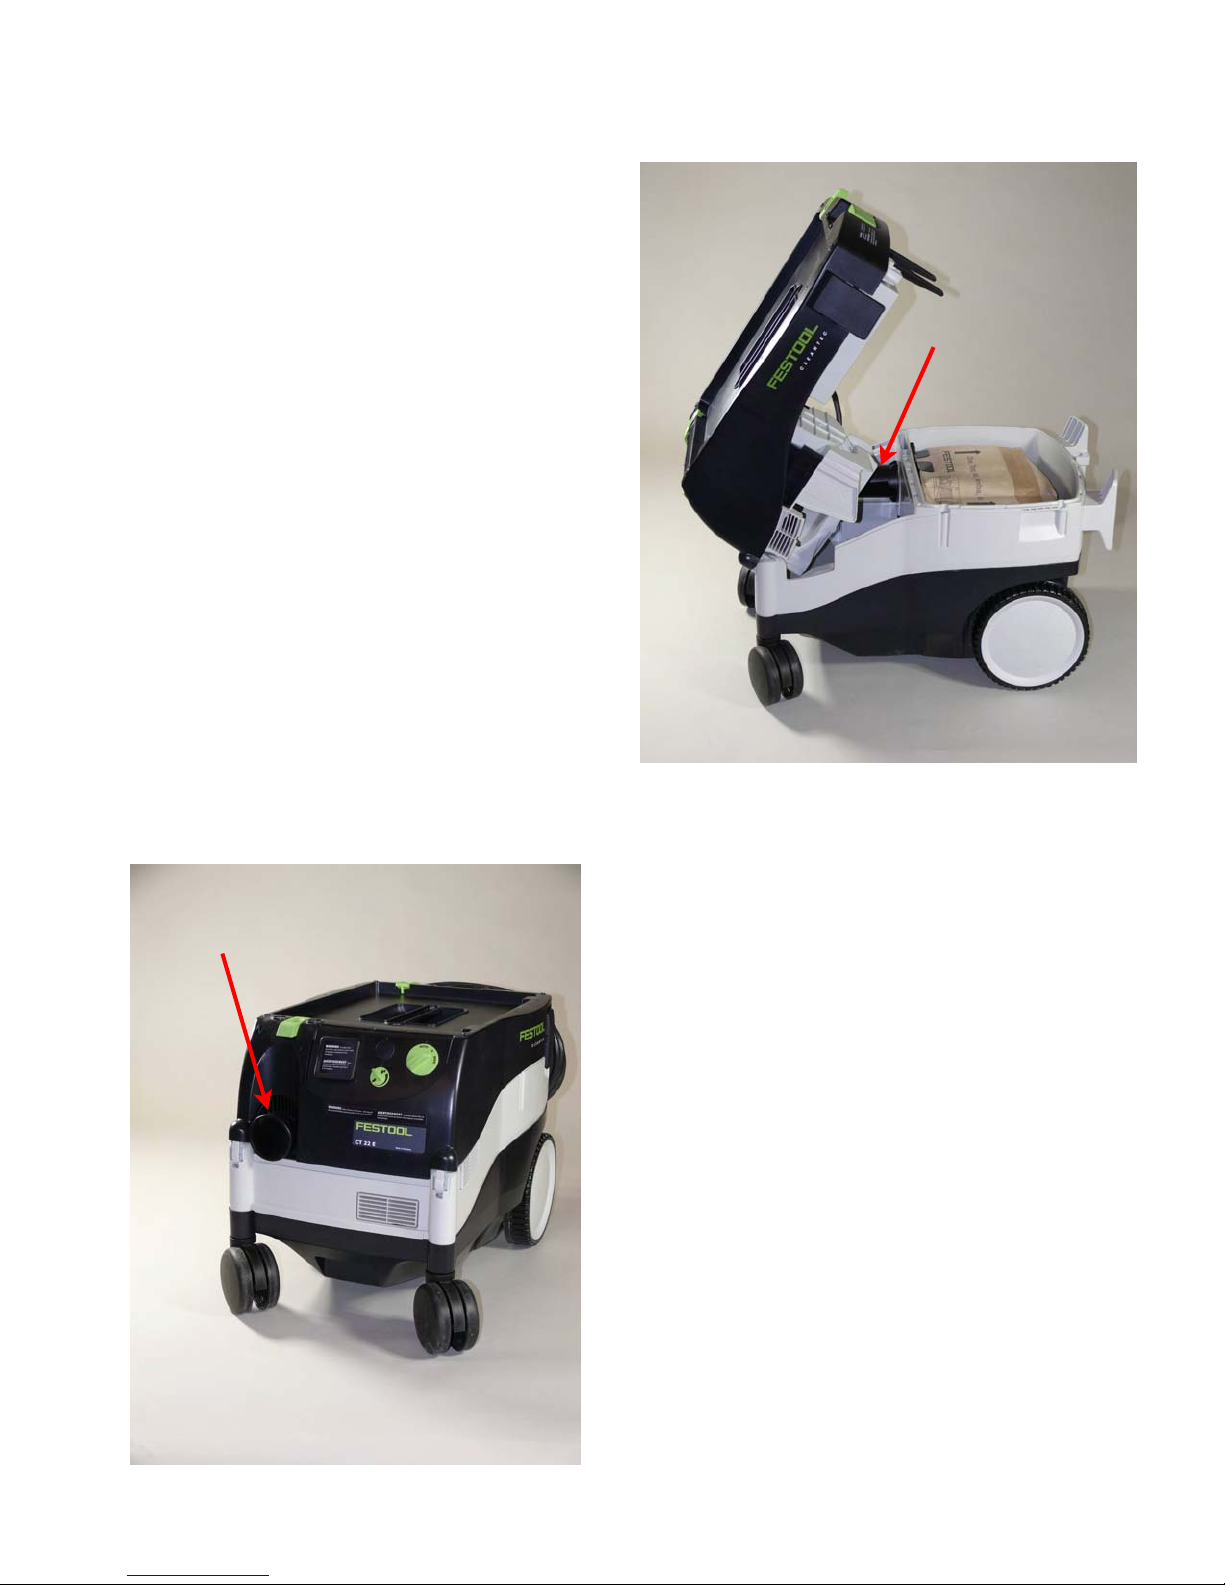
by releasing catches on the sides of the
unit and then lifting the whole top assembly off of the base section as is shown in
the bottom photo on the previous page.
The bag snaps into the bottom assembly
and a cone shaped section in the upper
assembly engages the bag opening
(which is sealed by a soft lip running all
around the bag opening) when the two
assemblies are brought together.
Air is sucked in through the hose port and
into the bag trapping most of the airborne
particulates. The now largely cleaned air
that passes through the disposable bag is
further scrubbed by replaceable automotive type air cleaner elements (shown in
brown in the upper assembly in the bottom photo on the previous page) before
being returned to the room.
Suction is 99 CFM with up to 80” of static
water lift so performance is impressive
even for such a small unit.
Inlet air tube
Inlet air tube
CT 22 Dust Extractor
The CT 22 and larger units are different.
First, the top hinges open rather than lifting off. The disposable bags fit into a
chamber tightly connecting to the incoming air hose tube shown in the photos
above and to the left.
CT 22 Dust Extractor
An “O” ring seals the bag chamber to the
top when the top is closed. As with the
CT Mini, the air coming through the disposable bag is quite clean. But unlike the
CT Mini which uses automotive style air
cleaner elements, on the CT 22 and
larger units, before the air is returned to
the room, it passes through dual HEPA
filters shown in white in the photo on the
next page. These remove 99.97% of all
particulate down to 0.3 microns in size
so that the air coming back into the room
where you are operating the sander is
99.99% dust-free.
Page 7
This is why the designed interaction
between the dust
collection built into
each sander and
the dust extraction
system itself is so
important to discuss
before we move on
to the sanders
themselves.
HEPA (High Efficiency Particulate
Air) filters were developed by the U.S.
Atomic Energy
Commission to remove radioactive
dust from industrial
exhaust. These
type filters are now
from the room is used to
cool the motor which is
never in the path of the
incoming dirty air. That
means a longer service
life and little down time.
The green tabs shown
on the inside of the back
wheels in the picture to
the left operate wheel
locks to keep the unit
steady when you want it
fixed in position.
HEPA
Filters
The front wheels are
casters for easy rolling
around.
As the size increases on
the CT 22 and larger
units the motor assembly remains the same,
but the lower chamber holding the bag
the primary filtration systems used in the
most sensitive manufacturing and healthcare environments.
They are a most welcome addition to my
studio and will be to your studio or shop
as well!
Another important feature of the Festool
dust collectors is the sealed motor chamber shown above. Only clean air drawn
CT 33 behind
CT 22 in front
Page 8
gets taller. A CT 22 is shown in front of a
CT 33 in the photo on the previous page.
Notice how the white lower section is
taller on the CT 33 than on the CT 22.
They draw 134 CFM and pull an impressive 90” of static water lift (23000Pa)
while generating only a 72dB noise
level.
I can’t leave the discussion about the
Festool dust collectors without commenting on the boom arm shown
mounted on the CT 33 on the previous page and to the right. This highly
useful device keeps the vacuum
hose and the power cord up off the
floor and out of your way no matter
which Festool product you might be
using.
When I first heard about the boom
arm I must admit that I thought it was
just one of those ‘nice to have but
certainly not critical’ items. From the
minute I first used one, I changed that
position 180 degrees. It simply alters for
the better how well the already very good
dust collection system works in a shop or
studio setting.
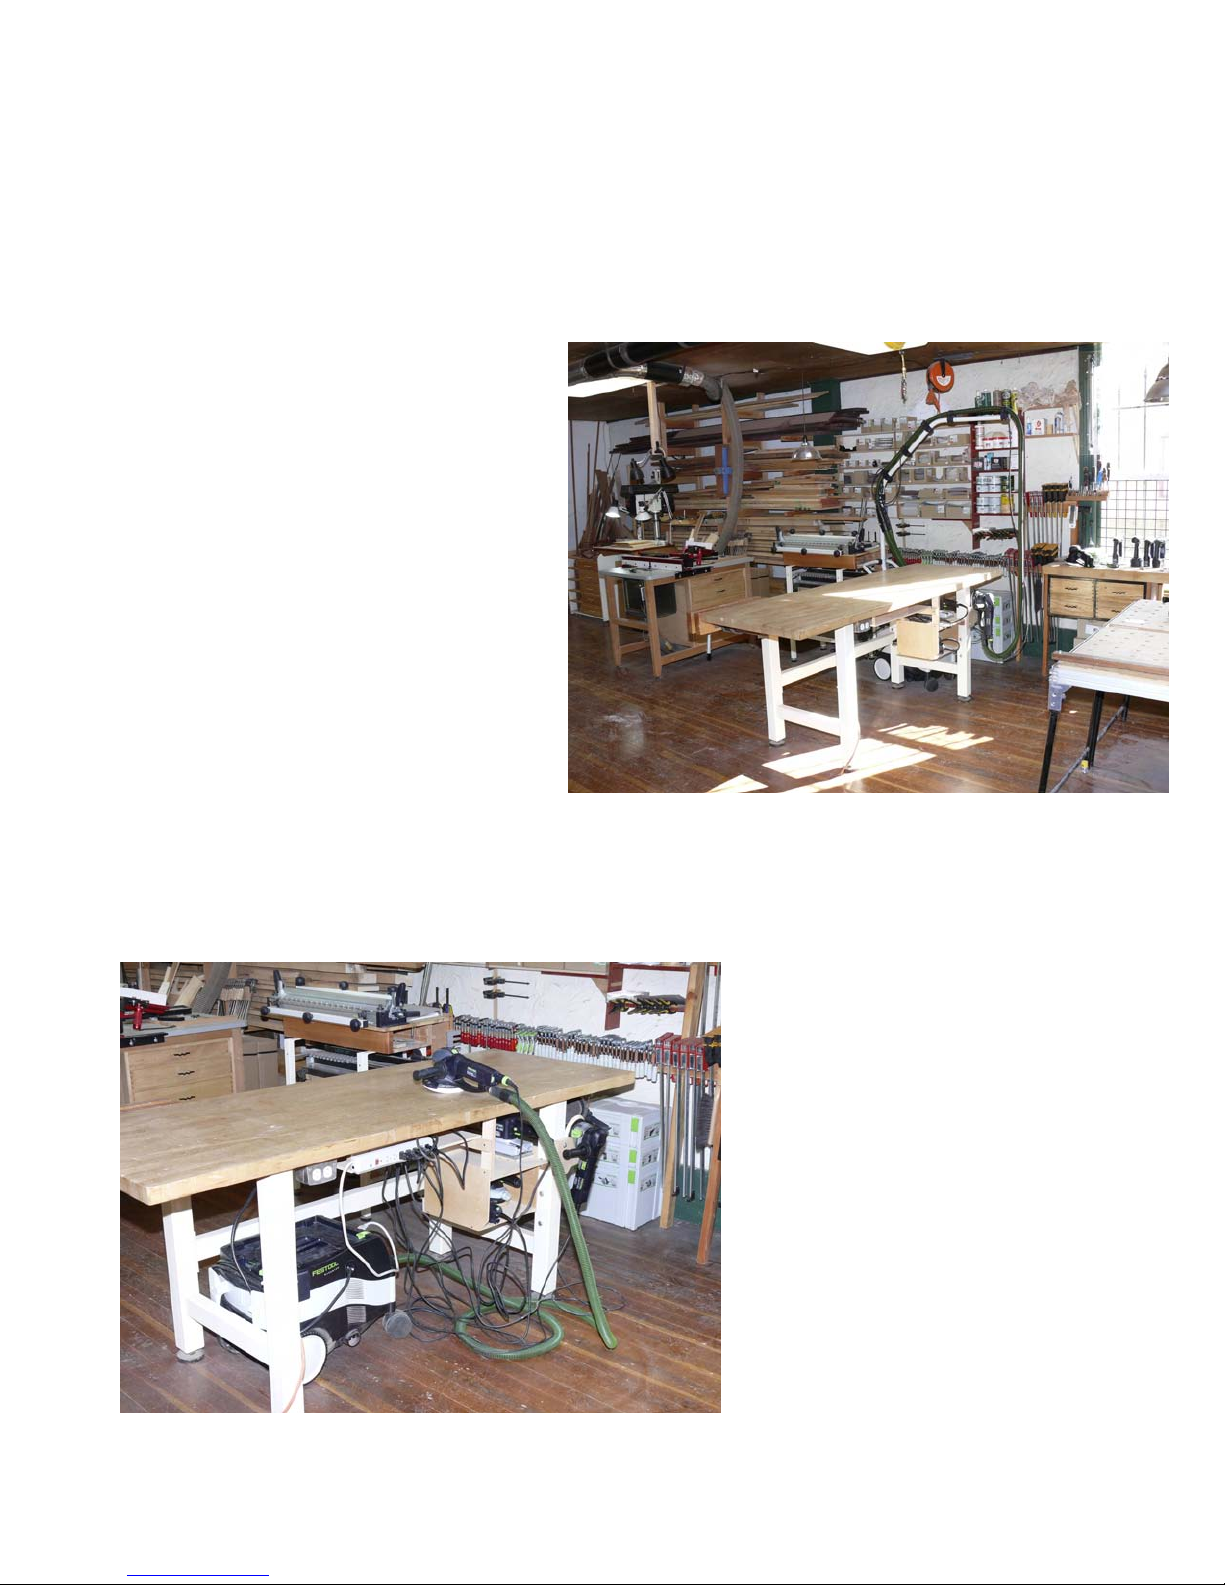
As you can see, bottom left, for years I
kept a Festool dust collector under my
primary sanding station with all the various Festool sanders close at hand. Yes, I
After the boom arm
was always stumbling over the hose and
the sea of cords shown in the photo below but, it was so much better than anything I had used before, I guess I just ig-
nored the mess and instead
enjoyed the dramatic improvement in productivity brought on
by the tight integration of the
sanders and the dust extractors.
Before the boom arm
However, as soon as the boom
arm mounted on the Festool
DC moved to the far side on
one end of the sanding station,
everything changed for the better. As the photo above clearly
shows, the sanding station now
is free of the hose/cord clutter
on the floor. The power strip
into which all the sanders
Page 9
were plugged is gone, replaced by the
one power cord that is right beside
the vacuum hose. All the sanders
are still in the same place and right
at hand, it is just that now the hose
and cord are both up off the floor and
out of my way.
The boom arm mounts easily to the
back of any of the CT 22 or larger
dust collectors. It swivels through a
wide arc so there is good work surface coverage. You can mount stabilizing out-riggers (supplied) if you
wish but I don’t find them necessary
the way I use the unit. I can’t say
enough good about the boom arm.
I won’t cover here the several other
neat features of the Festool dust collectors like the 20 amp power cords, the
self-locking stacking storage for the
boxes the sanders and other Festool
products come in (called “Systainers,”)
but instead will direct you to the Festool
catalog and web site for more details.
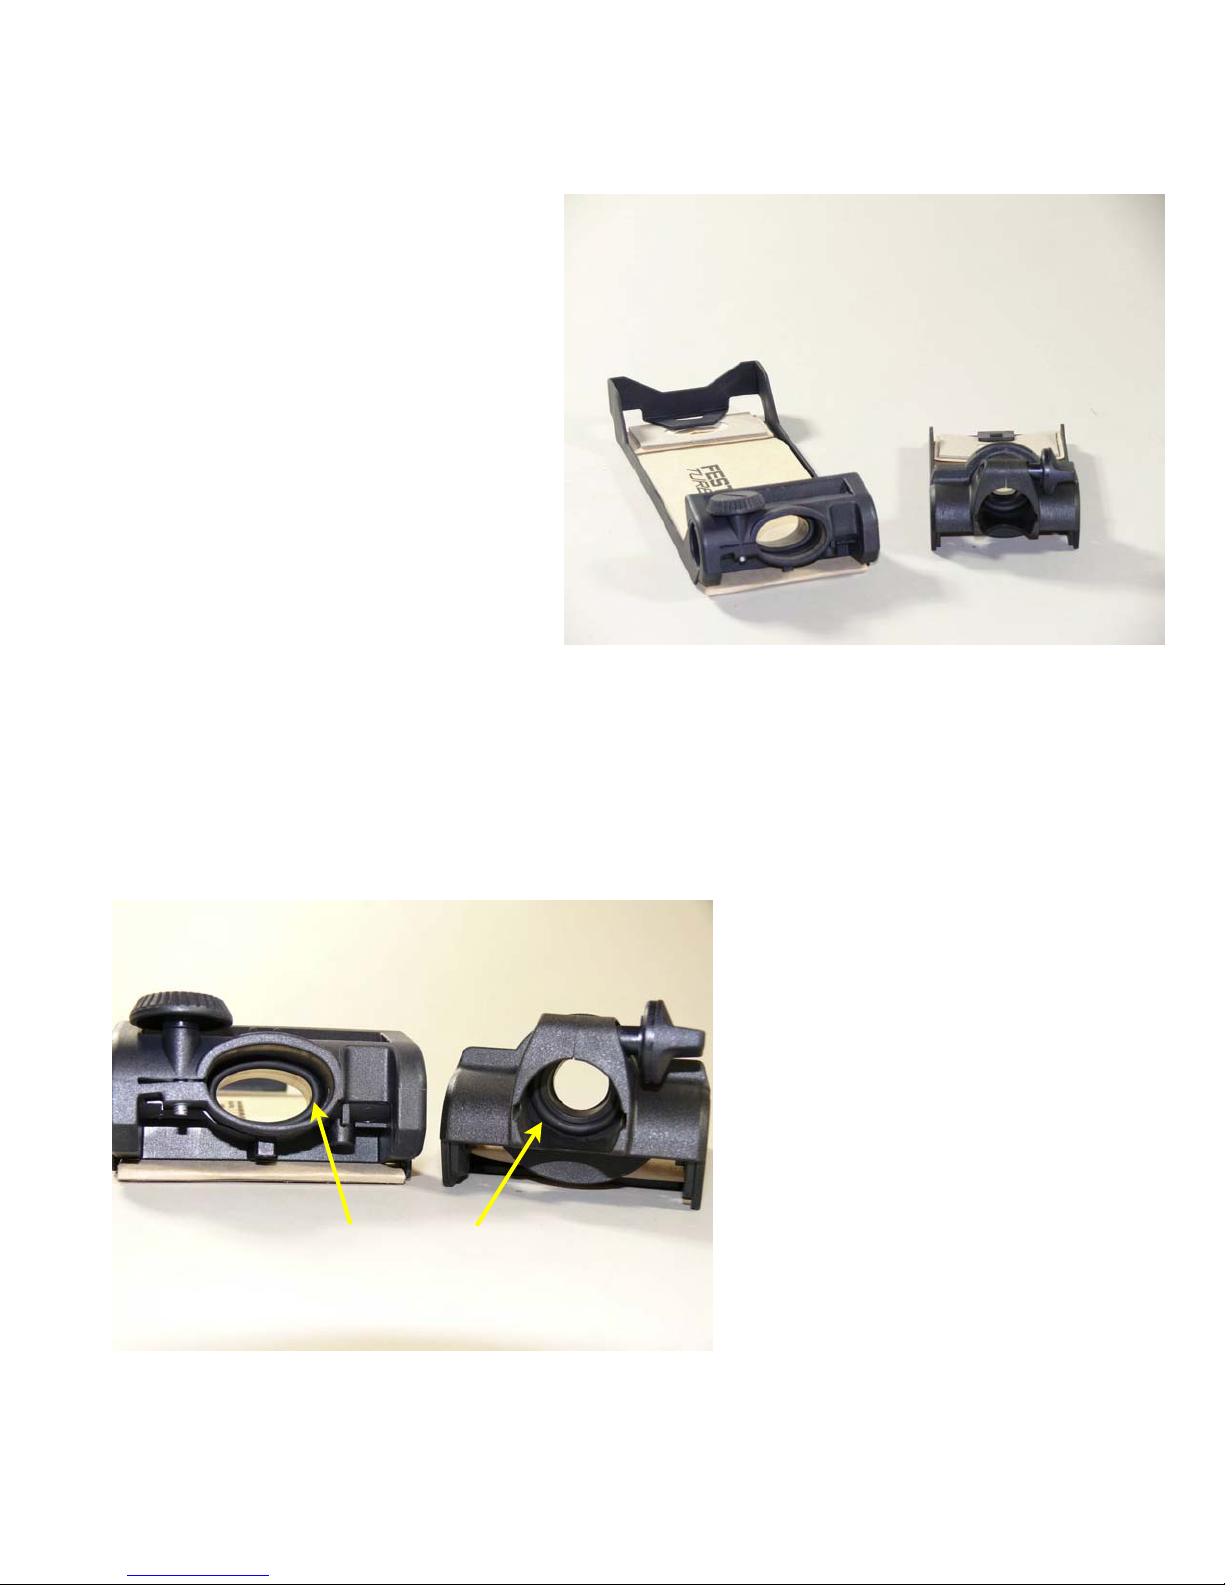
on the tool.
Many of the sanders also come with
handy “mini bags” which attach directly to
these ports when you are working in areas not easily reached by the dust collector hose. The photos here show both the
round and the oval port configu-
rations. Notice the “O” ring seal
at the bottom of the port fitting.
A nice touch.
“O” ring seal
All the Festool products with built-in dust
collection have either round or oval ports
Festool vacuum hoses have
soft rubber ends that can easily
mold to either the round or the
oval shape, and the green versions of those hoses are antistatic so they don’t build up dust
on the outside as normal vacuum hoses do.
Ok, now we know something
about the three different grit sizing “standards” (remember Festool supplied grits all use the
European FEPA
Page 10

standard,) and we have covered the very
important topic of user health via the dust
collection ports built into every Festool
sander working in conjunction with the
HEPA filtered Festool dust collectors, so it
is now time to move to the topic of the
sanding media itself.
Page 11

Festool Supplied Sanding Media
Festool supplies an extensive line of
sanding media for each of its sanders.
These different sanders utilize seven different shapes and sizes of pads so there
are seven different shapes for the Festool
supplied sanding media as shown here.
while Brilliant media is more densely
populated. This means that for any given
grit size, there will be fewer actual granules of grit per surface area on the Cristal
paper than on the Brilliant paper. As a
result, the Cristal paper will cut more aggressively and load up less than the Brilliant, but the Brilliant will leave a finer surface at any given grit level than will the
Cristal.
For really heavy duty work where tearing
of the media could be an issue, the rec-
ommended media is called SAPHIR. For
cleaning and mild sanding a scouring pad
type material called VLIES is supplied.
For solid surface (manmade countertop
materials) and automotive work where
paper loading can be a major issue, a
stearated media called TITAN is avail-
able.
The round shapes are 150mm, 125mm or
115mm in diameter. The triangular
shapes are 100mm x 150mm or 93mm x
93mm while the rectangular shapes are
either 80mm x 133mm or 115mm x
228mm. These equate to 6”, 5”, 4 1/2”
round, 4” x 6” or 3 11/16” triangular, and 3
5/32” x 5 1/4” or 4 1/2” x 9” rectangular.
For each of these shapes several different types of media are available. Each is
given a name which can be a bit intimidating at first. In the catalog and on the
web site an icon is used to identify the
most common use for each media type.
For our purposes I think the following
simple explanation will help clear things
up.
For bare wood the recommended type is
called RUBIN. For bare wood, paint,
varnish or filler materials either CRISTAL
or BRILLIANT can be used with success.
Cristal is a much more open grit paper
PLATIN is a special purpose mesh on
foam media designed for fine sanding of
metal or surfaces to be polished.
The ones I use the most in my furniture
making are Brilliant, Rubin and Cristal
and I use them on bare wood interchangeably. On finished surfaces that I
want to flatten before applying additional
top coats or before final polishing, I use
Brilliant. I also find lots of uses for the
scouring pad type material called Vlies. It
will brighten and clean metals, clean up
plastics without burning, clean rust off my
cast iron tool tables without changing the
surface itself, and scrub sinks and floors
clean when I gunk them up with finish or
glues.
There is no right or wrong here. Any media can be used for any task, it is just that
each is optimized for the task indicated.
Let’s look at each in a bit more detail.
Page 12

Brilliant is a
paper based
material of differing weights
to which highstrength aluminum oxide has
been bonded
by a synthetic
resin compound. It uses
antistatic
agents to reduce loading of the abrasives as you
sand. It is ideal for both sanding of bare
woods and for sanding paints and varnishes (sanding the finish itself). Since
the backing is thinner than Rubin or Saphir, it will follow minor contours somewhat better. It is also less expensive
which makes it an all-around good choice
for most furniture making applications.
has been bonded, also by a synthetic
resin compound. It uses special filling
materials to prevent premature clogging
with sanding dust or wood fibers. It tends
to last longer than Brilliant and is somewhat more expensive. It is also a good
all-around choice for most furniture making applications and does an especially
good job on bare wood.
Saphir is a
cloth based
aluminum oxide
designed for
rapid stock removal on wood,
metal, or manmade materials.
It is most commonly used
with rotary action sanders.
Cristal is an open coat material similar to
Brilliant but with fewer grit particles per
unit of surface area than Brilliant or Rubin. It is especially good for rapid stock
removal and for taking off old finishes
without undue damage to the underlying
surface. It is my first choice if the wood
surface is damaged and in need of flattening before finish sanding can begin or
where I am intending to shape the wood
before final finishing. It cuts very quickly
and does not load up even on resinous
woods like Bloodwood, Jataba, Teak, Cocobolo, Rosewoods and other exotics. It
does leave a more noticeable grit marking than either Brilliant or Rubin but those
grit marks can be quickly taken out by
starting with Brilliant or Rubin several grit
levels coarser than the last Cristal grit
used.
Rubin uses a heavier weight paper to
which another form of aluminum oxide
The heavy cloth
type backing can take more heat and
abuse than the paper backed materials
used on Brilliant, Cristal and Rubin.
While it can take more heat, be careful as
it is very aggressive and can remove a lot
of stock very quickly. In the process a lot
of heat can be generated. Use a light
touch and the results are very impressive.
Titan has a water resistant backing material and is designed for smoothing solid
surface (manmade) countertop materials
or automotive finishes.
Vlies is more like a
scouring pad and is
designed for smoothing finished surfaces or
for removing rust,
paints or pollutants
from just about any
surface. It uses both
Page 13

aluminum oxide and silicon carbide particles embedded in a synthetic fiber mat
allowing it to easily follow surface contours and to reach into surface imperfections. It does a great job of cleaning most
anything and in coarser grits can be quite
aggressive.
Platin is a mesh material impregnated
with silicon carbide abrasives on a foam
layer which I use either as a final step on
polished surfaces or for the final flattening
steps just before the use of rubbing or
buffing compounds. They are available in
“grits” up to 4000 so produce a really nice
fine surface on their own.
and valleys a bit like a topographical map
rather than a flat surface.
If Platin is used as the final step you will
get a very flat surface which will refract
light well but which has less surface
sheen than is achieved by following with
rubbing or buffing compounds so the surface will reflect a bit less light.
The view above is of the working surface
of Festool’s Platin while the photo above
right shows the foam layer (this photo of
another manufacturers similar product).
When Platin is followed by rubbing or
buffing compounds an extreme high gloss
can easily be achieved. Try this on highly
figured woods like big leaf maple that
have been finished by quality clear water
based conversion varnish and people will
just have to touch the surface to make
sure it is flat. It looks so three dimensional they will swear there are peaks
For some “real” magic on bare hardwood,
especially resinous exotics like bloodwood or rosewood, sand to around 800
grit and then use Platin working up to
4000 grit. The surface of the unfinished
wood will take on a gloss and patina of its
own that simply cannot be matched by
any finish I know if. A bit of wax will maintain that patina, but it is an easily marked
surface unsuited for any wear and is not
at all water resistant.
There are a number of other abrasive
materials available from other manufacturers that can also be useful but some
may present a bit of a downside as well.
One, sold by Mirka, is called “Abranet”. It
is an open silicon carbide mesh. Without
the interface pad also sold by Mirka, the
use of Abranet may prematurely wear the
hook and loop elements on the Festool
Page 14

pads, so be careful when using abrasive
materials supplied by others.
Why so many different kinds of
sanding materials?
Offering an array of different engineered
abrasives came about naturally for Festool. While they first became known in
Germany for the development of a portable chain saw in the 1920’s (photo right),
they really made their mark shortly after
WWII with the development of the first
powered orbital hand sander (lower photo
right.)
This tool so improved the efficiency of the
German furniture makers that, according
to a story in the January 2005 issue of
“Handy” magazine, those artisans would
travel for miles by bicycle to pay their deposits knowing they would wait weeks
just to receive one.
(These photos are from the Handy magazine article which can be found on the
Festool web site, www.festoolusa.com.)
Since that time Festool has refined and
expanded the art and science of power
hand sanding. Along the way they have
introduced numerous machines for moving the abrasive particles across the surface of the wood, added all these different kinds of abrasive materials, and designed integrated dust collection creating
whole “systems” optimized for this task.
Our next task is to look at the sanders
themselves.
Page 15

Let’s start by understanding how
the different kinds of sanding
machines do their job.
We are going to look at nine different
Festool sanders covering the range of
different ways of moving the abrasive.
the “old” and the “new” Rotex as we discuss that sander. The 150mm (6”) pad
diameter Rotex (the two shown on the left
in the bottom photo) is now also joined by
a 125mm (5”) pad diameter unit (shown
right most of the trio).
To help you judge relative size, each
sander we talk
about will be
shown with the
same collection
of different sizes
and shapes of
media and they
will also be
shown with me
holding each.
Hopefully, these
two visual cues
will put the different sizes into
better perspective.
The seven shown in this photo
sitting atop two Festool Multi
Function Tables (model 1080)
joined together are from my
studio and are in use daily. I
did clean them up a bit for
these photos, but they show the
marks and scuffs from continuous use.
Festool has also introduced an
upgraded version of the dual
mode sander shown second
from the left above (called the
“Rotex” sander), also shown in
the picture to the right. We will
cover the differences between
Each different
kind of sander is
designed to
Page 16

move the abrasive in a different pattern or
to have a different abrasive form factor to
reach different shapes of surfaces.
RS 400 (not pictured), DS 400
(second from the right) and RS 2
(third from the left) use an orbital
There are basically three different ways
the abrasive can be moved by a machine
sander: linearly in a fore-aft motion, in
a circle in a rotary motion, or back
and forth in an arc. Festool uses the
first two motions but not the arc motion.
If these motions are combined or the
pivot point is also moved at the same
time, the motion becomes much more
complex. If the pivot point rotates and
the pad is free to move independently but
not forced to move in a defined path, then
the motion is called “random orbit”.
We will discuss each of the different Festool sanders in terms of how they move
the abrasive from the pure rotary sander
to the various random orbit units.
RAS 115 uses a pure rotary motion
(third from the right in the picture).
motion.
DX 93 Deltex (right most pictured)
uses a tight rotary motion.
ETS 150/3 (left most), 150/5 (not
shown), and ETS 125 (not shown)
use a random orbit motion.
RO 150 Rotex (second from the
left) and RO 125 (not pictured) can
be switched between a random orbit motion and a rotary motion with
a rotating pivot point.
LS 130 uses a pure linear back and
forth motion (center one pictured).
Page 17

Let’s start with the RAS 115.04 E
sander. It is a pure rotary sander with a
circular pad 115mm (about 4 1/2”) in diameter. Some might liken it to an angle
grinder. The abrasive material is affixed
to the pad by a hook and loop system
that allows the material to be removed
and replaced without damage.
You can see from the photo above right
(RAS 115 in foreground) that there are no
holes around the perimeter of the pad as
in the other Festool sanders like the RO
150 behind it. Instead, there
is a space between the pad
and the base of the machine
through which particles are
drawn out through the built in
vacuum port at the rear of the
machine. There is a brush
about one third of the circumference of the pad (at the bottom of the pad in the photo)
that can be rotated to any position around the outside of
the pad to help direct these
cut particles into the vacuum
port. The handle on the side
of the machine is rotated to move the position of the brush. The speed of rotation
can be varied from 1500 to 4000 RPM.
Brush can be rotated
This is a VERY aggressive machine capable of removing a lot of material in a
hurry. This much abrasive action generates a lot of heat. It takes a light touch to
prevent digging the pad too far into the
work piece and to prevent overheating of
the pad or the work piece.
I find it ideal for rough shaping wood such
as carving a chair seat for example. In
furniture designs where I want to instill an
Oriental feel, I often will curve the under
sides of top or shelf components, a process I refer to as “boating.” The curves
are more abrupt (have a smaller radius)
at the outer edges and become softer (have longer radiuses) towards the center.
Such complex curves can be
roughed out easily and
quickly with the RAS sander
and then finished with one of
the less aggressive sanders
we will discuss later on.
The RAS sander is also very
handy for removing paints,
rust or surface contaminants
as long as you keep in mind
just how much heat doing so can generate. You don’t want to burn the work
piece nor do you want to burn and ruin
the pad.
Page 18

The Vlies scouring pads shown in use
with the RAS 115 to the right are especially useful for this as they tend to dissipate the heat better than regular abrasive
sheets do and leave far fewer deep
scratch marks than coarse abrasive
sheets will.
In this photo I am cleaning the floor of my
finish room which, as you might imagine,
gets quite gunked up from time to time.
The RAS 115 with Vlies scouring pads is
just the ticket.
The small (115mm) diameter pad helps
get into nooks and crannies that larger
grinder style units cannot such as under
the toe kick on the cabinets that are present in my finish room.
My suggestion is to practice a bit with this
machine before starting in on an important work piece. Use a slower speed and
a lighter touch until you get the feel of
how aggressive it is with a given abrasive
material. Once you develop a feel for it,
you will find it in your hands often.
Dust extraction, while very good, is not as
complete as with the other Festool sanders which employ the nine hole system
we discussed earlier where air is drawn
through the center hole and out through
the eight outer holes and into the attached dust collector. As mentioned
above, the RAS 115 instead uses a
space between the sanding material and
the body of the unit to draw the sanding
grit out through the vacuum port. The
brushes that can be rotated around the
outside perimeter of this space are what
help to direct the sanding grit into the
vacuum port.
Page 19

The LS 130 EQ is a pure linear
sander. It moves the pad fore and aft in a
4mm (5/32”) stroke. There is no rotary or
side to side action. This allows the effi-
cient
sanding
of
edges
and
profiles
that
would
not be
possi-
ble by
any other means. Sanders which move
the pad in any direction other than purely
linearly will create a flat spot on any linear
curved surface like a stair handrail. With
the LS sander you can easily do rebates
(rabbets), edges, or profiles that otherwise would require laborious hand sanding.
attached vacuum through a port designed
into the machine itself.
Finally, a scraping knife (shown in the
Many different pads are available to fit
flat profiles, both concave and convex
radiuses of different sizes, and various
angles. The standard profile pads are
shown here along with the sander itself.
There even is a kit (shown to the right of
the sander) which will allow you to create
a custom profile. A block of foam with
dust extraction holes already formed into
the block is included along with glue and
a hook and loop surface. Temporarily
glue the hook and loop to the profile with
the included contact cement. Fit a piece
of sand paper to carve the backer block
to the shape of your custom profile. Now
glue on the hook and loop surface to the
profiled backer block and you are ready
to sand to exactly that shape. Slick!
Each of these pads has holes in it to allow the extraction of sanding dust via an
center of this photo) is offered as an accessory. Since the motion of the LS 130
is purely fore and aft you can use this to
scrape off wallpaper, carpet, and other
glued on materials far more easily than
you could do by hand.
Page 20

Next are the orbital sanders.
These move the pad in an orbit around a
fixed pivot point. The DS 400 EQ (pictured) is a very small and lightweight
sander that employs a triangular shaped
pad that moves in a 2mm (5/64”) orbit.
Its companion is the RS 400 EQ (not pic-
While pure orbital sanders
from other
manufacturers
often will leave
very noticeable
circular scratch
patterns, the
small diameter
orbit on these
two leaves a
nearly imperceptible scratch
pattern with all
but the largest grits. They are not in use
every day in my studio like the other Festool sanders are, but when the small size
or tight corner ability is needed, they are
really handy.
The other pure rotary sander, the RS 2 E
(pictured below) is another story. It is a
big, powerful work horse that is in my
hands virtually every day. It has a bit
tured) which has the same small size and
orbit but with a rectangular pad.
Both are so much smaller than most of
the other Festool sanders that they are
ideal for getting into corners or areas like
the inside of the box pictured above
where the RS 2 E (on the left) and the
ETS 150 3 (on the right) simply won’t fit.
Page 21

larger orbit (2.5mm), has a much larger
pad (115mm x 228mm or 4 1/2” x 9”), and
at 5.5 pounds is twice as heavy as the
DS and RS 400 sanders.
That big flat sanding pad (the right most
media pictured above) simply cannot be
beat for smoothing out large surfaces. It
is not an overly aggressive sander compared to the RAS 115 we discussed earlier or the RO 150 we will be discussing
shortly, but you can use it all day long
with no tingling of the hands. Since it
produces a really flat surface, there is no
worry about dips or gouges showing up
after the final finish is applied.
The weight works very much in your favor. All you need to do is guide it across
the surface. No downward pressure is
needed and none is desirable. Just glide
it along nearly vibration free and enjoy
how the surface begins to develop a
natural patina even before you apply any
finish at all. I often stop just to admire the
natural beauty of the wood itself once I
have worked up to the finer grits.
As pictured here you can see
how the large flat surface is
ideal for rail, style and panel
components where a tip of
the sander could well leave
an undesirable depression
along an edge.
The RS sander is also the
champion in my book for
sanding edges and breaking
sharp edges. I particularly
like the way it handles end
grain. The pure orbital action seems to me to cut the
end grain fibers more
cleanly than any of the other
sanders. You can also get
right up into corners on pan-
Page 22

els that are not raised flush with the surrounding rail and style components.
You can get either hook and loop pads or
pads with a clamp on each end to mechanically hold the abrasive material. A
hole punch is available if you prefer to
use your own abrasive sheet goods instead of buying the pre-punched sanding
materials.
stand shown both in process and completed) without it.
If you get the impression that I like this
sander a lot, you are correct. I use it
every day and can’t imagine making
fine furniture (such as the Brazilian
Cherry and Black Walnut plasma TV
Page 23

The DX 93 E “Deltex” sander is a specialty sander with a number of tricks up
its small “sleeves.” It rotates in a short
orbit to prevent the scratches that I found
common with other brands of arc swing
detail sanders. Those other brands simply move the pad in a fixed arc which exacerbates scratch marks since, unless
you constantly
move the machine, the same
sanding grit
passes the surface of the work
piece at the
same location
repeatedly
leaving often
hard to remove
deep scratches.
The DX sander
does not do this
and the results even in tight corners are
outstanding.
It is gear driven so it can drive even
coarse abrasives easily, but where I find it
really shines is in doing careful detail restoration sanding. This was required by
my son, Alex, for the fragile pieces on this
folding lap table made a half century ago
by Tubbs, the Wallingford, VT, snow shoe
company. Turn down the speed, put on a
fine abrasive, and the DX becomes a
very precise sanding tool that won’t tear
up details that you want to preserve.
While the DS 93 is featured by Festool as
“.... designed for strong abrasion through
reduction gearing ..... ideal for stripping
off old, thick and stubborn coatings,” I find
it also is one of the gentlest and most
easily controlled of all the Festool sanders when the speed is turned down. I
don’t make scale models, but, if I did, this
would be the first sander for which I’d
reach.
The pad at 93mm x 93mm (left in the
photo to the right) is quite a bit smaller
than the 100mm x 150mm pad on the DS
400 (right) we discussed earlier. Also, the
form factor is flatter so you can maneuver
the DX into even smaller areas than you
can with the DS sander.
Page 24

Both hard and soft pads are available.
Festool materials are offered in Brilliant,
Rubin or Saphir (shown right) up to 400
grit.
I often hand cut much finer grits from
other size materials and use them on the
DX 93 when I want very fine finishes in
very tight corners. With no holes in my
hand cut abrasives the dust collection is
not good so I have to be careful to frequently wipe away the residual sanding
dust. Dust collection with the Festool
supplied materials which do have the
proper holes is excellent.
The photo on the right shows the relative
sizes of the DX 93 (right) and the DX 400
(left). The tape measures may help you
visualize the absolute size of each.
Page 25

This brings us to the best known of the
Festool sanders, the random orbit machines and the highly regarded Rotex
units.
Random orbit machines rotate a pivot
point while allowing the attached but
not mechanically driven pad to move
in a random motion. This produces
very fine finishes with little or no scratching so long as you keep the pad flat on
the work surface. Tip the pad to get more
aggressive stock removal and
scratches are sure to be the result.
In the Festool lineup three random orbit sanders are offered:
two 150mm (six inch) pad size
units and a 125mm (five inch)
pad size unit. The ETS 150
EQ units are available with either
a 3mm orbit for fine sanding
(shown here on the left and below) and a 5mm orbit (not pictured) for more aggressive, but
still very fine, stock removal. The
ETS 125 (not pictured) has a
2.5mm orbit.
All three feature the Festool unique “Jetstream” system for dust removal and control. As we discussed in the
beginning of
this manual, the
machines draw
air through a
hole in the center of the abrasive material
then out
through eight
holes around
the outer perimeter of the
pad through a
port designed
into the sanders
themselves. This system is so effective
that even after a day of sanding I seldom
need to clean off my sanding center nor
do I find a need for ceiling mounted ambient air dust cleaners. I only wear a
Page 26

mask when dealing with woods that I
know cause an allergic reaction.
I can’t even begin to remember how
many random orbit sanders I wore out
and threw away before I began buying
Festool sanders when they first became
available in the US. No matter what
brand I tried, I always found myself limited in how long I could sand by vibration
induced tingling in my hands and by the
cloud of dust thrown off. I also was always irritated by having to replace the
hook and loop pads every few months.
Not so with the Festool units. The vibration is so minimal that I never even think
about the length of time I have been
sanding and seldom, if ever, feel that
dreaded tingling sensation in my hands.
In all the time I have used Festool sanders, I have only replaced pads on two of
them: once
on a Rotex
unit that I
simply wore
out since it
was in use so
much, and
the other time
on the RAS
when I first
got it and did
not realize
just how
much heat
could be
generated by
that aggressive unit (“pilot error” on
my part, not a
design issue
with the machine.)
Now let’s look at what I call the “great
synthesizer” of the Festool sanders, the
dual mode Rotex sander, buffer, pol-
isher unit shown here. The previous version is shown in the top photo and the
newer, replacement version is shown left
along side the previous version in the
lower photo.
These have the form factor of angle
grinders but that is where any comparison stops. The Rotex units, whether the
Page 27

150mm (6”) pad unit or the 125mm (5”)
unit (both shown here for size comparison), feature a switch selectable sanding
action. The green switch on the top
makes the mode change. In one mode
they act just like the ETS random orbit
units. Switch modes on the RO 150 or
the RO 125 and things get very different.
The second mode on both machines is a
hybrid between the gear driven pure rotary motion of the RAS 115 and the pure
random orbit motion of the ETS units.
the random orbit mode and smooth out
the relatively rough surface left by the rotary mode all the while gathering up all
that sanding dust through the
unit and off into the bag of the
vacuum rather than sending it
into the air and into your lungs.
Remove the sanding hook and
loop pad and put on a
polishing/buffing pad and the
RO units turn into one of the
finest variable speed polishers
I have ever used.
To buff out a build finish to a
mirror-like surface takes only
the Festool felt pads and a
couple of grits of an automotive polishing compound. With
rotary motion speed control
from 240 to 560 RPMs and eccentric motion control from 2000 to 5600
orbits per minute you don’t have to worry
about burning a sensitive finish or knocking off the edges unless you simply
“screw up.”
Practice a bit and you can replicate a guitar or piano gloss like the top of this coffee table done in highly figured Oregon
The gear driven pad turns in a rotary
motion while the pivot point orbits to
minimize burning and scratching. In
this mode (what Festool calls “rotary/
random” mode) these units are capable of removing stock at a very rapid
rate. Put on a coarse grit and I would
call it very, very rapid stock removal,
enough so that with the 150mm pad it
can be a handful to control until you
get the hang of it.
What is slick is how you can do rapid
stock removal with one grit and then
without even switching grits change to
Page 28

big leaf maple. Truly amazing results and
all from one very versatile machine.
No question about it, the Rotex machines, along with the big flat pad RS2E,
are my favorite Festool sanders, hands
down. I use the others for special purposes, but day in and day out it is either
the Rotex or the big flat pad RS2E that is
in my hands most of the time.
I use the Rotex with papers of all kinds up
to 1200 grit, with mesh backed screens
up to 4000 grit and with felt pads and
several different grits of polishing compounds. I also use it for applying waxes
when I want a soft “hand” on a piece.
all the way to the 14 foot ceiling. The
vent hood was constructed of plywood
and then covered with 5mm thick veneers
of the Bloodwood. After the final sanding
(with the RO 150 and Festool CT22 dust
collector,) wax was used as the final finish to produce the soft patina look I was
after.
Notice how easy the RO 150 is to control
even with one hand. With both hands on
the RO 150 it is really easy to manage
allowing you to balance even in difficult
locations such as on a ladder without
having to hang on for dear life.
One wax I really like is a combination of
beeswax and hard carnuba wax in a toluene base that can be somewhat difficult
to apply evenly. Put a 6” micro fiber pad
(available from surbuf.com) on the hook
and loop surface of the RO 150 polishing
pad and waxing becomes as easy and
fast as polishing.
That is what I am doing in this picture.
Here the design of this very modern
kitchen with solid wood countertops
called for a South African Bloodwood
stove vent hood over the top of the commercial gas range. The vent hood goes
Before I take a piece to a show or put it
into a gallery where I know it will be “lovingly” handled frequently, I like to put on
three coats of this wax since fingerprints
from one day can simply be wiped off before the show opens the next.
When I did this by hand on large pieces it
was a significant task. Now it is a “no
brainer” that I can do at the last minute,
thanks to the RO machines.
The RO 150 E has a 5mm stroke identical to the ETS 150/5 and, in random orbit
mode, sands just the same and hence
just as well. The smaller RO 125 uses a
3.6mm stroke and performs in random
orbit mode much the same but a bit more
aggressively than the ETS 125 with it’s
2.5mm orbit.
Page 29

Conclusion
In this manual we have looked at nine different Festool sanders which run the
gamut from pure rotary, to pure linear, to
pure orbit, to combinations of all of these.
The different kinds of sanders allow you
to select the optimum abrasive motion for
the work you are doing and the result you
want to achieve.
The question I get all the time is, “Which
should I buy”? I think the best way to
parse that question is the following:
If you are only able to buy one Festool
sander, and you do general woodworking
and furniture making, my recommenda-
tion is to start with the RO 150 or RO
125 Rotex sander. These are the allaround work horse sanders that, with the
right abrasive materials, can take you
from aggressive sanding and shaping in
the rotary mode through fine finish sanding in the random orbit mode. Switch to
felt pads and rubbing compounds to impart a mirror-like shine to your finish or to
apply waxes easily. The one I use the
most is the RO 150 as I like the 150 mm
(6”) sanding surface. The smaller 125
mm RO 125 works just as well, only covers less ground. Some like the lighter
weight of the RO 125, but I do not find the
RO 150 either heavy or clumsy.
The RO 150 uses a 5mm stroke while the
RO 125 uses a 3.6 mm stroke which can
result in a slightly smoother finish with the
same grit abrasive.
Need to sand large flat surfaces? The
choice is simple - use the RS 2. The
2.5mm stroke and pure rotary motion
coupled with the large (4.5” x 9”) rectangular pad produces an exceptionally
smooth flat surface. It is ideal for panels,
edges or any flat component. It is so
smooth you can sand all day if you need
to without the dreaded tingle in the
hands, wrists or arms. Dust collection is
really good when coupled with any of the
Festool vacuums.
If one is doing model work or trying to
reach small recesses my choice would be
the DX 93 Deltex sander. The small
triangular pad reaches where most other
pad shapes will not. At high speeds such
as the maximum 9,500 RPM its 2.5mm
sanding stroke produces very rapid stock
removal but obviously only over small
surface areas as the pad is only 93mm x
93mm. Slow it down to the low speed of
5,000 RPMs and use a fine grit to produce very smooth, very controlled sanding on small or fragile components.
Is rapid stock removal or rapid cleaning of
gunk or rust the objective? Go for the
RAS 115. Put on Saphir, Cristal or Ru-
bin abrasives and shape just about anything. Switch to Vlies pads for cleaning,
gunk and rust removal.
Do you need to sand profiles or odd edge
surfaces? If so, there is no substitute for
the LS 130 pure linear sander with all of
the available profile shape pads. Add the
profiling kit and you can easily custom
shape a backer pad to fit nearly any profile.
More and more I am asked to make solid
wood countertops like the ones shown on
the next page. To make them properly
(so they will never warp,) I like to place
sliding dovetails every 150 to 300mm
along the bottom side. This allows the
solid wood top to expand and contract
with normal seasonal changes in humidity
while holding the top from warping over
Page 30

time. A lip covers the ends of these sliding dovetail stringers. The top is attached
to the cabinet by screwing into the stringers.
Most of my customers prefer a soft
rounded edge like is shown here which I
like to cut with a Festool 491-015 roundover bearing guided router bit. To finish
sand that curved edge I use a 491-197
pad on the LS 130. While the round-over
bit has a 9.5mm radius and the pad is a
10mm radius, the results are very good
indeed.
As we discussed earlier, a really nice feature is the ability to make your own custom profile using the 490 780 kit. With it,
you are limited only by the overall size of
the pad (80 x 195mm). If the edge profile
is bigger than that, you can use two or
more kits to make custom profiles for different parts of the edge profile. I
can’t tell you how much hand sanding time this gem saves.
If furniture making is what you do and you
can bring yourself to invest in three Festool sanders, the combination of the RO
150 Rotex, ETS 150/3, and RS 2 shown
below is really hard to beat. The RO 150
(previous version pictured foreground left)
will do the fast stock removal and shaping
operations as well as the sanding up to
the middle grit range. Then switch to the
ETS (rear) for the finer grits and the RS
(right) for the flat panels and your work
will take on a whole new smoothness. If
polishing and buffing fits the look you are
after, put felt pads or a sheepskin pad on
the RO 150 and let rubbing compounds
and waxes work their magic. You will be
floored by the mirror-like surface you can
create. Then, when your needs, interests, and pocket book allow, add one or
more of the spe-
cialty sanders
shown here.
In general, random orbit sanders
will likely be the ones you use the
most often in the most different applications with the exception of the
RS 2 which will see use daily if you
build furniture which has large flat
surfaces.
If you are like
me, before long
all the great Festool sanders will
be in use in your
shop or studio
on a daily basis.
Enjoy!
Page 31

A Closing Note On Continuous
Improvement Engineering
Earlier we saw a few pictures of the
“new” and “previous” versions of the
Rotex sanders. I want to comment a bit
more on the differences as it reflects
well the Festool focus on continuous
improvement engineering.
There certainly was nothing “wrong”
with the previous Rotex sander. I can’t
even guess how many hours I used that
machine before the new version became available. It was, and the new
one remains, the best sander I have ever
while the longer body of the
older version caused it to tip
backwards.
The dust port is now removable to make tasks like polishing which don’t require the
dust port a bit easier. The
removable dust port (shown
in the photo above) also acts
as a hand guard to keep you
from banging your knuckles
on the work surface during
aggressive sanding operations.
used.
So, what did they improve?
The new version (left) is a bit shorter,
easier to control and has a more powerful
motor (720 vs 500 watts). Notice in the
photo at the top of the next column how
the new version balances flat on its pad
Pads change with a quick
quarter-turn twist lock instead
of via removal of the machine
screw fastener used on the previous
model.
Notice that the new model features the
very handy removable cord that is being
introduced across the Festool line with
each upgraded model. A quick quarterturn removes or attaches the power cord
so it is not in your way when the machine
is not in use.
Page 32

On the previous version changing from
rotary to random orbit mode required
lifting the lock and twisting a shaft, the
green mechanism shown in this photo.
Simple enough but a bit fussy. On the
thumb naturally falls. The previous
model had the on-off switch on the
side where you had to consciously
look or feel for it.
Finally, there is now a slick snap on
guard that prevents the Rotex pad
from impacting the work piece -
very much appreciated if you have
ever scarred a work piece by inad-
new version the same change is accomplished by simply moving the green rectangular button on the front top of the
unit. Faster and far handier. The other
green button shown is the on-off switch
positioned to be on top right where your
vertently hitting some part of it
with the edge of the pad. Ouch!
So this new version of the already
very good Rotex is a nice piece of
continuous improvement engineering that adds useful new features, improves power, and makes
the unit a bit smaller and easier to
handle with none of the good stuff
from the previous unit compromised. Bravo Festool!
Page 33

About the author.
Jerry Work designs and hand crafts fine
furniture in the 1907 Masonic Temple
building in historic Kerby, Oregon. Unless otherwise noted, all of the photos
used in this manual were taken in his
studio and gallery. Located on the Redwood Highway (US 199) 26 miles SE of
Grants Pass, OR, where visitors are always welcome.
He can be reached at glwork@mac.com
or via phone at 541-592-5360.
 Loading...