

Page 1
Originalbedienungsanleitung/Ersatzteilliste 6
Original operating manual/Spare parts list 9
Notice d’utilisation d’origine/Liste de pièces de rechange 11
Manual de instrucciones original/Lista de piezas de repuesto 13
Istruzioni per l’uso originali/Elenco parti di ricambio 16
Originele gebruiksaanwijzing/Lijst met reserveonderdelen 19
Originalbruksanvisning/Reservdelslista 21
Alkuperäiset käyttöohjeet/Varaosaluettelo 23
Original brugsanvisning/Reservedelsliste 25
Originalbruksanvisning/Reservedelsliste 27
Manual de instruções original/Lista de peças sobresselentes 29
Оригинал Руководства по эксплуатации/Перечень запасных частей 31
Originál návodu k obsluze/Seznam náhradních dílù 34
Oryginalna instrukcja eksploatacji/Lista części zamiennych 36
MFT/3-VL
475444_005
Page 2

EG-Konformitätserklärung. Wir erklären in alleiniger
Verantwortung, dass dieses Produkt mit den folgenden
Normen oder normativen Dokumenten übereinstimmt: EN 60745-1,
EN 55014-1, EN 55014-2, EN 61000-3-2, EN 61000-3-3 gemäß den
Bestimmungen der Richtlinien 2006/42/EG, 2004/108/EG, 2011/65/EU
(ab 01.01.2013).
EC-Declaration of Conformity: We declare at our sole
responsibility that this product is in conformity with the following
standards or standardised documents: EN 60745-1, EN 55014-1,
EN 55014-2, EN 61000-3-2, EN 61000-3-3 in accordance with the
regulations 2006/42/EC, 2004/108/EC, 2011/65/EU (from 01.01.2013).
CE-Déclaration de conformité communautaire. Nous déclarons
sous notre propre responsabilité que ce produit est conforme
aux normes ou documents de normalisation suivants: EN 60745-1, EN
55014-1, EN 55014-2, EN 61000-3-2, EN 61000-3-3 conformément aux
prescriptions des directives2006/42/CE, 2004/108/CE, 2011/65/UE (à
partir du 01.01.2013).
CE-Declaración de conformidad. Declaramos bajo nuestra
exclusiva responsabilidad que este producto corresponde
a las siguientes normas o documentos normalizados: EN
60745-1, EN 55014-1, EN 55014-2, EN 61000-3-2, EN 610003-3 conforme a las prescripciones estipuladas en las directrices
2006/42/CE, 2004/108/CE, 2011/65/UE (a partir del 01.01.2013).
CE-Dichiarazione di conformità. Dichiariamo sotto la nostra
esclusiva responsabilità che il presente prodotto è conforme alle
norme e ai documenti normativi seguenti: EN 60745-1, EN 55014-1, EN
55014-2, EN 61000-3-2, EN 61000-3-3 conformemente alle normative
delle direttive 2006/42/CE, 2004/108/CE, 2011/65/UE (dal 01.01.2013).
EG-conformiteitsverklaring. Wij verklaren op eigen
verantwoordelijkheid dat dit produkt voldoet aan de volgende
normen of normatieve documenten:
EN 60745-1, EN 55014-1, EN
55014-2, EN 61000-3-2, EN 61000-3-3 conform de richtlijnen 2006/42/
EG, 2004/108/EG, 2011/65/EU (vanaf 01.01.2013).
EG-konformitetsförklaring. Vi förklarar i eget ansvar, att denna
produkt stämmer överens med följande normer och normativa
dokument: EN 60745-1, EN 55014-1, EN 55014-2, EN 61000-3-2, EN
61000-3-3 enligt bestämmelserna i direktiven 2006/42/EG, 2004/108/
EG, 2011/65/EU (fr o m 2013-01-01).
EY-standardinmukaisuusvakuutus. Vakuutamme
yksinvastuullisina, että tuote on seuraavien standardien ja
normatiivisten ohjeiden mukainen: EN 60745-1, EN 55014-1, EN
55014-2, EN 61000-3-2, EN 61000-3-3 direktiivien 2006/42/EY,
2004/108/EY, 2011/65/EU (01.01.2013 alkaen) määräysten mukaan.
Verlängerung
Guide extension
Rallonge
Serien-Nr.
Serial no.
N° de série
MFT/3-VL 495510, 495511, 495513, 495514
Jahr der CE-Kennzeichnung: Year of CE
mark:
Année du marquage CE :
2008
Page 3
EF-konformitetserklæring: Vi erklærer at have alene ansvaret
for, at dette produkt er i overensstemmelse med de følgende
normer eller normative dokumenter: EN 60745-1, EN 55014-1, EN
55014-2, EN 61000-3-2, EN 61000-3-3 i henhold til bestemmelserne af
direktiverne 2006/42/EG, 2004/108/EG, 2011/65/EU (fra 01.01.2013).
CE-Konformitetserklæring. Vi erklærer på eget ansvar at
dette produktet er i overensstemmelse med følgende normer
eller normative dokumenter: EN 60745-1, EN 55014-1, EN 55014-2,
EN 61000-3-2, EN 61000-3-3 iht. Bestemmelsene i rådsdirektivene
2006/42/EF, 2004/108/EF, 2011/65/EU (fra 01.01.2013).
CE-Declaração de conformidade: Declaramos, sob a nossa
exclusiva responsabilidade, que este produto corresponde às
normas ou aos documentos normativos citados a seguir: EN 60745-1,
EN 55014-1, EN 55014-2, EN 61000-3-2, EN 61000-3-3 segundo as
disposições das directivas 2006/42/CE, 2004/108/CE, 2011/65/UE (a
partir de 01.01.2013).
Декларация соответствия ЕС. Мы заявляем с исключительной
ответственностью, что данный продукт соответствует
следующим нормам или нормативным документам: EN 60745-1, EN
55014-1, EN 55014-2, EN 61000-3-2, EN 61000-3-3 в соответствии
с положениями директив 2006/42/ EG, 2004/108/EG, 2011/65/EU (с
01.01.2013).
ES prohlášení o shodě. Prohlašujeme s veškerou odpovědností,
že tento výrobek je ve shodě s následujícími normami nebo
normativními dokumenty: EN 60745-1, EN 55014-1, EN 55014-2, EN
61000-3-2, EN 61000-3-3 podle ustanovení směrnic, 2006/42/ES,
2004/108/ES, 2011/65/EU (od 01.01.2013).
Oświadczenie o zgodności z normami UE. Niniejszym
oświadczamy na własną odpowiedzialność, że produkt ten
spełnia następujące normy lub dokumenty normatywne: EN 60745-1,
EN 55014-1, EN 55014-2, EN 61000-3-2, EN 61000-3-3 zgodnie z
postanowieniami wytycznych 2006/42/EG, 2004/108/EG, 2011/65/UE
(od 01.01.2013).
Festool GmbH
Wertstr. 20
D-73240 Wendlingen
Dr. Johannes Steimel
Leiter Forschung, Entwicklung, technische Dokumentation
Manager Research and Development, Tecnical Documentation
Directeur de recherce, développement, documentation technique
Page 4
1
2
1-1
1-2
Page 5
3-1
3-2
3-3
3-4
4-2 4-3
4-4
4-5
3
4
Page 6
6
triebenes Elektrowerkzeug (ohne Netzkabel).
Bewahren Sie alle beiliegenden Dokumente auf, und geben Sie die Maschine nur zusammen mit
diesen Dokumenten weiter.
Ziehen Sie den Stecker aus der Steckdose, be- vor Sie Geräteeinstellungen vornehmen, Zubehörteile wechseln oder das Gerät weglegen.
Diese Vorsichtsmaßnahme verhindert den unbeabsichtigten Start des Geräts.
Die Tischbeine müssen verriegelt und gegen Zusammenklappen gesichert sein, bevor das
Elektrowerkzeug eingebaut wird. Das Sichern
und Verriegeln der Beine ist besonders für zusammenlegbare Tische wichtig.
Befestigen Sie das Elektrowerkzeug sicher im Tisch vor der Benutzung. Elektrowerkzeuge,
die sich im Tisch bewegen, können zu einem
Verlust der Kontrolle führen.
Stellen Sie den Tisch auf einer festen, eben und waagerechten Fläche auf. Wenn der Tisch
verrutschen oder wackeln kann, kann das
Elektrowerkzeug nicht zuverlässig und sicher
kontrolliert werden.
Überlasten Sie nicht den Tisch, und mißbrau- chen Sie diesen nicht als Leiter oder Gerüst.
Eine Überlastung oder ein Stehen auf dem
Tisch macht diesen kopfl astig und ein Umkippen wird wahrscheinlich.
5 Aufstellen
Sorgen Sie dafür, dass der Boden um die Ma- f
schine eben, in gutem Zustand und frei von
lose herumliegenden Gegenständen (z. B.
Spänen und Schnittresten) ist.
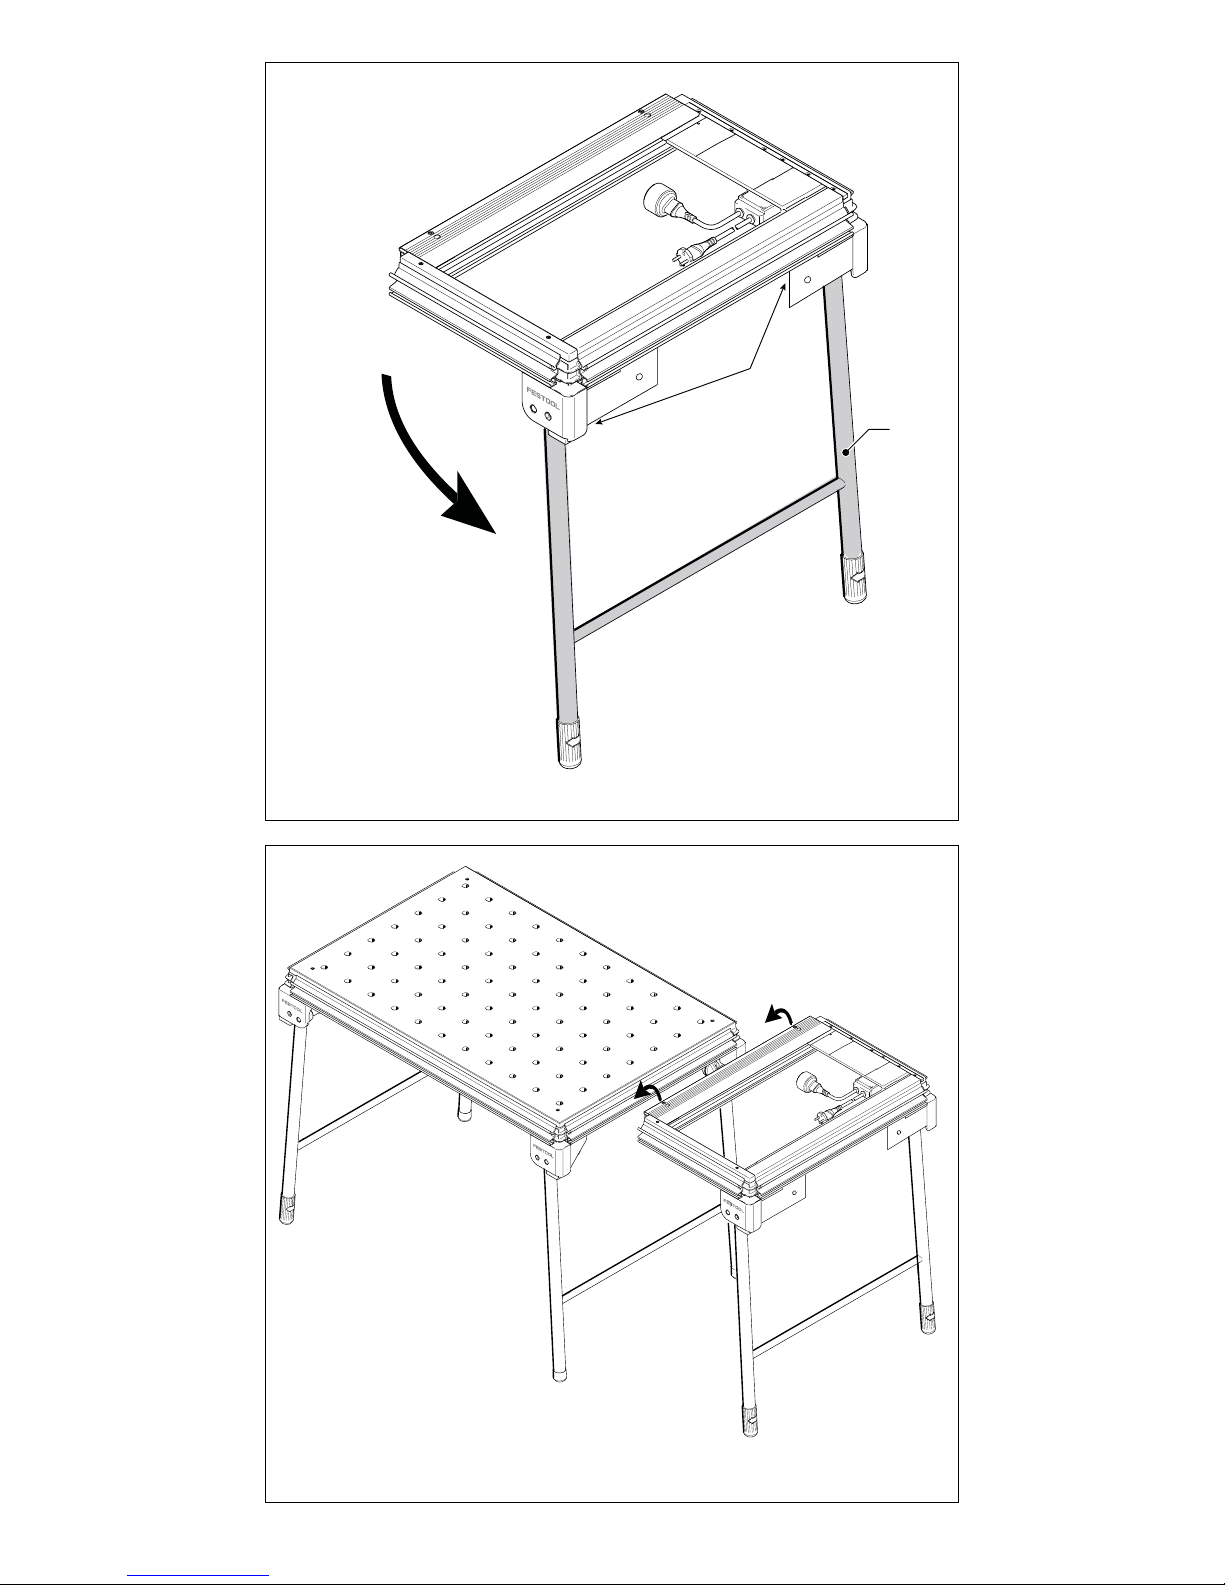
Zum Ausklappen der Beine [1-2] sind die zwei f
Drehknöpfe [1-1] bis zum Anschlag zu öffnen.
Nach dem Ausklappen der Beine sind die zwei
Drehknöpfe wieder festzudrehen.
Lockern Sie ggf. die Schrauben [3-2]. f
Setzen Sie die Verlängerung MFT/3-VL von f
oben auf die Nut am MFT/3 auf [Bild 2]. Achten
Sie darauf, dass die Fluchtlinien der Profi lnut
am MFT/3 und MFT/3-VL [3-4] übereinstimmen.
Passen Sie die Höhe der MFT/3-VL auf beiden f
Seiten mit den Schrauben [3-1] auf den MFT/3
an.
Verriegeln Sie die MFT/3-VL auf beiden f
Seiten mit der Schraube [3-2] am MFT/3.
Damit die Maschine sicher und eben steht, f
können beide Beine durch Verdrehen der Ab-
MFT/3-VL
1 Technische Daten
Tischabmessung
(Breite x Länge)
773 x 481 mm
Tischhöhe mit Klappbeinen
854 mm
Gewicht 11,3 kg
2 Symbole
Warnung vor allgemeiner Gefahr
Gefahr vor Stromschlag
Anleitung/Hinweise lesen!
Die angegebenen Abbildungen befi nden sich am
Anfang der Bedienungsanleitung.
3 Bestimmungsgemäße Verwen-
dung
MFT/3-VL ist eine Grundeinheit zum Einbau von
CMS-TS 55 CMS-TS 75 CMS-PS 200/PS 300 CMS-BS 120 CMS-OF -
Basis Module (außer Basis 1A) -
in Verbindung mit dem Multifunktionstisch
MFT/3.
Es dürfen nur die von Festool angebotenen Module und Elektrowerkzeuge eingebaut werden.
Der Einbau anderer Elektrowerkzeuge macht
den Tisch unsicher und erhöht die Gefährdung
für den Benutzer. Der Anbau darf nur am MFT/3
erfolgen.
Für Schäden und Unfälle bei nicht bestimmungsgemäßem Gebrauch haftet der Benutzer.
4 Sicherheitshinweise
ACHTUNG! Lesen Sie sämtliche Sicherheits-
hinweise und Anweisungen. Fehler bei der Einhaltung der Warnhinweise und Anweisungen
können elektrischen Schlag, Brand und/oder
schwere Verletzungen verursachen.
Der nachfolgend verwendete Begriff “Elektrowerkzeug” bezieht sich auf Ihr netzbetriebenes
Elektrowerkzeug (mit Netzkabel) oder akkube-
Page 7

7
schlussklappen [3-3] in der Länge verändert
werden.
6 Elektrischer Anschluss
WARNUNG
Unfallgefahr, falls die Maschine bei unzulässiger Spannung oder Frequenz betrieben wird.
Die Netzspannung und die Frequenz der f
Stromquelle müssen mit den Angaben auf
dem Typenschild der Maschine übereinstimmen.
In Nordamerika dürfen nur Festool Maschi- f
nen mit einer Spannungsangabe von 120 V
eingesetzt werden.
VORSICHT
Verletzungsgefahr, Stromschlag
Der Netzstecker darf nur an einer schutzge- f
erdeten Steckdose angeschlossen werden.
Es dürfen nur Verlängerungskabel mit f
Schutzleiter verwendet werden.
Die Schalter-/Steckereinheit [4-1] dient zur
Spannungsversorgung und zum EIN-/AUSSchalten eines in die MFT/3-VL eingebauten
Elektrowerkzeuges.
Stecken Sie den Netzstecker [4-5] in eine f
schutzgeerdete Steckdose.
Schließen Sie das in die MFT/3-VL eingebaute f
Elektrowerkzeug an den Stecker [4-4] an.
Drücken Sie zum EIN-Schalten die grüne Tas- f
te [4-2].
Drücken Sie zum AUS-Schalten die rote Taste f
[4-3].
Die Schalter-/Steckereinheit besitzt einen Nullspannungs-Auslöser. Dieser verhindert eine
selbständige Spannungswiederkehr nach einer
Spannungsunterbrechung (z.B. Stromausfall).
Drücken Sie nach einer Spannungsunterbrechung zum EIN-Schalten erneut die grüne Tas-
te.
7 Zubehör
Verwenden Sie nur das für dieses Gerät vorgesehene originale Festool Zubehör und Festool Verbrauchsmaterial, da diese System-Komponenten optimal aufeinander abgestimmt sind. Bei
der Verwendung von Zubehör und Verbrauchsmaterial anderer Anbieter ist eine qualitative
Beeinträchtigung der Arbeitsergebnisse und
Einschränkung der Garantieansprüche wahrscheinlich. Je nach Anwendung kann sich der
Verschleiß der Maschine oder Ihre persönliche
Belastung erhöhen. Schützen Sie daher sich
selbst, Ihre Maschine und Ihre Garantieansprüche durch die ausschließliche Nutzung von original Festool Zubehör und Festool Verbrauchsmaterial!
Die Bestellnummern für Zubehör und Werkzeuge fi nden Sie in Ihrem Festool-Katalog oder im
Internet unter „www.festool.com“.
8 Entsorgung
Werfen Sie das Gerät nicht in den Hausmüll!
Führen Sie die Geräte, Zubehör und Verpackungen einer umweltgerechten Wiederverwertung
zu. Beachten Sie die geltenden nationalen Vorschriften.
9 Gewährleistung
Für unsere Geräte leisten wir auf Material- oder
Fertigungsfehler Gewährleistung gemäß den
länderspezifi schen gesetzlichen Bestimmungen, mindestens jedoch 12 Monate. Innerhalb
der Staaten der EU beträgt die Gewährleistungszeit 24 Monate (Nachweis durch Rechnung oder Lieferschein). Schäden, die insbesondere auf natürliche Abnützung/Verschleiß,
Überlastung, unsachgemäße Behandlung bzw.
durch den Verwender verschuldete Schäden
oder sonstige Verwendung entgegen der Bedienungsanleitung zurückzuführen sind oder beim
Kauf bekannt waren, bleiben von der Gewährleistung ausgeschlossen. Ebenso ausgeschlossen bleiben Schäden, die auf die Verwendung
von nicht-original Zubehör und Verbrauchmaterialien (z.B. Schleifteller) zurückzuführen sind.
Beanstandungen können nur anerkannt werden,
wenn das Gerät unzerlegt an den Lieferanten
oder an eine autorisierte Festool-Kundendienstwerkstätte zurückgesendet wird. Bewahren Sie
Bedienungsanleitung, Sicherheitshinweise, Ersatzteilliste und Kaufbeleg gut auf. Im übrigen
gelten die jeweils aktuellen Gewährleistungsbedingungen des Herstellers.
Anmerkung
Aufgrund der ständigen Forschungs- und Entwicklungsarbeiten sind Änderungen der hierin
gemachten technischen Angaben vorbehalten.
Page 8

8
REACh
REACh ist die seit 2007 in ganz Europa gültige
Chemikalienverordnung. Wir als „nachgeschalteter Anwender“, also als Hersteller von Erzeugnissen sind uns unserer Informationspfl icht
unseren Kunden gegenüber bewusst. Um Sie
immer auf den neuesten Stand halten zu können
und über mögliche Stoffe der Kandidatenliste in
unseren Erzeugnissen zu informieren, haben wir
folgende Website für Sie eingerichtet:
www.festool.com/reach
Page 9
9
MFT/3-VL
1 Technical data
Bench dimensions
(width x length)
773 x 481 mm
Bench height with
foldaway legs
854 mm
Weight 11.3 kg
2 Symbols
Warning of general danger
Risk of electric shock
Read the Operating Instructions/Notes!
The specifi ed illustrations are at the beginning of
the Operating Instructions.
3 Intended use
MFT/3-VL is a basic unit for mounting the
CMS-TS 55 CMS-TS 75 CMS-PS 200/PS 300 CMS-BS 120 CMS-OF Basis modules (except Basis 1A) -
in combination with multifunction table MFT/3.
Do not install modules and electric power tools
that are not manufactured by Festool. Installing
other electric power tools may render the bench
unsafe and increase the risk of injury to the user.
Use in combination with the MFT/3 only.
The user bears the responsibility for damage and
accidents caused by improper use.
4 Safety instructions
CAUTION! Read and observe all informa-
tion and safety instructions. Ignoring warning notes and instructions may lead to electric shocks, fi res and/or cause serious injury.
The term "electric power tool" used in this document refers to all mains-powered (with mains
cable) or battery-powered (without mains cable)
electric power tools.
Keep all of the accompanying documents and pass on the documentation if the machine
changes ownership.
Remove the plug from the socket before ad- justing the machine settings, changing accessory parts or putting away the machine. This
precautionary measure will prevent the machine from starting accidentally.
The bench legs should be locked in position and secured against folding before the power tool is installed. Securing and locking the
legs is particularly important on collapsable
benches.
Make sure the power tool has been fi tted se- curely to the bench before using. Power tools
that move within the bench may run out of
control.
Position the bench on a stable, level, horizon- tal surface. If the bench slides or wobbles, it
may not be possible to control the power tool
safely and reliably.
Do not overload the bench and never use it as a ladder or trestle. Overloading or standing
on the bench will make it top-heavy and it will
most likely tip over.
5 Setting up
Ensure that the fl oor around the machine is f
level, in good condition and free of loose objects (e.g. chips and offcuts).
Unscrew the two rotary knobs [1-1] all the way f
and unfold the legs [1-2]. Tighten the rotary
knobs again once the legs are unfolded.
Slacken the screws [3-2] if necessary. f
Position the table extension MFT/3-VL into the f
groove on the MFT/3 from above [Fig. 2]. Make
sure that the profi le groove alignment lines on
the MFT/3 and MFT/3-VL [3-4] line up.
Adjust the height of the MFT/3-VL to the MFT/3 f
on both sides using screws [3-1].
Lock both sides of the MFT/3-VL using the f
screw [3-2] on the MFT/3.
If the machine wobbles, turn the end caps f
[3-3] on either leg to adjust the length so that
the machine stands securely.
Page 10

10
6 Electrical connection
WARNING
Risk of accident if the machine is operated using unauthorised voltages or frequencies.
The mains voltage and the frequency of the f
power source must correspond with the
specifi cations on the machine’s name plate.
In North America, only Festool machines with f
voltage specifi cations of 120 V may be used.
CAUTION
Risk of injury, electric shock
Never connect the plug to an unearthed sock- f
et.
Always use extension cables with a protective f
earth conductor.
The switch/connector unit [4-1] activates the
power supply and switches the electric power tool installed in the MFT/3-VL on and off.
Insert the plug [4-5] into an earthed socket. f
Connect the electric power tool installed in the f
MFT/3-VL to the plug [4-4].
Press the green button [4-2] to switch ON. f
Press the red button [4-3] to switch OFF. f
The switch/connector unit is fi tted with a zero
voltage actuator which prevents the power from
being restored automatically when the power
supply is interrupted (e.g. after a power failure).
After an interruption in the power supply, press
the green button to switch the machine ON.
7 Accessories
Use only original Festool accessories and Festool consumable material intended for this machine because these components are designed
specifi cally for the machine. Using accessories
and consumable material from other suppliers
will most likely affect the quality of your working results and limit any warranty claims. Machine wear or your own personal workload may
increase depending on the application. Protect
yourself and your machine, and preserve your
warranty claims by always using original Festool accessories and Festool consumable material! The order numbers of the accessories
and tools can be found in the Festool catalogue
or on the Internet under "www.festool.com".
8 Disposal
Do not throw the appliance in your household
waste! Dispose of machines, accessories and
packaging at an environmentally responsible recycling centre. Observe the valid national regulations.
9 Warranty
For our tools, we give warranty for material and
production defects in accordance with the locally applicable legal provisions, but in any case
for at least 12 months. Within the EU member
states, the warranty period is 24 months (verifi cation through invoice or delivery note). Damage caused by the operator, natural wear, overloading, incorrect handling or through the use
of the equipment not specifi ed in the operating
manual, or damage which was known at the
time of purchase, is not covered by the warranty.
Furthermore, damage caused by the use of nonoriginal accessories and consumable materials
(e.g. sanding pads) is also excluded. Complaints
can only be recognised if the tool is returned
while still assembled to the supplier or an authorised Festool Customer Service workshop.
Keep the operating manual, safety instructions,
spare parts list and purchase receipt in a safe
place. Otherwise the respective, current warranty conditions of the manufacturer shall apply.
Note
Due to continuous research and development
work, we reserve the right to make changes to
the technical content of this documentation.
REACh
REACh is a European Chemical Directive that
came into effect in 2007. As “downstream users”
and product manufacturers, we are aware of our
duty to provide our customers with information.
We have set up the following website to keep you
updated with all the latest news and provide you
with information on all the materials used in our
existing products: www.festool.com/reach
Page 11
11
MFT/3-VL
1 Caractéristiques techniques
Dimensions de la
table (largeur x longueur)
773 x 481 mm
Hauteur de la table
avec pieds rabattables
854 mm
Poids 11,3 kg
2 Symboles
Avertissement de danger général
Risque d'électrocution
Lire la notice / les instructions !
Les illustrations indiquées se trouvent au début
de la notice d'utilisation.
3 Utilisation conforme aux prescrip-
tions
L'unité MFT/3-VL est une unité de base pour le
montage de
CMS-TS 55 CMS-TS 75 CMS-PS 200/PS 300 CMS-BS 120 CMS-OF -
modules de base (excepté base 1A) en relation avec la table multifonctions MFT/3.
Seuls les modules et les outils électriques pro-
posés par Festool peuvent être montés. Le montage d'autres outils électriques rend la table incertaine et augmente le danger pour l'utilisateur.
Le montage doit uniquement s'effectuer sur la
table MFT/3.
L'utilisateur est responsable des dommages
et accidents provoqués par une utilisation non
conforme.
4 Consignes de sécurité
ATTENTION ! Veuillez lire toutes les consignes
de sécurité et instructions. Des erreurs résultant du non-respect des consignes d'avertisse-
ment et des instructions peuvent occasionner un
choc électrique, des brûlures et/ou des blessures graves.
Le terme "outil électrique" utilisé par la suite
se rapporte à votre outil électrique raccordé au
secteur (avec câble de secteur) ou à votre outil
électrique fonctionnant avec accumulateur (sans
câble de secteur).
Conservez précieusement tous les documents fournis. En cas de cession de la machine, donnez-les au nouveau propriétaire.
Débranchez le connecteur de la prise de cou- rant avant d'effectuer les réglages sur l'appareil, avant de remplacer les accessoires ou
avant de ranger l'appareil. Cette mesure de
précaution empêche un démarrage involontaire de l'appareil.
Les pieds de la table doivent être verrouillés et ne pas pouvoir se replier lorsque l'outil
électrique est monté. Le verrouillage et l'immobilisation des pieds sont particulièrement
importants pour les tables repliables.
Fixez de façon sûre l'outil électrique sur la ta- ble avant toute utilisation. Les outils électriques qui "bougent" par rapport à la table risquent d'occasionner une perte de contrôle.
Positionnez la table sur une surface stable, plane et horizontale. Si la table glisse ou vacille, l'outil électrique risque de n'être ni fi able, ni maîtrisable.
Ne surchargez pas la table ; ne l'utilisez pas comme échelle ou comme échafaudage. Le fait
de surcharger la table ou de monter dessus la
rend instable et susceptible de se renverser.
5 Installation
Veillez à ce que le sol autour de la machine soit f
plan, en bon état, et libre de tout objet (p. ex.
copeaux ou chutes de coupe).
Pour déplier les pieds [1-2], il convient d'ouvrir f
les deux boutons rotatifs [1-1] jusqu'en butée.
Les deux boutons rotatifs doivent à nouveau
être serrés après le dépliage des pieds.
Desserrez les vis [3-2] si nécessaire. f
Montez la rallonge MFT/3-VL par le haut dans f
la rainure de la table MFT/3 [fi gure 2]. Assurez-vous de la correspondance des lignes
d'alignement de la rainure du profi lé sur la table MFT/3 et la rallonge MFT/3-VL [3-4].
Page 12

12
Adaptez la hauteur de la rallonge MFT/3-VL f
des deux côtés par rapport à la table MFT/3, à
l'aide des vis [3-1].
Verrouillez la rallonge MFT/3-VL des deux f
côtés de la table MFT/3, au moyen de la vis
[3-2].
Afi n que la machine soit stable et horizonta- f
le, il est possible de modifi er la longueur des
deux pieds en tournant les capuchons d'extré-
mité [3-3].
6 Raccordement électrique
AVERTISSEMENT
Risque d'accident si la machine est utilisée
avec une tension ou une fréquence d'alimentation inadaptée.
La tension et la fréquence d'alimentation f
électrique doivent être conformes aux indications de la plaque signalétique de la machine.
En Amérique du nord, seuls des outils Fes- f
tool fonctionnant avec une tension de 120 V
doivent être utilisés.
ATTENTION
Risques de blessures, choc électrique
La fi che secteur doit uniquement être bran- f
chée sur une prise de courant reliée à la terre.
Seules des rallonges dotées d'un conducteur f
de protection peuvent être utilisées.
Le bloc interrupteur / connecteur [4-1] sert
à l'alimentation et à la mise en marche et à
l'arrêt d'un outil monté sur l'unité MFT/3-VL.
Branchez la fi che secteur [4-5] sur une prise f
de courant reliée à la terre.
Raccordez l'outil électrique monté sur l'unité f
MFT/3-VL au connecteur [4-4].
Pour la mise en marche, appuyez sur la tou- f
che verte [4-2].
Pour l'arrêt, appuyez sur la touche rouge f
[4-3].
Le bloc interrupteur / connecteur possède un
dispositif anti-réarmement. Ce dispositif empêche toute réalimentation après une coupure de
courant. Après une coupure de courant, appuyez
à nouveau sur la touche verte pour la remise en
marche.
7 Accessoires
Utilisez uniquement les accessoires Festool
et les consommables Festool d'origine prévus
pour cet appareil, car ces composants systèmes
sont parfaitement adaptés les uns par rapport
aux autres. Si vous utilisez des accessoires et
consommables d'autres marques, la qualité du
résultat peut être dégradée et les recours en
garantie peuvent être soumis à des restrictions.
L'usure de la machine ou votre charge personnelle peuvent augmenter selon chaque application. Pour cette raison, protégez-vous, votre outil
et vos droits à la garantie en utilisant exclusivement des accessoires Festool et des consommables Festool d'origine !
Les références des accessoires et des outils fi gurent dans le catalogue Festool ou sur sous
"www.festool.com".
8 Recyclage
Ne jetez pas les outils électriques avec les ordures ménagères! Eliminez les appareils, les
accessoires et les emballages de façon compatible avec l’environnement. Respectez en cela les
dispositions nationales en vigueur .
9 Garantie
Nous accordons pour nos appareils une garantie pour tout défaut de matière et vice de fabrication conformément aux spécifi cations légales
de chaque pays considéré, toutefois pour un
minimum de 12 mois. A l'intérieur des états de
l'Union Européenne, la durée de la garantie est
de 24 mois (justifi catif par la facture ou le bordereau de livraison). Les dommages provenant en
particulier de l'usure naturelle, d'une surcharge,
d'une manipulation non conforme ou imputables
à l'utilisateur ou à une utilisation contraire à la
notice d'utilisation, ou connus au moment de
l'achat, sont exclus de la garantie. Sont également exclus les dommages résultant de l'utilisation d'accessoires et de consommables (plateau de ponçage par exemple) qui ne sont pas
des pièces d'origine Festool.
Les réclamations ne peuvent être reconnues que
si l'appareil est renvoyé, sans être désassemblé,
au fournisseur ou à un service après-vente Festool agréé. Conservez bien la notice d'utilisation,
les consignes de sécurité, la nomenclature des
pièces de rechange et l'attestation d'achat. Pour
le reste, les conditions de garantie en vigueur du
fabricant sont applicables.
Page 13

13
Remarque
Nous nous réservons le droit de modifi er les caractéristiques techniques mentionnées en raison de nos travaux continus de recherche et de
développement.
REACH
REACh est le nom de la directive sur les produits
chimiques applicable à l’ensemble de l’Europe
depuis 2007. En notre qualité d’« utilisateur en
aval », en l’occurrence de fabricant de produits,
nous sommes tenus à un devoir d’information
vis-à-vis de notre clientèle. Afi n de vous tenir
systématiquement informés des dernières nouveautés ainsi que des substances susceptibles
de fi gurer sur la liste des candidats et rentrant
dans la composition de nos produits, nous avons
créé le site Internet suivant : www.festool.com/
reach
MFT/3-VL
1 Datos técnicos
Dimensiones de la mesa
(anchura x longitud)
773 x 481 mm
Altura de la mesa con patas
plegables
854 mm
Peso 11,3 kg
2 Símbolos
Aviso ante un peligro general
Peligro de electrocución
¡Leer las instrucciones e indicaciones!
Las fi guras indicadas se encuentran al principio
del manual de instrucciones.
3 Uso conforme a lo previsto
MFT/3-VL es una estructura básica para el montaje de
CMS-TS 55 -
CMS-TS 75 -
CMS-PS 200/PS 300 -
CMS-BS 120 -
CMS-OF -
Módulos Basis (excepto Basis 1A) en combinación con la mesa multifuncional
MFT/3.
Solo se deben montar módulos y herramientas
eléctricas de Festool. El montaje de otras herramientas eléctricas convierte a la mesa en insegura e incrementa el peligro para el usuario. El
montaje solo puede efectuarse en MFT/3.
El usuario es responsable de los daños y accidentes producidos por un uso indebido.
4 Indicaciones de seguridad
¡ATENCIÓN! Lea y observe todas las indicaciones
de seguridad. Si no se cumplen debidamente las
indicaciones de advertencia y las instrucciones
puede producirse una descarga eléctrica, fuego
y/o lesiones graves.
El término utilizado en adelante "herramienta
eléctrica" se refi ere a la herramienta eléctrica
alimentada por red eléctrica (con cable de red) o
una herramienta eléctrica alimentada por acumulador (sin cable de red).
Conserve todos los documentos adjuntos y en- tregue la máquina sólo junto con dicha documentación.
Extraiga el enchufe de la caja de contacto an- tes de efectuar los ajustes de la herramienta,
cambiar las piezas accesorias o guardar la herramienta. Esta medida de seguridad impide
el arranque accidental de la herramienta.
Antes de montar la herramienta eléctrica, compruebe que las patas de la mesa estén
bloqueadas para evitar el plegado accidental.
Fijar y bloquear las patas es de especial importancia en el caso de las mesas plegables.
Fije fi rmemente la herramienta eléctrica a la mesa antes de utilizarla. Si la herramienta
eléctrica se mueve, puede producirse la pérdida del control de la misma .
Page 14

14
Sitúe la mesa en una superfi cie sólida, lisa y -
horizontal. Si la mesa puede desplazarse o se
tambalea, no podrá controlar la herramienta
eléctrica de forma segura y efi caz.
No sobrecargue la mesa, ni la utilice a modo -
de escalera o andamio. Si la sobrecarga o se
sube encima de ella, existe un gran riesgo de
vuelco.
5 Instalación
Asegúrese de que la base alrededor de la má- f
quina sea plana, esté en buen estado y libre
de objetos sueltos (p. ej., virutas y restos de
corte).
Para desplegar las patas [1-2] deben abrirse f
los dos botones giratorios [1-1] hasta el tope.
Tras desplegar las patas deben girarse los dos
botones giratorios hasta su completo cierre.
En caso necesario, afl oje los tornillos [3-2]. f
Coloque la prolongación MFT/3-VL desde arri- f
ba sobre la ranura en MFT/3 [fi gura 2]. Obser-
ve que la alineación de la ranura perfi lada co-
incida en MFT/3 y MFT/3-VL [3-4].
Adapte la altura de la MFT/3-VL en ambos la- f
dos con los tornillos [3-1] a MFT/3.
Bloquee la MFT/3-VL en ambos lados con el f
tornillo [3-2] en MFT/3.
Para que la máquina permanezca en equilibrio f
y plana, puede modifi carse la longitud de am-
bas patas girando las caperuzas de tope [3-3].
6 Conexión eléctrica
AVISO
Peligro de accidente en caso de utilizar la máquina con una tensión o frecuencia incorrectas.
La tensión de la red y la frecuencia de la red f
eléctrica deben coincidir con los datos que fi guran en la placa de tipo de la máquina.
En Norteamérica solo pueden utilizarse las f
máquinas Festool con una tensión de 120 V.
ATENCIÓN
Peligro de lesiones, electrocución
El enchufe solo puede conectarse a una toma f
de corriente con protección mediante toma
de tierra.
Solo se deben utilizar cables de prolongación f
con conductor protector.
La unidad de conexión [4-1] permite la alimentación de corriente y la conexión o desconexión de
una herramienta eléctrica montada en la MFT/3VL.
Conecte el enchufe [4-5] a una toma de co- f
rriente con protección mediante toma de tierra.
Enchufe la herramienta montada en la MFT/3- f
VL en el enchufe [4-4].
Pulse la tecla verde [4-2] para conectar la he- f
rramienta.
Pulse la tecla roja [4-3] para desconectar la f
herramienta.
La unidad del interruptor/conector dispone de
un disparador de tensión nula que evita que se
recupere la tensión de forma automática tras
una caída de la tensión (p. ej., tras un corte de
corriente). Después de producirse una caída de
la tensión pulse de nuevo la tecla verde para co-
nectar la herramienta.
7 Accesorios
Utilice únicamente los accesorios Festool originales y el material de consumo Festool diseñados
para esta máquina, puesto que los componentes
de este sistema están óptimamente adaptados
entre sí. La utilización de accesorios y material
de consumo de otros fabricantes es probable que
afecte a la calidad de los resultados de trabajo y
conlleve una limitación de los derechos de la garantía. El desgaste de la máquina o de su carga
personal puede variar en función de la aplicación. Utilice únicamente accesorios originales y
material de consumo de Festool para su propia
protección y la de la máquina, así como de los
derechos de la garantía. Los números de pedido de los accesorios y herramientas fi guran en
el catálogo Festool o en Internet en la dirección
www.festool.com.
Page 15

15
8 Reciclaje
¡No desechar las herramientas eléctricas junto
con los residuos domésticos! Recicle los apara-
tos, accesorios y embalajes de forma respetuosa
con el medio ambiente. Tenga en cuenta la normativa vigente del país.
9 Garantía
Le ofrecemos una garantía ante defectos en los
materiales o de fabricación de nuestras herramientas conforme a las normativas nacionales
vigentes durante un periodo mínimo de 12 meses. El tiempo de validez de la garantía es de
24 meses en los países de la UE (mostrando la
factura o el resguardo de entrega). La garantía
no cubre los daños producidos por deterioro/
desgaste natural, sobrecarga, manejo inadecuado o daños ocasionados por el usuario o por un
uso distinto al indicado en el manual de instrucciones, así como tampoco cubre aquellos daños
conocidos por el usuario en el momento de la
compra. También quedan excluidos los daños
provocados a raíz de la utilización de accesorios
y materiales de consumo no originales (p. ej.,
platos lijadores). Solo se aceptarán reclamaciones si se envía la herramienta sin desmontar al
proveedor o a un taller de servicio autorizado por
Festool. Conserve el manual de instrucciones,
las indicaciones de seguridad, la lista de piezas
de repuesto y el ticket de compra. En otros casos
serán válidas las condiciones de garantía del fabricante.
Observación
Sujeto a modifi caciones técnicas como resultado de los continuos trabajos de investigación y
desarrollo.
REACH
La normativa REACh, vigente desde 2007 en
toda Europa, regula el uso de productos químicos. Nosotros, como “usuarios intermedios”,
es decir, como fabricantes de productos, somos
conscientes de nuestra obligación de mantener
informados a nuestros clientes. A fi n de mantenerle siempre al día de nuestras novedades y de
informarle sobre las posibles sustancias utilizadas en nuestros productos, hemos creado para
usted la siguiente página web: www.festool.com/
reach
Page 16

16
MFT/3-VL
1 Dati tecnici
Dimensioni del piano
(larghezza x lunghezza)
773 x 481 mm
Altezza del banco con
gambe pieghevoli
854 mm
Peso 11,3 kg
2 Simboli
Avvertenza di pericolo generico
Pericolo di scossa
Leggere le istruzioni/avvertenze!
Le fi gure indicate nel testo si trovano all'inizio
delle istruzioni per l'uso.
3 Utilizzo conforme
MFT/3-VL è un'unità di base per l'installazione
del
CMS-TS 55 -
CMS-TS 75 -
CMS-PS 200/PS 300 -
CMS-BS 120 -
CMS-OF -
Moduli Basis (escluso Basis 1A) in combinazione con il piano multifunzione
MFT/3.
Possono essere montati solo i moduli e gli uten-
sili elettrici offerti da Festool. Il montaggio di
altri utensili elettrici rende il banco instabile e
aumenta il rischio per l'utilizzatore. Montare
esclusivamente su MFT/3.
L'utilizzatore è responsabile per danni ed incidenti derivanti da un uso improprio.
4 Avvertenze di sicurezza
ATTENZIONE! Leggere tutte le avvertenze per
la sicurezza e le indicazioni. Eventuali errori
nell'osservanza delle avvertenze e delle indicazioni possono provocare scosse elettriche, incendi e/o gravi lesioni.
Il termine "utensile elettrico" utilizzato di segui-
to, si riferisce all'utensile alimentato elettricamente (con cavo di rete) o a batteria (senza cavo
di rete).
Conservare tutti i documenti allegati. Se affi data a terzi, la macchina deve essere
sempre provvista dei suddetti documenti.
Prima di regolare l'utensile, di sostituire gli accessori o di riporlo, estrarre la spina dalla
presa. Questa accortezza impedirà un avvio
accidentale dell'utensile.
Le gambe del banco devono essere bloccate e assicurate affi nché non si pieghino, prima di
installare l'utensile elettrico. Soprattutto per i
banchi pieghevoli è molto importante assicurare e bloccare le gambe.
Fissare saldamente l'utensile elettrico al ban- co in modo sicuro prima dell'utilizzo. Gli utensili elettrici che si muovono sul banco possono
causare la perdita del controllo.
Posizionare il banco su una superfi cie stabile, in piano e orizzontale. Se il banco può spostarsi o oscillare, l'utensile elettrico non può essere controllato in modo sicuro e affi dabile.
Non sovraccaricare il banco e non utilizzarlo in modo improprio, ad es. come scala o impalcatura. Se il banco viene sovraccaricato o utilizzato come sostegno per una persona, perde la
sua stabilità ed è probabile che si ribalti.
5 Montaggio
Accertatevi che il pavimento nei pressi della f
macchina sia in piano, in buono stato e non ci
siano oggetti sparsi nelle vicinanze (ad esempio trucioli e residui delle operazioni di taglio).
Per aprire le gambe [1-2], svitare le due ma- f
nopole [1-1] fi no all'arresto. Una volta aperte
le gambe, riavvitare le due manopole.
Allentate event. le viti [3-2]. f
Inserire la prolunga MFT/3-VL dall'alto nella f
scanalatura del MFT/3 [fi g. 2]. Sincerarsi che
le linee di fuga della scanalatura di profi lo sul
MFT/3 e MFT/3-VL [3-4] combacino.
Regolare l'altezza dell'MFT/3-VL su entrambi i f
lati per mezzo delle viti [3-1] sull'MFT/3.
Fissare l'MFT/3-VL su entrambi i lati con la f
vite [3-2] sull'MFT/3.
Al fi ne di garantire una stabilità e un equilibrio f
migliori della macchina, è possibile regolare la
lunghezza delle gambe ruotando i tappi [3-3].
Page 17

17
6 Collegamento elettrico
AVVERTIMENTO
Pericolo di incidente se la macchina viene azionata con una tensione o una frequenza diverse da
quelle ammesse.
La tensione di rete e la frequenza della sor- f
gente elettrica devono coincidere con le indicazioni sulla targhetta della macchina.
In America settentrionale è consentito esclu- f
sivamente l'impiego di utensili Festool con
una tensione di 120 V/Hz.
PRUDENZA
Pericolo di lesioni, scossa elettrica
La spina di rete deve essere collegata soltan- f
to ad una presa provvista di messa a terra.
Dovranno essere utilizzate solamente pro- f
lunghe munite di conduttore di terra.
L'unità interruttore/spina [4-1] serve per l'alimentazione elettrica e per l'accensione/spegnimento di uno strumento elettrico integrato in
MFT/3-VL.
Infi lare la spina elettrica [4-5] in una presa f
provvista di messa a terra.
Collegare l'utensile elettrico integrato in f
MFT/3-VL alla spina [4-4].
Per l'accensione, premere il tasto verde [4-2]. f
Per lo spegnimento, premere il tasto rosso f
[4-3].
L'unità interruttore/spina è munita di un inter-
ruttore di minima tensione. Esso impedisce il
ritorno di tensione automatico dopo un'interruzione di tensione (ad es. dopo una caduta di tensione). Per l'accensione dopo un'interruzione di
tensione, premere nuovamente il tasto verde.
7 Accessori
Utilizzare esclusivamente gli accessori originali
Festool e il materiale di consumo Festool previsti
per questa apparecchiatura, perché questi componenti di sistema sono perfettamente compatibili tra loro. L'utilizzo di accessori e materiale di
consumo di altri produttori pregiudica la qualità
dei risultati di lavoro e comporta una limitazione
della garanzia. A seconda dell'applicazione, può
aumentare l'usura della macchina o possono aumentare le sollecitazioni per l'utilizzatore. Per-
tanto vi raccomandiamo di proteggere voi stessi,
la macchina e la garanzia utilizzando esclusivamente accessori originali Festool e materiale di
consumo Festool!
I codici prodotto per accessori e utensili si trovano nel catalogo Festool o su Internet alla pagina
"www.festool.com".
8 Smaltimento
Non gettate gli utensili elettrici nei rifi uti domestici! Provvedere ad uno smaltimento ecologico
degli utensili elettrici, degli accessori e degli imballaggi! Osservare le disposizioni nazionali in
vigore.
9 Garanzia
Per le nostre apparecchiature forniamo una garanzia per difetti del materiale o difetti di produzione conforme alle disposizioni in vigore nei
rispettivi Paesi e comunque con una durata minima di 12 mesi. All'interno degli stati dell'UE la
durata della garanzia è pari a 24 mesi (comprovata dalla fattura o dal documento d'acquisto).
Sono esclusi dalla garanzia eventuali danni che,
in particolare, possono essere ricondotti a naturale usura/logoramento, sovraccarico, utilizzo
non conforme, oppure danni causati dall'utilizzatore o imputabili ad altri usi contrari a quanto
previsto dal manuale d'istruzioni o ancora difetti
noti al momento dell'acquisto. Vengono parimenti esclusi anche i danni derivanti dall'impiego di accessori e materiali di consumo (ad es.
platorelli) non originali.
Eventuali reclami potranno essere riconosciuti
solamente se l'apparecchiatura verrà rispedita,
integra, al fornitore o ad un centro di Assistenza clienti autorizzato Festool. Conservate con
cura il manuale d'uso, le avvertenze di sicurezza, l'elenco delle parti di ricambio e il documento
comprovante l'acquisto. Per il resto sono valide
le attuali condizioni di garanzia del costruttore.
Nota
In considerazione del continuo lavoro di ricerca
e sviluppo ci riserviamo il diritto di apportare
eventuali modifi che alle informazioni tecniche
contenute nella presente documentazione.
Page 18

18
REACH
REACh è l’ordinanza sulle sostanze chimiche
valida in tutta Europa dal 2007. Noi, in quanto
„utenti fi nali“, ovvero in quanto fabbricanti di
prodotti, siamo consapevoli del nostro dovere di
informazione nei confronti dei nostri clienti. Per
potervi tenere sempre aggiornati e per informarvi delle possibili sostanze appartenenti alla lista
di candidati e contenute nei nostri prodotti, abbiamo organizzato il seguente sito web per voi:
www.festool.com/reach
Page 19

19
MFT/3-VL
1 Technische gegevens
Tafelafmetingen
(breedte x lengte)
773 x 481 mm
Tafelhoogte met opklappoten
854 mm
Gewicht 11,3 kg
2 Symbolen
Waarschuwing voor algemeen gevaar
Gevaar voor elektrische schokken
Handleiding/aanwijzingen lezen!
De vermelde afbeeldingen staan in het begin van
de handleiding.
3
Gebruik volgens de bestemming
MFT/3-VL is een grondeenheid voor de inbouw
van
CMS-TS 55 -
CMS-TS 75 -
CMS-PS 200/PS 300 -
CMS-BS 120 -
CMS-OF -
Basis modules (behalve basis 1A) in combinatie met de multifunctionele tafel
MFT/3.
Alleen het elektrisch gereedschap en de modules die door Festool worden aangeboden, mogen
worden ingebouwd. De inbouw van ander elektrisch gereedschap maakt de tafel onveilig en
verhoogt het gevaar voor de gebruiker. De aanbouw mag alleen bij de MFT/3 plaatsvinden.
De gebruiker is aansprakelijk voor schade en
letsel bij gebruik dat niet volgens de voorschriften plaatsvindt.
4 Veiligheidsvoorschriften
ATTENTIE! Lees alle veiligheidsvoorschriften
en aanwijzingen. Wanneer men zich niet aan de
waarschuwingen en aanwijzingen houdt, kan
dit leiden tot elektrische schokken, brand en/of
ernstig letsel.
Het hieronder gebruikte begrip "elektrisch gereedschap" heeft betrekking op elektrisch gereedschap met netvoeding (met netsnoer) of
elektrisch gereedschap met accuvoeding (zonder netsnoer).
Bewaar zorgvuldig alle bijgevoegde documen- ten en geef de machine alleen samen met deze
documenten door.
Haal de stekker uit het stopcontact voordat u instellingen aan het apparaat wijzigt, accessoires verwisselt of het apparaat weglegt.
Deze voorzorgsmaatregel voorkomt dat het
apparaat per ongeluk gestart kan worden.
Voordat het elektrisch gereedschap wordt in- gebouwd, dienen de tafelpoten vergrendeld en
tegen inklappen beveiligd te zijn. Het beveiligen en vergrendelen is vooral belangrijk voor
opvouwbare tafels.
Bevestig het elektrisch gereedschap goed in de tafel alvorens het te gebruiken. Wanneer
het elektrisch gereedschap niet goed in de
tafel bevestigd is, kan dit tot een verlies van
controle leiden.
Stel de tafel op een stabiel, egaal en horizon- taal oppervlak op. Wanneer de tafel kan wegglijden of wiebelen, kan het elektrisch gereedschap niet betrouwbaar en goed worden
gecontroleerd.
Overbelast de tafel niet en gebruik hem niet als ladder of stellage. Wanneer de tafel overbelast wordt of wanneer erop
wordt gestaan, wordt hij topzwaar en bestaat er een grote kans dat hij omkantelt.
5 Opstellen
Zorg ervoor dat de vloer rond de machine egaal f
is, in goede staat verkeert en vrij is van losse,
rondom liggende voorwerpen (bijv. spanen en
zaagresten).
Voor het uitklappen van de poten [1-2] moe- f
ten de twee draaiknoppen [1-1] tot aan de
aanslag worden opengedraaid. Na het uitklappen van de poten dienen de twee draaiknoppen weer vastgedraaid te worden.
Draai zo nodig de schroeven [3-2] los. f
Plaats de verlenging MFT/3-VL van boven op f
de groef van de MFT/3 [Afbeelding 2]. Let erop
dat de vluchtlijnen van de profi elgroef op de
MFT/3 en MFT/3-VL [3-4] overeenkomen.
Pas de hoogte van de MFT/3-VL aan beide kan- f
ten met de schroeven [3-1] aan de MFT/3 aan.
Vergrendel de MFT/3-VL aan beide kanten met f
de schroef [3-2] op de MFT/3.
Om ervoor te zorgen dat de machine stevig en f
vlak staat, kan de lengte van beide poten aangepast worden door aan de afsluitkappen [3-3]
te draaien.
Page 20

20
6 Elektrische aansluiting
WAARSCHUWING
Gevaar voor ongevallen wanneer de machine
met een ontoelaatbare spanning of frequentie
wordt gebruikt.
De netspanning en de frequentie van de f
stroombron dienen met de gegevens op het
typeplaatje van de machine overeen te stemmen.
In Noord-Amerika mogen alleen Festool ma- f
chines met een spanningsopgave van 120 V
worden ingezet.
VOORZICHTIG
Gevaar voor letsel, elektrische schokken
De netstekker mag alleen in een geaard stop- f
contact gestoken worden.
Er mogen alleen verlengsnoeren met rand- f
aarde worden gebruikt.
De schakelaar-/stekkereenheid [4-1] dient voor
de spanningsvoeding en het IN-/UIT-schakelen
van het in de MFT/3-VL ingebouwde elektrische
gereedschap.
Steek de netstekker [4-5] in een geaard stop- f
contact.
Verbind het in de MFT/3-VL ingebouwde elek- f
trische gereedschap met de stekker [4-4].
Druk op de groene toets [4-2] om IN te scha- f
kelen.
Druk op de rode toets [4-3] om UIT te schake- f
len.
De schakelaar-/stekkereenheid beschikt over
een nulspanningsbeveiliging. Hiermee wordt
voorkomen dat de spanning zelfstandig terugkeert na een spanningsonderbreking (bijv. een
stroomuitval). Druk na een spanningsonderbreking opnieuw op de groene knop om IN te scha-
kelen.
7 Accessoires
Maak uitsluitend gebruik van de voor dit apparaat bestemde originele Festool-accessoires en
het Festool-verbruiksmateriaal, omdat deze systeemcomponenten optimaal op elkaar zijn afgestemd. Bij het gebruik van accessoires en verbruiksmateriaal van andere leveranciers is een
kwalitatieve beïnvloeding van de werkresultaten
en een beperking van de garantieaanspraken
waarschijnlijk. Al naar gelang de toepassing kan
de slijtage van de machine of de persoonlijke belasting van uzelf toenemen. Bescherm daarom
uzelf, uw machine en uw garantieaanspraken
door uitsluitend gebruik te maken van originele
Festool-accessoires en Festool-verbruiksmateriaal! De bestelnummers voor accessoires en
gereedschap vindt u in uw Festool-catalogus of
op het Internet bij "www.festool.com".
8 Afvoer
Geef het apparaat niet met het huisvuil mee!
Voer de apparaten, accessoires en verpakkingen
op milieuvriendelijke wijze af! Neem de geldende nationale voorschriften in acht.
9 Garantie
Voor onze toestellen verlenen we op materiaalof productiefouten garantie conform de landspecifi eke wettelijke bepalingen, minstens echter
12 maanden. Binnen de lidstaten van de EU bedraagt de garantietermijn 24 maanden (bewijs
door rekening of afl everingsbewijs). Schade
door natuurlijke slijtage, overbelasting, ondeskundige behandeling of schade veroorzaakt door
de gebruiker of door gebruik ingaande tegen de
aanwijzingen in de gebruiksaanwijzing of schade
die bij de aankoop gekend was, blijft uitgesloten
van de garantie. Ook schade die is terug te voeren op het gebruik van niet-originele accessoires
en verbruiksmaterialen (bijv. steunschijf) wordt
niet in aanmerking genomen. Klachten kunnen
alleen aanvaard worden als het toestel volledig
naar de leverancier of naar een geautoriseerde
Festool-klantendienstwerkplaats teruggestuurd
wordt. Bewaar de gebruiksaanwijzing, veiligheidsvoorschriften, onderdelenlijst en het aankoopbewijs zorgvuldig. Overigens gelden de actuele garantiebepalingen van de fabrikant.
Opmerking: Wegens de permanente onderzoeks- en ontwikkelingswerkzaamheden zijn
wijzigingen aan de hier gegeven technische informatie voorbehouden.
REACH
REACh is de sinds 2007 in heel Europa toepasselijke chemicaliënverordening. Wij als
„downstream-gebruiker“, dus als fabrikant van
producten, zijn ons bewust van onze informatieplicht tegenover onze klanten. Om u altijd over
de meest actuele stand van zaken op de hoogte
te houden en over mogelijke stoffen van de kandidatenlijst in onze producten te informeren,
hebben wij de volgende website voor u geopend:
www.festool.com/reach
Page 21

21
MFT/3-VL
1 Tekniska data
Bordets mått (bredd x
längd)
773 x 481 mm
Bordshöjd med fällbara ben
854 mm
Vikt 11,3 kg
2 Symboler
Varning för allmän risk!
Risk för elstöt
Läs bruksanvisningen/anvisningarna!
De angivna bilderna fi nns i början av bruksanvisningen.
3 Avsedd användning
MFT/3-VL är en grundenhet för montering av
CMS-TS 55 -
CMS-TS 75 -
CMS-PS 200/PS 300 -
CMS-BS 120 -
CMS-OF -
Basis-moduler (utom Basis 1A) i kombination med multifunktionsbord MFT/3.
Endast Festools egna moduler och elverktyg får
monteras. Om andra elverktyg monteras blir
bordet osäkert och riskerna för användaren ökar.
Montering får endast ske på MFT/3.
Användaren tar själv ansvar för skador och olyckor som uppstår vid felaktig användning.
4 Säkerhetsanvisningar
OBS! Läs och följ alla säkerhetsanvisningar och
instruktioner. Om man inte följer varningsmeddelanden och anvisningar ordentligt kan det leda
till elstötar, brand och/eller svåra personskador.
Begreppet "elverktyg" nedan avser elverktyg
som är nätdrivna (med nätkabel) eller batteridrivna (utan nätkabel).
Spara den medföljande dokumentationen och se till att den följer med maskinen.
Dra ut kontakten ur uttaget innan du gör in- ställningar, byter tillbehörsdelar eller lägger
undan maskinen. Dessa försiktighetsåtgärder
förhindrar att maskinen startas oavsiktligt.
Bordets ben måste vara låsta och spärrade mot hopfällning innan du monterar elverktyget. Det är särskilt viktigt att låsa och spärra
benen på hopfällbara bord.
Se till att elverktyget är säkert monterat i bor- det innan du använder det. Elverktyg som inte
är ordentligt fastsatta i bordet kan leda till att
du förlorar kontrollen.
Ställ bordet på fast, slätt och vågrätt underlag. Om bordet riskerar att glida eller välta kan du
inte kontrollera elverktyget på ett tillförlitligt
och kontrollerat sätt.
Du får inte överbelasta bordet eller använda det på felaktigt sätt, t.ex. som stege eller stativ. Om du överbelastar bordet eller står på
det, blir tyngdpunkten för hög och risken är
stor att det välter.
5 Uppställning
Se till att golvet runt maskinen är plant, i gott f
skick och städat (fritt från t ex spån och fl isor).
För att fälla ut benen [1-2] vrider man de två f
vridknapparna [1-1] till anslaget. När benen
är utfällda drar man åt vridknapparna igen.
Lossa vid behov skruvarna [3-2]. f
Montera förlängningen MFT/3-VL uppifrån i f
spåret på MFT/3 [Bild 2]. Se till att profi lspåren
på MFT/3 och MFT/3-VL [3-4] ligger i linje.
Anpassa höjden på MFT/3-VL till MFT/3 på f
båda sidor med skruvarna [3-1].
Lås MFT/3-VL på MFT/3 på båda sidor med f
skruven [3-2].
För att maskinen ska stå stabilt och plant, kan f
man justera längden på benen genom att vrida
hylsorna [3-3].
Page 22

22
6 Elanslutning
VARNING!
Om maskinen används med otillåten spänning
eller frekvens, fi nns risk för olyckor.
Nätspänningen och strömkällans frekvens f
måste överensstämma med uppgifterna på
maskinens märkplåt.
I Nordamerika får endast Festool-maskiner f
med en spänning på 120 V användas.
VARNING
Risk för personskada, elstöt
Nätkontakten får endast anslutas till ett sky- f
ddsjordat eluttag.
Använd bara jordade förlängningskablar. f
Brytaren/kontakten [4-1] fungerar som spänningsmatning och Till-/Från-omkopplare för det
elverktyg som monterats i MFT/3-VL.
Sätt i kontakten [4-5] i ett skyddsjordat elut- f
tag.
Anslut elverktyget i MFT/3-VL till kontakten f
[4-4].
Koppla till det genom att trycka på den gröna f
knappen [4-2].
Koppla ifrån det genom att trycka på den röda f
knappen [4-3].
Brytaren/kontakten har återstartsskydd. Det
förhindrar att spänningen slås på oavsiktligt efter avbrott (t.ex. strömavbrott). Slå PÅ igen efter
strömavbrottet genom att trycka på den gröna
knappen en gång till.
7 Tillbehör
Använd endast Festools originaltillbehör och
Festools förbrukningsmaterial som är avsedda
för den här enheten, eftersom dessa systemkomponenter är optimalt anpassade för varandra.
Om man använder tillbehör och förbrukningsmaterial av annat fabrikat, kan detta försämra
arbetsresultatens kvalitet och begränsa garantianspråken. Slitaget på maskinen och belastningen på användaren påverkas av hur maskinen
används. Skydda därför dig själv, din maskin och
rätten till garantianspråk genom att uteslutande
använda Festools originaltillbehör och -förbrukningsmaterial.
Artikelnummer för tillbehör och verktyg fi nns i
Festools katalog eller på Internet, "www.festool.
com".
8 Återvinning
Kasta inte apparaten i hushållssoporna! Lämna
maskiner, tillbehör och förpackningar till återvinning. Följ gällande nationella föreskrifter.
9 Garanti
Vi lämnar garanti för material- och tillverkningsfel i enlighet med gällande lag/nationella
bestämmelser, men minst 12 månader. Inom EU
är garantitiden 24 månader (intygas med kvitto
eller följesedel). Garantin omfattar inte skador
som beror på normalt slitage, överbelastning
eller ej avsedd användning samt skador som
användaren själv orsakat, som beror på att användaren inte följt bruksanvisningen eller skador som var kända vid köpet. Garantin gäller inte
heller skador som orsakas av att användaren
inte använt originaltillbehör och -förbrukningsmaterial (t ex slipskivor).
Garantianspråken gäller bara om du lämnar in
verktyget sammansatt till leverantören eller någon av Festools serviceställen. Spara bruksanvisning, säkerhetsanvisningar, reservdelslista
och kvitto. I övrigt gäller tillverkarens aktuella
garantivillkor.
Obs!
Vi förbehåller oss rätten till tekniska ändringar
pga kontinuerligt forsknings- och utvecklingsarbete.
REACH
REACh är den kemikalieförordning som sedan
2007 gäller i hela Europa. I egenskap av ”nedströmsanvändare”, dvs tillverkare av produkter,
är vi medvetna om den informationsplikt som
vi har gentemot våra kunder. För att hela tiden
hålla kunderna uppdaterade och informera om
eventuella ämnen i våra produkter som återfi nns
på den sk kandidatlistan, har vi tagit fram denna
webbsida: www.festool.com/reach
Page 23

23
MFT/3-VL
1 Tekniset tiedot
Pöydän mitat (leveys x
pituus)
773 x 481 mm
Pöydän korkeus taitettavilla jaloilla
854 mm
Paino 11,3 kg
2 Symbolit
Varoitus yleisestä vaarasta
Sähköiskun vaara
Lue ohjeet/huomautukset!
Mainitut kuvat ovat käyttöoppaan alussa.
3 Määräystenmukainen käyttö
MFT/3-VL on perusyksikkö, johon voidaan kiinnittää
CMS-TS 55 -
CMS-TS 75 -
CMS-PS 200/PS 300 -
CMS-BS 120 -
CMS-OF -
Basis-moduuli (paitsi moduuli Basis 1A) yhdessä monitoimipöydän MFT/3 kanssa.
Asenna vain Festoolin valikoiman moduuleita
ja sähkötyökaluja. Jonkin muun sähkötyökalun
asentaminen vaarantaa pöydän turvallisuuden,
minkä seurauksena käyttäjän turvallisuus on
vaarassa. Kiinnittämisen saa tehdä vain perusyksikköön MFT/3.
Ohjeiden vastaisesta käytöstä aiheutuneista vahingoista ja onnettomuuksista vastaa koneen
käyttäjä.
4 Turvaohjeet
Huomio! Lue kaikki turva- ja käyttöohjeet. Va-
roitusten ja ohjeiden noudattamisen laiminlyönti
voi aiheuttaa sähköiskun, tulipalon ja/tai vakavia
vammoja.
Seuraavassa käytetty käsite "sähkötyökalu" tarkoittaa verkkokäyttöistä sähkötyökaluasi (jossa
verkkojohto) tai akkukäyttöistä sähkötyökaluasi
(jossa ei verkkojohtoa).
Säilytä kaikki koneen mukana olevat doku- mentit huolellisesti ja anna ne aina koneen
mukana edelleen.
Irrota pistoke verkkopistorasiasta ennen kuin teet koneen säätöjä tai asetuksia, vaihdat tarvikkeita ja työkaluja tai kun lopetat koneen
käyttämisen. Tämä toimenpide estää koneen
käynnistymisen vahingossa.
Pöydän jalat on lukittava ja varmistettava ko- koon taittumisen estämiseksi ennen kuin sähkötyökalu asennetaan. Jalkojen varmistaminen ja lukitseminen on erityisen tärkeää, jos
pöytä on koottava.
Kiinnitä sähkötyökalu tukevasti pöytään ennen käyttöä. Sähkötyökalut, jotka liikkuvat pöydässä, voivat johtaa kontrollin menetykseen.
Aseta pöytä kiinteälle, tasaiselle ja vaakasuo- ralle pinnalle. Jos pöytä pääsee liukumaan tai
horjumaan, sähkötyökalua ei voida kontrolloida luotettavasti ja varmasti.
Älä ylikuormita pöytää, älä käytä sitä tikkaina tai telineenä. Ylikuormitus tai pöydällä seisominen tekee siitä nokkapainoisen ja kaatuminen on mahdollista.
5 Asetus
Huolehdi siitä, että koneen alla oleva lattia f
on tasainen, hyvässä kunnossa ja puhdas (ei
esim. lastuja ja sahausjätteitä).
Jalkojen [1-2] auki taittamiseksi avaa kaksi f
kierrettävää nuppia [1-1] ääriasentoon saakka.
Jalkojen auki taittamisen jälkeen kierrä nämä
kaksi kierrettävää nuppia takaisin kiinni.
Löysää tarvittaessa ruuveja [3-2]. f
Aseta jatko-osa MFT/3-VL ylhäältäpäin f
MFT/3:n uraan [kuva 2]. Varmista, että profi iliuran merkintälinjat MFT/3:ssa ja MFT/3VL:ssä [3-4] ovat kohdakkain.
Sovita MFT/3-VL:n korkeus molemmilta puo- f
lilta ruuveilla [3-1] MFT/3:een.
Lukitse MFT/3-VL molemmilta puolilta ruuvil- f
la [3-2] MFT/3:een.
Jotta saat koneen seisomaan tukevasti, voit f
säätää kummankin jalan pituutta alakappaletta [3-3] kiertämällä.
Page 24

24
6 Sähköliitäntä
VAROITUS
Onnettomuusvaara, jos konetta käytetään
kielletyllä jännitteellä tai taajuudella.
Verkkovirran jännitteen ja taajuuden pitää f
olla konekilvessä annettujen tietojen mukainen.
Pohjois-Amerikassa voidaan käyttää vain f
Festool-koneita, joiden käyttöjännite on 120
V.
VARO
Loukkaantumisvaara, sähköiskuvaara
Verkkopistokkeen saa liittää vain maadotet- f
tuun pistorasiaan.
Vain suojajohtimellista jatkojohtoa saa käyt- f
tää.
Katkaisin-/pistokeyksikkö [4-1] toimii jännitelähteenä ja MFT/3-VL:ään asennetun sähkötyökalun PÄÄLLE-/POIS PÄÄLTÄ -kytkimenä.
Liitä verkkopistoke [4-5] maadotettuun pisto- f
rasiaan.
Liitä MFT/3-VL:ään asennetun sähkötyökalun f
pistoke pistorasiaan [4-4].
PÄÄLLE kytkemiseksi paina vihreää painiketta f
[4-2].
POIS PÄÄLTÄ kytkemiseksi paina punaista pai- f
niketta [4-3].
Katkaisija-/pistokeyksikössä on nollajännite-
laukaisija. Se estää itsenäisen jännitteen palautumisen jännitekatkon jälkeen (esim. sähkökatko). Paina jännitekatkon jälkeen uudelleen
vihreästä painikkeesta PÄÄLLE-kytkemiseksi.
7 Lisätarvikkeet
Käytä vain tälle laitteelle tarkoitettuja alkuperäisiä Festool-tarvikkeita ja Festool-kulutusmateriaaleja, koska nämä järjestelmäkomponentit on
sovitettu parhaalla mahdollisella tavalla toisiinsa. Toisten valmistajien tarvikkeiden ja kulutusmateriaalien käyttö voi huonontaa työtulosten
laatua ja rajoittaa oikeutta takuuvaatimuksiin.
Käyttökohteesta riippuen ne voivat lisätä koneen
kulumista tai koneen käyttäjän rasittumista. Varmista siksi oma ja koneesi turvallisuus ja takuun
säilyminen käyttämällä ainoastaan alkuperäisiä
Festool-tarvikkeita ja Festool-kulutusmateriaaleja!
Tarvikkeiden ja työkalujen tilausnumerot löydät Festoolin tuote-/käyttöoppaasta tai internetistä osoitteesta "www.festool.com".
8 Hävittäminen
Älä hävitä laitetta talousjätteiden mukana! Toi-
mita käytöstä poistetut koneet, lisätarvikkeet ja
pakkaukset ympäristöä säästävään kierrätykseen. Noudata maakohtaisia määräyksiä.
9 Takuu
Annamme koneillemme materiaali- ja valmistusvirheiden osalta takuun maakohtaisten lakimääräysten mukaan, kuitenkin vähintään 12
kuukaudeksi. EU-maissa takuuaika on 24 kuukautta (lasku tai vastaanottotodistus toimii tositteena). Takuu ei koske vaurioita, jotka johtuvat
luonnollisesta kulumisesta, ylikuormituksesta,
epäasianmukaisesta käsittelystä, käyttäjän itse
aiheuttamista vahingoista tai käyttöohjeen vastaisesta käytöstä, tai jotka olivat tiedossa ostohetkellä. Takuu ei myöskään kata vaurioita,
jotka johtuvat muiden kuin Festoolin valmistamien tarvikkeiden ja kulutusmateriaalien (esim.
hiomalautanen) käytöstä. Voimme hyväksyä
takuuvaateet ainoastaan silloin, kun laite lähetetään purkamattomana laitteen toimittajalle tai valtuutetulle Festool-huoltokorjaamolle.
Säilytä käyttöohjeet, turvaohjeet, varaosalista
ja ostotosite hyvässä tallessa. Multa osin pätevät aina viimeisimmät valmistajan takuuehdot.
Huomautus
Jatkuvan tutkimus- ja tuotekehitystyön myötä
pidätämme oikeudet muutoksiin näihin teknisiin
tietoihin nähden.
REACH
REACh on vuodesta 2007 lähtien koko Euroopassa voimassaoleva kemikaaleja koskeva asetus.
Käytämme kemikaaleja tuotteidemme valmistuksessa ja olemme tietoisia tiedotusvelvollisuudestamme asiakkaillemme. Olemme avanneet
asiakkaitamme varten seuraavan Web-sivuston,
josta voit aina katsoa viimeisimmät tiedot tuotteissamme mahdollisesti käytettävistä aineista:
www.festool.com/reach
Page 25

25
MFT/3-VL
1 Tekniske data
Bordmål (bredde x
længde)
773 x 481 mm
Bordhøjde med klapben
854 mm
Vægt 11,3 kg
2 Symboler
Advarsel om generel fare
Fare for elektrisk stød
Læs vejledning/anvisninger!
De angivne illustrationer fi ndes i tillægget til
brugsanvisningen.
3 Bestemmelsesmæssig brug
MFT/3-VL er en grundenhed til montering af
CMS-TS 55 -
CMS-TS 75 -
CMS-PS 200/PS 300 -
CMS-BS 120 -
CMS-OF -
Basis-moduler (på nær Basis 1A) i forbindelse med arbejdsbordet MFT/3.
Der må kun monteres moduler og el-værktøj fra
Festool. Montering af andet el-værktøj gør bordet ustabilt og øger risikoen for brugeren. Montering må kun ske på MFT/3.
Brugeren hæfter for skader og uheld, som følge
af ikke-bestemmelsesmæssig brug.
4 Sikkerhedsanvisninger
VIGTIGT! Læs alle sikkerhedsanvisninger og øv-
rige anvisninger. Overholdes anvisningerne ikke,
er der risiko for elektrisk stød, brand og/eller alvorlige kvæstelser.
Det efterfølgende anvendte begreb "el-værktøj"
refererer til netdrevet el-værktøj (med ledning)
eller batteridrevet el-værktøj (uden ledning).
Opbevar alle medleverede papirer, og videregiv -
kun maskinen sammen med disse papirer.
Træk stikket ud af stikdåsen, inden du indstil- ler maskinen, udskifter tilbehør eller lægger
maskinen til side. Det forhindrer utilsigtet
start af maskinen.
Bordbenene skal være låste og sikret mod sammenklapning, før el-værktøjet monteres.
Sikring og låsning af benene er især vigtigt i
forbindelse med sammenklappelige borde.
Fastgør el-værktøjet sikkert til bordet, før det benyttes. Hvis el-værktøjet bevæger sig på
bordet, kan man miste kontrollen over maskinen.
Stil bordet på en fast, jævn og vandret fl ade. Hvis bordet rutscher eller vakler, kan el-værktøjet ikke styres pålideligt og sikkert.
Undgå at overbelaste bordet, og misbrug det ikke som stige eller stillads. Overbelastes eller stås der på bordet, er bordet
ustabilt, og der er risiko for, at det vælter.
5 Opstilling
Sørg for, at gulvet under maskinen er plant, f
i god tilstand, og at der ikke ligger løse genstande rundt omkring (fx spåner og skærerester).
Før benene [1-2] klappes ud, skal de to dreje- f
knapper [1-1] løsnes til anslag. Efter at have
klappet benene ud, skal de to drejeknapper
strammes igen.
Løsn evt. skruerne [3-2]. f
Sæt forlængerbordet MFT/3-VL i noten på f
MFT/3 ovenfra [billede 2]. Sørg for, at profi lnoten på MFT/3 og MFT/3-VL [3-4] fl ugter med
hinanden.
Tilpas højden på MFT/3-VL til MFT/3 i begge f
sider med skruerne [3-1] .
Fastgør MFT/3-VL på MFT/3 i begge sider med f
skruen [3-2].
For at sikre, at maskinen står sikkert og sta- f
bilt, kan begge ben forlænges ved at dreje på
endekapperne [3-3].
Page 26

26
6 Elektrisk tilslutning
ADVARSEL
Fare for ulykke, hvis maskinen kører med ikke
tilladt spænding eller frekvens.
Forsyningsspændingen og strømkildens fre- f
kvens skal stemme overens med angivelserne på maskinens typeskilt.
I Nordamerika må der kun bruges Festool- f
maskiner med en spændingsangivelse på
120 V.
FORSIGTIG
Risiko for kvæstelser, elektrisk stød
Netstikket må kun tilsluttes til en jordforbun- f
det stikdåse.
Der må kun anvendes forlængerkabler med f
beskyttelsesleder.
Det monterede el-værktøj på MFT/3-VL strømforsynes og tændes/slukkes med stikkontakten
(4-1).
Stik netstikket [4-5] i en jordforbundet stik- f
dåse. Kontrollampen (4-4) lyser, når der er
spænding på stikket.
Tilslut det monterede el-værktøj på MFT/3-VL f
til stikket [4-4].
El-værktøjet tændes med den grønne knap f
[4-2].
El-værktøjet slukkes med den røde knap f
[4-3].
Stikkontakten er forsynet med en nulspændings-
udløser. Dermed undgås automatisk genstart efter spændingsafbrydelse (f.eks. strømsvigt). Efter en spændingsafbrydelse skal der trykkes på
den grønne knap igen for at starte el-værktøjet.
7 Tilbehør
Anvend udelukkende det originale Festool-tilbehør og Festool-forbrugsmateriale, som er
beregnet til arbejdsbordet, da disse systemkomponenter er tilpasset optimalt til hinanden. Ved
anvendelse af tilbehør og forbrugsmateriale af
andre mærker skal man regne med en forringelse af arbejdsresultaterne og en begrænsning
af garantien. Alt efter anvendelse kan maskinen
opslides hurtigere eller brugeren belastes mere
end nødvendigt. Pas derfor på dig selv, maski-
nen og garantien ved udelukkende at anvende
originalt Festool-tilbehør og Festool-forbrugsmateriale!
Bestillingsnumrene for tilbehør og værktøj kan
du fi nde i dit Festool-katalog eller på internettet
under "www.festool.com".
8 Bortskaffelse
Smid ikke maskinen i husholdningsaffaldet!
Maskiner, tilbehør og emballage skal tilføres en
miljøvenlig form for genbrug! Overhold de gældende nationale regler.
9 Garanti
I henhold til de respektive landes lovmæssige
bestemmelser yder vi garanti for materiale- eller produktionsfejl, dog mindst på en periode af
12 måneder. I EU-medlemsstaterne udgør garantiperioden 24 måneder (faktura eller følgeseddel gælder som dokumentation). Garantien
dækker ikke fejl, der måtte opstå som følge af
naturligt slid, overbelastning, ukorrekt håndtering eller fejl, der forårsages af brugeren eller
anden anvendelse, der er i modstrid med brugsanvisningen eller fejl, der var kendt ved købet.
Garantien dækker heller ikke fejl, der skyldes
anvendelse af ikke-originalt tilbehør og forbrugsmateriale (f.eks. bagskiver). Reklamationer kan kun anerkendes, hvis maskinen sendes
uadskilt til leverandøren eller til et autoriseret
Festool-serviceværksted. Opbevar brugsanvisningen, sikkerhedsanvisninger, reservedelslisten og kvitteringen på et sikkert sted. Desuden
gælder de til enhver tid gældende garantibetingelser fra producenten.
Bemærk
På grund af kontinuerligt forsknings- og udviklingsarbejde forbeholder vi os ret til ændringer
af de heri anførte tekniske specifi kationer.
REACH
Kemikalieloven REACH trådte i kraft i 2007 og
er gældende i hele Europa. Som ”downstreambruger” af kemikalier, dvs. producent af produkter, tager vi vores informationspligt over for kunderne alvorligt. På følgende hjemmeside fi nder
du altid aktuelle informationer om de stoffer fra
kandidatlisten, som vores produkter kan indeholde: www.festool.com/reach
Page 27

27
MFT/3-VL
1 Tekniske spesifi kasjoner
Bordets mål (bredde x
lengde)
773 x 481 mm
Bordhøyde med nedfellbare bein
854 mm
Vekt 11,3 kg
2 Symboler
Advarsel mot generell fare
Fare for elektrisk støt
Anvisning / les merknader!
De oppgitte illustrasjonene fi nnes fremst i bruksanvisningen.
3 Defi nert bruk
MFT/3-VL er en grunnenhet for montering av
CMS-TS 55 -
CMS-TS 75 -
CMS-PS 200/PS 300 -
CMS-BS 120 -
CMS-OF -
Basismoduler (unntatt basis 1A) i forbindelse med multifunksjonsbordet MFT/3.
Det skal bare monteres moduler og elektro-
verktøy fra Festool. Montering av annet elektroverktøy gjør bordet utrygt og øker skaderisikoen
for brukeren. Monteringen skal bare gjøres på
MFT/3.
Brukeren er selv ansvarlig for skader og ulykker
som skyldes ikke forskriftsmessig bruk.
4 Sikkerhetsforskrifter
NB! Les alle sikkerhetsregler og anvisninger.
Hvis advarslene og anvisningene ikke overholdes, kan det føre til elektrisk støt, brann og/eller
alvorlige personskader.
Begrepet "Elektroverktøy" refererer i den følgende teksten til ditt nettdrevne elektroverktøy
(med nettkabel) eller ditt batteridrevne elektroverktøy (uten nettkabel).
Ta vare på alle vedlagte dokumenter, og over- lat ikke maskinen til andre uten disse.
Ta støpselet ut av kontakten før du gjør innstil- linger på maskinen, bytter tilbehørsdeler eller
legger bort maskinen. Disse forholdsreglene
hindrer at maskinen starter uten at du ønsker
det.
Bordbeina må være låst og sikret slik at de ikke klapper sammen før elektroverktøyet
monteres. Sikring og låsing av beina er spesielt viktig for sammenleggbare bord.
Fest elektroverktøyet trygt i bordet før bruk. Elektroverktøy som kan bevege seg i bordet
kan føre til tap av kontrollen.
Sett bordet på en fast, jevn og vannrett fl ate. Hvis bordet kan skli eller vakle, kan ikke elektroverktøyet kontrolleres på en sikker og pålitelig måte.
Ikke overbelast bordet, og ikke bruk det som stige eller stillas. Ved overbelastning eller hvis
du står på bordet, blir dette fremtungt og vil
sannsynligvis velte.
5 Plassering
Sørg for at gulvet rundt maskinen er jevnt og i f
god stand, og at det ikke ligger løse gjenstander der (f.eks. spon og avskjær).
Åpne de to vriderne [1-1] til anslagsposisjon f
for å folde ut beina [1-2]. Trekk til vriderne
igjen når beina er felt ut.
Løsne ev. skruene [3-2]. f
Sett forlengelsen MFT/3-VL ovenfra på sporet f
på MFT/3 [bilde 2]. Pass på at profi lsporene på
MFT/3 og MFT/3-VL [3-4] er i fl ukt.
Tilpass høyden på MFT/3-VL til skruene [3-1] f
på MFT/3 på begge sider.
Lås MFT/3-VL på begge sider med skruen f
[3-2] på MFT/3.
For at maskinen skal stå støtt og plant, kan du f
endre lengden på begge bena ved å skru på
foten [3-3] i lengderetningen.
Page 28

28
6 Elektrisk tilkobling
ADVARSEL!
Det er fare for ulykker hvis maskinen brukes
med spenning eller frekvens som ikke er tillatt.
Nettspenningen og strømkildens frekvens må f
stemme overens med angivelsene på maskinens typeskilt.
I Nord-Amerika er det kun tillatt å bruke Fe- f
stool-maskiner med spenningsangivelse 120
V.
FORSIKTIG
Skaderisiko. Elektrisk støt
Støpselet skal bare settes i jordet kontakt. f
Det må bare brukes jordet skjøteledning. f
Bryter-/støpselenheten [4-1] brukes til spenningsforsyning og inn-/utkobling av et elektroverktøy som er montert på MFT/3-VL.
Sett nettstøpselet [4-5] i en jordet stikkontakt. f
Slå på elektroverktøyet som er montert f
på MFT/3 VL, ved hjelp av pluggen [4-4].
Trykk på den grønne knappen [4-2] for å slå f
PÅ.
Trykk på den røde knappen [4-3] for å slå AV. f
Bryter-/pluggenheten har en nullspenningsut-
løser. Dette hindrer automatisk retur av spenning etter et avbrudd i spenningen (for eksempel
strømbrudd). Trykk på den grønne knappen for å
slå PÅ etter et spenningsavbrudd.
7 Tilbehør
Bruk bare originalt Festool-tilbehør og Festoolforbruksmateriale som er laget til denne maskinen, siden disse systemkomponentene er optimalt tilpasset til hverandre. Ved bruk av tilbehør
og forbruksmateriale fra andre tilbydere senker
kvaliteten på arbeidsresultatet og en sannsynlig innskrenking av garantien. Alt etter bruk kan
slitasjen på maskinen eller den personlige belastningen på deg økes. Beskytt derfor deg selv,
maskinen og din garantirett ved kun å benytte
originalt Festool-tilbehør og Festool-forbruksmateriale.
Bestillingsnumrene til tilbehør og verktøy fi nner
du i Festool-katalogen eller på Internett under
"www.festool.com".
8 Avhending
Kast aldri apparatet i husholdningsavfallet! Returner maskin, tilbehør og emballasje til et miljøvennlig gjenvinningsanlegg. Følg bestemmelsene som gjelder i ditt land.
9 Garanti
Vi garanterer mot material- og produksjonsfeil
på våre maskiner i henhold til nasjonale lover, og
minst i 12 måneder. Innenfor EU er garantiperioden 24 måneder (kvittering eller leveringsseddel
må fremlegges som bevis). Skader som skyldes naturlig slitasje, overbelastning, ufagmessig behandling eller skader som er forårsaket
av brukeren eller bruk som ikke er i henhold til
bruksanvisningen eller som var kjent ved kjøp,
dekkes ikke av garantien. Skader som skyldes
bruk av ikke-originalt tilbehør og forbruksmateriell (f.eks. slipetallerkener), dekkes heller ikke
av garantien.
Reklamasjoner godkjennes kun dersom maskinen sendes umontert tilbake til leverandøren eller et autorisert Festool servicesenter. Oppbevar
bruksanvisningen, sikkerhetsforskrifter, reservedelsliste og kjøpsbevis på et trygt sted. Ellers
gjelder de til enhver tid gjeldende garantibetingelsene fra produsenten.
Merknad
På grunn av fortløpende forsknings- og utviklingsarbeid tas det forbehold om endringer i de
tekniske opplysningene i dokumentet.
REACH
REACh har siden 2007 vært gjeldende kjemikalievedtekt over hele Europa. Som produsent av
produkter som inneholder kjemikalier, er vi bevisst på vår informasjonsplikt overfor kundene.
For at vi alltid skal kunne holde deg oppdatert
og gi deg informasjon om mulige stoffer i våre
produkter som fi nnes på listen, har vi opprettet
følgende nettside: www.festool.com/reach
Page 29

29
MFT/3-VL
1 Dados técnicos
Dimensões da bancada
(comprimento x largura)
773 x 481 mm
Altura da bancada com pernas articuladas
854 mm
Peso 11,3 kg
2 Símbolos
Perigo geral
Perigo de choque eléctrico
Ler indicações/notas!
As fi guras indicadas encontram-se no início do
manual de instruções.
3 Utilização conforme as disposi-
ções
A MFT/3-VL é uma unidade de base para montagem de
CMS-TS 55 -
CMS-TS 75 -
CMS-PS 200/PS 300 -
CMS-BS 120 -
CMS-OF -
Módulos Basis (excepto Basis 1A) Em conjunto com a bancada multifuncional
MFT/3.
Devem apenas montar-se os módulos e ferra-
mentas eléctricas disponibilizadas pela Festool.
A montagem de outras ferramentas eléctricas
torna a bancada instável e aumenta o perigo
para o utilizador. A montagem só deve ser efectuada na MFT/3.
Em caso de utilização incorrecta, o utilizador é
responsável por danos e acidentes.
4 Instruções de segurança
ATENÇÃO! Leia todas as indicações de seguran-
ça e instruções. A não observação das indicações
de segurança e instruções pode dar origem a um
choque eléctrico, um incêndio e/ou a ferimentos
graves.
O termo "ferramenta eléctrica", utilizado em se-
guida, refere-se à sua ferramenta eléctrica utilizada com ligação à rede (com cabo de rede) ou
com acumulador (sem cabo de rede).
Guarde todos os documentos anexos; a ferra- menta só deve ser entregue a terceiros juntamente com estes documentos.
Retire a fi cha da tomada de corrente antes de efectuar ajustes na ferramenta, substituir
acessórios ou pousar a ferramenta. Esta medida de prevenção impede o arranque involuntário da ferramenta.
Antes de montar a ferramenta eléctrica, as pernas da bancada devem estar bloqueadas e
protegidas contra rebatimento. A protecção e
o bloqueio das pernas é especialmente importante nas bancadas articuladas.
Antes da utilização, fi xe a ferramenta eléc- trica à bancada de modo seguro. Ferramentas eléctricas que se movam na bancada podem originar a perda de controlo.
Coloque a bancada sobre uma superfície sóli- da, plana e horizontal. Se a bancada escorregar ou abanar, não é possível controlar a ferramenta eléctrica de modo seguro e fi rme.
Não sobrecarregue a bancada e não a utilize como escadote ou andaime. Uma sobrecarga
ou utilização como escada ou andaime faz com
que a bancada fi que desequilibrada e possa
tombar.
5 Colocação
Providencie para que o chão em torno da fer- f
ramenta seja plano, esteja em bom estado e
não tenha objectos espalhados (p. ex. aparas e
restos do corte).
Para desdobrar as pernas [1-2], devem abrir- f
se os dois botões giratórios [1-1] até ao batente. Depois de desdobrar as pernas, devem
apertar-se de novo os dois botões giratórios.
Eventualmente, aliviar os parafusos [3-2]. f
Coloque o prolongamento MFT/3-VL a partir de f
cima na ranhura da MFT/3 [imagem 2]. Tenha
atenção para que os alinhamentos coincidam
com a ranhura perfi lada na MFT/3 e MFT/3-VL
[3-4].
Adapte a altura da MFT/3-VL à da MFT/3, de f
ambos os lados, utilizando os parafusos [3-1].
Bloqueie a MFT/3-VL na MFT/3, de ambos os f
lados, utilizando o parafuso [3-2].
Para que a ferramenta apoie de modo seguro f
e plano, é possível alterar o comprimento de
Page 30

30
ambas as pernas girando as capas terminais
[3-3].
6 Ligação eléctrica
ADVERTÊNCIA
Perigo de acidente, se a ferramenta for operada com uma tensão ou frequência inadmissível.
A tensão da rede e a frequência da fonte de f
corrente devem coincidir com os dados da
placa de identifi cação da ferramenta.
Na América do Norte, só podem ser utiliza- f
das ferramentas Festool com uma indicação
de tensão de 120 V.
CUIDADO
Perigo de ferimentos, choque eléctrico
A fi cha de ligação à rede só pode ser ligada a f
uma tomada com protecção de terra.
Devem apenas utilizar-se extensões de cabos f
com condutor de protecção.
A unidade de interruptores/fi chas [4-1] serve
para a alimentação de tensão e para ligar/desligar uma ferramenta eléctrica integrada na
MFT/3-VL.
Ligue a fi cha de rede [4-5] a uma tomada com f
protecção de terra.
Conecte a ferramenta eléctrica integrada na f
MFT/3-VL à fi cha [4-4].
Para ligar a ferramenta, prima a tecla verde f
[4-2].
Para desligar a ferramenta, prima a tecla ver- f
melha [4-3].
A unidade de interruptores/fi chas possui um
disjuntor de tensão nula. Este impede um restabelecimento automático de tensão após uma
interrupção da tensão (p. ex., falha de corrente).
Para ligar a ferramenta após uma interrupção
da tensão, prima novamente a tecla verde.
7 Acessórios
Utilize apenas acessórios e material de desgaste
originais Festool previstos para esta ferramenta,
pois estes componentes do sistema estão adaptados uns aos outros. Em caso de utilização de
acessórios e material de desgaste de outros fabricantes, é provável que a qualidade dos resultados dos trabalhos fi que afectada, sendo de esperar uma limitação dos direitos à garantia. Em
função da utilização, o desgaste da ferramenta
ou o seu esforço pessoal podem aumentar. Por
essa razão, proteja-se a si próprio, à sua ferramenta e aos seus direitos à garantia, utilizando
exclusivamente acessórios e material de desgaste originais Festool! Consulte os números
de encomenda dos acessórios e ferramentas no
seu catálogo Festool ou na Internet em "www.
festool.com".
8 Remoção
Não deite a ferramenta no lixo doméstico! En-
caminhe as ferramentas, acessórios e embalagens para um reaproveitamento ecológico! Observe as regulamentações nacionais em vigor.
9 Garantia
Para as nossas ferramentas, oferecemos uma
garantia em relação a defeitos do material e de
produção de acordo com as regulamentações legais específi cas por país, mas com uma duração
mínima de 12 meses. Dentro dos países da UE,
a garantia tem uma duração de 24 meses (prova
através da factura ou da guia de remessa). Os danos causados particularmente por uma deterioração/desgaste natural, sobrecarga, utilização
incorrecta ou os danos provocados pelo utilizador ou por outra utilização contrária ao manual
de instruções ou os danos que já eram conhecidos no momento da compra são excluídos da
garantia. Também se excluem os danos causados pela utilização de acessórios e materiais de
desgaste que não sejam originais da Festool (p.
ex., pratos de lixar). As reclamações só podem
ser aceites se a ferramenta for devolvida intacta
ao fornecedor ou a uma ofi cina de Serviço Apósvenda Festool autorizada. Guarde cuidadosamente o manual de instruções, as indicações de
segurança, a lista de peças sobresselentes e o
recibo de compra. De resto, são válidas as condições de garantia actuais do fabricante.
Nota
Devido aos constantes trabalhos de pesquisa e
desenvolvimento, reserva-se o direito a alterações dos dados técnicos aqui mencionados.
REACH
REACh é, desde 2007, o regulamento relativo
a produtos químicos, válido em toda a Europa.
Nós, enquanto “utilizadores subjacentes”, ou
seja, fabricante de produtos, estamos conscientes do nosso dever de informar os nossos clientes. Para o manter sempre actualizado e para o
informar sobre possíveis materiais da lista de
candidatos aos nossos produtos, criámos o seguinte website para si: www.festool.com/reach
Page 31

31
MFT/3-VL
1 Технические характеристики
Размеры стола (Ш x Д) 773 x 481 мм
Высота стола с откидны-
ми ножками
854 мм
Масса 11,3 кг
2 Символы
Предупреждение об общей опасности
Опасность удара током
Соблюдайте Руководство по эксплуатации/инструкции!
Иллюстрации находятся в начале Руководства
по эксплуатации.
3 Применение по назначению
MFT/3-VL служит основанием для установки:
CMS-TS 55 -
CMS-TS 75 -
CMS-PS 200/PS 300 -
CMS-BS 120 -
CMS-OF -
Модули Basis (кроме Basis 1A) в комбинации с многофункциональным столом
MFT/3.
Разрешается устанавливать только модули и
электроинструменты из ассортимента Festool.
Монтаж другого электроинструмента приводит
к неустойчивости стола и создает угрозу для
пользователя. Разрешается производить установку только на MFT/3.
Ответственность за ущерб и несчастные случаи, связанные с применением не по назначению, несет пользователь.
4 Указания по технике безопасно-
сти
ВНИМАНИЕ! Прочтите все указания по тех-
нике безопасности и инструкции. Неточное
соблюдение инструкций и предупреждений
может стать причиной удара электрическим
током, пожара и/или тяжелых травм.
Используемое в дальнейшем понятие "элек-
троинструмент" относится к электроинструменту, получающему питание от сети (с сетевым кабелем), или электроинструменту,
получающему питание от аккумулятора (без
сетевого кабеля).
Держите прилагаемый пакет документов ря- дом с машинкой и обязательно передавайте
его при последующей смене владельца.
Прежде чем приступить к регулировке ин- струмента, замене оснастки или во время
перерыва в работе, выньте вилку из розетки.
Эта мера предосторожности предотвращает
непреднамеренный запуск инструмента.
Перед установкой электроинструмента нож- ки стола необходимо зафиксировать, чтобы
они не сложились во время работы. Фиксация ножек особенно важна для складных
столов.
Перед использованием надёжно закрепите электроинструмент на столе. Незакрепленный на столе инструмент может привести к
потере контроля при работе.
Установите стол на твёрдую, ровную гори- зонтальную поверхность. Качающийся или
шатающийся стол не позволит надёжно и
безопасно контролировать электроинструмент.
Не перегружайте стол, не используйте его в качестве лестницы или подмостков. Если
перегрузить стол или встать на него, он может потерять устойчивость и перевернуться.
5 Установка
Пол вокруг инструмента должен быть ров- f
ным и находиться в хорошем состоянии. На
нём не должно быть незакрепленных или
посторонних предметов (напр., опилок или
обрезков).
Для откидывания ножек [1-2] следует до упо- f
ра отвернуть два винта-барашка [1-1]. После
откидывания ножек эти два винта следует
завернуть обратно.
При необходимости ослабьте винты [3-2]. f
Вставьте удлинительный элемент MFT/3-VL f
сверху в паз на MFT/3 [рис. 2]. Следите за
тем, чтобы линии соосности профилированных пазов на MFT/3 и MFT/3-VL [3-4] совпадали.
Page 32

32
С помощью винтов [3-1] подгоните с двух f
сторон высоту MFT/3-VL к MFT/3.
Зафиксируйте MFT/3-VL с двух сторон на f
MFT/3 с помощью винта [3-2].
Для обеспечения устойчивости инструмента f
можно изменить длину обеих ножек, пово-
рачивая колпачки [3-3].
6 Электрическое подключение
При превышении в ходе работ максимального
уровня напряжения или частоты возникает
опасность несчастного случая.
Сетевое напряжение и частота источника f
тока должны соответствовать данным, указанным на заводской табличке электроинструмента.
В Северной Америке можно использовать f
только инструменты Festool с характеристикой по напряжению 120 В.
Опасность травмирования, удар током
Сетевую вилку разрешается подсоединять f
только к заземлённой розетке.
Разрешается использовать удлинительный f
кабель только с защитным проводом.
Блок переключателей/замыкателей [4-1]
предназначен для подачи питания и включения/выключения установленных на MFT/3-VL
электроинструментов.
Вставьте сетевую вилку [4-5] в заземлённую f
розетку.
Подсоедините установленный на MFT/3-VL f
электроинструмент к вилке [4-4].
Для включения нажмите на зелёную кнопку f
[4-2].
Для выключения нажмите на красную кноп- f
ку [4-3].
В блоке переключателей/замыкателей рас-
положен расцепитель минимального напряжения. Он предотвращает самопроизвольное
восстановление напряжения после перерыва
в подаче питания (напр. прекращение подачи питания). Для включения после перерыва
в подаче питания снова нажмите на зелёную
кнопку.
7 Оснастка
Используйте только предназначенные для
данной машины оригинальную оснастку и расходные материалы Festool, так как эти компоненты оптимально согласованы между собой.
В случае использования оснастки и расходных
материалов других производителей следует
принимать во внимание возможность снижения качества работы и ограничений по гарантийным обязательствам. В зависимости от вида
работ это может привести к более интенсивному износу машины или к увеличению нагрузки
на руки. Используя оригинальные оснастку и
расходные материалы фирмы Festool, вы защищаете свою машину от повреждений, экономите силы и обеспечиваете предоставление
вам услуг по гарантии в полном объёме!
Коды для заказа оснастки и инструментов
можно найти в каталоге Festool и в сети Интернет по адресу "www.festool.com"
8 Утилизация
Не выбрасывайте аппарат вместе с бытовыми
отходами! Обеспечьте безопасную для окружающей среды утилизацию аппарата, оснастки и упаковки. Соблюдайте действующие национальные предписания.
9 Гарантия
На наш инструмент мы даем гарантию, распространяющуюся на материалы и дефекты
изготовления в соответствии с законодательством каждой из стран, но не меньше 12 месяцев. В странах ЕС срок гарантии составляет
24 месяца (подтверждение по счету или накладной). Гарантия не распространяется на
повреждения, полученные в результате естественного износа/использования, перегрузки,
ненадлежащего использования, повреждения
по вине Пользователя или при использовании
вопреки Руководству по эксплуатации, либо
известные на момент покупки (уценка товара).
Также исключается ответственность за ущерб,
вызванный использованием неоригинальной
оснастки и расходных материалов (например,
шлифовальных тарелок).
Рекламации признаются только в том случае,
если инструмент отправляется поставщику
или в мастерскую Сервисной службы Festool
в неразобранном состоянии. Сохраняйте Руководство по эксплуатации, указания по технике безопасности, список запасных частей и
Page 33

33
квитанцию о покупке. В остальном имеют силу
действующие на определённый момент условия предоставления гарантии изготовителем.
Примечание
В связи с постоянными исследованиями и
новыми техническими разработками фирма
оставляет за собой право на внесение изменений в технические характеристики.
REACH
С 2007 года директива REACh является регламентом по химическим веществам, действующим на территории всей Европы. Выступая в
роли «привлекаемого участника» этого регламента, мы, как производители изделий, принимаем на себя обязательство предоставлять соответствующую информацию нашим клиентам.
Чтобы держать вас в курсе последних событий
и предоставлять информацию о веществах,
которые включены в список вышеупомянутого регламента и которые могут использоваться
в наших изделиях, мы создали специальный
веб-сайт: www.festool.com/reach
Page 34

34
MFT/3-VL
1 Technické údaje
Rozměry stolu (šířka x
délka)
773 x 481 mm
Výška stolu se sklopnými nohami
854 mm
Hmotnost 11,3 kg
2 Symboly
Varování před všeobecným nebezpečím
Nebezpečí úrazu elektrickým proudem
Přečtěte si návod/pokyny!
Uvedené obrázky se nacházejí na začátku návodu k použití.
3 Správné použití
MFT/3-VL je základní jednotka pro montáž
CMS TS 55 -
CMS-TS 75 -
CMS-PS 200/PS 300 -
CMS-BS 120 -
CMS-OF -
Základní moduly (kromě Basis 1A) ve spojení s multifunkčním stolem MFT/3.
Je povoleno montovat pouze moduly a elektrické
nářadí nabízené fi rmou Festool. Při montáži jiného elektrického nářadí přestává být stůl spolehlivý a zvyšuje se nebezpečí pro uživatele. Montáž
se smí provádět pouze na MFT/3.
Za škody a úrazy vzniklé nesprávným použitím
odpovídá uživatel.
4 Bezpečnostní pokyny
POZOR! Přečtěte si všechny bezpečnostní poky-
ny a instrukce. Chyba při dodržování varovných
upozornění a instrukcí může způsobit zásah
elektrickým proudem, požár a/nebo vážné zranění.
Dále používaný pojem "elektrické nářadí" se
vztahuje na síťové elektrické nářadí (se síťovým
kabelem) nebo na akumulátorové nářadí (bez síťového kabelu).
- Všechny přiložené dokumenty si uschovejte a stroj předávejte dalším osobám pouze s těmito dokumenty.
Před nastavováním nářadí, výměnou příslu- šenství nebo než nářadí odložíte, vytáhněte
síťovou zástrčku ze zásuvky. Tímto bezpečnostním opatřením zabráníte neúmyslnému
spuštění nářadí.
Před namontováním elektrického nářadí je nutno nohy stolu zablokovat a zajistit proti
sklopení. Zajištění a zablokování nohou je mimořádně důležité u skládacích stolů.
Elektrické nářadí před použitím bezpečně při- pevněte ke stolu. Nad elektrickým nářadím,
které není ke stolu řádně upevněné, můžete
ztratit kontrolu.
Stůl postavte na pevnou, rovnou a vodorovnou plochu. Pokud se stůl může posunout nebo se
viklá, nelze mít elektrické nářadí spolehlivě
a bezpečně pod kontrolou.
Stůl nepřetěžujte a nepoužívejte k jiným úče- lům, např. jako žebřík nebo podstavec. Pokud
je stůl přetížený nebo když na něm stojíte, je
vratký a může se snadno překotit.
5 Ustavení
Postarejte se o to, aby byla podlaha kolem f
pily rovná, v dobrém stavu a bez volně ležících
předmětů (např. třísek a odřezků).
Pro vyklopení nohou [1-2] povolte na doraz dva f
otočné knofl íky [1-1]. Po vyklopení nohou je
tyto dva otočné knofl íky nutno opět utáhnout.
Příp. povolte šrouby [3-2]. f
Prodloužení MFT/3-VL nasaďte shora do dráž- f
ky na MFT/3 [obrázek 2]. Dbejte na to, aby si
spojnice drážky profi lu na MFT/3 a MFT/3-VL
[3-4] odpovídaly.
Výšku MFT/3-VL přizpůsobte na obou stranách f
pomocí šroubů [3-1] stolu MFT/3.
MFT/3-VL na obou stranách zajistěte šroubem f
[3-2] na MFT/3.
Aby nářadí stálo pevně a rovně, lze měnit délku f
obou nohou šroubováním koncovek [3-3].
Page 35

35
6 Elektrické připojení
VÝSTRAHA
Nebezpečí úrazu, pokud je nářadí používáno
při nesprávném napájení ze sítě.
Síťové napětí a frekvence zdroje elektrické f
energie musí souhlasit s údaji na typovém
štítku nářadí.
V Severní Americe se smí používat pouze ná- f
řadí Festool s napětím 120 V.
POZOR
Nebezpečí poranění elektrickým proudem
Síťová zástrčka se smí zapojovat pouze do f
uzemněné síťové zásuvky.
Je povoleno používat pouze prodlužovací ka- f
bely s ochranným vodičem.
Ovládací spínač se zásuvkou [4-1] slouží k napájení i zapínání a vypínání elektrického nářadí
zabudovaného do MFT/3-VL.
Síťovou zástrčku [4-5] zapojte do uzemněné f
zásuvky.
Elektrické nářadí zabudované do MFT/3-VL f
připojte k zástrčce [4-4].
Nářadí zapněte stisknutím zeleného tlačítka f
[4-2].
Nářadí vypněte stisknutím červeného tlačítka f
[4-3].
Ovládací spínač se zásuvkou je vybavený vypíná-
ním při podpětí. Zabraňuje samovolnému vracení napětí po přerušení napětí (např. při výpadku
proudu). Po přerušení napětí stiskněte pro za-
pnutí znovu zelené tlačítko.
7 Příslušenství
Používejte pouze originální příslušenství a spotřební materiál Festool, který je určen pro toto
zařízení, protože tyto systémové komponenty
jsou navzájem optimálně sladěné. Při použití
příslušenství a spotřebního materiálu od jiných
výrobců je pravděpodobné kvalitativní zhoršení
pracovních výsledků a omezení záručních nároků. V závislosti na použití se může zvýšit opotřebení nářadí nebo vaše osobní zatížení. Chraňte
tedy sami sebe, své nářadí a záruční nároky výhradním používáním originálního příslušenství
a spotřebního materiálu Festool!
Objednací čísla příslušenství a nářadí vyhledejte,
prosím, ve svém katalogu Festool nebo na internetu na "www.festool.com".
8 Likvidace
Nevyhazujte zařízení do domovního odpadu!
Nechte ekologicky zlikvidovat zařízení, příslušenství a obaly! Dodržujte platné národní předpisy.
9 Záruka
Na naše nářadí poskytujeme na vady materiálu
nebo výrobní vady záruku podle zákonných ustanovení jednotlivých zemí, minimálně ovšem 12
měsíců. V rámci zemí EU činí záruční doba 24
měsíců (na základě účtenky nebo dodacího listu). Ze záruky jsou vyloučeny škody způsobené
zejména přirozeným opotřebením, přetížením,
neodborným zacházením, resp. škody zaviněné uživatelem nebo způsobené jiným použitím,
v rozporu s provozním návodem, nebo které byly
známy již při zakoupení. Rovněž jsou vyloučeny
škody, které byly způsobeny použitím jiného než
originálního příslušenství a spotřebního materiálu Festool (např. brusné talíře). Reklamace lze
uznat pouze tehdy, pokud je nerozebrané nářadí zasláno zpět dodavateli nebo autorizovanému
servisu Festool. Návod k použití, bezpečnostní
pokyny, seznam náhradních dílů a nákupní doklad pečlivě uschovejte. Jinak platí vždy aktuální
záruční podmínky výrobce.
Poznámka
Na základě neustálého výzkumu a vývoje jsou vyhrazeny změny zde uvedených technických údajů.
REACH
REACh je nařízení o chemických látkách, platné
od roku 2007 v celé Evropě. Jako následný uživatel, tedy jako výrobce výrobků jsme si vědomi své
informační povinnosti vůči zákazníkům. Abychom
vás mohli vždy informovat o nejnovějším vývoji
a o možných látkách ze seznamu látek v našich
výrobcích, vytvořili jsme pro vás následující webovou stránku: www.festool.com/reach
Page 36

36
MFT/3-VL
1 Dane techniczne
Wymiary stołu (szerokość
x długość)
773 x 481 mm
Wysokość stołu z nóżkami
składanymi
854 mm
Ciężar 11,3 kg
2 Symbole
Ostrzeżenie przed ogólnym zagrożeniem
Niebezpieczeństwo porażenia prądem
Instrukcja/przeczytać zalecenia!
Podane rysunki znajdują się w załączniku instrukcji obsługi.
3 Użycie zgodne z przeznaczeniem
MFT/3-VL jest to jednostka podstawowa do montażu w
CMS-TS 55 -
CMS-TS 75 -
CMS-PS 200/PS 300 -
CMS-BS 120 -
CMS-OF -
Moduł Basis (oprócz Basis 1A) w połączeniu ze stołem wielofunkcyjnym MFT/3.
Można montować wyłącznie moduły i elektrona-
rzędzia oferowane przez fi rmę Festool. Montaż
innych elektronarzędzi czyni stół niestabilnym
i stanowi zagrożenie dla użytkownika. Montaż
może zostać wykonany tylko do MFT/3.
Za szkody i wypadki spowodowane użyciem niezgodnym z przeznaczeniem odpowiedzialność
ponosi użytkownik.
4 Zalecenia odnośnie bezpieczeń-
stwa pracy
UWAGA! Należy przeczytać wszystkie zalecenia
bezpieczeństwa pracy i instrukcje. Nieprzestrzeganie ostrzeżeń i instrukcji może spowodować
porażenie elektryczne, pożar oraz/lub ciężkie
obrażenia.
Używane niżej pojęcie "Elektronarzędzie" odnosi się do elektronarzędzia zasilanego z sieci (z
przewodem zasilającym) lub do elektronarzędzia zasilanego z akumulatorów (bez przewodu
zasilającego).
Wszystkie dołączone dokumenty należy zacho- wać i przekazać urządzenie następnemu użytkownikowi wyłącznie z tymi dokumentami.
Przed przystąpieniem do ustawiania urzą- dzenia, wymiany elementów wyposażenia lub
przed odłożeniem narzędzia, należy wyciągnąć
wtyczkę z gniazda wtykowego. Ta czynność zabezpieczająca zapobiega niezamierzonemu
uruchomieniu urządzenia.
Zanim narzędzie elektryczne zostanie zainsta- lowane nogi stołu muszą być zablokowane i
zabezpieczone przed złożeniem. Zabezpieczanie i blokowanie nóg jest ważne szczególnie w
przypadku stołów składanych.
Przed użyciem trzeba prawidłowo zamocować elektronarzędzie w stole. Narzędzia elektryczne, które poruszają się w stole, mogą spowodować utratę kontroli.
Ustawić stół na wytrzymałej, płaskiej i pozio- mej powierzchni. Jeśli stół może się przesuwać lub chwieje się, narzędzie elektryczne nie
może być prowadzone niezawodnie i bezpiecznie.
Nie wolno przeciążać stołu, ani wykorzystywać go, jako drabiny, ani rusztowania. Przeciążenie lub stawanie na stole powoduje utratę jego
stabilności i możliwe jest przewrócenie.
5 Posadawianie
Należy zadbać o to, aby podłoże wokół urzą- f
dzenia było płaskie, w dobrym stanie i bez leżących dookoła przedmiotów (np. wióry i pozostałości po cięciu).
W celu rozłożenia nóżek [1-2] trzeba odkręcić f
do oporu dwa pokrętła [1-1]. Po rozłożeniu nóżek dwa pokrętła należy ponownie przykręcić.
W razie potrzeby poluzować śruby [3-2]. f
Nałożyć przedłużenie MFT/3-VL od góry na f
wpust przy MFT/3 [rysunek 2]. Należy zwrócić
uwagę na to, aby osie przy wpuście profi lowanym w MFT/3 i w MFT/3-VL [3-4] pokrywały się
ze sobą.
Dopasować wysokość MFT/3-VL po obu stro- f
nach śrubami [3-1] do MFT/3.
Zablokować MFT/3-VL po obu stronach śrubą f
[3-2] w MFT/3.
Dla zapewnienia bezpiecznego i poziomego f
ustawienia urządzenia, można zmienić dłu-
Page 37

37
gość obu nóżek poprzez przekręcenie końcó-
wek [3-3].
6 Przyłącze elektryczne
OSTRZEENIE
Niebezpieczeństwo wypadku, jeśli urządzenie
będzie pracowało przy niedozwolonym napięciu lub częstotliwości.
Napięcie sieciowe i częstotliwość źródła prą- f
du muszą zgadzać się z danymi na tabliczce
identyfi kacyjnej urządzenia.
W Ameryce Północnej wolno stosować wy- f
łącznie urządzenia Festool o parametrach
napięcia 120 V.
OSTRONIE
Niebezpieczeństwo zranienia, porażenie prądem
Wtyczka przewodu zasilającego może zostać f
podłączona tylko do uziemionego gniazda
wtykowego.
Wolno stosować tylko przewód przedłużenio- f
wy z przewodem ochronnym.
Jednostka włącznikowo/wtyczkowa [4-1] służy
do zasilania oraz do włączania/wyłączania elektronarzędzia zamontowanego w MFT/3-VL.
Wsunąć wtyczkę przewodu zasilającego [4-5] f
do uziemionego gniazda wtykowego.
Podłączyć elektronarzędzie zainstalowane w f
MFT/3-VL wtyczką [4-4].
Nacisnąć zielony przycisk [4-2] w celu włącze- f
nia.
Nacisnąć czerwony przycisk [4-3] w celu wy- f
łączenia.
Jednostka włącznikowo/wtyczkowa posiada wy-
zwalacz zanikowy. Zapobiega on samoczynnemu
przywracaniu napięcia po przerwie w zasilaniu
(np. przerwa w dopływie prądu). W celu ponownego włączenia po przerwaniu zasilania należy
nacisnąć zielony przycisk.
7 Wyposażenie
Należy używać tylko oryginalnego wyposażenia
i materiałów eksploatacyjnych Festool przewidzianych dla tego urządzenia, ponieważ powyższe komponenty systemowe są do siebie optymalnie dostosowane. W przypadku stosowania
wyposażenia i materiałów użytkowych innych
oferentów, możliwe jest jakościowe pogorszenie
wyników pracy i ograniczenie praw gwarancyjnych. W zależności od zastosowania może ulec
zwiększeniu zużycie urządzenia lub obciążenie
pracownika podczas pracy. Z tego względu należy chronić siebie, swoje urządzenie i prawa gwarancyjne poprzez wyłączne stosowanie oryginalnego wyposażenia fi rmy Festool i oryginalnych
materiałów użytkowych fi rmy Festool!
Numery katalogowe wyposażenia i narzędzi podane są w katalogu fi rmy Festool lub w Internecie pod adresem "www.festool.com".
8 Usuwanie
Nie wolno wyrzucać urządzenia wraz z odpadami domowymi! Urządzenia, wyposażenie i opa-
kowania należy przekazać zgodnie z przepisami
o ochronie środowiska do odzysku surowców
wtórnych. Należy przestrzegać obowiązujących
przepisów państwowych.
9 Gwarancja
Na urządzenia produkcji naszej fi rmy udzielamy
gwarancji z tytułu wad materiałowych i błędów
produkcyjnych zgodnie z postanowieniami ustawowymi obowiązującymi na terytorium danego
kraju, która wynosi co najmniej 12 miesięcy. Na
terytorium państw UE czas trwania gwarancji
wynosi 24 miesiące (licząc od daty na rachunku lub dowodzie dostawy). Szkody, a zwłaszcza
naturalne zużycie, przeciążenie, użytkowanie
niezgodne z przeznaczeniem względnie szkody
zawinione przez użytkownika lub inne zastosowanie niezgodnie z instrukcją obsługi lub, które
znane były w momencie zakupu, nie są objęte
gwarancją. Nie są również objęte szkody, powstałe w wyniku stosowania nieoryginalnego
wyposażenia i materiałów użytkowych (np. talerze szlifi erskie).
Reklamacje mogą zostać uznane tylko wtedy,
gdy nierozłożone na części urządzenie zostanie
odesłane do dostawcy lub do upoważnionego
warsztatu serwisowego fi rmy. Należy zachować
instrukcję obsługi, zalecenia bezpieczeństwa, listę części zamiennych i dowód zakupu. Ponadto
obowiązują aktualne w momencie zakupu warunki gwarancyjne producenta.
Uwaga
Ze względu na stałe prace badawcze i rozwojowe
zastrzega się zmiany zamieszczonych tu danych
technicznych.
Page 38

38
REACH
REACh jest to rozporządzenie o substancjach
chemicznych, które obowiązuje w całej Europie od
2007 r. Firma nasza, jako „użytkownik końcowy“,
a zatem jako producent wyrobów jest świadoma
obowiązku informowania naszych klientów. W
celu dostarczania naszym klientom najnowszych
informacji oraz informowania o możliwych substancjach z listy kandydatów w wyrobach naszej
fi rmy, utworzyliśmy następującą stronę internetową: www.festool.com/reach
 Loading...