


User manual
FT-8100 HD
English

WARNING !!!
On the USB Memory Function for FT-8100 HD model, user can make record ing or playing function
using by external USB devices such as USB Flash Memory Disk or external USB HDD(Hard Disk).
However, below condition should be remarked before applying.
REMEMBER:
1. To use the external USB device, the device has to be supported by USB
2.0. In case of the USB flash memory disk for recording, we suggest to
use USB2.0 by SLC type with writing speed over 9.0MB/s for stable
recording and playing.
2. Please make sure the USB device condition is set as FAT32 before using.
To make FAT32 condition, user can make format function on their
personal PC.
3. External hard drives HDD should contain their own power supply unit.
CAUSION
1. Please do not remove the external USB device from the receiver during the recording or playing
in USB mode. Unexpected action could make damaged condition for either the receiver and the
external USB device.
2. Do not touch with wet hand in any cases.
2

SAFET Y INST RUCTIONS ..................................................................................................... 4
SOFTWARE FOR DOW NLOADING ......................................................................................... 4
USER MANUAL.................................................................................................................. 4
SYMBOLS USED ON THE RECEIVER ...................................................................................... 5
GENERAL INFORMATION .................................................................................................... 6
1. Main Features ......................................................................................................... 6
2. Unpac king .............................................................................................................. 6
3. General Operation of STB.......................................................................................... 6
INSTALLATION OF STB....................................................................................................... 7
1. Front Panel ............................................................................................................. 7
2. Rear Panel .............................................................................................................. 7
REMOTE CONT ROLLE ......................................................................................................... 8
1. Connec tion Diagram ................................................................................................. 9
1.1 Connect to TV with HDMI c able (recommended) .................................................... 9
1.2 Connect YPrPb Port ........................................................................................... 9
1.3 Connect SCART Port......................................................................................... 10
1.4 Connect Audio System ..................................................................................... 10
Quick Installation ............................................................................................................. 11
THE MAINMENU INFORMATION...........................................................................................12
Main menu ................................................................................................................ 12
1. System Set t ing ...................................................................................................... 12
1.1 OSD Language ................................................................................................ 12
1.2 Country ......................................................................................................... 12
1.3 LCN .............................................................................................................. 13
1.4 Time Setting................................................................................................... 13
1.5 Change passwo rd ............................................................................................ 13
1.6 System Information .........................................................................................13
1.7 Factory Reset.................................................................................................. 14
2. Video Setting ......................................................................................................... 14
3. Audio Set t ing ......................................................................................................... 14
4. Installation ............................................................................................................14
4.1 Manual Sc an ................................................................................................... 14
4.2 Auto Search ................................................................................................... 15
4.3 Firmware Update Via USB ................................................................................. 15
5. Program Manage .................................................................................................... 15
5.1 Program Edit ..................................................................................................15
6. Program Guide ....................................................................................................... 16
7. USB/PVR ...............................................................................................................16
8. Record.................................................................................................................. 16
8.1 Start record.................................................................................................... 16
8.2 Stop rec ord .................................................................................................... 16
Specifications..................................................................................................................17
3
SAFETY INSTRUCTIO NS
Please observe all warnings and instruct ions on the equipment and c ontained in these operating
instruct ions. You must install the dish with c orrect direction and angle.
Please care fully read this user’s manual before
using the receiver.
To avoid e lectric-shock hazards, do not open
the cabinet, refer servicing to qualified
personnel only. If cabinet is opened warra nty
will be invalid.
Please switch off completely the receiver
during thunder, during abnormal phenomenon,
before cleaning it and in case it remains out of
service for a long period.
Do not expose the receiver under the sunlight.
And keep it away from the heat source or
humid environments. Do not block ventilation
holes of the receive r so that air can circulate
freely.
Please place the rece iver in horizontal and
stable conditions, keeping it away from
vibrating.
If device is moved from warmer place to a
colder one some problem might occur. Please
switch off the rece iver and turn it on after 1 or
2 hours.
Keep the receiver away fro m flower vases,
tubs, sinks, etc., in order to avoid damaging
the equipment. Do not touch power supply
with wet hands.
Don’t put any objects on the receiver.
Be sure to turn the receiver off and disconnect the AC power cord before cleaning the receiver surfac e.
If the surface is dirty, wipe clean with a c loth which has been dipped in a weak soap/and/water solution
and wrung out thoroughly, and then wipe again with a dry cloth.
Do not connect cables while power is plugged.
Do not use da maged cables for c onnections: you could cause fires.
Please switch off completely the receiver while making all c onnections.
The product purchased is a sophisticated electronic device which is not suitable for c hildren under 18
years.
We do not assume respo ns ibility for damages c aused to people or object, deriving from use of the
device made by people under 18 years.
SOFTWARE FOR DO WNLOADING
Ferguson has used all t he available means to deliver to its users software updates guaranteeing the
best possible parameters of the satellite television rec eivers. Ferguson rese rves the right to ma ke
correct ions, changes or modifications of the software used in the receiver on any basis whatsoever and
without prior notice. The current version of the software is available on the following website
http://www.ferguson-digital.eu
USER MANUAL
Ferguson has use d all t he available means to ensure the latest information regarding its products.
Ferguson does not give a warranty regarding the contents of this User Manual and waives any implied
warranties rega rding market value or fitness for specific purposes. T he information contained herein
provide guidelines allow ing the operation and maintenance of the receiver.
Ferguson rese rves t he right t o make changes, c orrections or t o translate the User Manual without
giving prior notice of such changes. Therefore, it is recommended that users visit our website regularly
to receive the latest information.
4
SYMBOLS USED ON THE RECE IVER
The Digital Video Broadcast ing logo.
This logo tells you that t his rec eiver is co mpliant with the DVB st andards.
The caution risk of electrica l shoc k - do not open symbol
This sy mbol tells you that you are not allowed to open the receiver. Only authorized (service)
technicians are allowed to open t he box.
The CE ma rk.
This mark tells you that the receiver is following the provisions of Council Directive
89/336/EEC on the approximation of the laws of the Member States relating to the
electromagnetic compatibility and the provisions of Council Directive 73/23/EEC and 93/68/EEC on the
approximation of t he laws of the Member St ates relating to low voltage and electrical safety.
The double insulation symbo l.
This sy mbol tells yo u that t he rec eiver is electrically safe within the normal use of the
receiver as stated in the safety chapter.
Environme nt protection first!
Your applianc e contains valuable materials which c an be rec overed or recycled.
Leave it at a local civic waste collection point.
5

GENERAL INFORMATION
This digital terrestrial receiver is a highly cost-effective digital terrestrial receiver integrated. It
provides big channels storage with fast searching. The receiver is definitely one of t he best choices to
deliver your d igital life.
1. Main Features
• Fully conforms to MPEG4, MPEG2 and DVB-T standard.
• Separate T V/Radio List & Favourite Group List
• Auto & manually scan all available TV and Radio c hannels
• PAL-NTSC-SECAM Auto-c onversion syste m
• Supports logical c hannel number (LCN)
• Supports Teletext and Subtitles
• Advanc ed Electronic Program Guide (EPG)
2. Unpacking
Unpac k the receiver and c heck to ma ke sure that all of the following items are included in the
packaging.
1 x Remote Control Unit
1 x User’s Guide
1 x Digital T errestrial Receiver
3. Gene ral Operation of STB
Throughout this manual you will notice that the everyday operation of your ST B is based on a series of
user friend ly on sc reen display and menus. These menus will help you get t he most from your STB,
guiding you through installation, c hanne l organizing, viewing and many other funct ions.
All func tions c an be carried out using the buttons on t he RCU, and some of t he functions c an also be
carried out using the butt ons on the front panel.
Please be aware t hat new software may change the functionality of the receiver.
Should you experienc e any difficulties with the operation of your unit, please c onsult t he relevant
sect ion of this manual, including the Problem Shooting, or alternatively c all your dealer or a cust omer
service adviser.
NOTE:
Please be aware t hat new software may change t he functionality of t he receiver. The photo
and the function explanat ion involved in this specification is for reference only. If there is any
mistake, please refer to the entity.
6

INSTALLATION OF STB
1. Front Panel
【POWER】Press to switch between ON and OFF modes.
【CH-】Move c ursor or channe l down
【CH+】Move cursor or channel up
【DISPLAY SC REEN】Display t he channel number and status. Power indicator. Signal indicator.
【USB】USB for update software
2. Rear Panel
【ANT IN】Aerial signal input
【RF OUT】S ignal loop output
【S/PDIF】 Digital audio output.
【HDMI】Co nnects to the HDMI input on your TV set
【VIDEO】Connec ts to the video c hannel of T V
【R/L】Provides the stereo audio output t o TV or other equipments
【YPbPr】Provides a component video output t o TV or other equipments.
【TV】Connect to TV using SCART c able
【VCR】Connect to VCR using SCA RT cable.
7

REMO TE CONTROLLE
Due to sta ndardization fact m ost of Ferguson units is using t he
same remote control unit. That is why NOT all keys are being used
by this STB model!!
POWER
Turns t he Receiver ON/OFF.
TV/RADIO
Switc hes between TV and Radio modes.
MUTE
Selects the sound ON/OFF.
BACK
Returns to the previously viewed channel.
EPG
Elect ronic Program Guide, displays EP G.
MENU
Displays the menu o n the sc reen.
FORMAT
Selects various video aspec t ratio.
INFO
Displays the program info rmation bo x on t he sc reen.
EXIT
Returns to the previous menu and the screen.
OK
Shows the channel list or selec t s an item on t he menu.
VOL +, VOL–
Adjusts the sound volume (increase/dec rease).
CH +, CH –
Turns t o the next or previous c hannel.
TEXT
Shows the T ELETEXT on the screen if the TV can be available.
AUDIO
Selects the audio track for the current c hannel if applicable.
SUB.T
Selects the subtitle language for the c urrent channel if applicable.
FIND
Quick Find channel function.
EDIT
You c an edit the current channel information.
OPT (option)
To list the reserved programs sc hedule.
USB/PVR
Not used in this model.
FAV
Displays the favorite channel list.
REC - record c urrent service or set stop recording time when recording.
STOP - stop playback when play multi- media or set st op recording when recording.
PAUSE - pause live TV or multimedia playbac k in playing mode.
PLAY - return to normal speed playback in paused mode.
REW - fast backward
FF - fast forward
PG DO WN, PG UP
To move faster on any list.
8

1. Connection Diagram
The following figure shows cable connections required for TV and other related electrical equipment. If
you need any assistanc e for specific equipment connection, please c ontact your local dealer.
1.1 Connect to TV with HDMI cable (recommended)
1. Connec t LNB IN port on receiver to a satellite dish.
2. Connec t HDMI port on rec eiver to HDMI port on TV.
1.2 Connect YPrPb Port
1. Connec t LNB IN port on receiver to a satellite dish.
2. Connec t to TV as following figure.
9

1.3 Connect SCART Port
1. Connec t the antenna with LNB IN of the STB.
2. Connec t to TV as following figure.
1.4 Connect Audio System
1. Connec t the antenna with LNB IN of the STB.
2. Connec t the SPDIF with Digital Theater Systems to enjoy higher quality sound.
3. You c an also connect AUDIO L/R with AUDIO IN L/R of audio syst em by us ing the RCA c able.
10

Quick Installation
Step 1: C hec k the cable c onnections
Prior to powering up the receiver, ensure that all cables are correctly connect ed. Ensure that the unit is
connected to A/V equipment and the power soc ket.
Step 2: Insert the CAM (with s mart c ard) released by your se rvice provide r.
Insert t he CAM into the slot according to the arrow direction drawn.
Note: Don’t attempt to remove or insert the CAM while the receiver is powered on or initializing.
Step 3:Turn on the television a nd tune it to relevant video mode.
Step 4: Power on and Set STB
Turn on power switch ON/OFF of your receiver. The startup OSD will be shown on the TV screen.
Receiver initialization includes loading of the embedded syst e m parameters. If there are some
programs stored in the STB, c hannel number will be shown on the LED area. Otherwise , Install Guide
will show.
Use keys ▲▼ move t he cursor, keys c hange the item selec t .
Press <M ENU> o r <EXIT > to exit the Install Guide .
Step 5: Search program
Press <Start> to save current set and enter AUTO SCAN.
Step 6: P lay program
To display T V program list, press <OK> button directly at t he non-menu mo de, select the desired
program by using ▲▼ butt ons and press OK button t o watch.
11
THE MAINMENU INFORMATION
After c onnecting the STB and switc h on the power; the subject unit comes into work. If the signal is
ready and there are programs saved in the unit, the TV will show the channel which when you turn off
last time. T he unit will be in normal play mode after get t ing signal.
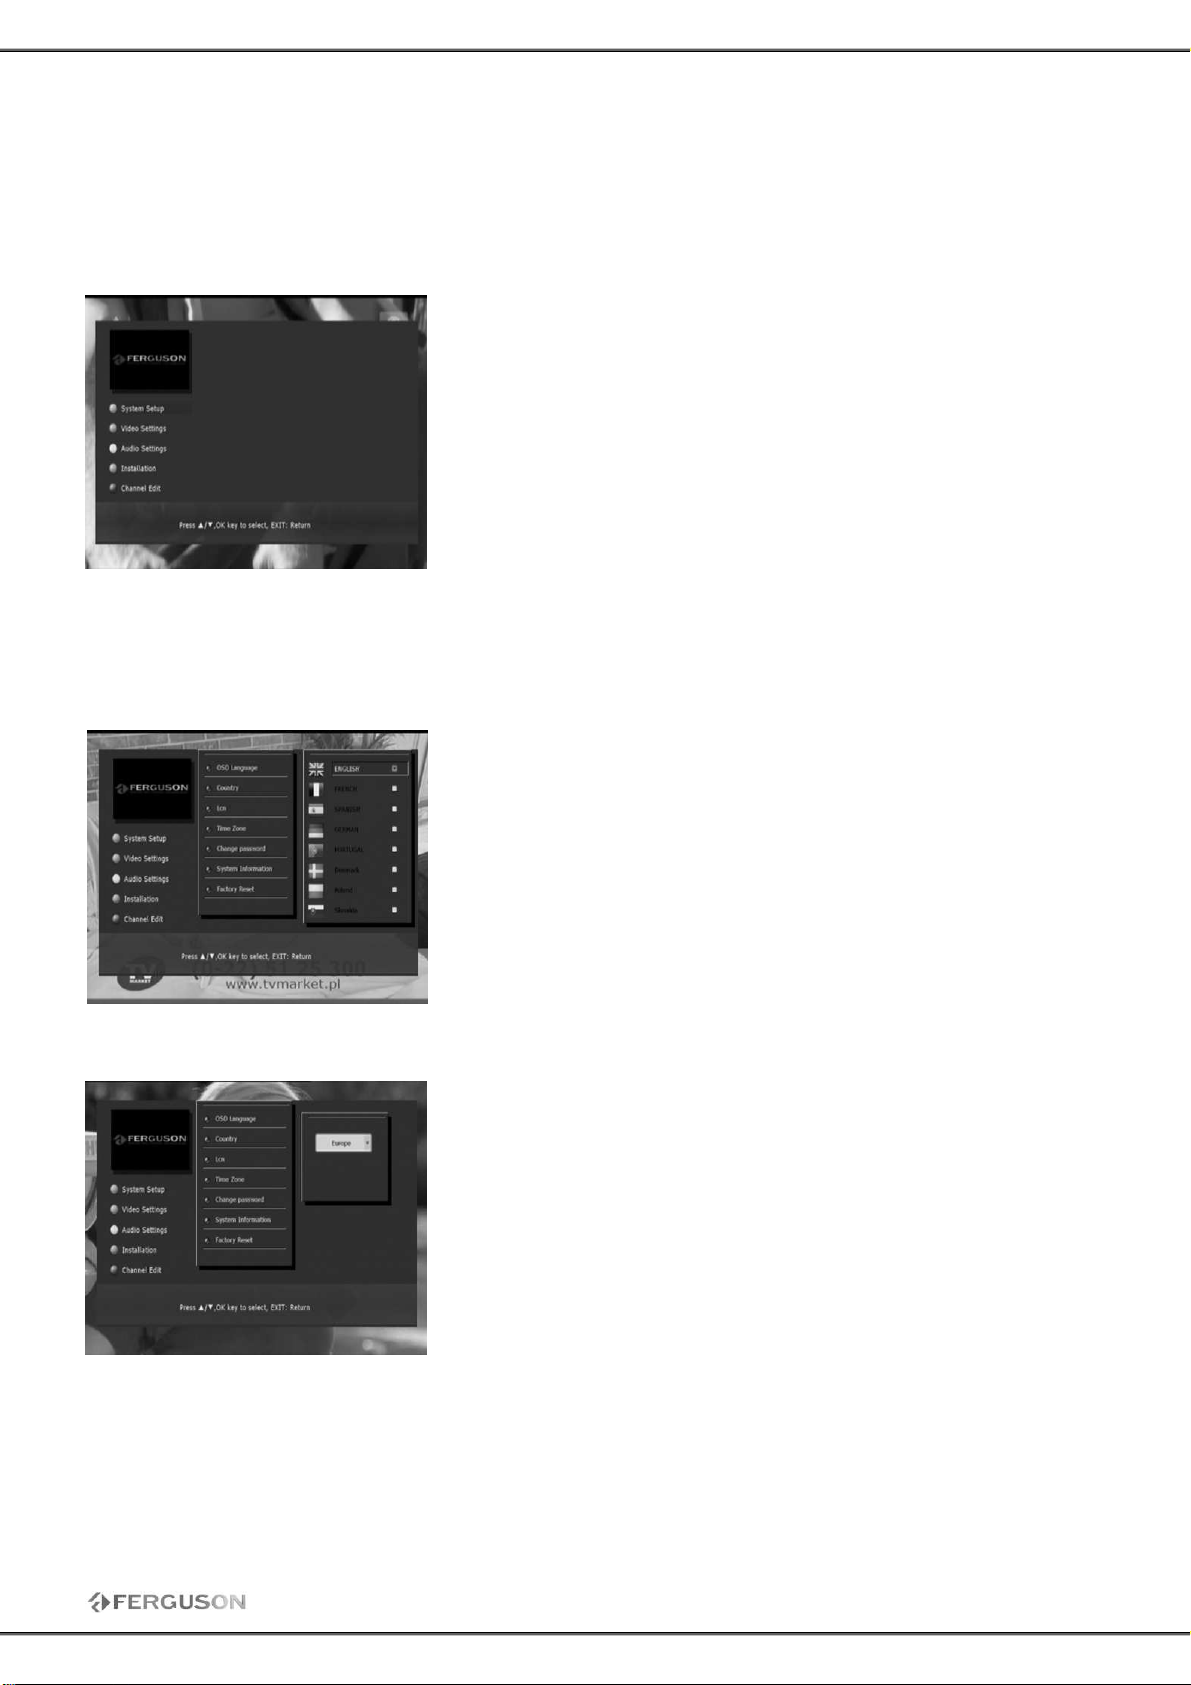
Main menu
Press <MENU> on the remote c ontrol unit t o open up the main
menu, and it inc ludes t he following ite ms.
[Syst em Setup]
[Video Set t ings]
[Audio Settings]
[Installation]
[Channel Edit]
Use keys ▲▼ move the c ursor, press <OK> to select the desired
ite m. And press <MENU> or <EXIT > to exit menu ope ration.
1. System Setting
1.1 OSD Language
1.2 Country
User can c hoose below options of OS D set control:
OSD language: select a preferred language available.
Make sure t o select the appropriate country of the installation of
your receiver. T his c hoice is linked to the default settings, such as
character enc oding.
12
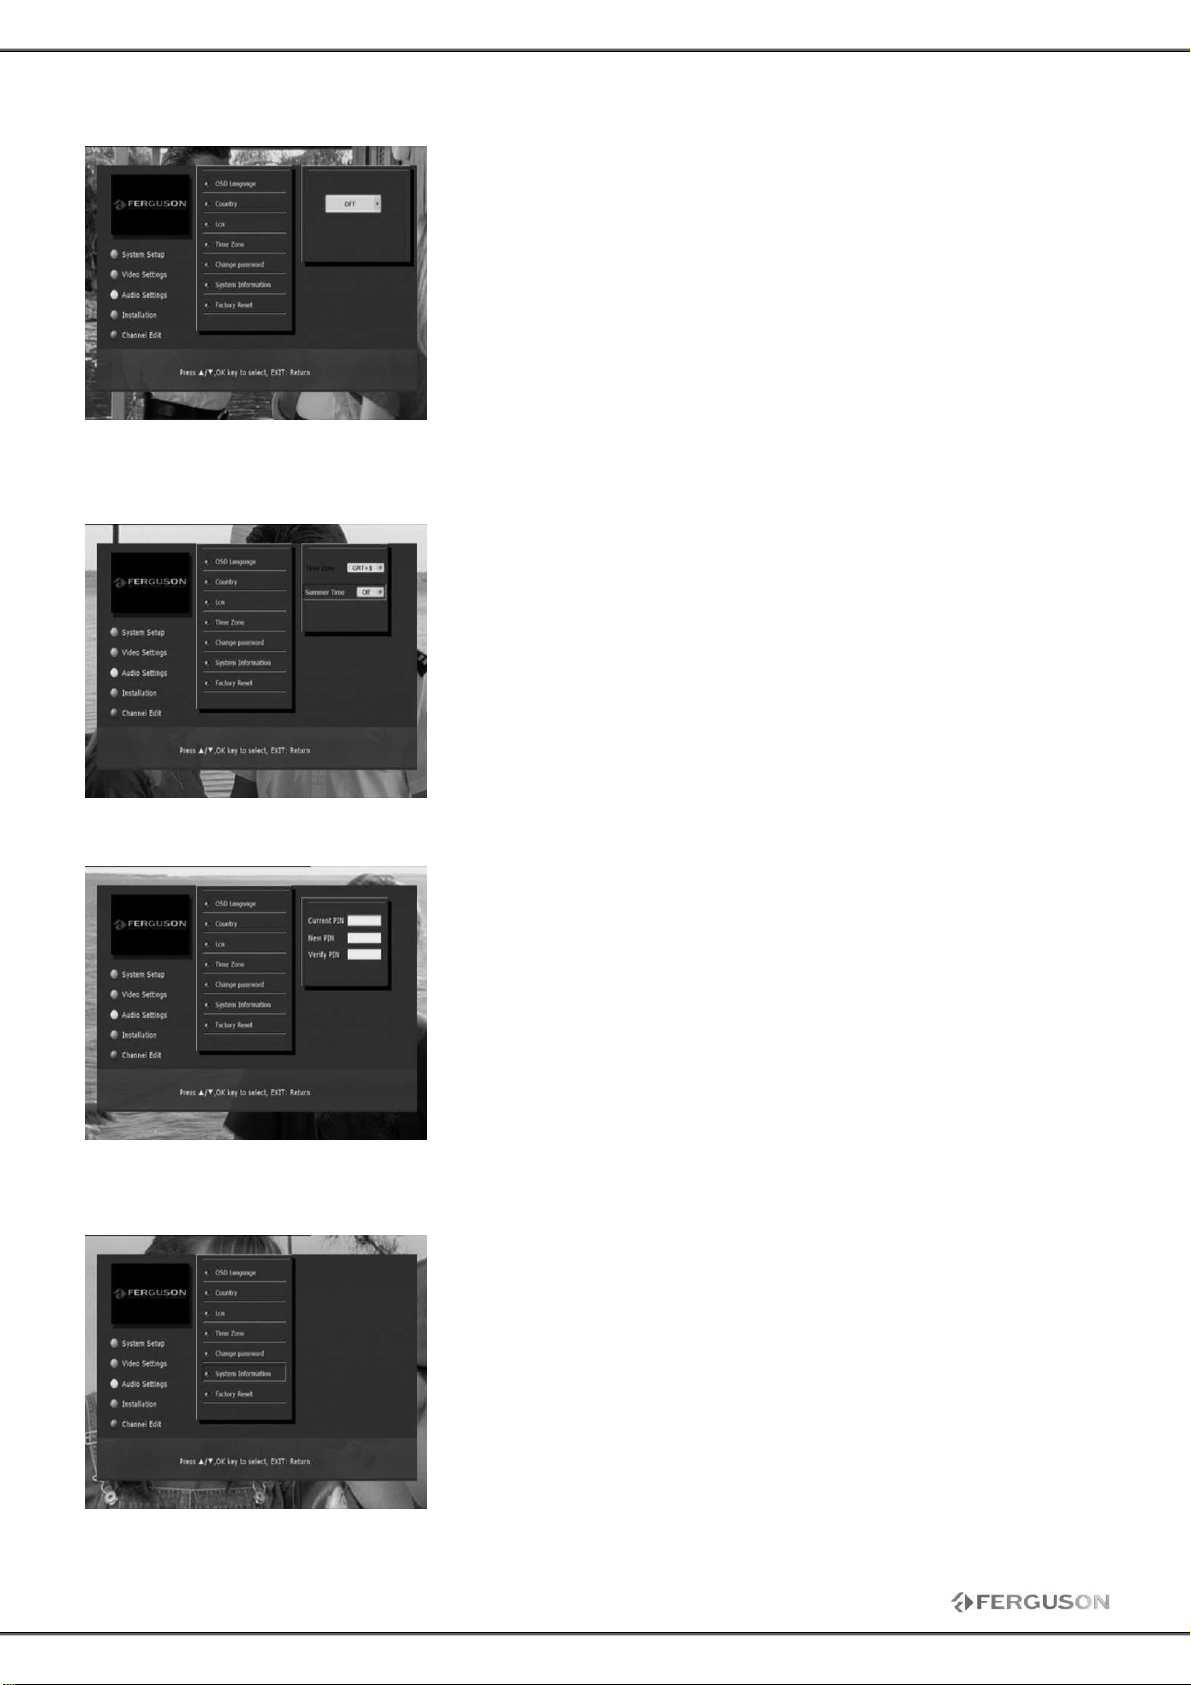
1.3 LC N
1.4 Time Sett ing
The logical channel number (LCN), also known as virtual channel
means a channel, which is d ifferent from the actual c hannel o r
frequency in which it is transmitted. Used for the automatic
numbering of channels in acc ordance with a proposal for the
provider.
User can c hoose below options of T ime set control:
Time Zone: GMT 0, GMT +1…
Daylight: On o r Off.
1.5 Change pass word
1.6 System Information
13
In this menu you can c hange default password. Default password
is 1234.
This OSD information shows the receiver’s basic information such
as manufacture, software and hardware version.

1.7 Facto ry Reset
2. Video Sett ing
This operation removes any changes made by t he user. The
receiver will return to its factory settings. Upon completion of this
operation rec eiver will automatically be rebooted.
User can c hoose below options of video control:
TV system: NTSC or PAL.
HD Output: 1080i, 720p, 576p, 576i, Auto
Aspec t ratio: Auto, 4:3 or 16:9.
SCART Output: CVBS or RGB.
3. Audio Setting
4. Installation
4.1 Manual Scan
User can c hoose below options of volume c ontrol:
Sound track: Left, Right or St ereo.
Digital output mode: PCM or RAW.
If you know the specific channel number of the programs, you can
use Manual Search to scan programs.
When move cursor to Channel, press OK then appear channel list.
Through up/down to choose the channel you need search by
manual scanning, bes ides, the Frequency below Channel will
change according to your choosing. After c hoosing, you can choose
"Start " to start channel sc anning.
14

4.2 Auto Search
Scan all available c hannels t hat depends on the Nation Setting in
the Install Guide. After searching well, new searched TV and radio
programs will be added to the corresponding program list.
4.3 Firmware Update Via USB
Warning: Do not turn off the power during the update. This risks lasting damage to
equipment.
Once you get the right file from your franchiser, please upgrade software as following st eps:
1. Format your USB disk to FAT32 file syste m and copy
/upgrade/ NEC_E MMA3SLHD.UPG to USB disk;
2. Power off receiver and pull out antenna
3. Insert USB disk to receiver’s USB port
4. Power on STB, and then enter into Installation->Firmware
update via USB.
5. Then the system will chec k the USB device and upgrade
soft ware by itself. If succ essful, the menu will display the progress
of updating .
6. After all done receiver will reboot automatically.
5. Program Manage
5.1 Program Edit
15
1. Press button red to select a favorite list.
2. Press the UP and DOWN keys t o select a channel and press OK
to select this channel to the favorite list. A c onfirmation logo will be
displayed next to the selected channel.
3. Press the EXIT key to qui t the menu. You are now
being asked to save the change or to cancel .
In the sa me way you can lock, move or delete channels.

6. Program Guide
7. USB/PVR
It provides information of the current and next programs on
different channels. The information is only available from the
network to which the channel you a re watc hing.
Press < EPG > key to switch between Program list and EPG list. The
contents shown on the up- right windows and EP G list vary
acc ording to the selection in P rogram list. Program detail
information is showing on up-left windows.
You can use key to switc h days among current 7 days shown
on the t op of the EPG list.
The rec eiver has a simple music, video and phot os in the JPEG
format player. The player is a function of additional, which means
that not all supported formats will work properly.
Video tab is also used fo r playbac k of your recordings.
8. Record
This function requires the support of USB HDD, so you have to c heck up w het her a USB HDD that is
FAT32 format has been connect ed to the USB interface.
Remar ks:
• Ensure t hat there is e nough free s pace before recording. If the free space on the hard disk is
insufficient, recording w ill st op.
• You c an record radio programs also.
8.1 Start record
Press the <REC> key on the RCU, system will popup a dialog to confirm. When rec ording, a record icon
will be d isplayed on the screen.
8.2 Stop record
Press STOP to end current rec ording, or in recording info window choose "StopRec".
16
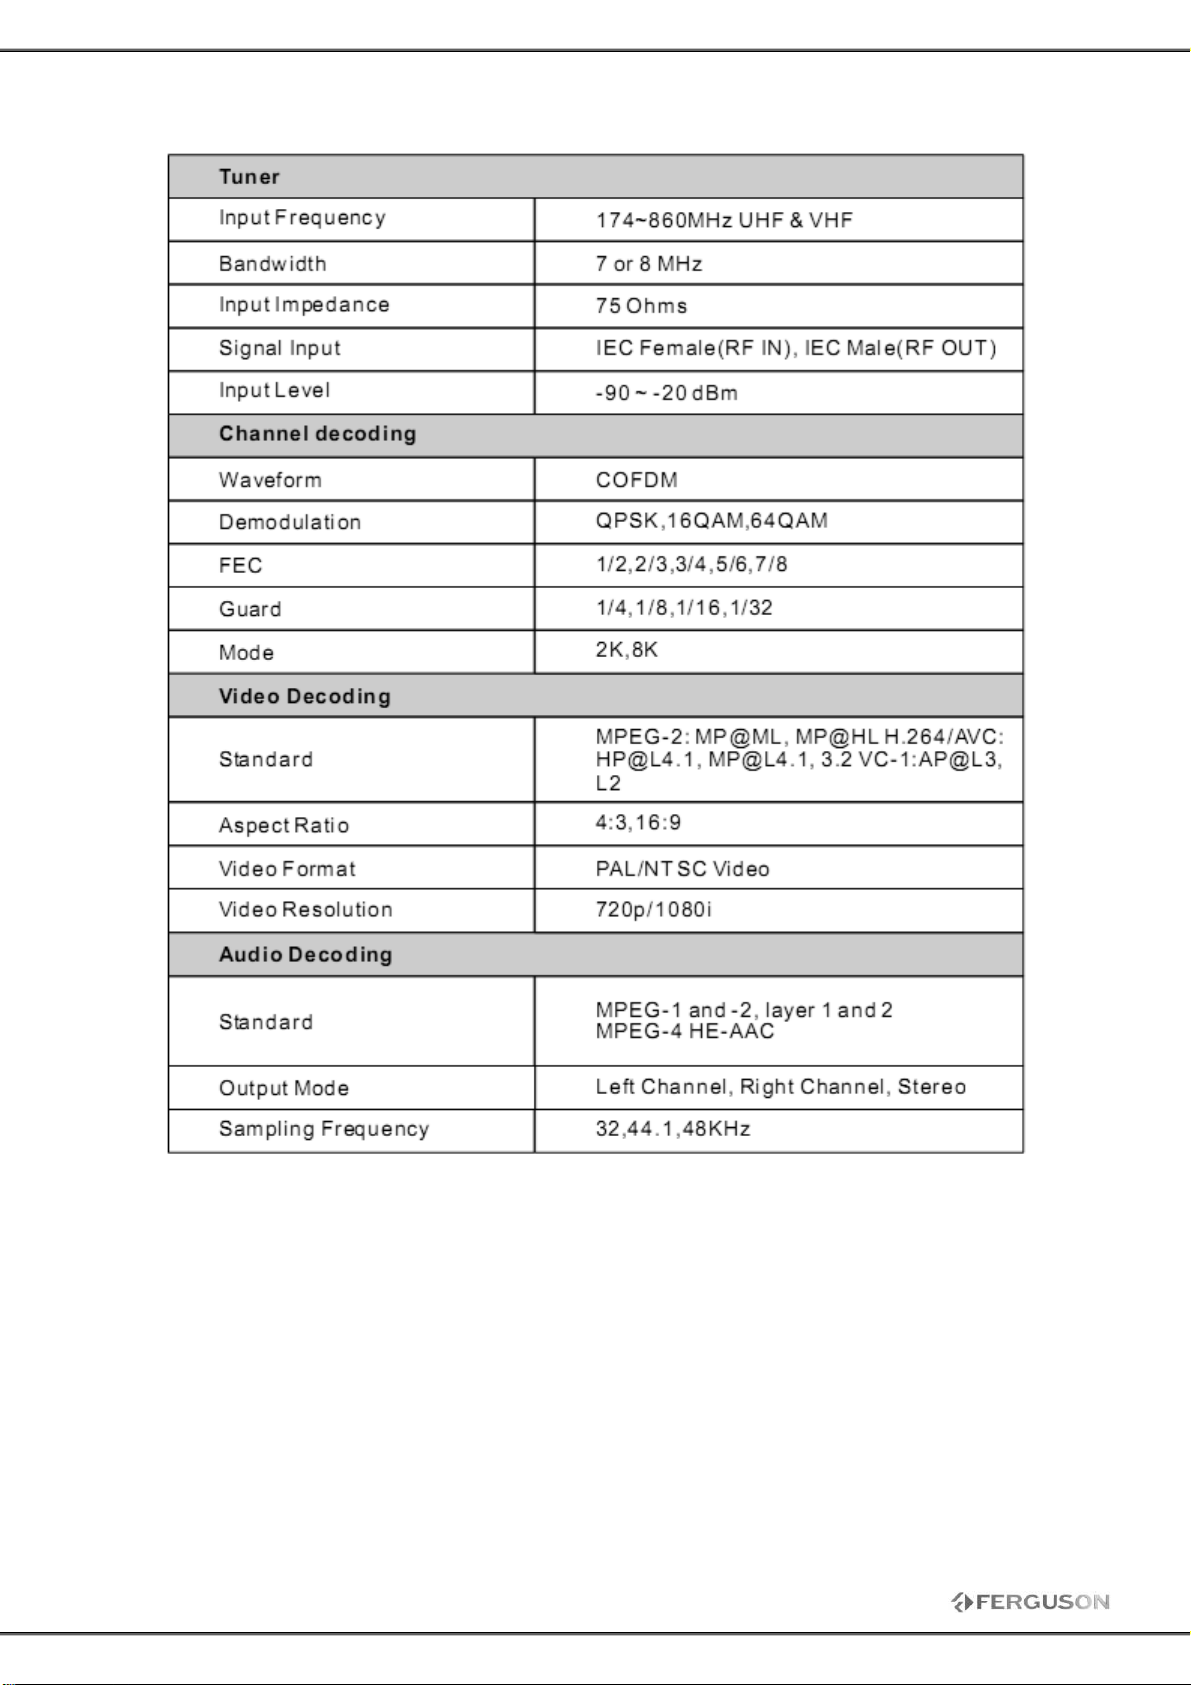
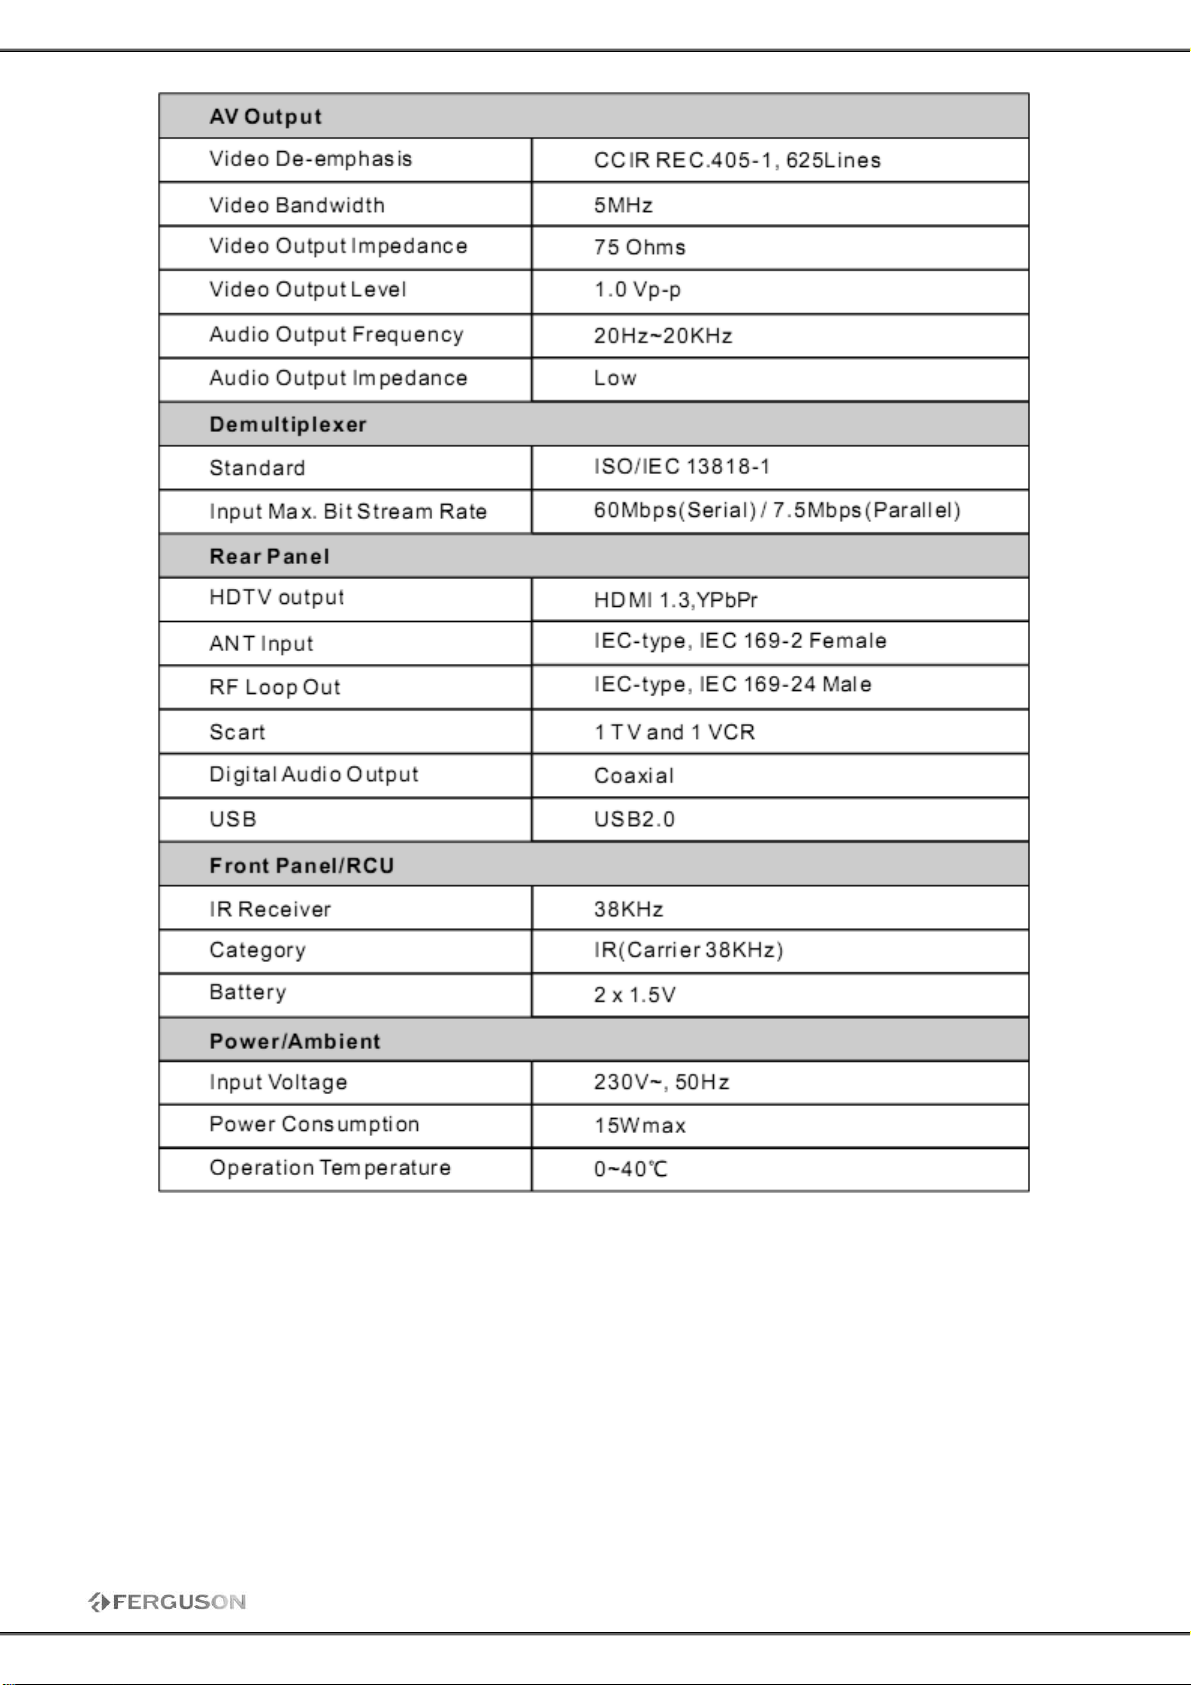
Specifications
17
18
 Loading...