

Page 1
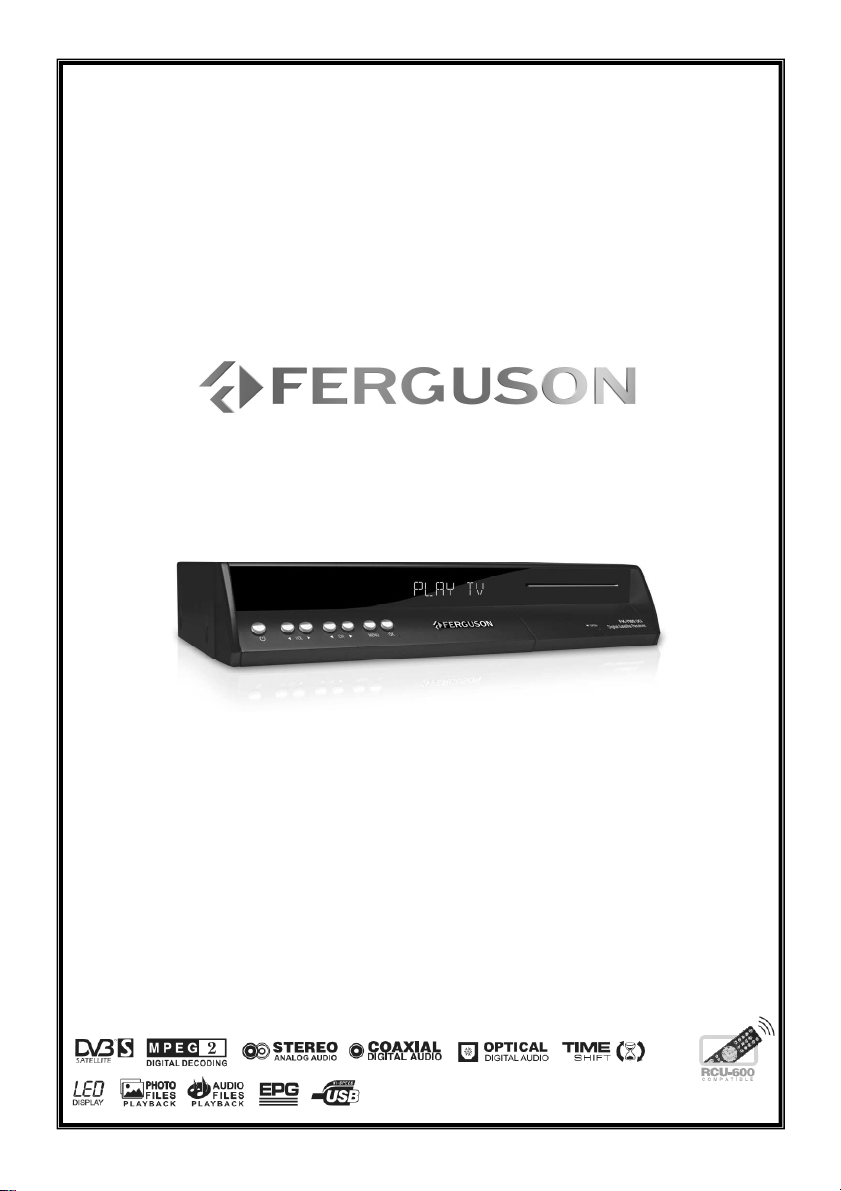
User manual
FK-Series
English
Page 2
2
WARNING !!!
On the USB Memory Function for FK-x900 series model, user can make recording or playing
function using by external USB devices such as USB Flash Memory Disk or external USB HDD(Hard
Disk). However, below condition should be remarked before applying.
REMEMBER:
1. To use the external USB device, the device has to be supported by USB
2.0. In case of the USB flash memory disk for recording, we suggest to
use USB2.0 by SLC type with writing speed over 9.0MB/s for stable
recording and playing.
2. Please make sure the USB device condition is set as FAT32 before using.
To make FAT32 condition, user can make format function on their
personal PC.
3. External hard drives HDD should contain their own power supply unit.
CAUSION
1. Please do not remove the external USB device from the receiver during the recording or playing
in USB mode. Unexpected action could make damaged condition for either the receiver and the
external USB device.
2. Do not touch with wet hand in any cases.
Page 3
3
SAFETY INSTRUCTIONS..................................................................................................................... 4
SOFTWARE FOR DOWNLOADING......................................................................................................... 4
USER MANUAL ................................................................................................................................. 4
SYMBOLS USED ON THE RECEIVER ..................................................................................................... 5
GENERAL INFORMATION.................................................................................................................... 6
1. Main Features ........................................................................................................................ 6
2. Unpacking............................................................................................................................. 6
3. General Operation of STB......................................................................................................... 6
4. Remote Control Unit RCU-500................................................................................................... 7
5. Front Panel............................................................................................................................ 8
5.1 CI Module(CAM) and smart card (applicable only for FK-7900 UCI).......................................... 8
6. Rear Panel............................................................................................................................. 9
7. Setting a satellite dish............................................................................................................. 9
8. Connection Diagram.............................................................................................................. 10
8.1 Connect to TV with HDMI cable 576p (applicable only for FK-7900 UCI) ................................. 10
8.2 Connect YPrPb Port (recommended)................................................................................. 10
8.3 Connect SCART Port ...................................................................................................... 11
8.4 Connect Audio System................................................................................................... 11
8.5 Connect USB Port ......................................................................................................... 12
8.6 Connect RF Port ........................................................................................................... 12
8.7 Connect to an other STB................................................................................................ 13
8.8 Setting motorized satellite dish ....................................................................................... 14
FIRST STEPS ................................................................................................................................. 15
MENU INFORMATION....................................................................................................................... 15
THE MENU INFORMATION ................................................................................................................ 16
1. Installation.......................................................................................................................... 16
1.1 Satellite ...................................................................................................................... 16
1.2 Antenna Config ............................................................................................................ 16
1.3 Switch ........................................................................................................................ 16
1.4 Positioner.................................................................................................................... 16
1.5 Edit, add new Transponder ............................................................................................. 17
1.6 Single Search............................................................................................................... 18
1.7 Multi Search ................................................................................................................ 18
1.8 Transponder Search ...................................................................................................... 18
2. User Preference.................................................................................................................... 18
2.1 Parental Control ........................................................................................................... 19
3. Utility ................................................................................................................................. 19
4. Channel Edit ........................................................................................................................ 19
4.1 Name Channel ............................................................................................................. 19
4.2 Delete Channel............................................................................................................. 20
4.3 Move Channel .............................................................................................................. 20
4.4 Lock Channel ............................................................................................................... 20
4.5 Adding Channel To Favorite ............................................................................................ 20
4.6 Save/Restore ............................................................................................................... 21
5. System Setting .................................................................................................................... 21
5.1 USB Upgrade ............................................................................................................... 21
5.2 SmartCard Info ............................................................................................................ 21
5.3 System Information ...................................................................................................... 22
5.4 Factory Default............................................................................................................. 22
6. Timer Setting....................................................................................................................... 22
7. General Viewing Function....................................................................................................... 22
7.1 Recording.................................................................................................................... 22
7.2 USB/PVR key ............................................................................................................... 23
7.3 Time Shifting ............................................................................................................... 23
7.4 EPG............................................................................................................................ 24
7.5 SAT List ...................................................................................................................... 24
7.6 Channel list ................................................................................................................. 24
7.7 Quick Find................................................................................................................... 25
7.8 Channel Edit ................................................................................................................ 25
7.9 Favorite ...................................................................................................................... 25
7.10 Audio Select............................................................................................................... 25
7.11 Subtitles Select .......................................................................................................... 25
TROUBLE SHOOTING ...................................................................................................................... 26
GLOSSARY .................................................................................................................................... 27
SPECIFICATION.............................................................................................................................. 28
Page 4
4
SAFETY INSTRUCTIONS
Please observe all warnings and instructions on the equipment and contained in these operating
instructions. You must install the dish with correct direction and angle.
Please carefully read this user’s manual before
using the receiver.
To avoid electric-shock hazards, do not open
the cabinet, refer servicing to qualified
personnel only. If cabinet is opened warranty
will be invalid.
Please switch off completely the receiver
during thunder, during abnormal phenomenon,
before cleaning it and in case it remains out of
service for a long period.
Do not expose the receiver under the sunlight.
And keep it away from the heat source or
humid environments. Do not block ventilation
holes of the receiver so that air can circulate
freely.
Please place the receiver in horizontal and
stable conditions, keeping it away from
vibrating.
If device is moved from warmer place to a
colder one some problem might occur. Please
switch off the receiver and turn it on after 1 or
2 hours.
Keep the receiver away from flower vases,
tubs, sinks, etc., in order to avoid damaging
the equipment. Do not touch power supply
with wet hands.
Don’t put any objects on the receiver.
Be sure to turn the receiver off and disconnect the AC power cord before cleaning the receiver surface.
If the surface is dirty, wipe clean with a cloth which has been dipped in a weak soap/and/water solution
and wrung out thoroughly, and then wipe again with a dry cloth.
Do not connect cables while power is plugged.
Do not use damaged cables for connections: you could cause fires.
Please switch off completely the receiver while making all connections.
The product purchased is a sophisticated electronic device which is not suitable for children under 18
years.
We do not assume responsibility for damages caused to people or object, deriving from use of the
device made by people under 18 years.
SOFTWARE FOR DOWNLOADING
Ferguson has used all the available means to deliver to its users software updates guaranteeing the
best possible parameters of the satellite television receivers. Ferguson reserves the right to make
corrections, changes or modifications of the software used in the receiver on any basis whatsoever and
without prior notice. The current version of the software is available on the following website
http://www.ferguson-digital.eu
USER MANUAL
Telstar has used all the available means to ensure the latest information regarding its products.
Ferguson does not give a warranty regarding the contents of this User Manual and waives any implied
warranties regarding market value or fitness for specific purposes. The information contained herein
provide guidelines allowing the operation and maintenance of the receiver.
Ferguson reserves the right to make changes, corrections or to translate the User Manual without
giving prior notice of such changes. Therefore, it is recommended that users visit our website regularly
to receive the latest information.
Page 5
5
SYMBOLS USED ON THE RECEIVER
The Digital Video Broadcasting logo.
This logo tells you that this receiver is compliant with the DVB standards.
technicians are allowed to open the box.
electromagnetic compatibility and the provisions of Council Directive 73/23/EEC and 93/68/EEC on the
approximation of the laws of the Member States relating to low voltage and electrical safety.
The caution risk of electrical shock - do not open symbol
This symbol tells you that you are not allowed to open the receiver. Only authorized (service)
The CE mark.
This mark tells you that the receiver is following the provisions of Council Directive
89/336/EEC on the approximation of the laws of the Member States relating to the
The double insulation symbol.
This symbol tells you that the receiver is electrically safe within the normal use of the
receiver as stated in the safety chapter.
Environment protection first!
Your appliance contains valuable materials which can be recovered or recycled.
Leave it at a local civic waste collection point.
Page 6
6
GENERAL INFORMATION
This digital satellite receiver is a highly cost-effective digital satellite receiver integrated. It
provides big channels storage with fast searching. The receiver is definitely one of the best
choices to deliver your digital life.
1. Main Features
USB PVR function – recording on USB memory
Digital Audio Stream through optical S/PDIF
Component (YPbPr) output
Advanced Electronic Program Guide (EPG)
Supports Teletext and Subtitles
Multi Language OSD Menu
Quick search function
Separate TV/Radio List & Favourite Group List
Program search in automatic, advanced and manual way
DiSEqC 1.0, 1.1, 1.2, Unicable and USALS control compatible
Program List Download through USB
Smart Card Interface for pay TV
Modulator RF OUT
2. Unpacking
Unpack the receiver and check to make sure that all of the following items are included in the
packaging.
1 x Remote Control Unit (RCU-500)
1 x User’s Guide
1 x Digital Satellite Receiver
3. General Operation of STB
Throughout this manual you will notice that the everyday operation of your STB is based on a series of
user friendly on screen display and menus. These menus will help you get the most from your STB,
guiding you through installation, channel organizing, viewing and many other functions.
All functions can be carried out using the buttons on the RCU, and some of the functions can also be
carried out using the buttons on the front panel.
Please be aware that new software may change the functionality of the receiver.
Should you experience any difficulties with the operation of your unit, please consult the relevant
section of this manual, including the Problem Shooting, or alternatively call your dealer or a customer
service adviser.
NOTE:
Please be aware that new software may change the functionality of the receiver. The photo
and the function explanation involved in this specification is for reference only. If there is any
mistake, please refer to the entity.
Page 7
7
4. Remote Control Unit RCU-500
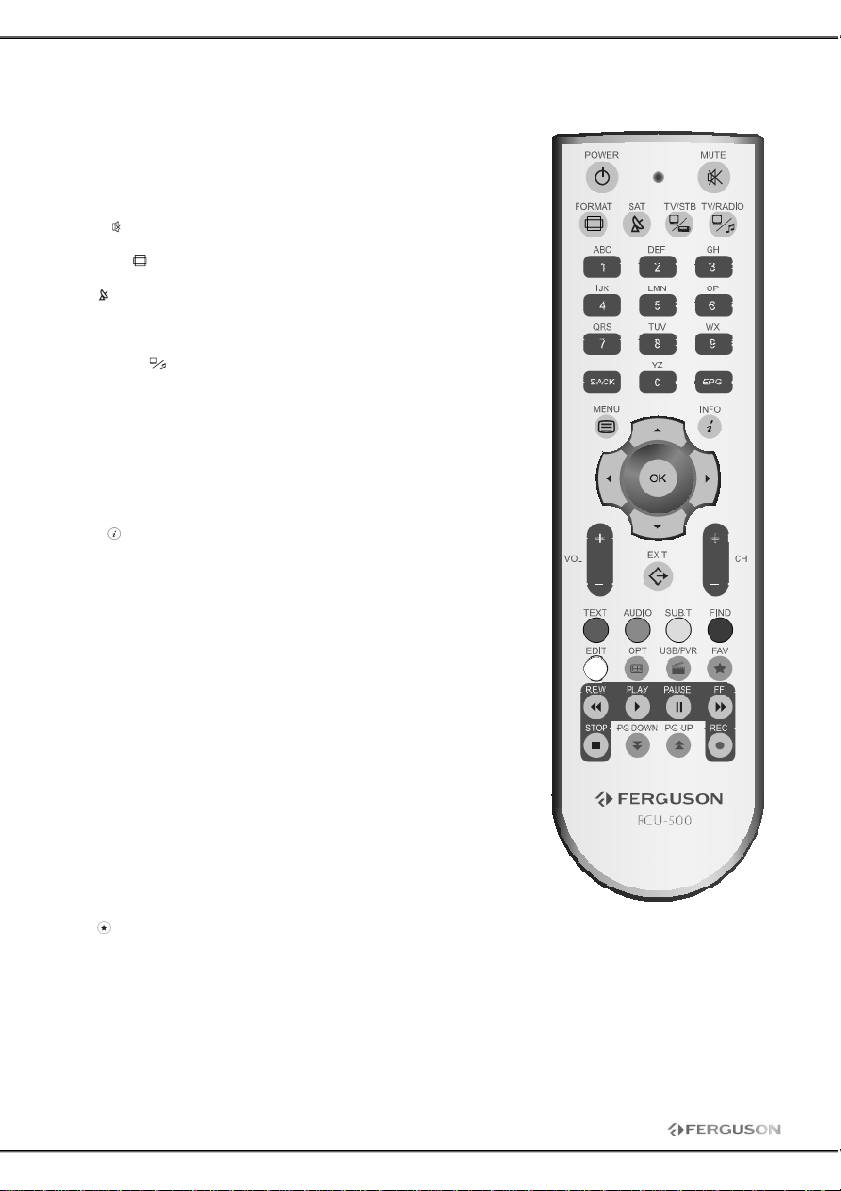
Due to standardization fact most of Ferguson units is using
the same remote control unit RCU-500. That is why NOT all
keys are being used by this STB model!!
POWER
Turns the Receiver ON/OFF.
MUTE
Selects the sound ON/OFF.
FORMAT
Selects various video aspect ratio.
SAT
Changes the satellite on the channel list.
TV/STB
Change SCART loop functionality.
TV/RADIO
Switches between TV and Radio modes.
BACK
Returns to the previously viewed channel.
EPG
Electronic Program Guide, displays EPG.
MENU
Displays the menu on the screen.
OK
Shows the channel list or selects an item on the menu.
INFO
Displays the program information box on the screen.
VOL +, VOL–
Adjusts the sound volume (increase/decrease).
EXIT
Returns to the previous menu and the screen.
CH +, CH –
Turns to the next or previous channel.
TEXT
Shows the TELETEXT on the screen if the TV can be available.
AUDIO
Selects the audio track for the current channel if applicable.
SUB.T
Selects the subtitle language for the current channel if
applicable.
FIND
Quick Find channel function.
EDIT
You can edit the current channel information.
OPT
Multifeed channel function.
USB/PVR
Shows USB menu only if USB storage was connected.
FAV
Displays the favorite channel list.
REW, PLAY, PAUSE, FF, STOP, REC
Keys for functions of recording, playing and time shift.
PG DOWN, PG UP
To move faster on any list.
Page 8
8
5. Front Panel
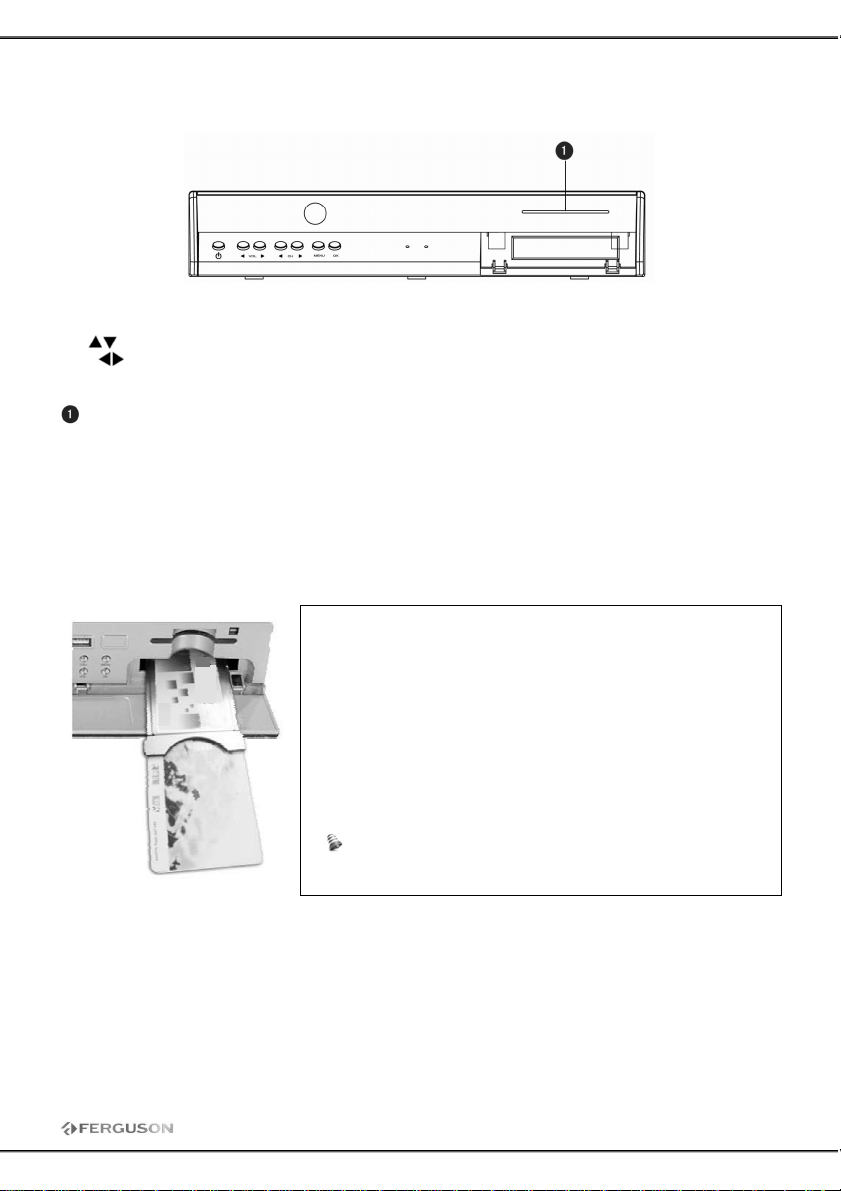
1.Turn off your set
-
top-box first.
POWER : Turns the receiver ON/OFF
CH : Changes the channels on the screen and moves the cursor up/down in the Menu
VOL : Increases/Decreases the volume levels or changes the setting in the Menu.
OK : Shows the Channel List on the screen and use to make selections in the Menu.
MENU : Shows the Main Menu on the screen
FK-6900 CR
:
Insert smart card – insert always chip side down!
5.1 CI Module(CAM) and smart card (applicable only for FK-7900 UCI)
Inserting a CI Module (with Smart card)
CI Module looks like a PC Card (called PCMCIA)for laptops. There are different kinds of CI Modules,
suitable for different coding systems.
2.Insert the Smart card into the Common Interface (CI)
module.
3.Open the CAM door and insert the CI module completely
into the CAM slot on the right of front panel. If you want to
take CAM out, please press handspike of CAM slot.
4.After correctly inserted, please turn on your set-top-box, it
allows you to watch scrambled channels.
Note: Ensure the Smartcard or CI module is inserted in the
right direction. Inserting in the wrong direction may cause
damage to the CI module.
Warning: Don’t attempt to remove or insert the smart
card while the receiver is on.
Page 9
9
6. Rear Panel
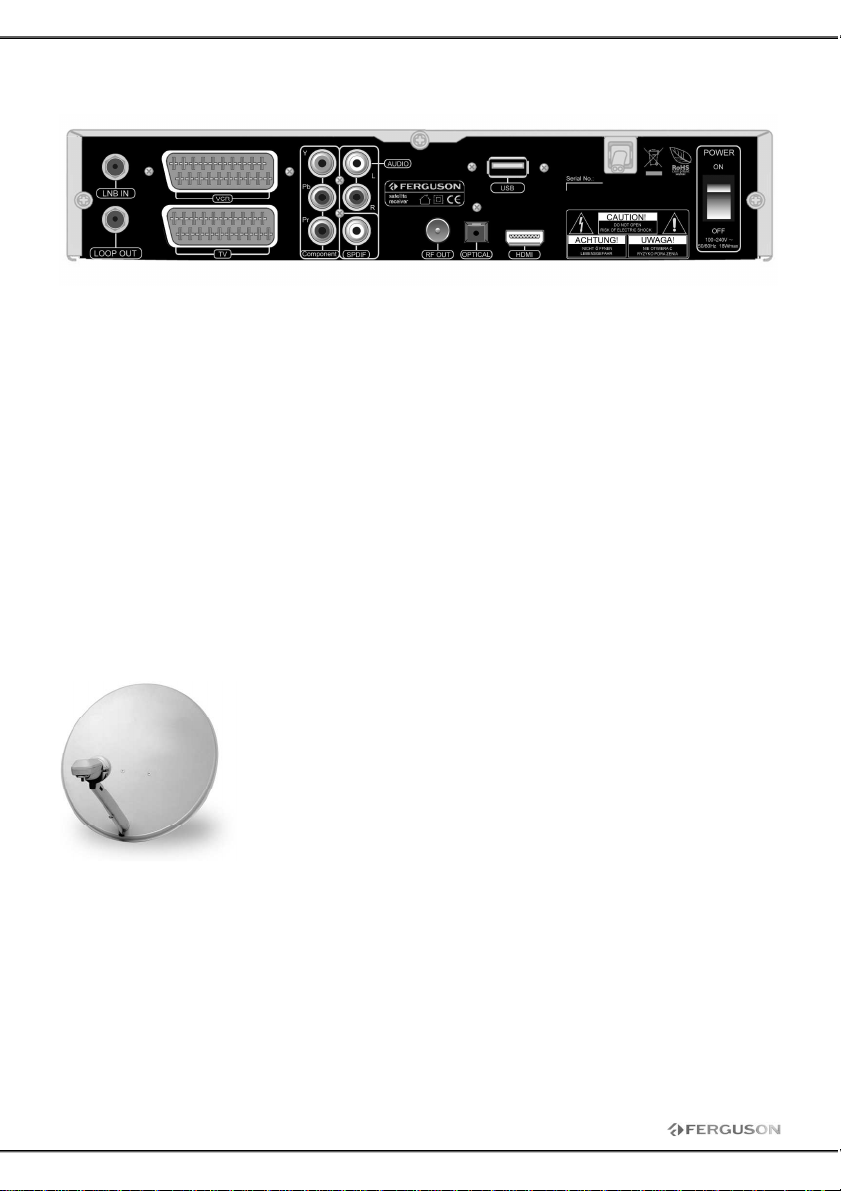
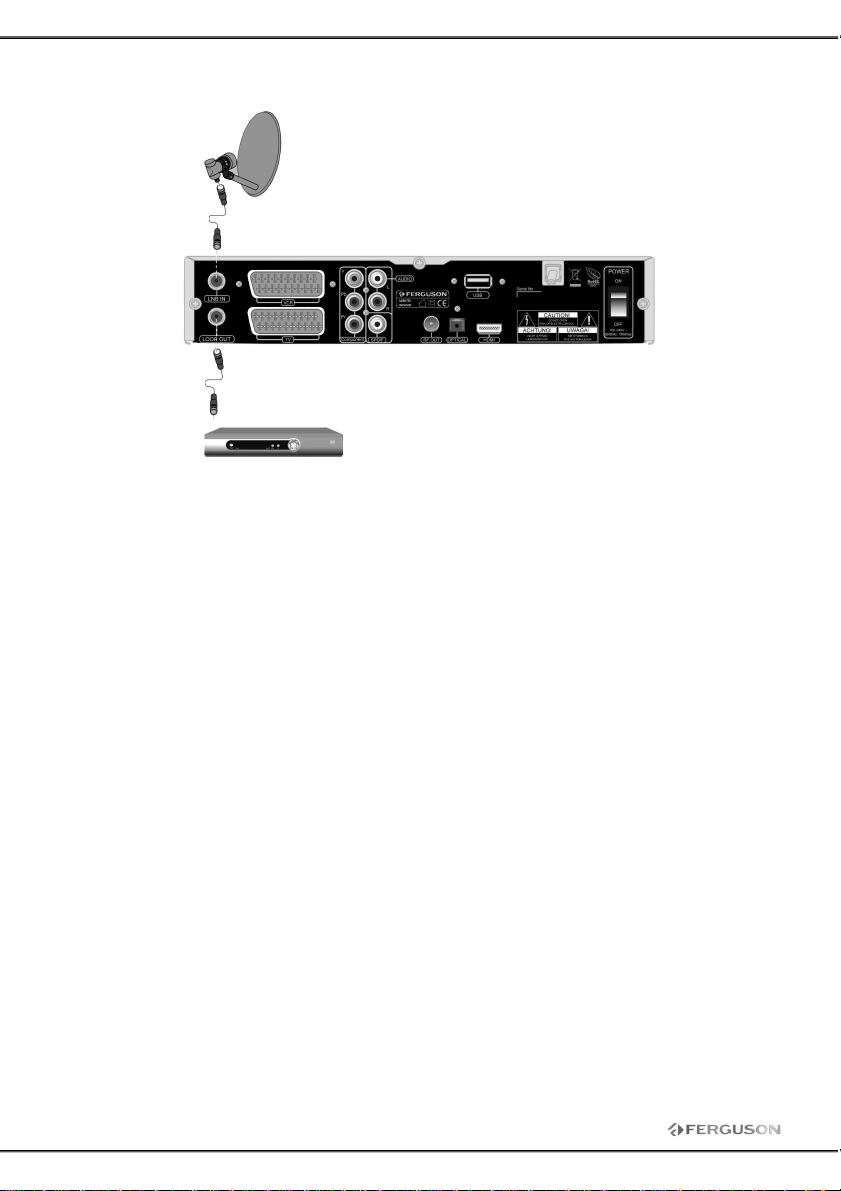
LNB IN: Connect to satellite antenna (IF input from LNB to digital tuner)
LOOP OUT: Connect to another receiver (IF loop through output from digital tuner)
TV: Connect to TV using SCART cable
VCR: Connect to VCR using SCART cable.
COMPONENT (YPbPr): Provides a component video output to TV or other equipments.
AUDIO (L/R): Provides the stereo audio output to TV or other equipments
S/P DIF : Connect to a hi-fi system
RF OUT: UHF RF output to TV set’s antenna in
OPTICAL: Connect to a hi-fi system
HDMI: Connects to the HDMI (576p) input on your TV set (only FK-7900 UCI)
USB: Connect external USB memory
100-240V ~ : Power supply
ON/OFF: Main power switch
7. Setting a satellite dish
In order to connect external equipment including a satellite dish and converter, use the installation
instructions or assistance from expert - installer!
The precise setting antenna is the basis for good reception. Even the best
antenna, which is ill-adjusted will cause problems with quality. Even small
mistakes can prevent the receipt or very worsen its quality. Before the
installation, make sure whether the place lends itself to that. The competent
direction can be pre-determined by comparing with other antennas.
Immediately before the antenna can not be any obstacles cover seeking to
signal the dish! When you are choosing the best place for the antenna, to
attach and it initially set, it still must be carefully adjusted. Each antenna is
enabling regulatory adjustment screws in vertical position and level.
In digital receivers regulation is difficult. Settings can no be done base on
picture, because it appears with delay. Also available indicators in the menu settings receiver typically
operate with a delay, so the regulation can take a long time and be very inaccurate. For the antenna
setting is necessary some meter antenna signal. Meter turns on a cable television converter between a
receiver. We will confirm the presence of switch voltage converter with a tuner, and will show the size
of the signal to satellites encountered. We invite you to benefit from expert assistance - installer!
Page 10
10
8. Connection Diagram
The following figure shows cable connections required for TV and other related electrical equipment. If
you need any assistance for specific equipment connection, please contact your local dealer.
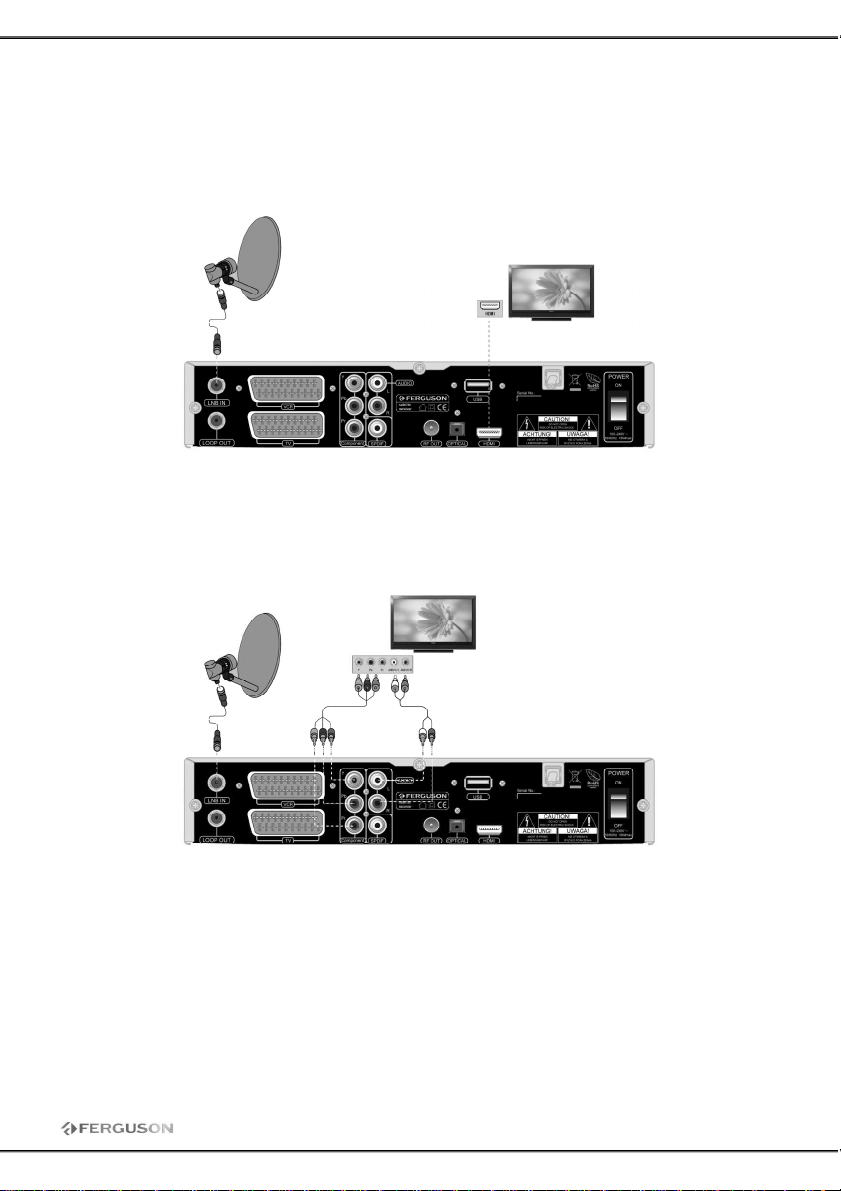
8.1 Connect to TV with HDMI cable 576p (applicable only for FK-7900 UCI)
1. Connect LNB IN port on receiver to a satellite dish.
2. Connect HDMI port on receiver to HDMI port on TV.
8.2 Connect YPrPb Port (recommended)
1. Connect LNB IN port on receiver to a satellite dish.
2. Connect to TV as following figure.
Page 11
11
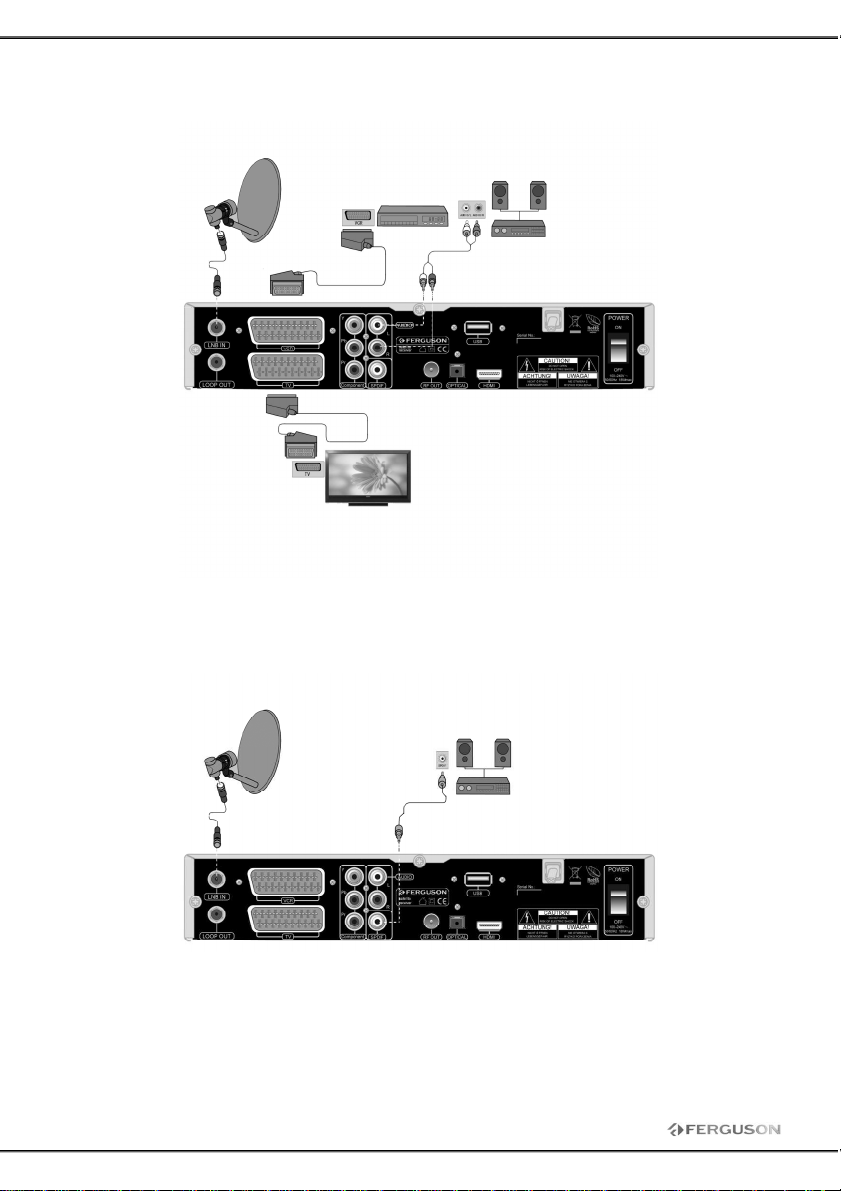
8.3 Connect SCART Port
1. Connect the antenna with LNB IN of the STB.
2. Connect to TV as following figure.
8.4 Connect Audio System
1. Connect the antenna with LNB IN of the STB.
2. Connect the SPDIF or OPTICAL with Digital Theater Systems to enjoy higher quality sound.
3. You can also connect AUDIO L/R with AUDIO IN L/R of audio system by using the RCA cable.
Page 12
12
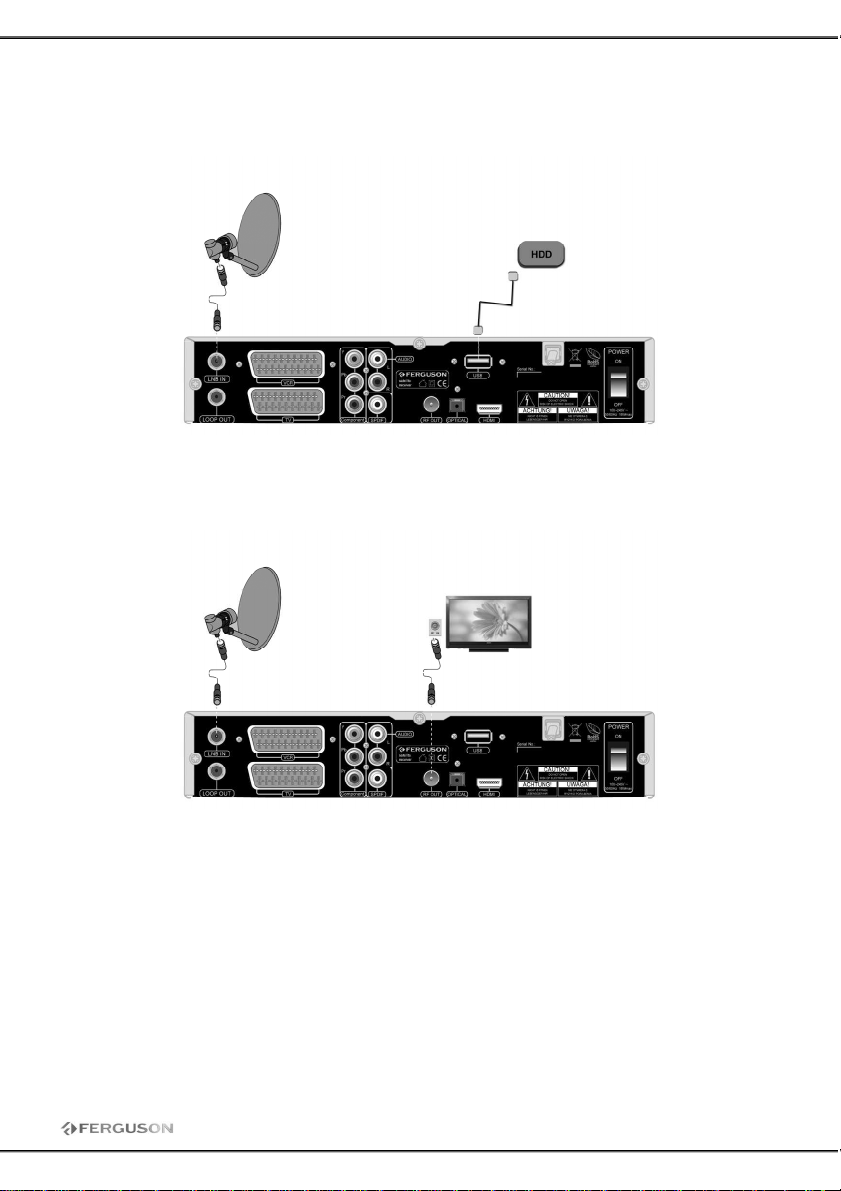
8.5 Connect USB Port
1. The receiver supports any hard disk placed in a housing with its own power. The only condition
is that assumption on the disk one primary partition and reformat it in FAT32.
2. We recommend that you keep backing up data on a personal computer. A large number of audio
files can slow down the work of the receiver (slow loading files).
8.6 Connect RF Port
1. Plug the receiver with cable TV.
2. Search for-TV channel, which gives the receiver.
Page 13
13
8.7 Connect to an other STB
1. Connect to an STB as following figure.
Page 14
14
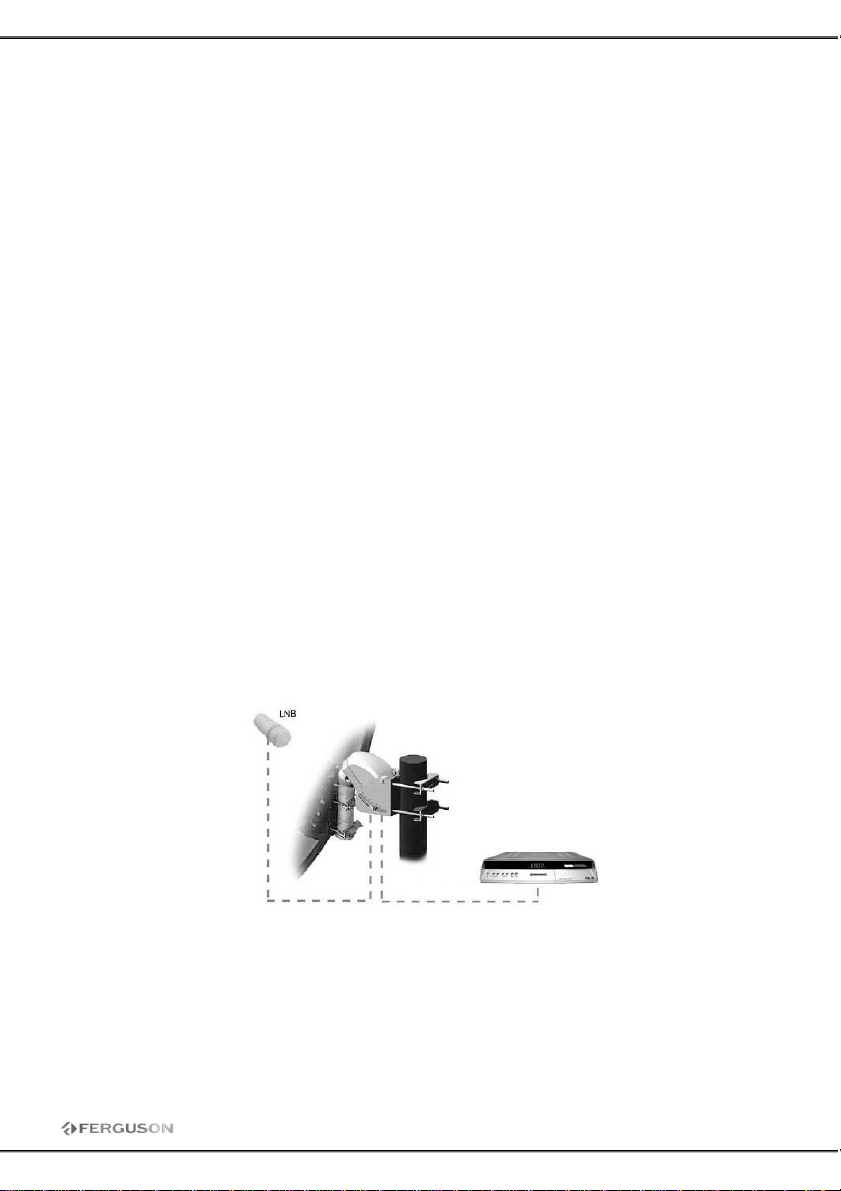
8.8 Setting motorized satellite dish
Proper work of Ferguson receiver ensures motorized system by USALS company Stab. To connect
the installation of the dish with motorized system USALS, connect the output of USALS to LNB IN
on rear panel of Ferguson receiver. The motor is what actually moves the antenna between the
various satellite positions and is installed in between the antenna mast and the antenna mount. It
is designed such that the axis of rotation is aligned with the North Star. This type of mount is often
referred to as a Polar Mount. As a result, azimuth and elevation do not have to be adjusted
individually. Instead, the antenna rotates on only one axis. The antenna motor is installed on the
already existing vertical mast. The local latitude position of the location is then setup on the
motor’s scale thus aligning the axis of rotation in the correct position. Similar to a fixed antenna
installation, the elevation scale on the antenna mount must be set for a satellite as close to south
as possible. In the southern hemisphere you would be looking for a northern-most satellite. The
selected satellite should lie within 5° of your southern-most position; the southern-most position
being equal to your local longitude. For example, if your local longitude is 73° west, then the
satellite you select should be located within +/- 5° of 73° west, or within the range 68° to 78° west.
USALS greatly simplifies the antenna setup. Ferguson receiver simply asks you for your local
geographical coordinates and calculates the satellite positions on its own using a complex
mathematical formula. The receiver then drives the motor directly to the selected satellite position.
Once you have a signal, you need only finely adjust the antenna mount and horizontal position (on
the mast itself) for maximum signal. If the initial southern setting was slightly off, it would now be
corrected. Once the first satellite is perfectly set, all the other satellites in the arc would also be
automatically set as soon as the orbital position of these additional satellites is entered into the
receiver.
Without USALS, the alignment of the antenna system is somewhat more difficult. DiSEqC 1.2 drives
the antenna to the selected satellite position in almost the same way. But since the local
geographical data is missing, the motor drives to a satellite position based on the prime meridian
and the equator. Therefore, when aligning the motor for the first time – and then again later
on with all the other satellite positions – alignment with the actual satellite position has to be
achieved with the motor commands “move east/west”. Because of these difficulties,
manufacturers of these motors make available helpful software on their web sites that
enable you to easily calculate the true position of a satellite.
Page 15
15
FIRST STEPS
1. Insert the plugs of the receiver’s and the auxiliary equipments in the power socket and switch them
on.
2. Select the AV channel on the TV set.
3. The receiver is delivered with pre-programmed TV channels and can be used immediately. To see if
there are any new channels, then activate the channel search.
Caution: Check the connections of all equipment and the antenna are in working order before
connecting the receiver to the power source.
MENU INFORMATION
The user interface has various ways to navigate through the menus and functions. Some of the keys on
the remote control unit give direct access to functions. The most important keys are identified as EPG,
colored keys, MENU and OK. Other keys are multi-functional which means that their function changes
dependent of the mode that you are in.
Unless otherwise specified; this note explains the way you can navigate through the pages of the user
menu.
1. Use the up and down keys to move the cursor up or down from one line to another line.
2. Use the left and right keys to move the cursor left or right the sub-menu.
3. Use the OK key to enter the sub-menu.
4. Use the EXIT key to leave the menu and return to the view mode.
5. In a sub-menu: use the OK key to confirm the selection; the Green bar indicates the active selection
Page 16
16
THE MENU INFORMATION
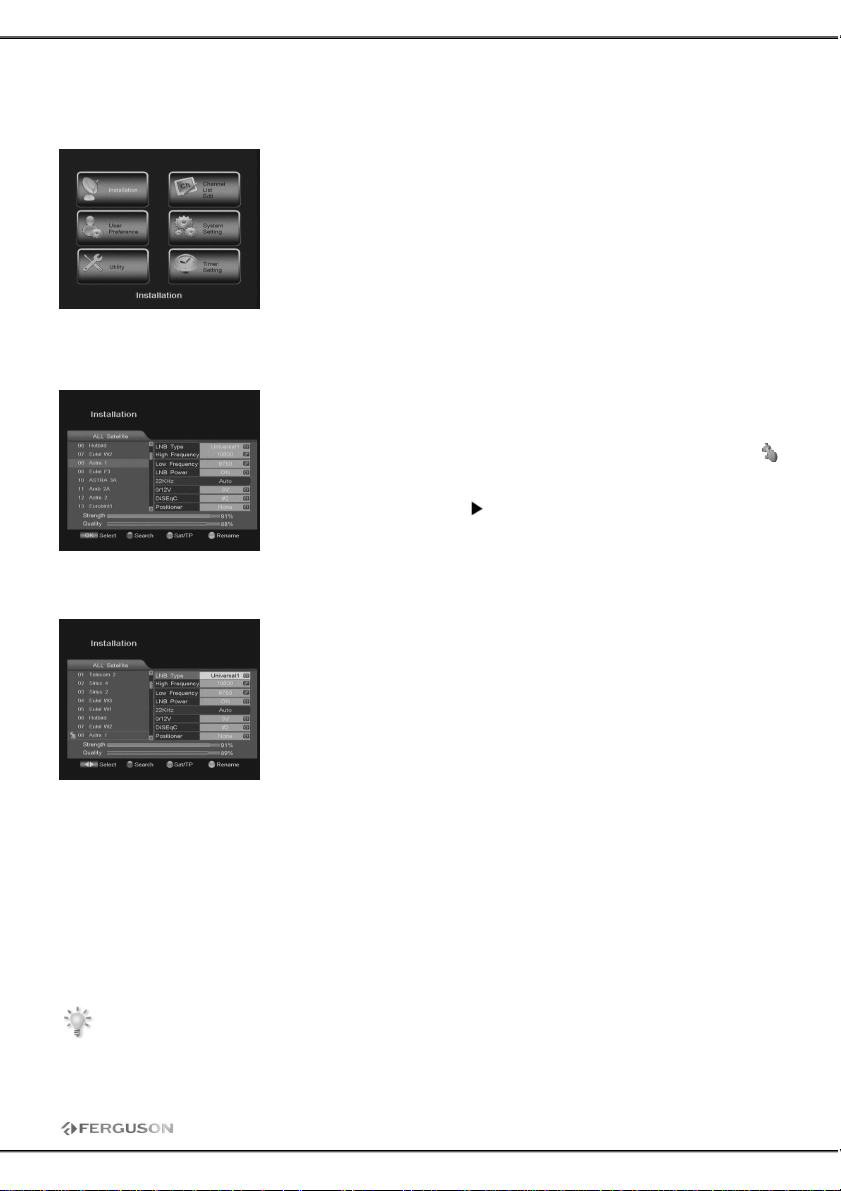
Press MENU key on the RCU to display the following menu on the non-menu mode. The menu consist
of 6 sub-menus such as the following:
1. Installation
2. User Preference
3. Utility
4. Channel List Edit
5. System Setting
6. Timer Setting
1. Installation
1.1 Satellite
Select the desired satellite by using arrow keys. You can also press OK
key to display a draw-down list, the pre-programmed satellites is list
here. You can select one or more satellites by using arrow keys, and
press OK to confirm. The selected satellites will be marked with the
symbol.
By pressing the right arrow , you can go to the editing of the satellite.
To save your changes press EXIT. You'll return in this manner to the list
of satellites.
1.2 Antenna Config
LNB Type: Select the desired option among WideBand, User, Standard
and Universal1.
High Frequency: The settings can be altered using the numeric
buttons.
Low Frequency: The settings can be altered using the numeric keys.
LNB Power: If your receiver is connected to the LNB, select YES. But if
your STB is connected to another receiver through Loop Through support,
you should check which receiver is connected directly to the LNB. In case
the other receiver is directly connected to the LNB, then select OFF.
Swith: switching system settings.
Positioner: motorized dish settings.
1.3 Switch
The individual satellite can be allocated directly to a DiSEqC position. Please select the proper your
cable installation switch and port option
1.4 Positioner
The settings is for the motor control of the satellite antenna. These only apply to an antenna with
corresponding function USALS or DiSEqC 1.2.
Caution: Leave the setting-up of the motor control to properly-trained personnel. Otherwise
the satellite equipment may not function correctly.
Page 17
17
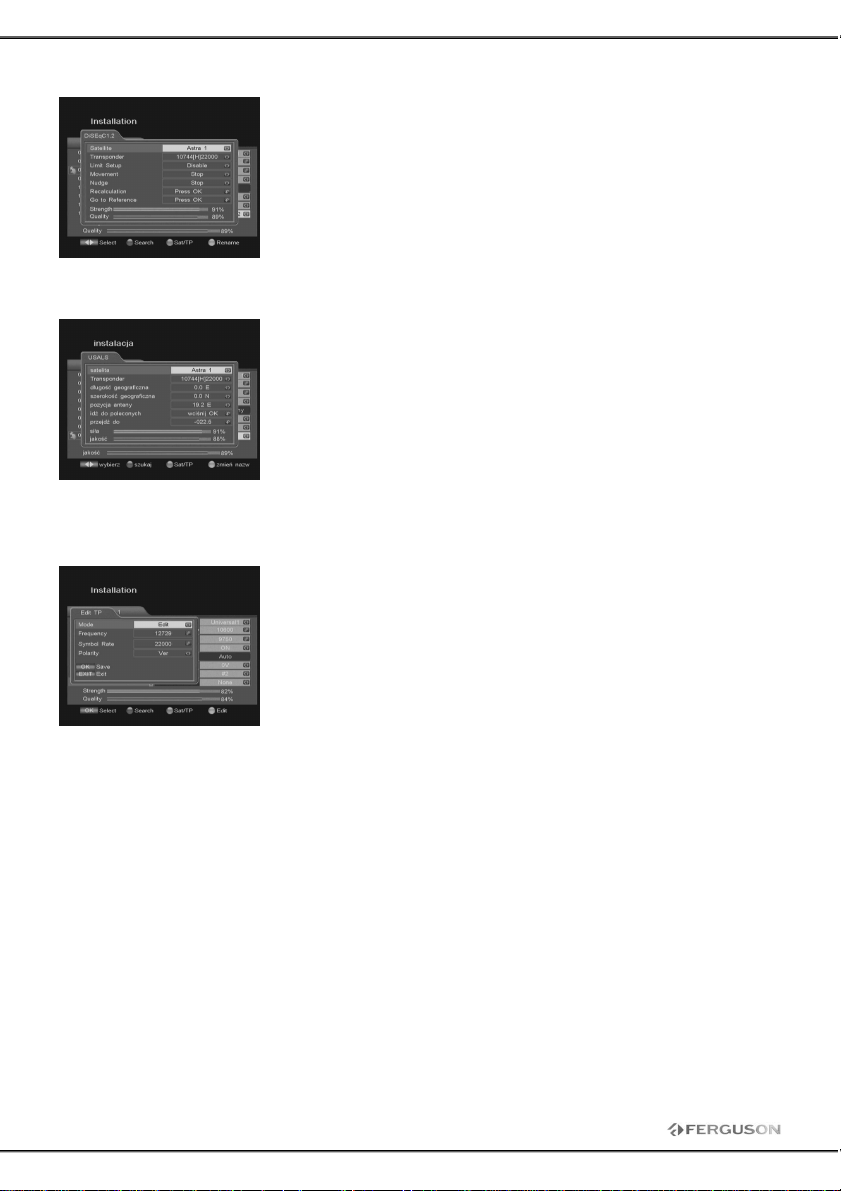
1.4.1 DiSEqC1.2
Satellite: Make a choice from the pre-programmed satellites.
Transponder: Select the desired TP under the current satellite.
Limit Setup: Select among Enable, Disable, East limit and West limit.
Movement : To move the antenna until it is turned into the desired
direction.
Nudge: To nudge the antenna until it is turned into the desired direction.
Recalculation: Select YES or NO.
Go to Reference : Select YES or NO.
1.4.2 USALS
Satellite: Make a choice from the pre-programmed satellites by using
arrow keys.
TP: Select the desired TP under the current satellite.
Local Longitude: Enter here the longitude of the local satellite antenna.
Local Latitude: Enter here the latitude of the local satellite antenna.
Dish Position: Set the position of antenna.
Go to Reference: Select YES or NO.
Go to : Press OK to toward the satellite.
1.5 Edit, add new Transponder
First, choose a satellite and press the green button (Sat / TP) to see the
list of satellite transponders. Select a transponder, then you'll be able to
adjust the parameters chosen transponder.
Mode: Select whether to edit the selected transponder, or add new to
the list.
Frequency: enter the frequency of improvement
Symbol Rate: enter the correct symbol rate
Polarity: select the polarity.
Press OK to add a new TP on the ADD TP item.
Page 18
18
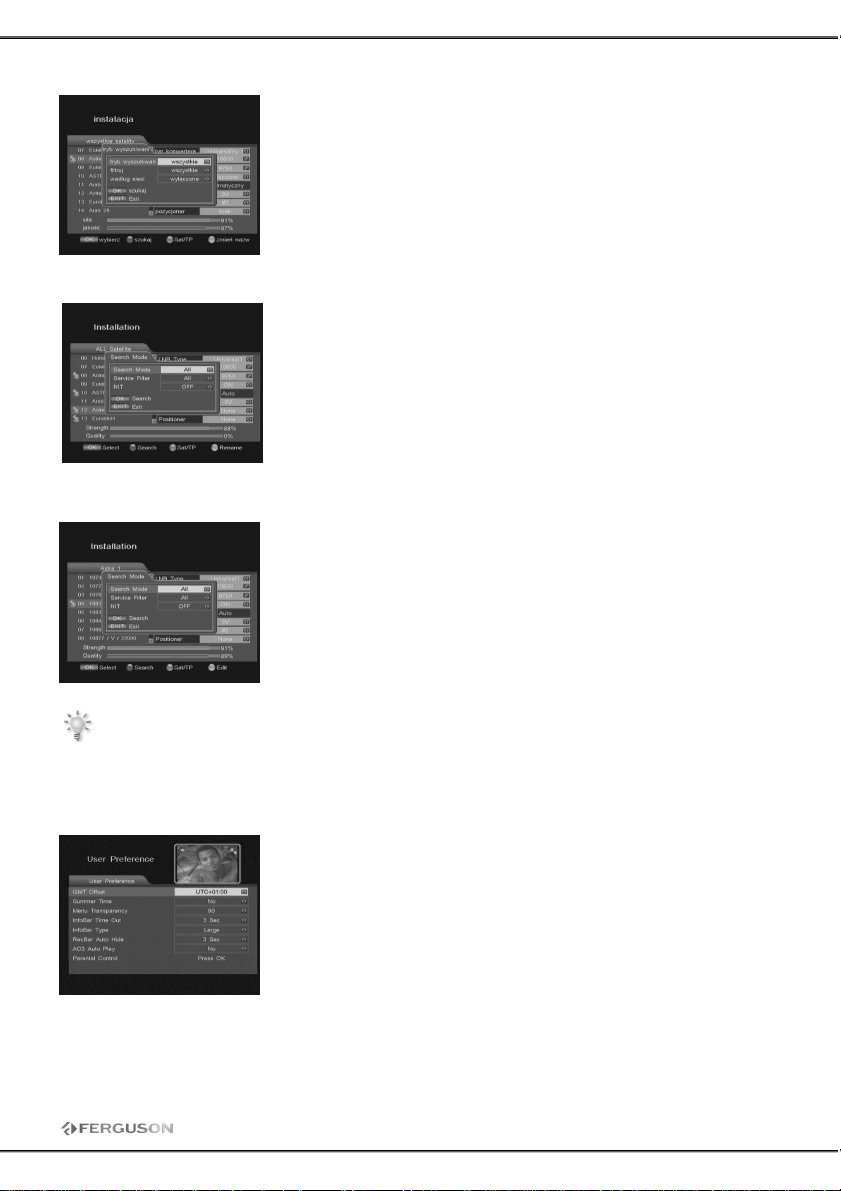
1.6 Single Search
The function is used to search channels in one satellite, which has been
selected. Press red key to enter the search window. First select search
mode by using arrow keys, and press OK to start search.
1.7 Multi Search
The function is used to search channels from several satellites at the
same time. To search several satellites in one after another, select the
desired satellite and then press the red button to display the search
window.
1.8 Transponder Search
To search Transponder, choose a satellite and press the green button to
go to the list of Transponder. Choose or add a new transponder, select it
and then press the red button to display the search box.
As in Multi Search, you can search several Transponders by selecting them before pressing red
button.
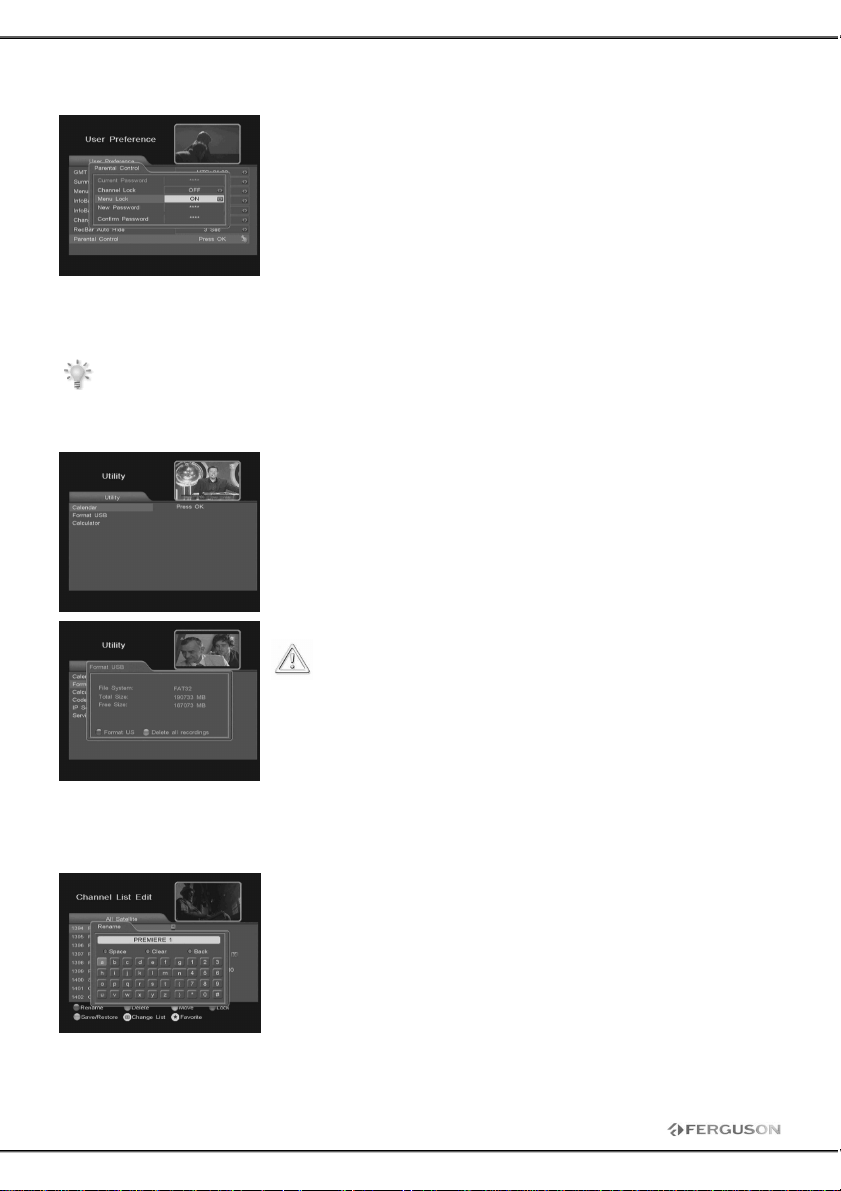
2. User Preference
GMT Offset: Usually you get the information real time from the satellite
automatically but sometimes they transmit wrong information. In that
case, you can adjust the real time using this function.
Summer Time: Press keys to select Yes or No.
Menu Transparency: You can adjust the transparency level by using
keys. From 65% to 100%.
InfoBar Time Out: When you want to fix up the channel information
box disappearing function, you can set time period at the option.
InfoBar Type: Select the banner type among small, middle and large.
RecBar Auto Hide: When you want to fix up the recording information
box disappearing function, you can set time period at the option.
AC3 Auto Play: This feature will automatically play surround sound
when it's available.
Page 19
19
2.1 Parental Control
The STB provides an active parental lock function, allowing you to block specific menu settings by
means of a four-digit security code.
Accessing the Parental Control menu is controlled by a current password.
The default value is 0000. If necessary, you can change it later.
Highlight the item you want to operate and press keys to select ON or
OFF. A password is required for the menu which its corresponding item
has been set to ON.
To change password:
1. To enter the new password in the input box of New Password, press numeric keys on the RCU
directly.
2. Enter the new password again in the input box of Confirm Password.
3. After finishing the above settings, press EXIT key to exit from this menu.
Note: Don’t forget your password, if you forget it, please ask seller for help.
3. Utility
The STB provides calendar, calculator and utility to format USB storages.
Format USB provides two different options:
Format: this option will remove all data from connected USB
disk. Press red button and confirm if you are sure what are you
doing! This operation is irreversible!
Delete all recordings: this option will remove just recorded files from
main folder.
4. Channel Edit
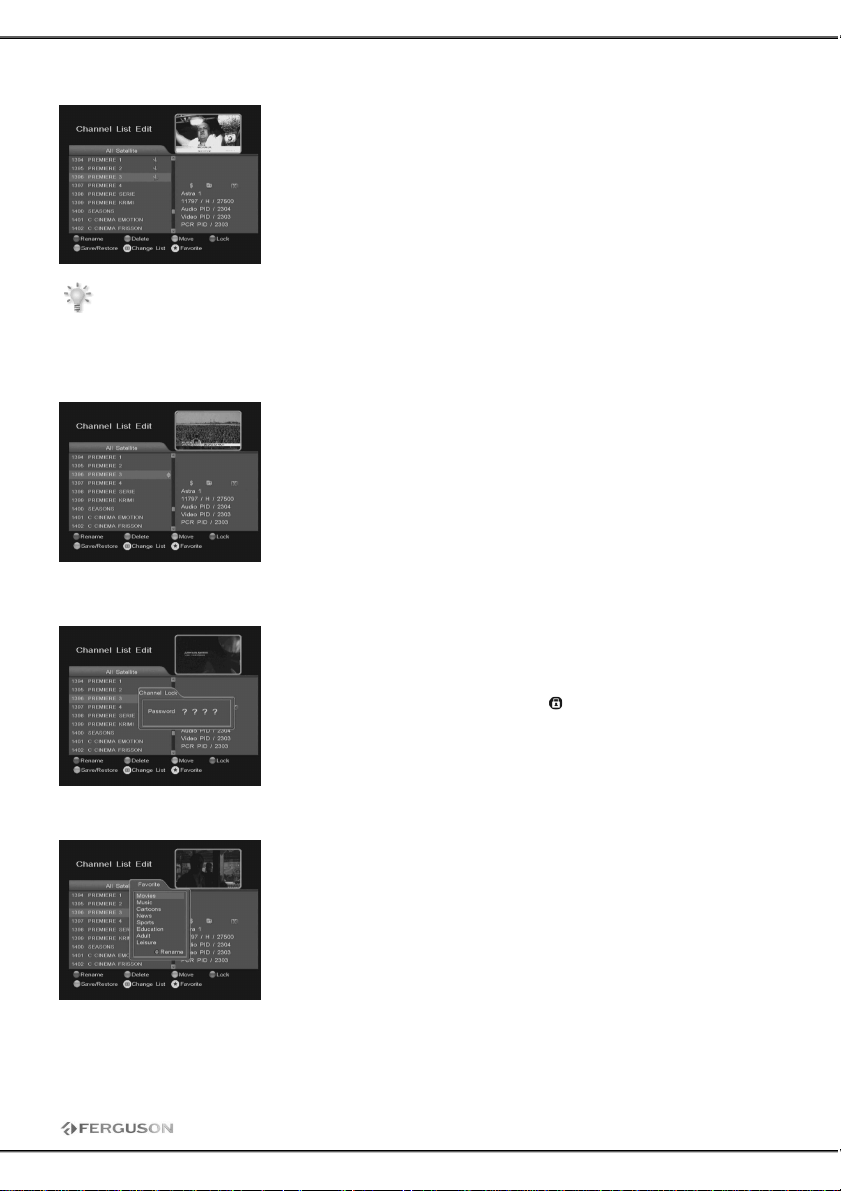
4.1 Name Channel
To rename a channel:
1. Press RED key.
2. Select the desired channel.
3. Press OK to enter the keypad dialog window.
In the window,
GREEN key can be used to cancel a letter on the caption bar at a time.
RED key is used to cancel all letters
BLUE key is used to place a blank
Arrow keys are used to move the cursor.
OK is pressed to confirm.
Press EXIT key to save the settings.
Page 20
20
4.2 Delete Channel
To delete a service:
1. Select the channel you want to delete and press GREEN key to
confirm.
2. After pressing GREEN key, a “scissors” mark appears on the right side
of the selected service name. That means this service is going to be
deleted. Press GREEN key again to cancel the deleting mark.
3. After pressing EXIT and leaving the channel will be removed.
Warning: If you delete a service from the current activated list, it is also deleted from all lists.
4.3 Move Channel
To move the channel:
1. Select the channel you want to move and press YELLOW key on the
RCU
2. After pressing YELLOW key, a “arrow” mark appears on the right side
of the selected service name. That means this service is going to be
moved. Press YELLOW key again to cancel the moving mark.
3. Then move cursor to the position you want to place.
4. Finally press OK key to confirm.
4.4 Lock Channel
To lock a channel, please follow the instructions shown as below.
1. Select the desired channel and press YELLOW key, the message box
with asked entering password will be displayed on the screen. The
default password is 0000.
2. After entering password, a padlock mark appears in the selected
channel name. It means that this service is locked.
If somebody want to play this channel, the correct password is required.
4.5 Adding Channel To Favorite
To add a channel to one of the favorite group:
1. Select the desired channel and press FAV key
2. A list of all favorites groups will be shown
3. Press OK to mark with symbol of heart, to attach channel to desired
group. Press EXIT to save.
In the pane to choose the group favorites, there is also the possibility of
changing the name of it. To do this, select group and press the RED
button.
Page 21
21
4.6 Save/Restore
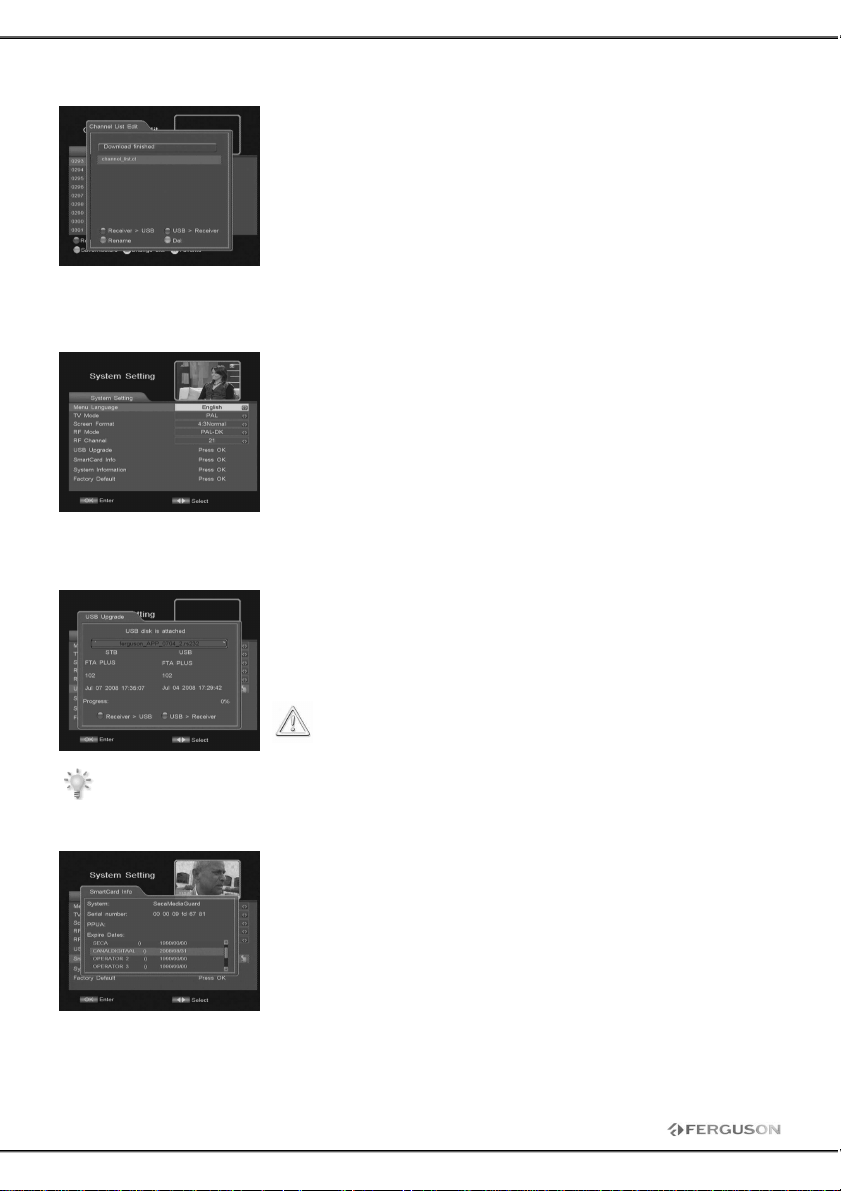
This option allows you to save or restore the channel list.
receiver > USB: This feature allows you to save the current list of
channels to file.
USB > receiver: This feature restores the saved file with a list of
channels. Note the current list will be irreversibly removed and replaced
by that of the selected file!
Rename: choose to rename file with channel list
Del: choose to delete channel list file
5. System Setting
Menu Language: Select the desired language for menu.
TV Mode: Two selections are provided: PAL or NTSC. To select the on
that fits your television.
Screen Format: To select your receiver output display format between
4:3 and 16:9.
RF Mode: If TV is connected with your receiver through RF cable, select
an UHF channel. The range of channels and frequency value are different.
Select the desired RF mode among PAL-DK, PAL-I, PAL B/G and NTSC-M.
RF Channel: Input the UHF channel number which is same as of your TV
set.
5.1 USB Upgrade
The files necessary to upgrade are available only on the website of the
manufacturer.
To update the receiver software save the file on a USB. Then use keys
left/right to select correct file, press the BLUE key and confirm OK to
start upgrading.
Note: All information and channel list will be lost! We
recommend that you write channel list before the upgrade.
Receiver > USB: This option allows you to save the current version of software on a USB
memory.
5.2 SmartCard Info
This menu displays some information of the receiver.
At this point you can check the expiration date of your smart card. This
option is not always available and depending on the operator!
Page 22
22
5.3 System Information
This menu displays some information of the receiver.
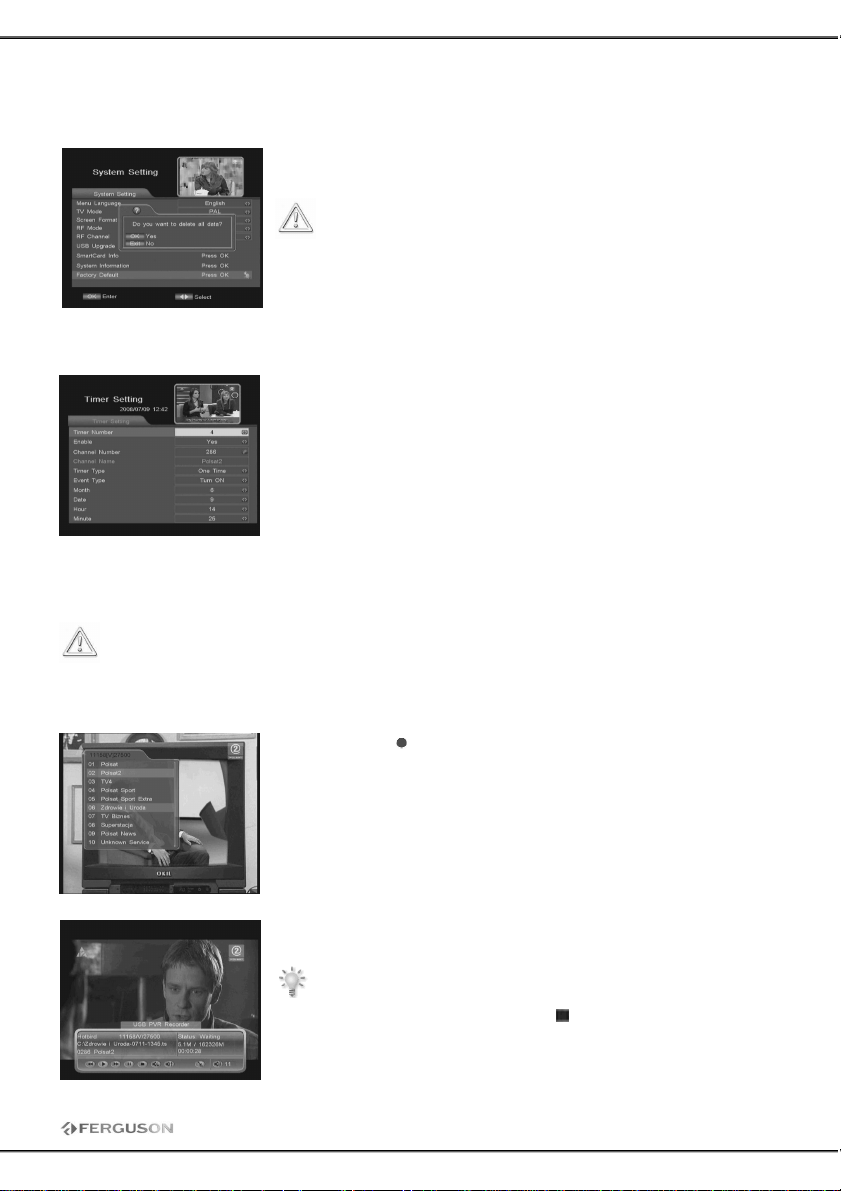
5.4 Factory Default
Enter the menu with four-digit number password (by default “0000”),
then click OK to delete all data and restart your receiver.
NOTE: On selecting factory default you will lose all of data,
channel list and information, which was previously installed!
6. Timer Setting
The function allows you to program 5 kinds of various timer.
Timer Number: Select the number of the timer.
Enable: Select YES or NO. If select NO, you can’t set the following item.
Channel Number: Enter the desired number of the channel.
Timer Type: Set daily or one time.
Event Type: Press arrow keys to pick the desired option.
7. General Viewing Function
7.1 Recording
This feature only works when properly connected external USB memory !!!
The receiver has called SEMI-TWIN TUNER, this feature allows while recording, watching another
channel broadcast from the same transponder.
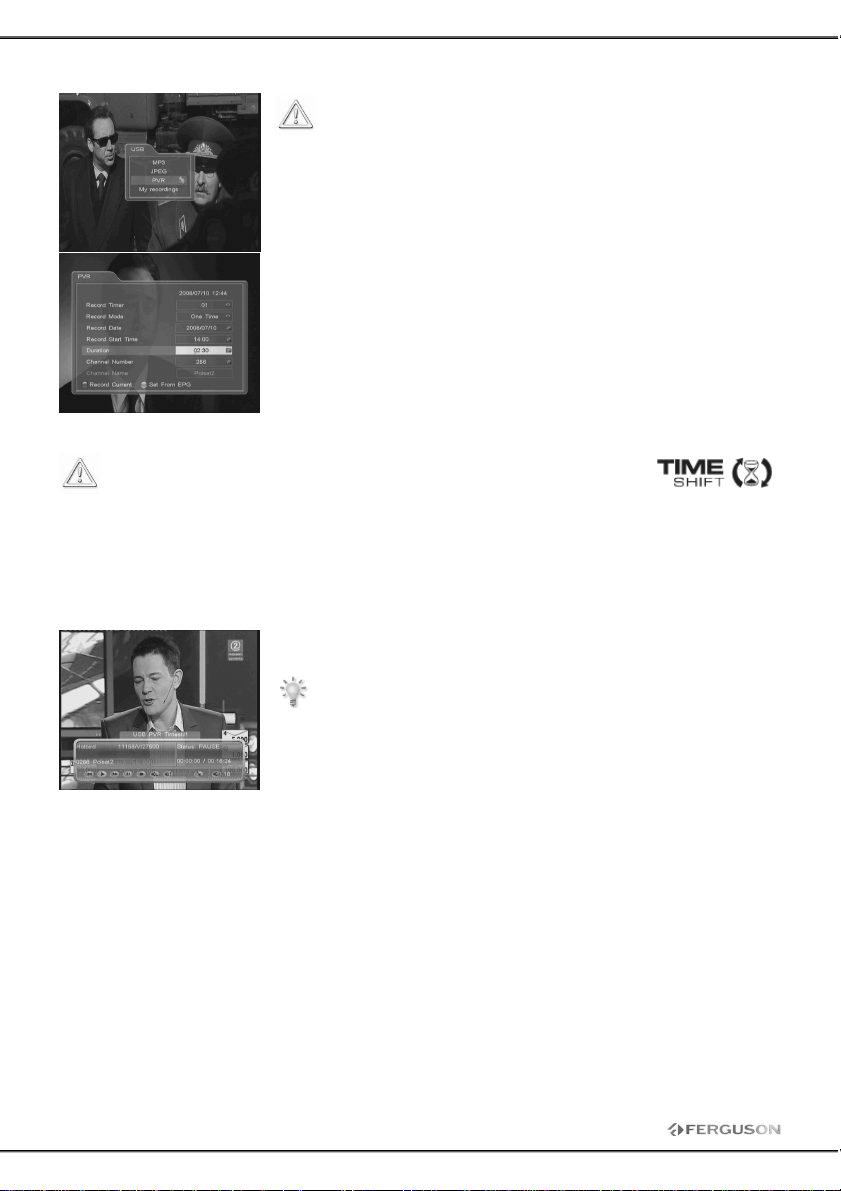
1. Press the REC button to display a list of channels from the current
transponder. Next points does not apply to model FK-7900 UCI. In this
model, when you press REC it just start to record current channel.
2. Use arrow keys to select channel you want to record. Currently viewed
channel is highlighted in red.
3. Confirm OK to begin recording. If you choose a different channel than
current receiver will start recording selected channel in the background
while remaining on current channel.
Information bar indicates what channel recording and viewing.
Please note that the bar is automatically hidden in accordance
with time set in the menu. To view it again, use the INFO.
To complete the recording, press STOP
or EXIT
Page 23
23
7.2 USB/PVR key
This option is available only if external USB memory was
properly connected!
MP3: this option provides simple audio files player.
JPEG: this option providers simple pictures browser.
PVR: in this submenu you can set different record events. To set it
choose desired options and press EXIT to save.
My recordings: this option provides simple browser and player of
recorded files.
7.3 Time Shifting
This feature only works when properly connected external USB memory !!!
The Time Shifting mode enables the user to "pause and control live TV". From the moment the receiver
Ferguson is in Time Shifting mode, it will continuously record the source from satellite into its buffer.
The buffer is created automatically on the external USB memory.
Pause Live TV
1. Press the PAUSE key
2. The screen will then show the time progression bar
Please note that the bar is automatically hidden in accordance
with time set in the menu. To view it again, use the INFO.
3. Press PLAY to resume. The Ferguson receiver will continue to record what is broadcasted live while
you are watching previously broadcasted programme.
Review Time Shifting buffer (play back live TV moments)
1. Switch to Time Shifting mode.
2. The Time Shifting buffer is available for reviewing.
Use the FF and REV buttons to navigate through the Time Shifting buffer and press PLAY to play.
Deactivate the Time Shifting mode
To deactivate the Time Shifting mode press EXIT key.
Page 24
24
7.4 EPG
7.5 SAT List
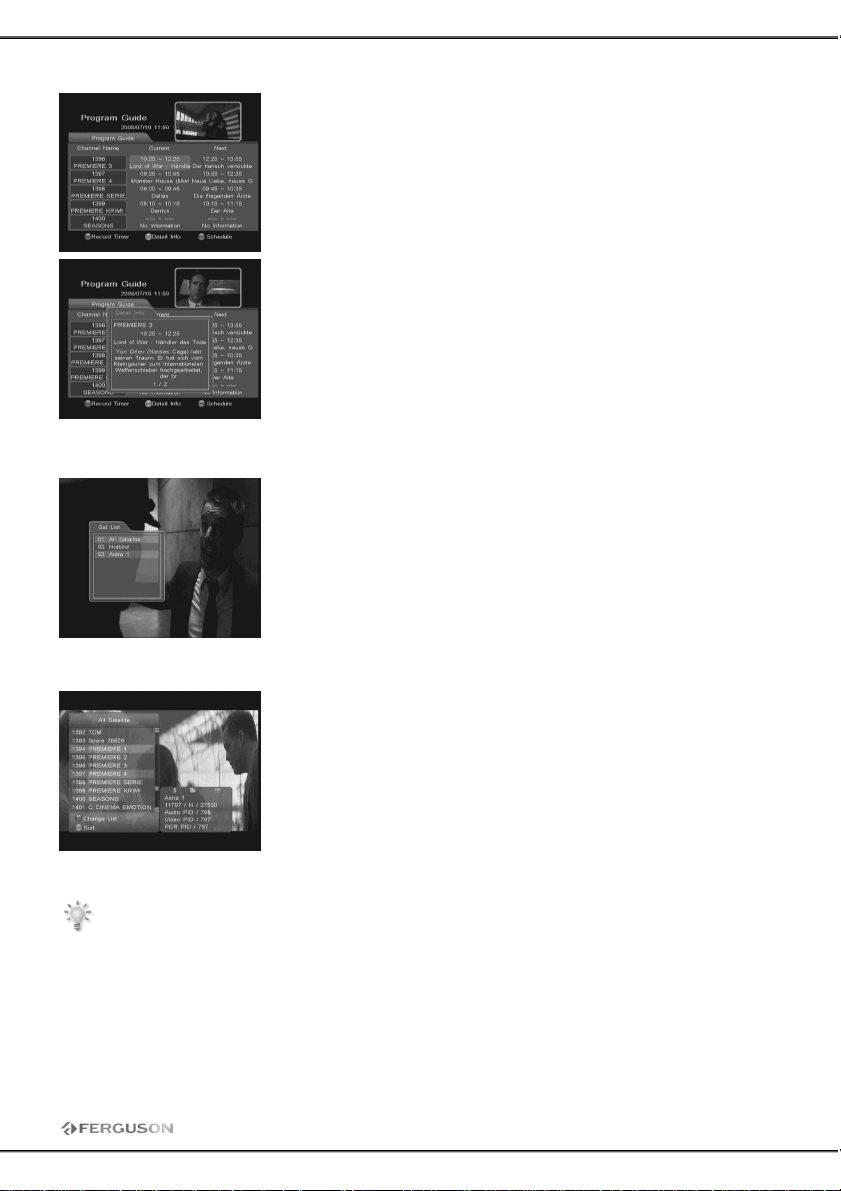
The receiver provides EPG function for you to get access to the TV Guide
(or Radio Guide if you are listening to radio channel) that will show the
titles and other information of the current and next programs on
different channel.
The information is only available from the network to which the channel
you are watching.
Press EPG key on the RCU to display the Program Guide window.
Press BLUE key to enter the schedule.
Press GREEN key to display the detail information of the selected
channel.
Press RED key to set the recording timer directly from EPG data.
If you searched channels from more than one satellite and want to have
a channel list for each satellite, press SAT key on the RCU, a satellite list
will be displayed on the screen. On the red is highlighted list, which you
are currently using.
7.6 Channel list
While watching, press OK key on the RCU to display a channel list. To
select a channel by using arrow keys, then press OK to play the selected
channel.
And furthermore, you can also sort and change channel list by using
corresponding operation.
Press GREEN key to display a box with sorting method. The channel will
sort according to your choice.
NOTE: sorting alphabetically is dependent on name of the channel broadcast by operator. Due
to the frequent use of hidden or special characters, not always channels will be sorted according
to our expectations.
Page 25
25
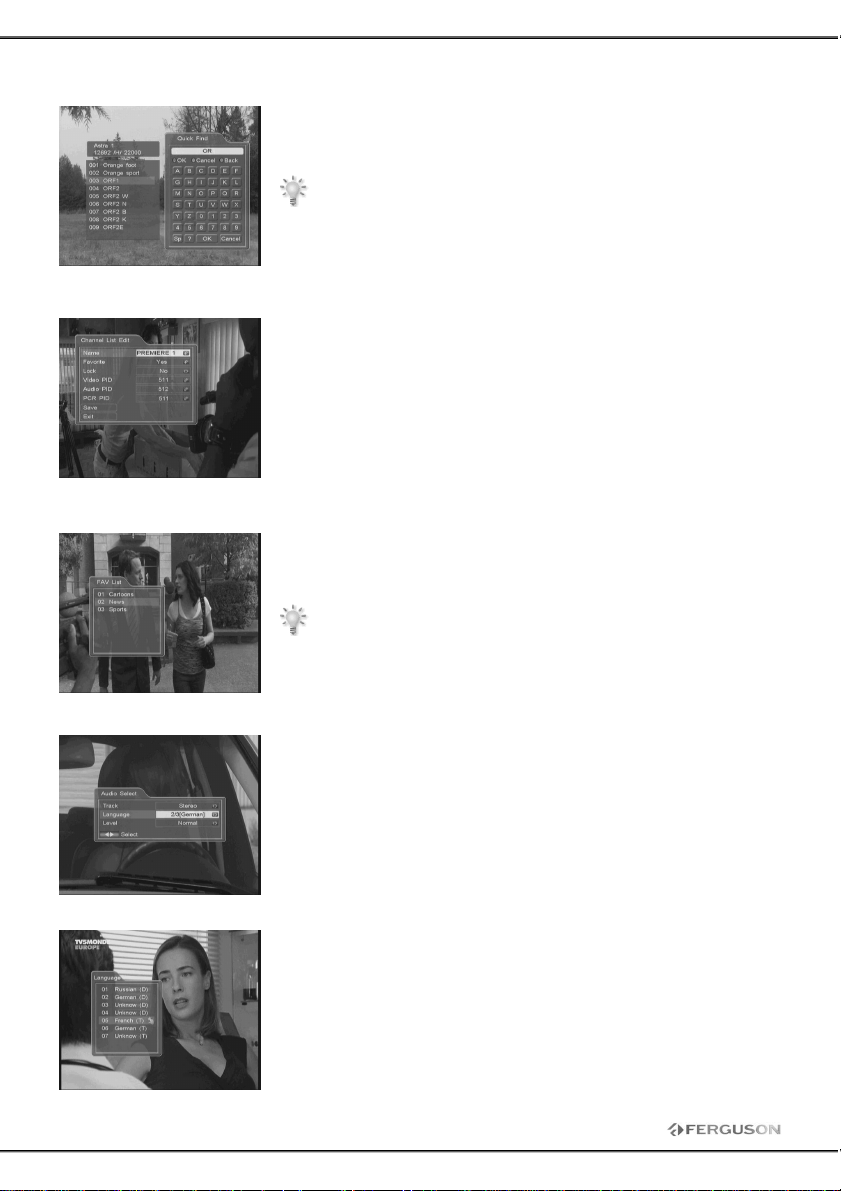
7.7 Quick Find
7.8 Channel Edit
7.9 Favorite
After pressing BULE key, the Quick Find window will be displayed. Select
the first letter of the channel name which you want to find at the
alphabet, the relevant channels will be display in the channel list.
You can use letters corresponding to numerical key and type
channel name the same way as SMS.
Watching any of channel from channel list press EDIT key on the RCU to
enter the Edit channel window.
Press FAV key to display a box with various favorite groups. A program
can belong to several groups, but a group cannot include the same
program.
Remember that on this list shows only used group. If you not
assigned to any group any channel this list will be empty.
7.10 Audio Select
7.11 Subtitles Select
Press AUDIO to set audio mode (stereo, left and right). Select language
in case of multilingual program.
Press SUB.T key on remote control to select subtitles screen, as long as
they are broadcast on the channel.
Page 26
26
LNB noise factor too
Change to an LNB with lower noise
No picture appears on the
connected by SCART
leads and the output
Change the receiver output channel
TROUBLE SHOOTING
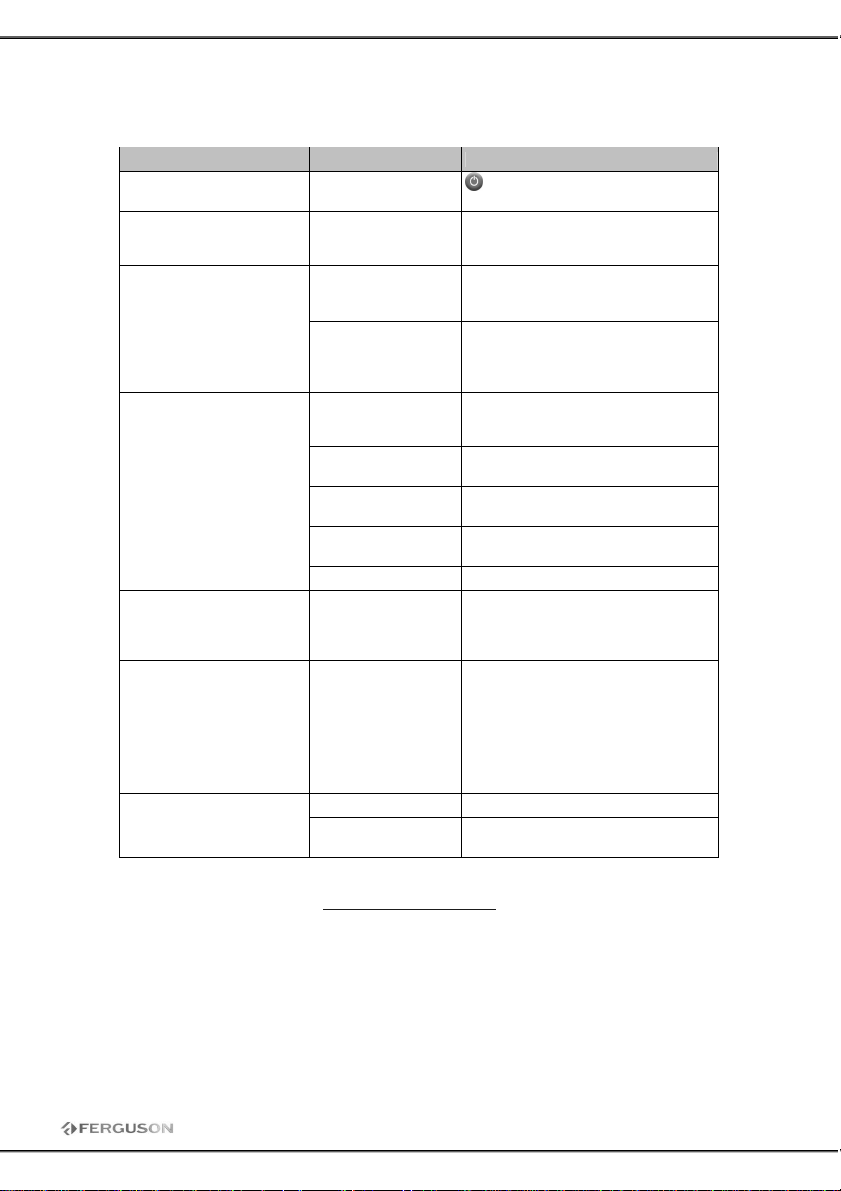
Problem Possible Causes What To Do
In worry about customer's satisfaction, in case of any problems, we ask you always before dispatch
device to check on our internet side: www.ferguson-digital.eu if the newer version of software is. Due
to conditions of guarantee the actualization of software does not rank to service repairs.
The display on the front
panel does not light up.
No sound
or picture, but the front
panel red light is ON.
No sound or picture.
Bad picture/
Blocking error.
TV screen.
There is interference on
your digital satellite
channel.
Main cable is not
connected.
The unit is in
standby mode.
The satellite dish is
not pointing at the
satellite.
No signal or weak
signal.
The satellite dish is
not pointing at the
satellite
Signal is too strong. Connect a signal attenuator to the
Satellite dish is too
small.
high.
The LNB is faulty. Change the LNB.
The system is
leads and TV is not
in AV/EXT mode.
The system is
connected using RF
channel of the
receiver interferes
with an existing
terrestrial channel
or Video signal.
Battery exhausted. Change the battery. The RCU is not working.
RCU is incorrectly
aimed.
Check that the main cable is
plugged into power socket.
Press the standby button .
Adjust the dish. Check the Signal
Level in the Antenna Setup menu.
Check the cable connections, LNB
and other equipment connected
between the LNB and the receiver,
and/or adjust the dish.
Adjust the dish.
LNB input.
Change to a larger dish.
factor.
Check the UHF channel fixed in
your system and tune the UHF
channel properly.
to a more suitable channel, or
connect the system using SCART
leads.
Aim the RCU at the unit, or check
that nothing blocks the front panel.
Page 27
27
GLOSSARY
CA - Conditional Access - Encryption system
used to secure content and grant access only to
subscribers.
CAM - conditional access module - is an
electronic device, usually incorporating a slot
for a smart card, which equips a set-top box
with the appropriate hardware facility to view
conditional access content that has been
encrypted using a conditional access system.
CI - Common Interface - is the slot on a
digital television receiver into which a
conditional access module (CAM) may be
inserted for satellite television. A receiver with a
common interface allows the user to access
encrypted television broadcasts as opposed to
free-to-air (FTA) channels.
DVB-S is the original Digital Video Broadcasting
forward error coding and modulation standard
for satellite television. DVB-S is used in both
MCPC and SCPC modes for broadcast network
feeds, as well as for direct broadcast satellite
services. The transport stream delivered by
DVB-S is mandated as MPEG-2.
EPG - Electronic Programme Guide, also
known as an Interactive Programme Guide or
IPG, provides an on screen guide to channel
listings, programme information or pay per
view events.
FTA - Free-to-air - broadcasts that are sent
unencrypted and may be received via any
suitable receiver.
LNB - low-noise block converter - is used in
communications satellite (usually broadcast
satellite) reception. The LNB is usually fixed on
the satellite dish.
MCPC - multiple channels per carrier several subcarriers are combined into a single
bitstream before being modulated onto a carrier
transmitted from a single location to one or
more remote sites.
Monoblock LNB - is a unit consisting of two
LNBs and is designed to receive satellites
spaced close together.
Pay-TV - Pay television or Premium
Television refers to subscription-based
television services, provided digital cable or
satellite, but also by digital terrestrial methods.
SCPC - Single channel per carrier - refers to
using a single signal at a given frequency and
bandwidth.
STB - Set-top box - Receiver device that
processes an incoming signal from a satellite
dish, aerial, cable, network or telephone line.
TP - Transponder – One of the transmitters on
a satellite. A transponder transmits on a
particular frequency to which a set-top box
must tune to receive a signal. Typically each
transponder can carry multiple compressed
digital television channels.
DiSEqC - (Digital Satellite Equipment
Control) is a communication protocol for use
between a satellite receiver and a device such
as a multi-dish switch or a small dish antenna
rotor. It is compatible with the actuators used to
rotate large C band dishes if used with a DiSEqC
positioner.
USALS – (Universal Satellites Automatic
Location System) - is a satellite motor
protocol that automatically creates a list of
available satellite positions in a motorized
satellite dish setup. It is used in conjunction
with the DiSEqC 1.2 protocol.
Page 28
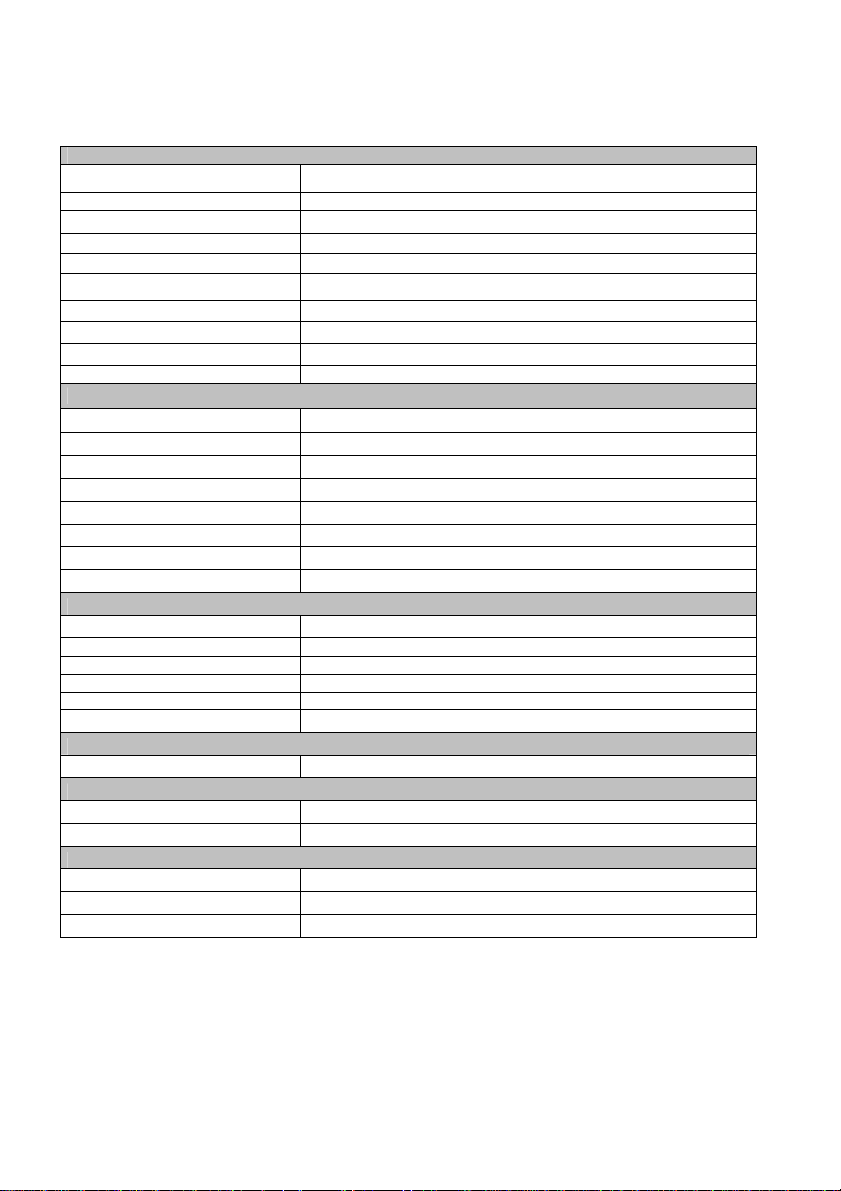
SPECIFICATION
TUNER
Input Frequency
Loop Out Frequency
Input Level
Input Impedance
LNB Supply
Demodulation Type
Roll Off Factor
FEC
Reed Solomon
Symbol Rate
AUDIO/ VIDEO PROCESSING
Audio Standard
Audio Channel
Audio Decoding
Audio Sampling Frequency
Video Standard
Aspect Ratio
Video Resolution
Video format
AV OUTPUT
Video De-emphasis CCIR REC.405-1, 625LINES
Video Bandwidth 5.5MHz
Video Output Impedance 75Ω
Video Output Level 1.0Vp-p
Audio Output Frequency 20Hz ~ 20KHz
Audio Output Impedance Low
FRONT PANEL
IR Receiver 38KHz
POWER SUPPLY
Input voltage AC100~240V, 50/60Hz
Power consumption ~18W
AMBIENT
Operation Temperature 0~40oC
Size 291.5mm(W) x 217mm(D) x 54mm(H)
Weight 1.8Kg
950 ~ 2150 MHz
950 ~ 2150 MHz
–65 ~ –25 dBm
75Ω
13V/18V/OFF, Imax = 400mA
QPSK
0.35
1/2, 2/3, 3/4, 5/6, 7/8, Automatic
204, 188, t = 8
2.0 ~ < 45 MS/s
ISO/IEC 13818-3
Mono, Dual-channel and Stereo
MPEG-1 & MPEG-2 layer I and II
32, 44.1 48KHz
ISO/IEC 13818-2, MPEG-2 MP@ML
4:3, 16:9
720 x 576 (PAL), 720 x 480(NTSC)
4:3, 16:9
 Loading...