

Page 1
N204/R01 (1.3.07)
INSTALLATION MANUAL /
LDTS 8, 12
FLOOR HEATING MATS/
GENERAL TERMS AND CONDITIONS/
•
Heating mats may be operated only as a part of building
structures. Fixing the heating cable to the fiberglass fabric during
manufacture by gluing is regarded to be only a temporary bond.
The heating mat is intended for installation in wet construction
processes (concrete, adhesive and “self- leveling” sealing materials
based on cement). When in use, the heating mat must be in full
contact with these materials and free from air bubbles.
•
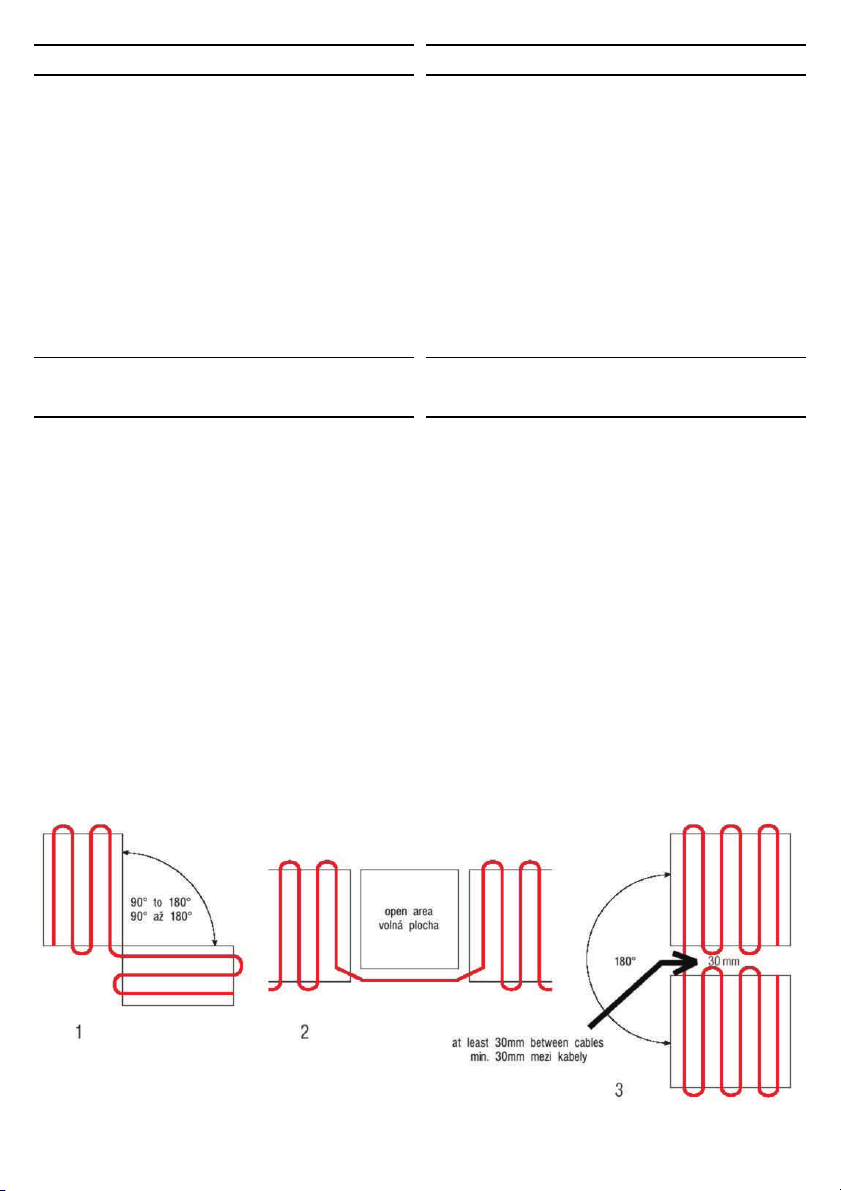
The mat may be adjusted only as shown in pictures 1 – 3, and
in no case may it be shortened. You may shorten only the cold
connection ends, as required. The connection joining the cold end
and the heating cable may not be installed in a bend. The
heating cables of the heating mats may neither touch nor cross
one another. The minimum distance between the cables is
30 mm. If the heating or power supply cables are damaged, they
must be replaced or repaired by the manufacturer, its service
technician or a similarly qualified person in order to prevent a
dangerous situation from arising. Do not use nails or screws to
install the cables!
•
When installing the cables, the diameter of a bend in the cable
must be at least eight times greater than the cable’s diameter.
•
The heating cable must be supplied with electricity by means of a
residual current circuit breaker with rated actuating current of
Δn≤
30mA, except for those mats with protective braiding that are
I
installed in a dry environment. We recommend that each heating
unit/circuit be equipped with a separate residual current device.
•
For safety reasons, heating mats may not be installed in walls.
•
The heating mats may be stored at temperatures from +10°C to
+35°C and installed at temperatures from +5°C to +30°C. When
in operation, they may not be exposed to temperatures exceeding
70°C.
•
In case that mats are laid in an area larger than 20m2 or with a
diagonal greater than 7m, it is necessary to account for expansion
of the foundation materials. The heating cable must not cross the
expansion joints. The non- heating connecting cables located at the
expansion joints must be laid loosely in a protective tube. All
installed elements – cold connection end, thermostat’s
probe – where they pass from the wall to the floor must be
placed in installation tubes and must allow for movement of the
floor and wall relative to one another.
PODLAHOVÉ TOPNÉ ROHOŽE
NÁVOD NA INSTALACI
VŠEOBECNÉ PODMÍNKY
Topné rohože smí být provozovány jen jako součást staveb-
•
ních konstrukcí. Fixace topného kabelu ke skelné tkanině
lepením je považována jen za dočasnou fixaci, topná rohož
slouží pro instalaci v mokrých stavebních procesech (beton,
lepící a „samonivelační“ tmely na cementové bázi) a při
provozu musí být s těmito hmotami v dokonalém kontaktu
bez vzduchových mezer.
•
Rohož může být upravována výhradně dle obrázků 1–3, v
žádném případě nesmí být krácena. Kráceny dle potřeby
mohou být pouze studené připojovací konce. Spojka spojující
studený konec a topný okruh nesmí být instalována v ohybu.
Topné kabely topných rohoží se nesmějí dotýkat, ani křížit,
vzdálenost topných kabelů od sebe je min. 30mm. Jestliže je
topný kabel nebo napájecí přívod poškozen, musí být nahrazen nebo opraven výrobcem, jeho servisním technikem nebo
podobně kvalifikovanou osobou, aby se zabránilo vzniku
nebezpečné situace. Kabely neinstalujte pomocí hřebíků a
vrutů!
•
Při instalaci musí být dodržen požadavek, že průměr ohybu
kabelu smí být minimálně osminásobek jeho průměru.
•
Topná rohož musí být napájena přes proudový chránič se
jmenovitým vybavovacím proudem I
ochranný opletením, které jsou instalovány v suchém prostředí. Doporučujeme každý topný celek / okruh topení vybavit
samostatným proudovým chráničem.
•
Topnou rohož z hlediska bezpečnosti je zakázáno instalovat
do stěn.
•
Topná rohož může být skladována při teplotě +10°C až
+35°C a instalována při teplotě +5 až +30°C a při provozu nesmí být vystavována teplotám vyšším než 70°C.
•
Při pokládání na plochy větší než 20m2 nebo s úhlopříčkou
větší než 7m je nezbytné respektovat dilataci podkladových
materiálů. Topná rohož nesmí přecházet přes dilatační spáry.
Připojovací netopné kabely musí být v místě dilatačních spár
volně uloženy v ochranné trubce. Přechod veškerých instalací
– studený konec, sonda termostatu – ze stěny do podlahy
musí být provedeny v instalačních trubkách a umožňovat
vzájemný pohyb podlahy a stěny.
Δn≤
30mA, mimo rohože s
Page 2

•
To allow for expansion around the periphery of the room between
the baseboards and the floor tiles, use an expansion profile or fill
the spaces with silicone sealing cement. The distance between the
heating mat and the wall must not be less than 50 mm.
•
The mat must not be placed either under such furnishings as
bathtubs, shower baths, toilets and the like or under furniture that
does not allow air to circulate. The maximum thermal resistance
between the heating part and the room may be R=0.12 m
•
The installation must allow for disconnecting the mat or mats at
both poles (which condition may be provided using the FENIXTherm 100 thermostat).
•
The label on the cold end of the heating mat shows the serial
number and production date. The label on the mat’s packaging
shows type, dimensions and area of the mat, total output, output
2
, as well as the mat’s supply voltage and electrical resis-
per 1m
tance.
•
Before and after laying the mats, it is necessary to measure the
resistance of the heating circuit. The measured values should be
equal. Record the measured values in the certificate of warranty.
•
Before and after laying the cables, it is necessary to measure the
insulation resistance between the heating conductor and the
protective braiding. This measured value may not be less than
Ω.
Record the measured values in the certificate of warranty.
0.5M
•
Before opening the package with the heating mat, it is necessary
to check whether the data on the label is in accordance with your
requested product.
•
In case of any discrepancies, you should report these immediately
to the manufacturer or supplier and discontinue the work
completely.
•
You must draw the scheme of the heating mat layout in the
certificate of warranty, indicating the exact distance of the connections of the supply cable and heating part from the walls of the
building. Record the serial number and production number of the
heating mat that are stated on the label on the mat’s cold end,
then insert/stick this label into the connection box.
•
The supplier must inform other construction suppliers about the
heating unit installed in the floor and of the related risks.
•
When installing the mats, the CSN 33- 2000- 7- 753 standard
requirements must be met.
•
The product is produced according to the CSN EN 60335- 2- 96
standard and must be installed in accordance with the national
regulations for electrical installation.
•
An insufficient thermal insulation layer below the heating system
may cause significant thermal loss (warmth moving downwards).
Recommended thermal insulation is 70–80mm of extruded polystyrene or similar thermal insulation materials. In case of reconstruction, where there is not space to install the thermal insulation to a
sufficient depth on the existing tiles, we recommend installing
F- boards in a depth of 6mm or 10mm to accelerate the warming
of the surface and to reduce the thermal loss. This material is
installed into the adhesive sealing cement that was shaped by a
notched spreader and the heating mat is placed directly onto its
surface. The F- boards do not need to be penetrated.
2
K/W.
•
Pro obvodovou dilataci mezi soklem a dlažbou použít dilatační profil, nebo spáru vyplnit silikonovým tmelem. Rohož musí
být nejméně 50 mm ode zdi.
•
Rohož nesmí být kladena pod zařizovací předměty jako jsou
vany, sprchové kouty, WC apod., jakož i pod nábytek neumožňující volné proudění vzduchu. Maximální tepelný odpor
mezi topnou jednotkou a místností může být R=0,12 m
•
Instalace musí umožňovat odpojení rohože, či rohoží v obou
pólech (splňuje termostat FENIX- Therm 100).
•
Na štítku umístěném na studeném konci topné rohože je
uvedeno výrobní číslo a datum výroby. Na štítku, který je
umístěn na obalu rohože je uveden typ, rozměry a plocha
rohože, dále celkový výkon, výkon na 1m
elektrický odpor rohože.
•
Před pokládkou i po pokládce je nutné provést měření
odporu topného okruhu. Naměřené hodnoty se musí shodovat. Naměřené hodnoty zapište do Záručního listu.
•
Před pokládkou i po pokládce topné rohože musí být provedeno měření izolačního odporu mezi topným vodičem a
ochranným opletením – naměřená hodnota nesmí být nižší
než 0,5MΩ.
•
Před rozbalením topné rohože je nutno zkontrolovat štítkové
údaje, jestli jsou ve shodě s požadovaným výrobkem.
•
Jakékoliv neshody ihned oznamte výrobci nebo dodavateli a
ukončete veškeré práce.
•
Do záručního listu musí být zakresleno uložení topné rohože
s označením spojek přívodního kabelu a topné části přesným
okótováním od stěn objektu. Do záručního listu musí být
opsáno výrobní číslo rohože a datum výroby ze štítku umístěného na studeném konci rohože, tento štítek následně
vložte/vlepte do připojovací krabice.
•
Dodavatel musí informovat ostatní dodavatele stavby o
umístění topné jednotky v podlaze a o rizicích z toho vyplívajících.
•
Při instalaci musí být dodrženy požadavky normy ČSN 332000–7–753.
•
Výrobek je vyroben dle požadavků ČSN EN 60335- 2- 96 a
musí být instalován v souladu s národními předpisy pro
elektrickou instalaci.
•
Nepoužitím dostatečné vrstvy tepelné izolace pod topným
systémem se vystavujete riziku značných tepelných ztrát
směrem dolů. Doporučená tepelná izolace je 70–80 mm
extrudovaného polystyrenu a obdobně tepelně izolujících
materiálů. Při rekonstrukcích, kde není prostor na stávající
dlažbu instalovat dostatečnou tepelnou izolaci, doporučujeme
pro zrychlení náběhu povrchu teploty a snížení tepelných
ztrát instalovat desky F—board v tloušťce 6 a 10mm. Tento
materiál se instaluje do zubové stěrky lepícího tmelu a topná
rohož se klade přímo na něj, není potřeba je předem penetrovat.
Naměřené hodnoty zapište do Záručního listu.
2
, napájecí napětí a
2
K/W.
2
Page 3
1. Description and connection
• The heating mat consists of the heating cable attached to a
supporting fiberglass fabric.
• The heating cables should be connected to a 230 V, 50 Hz
electrical network. Degree of protection: IP67.
• LDTS mats have protective braiding. The cable’s protective
braiding (CuSn 1mm
grid or metal shield and provides increased protection in
spaces where that is required (bathroom, laundry, etc.) The
protective braiding is to be connected to the PE conductor
or to a protective grounding connection.
2
) meets the standards required of metal
• LDTS mats have bottom- edge tapes that are adhesive on
both sides. After removing the covering paper from these
tapes, the mat can be attached to the base.
2. Using mats for moderately accumulating and
direct floor heating
a) Dimensioning
• If the floor heating is intended to be used to warm the floor
surface for short intervals, we recommend that the heating
mat be installed close to the floor’s surface.
• If the floor heating is to be used to heat a room, it is
necessary to know the thermal loss value for the building in
order to select the most suitable heating system. The
installed output should correspond to a multiple of 1.1 to
1.3 times the calculated thermal loss for the building. If it is
impossible to install the calculated output into the entire
floor area, an additional heating device must be used (for
example, direct heating convectors).
• For short- term heating and for bathrooms, we recommend
using the LDTS 12 heating mats with output of 160W/m
For rooms occupied for long time periods, we recommend
using the LDTS 8 heating mats with output of 100W/m
2
2
.
1. Popis a zapojení
•
Topná rohož je sestává z topného kabelu připevněného k
nosné sklovláknité tkanině.
•
Topné kabely se připojují na soustavu 230V, 50Hz. Krytí IP 67.
•
Rohože LDTS jsou vyráběny s kabelem s ochranným opletením. Ochranné opletení kabelu (CuSn 1mm
davek norem na kovovou mříž nebo kovový plášť a zajišťuje
zvýšenou ochranu v těch prostorách, kde je to vyžadováno
(koupelny, prádelny apod.). Ochranné opletení se připojuje k
PE vodiči nebo k ochrannému pospojování.
•
Rohože LDTS mají spodní krajní pásky oboustranně lepící. Po
odstranění krycího papíru z těchto pásek je možno rohož
přilepit k podkladu.
2
) zajišťuje poža-
2. Použití pro mírně akumulační a přímotopné
podlahové vytápění
a) Dimenzování
•
Pokud se jedná o krátkodobou temperaci povrchu podlahy,
doporučujeme topnou rohož instalovat blízko povrchu podlahy.
•
Pokud se jedná o vytápění místnosti, tak pro správnou volbu
topného systému musíme znát hodnotu tepelných ztrát
objektu. Instalovaný příkon by měl odpovídat 1,1 až 1,3
násobku vypočtených tepelných ztrát objektu. Pokud nelze
takto vypočtený příkon instalovat v celém rozsahu do podlahové plochy, musí se použít přídavné topení (např. přímotopné konvektory).
•
Pro krátkodobé vytápění a do koupelen doporučujeme topné
rohože LDTS 12 o výkonu 160W/m
době obývaných doporučujeme rohože LDTS 8 o výkonu
2
100W/m
.
.
2
. V prostorách dlouho-
3
Page 4

b) Installation – moderately accumulating system
b) Montáž — mírně akumulační systém
INSTALLATION INTO CONCRETE (self- leveling materials)
First read Clause 1 in the General Terms and Conditions.
•
• The concrete mixture must be sufficiently compact so that
the layer contains no air bubbles, cavities and the like and
ensures full contact with the heating cable. Compacting must
be done carefully, by hand, to prevent damaging the cable.
In no case may immersion vibrators be used.
• The concrete mixture must contain so- called plasticizers (for
example, MAPEI- DYNAMONSR or PLANICRETE).
• When concreting, it is necessary to bear in mind that in
case of a break in work longer than 60 minutes the
concreted areas do not join fully. Therefore, in case of a
longer break, it is necessary to create an adhesive
connecting bridge (e.g., by penetrating or in another manner).
INSTALACE DO BETONU
•
•
•
•
•
• The areas where the heating mat is to be placed must be
insulated thermally using polystyrene (expanded polystyrene
of at least 25kg/m
with a long- term thermal resistance of 75°C) or mineral
floor board 70–80mm thick. In case of a moderately
accumulating system, the heating mat may be placed directly
on the thermal insulation (LDTS 8 – expanded polystyrene,
LDTS 12 – extruded polystyrene).
3
or, even better, extruded polystyrene
•
• When installing the reinforcing steel, you must pay close
attention to avoid damaging the cable’s insulation.
PROCEDURE
Clean the concrete area, remove any sharp objects.
•
• Unroll the heating mat according to the area to be heated.
• Remove the protective layer from the self- adhesive tapes
and attach the mat to the base.
• In humid spaces, connect the protective braiding of the
cable to the protective grounding connection for the room.
• The connector joining the cold connection end and the
heating circuit must not be installed in a bend.
• Measure the resistance of the heating circuit and the
insulation resistance or the leaking current and record the
measured values in the certificate of warranty.
• Cover the mat with a concrete layer. After concreting is
finished, measure the resistance values again and record
them in the certificate of warranty.
• Wait at least 28 days after installation before putting the
mat into operation, so that the concrete will be set fully.
• Materials used in finishing the floor surface must be
approved by their respective manufacturers for use on floors
under thermal stress.
POSTUP
•
•
•
•
•
•
•
•
•
(samonivelační hmoty)
Nejprve si přečtěte bod 1. Všeobecné podmínky.
Betonová směs musí být natolik zhutněná, aby vrstva neob-
sahovala vzduchové bubliny, kaverny apod. a zajišťovala
dokonalý kontakt s topným kabelem. Hutnit nutno opatrně,
ručně, aby nedošlo k poškození kabelu. V žádném případě
nepoužívat ponorné vibrátory.
Betonová směs musí obsahovat tzv. plastifikátory (např.
MAPEI- DYNAMONSR nebo PLANICRETE).
Při betonování je nutno dbát na skutečnost, že při přestávce
delší 60 minut se betonované plochy dokonale nespojí. Proto
při delší prodlevě je nutno vytvořit adhezivní spojovací můstek, např. penetrací nebo jiným způsobem.
Plochy na které se bude klást topná rohož by se měly
tepelně odizolovat polystyrenem (expandovaný min. 25kg/m
nebo ještě lépe extrudovaný polystyren s dlouhodobou teplotní odolností 75°C) nebo minerální podlahovou deskou v
minimální tloušťce 70–80mm. V případě mírně akumulačního
systému lze klást topnou rohož přímo na tepelnou izolaci
(LDTS 8 - expandovaný polystyren, LDTS 12 - extrudovaný
polystyren).
Při instalaci armovacího železa je nutno dát pozor, aby
nedošlo k poškození izolace kabelu.
Podkladovou plochu očistěte a zbavte ostrých předmětů.
Topnou rohož rozviňte dle požadované vytápěné plochy.
Odstraňte ochranou vrstvu ze samolepících pásek a rohož
přilepte k podkladu.
Ve vlhkých prostorech spojte ochranné opletení kabelu s
ochranným pospojováním místnosti.
Spojka spojující studený konec a topný okruh nesmí být
instalována v ohybu.
Proveďte proměření odporu topného okruhu a izolačního
odporu, nebo unikajícího proudu a hodnotu zapište do Záručního listu.
Rohož zalejte vrstvou betonu a po skončení betonářských
prací opět proveďte měření a zápis do Záručního listu.
Rohož uveďte do chodu nejdříve po 28 dnech, po úplném
vyzrání betonu.
Materiály dále používané pro zušlechtění povrchu podlahy
musí mít doporučení od výrobce, že jsou určeny pro tepelně
namáhané podlahy.
3
4
Page 5

1)
Base
/ podklad
2) Thermal insulation, 80mm / tepelná izolace 80mm
3) Ecofloor heating mat / topná rohož ECOFLOOR
4) Reinforcing steel grid (KARI) / armovací ocelová síť
(KARI)
5) Accumulating concrete layer, 40—50mm / betonová
akumulační vrstva 40–50 mm
6) Installation pipe with floor probe / trubka (husí krk)
s podlahovou sondou
7) Floor tites / dlažba
c) Installation – direct heating system
• First read Clause 1 of the General Terms and
Conditions.
• Detailed descriptions of use for the individual
materials can be found in the installation manuals for the
recommended materials.
PROCEDURE
Unroll the heating mat and adjust it according to the area
•
to be heated. Mark the place for the connection and ending
of the heating mat on the floor. Roll the mat up again.
• Create “pockets” in the base material where you will place
the connections for the heating and non- heating components.
• Clean the concrete area, remove any sharp objects and coat
it using a suitable penetrating solution.
• Unroll the heating mat according to the area to be heated.
• Remove the protective covering from the self- adhesive tapes
and attach the mat to the base.
• Measure the resistance of the heating circuit and the
insulation resistance and record the measured values in the
certificate of warranty.
• Use flexible adhesive sealing cement and a flat spreader to
smooth the floor surface (be careful not to damage the
cable with the sharp edge of the spreader).
• Before laying the floor tiles, measure the heating circuit
values again and record both values in the certificate of
warranty.
• Lay the floor tiles onto the surface.
• When putting the heating mat into operation, the adhesive
sealing cement must be fully hardened (see instruction for
use and recommendation from material’s manufacturer).
c) Montáž — přímotopný systém
•
Nejprve si přečtěte bod 1. Všeobecné podmínky.
•
Detailní použití jednotlivých hmot je uvedeno v
návodech přiložených k doporučeným hmotám.
POSTUP
•
Rohož rozviňte a upravte dle požadovaného tvaru vytápěné
plochy, na podlaze vyznačte místo pro spojku a ukončení
topné rohože. Rohož sviňte.
•
V podkladovém materiálu vytvořte „kapsy“ pro uložení spojek
topných a netopných částí.
•
Podkladovou plochu očistěte, zbavte ostrých předmětů a
napenetrujte vhodným penetračním přípravkem.
•
Topnou rohož rozviňte dle požadované vytápěné plochy.
•
Odstraňte ochranou vrstvu ze samolepících pásek a rohož
přilepte k podkladu.
•
Proveďte proměření odporu topného okruhu a izolačního
odporu, hodnoty zapište do Záručního listu.
•
Flexibilním lepicím tmelem za pomocí hladké stěrky srovnejte
podlahovou plochu (dbejte, aby jste ostrou hranou stěrky
nepoškodili kabel).
•
Před položením dlažby opět proveďte měření topného okruhu
a obě naměřené hodnoty zaznamenejte do Záručního listu.
•
Položte dlažbu.
•
Topnou rohož uveďte do provozu až po vytvrdnutí lepícího
tmelu, dle doporučení výrobce tmelu.
5
Page 6

Direct heating system – new constructions /
Přímotopný systém — novostavby
1) Base
/ Podklad
2) Thermal insulation 70–80mm /
3) Reinforcing steel grid (KARI) /
4) Concrate spread layer 40mm
40mm
5) Flexible adhesive sealing cement /
6) ECOFLOOR heating mat /
7) Floor tiles /
Dlažba
Tepelné izolace 70—80mm
Armovací ocelová síť (KARI)
/ Betonová vrstva cca
Flexibilní lepící tmel
Topná rohož ECOFLOOR
Direct heating system – reconstruction /
Přímotopný systém — rekonstrukce
d) Regulation
•
For regulation, use one of FENIX’s currently available thermostats.
•
For floors where exceeding the hygienic limit of 27°C is not
anticipated, or for floors in rooms occupied for only short intervals
(bathroom, lavatory, corridor) with surface area output of up to
2
, it is optional to use the thermostat’s limiting floor probe.
160W/m
For all other applications, the thermostat must be equipped with a
floor probe with the maximum temperature set to 35°C.
1)
Original floor tiles or another base /
jiný podklad
2) Flexible adhesive sealing cement /
3) F- BOARD thermal insulation (optional) /
BOARD (není podmínkou)
4) ECOFLOOR heating mat /
5) Flexible adhesive sealing cement /
6) New floor tiles /
Topná rohož ECOFLOOR
Nová dlažba
Původní dlažba nebo
Flexibilní lepící tmel
Tepelné izolace F-
Flexibilní lepící tmel
d) Regulace
•
Pro regulaci použijte termostat z aktuální nabídky firmy FENIX.
•
U podlah, kde se nepředpokládá překročení hygienické hranice 27°C nebo se jedná o krátkodobě obývané místnosti
(koupelna, WC, chodba) s plošným příkonem do 160W/m
není podmínkou limitující podlahová sonda termostatu. U
všech ostatních aplikací musí být termostat vybaven
podlahovou sondou s max. nastavením 35°C.
2
6
Page 7

3. Accelerating the warming of heating floors
a) For heating mat laid in a concrete layer
• Wait at least 4–6 weeks after installation before putting the
mat into operation, so that the concrete will be set fully.
• On the first day, set the temperature of the floor to be the
same as the temperature in the room (maximum 18°C).
• In the following days, increase the temperature in increments
of 2°C per day up to 28°C.
• Maintain the temperature of 28°C for three days.
• Then, decrease the temperature of the floor by 5°C per day
until you reach the initial temperature.
• Afterwards, you can set the desired temperature and put the
floor into normal operation.
b) For heating mat laid into self- leveling
material and into adhesive sealing cement
• We recommend putting the mat into operation after 5 days
from laying the final layer of the floor (floor covering).
Note: The values mentioned above are for information only, it
is necessary to follow the instructions provided by the
manufacturer of the respective construction material.
3. Náběhy topných podlah
a) uložení ve vrstvě betonu
•
Topná podlaha se uvádí do provozu až po řádném vytvrdnutí
betonu po 4–6 týdnech.
•
První den nastavit teplotu podlahy shodnou s teplotou v
místnosti (maximálně 18°C).
•
Následující dny zvyšovat teplotu podlahy postupně o 2°C/den
až na 28°C.
•
Teplotu podlahy udržovat na teplotě 28°C po dobu tří dnů.
•
Následně snižovat teplotu podlahy o 5°C denně dokud
nedosáhne počáteční teploty.
•
Poté je možno teplotu podlahy nastavit na požadovanou a
uvést podlahu do běžného provozu.
b) uložení v samonivelační hmotě a v lepícím tmelu
•
Topnou podlahu doporučujeme uvést do provozu po 5 dnech
od položení finální vrstvy podlahy (krytiny).
Pozn.: Uvedené údaje jsou doporučené, přednostně je nutno se
řídit pokyny uvedenými výrobcem příslušné stavební hmoty.
7
Page 8

4. Warranty, claims
ECOFLOOR, supplier of the cable circuits, provides a warranty period of 24
months for the product’s functionality, beginning from the date of its
installation that is confirmed in the certificate of warranty (installation must be
made at latest within 6 months from the date of purchase), provided that:
•
a certificate of warranty and proof of purchase are submitted,
•
the procedure described in this user guide has been followed,
•
data on laying and connecting the cable in the floor and the resulting
measured values of the insulation resistance of the heating cable are
provided, and
•
the procedure for applying the sealing cement specified by its producer
has been followed.
Claims may be made in writing at the company that performed the installation, or directly to the manufacturer.
Provided that the aforementioned conditions were met and the warranty
period has expired, the conditions under the claims procedure, clause 5,
applies for an additional period of 8 years.
The claims procedure also is available at the website http://www.fenixgroup.cz
4. Záruka, reklamace
Dodavatel kabelových okruhů ECOFLOOR poskytuje záruku na
její funkčnost po dobu 24 měsíců ode dne instalace potvrzené
na záručním listě (instalace musí být provedena maximálně 6
měsíců od data prodeje) pokud je:
•
doložen záruční list a doklad o zakoupení,
•
dodržen postup dle tohoto návodu,
•
doloženy údaje o skladbě kabelu v podlaze, zapojení a
výsledcích měření izolačního odporu topného kabelu,
•
dodržen návod výrobce pro aplikaci tmelů.
Reklamace se uplatňuje písemně u firmy, která provedla
instalaci, připadně přímo u výrobce.
Při dodržení výše uvedených podmínek a po uplynutí záruční
doby platí po dobu dalších 8 let podmínky dle reklamačního
řádu, bod č. 5.
Reklamační řád je také na http://www.fenixgroup.cz
8
Fenix Trading s.r.o.
Slezská 2, 790 01 Jeseník
tel.: +420 584 495 304, fax: +420 584 495 303
e- mail: fenix@fenixgroup.cz , http://www.fenixgroup.cz
 Loading...