

Page 1

N641/R07 (26.09.16)
Návod k montáži
Zápustný rám Ecosun S+ 18 - 24
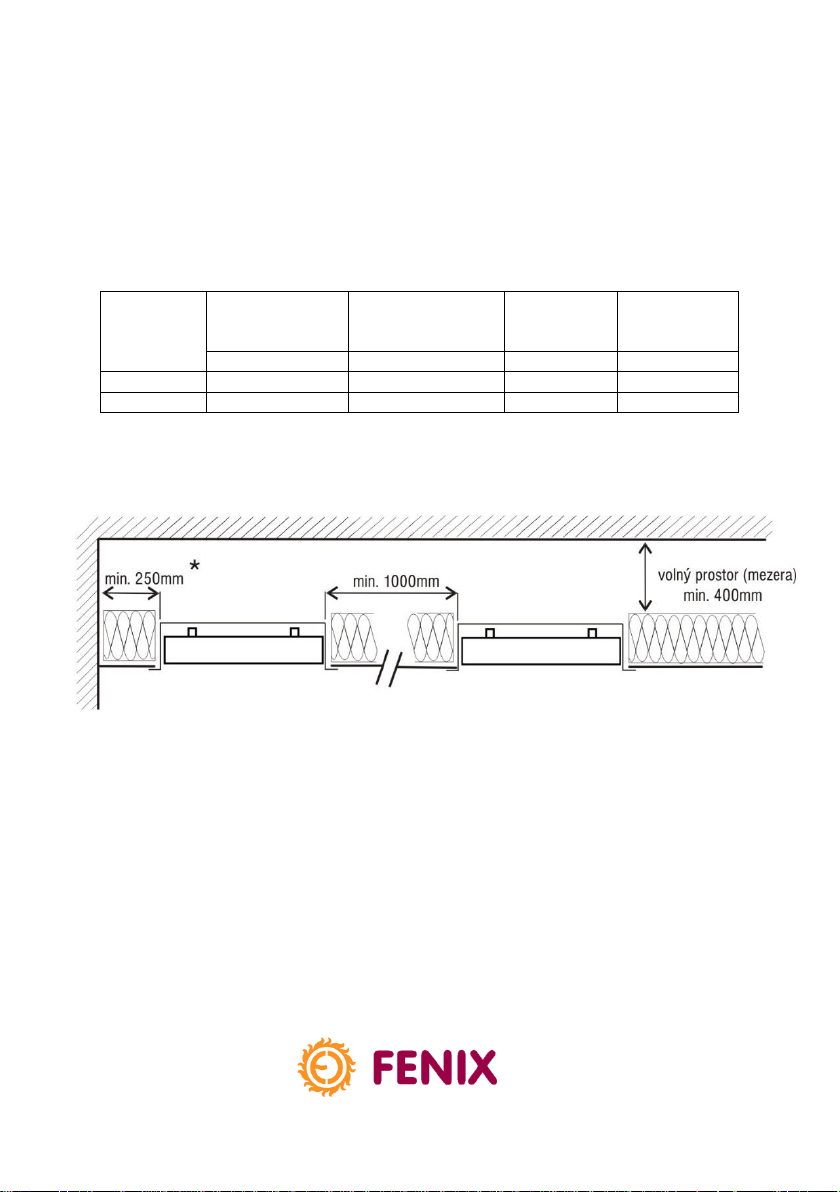
1) Připravte stavební otvor pro zápustný rám. Je nutné dodržet minimální objem mezistropu,
minimální odstupy mezi panely, odstupy od stěn a stropu (*hloubku otvoru) viz tabulka,
obr.
2) Veškeré hořlavé materiály musí být z konstrukce stropu odstraněny nebo nahrazeny
nehořlavými materiály.
3) Po obvodu otvoru instalujte nosnou konstrukci zápustného rámu nebo připevněte nosné
závitové tyče průměru 5mm ke konstrukci stropu.
Nosná konstrukce/závitové tyče musí být ve stropní konstrukci upevněna tak, aby unesla
váhu instalovaného panelu včetně zápustného rámu.
4) Do připraveného stavebního otvoru nasuňte zápustný rám a upevněte jej do připravené
nosné konstrukce rámu pomocí vrutů průměru 5mm se zápustnou hlavou, nebo upevněte
rám do závitových tyčí a zajistěte maticemi s podložkami.
5) Díly číslo 1 (obr. 1)upevněte do bočních otvorů v panelu (dále od svorkovnice)
a zajistěte šroubem.
6) Nasuňte panel do rámu tak, aby otvory v dílech č. 1 zapadly do obou čepů v rámu (obr .2).
7) Protáhněte přívodní vodič do svorkovnice a zaklopte panel na první západku držáku panelu
(obr. 3).
8) Proveďte el. zapojení panelu - viz návod k panelu.
9) Nasaďte kryt svorkovnice.
10) Zaklopte panel do rámu (vodorovná poloha), druhá poloha západky (obr. 4).
11) Ujistěte se, že je panel správně uchycen - lehkým zatažením směrem k podlaze.
Příslušenství pro instalaci tepelných ochran ( strana 11)
1) Tepelnou ochranu umístíme tak, aby přes otvory v přírubě bylo vidět perforace v
karoserii
2) Do perforovaných otvorů přišroubujeme pomocí přiložených samořezných šroubů
3) Zapojíme tepelné ochrany dle vyobrazení, samořezné šrouby potřeme silikonovým
tmelem proti korozi
Page 2
2
Demontáž panelu
1) Vypněte přívod napájení panelu!
2) Přes otvory v krytu svorkovnice odklopte západky panelu pomocí plochého šroubováku
(obr. 4).
3) Dále postupujte v obráceném pořadí montáže.
* doporučená minimální vzdálenost pro omezení ohřevu stěny je 1000 mm
Typ panelu
Rozměr rámu
(s lemem)
d x š x v
Rozměr otvoru
d x š x h*
Celková váha
(panel + rám)
Min. objem
mezistropu pro
1ks panelu
[mm]
[mm]
[kg]
[m3]
Ecosun S+ 18
1596 x 298 x 100
1570 x 260 x 400
16,5
3,7
Ecosun S+ 24
1596 x 298 x 100
1570 x 260 x 400
16,5
3,7
Page 3

3
Instructions for installation
Ecosun S+ 18 – 24 recessed frame
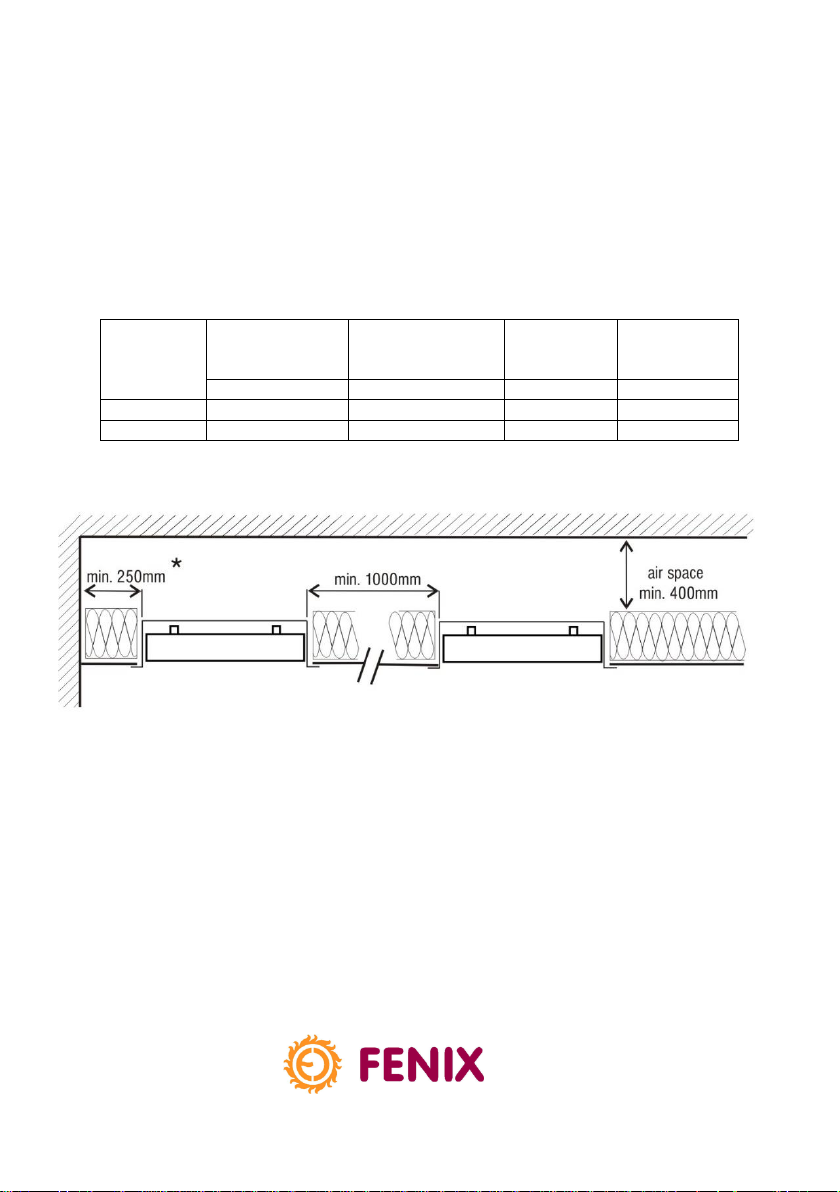
1) Prepare the opening for the installation of the recessed frame. It is necessary to maintain a
minimum false ceiling volume, minimum clearances between the heaters, minimum
clearances from walls and ceiling (*opening depth); see the table and fig.
2) All flammable materials must be removed from the ceiling structure or replaced by
inflammable materials.
3) Install the load-bearing structure of the recessed frame along the circumference of the
prepared opening. Alternatively, attach load-bearing threaded rods with a diameter of
5mm to the ceiling structure.
The load bearing structure/threaded rods must be fastened within the ceiling structure in
such a way that they can carry the weight of the installed panel, including the recessed
frame.
4) Insert the recessed frame into the prepared opening and attach it to the structure installed
to bear its load using 5 mm diameter screws with countersunk heads. Alternatively, if
threaded rods are used, attach the frame to the rods and secure it with nuts and washers.
5) Attach parts No. 1 (Fig.1) into the side openings in the panel (further away from the
terminal) and secure them with screws.
6) Insert the panel into the frame in such a way that the openings in parts No. 1 slide onto
both frame pins (Fig. 2)
7) Pull the supply lead into the terminal and place the panel onto the first latch of the panel
holder (Fig. 3).
8) Connect the panel to the electrical wiring system – see the panel’s instruction manual.
9) Attach the terminal cover.
10) Place the panel in the frame (in the horizontal position), with the latch in the second
position (Fig. 4).
11) Make sure that the panel is attached correctly by pulling it gently in the direction of the
floor.
Accessories for the installation of thermal protection (page 11)
1) Place the thermal protection in such a way that the perforations in the body of the
appliance can be seen through the openings in the flange.
2) Screw it into the perforated openings using the attached self-tapping screws.
3) Connect the thermal protection as shown, and smear the self-tapping screws with
silicone sealant to prevent corrosion.
Page 4
4
Panel removal
1) Switch off the power supply to the panel!
2) Insert a flat-head screwdriver through the openings in the terminal cover (Fig. 4) and
lift up the latches holding the panel.
3) Proceed in reverse order to the steps followed during installation.
* the recommended minimum distance in order to limit the warming of the wall
is 1000 mm
Type of panel
Frame dimensions
(with edging)
l x w x h
Dimensions of the
opening
l x w x h*
Total weight
(panel +
frame)
Min. volume of
false ceiling for
panel unit
[mm]
[mm]
[kg]
[m3]
Ecosun S+ 18
1596 x 298 x 100
1570 x 260 x 400
16,5
3,7
Ecosun S+ 24
1596 x 298 x 100
1570 x 260 x 400
16,5
3,7
Page 5

5
Montageanleitung
Einbaurahmen Ecosun S+ 18 - 24
1) Die Bauöffnung für den Einbaurahmen vorbereiten. Das Mindestvolumen des
Deckenzwischenraumes, die Mindestabstand zwischen den Heizungen, die
Mindestabstände von den Wänden und der Decke (*Tiefe der Deckenöffnung) müssen
eingehalten werden – siehe Tabelle, Abb.
2) Alle brennbaren Materialien sind aus der Deckenkonstruktion zu entfernen oder durch
nichtbrennbare zu ersetzen.
3) Um die Bauöffnung herum die Tragkonstruktion für den Einbaurahmen installieren oder
tragende Gewindestangen von 5 mm Durchmesser an die Deckenkonstruktion befestigen.
Die Tragkonstruktion des Rahmens/Die Gewindestangen ist/sind an die Decke so zu
befestigen, dass sie das Gewicht des zu installierenden Heizpaneels einschl. Einbaurahmen
tragen kann.
4) Den Einbaurahmen in die vorbereitete Bauöffnung schieben und mit Hilfe von
Senkkopfschrauben 5 mm an die Tragkonstruktion befestigen bzw. auf die
Gewindestangen einstecken und durch Muttern mit Unterlegscheiben sichern.
5) Die mit "1" gekennzeichneten Teile (Abb. 1) in den Seitenöffnungen des Paneels befestigen
(am von der Klemmleiste entfernteren Ende) und mit Schrauben sichern.
6) Das Paneel in den Einbaurahmen schieben, bis die beiden Rahmenzapfen in die Öffnungen
der mit "1" gekennzeichneten Teile einrasten (Abb. 2).
7) Das Stromversorgungskabel in die Klemmleiste durchziehen und das Paneel so einbauen,
dass die erste Rastklinke einrastet (Abb. 3).
8) Elektrischen Anschluss des Paneels durchführen – siehe Montageanleitung des Paneels.
9) Die Abdeckung der Klemmleiste aufsetzen.
10) Das Paneel im Einbaurahmen in waagrechte Position bringen (Rastklinke auf Position 2).
11) Durch leichtes Ziehen in Richtung Fußboden die richtige Befestigung des Paneels
überprüfen.
Zubehör für Installierung thermischen Schutzes (Seite 11)
1) Thermischer Schutz ist so anzubringen, dass durch die Öffnungen im Flansch die
Perforationen der Karosserie zu sehen sind.
2) Ihn in die perforierten Öffnungen mittels gelieferter Gewindeschneidschrauben
anschrauben
3) Den thermischen Schutz gemäß Abbildung schalten, die Gewindeschneidschrauben
natürlich mit einem Korrosionsschutz-Silikonkitt aufstreichen.
Page 6

6
Demontage des Paneels
1) Die Stromzufuhr zum Paneel unterbrechen.
2) Die Rastklinken des Paneels über die Öffnungen in der Abdeckung der Klemmleiste
mittels eines flachen Schraubendrehers lösen (Abb. 4).
3) Weiter in umgekehrter Reihenfolge zur Montage vorgehen.
* Empfohlener Mindestabstand zwecks Reduzierung der Wanderwärmung
beträgt 1000mm
Typ
Rahmenmaße
(mit Randleiste)
L x B x H
Öffnungsmaße
L x B x H*
Gesamtgewicht
(Paneel +
Rahmen)
Min. Raumbedarf
(Deckenzwischenraum)
pro Paneel
[mm]
[mm]
[kg]
[m3]
Ecosun S+ 18
1596 x 298 x 100
1570 x 260 x 400
16,5
3,7
Ecosun S+ 24
1596 x 298 x 100
1570 x 260 x 400
16,5
3,7
Page 7

7
Инструкция по монтажу
Утопленная рама Ecosun S+ 18 – 24
1) Подготовьте в потолке проём для утопленной рамы. Необходимо соблюдать
минимальный объем промежуточного перекрытия, минимальное расстояние между
панелями, минимальные расстояния между стенами и потолком (*глубину проема),
см. таблицу, рис.
2) Любые горючие материалы с конструкции потолка должны быть сняты или заменены
негорючими материалами.
3) По периметру проёма установите несущую конструкцию утопленной рамы или
прикрепите несущие стержни с резьбовой нарезкой диаметром 5мм к конструкции
потолка. Несущая конструкция/ стержни с резьбовой нарезкой в конструкции потолка
должны быть закреплены с таким расчетом, чтобы выдержали вес устанавливаемой
панели вместе с утопленной рамой.
4) В подготовленный проём вставьте утопленную раму и прикрепите ее к несущей
конструкции рамы при помощи шурупов диаметром 5мм с потайной головкой или
прикрепите раму к стержням с резьбовой нарезкой и зафиксируйте гайками с
шайбами.
5) Детали номер 1 (рис. 1) закрепите в боковые отверстия в панели (подальше от
клеммной сборки) и зафиксируйте гайками.
6) Вставьте панель в раму так, чтобы отверстия в деталях № 1 совпали с обеими
цапфами в раме (рис.2).
7) Протяните питающий провод в клеммную сборку и защелкните панель на первую
защелку держателя панели (рис. 3).
8) Подключите панель к электропроводке – см. руководство к панели.
9) Закройте крышку клеммной сборки.
10) Защелкните панель в раму (с соблюдением горизонтального положения), вторая
позиция защелки (рис. 4).
11) Убедитесь, что панель прихвачена правильно, слегка потянув ее вниз.
Принадлежности для установки термозащиты (страница 11)
1) Термозащита должна быть расположена так, чтобы через отверстия во фланце
было видно перфорирование в кузове
2) В отверстия перфорирования привинчиваем при помощи прилагаемых
саморезов
Page 8

8
3) Термозащиту присоединяем, как показано на рисунке, саморезы смазываем
силиконовой мастикой для предохранения от коррозии
Демонтаж панели
1) Выключите питающий провод панели!
2) Через отверстия в крышке клеммной сборки откиньте защелки панели при
помощи плоской отвертки (рис. 4).
3) Дальше действуйте в обратной последовательности действий при монтаже.
* рекомендуемое минимальное расстояние для предупреждения
нагревания стены - 1000 мм
Тип панели
Размер рамы
(с обрамлением)
Д x Ш x В
Размер проёма
Д x Ш x Г*
Общий вес
(панель + рама)
Мин. объем
промежуточного
перекрытия на
1комп. панели
[мм]
[мм]
[кг]
[м3]
Ecosun S+ 18
1596 x 298 x 100
1570 x 260 x 400
16,5
3,7
Ecosun S+ 24
1596 x 298 x 100
1570 x 260 x 400
16,5
3,7
Page 9

9
1)
2)
3)
Page 10

10
4)
Page 11

11
Page 12

12
Fenix s.r.o. Fenix Trading s.r.o.
Jaroslava Ježka 1338/18a, 790 01 Jeseník Slezská 2, 790 01 Jeseník
tel.: +420 584 495 442, fax: +420 584 495 431 tel.: +420 584 495 304, fax: +420 584 495 303
e-mail: fenix@fenixgroup.cz , http://www.fenixgroup.cz e-mail: fenix@fenixgroup.cz , http://www.fenixgroup.cz
 Loading...