

Fender Super-Sonic Twin, Super-Sonic 100 Head Owner's Manual

TWIN & 100 HEAD AMPLIFIERS
ENGLISH - PAGES . . . . . . . . . . .6-8
ESPAÑOL - PAGINAS . . . . . . . .9-11
FRANÇAIS - PAGES . . . . . . . . . .12-14
ITALIANO - PAGINE . . . . . . . . . 15-17
DEUTSCH - SEITEN . . . . . . . . . .18-20
PORTUGUÊS - PAGINA. . . . . . .21-23
IMPORTANT SAFETY INSTRUCTIONS
T he lightning flash wit h arrowhead symbol wit hin an equilateral triangle is i ntended to
alert the user to the presence of uninsulated “dangerous voltage” within the product’s
enclosure that may be of sufficient magnitude to constitute a risk of electric shock to
persons.
The exclamation point within an equilateral triangle is intended to alert the user to the
presence of important operating and maintenance (servicing) instructions in the
literature accompanying the produc t.
1) Read these instructions.
2) Keep th ese instruc tions.
3) Heed all warnings.
4) Follow a ll instruct ions.
5) Do not us e this apparatu s near water.
6) Clean onl y with dry cloth .
7) Do not bl ock any ventilati on openings. Ins tall in accordance w ith the manufac turer’s inst ructions.
8) Do not ins tall near any heat sou rces such as radiat ors, heat regis ters, stoves, or ot her apparatus (in cluding
amplifiers) that produce heat.
9) Do no t defeat the s afety pur pose of the po larized or gr ounding-t ype plug. A po larized plug h as two blade s
with one w ider than the other. A gro unding type plu g has two blades and a t hird grounding pro ng. The
wide blad e or the third pro ng are provide d for your safe ty. If the provi ded plug does n ot fit into your o utlet,
consult an e lectrician f or replacement of t he obsolete ou tlet.
10) Protec t the power cord f rom being walke d on or pinched p articula rly at plugs, conv enience recept acles and
the point w here they exit f rom the appara tus.
11) Only use at tachments/acce ssories spe cified by the m anufacture r.
12) Use only with the cart, stand, tripod, bracket, or table specified by the manufacturer
or sold with the apparatus. When a cart is used, use caution when moving the cart/
apparat us combination to a void injury fr om tip-over.
13) Unplug this ap paratus durin g lightning stor ms or when unuse d for long period s of time.
14) Refer all servicing to qualified service personnel. Servicing is required when the apparatus has been
damaged in any way, such as power-supply cord or plug is damaged, liquid has been spilled or objects have
fallen int o the apparatus, t he apparatus has b een exposed t o rain or moisture , does not operate n ormally,
or has been dropped.
15) To com pletely disconne ct this apparat us from the AC mains, d isconnect the p ower supply cord plu g from
the AC receptacle.
16) The mains plug o f the power supply c ord shall remain read ily operable.
17) WAR NING – To reduce the risk of fire or electric shock, do not expose this apparatus to rain or moisture.
18) Do not expo se this equipmen t to dripping or splas hing and ensure tha t no objects f illed with liquid s, such
as vases, are placed on the equipment.
19) Maintain at least 6 inches (15.25 cm) of unobstructed air space behind the unit to allow for proper
ventilat ion and cooling of th e unit.
20) CAUTION – For rack mounte d power amplifie rs, keep all wiring an d materials away fro m the sides of the
unit and all ow the unit to cool dow n for 2 minutes be fore pulling fro m a rack enclosur e.
21) Amplifi ers and loudsp eaker system s, and ear/headphon es (if equippe d) are capable o f producing ver y high
sound pre ssure levels whic h may cause tempor ary or permane nt hearing damage. Us e care when set ting
and adjus ting volume level s during use.
22) FCC COMPLIANCE N OTICE: This equi pment has been te sted and found to co mply with the limi ts for a Class
B digital device, pursuant to Part 15 of the FCC rules. These limits are designed to provide reasonable
protection against harmful interference in a residential installation. This equipment generates, uses and
can radia te radio frequ ency energy and i f not used in accor dance with the ins tructio ns, may cause harm ful
interference to radio communications and there is no guarantee that interference will not occur in a
particular installation. If this equipment does c ause harmful inter ference to radio or television reception,
which can be determined by turning the equipment off and on, the user is encouraged to try to correct
the interference by one or more of the following measures: reorient or relocate the receiving antenna,
increase the separation between the equipment and receiver, connect the equipment into an outlet on a
circuit d ifferen t from that of t he receiver. Con sult the dealer or an experi enced radio/ TV technic ian if help is
neede d with interf erence. NOTE: FMIC w ill not be respon sible for unaut horized equi pment modifi cations
that could v iolate FCC rules, an d/ or void produc t safety cer tificati ons.
23) WARNI NG – To maintain product safety, products with internal or external (battery pack) batteries:
•Batteries and/or the product in which they are installed, shall not be exposed to excessive heat such
as sunshine, fire or the like. •There may be a danger of explosion if the battery is incorrec tly connected/
replaced. Replace only with the same or equivalent type battery specified in the instructions or on the
product.
24) CAUTION – Unplug unit and allow i t to cool before t ouching/ replac ing vacuum tube s.
25) WARNI NG – Provide an ear thing conne ction befo re the mains plug is co nnected to t he mains. And, when
disconnecting the earthing connection, be sure to disconnect after pulling out the mains plug from the
mains.
26) Apparatus with CLASS I construction (grounded type with a three-prong plug) must be connected to a
MAINS soc ket outlet with a p rotective ear thing connec tion.
. . . . . . . . . . . . . 24-26
INSTRUCCIONES DE SEGURIDAD IMPORTANTES
E l relámpago con el símbol o de cabeza de f lecha dentro de un tr iángulo equilátero ti ene por objeto
alertar al usuario de la presencia de “voltaje peligroso” no aislado dentro del gabinete del
producto, que puede ser de magnitud suficiente como para constituir un riesgo de descarga
eléctr ica para las persona s.
El signo de admiración dentro de un triángulo equilátero tiene por objeto alertar al usuario a la
presencia de importantes instrucciones de operación y mantenimiento (servicio) en los
documento s que acompañan al produc to.
CONSIGNES DE SÉCURITÉ IMPORTANTES
Ce s ymbole avertit l'utili sateur de la présence d’une ten sion dangereuse non iso lée dans
le boîtier du produit, qui peut être suffisamment importante pour constituer un risque
d'électrocution.
Le s ymbole du point d’exclamat ion dans un triangle équ ilatéral avertit l’util isateur de la présence
d’instructions importantes relatives au fonctionnement et à l'entretien dans la documentation
qui accompagne le produit.
1) Lea e stas instrucciones.
2) Conser ve estas i nstrucci ones.
3) Atienda todas las adver tencias.
4) Siga todas las instrucciones.
5) No use este aparato cerc a del agua.
6) Limpie sólo con un paño seco.
7) N o bloquee ningún orif icio de ventilación. Inst ale de acuerdo con las instr ucciones del fabri cante.
8) No lo in stale cerca de ninguna fuente de calor, como radiadore s, registros de calef acción, estufas u otros
aparatos (in cluidos los amplific adores) que produzcan c alor.
9) No elimine el objet ivo de seguridad de la clavija p olarizada o con conexión a t ierra. Una clavija polariz ada
tiene dos hojas, una de ellas más ancha que la otra. Una clavija con conexión a tierra tiene dos hojas y
una tercera pata de tierra. La hoja ancha o la tercera pata se suministran para su seguridad. Si la clavija
suministrada no encaja en su enchufe, consulte a un electricista para que reemplace el enchufe obsoleto.
10) Proteja el cable de alimentación para que no sea pisado o pellizcado, especialmente en las clavijas,
receptácul os de conveniencia y en el punto en el que s alen del aparato.
11) Use únicame nte aditamentos o accesor ios especific ados por el fabrican te.
12) Úselo únicamente con el carrito, soporte, trípode, abrazadera o mesa especificados
por el fabricante o que se venden con el aparato. Cuando se use un carrito, sea
precavido al mover la combinación de carrito y aparato para evitar lesiones por
volcadura.
13) Desenchufe este aparato durante las tormentas eléctricas o cuando no se use durante períodos
prolongados de tiempo.
14) Refiera todo el servicio a personal cualificado. Se requiere servicio cuando el aparato se ha dañado de
cualquier forma, como si se dañan el cable de alimentación o la clavija, si se ha vertido un líquido o han
caíd o objeto s al inte rior del aparat o, si el apa rato ha e stado e xpue sto a la llu via o la hu medad, no func iona
normalment e o ha caído.
15) Para desconectar completamente este aparato de la red de CA, desconecte el cable de alimentación
eléctrica del receptáculo de CA.
16) La clavija elé ctrica del cable de ali mentación se mantendrá f ácilmente operativa.
17) ADVERTENCIA – Para reducir el riesgo de incendio o descarga eléctrica, no exponga este aparato a la
lluvia o la humedad.
18) No exponga este equipo a escurrimientos o salpicaduras, y asegúrese de que no se coloquen objetos
llenos de líquido, como jarrones, sobre el equipo.
19) M antenga al menos 6 pulga das (15.25 cm) de espacio de ventila ción sin obstru cciones detrá s de la unidad
para permitir su ventilación y enfriamiento adecuados.
20) PRECAUCIÓN – En el caso de amplificadores de potencia montados en anaqueles, conserve todo el
cableado y materiales alejados de los lados de la unidad y permita que la unidad se enfríe durante 2
minutos ante s de retirarla de un gabine te de anaquel.
21) Los amplificadores, sistemas de altavoces y auriculares (sea cual sea el dispositivo con el que esté
equipada la unidad) son capaces de producir niveles de presión sonora muy elevados que pueden llegar
a producir pr oblemas de sordera ta nto temporal como crónic a. Tenga mucho cui dado a la hora de ajustar
los niveles de volumen al usar este aparato.
22) Certificación de cumplimiento de la sección 15 de las normas FCC (para dispositivos digitales, según sea
aplicable en cada caso) - Sección 15.21: Los cambios o modificaciones que no hayan sido autorizados
expres amente y por escri to por la empresa re sponsable del cump limiento de estas n ormas pueden anular
la autor ización d el usuario p ara segui r utilizan do este apa rato. NOTA: El f abricante no será res ponsable d e
ninguna inter ferencia en radio o T V que sea producid a por modificac iones no autoriz adas en este aparato.
Tal tipo de modificaciones pueden anular la autorización del usuario para seguir utilizando este aparato.
23) ADVERTENCIA – Para mantener la seguridad de los productos con baterías internas o externas
(paquete de baterías): •Las baterías y el producto en el que están instaladas no deberán exponerse a
calor excesivo, como la luz del sol, fuego y similares. •Puede haber peligro de explosión si la batería se
conecta o reemplaza de modo incorrecto. Reemplácelas sólo con baterías del mismo tipo o equivalente
especi ficadas en las instru cciones o en el producto.
24) PRECAUCIÓN – Des conecte esta unidad de la corriente y esp ere un rato hasta que se ref rigere antes de
tocar / sus tituir las válvulas.
25) PRECAUCION – Antes de con ectar el cable de alim entación a la corriente e léctrica, cons iga una conexión
a tierra. Además, a la hora de desconectar esta toma de tierra, asegúrese de hacerlo después de haber
extraído el cable de alimentación del chasis.
26) Los dispositivos de CL ASE I (enchufe de tres bornes con toma de tierra) como e ste deben ser conect ados
a una salida de cor riente que disponga de una conexión de toma de tier ra de seguridad.
1) Lisez ces in structions.
2) Conservez ces ins tructions.
3) Respectez toutes les mises en g arde.
4) Suivez toutes les instructions.
5) N’utilisez pas cet appareil à proximité d’un point d ’eau.
6) Nettoyez-le uniquement avec un chiffon sec.
7) Ne bloquez pas le s ouvertures de venti lation. Installez l'appareil en sui vant les instruct ions du fabricant.
8) Ne l’ins tallez pas à proximité d ’une source de chaleur, comme un radia teur, un four ou tout autre appa reil
(incluant les am plificateurs) produ isant de la chaleur.
9) Ne modifiez pas la fiche polarisée (Canada) ou la mise à la terre. Les fiches polarisées possèdent deux
lames, dont l’une es t plus large que l’autre. Les fiche s avec mise à la terre possèdent deux broches plus
une br oche de terre. L a lame plu s large e t la terr e sont de s élémen ts de sé curit é. Si la fi che ne co rrespo nd
pas à votre prise secteur, contac tez un électric ien pour la faire remplacer.
10) Évitez de marcher sur le cordon secteur ou de le pincer, en particulier au niveau des fiches, des prises
secteu r et de l'embase de l’appareil.
11) Utilisez uni quement les pièces/access oires spécifié s par le fabricant.
12) Utilisez uniquement le chariot, le support, le trépied, la console ou la table spécifiés
par le fabricant ou vendus avec l’appareil. Lorsqu'un chariot est u tilisé, prenez toutes
les précau tions nécessaires p our éviter les chutes lor s du déplacement de l’ensemble
chariot-appareil.
13) Déconnec tez l’appareil pendant les o rages ou les longues pé riodes d'inutilisat ion.
14) Confiez toutes les réparations à un technicien qualifié. Vous devez faire contrôler cet appareil s'il a
été endommagé de quelque façon que ce soit, comme lorsque le cordon secteur ou les fiches sont
endommagé s, qu'un liquide ou des objet s se sont infiltré s dans l’appareil, qu'il a été exp osé à la pluie ou
l’humidité, q u'il a subi un choc o u qu'il ne fonctionne pa s normalement.
15) Pour déconnecter entièrement l’appareil du secteur (phase, neutre et terre), déconnectez la fiche du
cordon secteur de la prise.
16) La fiche du cordon secteur doit demeurer accessible en tout temps.
17) MISE EN GARDE – Pour réduire les r isques d’incendi e ou d'électrocut ion, n’exposez pas cet a ppareil aux
intempéries ou à l'humidité.
18) N’exposez p as cet appareil à l’humidité o u aux projections liqu ides. Ne posez pas de r écipient rempli de
liquide, tel qu'un vase, sur cet appareil.
19) Maintenez un espace d’au moins 15 cm (6 pouces) à l'arrière de l'appareil pour laisser circuler l’air et
permet tre une ventilation et un ref roidissement convenables.
20) ATT ENTI ON – Pour les amplificateurs de puissance montés en Rack, ne placez pas de câbles et
matériaux à proximité des côtés de l’appareil. Laissez l'appareil refroidir pendant 2 minutes avant de le
retirer du Rack.
21) Les amplificateurs, les haut-parleurs, les enceintes, les casques et écouteurs (selon le cas) peuvent
produire des niveaux sonores très élevés qui peuvent causer des dommages auditifs temporaires ou
permanents. Réglez le volume avec modération.
22) Norme fédérale US FCC Part 15 (pour les produits numériques répondant aux descriptions) - alinéa
15.21 : Les changements ou modifications non approuvées officiellement par l'organisation ou la
société responsable de la conformation à la norme peuvent annuler le droit de l'utilisateur à se servir
du produit. REMARQUE : le fabricant n'est pas responsable des interférences radio ou TV causées par
les modifications non-autorisées app ortées au matériel. Ces modifications peuvent annuler le droit de
l'utilisateur à se servir du produit.
23) MISE EN GARDE – Pour éviter d'endommager les produits munis de piles internes ou externes: •
Les piles et/ou le produit dans lequel elles sont installées ne doivent pas être exposés à une chaleur
excessive, comme les rayons du soleil, le feu, etc. • Il y a un risque d’explosion lorsque la pile n’est
pas correctement connectée/remplacée. Remplacez-la uniquement par une pile de type identique ou
équivalent, spécifié dans les instruc tions ou sur le produit.
24) ATTE NTI ON – Déconn ectez l'appareil du se cteur et laissez- le refroidir avant de t oucher ou de remplacer
les lampes.
25) ATTE NTIO N – Veuillez vous assurer que l'appareil soit mis à la terre avant de connecter la fiche
au secteur. De la même façon, assurez-vous que la terre soit déconnectée en dernier lorsque vous
déconnectez la prise du secteur.
26) Les équipements de CLASSE I (mis à la terre avec une fiche secteur à trois broches) doivent être
impérativement connectés à une prise SECTEUR avec ter re.

IMPORTANTI NORME DI SICUREZZA
Il simbolo del fulmine con la punta a freccia, racchiuso in un triangolo equilatero, avverte
l’utente della presenza di tensione pericolosa non isolata all’interno del prodotto, suf ficiente
a costitui re un rischio di shock elet trico per le persone.
WICHTIGE ANWEISUNGEN ZU IHRER SICHERHEIT
Das Symbol Blit z und Pfeil in eine m gleichseitig en Dreieck soll d en Benutzer vo r dem Vorhandensein
nicht isolierter „gefährlicher Spannung“ im Gehäuse des Produkts warnen, die möglicherweise
hoch genug ist, um ein Stromsc hlagrisiko darzuste llen.
Il punto esclamativo all’interno di un triangolo equilatero avvisa l’utente della presenza di
importanti istruzioni per il funzionamento e la manutenzione incluse nel materiale
informati vo che accompagna il prodot to.
1) Leggere queste istruzioni.
2) Conservare queste istruzioni.
3) Rispet tare tutte le avvertenze.
4) Se guire tutte le ist ruzioni.
5) Non usare questo app arecchio vicino all’acqua.
6) Pulire unicamente con un panno asciut to.
7) Non ostruire le prese di aeraz ione. Installare secondo le istruzioni f ornite dal costrut tore.
8) Non installare vicino a fonti di calore come caloriferi, diffusori di calore, stufe o altri dispositivi che
producono calore (inclusi gli am plificatori).
9) Non annullare la sicurezza garantita dalla sp ina polarizzata o con me ssa a terra. Le spine polar izzate
sono caratterizzate da due lamine, di cui una più grande dell’altra. Le spine con messa a terra
dispongo no di due lame e di un terzo p olo per la messa a ter ra. La lamina grande o i l terzo polo sono
contemplati per garantire la sicurezza. Se la spina del cavo fornito in dotazione non si adatta alla
presa, consultare un elettricista per sostituire la presa obsoleta.
10) Proteggere il cavo di alimentazione perché non venga calpestato, tirato o piegato, in particolare
vicino alla pre sa e al punto in cui il cavo esce dal dispositivo.
11) Us are solo accessori/componenti sp ecificati dal costruttore.
12) Usare solo carrelli, supporti, treppiedi, staffe o tavoli specificati dal costruttore o
venduti con l’appa recchio. Quando si usa un c arrello, fare atten zione nello spostar e la
combinazione carrello/apparecc hio per evitare lesioni c ausate dal ribaltamen to.
13) S collegare il dispositivo durante i temporali con fulmini o in caso di lung hi periodi di inutiliz zo.
14) Per l’assistenza tecnica rivolgersi sempre a personale qualificato. È necessaria l’assistenza quando
il dispositivo risulta danneggiato in qualunque modo (ad esempio: cavo di alimentazione o spina
danneggiat i, liquido versato o ogg etti caduti nel d ispositivo, disposi tivo esposto a pio ggia o umidità,
funzion amento non normale o dispo sitivo caduto).
15) Per scollegare completamente l’apparecchio dalla presa di rete CA togliere la spina del cavo di
alimentazi one dalla presa CA.
16) L a spina di rete del cavo di alimenta zione deve essere sempr e facilmente accessibile e operabile.
17) AVVE RTENZ A - Per ridurre il r ischio di incendio o di s hock elettri co, non esporre que sto apparecchio
alla pioggia o all’umidità.
18) Non esporre il dispositivo a sgocciolamenti o a spruzzi di alcun liquido ed assicurarsi che nessun
oggetto contenente liquidi, come vasi, venga collocato su di esso.
19) L asciare almeno 15 cm di spazio libero dietro al dispositivo per consentire una corretta aerazione e il
raffre ddamento dell'unità.
20) ATT ENZI ONE- Per gli amplificatori di potenza montati all'interno di un rack, mantenere tut ti i cavi
e gli oggetti lontano dai fianchi laterali del dispositivo e, prima di estrarlo dal rack-case, lasciarlo
raff reddare per 2 minuti.
21) Gli amplificatori, i sistemi di altoparlanti e le cuffie/dispositivi in-ear (se presenti) possono
generare livelli audio con un'elevata pressione sonora, in grado di causare danni temporanei o
permanen ti all'udito. Quindi, durant e l'uso è opportuno p restare molta at tenzione nell'imp ostazione
e regolazio ne dei livelli di volume.
22) Dichiarazione di Conformità FCC Parte 15 (per prodotti digitali, se applicabile) Parte 15.21: Le modifiche non espressamente approvate dalla parte responsabile alla conformità
può annullare l'autorità dell'utente di operare con il dispositivo. NOTA: Il costruttore non è da
ritenersi responsabile per qualsiasi interferenza radio o TV causata da modifiche non autorizzate
del dispositivo in oggetto. Tali modifiche possono annullare l'autorità dell'utente di operare con il
dispositivo.
23) AVVE RTENZ A – Per preservare la sicurezza dell'unità, prodotti con batterie interne o esterne
(batter y-pack): • Le batteri e e/o il prodotto in cui ques te sono installate non de vono essere espos ti a
calore eccessivo, come luce solare, fuoco o simili. • Se la batteria viene collegata/sostituita in modo
non corretto può sussistere il rischio di esplosione. Sostituire solo con batterie dello stesso tipo o
equivalente, co me specificato nelle istruzioni o su l prodotto.
24) CAUTELA - Prima di toccare/sos tituire le valvole, disconn ettere l'unità e lasciarla r affreddare.
25) ATTE NZIO NE – Prima di collegare la spina alla rete elettrica, assicurarsi che la presa disponga
di messa a terra. Inoltre, nel disconnettere la connessione con messa a terra, assicurarsi di aver
precedentemente scollegato la spina dalla rete elettrica.
26) Gli apparati in CLASSE I (con messa a terra mediante spina a tre-poli) devono essere collegati alla
presa di cor rente elettrica tr amite una connessione protettiva con mes sa a terra.
Das Ausrufezeichen in einem gleichseitigen Dreieck soll den Benutzer auf wichtige Bedienungsund Wartungsanweisungen (Serviceanweisungen) in den dem Produkt beiliegenden Broschüren
aufmerksam machen.
1) Lesen Sie dies e Anweisungen.
2) Bewahren Sie die se Anweisungen auf.
3) Beachten Sie alle Warnhinweise.
4) Befolgen Sie alle Anweisungen.
5) Benutzen Sie die Vorrichtung nie in der Nähe von Wasser.
6) Nur mit trockenem Tuch reinigen.
7) Belüf tungsöffnungen nicht blockie ren. Den Anweisungen des Herstellers ent sprechend installie ren.
8) Installier en Sie die Vorrichtung nicht in de r Nähe von Wärmequellen wie Ra diatoren, Heizkörpern, H erden
oder andere n Geräten (insbesonde re Verstär kern), die Wärme er zeugen.
9) Achten Sie darauf, den Sicherheitszweck des verpolungssicheren oder geerdeten Steckers nicht zu
umgehen. Ein ve rpolungssicher er Stecker ist mit z wei flachen Stif ten ausgesta ttet, von denen ei ner breiter
ist als der and ere. Ein geerdeter Ste cker ist mit zwei Sti ften und einer Erdb uchse ausgest attet. Der breit ere
Stift oder die Erdbuchse dienen Ihrer Sicherheit. Sollte der mitgelieferter Stecker nicht in Ihre Steckdose
passen, wend en Sie sich zum Austausch der veralteten Steckdose an einen Elektr iker.
10) Schützen Sie das Stromkabel davor, dass darauf getreten oder dass es besonders am Stecker, an
Steckerleisten oder an der Aus trittsstelle aus dem Gerät gekni ckt wird.
11) Verwenden Sie nur vom Hersteller zugelassenes Zu behör.
12) Benutzen Sie das Gerät nur mit den vom Hersteller festgelegten oder gemeinsam mit
dem Gerät verkauften Wagen, Ständern, Stativen, Halterungen oder Tischen. Achten
Sie bei Benut zung eines Wagens da rauf, dass das gemeins am mit dem Wagen bewegte
Gerät nicht k ippt und zu Verletzung en führt.
13) Ziehen Si e bei Gewittern oder bei längeren Stillst andzeiten den Netzstecker des Geräts.
14) Überlassen Sie alle Wartungsarbeiten qualifiziertem Personal. Ein Service wird erforderlich, wenn das
Gerät in irg endeiner Weise besc hädigt wurde, beis pielsweise bei Be schädigung des N etzstecke rs oder des
Netzka bels, wenn Flüssigkeiten über das G erät vergossen wurden od er Gegenstände in das G erät gefallen
sind, das Gerät Regen oder Feuchtigkeit ausgesetzt war, nicht ordnungsgemäß funktioniert oder fallen
gelassen wurde,
15) Ziehen Sie den Netzstecker aus der Steckdose, um das Gerät vollständig vom Wechselstromnetz zu
trennen.
16) Der Ne tzstecker des N etzkabels muss jederzeit betr iebsbereit sein.
17) WARNHINWEIS: Um die Gefahr vom Feuer oder Stromschlag zu vermeiden, darf das Gerät nicht Regen
oder Feuchtigkeit ausgesetzt werden.
18) La ssen Sie nicht zu, dass Flü ssigkeiten auf das Gerät t ropfen oder gespr itzt werden könn en, und achten Sie
darauf, dass kein e mit Wasser gefüllten Ge genstände wie Vasen auf da s Gerät gestellt werden.
19) Achten Sie auf mindestens 15 cm Abstand hinter dem Gerät für die ungehinderte Luftzirkulation und
Kühlung des Ge räts.
20) VORSICHT: Bei in Regalen (Racks) montierten Verstärkern ist die gesamte Verkabelung und sämtliches
Material von den Seiten des Gerätes fernzuhalten; lassen Sie das Gerät vor Entnahme aus dem Rack z wei
Minuten lang abkühlen.
21) Verstärker, Lautsprechersysteme und Ohr/Kopfhörer (falls getragen) können sehr hohe Schalldruckpegel
erzeugen und dadurch vorübergehende oder dauerhafte Hörschäden verursachen. Gehen Sie vorsichtig
vor, wenn Sie während des Betriebs die L autstärkepegel einstellen oder nachregeln.
22) FCC Konformitätserklärung Teil 15 (für Digitalprodukte, nach Anwendbarkeit) - Teil 15.21: Änderungen
oder Modif ikationen, die nic ht ausdrücklich v on der für die Konfor mität verantwo rtlichen Stelle ge nehmigt
wurden, können zu einem Betriebsverbot führen. HINWEIS: Der Hersteller ist nicht verantwortlich für
Radio- oder TV-Interferenzen, die durch unautorisierte Modifikationen an diesem Gerät verursacht
werden. Derartige Modifikationen können zu einem Betriebsverbot führen.
23) WARNHINWEIS: Zur Aufrechterhaltung der Sicherheit von mit internen oder externen Batterien
(Akkumulatoren) betriebenen Produkten ist folgendes zu beachten: • Die Batterien sowie das Produkt,
in dem sie installiert sind, dürfen keiner übermäßigen Hitze (durch Sonneneinstrahlung, Feuer usw.)
ausgesetzt werden. • Bei unsachgemäßem Anschluss/Austausch der Batterien besteht Explosionsgef ahr.
Der Austausch darf nur mit Batterien des gleichen oder gleichwertigen Typs erfolgen, der in den
Anweisungen oder am Produkt angegeben ist.
24) VORSICHT – Ziehen Sie den Net zstecker und lasse n Sie das Gerät abkühlen, bevor Si e die Vakuumröhren
berühren/ersetzen.
25) VORSICHT – Stellen Sie einen Erdungsanschluss her, bevor Sie den Netzstecker in die Netzsteckdose
stecken. Unt erbrechen Sie den E rdungsanschlu ss erst, nachd em Sie den Netzs tecker aus der Net zsteckdo se
gezogen haben.
26) CLASS I Geräte (geerdet mit einem 3-Stift Stecker) müssen an eine Netzsteckdose mit Schutzerde
angeschl ossen werden.
INSTRUÇÕES DE SEGURANÇA IMPORTANTES
O r elâmpago com símbolo de cab eça de flecha den tro de um triângulo equiláte ro destina-se a
alertar o utilizador para a presença de “tensão perigosa” dentro da es trutura do produto que
pode ter mag nitude suficien te para representa r um risco de choque elé ctrico para as pe ssoas.
安全にご使用いただくために
二等辺三角形の中の矢印のついた稲妻の閃光のシンボルは、人に電気ショ
ックを与えるに十 分な、絶縁されていない「高電圧の危険 」が製品のケース
内にあることを警告するものです。
O ponto de exc lamação dentro do tr iângulo equilátero des tina-se a alert ar o utilizador para a
presença de instruções de funcionamento e manutenção (assistência técnica) na
document ação que acompanha o pro duto.
1) Leia estas instruções.
2) Guarde estas instruções.
3) Cumpra todas as adver tências.
4) Siga todas as instruções.
5) Não utilize es te aparelho próximo de águ a.
6) Limpe apenas co m um pano seco.
7) Não bloquei e quaisquer orifíc ios de ventilação. Instale de acordo com as instruções do fabricante.
8) Não instale próximo de fontes de calor, tais como radiadores, saídas de ar quente, fogões ou outros
aparelhos (in cluindo amplifica dores) que produzam c alor.
9) Não anule a finalidade de segurança da ficha polarizada ou de ligação à terra. Uma ficha polarizada
possui duas lâ minas, sendo uma delas mais la rga do que a outra. Uma fic ha de ligação à terra pos sui
duas lâminas e um ter ceira ponta de ligação à te rra. A lâmina larga ou a terceira p onta são fornec idas
para sua segurança. Se a ficha fornecida não couber na sua tomada, consulte um electricista para
substituir a tomada obsoleta.
10) Proteja o cabo de alimentação eléctrica do aparelho para que não seja pisado ou dobrado
especia lmente nas fichas, nos r eceptáculos ou no pon to onde o cabo sai do apare lho.
11) Util ize apenas acessór ios/peças esp ecificados p elo fabricante.
12) Utilize o aparelho apenas com o carrinho, suporte, tripé ou mesa especificados
pelo fabricante ou vendidos com o aparelho. Quando utilizar um carrinho, tenha
cuidado ao deslocar a combinação carrinho/aparelho para evitar ferimentos
provocados por uma possível queda.
13) Desligue este aparelho durante trovoadas ou quando não for utilizá-lo por um
longo período de tempo.
14) Solicite todas as reparações a pessoal de assistência qualificado. É necessária assistência técnica
quando o apar elhos se tiver danifi cado de alguma forma com o, por exemplo, o cabo de ali mentação
ou a ficha estão danificados, foram derramados líquidos ou caíram objectos para dentro do aparelho,
o aparelho esteve exposto a chuva ou humidade, o aparelho não funciona normalmente ou sofreu
uma queda.
15) Para desligar por completo este aparelho da corrente eléctrica de CA, desligue a ficha do cabo de
alimentaç ão do receptáculo de CA .
16) A fic ha eléctrica do c abo de alimentação ir á permanecer pront a a funcionar.
17) ADVERTÊNCIA – Para re duzir o risco de incênd io ou choque eléct rico, não exponha es te aparelho a
chuva ou humi dade.
18) Não ex ponha este equipam ento a gotejamento ou salpicos e ce rtifique-s e de que não são colocado s
objecto s com líquidos, tais como jarr as, sobre o equipamento.
19) Mantenha desobstruído pelo menos 15,25 cm de espaço por trás da unidade para que a unidade
disponha de ventilação e arrefecimento adequados.
20) CUIDADO – Para amplificadores montados numa estante, mantenha todas as ligações eléctricas
e materiais afastados das partes laterais da unidade e deixe a unidade arrefecer durante 2 minutos
antes de ret irar de uma estante.
21) Amplificadores, sistemas de alto-falantes, e fones de ouvido (se equipado) são capazes de
produzir níveis de pressão de som muito altos que podem causar lesões auditivas temporárias ou
permanente s. Seja cauteloso ao conf igurar e ajustar os níve is de volume durante o uso.
22) FCC parte 15 Indicação de Conformidade (para produtos digitais, como aplicável) – Parte 15.21:
Mudanças ou modificações não aprovadas por parte da responsável pela conformidade, poderia
causar que o usuário não tenha mais a autoridade de manusear o equipamento. NOTA: O fabricante
não está responsável por qualquer interferência de radio ou televisão causada por modificações
deste eq uipamento. Tais modifica ções pode fazer com qu e o usuário não tenha mais a aut oridade de
manuseá-lo.
23) ADVERTÊNCIA – Para manter a segurança do produto, no caso de produtos com pilhas (conjunto
de pilhas) internas ou externas: • As pilhas e/ou o produto no qual estão instaladas, não devem ser
expos tos a temperaturas e xcessivas, tal como a luz s olar directa, fo go, ou temperaturas se melhantes.
• Pode exis tir um risco de explos ão se a pilha estiver ligada/colocada de forma in correcta. Subst itua
apenas por pilhas de tipo equivalente ou idêntico ao especificado nas instruções ou no produto.
24) AVIS O – Desconec te a unidade e permite -o de resfriar-s e antes tocar ou troc ar as válvulas de vácuo.
25) AVIS O – Providencie uma conexão terra antes de ligar seu aparelho à tomada. E, quando estiver
desconectando o terra, certifique-se de ter desconectado antes de puxar o fio ligado à corrente
elétrica.
26) A aparelhagem com constr uçãoCLASS I (tipo ter ra com um plugue de 3 pinos) deve se r conectado a
uma tomada elé tricaMAINScom uma con exão terra de proteç ão.
二等辺三角形の中の感嘆符合は、重要な操作方法およびメンテナンス方法
の記述が製品に付属の説明書にあることを示します。
1) 以下の説明をお読みください。
2) 本説明書を保存してください。
3) 警 告にはすべて注意してください。
4)使用方法にはすべて従ってください。
5)本装置は水の近くでは使用しないでください。
6) 清掃は、乾いた布でのみ行ってください。
7) 通気孔はふさがないでください。製造元の手順書に従って設置してください。
8) ラジエーター、ヒート レジスター、調理用コンロ、音響用アンプリファイア等の、
熱を発する機器の近くには設置しないでください。
9) 極 性プラグや接地プラグの安全機能を妨げ ないようにしてください。極性プラグ
は二つのブレードの一方が他方より幅広くなっています。接地型プラグには、二つ
のブレードに加 えて接地プロングがあります。幅の広いブレードまたは3番目のプ
ロングは、安全用です。プラグがコンセントに合わな いときは、電気技師に相談し
て旧式のコンセントを付け替えてください。
10) 電源コードが踏まれたり、特にプラグ、便利レセプタクル、または装置から出てくる
箇所でねじれないように保護してください。
11) メーカー指定の付 属品 /アクセサリーの みを 使 用してください。
12) カード、スタンド、三脚、ブラケット、テーブルは、メーカー指定の
もの、または装置と共に販売されているもののみを使用してくださ
い。カートをご使用の場合は、カートと装置を一緒に移動させると
き、転倒によって怪我をされないようご注意ください。
13) 稲妻が光っている間、また長期間ご使 用にならないときは、本装置の電源をプラ
グから抜いてください。
14) メンテナンスは すべて、資格のあるメンテナン スサービス要員に依頼してくださ
い。メンテナンスは装置が何らかの形で損傷した場合、例えば次のような場合に
必要となります: 電源コードまたはプラグが損傷した場合、装置の中に液体が
こぼれて入ったり、ものが落ちて入ったりした場合、装置が雨や湿気にさらされた
場合、装置が正常に動作しない場合、装置を落とした場合。
15) 本装置をAC主電源から完全に切り離すには、電源コードのプラグをACコンセン
トから 抜いてください。
16) 電源コードの電源プラグは、常に操作可能な状態にしておいてください。
17) 警告−火災や電気ショックの危険を減らすため、本装置を雨や湿気にさらさない
ようにしてくださ い。
18) 本装置を水のしずくや水はねにさらさないでください。また、花瓶などの水の入っ
たものは本装置の上には絶対に置かないようにしてください。
19) 本装置ユニットの適 切な通気および冷 却のため、その背後に少なくとも 15.5 cm
のスペースを確保し、そこには さえぎ るようなものは 置 かないようにしてくださ
い。
20) 注意−ラックに搭載したパワーアンプリファイアの場合は、配線その他をユニッ
トの側 面から離しておいてください。また、ラックのケースからユニットを取り出す
前にユニットを2分間冷却させてください。
21) アンプリファイヤー、ラウドスピーカーシステムとイヤフォン/ヘッドフォン(必要な
場合)は、非常に大きな音圧レベルを生成し、一時的または恒久的な聴覚のダメ
ージの原因となる場合があります。使用中のボリューム•レベルの設定と調整には
注意が必要です。
22) FCCPart15適合宣言(デジタル製品、規定の通り)‒Part15.21:順守の責任を持つ
団体によって明示的に許可されていない変更や改造は、ユー ザー の機 器 を操 作 す
る権限を無効にする場合があります。注意: 製造者は機器に施された未認証の改
造によって引き起こされた、あらゆるラジオまたはテレビの障害については、責任
を有しません。この種の改造はユーザーの機器を操作する権限を無効にする場合
があります。
23) 警告−安全確保のため、バッテリーを 内 臓した 、または外部バッテリー(バッテリ
ーパック)を使用した製品をご使用の際は、次のことにご注意ください: * バ
ッテリーおよび/またはバッテリーが入った製品は、太陽光線、火、等の過度の熱
にはさらさないでください。* バッテリーの接続/交換方法を誤ると、爆発の危
険性があります。交換するときは、説明書または製品上に記載されたものと同じ
か、同等の種類のバッテリーのみを使用してください。
24) 注意 ‒ 真空管に触る/交換する前に、製品をコンセントから抜き冷却させてくださ
い。
25) 警告:電源に電源プラグを差し込む前に、接地されている接続を提供してくださ
い。また、接地されている接続を切断する場合は、 電源から電源プラグを抜いて
から接地を切断してください。
26) クラス I 構造の機器(3 本プロングのプラグを持つ接地型)は、保護用接
地接続を持つ電源コンセントに接続する必要があります。
fender.com
6
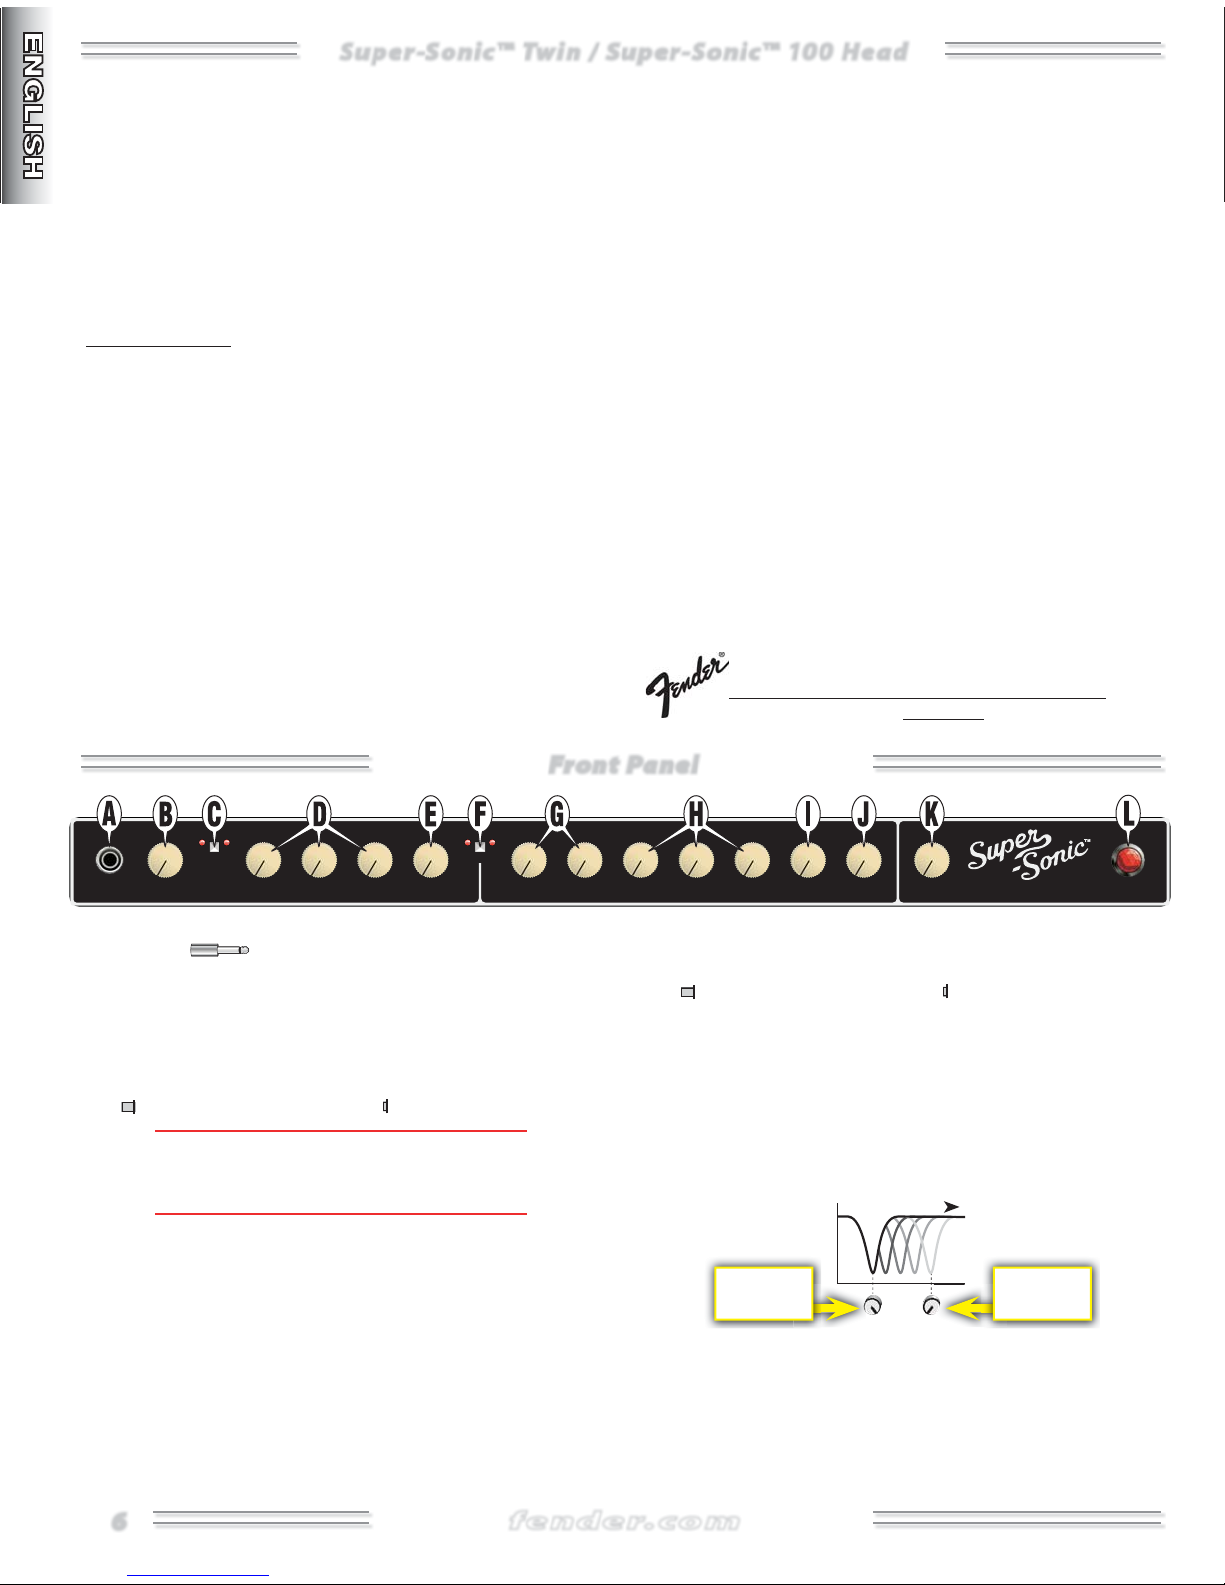
Front Panel
Super-Sonic™ Twin / Super-Sonic™ 100 Head
Super-Sonic™ Twin / Super-Sonic™ 100 Head
Super Sonic amplifiers are designed for guitarists who want to create unmistakable Fender clean tones and expressive modern highgain tones…with one no-nonsense tube amp. The VINTAGE channel
delivers tones based on legendary Fender favorites, and the BURN
channel ignites musical inspiration with overdrive flavors from bluesy
to flame-throwing. The Super-Sonic amp is capable of modern highgain overdrive and sustain, but these characteristics can be fine tuned
without masking the tonal character of YOUR guitar. The Super-Sonic
Twin and 100 Head also contain impressive extras like Arena/Club
switch, Damping control, and all-new Fender Automatic Bias control.
Features include:
• 100 Watts from four 6L6 output tubes
• ARENA/CLUB switch provides selectable 100 Watt or 25 Watt
output
• Seven 12AX7 preamp tubes & two 12AT7 tubes
• VINTAGE channel contains pre-gain tone controls and two
different switchable voices:
• Shimmering clean tone derived from vintage Fender Twin
Reverb® and Showman® amplifiers
• Fat, punchy tone reminiscent of 1960s Bassman® amplifiers
• Pre and Master Volume controls can be set for pure clean or
slightly overdriven tones
• BURN channel allows tonal experimentation with post-gain EQ
and two-stage cascading preamp controls:
• GAIN 1 provides edgy breakup and distortion
• GAIN 2 adds compression, thickness, and sustain
• NOTCH TUNE lets you move the midrange notch for a variety of
American and British flavors
• Tube-driven Fender long-spring Reverb by Accutronics®
• Professional FX loop with level control; may also be used as a
footswitchable boost
• Choice of classic Black/Silver or iconic 1961 Blonde/Oxblood
cosmetic treatment
• Cover and 4-button pedalboard-friendly footswitch included
• 5-year limited transferable warranty (US and Canada; other
territories may vary)
• Fender Automatic Bias (patent pending) lets you easily set your
output tubes to the recommended factory setting without meter
or tools. Bias may be set “hotter” or “cooler” if desired, and almost
any mix of 6L6 tubes will work.
• DAMPING control (on rear panel) lets you select Normal, Loose, or
Tight speaker response
• Custom transformers by Schumacher
• Super-Sonic Twin contains two premium 12” Celestion® Vintage 30
speakers
• Super-Sonic 100 Head matches Super-Sonic 100 412 Straight and
Slant enclosures
The World's Most Popular Instrument Amplifiers...
Since 1946
Front Panel
56
VINTAGE/BURN
56
4
4
7
3
3
8
2
2
9
10
1
1
INPUT
56
4
7
SHOWMAN
3
8
2
9
10
1
GAIN
56
4
4
/
BASSMAN
3
2
10
1
TREBLE
7
7
8
9
3
3
8
2
9
10
1
BASS
4
4
2
10
1
MID VOLUME GAIN 1 GAIN 2
7
7
3
8
8
2
9
9
10
1
56
56
56
A. INPUT — Plug your guitar in here.
B. GAIN Adjusts the input signal level of the VINTAGE channel. Use
together with VOLUME {E} to control the loudness of the VINTAGE
channel. Set to maximum for moderate overdrive.
C. TWIN REVERB® OR SHOWMAN® / BASSMAN ® — Selects the amplifier
circuitry of the VINTAGE channel, as indicated by the LEDs.
TWIN REVERB / SHOWMAN BASSMAN
The TWIN REVERB / SHOWMAN setting provides a Fender Blackface™
♫
vintage amplifier voicing and the BASSMAN setting provides a Fender
Tweed vintage amplifier voicing.
D. TREBLE / BASS / MID — Adjusts the tonal character of the VINTAGE
channel.
E. VOLUME — Adjusts the overall loudness of the amplifier when the
VINTAGE channel is active. When set to maximum, the GAIN {B} control
acts as a single volume control, similar to those on vintage Fender
amplifiers.
56
56
56
56
7
4
7
3
3
8
8
2
9
1
TREBLE
9
10
10
4
4
7
8
2
9
10
1
BASS
7
3
8
2
9
10
1
MID NOTCH TUNE
4
3
2
1
56
4
7
3
8
2
9
10
1
VOLUME
56
4
7
8
9
10
3
2
1
REVERB
7
8
9
10
FENDER MUSICAL INSTRUMENTS
F. VINTAGE / BURN — Selects the active channel as indicated by the
LEDs.
VINTAGE Channel BURN Channel
G. GAIN / GAIN — Primary and secondary adjustments for distortion
and sustain of the BURN channel. Use together with VOLUME {J} to
control the loudness of the BURN channel.
H. TREBLE / BASS / MID Adjusts the tonal character of the BURN chan-
nel.
I. NOTCH TUNE Use to move the midrange (MID) notch for a variety
of American and British tonal flavors.
FREQUENCY
Tre ble
Emphasis
Bass
Emphasis
J. VOLUME — Adjusts the overall loudness of the amplifier when the
BURN channel is active.
6
K. REVERB — Adjusts the Reverb level for both channels.
L. POWER IN DICATOR Illuminates when the unit is ON.
7
fender.com
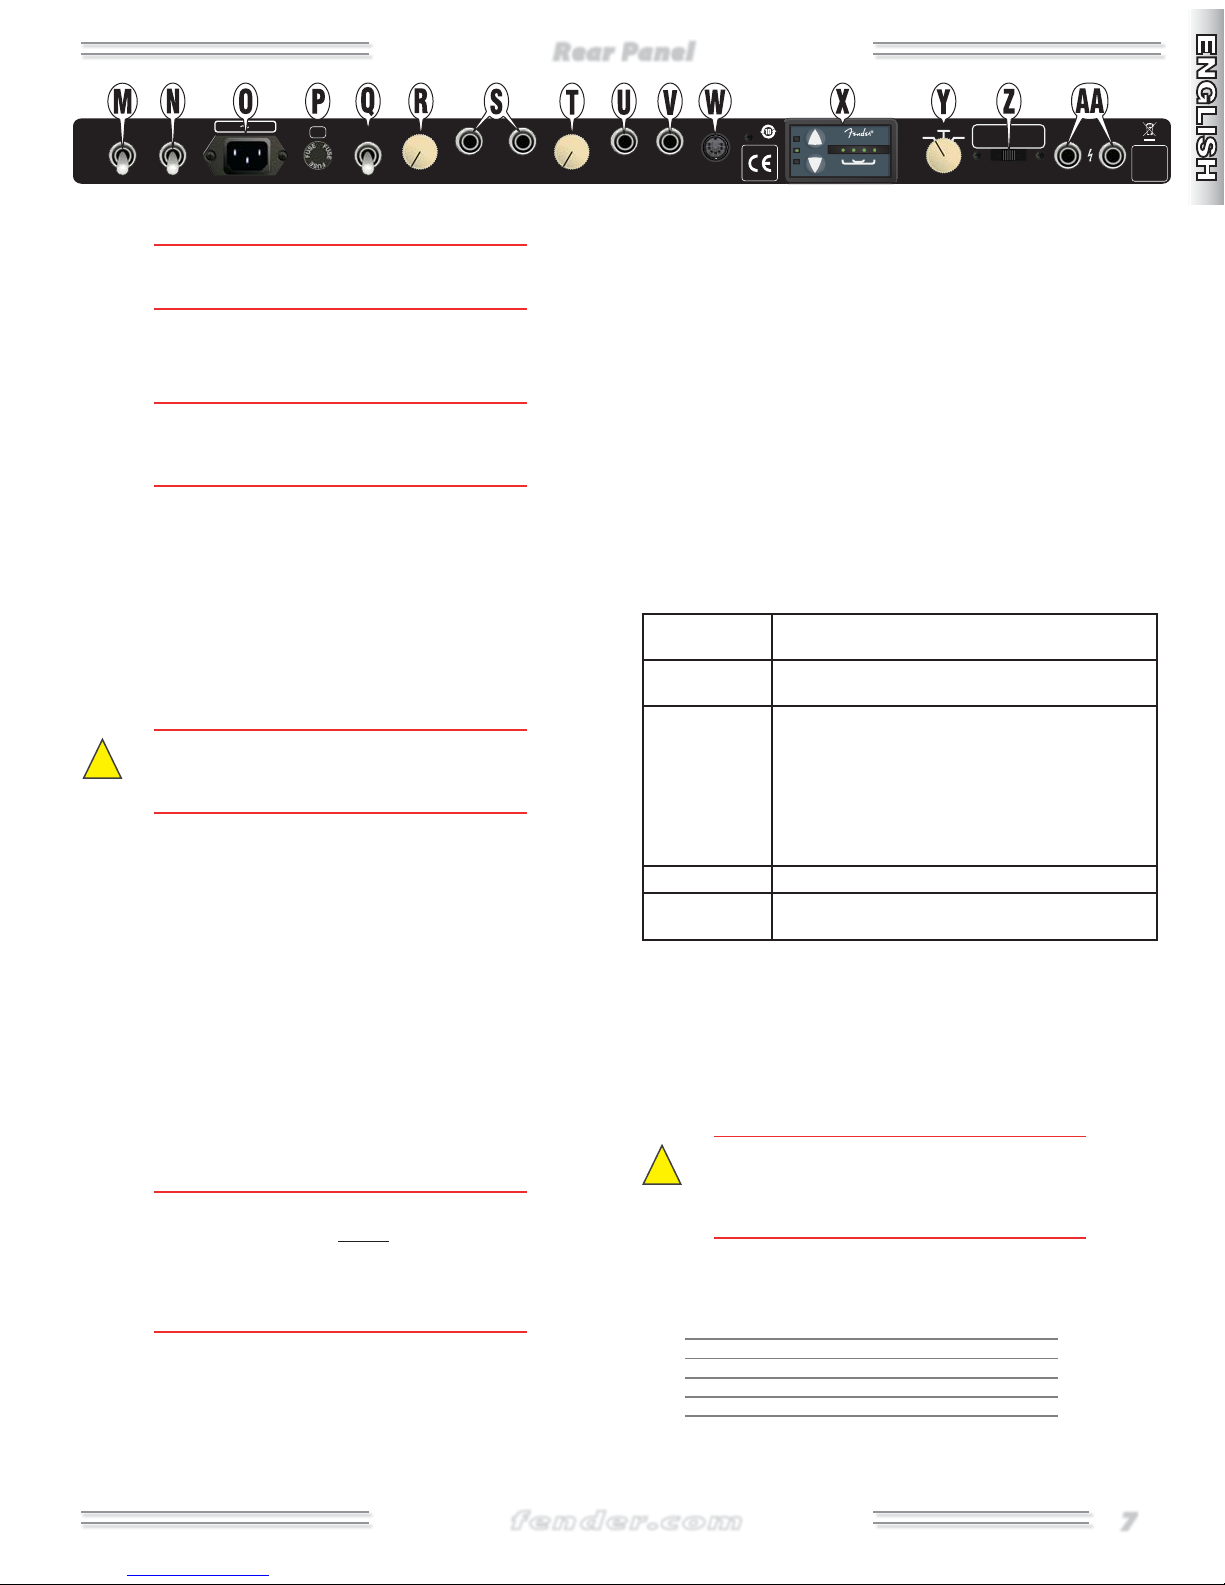
Rear Panel
Rear Panel
TYPE: PR 903
ON
OFF
POWER STANDBY
INPUT
POWER
V Hz
325W
FUSE
4A L
ARENA
250V
SEND RETURN
MIN MAX MIN MAX
SEND LEVEL RETURN LEVEL
CLUB
M. PO WER Switches the unit on-off.
You can extend the life of the amplifier tubes by keeping the STANDBY
♫
{N} switch down for 60 seconds when you first switch on the power.
N. STANDBY — In standby, the amplifier outputs are disabled while
power is supplied to the tube filaments only, keeping them warm and
ready to play.
Use STANDBY instead of switching the power off during short breaks
♫
to extend tube life span and to avoid the tube warm-up delay upon
returning to play the amp.
O. IEC POWER INPUT SOCKET Connect to a grounded outlet using the
supplied power cord in accordance with the voltage and frequency
specifications shown on the rear panel of your amplifier.
P. FUSE Protects the amplifier from electrical faults. Only replace a
blown fuse with the type and rating specified on the rear panel of
your amplifier.
Q. ARENA / CLUB Select ARENA for maximum power output (W)
when playing larger venues. Select CLUB for lower power output (W)
when playing smaller venues or recording.
It is recommended that you change the position of the ARENA/CLUB
!
switch only when the amplifier is OFF or in STANDBY to reduce stress
on the tubes and to extend tube life span.
R. SEND LEV EL Adjusts the output level of the SEND {S} jack. Use to
accommodate the input sensitivity of your external effects device.
S. SEND / RETURN These effects loop jacks have been tested and
found compatible with instrument-level stomp boxes and line-level
effects processors. Connect SEND to your effects device input and
RETURN to the effects output.
To set the Effect Loop "Unity Gain Level" (so the effects loop volume
level equals the volume with the effects loop disabled):
1. Start with the SEND LEVEL {R} at maximum and the RETURN LEVEL {T} at
minimum.
2. If any distortion is noted with the effects processor, reduce the SEND
LEVEL (and/or the processor's input level control) until the distortion is
no longer present).
3. Then increase the RETURN LEVEL (and/or the processor's output level
control) so the effects loop output is at unity gain (or to your preference).
The Effects Loop button on the footswitch can be configured as a
switchable lead volume boost without effects by simply connecting
♫
SEND to RETURN with an instrument cable. The effects loop will
provide an additional 12dB gain when both SEND LEVEL {R} and
RETURN LEVEL {T} are set to maximum. Lower the RETURN LEVEL for
less boost if preferred.
T. R ETURN LEVEL Adjusts the RETURN {S} jack input level going into
the power amp. Use to match the volume level of the amp when
effects are off, or to set an alternate volume level selectable from the
footswitch.
SERIAL NUMBER
PRE AMP
OUT
POWER AMP
IN
FOOT SWITCH
WARM
NORMAL
COOL
ADJUST
AUTOMATIC BIAS
2A 1A 1B 2B
OUTPUT TUBE STATUS
PATENT PENDING
NORMAL
LOOSE TIGHT
DAMPING CONTROL
4Ω 8Ω 16Ω
IMPEDANCE
PARALLEL SPEAKER OUTPUTS
4Ω min TOTAL
100W
MAIN
SPEAKER
U. PRE AMP OUT — An unbalanced, line-level output (includes Reverb).
V. POWER AMP IN — A direct input to the power amplifier. The preamp
circuit is automatically disconnected when a plug is inserted into this
jack.
W. FOOTSW ITCH Connect the included -button footswitch to enable
remote selection of: Amp Voicing {C}, Channel {F}, Reverb and FX
Loop Bypass. NOTE: The front panel push buttons are disabled when the
footswitch is connected.
X. AUTOMATIC BIA S Select the desired tube bias temperature
(WARM/NORMAL/COOL) using the up and down arrows, after the
amplifier has warmed up (at least one minute). The amplifier will
remember your last setting the next time you switch the unit on.
NOTE: Press the up and down arrows simultaneously for one second to
restore factory automatic bias settings.
The OUTPUT TUBE STATUS indicator LEDs will display the following
information depending on the status of each tube:
LEDs scan left
to right:
LED is solid
green:
LED is blinking
green:
The amplifier is warming up (takes approximately 1
minute).
The tube is OK and the bias matches the selected bias
temperature (WARM/NORMAL/COOL).
The tube bias does not match the selected bias temperature. This may happen for individual tubes from time
to time while the automatic bias system is adjusting the
bias. It usually will take less than 20 seconds to reach to
the target bias and for the LED to go back to solid green.
If the LED continues to blink after 5 minutes, its bias setting is beyond the range of the automatic bias and this
tube should be replaced.
LED is red: The tube has failed or is missing.
LED is orange:
The tube has shutdown. A tube may shutdown when the
other tube in the pair (1A/1B) or (2A/2B) is bad or missing.
Y. DAMPING CONTROL — Use to select a "looser" or "tighter" response
from the speakers. Damping is the interaction of the tube power amp
with the speakers.
Z. IMPEDANCE SELECTOR — Select the speaker output impedance that
matches the total impedance load of the speaker configuration you
have chosen from the table below {AA}.
AA. MAIN SPEAKER / EXTERNAL SPEAKER
A speaker must ALWAYS be connected to the MAIN SPEAKER jack
!
when the amplifier is ON or damage may occur to the unit. Switch the
amplifier OFF or to STANDBY while changing speaker connections or
impedance settings.
Connect speaker enclosures and set the IMPEDANCE SELECTOR {Z}
according to the table below.
MAIN EXTERNAL IMPEDANCE
SPEAKER SPEAKER SELECTOR
Ω + None = Ω
Ω + Ω = Ω
Ω + None = Ω
Ω + Ω = Ω
Ω + None = Ω
EXTERNAL
SPEAKER
7

Specifications
BURN Channel Suggested Settings
BURN Channel Suggested Settings
fender.com
8
Big Rock
Strat Cat
Bronto-Sonic
Tou ch -S ensi ti ve
Fat & Warm
Specifications
MODEL: SUPER-SONIC 100 HEAD SUPER-SONIC TWIN (COMBO)
TYPE: PR 903 PR 903
PART NUMBERS: 2162100x00* (120V, 60Hz) 2162000x00* (120V, 60Hz)
2162101x00* (110V, 60Hz) TW 2162001x00* (110V, 60Hz) TW
2162103x00* (240V, 50Hz) AUS 2162003x00* (240V, 50Hz) AUS
2162104x00* (230V, 50Hz) UK 2162004x00* (230V, 50Hz) UK
2162105x00* (220V, 50Hz) ARG 2162005x00* (220V, 50Hz) ARG
2162106x00* (230V, 50Hz) EUR 2162006x00* (230V, 50Hz) EUR
2162107x00* (100V, 50Hz) JPN 2162007x00* (100V, 50Hz) JPN
2162109x00* (220V, 60Hz) ROK 2162009x00* (220V, 60Hz) ROK
POWER REQUIREMENT: 325W 325W
POWER AMP OUTPUT: 100W RMS @ 10% THD, 1kHz sine into 8Ω 100W RMS @ 10% THD, 1kHz sine into 8Ω
INPUT IMPEDANCE: 1M 1M
OUTPUT IMPEDANCE: 4 / 8Ω / 16Ω (selectable) 4 / 8Ω / 16Ω (selectable)
FUSES 100V-120V UNITS: F 8A L, 250V F 8A L, 250V
220V-240V UNITS: F 4A L, 250V F 4A L, 250V
TUBES: (4) 6L6GC; (7) 12AX7A; (2) 12AT7 (4) 6L6GC; (7) 12AX7A; (2) 12AT7
FOOTSWITCH (INCLUDED): 4-button, (078324) 4-button, (078324)
1. Vintage/Burn, 2. Normal/Fat, 3. Reverb, 4. Effects 1. Vintage/Burn, 2. Normal/Fat, 3. Reverb, 4. Effects
SPEAKERS: Super-Sonic® 100 412 ST** (2162400x00)* Two 8Ω, 12" Celestion® Vintage 30 (047279)
Super-Sonic® 100 412 SL** (2162450x00)*
DIMENSIONS HEIGHT: 10.5 in (26.7 cm) 20.25 in (51.4 cm)
WIDTH: 26.25 in (66.7 cm) 26.26 in (66.7 cm)
DEPTH: 10.53 in (26.7 cm) 11.31 in (28.7 cm)
WEIGHT: 53 lb (24.04 kg) 83 lb (37.65 kg)
*Super-Sonic amplifier and speaker cabinet exterior color code: Black "x"=0, Blonde "x"=4
**Recommended enclosures. Sold separately.
Product specifications are subject to change without notice.
8
◊
◊
9
fender.com
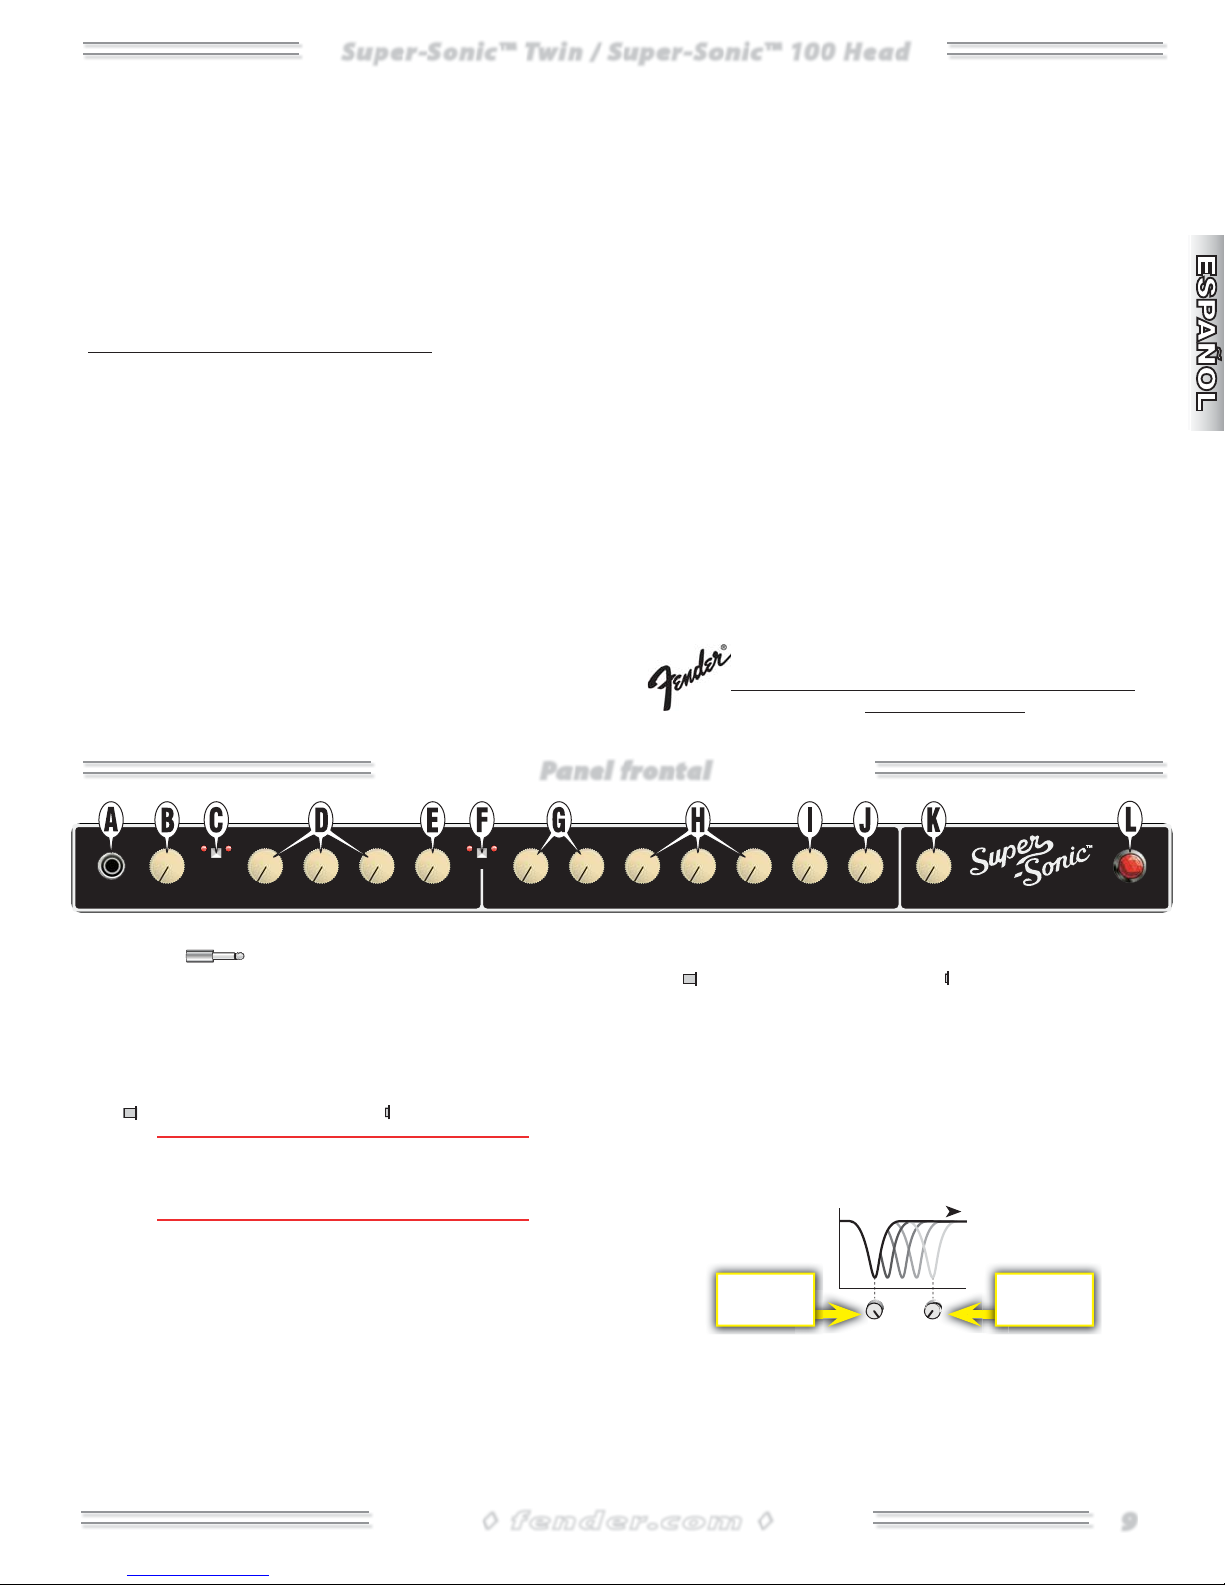
Panel frontal
Super-Sonic™ Twin / Super-Sonic™ 100 Head
Super-Sonic™ Twin / Super-Sonic™ 100 Head
Los amplificadores Super Sonic han sido diseñados para los guitarristas
que quieran crear los inolvidables sonidos limpios Fender y sonidos de
alta ganancia modernos y expresivos…con un simple amplificador de
válvulas. El canal VINTAGE produce sonidos basados en los legendarios
favoritos de Fender, mientras que BURN inflama la inspiración musical
con saturaciones de todo tipo. El amplificador Super-Sonic es capaz de
producir saturación y sustain de alta ganancia modernos, pero puede
refinar aun más estas características sin enmascarar el carácter tonal
de SU guitarra. Los Super-Sonic Twin y 100 Head también le ofrecen
algunos extras increíbles como el interruptor Arena/Club, control
Damping y el innovador control bias automático de Fender.
Estas son sus principales características:
• 100 watios desde sus cuatro válvulas de salida 6L6
• El interruptor ARENA/CLUB le ofrece una salida conmutable de
100 ó 25 watios
• Siete válvulas de previo 12AX7 y dos válvulas 12AT7
• El canal VINTAGE contiene controles de tono pre-ganancia y dos
voces distintas conmutables:
• Un tono limpio y brillante derivado de los tradicionales
amplificadores Fender Twin Reverb® y Showman®
• Sonidos gruesos y con pegadas, reminiscencia de los
amplificadores Bassman® de los años 60
• Controles de volumen Pre y Master que puede ajustar para
conseguir sonidos totalmente limpios o ligeramente saturados
• Canal BURN que le permite una total experimentación tonal con
EQ post-ganancia y dos fases de controles de previo en cascada:
• GAIN 1 le ofrece distorsión y un sonido cortante
• GAIN 2 añade compresión, grosor y sustain
• NOTCH TUNE le permite desplazar la muesca del rango medio
para conseguir una amplia gama de sonidos de tipo americano
y británico
• Reverb de muelles Fender con control de válvulas por Accutronics®
• Bucle de efectos profesional con control de nivel; también puede
usarlo como un realce controlable por pedal
• Disponible en acabados Negro/plata o nuestro famoso Dorado/
Oxido de 1961
• Incluye tapa y pedalera de 4 botones
• 5 años de garantía limitada transferible (en EE.UU. y Canadá; en el
resto de países puede ser distinto)
•
El bias au tom ático d e Fe nde r (p end iente d e pa tente) le permite ajust ar
fácilmente sus válvulas de salida a la configuración recomendada de
fábrica sin la necesidad de medidores o herramientas. Puede ajustar
este bias más “caliente” o “frío” a voluntad, y funcionará con casi
cualquier combinación de válvulas 6L6.
• Control DAMPING (en el panel trasero) que le permite elegir entre
Normal, Loose o Tight como respuesta del altavoz
• Transformadores exclusivos Schumacher
• El Super-Sonic Twin incluye dos altavoces Vintage 30 de 12”
fabricados por Celestion®
• El Super-Sonic 100 Head admite los recintos acústicos Super-Sonic
100 412 Straight y Slant
Los amplificadores de instrumentos más famosos del
Mundo... desde 1946
Panel frontal
56
VINTAGE/BURN
56
4
4
7
3
3
8
2
2
9
10
10
1
1
INPUT
56
4
7
SHOWMAN
3
8
2
9
10
1
GAIN
56
4
4
/
BASSMAN
3
2
10
1
TREBLE
7
7
8
9
3
3
8
2
9
10
1
BASS
4
4
2
10
1
MID VOLUME GAIN 1 GAIN 2
7
7
3
8
8
2
9
9
10
1
56
56
56
A. INPUT — Conecte aquí su guitarra.
B. GAIN Ajusta el nivel de señal de entrada del canal VINTAGE. Uselo
junto con VOLUME {E} para controlar el volumen percibido del canal
VINTAGE. Ajústelo al máximo para una saturación media.
C. TWIN REVERB® O SHOWMAN® / BASSMAN ®— Elige la circuitería de
amplificación del canal VINTAGE, tal como le indicará el piloto.
TWIN REVERB / SHOWMAN BASSMAN
El ajuste TWIN REVERB / SHOWMAN ofrece un voicing de amplificador
♫
tradicional Fender Blackface™, mientras que BASSMAN se le ofrece
del amplificador clásico Fender Tweed.
D. TREBLE / BASS / MID — Ajustan el carácter tonal del canal VINTAGE.
E. VOLUME — Ajusta el volumen percibido global del amplificador
cuando está activo el canal VINTAGE. Cuando lo ajuste al máximo, el
control GAIN {B} actuará como un único control de volumen, similar al
de los clásicos amplificadores Fender.
56
56
56
56
7
4
7
3
3
8
8
2
9
9
10
1
TREBLE
4
4
7
3
8
2
9
10
1
BASS
7
8
2
9
10
1
MID NOTCH TUNE
4
3
2
1
56
4
7
3
8
2
9
10
1
VOLUME
56
4
7
8
9
10
3
2
1
REVERB
7
8
9
10
FENDER MUSICAL INSTRUMENTS
F. VINTAGE / BURN — Elige el canal activo, tal como le indicará el piloto.
Canal VINTAGE Canal BURN
G. GAIN / GAIN — Ajustes principal y secundario de la distorsión y
sustain del canal BURN. Uselos junto con VOLUME {J} para controlar el
volumen percibido del canal BURN.
H. TREBLE / BASS / MID Ajustan el carácter tonal del canal BURN.
I. NOTCH TUNE Uselo para desplazar la muesca de rango medio (MID)
para conseguir distintos sonidos de tipo americano o británico.
FRECUENCIA
Enfasis de
agudos
Enfasis de
graves
J. VOLUME — Ajusta el volumen percibido global del amplificador
cuando está activo el canal BURN.
K. REVERB — Ajusta el nivel de reverb para ambos canales.
L. PILOTO DE ENCENDIDO Se ilumina cuando la unidad está
◊
encendida.
◊
9
 Loading...