

Page 1
Electric Paper Trimmer
TM
PowerTrim
Please read these instructions before use.
E
Lire ces instructions avant utilisation.
F
Lea estas instrucciones antes del usarlo.
S
Page 2

INDEX
TRIMMER CONTROLS / QUICK START GUIDE 3
ENGLISH 4-9
FRANCAIS 10-15
ESPAÑOL 16-21
Page 3
TRIMMER CONTROLS
A
E
F
D
QUICK START GUIDE
1 2 4
12”
3
H
G
B
C
5
9
3
6 7 8
10 11
Page 4

ENGLISH
CAPABILITIES
E
Performance
Cutting length 16.5” / 420mm
Max cutting capacity 30 sheets / 20lb
Trimming mechanism Electric trimming
PowerSave Auto Shut-off 30min
IMPORTANT SAFETY INSTRUCTIONS
CAUTION:
Warning - blades are extremely sharp when exposed.
When trimming:
DO ensure the machine is on a stable surface.
DO plug the machine into an easily accessible socket.
DO test cuts on scrap sheets before trimming final documents.
DO remove staples and other metal articles prior to trimming.
DO keep the machine away from heat and water sources.
DO turn off the machine after each use.
DO switch off and unplug PowerTrim when not in use.
Please read before use and keep for future reference.
Technical Data
Main voltage 120V AC
Frequency 50/60Hz
Wattage 80 Watts
Amps 1.8 Amps Max.
Machine rating 24V DC / 1.8 Amps
Dimensions (WxDxH)
24.5” x 12” x 4.75” / 620 x 300 x 120mm
Net weight 11lbs / 5 kg
DO NOT leave the power cord in contact with hot surfaces.
DO NOT leave electric cord hanging from cupboards or shelves.
DO NOT use appliance if the power cord is damaged.
DO NOT exceed the machines quoted performance.
DO NOT open or attempt to repair, as this will void your war-
ranty. Contact Customer Service if you have any questions.
PRODUCT REGISTRATION
Thank you for purchasing a Fellowes product. Please visit www.fellowes.com/register to register your product and benefit from
product news, feedback and offers. Product details can be found listed on the rating plate positioned on the rear side or underside
of the machine.
NEED HELP?
Let our experts help you with a solution. You’ll nd the numbers
for your nearest service center on the back cover of this manual.
Customer Service:
4
www.fellowes.com
Page 5

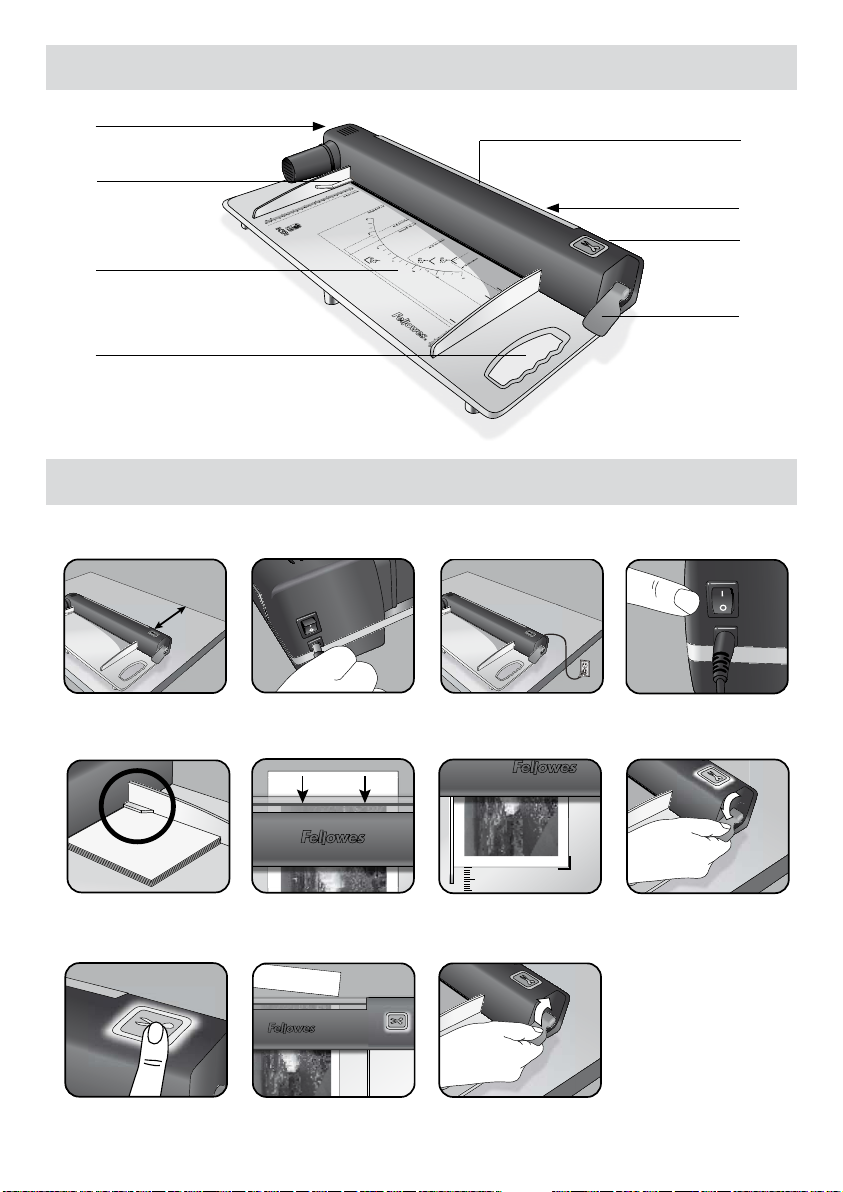
TRIMMER CONTROLS
A On/off switch (at side) E Overload protection - Paper gauge
B Cut-Control LED touch pad F Illuminated LED cutting bed
C
SafeCut
™ Clamp
D Carry point H Window for paper alignment
G SafeCut™ Guard (at rear) to protect internal mechanism
- with power breaker (magnetic closure)
FEATURES & TIPS
FEATURES
SafeCut™ Guard
Ensures that power supply is stopped when guard
is opened – for service and maintenance.
SafeCut™ Clamp
Ensures that paper is securely clamped before
trimming – trimmer won’t cut when SafeCut™
Clamp is not closed.
Electric trimming
The ultimate trimming solution for safety and
comfort – PowerTrim Electric trimming.
Cut Control function
LED touch pad with Start-Stop function to start
and stop trimming . User can stop trimming if
finished before cycle of 6 cuts has ended.
TIPS
• Always clamp paper down with SafeCut™ Clamp before
trimming.
• Make sure paper is properly adjusted.
• Replace blade unit every 2000 cuts and cutting strip every
500 cuts or when showing signs of wear. Item number for
accessory pack # 54125.
• Align cut line with the outer edge of the orange trimline.
For best results, mark the exact cut position on the item
before trimming and try trimming a test sheet.
WORLDWIDE WARRANTY
Fellowes warrants all parts of the trimmer to be free of defects in material and workmanship for 2 years from the date of
purchase by the original consumer. If any part is found to be defective during warranty period, your sole and exclusive remedy
will be repair or replacement, at Fellowes’ option and expense, of the defective part. This warranty does not apply in cases of
abuse, mishandling or unauthorized repair. Any implied warranty, including that of merchantability or tness for particular
purpose, is hereby limited in duration to the appropriate warranty period set forth above. In no event shall Fellowes be liable for
any consequential or incidental damages attributable to this product. This warranty gives you specic legal rights. You may have
other legal rights that vary from this warranty. The duration, terms and conditions of this warranty are valid worldwide, except
where different limitations, restrictions or conditions may be required by local law. For more details or to obtain services under this
warranty, please contact Fellowes or your dealer.
5
Page 6

BEFORE TRIMMING
Ensure the machine is on a stable surface. Check that
1. 2.
there is enough clear space behind the machine to allow
trimmed items to pass through freely.
3.
STEPS TO TRIM
Switch the power on.
4.
5.
Insert document to trim. Use the document gauge at
the sides of the cutting base to check that items do not
exceed maximum capacity.
6.
Use transparent window with orange trimline guide to
quickly and accurately align your cuts. Align cut line
with the outer edge of the orange trimline. For best
results, mark the exact cut position on the item before
trimming and try trimming a test sheet.
7.
Alternatively, align item with the cut dimensions on the
base of the trimmer.
9.
11.
Connect the supplied power lead to the machine.
Plug the power lead in to an easily accessible main
socket. Switch the main supply on.
To trim press the Cut-Control LED touch pad. When
touched, the Cut-Control LED will light up in pink and
then turn flashing blue when it is cutting.
PowerTrim will complete 3 cut cycles (of 6 cuts) for
10.
cutting max 30 sheets (20lb). To stop cutting press the
Cut-Control LED touch pad.
Release clamping mechanism again before removing
items from cutting bed.
Secure document with SafeCut™ Clamp, the Cut-
8.
Control LED touch pad will light up blue.
6
Page 7

BLADE UNIT REPLACEMENT
Unplug PowerTrim. Remove
SafeCut™ Guard
(magnetic catch).
Unscrew the 2 cross
head screws on either
side of the cutter blade
unit (Phillips type
screwdriver).
Remove the cutter
blade unit by pulling
the button on the blade
unit. Replace with new
blade unit (#54125).
CHANGING CUTTING STRIPS
Unplug PowerTrim. Remove
SafeCut™ Guard (magnetic
catch).
Make sure SafeCut™
Clamp is open.
Rotate small safety catches to release the cutting strip. Turn
cutting strip over to use other side of the strip . When all
areas have been used, replace cutting strip with new one
from accessory pack (#54125). Re-secure cutting strip and
SafeCut™ Guard again.
REPLACEMENT ACCESSORIES
The following replacement parts are available for PowerTrim as a combined accessory pack (#54125):
Tighten screws. Re-secure
SafeCut™ Guard.
Item Required
1 blade unit After 2000 cuts
2 cutting strips After 500 cuts
7
Page 8

TROUBLESHOOTING AND LED INDICATORS
Status Possible Cause Solution
Scissor icon is ON. Base LED lights
are ON
Scissor Icon is OFF. Base LED lights
are ON
Scissor Icon is OFF. Base LED lights
are OFF
Scissor icon is PINK + beep sound Touched scissor icon -
Scissor icon ashing BLUE (FAST). Base
lights are ON
Scissor icon ashing BLUE (SLOW).
Base lights are OFF
Paper is cut, machine is still operating
Scissor icon flashes RED and BLUE.
Base lights are ON
Scissor icon is RED. Base lights are OFF Error. Machine is hot
Poor cut quality Worn cutting strips or worn blades
Ready to trim (clamped down and all
covers closed)
SafeCut Clamp is open Insert item and close SafeCut Clamp
No power
SafeCut Guard is open
Trimming in progress -
PowerSave mode Touch scissor icon.
Machine will cut for 3 cut cycles (or 6
cuts) automatically
Error
-
Turn on main supply and switch on
machine
Ensure SafeCut Guard is correctly
closed
Touch scissor icon.
Check SafeCut Clamp is closed and
SafeCut Guard is correctly closed
Machine must cool for 30 minutes
(minimum)
Flip cutting strip and use reverse side.
Check blade quality. Replace from
accessory pack (CRC 54125)
8
Page 9

Electric Paper Trimmer
PowerTrim
TM
FCC CLASS B NOTICE
Note: This equipment has been tested and found to comply with the limits for a Class B digital device, pursuant to part 15 of the FCC
Rules. These limits are designed to provide reasonable protection against harmful interference in a residential installation. This equipment generates, uses and can radiate radio frequency energy and, if not installed and used in accordance with the instructions, may
cause harmful interference to radio communications. However, there is no guarantee that interference will not occur in a particular
installation. If this equipment does cause harmful interference to radio or television reception, which can be determined by turning the
equipment off and on, the user is encouraged to try to correct the interference by one or more of the following measures:
• Reorient or relocate the receiving antenna.
• Increase the separation between the equipment and receiver.
• Connect the equipment into an outlet on a circuit different from that to which the receiver is connected.
• Consult the dealer or an experienced radio/TV technician for help.
CANADA CLASS B NOTICE - AVIS CANADA, CLASSE B
This Class B digital apparatus complies with Canadian ICES-003.
Cet appareil numérique de la classe B est conforme à la norme NMB-003 du Canada.
MODIFICATIONS
Any modications made to this device that are not approved by Fellowes may void the authority granted to the user by the FCC and/or
by Industry Canada to operate this equipment.
Toutes modications apportées à ce dispositif et non approuvées par Fellowes annuleront le droit accordé à l’utilisateur par le FCC et/ou
par Industrie Canada de faire fonctionner cet équipement.
Fellowes
Australia +61-3-8336-9700
Benelux +31-(0)-76-523-2090
Canada +1-905-475-6320
Deutschland +49-(0)-5131-49770
España / Portugal + 34 902 33 55 69
France +33-(0)-1-30-6-86-80
Italia +39-71-730041
Japan +81-(0)-3-5496-2401
Korea +82-(0)-2-3462-2844
Malaysia +60-(0)-35122-1231
Polska +48-(22)-771-47-40
Russia +7-(495)-228-14-03
Singapore +65-6221-3811
United Kingdom +44-(0)-1302-836836
United States +1-630-893-1600
Australia
Benelux
1789 Norwood Avenue, Itasca, Illinois 60143-1095 • USA • 630-893-1600
Canada
China
Deutschland
España
2009 Fellowes, Inc. Part No. 403954-1
France
Italia
Japan
Korea
Polska
Singapore
fellowes.com
United Kingdom
United States
 Loading...