


ITUBE 182

USER MANUAL
ENGLISH
TL A
udio
®
by
FATMAN
iTube 182
Valve Amplifier 2 x 18Watt

Page
Safety Instructions . . . . . . . . . . . . . . . . . . . .3
Amplifier Connection Diagram . . . . . . . . . . .4
Amplifier Connections . . . . . . . . . . . . . . . . .5
Front Panel Controls . . . . . . . . . . . . . . . . . . .6
Troubleshooting . . . . . . . . . . . . . . . . . . . . . .7
Maintenance . . . . . . . . . . . . . . . . . . . . . . . .8
Specifications . . . . . . . . . . . . . . . . . . . . . . . .8
Congratulations on your choice of the Fatman iTube 182 by TL Audio. We have used years of audio
engineering experience to bring you a product that will truly enhance your listening experience.
In order to obtain the best performance from this system please read this owners manual
thoroughly and use your iTube 182 only in accordance with its instructions.
Contents
2
iTube 182

IMPORTANT SAFETY INSTRUCTIONS
Read instructions - All safety and operating instructions
should be read thoroughly before attempting to operate
the Fatman ITube 182.
•
Retain Instructions in a safe place for future
reference.
•
Follow all instructions detailed in this manual.
•
Observe all safety warnings given in this manual.
•
This unit should NOT be situated in close proximity
to water. Avoid placement near bathtubs, sinks,
washing machines, swimming pool, Sauna etc.
•
Avoid exposure to direct sunlight or to extremes of
temperature or humidity.
•
Do not place near direct heat sources such as
radiators, stoves, gas fires, naked flames or
candles.
•
Ensure that the unit is placed on a clean, dry and
flat surface before operation.
•
Do not drop unit, apply excessive force to the
controls or place heavy objects on top of the unit.
•
Do not allow excessive levels of dust to gather on
the 182.
•
To clean, use a soft dry cloth. If necessary, use a
damp cloth without any solvents.
•
Ensure that the area in which the unit is situated
has adequate ventilation. Do not place the ITube
182 in a position where its ventilation may become
obstructed. Avoid placement on beds, sofas, rugs,
enclosed bookcases / cabinets and any other area
which may cause interference to the ventilation of
the product thus causing it to overheat.
•
Ensure that the unit is connected to the correct
power supply as indicated on the unit. Unplug the
ITube 182 when not in use for a long period.
Always make sure power cables are placed safely
and are not obstructing a walkway.
•
This product can get hot. Do not touch the tubes
and keep away from babies and children.
•
To avoid risk of electric shock, do not attempt to
remover the cover or the back of unit - there are no
user serviceable parts.
•
When this product is moved from a cool to a warm
place, condensation may occur on the surface of
the vacuum tube. In this instance, please allow 1
hour before attempting to operate the unit. This will
avoid leakage or blowout of the vacuum tube due to
sudden heat.
•
The iTube 182 should be serviced by an authorised
service engineer in the event of any of the following
circumstances.
1. The power supply or cord sustains damage.
2. The unit is struck by a falling object.
3. The unit is exposed to rain or moisture.
4. Liquid is inadvertently spilt on the unit.
5. The unit does not seem to operate normally or
exhibits a sudden change in performance.
6. The unit has been dropped.
•
Any unauthorised changes or modifications to this
equipment would render the manufacturer's
warranty null and void.
Safety Instructions
3
USER MANUAL
ENGLISH
4
iTube 182
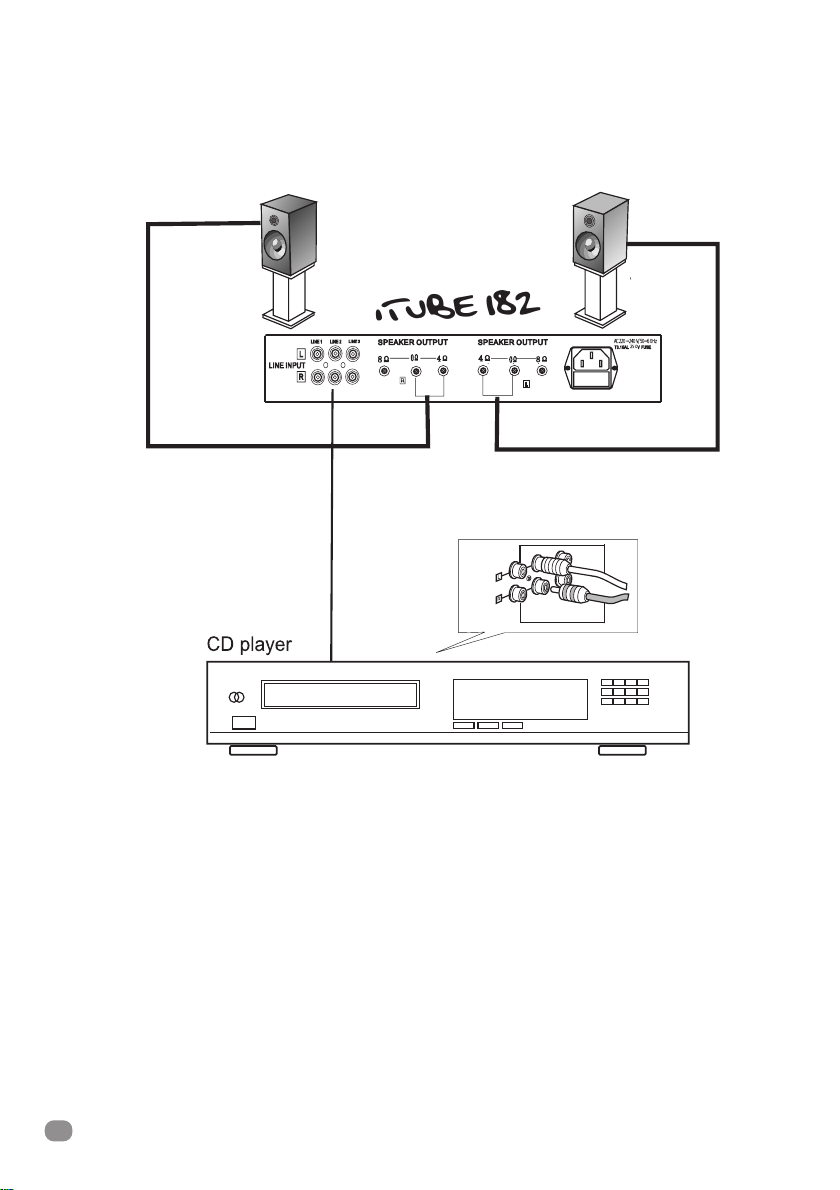
• Before attempting to make any connections to or
from the unit, be sure to first switch OFF the power
to this unit and to any other components to which
connections are being made.
• Make sure that all connections between this unit and
other components are made correctly, that is to say
L(left) to L, R(Right) to R, + to + and - to - Also , refer
to the owner's manual of each component that is
connected to this unit.
• Always turn OFF the power switches when
connecting or disconnecting from mains power.
• It is recommended that you disconnect the power
supply from the mains when the unit is in a
protracted period of non-use (holidays, etc).
• When connecting speakers, ensure they have an
impedance of between 4 & 8 ohms.
Amplifier Connections
AC220~240V/50~60Hz
250
iTube 182

5
USER MANUAL
ENGLISH
• Connect using high quality, bare(stripped) speaker
wire. Please note that if your speaker wires are not
connected properly you may hear no sound or if
polarities are reversed, you will hear oddities in the
signal path with an unnatural loss of bass
frequencies
• When using bare speaker wires, fit at least 1.6mm of
insulation inside the speaker terminals so that no
bare wire is visible
• Make sure the wire holders are firmly screwed in to
prevent wires from becoming loose. If wires touch,
the speakers and or the unit could be damaged
Amplifier Connections
Connecting the iTube Dock
1
2
3
4
123 4
1. Video Output: Connect the video cable (yellow)
in between the video output connector (yellow) of
the iTube and the video input of your TV.
2. Audio Output: Connect the audio cable from
the audio output of the ITube docking station to
the audio input of the the iTube Valve amplifier.
3. S-Video Output: Use an S-Video cable (not
included) to connect S-Video output of your
iTube to the S-Video input of your TV.
4. Power adaptor in: Connect power cable
between iTube and mains supply.
1. Backrest.
2. iPod dock connector.
3. iPod dock input
connected indicator LED.
4. Power indicator.
ERRATUM
PLEASE USE THE ON SWITCH ON THE REMOTE CONTROL TO TURN ON THE DOCK.
iTube 182
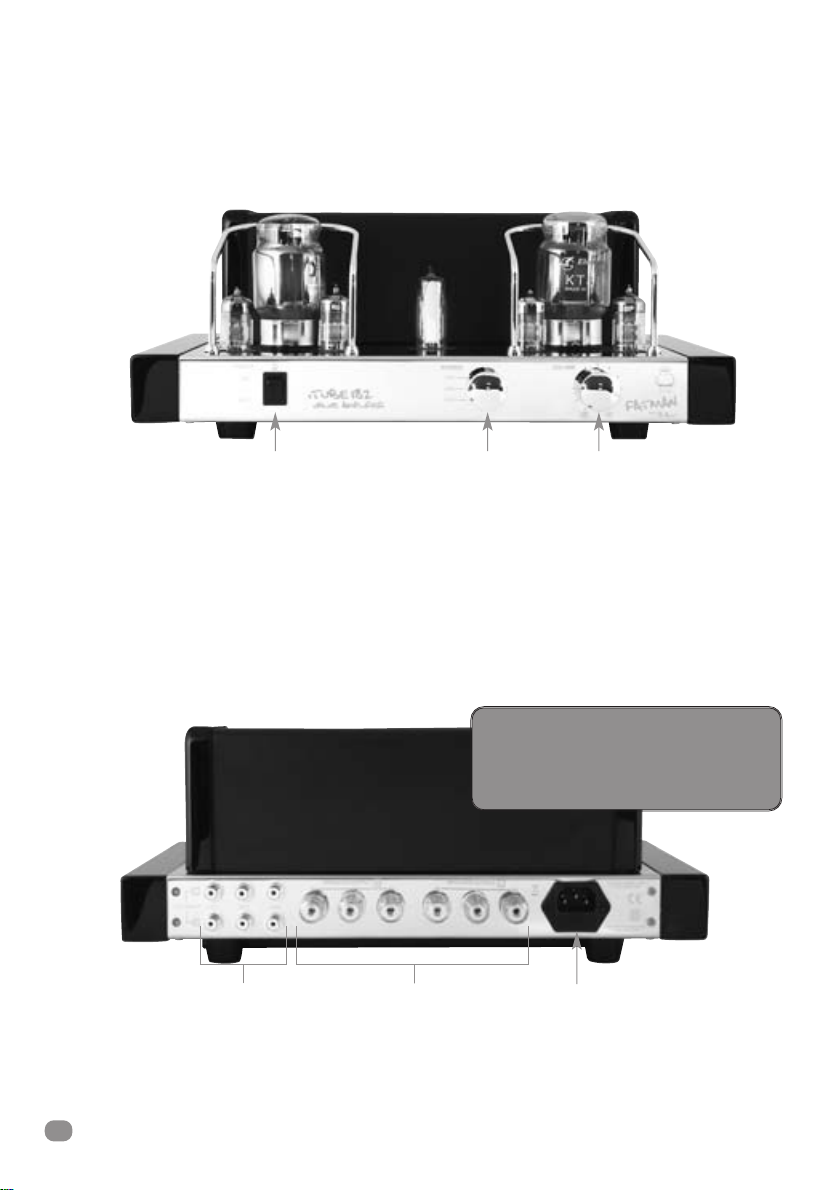
6
POWER SWITCH
- Press this switch to ON for power. The indicator will illuminate while the power is ON.
Press to OFF to switch off the power.
Please Note The Following:
Before switching ON the power, be sure to set the volume control to the lowest setting in order to avoid
damage to the speakers - the speaker-protection circuit will mute the volume for a few seconds after power is switched ON.
SOURCE
- For selecting the different Signal Source.
VOLUME CONTROL - To increase or decrease the volume.
Front & Rear Panel Controls
Power Switch Source Volume
Line Input
Speaker Output
AC Power Input
ATTENTION:
Your iTube 182 should only be
re-started 5 minutes after switching
off, to avoid damaging the tubes.
!!
USER MANUAL
ENGLISH
7
If your ITube 182 fails to operate normally, please check the following points to determine if the fault can be
corrected with one of the simple suggestions below. If you feel your unit is still faulty after reading this, please
contact your authorised dealer or service centre.
SYMPTOM
- The unit fails to turn
on when the POWER
switch is pressed.
- No Sound.
- No sound is heard
from the left and /or
the right speaker.
- The acoustic image
is unstable.
POSSIBLE CAUSE
- Power adaptor is not
connected properly.
- Mains supply is off.
- The volume control is set to
the fully counter-clockwise
position.
- Connection cords are not
connected securely to the
INPUT terminals.
- Speakers are not connected
properly.
- Speakers are not properly
connected.
- The signal input is not
properly connected.
- The positive and negative
polarities of the unit and
speakers are not matched.
REMEDY
- Make sure power is firmly plugged in.
- Turn clockwise.
- Connect securely.
- Connect securely.
- Connect correctly.
- Connect correctly.
- Re-connect correctly.
Troubleshooting

iTube 182
8
• Source Inputs: 3
• Max Output Power: 18W x 2
• Frequency Response: 20-20KHz (±1.5dB)
• Distortion: ≤ 2%
• Signal to Noise Ratio: ≥ 86dB
• Input Sensitivity: 230m V
• Input Impedance: 100K ohm
• Output Impedance: 4 ohm/8 ohm
• Size (LxWxH): 382mm x 290mm x 157mm
• Weight: 14.2KGs
• Tubes used: KT94 (KT88,KT90,KT100) x 2,
6N3(5670) x 4,
6E2(EM87) x 1
• Power Supply: AC100~120V/50~60Hz
AC220~240V/50~60Hz
Specifications subject to change without notice.
Specification
Please contact your local authorised dealer or reseller.
info@fat-man.co.uk
www.fat-man.co.uk
Service
TL A
udio
®
by
FATMAN

BEDIENUNGSANLEITUNG
DEUTSCH
TL A
udio
®
by
FATMAN
iTube 182
Verstärker 2 x 18W

Page
Safety Instructions . . . . . . . . . . . . . . . . . . . .3
Amplifier Connection Diagram . . . . . . . . . . .4
Amplifier Connections . . . . . . . . . . . . . . . . .5
Front Panel Controls . . . . . . . . . . . . . . . . . . .6
Troubleshooting . . . . . . . . . . . . . . . . . . . . . .7
Maintenance . . . . . . . . . . . . . . . . . . . . . . . .8
Specifications . . . . . . . . . . . . . . . . . . . . . . . .8
Wir gratulieren Ihnen zu ihrem Fatman iTube 182 von TL Audio. Wir investierten Jahre der
Erfahrung aus HiFi-Entwicklung in dieses Produkt für wahrhaftigen Musikgenuß.
Um den maximale Leistung aus Ihrem iTube 182 zu holen, lesen und befolgen Sie bitte diese
Anleitung sorgfältig.
Contents
2
iTube 182

IMPORTANT SAFETY INSTRUCTIONS
Lesen Sie die Anleitung – Sie sollten alle Sicherheits-
und Bedienhinweise kennen, bevor Sie den Fatman
iTube 182 verwenden.
•
Verwahren Sie die Anleitung für später an einem
sicheren Ort.
•
Folgen Sie detailliert den Anweisungen dieser
Anleitung.
•
Leisten Sie allen Sicherheitswarnungen in dieser
Anleitung folge.
•
Das Gerät darf NICHT in der Nähe von Wasser
betrieben werden. Vermeiden Sie Aufstellung nahe
der Badewanne, Waschbecken, Waschmaschine,
Swimmingpool, Sauna, etc.
•
Setzen Sie das Gerät keinem direkten Sonnenlicht
oder extremen Teparaturen oder Feuchtigkeit aus
•
Platzieren Sie das Geräte auf keinen Fall neben
Heizkörpern, Kochplatten, Gasherden, offenem
Feuer oder Kerzen.
•
Stellen Sie das Gerät vor der Inbetriebnahme auf
eine saubere, trockene und ebene Fläche.
•
Lassen Sie das Gerät nicht fallen und üben sie
keine großen Kräfte auf die Bedienelemente aus.
Stellen Sie nichts schweres darauf.
•
Vermeiden Sie größere Staubansammlungen auf
dem 182.
•
Zur Reinigung verwenden Sie ein trockenes oder
feuchtes Tuch aber keinesfalls Lösungsmittel.
•
Stellen Sie sicher, das der Aufstellort über
ausreichenden Luftaustausch verfügt. Platzieren Sie
den iTube keinesfalls wo die Luftzirkulation
unterbrochen werden könnte. Vermeiden Sie
Betten, Sofas, Teppiche, geschlossene
Regale/Schränke und andere Bereiche, in denen
mangelnde Luftzirkulation eine Überhitzung
verursachen könnte.
•
Stellen Sie sicher, dass das Gerät mit dem richtigen
Netzteil angeschlossen ist. Benötigen Sie den iTube
252 länger nicht, ziehen Sie den Netzstecker.
Verlegen Sie das Netzkabel sorgfälltig, vermeiden
Sie Stolperfallen.
•
Dieses Gerät kann heiß werden. Berühren Sie die
Röhren nicht und halten Sie es von Babies und
Kindern fern.
•
Vermeiden Sie elektrische Schocks und versuchen
Sie nicht, die Abdeckung zu entfernen – Es
befinden sich keine anwenderrelevanten Teile im
Inneren.
•
Transportieren Sie das Gerät von einem kalten an
einen warmen Ort kann sich Kondensation auf den
Röhren bilden. In diesem Fall warten Sie
wenigstens1 Stunde vor erneuter Inbetriebnahme.
Das verhindert Undichtigkeiten oder Zerstörung der
Röhren durch die plötzliche Erwärmung.
•
Ihr iTube 252 sollte bei Folgendem von einem
authorisierten Fachmann gewartet werden:
1. Das Netzkabel ist beschädigt.
2. Das Gerät wurde durch einen Sturz beschädigt.
3. Das Gerät war Wasser oder Feuchtigkeit
ausgesetzt.
4. Flüssigkeit hat sich auf oder in das Gerät verteilt.
5. Das Gerät arbeitet nicht wie gewohnt oder zeigt
einen plötzliche Änderung in seinem Klang.
6. Sie haben das Gerät fallen gelassen.
•
ß Jede unauthorisierte Änderung oder Modifikation
an der Technik hat den Verlust der
Herstellergarantie zur Folge.
Sicherheitshinweise
3
BEDIENUNGSANLEITUNG
DEUTSCH

4
iTube 182
• Bevor Sie mit dem Verkabeln beginnen stellen Sie
sicher, das alle zu verbindenden Geräte abgeschaltet
oder vom Stromnetz getrennt sind.
• Stellen Sie sicher, das alle Verbindungen zwischen
den Geräten korrekt ausgeführt sind, also L (links) zu
L und R (rechts) zu R, + zu + , - zu -. Beachten Sie
auch Verkabelungshinweise der Anleitungen der
anzuschließenden Geräte.
• Schalten Sie das Gerät immer erst aus (OFF), bevor
Sie es ans Stromnetz anschließen oder davon trennen.
• Wir empfehlen das Gerät bei längerem Nichtgebrauch
(Urlaub, etc.) vom Stromnetz zu trennen.
• Wenn Sie Lautsprecher anschließen, stellen Sie sicher,
das deren Impedanz zwischen 4 und 8 Ohm liegt.
Verkabelung
AC220~240V/50~60Hz
250
iTube 182
 Loading...