

Page 1
Welcome to the world of the Fatar Studio Series Keyboard Controllers.
Congratulations on purchasing the ST-490 Plus, one of the finest master keyboard
controllers in the world today. The Studio-490 Plus is the perfect choice for a
musician looking for a simple yet versatile keyboard controller to produce quality
results for the live or studio environment.
TECHNICAL CHARACTERISTICS:
* 49 keys
* One zone
* Velocity Sensitive
* Two Parallel MIDI Outputs
* Sustain Input Jack
*Volume Input Jack
* Program change, MIDI Channel, Transpose.
* External Adapter 9V DC 500mA included
CONNECTIONS:
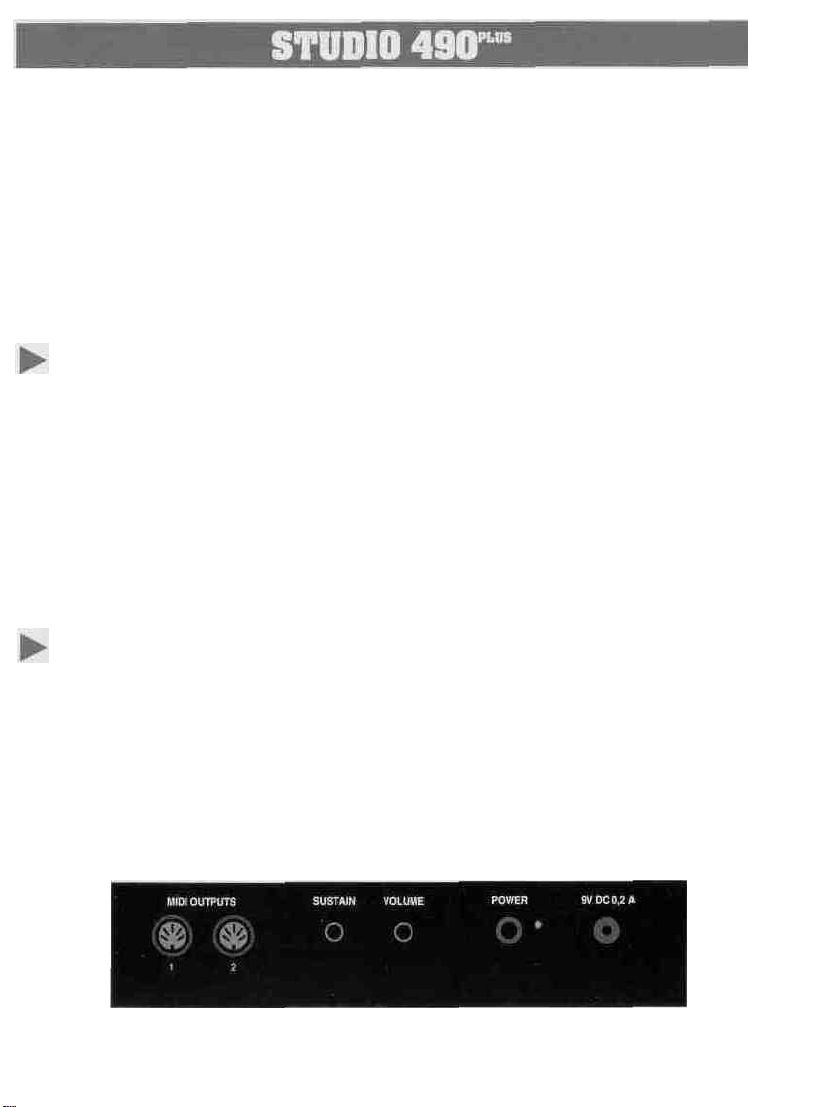
1) Connect the AC adapter cable to the power input jack, in the back of the
controller, located next to the power switch. See Figure #1.
Make sure that the AC adapter corresponds to the correct voltage output. The
Studio 490 Plus will accept an adapter that has a rating of 9V DC with a positive
polarity tip and has a minimum current of 200 ma.
Figure #1.
Page 2

2) Connect MIDI cable from the ST-490 Plus s MIDI outputs, (each output can
handle up to four synthesizers, modules, or effect devices) to the MIDI input on
your sound sources.
Set
your sound sources to the desired
MIDI
channels
by
the
ST6lOPlus. Each channel would normally be assigned to a different sound or effect.
Since the ST-490 Plus has only one zone, you can only program one of thel6
channels at a time. Make sure that your sound source is properly assigned to the
channel you are sending on.
To select a base channel hold the [CHANNEL[ switch and enter the channel number
(1 through l6) by depressing the appropriate black numbered key (0-9). The
function switch must be released after the black number keys. At this point the ST490 Plus is sending on that channel.
Program change:
A program change command allows you to change the sound on your sound
source from the ST-490 Plus. The program change will be sent on whichever MIDI
channel the ST-490 Plus
0 Plus is currently set. Program changes are numbered 1 through 128. You may
notice, depending on the sound source, that a program change of 1 will show up
on your sound source as 0. This is not a problem, since MIDI is not completely
standard between manufacturers. Thank the heavens that there are only a few
anomalies like this between the manufacturers.
To issue a program change, hold the [PROGRAM] switch and enter the desired
number on the numbered black keys with the appropriate program number or use
the [INC]/ [DEC] (increment/ decrement) keys. If a number greater than 128 is
entered, it will wrap around to the beginning.
Bank change: i
Some sound sources today, especially
found
on
computer sound cards, have a
feature called bank select. The MIDI specification calls for bank numbers 1 through
16384. Once you have selected your bank you are able to select a program change
(1 through 128).
To select a bank of programs, hold the [PROGRAM ]switch, press [BANK] key, and
enter the appropriate bank number using the 0 through 9 keys. The bank
command will be transmitted when the [PROGRAM] switch is released.
The [INC]/ [DEC] keys may be used instead of entering the bank number.
Page 3

OPERATION:
Getting around the ST-490 Plus is very simple. However, you must know certain
basic MIDI theory before it can make sense.
Transposition:
Sometimes a player may not be able to play in a certain key. At these times the
[TRANSPOSE] switch will be invaluable. For example, if you need to change from
the key of C major to the key of Eb major, you can still play the C major keys, but
what you hear would be Eb major.
To transpose the keyboard, hold the [TRANSPOSE] switch and press the desired key on the
keyboard above or below middle C. The result will be a new key change when the C major
keys are played. Your range is limited to 24 half steps up and 24 half steps down.
If there are any technical problems that relate to the ST-490 Plus only, please contact Music
Industries Corp. 800-431-6699. Best of luck!"
Page 4

This equipment has been tested and found to comply with the limits for a Class B digital
device, pursuant to Part 15 of the FCC rules. These limits are designed to provide
reasonable protection against harmful interference in a residential installation. This
equipment generates, uses, and can radiate radio frequency energy and, if not installed
and used in accordance with the instructions, may cause interference to radio
communications. However, there is no guarantee that interference will not occur in a
particular installation. If this equipment does cause harmful interference to radio or
television reception, which can be determined by turning the equipment on and off, the
user is encouraged to try to correct the interference by one or more of the following
measures:
• Reorient or relocate the receiving antennas.
• Increase the separation between the equipment and the receiver.
• Connect the equipment into an outlet on a circuit different from that to which the
receiver
is connected.
• Consult the dealer or an experienced radio/TV technician for help.
NOTE: Use of shielded power and interface cables with this equipment is required in order
to ensure compliance with FCC specifications.
CAUTION: Changes or modifications to this equipment not expressly approved by the
manufacturer responsible for compliance could void the user's authority to operate the
equipment.
It is recommended that only FCC class B certified devices be used with this equipment.
Operation of Class A equipment in a residential area is likely to cause harmful interference
in which case the user will be required to correct the interference at his or her own
expense.
 Loading...