

Page 1
Page 2

SECTION 1.
Introduction:
Why and how do we use MIDI Controllers? What are Zones? Uses and Applications.
Congratulations on your new purchase of
In this manual we will explain the concepts and techniques of using Master MIDI Controllers
to greatly expand your flexibility, creativity, control and productivity in your live or studio
keyboard setup. Whether you are using one multi-timbral sound module or a rack full of them,
this
Master Controller Keyboard and all
tly expand your professional and creative abilities.
The concept of a controller is to centralize your accessibility to your MIDI modules. It gives
you a central point of control over your slave modules in a given setup.
Have you ever tried to line up patches in your sound modules so that when you selected a
patch on your keyboard your other sound modules called up the right patch? Ever tried to
locate a patch position to write over a sound that you hopefully won't need later? Tired of
bending down to squint and see the display and program a module at the bottom of your rack?
All of these scenarios are greatly reduced when using a Master Controller.
The concept of ZONES, SPLITS and LAYERS is as follows:
A ZONE
consists
parameter messages that are communicated to your slave module(s), this reduces the need to
write and store patches on your module. These parameters may consist of the following information: patch number, volume setting, velocity curve, transposition value, pedal enable,
wheels enable,
tion
is
sent
two (2) completely independent zones, meaning each zone can transmit all of its own information on any given MIDI channel. The range of notes in each zone can be setup to be adjacent
to
another
ZONE
starts)
introduce
of a specified range of keys on your keyboard. That range of
etc....
When
a patch
to
your modules instantly. The Studio
ZONES
or assigned
the
concept
range of
of
LAYERS
notes
to
overlap each
and SPLITS.
the
the
is
selected
( one
SL-161/SL-61
other Studio Logic Controllers by
other
Studio Logic Master Controller by
on your Master Controller all of
Logic
ZONE
ends, going up
or
any
SL-161/SL-61
Master Controller by
the
part
of each
keyboard,
other's
FATAR
will
notes
is
this
FATAR
as
ranges.
FATAR.
grea-
assigned
informa-
has
another
Thus we
A
SPLIT
is
when
one
ZONE'S
range of
ple
would
be
Bass in
be
any amount of consecutive
two
or more
LAYERS
and modules have to offer. Let's say we have a big pop ballad that needs your special touch?
We
want
re keyboard's range of
patch:
with the release rate up slightly. If one or more patches are not in the same octave as the
others
to line it up properly with the others. Something sounds a little mushy when playing Piano
parts
riment with disabling
deep, rich, rather large and musically useful sounding patch to use on your ballad.
Are you beginning to see the possibilities here? Please step inside the manual and we'll take
you through the simple yet versatile features of the Studio Logic 610 Master Controller by
FATAR.
ZONE'S
are
the
to
create
(1)
dark rich Electric Piano, (2)
it's
easy
using
the
the
left
hand and Piano in
range of
way we can build
a "Pad
to
fix.
SUSTAIN PEDAL?
notes
Piano"
notes.
Using
Go
to
that
the
SUSTAIN PEDAL
notes
ends
and another
the
notes
regardless of where another
overlap we call
fat
lush
patches
sound
to
cover
the
two
slow
ZONE'S
Try
transpose feature and move
going
to
for
this a LAYER.
using
the
ZONES,
attack
the
ZONE
that
zone.
ZONE'S
right hand.
the
song. Assign each
assign each of them
for
Within
A ZONE'S
ZONE'S
full
potential
the
"non Piano" sound and
moments you should have
begins. A simple
range of
notes
of
ZONE
to
to
it
up or down 12
notes
begin.
what
your
cover
the
play a different
String Pad
exam-
can
When
synths
enti-
steps
expe-
a
Page 3
THE KEYBOARD
THE WHEELS
THE ZONES
SECTION 2.
Features:
A
guided
The
version
has a very dynamic yet quick response to it. The velocity sensitive action can be modified with
several
key
The PITCH and MODULATION WHEELS are the standard style, however, they are made with a
new rubberized
sation during performing and programming for a more musical response.
The
to
manual,
ZONES consists of:
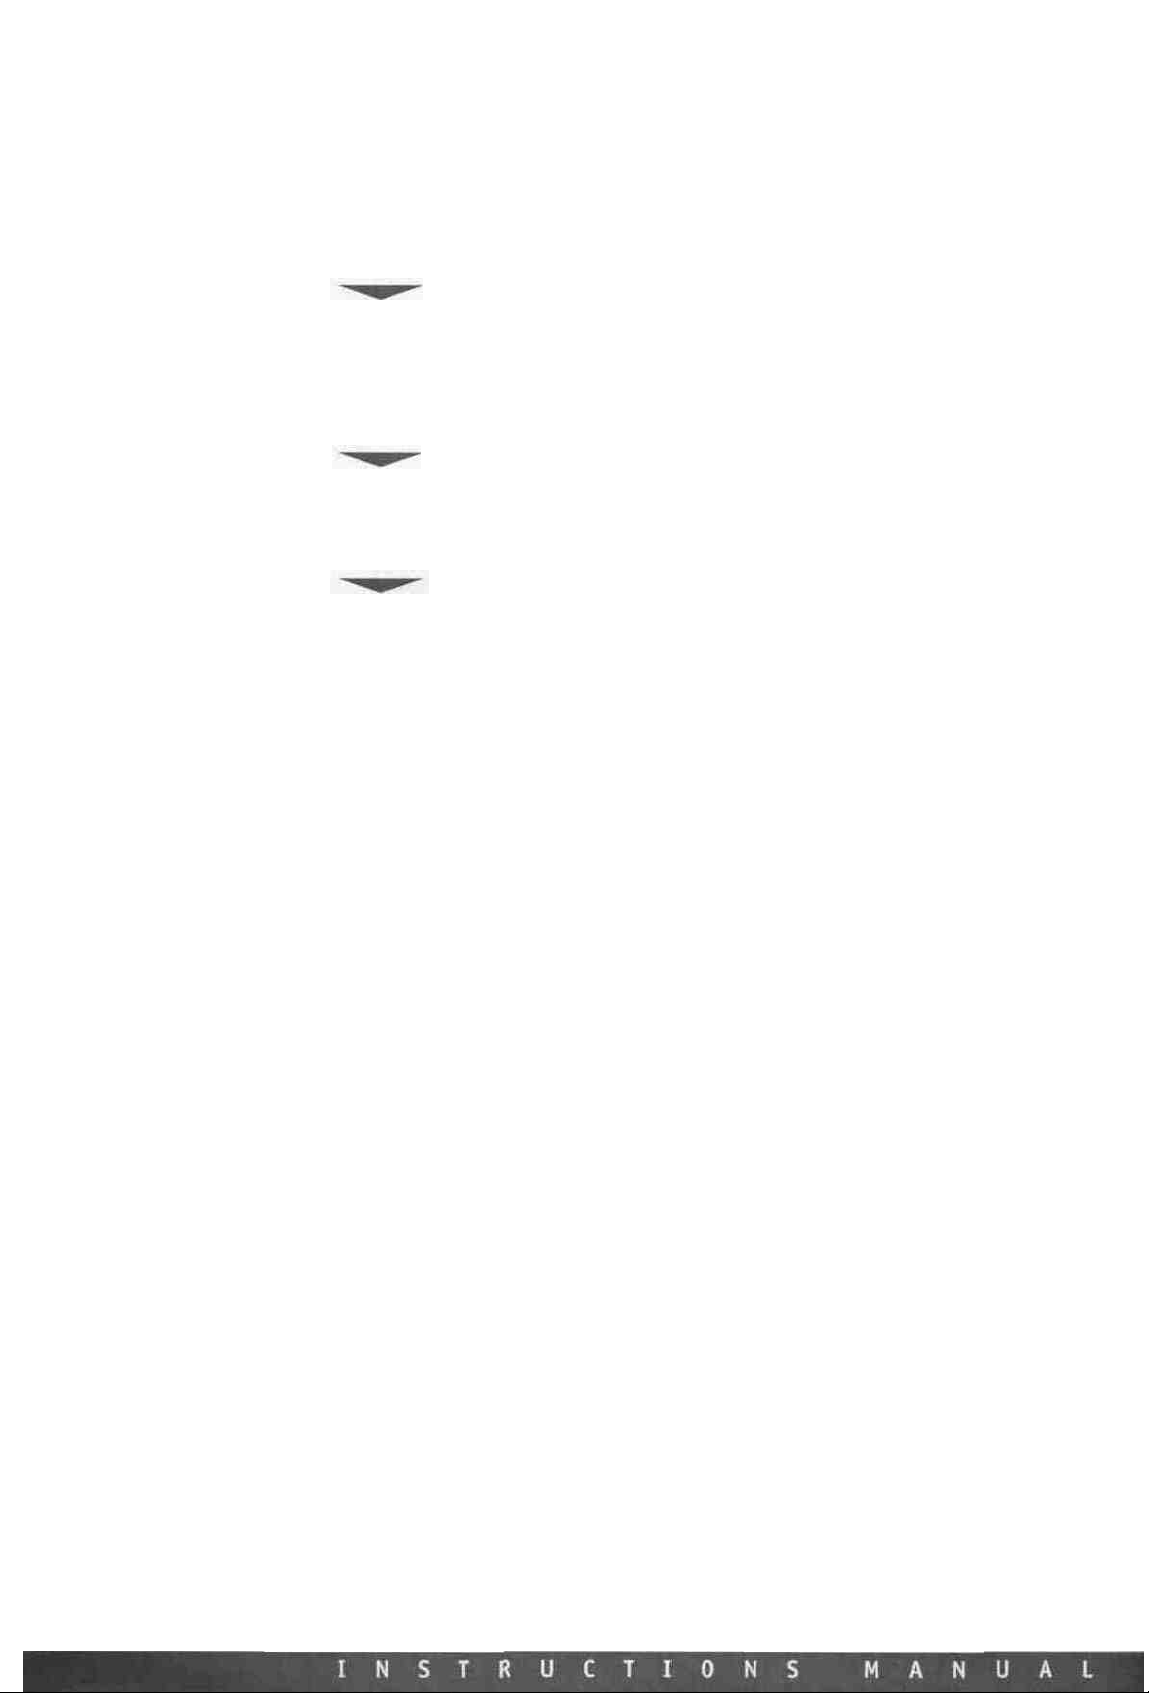
1. ZONE ENABLE/DISABLE BUTTON: Located on the front panel above the keyboard itself.
These are used
independently of each other. In other words, you can have any combination of ZONES on or
off
tour
through
Studio
Logic
of
the
classic
VELOCITY
action
of
the
SL-161/SL-61
has
any range
at
the
any
of
ZONES
point
the
Studio
161/61
has a
61
key
FATAR
action.
CURVE
response
SL-161/SL-61
will
transmit
texture.
to
They have been designed
(2)
two
independent
keys across
are
turn
by accessing these
the
the
the
heart
of
ZONES
SL-161/SL-61's
Logic
161/61's
FATAR
It
is
an extremely
settings
channel
creating
on and
ZONE
Controls and Features,
semi-weighted
that
will
AFTERTOUCH
to
ZONES
with
keyboard.
musically
off
in
PERFORMANCE
switches.
piano
musical
be discussed
give
the
each
As
discussed
useful
action.
feeling
on
player a more
of
them
Layers and
later
all
ZONES.
in
mode.
piano
in
capable
the
It
is a new,
style
this
manual.
solid
of
being
introduction
Splits.
Each
Each
switch
improved
action
The
tactile
assigned
to
of
the
functions
that
61
sen-
this
(2)
While
in
EDIT mode,
editing,
you
2.
the
3.
can
sound
4. PROGRAM CHANGE: Patch selection can be made for each ZONE while in the EDIT mode.
Each ZONE can be set to select (send) patch changes 1 to 128 (some manufacturers use a numbering scheme 0 to 127, so you may need to add (1) to each patchtt to achieve the desired results).
5.
(keys)
points can overlap thus creating LAYERS.
6 .TRANSPOSE: Each ZONE can be set to transpose its key range up or down 24 semitones. In
other words, up or down 2 octaves from the synth module's original setting.
7 .SUSTAIN PEDAL ENABLE / DISABLE SELECT: You can set each ZONE to respond or not
respond
8. WHEELS ENABLE / DISABLE SELECT: You can set each ZONE to respond or not respond to
PITCH and MODULATION WHEEL information. This is done in the EDIT mode for each ZONE.
only
select
MIDI
CHANNEL
16
MIDI
BANK
SELECT:
initiate
module
SPLIT or
for
to
each
or select
KEY
each
sustain
the
ZONE BUTTONS
one
ZONE
at a time
ZONE
SWITCH
SELECT:
channels
After
you
are accessing. More on
NOTE
ZONE.
pedal
While
available.
selecting a MIDI
BANK
Changes. The commands are
RANGE:
The
ZONES
information.
are used
can be selected and
for
editing.
in
EDIT mode each
Only one
This
MIDI
channel
edit
function
are
completely
This
BANK
is
done
to
select
the
ZONE
channel
can be
to
transmit
SELECT
allows
independent
in
the
the
desired
buttons
can be
transmitted
on,
different
later
in
you
to
select
EDIT mode
ZONE
now
set
and
while
depending
this
manual.
the
of
each
for
to
toggle
to
transmit
at a time
in
range
other
each
be
edited.
on and
EDIT
on
the
of
active
and
ZONE.
While
off
on any
per
ZONE.
mode,
external
notes
their
split
as
of
you
9. AFTERTOUCH ENABLE / DISABLE SELECT: You can set each ZONE to respond or not respond
CHANNEL AFTERTOUCH information. This is done in the EDIT mode for each ZONE.
10.
SHAPE:
velocity
There are 8 preset velocity curves to choose from that vary the dynamic response of the keyboard. Again, these settings are specific to each ZONE and are accessed while in the EDIT
mode.
Velocity
information
curve
from
settings
the
keyboard
specific
will
to
each
be
transmitted
ZONE.
These
to
setting
the
will
receiving
alter
MIDI
the
way
channel.
Page 4

GLOBAL
the dynamic response of the entire keyboard across all (2) ZONES. There are 8 global settings
to choose from. Again, these setting are accessed while in the EDIT mode.
VELOCITY
CURVE:
This
VELOCITY
CURVE
setting
is a global
one, meaning
it
affects
SUSTAIN
SUSTAIN
VOLUME
dard
POWER
plied
MEMORY
powered down. All programmed settings are transmitted when the unit is powered up. There
is no need to store edited information, simply exiting the edit mode causes the information
to be stored.
PEDAL:
PEDAL
PEDAL:
VOLUME
POWER
PEDAL
INPUT:
SUPPLY
STORAGE:
The
input.
The
The
Studio
The
Studio
input.
Studio
input.
The
Studio
Logic
VP-26
Logic
Logic
Logic
SL-161/SL-61
by Fatar
SL-161/SL-61
SL-161/SL-61
SL-161/SL-61
has a connection
is
recommended.
has a connection
has a
will
connection
remember
jack
on
the
rear panel for
jack
on
the
rear panel for a stan-
jack
on
the
rear
panel
all
of
your preset information when
for
the
a
sup-
SECTIONS.
POWER INPUT
POWER SWITCH
SUSTAIN PEDAL
Rear Panel Connections and Features:
Powering up. Connecting Pedals and hooking up with your other gear.
The
Studio
Logic
SL-161/SL-61
INPUT.
The
AC
adapter
minimum current of 200 mA.
The
Studio Logic
SUPPLY
INPUT.
board all preset data is transmitted out through the MIDI OUT connections.
The
Studio Logic
This jack
SUSTAIN
pedal is presently connected to the keyboard, regardless of polarity (e.g. PS100 or VFP1). Note:
SUSTAIN
PEDALS.
PEDAL
SL-161/SL-61
There
SL-161/SL-61
will
function
must
has a connection jack on
POWER
SUPPLY
has
its
POWER
is
also a red
has a connection jack on
properly
Upon
powering up
be
plugged
LED
with
in
supplied
SWITCH
to
indicate
either
the
Studio Logic
prior
to
the
rear
panel for
with
this
unit
is a positive
located on
the
the
type of "normally closed" or "normally open"
powering up
the
back
unit
is on.
rear
panel for a SUSTAIN
SL-161/SL-61
will
to
properly
the
AC
POWER
tip
panel next
Upon
powering up
recognize whichever type
sense
polarity.
SUPPLY
9V
DC
to
the
POWER
the
PEDAL
with
key-
input.
of
a
VOLUME PEDAL
The
input
ge
the
Studio
Logic
SL-161/SL-61
that
uses a stereo or balanced jack
volume
equally
has a connection jack on
across
all
four
(e.g.
ZONES
simultaneously.
the
VP-26
rear
panel for a standard
by Fatar).
This
volume
VOLUME
control
will
PEDAL
chan-
Page 5
MIDI OUT CONNECTIONS
MIDI OUT
Master Controller to your various MIDI sound sources. Using a standard 5 pin DIN MIDI cable,
connect the Studio Logic MIDI OUT to your MIDI input jack on your synthesizer, sound module or other MIDI equipped keyboard. You may use the THRU (daisy chain) feature on your MIDI
gear to connect to other MIDI modules if you like. Avoid daisy chaining more than 2 modules, if possible, to reduce the possibility of MIDI log jam or timing delays. The Studio Logic
SL-161/SL-61
to help reduce the possibility of timing delays when connecting to multiple MIDI sound modules.
MIDI OUT connections on this keyboard.
Connections: The
conveniently
When
connecting multiple
MIDI OUT
is
supplied with
two
devices
jacks
are
where you
parallel (identical)
to
your
SL-161/SL-61
connect
MIDI OUT
allocate
your
Studio
jacks on
them equally
Logic
the
rear panel
across
SL-161/SL-61
the
two
ZONE SELECT
SECTION 4.
Description of Front Panel Controls and Features:
What are they, what do they do and how do I use them?
Located on
the
The LED indicators will be lit up when its corresponding zone is active or selected for editing.
three
the
top
keyboard
panel
ZONES
there
are
the
(2)
ZONE
buttons
while in play mode and (2)
for
the
selecting
(1)
enabling and disabling of
the
ZONES
while in
EDIT
MODE.
In PLAY mode any combination of ZONES may be on or off at any point in time. However, in
EDIT
mode
the
ZONE
switches may only
at a time
mode.
sponding ZONE BUTTONS.
Please note that you may only press a zone button and disable or^nable a zone while no notes
are depressed on the keyboard or while the sustain pedal is being depressed.
may
You
are
be
edited
able
and
to
jump from
therefore
ZONE
be
only
to
used
one
ZONE
to
select
ZONE
light may
while in
one
ZONE
at a time.
be
lit
at a time
edit
mode by depressing
Only
one
while in
the
ZONE
EDIT
corre-
Page 6

UP, DOWN, ENTER/EDIT
The
UP
mode.
and
DOWN
buttons
are
used
to
scroll
through
the
FUNCTION
selections
while
in
edit
10
(H)
(ON)
MIDI
KEY
PAD;
AND
(-),
AND
(OFF)
CHANNEL
Depressing
is
lit
Using
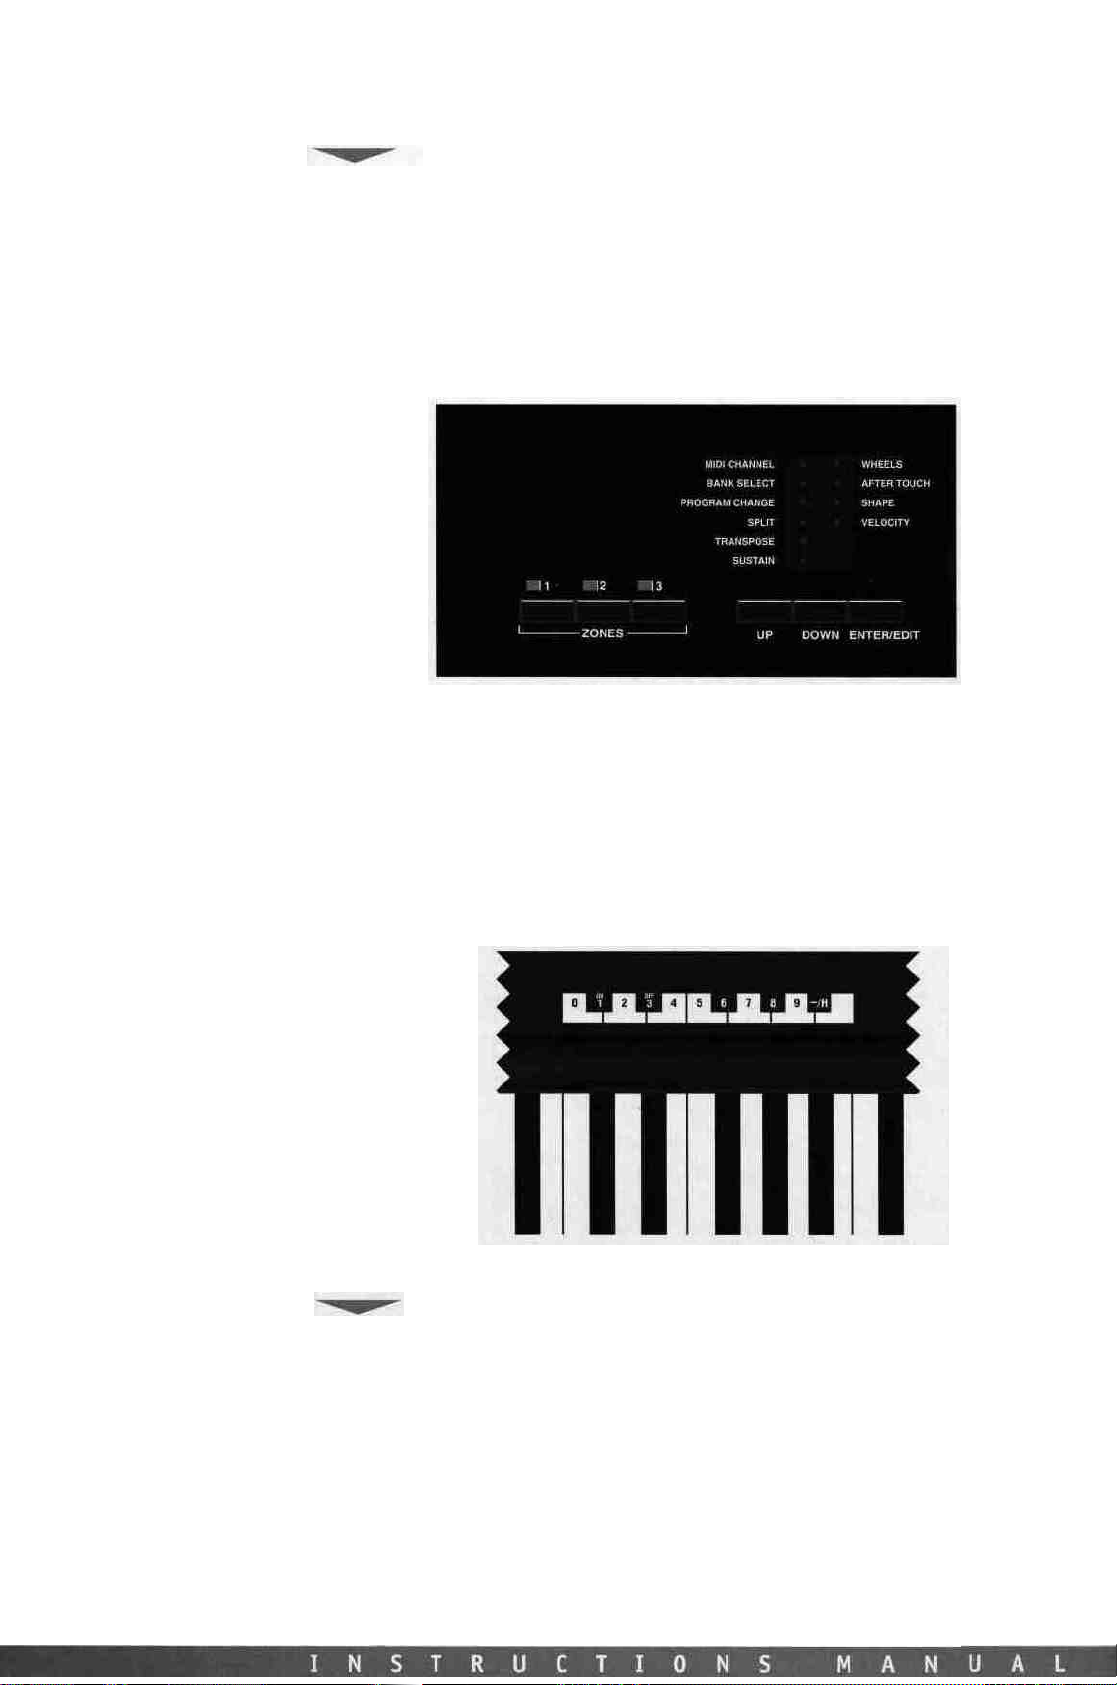
This is the area where you enter desired parameters for selected FUNCTIONS being edited. The
numerical keypad, (H) and (-), (on) and (off) are assigned to correspond to the keys of the
central octave of the KEYBOARD.
While
note information.
In
other words, while
information
Used
access
Select desired
UP/DOWN
using
depressing the EDIT/ENTER button. In exiting the EDIT mode you store the new information
automatically
and transmit information on the new selected MIDI channel. In order to play and transmit on
a
desired
lit.
The
the
next
to
the
the
UP/DOWN
in
EDIT
until
to
select which
this,
parameter
buttons
the
10
in
ZONE,
ZONE
ENTER/EDIT
corresponding
buttons
MODE
these
in
EDIT
you
exit
MIDI
enter
ZONE
for
to
select
key keypad
the
SL-161/SL-61
select
the
switch
will
button
enters and
FUNCTION
will
cause
keys
now
function
MODE
the
the
EDIT
MODE.
channel each
EDIT
editing
MIDI
to
set
Master Controller's memory and enable
corresponding
toggle
of
mode
by depressing
CHANNEL
the
ZONE'S
to
turn
exits
the
that
is presently selected
the
LED
to
scroll through
as
our data entry method and
entire keyboard is
the
(2)
ZONES
by selecting
function.
MIDI
ZONE
ZONE
ENTER/EDIT.
its
corresponding
You
transmit
switch
on and
off.
while
EDIT
mode.
disabled
will
now
channel. Exit
While
for
editing.
the
FUNCTION
and
will
transmit
enter a one or
in
play
ZONE
the
keyboard
mode
its
in
edit
mode a LED
selections.
will
not
not
transmit
information
switch.
two
digit
the
EDIT
ZONE
so
that
transmit
note
on.
Use
the
value
mode by
to
play
its
LED
To
is
BANK SELECT
PROGRAM CHANGE
SPUn-
Used
to
transmit
assigning
you to change the sound bank of your synth module or external sound source.
The
you are transmitting to and can vary from manufacturer to manufacturer. If the synth module
you
wish to select. If your module requires a more complete protocol (Control 32+ Control 0) then
you need to enter Control 32 and then press the key corresponding to the "H" (represents
Higher part of Bank Change Byte) symbol (same as minus key). Then enter the desired number for Control 0. The key sequence would be as follows: enter 32, then the (-) minus key
which also has the (H) symbol labeled above it, then the bank number to change to.
Used
meter you
switch, then enter EDIT mode by selecting ENTER/EDIT.
Select desired
UP/DOWN buttons to select the PROGRAM CHANGE function. Enter the desired number of your
patch selection on the keypad (MIDI Program change messages are from 1 to 128). Exit the
EDIT mode by depressing the EDIT/ENTER button. In exiting the EDIT mode you store the new
information
and enable the keyboard to play the new selected PROGRAM CHANGE.
Used to select the range of keys to be active for a specific ZONE. To set the Key Range or SPLIT
for a ZONE,
to
lowest key on the KEYBOARD and then the highest key on the KEYBOARD to define the range
of
edit
the
reception
are
using requires only "Control
to
select a PATCH
SPLIT
is
keys
to
parameters
or
MIDI
protocol
first
turn
ZONE
in
the
enter
the
lit.
Press
be active
that
initiate a BANK
CHANNEL,
on
for
SL-161/SL-61's
EDIT
the
in
were changed.
press
for
BANK
NUMBER
the
desired
editing
Master
MODE
ZONE
button
that
ZONE.
SELECT
or
PROGRAM
by depressing
by pressing
Exiting
CHANGE
DOWN
32"
ZONE
Controllers memory,
The
message
button
depends on
then you
CHANGE
by selecting and pressing
ENTER/EDIT,
for
the
the
EDIT
ranges
on a given
to
switch
the
will
have
for a specific
its
corresponding
ZONE
you wish
MODE
of
keys
zone.
After
selecting
to
BANK
SELECT.
type
and
make
to
only enter
ZONE.
ZONE
transmit
toggle
stores
can be any one note (by
the
up or down
to
set,
the
information
This mode allows
of
the
sound module
the
bank number you
To
access
its
corresponding
switch.
selected patch number
now
Now
till
the
press
and
this
use
light
the
desired
all
hitting
and
para-
ZONE
the
next
other
the
Page 7

TRANSPOSE
SUSTAIN
same
key
twice)
or
the
entire length of the
highest key. The range can be any contiguous combination of notes in between the highest
and lowest note on the keyboard and completely independent and different for each zone. You
can ovelap any amount of notes from ZONE to ZONE. '
Used to TRANSPOSE the range of keys on a ZONE up or down a specific amount of half steps
from
middle
middle C corresponds to the central middle "C" on the Grand Staff, (providing the stored patch
in your synthesizer module is set to the same value).
Let's say you want to transpose and raise the tone of a ZONE by 4 semitones. Enter EDIT
mode, select
UP/DOWN keys. Now hit 4 on the numerical keypad and exit the EDIT mode. Let's say you wanted to lower the tone by an octave. Follow the same procedure as above but instead of hitting
(4) on
can TRANSPOSE a maximum of +/" 24 semitones (or two octaves) by entering a positive or
negative number up to 24 (+ or -). Positive values are entered by depressing the desired number
keys
key(s).
This FUNCTION allows you to enable or disable the SUSTAIN PEDAL for each zone. For an example, if you want to disable the SUSTAIN PEDAL for ZONE 2: While in the EDIT MODE press
UP/DOWN
on),
press
to
"E
SUSTAIN
excluded ZONE, select EDIT, SUSTAIN and then press ON.
C.
Normally
the
desired
the
10
key
and negative values
again
to
select the
the
ZONE
#2
flat"
on
the
numerical keypad. After
PEDAL,
while
ZONE
the
"4"
ZONE
keypad,
are
SUSTAIN
button
no. 2 will
ZONES
to
be
first
hit
entered by
to
select
KEYBOARD
have a TRANSPOSE
edited,
the
function.
ZONE 2 or
be
select
minus
first
that,
excluded.
key
hitting
Now
editing
all
the other
To
by
the
then
the
that
and then
regain
hitting
value of
enter
SUSTAIN
the lowest and then the
"O".
This
means
TRANSPOSE
12
(-)
key
ZONES
SUSTAIN
function
and
exit
then
the
is selected
OFF
key
which corresponds
will
be affected
PEDAL
EDIT
desired number
that
using the
mode.
(LED
switched
control
the
You
by
the
on the
WHEELS
An obvious application
to
the
lower end of
ZONES
to
play a Piano or Pad/String sound layer leaving
them.
Hopefully you are starting to see even more of the possibilities now becoming available to you
using a Studio Logic Master Controller. With just a bit of creative thought on your part you
should be coming up with interesting and useful patches for your own musical needs.
This FUNCTION allows the user to disable or enable the two WHEELS for each of the four ZONES.
Again, as an example, if you wanted to disable the two WHEELS for ZONE 1: enter the EDIT
mode, select
scroll to the WHEELS parameter selection (making sure its corresponding LED is lit,) then
select the OFF key (corresponding to middle Eb on the keyboard.) Now exit the EDIT mode by
depressing
WHEELS
above but instead select the ON button on the keyboard (corresponding to middle Db on the
keyboard.)
A
possible application
part of
ending somewhere in the middle of the keyboard, leaving room for a split above it.
Perhaps
the lower part of the keyboard but sounding in the middle range closer to middle "C". Leave
the
SUSTAIN
Now use remaining ZONES to create a layer using the upper unused remaining notes on the
keyboard. Assign
for these ZONES but leave the WHEELS enabled.
ZONE 1 for
the
while
ZONE 1 will
the
keyboard set
you
can
PEDAL
for
this
the
KEYBOARD
editing
ENTER/EDIT
transpose
enabled
this
for
this
ZONE
button.
be
to
the
sustaining or
but
or
FUNCTION
(pressing
excluded.
feature would
lower
disable
ZONES
would be
that
is set
With
this
To
ZONES
the
to a lead patch or patches,
to
disable
to a Bass
ZONE 1 button),
edit
reverse
be
to
"Pad"
up
WHEELS
patch.
all
the
this
edit
have a ZONE
sounds,
an
octave
for
this
the
In
the
now
other
follow
with
so
ZONE
Sustain
addition,
SUSTAIN
use
ZONES
or
ZONES
the
that
Pedal
on
a ZONE
now
use
PEDAL
functional
the
UP/DOWN
will
be
affected by the
the
same
instructions
assigned
top
ends
you would play chords on
or
ZONES.
disable
of these
the
SUSTAIN
to
the
other
buttons
the
lower
ZONES
PEDAL
set
for
to
as
Now you can perform and hold down chords in the lower part of the keyboard using and hol-
ding down the SUSTAIN PEDAL to "latch" the sustained chords.
Now, using both hands to play lead over the top, using the right hand to play melody and the
left
to
use
the
PITCH
and
MODULATION WHEELS,
then SUSTAIN and "latch" again on the next chord and continue playing two handed leads over
the new chord.
Release
the
SUSTAIN
pedal
to
change chords
Page 8

AFTERTOUCH
SHAPE
This FUNCTION allows you to enable or disable the AFTERTOUCH for each ZONE. .For an exam-
ple, if you want to disable the AFTERTOUCH for zone 3: While in the EDIT mode select ZONE 3
for
editing
Then
other
AFTERTOUCH control on the excluded ZONE, select EDIT, AFTERTOUCH and then press ON.
An application for this might be as follows: Refer to the patch set up from the preceding example
in
AFTERTOUCH
sirable
patch.
sages from your lead performance being sent to your sustaining chords.
This function allows the user to change the dynamic cutves which control the velocity responses for each of the four ZONES. This FUNCTION allows you to adapt your Master Keyboard
Controller to the dynamic response of your expander or external MIDI device. It also allows
you
FUNCTION offers you 8 different preset curves to select from, 4 positive and 4 negative. Each
ZONE
To select a specific SHAPE for a ZONE follow the normal EDIT operation. Enter EDIT mode,
select a desired
function
Selecting a (-)
of that curve. By negative shape we mean that the curve has an opposite affect with respect
to
the
FUNCTION is useful when you have two different curves (one + and one -) on two ZONES, as
this
(-) 1 corresponds to the inverted SHAPE 1, and so on.
press
ZONES
the
vibrato
Use
to
adjust
can
SHAPE
touch.
results
then
press
UP/DOWN
OFF
key which corresponds
will
be
affected by
WHEELS
the
have
in a velocity
section above.
for
volume swells or vibrato modulation. While doing
messages
AFTERTOUCH
the
its
ZONE
using
before
Therefore, a light
are
keyboard's reaction
own
SHAPE
for
the
hitting
crossfade
buttons
the
being
disable feature
setting.
editing
UP/DOWN
the
touch brings about a high response and vice versa. This
to
scroll
to E flat
AFTERTOUCH
In
your lead patch
sent
to
your sustaining chords
in
these lower
to
your specific
by
hitting
buttons and
number
effect.
its
will
select
As
one sound gets lower
on the numerical keypad. After
while
corresponding
finally
to
and select the
ZONE
no. 3 will
in
the
ZONES
touch.
The
select 1,2,3 or 4
an
inverted version or
AFTERTOUCH
be excluded.
right
hand you
this
you
in
the
lower
to
eliminate
Studio Logic
ZONE
switch.
the
other gets
function..
that,
all
To
may
be
may
find
that
ZONES
aftertouch
SL-161/SL-61's
Now
select
for
SHAPE
selection.
NEGATIVE SHAPE
louder.
the
regain
using
unde-
in
this
mes-
SHAPE
edit
SHAPE
SHAPE
VELOCITY
SHAPE
no. 1 has a linear
sent on the market. This is the default setting for each of the (2) ZONES..
SHAPE
no. 2 has a less
ful
to
gain a wider dynamic response.
a ballad or softer piece of music for a more expressive feel to the keyboard. You may also like
this
setting
easier to "pump" a part or vary the accents. It is also useful when the input MIDI device is
too sensitive and you want to lower the relative velocities being transmitted.
SHAPE
higher
Rock Piano or Honky-tonk Blues style and need to be heard over a loud band. This SHAPE sca-
les the relative velocities up.
SHAPE no. 4 has an even more sensitive response than SHAPE no. 3. Useful for removing some
or all of the dynamic response to the keyboard. Use it when you want to trigger Samples, Loops
or Sound FX easily so that they play at their maximum volume without having to hit the key
as hard.
The
VELOCITY
dynamic response settings for the keyboard and the MIDI velocity information that is transmitted.
mode when you select
you are changing a GLOBAL setting covering all three ZONES. While in the previous section you
could
response of the entire keyboard. This VELOCITY parameter can help adapt your Controller
Keyboard to your MIDI modules and to your specific touch and feel preferences so as to give
you the most expressive control available.
To select a VELOCITY curve enter the EDIT mode, use the UP/DOWN buttons to select VELO-
CITY,
mode to play and audition each of these curves.
while
using
no. 3 has a more
velocities
The difference
select a dynamic curve
then
with a lighter
is
similar
chose 1 through
response, which is compatible
sensitive
the
in
is
VELOCITY,
response,
SL-161/SL-61
to
sensitive
function
that
8 on
touch.
the
for
the
each
the
response
and
VELOCITY
10 key keypad
so
it
Try
this
SHAPE
program Hi
than
This
SHAPE
application
parameter
LED's
for
ZONE,
now you have 8
requires a stronger
Hats
all 3 ZONES
with
on a Piano
or
Drums
Shape
no. 1.
may
be useful
to
the
SHAPE
is
to
select
most
of
the
touch.
or
Electric
into a sequencer,
You
will
to
you
feature
a GLOBAL
light
different
your
setting.
up simultaneously
curves
VELOCITY
MIDI
This
Piano
be able
if
you
in
that
setting.
devices pre-
setting
While
that
while
it
makes
to
transmit
are
playing
they
are
indicating
affect
Exit
is
playing
in
EDIT
use-
it
a
both
the
EDIT
Page 9

10 KEYPAD,
(H)
AND
(-),
(ON) AND (OFF):
As
you have most
uses
the
keyboard
in the central octave, starting at the middle C, are assigned to specific functions for data entry
in EDIT mode and are clearly labeled as indicated in the diagram below. While you are in the
EDIT
mode
and using
and performance information. You must exit the EDIT mode to play notes from the keyboard.
likely
figured
itself
in
EDIT
the
numerical keypad
out
by
mode
as
this
the
point
10
the
keyboard
the
KEY
KEYPAD
Studio
Logic Master Controller
and data entry source.
itself
does
not
transmit
SL-161/SL-61
The
keys
MIDI
notes
DEFAULT SETTINGS
GENERAL RESET
SECTION 5.
Programming
Creating musically useful Patches and how to do it.
Before we
the
design architecture and how
When
your Master
default settings: ^
ZONE
#1
1
through 3 respectively,
switchable commands are in the ON position.
All ZONES set to SHAPE #1, VELOCITY = 4, TRANSPOSE = 0.
VOLUME SETTINGS OF 127 if no VOLUME PEDAL is connected. If a VOLUME
PEDAL
SUSTAIN OFF. (PEDAL is enabled but in the off position, CC 64 - 0)
PITCH BEND value = 0, MODULATION WHEEL value =0
To reset the unit to the above factory settings:
the
Studio
Logic
get
into
some
programming examples and
Controller
ON,
Zones
#2,#3
is connected whatever
is
OFF.
their
position
SL-161/SL-61
The
Master
the
Studio
switched
three
SPLIT
is set
on
zones
the
Logic
for
to
pedal
Controller:
tips,
SL-161/SL-61
the
first
are
set
to
the
full
extension
is
in
will
the
following
Master
time
it
transmit
of
be
transmitted.
information
Controller operates.
will
transmit
on
MIDI
all
61
keys and
the
following
channels
all
is
about
Power up the keyboard while holding down all three UP-DOWN-ENTER buttons, hold for a few
seconds then release all three buttons, c
Page 10

GENERAL PROGRAMMING
INFORMATION
When the Master Controller is powered up it always transmits the contents of the program
memory.
After programming any parameters, the contents of the memory is transmitted when exiting
EDIT mode.
To transmit the contents of the memory while in play mode press the ENTER/EDIT button twice.
Exiting the EDIT mode automatically stores the newly changed parameters, if any, into the
memory.
APPLICATIONS USES AND
USER TIPS
THE ZONES
THE BIG LAYER
When powering down
again upon power up.
You can
You must release all pedals and keys before entering into the edit mode.
When
was
When EDIT MODE is selected, the keyboard does not sound. To test the programmed variations
and
These suggestions are
of these features for your own musical applications and needs.
The
ters and
sounds and modules. We've already discussed how to operate the ZONES.
Now we apply them to musical applications. You can use the three (2) ZONES in a number of
different ways: Here are some options and possible applications using the features of this keyboard.
Set
patches or three similar Piano patches.Try two piano patches and a string patch. Experiment
with
While playing one section of a song, leave some of the layers turned off and then switch them
on
your module try setting and storing your PIANO patches to not respond to MIDI volume (CC#7)
then using a Volume Pedal on your Master Controller you can bring up the Strings behind the
Piano when needed.
not
re-entering
left
when
play
the
ZONES
the
all
three
disabling
during
enter
previously
keyboard
are
ZONES
ZONES
the
the
unit
all
information
the
EDIT
MODE
if
the
EDIT
MODE
it
will
in
the
EDIT
exit
the
EDIT
designed
the
heart
themselves gives
to
the
some
of
the
"Chorus" by pressing
as a starting
of
the
SL-161/SL-61
same range
features on some
in
memory
you
are
holding
be
on
the
parameter
MODE.
MODE.
point
to
Master
Controller.
the
player
new
of
notes and assign each
of
the
ZONES
their
ZONE SWITCHES
down
help
found
is
retained
keys
or pressing
setting
stimulate
Creative
flexibility
of
such as,
to
build
and
then
the
sustain
and ZONE
your
use
of
and
them
to
AFTERTOUCH
dynamics
own
the
ZONE'S
control
three
in
selection
creative
similar
the
transmitted
pedal.
as
it
usage
parame-
over
their
String
or SUSTAIN.
song.
On
THE SPLIT
ANOTHER SPLIT?
Set
two
ZONES
in
your
left
hand
for
an
Electric
hand
for a string
range.
Try a Bass patch using one ZONE in the lowest two octaves of the keyboard, disable the
SUSTAIN
Now create a SPLIT
patch,
disabled.
sound using the Sustain Pedal and now play Horn stabs or lines above it with your right hand.
*Note
per performance range no matter where on the 61 keys you may place a ZONES upper and lower
limits.
nal note placement and tuning as on an Acoustic Piano.
PEDAL
and
You
On
Think
or horn
and
TRANSPOSE
the
last
ZONE
can
play a bass
Splits:
Always remember
of
the
whole keyboard
in
part.
the
for
Use
the
up an octave or
middle
the
line
range
top
octave or
with
to
use
as
TRANSPOSE
your
61
Piano/Pad
two
with
ZONE
so
left
hand, sustain chords you've
the
TRANSPOSE
keys
or
layer
feature
on a Brass
triggers
to
(2)
to
bring
place
it
set
to a Breathy Synth or Comping
feature
available
and set
in
patch
ZONE
these
the
range
with
to
place your parts
rather
(2)
in
the
ZONES
into a useful
of a bass
the
SUSTAIN PEDAL
played
on
than
the
traditio-
right
guitar.
the
Pad
in
pro-
Page 11

A FEW OTHER TIPS
INCLUDED FOR YOUR
CONSIDERATION:
Live and Studio Applications.
Live
application:
elements in your layers.
Studio application: Connect your MIDI out from your Master Controller to the MIDI in on your
Sequencer and the MIDI out of your sequencer to your Modules. Set your sequencer input filter to Direct Echo or the appropriate setting to pass all information through (non channelize). If you come up with an interesting layered patch set your sequencer to multi-record and
hit edit enter twice while your sequencer is recording to record your patch changes to the
sequencer and then continue and play while recording a performance for all your layers. For
another section of your track you can do the same with another patch and record and automate your patch
may come up with patches and parts you might not have conceived programming the tradi-
tional one track at a time way.
Live
application:
Live
application:
ZONE
hit
the
set a range
your sampler
sample up or down to a useful range for triggering. If the (+) or (-) 24 steps of transposition
is not enough, assign the Sample trigger note to an appropriate one in the sampler and save
it that way.
Try
using the
changes
Use
Set a ZONE
same
of (1) one note for
to
trigger a Loop
along
the
inverted
note twice
different
with
to
only
at
that
or
SHAPES
your performance. Using the layers
or
(-)
SHAPES
one note.
either
the lowest note or
ZONE.
trigger a Sound
in
When
Assign
FX.
each
ZONE
to
experiment
editing
that
Zone
Use
the
to
manipulate
with
velocity
SPLIT parameter
highest
note on the
to a MIDI
TRANSPOSE
channel
feature
and
balance the
on
the
crossfades.
in
keyboard
that
to
SL-161/SL-61
setting
goes
bring
you
up
to
to
the
Live or Studio
alternate patches not stored in the first 127 patch positions on your synth.
Live
application:
CHES
to
Live or Studio
in octaves or harmonies.
Studio application: Again, use multi-record on your sequencer but this time with a split patch
set up on your
The point is, get creative and innovative using all your new possibilities.
Studio, Scoring to Picture application: Perhaps your sequencer might be locked to video via
SMPTE.
Set up a split
more live sense while watching picture. Jump to another sound as the picture inspires you
while recording all your performances simultaneously to the sequencer in multi-record. After
recording you'll have each of your instruments parts recorded on it's own track, now you can
go back and edit or elaborate on your improvisation to picture. If your sequencer doesn't
record
separate
nel parts after recording to separate your to individual tracks for editing.
application:
Use
the
(2)
toggle and play one
application:
SL-161/SL-61
record two or
patch
with
MIDI
channels
Using
the
BANK SELECT
ZONES
ZONE
Use
the
all
to
to
set up three
at a time
TRANSPOSE
more
Orchestral elements on the
separate tracks simultaneously you
for
parts
particular
feature
at
once.
feature
different
songs
to
create
Bass
get
to
those often
patches,
or
sections of songs.
intervals
and
comp
or chords and melody.
SL-161/SL-61,
perform and play
can
always
useful
use
the
ZONE
from layered
filter
by chan-
and
SWIT-
ZONES
in
a
SECTION 6.
Charts:
Useful Charts and Graphics
Included on the following two pages are 2 identical copies of a template for you to write down
the settings for the patches you come up with. These are included so you can build a library
of your favorite patches and settings. Carefully tear or cut out one of the copies and feel free
to run it through a copy machine to make more blanks for yourself. If you require more copies
call, in
the
USA,
Music
Industries
Corp.
at 1(800)431-6699.
Page 12

PATCH PARAMETER CHART
ModelSL-161/SL-61
Studio Logic
Master Controller
PATCH PARAMETER CHART
ModelSL-161/SL-61
Studio Logic
Master Controller
Page 13

ZONE VELOCITY
CURVES (SHAPE)
The
following
are here to help you conceptualize and understand how these CURVES affect the dynamic
response of your ZONES.
charts
are
graphic displays
of
the
ZONE
specific
(SHAPE)
velocity
curves.
They
Page 14

GENERAL
MIDI
PATCH LIST
The following charts show the standard General MIDI patch locations. If you are using a
General
ZONE'S
MIDI
Module or Keyboard
PATCH
CHANGES
this
you can refer
to
will
this
come
chart
in
handy. When you are programming your
for
entering
numbers
of
desired Patches.
1. Piano 1
2. Piano 2
3. Piano 3
4. Honky Tonk
5. Electric Piano 1
6. Electric Piano 2
7. Harpsichord
8. Clavinet
9. Celesta
10. Glockenspiel
11. Muic Box
12. Vibraphone
13. Marimba
14. Xylophone
15. Tubular Bell
16. Dulcimer
17. Electric Organ 1
18. Electric Organ 2
19. Electric Organ 3
20. Church Organ
21. Reed Organ
22. Accordion
23. Harmonica
24. Bandonion
25. Nylon Guitar
26. Steel Guitar
27. Jazz Guitar
28. Clean Guitar
29. Muted Guitar
30. Drive Guitar
43. Cello
44. Contra Bass
45. Tremolo Strings
46. Pizzicato Strings
47. Harp
48. Timpani
49. Strings
50. Slow Strings
51. Synth Strings 1
52. Synth Strings 2
53. Choir Aahs
54. Voice Oohs
55. Synth Voice
56. Orchestra Hit
57. Trumpet
58. Trombone
59. Tuba
60. Muted Trumpet
61. French Horn
62. Brass Section
63. Synth Brass 1
64. Synth Brass 2 '
65. Soprano Saxophone
66. Alto Saxophone
67. Tenor Saxophone
68. Baritone Saxophone
69. Oboe
70. English Horn
71. Bassoon
72. Clarinet
86. Solo Vox
87. Fifths
88. Bass Lead
89. Fantasia ,
90. Warm Pad
91. Poly Synth
92. Space Vox
93. Bow Glass
94. Metal Pad
95. Halo Pad
96. Sweep Pad
97. Ice Rain
98. Sound Track
99. Crystal
100. Atmosphere
101. Brightness
102. Goblin
103. Echo Drop
104. Star Theme
105. Sitar
106. Banjo
107. Shamishen
108. Koto
109. Kalimba
110. Bagpipe
111.
Fiddle
112. Shanai
113. Tinkle Bell
114. Agogo
115. Steel Drum
Page 15

TROUBLE SHOOTING
GUIDE
PROBLEM Keyboard does not power up?
POSSIBLE
SOLUTIONS • Make
31. Lead Guitar
32. Harmonic Guitar
33. Acoustic Bass
34. Finger Bass
35. Pick Bass
36. Fretless Bass
37. Slap Bass 1
38. Slap Bass 2
39. Synth Bass 1
40. Synth Bass 2
41. Violin
42. Viola
73. Piccolo
74. Flute
75. Recorder
76. Pan Flute
77. Bottle Blow
78. Shakuhachi
79. Whistle
80. Ocarina
81. Square
82. Sawtooth
83. Calliope
84. Chiffer
85. Charang
116. Wood Block
117. Taiko
, 118. Melody Tom
119. Synth Drum
120. Reversed Cymbal
121. Guitar Noise ,
122. Key Click
123. Seashore
124. Birds .
125. Telephone
126. Helicopter
127. Applause
128. Gunshot
SECTION 7.
Appendix
sure
the
power supply
• Make sure the power supply is properly connected to the keyboard
is
connected
to
the
wall
outlet
PROBLEM Keyboard does not seem to be sending MIDI notes to my modules
POSSIBLE SOLUTIONS Make sure you are not in the EDIT MODE.
Make sure the ZONE switch of the ZONE you are trying to play is on.
Make sure the MIDI channel you are playing on is enabled on your sound source.
Make sure your sound modules audio outputs are connected properly to your mixer or amp.
Make sure your mixer amp or sound system is on and the volume settings are up.
PROBLEM I have made changes in EDIT MODE but the changes do not seem to be present when I
return to PLAY MODE?
POSSIBLE
POSSIBLE SOLUTIONS
POSSIBLE SOLUTIONS • Make sure it is plugged in properly to the SUSTAIN PEDAL INPUT
POSSIBLE SOLUTION • Power the keyboard down. With the SUSTAIN PEDAL plugged in to the SUSTAIN PEDAL INPUT
SOLUTION • This can happen very
that
you were
you
last
PROBLEM I know I am sending
I play but I hear nothing?
•
Make
sure
• Make sure your sound modules audio outputs are connected properly to your mixer or amp.
• Make sure your mixer amp or sound system is on and the volume settings are up.
PROBLEM The SUSTAIN PEDAL does not seem to work?
•
Make sure
PROBLEM The SUSTAIN PEDAL seems to work in reverse?
power
the
ting for the type of pedal you are using and adjust properly.
playing
edited
the
the
keyboard
easily.
before
not
necessarily
MIDI
VOLUME
SUSTAIN
up.
PEDAL
This
When
hitting
the
to
my
is
PEDAL
is
will
you
enter EDIT
EDIT. When
ZONE
you
module
depressed forward
enabled
cause
because I see
for
the
SL-161/SL-61
MODE
entering
have on
to
the
ZONE
make sure you are
edit
mode
you
in
PLAY
MODE.
the
MIDI
indicator
send
full
volume!
you
are
playing
to
sense
the
editing
will
be on
light
proper
the
the
up when
polarity
ZONE
ZONE
set-
PROBLEM The WHEELS or AFTERTOUCH do not seem to work?
POSSIBLE SOLUTIONS • Make
• Make sure they are enabled in the Patch in your module you are sending to.
PROBLEM I am playing a ZONE that I know is on but nothing is happening?
POSSIBLE
SOLUTIONS • Make
• Make sure that the MIDI channel is set correctly.
•
Make
sure
sure
sure
they
are enabled on
you
are
playing
the
VOLUME
within
PEDAL
is
the
ZONE
the
SPLIT range
depressed
and
you
are
playing
of
notes set up
all
other
volume
for
that
setting
ZONE
are
up.
 Loading...