

Page 1
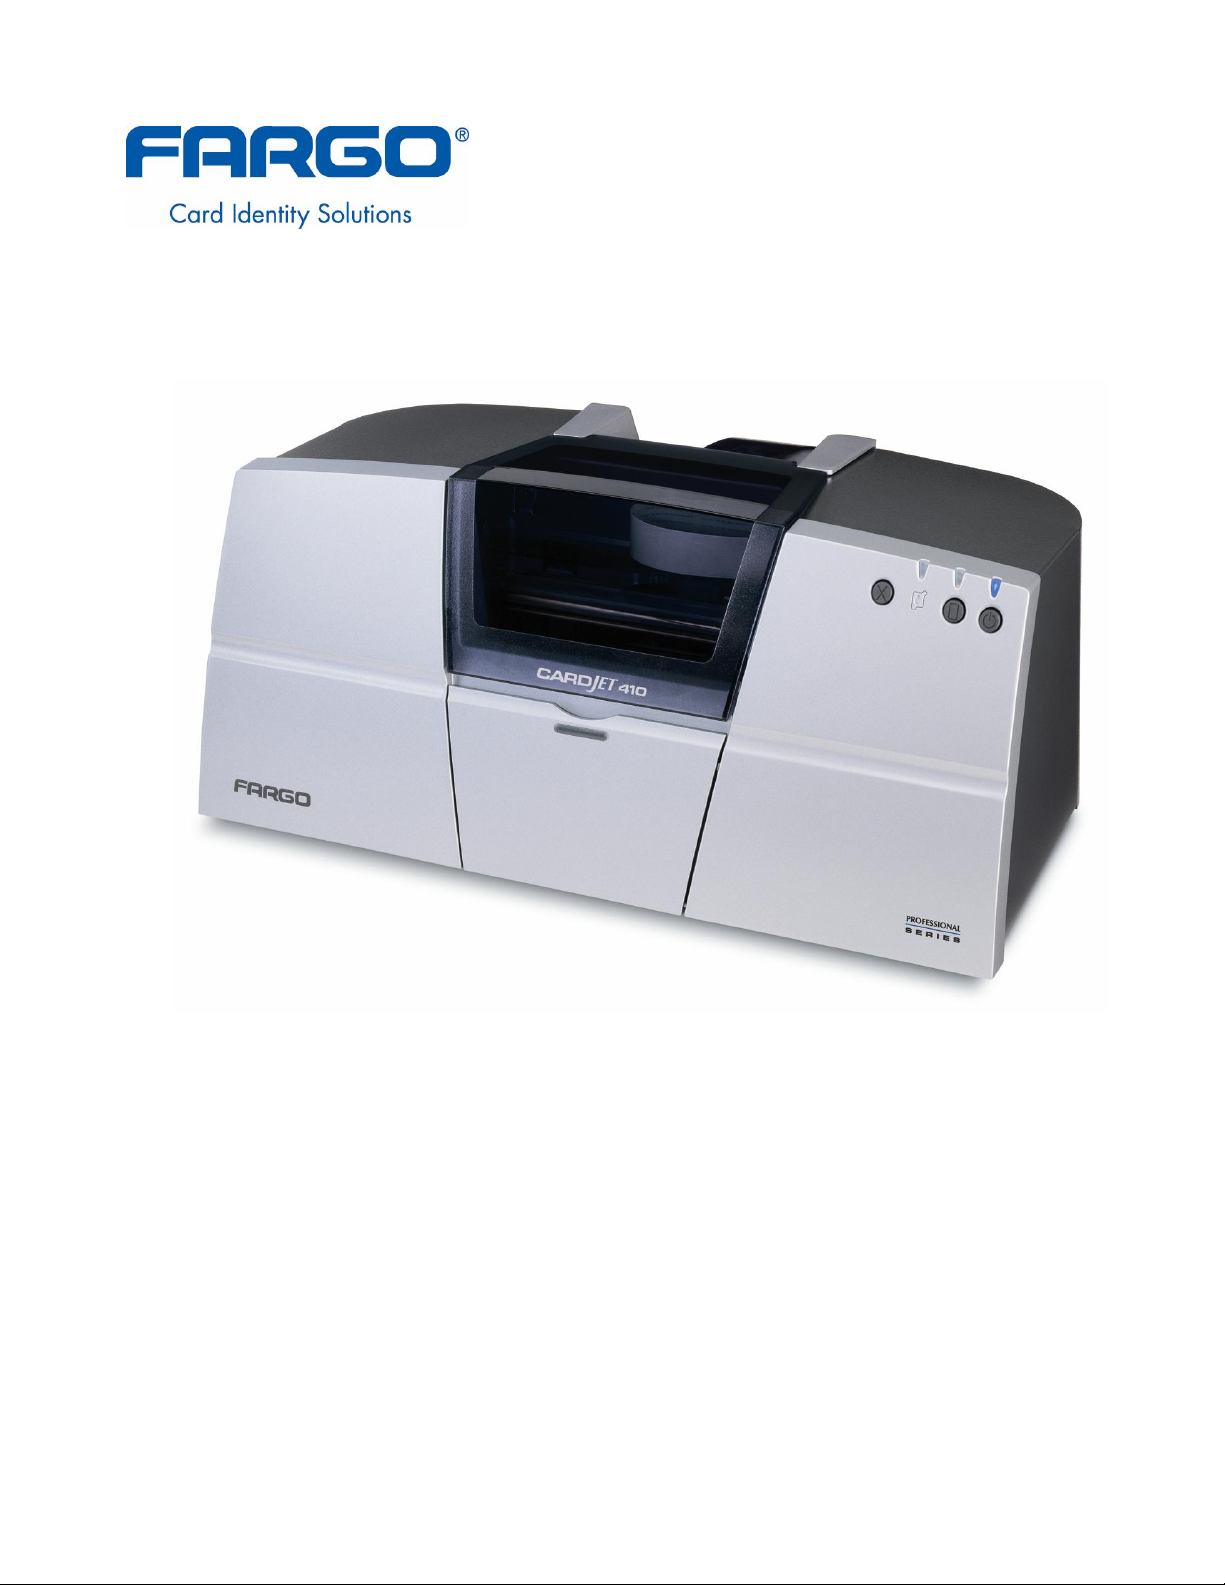
Fargo CardJet™ Professional Series 410 Card
Printer/Encoder and Persona CardJet™ C7
Printer User Guide (Rev. 6.1)
Part Number: L000286
Page 2

RESTRICTED USE ONLY Fargo Electronics, Inc.
Fargo CardJet Professional Series 410 Card Printer/Encoder and Persona CardJet C7
Printer User Guide (Rev. 6.1), property of Fargo Electronics, Incorporated
Copyright 2002, 2003, 2004, 2005, 2006 by Fargo Electronics, Incorporated. All rights
reserved. Printed in the United States of America. Exclusive permission is granted to
authorized resellers of Fargo products to reproduce and distribute this copyrighted document
to authorized Fargo customers, who have signed a “no disclosure agreement” regarding the
restricted, proprietary use of said document.
The revision number for this document will be updated to reflect changes, corrections,
updates and enhancements to this document.
Revision Control
Date Document Title
Number
Revision 6.1 1 February 2006 Fargo CardJet Professional Series 410 Card
Printer/Encoder and Persona CardJet C7 Printer User
Guide
Revision 6.0 1 December 2004 Same document title
Revision 5.0 1 January 2004 Same document title
These reference documents were thoroughly reviewed to provide Fargo with professional
and international standards, requirements, guidelines and models for our technical, training
and user documentation. At all times, the Copyright Protection Notice for each document was
adhered to within our Fargo documentation process. This reference to other documents does
not imply that Fargo is an ISO-certified company at this time.
ANSI/ISO/ASQ Q9001-2000 American National Standard, (sub-title) Quality Management
Systems - Requirements (published by the American Society of Quality, Quality Press,
P.O. Box 3005, Milwaukee, Wisconsin 53201-3005)
The ASQ ISO 9000:2000 Handbook (editors, Charles A. Cianfrani, Joseph J. Tsiakals
and John E. West; Second Edition; published by the American Society of Quality, Quality
Press, 600 N. Plankinton Avenue, Milwaukee, Wisconsin 53203)
Juran's Quality Handbook (editors, Joseph M. Juran and A. Blanton Godfrey; Fifth
Edition, McGraw-Hill)
Any questions regarding changes, corrections, updates or enhancements to this document
should be forwarded to:
Fargo Electronics, Incorporated
Support Services
6533 Flying Cloud Drive
Eden Prairie, MN 55344 (USA)
(952) 941-9470
(800) 459-5636
FAX: (952) 941-7836
www.fargo.com
E-mail: sales@fargo.com
CardJet 410 Card Printer/Encoder and Persona CardJet C7 Printer User Guide (Rev. 6.1)
2
Page 3

RESTRICTED USE ONLY Fargo Electronics, Inc.
Table of Contents
Section 1: Introduction to CardJet____________________________________________1-1
Reviewing the Notices and Trademark Restrictions _________________________________________ 1-1
Reviewing the Notices _____________________________________________________________ 1-1
Reviewing the Trademark Acknowledgments ___________________________________________ 1-1
Reviewing information pertinent to Users in the United States ______________________________ 1-1
How to use the manual _______________________________________________________________ 1-2
Safety Messages (review carefully)______________________________________________________ 1-3
Additional Safety Precautions for CardJet Technicians (review carefully) _____________________ 1-4
Section 2: Technician Overview______________________________________________2-1
Table of Contents ___________________________________________________________________ 2-1
Reviewing the CardJet Printers (410 and C7) ______________________________________________ 2-3
Reviewing the Professional Series CardJet 410 Card Printer/Encoder_________________________ 2-3
Reviewing the Persona CardJet C7 Card Printer/Encoder __________________________________ 2-4
Reviewing the Professional CardJet 410 and Persona C7 ID Card Printers _____________________ 2-4
Technician Review of Printer Features ___________________________________________________ 2-5
Technician Review of CardJet Specifications _____________________________________________ 2-13
Reviewing the Regulatory Compliances_______________________________________________ 2-13
Reviewing the Agency Listings _____________________________________________________ 2-14
Reviewing the Technical Specifications_______________________________________________ 2-15
Technician Review of CardJet Card Printer Setup _________________________________________ 2-18
Selecting an area for the Card Printer_________________________________________________ 2-18
Connecting the Card Printer to the Computer___________________________________________ 2-19
Opening the Top Cover to the Card Printer ____________________________________________ 2-20
Powering up the Card Printer _______________________________________________________ 2-21
Reviewing the Printer Driver Operator Interface ________________________________________ 2-22
Reviewing the Printer Properties window _____________________________________________ 2-25
Technician Review of Ink and Card Cartridges ___________________________________________ 2-26
Reviewing the Ink Cartridges _______________________________________________________ 2-27
Storing the Ink Cartridges (review carefully)___________________________________________ 2-27
Loading the Ink Cartridges _________________________________________________________ 2-28
Reviewing the Card Cartridges______________________________________________________ 2-31
Storing the Card Cartridges (review carefully)__________________________________________ 2-31
Loading the Card Cartridge ________________________________________________________ 2-32
Printing the Test Print (after installing Ink and Card Cartridges)____________________________ 2-34
Technician Handbook for CardJet Card Printers___________________________________________ 2-35
Section 3: Troubleshooting Guidelines ________________________________________3-1
Table of Contents ___________________________________________________________________ 3-1
Safety Messages (review carefully)______________________________________________________ 3-2
Additional Safety Precautions for CardJet Technicians (review carefully) _____________________ 3-3
Interpreting the LED Lights ___________________________________________________________ 3-5
Reviewing the Fargo Controller error types _______________________________________________ 3-8
Reviewing the Error Messages for Printer Drivers __________________________________________ 3-9
Reviewing the Status Monitor dialog box and buttons_____________________________________ 3-9
Reviewing the Error Messages Windows 98Se/Me/2000/XP Printer Drivers __________________ 3-10
Reviewing the Error Messages for the Magnetic Encoding Module _________________________ 3-16
Troubleshooting with Printer Components _______________________________________________ 3-17
Troubleshooting with the Card and Ink LED Indicators___________________________________ 3-17
Troubleshooting with the Printer Driver Ink Fuel Gauges _________________________________ 3-19
Troubleshooting with the normal Printer Driver Preference Options_________________________ 3-19
Troubleshooting with the Magnetic Encoding Module (both 410/C7 models) _________________ 3-19
Troubleshooting with the Error Messages _____________________________________________ 3-20
CardJet 410 Card Printer/Encoder and Persona CardJet C7 Printer User Guide (Rev. 6.1)
3
Page 4

RESTRICTED USE ONLY Fargo Electronics, Inc.
Troubleshooting with the Printer connections __________________________________________ 3-21
Troubleshooting the Card Jam ______________________________________________________ 3-22
Troubleshooting with the Host Driver Download Software ________________________________ 3-22
Troubleshooting with an open Printer Top Cover _______________________________________ 3-22
Resolving the CardJet Card Printer problems _____________________________________________ 3-23
Resolving the Printer Startup problems _______________________________________________ 3-23
Resolving the Bar Code problems ___________________________________________________ 3-24
Resolving the Off-center Card Printing problems _______________________________________ 3-24
Resolving the pixelated or grainy ID Card Photo problems ________________________________ 3-25
Section 4: Printer Adjustments_______________________________________________4-1
Table of Contents ___________________________________________________________________ 4-1
Safety Messages (review carefully)______________________________________________________ 4-3
Additional Safety Precautions for CardJet Technicians (review carefully) _____________________ 4-4
Installing the Windows Printer Driver____________________________________________________ 4-5
Installing the Printer Driver from the Software Installation CD______________________________ 4-5
Resolving the unopened CD Installer Program problem __________________________________ 4-31
Installing the Printer Driver Updates _________________________________________________ 4-32
Downloading the Printer Driver Files_________________________________________________ 4-33
Setting up the Printer Driver __________________________________________________________ 4-34
Windows 98 / Windows Millennium _________________________________________________ 4-34
Windows 2000 / Windows XP ______________________________________________________ 4-34
Printer Driver Options_______________________________________________________________ 4-35
Selecting the Card tab window ________________________________________________________ 4-36
Selecting the Print Quality (Best, Normal or Fast print modes) _____________________________ 4-37
Using the default Card Size ________________________________________________________ 4-39
Selecting the Orientation (Portrait or Landscape) _______________________________________ 4-40
Selecting the Rotate Front by 180 Degrees option _______________________________________ 4-41
Specifying the Copies_____________________________________________________________ 4-41
Clicking on the About button _______________________________________________________ 4-42
Selecting the Image Color tab _________________________________________________________ 4-43
Selecting the Color Quality under the Image Color tab ___________________________________ 4-44
Selecting the Color Quality ________________________________________________________ 4-45
Selecting the Print in Grayscale checkbox _____________________________________________ 4-46
Selecting the Print in Grayscale checkbox _____________________________________________ 4-46
Selecting the Infrared Bar Codes checkbox ____________________________________________ 4-46
Selecting the Default button _______________________________________________________ 4-47
Selecting the Image Position tab _______________________________________________________ 4-48
Using the Vertical and Horizontal Adjustment arrows____________________________________ 4-49
Selecting the Magnetic Encoding tab (both 410/C7 models) _________________________________ 4-51
Using the Verification option under Magnetic Encoding__________________________________ 4-52
Using the Magnetic Track Selection option under Magnetic Encoding _______________________ 4-53
Using the Magnetic Track Options under Magnetic Encoding______________________________ 4-54
Using the Bit Density radio buttons under Magnetic Encoding _____________________________ 4-55
Using the Character Size radio buttons under Magnetic Encoding __________________________ 4-55
Using the ASCII Offset under Magnetic Encoding ______________________________________ 4-56
Using the LRC Generation radio buttons under Magnetic Encoding _________________________ 4-57
Using the Character Parity radio buttons under Magnetic Encoding _________________________ 4-57
Reviewing the Shift Data Left under Magnetic Encoding _________________________________ 4-58
Using the Default button under Magnetic Encoding _____________________________________ 4-59
Reviewing the ISO Track Locations__________________________________________________ 4-60
Reviewing the Sample String _______________________________________________________ 4-61
Reviewing the ASCII Code and Character Table________________________________________ 4-62
Sending the Track Information______________________________________________________ 4-63
Selecting the Print Supplies tab________________________________________________________ 4-64
Using the Reorder Numbers indicators________________________________________________ 4-66
CardJet 410 Card Printer/Encoder and Persona CardJet C7 Printer User Guide (Rev. 6.1)
4
Page 5

RESTRICTED USE ONLY Fargo Electronics, Inc.
Accessing the Color Map Selection Dialog ____________________________________________ 4-67
Selecting the Color Map (Card Media Type) ___________________________________________ 4-68
Selecting the Clean Ink Cartridge Nozzles button _______________________________________ 4-69
Selecting the Test Printer button_____________________________________________________ 4-74
Section 5: Cleaning and Maintenance_________________________________________5-1
Table of Contents ___________________________________________________________________ 5-1
Safety Messages (review carefully)______________________________________________________ 5-2
Additional Safety Precautions for CardJet Technicians (review carefully) _____________________ 5-3
Using the Required Supplies ___________________________________________________________ 5-4
Cleaning the Printer's Exterior _________________________________________________________ 5-5
Cleaning the Ink Cartridges____________________________________________________________ 5-5
Automatically Cleaning Ink Cartridges ________________________________________________ 5-5
Manually cleaning the Ink Cartridges__________________________________________________ 5-6
Gathering the Cleaning Supplies _____________________________________________________ 5-6
Preparing to Clean the Ink Cartridges__________________________________________________ 5-6
Cleaning the Ink Cartridges and Ink Cartridge Cradle _____________________________________ 5-7
CardJet Maintenance Kit Instructions ____________________________________________________ 5-9
Reviewing related Displays _________________________________________________________ 5-9
Lubricating the upper Ink Carriage Rail _______________________________________________ 5-11
Cleaning the Ink Carriage Rod ______________________________________________________ 5-13
Replacing the Felt Ink Well ________________________________________________________ 5-15
Cleaning the Card Hopper Feed Roller________________________________________________ 5-18
Cleaning the interior Card Feed Rollers _______________________________________________ 5-20
Section 6: Fargo Technical Support __________________________________________6-1
Contacting Fargo Technical Support_____________________________________________________ 6-1
Section 7: Reviewing the Spare Parts List ______________________________________7-1
Section 8: Glossary of Terms ________________________________________________8-1
Section 9: Index___________________________________________________________ 14
CardJet 410 Card Printer/Encoder and Persona CardJet C7 Printer User Guide (Rev. 6.1)
5
Page 6

RESTRICTED USE ONLY Fargo Electronics, Inc.
Section 1: Introduction to CardJet
Reviewing the Notices and Trademark Restrictions
Reviewing the Notices
The information in this document is subject to change without notice.
NO WARRANTY OF ANY KIND IS MADE WITH REGARD TO THIS MATERIAL,
INCLUDING, BUT NOT LIMITED TO, THE IMPLIED WARRANTIES OF
MERCHANTABILITY AND FITNESS FOR A PARTICULAR PURPOSE.
No liability is assumed for errors contained herein or for incidental damages in connection
with the furnishing, performance or use of this material.
This document contains proprietary information which is protected by copyright. All rights are
reserved. No part of this document may be photocopied, reproduced or translated into
another language without prior written consent.
Reviewing the Trademark Acknowledgments
CardJet Persona and Fargo are Registered trademarks of Fargo Electronics, Inc. IBM is a
registered trademark of International Business Machines Corporation. Windows is a
registered trademark of Microsoft Corporation. All other trademarks are the property of their
respective owners.
Reviewing information pertinent to Users in the United States
This equipment has been tested and found to comply with the limits for a Class B digital
device, pursuant to Part 15 of the FCC Rules. These limits are designed to provide
reasonable protection against harmful interference in a residential installation. This
equipment generates, uses and can radiate radio frequency energy and, if not installed and
used in accordance with the instructions, may cause harmful interference to radio
communications. However, there is no guarantee that interference will not occur in a
particular installation. If this equipment does cause harmful interference to radio or television
reception, which can be determined by turning the equipment off and on, the user is
encouraged to try to correct the interference by one or more of the following measures:
Re-orient or relocate the receiving antenna. Increase the separation between the
equipment and receiver.
Connect the equipment into an outlet on a circuit different from that to which the receiver
is connected.
Consult the dealer or an experienced radio/TV technician for help.
Use of a shielded cable is required to comply with the Class B limits of Part 15 of the FCC
Rules. You are cautioned that any changes or modifications not expressly approved in this
manual could void your authority to operate and/or obtain warranty service for this
equipment.
CardJet 410 Card Printer/Encoder and Persona CardJet C7 Printer User Guide (Rev. 6.1)
1-1
Page 7
RESTRICTED USE ONLY Fargo Electronics, Inc.
How to use the manual
The CardJet Card Printer User Guide (Rev. 6.1) is, in fact, the troubleshooting and field
service manual for both the Professional Series CardJet 410 Card Printer/Encoder and the
Persona CardJet C7 Card Printer/Encoder. The manual is designed to provide installers
and technicians with quick, efficient lookup of related procedures, components and terms.
The manual can be used effectively either in soft or hard copy, depending on the preference
of the installer or technician.
Manual Description
Glossary of Terms and
Technical/Functional
Specifications (hyper-linked)
Table of Contents (hyperlinked)
Troubleshooting,
Replacement, Removal and
Navigation Procedures (in
hyper-linked Sections)
Cross-Referencing (hyperlinked)
Comprehensive Index
(hyper-linked)
You can go directly to the Glossary of Terms, Technical
Specifications and Functional Specifications to learn how
to use the processes, procedures, functions and windows
for both Card Printers within concise, correlative tables.
You can use the automated Table of Contents to quickly
locate, for example, an error message, a procedure, the
index or an appendix.
You can go directly to the Technical and Functional
Specifications, General Troubleshooting, Printer
Adjustments, Parts Replacement, Removal and
Replacement procedures. The section titles are always
labeled according to their function for consistent usage.
You can use the cross-referencing links to quickly locate,
for example, an error message or a procedure.
You can use the Comprehensive Index to quickly locate
information on both 410/C7 Card Printers, relating to a
specification, a procedural step, a window or screen, a
component, a term, a qualifier or a related feature to the
CardJet Card Printers.
CardJet 410 Card Printer/Encoder and Persona CardJet C7 Printer User Guide (Rev. 6.1)
1-2
Page 8
RESTRICTED USE ONLY Fargo Electronics, Inc.
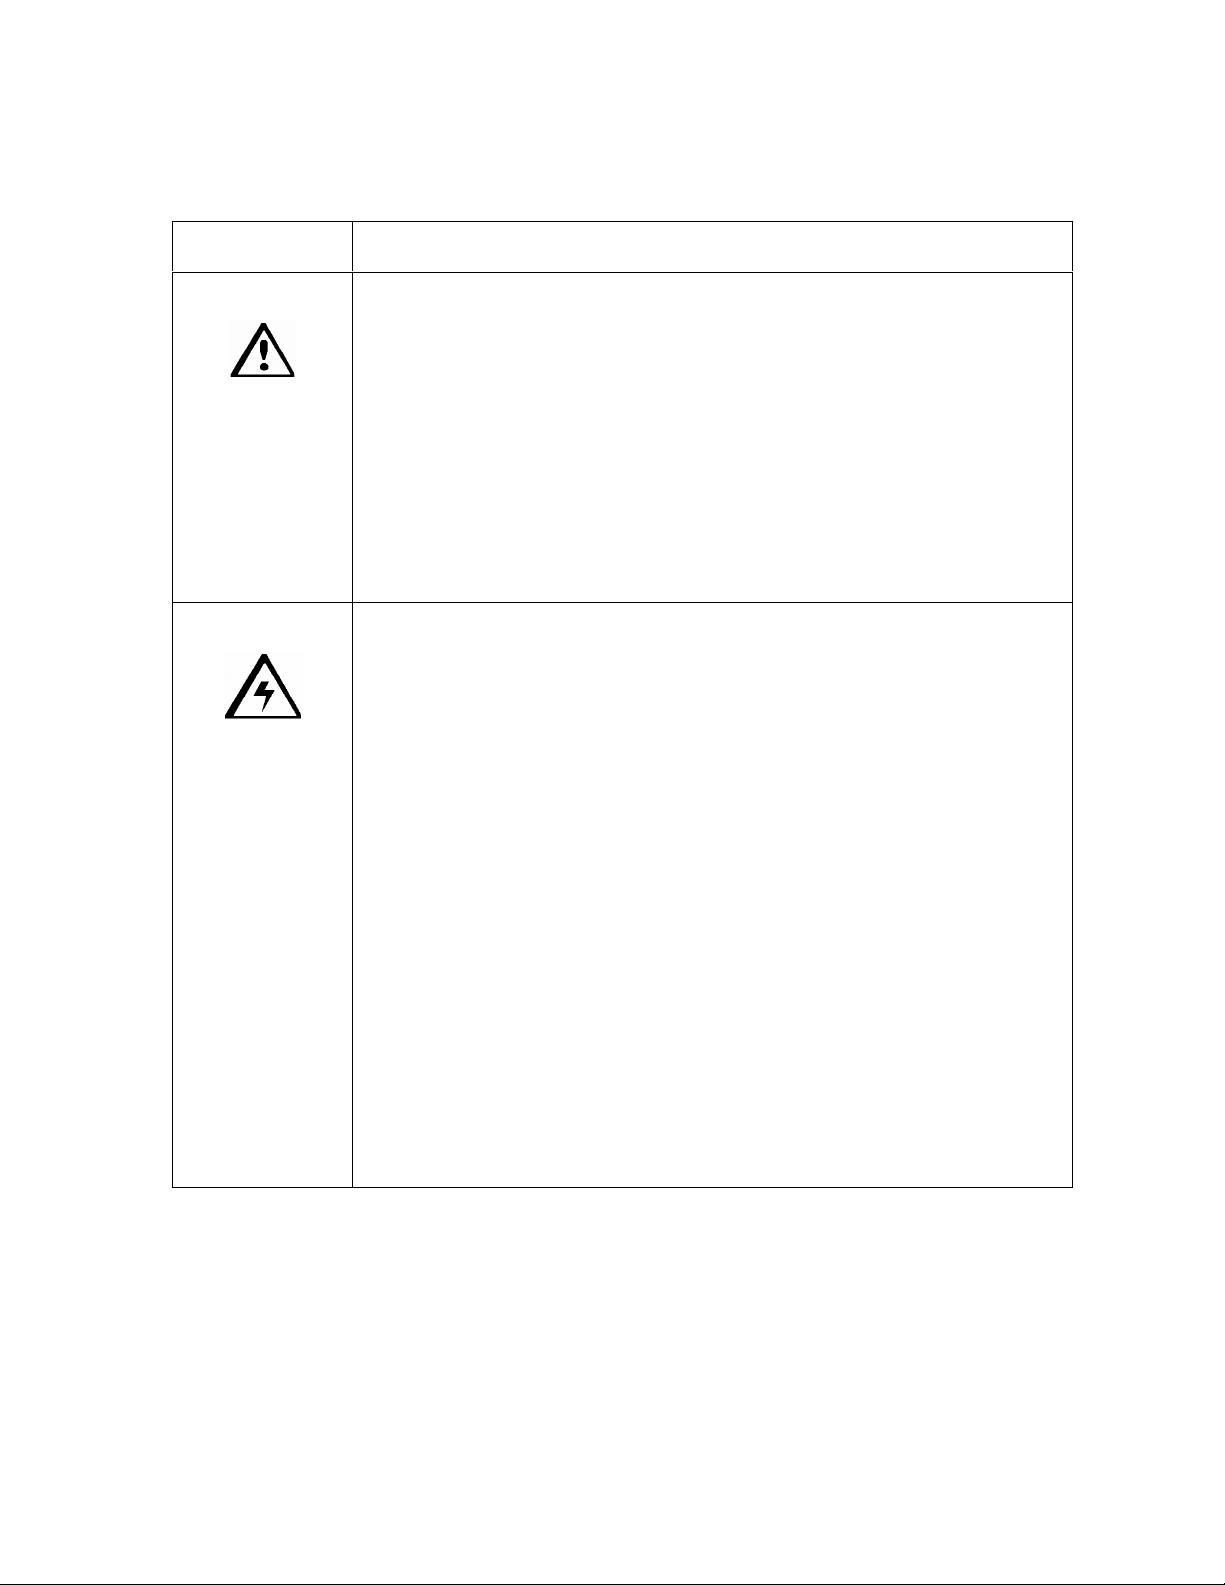
Safety Messages (review carefully)
Symbol Critical Instructions for Safety purposes
Danger:
Caution:
Failure to follow these installation guidelines can result in death or
serious injury.
Information that raises potential safety issues is indicated by a warning
symbol (as shown to the below).
To prevent personal injury, refer to the following safety messages
before performing an operation preceded by this symbol.
To prevent personal injury, always remove the power cord prior to
performing repair procedures, unless otherwise specified.
To prevent personal injury, Ensure only qualified personnel
perform these procedures.
This device is electrostatically sensitive. It can be damaged if
exposed to static electricity discharges.
Information that raises potential electrostatic safety issues is indicated
by a warning symbol (as shown to the below).
To prevent equipment or media damage, refer to the following
safety messages before performing an operation preceded by this
symbol.
To prevent equipment or media damage, observe all established
Electrostatic Discharge (ESD) procedures while handling cables in
or near the Circuit Board and Printhead Assemblies.
To prevent equipment or media damage, always wear an
appropriate personal grounding device (e.g., a high quality wrist
strap grounded to avoid potential damage).
To prevent equipment or media damage, always remove the
Ribbon and Cards from the Printer before making any repairs,
unless otherwise specified.
To prevent equipment or media damage, take jewelry off of
fingers and hands, as well as thoroughly clean hands to remove oil
and debris before working on the Printer.
CardJet 410 Card Printer/Encoder and Persona CardJet C7 Printer User Guide (Rev. 6.1)
1-3
Page 9

RESTRICTED USE ONLY Fargo Electronics, Inc.
Additional Safety Precautions for CardJet Technicians (review
carefully)
Symbol Critical Instructions for Safety purposes
Danger:
Before operating the unit, please read the following safety
precautions carefully:
Fire or Shock Hazard: Prevent fire or shock hazard by not
exposing the unit to rain or moisture.
Electronic Shock: Reduce the risk of electronic shock by not
removing the front, top or back Panels. No Operator-serviceable
parts inside. (Technician Note: Refer servicing to qualified
service personnel.)
Correct Voltage Rating: Operate the unit only on 100-240 VAC,
50/60 Hz. (Technician Note: If you have any doubt as to whether
you have a unit with the correct voltage rating for the country's
power supply, DO NOT attempt to use the unit. Contact the dealer
or the factory.)
Liquid or Solid Object: Stop operation immediately if any liquid
or solid object should fall into the cabinet. (Technician Note:
Unplug the unit and have it checked by qualified service
personnel.)
AC power cord: Use only the AC power cord included with this
unit or an equivalent cord.
ESD procedures: Be sure to observe all established Electro-
Static Discharge (ESD) procedures while handling cables in or
near the Circuit Board.
Grounding Device Safeguards: Always wear an appropriate
personal grounding device, such as a wrist strap with integral
resistor, connected to an ESD ground to avoid potential damage.
Electrostatic Sensitive Device: At a minimum, make positive
contact with the bare metal chassis of the Printer with the hand
before proceeding with the procedure. (Technician Note: This
device is electrostatic sensitive. It may be damaged if exposed to
static electrical discharges. Discharges may be generated by
various means, such as walking on a carpeted floor.)
CardJet 410 Card Printer/Encoder and Persona CardJet C7 Printer User Guide (Rev. 6.1)
1-4
Page 10

RESTRICTED USE ONLY Fargo Electronics, Inc.
Section 2: Technician Overview
Technicians can review this section for a comprehensive troubleshooting strategy for the two
CardJet Card Printers. Technicians can use this strategy to gain expert-level knowledge of
the Printer in order to efficiently troubleshooting all aspects of it. This method safeguards the
need to maintain fully-operational Printers at all times and ensures that on-site Technicians
have access to critical, accurate and current CardJet troubleshooting-related procedures.
Table of Contents
Section 2: Technician Overview______________________________________________2-1
Table of Contents ___________________________________________________________________ 2-1
Reviewing the CardJet Printers (410 and C7) ______________________________________________ 2-3
Reviewing the Professional Series CardJet 410 Card Printer/Encoder_________________________ 2-3
Reviewing the Persona CardJet C7 Card Printer/Encoder __________________________________ 2-4
Reviewing the Professional CardJet 410 and Persona C7 ID Card Printers _____________________ 2-4
Technician Review of Printer Features ___________________________________________________ 2-5
Technician Review of Printer Features (continued)_____________________________________ 2-6
Technician Review of Printer Features (continued)_____________________________________ 2-7
Technician Review of Printer Features (continued)_____________________________________ 2-8
Technician Review of Printer Features (continued)_____________________________________ 2-9
Technician Review of Printer Features (continued)____________________________________ 2-10
Technician Review of Printer Features (continued)____________________________________ 2-11
Technician Review of Printer Features (continued)____________________________________ 2-12
Technician Review of CardJet Specifications _____________________________________________ 2-13
Reviewing the Regulatory Compliances_______________________________________________ 2-13
Reviewing the Agency Listings _____________________________________________________ 2-14
Reviewing the Technical Specifications_______________________________________________ 2-15
Reviewing the Technical Specifications (continued)___________________________________ 2-16
Reviewing the Technical Specifications (continued)___________________________________ 2-17
Technician Review of CardJet Card Printer Setup _________________________________________ 2-18
Selecting an area for the Card Printer_________________________________________________ 2-18
Connecting the Card Printer to the Computer___________________________________________ 2-19
Opening the Top Cover to the Card Printer ____________________________________________ 2-20
Powering up the Card Printer _______________________________________________________ 2-21
Reviewing the Printer Driver Operator Interface ________________________________________ 2-22
Reviewing the Printer Driver Operator Interface (continued) ____________________________ 2-23
Reviewing the Printer Driver Operator Interface (continued) ____________________________ 2-24
Reviewing the Printer Properties window _____________________________________________ 2-25
Technician Review of Ink and Card Cartridges ___________________________________________ 2-26
Reviewing the Ink Cartridges _______________________________________________________ 2-27
Storing the Ink Cartridges (review carefully)___________________________________________ 2-27
Loading the Ink Cartridges _________________________________________________________ 2-28
Loading the Ink Cartridges (continued) _____________________________________________ 2-29
Loading the Ink Cartridges (continued) _____________________________________________ 2-30
Reviewing the Card Cartridges______________________________________________________ 2-31
Storing the Card Cartridges (review carefully)__________________________________________ 2-31
Loading the Card Cartridge ________________________________________________________ 2-32
Loading the Card Cartridge (continued) ____________________________________________ 2-33
Printing the Test Print (after installing Ink and Card Cartridges)____________________________ 2-34
Technician Handbook for CardJet Card Printers___________________________________________ 2-35
Technician Handbook for CardJet Card Printers (continued) ____________________________ 2-36
Technician Handbook for CardJet Card Printers (continued) ____________________________ 2-37
Technician Handbook for CardJet Card Printers (continued) ____________________________ 2-38
CardJet 410 Card Printer/Encoder and Persona CardJet C7 Printer User Guide (Rev. 6.1)
2-1
Page 11

RESTRICTED USE ONLY Fargo Electronics, Inc.
Technician Handbook for CardJet Card Printers (continued) ____________________________ 2-39
Technician Handbook for CardJet Card Printers (continued) ____________________________ 2-40
Technician Handbook for CardJet Card Printers (continued) ____________________________ 2-41
Technician Handbook for CardJet Card Printers (continued) ____________________________ 2-42
Technician Handbook for CardJet Card Printers (continued) ____________________________ 2-43
Technician Handbook for CardJet Card Printers (continued) ____________________________ 2-44
Technician Handbook for CardJet Card Printers (continued) ____________________________ 2-45
Technician Handbook for CardJet Card Printers (continued) ____________________________ 2-46
Technician Handbook for CardJet Card Printers (continued) ____________________________ 2-47
Technician Handbook for CardJet Card Printers (continued) ____________________________ 2-48
Technician Handbook for CardJet Card Printers (continued) ____________________________ 2-49
Technician Handbook for CardJet Card Printers (continued) ____________________________ 2-50
Technician Handbook for CardJet Card Printers (continued) ____________________________ 2-51
Technician Handbook for CardJet Card Printers (continued) ____________________________ 2-52
Technician Handbook for CardJet Card Printers (continued) ____________________________ 2-53
Technician Handbook for CardJet Card Printers (continued) ____________________________ 2-54
Technician Handbook for CardJet Card Printers (continued) ____________________________ 2-55
Technician Handbook for CardJet Card Printers (continued) ____________________________ 2-56
Technician Handbook for CardJet Card Printers (continued) ____________________________ 2-57
Technician Handbook for CardJet Card Printers (continued) ____________________________ 2-58
Technician Handbook for CardJet Card Printers (continued) ____________________________ 2-59
Technician Handbook for CardJet Card Printers (continued) ____________________________ 2-60
Technician Handbook for CardJet Card Printers (continued) ____________________________ 2-61
Technician Handbook for CardJet Card Printers (continued) ____________________________ 2-62
Technician Handbook for CardJet Card Printers (continued) ____________________________ 2-63
Technician Handbook for CardJet Card Printers (continued) ____________________________ 2-64
Technician Handbook for CardJet Card Printers (continued) ____________________________ 2-65
CardJet 410 Card Printer/Encoder and Persona CardJet C7 Printer User Guide (Rev. 6.1)
2-2
Page 12

RESTRICTED USE ONLY Fargo Electronics, Inc.
Reviewing the CardJet Printers (410 and C7)
The CardJet Card Printer is a single-sided inkjet ID Card Printer. The two (2) CardJet
models are the Professional Series CardJet 410 Card Printer/Encoder and the Persona
CardJet C7 Printer. (Note: Each Printer will use inkjet receptive cards that are 30 mil in
thickness and CR-80 in size. The cards are stored in an easy loading Card Cartridge.)
The Printer will require two (2) separate Ink Cartridges: a color printing Cartridge that
contains dye color inks (YMC) and a black printing Cartridge that contains pigment-black
ink (K).
Reviewing the Professional Series CardJet 410 Card
Printer/Encoder
The Professional Series CardJet 410 is a single-sided, inkjet ID Card Printer.
Standard features:
Full color and monochrome inkjet card printing capability
Cartridge load color (YMC) and black (K) inks
Cartridge load blank cards
50 card capacity Output Hopper
100-card Card Cartridge
Optional features:
High-coercivity magnetic stripe encoding
CardJet 410 Card Printer/Encoder and Persona CardJet C7 Printer User Guide (Rev. 6.1)
2-3
Page 13

RESTRICTED USE ONLY Fargo Electronics, Inc.
Reviewing the Persona CardJet C7 Card Printer/Encoder
The Persona CardJet C7 is a single-sided, inkjet ID Card Printer.
Standard features:
Full color and monochrome inkjet card printing capability
Cartridge load color (YMC) and black (K) inks
Cartridge load blank cards
50 card capacity Output Hopper
50-card Card Cartridge
Optional features:
High-coercivity magnetic stripe encoding
Reviewing the Professional CardJet 410 and Persona C7 ID Card
Printers
These two models will differ as follows:
Professional CardJet 410 Card Printer Persona CardJet C7 Card Printer
100-card capacity Card Cartridge 50-card capacity Card Cartridge
Optional Hi-Co Magnetic Stripe Encoding Optional Hi-Co Magnetic Stripe Encoding
Professional Series Look and Color Persona Series Look and Color (Ice Blue)
Professional Series Driver/Firmware Persona Series Driver/Firmware
Full Warranty Limited Warranty
Available with Bundle:
Printer
Camera/Tripod
Software
Available with Mag Bundle Not available with Mag Bundle
Available with Bundle:
Printer
Camera/Tripod
Software
Ink Ink
CardJet 410 Card Printer/Encoder and Persona CardJet C7 Printer User Guide (Rev. 6.1)
2-4
Page 14

RESTRICTED USE ONLY Fargo Electronics, Inc.
Technician Review of Printer Features
See the next page. Refer to the Technician Handbook for CardJet Card Printers in this
section.
Function Description
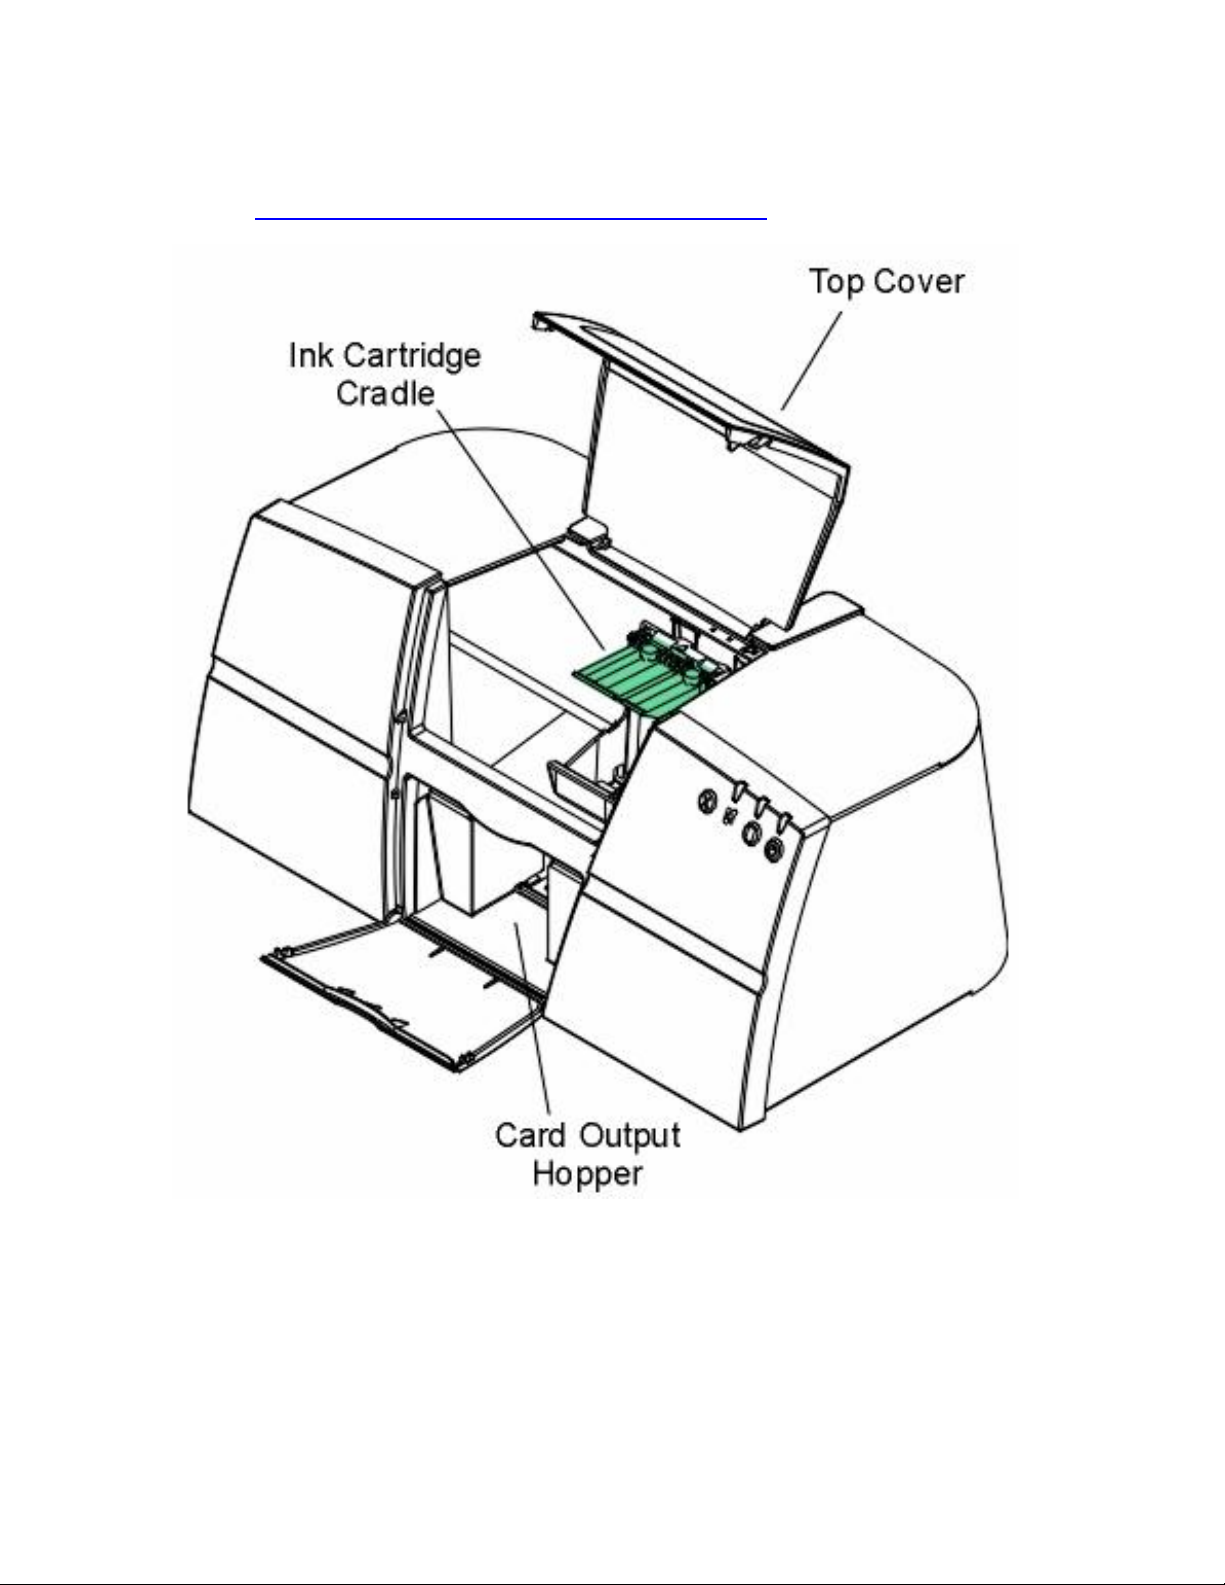
Top Cover Opens to allow access to the Ink Cartridges and Card Path. This cover must
be closed in order for the Printer to begin printing. See Opening the Top
Cover to the Card Printer. See CardJet Engineering Drawing R400019 in the
appendix.
Ink
Cartridge
Cradle
Card
Output
Hopper
Holds the Ink Cartridges and moves them back and forth across the card
during printing. (Note: Before Ink Cartridges can be loaded into the Printer,
the Printer Driver must be installed and the Printer's Power and USB cables
must be connected.)
Once this is done, the Printer's Ink Cartridge Cradle will move to the center
position whenever the Top Cover is open.
Catches printed cards as they eject from the Printer. This Hopper will hold a
maximum of 50 cards. The Card Output Hopper Door can be either opened
or closed while printing, but If you would like printed cards to stack neatly,
leave the door closed, as shown below. (Note: An external Card Output
Hopper is provided if the Printer model includes the Magnetic Stripe
Encoding Module.)
CardJet 410 Card Printer/Encoder and Persona CardJet C7 Printer User Guide (Rev. 6.1)
2-5
Page 15
RESTRICTED USE ONLY Fargo Electronics, Inc.
Technician Review of Printer Features (continued)
See the Cleaning the Ink Cartridges and Ink Cartridge Cradle procedure.
CardJet 410 Card Printer/Encoder and Persona CardJet C7 Printer User Guide (Rev. 6.1)
2-6
Page 16

RESTRICTED USE ONLY Fargo Electronics, Inc.
Technician Review of Printer Features (continued)
Function Description
Power
button and
LED
Printer connected to the PC:
The Power button turns the Printer ON and OFF. (Note: When lit, the
blue LED light indicates when power is ON.)
Press the Power button to turn the Printer ON and OFF.
The blue LED above the button turns OFF or ON to indicate when
power is applied. (Note: This LED will flash when the Printer is
processing a print job.)
If the Power button is pressed during a print job, the print job will be
lost and the Printer will reset (depends on Windows configuration).
Printer not connected to the PC:
Press the Power button to turn the Printer ON and OFF. (Note: The
blue LED above the button turns OFF or ON to indicate when power is
applied. This is the only active button when the Printer is not connected
to the PC.)
All other buttons will not function and a Card Printer self-test will not be
possible. (Note: When the Printer is not connected and the Card
Cartridge and Ink Cartridge are not installed, only the Ink LED will flash
as this is controlled by firmware.)
The Card LED will not flash in this mode when the Card Cartridge is not
installed. (Note: The Printer must be connected to the PC for the Card
LED to flash.)
(Note: Avoid pressing multiple buttons simultaneously or pressing and
holding a button or combination of buttons.)
See the Interpreting the LED Lights procedure.
CardJet 410 Card Printer/Encoder and Persona CardJet C7 Printer User Guide (Rev. 6.1)
2-7
Page 17
RESTRICTED USE ONLY Fargo Electronics, Inc.
LED
Button /
LED
Technician Review of Printer Features (continued)
X
CANCEL
Button
CardJet 410 Card Printer/Encoder and Persona CardJet C7 Printer User Guide (Rev. 6.1)
INK
LED
CARD
Button /
POWER
2-8
Page 18

RESTRICTED USE ONLY Fargo Electronics, Inc.
Technician Review of Printer Features (continued)
Function Description
Card
button and
LED
Card Status button / LED:
The Card button is used to resume operation after an error condition is
cleared. In general, as the icon on this button indicates, errors are related to
card feeding and printing.
If an error occurs, the Card LED light will flash. Correct the error and
press the Card button to resume. (Note: The Card LED will also flash if
the Card Cartridge is not installed or if it has run out of cards.)
When lit, the amber LED above this symbol will flash to indicate you
need to check the status of the Card Cartridge and/or the card being
used for the current print job.
This LED will flash when:
The Card Cartridge is improperly installed or missing.
The Card Cartridge is out of cards.
A card is unable to feed from the Card Cartridge.
A card is jammed along the Card Path.
A non Fargo-certified Card Cartridge is installed.
Troubleshooting Instructions. See Section 2):
1. Correct the condition and press the Card button to continue printing.
(Note: If neither the Ink Cartridge nor the Card Cartridge are installed, only
the Card LED will flash at first. When the Card Cartridge is installed, the Ink
LED will then flash until the Ink Cartridge is installed. These two lights will not
flash simultaneously.)
See the Interpreting the LED Lights procedure.
CardJet 410 Card Printer/Encoder and Persona CardJet C7 Printer User Guide (Rev. 6.1)
2-9
Page 19

RESTRICTED USE ONLY Fargo Electronics, Inc.
Technician Review of Printer Features (continued)
Function Description
Ink LED
The Ink Cartridge Status LED is described below:
The Ink LED light indicates when you need to check the status of the color or
black Ink Cartridge. (Note: Both Ink Cartridges must be installed in order for
the Printer to function.)
Light is off. When the light is off, both Cartridges are ready for printing.
Ink LED light is lit. When the Ink LED light is lit, it indicates that ink is
not installed, ink is out or that there is a problem with one of the Ink
Cartridges. In this case, correct the issue and close the Printer's Top
Cover to resume operation. When lit, the amber LED above this symbol
will flash to indicate you need to check the status of the Ink Cartridges.
This LED will flash when:
The Top Cover is open. When open, the Ink Cartridge will move to the
install position. Regardless of the Ink Cartridge condition, the Cartridge
will always move to this position. (Note: When the Top Cover is closed,
the Cartridge will return to its home position. If a print job has been
received, printing will resume when the Top Cover is closed. If the Top
Cover is left open, the Cartridge will return to its home position after 5
minutes of the Printer sitting idle.) See CardJet Engineering Drawing
R400019 in the appendix.
One or both of the Ink Cartridges is improperly installed or missing
and the Top Cover is closed. (Note: When Top Cover is opened, the
Cartridge will move to the same standard install position described in
condition 1.)
One or both of the Ink Cartridges is out of ink and the Top Cover is
closed. (Note: When Top Cover is opened, the Cartridge will move to
the same standard install position described in condition 1.)
A non Fargo-certified Cartridge is installed and the Top Cover is
closed. (Note: When Top Cover is opened, the Cartridge will move to
the same standard install position described in condition 1.)
Troubleshooting Instructions. See Section 2):
1. Correct the condition and close the Top Cover to continue printing.
See the Interpreting the LED Lights procedure.
CardJet 410 Card Printer/Encoder and Persona CardJet C7 Printer User Guide (Rev. 6.1)
2-10
Page 20
RESTRICTED USE ONLY Fargo Electronics, Inc.
Technician Review of Printer Features (continued)
Function Description
Cancel
button
X
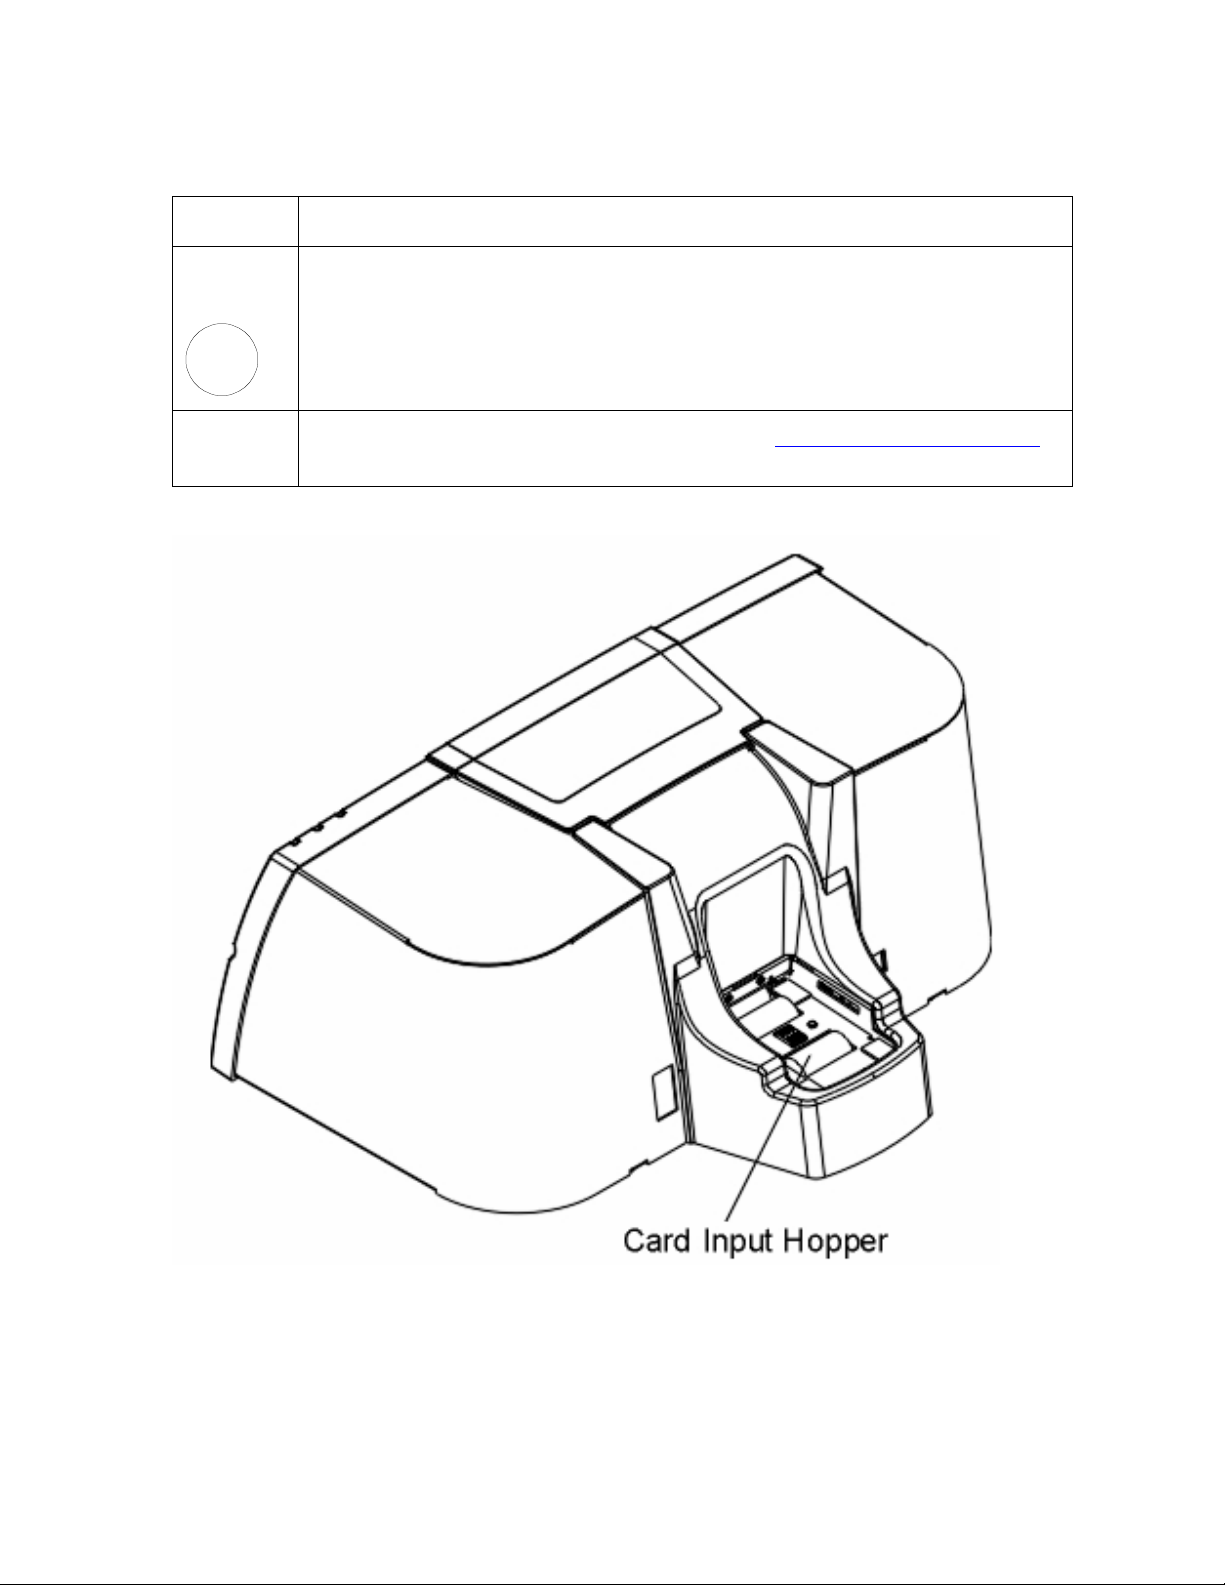
Card Input
Hopper
Press the Cancel button to cancel the current print job and reset the Printer
for the next print job. (Note: This will cancel the job at both the PC and the
Printer level. If a card is left within the Printer after a print job is canceled, it
will automatically be ejected.)
Load the Card Cartridges into this Hopper. See Loading the Card Cartridge.
CardJet 410 Card Printer/Encoder and Persona CardJet C7 Printer User Guide (Rev. 6.1)
2-11
Page 21
RESTRICTED USE ONLY Fargo Electronics, Inc.
Technician Review of Printer Features (continued)
Function Description
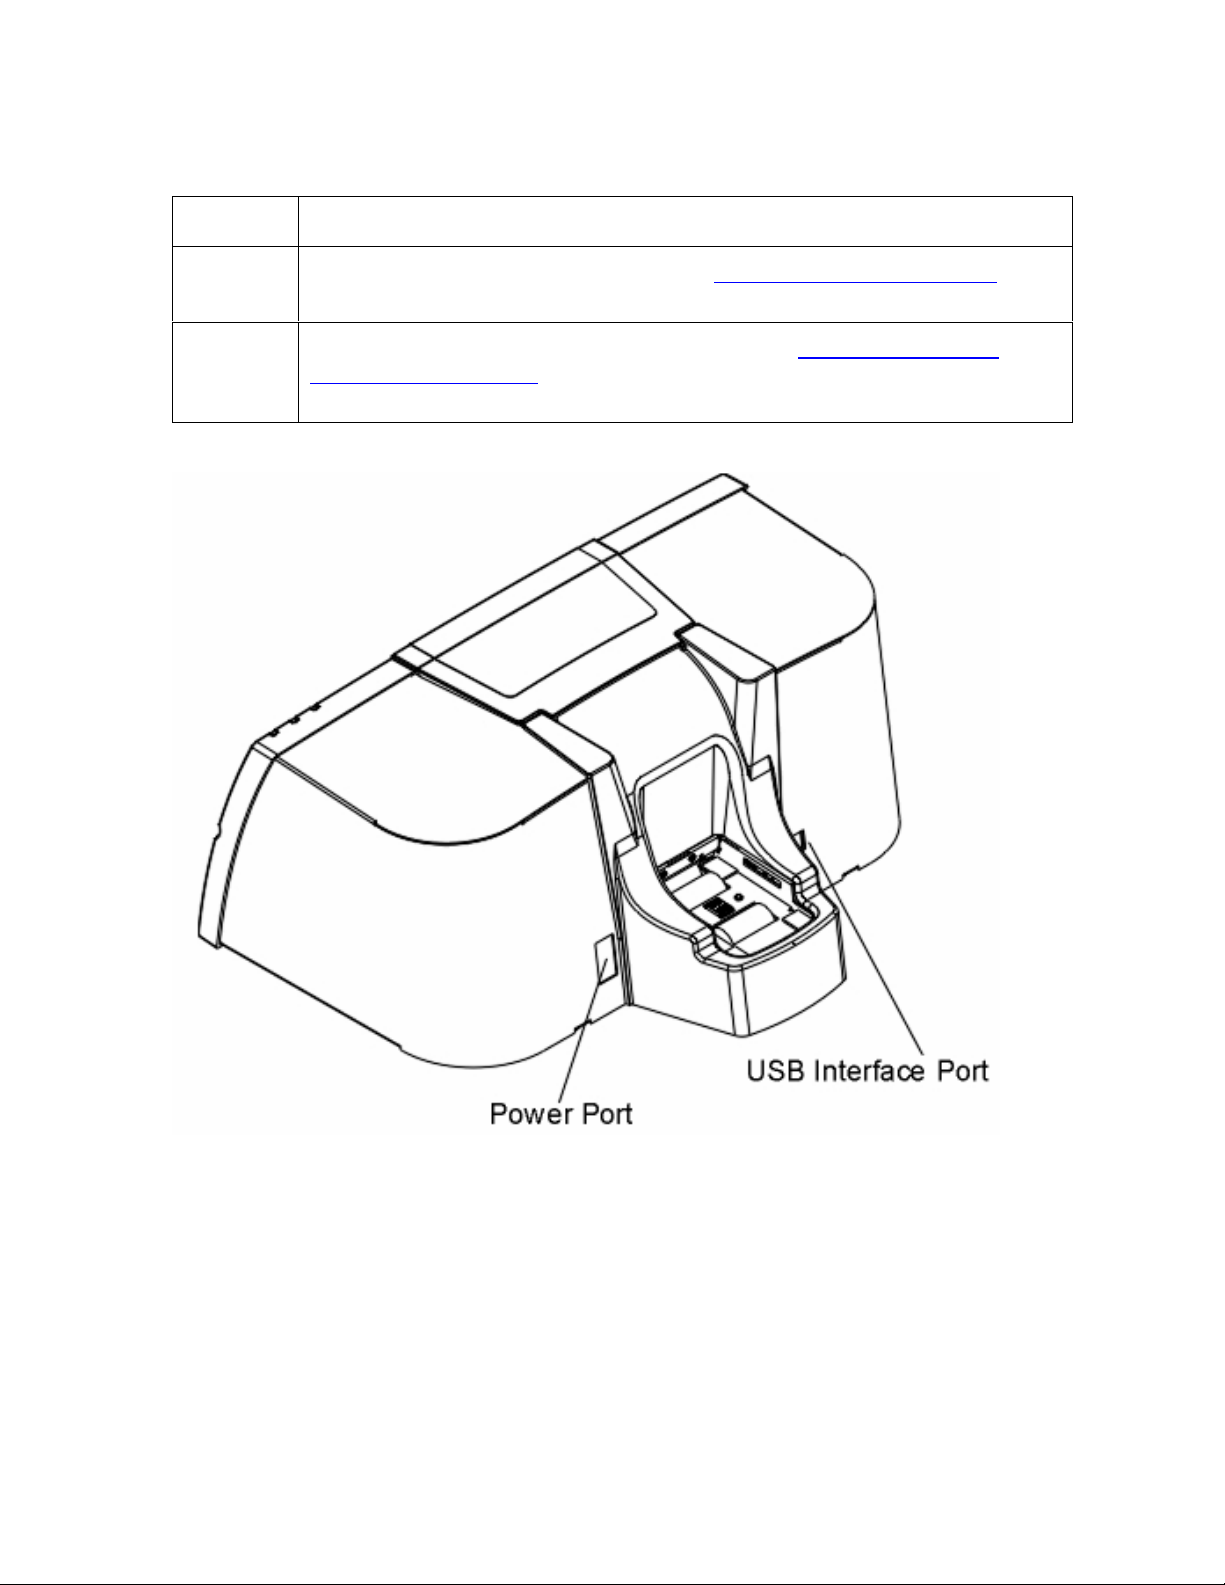
Power
Port
USB
Interface
Port
Connect to the included power cord. See Powering up the Card Printer.
Connect to a Windows PC with a USB cable. See Connecting the Card
Printer to the Computer.
CardJet 410 Card Printer/Encoder and Persona CardJet C7 Printer User Guide (Rev. 6.1)
2-12
Page 22

RESTRICTED USE ONLY Fargo Electronics, Inc.
Technician Review of CardJet Specifications
The purpose of this section is to provide the Operator with specific information on the
Regulatory Compliances, Agency Listings and Technical Specifications for the CardJet Card
Printers. Refer to the Technician Handbook for CardJet Card Printers in this section.
Reviewing the Regulatory Compliances
Term Description
CSA The Printer manufacturer has been authorized by UL to represent the
Card Printer as CSA Certified under CSA Standard 22.2.
File Number: E145118
FCC The Card Printer complies with the requirements in Part 15 of the FCC
rules for a Class B digital device. (Note: These requirements are
designed to provide reasonable protection against harmful interference
in a residential installation.)
If equipment operation in a residential area causes unacceptable
interference to radio and TV reception, the Operator is required to take
whatever steps are necessary to correct the interference.
ITS-EMC The Card Printer has been tested and complies with EN55022 Class B:
1998, EN55024: 1998, EN61000-3-2 and EN61000-3-3 standards for
EMC (electro-magnetic compatibility).
(Note: Based on the above testing, the Printer manufacturer certifies
that the Card Printer complies with all current EMC directives of the
European Community and has placed the CE mark on the Card
Printer.)
Certificate Number: 00027
UL-GS The Card Printer has been tested and complies with EN60950 and
bears the UL-GS mark.
License Number: TBD
UL The Card Printer is listed under UL 60950 INFORMATION
TECHNOLOGY EQUIPMENT.
File Number: E145118, Volume 1, Section 19
CardJet 410 Card Printer/Encoder and Persona CardJet C7 Printer User Guide (Rev. 6.1)
2-13
Page 23

RESTRICTED USE ONLY Fargo Electronics, Inc.
Reviewing the Agency Listings
Term Description
Emissions
Standards
Safety Standards UL 60950, CSA C2.2 No. 60950 and UL-GS (EN 60950 A1-A4,
Danger: You must unplug the power cable to the Card Printer to
CE, FCC, CRC c1374, BSMI, ITS (EN 55022 Class B:1998, FCC
Class B, EN 55024: 1998)
A11), CE
ensure that all power is disconnected from the unit. Do not attempt any
work on the Card Printer’s interior unless you have first unplugged the
unit.
CardJet 410 Card Printer/Encoder and Persona CardJet C7 Printer User Guide (Rev. 6.1)
2-14
Page 24

RESTRICTED USE ONLY Fargo Electronics, Inc.
Reviewing the Technical Specifications
The Technical Specifications for the Professional Series CardJet 410 Card Printer/Encoder
and Persona CardJet C7 Printer are provided here. (Note: The CardJet Card Printers do not
provide for oversized card capability, less than 30-mil card capability, Smart card encoding,
support of non-Fargo cards and exception feed.)
Type Description
Accepted Standard
CR-80 CardJet cards (3.375”L x 2.125”W / 85.6mmL x 54mmW)
Card Sizes
Accepted Card
.030-inch (30 mil) / .762mm
Thickness
Accepted Card Types Fargo CardJet Cards
Card Cartridge
Capacity (non
refillable)
Card Output Hopper
Professional Series CardJet 410 Printer/Encoder: 100 cards
Persona CardJet C7 Printer/Encoder: 50 cards
50 cards
Capacity
Colors Up to 16.7 million
Dimensions 8.0” (H) x 18.0” (W) x 14.0” (D) / 203mmh x 457mmW x 356mmD
Encoding Options The High-Coercivity Magnetic Stripe Encoding Module can be
ordered factory-installed or as a field upgradeable module.
Ink Cartridge
Capacity
SmartLoad Ink Cartridges contain an exclusive Ink Level Gauge
that reports remaining prints and alerts when the ink is low or out.
SmartLoad Ink Cartridge:
Full Color: 300 prints (250 for Persona C7)
Black: 900 prints (750 for Persona C7)
See the Selecting the Print Quality (Best, Normal or Fast print
modes) procedure.
Continued on the next page
CardJet 410 Card Printer/Encoder and Persona CardJet C7 Printer User Guide (Rev. 6.1)
2-15
Page 25
RESTRICTED USE ONLY Fargo Electronics, Inc.
Reviewing the Technical Specifications (continued)
Type Description
Interface USB 1.1
Memory 2MB RAM
Operating
59° to 95° F / 15° to 35° C
Temperature
Operating
Humidity
The Operating Humidity is at 20% to 80% (non-condensing).
Exception (70% upper humidity range): When printing the
glossy card in the IR bar code mode, the upper humidity range is
reduced to 70% due to the use of the black ink cartridge (P/N
041032 for CardJet 410 and P/N 041732 for Persona C7).
Standard (80% upper humidity range): The PPG (matte) card’s
upper humidity range is at 80% in all print modes (including the
Infrared Bar Codes option/radio box under the Image Color tab).
The glossy card card’s upper humidity range is at 80% in all other
print modes (Best, Normal and Fast).
Print Method Thermal Inkjet
Print Speed Print speed will vary depending on the amount of color coverage
within a card design. (Note: The above print speeds represent a
color, full-bleed design; designs with less color coverage will print
faster.)
Print speed indicates an approximate batch print speed. (Note: It is
measured from the time a card feeds into the Printer to the time it
ejects from the Printer. Print speeds do not include the time needed
for the PC to process the image.)
Process time is dependent on the size of the file, the CPU, amount of
RAM and the amount of available resources at the time of the print.
Fast print quality: 26 seconds per card / 138 cards per hour
Normal print quality: 42 seconds per card / 86 cards per hour
Best print quality: 76 seconds per card / 47 cards per hour
See the Selecting the Print Quality (Best, Normal or Fast print modes)
procedure.
Continued on the next page
CardJet 410 Card Printer/Encoder and Persona CardJet C7 Printer User Guide (Rev. 6.1)
2-16
Page 26

RESTRICTED USE ONLY Fargo Electronics, Inc.
Reviewing the Technical Specifications (continued)
Type Description
Printer Drivers Windows 98 / Me / 2000 / XP
Resolution 600 dpi (Fast mode)
This is the number of individual pixels in a graphic, taken over a given
length, used to indicate the sharpness of the picture and the level of
detail. The number of elements in the Printhead determines Fargo
Printer resolution. See CardJet Engineering Drawing No. D400147 in
the appendix.
Software Drivers Windows 98, Windows Millennium, Windows 2000, Windows XP
Storage
TBD
Temperature /
Humidity
Supply Voltage 100 to 240 VAC, 1.0A
Supply
50 Hz / 60 Hz
Frequency
System
Requirements
IBM-PC or compatible, Windows 98Se/Me/2000/XP, Pentium™ class
233 MHz computer with 64 MB of RAM or higher, 200 MB free hard
disk space or higher, USB 1.1
Warranty Printer – Two Year
2 year – Professional
1 year – Persona
OR
Indicate to refer to price list.
Weight 19.4 lbs. / 8.8 kg
Continued on the next page
CardJet 410 Card Printer/Encoder and Persona CardJet C7 Printer User Guide (Rev. 6.1)
2-17
Page 27

RESTRICTED USE ONLY Fargo Electronics, Inc.
Technician Review of CardJet Card Printer Setup
IMPORTANT! Fargo Card Printers require highly specialized print supplies to function
properly. To maximize Printer life, reliability, printed card quality and durability, you must use
only Fargo Certified Supplies. For this reason, the Fargo warranty is void, where not
prohibited by law, if you use non-Fargo Certified Supplies. To order additional materials,
please contact the Fargo authorized reseller.
Selecting an area for the Card Printer
Step Procedure
1 Place the unit in a location with adequate air circulation to prevent internal heat
build up.
2 Use the Printer's dimensions as a guideline for the minimum clearances to the
unit. (Note: Allow for adequate clearance above the unit to accommodate the
height of the unit with its Top Cover open.)
3 Do not install unit (a) near heat sources such as radiators or air ducts or (b) in a
place subject to direct sun-light, excessive dust, mechanical vibration or shock.
4 Read carefully the caution about moisture condensation.
Caution: If the unit is brought directly from a cold to a warm location or
is placed in a very damp room, moisture may condense inside the unit. (Note:
Should this occur, print quality may not be optimum. Leave the unit turned OFF
in a warm, dry room for several hours before using. This will allow the moisture
to evaporate.)
CardJet 410 Card Printer/Encoder and Persona CardJet C7 Printer User Guide (Rev. 6.1)
2-18
Page 28

RESTRICTED USE ONLY Fargo Electronics, Inc.
Connecting the Card Printer to the Computer
The Card Printer is designed to be used with any IBM-PC or compatible running Windows
98Se/Me/2000/XP. For best results, a Pentium™ class 233 MHz computer with 64 MB of
RAM or higher and 200 MB free hard disk space is required. The Printer is equipped with a
USB 1.1 high-speed interface port. This port is the means through which the Printer receives
data from the computer.
IMPORTANT! You must install the Printer Driver software prior to connecting the
Printer to the computer. The Printer Driver installation program will prompt you when to
connect the Printer. If you have not already done so, please install the Printer Driver software
at this time. See the Installing the Windows Printer Driver procedure.
To connect the Printer to the computer, obtain a USB interface cable and refer to the
following steps:
Step Procedure
1 Connect the smaller end of the USB cable to the Printer's USB port.
2 Connect the other end of the cable to the back of the PC at an available USB
port.
CardJet 410 Card Printer/Encoder and Persona CardJet C7 Printer User Guide (Rev. 6.1)
2-19
Page 29

RESTRICTED USE ONLY Fargo Electronics, Inc.
Opening the Top Cover to the Card Printer
Step Procedure
1 Open the Top Cover of the Printer by lifting up on its front edge and tilting the
cover back into its fully open position. See CardJet Engineering Drawing
R400019 in the appendix.
2 To close the Top Cover, gently lower the Top Cover until it clicks into place.
IMPORTANT! Before the Ink Cartridges can be loaded into the Printer, the Printer Driver
must be installed and the Printer's power and USB cables must be connected. Once this is
done, the Printer's Ink Cartridge Cradle will move to the center position whenever the Top
Cover is open. The Top Cover must be closed securely in order for the Printer to operate.
CardJet 410 Card Printer/Encoder and Persona CardJet C7 Printer User Guide (Rev. 6.1)
2-20
Page 30

RESTRICTED USE ONLY Fargo Electronics, Inc.
Powering up the Card Printer
The power supply within the Printer is a universal power supply properly configured for the
power used in the (respective) country. To connect power to the Printer, locate the
appropriate power cord for the country and refer to the following steps:
Step Procedure
1
CAUTION! The (included) two (2) power cords are designed for use
only with the Card Printer. (Note: If you have any doubts about the plug
configuration or the voltage, do not attempt to use the Printer. Contact the Fargo
authorized reseller for information on the correct power configuration.)
Locate the power cord included with the Card Printer.
2 Place the power cord into the power cord port of the Card Printer.
3 Place the AC power plug end of the power supply cord into an available wall
outlet.
4
Press the Power button if you wish to turn the Printer ON or OFF. (Note: If the
Printer will not be used for a long period of time, unplug the power cable to the
Card Printer to ensure that all power is disconnected from the unit.)
CardJet 410 Card Printer/Encoder and Persona CardJet C7 Printer User Guide (Rev. 6.1)
2-21
Page 31

RESTRICTED USE ONLY Fargo Electronics, Inc.
Reviewing the Printer Driver Operator Interface
Technicians can access the Printer Driver window by selecting Start button > Settings >
Printers > CardJet Professional 410 Card Printer (right click) or CardJet Persona C7 Card
Printer (right click) > Printing Preferences to bring up the CardJet 410 Card Printer Printing
Preferences window.
Technicians can use the Card, Image Color, Image Position, Magnetic Encoding and Print
Supplies tabs to make appropriate selections, as described below and (in more detail) in
Section 3: Printer Adjustments.
Step Description
Interfacing with the Card tab:
1
Access the Card tab via the CardJet 410 or Persona C7 Card Printer Printing
Preferences windows.
Use the Card tab to select Print Quality (Fast, Normal and Best), the Card Size
(up/down arrows), the Orientation: Portrait and Landscape (radio buttons), the
Rotate Image 180° (checkbox) and Copies (checkbox). See the Selecting the
Print Quality (Best, Normal or Fast print modes) procedure.
Also provides the About button. See Selecting the Card tab window.
Interfacing with the Image Color tab:
2
Access the Image Color tab via the CardJet 410 or Persona C7 Card Printer
Printing Preferences windows. See the Selecting the Image Color tab.
Use the Image Color tab to select Print Quality (radio buttons), Color Quality
(adjustment slides), Automatic Image Enhancement (checkbox), Print in
Grayscale (checkbox) and Infrared Bar Codes (checkbox).
Also provides the Default button.
Interfacing with the Image Position tab:
3
Access the Image Position tab via the CardJet 410 or Persona C7 Card Printer
Printing Preferences windows. See the Image Position tab.
Use the Image Position tab to select Horizontal and Vertical positioning (right and
left arrows) of the cards.
Continued on the next page
CardJet 410 Card Printer/Encoder and Persona CardJet C7 Printer User Guide (Rev. 6.1)
2-22
Page 32

RESTRICTED USE ONLY Fargo Electronics, Inc.
Reviewing the Printer Driver Operator Interface (continued)
See Section 3: Printer Adjustments for more detailed procedures.
CardJet 410 Card Printer/Encoder and Persona CardJet C7 Printer User Guide (Rev. 6.1)
2-23
Page 33

RESTRICTED USE ONLY Fargo Electronics, Inc.
Reviewing the Printer Driver Operator Interface (continued)
Step Description
Interfacing with the Magnetic tab (option with the CardJet 410 and Persona
4
C7 Card Printers):
Access the Magnetic Encoding tab via the CardJet 410 or Persona C7 Card
Printer Printing Preferences windows. See the Selecting the Magnetic Encoding
tab (both 410/C7 models) procedure.
Use the Magnetic Encoding tab to select the Verification (radio buttons) and
Retries (up/down arrows), Magnetic Track Selection (radio buttons), Magnetic
Track Options: Bit Density (radio buttons), Character Size (radio buttons), ASCII
Offset (radio buttons), LRC Generation (radio buttons), Character Parity (radio
buttons) and Shift Data Left (checkbox).
Also provides a Default button.
Interfacing with the Print Supplies tab:
5
Access the Print Supplies tab via the CardJet 410 or Persona C7 Card Printer
Printing Preferences windows. See the Selecting the Print Supplies tab.
Use the Print Supplies tab to view Prints Remaining under Color Ink Cartridge and
Black Ink Cartridge.
Also provides the Clean Ink Cartridge Nozzles button. The Technician can view
the Color Ink Cartridge Reorder Number, Black Ink Cartridge Reorder Number
and the Card Cartridge Reorder Number.
Continued on the next page
CardJet 410 Card Printer/Encoder and Persona CardJet C7 Printer User Guide (Rev. 6.1)
2-24
Page 34

RESTRICTED USE ONLY Fargo Electronics, Inc.
Reviewing the Printer Properties window
Access the Professional Series CardJet 410 or Persona CardJet C7 Card Printer Properties
window via Start > Settings > Printers > Properties in order to input appropriate Printer
Property information.
CardJet 410 Card Printer/Encoder and Persona CardJet C7 Printer User Guide (Rev. 6.1)
2-25
Page 35

RESTRICTED USE ONLY Fargo Electronics, Inc.
Technician Review of Ink and Card Cartridges
The CardJet Card Printer requires specialized Ink and Card Cartridges to produce highquality, durable cards. This section explains these materials in detail and also explains how
each is loaded into the Printer. Refer to the Technician Handbook for CardJet Card
Printers in this section.
CardJet 410 Card Printer/Encoder and Persona CardJet C7 Printer User Guide (Rev. 6.1)
2-26
Page 36

RESTRICTED USE ONLY Fargo Electronics, Inc.
Reviewing the Ink Cartridges
The CardJet printing process requires that two highly specialized Ink Cartridges are installed:
(1) a color Ink Cartridge and (2) a black Ink Cartridge. Both Cartridges must be installed for
the Printer to function. Together, these Ink Cartridges produce all of the rich, colorful
graphics, text, bar codes and photographs necessary for producing high-quality cards.
Unlike most other Ink Cartridges, the CardJet Cartridges provide built-in technology which
allows the Printer Driver to report:
how many prints remain in each Cartridge,
when ink is running low and
when ink has run out.
This allows you to carefully monitor the ink usage and alerts you when you need to order
additional supplies. It also prevents you from printing with an empty Ink Cartridge and
wasting partially printed cards.
IMPORTANT! Fargo Card Printers require highly specialized Ink Cartridges to function
properly. To maximize Printer life, reliability, printed card quality and durability, you must use
only Fargo Certified Supplies. For this reason, the Fargo warranty is void, where not
prohibited by law, if you use non-Fargo Certified Supplies. To order additional materials,
please contact the Fargo authorized reseller. The part numbers for the currently installed
Cartridges can be found in the Print Supplies tab of the Printer Driver.
Storing the Ink Cartridges (review carefully)
Step Procedure
1 To maintain excellent print quality from the Ink Cartridges:
Keep all Ink Cartridges in their sealed packages, at room temperature (60-
78° F or 15.6-26.6° C), until you are ready to use them.
Once installed, leave the Ink Cartridges in their cradle at all times to keep
them from drying out or becoming clogged.
If you store an unsealed Ink Cartridge, do so in an airtight plastic container.
Caution: Do not unplug the Printer until printing is complete and the
Ink Cartridge Cradle has returned to its home position on the right side of the
Printer. (Note: The Ink Cartridges will dry out if not stored in their home
position.)
CardJet 410 Card Printer/Encoder and Persona CardJet C7 Printer User Guide (Rev. 6.1)
2-27
Page 37

RESTRICTED USE ONLY Fargo Electronics, Inc.
Loading the Ink Cartridges
Prior to loading Ink Cartridges, the Ink LED light will flash to signal that Ink Cartridges must
be installed. Follow these steps to load both the color and black Ink Cartridges into the
Printer. See the Interpreting the LED Lights procedure.
Step Procedure
1
Caution: Before Ink Cartridges can be loaded into the Printer, the
Printer Driver must be installed and the Printer's power and USB cables must be
connected. Once this is done, the Printer's Ink Cartridge Cradle will move to the
center position whenever the Top Cover is open.
Open the Top Cover by lifting up on the cover and tilting the cover back into its
fully open position. The Ink Cartridge Cradle will move to the center position.
CardJet 410 Card Printer/Encoder and Persona CardJet C7 Printer User Guide (Rev. 6.1)
2-28
Page 38

RESTRICTED USE ONLY Fargo Electronics, Inc.
Loading the Ink Cartridges (continued)
Step Procedure
2 Remove the Ink Cartridge from its packaging and carefully remove the protective
vinyl tape.
Caution: Do NOT touch the Ink Cartridge nozzles or copper contacts.
Touching these parts will result in clogs, ink failure and bad electrical connection.
Also, do NOT remove the copper strips, which are required electrical contacts.
CardJet 410 Card Printer/Encoder and Persona CardJet C7 Printer User Guide (Rev. 6.1)
2-29
Page 39

RESTRICTED USE ONLY Fargo Electronics, Inc.
Loading the Ink Cartridges (continued)
Step Procedure
3 Push the Ink Cartridge firmly, straight down into the Ink Cartridge Cradle.
4 Close the cradle latch. When the latch is fully closed, you will hear a click. Once
both Cartridges are loaded, close the Top Cover. (Note: When loaded properly,
the Ink Cartridge Cradle will return to the home position on the right-hand side of
the Printer and the Ink LED light will turn off indicating that the Ink Cartridges are
installed and ready for printing.) See the Interpreting the LED Lights procedure.
CardJet 410 Card Printer/Encoder and Persona CardJet C7 Printer User Guide (Rev. 6.1)
2-30
Page 40

RESTRICTED USE ONLY Fargo Electronics, Inc.
Reviewing the Card Cartridges
The Card Printer accepts on CardJet cards with a thickness of 30 mil (.030"/.762mm).
Thermal Inkjet Printing: CardJet cards are specially designed for use with thermal
inkjet printing. (Note: Their unique surface coating is what allows you to produce inkjet
cards that have the color clarity, durability and moisture resistance required for the rigors
of most ID card applications.)
Preloaded Card Cartridges: For the convenience, these special cards are preloaded
into an easy-to-install Card Cartridge. (Note: In addition to making card loading simple,
the Card Cartridge also protects blank cards from dust, fingerprints and other
contaminants that can degraded the quality of printed cards.)
Clear Cartridge: The Cartridge is clear so you can tell at a glance about how many
cards remain.
Magnetic Stripe Encoding Module (both 410/C7 models): Blank cards are available
with or without a magnetic stripe on the back side. (Note: Magnetic stripes are generally
used only in conjunction with Printers which include the optional Magnetic Stripe
Encoding Module (both 410/C7 models).
IMPORTANT! Fargo Card Printers require highly specialized Card Cartridges to function
properly. To maximize Printer life, reliability, printed card quality and durability, you must use
only Fargo Certified Supplies. For this reason, the Fargo warranty is void, where not
prohibited by law, if you use non-Fargo Certified Supplies. To order additional materials,
please contact the Fargo authorized reseller. The part numbers for the currently installed
Cartridges can be found in the Print Supplies tab of the Printer Driver.
Storing the Card Cartridges (review carefully)
To maintain excellent print quality from the Card Cartridges, follow these guidelines:
Keep all Card Cartridges in their original packaging, at room temperature (60-78° F or
15.6-26.6° C), until you need to use them.
Do NOT drop Card Cartridges and cause them to break and become unusable.
CardJet 410 Card Printer/Encoder and Persona CardJet C7 Printer User Guide (Rev. 6.1)
2-31
Page 41

RESTRICTED USE ONLY Fargo Electronics, Inc.
Loading the Card Cartridge
Before printing, load blank cards into the Printer's Card Input Hopper, as follows:
Step Procedure
1
Close the Printer's Top Cover. (Note: The Printer will indicate that a Card
Cartridge needs to be installed by flashing the Card LED light.) See the
Interpreting the LED Lights procedure.
2 Remove the Card Cartridge from its packaging.
CardJet 410 Card Printer/Encoder and Persona CardJet C7 Printer User Guide (Rev. 6.1)
2-32
Page 42

RESTRICTED USE ONLY Fargo Electronics, Inc.
Loading the Card Cartridge (continued)
Step Procedure
3 Set the Card Cartridge onto the Card Input Hopper with the arrow on the top of
the Cartridge pointing toward the front of the Printer as shown below. Push the
Card Cartridge down until it clicks into place. See the next two pages. (Note:
When installed properly, the Card LED light will turn off to signal that the Card
Cartridge is ready for printing.)
Caution: When not in use, keep the Card Cartridge in place to prevent
dust from accumulating on the Drive Rollers.
CardJet 410 Card Printer/Encoder and Persona CardJet C7 Printer User Guide (Rev. 6.1)
2-33
Page 43

RESTRICTED USE ONLY Fargo Electronics, Inc.
Printing the Test Print (after installing Ink and Card Cartridges)
Once the Ink and Card Cartridges are installed, a self-test should be performed to check for
proper operation of the Printer. (Note: The self-test function also requires that the Print
Driver is installed and the Printer's power and USB cables connected.)
Refer to the following to print a test print:
Step Procedure
1 Open the Printer Driver's Printer Properties Window.
2 Click on the Print Supplies tab. See Using the Print Supplies tab.
3
4
Click on the Test Printer button. See Selecting the Test Printer button.
From the Send Test window, click on the Send button to send a color test print
to the Printer. See Selecting the Test Printer button. (Note: After a few seconds,
the following test image will begin printing.)
CardJet 410 Card Printer/Encoder and Persona CardJet C7 Printer User Guide (Rev. 6.1)
2-34
Page 44

RESTRICTED USE ONLY Fargo Electronics, Inc.
Technician Handbook for CardJet Card Printers
This section is provided for Technicians at the Intermediate and Expert levels, who want to
become thoroughly familiar with the Printer functions as soon as it is installed.
From a Technician’s perspective, the CardJet Professional 410 and Persona C7 printing
systems consists of an HP Print Engine and Fargo additions that allows printing on
CardJet cards (CR-80, 30 mil). For this purpose, the Printer has a special Card Path, an
Input Hopper for a Card Cartridge, extra Card Sensor(s) and a Fargo Controller (2
Boards). (Note: The Two models are the Professional Series CardJet 410 Card
Printer/Encoder and the Persona CardJet C7 Printer/Encoder.)
The purpose of this section is to provide Technicians with a checklist of service
requirements built into the CardJet Card Printer. The Technician can review these service
requirements and refer to their corresponding service procedure (as needed). The entire
printing system is designed for very efficient service and maintenance by the Technician.
Topic Description
Bad Card
Cartridge Tag
Detection
(See Card
LED)
Black Ink
Cartridge
The Printer correctly validates a replacement Cartridge and reports a Bad
Card Cartridge tag via the Card LEDbefore running out of cards.
The printing will continue when the Card Cartridge is replaced with a good
Cartridge.
The Black Ink Cartridge provides enough ink for a minimum of 900 cards.
CardJet 410: 900 card minimum
Persona C7: 750 card minimum
Continued on the next page
CardJet 410 Card Printer/Encoder and Persona CardJet C7 Printer User Guide (Rev. 6.1)
2-35
Page 45

RESTRICTED USE ONLY Fargo Electronics, Inc.
Technician Handbook for CardJet Card Printers (continued)
Function Description
Card
button and
LED
Card Status button / LED:
The Card button is used to resume operation after an error condition is
cleared. In general, as the icon on this button indicates, errors are related to
card feeding and printing.
If an error occurs, the Card LED light will flash. Correct the error and
press the Card button to resume. (Note: The Card LED will also flash if
the Card Cartridge is not installed or if it has run out of cards.)
When lit, the amber LED above this symbol will flash to indicate you
need to check the status of the Card Cartridge and/or the card being
used for the current print job.
This LED will flash when:
The Card Cartridge is improperly installed or missing.
The Card Cartridge is out of cards.
A card is unable to feed from the Card Cartridge.
A card is jammed along the Card Path.
A non Fargo-certified Card Cartridge is installed.
Troubleshooting Instructions. See Section 2):
Physically fix the card feed error conditions and press the Card button to
correctly initiate an attempt to resume the print job starting with a fresh
card.
To replace the Card Cartridge, press the Card button on the front of the
Printer to continue printing.
To install the Card Cartridge, press the Card button on the front of the
Printer to print or cancel printing.
(Note: If neither the Ink Cartridge nor the Card Cartridge are installed, only
the Card LED will flash at first. When the Card Cartridge is installed, the Ink
LED will then flash until the Ink Cartridge is installed. These two lights will not
flash simultaneously.)
See the Interpreting the LED Lights procedure.
Continued on the next page
CardJet 410 Card Printer/Encoder and Persona CardJet C7 Printer User Guide (Rev. 6.1)
2-36
Page 46

RESTRICTED USE ONLY Fargo Electronics, Inc.
LED
Button /
LED
Technician Handbook for CardJet Card Printers (continued)
Topic Description
Cancel / Retry
button (Error
recovery)
X
Relates to
Printer Error
Reporting and
Recovery (both
410/C7 models)
See the description (above) for the Cancel button.
The Operator can push on the Cancel / Retry button after removing a
misfed or stuck card in the Card Path.
The Cancel / Retry button activates when a card is hung up in the
Feed Station/Card Path or it is misfed.
Troubleshooting Instructions. See Section 2):
Use the Cancel / Retry button to cancel print jobs and reset the
Printer for the next print job. (Note: This Cancel function will
cancel all print jobs at both the PC and the Printer level and will
completely reset the Printer. If a card is left within the Printer after a
print job is canceled, it will automatically be ejected.)
X
CANCEL
Button
INK
LED
CARD
Button /
POWER
Continued on the next page
CardJet 410 Card Printer/Encoder and Persona CardJet C7 Printer User Guide (Rev. 6.1)
2-37
Page 47

RESTRICTED USE ONLY Fargo Electronics, Inc.
Technician Handbook for CardJet Card Printers (continued)
Topic Description
Card Cartridge
(both 410/C7
models)
Card Cartridge
is moved during
the Smart tag
read cycle
Card Cartridge
is correctly
installed
The Card Cartridge displays the quantity levels of cards remaining.
The Card Cartridge is a self-contained, transparent Cartridge, which is
positioned in the Card Printer to be easily seen (for card monitoring
purposes) and is easily installed (for one-way, top loading installation).
Operating Instructions. See Section 1:
You can hear a click when the Card Cartridge is correctly installed
in the Card Printer. Also, the light will go out.
The Printer correctly detects and reports an improperly loaded Card
Cartridge via Card LED and on-screen messagewhen the Cartridge
is moved during the Smart electronic tag read cycle.
The Card LED begins to blink indicating an error. A PC screen pop-up
is displayed, stating: The card Cartridge is not installed.
Troubleshooting Instructions. See Section 2):
Install the Cartridge, then press the Card button on the front of the
Printer to print or cancel printing.
The Printer detects a correctly loaded Card Cartridge, cancels the Card
LED warning and successfully prints the requested card.
The Card LED ceases to blink indicating an error. No PC screen pop-up
is displayed. A card is successfully printed.
Card Cartridge
Error
Messages:
Cards Out
Card Cartridge
(incorrectly
installed; LED
error light)
The errors message that appear as a dialog to warn the following:
Cards Out (includes LED flash).
See the Interpreting the LED Lights procedure.
The LED error light indicates an incorrect Card Cartridge installation.
See the Interpreting the LED Lights procedure.
Continued on the next page
CardJet 410 Card Printer/Encoder and Persona CardJet C7 Printer User Guide (Rev. 6.1)
2-38
Page 48

RESTRICTED USE ONLY Fargo Electronics, Inc.
Technician Handbook for CardJet Card Printers (continued)
Topic Description
Card Encoding The Encoding module is self-contained and easily field-upgradeable by
an Operator (or a Service Technician).
Encode Only option (not provided): The Printer will not provide
an Encode Only option that allows for encoding without printing.
Strictly used with Fargo CardJet products: The Encoder is
designed so it can only be used with Fargo CardJet products.
Card Error
Recovery (See
Card LED)
Color Ink
Cartridge out of
ink
The Firmware traps and reports the error condition via the Card LED
and a corresponding message at the Driver Operator Interfaceafter
which the print operation is halted.
The Printer will restart the operation and will continue printing cards
after the Operator opens the Printer Top Cover, fixes and removes the
jammed card, closes the Printer Top Cover and presses the Card
button.
Troubleshooting Instructions. See Section 2):
Open the Printer Top Cover, fix it and remove the jammed card.
Close the Printer Top Cover to restart the Printer operation and
continue printing cards.
Prior to the first card printing, the Ink LED begins to blink, indicating an
error. The Printer correctly detects and reports improperly loaded Card
Cartridges. See the Interpreting the LED Lights procedure.
The PC screen pop-ups displays this message: The color Ink
Cartridge in the Printer is out of ink.
Troubleshooting Instructions. See Section 2):
Replace the Cartridge and close the cover to print.
Continued on the next page
CardJet 410 Card Printer/Encoder and Persona CardJet C7 Printer User Guide (Rev. 6.1)
2-39
Page 49

RESTRICTED USE ONLY Fargo Electronics, Inc.
Technician Handbook for CardJet Card Printers (continued)
Topic Description
Card LED The Firmware correctly detects the card feed error condition and
indicates a fatal error condition (via the Card LED) and a PC on-screen
error message indicating a card feeding error (via the Driver Operator
interface).
The Printer has LED, Sensor and Error Message malfunction
indicators to inform the Operator that the equipment is
malfunctioning and to indicate which component is malfunctioning.
The Printer has LED indicators on the front that provide Error
reporting. In addition, Error reporting appears on the PC screens to
indicate error, status and corrective action.
The errors message that appear as a dialog to warn the Operator
are for Cards Out (includes LED flash).
The LED error light indicates an incorrect Card Cartridge
installation.
Card LED The Printer via the Card LED correctly detects and reports empty,
illegal or improperly load Card Cartridges.
Card LED (bad
Smart tag)
Before running out of cards, the Printer correctly validates a
replacement Cartridge and reports that it has a bad Smart tag (via the
Card LED) and that printing will continue when the Card Cartridge is
replaced with a good Cartridge.
Card LED
(illegal Card
Cartridge)
Before running out of cards, the Printer correctly validates a
replacement Cartridge and reports that it is illegal via the Card LED and
that printing will continue when the Card Cartridge is replaced with a
legal Cartridge.
Card Level
Monitoring (via
The Card Cartridge can be used to monitor card levels because it is
transparent and the Operator can see directly into the Cartridge.
Card Cartridge)
Continued on the next page
CardJet 410 Card Printer/Encoder and Persona CardJet C7 Printer User Guide (Rev. 6.1)
2-40
Page 50

RESTRICTED USE ONLY Fargo Electronics, Inc.
Technician Handbook for CardJet Card Printers (continued)
Topic Description
Card
Quantities
(50-card for
Persona C7
and 100card for
Professional
410)
The Card Cartridge is used to provide 100-card (Professional 410) and 50card (Persona C7) quantities through the same Cartridge in both the
Professional Series model and the Persona Series model.
Smart Tag Technology (differentiates): The Smart Tag technology
on the bottom of the Card Cartridge is used to differentiate between the
50-card and 100-card capacity in these two models.
Persona Series (50-card Card Cartridge only): The Persona series
Printer model does not support the 100-card Card Cartridge.
Professional Series (100-card Card Cartridge only): The Persona
series Printer model does not support the 50-card Card Cartridge.
Card Path This allows Operators to fine tune the position of the print area on the card.
(Note: The orientation of the card icon is portrait due to the front-to-back
orientation of the Printer's Card Path.) See the Selecting the Image
Position tab.
The Professional 410 and Persona CardJet C7 printing systems consist of
an HP Print Engine and Fargo additions that allows printing on CardJet
cards (CR-80, 30 mil).
For this purpose, the Printer has a special Card Path, an Input Hopper for
a Card Cartridge, extra Card Sensor and a Fargo Controller (2 Boards).
Troubleshooting Instructions. See Section 2):
Push on the Cancel / Retry button after removing a misfed or stuck
card in the Card Path.) (Note: The slotted Optical Sensor on the Card
Path is located between the Card Cartridge and the print area.)
The Print Cartridge does not center over the Card Path when the cover
is opened.
The Cancel / Retry button activates when a card is hung up in the
Feed Station/Card Path or it is misfed.
Card Sensor An electro-mechanical/electro-optical device used to indicate a change in
state in the Printer such as when a card reaches a certain location.
Continued on the next page
CardJet 410 Card Printer/Encoder and Persona CardJet C7 Printer User Guide (Rev. 6.1)
2-41
Page 51

RESTRICTED USE ONLY Fargo Electronics, Inc.
Technician Handbook for CardJet Card Printers (continued)
Topic Description
Card Size The Card Printer accepts only CardJet cards.
Card Surface Use only CardJet cards.
Color Matching The process of adjusting color hue, saturation and brightness, to
duplicate a desired color.
An algorithm within the Driver, which adjusts the color balance and
provides output with the desired color, automates this process.
Connectors to
The system has one USB upstream, type B connector to a PC.
Internal
Circuitry
Cover The access covers are not removable and they are self-supporting
when open. See CardJet Engineering Drawing R400019 in the
appendix.
When the print job and the Printer is initiated with normal conditions
and the Printer Top Cover is opened during the print process, the
Firmware will trap the condition and will put the Printer into a safe
pause mode.
The Lid Sensor is a reflective Sensor used to detect if the cover is
open. It can be affected by direct sunlight.
Continued on the next page
CardJet 410 Card Printer/Encoder and Persona CardJet C7 Printer User Guide (Rev. 6.1)
2-42
Page 52

RESTRICTED USE ONLY Fargo Electronics, Inc.
Technician Handbook for CardJet Card Printers (continued)
Topic Description
Card Printing
Jam
Card Sensor
condition (turns
LED on/off;
both 410/C7
models)
The Firmware correctly detects the condition and indicates a fatal error
condition via Card LED and a PC on-screen error message via the
Driver Operator Interfacewhen a print job and the Printer are
configured with anomalous conditions intended to induce a card printing
jam.
Troubleshooting Instructions. See Section 2):
After an error has been detected and reported, you can open the
cover, remove the jammed card and then close the cover and press
the Card button to continue the print job starting with a fresh card.
The Fargo Controller turns the LED on/off depending on the Card
Sensor condition. See the Interpreting the LED Lights procedure.
(Note: When no card is present, the LED is onand nothing interrupts
the IR emission.)
This Sensor is described as follows:
Detect card jam: The Card Sensor is used to determine the card
position in case of a jam, as well as for service purposes.
Detect card edge: The Fargo Controller detects if there was a
leading or trailing edge of a card detected.
Continued on the next page
CardJet 410 Card Printer/Encoder and Persona CardJet C7 Printer User Guide (Rev. 6.1)
2-43
Page 53

RESTRICTED USE ONLY Fargo Electronics, Inc.
Technician Handbook for CardJet Card Printers (continued)
Topic Description
Color Ink
Cartridge
Driver
Installation
Driver Operator
interface
Here is the breakdown:
CardJet 410: 300 color ink cards
Persona C7: 250 color ink cards
Installation and Startup Procedures. See Section 3):
1. Load the Driver CDROM into the PC. (Note: The host Driver
download software automatically opens and prompts the Operator
through the Driver installation process.)
The device initialization and Firmware downloading
occurswhen the Printer start-up is initiated.
The cards are printed with acceptable color reproduction and
image placementwhen the Operator initiates a print job
following Driver installation.
Firmware traps and reports encoding error responses via required LED
illumination and messages at the Driver Operator interface.
Firmware correctly detects the card feed error condition and
indicates a fatal error condition (via the Card LED) and a PC onscreen error message indicating a card feeding error (via the Driver
Operator interface).
Empty Ink
Cartridge (1)
(See Ink LED
and Error
Messages)
Firmware correctly detects the card printing jam condition and
indicates a fatal error condition (via the Card LED) and a PC onscreen error message (via the Driver Operator interface).
The Printer correctly notifies the Operator of the empty Ink Cartridge via
the Ink LED and on screen messagebefore running out of ink.
The remainder of the print job is restarted when a new Cartridge is
correctly installed.
Continued on the next page
CardJet 410 Card Printer/Encoder and Persona CardJet C7 Printer User Guide (Rev. 6.1)
2-44
Page 54

RESTRICTED USE ONLY Fargo Electronics, Inc.
Technician Handbook for CardJet Card Printers (continued)
Topic Description
Empty Ink
Cartridges (2)
(See Ink LED
and Error
Messages)
Non-empty Ink
Cartridges
OR
Non-empty
color Ink
Cartridges
Empty black Ink
Cartridge (See
Ink LED and
Error
Messages)
Empty black Ink
Cartridge
(replaced)
The Printer correctly detects and reports an empty Ink Cartridge via
LED and on-screen messagewhen the empty Cartridges are in the
Printer where both Cartridges are empty.
The Printer correctly detects non-empty Ink Cartridgeswhen the
empty Cartridges are replaced in the Printer.
The printing continues on the print job that was halted by the detection
of the empty Ink Cartridges.
The Printer correctly detects and reports an empty black Ink Cartridge
via LED and on-screen messagewhen the empty Cartridges are in
the Printer where the black Cartridge is empty.
The Printer correctly detects non-empty Ink Cartridgeswhen the
empty black Ink Cartridge is replaced in the Printer.
The printing continues on the print job that was halted by the detection
of the empty black Ink Cartridge.
Encoder Error
Handling (See
LED and Error
Messages)
The Firmware traps and reports encoding error responses via required
LED illumination and messages at the Driver Operator interfacewhen
a print job and the Printer are configured with anomalous conditions
intended to trigger specific encoding errors.
The batch jobs are correctly resumed. After an error has been detected
and reported, an Encoding Retry option is provided for the
Operatorvia an on-screen button that correctly initiates an attempt to
re-encode the card when selected.
Continued on the next page
CardJet 410 Card Printer/Encoder and Persona CardJet C7 Printer User Guide (Rev. 6.1)
2-45
Page 55

RESTRICTED USE ONLY Fargo Electronics, Inc.
Technician Handbook for CardJet Card Printers (continued)
Topic Description
Encoding Retry
option
Error Recovery
Printer Error
Reporting and
Recovery (both
410/C7 models)
HiCo Magnetic
Encoding Card
Printing
High-coercivity
Stripe Encoding
Encoding Retry option is provided the Operator via an on-screen
button that correctly initiates an attempt to re-encode the card when
selected.
Push on the Card button to clear a jam.
Push on the Cancel / Retry button after removing a misfed or stuck
card in the Card Path. (Note: The Cancel / Retry button activates
when a card is hung up in the Feed Station/Card Path or it is misfed.)
The Printer is correctly printing an imagewhen the Operator provides
Magnetic Encoding as part of the requested card image data via the
Driver software.
The Printer supports optional high-coercivity magnetic stripe encoding.
It does not support low-coercivity and JIS II encoding.
Process: The Printer will not be capable of printing and encoding
sequentially.
Print > Encode > Feed: It will print, then encode and then feed in
the next card for printing.
Encoding Error: If there is an encoding error, the Printer must
pause operation and report an error so the improperly encoded card
does not end up in the stack of good cards.
Host Driver
Download
Software
The host Driver download software automatically opens and prompts
the Operator through the Driver installation process when the Driver
CDROM is loaded into the PC.
HP Print Engine The stand-alone Core HP Print Driver supports all required functionality
of the HP Print Engine subsystem.
Windows recognizes three (3) USB devices: the Print Engine, the Fargo
Controller and an on-Board USB hub (needed to split USB upstream
into three USB downstream channels).
Continued on the next page
CardJet 410 Card Printer/Encoder and Persona CardJet C7 Printer User Guide (Rev. 6.1)
2-46
Page 56

RESTRICTED USE ONLY Fargo Electronics, Inc.
Technician Handbook for CardJet Card Printers (continued)
Topic Description
Fargo
Controller to HP
Sensor
Assembly
Illegal Ink
Cartridge
Detection (via
Ink LED)
Image
Positioning
Improperly
installed color
Ink Cartridges
Improperly
seated Card
Cartridge
(See Card LED
and Error
Messages)
There are two (2) cables which connect the Fargo Controller with the
Sensor in the HP Print Engine. These cables must be properly attached
for the Printer to operate properly.
The Printer correctly validates the replacement Cartridge and reports
that it is an illegal Cartridge via the Ink LEDbefore running out of ink
and having a new Ink Cartridge installed.
The printing is restarted when the Ink Cartridge is replaced with a good
Cartridge.
Use the Image Position controls to adjust the position of the overall
print area to be precisely centered on a card.
The Printer correctly detects an improperly installed color Ink
Cartridgeswhen the empty color Cartridge is replaced in the Printer
(but it is installed incorrectly).
The Printer correctly detects and reports improperly loaded Card
Cartridges via the Card LED and on-screen messagewhen the Card
Cartridge is improperly seated. (Note: The Card LED begins to blink
indicating an error.)
A PC screen pop-up is displayed: The card Cartridge is not
installed.
Incorrect Card
Cartridge
Detection (See
Card LED)
Troubleshooting Instructions. See Section 2):
1. Correctly load the Card Cartridge to cancel the error conditions.
2. Install the Cartridge, then press the Card button on the front of the
Printer to print or cancel printing.
The Printer correctly validates a replacement Cartridge and reports that
it is an illegal Cartridge via the Card LEDbefore running out of cards.
The printing will continue when the Card Cartridge is replaced with a
legal Cartridge.
Continued on the next page
CardJet 410 Card Printer/Encoder and Persona CardJet C7 Printer User Guide (Rev. 6.1)
2-47
Page 57

RESTRICTED USE ONLY Fargo Electronics, Inc.
Technician Handbook for CardJet Card Printers (continued)
Topic Description
Initial Card
Feed Error
The Firmware correctly detects the condition and indicates a fatal error
condition (via the Card LED and a PC on-screen error message),
indicating a card feeding error via the Driver Operator Interfacewhen
a print job and the Printer are configured with anomalous conditions
intended to induce a card feed error.
After an error has been detected and reported, physically fixing the card
feed error conditions and pressing the Card button correctly initiates an
attempt to resume the print job starting with a fresh card.
Physically fix the card feed error conditions and press the Card button
to resume the print job.
Ink Cartridges The Ink Cartridge is described below:
Incorrect Ink Cartridge Installation: The Ink LED error light
reports incorrect Ink Cartridge installation.
Ink Cartridges: The Ink Cartridges is a protected supplies item to
the Fargo Printer.
Smart technology: The Ink Cartridge uses Smart supplies
technology for keeping Fargo Cartridges proprietary, providing
capability to decrement the tag. A Cartridge is spent. It cannot be
reused.
Printing bar codes: The Printer is capable of printing bar codes
that are readable by both infrared and visible-light bar code
scanners. Infrared bar codes require the infrared bar code print
mode.
Cartridge Requirements: The Printer will require both the color,
dye Ink Cartridge and the black pigment Ink Cartridge to function.
Continued on the next page
CardJet 410 Card Printer/Encoder and Persona CardJet C7 Printer User Guide (Rev. 6.1)
2-48
Page 58

RESTRICTED USE ONLY Fargo Electronics, Inc.
Technician Handbook for CardJet Card Printers (continued)
Function Description
Ink LED
The Ink Cartridge Status LED is described below. See next page):
The Ink LED light indicates when you need to check the status of the color or
black Ink Cartridge. (Note: Both Ink Cartridges must be installed in order for
the Printer to function.)
Light is off. When the light is off, both Cartridges are ready for printing.
Ink LED light is lit. When the Ink LED light is lit, it indicates that ink is
not installed, ink is out or that there is a problem with one of the Ink
Cartridges. In this case, correct the issue and close the Printer's Top
Cover to resume operation. When lit, the amber LED above this symbol
will flash to indicate you need to check the status of the Ink Cartridges.
This LED will flash when:
The Top Cover is open. When open, the Ink Cartridge will move to the
install position. Regardless of the Ink Cartridge condition, the Cartridge
will always move to this position. (Note: When the Top Cover is closed,
the Cartridge will return to its home position. If a print job has been
received, printing will resume when the Top Cover is closed. If the Top
Cover is left open, the Cartridge will return to its home position after 5
minutes of the Printer sitting idle.)
One or both of the Ink Cartridges is improperly installed or missing
and the Top Cover is closed. (Note: When Top Cover is opened, the
Cartridge will move to the same standard install position described in
condition 1.)
One or both of the Ink Cartridges is out of ink and the Top Cover is
closed. (Note: When Top Cover is opened, the Cartridge will move to
the same standard install position described in condition 1.)
A non Fargo-certified Cartridge is installed and the Top Cover is
closed. (Note: When Top Cover is opened, the Cartridge will move to
the same standard install position described in condition 1.)
Troubleshooting Instructions. See Section 2):
1. Correct the condition and close the Top Cover to continue printing.
Continued on the next page
CardJet 410 Card Printer/Encoder and Persona CardJet C7 Printer User Guide (Rev. 6.1)
2-49
Page 59

RESTRICTED USE ONLY Fargo Electronics, Inc.
Technician Handbook for CardJet Card Printers (continued)
Term Description
Ink Cartridge The Printer requires both the color, dye-based Ink Cartridge and the
black pigment Ink Cartridge to function properly.
The Printer can print bar codes that are readable by both infrared
bar code mode and visible-light bar code scanners. The Cartridge
installation follow the way HP currently does it.
The Ink Cartridge uses Smart supplies technology, providing
capability to decrement the tag and the supplies security. A
Cartridge is spent. It cannot be reused.
Ink Cartridge
Tag Detection
(via Ink LED) –
Bad data tag
Ink Error
Recovery (See
Ink LED)
Ink LED (empty
Ink Cartridge)
The Printer correctly validates the replacement Cartridge and reports
that it has a bad tag via the Ink LEDbefore running out of ink and
having a new Ink Cartridge installed.
The printing is restarted when the Ink Cartridge is replaced with a legal
Cartridge.
The Firmware traps and reports the error condition via the Ink LED and
a corresponding message at the Driver Operator Interfaceafter which
the print operation is halted.
The Printer will restart the operation and will continue printing cards
after the Operator opens the Printer Top Cover, fixes the Ink Cartridge
condition and closes the Printer Top Cover.
Troubleshooting Instructions. See Section 2):
1. Open the Printer Top Cover, fix the Ink Cartridge condition and
close the Printer Top Cover to restart the Printer operation and
continue printing cards.
Before running out of a ink, the Printer correctly notifies the Operator of
the empty Ink Cartridge via the ink LED and that the remainder of the
print job is restarted when a new Cartridge is correctly installed.
Ink LED (illegal
Ink Cartridge)
Before running out of ink and having a new Ink Cartridge installed, the
Printer correctly validates the replacement Cartridge and reports if it is
illegal via the ink LED and that printing are restarted when the Ink
Cartridge is replaced with a good Cartridge.
Continued on the next page
CardJet 410 Card Printer/Encoder and Persona CardJet C7 Printer User Guide (Rev. 6.1)
2-50
Page 60

RESTRICTED USE ONLY Fargo Electronics, Inc.
Technician Handbook for CardJet Card Printers (continued)
Topic Description
Ink LED (bad
tag)
Ink LED error
light (reports
incorrect Ink
Cartridge
install; both
410/C7 models)
Ink Level
Monitoring (See
Printer Driver
Fuel Gauge)
Ink Level
Gauge
InkJet Bad Card
Cartridge Tag
Detection
Before running out of ink and having a new Ink Cartridge installed, the
Printer correctly validates the replacement Cartridge and reports that it
has a bad tag via the ink LED and that printing are restarted when the
Ink Cartridge is replaced with a legal Cartridge.
The Ink LED error light reports incorrect Ink Cartridge installation.
The Ink Cartridges are a protected supplies item to the Fargo Printer.
The Printer Driver Fuel Gauge feature correctly provides the Operator
with a display of the estimated amount of ink remaining in the
Cartridgewhen the Operator requests it. The Printer is set up to
ensure the appropriate ink levels exist before starting each print job.
SmartLoad Ink Cartridges contain an exclusive Ink Level Gauge that
reports remaining prints and alerts when the ink is low or out.
The Printer correctly validates a replacement Cartridge and reports that
it is illegal via the Card LEDbefore running out of cards.
The Printer correctly detects and reports card Cartridge with a bad
tag via LED and on-screen message.
The printing will continue when the Card Cartridge is replaced with
a good Cartridge.
Continued on the next page
CardJet 410 Card Printer/Encoder and Persona CardJet C7 Printer User Guide (Rev. 6.1)
2-51
Page 61

RESTRICTED USE ONLY Fargo Electronics, Inc.
Technician Handbook for CardJet Card Printers (continued)
Topic Description
InkJet Illegal Ink
Cartridge
Detection (See
Ink LED)
The Printer correctly validates the replacement Cartridge and reports
that it is illegal via the Ink LEDbefore running out of ink and having a
new Ink Cartridge installed. The printing is restarted when the Ink
Cartridge is replaced with a good Cartridge.
Input Hopper The Printer has a special Card Path, an Input Hopper for a Card
Cartridge, extra Card Sensor and a Fargo Controller (2 Boards). This
Printer area stores the blank cards, ready to print.
Installing Ink
Cartridge
Detection (See
The Printer correctly notifies the Operator of the empty Ink Cartridge via
the Ink LEDbefore running out of ink. The remainder of the print job is
restarted when a new Cartridge is correctly installed.
Ink LED)
Interchangeable
Commercial
parts
Interface to the
PC
Both Printers primarily uses customized CardJet parts to ensure
interchangeability and to simplify the problem of field stocking of
replacement parts.
The Printer is equipped with USB interface.
Technicians can access the Printer Driver Operator Interface
window by selecting Start button > Settings > Printers > CardJet
410 Card Printer (right click) > Printing Preferences to bring up the
CardJet 410 or Persona C7 Card Printer Printing Preferences
window.
Technicians can use the Card, Image Quality, Image Position,
Magnetic Encoding and Print Supplies tabs to make appropriate
selections, as described below and (in more detail) in Section 3:
Printer Adjustments.
Continued on the next page
CardJet 410 Card Printer/Encoder and Persona CardJet C7 Printer User Guide (Rev. 6.1)
2-52
Page 62

RESTRICTED USE ONLY Fargo Electronics, Inc.
Technician Handbook for CardJet Card Printers (continued)
Term Description
Interface (using
the Card tab)
Interface (using
the Image Color
tab)
Interface (using
the Image
Position tab)
Interfacing with the Card tab:
Access the Card tab via CardJet 410 or Persona C7 Card Printer
Printing Preferences window.
Use the Card tab to select Print Quality (Fast, Normal and Best), the
Card Size (up/down arrows), the Orientation: Portrait and Landscape
(radio buttons), the Rotate Image 180° (checkbox) and Copies
(checkbox). See the Selecting the Print Quality (Best, Normal or Fast
print modes) procedure.
Also provides the About button. See Selecting the Card tab window.
Interfacing with the Image Color tab:
Access the Image Color tab via CardJet 410 or Persona C7 Card
Printer Printing Preferences window. See the Selecting the Image Color
tab.
Use the Image Color tab to select Print Quality (radio buttons), Color
Quality (adjustment slides), Automatic Image Enhancement (checkbox),
Ink Volume (adjustment slide), Print in Grayscale (checkbox) and
Infrared Bar Codes (checkbox).
Also provides the Default button.
Interfacing with the Image Position tab:
Access the Image Position tab via CardJet 410 or Persona C7 Card
Printer Printing Preferences window. See the Image Position tab.
Use the Image Position tab to select Horizontal and Vertical positioning
(right and left arrows) of the cards.
Continued on the next page
CardJet 410 Card Printer/Encoder and Persona CardJet C7 Printer User Guide (Rev. 6.1)
2-53
Page 63

RESTRICTED USE ONLY Fargo Electronics, Inc.
Technician Handbook for CardJet Card Printers (continued)
Topic Description
Interface (using
the Magnetic
Encoding tab)
Interface (using
the Print
Supplies tab)
Interfacing with the Magnetic tab (both 410/C7 models):
Access the Magnetic Encoding tab via CardJet 410 or Persona C7
Card Printer Printing Preferences window. See the Selecting the
Magnetic Encoding tab (both 410/C7 models) procedure.
Use the Magnetic Encoding tab to select the Verification (radio
buttons) and Retries (up/down arrows), Magnetic Track Selection
(radio buttons), Magnetic Track Options: Bit Density (radio buttons),
Character Size (radio buttons), ASCII Offset (radio buttons), LRC
Generation (radio buttons), Character Parity (radio buttons) and Shift
Data Left (checkbox).
Also provides a Default button.
Interfacing with the Print Supplies tab:
Access the Print Supplies tab via CardJet 410 or Persona C7 Card
Printer Printing Preferences window. See the Selecting the Print
Supplies tab.
Use the Print Supplies tab to view Prints Remaining under Color Ink
Cartridge and Black Ink Cartridge.
Also provides the Clean Ink Cartridge Nozzles button. The Technician
can view the Color Ink Cartridge Reorder Number, Black Ink Cartridge
Reorder Number and the Card Cartridge Reorder Number.
Continued on the next page
CardJet 410 Card Printer/Encoder and Persona CardJet C7 Printer User Guide (Rev. 6.1)
2-54
Page 64

RESTRICTED USE ONLY Fargo Electronics, Inc.
Technician Handbook for CardJet Card Printers (continued)
Term Description
Malfunction
indicators
LED Indicators
Printer Error
Reporting and
Recovery (both
410/C7 models)
The Printer has LED, Sensor and Error Message malfunction indicators
to inform the Operator that the equipment is malfunctioning and to
indicate which component is malfunctioning.
LED (Paper Sensor): The Paper Sensor LED is on right away
when the power is provided.
Card LED (bad tag): Before running out of cards, the Printer
correctly validates a replacement Cartridge and reports that it has a
bad tag via the Card LED and that printing will continue when the
Card Cartridge is replaced with a good Cartridge.
Card LED (illegal Card Cartridge): Before running out of cards,
the Printer correctly validates a replacement Cartridge and reports
that it is illegal via the Card LED and that printing will continue when
the Card Cartridge is replaced with a legal Cartridge.
Ink LED (empty Ink Cartridge): Before running out of ink, the
Printer correctly notifies the Operator of the empty Ink Cartridge via
the Ink LED and that the remainder of the print job is restarted when
a new Cartridge is correctly installed.
Ink LED (illegal Ink Cartridge): Before running out of ink and
having a new Ink Cartridge installed, the Printer correctly validates
the replacement Cartridge and reports that it is illegal via the Ink
LED and that printing are restarted when the Ink Cartridge is
replaced with a good Cartridge.
Continued on the next page
CardJet 410 Card Printer/Encoder and Persona CardJet C7 Printer User Guide (Rev. 6.1)
2-55
Page 65

RESTRICTED USE ONLY Fargo Electronics, Inc.
Technician Handbook for CardJet Card Printers (continued)
Term Description
LED Indicators
Relates to
Printer Error
Reporting and
Recovery (both
410/C7 models)
LED Panel
The Printer has LED, Sensor and Error Message malfunction indicators
to inform the Operator that the equipment is malfunctioning and to
indicate which component is malfunctioning.
The Printer has LED indicators on the front that provide Error
reporting. In addition, Error reporting appears on the PC screens to
indicate error, status and corrective action.
The errors message that appears as a dialog to warn the Operator
are for Cards Out (includes LED flash).
The LED error light indicates an incorrect Card Cartridge
installation.
Ink LED (bad tag): Before running out of ink and having a new Ink
Cartridge installed, the Printer correctly validates the replacement
Cartridge and reports that it has a bad tag via the Ink LED and that
printing are restarted when the Ink Cartridge is replaced with a legal
Cartridge.
Encoding Errors (LED / Driver UI): Firmware traps and reports
encoding error responses via required LED illumination and
messages at the Driver Operator interface.
Card LED (card feeding errors): Firmware correctly detect the
card feed error condition and indicates a fatal error condition (via
the Card LED) and a PC on-screen error message indicating a card
feeding error (via the Driver Operator interface).
Continued on the next page
CardJet 410 Card Printer/Encoder and Persona CardJet C7 Printer User Guide (Rev. 6.1)
2-56
Page 66

RESTRICTED USE ONLY Fargo Electronics, Inc.
Technician Handbook for CardJet Card Printers (continued)
Term Description
Monitoring Card
Levels
The Card Cartridge is transparent for visual card monitoring from side
or top view. The LED error light indicates the following:
Cards Out message: This provides a definitive Cards Out
message on the PC screen and a LED flash on the Printer.
Card Cartridge Replacement: This resumes without an error after
a Card Cartridge is replaced if the cards run out in the middle of a
batch print.
Normal Card
Printing (See
Printer Driver
Select the normal Printer Driver preference options to print cards with
color reproduction matching the required color characteristics of a
sample image to within acceptable limits.
preference
options)
Optical Sensors The slotted Optical Sensor on the Card Path is located between the
Card Cartridge and the print area.
Output Hopper The portion of the Printer that accepts the completed cards. Close the
door if you want the card to stick neatly.
Pause, Slow
Print
When the Printer data from the PC slows down or pauses for short
intervals, there is not adverse effect on the printed output. (Note:
When the print job and the Printer is initiated with normal conditions
and the Printer Top Cover is opened during the print process, the
Firmware will trap the condition and will put the Printer into a safe
pause mode.)
Continued on the next page
CardJet 410 Card Printer/Encoder and Persona CardJet C7 Printer User Guide (Rev. 6.1)
2-57
Page 67

RESTRICTED USE ONLY Fargo Electronics, Inc.
LED
Button /
LED
Technician Handbook for CardJet Card Printers (continued)
Topic Description
Power button /
LED
Printer connected to the PC:
The Power button turns the Printer ON and OFF. (Note: When lit,
the blue LED light indicates when power is ON.)
Press the Power button to turn the Printer ON and OFF.
The blue LED above the button turns OFF or ON to indicate when
power is applied. (Note: This LED will flash when the Printer is
processing a print job.)
If the Power button is pressed during a print job, the print job will be
lost and the Printer will reset (depends on Windows configuration).
Printer not connected to the PC:
Press the Power button to turn the Printer ON and OFF. (Note:
The blue LED above the button turns OFF or ON to indicate when
power is applied. This is the only active button when the Printer is
not connected to the PC.)
All other buttons will not function and a Card Printer self-test will not
be possible. (Note: When the Printer is not connected and the
Card Cartridge and Ink Cartridge are not installed, only the Ink LED
will flash as this is controlled by firmware.)
The Card LED will not flash in this mode when the Card Cartridge is
not installed. (Note: The Printer must be connected to the PC for
the Card LED to flash.)
(Note: Avoid pressing multiple buttons simultaneously or pressing and
holding a button or combination of buttons.)
See the description (above) for the Power button / LED.
X
CANCEL
Button
CardJet 410 Card Printer/Encoder and Persona CardJet C7 Printer User Guide (Rev. 6.1)
INK
LED
CARD
Button /
POWER
Continued on the next page
2-58
Page 68

RESTRICTED USE ONLY Fargo Electronics, Inc.
Technician Handbook for CardJet Card Printers (continued)
Term Description
Power Supply
Printer
connected to a
domestic US
power source
Printer Drive
Fuel Gauge
(used for
monitoring ink
levels)
Fargo supplies both cord sets for Internal power supply. (Note: This
provides a dual power supply (110v/220v).)
1. Connect the Printer to a domestic US power source via appropriate
power cord, to start-up the Printer. (Note: Normal device
initialization and Firmware downloading. Printer start-up is initiated.
The cards are printed with acceptable color reproduction and image
placement when the Operator selects normal Printer Driver
preference options and initiates a print job.)
2. Select the normal Printer Driver preference options and start a print
job. Ensure that the cards are printed with acceptable color
reproduction and image placement.
The Printer Driver Fuel Gauge correctly provides the Operator with a
display of the estimated amount of ink remaining in the Cartridge when
the Operator requests it.
Ink Levels: The Printer is set up to ensure the appropriate ink
levels exist before starting each print job.
Monochrome/Color Cartridge: The Printer provides a fuel gauge
in Printer Driver to monitor both monochrome and color Cartridge.
Each Cartridge is monitored individually.
Ink Low message: The Fuel Gauge provides an onscreen
Operator warning for Ink Low.
Ink Out message: The Fuel Gauge provides a definitive Ink Out
message on screen and LED flash. (Note: It resumes without error
after an Ink Cartridge is replaced if ink runs out in the middle of a
batch print.)
Continued on the next page
CardJet 410 Card Printer/Encoder and Persona CardJet C7 Printer User Guide (Rev. 6.1)
2-59
Page 69

RESTRICTED USE ONLY Fargo Electronics, Inc.
Technician Handbook for CardJet Card Printers (continued)
Topic Description
Printer Driver
(USB plug &
play
capabilities)
Printer Error
Reporting and
Recovery (both
410/C7 models)
A software utility that serves as an interface between the Printer and
the Windows GDI (Graphical Device Interface), making the Printer's
functions available through the software application.
When the Operator selects normal Printer Driver preference options,
cards are printed with color reproduction matching the required color
characteristics of a sample image to within acceptable limits.
Professional series type Online Operator's Guide
Driver Provides What's This… and context sensitive help capability
Driver Provides tab style format consistent with Professional Series
Drivers.
Driver supports on-screen error/status messaging for conditions
such as Out of Cards, Out of Ink, etc.
Driver is compatible with Windows 98, Windows Millennium,
Windows 2000 and Windows XP.
The Printer has LED indicators on the front that provide Error reporting.
In addition, Error reporting appears on the PC screens to indicate error,
status and corrective action.
The Operator can push on the Card button after removing a misfed or
stuck card in the Card Path.
Printer Interface
and Connection
(Printer Driver
preference
options)
1. Connect the Printer to a host PC via a USB cable to start-up the
Printer. There is device initialization and Firmware downloading
occurwhen Printer start-up is initiated. (Note: The cards are
printed with acceptable color reproduction and image placement
when the Operator selects normal Printer Driver preference options
and initiates a print job.)
2. Select the normal Printer Driver preference options and start a print
job. Ensure that the cards are printed with acceptable color
reproduction and image placement.
Continued on the next page
CardJet 410 Card Printer/Encoder and Persona CardJet C7 Printer User Guide (Rev. 6.1)
2-60
Page 70

RESTRICTED USE ONLY Fargo Electronics, Inc.
Technician Handbook for CardJet Card Printers (continued)
Type Description
Printer
Connections
Printer connections are described as follows for Technician review:
PC via a USB cable connection: When a Printer is connected to a
host PC via a USB cable, device initialization and Firmware
downloading occur when Printer start-up is initiated.
Technician Note: Ensure that cards are printed with acceptable
color reproduction and image placement when the Operator selects
normal Printer Driver preference options and initiates a print job.
US power source connection: When a Printer is connected to a
domestic US power source via appropriate power cord, device
initialization and Firmware downloading occur when Printer start-up
is initiated.
Technician Note: Ensure that cards are printed with acceptable
color reproduction and image placement when the Operator selects
normal Printer Driver preference options and initiates a print job.
Non-domestic power source connection: When a Printer is
connected to a specific non-domestic power source via the
appropriate supplied power cord, device initialization and Firmware
downloading occur when Printer start-up is initiated.
Technician Note: Ensure that cards are printed with acceptable
color reproduction and image placement when the Operator selects
normal Printer Driver preference options and initiates a print job.
Printer
connected to a
specific nondomestic power
source
1. Connect the Printer to a specific non-domestic power source via the
appropriate supplied power cord to start-up the Printer.
Start-up: Normal device initialization and Firmware
downloading occur. Printer start-up is initiated.
Desired Result: The cards are printed with acceptable color
reproduction and image placement when the Operator selects
normal Printer Driver preference options and initiates a print job.
2. Select the normal Printer Driver preference options and start a print
job. Ensure that the cards are printed with acceptable color
reproduction and image placement.
Continued on the next page
CardJet 410 Card Printer/Encoder and Persona CardJet C7 Printer User Guide (Rev. 6.1)
2-61
Page 71

RESTRICTED USE ONLY Fargo Electronics, Inc.
Technician Handbook for CardJet Card Printers (continued)
Topic Description
Print Mode
Speeds (Best,
Normal, Fast)
(both 410/C7
models)
The print speeds are Best Print Mode (76 seconds), Normal Print
Mode (42 seconds) and FAST Print Mode (26 seconds). See the
Selecting the Print Quality (Best, Normal or Fast print modes)
procedure.
Best, Normal and Fast Modes: The three (3) modes of print
quality are Best, Normal and Fast. When Best is selected, an
additional check box will activate; this allows Operators to select
(use) the pigmented pen. Initially, most Operators will only need to
select this if they need bar code readability by an infrared bar code
scanner.
Print Speed Modes: Speed is under seventy-six (76) seconds per
full coverage single-sided card in Best print mode, under forty-two
(42) seconds per card in Normal mode and under twenty-six (26)
seconds per card in Fast mode.
Default Print Mode (set to Normal): The Default Print Mode is set
to the Normal Print Mode. Over the edge printing is supported.
Print Modes: Full-color and monochrome-only print modes is
supported through selectable option in Printer Driver.
Output Hopper: The portion of the Printer that accepts the
completed cards.
Printed Label
(P/N and Lot
Number)
Printer Service
and
Maintenance
(both 410/C7
models)
Card Capacity: The card capacity are a maximum of 50 cards.
The Card Cartridge provides a printed label on it (not just on the
Cartridge packaging) that shows the part number and the lot number.
The smart chip does not report this information.
Technicians can efficiently work with a professional Printer Cleaning Kit
that includes specific instructions.
The Operator should not need to service or maintain this Printer.
Continued on the next page
CardJet 410 Card Printer/Encoder and Persona CardJet C7 Printer User Guide (Rev. 6.1)
2-62
Page 72

RESTRICTED USE ONLY Fargo Electronics, Inc.
Technician Handbook for CardJet Card Printers (continued)
Topic Description
Printer Start-up
Ink Carriage
mechanism
Programmed
color Ink
Cartridge with a
Professional
product
Programmed
black Ink
Cartridge with a
Professional
product
Raising Cover
while printing
Replace empty
Ink Cartridges
The device initialization and Firmware downloading occurwhen the
Printer start-up is initiated.
The device on a Printer that produces the image on the media.
The Printer correctly detects and reports a color Ink Cartridge
programmed with a Professional product ID via Ink LED and on-screen
message. See Ink LED and Error Messages in Section 2.
The Printer correctly detects and reports a black Ink Cartridge
programmed with a Professional product ID via Ink LED and on-screen
message. See Ink LED and Error Messages in Section 2.
You can raise the cover during the printing process and it will have no
effect on the printing process and the card print quality.
The Printer correctly detects and reports an empty color Ink Cartridge
via LED and on-screen messagewhen the empty Cartridges are in
the Printer where the color Cartridge is empty.
Troubleshooting Instructions:
Correctly install the non-empty black and color Ink Cartridges in the
CardJet Printer.
Observe and record the Printer and PC screen responses when the
card is printed. The Ink LED should return to normal. The Printer
should resume printing the print job.
Continued on the next page
CardJet 410 Card Printer/Encoder and Persona CardJet C7 Printer User Guide (Rev. 6.1)
2-63
Page 73

RESTRICTED USE ONLY Fargo Electronics, Inc.
Technician Handbook for CardJet Card Printers (continued)
Topic Description
Self-supporting
access covers
Service
documents
Spare parts
available
The access covers are removable and they are self-supporting when
open.
Refers to the thorough and complete service documents provided with
each Fargo Card Printer.
There are anticipated spare parts available with the product, in order to
ensure a continuous Printer performance.
Standard tools The required tools are standard, commonly available types.
Top Cover
Open During
Print Recovery
The Printer is initiated with normal conditions and the Printer Top Cover
is opened during the print process.
The Firmware will trap the condition and will put the Printer into a
safe pause mode.
The Printer will restart the operation and will continue printing cards
after the Operator closes the Printer Top Cover.
Operating Instruction. See Sections 2 and 3):
1. Close the Printer Top Cover to restart the Printer operation and
continue printing cards.
Continued on the next page
CardJet 410 Card Printer/Encoder and Persona CardJet C7 Printer User Guide (Rev. 6.1)
2-64
Page 74

RESTRICTED USE ONLY Fargo Electronics, Inc.
Technician Handbook for CardJet Card Printers (continued)
Topic Description
Unprogrammed
color Ink
Cartridge
Unprogrammed
black Ink
Cartridge
USB Interface
(Universal
Serial Bus;
electrical
structure)
The Printer correctly detects and reports an un-programmed color Ink
Cartridge via the Ink LED and on-screen message. See Ink LED and
Error Messages in Section 2.
The Printer correctly detects and reports an un-programmed black Ink
Cartridge via ink LED and on-screen message. See Ink LED and Error
Messages in Section 2.
A 1.5MB/sec (12MB/sec) serial communication interface that can
support 127 separate devices consisting of 4 wires: power, ground,
data in and data out.
Interface to PC and Power Supply: The system uses USB
interface to communicate to a PC and internal power supply.
Firmware initializes Fargo Controller Board.
Controller: The Fargo Controller supports USB 1.1 support.
Firmware: The Firmware is downloaded if the Printer has been
unpowered and then you power it up and connect the USB cable.
The Firmware is a part of Fargo PC Driver. To upgrade the
Firmware, the Operator has to update the Driver.
System connections: The system has one USB upstream, type B
connector to a PC and 3 downstream channels, with internal
connections going to Fargo Controller, HP Print Engine and optional
encoding Board.
USB Hub Windows recognizes three (3) USB devices: the Print Engine, the
Fargo Controller and an on-Board USB hub (needed to split USB
upstream into three USB downstream channels).
CardJet 410 Card Printer/Encoder and Persona CardJet C7 Printer User Guide (Rev. 6.1)
2-65
Page 75

RESTRICTED USE ONLY Fargo Electronics, Inc.
Section 3: Troubleshooting Guidelines
The purpose of this section is to provide Technicians with a breakdown of the CardJet Card
Printers Troubleshooting and Printer Maintenance requirements.
Table of Contents
Section 3: Troubleshooting Guidelines ________________________________________3-1
Table of Contents ___________________________________________________________________ 3-1
Safety Messages (review carefully)______________________________________________________ 3-2
Additional Safety Precautions for CardJet Technicians (review carefully) _____________________ 3-3
Interpreting the LED Lights ___________________________________________________________ 3-5
Interpreting LED Lights (continued) ________________________________________________ 3-6
Continued on the next page _______________________________________________________ 3-6
Interpreting LED Lights (continued) ________________________________________________ 3-7
Reviewing the Fargo Controller error types _______________________________________________ 3-8
Reviewing the Error Messages for Printer Drivers __________________________________________ 3-9
Reviewing the Status Monitor dialog box and buttons_____________________________________ 3-9
Reviewing the Error Messages Windows 98Se/Me/2000/XP Printer Drivers __________________ 3-10
Reviewing the Error Messages Windows 98Se/Me/2000/XP Printer Drivers (continued) ______ 3-11
Reviewing the Error Messages Windows 98Se/Me/2000/XP Printer Drivers (continued) ______ 3-12
Reviewing the Error Messages Windows 98Se/Me/2000/XP Printer Drivers (continued) ______ 3-13
Reviewing the Error Messages Windows 98Se/Me/2000/XP Printer Drivers (continued) ______ 3-14
Reviewing the Error Messages for Windows 98Se/Me/2000/XP Printer Drivers (continued) ___ 3-15
Reviewing the Error Messages for the Magnetic Encoding Module _________________________ 3-16
Troubleshooting with Printer Components _______________________________________________ 3-17
Troubleshooting with the Card and Ink LED Indicators___________________________________ 3-17
Troubleshooting with the Card and Ink LED (continued) _______________________________ 3-18
Troubleshooting with the Printer Driver Ink Fuel Gauges _________________________________ 3-19
Troubleshooting with the normal Printer Driver Preference Options_________________________ 3-19
Troubleshooting with the Magnetic Encoding Module (both 410/C7 models) _________________ 3-19
Troubleshooting with the Error Messages _____________________________________________ 3-20
Troubleshooting with the Printer connections __________________________________________ 3-21
Troubleshooting the Card Jam ______________________________________________________ 3-22
Troubleshooting with the Host Driver Download Software ________________________________ 3-22
Troubleshooting with an open Printer Top Cover _______________________________________ 3-22
Resolving the CardJet Card Printer problems _____________________________________________ 3-23
Resolving the Printer Startup problems _______________________________________________ 3-23
Resolving the Bar Code problems ___________________________________________________ 3-24
Resolving the Off-center Card Printing problems _______________________________________ 3-24
Resolving the pixelated or grainy ID Card Photo problems ________________________________ 3-25
CardJet 410 Card Printer/Encoder and Persona CardJet C7 Printer User Guide (Rev. 6.1)
3-1
Page 76

RESTRICTED USE ONLY Fargo Electronics, Inc.
Safety Messages (review carefully)
Symbol Critical Instructions for Safety purposes
Danger:
Caution:
Failure to follow these installation guidelines can result in death or
serious injury.
Information that raises potential safety issues is indicated by a warning
symbol (as shown to the below).
To prevent personal injury, refer to the following safety messages
before performing an operation preceded by this symbol.
To prevent personal injury, always remove the power cord prior to
performing repair procedures, unless otherwise specified.
To prevent personal injury, Ensure only qualified personnel perform
these procedures.
This device is electrostatically sensitive. It can be damaged if
exposed to static electricity discharges.
Information that raises potential electrostatic safety issues is indicated by a
warning symbol (as shown to the below).
To prevent equipment or media damage, refer to the following safety
messages before performing an operation preceded by this symbol.
To prevent equipment or media damage, observe all established
Electrostatic Discharge (ESD) procedures while handling cables in or
near the Circuit Board and Printhead Assemblies.
To prevent equipment or media damage, always wear an appropriate
personal grounding device (e.g., a high quality wrist strap grounded to
avoid potential damage).
To prevent equipment or media damage, always remove the Ribbon
and Cards from the Printer before making any repairs, unless otherwise
specified.
To prevent equipment or media damage, take jewelry off of fingers
and hands, as well as thoroughly clean hands to remove oil and debris
before working on the Printer.
CardJet 410 Card Printer/Encoder and Persona CardJet C7 Printer User Guide (Rev. 6.1)
3-2
Page 77

RESTRICTED USE ONLY Fargo Electronics, Inc.
Additional Safety Precautions for CardJet Technicians (review
carefully)
Symbol Critical Instructions for Safety purposes
Danger:
Before operating the unit, please read the following safety
precautions carefully:
Fire or Shock Hazard: Prevent fire or shock hazard by not
exposing the unit to rain or moisture.
Electronic Shock: Reduce the risk of electronic shock by not
removing the front, top or back Panels. No Operator-serviceable
parts inside. (Technician Note: Refer servicing to qualified
service personnel.)
Correct Voltage Rating: Operate the unit only on 100-240 VAC,
50/60 Hz. (Technician Note: If you have any doubt as to whether
you have a unit with the correct voltage rating for the country's
power supply, DO NOT attempt to use the unit. Contact the dealer
or the factory.)
Liquid or Solid Object: Stop operation immediately if any liquid
or solid object should fall into the cabinet. (Technician Note:
Unplug the unit and have it checked by qualified service
personnel.)
AC power cord: Use only the AC power cord included with this
unit or an equivalent cord.
ESD procedures: Be sure to observe all established Electro-
Static Discharge (ESD) procedures while handling cables in or
near the Circuit Board.
Grounding Device Safeguards: Always wear an appropriate
personal grounding device, such as a wrist strap with integral
resistor, connected to an ESD ground to avoid potential damage.
Electrostatic Sensitive Device: At a minimum, make positive
contact with the bare metal chassis of the Printer with the hand
before proceeding with the procedure. (Technician Note: This
device is electrostatic sensitive. It may be damaged if exposed to
static electrical discharges. Discharges may be generated by
various means, such as walking on a carpeted floor.)
CardJet 410 Card Printer/Encoder and Persona CardJet C7 Printer User Guide (Rev. 6.1)
3-3
Page 78

RESTRICTED USE ONLY Fargo Electronics, Inc.
Danger: You must unplug the power cable to the Card Printer to
ensure that all power is disconnected from the unit. Do not attempt any
work on the Card Printer’s interior unless you have first unplugged the
unit.
CardJet 410 Card Printer/Encoder and Persona CardJet C7 Printer User Guide (Rev. 6.1)
3-4
Page 79

RESTRICTED USE ONLY Fargo Electronics, Inc.
Interpreting the LED Lights
The LED lights located on the front of the Printer indicate what is working and not working
inside the Printer. To accurately interpret what it means when these lights are on, off or
flashing, please refer to the following table. Refer to the Technician Handbook for CardJet
Card Printers in Section 1 (as needed).
Power
LED
On solid Off Off Printer is ON and READY to print.
Flashing Off Off Indicates the Printer is processing a print job. This
Card
LED
Ink LED Cause / Solution
flashing will begin as soon as the Printer receives
the print job and will continue until the job is
completely printed.
CardJet 410 Card Printer/Encoder and Persona CardJet C7 Printer User Guide (Rev. 6.1)
3-5
Page 80

RESTRICTED USE ONLY Fargo Electronics, Inc.
Interpreting LED Lights (continued)
Power
LED
Card
LED
Ink
LED
Cause / Solution
On solid Flashing Off Indicates you need to check the status of the Card
Cartridge and/or the card being used for the current
print job. This LED will flash when:
The Card Cartridge is improperly installed or
missing. Verify the Cartridge is properly installed.
push down on the top of the Cartridge to Ensure it
is fully seated in the Printer.
The Card Cartridge is out of cards. Replace the
Card Cartridge.
A card is unable to feed from the Card Cartridge.
Verify the Cartridge is properly installed. Push
down on the top of the Cartridge to Ensure it is
fully seated in the Printer.
A card is jammed specificwhere along the Card
Path. Clear the jam.
A non Fargo-certified Card Cartridge is installed.
Use only Fargo Certified Supplies.
In any of these situations, correct the condition and
press the Card button to continue printing.
If neither the Ink Cartridge nor the Card Cartridge
are installed, only the Card LED will flash at first.
When the Card Cartridge is installed, the Ink LED
will then flash until the Ink Cartridge is installed.
These two lights will not flash simultaneously.
If the Printer has a Magnetic Encoding Module
installed and you are attempting to encode
magnetic information onto a card while printing, a
flashing Card LED can also indicate an encoding
mis-verify or specific other type of encoding error.
If information is not encoded properly or encoded
onto a bad magnetic stripe, the Printer is unable to
verify the encoded data. When this happens, the
Printer will signal an error on the PC screen.
Follow the on-screen prompts to correct this error.
Continued on the next page
CardJet 410 Card Printer/Encoder and Persona CardJet C7 Printer User Guide (Rev. 6.1)
3-6
Page 81

RESTRICTED USE ONLY Fargo Electronics, Inc.
Interpreting LED Lights (continued)
Power
LED
Card
LED
Ink LED Cause / Solution
On solid Off Flashing Indicates you need to check the status of the Ink
Cartridges.
This LED will flash when:
The Top Cover is open. When open, the Ink
Cartridge will move to the install position.
Regardless of the Ink Cartridge condition, the
Cartridge will always move to this position. When
the Top Cover is closed, the Cartridge will return to
its home position. If a print job has been received,
printing will resume when the Top Cover is closed.
If the Top Cover is left open, the Cartridge will
return to its home position after a few minutes of
the Printer sitting idle.
One or both of the Ink Cartridges is improperly
installed or missing. Open the Top Cover and
install or reinstall the Ink Cartridges.
One or both of the Ink Cartridges is out of ink.
Replace the empty Ink Cartridge.
A non Fargo-certified Cartridge is installed. Use
only Fargo Certified Supplies.
It flashes when the ink runs out early.
Troubleshooting Instructions:
1. In any of these situations, correct the condition and
close the Top Cover to continue printing.
CardJet 410 Card Printer/Encoder and Persona CardJet C7 Printer User Guide (Rev. 6.1)
3-7
Page 82

RESTRICTED USE ONLY Fargo Electronics, Inc.
Reviewing the Fargo Controller error types
The Driver periodically requests status information from Fargo Controller.
Error Type Description
Cartridge
Problems
Cartridge
Works
Closed Lid If the Lid is closed, the Fargo Controller will read the Cartridges again and
Error
Message
Error
Repeated
The Ink LED will blink and Ink Cartridges will move to the specified location
for replacement. The Driver will read the tags on both Cartridges to
determine if it is an out of ink situation.
Depending on the result of this read, the Driver will post a message:
Black/Color Cartridge is (are) out of ink or Cover Open.
If the Cartridges are good this time, the Driver can continue printing.
send the results to the Driver.
If there is any error, the Fargo Controller sends the error number to the
host. The Driver shows an error message with detailed explanation of the
error condition.
The Driver will post corresponding error messages again (as generated).
CardJet 410 Card Printer/Encoder and Persona CardJet C7 Printer User Guide (Rev. 6.1)
3-8
Page 83

RESTRICTED USE ONLY Fargo Electronics, Inc.
Reviewing the Error Messages for Printer Drivers
This section applies to the Status Monitor requirements for Windows 98Se/Me/2000/XP
Printer Drivers. Refer to the Technician Handbook for CardJet Card Printers in Section 1
(as needed).
Reviewing the Status Monitor dialog box and buttons
The Status Monitor only presents itself to the Operator when an error occurs. (Note: The
dialog box includes the error message, the cause/solution and the action buttons which allow
the Operator to resolve the issue.)
Graphic Icon: The dialog box also shows a generic graphic icon, shown below, that will
appear in the same position within the dialog box for all error messages.
buttons: Specific or all of the following buttons are provided depending on the specific
Printer condition. Each button will display in its set position indicated above regardless of
if all or only one button is displayed.
Error Code: For each error, an error code will also display in the lower left-hand corner
of the dialog box. This number should be as unobtrusive as possible and appear in a
smaller font.
Buttons Description
OK This OK button closes the dialog box. If not clicked, the dialog box will
close automatically once the error is corrected.
Cancel Print The Cancel button cancels the job at Printer and at PC.
Help This Help button opens the Help file, which is a link to the appropriate
topic of the HTML Online Operator’s Guide.
CardJet 410 Card Printer/Encoder and Persona CardJet C7 Printer User Guide (Rev. 6.1)
3-9
Page 84

RESTRICTED USE ONLY Fargo Electronics, Inc.
Reviewing the Error Messages Windows 98Se/Me/2000/XP Printer
Drivers
Error Message Problem Solution
Black Ink
Cartridge Not
Installed
Error Code: 4
(displayed on
lower left)
Black Ink
Cartridge Low
Error Code: 9
(displayed on
lower left)
Black Ink
Cartridge Out
Error Code: 10
(displayed on
lower left)
Black Ink
Cartridge problem
Error Code: 6
(displayed on
lower left)
Indicates the black Ink Cartridge
is not installed. (Note: The error
code is X.)
Indicates the black Ink Cartridge
in the Printer is low on ink.
(Note: The black ink count has
reached 20. This error message
displays when 20 prints remain
and it opens and closes for each
job.)
Indicates the black Ink Cartridge
in the Printer is out of ink. (Note:
The black ink count has reached
0.)
Indicates Black Ink Cartridge
problem. (Note: The error code
is X.)
Install the Cartridge to print or
cancel printing by pressing the
Cancel button on the front of the
Printer.
Consider having a replacement
Cartridge available. To order
additional Cartridges, please refer
to the reordering information on
the Cartridge label.
Replace the Cartridge and close
the Top Cover to print.
To order additional Cartridges,
please refer to the reordering
information on the Cartridge label.
Replace the Cartridge and close
the Top Cover to print.
Try removing and replacing the
black Print Cartridge.
If the problem persists, install a
new black Print Cartridge.
Continued on the next page
CardJet 410 Card Printer/Encoder and Persona CardJet C7 Printer User Guide (Rev. 6.1)
3-10
Page 85

RESTRICTED USE ONLY Fargo Electronics, Inc.
Reviewing the Error Messages Windows 98Se/Me/2000/XP Printer Drivers
(continued)
Error Message Problem Solution
Card Cartridge
Not Installed
Error Code: 16
(displayed on
lower left)
Card Cartridge
Problem
Error Code: 19
(displayed on
lower left)
Card Jam
Error Code: 21
(displayed on
lower left)
Cards Out
Error Code: 15
(displayed on
lower left)
Indicates the Card Cartridge is
not installed.
Indicates the Card Cartridge
failed to interact.
Indicates a card is jammed
inside the Printer. Displays a
Card Jam error.
Indicates the Card Cartridge in
the Printer is out of cards.
Install the Cartridge, then press
the Card button on the front of the
Printer to print or cancel printing.
Remove and replace the Card
Cartridge. If the problem persists,
install a new Card Cartridge.
Check under the Printer’s Top
Cover and clear the obstruction.
Press the Card button on the front
of the Printer to try again.
To order additional Cartridges,
refer to the reordering information
on the Cartridge label.
Replace the Card Cartridge, then
press the Card button on the front
of the Printer to continue printing.
Continued on the next page
CardJet 410 Card Printer/Encoder and Persona CardJet C7 Printer User Guide (Rev. 6.1)
3-11
Page 86

RESTRICTED USE ONLY Fargo Electronics, Inc.
Reviewing the Error Messages Windows 98Se/Me/2000/XP Printer Drivers
(continued)
Error Message Problem Solution
Color Ink
Cartridge Low
Error Code: 7
(displayed on
lower left)
Color Ink
Cartridge Not
Installed
Error Code: 3
(displayed on
lower left)
Color Ink
Cartridge problem
Error Code: 5
(displayed on
lower left)
Color Ink
Cartridge Out
Error Code: 8
(displayed on
lower left)
Indicates the color Ink Cartridge
in the Printer is low on ink.
(Note: The color ink count has
reached 20. This error message
displays when 20 prints remain
and it opens and closes for each
job.)
Indicates the color Ink Cartridge
is not installed. (Note: The error
code is X.)
Indicates a Color Ink Cartridge
problem. (Note: The error code
is X.)
Indicates the color Ink Cartridge
in the Printer is out of ink. (Note:
The color ink count has reached
0.)
Consider having a replacement
Cartridge available. To order
additional Cartridges, refer to the
reordering information on the
Cartridge label.
Replace the Cartridge and close
the Top Cover to print.
Install the Cartridge to print or
cancel printing by pressing the
Cancel button on the front of the
Printer.
Try removing and replacing the
color Print Cartridge.
If the problem persists, install a
new color Print Cartridge.
To order additional Cartridges,
please refer to the reordering
information on the Cartridge label.
Replace the Cartridge and close
the Top Cover to print.
Exception Error
Error Code: 22
(displayed on
Indicates the Printer is unable to
function properly. (The Firmware
reports an illegal state.)
Call for technical assistance and
report the error code in the lower
left-hand corner of this window.
lower left)
Continued on the next page
CardJet 410 Card Printer/Encoder and Persona CardJet C7 Printer User Guide (Rev. 6.1)
3-12
Page 87

RESTRICTED USE ONLY Fargo Electronics, Inc.
Reviewing the Error Messages Windows 98Se/Me/2000/XP Printer Drivers
(continued)
Error Message Problem Solution
Illegal Black Ink
Cartridge
Error Code: 14
(displayed on
lower left)
Illegal Card
Cartridge
Error Code: 18
(displayed on
lower left)
Illegal Color Ink
Cartridge
Error Code: 13
(displayed on
lower left)
Indicates one of the following:
The installed black Ink
Cartridge is bad.
It is not a certified CardJet
Cartridge.
Indicates the installed card
Cartridge is bad or is not a
certified CardJet Cartridge.
Indicates one of the following:
The installed color Ink
Cartridge is bad.
It is not a certified CardJet
Cartridge.
No tag is present.
It cannot read the tag.
Replace the Cartridge with a
certified Cartridge and close the
Top Cover to print.
Replace the Cartridge with a
certified Cartridge, then press the
Card button on the front of the
Printer to continue printing.
Replace the Cartridge with a
certified Cartridge and close the
Top Cover to print.
The tag is corrupted.
Continued on the next page
CardJet 410 Card Printer/Encoder and Persona CardJet C7 Printer User Guide (Rev. 6.1)
3-13
Page 88

RESTRICTED USE ONLY Fargo Electronics, Inc.
Reviewing the Error Messages Windows 98Se/Me/2000/XP Printer Drivers
(continued)
Error Message Problem Solution
Improper Black
Ink Cartridge
Error Code: 12
(displayed on
lower left)
Improper Card
Cartridge
Error Code: 17
(displayed on
lower left)
Indicates one of the following:
The installed black Ink
Cartridge is not for use with
the Printer model.
There is an incorrect black
color Ink Cartridge Id.
Persona supplies are
installed into a Professional
model.
Indicates the installed Card
Cartridge is not suitable for the
print job for these reasons:
It is trying to mag encode
blank cards.
The installed Card Cartridge
is not for use with the Printer
model.
It is trying to send a job with
Magnetic Encoding when
blank cards are installed.
Replace with the proper Cartridge
and close the Top Cover to print.
Replace with the proper Cartridge,
then press the Card button on the
front of the Printer to continue
printing.
Persona supplies are
installed into a professional
model or vice versa.
Improper Color
Ink Cartridge
Error Code: 11
(displayed on
lower left)
Indicates one of the following:
The installed color Ink
Cartridge is not for use with
the Printer model.
There is an incorrect black
Replace with the proper Cartridge
and close the Top Cover to print.
color Ink Cartridge Id.
Persona supplies are
installed into a Professional
model.
Continued on the next page
CardJet 410 Card Printer/Encoder and Persona CardJet C7 Printer User Guide (Rev. 6.1)
3-14
Page 89

RESTRICTED USE ONLY Fargo Electronics, Inc.
Reviewing the Error Messages for Windows 98Se/Me/2000/XP Printer Drivers
(continued)
Error Message Problem Solution and Related Service
Procedure
Mechanism
Error Code: 2
(displayed on
lower left)
Top Cover Open
Error Code: 1
(displayed on
lower left)
Unable To Feed
Card
Error Code: 20
(displayed on
lower left)
Indicates the Print Cartridge
cradle cannot move. (Note: The
error code is 2.)
Indicates the Printer cannot print
because the Top Cover is open.
(Note: The error code is 1.)
Indicates a card cannot feed
from the Card Cartridge.
Displays a No Paper Fed error.
Check under the Printer’s Top
Cover for a card jam or other
obstruction.
Close the Top Cover to print.
To cancel, close the Top Cover
and press the Cancel button on
the front of the Printer.
Remove the Card Cartridge and
check for a card jam or other
obstruction.
Reinstall the Card Cartridge and
press the Card button on the front
of the Printer to try again.
CardJet 410 Card Printer/Encoder and Persona CardJet C7 Printer User Guide (Rev. 6.1)
3-15
Page 90

RESTRICTED USE ONLY Fargo Electronics, Inc.
Reviewing the Error Messages for the Magnetic Encoding Module
Mag
Message
Card Jam in
Encoding
Module
Unable to
Verify
Magnetic
Data
Magnetic
Data Error
Problem Solution
Indicates a card is jammed in the
Magnetic Stripe Encoding module.
Reposition the card under the
encoder’s roller and click on the
Retry button to try encoding
again.
OR
Click on the Cancel button to
cancel encoding.
Indicates the Magnetic Data
encoded on the current card could
not be verified.
Click on Retry to try verifying
again.
OR
Click on Cancel to cancel
encoding. (Note: In most cases,
verify errors are due to a defective
magnetic stripe.)
Indicates the data sent to the
Magnetic Encoder contains errors.
The current encoding job cannot be
completed.
Click Cancel and remove the card
from the Encoding Module.
Be sure to format the Magnetic
Encoding data according to the
instructions in the Online
Operator’s Guide.
Cancelled
Card in
Encoding
Module
Indicates the encoder will feed in
reverse a short distance to see if the
card is still in the unit.
If it is still in the unit, the card are
moved to the Home / Error position
and the following message will
Remove the cancelled card from
the Encoding Module by grasping
the end of it and pulling it out.
Be sure to separate this card from
the cards that encoded
successfully.
appear: Cancelled Card in
Encoding Module
After the Cancel button is clicked,
there is a cancelled card in the
Encoding Module.
Continued on the next page
CardJet 410 Card Printer/Encoder and Persona CardJet C7 Printer User Guide (Rev. 6.1)
3-16
Page 91

RESTRICTED USE ONLY Fargo Electronics, Inc.
Troubleshooting with Printer Components
This section provides troubleshooting procedures for the Technician. Refer to the
Technician Handbook for CardJet Card Printers in Section 1 (as needed).
Troubleshooting with the Card and Ink LED Indicators
Step Description
1 Determine if the Printer correctly detects and reports empty, illegal or improperly
loaded Card Cartridges.
Card LED (bad Smart tag): Before running out of cards, the Printer
correctly validates a replacement Card Cartridge and reports that it has a bad
Smart tag via the Card LED.
Technician Note: Ensure that printing continues when the Card Cartridge
with the bad Smart tag is replaced with a good Cartridge.
2 Determine if the Printer correctly detects and reports empty, illegal or improperly
loaded Card Cartridges.
Card LED (illegal Card Cartridge): Before running out of cards, the Printer
correctly validates a replacement Cartridge and reports that it is illegal via the
Card LED.
Technician Note: Ensure that printing continues when the Card Cartridge is
replaced with a legal Cartridge.
3 Determine if the Printer correctly detects and reports empty, illegal or improperly
loaded Ink Cartridges.
Ink LED (empty Ink Cartridge): Before running out of ink, the Printer
correctly notifies the Operator of the empty Ink Cartridge via the Ink LED.
Technician Note: Ensure that the remainder of the print job is restarted
when a new Cartridge is correctly installed.
CardJet 410 Card Printer/Encoder and Persona CardJet C7 Printer User Guide (Rev. 6.1)
3-17
Page 92

RESTRICTED USE ONLY Fargo Electronics, Inc.
Troubleshooting with the Card and Ink LED (continued)
Step Description
4 Determine if the Printer correctly detects and reports empty, illegal or improperly
loaded Ink Cartridges.
Ink LED (illegal Ink Cartridge): Before running out of ink and having a new
Ink Cartridge installed, the Printer correctly validates the replacement
Cartridge and reports that it is illegal via the ink LED.
Technician Note: Ensure that printing continues and that printing are
restarted when the Ink Cartridge is replaced with a good Cartridge.
5 Determine if the Printer correctly detects and reports empty, illegal or improperly
loaded Card and Ink Cartridges.
Ink LED (bad tag): Before running out of ink and having a new Ink Cartridge
installed, the Printer correctly validates the replacement Cartridge and
reports that it has a bad tag via the ink LED.
Technician Note: Ensure that printing continues and that printing are
restarted when the Ink Cartridge is replaced with a legal Cartridge.
CardJet 410 Card Printer/Encoder and Persona CardJet C7 Printer User Guide (Rev. 6.1)
3-18
Page 93

RESTRICTED USE ONLY Fargo Electronics, Inc.
Troubleshooting with the Printer Driver Ink Fuel Gauges
Step Description
1 Determine if the Printer Driver Ink Fuel Gauge correctly provides the Operator
with a display of the estimated amount of ink remaining in the Cartridge when the
Operator requests it.
Troubleshooting with the normal Printer Driver Preference Options
Step Description
1 Ensure that when the Operator selects normal Printer Driver preference options,
the cards are printed with color reproduction matching the required color
characteristics of a sample image to within acceptable limits.
Troubleshooting with the Magnetic Encoding Module (both 410/C7
models)
Step Description
1 Ensure that the Printer (which has had a Magnetic Encoding module installed)
correctly:
Prints an image when the Operator provides Magnetic Encoding as part of the
requested card image data via the Driver software.
Encodes HiCo Magnetic Encoding data onto a magnetic strip on each card.
CardJet 410 Card Printer/Encoder and Persona CardJet C7 Printer User Guide (Rev. 6.1)
3-19
Page 94

RESTRICTED USE ONLY Fargo Electronics, Inc.
Troubleshooting with the Error Messages
Step Description
1 Determine if the Printer performs these functions:
Encoding Errors: The Printer traps and reports encoding error responses via
required LED illumination and messages at the Driver Operator Interface.
Technician Note: Ensure that Batch jobs are correctly resumed and that
after an error has been detected and reported, an Encoding Retry option is
provided the Operator via an on-screen button that correctly initiates an
attempt to re-encode the card when selected.
2 Determine if the Printer performs these functions:
Card Feeding Errors: The Printer correctly detects the card feed error
condition and indicates a fatal error condition via the Card LED and a PC onscreen error message indicating a card feeding error via the Driver Operator
Interface.
Technician Note: After an error has been detected and reported, physically
fix the card feed error conditions and press the card button to correctly initiate
an attempt to resume the print job starting with a fresh card.
3 Determine if the Printer performs these functions:
LED and PC on-screen Error Messages: The Printer correctly detects the
card printing jam condition and indicates a fatal error condition via Card LED
and a PC on-screen error message via the Driver Operator Interface.
Technician Note: After an error has been detected and reported, open the
cover and removing the jammed card and then close the cover to correctly
initiate an attempt to continue the print job starting with a fresh card.
CardJet 410 Card Printer/Encoder and Persona CardJet C7 Printer User Guide (Rev. 6.1)
3-20
Page 95

RESTRICTED USE ONLY Fargo Electronics, Inc.
Troubleshooting with the Printer connections
Step Description
1 Ensure that Printer connections provide these functions:
PC via a USB cable connection: When a Printer is connected to a host PC
via a USB cable, device initialization and Firmware downloading occur when
Printer start-up is initiated.
Technician Note: Ensure that the cards are printed with acceptable color
reproduction and image placement when the Operator selects normal Printer
Driver preference options and initiates a print job.
2 Ensure that Printer connections provide these functions:
US power source connection: When a Printer is connected to a domestic
US power source via appropriate power cord, device initialization and
Firmware downloading occur when Printer start-up is initiated.
Technician Note: Ensure that the cards are printed with acceptable color
reproduction and image placement when the Operator selects normal Printer
Driver preference options and initiates a print job.
3 Ensure that Printer connections provide these functions:
Non-domestic power source connection: When a Printer is connected to a
specific non-domestic power source via the appropriate supplied power cord,
device initialization and Firmware downloading occur when Printer start-up is
initiated.
Technician Note: Ensure that the cards are printed with acceptable color
reproduction and image placement when the Operator selects normal Printer
Driver preference options and initiates a print job.
CardJet 410 Card Printer/Encoder and Persona CardJet C7 Printer User Guide (Rev. 6.1)
3-21
Page 96

RESTRICTED USE ONLY Fargo Electronics, Inc.
Troubleshooting the Card Jam
If a card becomes jammed inside the Printer, the Card LED light will flash and the Printer will
pause operation. Refer to the following steps for instructions to clear the jam:
Step Procedure
1 Leave the power ON and open the Printer's Top Cover.
2 Remove the Card Cartridge.
3 Locate the jammed card and remove it from the Printer.
4
5 Close the Top Cover and reload the Card Cartridge.
Press the Card button to resume printing.
Troubleshooting with the Host Driver Download Software
Step Description
1 Troubleshooting as follows:
Software downloaded: The host Driver download software automatically
opens and prompts the Operator through the Driver installation process when
the Driver CDROM is loaded into the PC.
Technician Note: Ensure that device initialization and Firmware downloading
occur when Printer start-up is initiated and cards are printed with acceptable
color reproduction and image placement when the Operator initiates a print
job following Driver installation.
Troubleshooting with an open Printer Top Cover
Step Description
1 Troubleshooting as follows:
Open Printer Top Cover: When a print job and the Printer is initiated with
normal conditions and the Printer Top Cover is opened during the print
process, the Firmware will trap the condition and will put the Printer into a
Safe Pause mode.
Technician Note: Ensure that the Printer will restart the operation and will
continue printing cards after the Operator closes the Printer Top Cover. See
CardJet Engineering Drawing R400019 in the appendix.
CardJet 410 Card Printer/Encoder and Persona CardJet C7 Printer User Guide (Rev. 6.1)
3-22
Page 97

RESTRICTED USE ONLY Fargo Electronics, Inc.
Resolving the CardJet Card Printer problems
Refer to the Technician Handbook for CardJet Card Printers in Section 1 (as needed).
Resolving the Printer Startup problems
Step Description
1 Troubleshooting as follows:
a. Ensure that the Printer Driver is installed, the interface cable is connected and
the power cord is plugged in securely on both ends and that the Printer is ON.
b. Confirm power is applied by pressing the Power button.
c. Be sure the Printer is ready. (Note: The blue Power LED light should be lit
when the Printer is ready to print.)
d. No other LED lights should be lit when the Printer is in ready mode. If they
are, verify that Ink and Card Cartridges are properly installed.
e. Make certain that the Printer cable is securely connected. (Note: An error
message in the software application telling you that the Printer is not
responding is often due to a missing or defective interface cable.)
CardJet 410 Card Printer/Encoder and Persona CardJet C7 Printer User Guide (Rev. 6.1)
3-23
Page 98

RESTRICTED USE ONLY Fargo Electronics, Inc.
Resolving the Bar Code problems
Step Description
1 Are you using an infrared bar code scanner? If so, select the Infrared Bar Codes
option within the Image Color tab. (Note: This option directs the Printer to print
black text and bar codes with the black pigmented Ink Cartridge which is required
for printing infrared bar codes.)
Resolving the Off-center Card Printing problems
Use the Image Position tab in the Driver to precisely center the image. See the Selecting
the Image Position tab.
CardJet 410 Card Printer/Encoder and Persona CardJet C7 Printer User Guide (Rev. 6.1)
3-24
Page 99

RESTRICTED USE ONLY Fargo Electronics, Inc.
Resolving the pixelated or grainy ID Card Photo problems
Step Description
1 For best photo-realistic output, you should always use high resolution, 24-bit color
images.
If scanning an image, always scan the image at a 24-bit color setting, at the
same size at which you will be printing and at a minimum of 300 dpi or higher,
depending on the image size and the application.
If you stretch or blow up a small or low resolution image, you will always get a
pixelated or grainy effect when printing.
If capturing images with a digital camera or video camera, be sure the camera
has a high enough resolution for photos to be printed at about the same size
at which they were captured.
CardJet 410 Card Printer/Encoder and Persona CardJet C7 Printer User Guide (Rev. 6.1)
3-25
Page 100

RESTRICTED USE ONLY Fargo Electronics, Inc.
Section 4: Printer Adjustments
The purpose of this section is to provide the Operator with specific information on Printer
adjustment procedures. Refer to the Technician Handbook for CardJet Card Printers in
Section 1 (as needed).
Table of Contents
Section 4: Printer Adjustments_______________________________________________4-1
Table of Contents ___________________________________________________________________ 4-1
Safety Messages (review carefully)______________________________________________________ 4-3
Additional Safety Precautions for CardJet Technicians (review carefully) _____________________ 4-4
Installing the Windows Printer Driver____________________________________________________ 4-5
Installing the Printer Driver from the Software Installation CD______________________________ 4-5
Installing the Windows Printer Driver (continued) _____________________________________ 4-6
Installing the Windows Printer Driver (continued) _____________________________________ 4-7
Installing the Windows Printer Driver (continued) _____________________________________ 4-8
Installing the Windows Printer Driver (continued) _____________________________________ 4-9
Installing the Windows Printer Driver (continued) ____________________________________ 4-10
Installing the Windows Printer Driver (continued) ____________________________________ 4-11
Installing the Windows Printer Driver (continued) ____________________________________ 4-12
Installing the Windows Printer Driver (continued) ____________________________________ 4-13
Installing the Windows Printer Driver (continued) ____________________________________ 4-14
Installing the Windows Printer Driver (continued) ____________________________________ 4-15
Installing the Windows Printer Driver (continued) ____________________________________ 4-16
Installing the Windows Printer Driver (continued) ____________________________________ 4-17
Installing the Windows Printer Driver (continued) ____________________________________ 4-18
Installing the Windows Printer Driver (continued) ____________________________________ 4-19
Installing the Windows Printer Driver (continued) ____________________________________ 4-20
Installing the Windows Printer Driver (continued) ____________________________________ 4-21
Installing the Windows Printer Driver (continued) ____________________________________ 4-22
Installing the Windows Printer Driver (continued) ____________________________________ 4-23
Installing the Windows Printer Driver (continued) ____________________________________ 4-24
Installing the Windows Printer Driver (continued) ____________________________________ 4-25
Installing the Windows Printer Driver (continued) ____________________________________ 4-26
Installing the Windows Printer Driver (continued) ____________________________________ 4-27
Installing the Windows Printer Driver (continued) ____________________________________ 4-28
Installing the Windows Printer Driver (continued) ____________________________________ 4-29
Installing the Windows Printer Driver (continued) ____________________________________ 4-30
Resolving the unopened CD Installer Program problem __________________________________ 4-31
Installing the Printer Driver Updates _________________________________________________ 4-32
Downloading the Printer Driver Files_________________________________________________ 4-33
Setting up the Printer Driver __________________________________________________________ 4-34
Windows 98 / Windows Millennium _________________________________________________ 4-34
Windows 2000 / Windows XP ______________________________________________________ 4-34
Printer Driver Options_______________________________________________________________ 4-35
Selecting the Card tab window ________________________________________________________ 4-36
Selecting the Print Quality (Best, Normal or Fast print modes) _____________________________ 4-37
Selecting the Print Quality (Best, Normal or Fast print modes) (continued) _________________ 4-38
Using the default Card Size ________________________________________________________ 4-39
Selecting the Orientation (Portrait or Landscape) _______________________________________ 4-40
Selecting the Rotate Front by 180 Degrees option _______________________________________ 4-41
Specifying the Copies_____________________________________________________________ 4-41
Clicking on the About button _______________________________________________________ 4-42
CardJet 410 Card Printer/Encoder and Persona CardJet C7 Printer User Guide (Rev. 6.1)
4-1
 Loading...