


Color ID Card Printer II

Operating Instructions
970922-510343-(02)
Color ID Card Printer II
© Copyright 1997 All rights reserved.

Notices
The information in this document is subject to change
without notice.
NO WARRANTY OF ANY KIND IS MADE WITH
REGARD TO THIS MATERIAL, INCLUDING, BUT
NOT LIMITED TO, THE IMPLIED WARRANTIES OF
MERCHANTABILITY AND FITNESS FOR A
PARTICULAR PURPOSE.
No liability is assumed for errors contained herein or for
incidental damages in connection with the furnishing,
performance, or use of this material.
This document contains proprietary information which
is protected by copyright. All rights are reserved. No
part of this document may be photocopied, reproduced,
or translated into another language without prior
written consent.
Patent Pending
Trademark Acknowledgements
IBM is a registered trademark of International Business
Machines Corporation. Windows is a trademark of
Microsoft Corporation. All other trademarks are the
property of their respective owners.
Printing History
Edition 1.2, #970922
© Copyright 1997 All rights reserved.
iii

For Users in the United States:
This equipment has been tested and found to comply
with the limits for a Class A digital device, pursuant to
Part 15 of the FCC Rules. These limits are designed to
provide reasonable protection against harmful
interference in a residential installation. This equipment
generates, uses, and can radiate radio frequency energy
and, if not installed and used in accordance with the
instructions, may cause harmful interference to radio
communications. However, there is no guarantee that
interference will not occur in a particular installation. If
this equipment does cause harmful interference to radio
or television reception, which can be determined by
turning the equipment off and on, the user is
encouraged to try to correct the interference by one or
more of the following measures:
■
Re-orient or relocate the receiving antenna.
■
Increase the separation between the equipment
and receiver.
■
Connect the equipment into an outlet on a circuit
different from that to which the receiver is connected.
■
Consult the dealer or an experienced radio/TV
technician for help.
Use of a shielded cable is required to comply with the
Class A limits of Part 15 of the FCC Rules.
You are cautioned that any changes or modifications not
expressly approved in this manual could void your
authority to operate and/or obtain warranty service for
this equipment.
For Users in Canada:
This digital apparatus does not exceed the Class A
limits for radio noise for digital apparatus set out on the
Radio Interference Regulations of the Canadian
Department of Communications.
Le present appareil numerique nÕemet pas de bruits
radioelectriques depassant les limites applicables aux
appareils numeriques de la class A prescrites dans le
Reglement sur le brouillage radioelectrique edicte par le
ministere des Communications du Canada.
iv

Table of
Contents
Section 1: Introduction
A. How Your Color ID Card Printer
Works .............................................................1
B. Special Features ...........................................1
Section 2: Safety Precautions...........................3
Section 3: Getting Started
A. Choosing a Good Location ......................12
B. About Moisture Condensation ................12
C. Unpacking and Inspection .......................12
D. Identifying the Parts .................................13
Section 4: Ribbons and Cards
A. About Ribbons ...........................................15
B. Loading Ribbon into the Printer ..............17
C. About Cards................................................18
D. Loading Cards into the Printer ................20
Section 5: Card Laminating
A. About the PrinterÕs Laminator.................21
B. About Overlaminates ................................22
C. Loading the Overlaminate into
the Printer....................................................23
Section 6: Hooking Up the Printer
A. Applying Power ........................................25
B. Running the Self Test ................................25
C. Connecting the Color ID Card
Printer to Your Computer .........................26
Section 7: Installing and Using the Color ID
Card Printer Driver
A. Installing the Windows
Printer Driver .............................................28
B. Installing the 32-Bit Print Spooler for
Windows 95 ................................................30
C. Setting Up the Windows
Printer Driver .............................................32
D. Printing a Card ..........................................40
Section 8: Maintenance
A. Supplies Required .....................................41
B. Standard Printhead Cleaning...................42
C. Expanded Printhead Cleaning ................42
D. Cleaning the PrinterÕs Case .....................43
E. Cleaning the Inside of the Printer ...........43
F. Clearing a Card Jam ..................................43
G. Clearing a Ribbon Jam ..............................44
H. Cleaning the Card Feed Rollers ..............44
I. Cleaning the Drive Roller .........................45
J. Maintaining the Cleaning Rollers............46
v

Section 9: Mechanical Adjustments
A. Adjusting the Card Input Guides............47
B. Adjusting the Internal Card Guide..........47
C. Adjusting the Card Separator Flap..........49
D. Adjusting the Laminator...........................51
Section 10: Troubleshooting .........................53
Section 11: Technical Specifications...........58
Appendix A: Magnetic Stripe Encoding
Module
A. Introduction ................................................59
B. Track Locations...........................................60
C. Sending Track Information .......................60
Appendix B: Interfacing Information
A. Introduction ................................................62
B. Centronics-type Parallel Interface ...........62
Index .................................................................63
vi

1
The Color ID Card Printer utilizes dye-sublimation
printing technology to achieve its direct-to-card
photo-quality output. Dye-sublimation is a process
which uses a dye-based ribbon roll that is
partitioned by a number of consecutive color
panels. The panels are grouped in a repeating
series of four separate colors, Yellow, Magenta,
Cyan, and Black (YMCK), along the entire length
of the ribbon. The ID Card Printer always prints
the yellow panel first, followed by the magenta
panel, the cyan panel, and finally the black panel.
If applicable, the fifth clear overlay panel will
always follow the black panel.
As the ribbon and card pass simultaneously
beneath the printhead, the hundreds of thermal
elements within the printhead heat the dyes on the
ribbon. When these dyes are heated, they vaporize
and diffuse into the surface of the card. By varying
the heat intensity of each thermal element within
the printhead, it is possible for each transferred dot
of color to vary in hue, thus blending one color into
the next. The result? Continuous-tone, photorealistic color images.
The Color ID Card Printer will print from any IBMPC
¨
or compatible running Windowsª 3.1x or
Windows 95. This means that you can use the
printer with virtually any software package
running under Windows without any special setup or configuration beyond the initial installation
of the specific software driver and interface cable.
Data is sent to the Color ID Card Printer in a bitmapped, rasterized format so your computer,
along with the printer driver software, will do
almost all of the complex Raster Image Processing
(ÒRIPÓ) work; therefore, the faster your computer,
the faster the image will be RIPÕd and sent to the
printer.
A. How Your
Color ID Card
Printer Works
1
Introduction
Congratulations
on your purchase
of the Color ID
Card Printer. This
printer has been
designed to
provide you with
stunning, photoquality color
output on a
variety of
different card
sizes and
thicknesses. It
offers many
features which
easily allow you
to create full-color
photo ID cards
complete with
high resolution
graphics, text, bar
codes, and even a
clear or
holographic
overlaminate.
B. Special
Features
Your Color ID Card Printer has many distinct
advantages over other color ID card printers. Its
100 card capacity card hopper allows for automatic
card feeding which reduces the time and personnel
required to create a photo ID card. In addition, the
Color ID Card Printer offers:
■
Automatic, dual-sided printing in color or
monochrome

■
Simultaneous dye-sublimation/resin thermal
transfer printing capability for printing
continuous-tone photos and crisp, readable bar
codes
■
Thermal transfer film or polyester chip
overlaminate capabilities
■
Optional magnetic stripe or smart card encoding
capabilities
■
A fast print speed of just 30 seconds/full color
card
■
Fast, 32-bit print spooler for Windows 95
■
Dual-sided card cleaning system
■
Upgradable memory (2MB maximum)
■
Optional color matching software
■
Optional Ethernet network support
And best of all, operation of the printer is simple
and straight forward. Please refer to the remainder
of this manual for instructions on setting up and
printing with your new Color ID Card Printer.
2

2
Safety
Precautions
Before operating the
unit, please read the
following safety
precautions carefully.
3
Warnings
CAUTION!
TO PREVENT FIRE OR SHOCK HAZARD,
DO NOT EXPOSE THE UNIT TO RAIN OR
MOISTURE. TO REDUCE THE RISK OF
ELECTRIC SHOCK, DO NOT REMOVE
FRONT, TOP OR BACK PANELS. NO USERSERVICEABLE PARTS INSIDE. REFER
SERVICING TO QUALIFIED SERVICE
PERSONNEL.
■
Operate the unit only on 110-120 VAC, 50/60 Hz.
For printers that have been shipped outside of
the United States and Canada, operate the unit
only on 220-240 VAC, 50/60 Hz. If you have any
doubt as to whether you have a unit with the
correct voltage rating for your countryÕs power
supply, DO NOT ATTEMPT TO USE THE
UNIT. Contact your dealer or the factory.
■
Stop operation immediately if any liquid or solid
object should fall into the cabinet. Unplug the
unit and have it checked by qualified service
personnel.
■
Do not disassemble the cabinet. Refer servicing
only to qualified personnel.
■
Service personnel: parts of this device may be
damaged if exposed to static electrical discharges
generated by various means, such as walking on
a carpeted floor. To avoid potential damage,
always wear an appropriate personal grounding
device, such as a wrist strap (w/ integral resistor)
connected to an ESD ground. Or, at a minimum,
make positive contact with the bare metal chassis
of the printer with your hand prior to touching
any internal electrical components.

1
Sicherheitsmaßnahmen
4
Machen Sie sich vor
Inbetriebnahme des
Geräts mit den
Sicherheitsmaßnahmen
gründlich vertraut.
Sicherheitshinweise
VORSICHT!
ZUR VERHÜTUNG VON FEUERGEFAHR
ODER ELEKTRISCHEN SCHLÄGEN DAS
GERÄT VOR REGEN ODER FEUCHTIGKEIT
SCHÜTZEN. UM DIE GEFAHR VON
STROMSCHLÄGEN ZU VERHINDERN,
OBERE, SEITLICHE UND HINTERE
ABDECKUNG NICHT ABNEHMEN. DAS
GERÄT ENTHÄLT KEINE TEILE, DIE VOM
BENUTZER GEWARTET WERDEN KÖNNEN.
WARTUNGSARBEITEN DÜRFEN NUR VON
QUALIFIZIERTEM FACHPERSONAL
DURCHGEFÜHRT WERDEN.
■
Das GerŠt nur mit 120 V 50/60 Hz Wechselstrom
betreiben. Drucker, die au§erhalb der USA und
Kanada verwendet werden, nur mit 220/240 V
50/60 Hz Wechselstrom betreiben. Wenn Sie
nicht sicher sind, ob Ihr GerŠt mit der Spannung
des šrtlichen Stromnetzes arbeitet, DAS GERÄT
NICHT IN BETRIEB NEHMEN. Wenden Sie
sich an Ihren HŠndler oder den Hersteller des
GerŠts.
■
Den Betrieb sofort unterbrechen, wenn ein
Gegenstand in das GehŠuse gefallen oder
FlŸssigkeit eingedrungen ist. Den Netzstecker
ziehen und das GerŠt von qualifiziertem
Wartungspersonal ŸberprŸfen lassen.
■
Keine GehŠuseteile abnehmen. Wartungsarbeiten
nur von qualifiziertem Fachpersonal
durchfŸhren lassen.

5
1
Consignes
de sécurité
Avant d’utiliser
l’appareil, prière de
lire attentivement les
consignes de sécurité
suivantes.
Avertissements
ATTENTION!
POUR EVITER TOUT RISQUE D’INCENDIE
OU D’ELECTROCUTION, NE PAS EXPOSER
L’APPAREIL A LA PLUIE OU A L’HUMIDITE.
POUR EVITER TOUTE DECHARGE
ELECTRIQUE, NE PAS RETIRER LES
PANNEAUX AVANT, SUPERIEUR OU
ARRIERE. NE PAS TENTER DE REPARER
SOI-MEME LES PIECES A L’INTERIEUR DE
L’APPAREIL. CONFIER L’ENTRETIEN DE
L’APPAREIL A UN PERSONNEL QUALIFIE.
■
Faire fonctionner lÕappareil uniquement sur
courant alternatif de 110/120 V, 50 ou 60 Hz. Les
imprimantes expŽdiŽes en-dehors des Etats-Unis
et du Canada fonctionnent uniquement sur
courant alternatif de 220/240 V, 50 or 60 Hz. En
cas de doute sur la compatibilitŽ entre la tension
nominale de lÕappareil et le courant du pays
dÕutilisation, NE PAS TENTER D’UTILISER
L’APPAREIL. Contacter le revendeur ou lÕusine.
■
Arr•ter immŽdiatement le fonctionnement si un
liquide ou un solide venait ˆ sÕinfiltrer ˆ
lÕintŽrieur de lÕarmoire. DŽbrancher lÕappareil et
le faire vŽrifier par un personnel qualifiŽ.
■
Ne pas dŽmonter lÕappareil. Confier lÕentretien
de lÕappareil ˆ un personnel qualifiŽ.

1
Precauciones
de seguridad
Antes de operar la
unidad, haga el favor
de leer detenidamente
las siguientes
precauciones de
seguridad.
6
Advertencias
¡PRECAUCION!
PARA EVITAR PELIGROS DE INCENDIO O
CHOQUE ELECTRICO, NO EXPONGA LA
UNIDAD A LA LLUVIA NI A LA HUMEDAD.
PARA REDUCIR EL RIESGO DE CHOQUE
ELECTRICO, NO QUITE LOS PANELES
FRONTALES, SUPERIORES, LATERALES NI
DE FONDO. EL INTERIOR NO TIENE PIEZAS
REPARABLES POR EL USUARIO. PARA
SERVICIO DE REPARACION Y
MANTENIMIENTO SOLICITE LA ATENCION
DE UN TECNICO DE SERVICIO
AUTORIZADO.
■
Opere la unidad s—lo a 110-120 VAC, 50/60 Hz.
Para las impresoras enviadas fuera de los Estados
Unidos y Canad‡, opere la unidad s—lo a 220-240
VAC, 50/60 Hz. Si no est‡ seguro que la unidad
que tiene es compatible al voltaje de la corriente
elŽctrica de su pa’s, NO INTENTE USAR LA
UNIDAD. Llame al representante de ventas o a
la f‡brica.
■
Detenga la operaci—n inmediatamente si algœn
l’quido u objeto s—lido cayera en el armario.
Desenchufe la unidad y h‡gala revisar por un
tŽcnico de servicio autorizado.
■
No desarme el armario. Para servicio de
mantenimiento, solicite la atenci—n de un tŽcnico
autorizado.

Prima di dare inizio al
funzionamento
dell’unità, siete
pregati di leggere
attentamente le
seguenti precauzioni
di sicurezza.
1
Precauzioni
per la
Sicurezza
7
Avvertenze
ATTENZIONE!
ONDE EVITARE IL PERICOLO DI INCENDIO
O SCOSSA ELETTRICA, NON ESPORRE
L’UNITÀ ALLA PIOGGIA OD UMIDITÀ.
EVITARE DI RIMUOVERE I PANNELLI
ANTERIORE, SUPERIORE, O POSTERIORE
PER RIDURRE IL RISCHIO DI SCOSSA
ELETTRICA. LA MANUTENZIONE DELLE
PARTI INTERNE DELL’UNITÀ NON É DI
COMPETENZA DELL’UTENTE. AI FINI
DELLA RIPARAZIONE RIVOLGERSI AL
PERSONALE DI COMPETENZA.
■
Negli Stati Uniti e Canada lÕunitˆ funziona solo
con alimentazione a 110-120 VAC, 50/60 Hz. Le
stampanti destinate ad altri paesi funzionano
solo con alimentazione a 220/240 VAC, 50/60 Hz.
Qualora non abbiate la certezza che il
trasformatore e la spina di cui disponete siano
quelli adeguati allÕalimentazione erogata nel
vostro paese, NON USARE L’UNITÀ. Rivolgersi
piuttosto al rivenditore o la fabbrica del luogo.
■
Arrestare immediatamento il funzionamento
dellÕunitˆ qualora si verifichi un versamento di
liquido o la caduta di un oggetto solido al suo
interno. Staccare la spina e rivolgersi al personale
di assistenza qualificato.
■
Non smontare la struttura dellÕalloggiamento. Le
riparazioni vanno effettuate solo dal personale di
competenza.

1
Precauções
de
Segurança
Antes de operar esta
unidade, leia
cuidadosamente as
seguintes precauções
de segurança.
Advertências
CUIDADO!
PARA EVITAR PERIGO DE CHOQUES
ELÉTRICOS OU INCÊNDIO, NÃO EXPONHA
A UNIDADE À CHUVA OU UMIDADE. PARA
REDUZIR O RISCO DE CHOQUES
ELÉTRICOS, NÃO REMOVA OS PAINÉIS
DIANTEIRO, SUPERIOR OU TRASEIRO.
NENHUMA PEÇA NO INTERIOR DESTA
UNIDADE PODE SER CONSERTADA PELO
USUÁRIO. PEÇA ASSISTÊNCIA AO PESSOAL
DE MANUTENÇÃO QUALIFICADO.
■
Opere esta unidade somente em 110-120 VAC,
50/60 Hz. As impressoras enviadas para fora dos
Estados Unidos ou Canad‡ devem ser operadas
somente em 220-240 VAC, 50/60 Hz. Se voc• n‹o
souber se a sua unidade tem a voltagem correta
para o sistema elŽtrico do seu pais, NÃO TENTE
USAR ESTA UNIDADE. Entre em contato com
seu revendedor ou com a f‡brica.
■
Pare imediatamente a opera•‹o se qualquer
l’quido ou objeto s—lido cair no gabinete.
Desligue a unidade da tomada e leve-a ao pessoal
de manuten•‹o qualificado.
■
N‹o desmonte o gabinete. Pe•a assist•ncia
somente ao pessoal qualificado.
8

9
Chinese or Japanese to be
keylined here

10
Chinese or Japanese to be
keylined here

11
Arabic to be keylined here

3
Getting
Started
12
A. Choosing a
Good Location
Place the unit in a location with adequate air
circulation to prevent internal heat build up.
1. Use the dimensions specified in Section 11 as a
guideline for the minimum clearances to the unit.
NOTE
Allow for adequate clearance above the unit to
accommodate the height of the unit with its covers open.
2. Do not install unit (a) near heat sources such as
radiators or air ducts, or (b) in a place subject to
direct sun-light, excessive dust, mechanical
vibration or shock.
B. About
Moisture
Condensation
If the unit is brought directly from a cold to a
warm location, or is placed in a very damp room,
moisture may condense inside the unit. Should this
occur, print quality may not be optimum. Leave
the unit turned OFF in a warm, dry room for
several hours before using. This will allow the
moisture to evaporate.
C. Unpacking and
Inspection
While unpacking your printer, inspect the carton to
ensure that no damage has occurred during
shipping. Make sure that all supplied accessories
are included with your unit. The following items
should be included with your Color ID Card
Printer:
■
Printer
■
Power Cord
■
Cleaning Roller
■
Printer Driver Diskette (3.5Ó)
■
32-bit Print Spooler Software; for use in
Windows 95 only
■
Warranty Statement and Registration Card
■
This manual and other printed information
Save the carton and packing materials. They will
come in handy when transporting the unit or
shipping it for service.
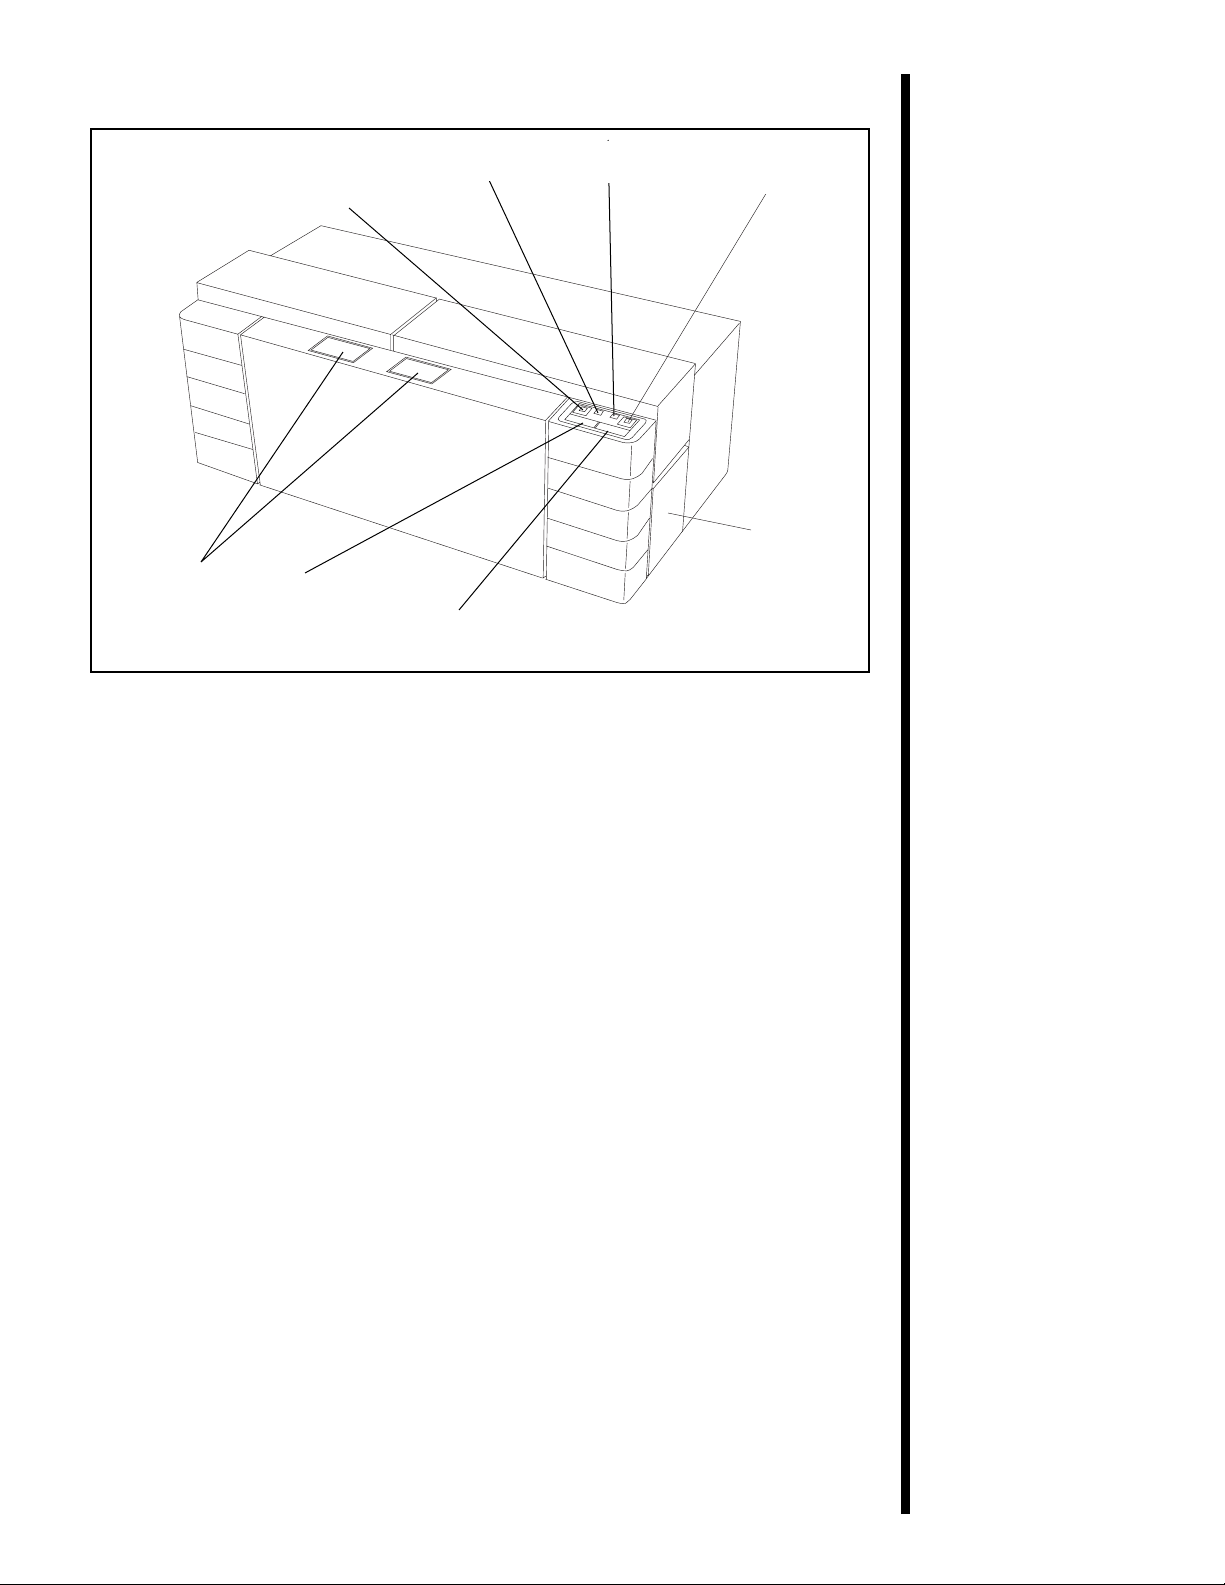
13
Cover
Release
Buttons
on/cancel
Card
Hopper
Door
clean/ribbon
on-line
Button
on/cancel
Button
laminator
LED
on-line
LED
D. Identifying
the Parts
1. This illustration shows all of the control
buttons and the LED indicator lights found on the
front of the Color ID Card Printer. The laminator
light indicates the current status of the printerÕs
built-in laminator. When the light is flashing, the
laminator is either heating up or cooling down.
When the light is solid, the laminator has reached
and is maintaining its target temperature.
The on/cancel button signifies that the printer
power is ON and also serves to cancel the current
print job and reset the printer for the next print job.
This button also ejects any cards left within the
printer after a print job is canceled.
The on-line button takes the printer on and offline. The printer must have the on-line light
illuminated in order to print. When flashing, the
on-line light also serves to indicate a print error
condition. Such conditions are discussed in
Section 10 of this manual.
The clean/ribbon light illuminates when your
ribbon supply is getting low. The light will
illuminate when approximately 10-20 prints are left
on the ribbon. The clean/ribbon light also serves as
a reminder that the printer should be cleaned
during every ribbon change (about every 250
prints) according to the steps in this manualÕs
Maintenance Section.
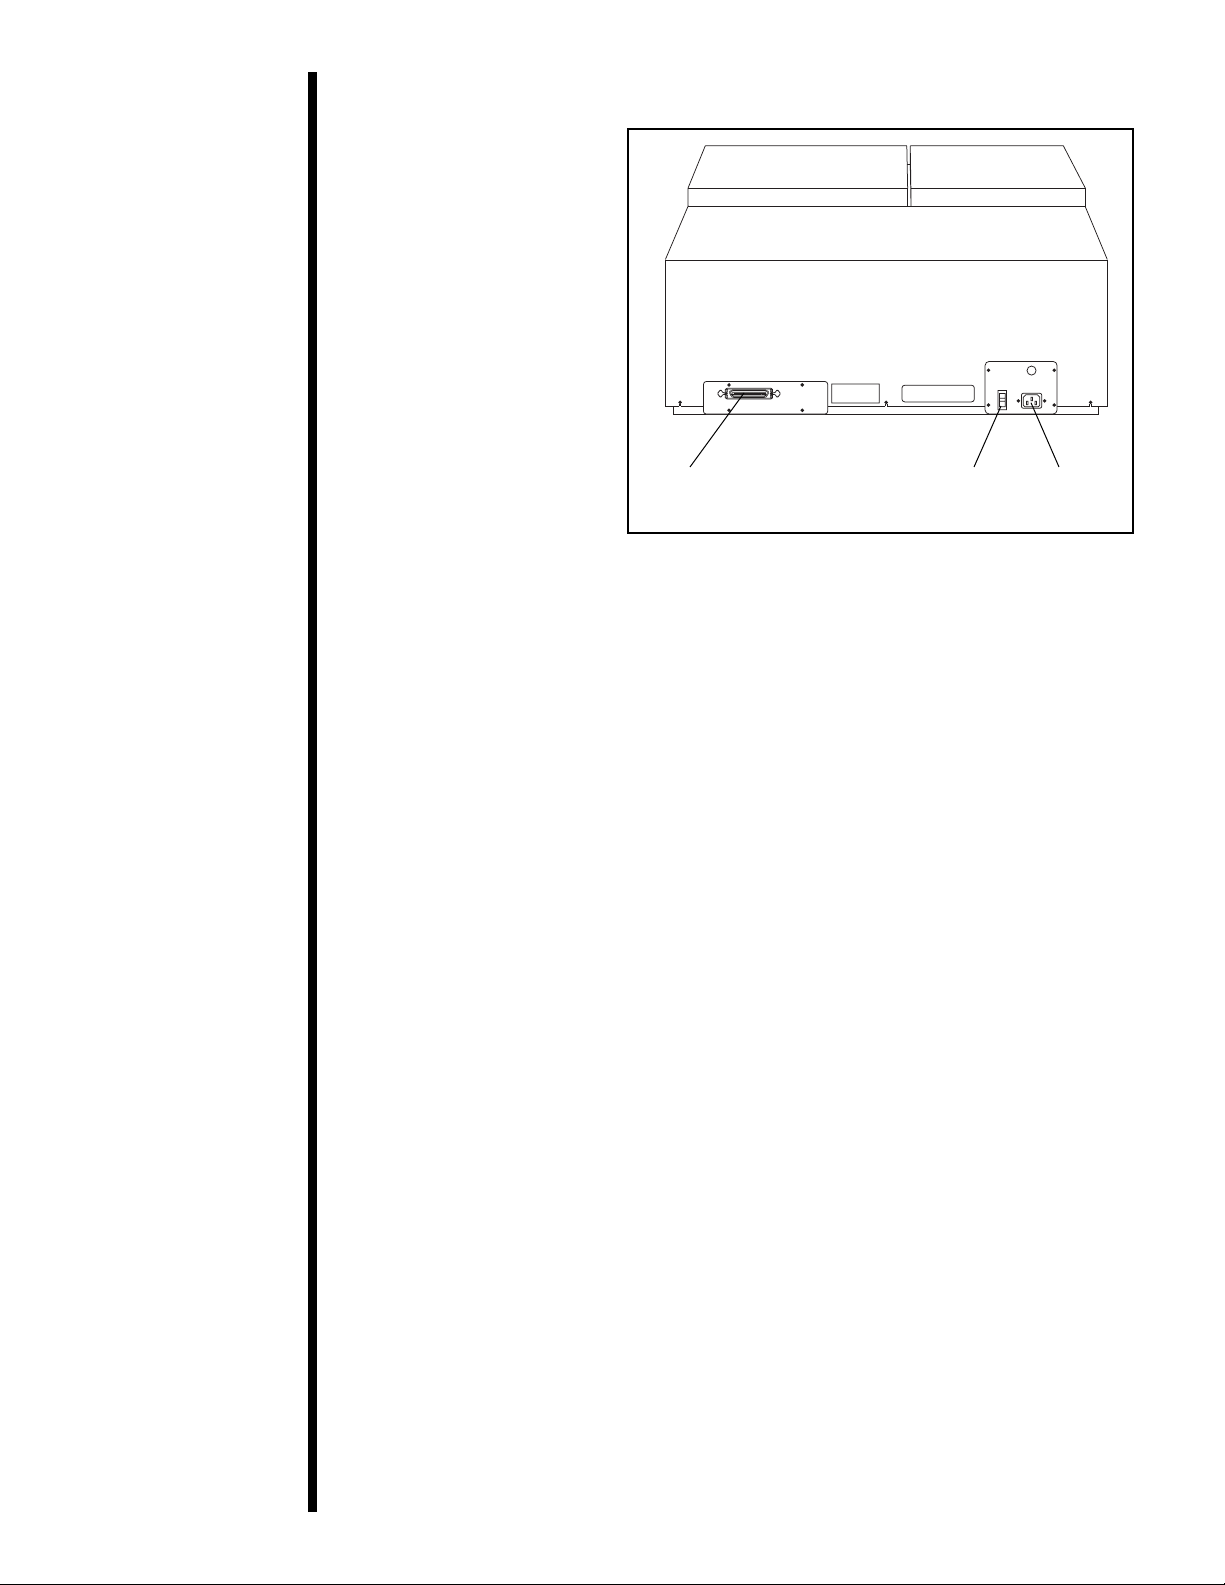
14
2. This illustration
shows the input ports
found on the rear panel
of the printer. For
complete instructions
about each of these
features, see later
sections of this manual.
Power
Input
Port
Parallel
Interface
Power
Switch

15
4
Ribbons and
Cards
The Color ID Card Printer has the following ribbon
types available for printing:
■
Standard Resin Black (K) ribbon with no clear
overlay panel (produces 1,000 prints)
■
A variety of Colored Resin ribbons with no clear
overlay panel (produce 1,000 prints)
■
Premium Resin Black (K) ribbon with no clear
overlay panel (produces 1,000 prints)
■
A gold Metallic Resin ribbon with no clear overlay
panel (produces 1,000 prints)
■
Dye-Sublimation Black (BO) ribbon with a clear
overlay panel (produces 500 prints)
■
Full-Color (YMCBO) ribbon with a dyesublimation black panel and a clear overlay panel
(produces 250 prints)
■
Full-Color (YMCKO) ribbon with a resin black
panel and a clear overlay panel (produces 250
prints)
■
Full-Color (YMCKOK) ribbon with 2 resin black
panels and a clear overlay panel (produces 250
prints)
■
Full-Color (YMCKK) ribbon with 2 resin black
panels and NO clear overlay panel (produces 250
prints)
The ribbons which have a clear overlay panel (O)
will print an ID card and place a clear, protective
overlay over the cardÕs printable area. Be sure that
the Overlay option within the printer driver setup
window is selected when printing with these ribbons
unless you intend to utilize the printer's built-in
laminator. When applying the PolyGuard
overlaminate, do not apply the ribbonÕs clear overlay
panel since it will interfere with the transfer of the
overlaminate material. When applying the film
overlaminate, the ribbonÕs clear overlay should be
applied on top of the overlaminate. See Section 5-B
for further overlaminate information. See Section
7-B for instructions on enabling or disabling the
printerÕs Overlay option.
All color or monochrome dye-sublimation cards must have
either a printed overlay or a chip or film overlaminate
applied to them. If neither of these types of protective
coatings are applied, your card's dye-sublimation image
will quickly begin to wear or fade. Cards printed solely
with monochrome resin text, bar codes, or images do not
require any type of protective overlay or overlaminate.
A. About
Ribbons
NOTE

16
The ribbons which utilize a resin black (K), are
intended for printing bar codes onto cards which
can be read by both infra-red and visible light bar
code scanners. Bar codes printed with a dyesublimation black (B) can only be read by a visible
light bar code scanner.
The black monochrome-only resin ribbons (K) are
available in both a premium and standard quality.
The premium resin black ribbon provides
maximum durability and is ideal for applications
such as access control where cards are repeatedly
swiped through a magnetic stripe reader. The
standard resin black ribbon provides high
durability ideal for most general purpose ID card
applications.
In addition to a standard black resin ribbon, several
other standard resin ribbons are also available in a
variety of spot colors including blue, green, red,
and metallic gold. All monochrome resin ribbons
provide 1,000 prints. Bar codes printed with the
blue and green ribbons can be read by both infrared and visible light bar code scanners. Bar codes
printed with the metallic gold ribbon can only be
read by an infra-red bar code scanner. Bar codes
printed with the red ribbon are NOT readable.
The Full-Color YMCKK ribbon is intended to be
used for dual-sided printing. By supplying two
resin black panels, this ribbon lets you print fullcolor on one side and monochrome resin black on
the other, without wasting an entirely new set of
ribbon panels for the monochrome side. Since no
overlay panel is included, this ribbon must be used
in conjunction with the printerÕs overlaminate
function. If you do not wish to use the
overlaminate function, another Full-Color
YMCKOK ribbon is available which also includes a
clear overlay panel. When printing with either of
these ribbons, no overlaminate is necessary for the
monochrome resin black side.
Watches, rings, bracelets, and other jewelry can damage
the printhead if accidentally bumped against it. For best
results, remove such items before installing or removing
ribbons.
IMPORTANT!
 Loading...