

FARGO electronic FOTO User Manual

970627-510489-(04)
™
UserÕs Manual
© 1997 by FARGO Electronics, Incorporated

Notices
The information in this document is subject to change without notice.
FARGO ELECTRONICS, INCORPORATED, MAKES NO WARRANTY OF ANY KIND WITH
REGARD TO THIS MATERIAL, INCLUDING, BUT NOT LIMITED TO, THE IMPLIED WARRANTIES
OF MERCHANTABILITY AND FITNESS FOR A PARTICULAR PURPOSE.
FARGO shall not be liable for errors contained herein or for incidental damages in connection with the
furnishing, performance, or use of this material.
This document contains proprietary information which is protected by copyright. All rights are
reserved. No part of this document may be photocopied, reproduced, or translated into another
language without the prior written consent of FARGO Electronics, Incorporated.
Patent Pending.
Trademark Acknowledgments
FotoFUN!, FotoMUG!, and FotoLABEL! are trademarks and FARGO is a registered trademark of FARGO
Electronics, Incorporated. IBM is a registered trademark of International Business Machines
Corporation. Windows is a trademark of Microsoft Corporation. Apple and Macintosh are registered
trademarks and QuickDraw and AppleTalk are trademarks of Apple Computer, Inc. All other
trademarks are the property of their respective owners.
Printing History
Edition 1.4, #970627
© Copyright 1997 by FARGO Electronics, Incorporated
All rights reserved.
For Users in the United States:
This equipment has been tested and found to comply with the limits for a Class B digital device,
pursuant to Part 15 of the FCC Rules. These limits are designed to provide reasonable protection
against harmful interference in a residential installation. This equipment generates, uses, and can
radiate radio frequency energy and, if not installed and used in accordance with the instructions, may
cause harmful interference to radio communications. However, there is no guarantee that interference
will not occur in a particular installation. If this equipment does cause harmful interference to radio or
television reception, which can be determined by turning the equipment off and on, the user is
encouraged to try to correct the interference by one or more of the following measures:
¥ Re-orient or relocate the receiving antenna.
¥ Increase the separation between the equipment
and receiver.
¥ Connect the equipment into an outlet on a circuit different from that to which the receiver is
connected.
¥ Consult the dealer or an experienced radio/TV technician for help.
Use of a shielded cable is required to comply with the Class B limits of Part 15 of the FCC Rules.
You are cautioned that any changes or modifications not expressly approved in this manual could void
your authority to operate and/or obtain warranty service for this equipment.
For Users in Canada:
This digital apparatus does not exceed the Class B limits for radio noise for digital apparatus set out on
the Radio Interference Regulations of the Canadian Department of Communications.
Le present appareil numerique nÕemet pas de bruits radioelectriques depassant les limites applicables
aux appareils numeriques de la class B prescrites dans le Reglement sur le brouillage radioelectrique
edicte par le ministere des Communications du Canada.
CAUTION!
TO PREVENT FIRE OR SHOCK HAZARD, DO NOT EXPOSE THE UNIT TO RAIN OR MOISTURE.
TO REDUCE THE RISK OF ELECTRIC SHOCK, DO NOT REMOVE SIDE OR BACK PANELS. NO
USER-SERVICEABLE PARTS INSIDE. REFER SERVICING TO QUALIFIED SERVICE PERSONNEL.
OPERATE THE UNIT ONLY ON 100-250 VAC, 50/60 Hz. USE PRINTER ONLY WITH THE POWER
SUPPLY LABELED FOR USE WITH FotoFUN!
ii

Table of Contents
Section 1: Getting Started
A. Choosing a Good Location..................................................................1
B. Unpacking and Inspection ...................................................................1
C. Identifying the Parts .............................................................................2
Section 2: Photo Ribbon and Paper
A. About Photo Ribbon and Paper..........................................................3
B. Installing Photo Ribbon........................................................................3
C. Installing Photo Paper, Postcards, or Label Paper ...........................5
Section 3: Powering Up FotoFUN!
A. Applying Power ....................................................................................6
B. Printing a Self Test.................................................................................7
Section 4: Using FotoFUN! for Windows
A. Connecting FotoFUN! to Your Computer..........................................8
B. Installing the FotoFUN! Printer Driver...............................................9
C. Setting Up the FotoFUN! Printer Driver ..........................................12
D. Printing a Photo ..................................................................................15
Section 5: Using FotoFUN! for Macintosh
A. Connecting FotoFUN! to Your Computer........................................17
B. Installing the FotoFUN! Printer Driver.............................................18
C. The Chooser .........................................................................................19
D. Setting Up the FotoFUN! Printer Driver..........................................21
E. Printing a Photo...................................................................................23
Section 6: Using the Print Backgrounder for Macintosh
A. Installing the Backgrounder..............................................................25
B. Printing with the Backgrounder........................................................25
C. The Backgrounder Status Window...................................................26
D. Backgrounder Menus .........................................................................27
E. Problems During a Background Print..............................................29
Section 7: Interpreting the FotoFUN! Indicator Lights
A. The
B. The
C. Both LED Indicator Lights.................................................................31
Section 8: Maintaining FotoFUN!
A. Cleaning the Printhead ......................................................................32
B. Cleaning the Outside and Inside of the Printer..............................33
C. Cleaning the Driver Roller.................................................................33
D. Clearing a Paper Jam..........................................................................33
E. Clearing a Ribbon Jam........................................................................34
F. Technical Support.................................................................................34
Section 9: Technical Specifications .............................................................35
Index ..................................................................................................................36
on off
clear
LED Indicator Light .......................................................30
LED Indicator Light ..........................................................30
iii

Section 1: Getting Started
THANK YOU…
Éfor choosing FARGOÕs FotoFUN! Digital Color Photo Printer.
FotoFUN! is the perfect way for you to print all of your smaller
digital photos and designs at just the right size. With its wide
variety of printing accessories, FotoFUN! is also the perfect way
to print custom photo labels, photo postcards, birth announcements, party invitations, or holiday photo greeting cards. And
with FARGOÕs special FotoMUG!ª kit, you can even print and
transfer all of your favorite photos directly onto coffee mugs.
To begin your color printing adventure, please refer to the
remainder of this manual. The FotoFUN! UserÕs Manual is
your complete step-by-step guide to quickly and easily setting
up and printing with your new FotoFUN! Digital Color Photo
Printer!
A. CHOOSING A GOOD LOCATION
¥ Place FotoFUN! in a location with adequate air circulation
to prevent internal heat build up.
¥ Do not place printer in a location where the ventilation
slots located on the rear of the unit could become blocked.
¥ Do not place printer near heat sources such as radiators or
air ducts or in a place subject to direct sun-light, excessive
dust, mechanical vibration or shock.
¥ Allow for adequate clearance above the printer to
accommodate the height of the printer with its cover open.
B. UNPACKING AND INSPECTION
While unpacking your printer, inspect the carton to ensure that
no damage has occurred during shipping. Make sure that all
supplied accessories are included with your unit. The
following items should be included with FotoFUN!
¥ Printer
¥ Power Supply
¥ Printer Driver Diskette (3.5Ó)
¥ Print Film Kit (36 prints)
¥ Warranty Statement and Registration Card
¥ This manual and other printed information
1 Getting Started
Save the carton and packing materials. They will come in
handy when transporting the printer.
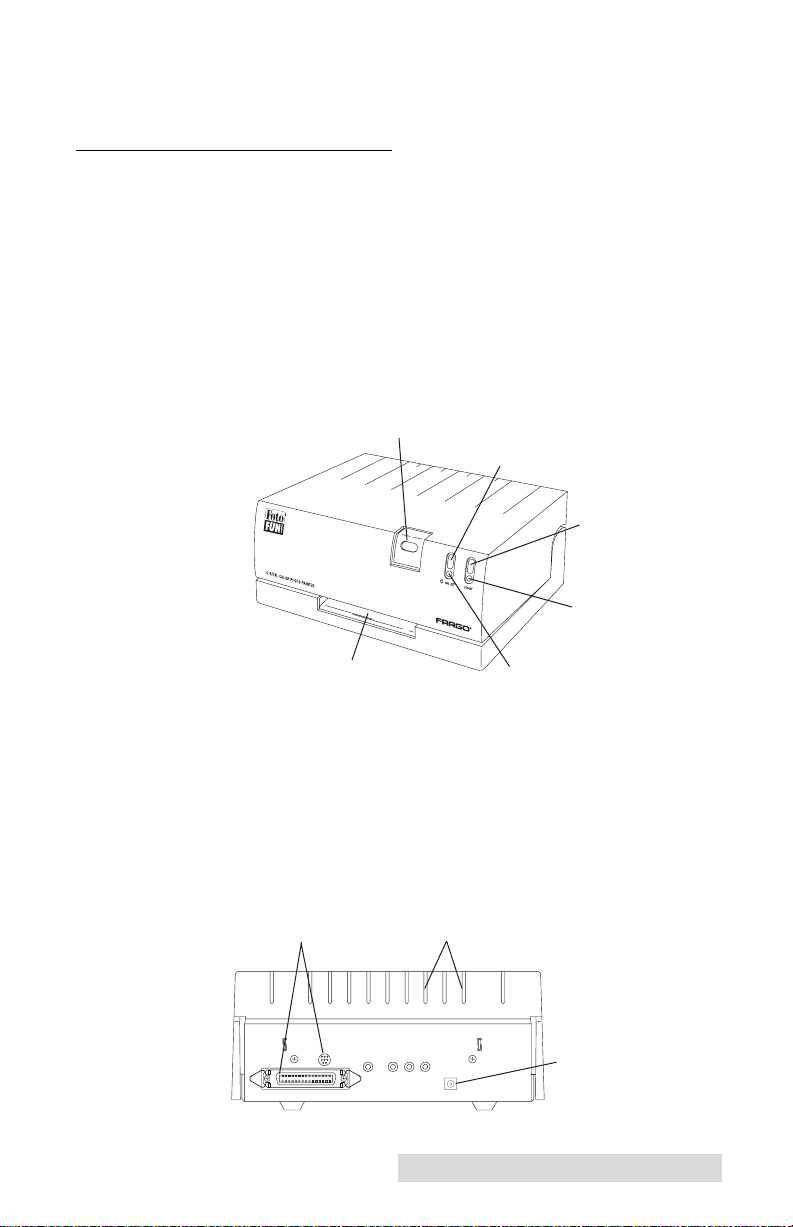
C. IDENTIFYING THE PARTS
This illustration shows the printerÕs Cover Release Button, the
Paper Input/Output Slot, the
their LED indicator lights. The
printerÕs power on and off. This button also serves to cancel
the current print job and to reset the printer for the next print
job. Turning the printerÕs power on and off also ejects any
paper left within the printer after a print job is canceled. The
clear
button clears all print errors as indicated by its flashing
LED indicator light (see Section 7 for further LED information).
Cover Release Button
on off
on off
and
clear
buttons, and
button turns the
on off
Button
clear
clear
Button
LED
Paper Input/Output Slot
on off
LED
This illustration shows the printerÕs Ventilation Slots, its Power
Input Port, and its Interface Port. The printer ships with either
a parallel or a serial interface port. If using FotoFUN! for
Windowsª, a Parallel Interface Port is provided. If using
FotoFUN! for Apple¨Macintosh¨, a Serial Interface Port is
provided. The printer does not include both interfaces. Please
refer to later sections of this manual for further information on
these ports.
Interface Port
Ventilation Slots
Power Input Port
Getting Started 2

Section 2: Photo Ribbon and Paper
A. ABOUT PHOTO RIBBON AND PAPER
For full-color printing, FotoFUN! has a 3-color ribbon available.
This ribbon consists of a series of three consecutive colored
panels along with a fourth clear overlay panel. The three
colored panels, yellow, magenta and cyan, combine to offer an
almost infinite number of printable colors. The clear overlay
panel is printed last and serves to seal and protect your printed
images from moisture, fingerprints, and UV light.
Although printing with the clear overlay panel is optional, it is
highly recommended that you always utilize the ribbonÕs clear
overlay panel when printing. The clear overlay will greatly
extend the longevity of your prints. Without the clear overlay,
images will fade more quickly. The only time you should not
print with the clear overlay panel is if you plan to transfer the
printed image to a mug (see Section 4 or 5 for instructions on
enabling or disabling the clear overlay print function).
FotoFUN! ribbon comes prepackaged with FARGOÕs special
photo paper in what is called a Print Film Kit. This kit consists
of a 36-print ribbon and 36 sheets of photo paper. A 36-print
Postcard Film Kit and a 36-print FotoLABEL!™Kit are also
available for printing custom photo postcards as well as photo
labels or bumper stickers. FotoFUN! ribbons and paper are not
sold separately.
Contact your local FotoFUN! dealer or contact FARGO directly
at 1-800-327-4690 for selection and pricing on the most current
FotoFUN! supplies, options, and accessories.
B. INSTALLING PHOTO RIBBON
1. Remove the ribbon from its packaging. Try not to touch
the colored portion of the ribbon. Oil or dirt from your
hands can impair print quality.
2. The supply end of the ribbon is the end with the fresh,
unused ribbon on it. The ribbon take-up is the other end.
3 Photo Ribbon and Paper
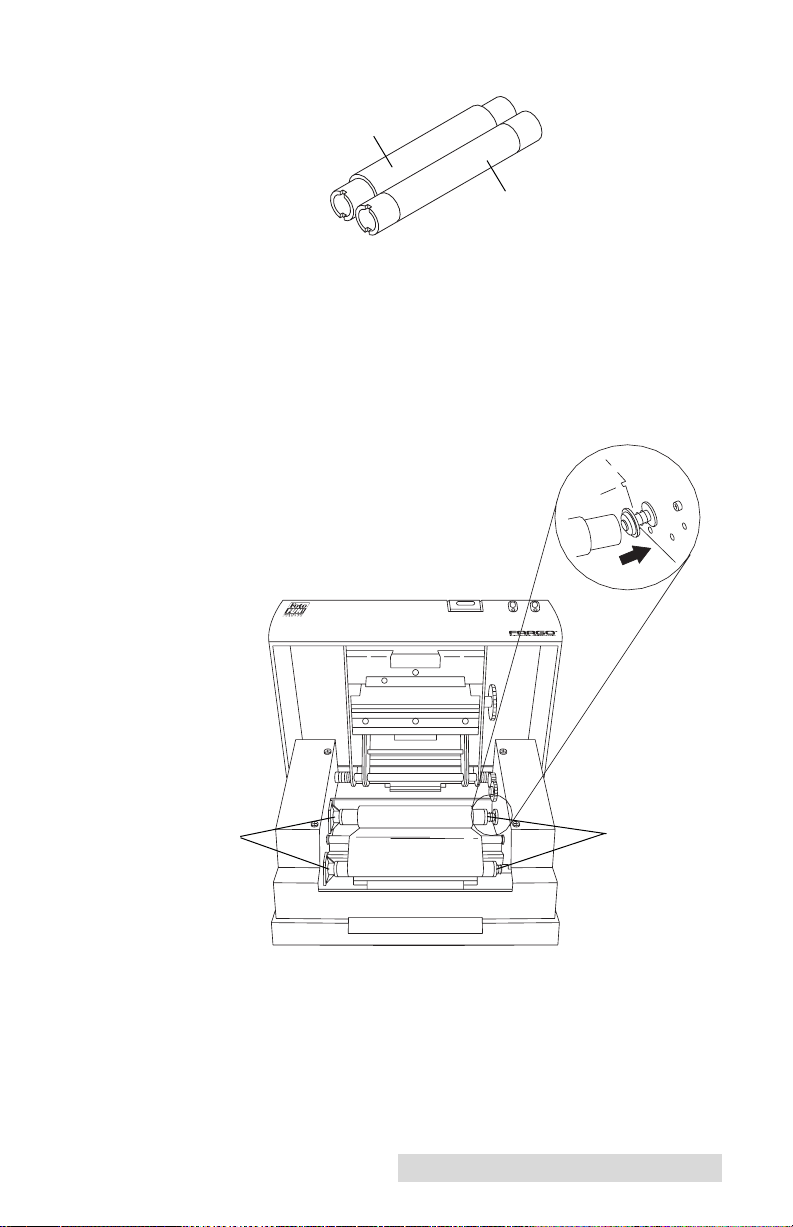
Supply
Take-up
3. Place the supply end of the ribbon in between the two
black ribbon drive hubs located towards the rear of the
printerÕs interior. Insert the supply end so that the ribbon
is fed from underneath the ribbon roll. Hint: the ribbon
drive hub on the right-hand side of the printer is spring-loaded.
Use the end of the ribbon core to push in this ribbon drive hub as
ribbon is inserted.
Ribbon
drive hubs
Spring-loaded
ribbon drive
hubs
4. Place the take-up end of the ribbon in between the front
ribbon drive hubs. When installed properly, ribbon will
feed from underneath the supply end of the ribbon roll,
up and over the top of the take-up end.
Photo Ribbon and Paper 4
C. INSERTING PHOTO PAPER, POSTCARDS, OR
LABEL PAPER
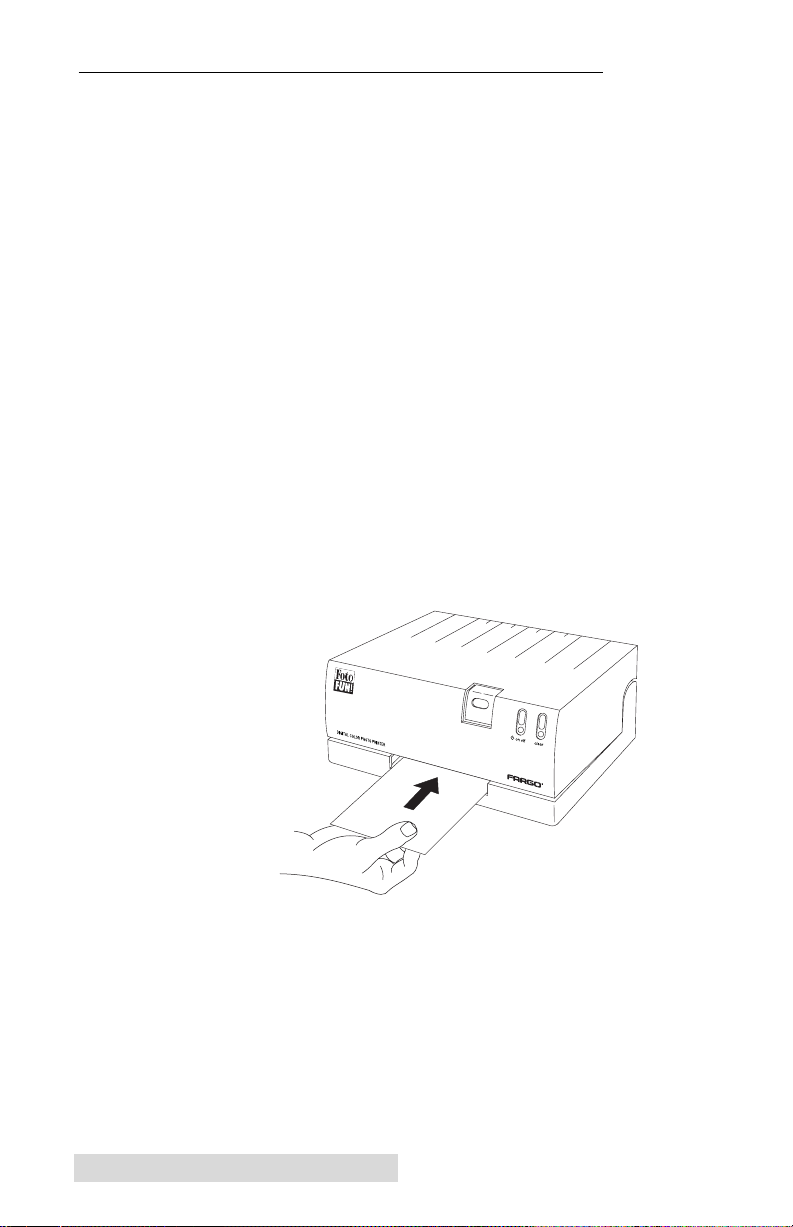
FotoFUN! paper is inserted one sheet at a time and only when
the printer prompts you to do so.
1. With ribbon installed and the printer cover closed, send a
print job to FotoFUN!
2. When you hear the printerÕs feed rollers begin to turn, insert
the paper into the printer with the glossy print side facing
down. Note that once the rollers begin to turn, you have
about 20 seconds to insert the paper. If you wait longer than
20 seconds before inserting the paper into the printer, the
feed rollers will stop turning and the
clear
light will begin
flashing quickly. To resume printing, simply press the clear
button to restart the feed rollers, and insert the paper.
IMPORTANT!
Do not touch the printable side of the paper. Oil or dirt from
your hands can impair print quality. Handle blank photo
paper by grasping only the very top or bottom of the sheet.
Also, do not attempt to insert FotoFUN! paper, postcards, or
label paper into a laser printer. This media is sensitive to
extreme heat and could damage a laser printer!
3. Insert paper into the printer until it pauses. Once inserted,
paper will automatically feed and print.
NOTE:
As an added feature, it is also possible to pre-load a sheet of paper
before you begin your print job. To do this, simply press the
button to start the feed rollers turning. Then, insert a sheet of paper
according to the above instructions. You can now start your print job
and walk away. FotoFUN! will automatically begin printing once it
receives your print job.
5 Photo Ribbon and Paper
clear

Section 3: Powering Up FotoFUN!
A. APPLYING POWER
The power supply included with FotoFUN! should be properly
configured for the power used in your country. Remove the
power supply from the box and double-check that it is correct.
CAUTION!
If you have any doubts about the plug configuration or the
voltage, DO NOT ATTEMPT TO USE THE PRINTER.
Contact the printer reseller or FARGO for information on the
correct power supply configuration.
1. Plug the power cord into the power cord port of the power
supply.
2. Place the DC power plug end of the power supply into the
printerÕs Power Input Port.
3. Place the AC power plug end of the power supply cord
into an available wall outlet.
Powering Up FotoFUN! 6
Power is automatically applied to the printer when it is plugged
FotoFUN! VER: 1.09 08/09/95
NOTE:
in. Press the
Optional external power supply must be a listed Class 2 device with
on off
button if you wish to turn the printer off.
an output rating of 20 volts and 4 amps DC (direct current).
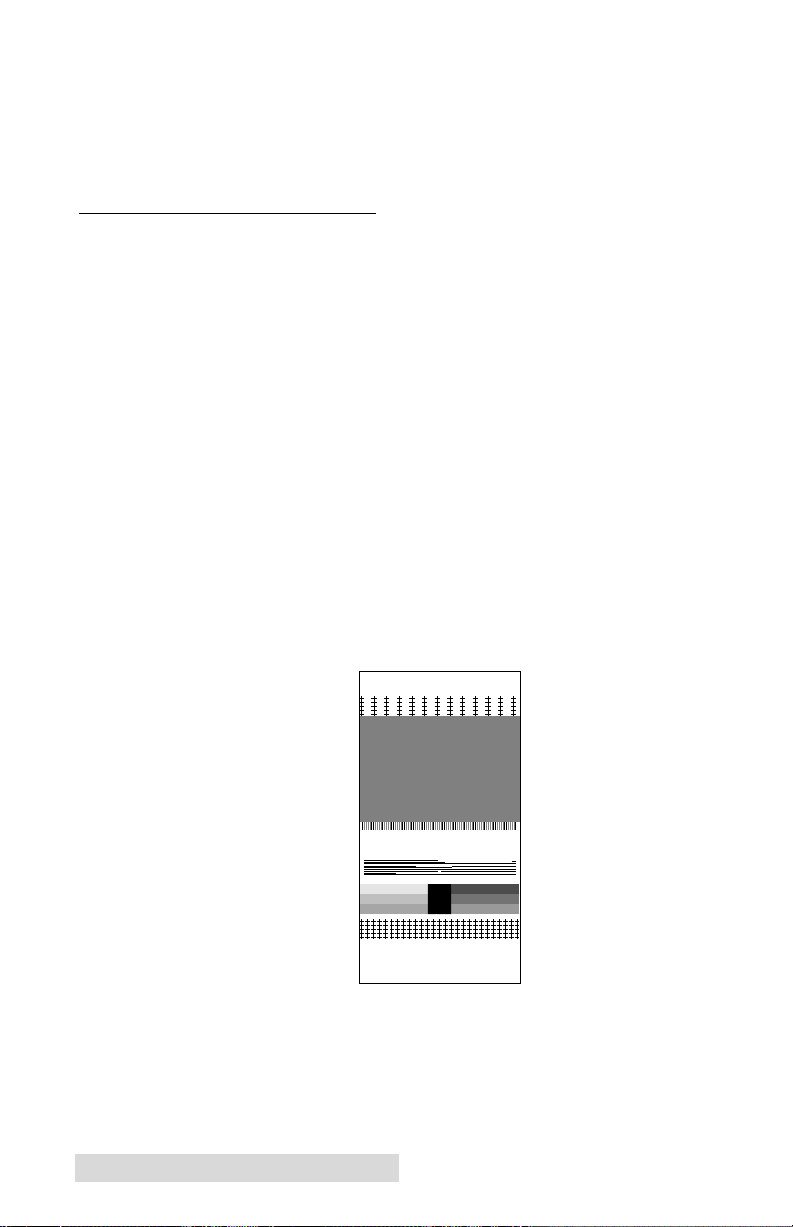
B. PRINTING A SELF TEST
Now that ribbon is installed and power is connected, a self test
should be performed to check for proper operation of the
printer. A sample of the self test print is shown below. Refer to
the following steps to run a self test:
1. If power is on, turn it off now. The
Verify that ribbon is installed.
2. With the printerÕs cover closed, press and hold the
button.
3. While holding the
on off
button. Continue to hold the
clear
until the self test activates.
4. You should then hear the printerÕs feed rollers begin to turn.
Once these rollers begin to turn, release the
and insert a sheet of photo paper with the glossy print side
facing down. The self test pattern should now be printing.
on off
light should be off.
clear
button down, press and release the
clear
button down
clear
button
Color Self Test Example: (30% of actual size)
NOTE:
If you notice dark lines running the length of your self test print, don’t
worry. These lines will not appear in your output when printing from
your computer. The self test feature is intended only for testing the
mechanical funtions of the printer, not its print quality.
7 Powering Up FotoFUN!

Section 4: Using FotoFUN! for W indows
A. CONNECTING
FotoFUN! is designed to be used with nearly any IBM-PC¨or
compatible running Windows 3.1x or Windows 95. For best
performance, a minimum of a 486/66 computer with 8Mb of
RAM or higher is recommended.
The printer is equipped with a standard 8-bit Centronics-type
parallel port. This port is the means through which FotoFUN!
receives data from your computer. To connect FotoFUN! to your
computer, simply obtain a standard computer to printer parallel
cable, and refer to the following steps:
NOTE
You may experience printing problems if your computer ’s parallel port
mode is set to ECP. For best results, set your computer’s parallel port
to the standard “Printer Port” setting. Refer to your computer’s
system documentation for instructions on checking and/or changing the
parallel port mode.
1. Connect the Centronics-type parallel side of the cable to the
printer. Snap the fastening clips into place.
FotoFUN!
TO YOUR COMPUTER
Using FotoFUN! for Windows 8

2. Connect the other side to the back of your computer at
LPT1, LPT2, or the PARALLEL connector.
The printer must have its
data. If the light is not on, press the
connected properly, both the illuminated
lights will remain solid.
B. INSTALLING THE
FotoFUN! can be used with virtually any Windows 3.1x/95
application program. This is accomplished by installing in
Windows what is called a Òprinter driver.Ó The printer driver
is simply a diskette with software on it which gives FotoFUN!
all the information needed for printing. Use the following
steps to install the FotoFUN! printer driver. Keep in mind that
the original FotoFUN! printer driver packaged with the printer
must be installed before installing any other printer driver
versions or upgrades.
IMPORTANT!
Windows 95
To install the printer driver into Windows 95, refer to the
following:
1. Insert the printer driver diskette into your computerÕs disk
You must keep the original printer driver diskette which
shipped with your printer. This printer driver diskette
includes special print information which is unique to your
specific printer and may be called for when updating printer
drivers. Do not lose this disk!
drive.
clear
FotoFUN!
light illuminated to receive
clear
button. When
on off
PRINTER DRIVER
and
clear
9 Using FotoFUN! for Windows
 Loading...