

Farallon Communications PB 1400 User Manual

PB 1400 Ethernet Card
User’s Guide
Chapter 1 – Installation............................................. 3
Installing the hardware ............................................... 4
Connecting to the network .......................................... 8
Installing the software................................................ 9
Chapter 2 – Operation ............................................. 13
Operation checklist .................................................. 14
Using the PB 1400 Ethernet Card Diagnostics control
panel ...................................................................... 15
Network Guidelines .................................................. 18
Appendix A – Technical Specifications ..................... 19
Farallon Technical Support ...................................... 23
How to reach us ...................................................... 23
Expanding your network with Farallon......................... 25
Warranty

Copyright notice
Copyright © 1997 Farallon Communications, Inc. v.397
All rights reserved. Printed in the U.S.A.
This manual and any associated artwork, software, and product designs are copyrighted with all rights
reserved. Under the copyright laws this manual, artwork, software, and product designs may not be
copied, in whole or part, without the written consent of Farallon Communications. Copying includes
translation to another language or format.
Farallon Communications, Inc.
2470 Mariner Square Loop
Alameda, CA 94501-1010
USA
Part Number
For additional copies of this manual, order Farallon part number 6120290-00-01.

Chapter 1
Installation
Installation 3
The Farallon PB 1400 Ethernet Card is an internal Ethernet adapter
for the PowerBook 1400 computer. The PB 1400 Ethernet Card
connects to traditional 10Base-T networks.
The PB 1400 Ethernet Card installs into the expansion slot on the
PowerBook 1400. The PB 1400 Ethernet Card requires Macintosh
System 7.5.3 or later, and at least eight megabytes of randomaccess memory (RAM). As with all Farallon Ethernet networking
products, PB 1400 Ethernet Cards are fully compliant with IEEE
Ethernet standards.
Installing a PB 1400 Ethernet Card involves three basic steps:
1. Installing the hardware (see pages 4–7)
2. Connecting to the network (see page 8)
3. Installing the software (see pages 9–12)

4 Chapter 1
Installing the hardware
Important: The instructions below are general guidelines for hardware
installation. It is important to consult your
User’s Manual
PowerBook manual, look for the section called “Installing Expansion
Cards.” This section will give you specific instructions for opening
your PowerBook, installing a card in the expansion slot, and
reassembling the computer.
Farallon recommends that this card should be installed by an
authorized Apple reseller. If you damage the computer while installing
a computer component, the damage will not be covered by the
computer’s warranty.
1. Begin by powering down your PowerBook according to the
instructions in your PowerBook manual.
before installing the PB 1400 Ethernet Card. In your
Macintosh PowerBook
2. Disconnect all the cables attached to the computer.
3. Remove the computer’s battery.
Important: If you don’t remove the battery and disconnect the cables
before you install the card, you might damage your computer.
4. Open the door that covers the ports on the computer’s back
panel.
5. Using a standard screw driver, remove the cover over the
expansion slot port.
6. Remove the speaker grill (located just above the keyboard). Slide
the grill to the left to remove it.
7. Remove the keyboard. Insert your fingers under the top of the
keyboard and gently flip it face down so the area beneath it is
exposed.
Installation 5
8. Using a Phillips screwdriver, remove the five screws that hold
down the heat shield. Remove the heat shield.
9. If a RAM card is present, gently lift up the RAM card (located to
the right of the keyboard ribbon cable) and set it aside. You need
to temporarily remove the RAM card to make room for the PB
1400 Ethernet Card. You’ll reinstall the RAM card later.
10. Remove the PB 1400 Ethernet Card from its antistatic bag,
handling the card by its edges to avoid touching the components.
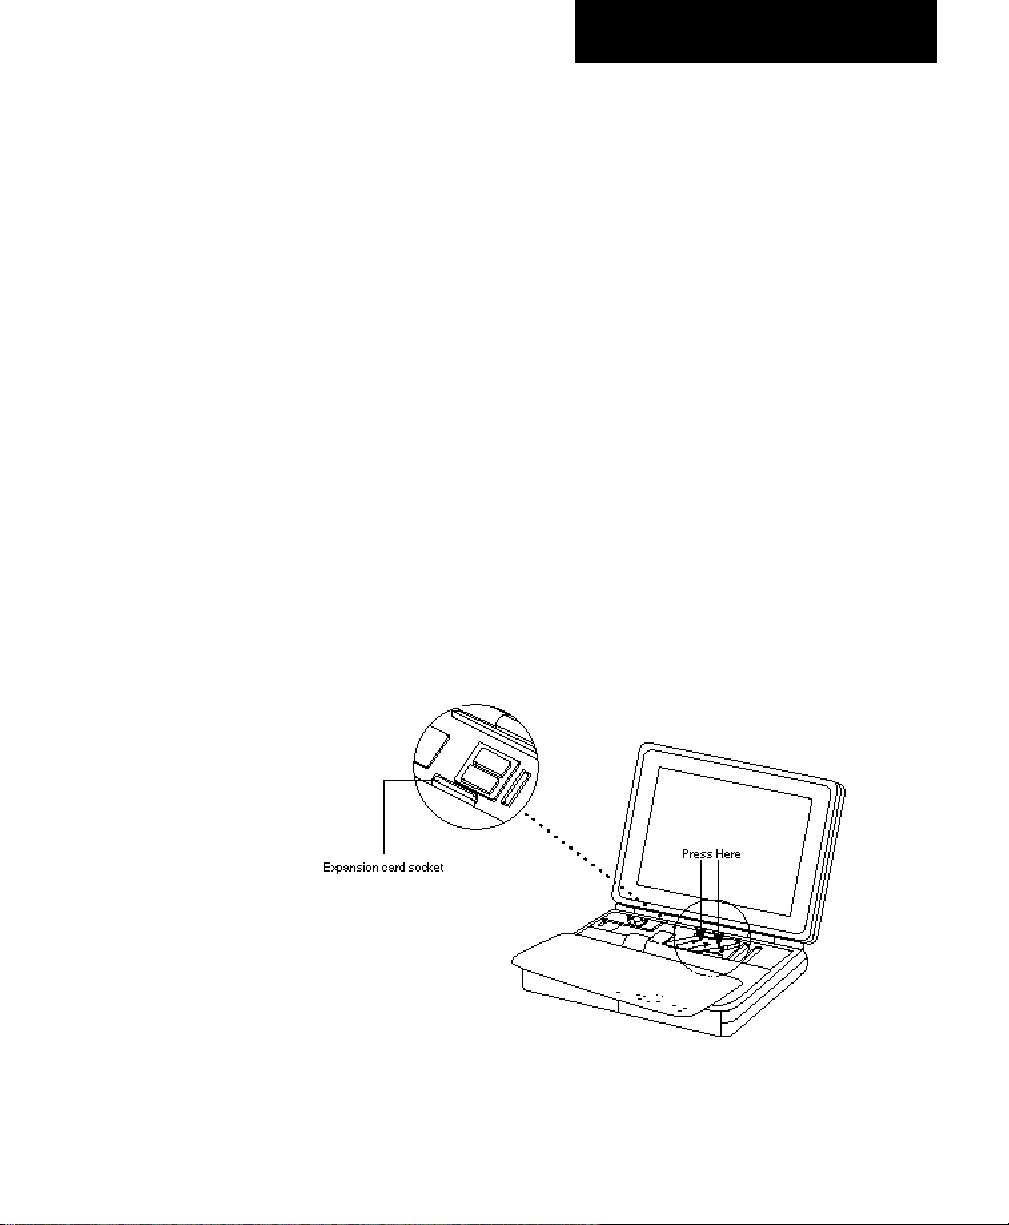
11. Locate the internal expansion slot. (The slot is located to the
right of the keyboard ribbon cable.)
12. Insert the RJ-45 port on the card into the empty space on the
computer’s back panel (with the components facing down). Press
down lightly on the top of the card to help guide the Ethernet port
through the hole in the back panel. Do not seat the PB 1400
Ethernet Card yet.
Inserting the PB 1400 Ethernet Card

6 Chapter 1
13. Place the RAM card beneath the PB 1400 Ethernet Card. (See
the illustration below.) If necessary, you can gently raise the PB
1400 Ethernet Card and move it to the left to make room for the
RAM card (do not bend the PB 1400 Ethernet Card). Align the
RAM card over the RAM card slot, and press down firmly until the
card’s connector is fully seated in the slot.
Reinserting the RAM card
14. Align the PB 1400 Ethernet Card over the expansion slot, and
press down firmly until the card’s connector is fully seated in the
slot. Do not force; if you meet resistance, pull the card out and
try again.
Installation 7
15. To see if the card is properly connected, gently try to lift it out of
the slot. It should resist and stay in place.
16. Reassemble your PowerBook according to the instructions in your
PowerBook manual.
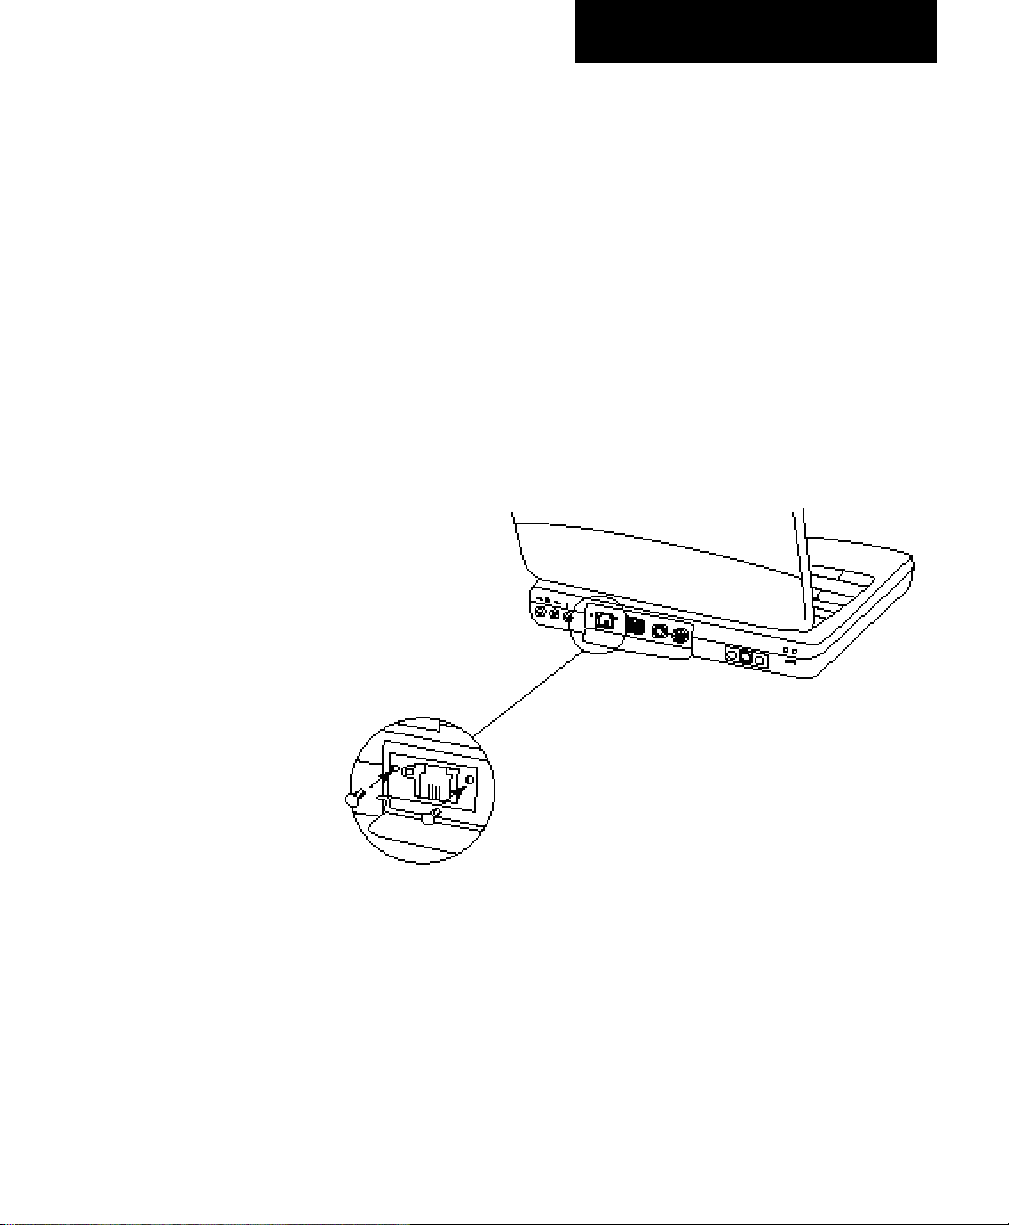
17. Attach the metal bracket that came with the card over the
Ethernet port. Align the bracket’s two holes with the holes beside
the Ethernet port. Using a Phillips screwdriver, screw in the two
metal screws that came with the card.
Attaching the metal bracket
8 Chapter 1
Connecting to the network
After the PB 1400 Ethernet Card is installed in your Macintosh, the
next step is to connect it to your Ethernet network.
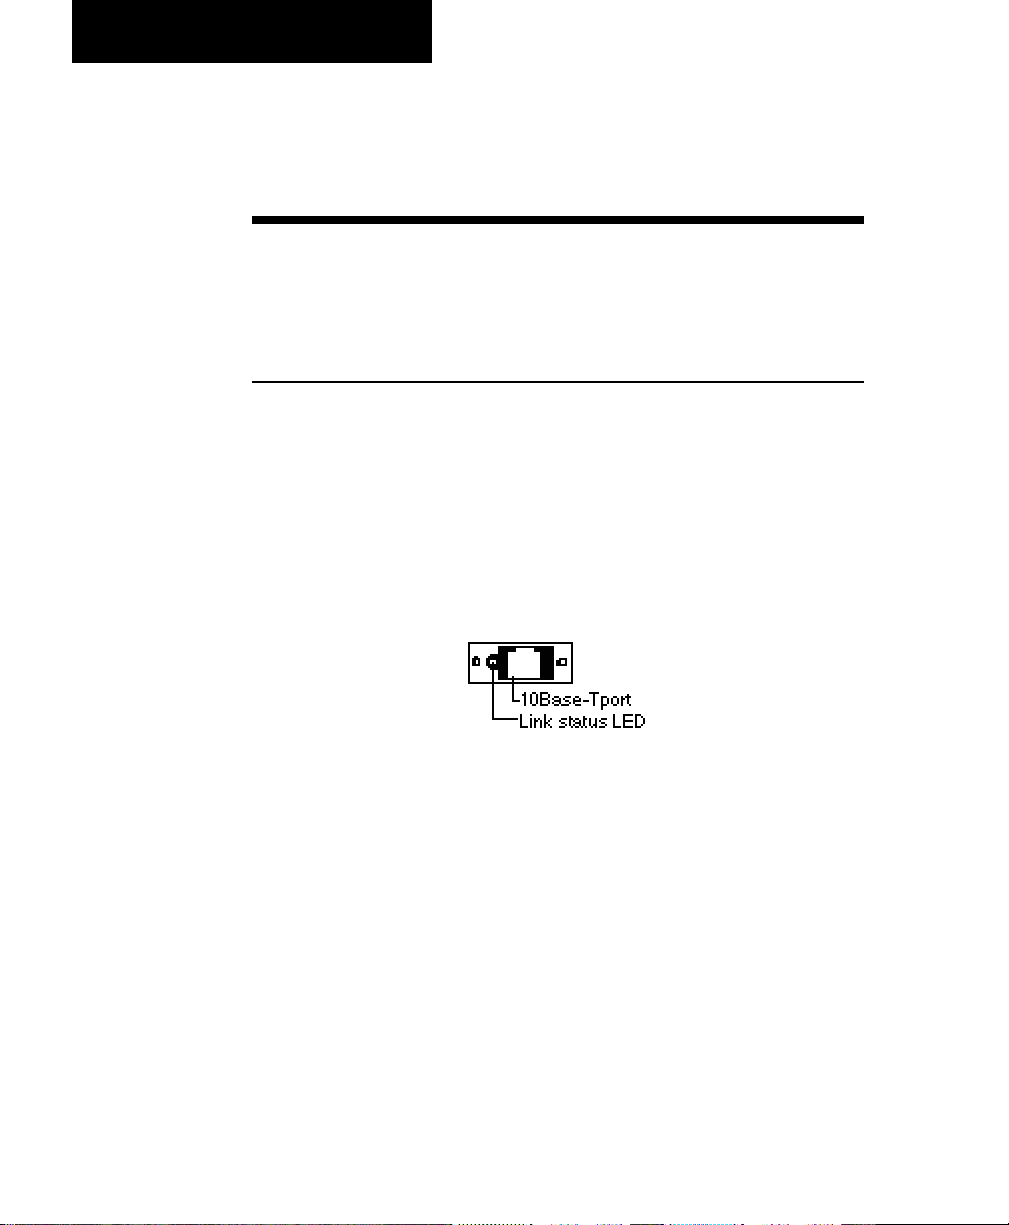
10Base-T
The PB 1400 Ethernet Card comes with a 10Base-T cable for
connecting to a 10Base-T Ethernet network. Plug one end of the
10Base-T cable into the port on the card, and connect the other end
to your Ethernet network.
Start up your Macintosh and check to see that the card's LED is lit.
(The LED is on the card’s bracket next to the port.) A steady green
light indicates that the card is receiving the link signal from the
network.
Bracket on the PB 1400 Ethernet Card
Installation 9
Installing the software
After the PB 1400 Ethernet Card is connected to your network,
complete the installation process by installing the Farallon software.
Software installation for the PB 1400 Ethernet Card involves the
following three steps:
1. Running the installer
2. Configuring the networking software
3. Connecting to network services
Running the installer
Before installing Farallon software, restart your Macintosh while
holding down the Shift key. This temporarily disables extensions that
may cause conflicts. Then insert the PB 1400 Ethernet EN Installer
disk into the floppy drive of your Macintosh.
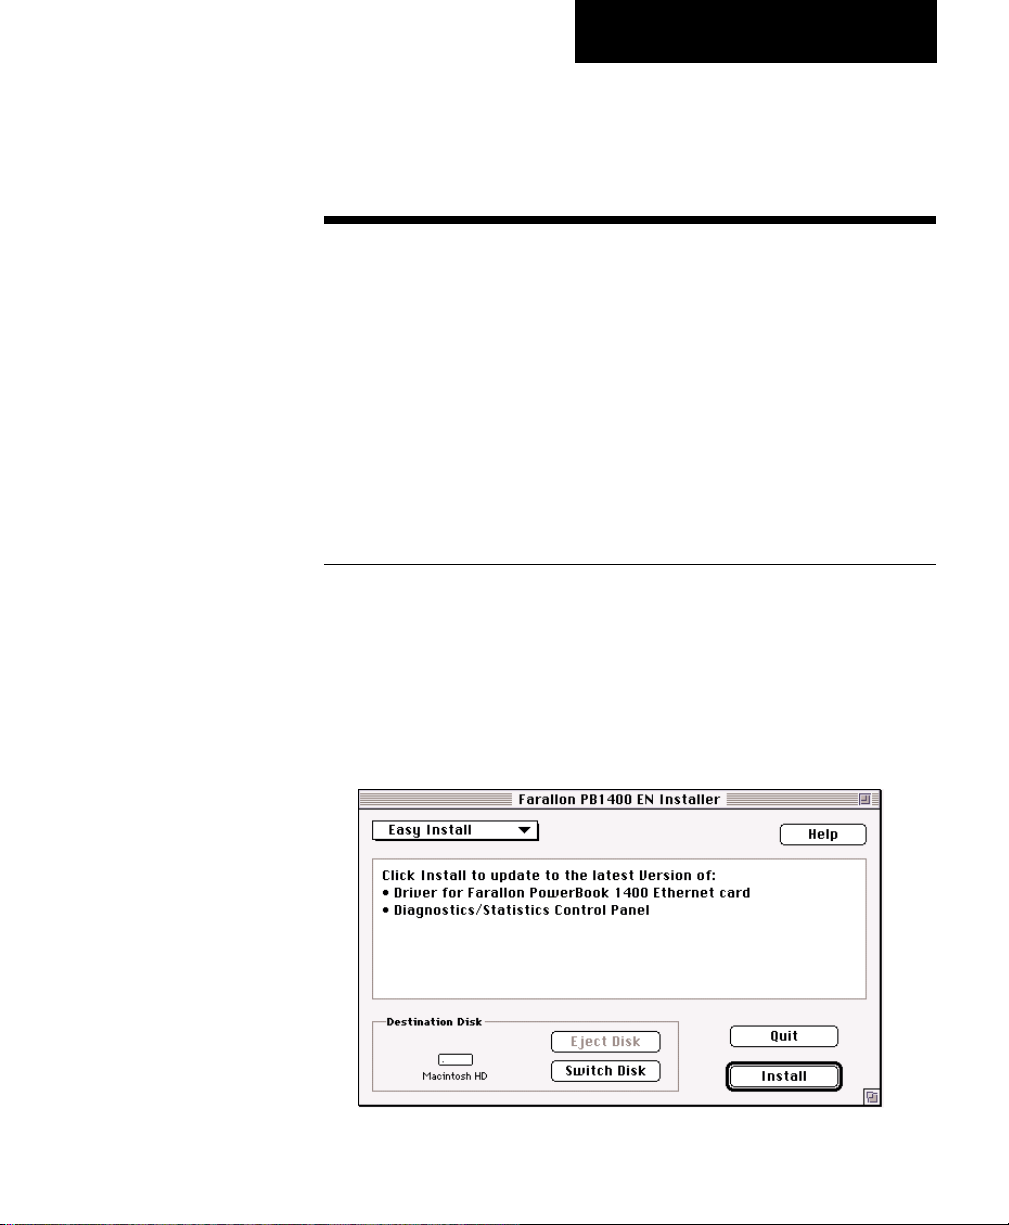
Double-click the Installer icon. The Farallon PB 1400 EN Installer
dialog box appears.
 Loading...