

Page 1

F
arall
on
Netopia ISDN Modem
User’s Guide
Model 612 for PC Computers
Model 412 for Macintosh Computers
Farallon Communications, Inc.
Page 2

Copyright notice
Copyright © 1996 Farallon Communications, Inc. v.1096
All rights reserved. Printed in the U.S.A.
This manual and any associated artwork, software, and product designs are
copyrighted with all rights reserved. Under the copyright laws this manual, artwork,
software, and product designs may not be copied, in whole or part, without the
written consent of Farallon Communications. Under the law, copying includes
translation to another language or format.
Farallon Communications, Inc.
2470 Mariner Square Loop
Alameda, CA 94501-1010
U.S.A.
Trademarks
Netopia, Farallon, and the Farallon logo design are trademarks of Farallon
Communications, Inc.
All other product names are the trademarks of their respective owners.
Credits
Portions of this user’s guide were written by Igal Dahari Levy and Robert Remillard.
Portions of this user’s guide were adapted by Igal Dahari Levy. Josie Cerrato edited
this user’s guide.
Part number
For additional copies of this user’s guide, order Farallon part number
6120264-00-03.
Printed on
Recycled Materials
Page 3

Contents
iii
Chapter 1 — Introduction.......................................................1-1
Netopia ISDN Modem features................................................ 1-2
Farallon support.................................................................. 1-3
Netopia ISDN Modem package contents.................................. 1-3
Computer system requirements .............................................. 1-4
PC requirements ................................................................. 1-4
Macintosh computer requirements ....................................... 1-4
Cabling requirements .......................................................... 1-5
Chapter 2 — Setting Up ISDN Service ....................................2-1
About ISDN............................................................................ 2-2
ISDN and the Netopia ISDN Modem...................................... 2-2
Terms used in this user’s guide ........................................... 2-5
SPID formats ...................................................................... 2-6
Preparing for an ISDN line....................................................... 2-7
Find an ISDN service provider .............................................. 2-7
Decide on a type of ISDN line............................................... 2-8
Choose a phone line ........................................................... 2-8
Use your ISDN worksheet .................................................... 2-8
Ordering your ISDN line........................................................... 2-9
Contacting the telephone company..................................... 2-10
General ISDN line configuration.......................................... 2-14
Chapter 3 — Installing the Netopia ISDN Modem....................3-1
Connecting to a PC................................................................. 3-2
Connecting to a Macintosh computer....................................... 3-4
Connecting analog equipment................................................. 3-6
Page 4

iv Netopia ISDN Modem User’s Guide
Chapter 4 — Configuration using a PC....................................4-1
Configuration using Windows, Windows 95, and Windows NT..... 4-2
Placing calls with Windows................................................. 4-10
Installing the Windows 95 modem driver............................. 4-10
Placing calls with Windows 95............................................ 4-13
Installing the Windows NT modem driver............................. 4-16
Placing calls with Windows NT............................................ 4-18
Windows configuration options........................................... 4-19
Configuration using DOS....................................................... 4-23
Placing calls with DOS....................................................... 4-26
Chapter 5 — Configuration using a Macintosh computer.........5-1
Configuration using a Macintosh computer............................... 5-2
The ISDN Setup application .................................................... 5-5
The Easy Setup window ....................................................... 5-6
The Advanced window.......................................................... 5-9
The Utilities window........................................................... 5-14
The Modem View window................................................... 5-16
Saving and loading modem settings ................................... 5-18
Quitting the ISDN Setup application.................................... 5-20
Placing calls with a Macintosh computer................................ 5-20
Chapter 6 — Advanced Features............................................6-1
Placing calls using AT commands............................................ 6-2
Using data compression......................................................... 6-3
Using Multilink PPP ................................................................ 6-4
Storing Multilink Endpoint Identifiers in S registers ................ 6-5
Using PPP authentication protocols ...................................... 6-6
Using Dynamic Bandwidth Allocation........................................ 6-7
Placing a Toll Saver call .......................................................... 6-8
About QuickSelect.................................................................. 6-8
Optimizing serial port performance.......................................... 6-9
PC serial ports.................................................................... 6-9
Macintosh serial ports......................................................... 6-9
Page 5

Contents v
About autobaud ................................................................... 6-10
Using the analog device ports............................................... 6-11
Receiving analog calls .......................................................... 6-12
Call routing to the analog device ports................................ 6-13
Receiving data calls ............................................................. 6-16
Chapter 7 — Troubleshooting.................................................7-1
Netopia ISDN Modem LEDs..................................................... 7-2
Troubleshooting tips............................................................... 7-4
Downloading firmware to your ISDN modem ............................. 7-8
From a PC .......................................................................... 7-8
From a Macintosh computer............................................... 7-10
Appendix A — Modem Operation............................................A-1
Modem basics....................................................................... A-2
Operating modes................................................................. A-2
The AT command set........................................................... A-3
Using the modem................................................................ A-5
Modem command summaries................................................. A-8
AT commands..................................................................... A-8
S registers........................................................................ A-11
ISDN modem result codes ................................................. A-17
Appendix B — ISDN Events....................................................B-1
ISDN event cause codes...................................................... B-2
Appendix C — Technical Specifications ..................................C-1
RS-232-D pin assignments................................................... C-3
PC serial cable pin assignments........................................... C-4
Macintosh DIN-8 pin assignments ........................................ C-5
Regulatory notices .............................................................. C-6
Appendix D — About the COM Port Accelerator......................D-1
Installation ............................................................................ D-2
Page 6

vi Netopia ISDN Modem User’s Guide
Farallon Technical Support....................................................TS-1
Before calling Farallon....................................................... TS-1
Environment profile ........................................................... TS-2
How to reach us................................................................ TS-2
Glossary...............................................................................GL-1
Index ........................................................................................1
Limited Warranty and Limitation of Remedies
Page 7
Chapter 1
Introduction
1-1
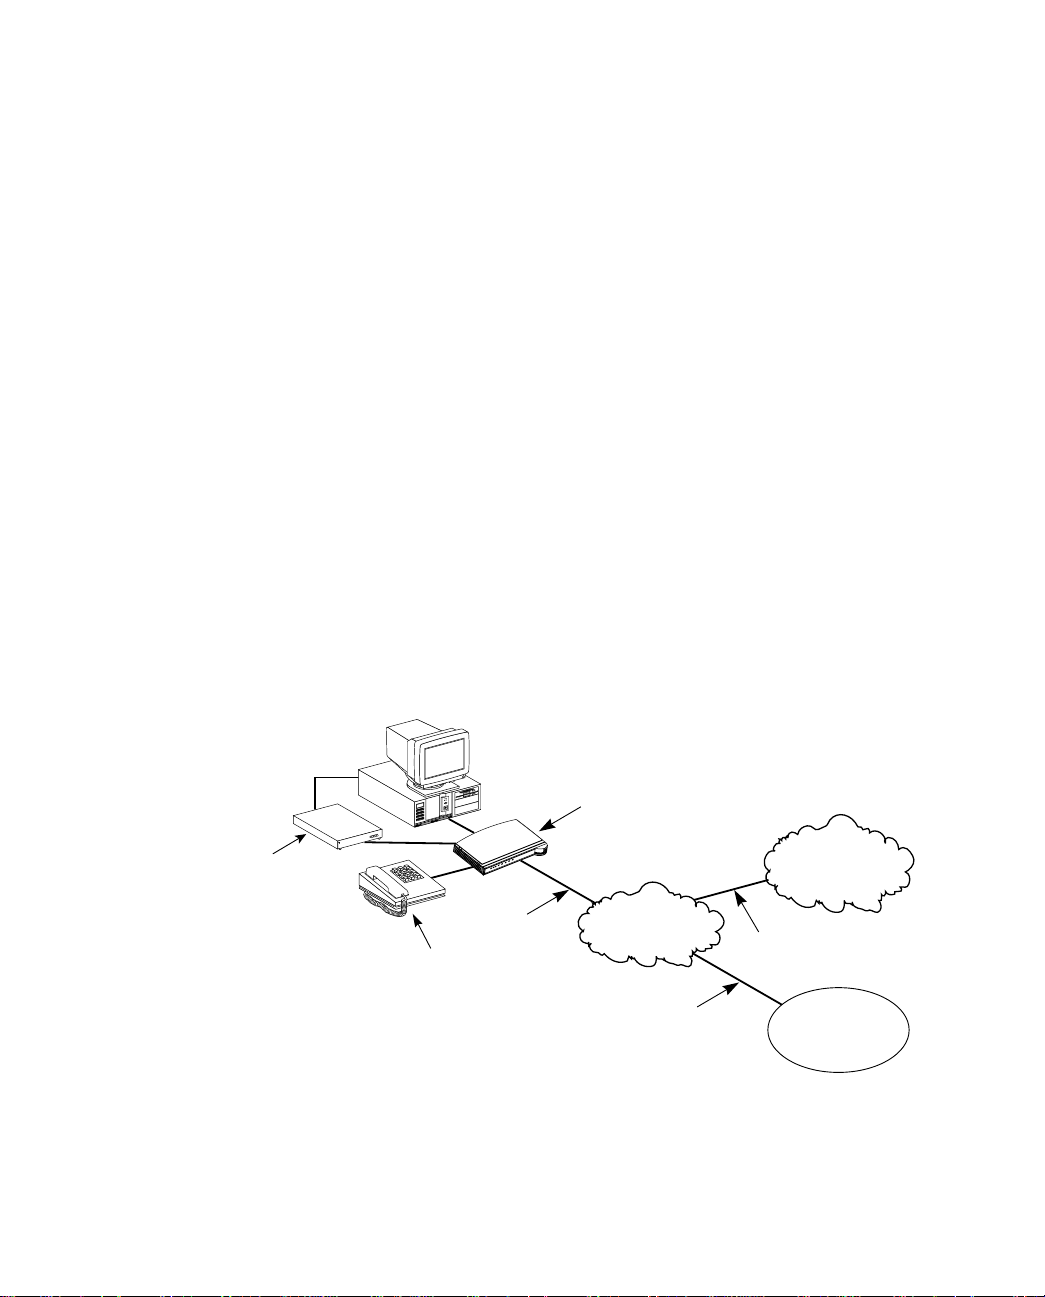
The Netopia ISDN Modem is an external, stand-alone, ISDN
terminal adapter. Using Integrated Services Digital Network (ISDN)
technology, the Netopia ISDN Modem provides high-speed access to
analog and digital services. With the Netopia ISDN Modem, you can
access the Internet, your corporate local area network (LAN), or
another individual computer.
This chapter introduces the Netopia ISDN Modem and its features.
It also explains the requirements for using the Netopia ISDN
Modem.
Analog Modem
Netopia
ISDN Modem
P
D
o
-C
w
T
h
e
a
e
r
n
s
t
n
e
B
l
-1
B
-2
n
o
ll
a
r
a
F
ISDN line
M
3 Com
T
Impact
R
T
D
D
R
D
S
2
B
1
DB
T
S
E
T
R
W
P
Public telephone
network
Analog or ISDN line
Analog telephone
Analog or ISDN line
Analog and digital network access with the Netopia ISDN Modem
Internet
or
on-line service
Corporate
LAN
Page 8

1-2 Netopia ISDN Modem User’s Guide
Netopia ISDN Modem features
You can use the Netopia ISDN Modem to dial into any
ISDN-compliant terminal adapter or router that supports the Point-to
Point (PPP) protocol over ISDN.
The Netopia ISDN Modem comes in two models:
■
Model 612 for use with PC computers
Model 412 for use with Macintosh computers
■
The Netopia ISDN Modem’s features include:
■
Support high-speed digital access using Multilink PPP, Stac
compression, and a high-speed serial port.
■
Dynamic Bandwidth Allocation (DBA).
■
A complete digital network termination (Basic Rate ISDN NT1).
■
Two analog device ports for using analog telephone devices
with the ISDN line and flexible call routing to the two analog
ports.
■
QuickSelect feature to automatically convert asynchronous
Point-to-Point Protocol (PPP) into synchronous (HDLC-based)
PPP.
■
Support for the Password Authentication Protocol (PAP) and the
Challenge Handshake Authentication Protocol (CHAP).
■
Automatic detection and adaptation to the baud rate of your
computer’s serial port (autobaud).
■
Toll Saver 56K permissive dialing, which allows you to place a
data call over an ISDN line set up for voice connections.
■
A comprehensive diagnostic test and LED status display.
■
Netopia ISDN Assistant to configure the switch type and SPID
parameters.
Page 9

Introduction 1-3
Farallon support
Netopia Care Service Program that includes 30 days of
■
toll-free telephone technical support, lifetime technical support
via e-mail, the World Wide Web, fax, and the Farallon bulletin
board service (BBS). This program also includes a 1-year
warranty that allows you to receive a replacement unit with a
5-day turnaround.
Keep it Running, Guaranteed!
■
support plan that provides toll-free telephone support and a
next-day product-replacement warranty.
Up & Running, Guaranteed!
■
which Farallon helps you obtain ISDN and Internet services and
guarantees a successful connection.
Netopia ISDN Modem package contents
The Netopia ISDN Modem package includes:
A Netopia ISDN Modem unit (model 612 connects to a PC;
■
model 412 connects to a Macintosh computer)
A power cable with an AC wall transformer
■
A DB-25–to–DB-9 serial cable (model 612 only)
■
A DB-25–to–mini-DIN-8 serial cable (model 412 only)
■
An RJ-11–to–RJ-11 ISDN telephone cable
■
A 3.5" installation diskette with configuration software
■
A Netopia ISDN Modem user’s guide
■
A Getting Started card with an attached phone card
■
, an optional 3-year premium
, an optional service program in
Internet access software
■
Page 10

1-4 Netopia ISDN Modem User’s Guide
Computer system requirements
Refer to the appropriate section below for information on PC and
Macintosh computer requirements.
PC requirements
Your PC should have the following:
A 386, 486, or Pentium processor
■
640 KB of conventional memory
■
■
MS-DOS 5.0 or later operating system
■
Microsoft Windows 3.1 or later, Windows 95, or Windows NT
■
A hard disk drive with 2 MB of free space
■
An available serial (COM) port equipped with a 16550 universal
asynchronous transmitter. (See the “Optimizing serial port
performance” section on page 6-9 for more information.)
Macintosh computer requirements
Your Macintosh computer must be a Macintosh Plus or later model.
It must have the following:
■
System 7 or later operating system
■
A hard disk drive with 2 MB of free space
■
An available serial port (see the “Optimizing serial port
performance” section on page 6-9 for more information).
Page 11

Introduction 1-5
Your communications software, such as a PPP client application,
may additionally require:
■
System 7.1 or later
■
A Macintosh computer equipped with a 68020 or later CPU
Cabling requirements
Your package contains a PC or Macintosh serial cable to connect
the Netopia ISDN Modem to your computer.
If your PC computer has a 25-pin serial port, you will need a
DB-9–to–DB-25 adapter. See “RS-232-D pin assignments” on
page C-3 for a description of the pins on the ISDN modem’s
RS-232-D port.
Page 12

Page 13

Chapter 2
Setting Up ISDN Service
This chapter shows you how to set up ISDN service. You will learn
about what ISDN is, how to prepare for setting up an ISDN line, and
how to work with an ISDN service provider. If you already have an
ISDN line, you may still want to read the rest of this chapter to find
the ISDN information needed to properly configure your Netopia
ISDN Modem.
2-1
If you opted for the
will set up ISDN service for you. However, you may still want to read
this chapter to become familiar with basic ISDN concepts.
This chapter is divided into three main sections:
■
A short description of ISDN and definitions of some common
ISDN terms
■
Preparing to order your ISDN line
■
Ordering your ISDN line
Up & Running, Guaranteed!
program, Farallon
Page 14

2-2 Netopia ISDN Modem User’s Guide
About ISDN
ISDN uses digital technology to connect to the public telephone
network. Using the existing copper wire and public telephone
network infrastructure, ISDN provides for existing voice services
and high-speed, dial-up data service.
Networks using ISDN communicate more efficiently than those
using analog lines. This is due to the relatively low cost of ISDN, the
fact that digital lines are relatively free of the random noise
associated with analog lines, and the high communication speeds
that can be achieved. ISDN Basic Rate Interface (BRI) lines can
reach speeds of up to 128 thousand bits per second (Kbps). A
typical high-speed modem can only send data over an analog line at
up to 28.8 Kbps.
You can convert almost any existing regular telephone line to ISDN
by ordering ISDN service for that line. In most cases, no rewiring is
necessary for the conversion and no special equipment is needed
to use the converted line with your Netopia ISDN Modem. (Keep in
mind that if you convert an analog line to an ISDN line, you will not
be able to directly connect analog devices to the ISDN line in most
cases.)
ISDN and the Netopia ISDN Modem
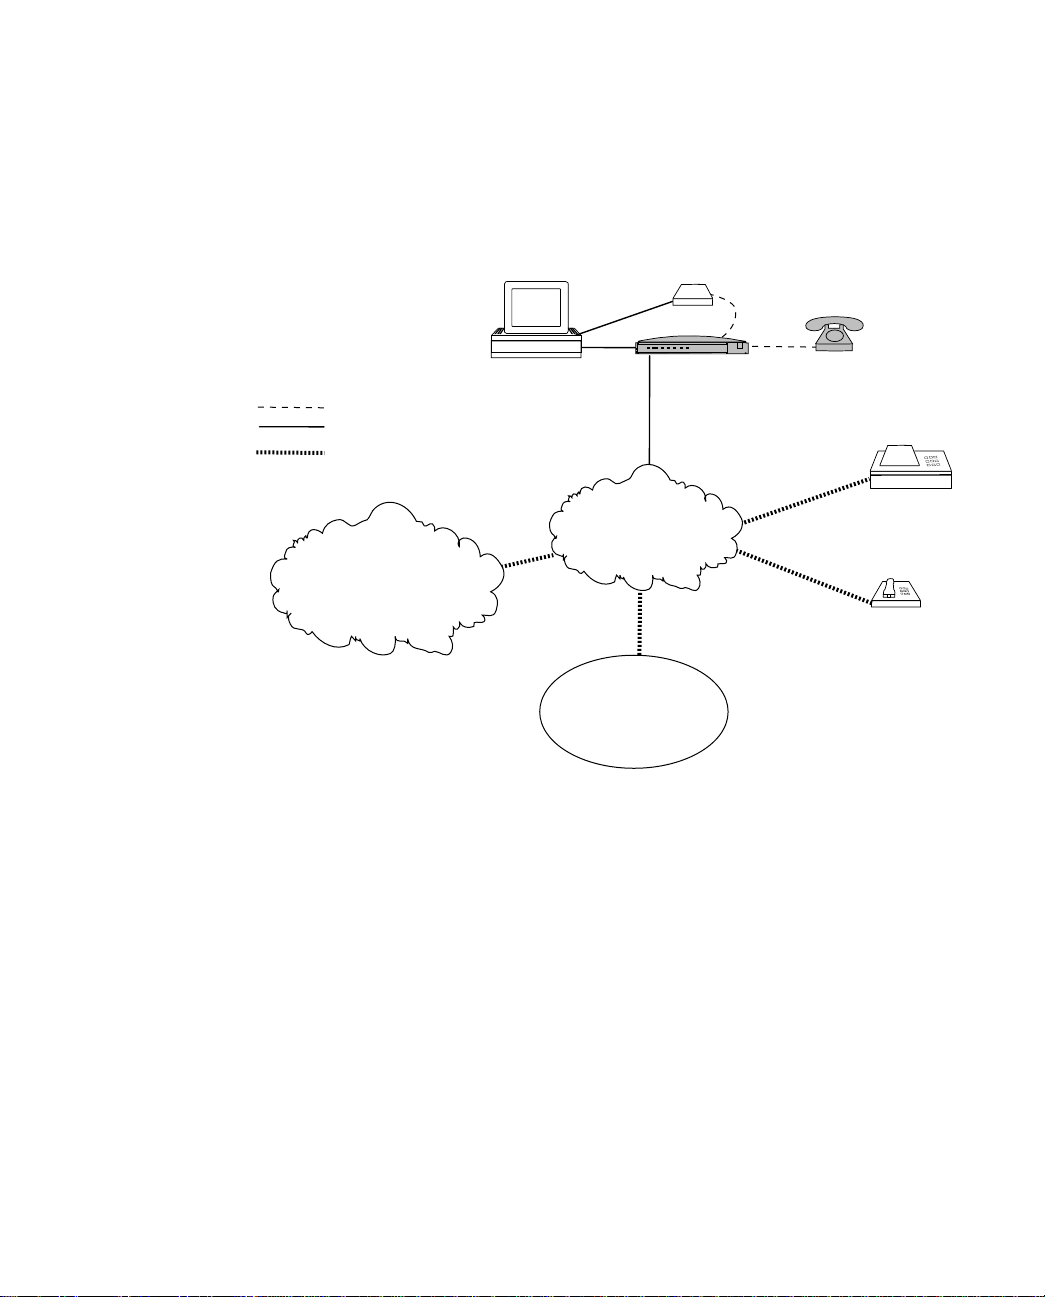
If you’ve been using an ordinary modem to dial into analog data
services, such as a corporate LAN or online service, you can
continue to do so with your digital ISDN line. Simply connect your
analog modem to one of the analog device ports on the Netopia
ISDN Modem and continue to use your analog devices in the same
fashion as before.
The Netopia ISDN Modem will convert the analog signal to a digital
signal for transmission over the ISDN line in such a way that it can
be retransmitted by the public switched network to an analog
device.
Page 15
Setting Up ISDN Service 2-3
Analog connection
Digital connection
Analog or digital connection
Internet Service Provider
or online service
Using analog devices with the Netopia ISDN Modem to communicate with
analog voice and data services
Your computer
Analog modem
PWR TESTD B1 B2 SD RD DTR
Netopia
ISDN Modem
Public telephone
network
Corporate
LAN
Netopia
Analog phone
Fax services
Telephone voice
services
Page 16
2-4 Netopia ISDN Modem User’s Guide
Your computer
Digital connection
Internet Service Provider
or online service
*
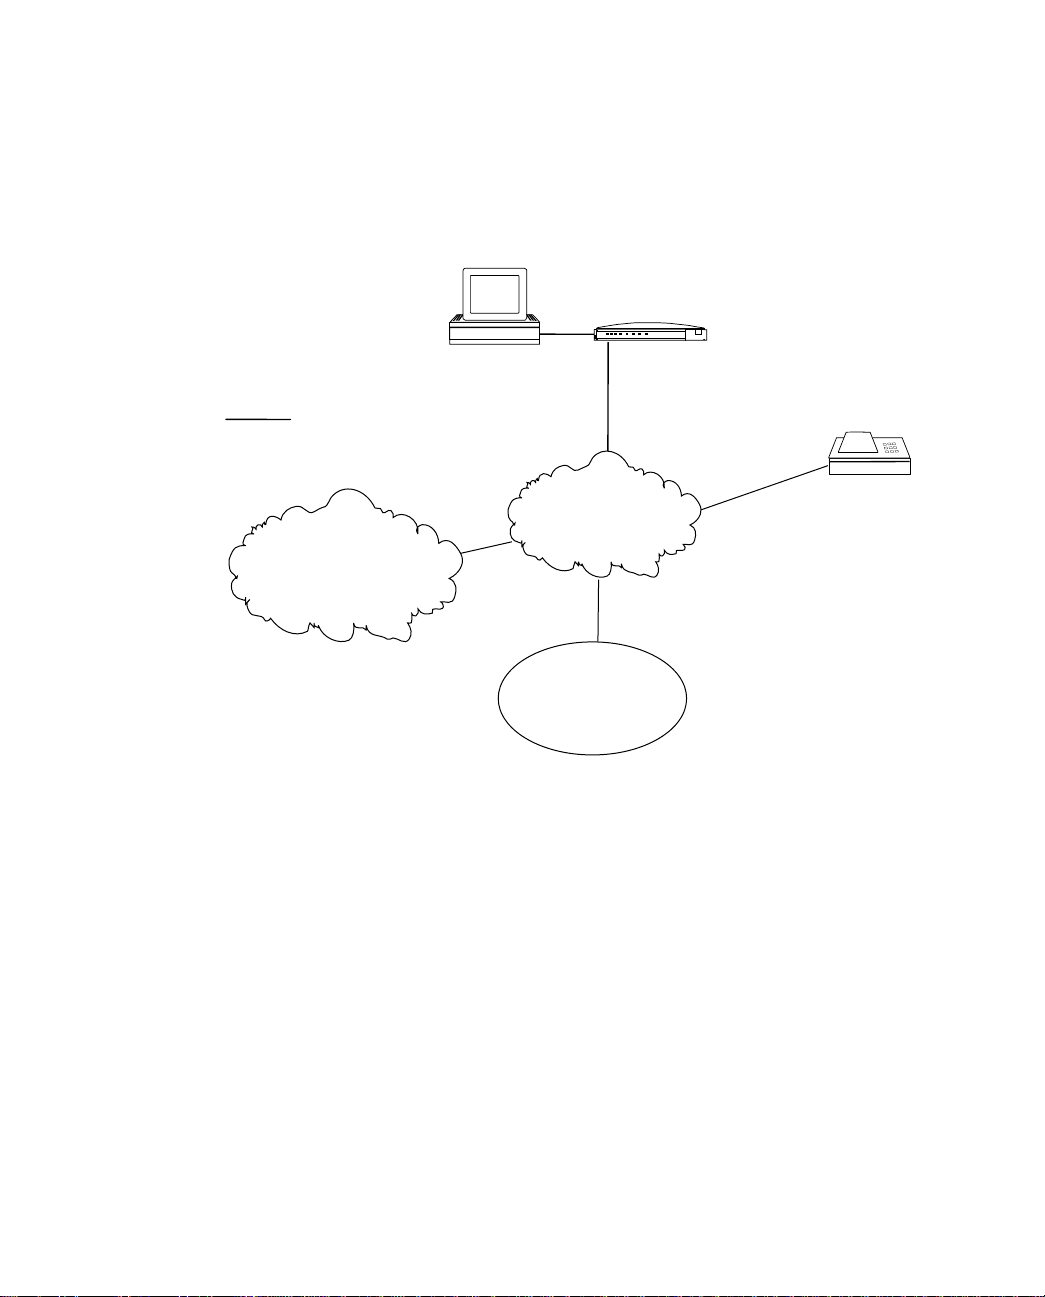
Using the Netopia ISDN Modem to connect to digital voice and data services
PWR TESTD B1 B2 SD RD DTR
Netopia
ISDN Modem
Public telephone
network
Corporate
LAN
Netopia
ISDN fax service
* If you choose not to connect any analog devices to the Netopia
ISDN ModemÕs analog device ports, you will be able to connect to
other ISDN devices, but not to analog devices. See the diagrams
above.
Page 17
Setting Up ISDN Service 2-5
Terms used in this user’s guide
The following ISDN-related terms are used in this user’s guide:
Basic Rate Interface (BRI):
order from the ISDN service provider. A BRI ISDN line has two
B channels and a D channel. The B channels carry data at 56 Kbps
or 64 Kbps, and can be used by the applications you use to access
the Internet. The D channel is reserved for call setup and signalling.
D channel
Switch:
from the telephone company’s local central office. You must know
the type of switch—sometimes referred to as
configuration
Directory number (DN):
the ISDN line you order (the directory number is also referred to as
the “telephone number” in this user’s guide). Depending on the type
of switch on your line, there may be one directory number for both
B channels, or one for each B channel.
The massive computer that controls your telephone line
—on your line to properly configure the ISDN modem.
BRI is the type of ISDN service you will
B channels
ISDN BRI
switch
The actual phone number associated with
SPID:
The Service Profile ID generally looks like the directory
number with some extra digits (the TID) appended to it. The number
of SPIDs received with BRI service can vary from none to two.
TID (Terminal ID): This one- or two-digit number is associated with
the SPID. It’s usually 1 or 01 for the first SPID and 2 or 02 for the
second SPID, but it can vary in form.
If you encounter other unfamiliar terms, check the glossary.
Page 18

2-6 Netopia ISDN Modem User’s Guide
SPID formats
The exact format of ISDN SPIDs is sometimes a point of confusion.
This is because several formats exist, and some formats allow
variations.
The table below displays the general SPID formats for some of the
types of ISDN switch configurations supported by the Netopia ISDN
Modem. The formats shown are a subset of possible SPID formats,
but in most cases they should work.
In the following table, xxxxxxx represents the directory number
assigned to your ISDN line, and yyy represents your area code.
Switch SPID format
AT&T 5ESS custom (multipoint)
National ISDN-1
on AT&T 5ESS
(multipoint)
National ISDN-1
on Northern
Telecom DMS-100
Note: AT&T 5ESS custom point-to-point switches have no SPIDs
and are not represented in the table above. However, this type of
switch configuration is supported by the Netopia ISDN Modem.
Example SPIDs If your ISDN line is controlled by a DMS-100 using National ISDN-1,
and your directory numbers are given as (415)234-5678 and
(415)234-5679, your SPIDs are 4152345678100 and
4152345679200. Alternately, your SPIDs can be
41523456780100 and 41523456790200.
yyyxxxxxxx100 and yyyxxxxxxx200
yyyxxxxxxx0100 and yyyxxxxxxx0200
01xxxxxxx0
01xxxxxxx00
or
Page 19

Preparing for an ISDN line
When you order an ISDN line, you will exchange information with the
ISDN service provider about the kind of service you need. The
provider, in turn, will give you some information about your line that
will be useful when you configure your Netopia ISDN Modem.
There are a few things to do before you can order an ISDN line:
■ Find an ISDN service provider
■ Decide on a type of ISDN line
■ Choose a phone line
■ Use your ISDN worksheet
These are explained in the corresponding sections below.
Setting Up ISDN Service 2-7
Find an ISDN service provider
ISDN service is typically provided by local telephone companies. In
certain regions, there may be other types of companies providing
ISDN service, such as long distance telephone companies. In this
user’s guide, we’ll refer to the ISDN service providers as telephone
companies.
If you are unsure of who provides ISDN service in your area, start by
contacting your local telephone company (refer to the list of contact
numbers for telephone companies that appears later in this
chapter). Ask for the ISDN service representative or for someone in
the company’s marketing or business services office.
Regardless of who you choose for ISDN service, the basic process
of setting up an ISDN line should be the same.
Page 20

2-8 Netopia ISDN Modem User’s Guide
Decide on a type of ISDN line
An ISDN line can be configured to carry data only, or both data and
voice.
Choose a phone line
To order an ISDN line, you must either designate an existing
telephone line to be converted, or order a new line to be installed.
There will probably be an additional charge if you add a new ISDN
line. However, if you convert an analog line to an ISDN line, you will
not be able to directly connect analog devices to the ISDN line in
most cases.
Regardless of your choice, make sure there is a wall jack for the line
you choose near where you intend to install your Netopia ISDN
Modem.
Use your ISDN worksheet
The ISDN Worksheet at the end of this chapter (see page 2-18)
contains sections where you can note important information about
your ISDN account. You may want to photocopy the ISDN Worksheet
and fill in the copy.
Note: The ISDN Worksheet is for your convenience only. You may
receive forms containing similar information from your telephone
company. In any case, the ISDN Worksheet is not an application for
an ISDN line nor a substitute for the forms your telephone company
uses.
Fill in section 1 of the worksheet once you find out exactly who you’ll
order your ISDN line from. Fill in as much of section 2 as you can
before calling your telephone company. The information in section 3
can only be filled in after you order your ISDN line.
Page 21

Be sure to check the accuracy of the information you enter on the
worksheet. Some of it will be needed later when you configure your
Netopia ISDN Modem.
It’s also a good idea to have the worksheet available if you call
Farallon technical support. The information on the sheet may help a
Farallon technician answer your questions more quickly.
Ordering your ISDN line
This section contains the information you’ll need to successfully
order an ISDN line.
Read this section through before contacting your telephone
company. Then refer to it when you actually order your line.
The first step in ordering your ISDN line is to prepare for the
questions your telephone company may ask, such as:
Setting Up ISDN Service 2-9
■ Will you be using an existing telephone line or need a new one?
■ Where is the line located?
■ Who is the contact person at that location?
■ Who will be billed for the line or should this line be added to an
existing account?
■ Should the service (or number) be listed?
Use section 2 of the ISDN Worksheet to record the answers to
these questions before calling your telephone company. Your
telephone company may also ask other questions about the type of
service you want.
Page 22

2-10 Netopia ISDN Modem User’s Guide
Contacting the telephone company
Below is a list of items that can help you order your ISDN line more
easily. These items correlate with items in section 3 of the ISDN
Worksheet (see page 2-18).
Depending on your situation, some of these items may not apply to
your order, and all of the items may not be dealt with by your
telephone company at the same time. In addition, there may be
other issues you will need to ask the telephone company about.
When an item in this list generates information that should be
entered in your worksheet, be sure to do so.
First, read through this list and become familiar with its contents.
Then call your telephone company and refer to the items in the list
during the ordering process.
1. Call your telephone company. Refer to the table below for your
telephone company’s phone number.
State Telephone Number
Alabama 800-858--9413
Alaska 907-561-1221
Arizona 800-898-WORK
Arkansas 800-SWB-ISDN
California 800-4PB-ISDN
Colorado 800-898-WORK
Connecticut 800-430-ISDN
Delaware 800-570-ISDN
Florida 800-858--9413
Georgia 800-858--9413
Hawaii 808-586-3000
Page 23

Setting Up ISDN Service 2-11
State Telephone Number
Idaho 800-898-WORK
Iowa 800-898-WORK
Illinois 800-TEAM-DATA
Indiana 800-TEAM-DATA
Kansas 800-SWB-ISDN
Kentucky 800-858--9413; 513-566--9413
Louisiana 800-858--9413
Maine 800-GET-ISDN
Maryland 800-570-ISDN
Massachusetts 800-GET-ISDN
Michigan 800-TEAM-DATA
Minnesota 800-898-WORK
Mississippi 800-858--9413
Missouri 800-SWB-ISDN
Montana 800-898-WORK
Nebraska 800-898-WORK
Nevada 702-333-4811
New Jersey 800-570-ISDN
New Hampshire 800-GET-ISDN
New Mexico 800-898-WORK
New York 800-GET-ISDN; 716-777-1234
North Carolina 800-858--9413
North Dakota 800-898-WORK
Page 24

2-12 Netopia ISDN Modem User’s Guide
Ohio 800-TEAM-DATA; 513-566--9413
Oklahoma 800-SWB-ISDN
Oregon 800-898-WORK
Pennsylvania 800-570-ISDN
Rhode Island 800-GET-ISDN
South Carolina 800-858--9413
South Dakota 800-898-WORK
Tennessee 800-858--9413
Texas 800-SWB-ISDN
Utah 800-898-WORK
State Telephone Number
Vermont 800-GET-ISDN
Virginia 800-570-ISDN
Washington 800-898-WORK
Washington DC 800-570-ISDN
West Virginia 800-570-ISDN
Wisconsin 800-TEAM-DATA
Wyoming 800-898-WORK
2. ISDN line configuration. Your telephone company may have the
Netopia ISDN Modem on a list of supported products that have
been tested with a particular ISDN line configuration. If your
telephone company confirms that the Netopia ISDN Modem is
on that list, then it will know how to set up your line.
Note: If your telephone company does not recognize the
Netopia ISDN Modem, you should read “General ISDN line
configuration” on page 2-14.
Page 25

Setting Up ISDN Service 2-13
3. Type of switch configuration used on your line. You must
receive this information from your telephone company to properly configure the Netopia ISDN Modem. The switch should be
one of the types supported by the Netopia ISDN Modem:
■ AT&T 5ESS custom
■ Northern Telecom DMS-100 or Siemens EWSD
■ AT&T 5ESS
4. Directory numbers and SPID (service profile identifier) numbers. This information may be provided to you at a later time,
after your line has been set up. There may be one or two directory numbers, and one or two SPIDs. If the switch on your line
is an AT&T 5ESS custom point-to-point, you will receive no
SPIDs. It’s very important that you record this information accurately.
Note: Regardless of the number of directory numbers and
SPIDs you receive, your line should be configured to allow the
Netopia ISDN Modem to use both B channels at once.
5. Circuit ID number. Your line has a unique physical address
called a circuit ID. Y ou should obtain this number from your telephone company and record it on the worksheet. The circuit
number can be useful for locating your line and its associated
circuit in case of a problem.
6. Long-distance company to be used on your ISDN line. When
the Netopia ISDN Modem makes long distance calls on your
ISDN line, you will be billed by a long distance telephone company. Make sure that you have the long distance company of
your choice.
Page 26

2-14 Netopia ISDN Modem User’s Guide
General ISDN line configuration
What if your telephone company does not recognize the Netopia
ISDN Modem? You can still use the ISDN Worksheet, but follow
these steps:
1. Ask for a standard Basic Rate Interface (BRI).
2. Ask the telephone company representative what type of switch
the company will use for your line: AT&T 5ESS custom, Northern Telecom DMS-100/Siemens EWSD, or AT&T 5ESS. Note
this information on your ISDN Worksheet for later use.
Note: NI-1 can appear on an AT&T 5ESS or a Northern Telecom
DMS-100.
3. Locate your telephone company’s ISDN switch type in the table
below. Provide the switch parameters to the representative.
Page 27

ISDN switch type
Setting Up ISDN Service 2-15
ISDN Line
Configuration
Parameter
AT&T
Custom
5ESS
AT&T 5ESS
National ISDN-1
Northern
Telecom
DMS-100
Siemens EWSD
National ISDN-1
National ISDN-1
Standard (2B+D)
Line type
line with
point-to-point
configuration
Line code
Interface type
2B1Q (no NT1
required)
U interface with an
RJ-45 jack
Directory numbers 2
Maximum
terminals
Maximum B
channels
Circuit-switched
voice
Circuit-switched
voice limit
Circuit-switched
voice channel
Circuit-switched
data
Circuit-switched
data and voice
Circuit-switched
data channel
*
1 1 NA NA
2222
*
2
*
2
Any Any NA NA
*
2
NA NA NA Yes
Any Any NA NA
Standard (2B+D)
National ISDN-1
line
2B1Q (no NT1
required)
U interface with an
RJ-45 jack
*
2
*
2
*
2
*
2
Standard (2B+D)
National ISDN-1
line
2B1Q (no NT1
required)
U interface with an
RJ-45 jack
22
NA NA
NA Dynamic
NA NA
Standard (2B+D)
National ISDN-1
line
2B1Q (no NT1
required)
U interface with an
RJ-45 jack
* The directory number, circuit-switched voice, and circuit-switched voice limit parameters should be
set to 2 to allow both analog device ports to be used simultaneously. If these parameters are set
to 1, the ISDN line can only place or receive one call at a time.
*
Page 28

2-16 Netopia ISDN Modem User’s Guide
ISDN switch type
ISDN Line
Configuration
Parameter
AT&T
Custom
5ESS
AT&T 5ESS
National ISDN-1
Northern
Telecom
DMS-100
Siemens EWSD
National ISDN-1
National ISDN-1
Circuit-switched
data limit
2 2 NA None
Terminal type A (basic terminal) A (basic terminal) Functional PVC 2 Functional
Display Yes Yes NA NA
Actual user Yes Yes NA NA
Voice or data Both Both Both No
Data option NA NA
Call appearance
preference
Circuit-switched
option
Bearer restriction
option
Idle Idle NA NA
NA NA Yes NA
NA NA
Protocol NA NA
Lower layer
compatibility
No packet mode
data (NOPMD)
Functional version
2 (PVC 2)
NA
No packet mode
data (NOPMD)
Functional
SPID suffix NA NA 1 1
Terminal Endpoint
Identifier
NA NA Dynamic Dynamic
Maximum keys NA NA 64 NA
Ring NA NA No NA
Key system (EKTS) NA NA No No
Flexible Call
Offering (FCO)
Yes
*
Yes
*
Yes
*
Yes
*
* FCO (also referred to as “Additional Call Offering”) allows you to receive an incoming call while a
Multilink PPP call is active. If you do not want this feature, which might cost extra, notify your telephone service provider. Note that FCO is not required.
Page 29

Setting Up ISDN Service 2-17
4. Ask the telephone company representative to provide the information you need to fill out section 3 of the worksheet.
5. Present the ordering information you receive from the telephone company representative to the ISDN line installer or telephone company service representative in your area. Also, make
sure that your local telephone company installer installs a new
or rewires an existing RJ-11 or RJ-45 jack for your ISDN line.
Y ou will connect the Netopia ISDN Modem to this jack using the
RJ-11–to–RJ-11 ISDN telephone cable.
6. Once your Netopia ISDN Modem is installed and configured, try
to place a call. If the line does not function properly with the
ISDN modem, contact your telephone company and ask them to
reconfigure the line until it works properly.
Page 30

2-18 Netopia ISDN Modem User’s Guide
ISDN Worksheet
1. Telephone company contact information
Name and address:
_____________________________________________________________
_____________________________________________________________
_____________________________________________________________
Telephone/Fax numbers: _______________________________________
E-mail address: _______________________________________________
2. Your information
Street address where your ISDN line is located:
_____________________________________________________________
_____________________________________________________________
_____________________________________________________________
Contact person at this location, including phone number:
_____________________________________________________________
Is this an existing line or a new line (to be installed)?
__ existing
__ new
Should the number for this line be listed in the telephone company’s directory?
__ no
__ yes
Billing address for your ISDN line:
_____________________________________________________________
_____________________________________________________________
_____________________________________________________________
_____________________________________________________________
Page 31

3. ISDN information
ISDN line configuration method used (check one):
__ By product (Netopia ISDN Modem)
__ Other method
Type of switch (check one):
__ AT&T 5ESS custom
__ Northern Telecom DMS-100/Siemens EWSD National ISDN-1
__ AT&T 5ESS
Primary directory number (ID 1): ________________________________
Primary SPID (1): _____________________________________________
Secondary directory number (ID 2): _____________________________
Secondary SPID (2): __________________________________________
Setting Up ISDN Service 2-19
B channel data rate: __________________________________________
Circuit ID number: ____________________________________________
Long distance carrier used on ISDN line:_________________________
Page 32

Page 33
Chapter 3
Installing the Netopia ISDN Modem
This chapter describes the installation of the Netopia ISDN Modem.
The installation procedure assumes that you are familiar with PCs or
Macintosh computers. If you are not, refer to the documentation
that accompanied your computer for instructions on hardware
installation and operating system commands.
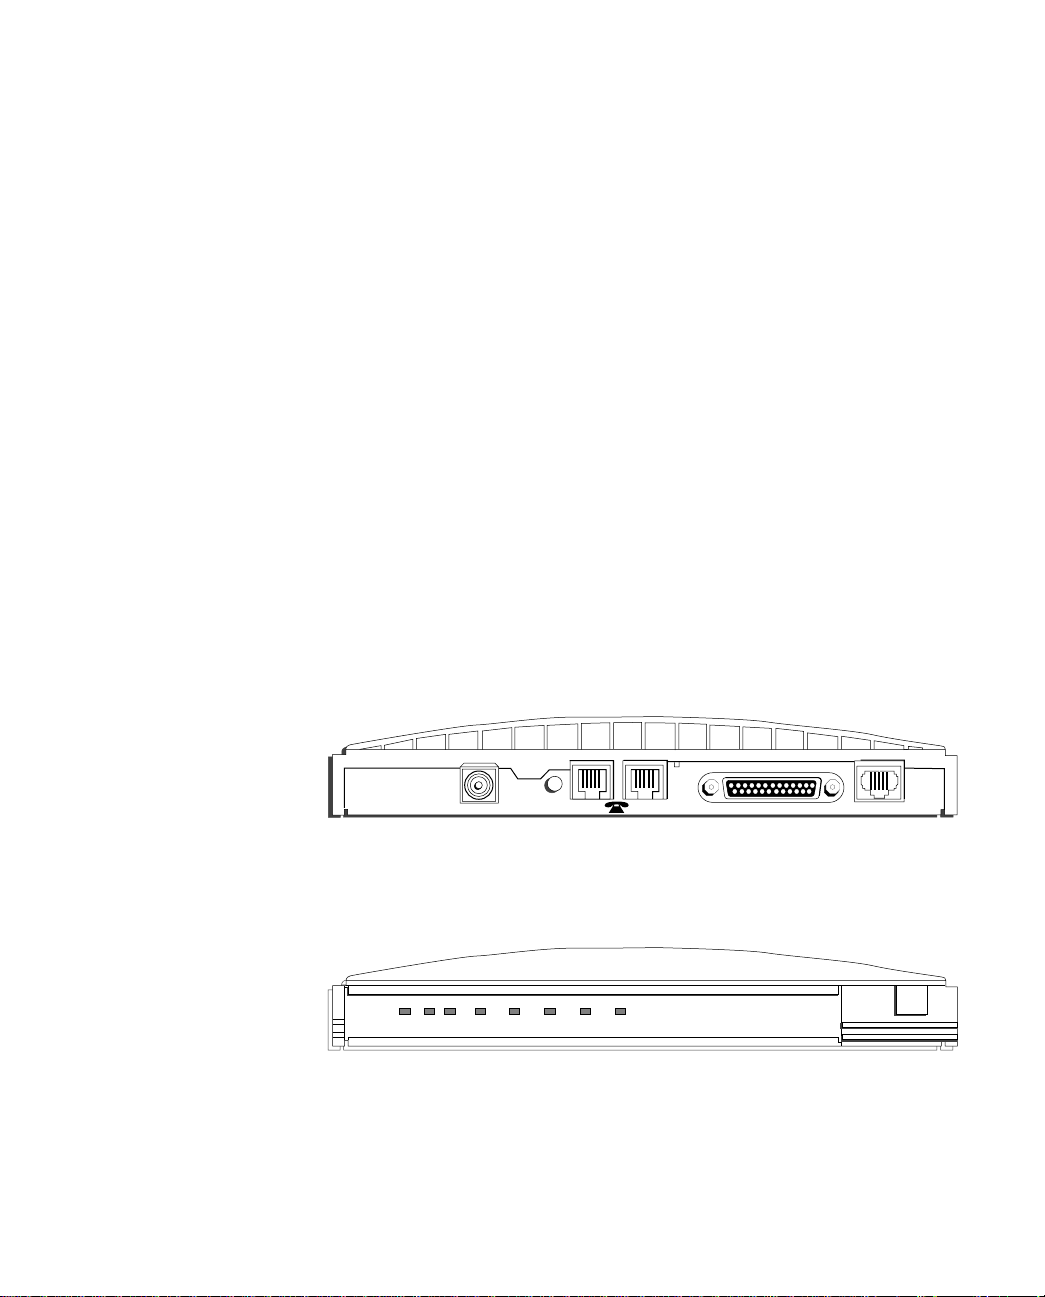
During installation, refer to the figures below showing the ISDN
modem’s back and front panels. If you encounter difficulties after
installation, refer to Chapter 7, “Troubleshooting.”
3-1
9 VDC
.6A MAX
Power Test D B1 B2 Send Receive Ready
Front panel of the Netopia ISDN Modem, showing all LEDs
RESET
12
Back panel of the Netopia ISDN Modem
RS-232 ISDN U
Netopia™ ISDN Modem
Page 34
3-2 Netopia ISDN Modem User’s Guide
Connecting to a PC
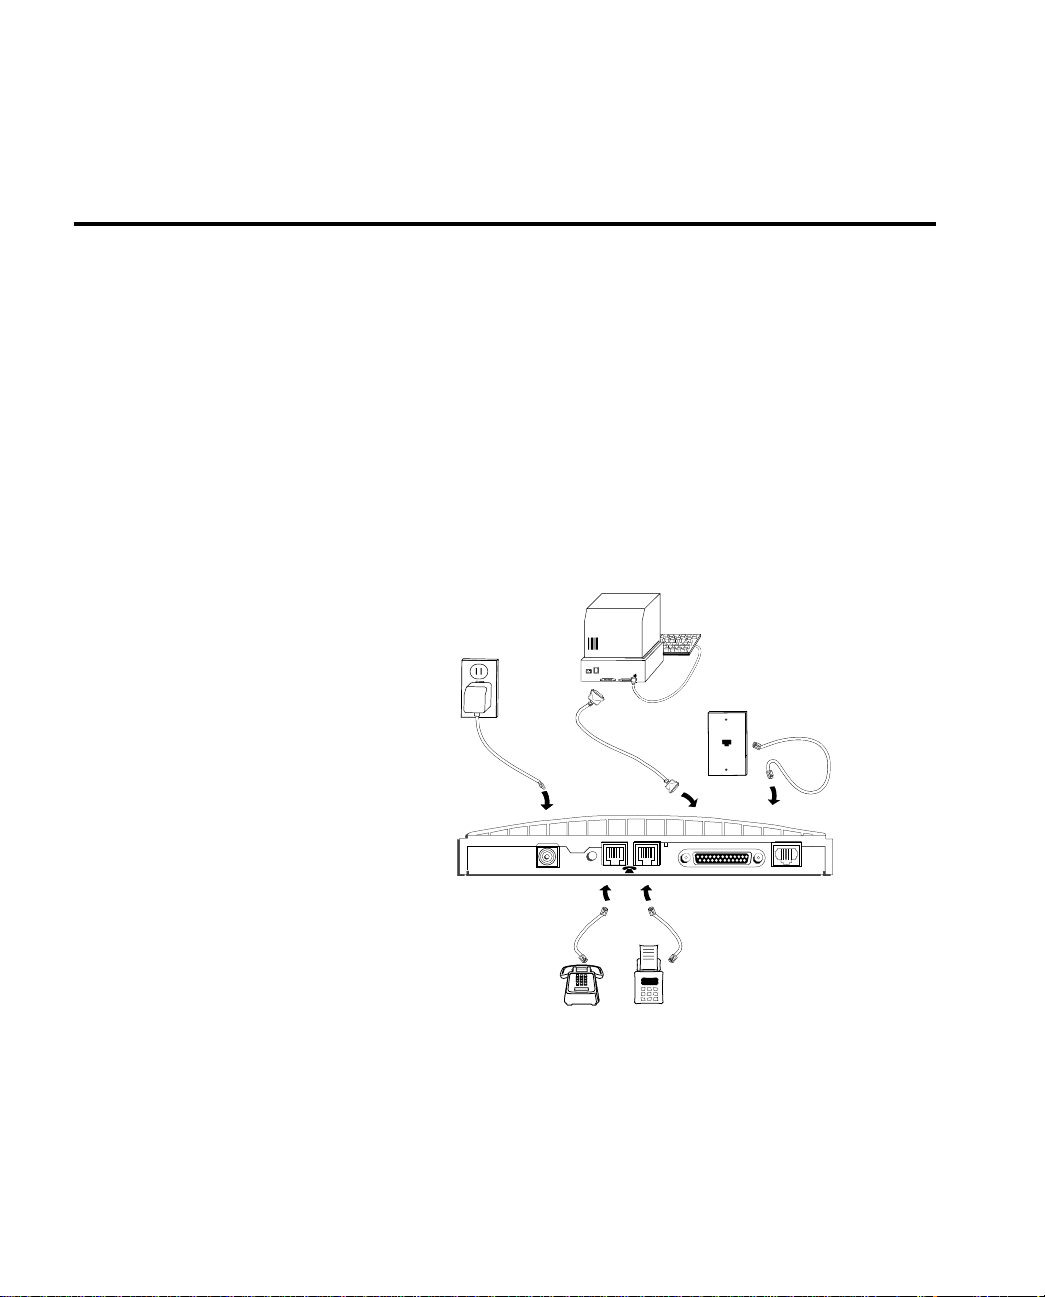
To connect the Netopia ISDN Modem model 612 to a PC:
1. Turn off the computer and ensure that the Netopia ISDN
Modem is not plugged in.
2. Connect the 25-pin male end of the ISDN modem’s serial cable
to the port labeled RS-232 on the ISDN modem’s back panel.
3. Connect the other end of the serial cable to a serial (COM) port
on the back of your PC.
Note: Most COM ports are labeled COM, SERIAL, or RS-232. If
the COM port has a DB-25 connector, use a DB-9–to–DB-25
adapter, which you can purchase from your local computer
parts dealer.
Computer
Wall
Outlet
Netopia
ISDN
Modem
9 VDC
.6A MAX
RESET
1 2
RS-232 ISDN U
FAX
ISDN
Wall Jack
Connecting to the Netopia ISDN Modem
4. Connect one end of the ISDN cable to the RJ-45 port labeled
ISDN U on the ISDN modem’s back panel.
Page 35

Installing the Netopia ISDN Modem 3-3
Caution! Do not connect the ISDN cable to the Netopia ISDN Modem’s
RJ-11 analog device ports (identified by the telephone icon).
These ports are designed for connecting standard analog
telephone equipment.
5. Connect the other end of the ISDN cable to the RJ-11 or RJ-45
ISDN wall jack. An RJ-45 jack will accept your cable’s RJ-11
connector.
Caution! Do not connect the ISDN cable to a standard analog telephone
jack or to an external ISDN network termination device (NT1).
Make sure it is connected to an ISDN jack (also called an ISDN
“U” interface).
6. Connect the ISDN modem’s power cable to the connector
labeled 9VDC on the back panel of the ISDN modem.
7. Plug the transformer end of the power cable into a standard AC
wall outlet.
The LEDs on the front panel (see the front panel figure on
page 3-1) flash momentarily as the ISDN modem undergoes a
power-up self-test. The Power and D channel LEDs will remain
lit until the configuration parameters are set.
8. Go to Chapter 4, “Configuration using a PC” to configure the
Netopia ISDN Modem.
Page 36
3-4 Netopia ISDN Modem User’s Guide
Connecting to a Macintosh computer
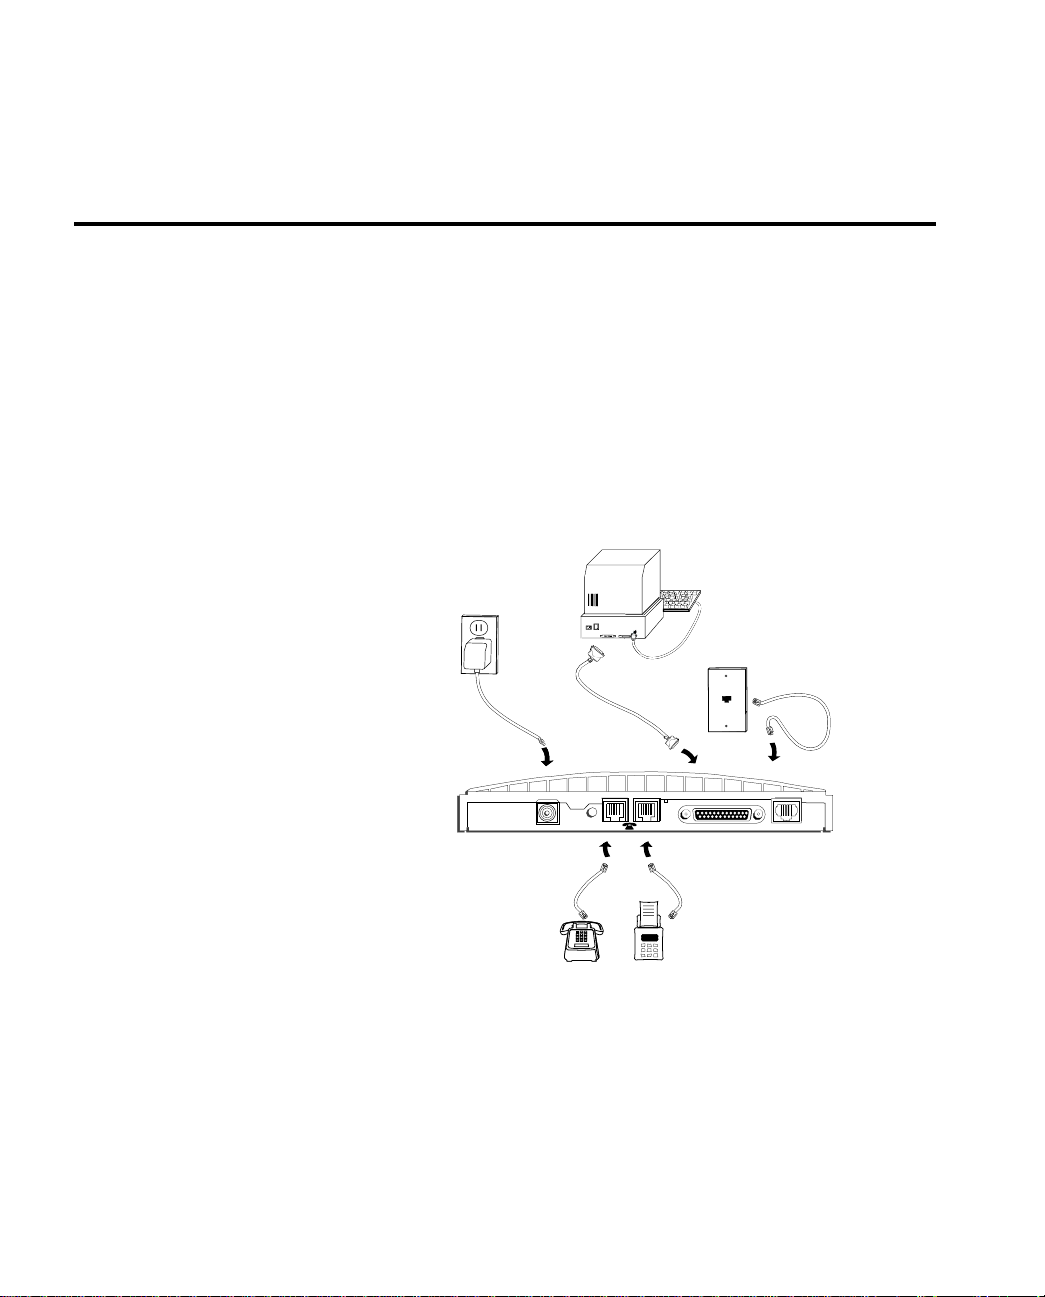
To connect the Netopia ISDN Modem model 412 to a Macintosh
computer:
1. Turn off the computer and ensure that the Netopia ISDN
Modem is not plugged in.
2. Connect the 25-pin male end of the ISDN modem’s serial cable
to the port labeled RS-232 on the ISDN modem’s back panel.
3. Connect the other end of the serial cable to the printer or
modem port on the back of the Macintosh computer. For more
information about serial ports, see the “Steps 3 to 6: Selecting
the serial port options” section on page 5-2.
Wall
Outlet
Computer
ISDN
Wall Jack
Netopia
ISDN
Modem
9 VDC
.6A MAX
RESET
1 2
RS-232 ISDN U
FAX
Connecting to the Netopia ISDN Modem
4. Connect one end of the ISDN cable to the RJ-45 port labeled
ISDN U on the ISDN modem’s back panel.
Page 37

Installing the Netopia ISDN Modem 3-5
Caution! Do not connect the ISDN cable to the Netopia ISDN Modem’s
RJ-11 analog device ports (identified by the telephone icon).
These ports are designed for connecting standard analog
telephone equipment.
5. Connect the other end of the cable to the RJ-11 or RJ-45 ISDN
wall jack. An RJ-45 jack will accept your cable’s RJ-11
connector.
Caution! Do not connect the ISDN cable to a standard analog telephone
jack or to an external ISDN network termination device (NT1).
Make sure it is connected to an ISDN jack (also called an ISDN
“U” interface).
6. Connect the Netopia ISDN Modem power cable to the
connector labeled 9VDC on the back panel of the ISDN modem.
7. Plug the transformer end of the power cable into a standard AC
wall outlet.
The LEDs on the front panel (see the front panel figure on
page 3-1) flash momentarily as the ISDN modem undergoes a
power-up self-test.
8. Turn on the computer’s power switch and restart.
9. To configure the Netopia ISDN Modem, see the “Configuration
using a Macintosh computer” section on page 5-2.
Page 38

3-6 Netopia ISDN Modem User’s Guide
Connecting analog equipment
To connect a touch-tone telephone, answering machine, fax
machine, or external analog modem to the Netopia ISDN Modem:
1. Turn off the computer and ensure that the Netopia ISDN
Modem is not plugged in.
2. Insert one RJ-11 connector into one of the analog device ports
on the Netopia ISDN Modem (these ports are labeled with a
telephone icon).
Note: You need to provide an RJ-11 to RJ-11 cable for each
analog device port connection.
3. Insert the other end of the cable into the appropriate RJ-11 port
on the analog device.
4. Repeat steps 2 and 3 to connect an additional analog device.
For more information about analog connections, see the “Using
the analog device ports” section on page 6-11.
Page 39

Chapter 4
Configuration using a PC
This chapter explains how to configure your Netopia ISDN Modem
using a PC.
You will install the Netopia Windows configuration software and use
it to configure your ISDN modem under Windows, Windows 95, and
Windows NT . You need to install the DOS configuration software and
use it to configure the ISDN modem under DOS.
Topics covered in this chapter include:
4-1
■ How to configure your Netopia ISDN Modem and place calls
under Windows, Windows 95, and Windows NT (page 4-2)
■ How to install the modem driver for Windows 95 (page 4-10)
■ How to install the modem driver for Windows NT (page 4-16)
■ How to use the configuration software to test the ISDN
connection and save modem settings (page 4-19)
■ How to configure your ISDN modem and place calls using DOS
(page 4-23)
Important: Configuring your Netopia ISDN Modem using Windows
95 and Windows NT is a two-step process. The first step is to use
the Windows configuration software to define modem settings
(page 4-2). The second step is to install a modem driver in the
operating system you are using (page 4-10 or page 4-16).
Page 40
4-2 Netopia ISDN Modem User’s Guide
Configuration using Windows, Windows 95, and Windows NT
This section describes how to configure the Netopia ISDN Modem
using Windows, Windows 95, and Windows NT.
Steps 1 to 4:
Installing the software
1. Insert the Netopia ISDN Modem Configuration Software for DOS
and Windows diskette into an available floppy drive.
2. Select Run from the File menu (Windows 3.X and Windows NT)
or from the Start menu (Windows 95). (In Windows 3.x and
Windows NT , leave the Run Minimized check box unchecked.) In
the Run dialog box, type
a:setup
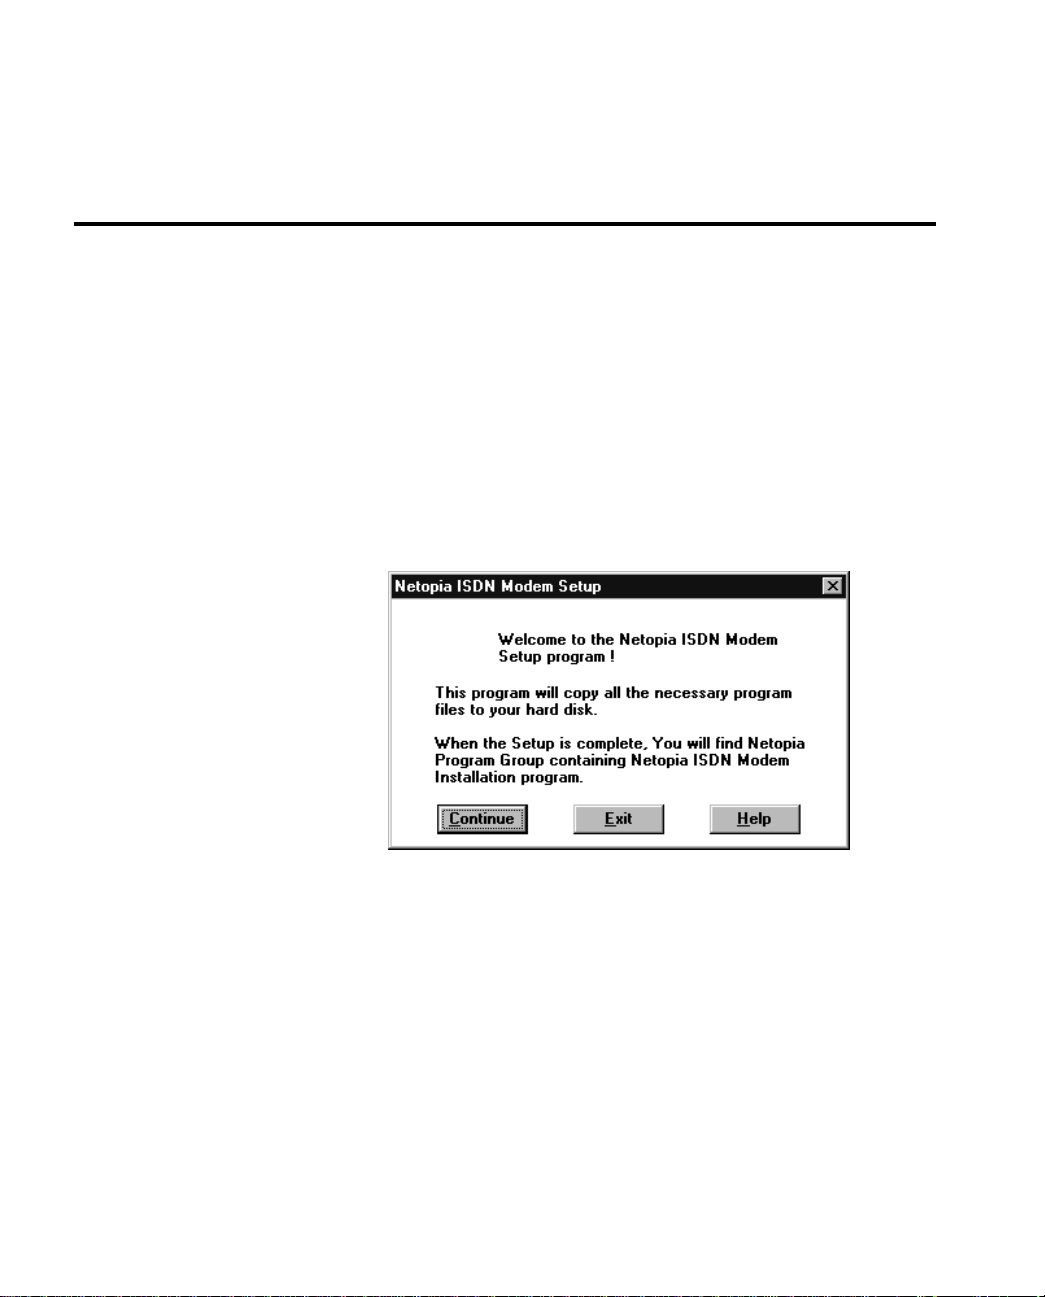
The Netopia ISDN Modem Setup dialog box appears.
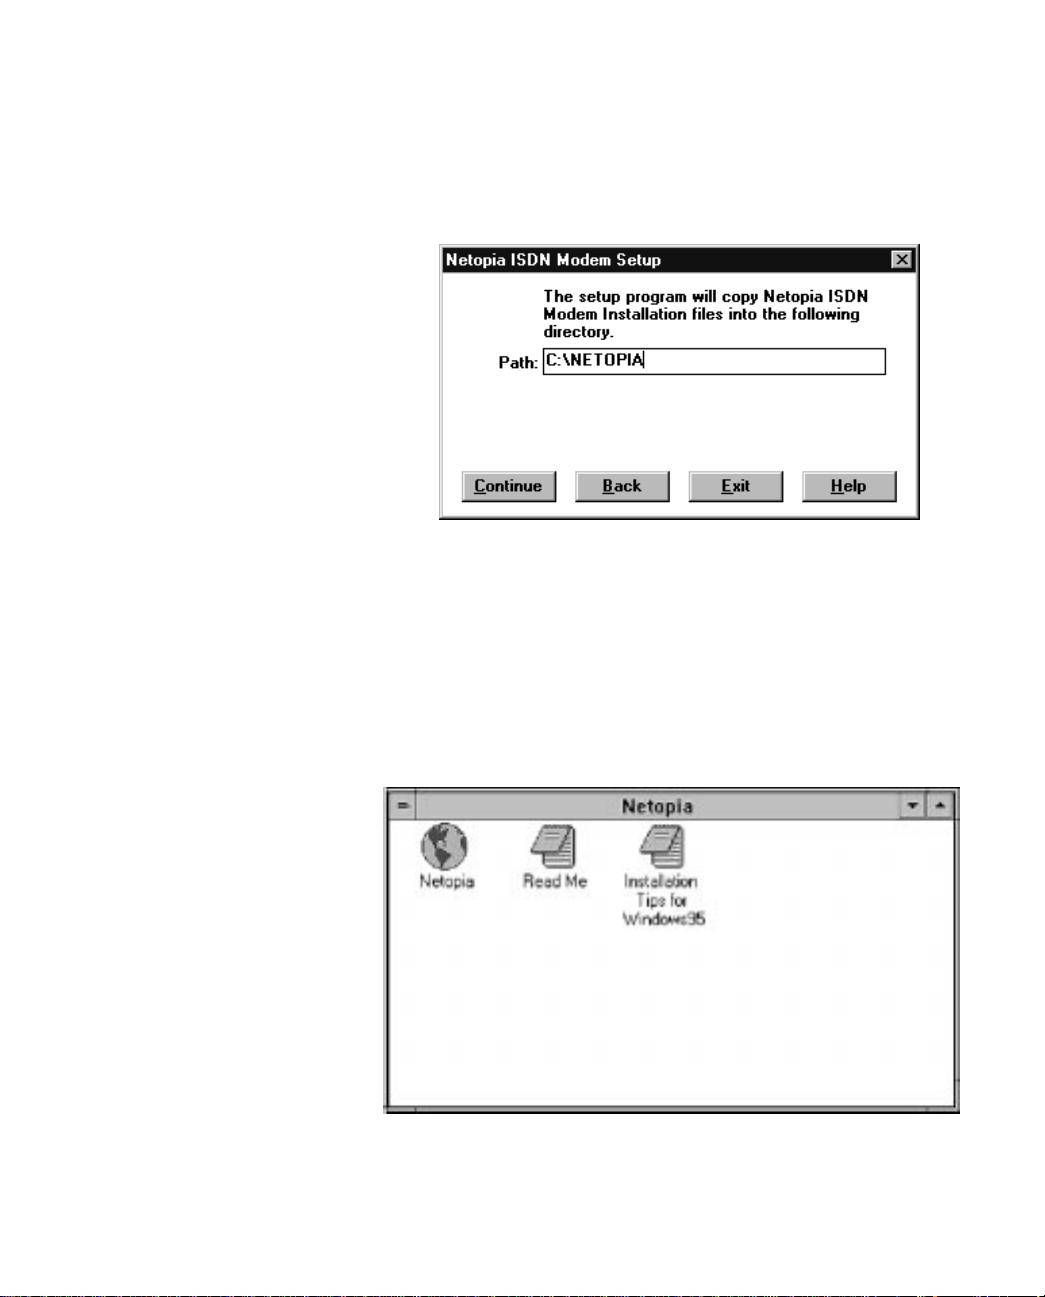
3. Click Continue. Another dialog box appears. You can use this
dialog box to specify where you want to install the Netopia files.
By default, the files are installed in the C:\NETOPIA directory. If
you want to install the Netopia files in a different directory,
enter the complete path to the desired location in the Path
field.
Page 41
Configuration using a PC 4-3
4. Click Continue to install the files.
A message will appear on the screen and inform you if the
installation was successful. If the installation was not
successful, try running the installation program again.
If you are using Windows 3.x, a dialog box appears and ask if
you want to install a COM port enhancement driver. For
information, see Appendix D, “About the COM Port
Accelerator.” After a successful installation, the Netopia icon
appears in the Netopia window.
Page 42

4-4 Netopia ISDN Modem User’s Guide
Steps 5 to 9:
Running ISDN Assistant
ISDN Assistant is a program that detects the switch type and
configures the SPID(s). ISDN Assistant automatically runs if it
detects any change to the configuration parameters, for example, if
the ISDN modem is connected to a different ISDN line.
Note: You will need the ISDN telephone or directory numbers from
the configuration parameters you entered on your ISDN worksheet.
For information, see the “Use your ISDN worksheet” section on
page 2-8.
5. Double-click the Netopia icon. A message appears. If you don’t
want ISDN Assistant to configure your ISDN modem, click the
Cancel button and go on to the “About the configuration dialog
box” section on page 4-6.
6. If you want to run ISDN Assistant, wait about 30 seconds while
the program configures your switch type. A status message will
appear. Then, after the switch type is configured, the dialog box
for the first telephone number appears.
7. Enter the telephone number for your ISDN line.
Note: You don’t need to enter delimiters like parentheses “( )”
or hyphens “-”.
Page 43

Configuration using a PC 4-5
8. Click Next. A dialog box appears, indicating that the Netopia
ISDN Modem is detecting the SPID for the first telephone number (it takes a minute or two to configure the SPID). After the
SPID is configured, another dialog box appears.
9. If you have a second telephone number for your ISDN line, enter
it, and then click Next. If you do not have a second telephone
number for your ISDN line, leave the field blank, and then click
Cancel. If you entered a second telephone number, the program
confirms the SPID for the second telephone number and then
displays a dialog box to show the SPID was configured correctly.
Click Finish to continue.
Page 44
4-6 Netopia ISDN Modem User’s Guide
About the configuration
dialog box
After running ISDN Assistant, the configuration program will
automatically try to detect the COM port to which the Netopia ISDN
Modem is connected.
■ If the program can detect the COM port, the configuration
dialog box appears.
■ If the program cannot detect the COM port, the COM Port
Provisioning dialog box appears. Choose the COM port to which
the ISDN modem is connected. Click Connect. Then the
configuration dialog box appears.
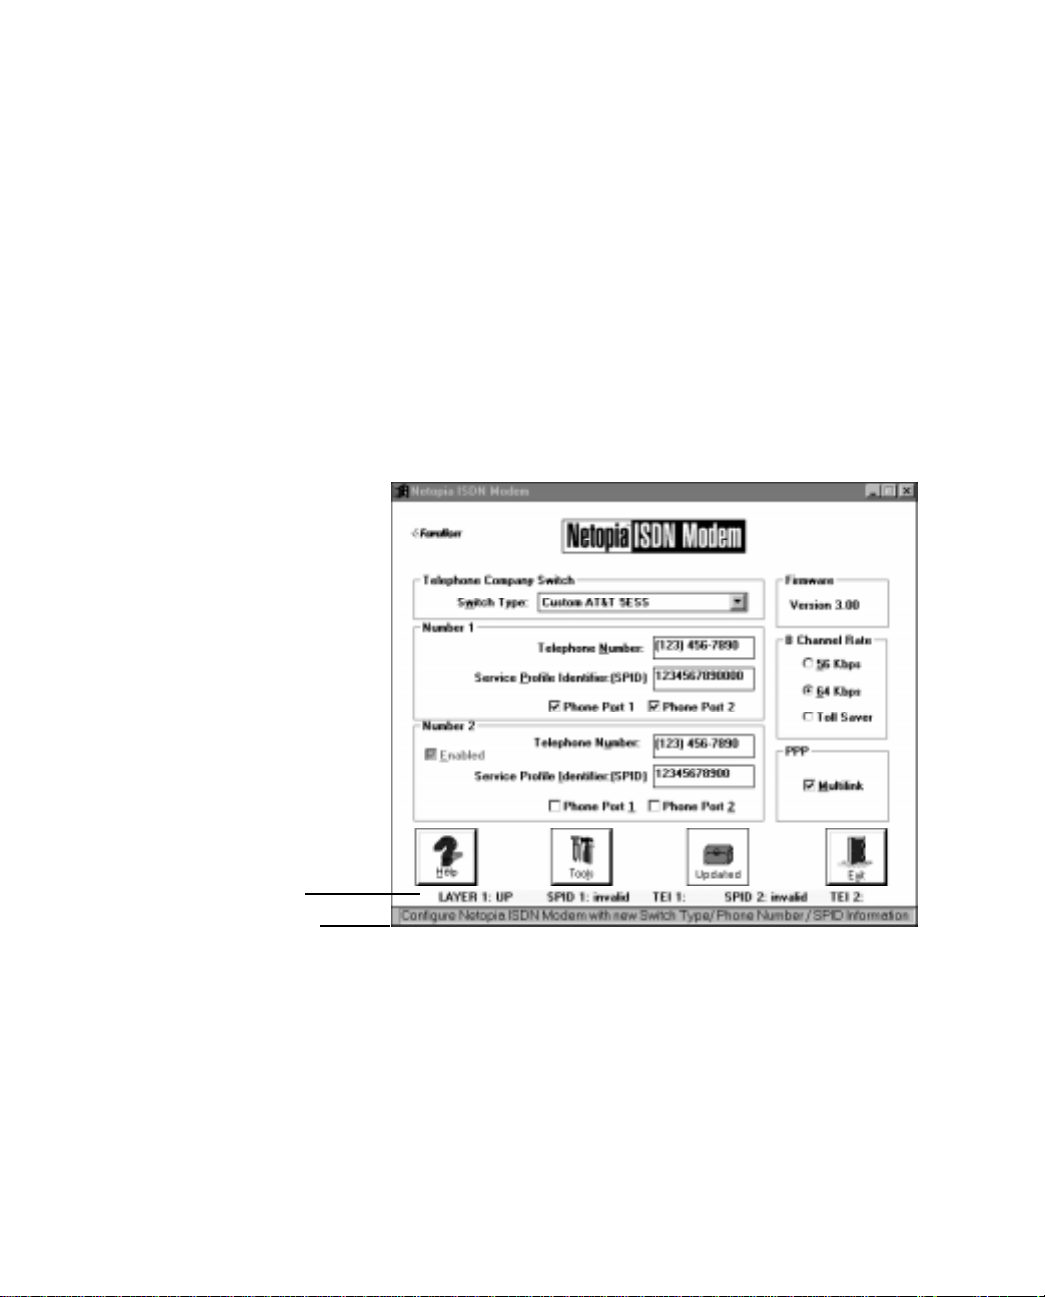
Status area
Message bar
Windows configuration dialog box
A message bar at the bottom of the dialog box provides help for
completing the fields. If you click in a field, the message bar tells
you what information to enter in the field. The message bar also
provides status information about the ISDN modem. For example, a
message will appear if the ISDN modem is disconnected from the
ISDN telephone line.
Page 45

Configuration using a PC 4-7
The right side of the dialog box shows the ISDN modem’s firmware
version, along with any installed options, such as Multilink PPP. For
information about Multilink PPP, see the “Using Multilink PPP”
section on page 6-4.
Disabled items (items that are dimmed) are not applicable and do
not need to be configured.
A status area below the Help, Tools, Update, and Exit buttons
provides the following ISDN status information:
■ Layer 1 status
■ Service Profile Identifier (SPID) for telephone numbers 1 and 2
■ Terminal Endpoint Identifiers (TEI) 1 and 2 (for information
purposes only)
Check to make sure the switch type and SPID(s) the software
configures match the settings the telephone company gave you.
Step 10:
Configuring call routing
Step 11: Configuring the
B channel data rate
The call routing option (the Phone Port and Phone Port 2 check
boxes in the Number 1 and Number 2 areas) lets you route calls to
analog devices connected to the analog device ports. If you have
more than one telephone number, you can route calls from either
number to Phone Port 1 or Phone Port 2. By default, all the Phone
Port boxes are checked. This allows calls to both ISDN telephone
numbers to simultaneously ring devices attached to both ports. For
more information, see the “Call routing to the analog device ports”
section on page 6-13.
The configuration dialog box lets you configure call routing for Phone
Number 1 and Phone Number 2.
10. Check the box beside the phone port(s) to which you want to
route calls from telephone number 1 and telephone number 2.
You can configure the B channel data rate for 56 or 64 Kbps. The
data rate you select should match your telephone company’s
B channel rate (for information, see the “ISDN Worksheet” section
on page 2-18.) By default, the B channel data rate on the Netopia
ISDN Modem is set at 56 Kbps. If this setting doesn’t match your
telephone company’s rate, you need to change the setting.
Page 46

4-8 Netopia ISDN Modem User’s Guide
If you select the T oll Saver option in the configuration dialog box, T oll
Saver will be applied to all outgoing ISDN calls. You must disable
the Toll Saver feature to place calls to devices that do not support
this feature.
11. To change the B channel data rate, select either 56, 64, or Toll
Saver for the B Channel Rate. For more information about Toll
Saver, see the “Placing a Toll Saver call” section on page 6-8.
Step 12: Enabling and
disabling Multilink PPP
Steps 13 to 14:
Completing the
configuration
Multilink PPP allows a maximum digital connection of up to 128
Kbps by virtually linking two 56 Kbps or 64 Kbps B channels.
12. Click in the Multilink check box in the PPP area (lower-right corner) to toggle Multilink PPP. If the box is checked, Multilink PPP
is on. For more information about Multilink PPP, see the “Using
Multilink PPP” section on page 6-4.
13. Click the Update button to download the parameters displayed
in the dialog box to your ISDN modem.
14. Check the status area to verify the configuration. If the parameters were configured accurately and the ISDN modem is ready
to send and receive calls, the status area fields should contain
the information shown below. Note that you do not configure
the Terminal Endpoint Identifier (TEI) numbers, they are generated automatically by the telephone company.
■ Layer 1: UP
■ SPID 1: Init
■ TEI 1: Number from 0 to 127
■ SPID 2: Init (if required)
■ TEI 2: Number from 0 to 127 (if required)
Page 47

Configuration using a PC 4-9
Entering the switch type and SPID parameters
In most cases, ISDN Assistant will enter the information required to
connect to your Netopia ISDN Modem. However, if ISDN Assistant
doesn’t configure your ISDN modem correctly or if you want to enter
information yourself, you can follow the instructions below to enter
configuration information directly into the configuration dialog box.
1. Select the type of switch, as specified by your telephone company, from the Telephone Company Switch drop-down list.
2. Click in the Telephone Number field in the Number 1 area and
enter the first telephone (or “directory”) number of your ISDN
line.
3. Click in the Service Profile Identifier (SPID) field and enter the
corresponding SPID for the telephone number you entered in
the previous step. Y ou should have also received the SPID from
your telephone company. Note that this field scrolls to allow you
to enter as much information as necessary.
4. If you have a second telephone number associated with your
ISDN telephone line (some telephone companies require two),
check the Enabled box and enter the number and
corresponding SPID in the appropriate fields in the Number 2
area.
5. Click the Update button to download the parameters listed in
steps 1 through 4 to your ISDN modem.
6. Check the status area to verify the configuration. If the
parameters were configured accurately and the ISDN modem is
ready to send and receive calls, the status area fields should
contain the information shown in the “Steps 13 to 14:
Completing the configuration” section on page 4-8.
7. Click Exit to leave the utility.
If the parameters match those of the telephone company’s ISDN
switch, the D channel LED lights up for a few minutes, flashes for
several seconds, and then turns off. If the LED continues to flash or
remains lit, see Chapter 7, “Troubleshooting.”
Page 48

4-10 Netopia ISDN Modem User’s Guide
If the D channel LED indicates a proper connection to the ISDN
switch by turning off and you are using Windows, you can use your
communications software to establish an ISDN connection. Go to
the next section to place calls using your ISDN modem.
If the D channel LED indicates a proper connection to the ISDN
switch by turning off and you are using Windows 95, to complete
the Windows 95 installation see the “Installing the Windows 95
modem driver” section on page 4-10.
If the D channel LED indicates a proper connection to the ISDN
switch by turning off and you are using Windows NT, to complete the
installation see the “Installing the Windows NT modem driver”
section on page 4-16.
Placing calls with Windows
To place calls using Windows, you can use any standard
communications application that recognizes AT commands.
Note: Most areas require you to dial ISDN calls with 11 digits (for
example, 1-800-555-1212), even for local calls.
Note that you must use Multilink PPP to make calls using two ISDN
B channels. For information. see the “Using Multilink PPP” section
on page 6-4.
Installing the Windows 95 modem driver
If you are using Windows 95, you need to install a modem driver for
your ISDN modem before you can place calls. Follow the
instructions below to install the Windows 95 modem driver.
Note: The serial port speed of most PCs limits the computer’s
maximum data transmission rate. Typically, PCs are limited to a
maximum transmission speed of 115.2 Kbps. However, advanced
serial cards and drivers are available to boost the serial port speed
up to 230.4 Kbps. (For more information, see the “Optimizing serial
port performance” section on page 6-9.)
Page 49
Configuration using a PC 4-11
1. From the Start menu, select Settings, then select Control
Panel.
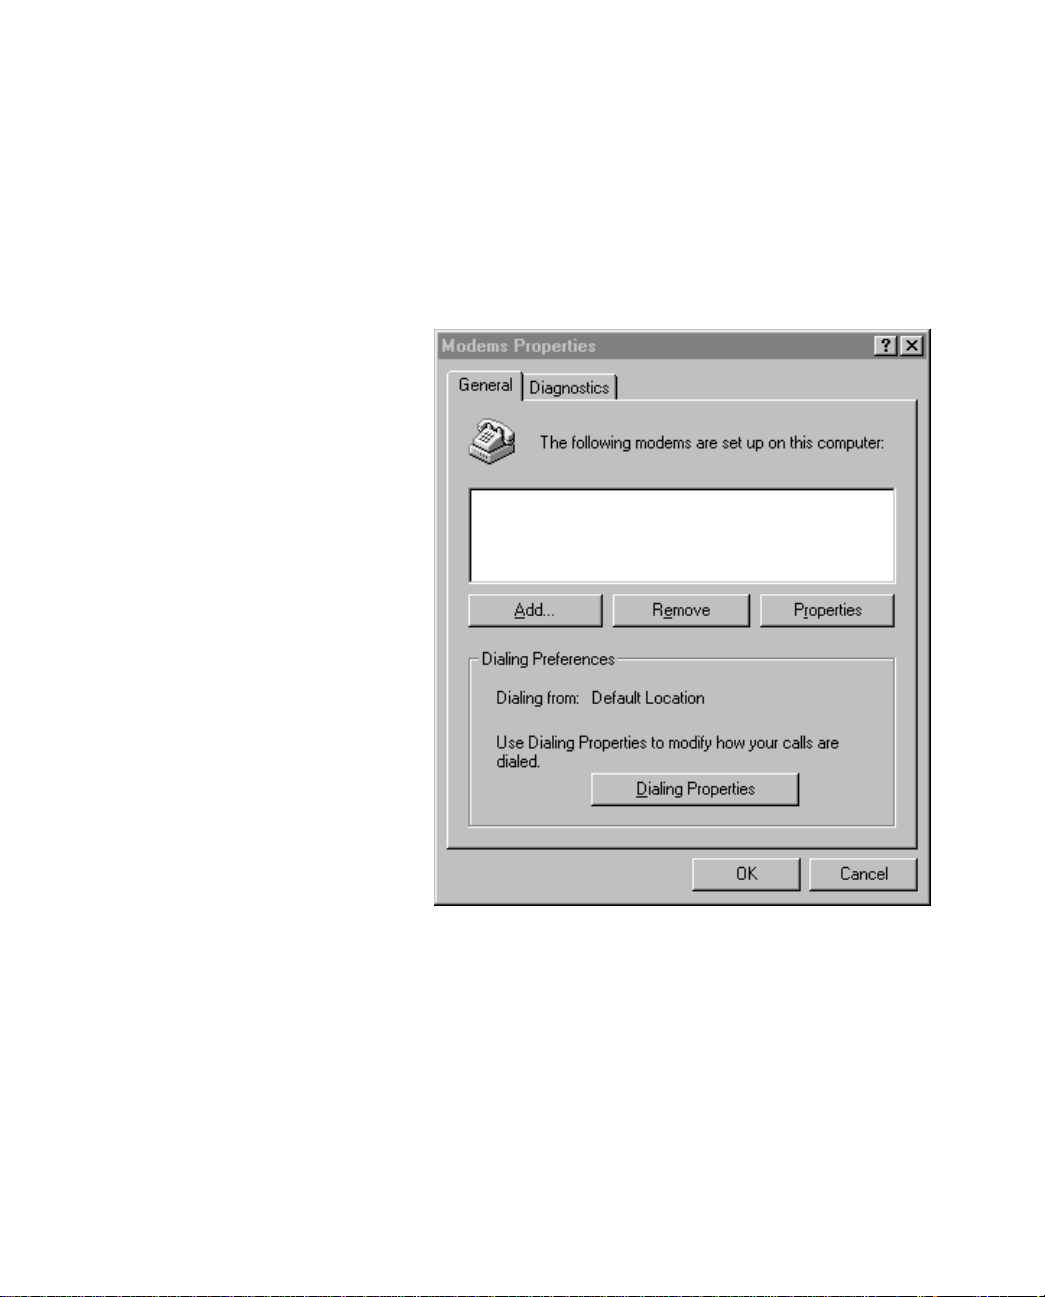
2. Double-click the Modems icon. The Modems Properties dialog
box appears.
Page 50
4-12 Netopia ISDN Modem User’s Guide
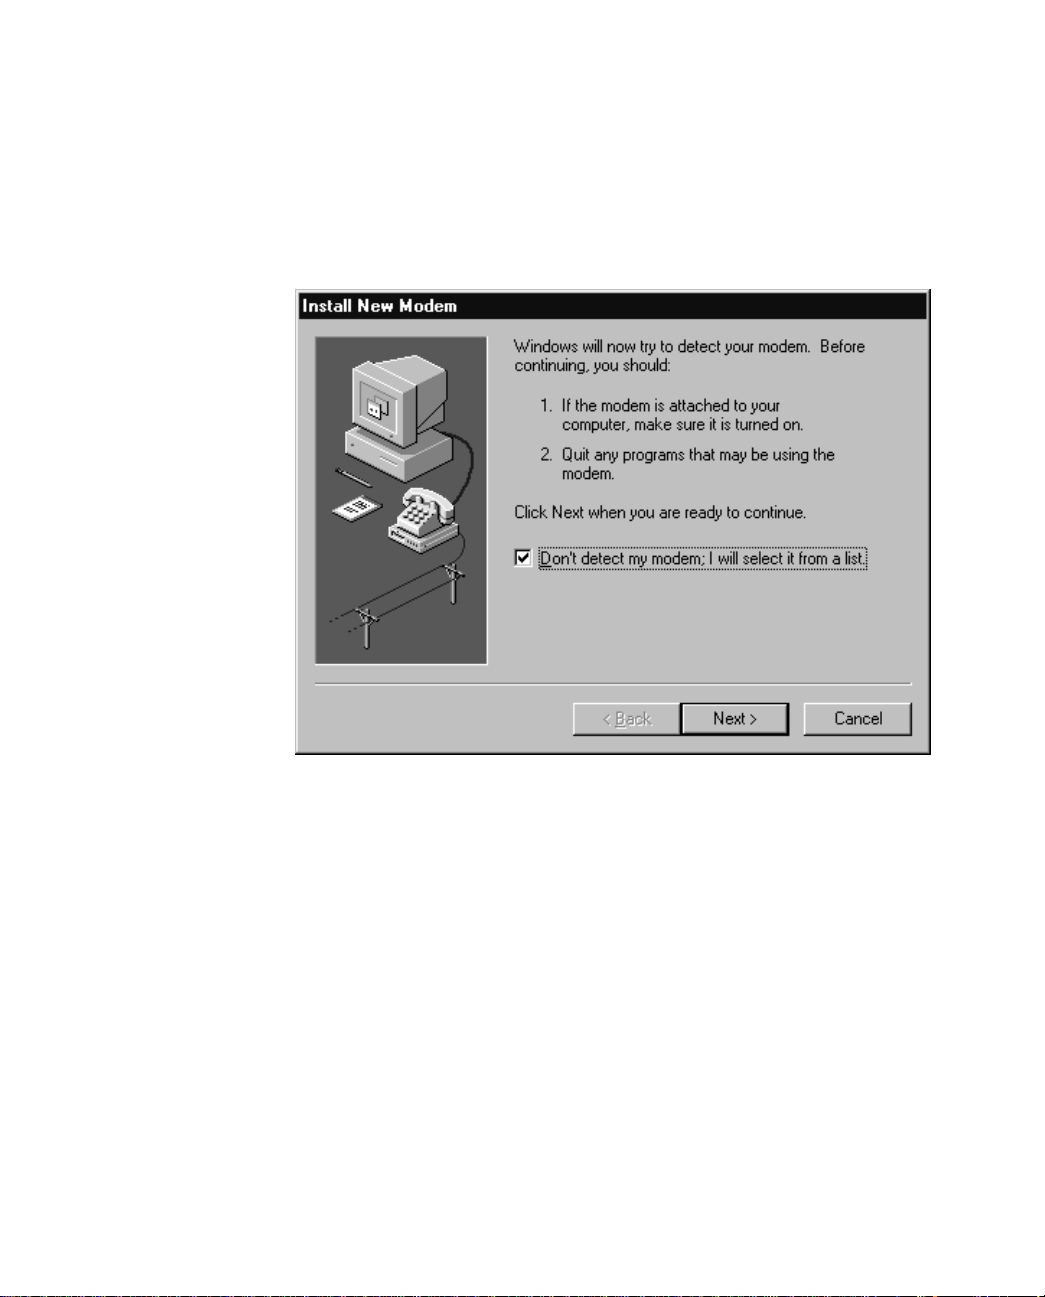
3. Click the Add button. The Install New Modem dialog box
appears.
4. Check the Don’t detect my modem… box to prevent automatic
detection of the Netopia ISDN Modem. Click Next. The dialog
box listing modem manufacturers and modem models appears.
5. Click Have Disk. The Install From Disk dialog box appears.
6. Insert the Netopia Modem Configuration Software for DOS and
Windows diskette into the floppy drive. If necessary, enter the
identifier of the drive in which you inserted the diskette. For
example, if the diskette is in drive B, enter B:\. Click OK.
7. To establish connections up to 115 Kbps, select Netopia ISDN
Modem (Autobaud). To fix connections at 230 Kbps, select
Netopia ISDN Modem (Fixed 230K). Click Next. The COM Port
dialog box appears.
Page 51
Configuration using a PC 4-13
8. Select the COM port to which the Netopia ISDN Modem is
physically connected. Click Next. A dialog box appears
indicating setup was successful. Click Finish. The Modems
Properties dialog box appears. Click Close.
This completes the Windows 95 configuration procedure.
If you are using Windows 95, go on to the “Placing calls with
Windows 95” section below for information on how to place a call.
Placing calls with Windows 95
This section describes how to set up connections to various
destinations using the Dial-Up Networking feature of Windows 95.
The Dial-Up Networking feature in Windows 95 is PPP client software
used in a range of corporate LAN-access and internet-access
applications.
Steps 1 to 8: Define the
connection
1. From the Start menu, select Programs, then Accessories, then
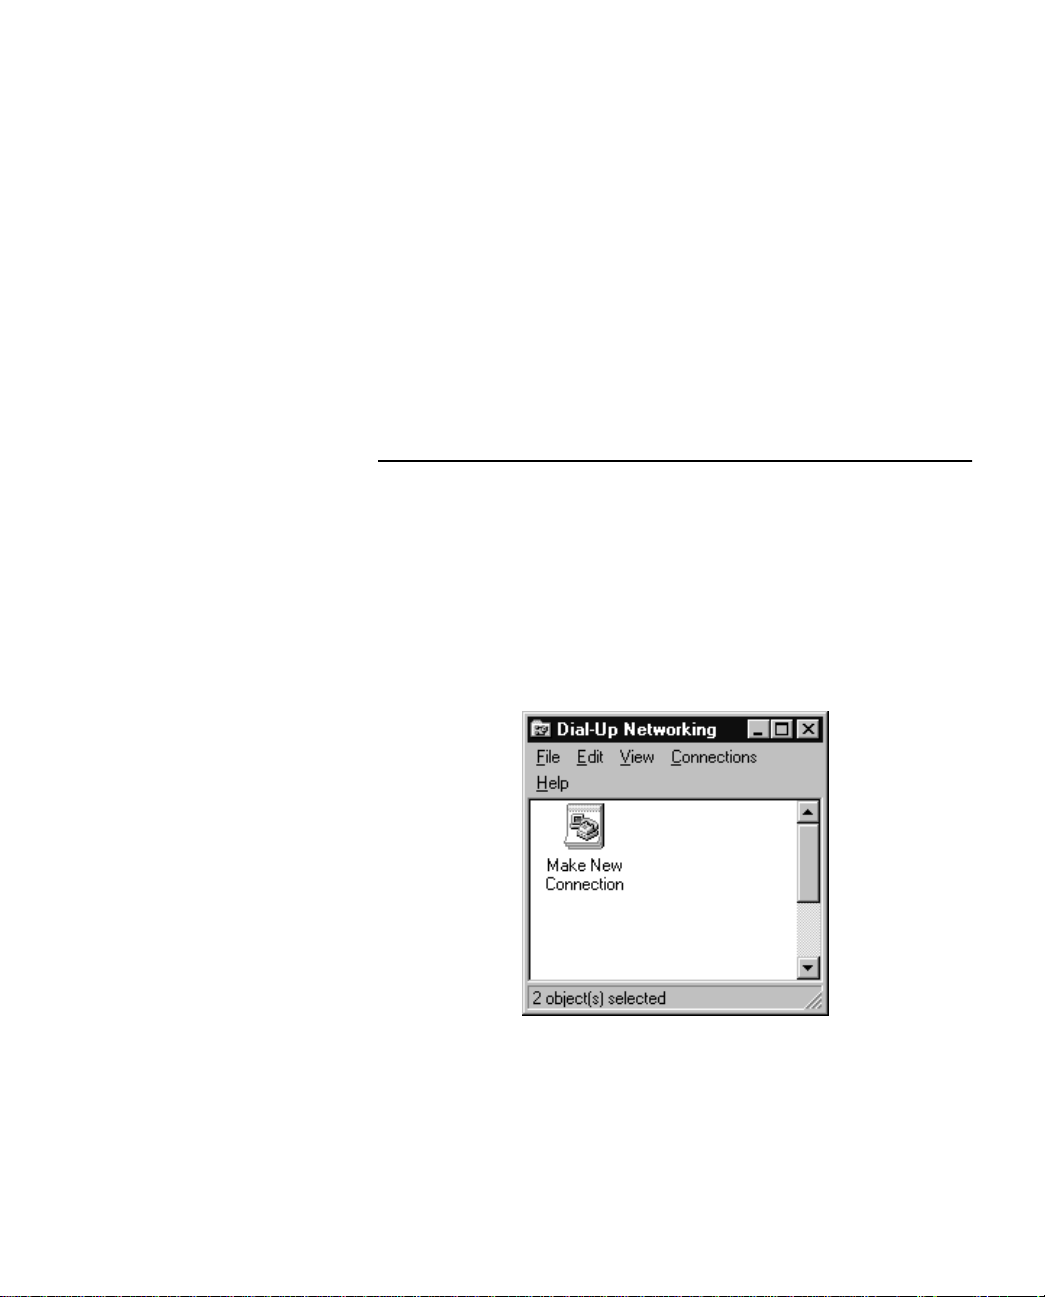
Dial Up Networking. The Dial-Up Networking dialog box appears.
2. Double-click the Make New Connection icon, and enter a name
for this connection.
Page 52
4-14 Netopia ISDN Modem User’s Guide
3. Select a Netopia ISDN Modem driver from the Select a modem
pop-up menu and click Configure. The Netopia ISDN Modem
dialog box appears.
4. Select the COM port to which the Netopia ISDN Modem is
physically connected.
5. Select the maximum COM port speed.
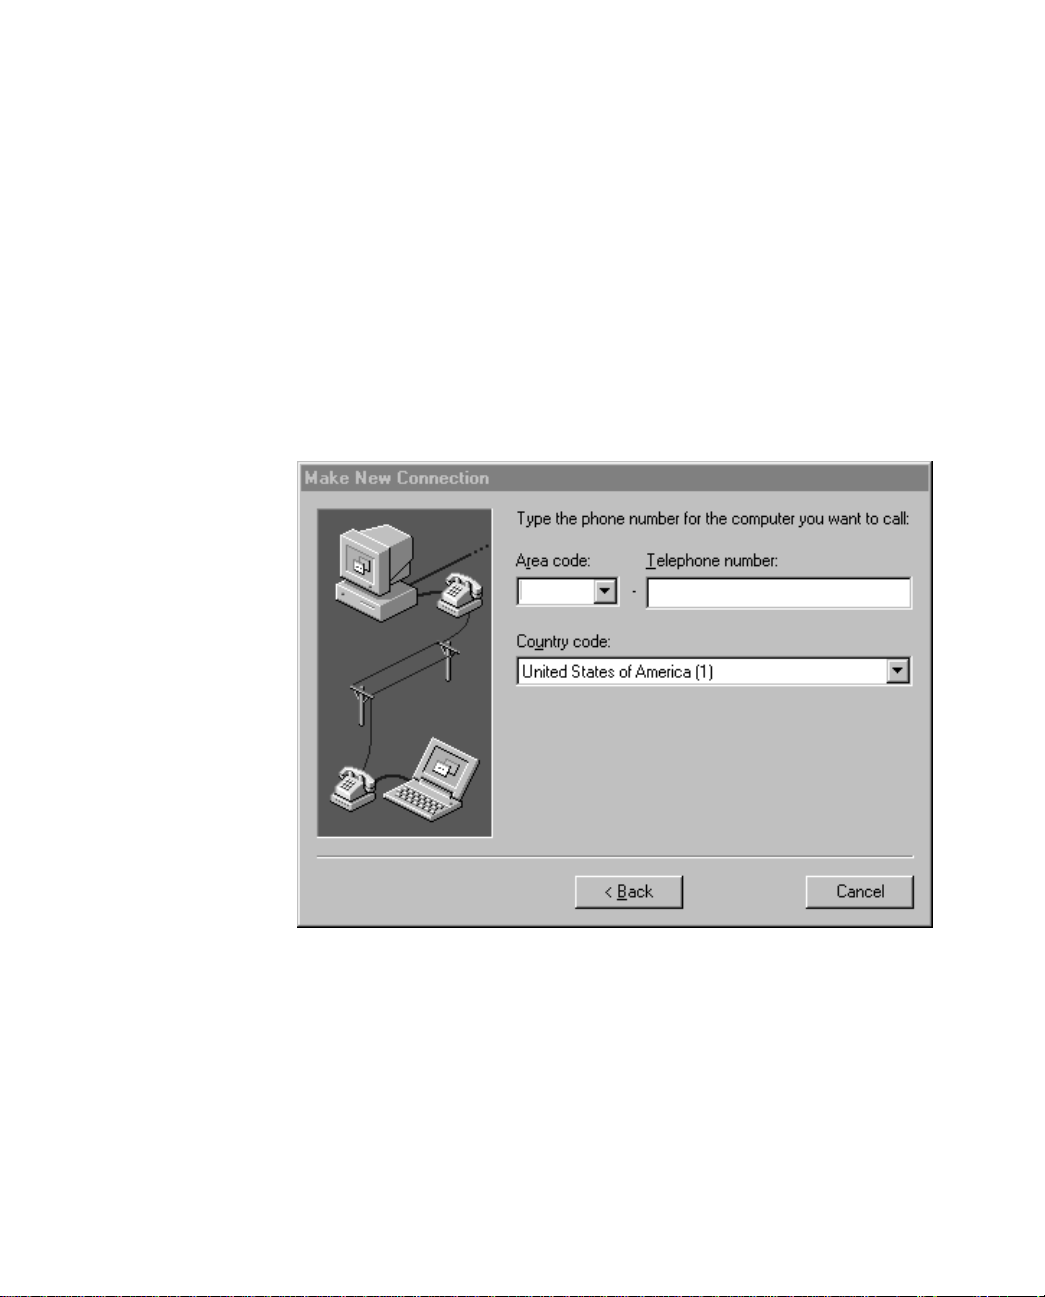
6. Click OK, then click Next. The Make New Connection dialog box
appears.
7. Enter the area code, telephone number, and country code of
the destination you want to call.
Note: Most areas require you to dial ISDN calls with 11 digits
(for example, 1-800-555-1212), even for local calls.
8. Click Next, then click Finish. A connection icon representing the
Dial-Up Networking connection you just created appears in the
Dial-Up Networking folder.
Page 53
Configuration using a PC 4-15
Steps 9 to 10:
Placing a call
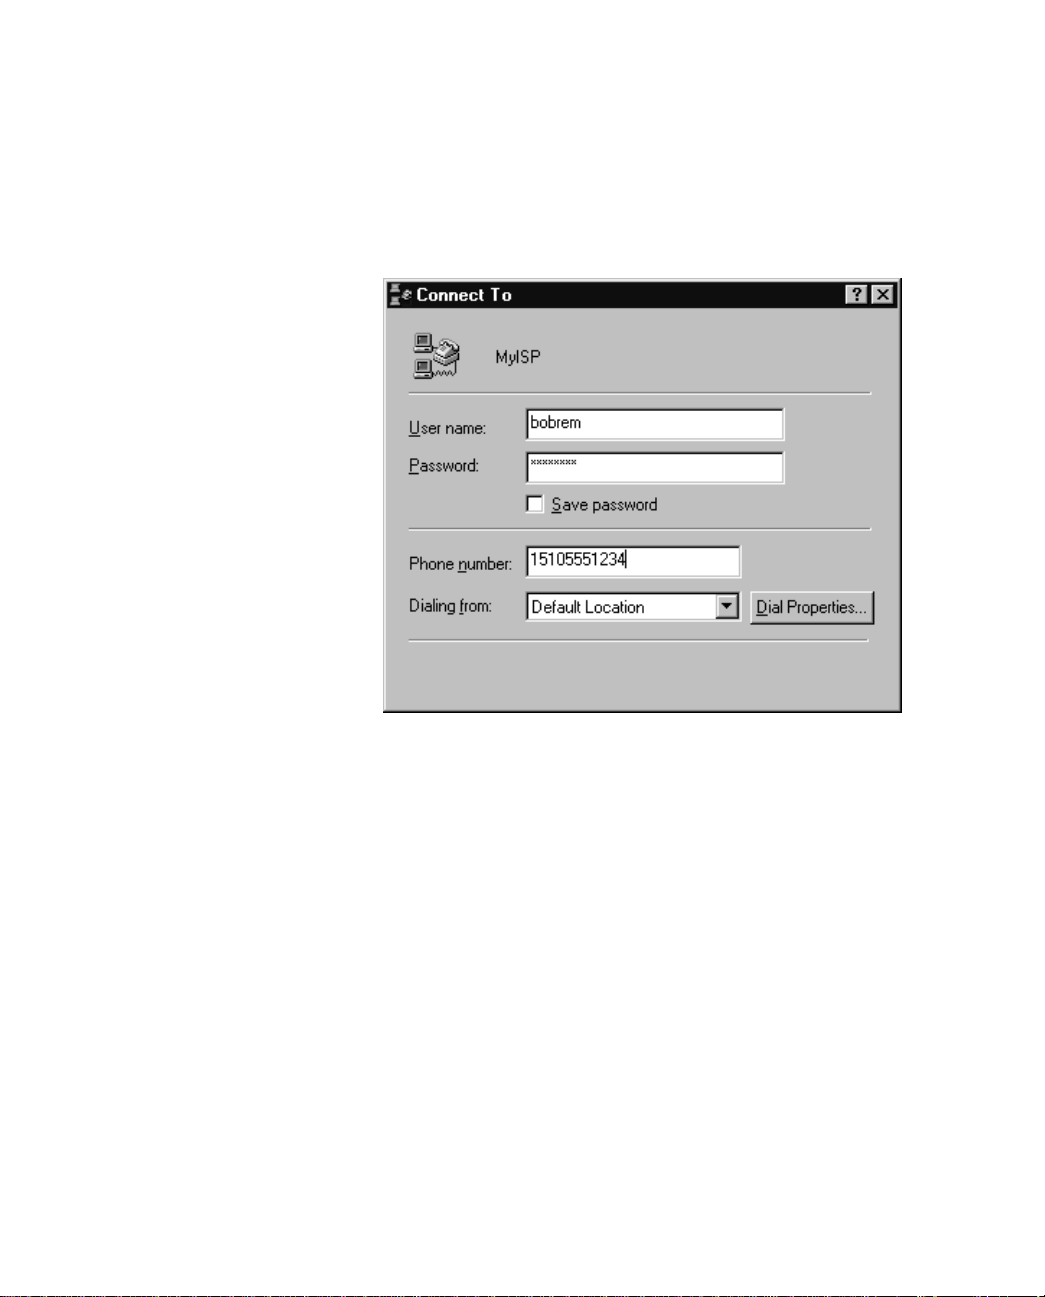
9. To place a call, double-click on a connection icon. The Connect
To dialog box appears.
10. Enter your user name and login password in the appropriate
fields, and then click Connect. (See your Windows 95 documentation for more information about making connections.)
Note: The Dial-Up Networking utility reports the speed of the first
connection only. If you enabled Multilink PPP, click on the modem
icon in the task bar to see the current connection speed.
Page 54

4-16 Netopia ISDN Modem User’s Guide
Installing the Windows NT modem driver
If you are using Windows NT, you need to install a modem driver for
your ISDN modem before you can place calls. Follow the
instructions below to install the Windows NT modem driver.
Note: The Remote Access Service (RAS) software must be installed
on your system before you install the Windows NT modem driver.
You use RAS to install the modem driver. See your Windows NT
documentation for information on installing RAS.
Installing the Windows NT modem driver
1. Start up the File Manager.
2. Locate the Windows NT MODEM.INF file in the
%SYSTEMROOT%\SYSTEM32\RAS directory.
For example, if your root directory is named WINDOWS and is
located on the C:\ drive, the Windows NT MODEM.INF file is in
the following directory:
C:\WINDOWS\SYSTEM32\RAS
3. Use the Rename command in the File menu to change the
name of the MODEM.INF file to MODEM.ORG.
4. Locate the MODEM.INF file in the directory in which you
installed the Netopia configuration files. (By default, the file is
installed in the C:\NETOPIA directory.)
5. Copy the Netopia ISDN Modem file, MODEM.INF, from the Netopia directory to the same directory as the MODEM.ORG file.
(You are replacing the Windows NT MODEM.INF file with the
Netopia MODEM.INF file.)
6. Open the Main folder in the Program Manager and double-click
the Control Panel icon. The Control Panel folder opens.
Page 55
Configuration using a PC 4-17
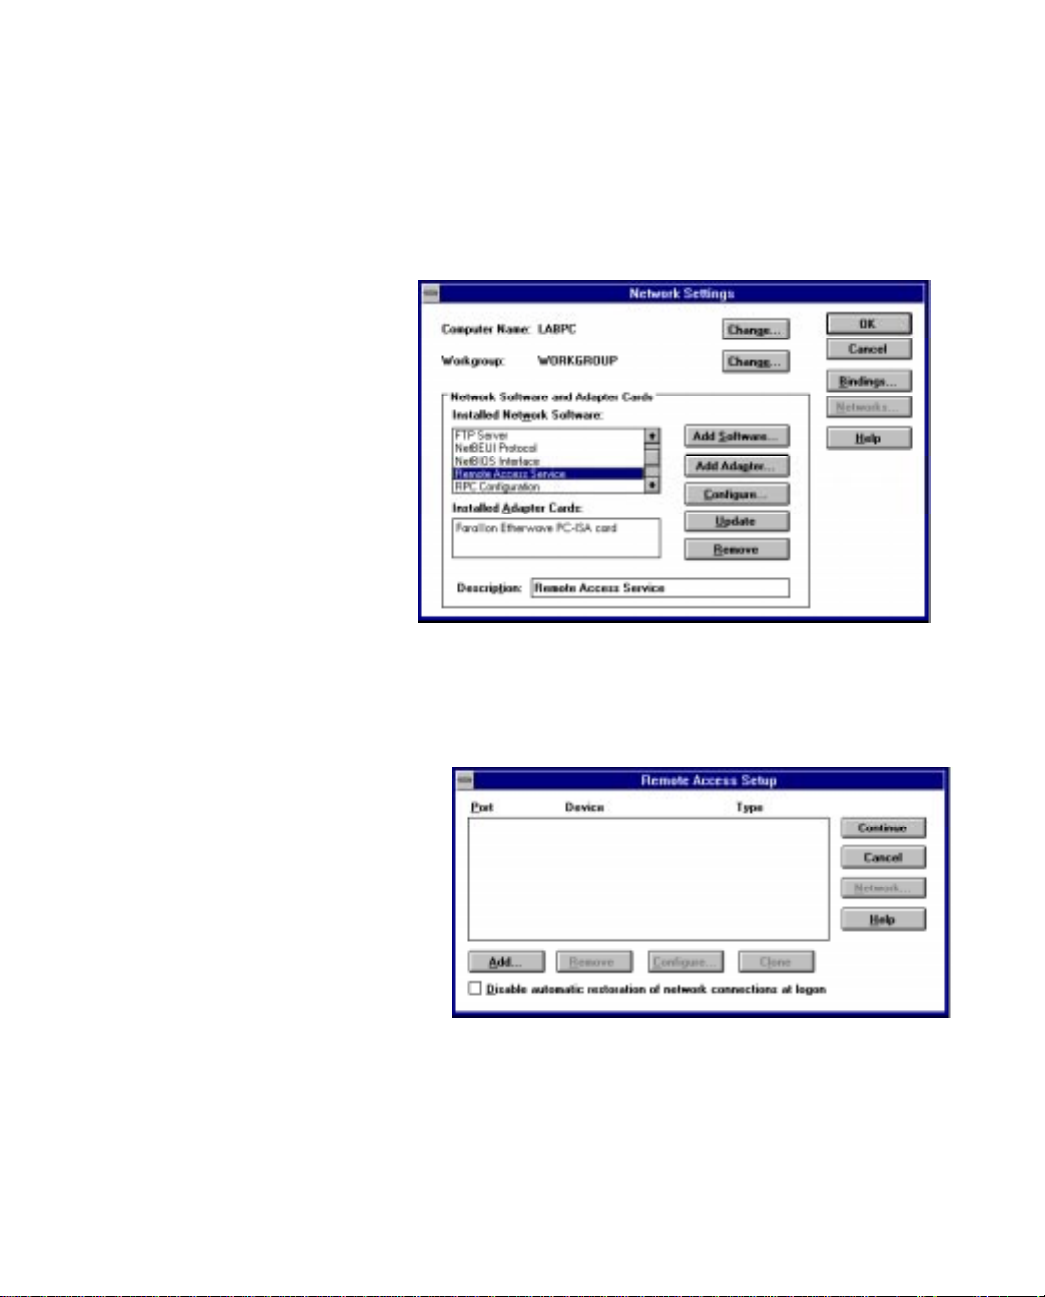
7. Double-click the Network icon. The Network Settings dialog box
appears.
8. Select Remote Access Service from the Installed Network Software list box.
9. Click the Configure button. The Remote Access Setup dialog
box appears.
10. If a modem is already configured and appears in the dialog box,
select the modem in the dialog box and click the Remove button. If no modem appears in the dialog, go to the next step.
11. Click the Add button. The Add Port dialog box appears.
Page 56

4-18 Netopia ISDN Modem User’s Guide
12. Select the COM port to which the ISDN modem is connected
from the Port pop-up menu and then click OK. The Remote
Access Setup message box appears.
13. Click Cancel to cancel automatic modem detection. The Configure Port dialog box appears.
14. Select Netopia ISDN Modem (Autobaud) for baud rates up to
115 Kbps; select Netopia ISDN Modem (230K) to fix the connection at 230 Kbps.
15. Select Dial out and Receive calls for the Port Usage. Click OK.
The Remote Access Setup dialog box appears.
16. Click Continue.
17. Click OK to exit from the Network Settings dialog box. The Network Settings Change alert dialog box appears.
18. Click the Restart Now button to restart Windows NT.
Once your system restarts, you are ready to start using your
Netopia ISDN Modem. See the section below for information.
Placing calls with Windows NT
If you are using Windows NT, after you configure your Netopia ISDN
Modem and install the Windows NT modem driver, you can use your
communications software to establish an ISDN connection. Y ou can
use any standard communications application that recognizes AT
commands.
Note: Most areas require you to dial ISDN calls with 11 digits (for
example, 1-800-555-1212), even for local calls.
Note that you must use Multilink PPP to make calls using two ISDN
B channels. For information, see the “Using Multilink PPP” section
on page 6-4.
Page 57
Configuration using a PC 4-19
Windows configuration options
Y ou can use the Netopia Windows configuration program to test your
ISDN switching connection, save and load modem settings, and
download new firmware to your ISDN modem. You can use the
Windows configuration software with Windows, Windows 95, and
Windows NT.
Testing the ISDN switching connection
You can use the diagnostic mode to test your ISDN switching
connection to the telephone company. Typically, you will only need to
do this to troubleshoot communications problems.
For descriptions of the information reported on screen while in
diagnostic mode, see Appendix B, “ISDN Events.”
To use the diagnostic mode:
1. Start up the Netopia Windows configuration program.
2. Click the T ools button in the Netopia ISDN Modem window. The
toolbar appears.
Page 58
4-20 Netopia ISDN Modem User’s Guide
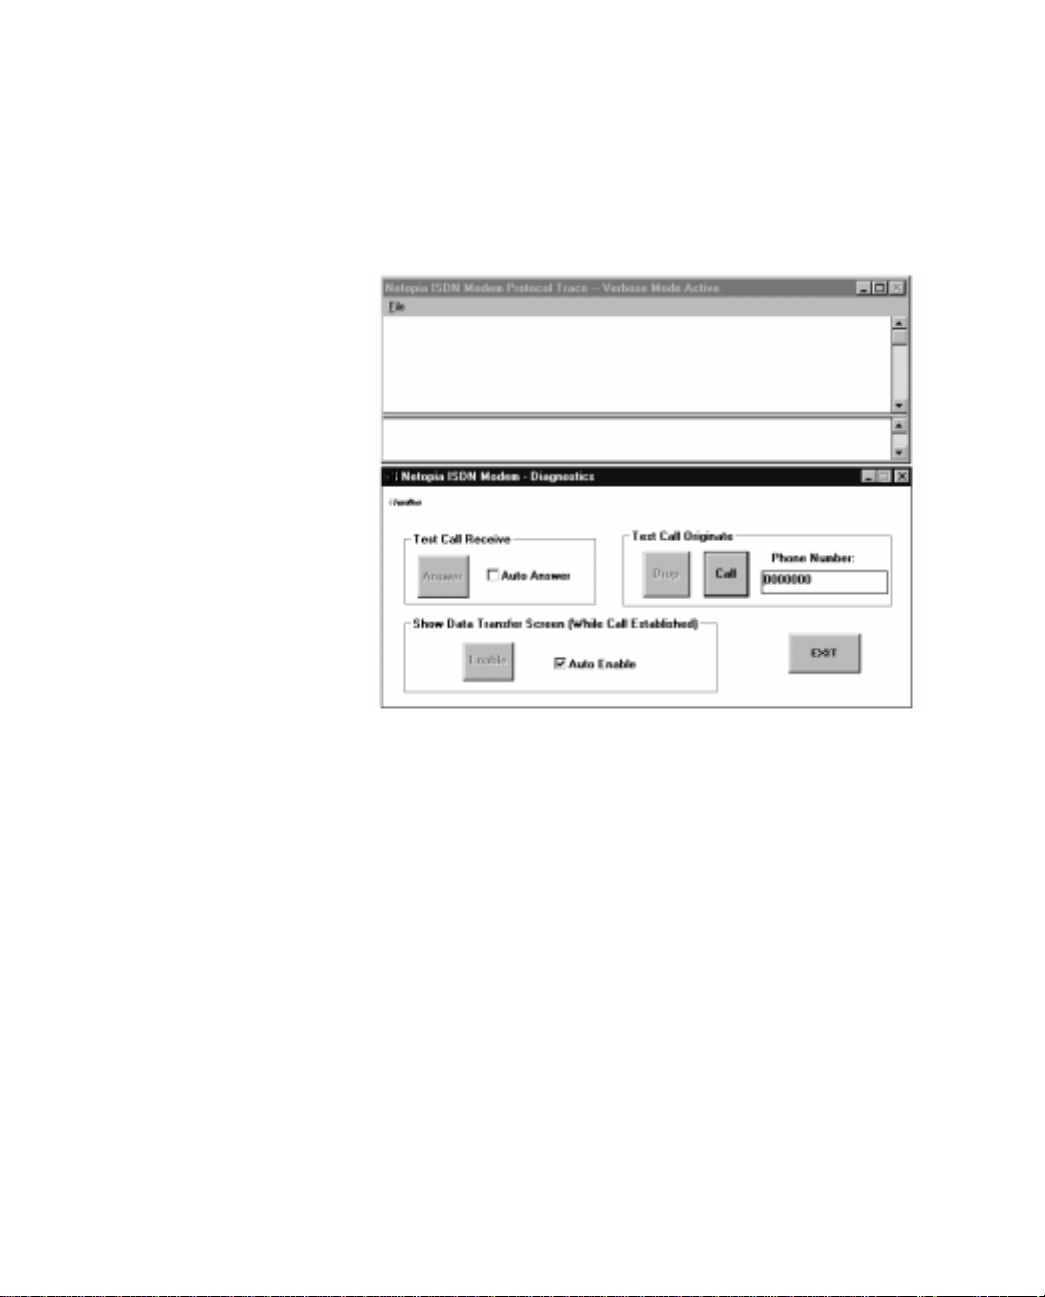
3. Click the Tests button. The Modem Protocol Trace and Diagnostics windows appear.
4. Enter a phone number in the Phone Number field. (Make sure
you enter the number associated with an ISDN line.)
5. Click the Call button. The diagnostic program traces the
progress of the call from the ISDN modem to the destination
and reports information about the call in the Modem Protocol
Trace window.
6. Click the Exit button to exit from the diagnostic mode.
Page 59
Configuration using a PC 4-21
Saving modem settings
You can save the current modem settings to a configuration file.
This allows you to save different configurations and then quickly
load the settings from the configuration file and configure the
modem in a particular way. The configuration file contains all the
configuration parameters currently set in the Netopia ISDN Modem.
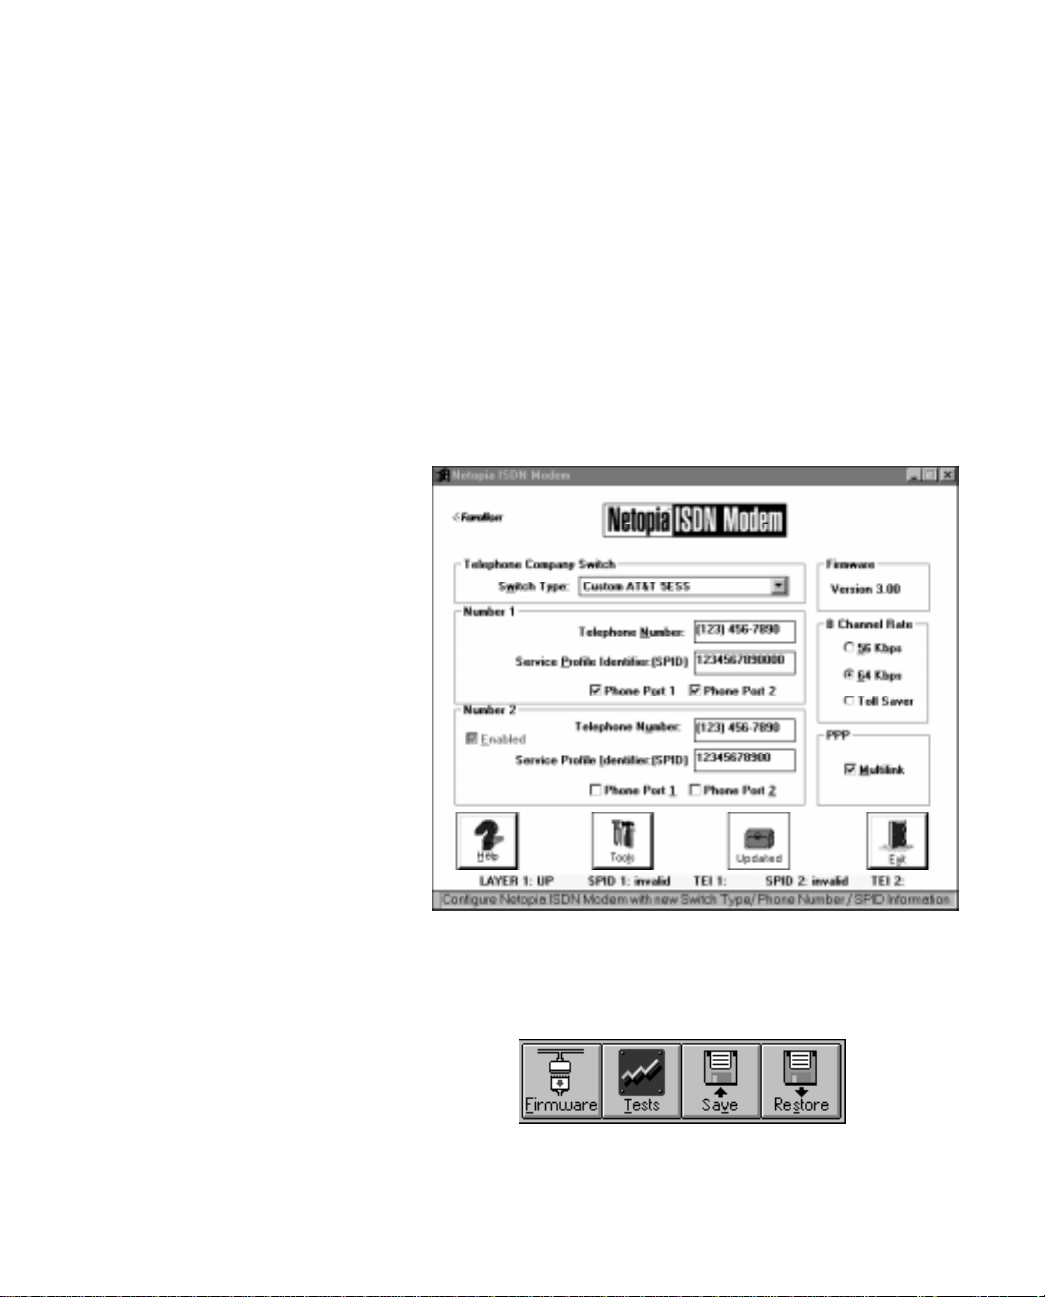
When you start up the Netopia Windows configuration program, the
ISDN modem’s current settings appear in the Netopia ISDN Modem
window.
To save a configuration file:
1. Click the T ools button on the Netopia ISDN Modem window . The
toolbar appears.
Page 60
4-22 Netopia ISDN Modem User’s Guide
2. Click the Save button on the toolbar. The dialog box used to
save files appears.
3. Use the dialog box to save the file under the name and in the
location you want. Make sure you use the .cfg extension for the
filename.
Loading modem settings
You can load settings you’ve previously saved in a configuration file
and then use the settings to configure the modem.
To load modem settings:
1. Click the T ools button on the Netopia ISDN Modem window . The
toolbar appears.
2. Click the Restore button on the toolbar. The dialog box used to
open documents appears.
3. Use the dialog box to locate and open the configuration file you
want. A dialog box appears and asks if you want to overwrite
the current modem configuration displayed on screen.
4. Click the Yes button to continue. Another dialog box appears
and asks if you want to configure the modem with the restored
settings.
5. Click the Yes button to proceed. The program sends the settings to the modem.
Downloading firmware
For information about downloading new firmware to your ISDN
modem, see the “Downloading firmware to your ISDN modem”
section on page 7-8.
Page 61
Configuration using DOS
This section describes how to configure the Netopia ISDN Modem
using DOS.
Configuration using a PC 4-23
Steps 1 to 3:
Installing the software
Steps 4 and 5:
Selecting the COM port
1. Create a directory on the hard drive. For example, to create a
directory named netopia on your C drive, at the C:\ prompt
type:
md c:\netopia
2. Insert the Netopia ISDN Modem Configuration Software for DOS
and Windows diskette into the PC’s floppy drive, and copy all
the files from the diskette to the new DOS directory you just
created. To copy all files from the diskette to the directory,
\netopia, at the A:\ prompt type:
copy a:*.* c:\netopia
3. Change to the directory containing the copied files and type:
install
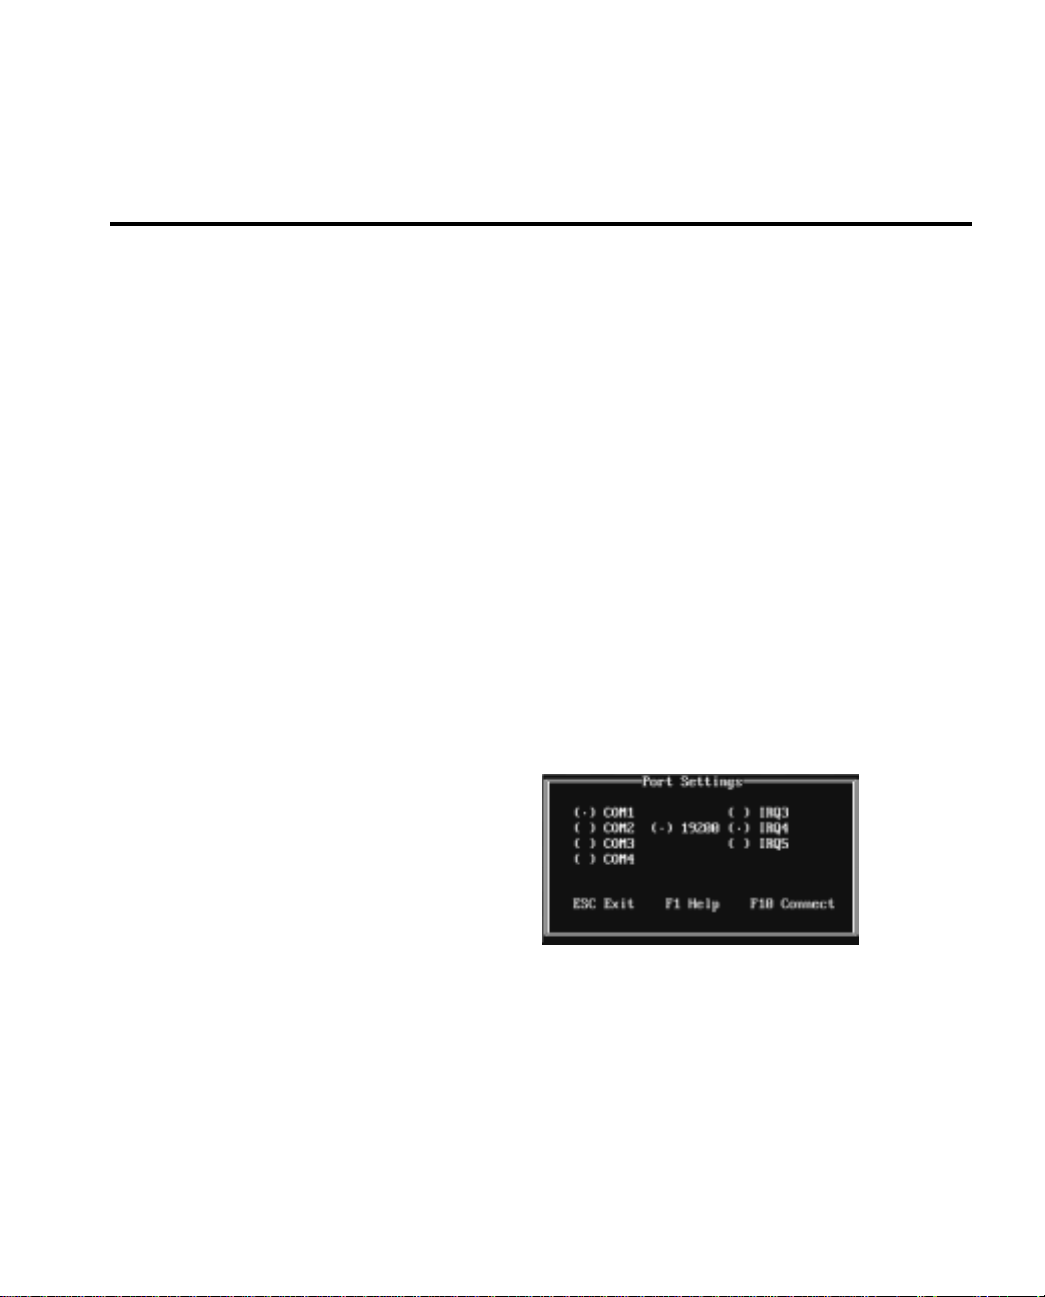
The configuration program launches and presents the Port
Settings screen. Use the Up Arrow and Down Arrow keys to
move the cursor. Use the space bar to select a parameter.
4. Select the ISDN modem’s COM port. When you select the port,
the standard interrupt (IRQ) associated with that port is
automatically chosen.
Note: The data rate displayed on screen is the speed of
communication between the computer and the Netopia ISDN
Modem.
Page 62
4-24 Netopia ISDN Modem User’s Guide
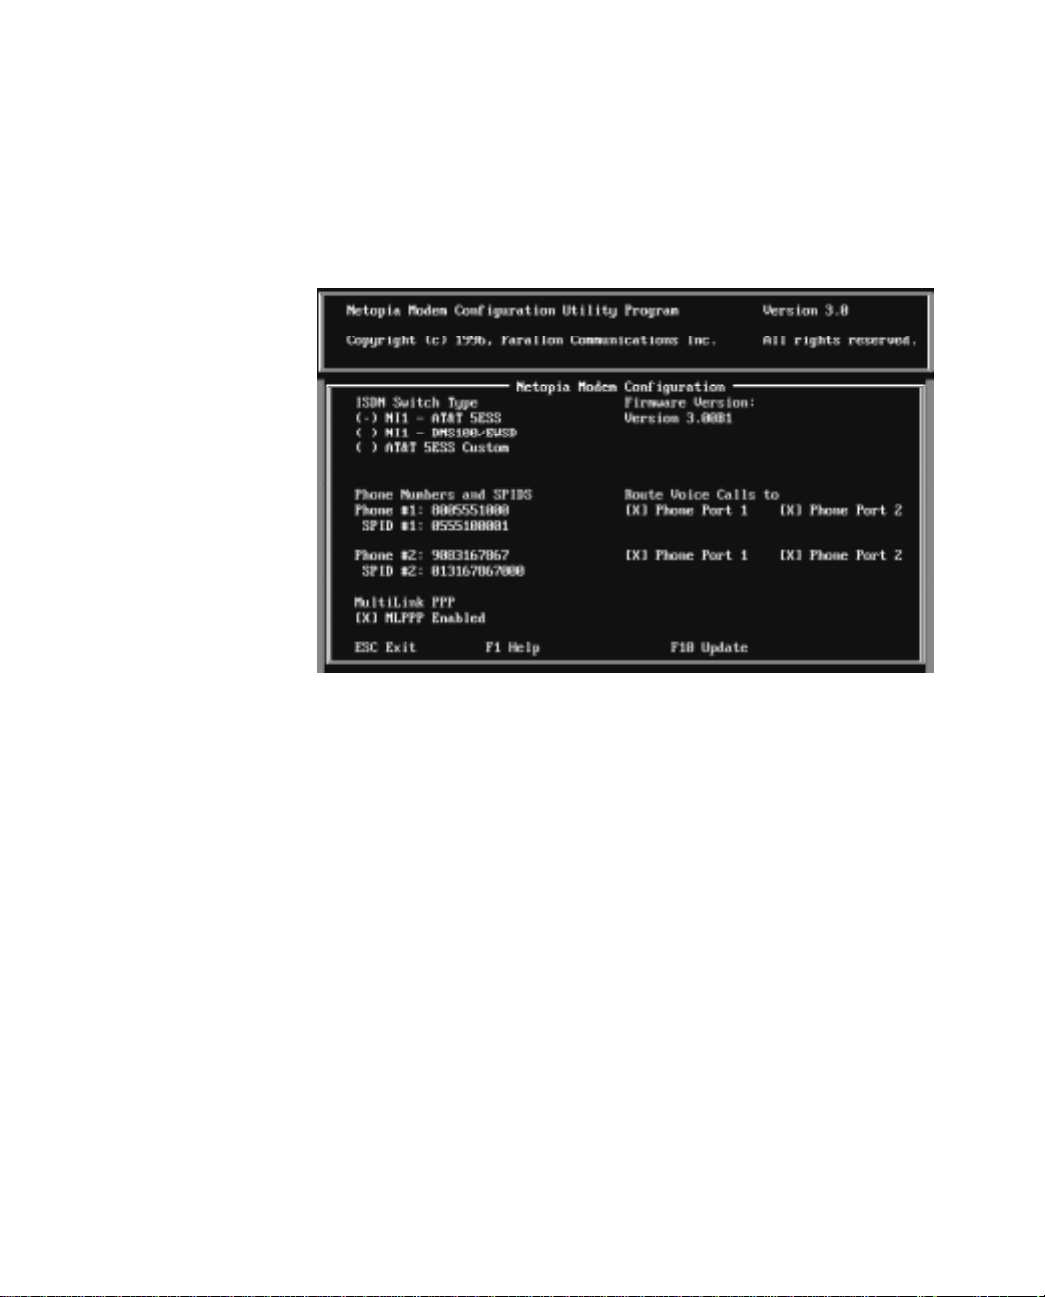
5. Press F10 to connect to the Netopia ISDN Modem via the
chosen COM port. The configuration screen appears.
Step 6:
Selecting the switch type
Steps 7 to 9:
Configuring Phone #1
6. Move the cursor to the ISDN switch type used by your telephone
company and press the space bar to select it. You should have
received the ISDN switch type from your telephone company.
7. Move the cursor to the Phone #1 field and enter the first
telephone (or “directory”) number of the ISDN line to which your
Netopia ISDN Modem is connected.
8. Move the cursor to the SPID #1 field and enter the
corresponding Service Profile Identifier (SPID) for the telephone
number you entered in the previous step. Y ou should have also
received this SPID from your telephone company.
The Route Voice Calls option lets you route calls to analog
telephone devices connected to the analog device ports. By
default, calls to both ISDN telephone numbers ring the devices
connected to both ports simultaneously. If you have more than
one telephone number, you can route calls from the two
numbers to Phone Port 1 or Phone Port 2.
Page 63

Configuration using a PC 4-25
9. Move the cursor to the port you want to select (Phone Port 1 or
Phone Port 2, next to the Phone #1 field) and press the space
bar to toggle the check mark on and off. If a check mark
appears next to a phone port, calls on telephone number 1 will
be routed to that port. For more information about call routing,
see the “Call routing to the analog device ports” section on
page 6-13.
Steps 10 to 12:
Configuring Phone #2
Step 13:
Enabling Multilink PPP
Steps 14 to 16:
Completing the
Configuration
10. If you have a second telephone number associated with your
ISDN telephone line (some telephone companies require two),
move the cursor to the Phone #2 field and enter the number.
11. If you entered a number for Phone #2, move the cursor to the
SPID #2 field and enter the corresponding SPID for the second
telephone number. You should have also received this SPID
from your telephone company.
12. If you entered a number for Phone #2, you can also choose to
route calls on the second telephone number. Move the cursor
to Phone Port 1 or Phone Port 2 (next to the Phone #2 field)
and press the space bar to toggle the check mark on and off. If
a check mark appears next to a phone port, calls on telephone
number 2 will be routed to that port.
13. Move the cursor to MLPPP Enabled to turn Multilink PPP on and
off. Press the space bar to toggle the check mark beside this
option on and off. When this option is checked, Multilink PPP is
on. For more information about Multilink PPP, see the “Using
Multilink PPP” section on page 6-4.
14. Confirm that the parameters listed in steps 6 through 13 are
correct.
15. Press F10 to update the information to the Netopia ISDN
Modem.
16. Press Escape to return to the main menu. Once in the main
menu, choose the Exit command to exit from the program.
If the parameters match those of the telephone company’s ISDN
switch, the D channel LED lights for a few minutes, flashes for
several seconds, and then turns off. If the LED continues to flash or
remains lit, see Chapter 7, “Troubleshooting.”
Page 64

4-26 Netopia ISDN Modem User’s Guide
Placing calls with DOS
If the D channel LED indicates a proper connection to the ISDN
switch, you can place your first call. You can use any standard
communications application that recognizes AT commands.
Note: Most areas require you to dial ISDN calls with 11 digits (for
example, 1-800-555-1212), even for local calls.
Note that you must use Multilink PPP to make calls using two ISDN
B channels. For information, see the “Using Multilink PPP” section
on page 6-4.
Page 65

Chapter 5
Configuration using a Macintosh computer
This chapter explains how to configure your Netopia ISDN Modem to
work with Macintosh computers.
Topics covered in this chapter include:
■ How to configure your Netopia ISDN Modem to work with a
Macintosh computer
■ How to place calls with a Macintosh computer
5-1
Page 66
5-2 Netopia ISDN Modem User’s Guide
Configuration using a Macintosh computer
To configure the Netopia ISDN Modem for a Macintosh computer:
Steps 1 to 2:
Installing the software
Steps 3 to 6:
Selecting the serial port
options
1. Create a folder on your hard disk for the Netopia files and
assign a name to the folder (for example, “Netopia ISDN
Modem”).
2. Insert the Netopia ISDN Modem Configuration Software for
Macintosh diskette into the diskette drive and copy the files by
selecting them and dragging them to the folder you created.
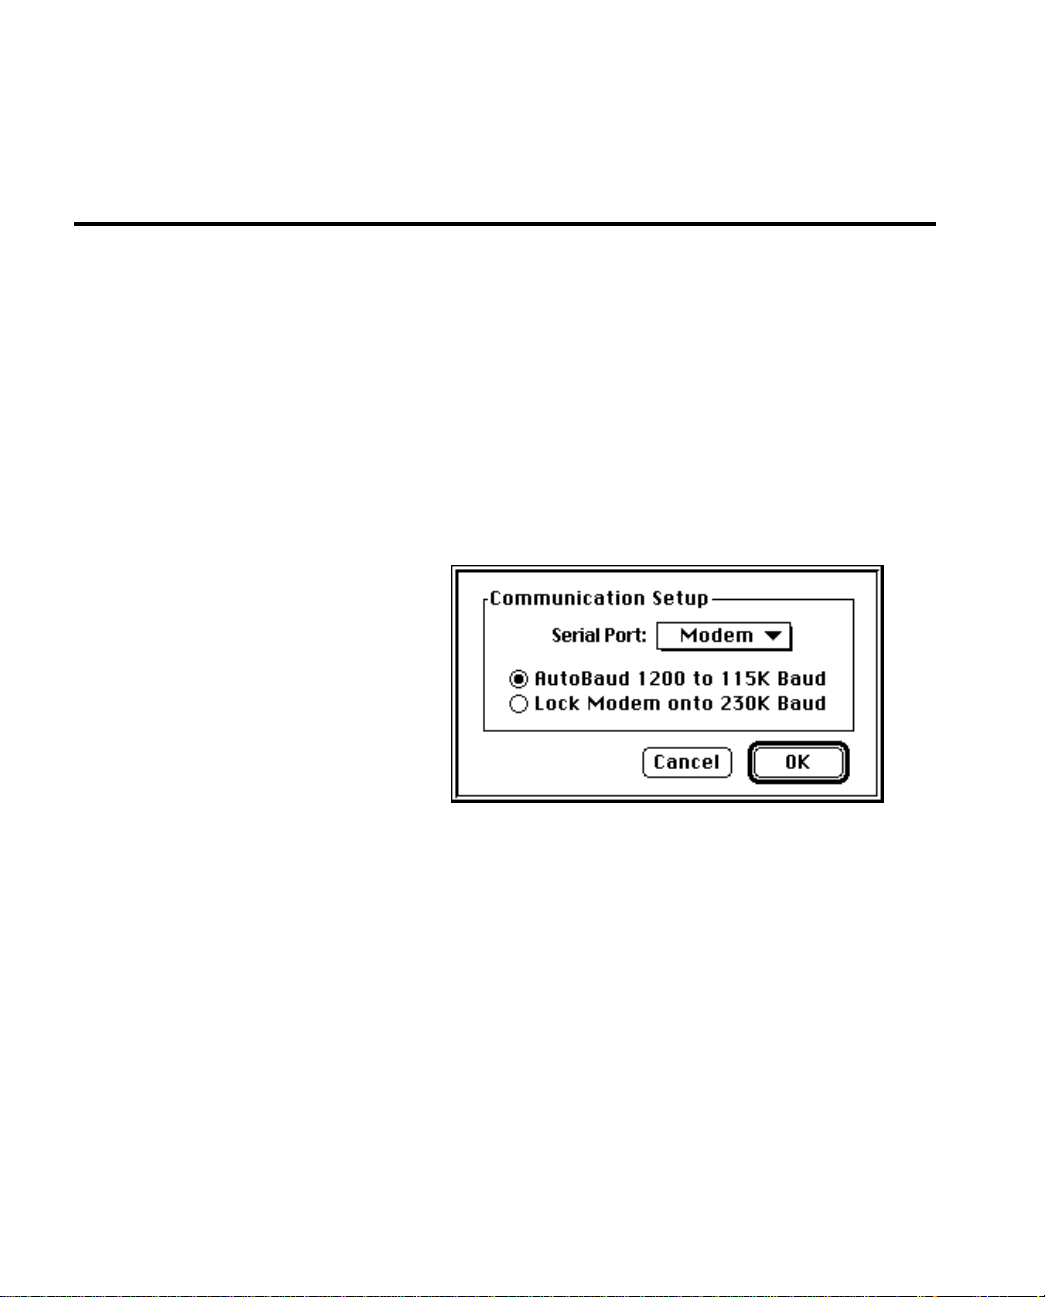
3. Open the Netopia ISDN Modem folder and double-click the
ISDN Setup icon. The Communication Setup dialog box
appears.
4. From the Serial Port pop-up menu, choose the serial port to
which the Netopia ISDN Modem is connected. If you want to
use an alternate serial port device, such as the Port Juggler
from Momentum, be sure to set the port according to the
device manufacturer’s instructions.
Note: Other devices, such as serial expansion cards, may not
work properly with the ISDN Setup application if the devices
require use of the Serial Port Manager or the Comm Toolbox. To
configure the Netopia ISDN Modem using the ISDN Setup
application, attach the ISDN modem directly to the printer or
modem port. You may still be able to use the alternate serial
devices with the ISDN modem and your application software.
Page 67

Configuration using a Macintosh computer 5-3
5. Click the button beside the baud option you want. Select Autobaud 1200 to 115K Baud to allow the software to automatically
determine the maximum communication speed your computer
supports; select Lock Modem onto 230K Baud to communicate
at 230K. If you select the 230K option and your Macintosh
computer does not support 230K communication, a message
will appear to inform you of this and tell you the port will be set
at 57600 Baud.
6. Click OK to continue, or click Cancel to quit the ISDN Setup
application.
Steps 7 to 9:
Running ISDN Assistant
You can use ISDN Assistant to configure your ISDN modem. ISDN
Assistant is a program that detects the switch type and configures
the SPID(s). ISDN Assistant starts up automatically the first time
you configure your ISDN modem or after you make a change to the
configuration parameters, for example, if you connect the ISDN
modem to a different ISDN line.
You will need the ISDN telephone numbers from the configuration
parameters you entered on your ISDN worksheet. For information,
see the “Use your ISDN worksheet” section on page 2-8.
7. Click Next to run ISDN Assistant. Click Cancel if you don’t want
to run ISDN Assistant.
If you click Cancel, a message appears to inform you the ISDN
modem was not configured. Click Done to continue. To
configure the ISDN modem yourself, see the “The ISDN Setup
application” section on page 5-5.
If you click Next (to run ISDN Assistant), ISDN Assistant
displays a status message as the program attempts to
configure your switch type.
Page 68
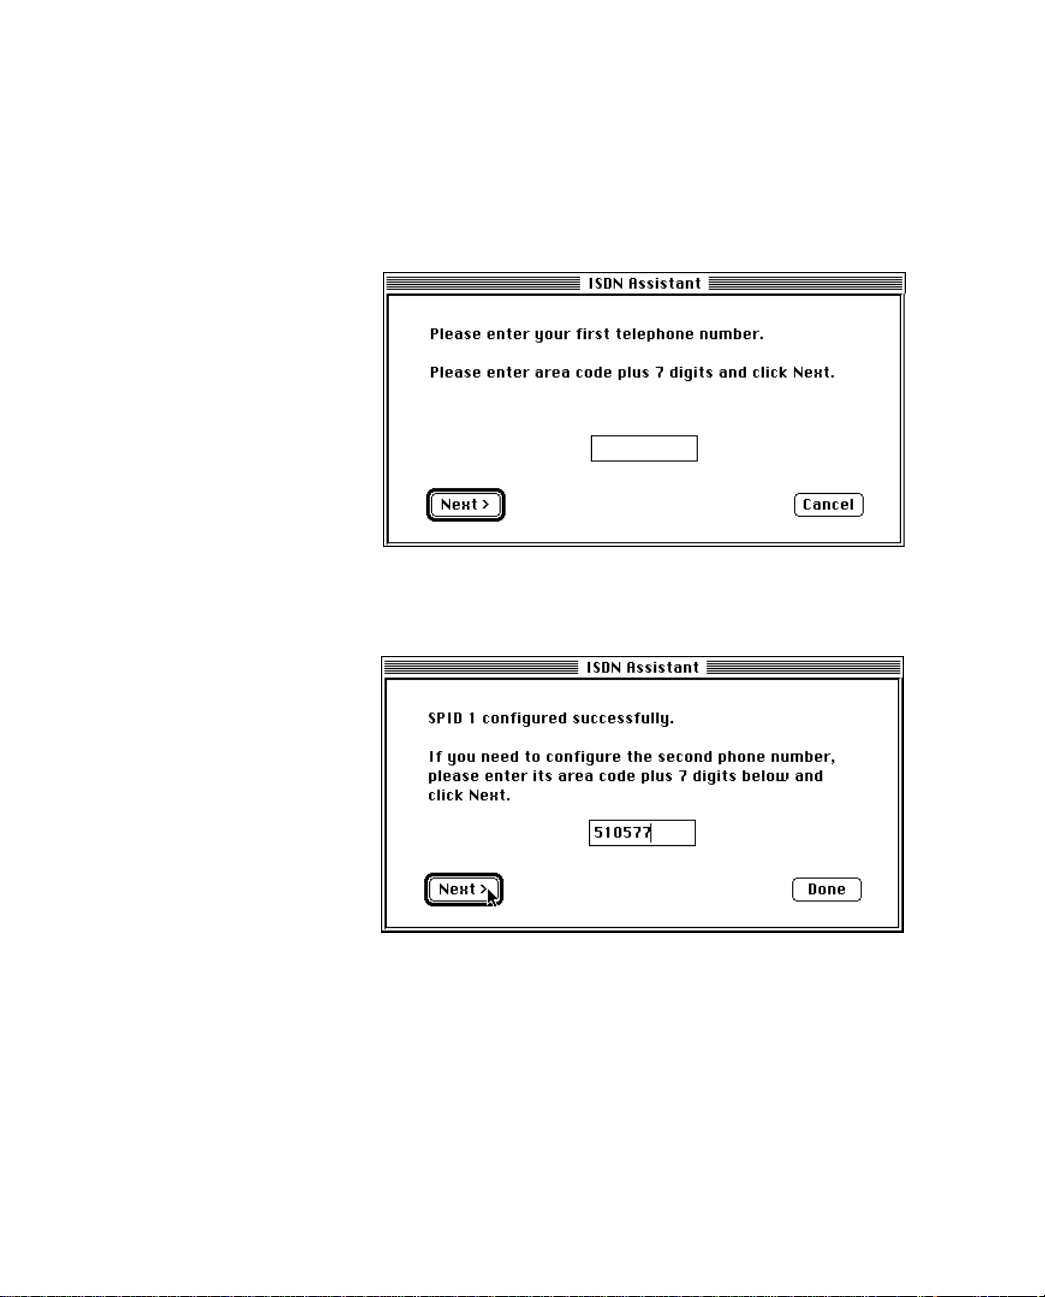
5-4 Netopia ISDN Modem User’s Guide
After the switch type is configured, the dialog box for the first
telephone number appears.
8. Enter the first telephone number for your ISDN line. Click OK.
After the SPID for the first telephone number is configured, the
dialog box for the second telephone number appears.
9. If you have a second telephone number for your ISDN line, enter
it, and then click Next. If you do not have a second telephone
number for your ISDN line, leave the field blank, and then click
Done. An Untitled document appears. See the next section.
Page 69
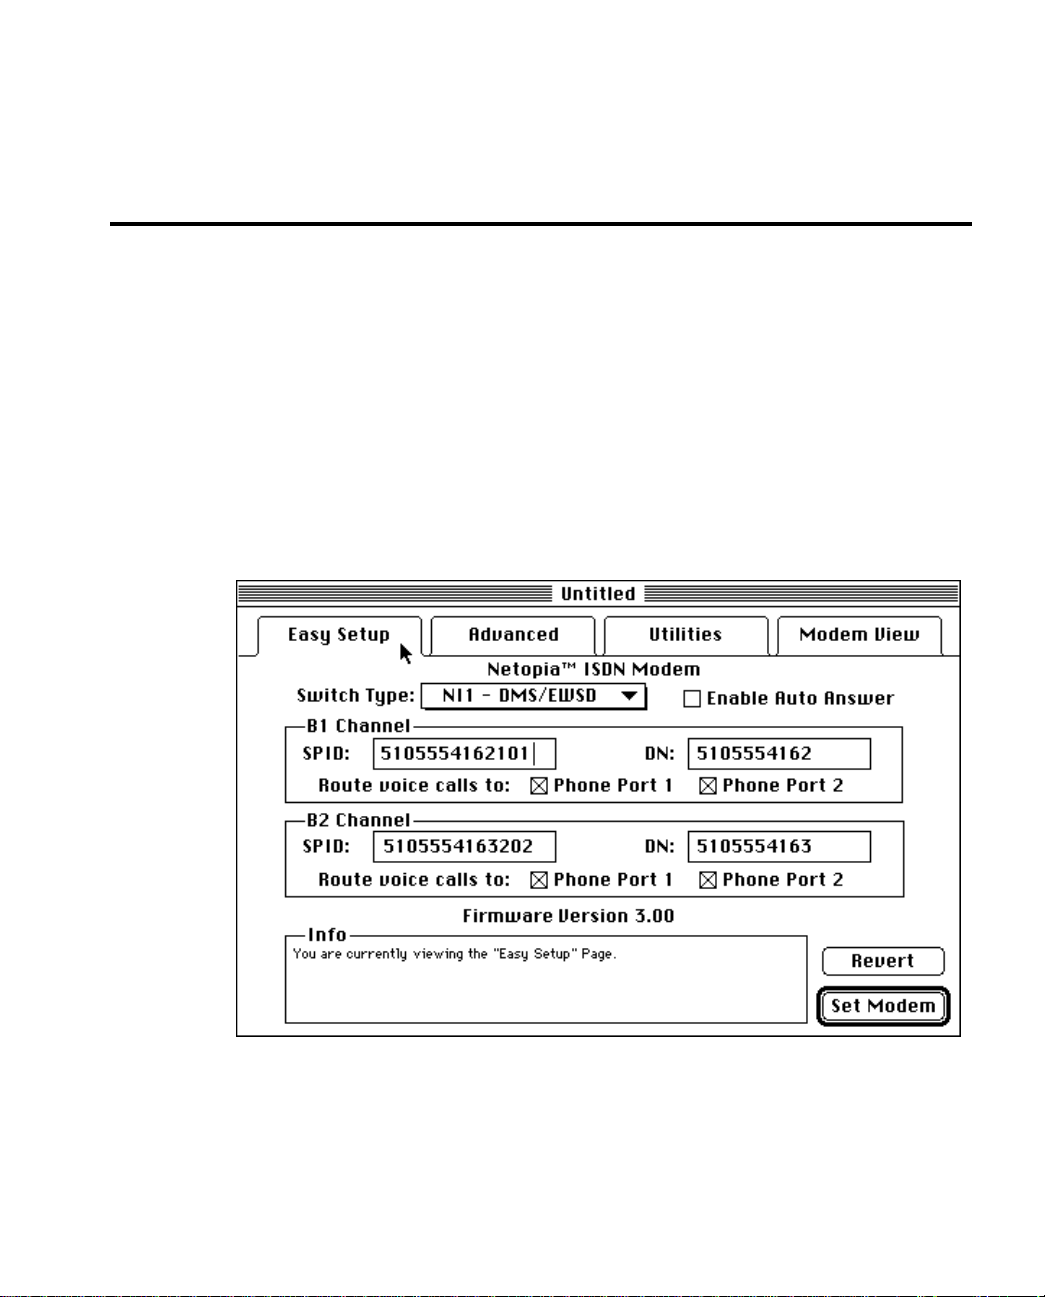
The ISDN Setup application
The ISDN Setup application has four configuration windows: Easy
Setup, Advanced, Utilities, and Modem View. Each window has its
own labeled tab. To access a configuration window, click on its tab.
The Easy Setup window is always on top when you first open the
ISDN Setup application. In most cases, you’ll only need to use the
Easy Setup window to configure your Netopia ISDN Modem.
The Info area at the bottom of each window displays
context-sensitive help about the control (tab, pop-up menu, data
entry field, and so on) you point to with the mouse pointer.
The ISDN Setup application windows are described in the following
four sections.
Configuration using a Macintosh computer 5-5
Page 70
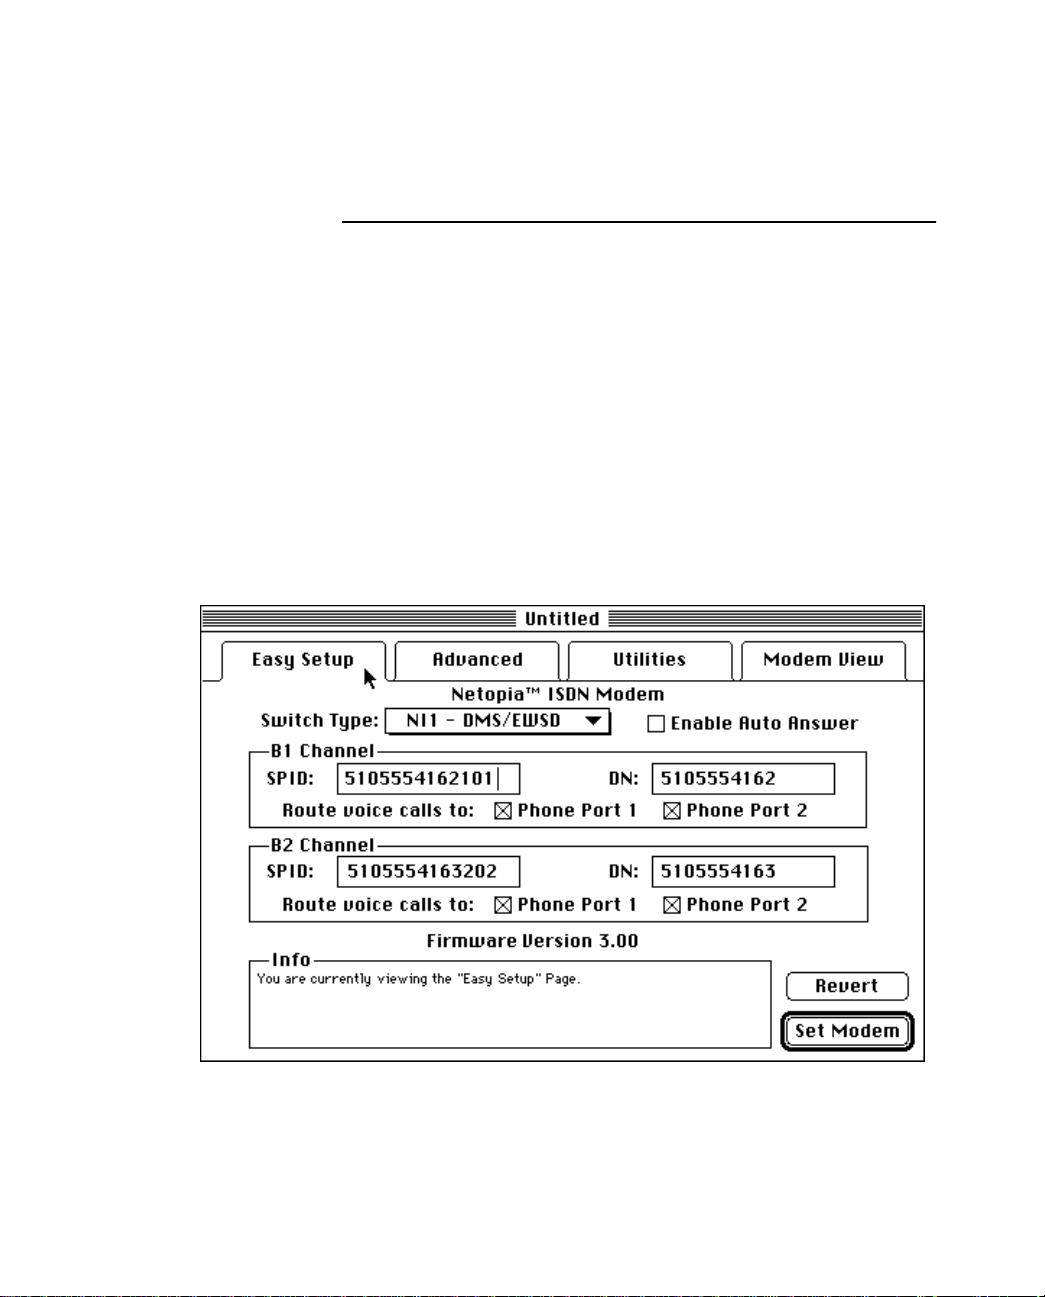
5-6 Netopia ISDN Modem User’s Guide
The Easy Setup window
The Easy Setup window appears when you first open the ISDN Setup
application. Use this window to define your:
■ Telephone company’s ISDN switch type
■ B channel Service Profile Identifiers (SPIDs)
■ B channel Directory Numbers (DNs)
■ Call routing preferences
The telephone company installer provides these parameters to you
when your ISDN line is installed.
You also use this window to enable and disable the auto answer
feature.
Page 71

Configuration using a Macintosh computer 5-7
Note: You can use the ISDN Setup utility for both the Netopia ISDN
Modem Model 411 and 412. The two models support slightly
different features. The software automatically detects which model
you are using and only displays features that apply to that model.
The sections below note the features that are available to only one
of the two models.
If you filled out the ISDN parameters worksheet in Chapter 2, refer
to it now.
Note: If you ran the ISDN Assistant software, the Switch Type, DN,
and SPID will automatically be entered. The instructions below
describe how to manually fill out all the fields in the Easy Setup
Window.
To configure the Easy Setup window:
1. Choose a switch type from the Switch Type pop-up menu.
2. In the B1 Channel SPID entry field, enter the SPID associated
with the primary directory number (DN). If the cursor is not in
the B1 Channel SPID entry field, double-click in the field or
press the Tab key until the field is selected.
3. In the B1 Channel DN entry field, enter the primary DN.
4. Check the box beside the phone port(s) to which you want to
route calls from telephone number 1. This option lets you route
calls to analog devices connected to the analog device ports.
For information about call routing, see the “Call routing to the
analog device ports” section on page 6-13. (This option is only
available for the Netopia ISDN Modem Model 412.) If you do
not have a secondary SPID and DN, skip steps 5 through 7.
5. In the B2 Channel SPID entry field, enter the SPID associated
with the secondary directory number (DN).
6. In the B2 Channel DN entry field, enter the secondary DN.
7. Check the box beside the phone port(s) to which you want to
route calls from telephone number 2. (This option is only available for the Netopia ISDN Modem Model 412.)
Page 72

5-8 Netopia ISDN Modem User’s Guide
Note: If you want to change the settings displayed in the
window to the settings currently defined in the Netopia ISDN
modem, click the Revert button. This button is useful if you
make a mistake entering new settings in the window and want
to revert to the old settings.
8. Check the Enable Auto Answer box to turn on the auto answer
feature. When Enable Auto Answer is active, the ISDN modem
automatically answers incoming data calls. You might want to
use this feature if you have callback set up in your communications software or you want to receive incoming data calls over
your Netopia ISDN Modem.
9. Click the Set Modem button to configure the Netopia ISDN
Modem with the new settings. Generally, you will only need to
set the parameters in the Easy Setup window once.
Note: The changes you make in the Easy Setup window are not
sent to the ISDN modem until you click the Set Modem button.
When the settings on the Easy Setup and Advanced windows
exactly match the ISDN modem’s settings, the Set Modem
button is disabled.
If the parameters match those registered at the telephone company
ISDN switch, the D channel LED lights for a few minutes, flashes for
several seconds, and then turns off. If the LED continues to flash or
remains lit, see Chapter 7, “Troubleshooting.”
If the D channel LED indicates a proper connection to the ISDN
switch, you can place your first call. Go to the “Placing calls with a
Macintosh computer” section on page 5-20.
Page 73
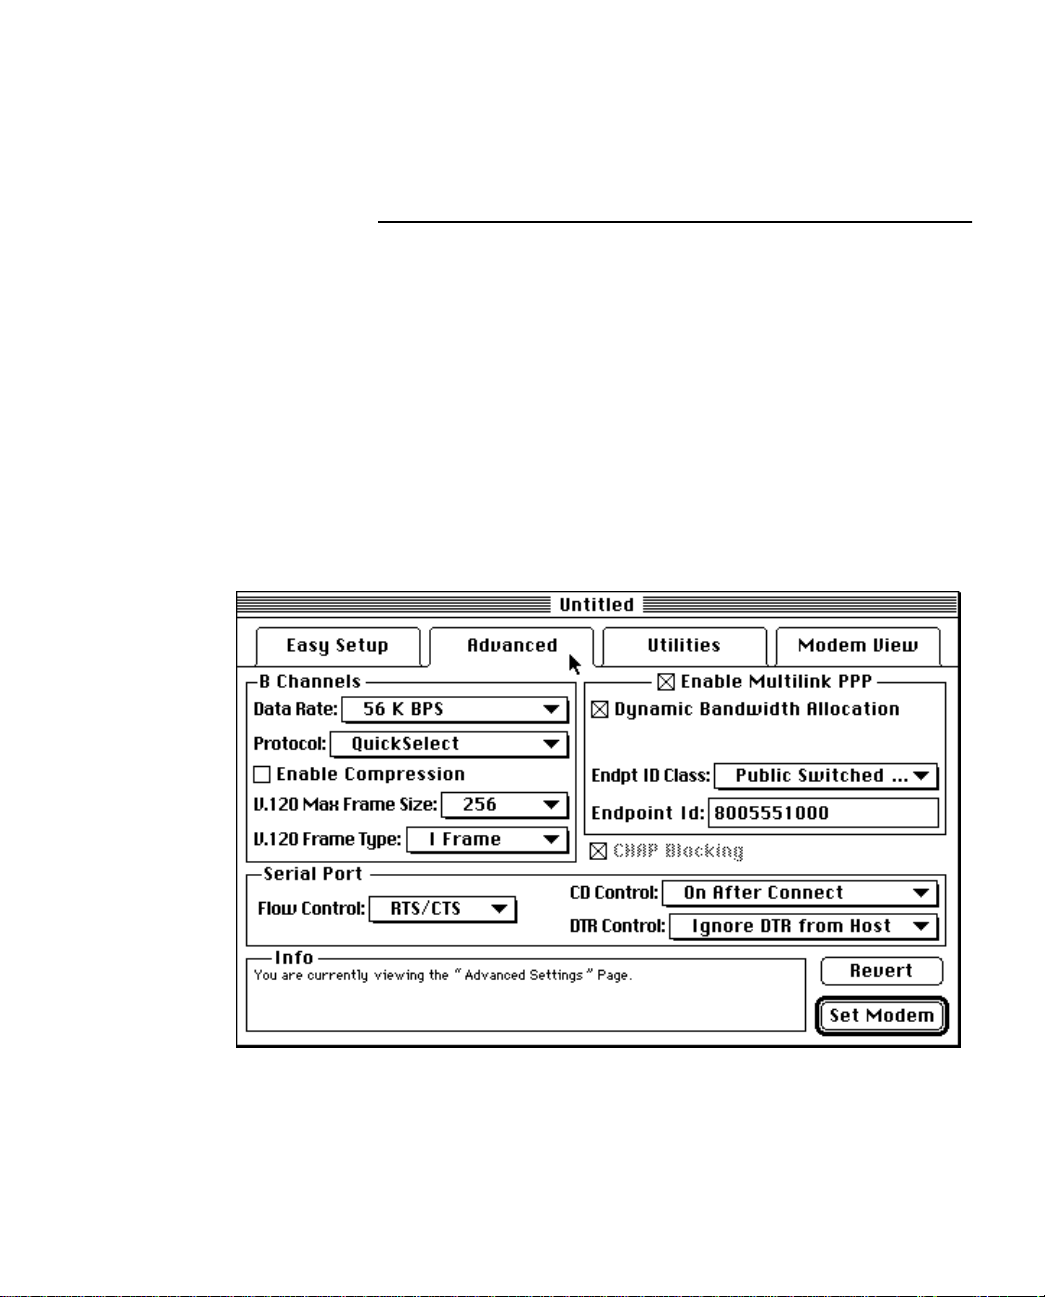
Configuration using a Macintosh computer 5-9
The Advanced window
The Advanced window contains three main areas:
■ B Channels
■ Enable Multilink PPP
■ Serial Port
In most cases, you’ll probably only need to modify the Data Rate
setting, which appears in the B Channels area.
Note: The changes you make in the Advanced window are not sent
to the ISDN modem until you click the Set Modem button. When the
settings on the Advanced and Easy Setup windows exactly match
the ISDN modem’s settings, the Set Modem button is disabled.
Page 74

5-10 Netopia ISDN Modem User’s Guide
B Channels
The B Channels area lets you select options for your two ISDN
B channels.
Data Rate. Choose the B-channel data rate you want from the Data
Rate pop-up menu. The data rate options are 56 Kbps and 64 Kbps
(the two data rates ISDN supports). Not all telephone services
support the 64 Kbps data rate. Select the data rate used by your
telephone company.
Protocol. The Protocol pop-up menu lets you choose the transport
protocol you want. The protocol options are QuickSelect,
Async/Sync PPP Convert, and V .120. In most cases, you should use
the QuickSelect protocol. QuickSelect allows the Netopia ISDN
Modem to automatically detect the protocol in use on the ISDN line
and adapt to that protocol. Also, when QuickSelect is active, the
modem converts asynchronous Point-to-Point (PPP) information into
synchronous (HDLC-based) PPP information. If you select either the
Async/Sync PPP Convert or V.120 protocol, the Netopia ISDN
Modem will only use the selected protocol.
Enable Compression. (This option is only available for the Netopia
ISDN Modem Model 412.) Check the Enable Compression box to
turn on data compression. Data compression is a method of
reducing the size of data without losing any of the information.
Models 412 and 612 of the Netopia ISDN Modem automatically use
Stac data compression to compress data to improve data transfer
times. To take advantage of data compression, the device you are
dialing into must also support data compression. Note that the
Netopia ISDN Modem’s data compression will not be used if data
compression is in use in your communications application. For more
information about data compression, see the “Using data
compression” section on page 6-3.
V.120 Max Frame Size. The V.120 Max Frame Size pop-up menu
lets you specify the maximum number of bytes in a V.120 frame.
V.120 is an alternative transport protocol to PPP. The available
frame sizes range from 240 to 256 bytes. Leave this set at 256
unless your system administrator or Internet Service Provider (ISP)
instructs you to specify a different value.
Page 75

Configuration using a Macintosh computer 5-11
V.120 Frame Type. The V.120 Frame Type pop-up menu lets you
choose either I or UI as the V.120 frame type. Leave this set at I
unless your system administrator or ISP instructs you to specify UI.
Enable Multilink PPP
The Enable Multilink PPP area lets you enable and disable the
modem’s Multilink PPP and dynamic bandwidth allocation features
and define certain parameters for Multilink PPP. For more
information, see the “Using Multilink PPP” section on page 6-4.
Enable Multilink PPP. Check the Enable Multilink PPP box to turn on
the Multilink PPP feature. When Multilink PPP is on, the Netopia
ISDN Modem can combine two B channels to allow up to 128 Kbps
of data to pass through the ISDN line. You must enable this option
in order to use the Dynamic Bandwidth Allocation feature.
Dynamic Bandwidth Allocation. Check the Dynamic Bandwidth
Allocation box to turn on the Dynamic Bandwidth Allocation feature.
When Dynamic Bandwidth Allocation is on, you can initiate a phone
conversation after you have established a dual B channel
connection. When you initiate the phone conversation, the modem
disconnects one of the B channels and uses it for the voice call. For
more information, see the “Using Dynamic Bandwidth Allocation”
section on page 6-7.
Second DN. (This option is only available for the Netopia ISDN
Modem Model 411.) If necessary, enter a secondary directory
number (DN) in the Second DN field. The Second DN number is the
second number of a destination you call. In most cases, you only
need to enter a second directory number if your telephone company
uses a switch other than an AT&T 5ESS switch or the destination
you are calling does not have its ISDN lines organized in a hunt
group. (A hunt group is a collection of phone lines that can be
accessed by the same phone number.)
Page 76

5-12 Netopia ISDN Modem User’s Guide
EndPt ID Class. The Endpt (Endpoint) ID Class pop-up menu lets
you choose the method by which an Endpoint ID is assigned. An
Endpoint ID is a number that some hosts use to keep track of a
particular connection. The available Endpoint ID Classes are None,
Locally Assigned, Internet Protocol, IEEE 802.1 MAC, PPP Magic
Number, and Public Switched Net Directory. In most cases, you
should choose Public Switched Net Directory as the Endpoint ID
Class unless your system administrator or ISP tells you to specify
one of the other classes.
Endpoint ID. In most cases, you should leave this field empty and
leave the Endpoint ID Class set to its default value of 5 (Public
Switched Network Directory Number). With these default settings,
the ISDN modem will later automatically fill in the Endpoint Identifier
with telephone number 1 (DN1). If your endpoint identifier class is
not 5, obtain the identifier from your Internet Service Provider and
enter it in this field.
CHAP Blocking. Check the CHAP Blocking box to disable the CHAP
authentication feature. If this box is checked, the Netopia ISDN
Modem will use PAP for authentication. If you are using Multilink
PPP, you must check this box to block CHAP authentication.
Serial Port
The Serial Port area lets you specify options for flow control, carrier
detect (CD) control, and data terminal ready (DTR) control.
Flow Control. Use the Flow Control pop-up menu to choose the flow
control option set up in your communications program. Flow control
affects the flow of information between your workstation and the
Netopia ISDN Modem. The available flow control options are None,
XON/XOFF (software handshake), and RTS/CTS (Request to
Send/Clear to Send). RTS/CTS is a hardware handshake protocol.
In most cases, you should choose RTS/CTS unless your system
administrator or ISP tells you to specify one of the other options.
Page 77

Configuration using a Macintosh computer 5-13
CD Control. Use the CD (Carrier Detect) Control pop-up menu to
control how the modem handles the carrier signal. The available
options are Always On, On After Connect, and Temp Off At
Disconnect.
Always On.
On After Connect.
the remote system. Carrier detect turns on when a connection is
established and turns off when the connection is terminated. In
most cases, you should choose this option unless your system
administrator or ISP tells you to specify one of the other options.
Temp Off at Disconnect.
then turns back on when you disconnect from a remote system.
DTR Control. The DTR (Data Terminal Ready) Control options define
how the modem handles DTR signals from your workstation. The
options are Ignore DTR from Host, Enter Command State, and Hang
Up.
Ignore DTR from Host.
workstation. In most cases, you should choose this option unless
your system administrator or ISP tells you to specify one of the other
options.
Enter Command State.
enters the command state (the state in which it responds to AT
commands) when it detects an on-off DTR transition.
Hang Up.
system) and then automatically enters the command state when
DTR changes from on to off.
Carrier detect remains on at all times.
Carrier detect follows the state of the carrier from
Carrier detect temporarily turns off and
The modem ignores DTR signals from your
The Netopia ISDN Modem automatically
The modem hangs up (disconnects from the remote
Page 78
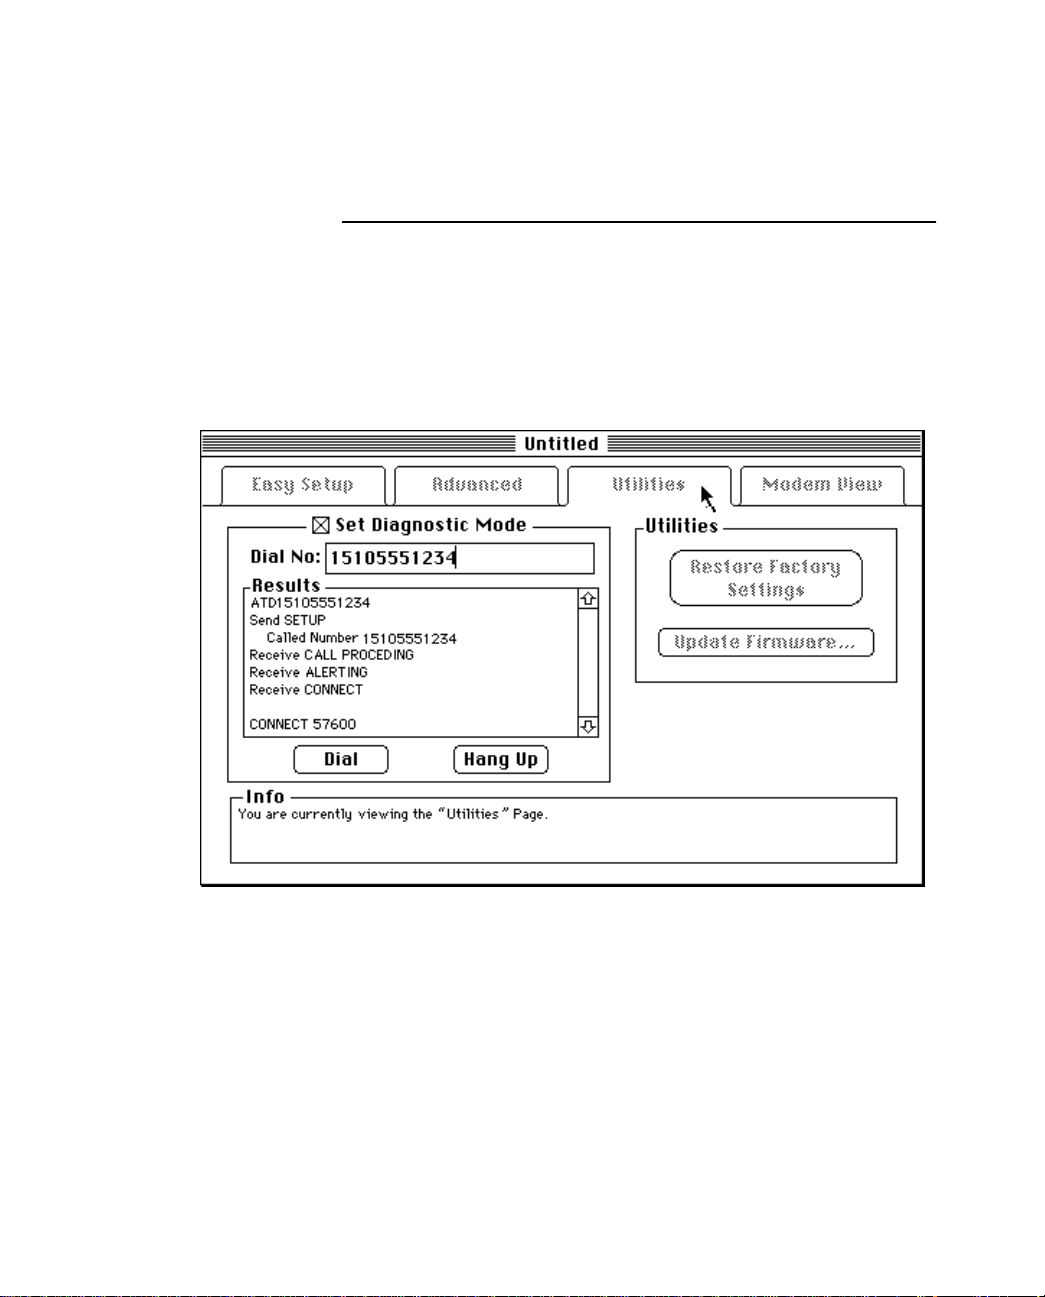
5-14 Netopia ISDN Modem User’s Guide
The Utilities window
You can use the Utilities window to do the following:
■ Test the ISDN switching connection to the telephone company
■ Restore the modem’s original factory settings
■ Update the modem with new firmware
Testing the ISDN switching connection
You can use the diagnostic mode to test your ISDN switching
connection to the telephone company. Typically, you will only need to
do this to troubleshoot communications problems.
For descriptions of the information reported on screen while in
diagnostic mode, see Appendix B, “ISDN Events.”
Page 79

Configuration using a Macintosh computer 5-15
Note: When you enter diagnostic mode, you cannot perform other
tasks, such as quitting the program or activating other windows,
until you exit from diagnostic mode.
To use the diagnostic mode:
1. Check the Set Diagnostic Mode box in the Utilities window.
2. Type a phone number in the Dial No. field. (Make sure you type
the number associated with an ISDN line.)
3. Click the Dial button. The diagnostic program traces the
progress of the call from the ISDN modem to the destination
and reports information about the call in the Results window.
4. Click the Hang Up button to hang up the line.
5. Uncheck the Set Diagnostic Mode box to exit from the diagnostic mode.
Restoring the factory settings
If you experience problems, you might want to restore the Netopia
ISDN Modem’s factory default settings. When you do this, most of
the Netopia ISDN Modem’s settings (including most of the settings
defined in the Advanced window) are returned to their original
factory defaults. The settings defined in the Easy Setup window (the
switch type and the B channel SPIDs and directory numbers) are not
reset to their factory defaults. In addition, the settings in S register
60 (B Channels Data Rate), 80 (Enable Multilink PPP), 82 (Multilink
PPP Endpoint ID Class), and 84 (CHAP control) are also not reset.
These settings are retained until you change them. For a summary
of factory default settings, see Appendix A, “Modem Operation.”
If you configured the ISDN modem with different settings, when you
click the Restore Factory Settings button, the ISDN Setup program
displays a dialog box that allows you to choose to save your current
modem settings. For information on saving settings, see the
“Saving modem settings” section on page 5-18.
Updating the ISDN modem’s Firmware
For information about updating the ISDN modem’s firmware, see the
“Downloading firmware to your ISDN modem” section on page 7-8.
Page 80
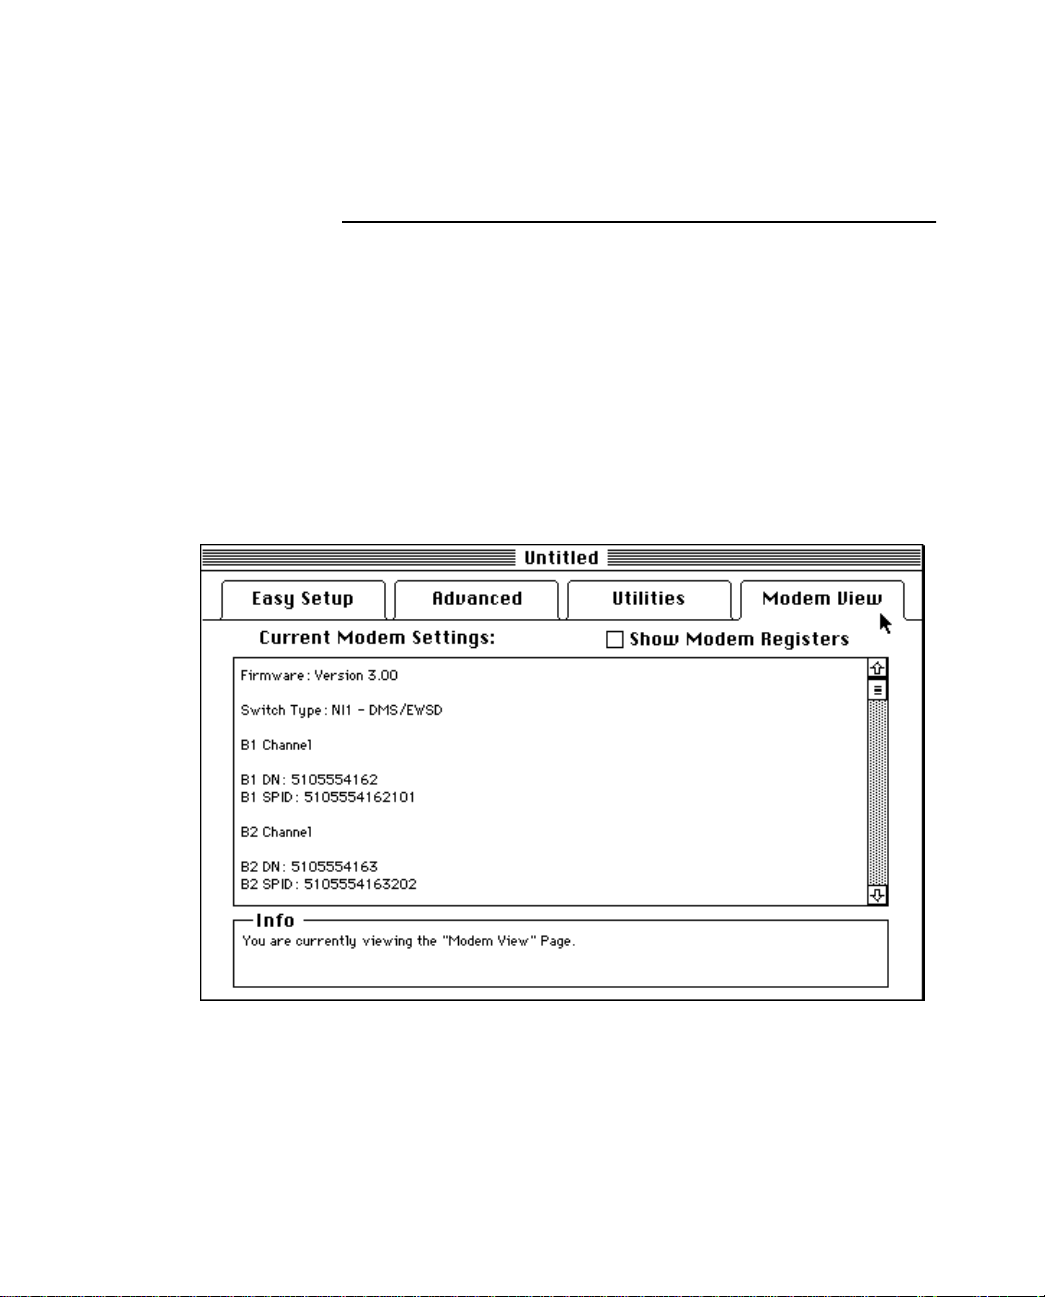
5-16 Netopia ISDN Modem User’s Guide
The Modem View window
The Modem View window displays detailed information about the
ISDN modem’s current configuration. You can also use this window
to display the S registers associated with each setting. For
information about S registers, see Appendix A, “Modem Operation.”
The information in this window is updated each time you click the
Modem View tab.
Note: The settings displayed in the Modem View window may differ
from the settings in the Easy Setup and Advanced windows if you
have changed any Easy Setup or Advanced settings but haven’t sent
them to the ISDN modem by clicking the Set Modem button.
Page 81

Configuration using a Macintosh computer 5-17
The default view of the Modem View window displays the following
information:
■ Firmware version number
■ Switch type
■ B-channel directory numbers and SPIDs
■ Call routing and auto answer settings
■ B-channels setup
■ Multilink PPP settings
■ Serial port control settings
■ Miscellaneous connection options
■ Read-only registers’ contents
■ Product identification information
Displaying Modem Register information
Check the Show Modem Registers box to display the modem
registers associated with the modem settings. For example, if Show
Modem Registers is active, the register associated with the B1
channel directory number (S register 51) appears next to the B1 DN
value.
Page 82

5-18 Netopia ISDN Modem User’s Guide
Saving and loading modem settings
You can save the current modem settings to a configuration file.
This allows you to save different configurations and then quickly
load the settings from the configuration file and configure the
modem in a particular way. The configuration file contains the
information that appears in the Modem View window, including the
modem register information.
Saving modem settings
To save a configuration file:
1. Click the Set Modem button to update the ISDN modem with
any changes you’ve made in the Easy Setup and Advanced windows.
2. Choose the Save command from the File menu. (The Save command is only active when the settings in the Easy Setup and
Advanced windows match the settings defined in the modem.)
The dialog box used to save documents appears.
3. Use the dialog box to save the file with the name and location
you want. The name you assigned to the file appears in the window’s title bar.
4. After you’ve saved the settings to a configuration file, use the
Save command to write the current modem settings to the current configuration file.
Saving a copy of a configuration file
To save a copy of a configuration file:
1. Save the configuration file. (Refer to the previous section.)
2. Choose the Save As command from the File menu. The dialog
box used to save files appears.
3. Use the dialog box to save the file with the name and location
you want. If you want to save the copy in the same place as the
original document, type a unique name for the copy.
Page 83

Configuration using a Macintosh computer 5-19
Note: You can read a saved configuration file using a text editor
such as SimpleText or Notepad. However, if you make any changes
to the file using a text editor, the ISDN Setup application will not be
able to open the modified file.
Loading modem settings
You can load settings you’ve saved in a configuration file and then
use the settings to configure the modem.
One way to load the settings is to double-click the icon of the
configuration file that contains the settings you want. The ISDN
Setup application starts up and opens the selected file.
To load modem settings while ISDN Setup is running:
1. Choose the Open command from the File menu. The dialog box
used to open files appears.
2. Use the dialog box to locate and open the modem configuration
file you want.
3. After you’ve loaded the settings, if necessary, click the Easy
Setup tab in the ISDN Setup application to display the Easy
Setup window, then click the Set Modem button to send the
settings to the modem.
The name of the current configuration file appears in the window’s
title bar.
Page 84

5-20 Netopia ISDN Modem User’s Guide
Quitting the ISDN Setup application
After you’ve configured your ISDN modem:
1. Choose Quit from the File menu. If you’ve changed the configuration settings without updating the ISDN modem and/or saving
the settings to a modem settings document, an alert dialog box
appears.
Depending on whether or not you’ve updated the ISDN modem
or saved the settings, the dialog box will give you one or more
of the following options:
■ Update the ISDN modem with the new settings
■ Save the new settings in the configuration file
■ Exit from the application and do one, both, or none of the
above actions
2. Click the appropriate buttons to specify what you want to do
before you exit from the program.
Placing calls with a Macintosh computer
After you configure your Netopia ISDN Modem using the Macintosh
configuration software, you can use your communications software
to establish an ISDN connection. You can use any standard
communications application that recognizes AT commands.
Examples of compatible communications applications include Apple
Remote Access (ARA), MicroPhone, or PPP client software, such as
InterPPP or FreePPP.
Note: Most areas require you to dial ISDN calls with 11 digits (for
example, 1-800-555-1212), even for local calls.
Note that you must use Multilink PPP to make calls using two ISDN
B channels. For information, see the “Using Multilink PPP” section
on page 6-4.
Page 85

Chapter 6
Advanced Features
This chapter illustrates how to use the advanced features available
in your Netopia ISDN Modem.
This chapter covers the following topics:
■ Placing calls using AT commands
■ Using Multilink PPP
■ Using PPP authentication protocols
6-1
■ Using the analog device ports
■ Receiving data calls
■ Receiving analog calls
The Netopia ISDN Modem uses AT commands and S registers for
call management. See Appendix A, “Modem Operation,” for
instructions on use of the AT command set and a tabular summary
of the AT command lines.
Page 86

6-2 Netopia ISDN Modem User’s Guide
Placing calls using AT commands
Your communications software can communicate with the Netopia
ISDN Modem using standard AT commands. To configure your
software, select a Hayes-compatible modem configuration, such as
“generic modem,” if no special setting is available for the Netopia
ISDN Modem. Refer to your communications software
documentation for more details.
When you place a call from a PC or Macintosh computer, the
Netopia ISDN Modem recognizes the AT command ATD to dial a
digital ISDN data call. Depending on the setting of S register 60,
56 Kbps (default) or 64 Kbps B channel transmission speeds are
used. Correct examples of outgoing circuit-switched ISDN modem
commands with dial strings are shown below.
■ Dialing with spaces: AT D 1 908 555 7891
■ Dialing without spaces: ATD19085557891
■ Making a Toll Saver (Switched 56) call: ATDD 19085551234
Note: All outgoing calls can be forced to be Toll Saver calls by
setting S register 61 to 1.
Enter ATS61=1
Note: Most areas require you to dial ISDN calls with 11 digits
(for example, 1-800-555-1212), even for local calls.
■ Making a Multilink PPP call using two numbers:
ATD19085557891 & 19085555555
You need to use Multilink PPP to make a call using two ISDN
B channels with the Netopia ISDN Modem. See the “Using Multilink
PPP” section later in this chapter for details.
Page 87

Using data compression
Compression is a method of reducing the size of data without losing
any of the information. Models 412 and 612 of the Netopia ISDN
Modem automatically use Stac data compression to compress data
to improve data transfer times.
The following check modes are negotiable: None, One Byte
Sequence Number, and Extended. The mode is automatically
negotiated when a PPP call is placed to another device that
supports the compression control protocol. Generally, Extended is
the preferred mode. The amount of compression depends on the
type of file being transferred. For example, a text file compresses
better than a binary (application or executable) file.
Compression is enabled by default. If you enable compression on
the ISDN modem and your application uses compression,
compression will be disabled in the ISDN modem.
You can use compression in dual B channel Multilink PPP
connections and single B channel connections. By using
compression on a single B channel, you can achieve performance
rivaling a two B channel connection at a fraction of the cost.
Because telephone and Internet providers often base charges on
the number of B channels used, the Netopia ISDN Modem’s
compression feature, which is not available in most other ISDN
terminal adapters, lets you achieve nearly the throughput of a two B
channel connection at the price of a single B channel connection.
Advanced Features 6-3
Compression is negotiated between your ISDN modem and the
device to which you are placing the Multilink PPP call. To take
advantage of data compression, the device you are dialing into must
also support data compression. If the other device does not
support compression, compression will not be implemented.
Page 88

6-4 Netopia ISDN Modem User’s Guide
Using Multilink PPP
The Netopia ISDN Modem supports Multilink PPP , which can link the
two ISDN B channels and allow a maximum digital connection of
128 Kbps. Multilink PPP is enabled by default.
If want to use Multilink PPP, make sure:
■ Multilink PPP is turned on in the Netopia ISDN Modem.
■ The serial port of your PC or Macintosh computer supports a
data transmission rate of at least 115.2 Kbps and you’ve set
the port speed in your communications software to the
maximum available data rate.
■ Both the telephone company service and the Internet Service
Provider (ISP) or LAN dial-in service support two B channel
connections.
■ Both you and the destination you are calling are using software
that supports PPP, such as Dial-Up Networking in Windows 95
or InterPPP and FreePPP in the Macintosh operating system.
The following registers control Multilink PPP and are set by your
configuration software:
■ S register 80 enables or disables Multilink PPP operation
■ S registers 82 and 83 control Multilink configuration
■ S register 70 controls Dynamic Bandwidth Allocation (DBA) in
Multilink mode
By default, the Netopia ISDN Modem dials the same number for
both Multilink PPP channels. If the destination requires a different
telephone number to establish a second Multilink PPP channel, then
you must include this second telephone number in the dial string.
The ampersand character (&) is used to dial two telephone
numbers: for example, ATD19085557891 & 19085555555
Note: If you are using a Macintosh computer and a Model 411
Netopia ISDN Modem, start up the ISDN Setup application and
enter the second telephone number (DN) in the Second DN field in
the Advanced window. (For more information, see the “Second DN”
section on page 5-11.)
Page 89

Advanced Features 6-5
By default, the ISDN modem makes calls using the 2 B channels.
Note that there may be cost implications to the use of two B
channels. Check your usage rates with your service providers, such
as the telephone company, Internet Service Provider, or online
service provider.
Storing Multilink Endpoint Identifiers in
S registers
Some Multilink PPP implementations require the use of a Multilink
PPP option called the Multilink Endpoint Identifier. The Multilink
Endpoint Identifier is a number that the Netopia ISDN Modem uses
to distinguish its Multilink PPP calls to a remote router from other
Multilink PPP calls. The default Multilink Endpoint Identifier for the
ISDN modem is the first B Channel’s directory number (as entered
in S register 51). The Multilink Endpoint Identifier must be unique in
order to identify the ISDN modem’s PPP call. This Multilink Endpoint
Identifier also identifies the Multilink session and allows the remote
router to add or subtract B Channels to that Multilink PPP session
when the ISDN modem requests it.
You probably won’t need to change the default settings for the
S registers that control the Multilink Endpoint Identifier (S registers
82 and 83) unless otherwise specified by your systems
administrator or ISP. The defaults are S82=5 (Public Switched
Network Directory Number) and S83=(initially empty). (If you have
S82 set to the default value of 5, leave S83 empty. The ISDN
modem will later automatically fill in S83 with the directory number
entered in S register 51.) If you do change the Multilink Endpoint
Identifier, however, make sure the number you specify is a “unique”
number to the equipment you are dialing into so the equipment will
not confuse your Multilink PPP call with another call.
Page 90

6-6 Netopia ISDN Modem User’s Guide
■ S register 82 stores the Multilink Endpoint Identifier Class
value. Valid class values are listed in Appendix A, “Modem
Operation.”
■ S register 83 stores the actual Multilink Endpoint Identifier.
Note: This option is not required in most cases, so these
registers typically do not have to be changed. Your system
administrator or Internet Service Provider will provide you with a
Multilink Endpoint Identifier if it is required.
Using PPP authentication protocols
The Point-to-Point protocol (PPP), when used with Dial-Up
Networking, FreePPP, and other software, allows for authentication
of users dialing into hosts or routers. While the connection between
a user and host is being established, the host may request
authentication before the link is established. In addition, the host
will request a certain type of authentication: typically Password
Authentication Protocol (PAP) or Challenge Handshake
Authentication Protocol (CHAP). PAP verifies the user’s plain text ID
and password. CHAP is a stronger authentication method. It uses
encryption and may repeatedly verify the user’s ID any time during
the connection.
In response to the host’s request, the client software indicates
whether or not it supports the same type of authentication. If it
does not support the same type of authentication, it may request an
alternative type of authentication. (For example, if the host requests
CHAP, but the client software only supports PAP, the client software
will request PAP.) After establishing a type of authentication, the
process of verifying the user begins.
Both PAP and CHAP are built into the Netopia ISDN Modem and are
configured by your PPP software. To enable CHAP using Windows 95
Dial-Up Networking, check the Require encrypted password box in
the Server Types dialog box.
Page 91

Note: You cannot use CHAP when you make Multilink PPP calls.
CHAP is disabled by default, so this should not be a problem.
However, if CHAP is enabled, before you make a Multilink PPP call,
you must disable CHAP by sending the command, ATS84=1, to the
ISDN modem using your communications application. If you are
using a Macintosh computer, use the ISDN Setup application to turn
off CHAP. For information, see the “CHAP Blocking” section on
page 5-12.
Using Dynamic Bandwidth Allocation
The ISDN modem supports Dynamic Bandwidth Allocation (DBA).
When Dynamic Bandwidth Allocation is enabled (by default), you can
place an analog (voice) call from a device that is attached to one of
the analog device ports while a Multilink PPP call is active. The ISDN
modem will automatically use one of the B channels for the analog
call. Once the analog call ends, the ISDN modem automatically
reestablishes that channel for Multilink PPP operation. Your voice
call will be billed at ISDN rates because the signal is carried over
your ISDN line.
Advanced Features 6-7
Note: If you are on the receiving end of a Multilink PPP call and you
place a voice call, one of the B channels will be used for the voice
call. However, when the voice call is finished, the B channel used for
the voice call cannot be returned to the Multilink PPP call. The B
channel can only be returned to the call if you initiated the Multilink
PPP call.
Page 92

6-8 Netopia ISDN Modem User’s Guide
Placing a Toll Saver call
The Toll Saver feature allows you to place a data call using a voice
channel, thereby saving the extra cost often associated with placing
a data call. By combining the Toll Saver feature with the Netopia
ISDN Modem’s built-in data compression, you can transfer up to
128 Kbps of data for the cost of a single voice call.
Note: T o place a Toll Saver call, the device you are dialing into must
be capable of generating the 3.1 kHz tone necessary for disabling
the echo cancellers on the line. Also, check with your Internet
Service Provider to verify that this feature (also called “56
permissive calls”) is supported.
T o manually dial a Toll Saver call, send the following AT command to
the Netopia ISDN Modem:
ATDD <telephone number>
for example: ATDD 14085551234
About QuickSelect
To configure the ISDN modem to send all outgoing calls as Toll
Saver calls, set S register 61 to 1.
The ISDN modem’s QuickSelect feature automatically converts
asynchronous Point-to-Point Protocol (PPP) into synchronous
(HDLC-based) PPP. This allows for connections to communication
servers and routers that have Basic Rate Interface (BRI) ISDN,
Primary Rate Interface (PRI) ISDN, or T1 access lines.
Using the Netopia ISDN Modem’s QuickSelect feature, you do not
have to manually select the proper protocol for each ISDN call. With
QuickSelect enabled, the ISDN modem automatically detects and
uses the required protocol. QuickSelect is enabled by default.
Page 93

Optimizing serial port performance
The serial port speed of most PC and Macintosh computers limits
the computer’s maximum data transmission rate. Typically, PCs and
Macintosh computers are limited to a maximum transmission speed
of 115.2 Kbps. However, advanced serial cards and drivers are
available to boost the serial port speed up to 230.4 Kbps.
PC serial ports
For sustained performance at data rates higher than 57.6 Kbps,
Farallon recommends that your PC’s serial COM port be equipped
with a 16550 universal asynchronous receiver/transmitter (UART).
To determine what type of UART is installed in your PC, type msd at
the DOS prompt to run the Microsoft Diagnostic Program.
Advanced Features 6-9
You can use software utility tools to optimize the performance and
reliability of the serial port through the 16550 UART. Recommended
tools include WFXCOM.DRV, available on a number of BBS and ftp
sites, or TurboCom, available from Pacific CommWare, Inc., of
Ashland, Oregon (541-482-2744).
Macintosh serial ports
Macintosh models equipped with 680x0 processors are generally
limited to serial port speeds of 57.6 Kbps. Power Macintosh and AV
models equipped with Apple’s GeoPort technology can generally
support serial speeds of 115.2 Kbps or higher. For optimal
performance, Farallon recommends installing Apple’s Serial DMA
extension, version 2.02 or later, which requires Macintosh System
7.5 or later. If you are using System 7.5.3 or later, the correct
version of the serial driver is already installed in your system and
you do not need to add this extension. For more information about
serial connections, see the “Configuration using a Macintosh
computer” section on page 5-2.
Page 94

6-10 Netopia ISDN Modem User’s Guide
About autobaud
Autobaud automatically detects your computer’s serial port current
data rate, up to 115.2 Kbps (autobaud does not support 230.4
Kbps transmissions).
To set the baud rate to the maximum speed of 230.4 Kbps, first
make sure your computer’s serial port and your communications
software support 230.4 Kbps transmission speed. Then send the
following command to the Netopia ISDN Modem: AT $B 230400.
Change the setting of your application program to 230400 bps. If
you are using a Macintosh computer, start up the ISDN Setup
application and set the baud rate to 230.4 Kbps. (For more
information, see the “Configuration using a Macintosh computer”
section on page 5-2.)
If you are using the Windows configuration program, autobaud must
be enabled to access the Netopia ISDN Modem configuration dialog
box. If the baud rate is set to a specific rate (such as 230.4 Kbps),
you will not be able to access the configuration dialog box.
Before you set the ISDN modem to a specific baud rate, make sure
the configuration dialog box parameters are set correctly. To return
to autobaud mode, set the baud rate of your communications
program to the baud rate you defined for the ISDN modem and then
send the following AT command: AT$B0. This sets the ISDN modem
to autobaud. If you are still unable to access the configuration
dialog box, press and hold down the “a” key on the keyboard and
press the RESET key on the back of the ISDN modem. Hold the “a”
key down until the ISDN modem comes back on line and then
release the key.
Page 95

Using the analog device ports
If you have analog touch-tone telephones, answering machines, fax
machines, external analog modems, or other analog telephone
devices, you can connect them to the two RJ-11 modular jacks on
the Netopia ISDN Modem. The two ports are located above the
telephone icon on the back panel of the ISDN modem.
The Netopia ISDN Modem does not support pulse-dialing (rotary)
telephones.
To place an analog call, simply take the telephone handset or
external fax machine off the hook, wait for a dial tone, and dial the
destination telephone number. Similarly, to use an analog modem,
connect the analog modem to one of the analog device ports and
use the modem the same way as if it were connected to a regular
phone line. See the next section for information about receiving
analog calls.
Note: The Netopia ISDN Modem is designed to operate with
telephones that are compatible with the original AT&T 2500
touch-tone telephone standard. You may operate up to three
compatible touch-tone devices per analog device port using modular
telephone cable of up to 200 feet in length. Although the ISDN
modem may function satisfactorily at longer cable distances with
more than two attached telephones, proper operation at longer
cable distances is not guaranteed in all situations.
Advanced Features 6-11
Some telephone equipment, most notably speaker phones that
draw large amounts of power, may not work at all on the ISDN
modem’s analog device ports. These devices do not conform to the
power specification of the AT&T 2500 touch-tone telephone
standard, and their operation is not guaranteed.
Page 96

6-12 Netopia ISDN Modem User’s Guide
Receiving analog calls
The Netopia ISDN Modem can receive incoming analog calls, such
as calls from an ordinary fax machine or pay phone. The ISDN
modem will direct the call to devices connected to the two analog
ports.
You can receive an analog call under the following scenarios:
■ If you are using one B channel for a digital data call (such as a
connection to your Internet Service Provider), you can receive
an analog telephone call on the other B channel.
■ If you are using one B channel for a digital data call, and
someone calls the number associated with the B channel you
are using, the incoming analog call will receive a busy signal
unless your local switch is an AT&T 5ESS switch. An A T&T 5ESS
switch will let the incoming analog call roll over to the available
B channel.
You cannot receive an analog call:
■ When you are using both of the B channels for two analog calls,
an analog call and a digital data call, or for a Multilink PPP
digital data call.
Note: An option called Flexible Call Offering (FCO) or Additional
Call offering (ACO), which is included in the ISDN service from
some telephone companies, allows you to receive an incoming
call while a dual-channel Multilink PPP call is in progress.
Page 97
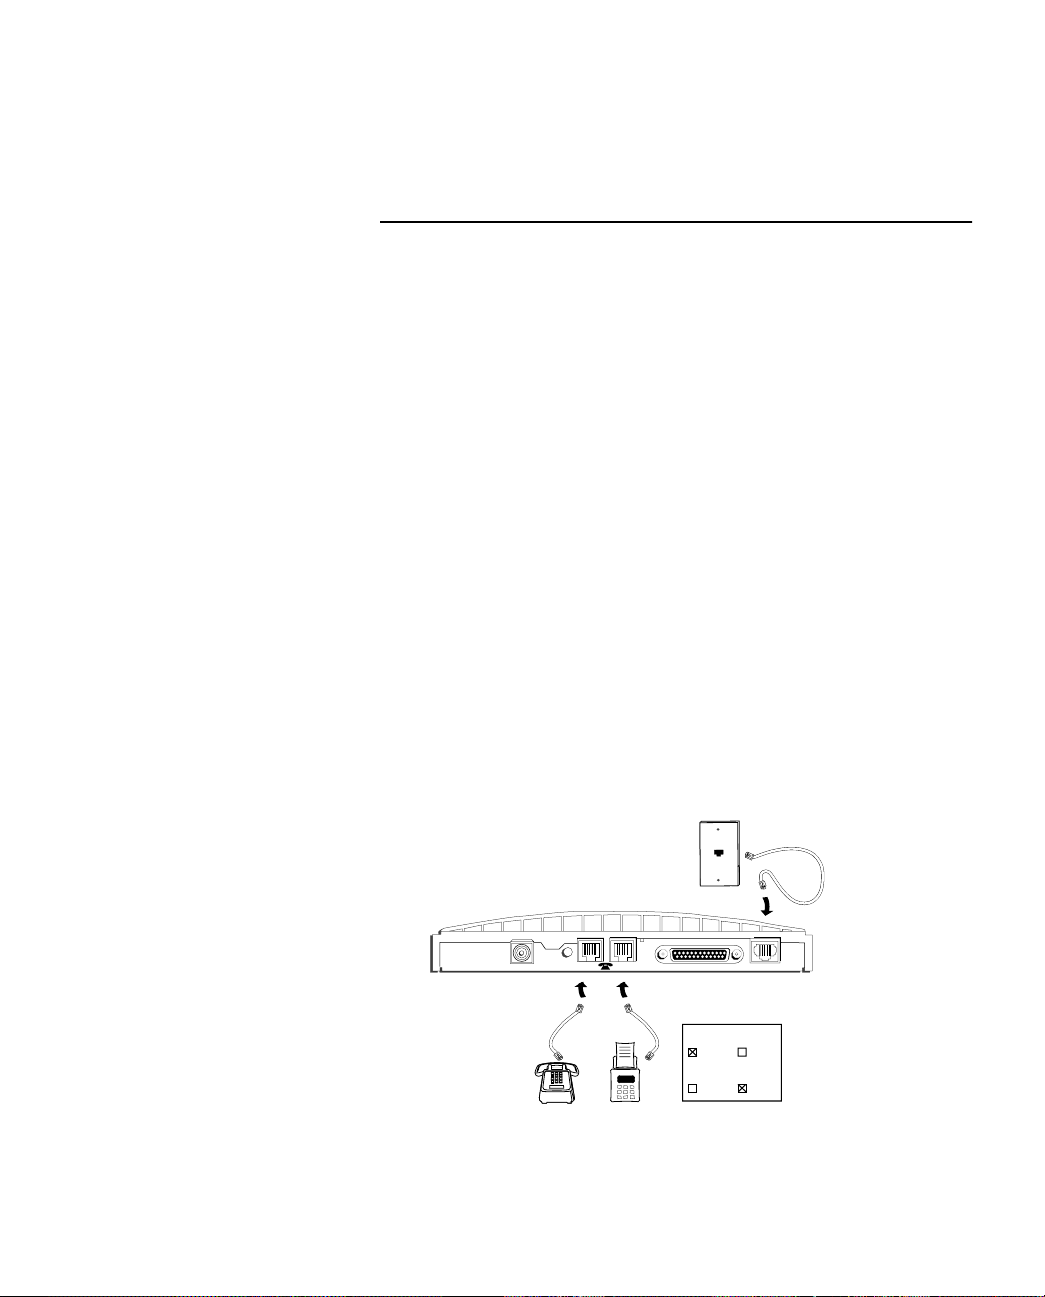
Advanced Features 6-13
Call routing to the analog device ports
Because ISDN supports two independent B channels, you can use
each channel separately. You can use the Netopia configuration
software to route calls on telephone numbers 1 and 2 to specific
analog device ports. By default, incoming calls to ISDN telephone
numbers 1 and 2 ring both analog device ports simultaneously.
Using the Netopia configuration software, check the box beside the
phone port(s) to which you want to route calls from telephone
number 1 and telephone number 2. In the configuration software,
the analog device ports are called Phone Port 1 and Phone Port 2.
Example You might want to use call routing to exclusively assign a telephone
number to a device. For example, suppose you have an analog
telephone attached to Phone Port 1 and a fax machine attached to
Phone Port 2. To route incoming calls from telephone number 1 to
the telephone and calls from telephone number 2 to the fax
machine, you would do the following in the Netopia configuration
software. In the Number 1 area, check the Phone Port 1 check box
and uncheck the Phone Port 2 check box (this routes incoming calls
on telephone number 1 to Phone Port 1). In the Phone Number 2
area, uncheck the Phone Port 1 check box and check the Phone
Port 2 check box (this routes incoming calls on telephone number 2
to Phone Port 2).
Netopia
ISDN
Modem
9 VDC
.6A MAX
RESET
12
RS-232 ISDN U
Phone #1
FAX
Port 1 Port 2
Phone #2
Port 1 Port 2
Analog devices connected to analog phone ports
ISDN
Wall Jack
Phone Numbers 1 & 2
Page 98

6-14 Netopia ISDN Modem User’s Guide
If both ports are selected for a telephone number, incoming calls
ring devices attached to both ports simultaneously.
If you have only one phone number for your ISDN line and two
analog devices connected to the analog device ports, check the
Phone Port 1 and Phone Port 2 boxes in the Number 1 area. Calls
to telephone number 1 will ring both devices, allowing you to answer
the call on either device. Note, however, because you have only one
telephone number, you cannot place or receive more than one call
at a time.
For information on configuring call routing on a PC, see “Step 10:
Configuring call routing” on page 4-7. For information on configuring
call routing on a Macintosh computer, see “The Easy Setup window”
on page 5-6.
The table below shows how the call routing settings you specify in
the Netopia configuration software determine how incoming calls on
phone number 1 and phone number 2 are routed to the two analog
device ports (Port 1 and Port 2). (If the box beside the port is
checked, calls are routed to that port.)
Page 99

Advanced Features 6-15
Phone Number and
Port Selections
Phone #1 Port 1 Port 2
Phone #2 Port 1 Port 2
Phone #1 Port 1 Port 2
Phone #2 Port 1 Port 2
Phone #1 Port 1 Port 2
Phone #2 Port 1 Port 2
Phone #1 Port 1 Port 2
Phone #2 Port 1 Port 2
Phone #1 Port 1 Port 2
Phone #2 Port 1 Port 2
Phone #1 Port 1 Port 2
Phone #2 Port 1 Port 2
Phone #1 Port 1 Port 2
Phone #2 Port 1 Port 2
Phone #1 Port 1 Port 2
Phone #2 Port 1 Port 2
Phone #1 Port 1 Port 2
Phone #2 Port 1 Port 2
Phone #1 Port 1 Port 2
Phone #2 Port 1 Port 2
Phone #1 Port 1 Port 2
Phone #2 Port 1 Port 2
Phone #1 Port 1 Port 2
Phone #2 Port 1 Port 2
Phone #1 Port 1 Port 2
Phone #2 Port 1 Port 2
Phone #1 Port 1 Port 2
Phone #2 Port 1 Port 2
Phone #1 Port 1 Port 2
Phone #2 Port 1 Port 2
Phone #1 Port 1 Port 2
Phone #2 Port 1 Port 2
Analog Port Receiving Call
Phone #1 Phone #2
Calls routed to Phone Port 1 or 2
(default)
Calls routed to Phone Port 1 only Calls routed to Phone Port 2 only
Calls routed to Phone Port 2 only Calls routed to Phone Port 1 only
Calls routed to Phone Port 1 only Incoming calls blocked
Calls routed to Phone Port 2 only Incoming calls blocked
Calls routed to Phone Port 1 or 2 Incoming calls blocked
Incoming calls blocked Calls routed to Phone Port 1 only
Calls routed to Phone Port 1 only Calls routed to Phone Port 1 only
Calls routed to Phone Port 1 or 2 Incoming calls blocked
Incoming calls blocked Calls routed to Phone Port 2 only
Calls routed to Phone Port 2 only Calls routed to Phone Port 2 only
Calls routed to Phone Port 1 or 2 Calls routed to Phone Port 2 only
Incoming calls blocked Calls routed to Phone Port 1 or 2
Calls routed to Phone Port 1 only Calls routed to Phone Port 1 or 2
Calls routed to Phone Port 2 only Calls routed to Phone Port 1 or 2
Incoming calls blocked Incoming calls blocked
Calls routed to Phone Port 1 or 2
(default)
Page 100

6-16 Netopia ISDN Modem User’s Guide
Receiving data calls
The Netopia ISDN Modem can receive incoming circuit-switched
data calls from other Netopia ISDN Modems or from ISDN devices
and Switched 56 equipment.
■ If you are using one B channel, and you receive a data call on
the number associated with the other B channel, the incoming
data call will ring through.
■ If you are using one B channel, and you receive a data call on
the number associated with the B channel you are using, the
incoming data call will receive a busy signal unless your local
switch is an AT&T 5ESS switch. An AT&T 5ESS switch will let
the incoming data call roll over to the available B channel.
■ If both B channels are in use, you cannot receive a data call.
 Loading...