

Farallon Communications NetLINE User Manual

NetLINE
PC Card
User’s Guide
F
arall
on

Copyright © 2000 Farallon Communications, Inc. v.0100
All rights reserved.
This manual and any associated artwork, software, and product designs
are copyrighted with all rights reser ved. Under the copyright laws this
manual, artwork, software, and product designs may not be copied, in
whole or part, without the written consent of Farallon. Under the law,
copying includes translation to another language or format.
Farallon Communications
3089 Teagarden St.
San Leandro, CA 94577-5720
U.S.A.
For additional copies of this user’s guide, order Farallon part number
6120370-00-01.
Other products and corporate names may be trademarks of other
companies and are used only for explanation and to the owner’s benefit
without intent to infringe.

Contents
Chapter 1 - Introduction ........................................................ 5
Features ............................................................................ 6
Chapter 2 - Installation ......................................................... 7
Installing the hardware ........................................................ 8
Installing the software ....................................................... 10
Windows 98 ................................................................ 10
Windows 95 ................................................................ 11
Windows 2000 ............................................................ 12
Windows NT 4.0 ........................................................... 13
Connecting to the network ................................................. 14
Chapter 3 - Operation ......................................................... 15
NetLINE Card LEDs ........................................................... 16
Diagnostic utility ............................................................... 17
Chapter 4 - Farallon Technical Support ................................ 19
Appendix............................................................................ 21
Specifications ................................................................... 21
Regulatory notices ............................................................ 22
Warranty ............................................................................ 25


Chapter 1
Introduction
The Farallon NetLINE PC Card serves as an Ethernet
adapter for any Windows compatible computer with a
PCMCIA slot. The adapter provides an RJ-45 port to
connect to a 10Base-T Ethernet network or other Ethernet
device such as a hub, cable modem or DSL modem.
5
The card is fully compliant with IEEE Ethernet standards
and PCMCIA Type II specifications. It supports Windows
95, Windows 98, Windows 2000 and Windows NT 4.0.
Please make sure that the following items are included in
your Farallon package:
■
NetLINE PC Card (with connector cable)
■
Farallon diskette
■
this user's guide

6 Chapter 1
F
EATURES
Complies with IEEE 802.3 10Base-T Ethernet stan-
■
dards.
Complies with 16-bit PCMCIA specifications.
■
Provides LED indicators for Power, Link and Activity.
■
Operates with Windows NT 4.0, Windows 95/98 and
■
Windows 2000.

Chapter 2
Installation
Your NetLINE PC Card can be installed in three simple
steps:
■
Installing the hardware
■
Installing the software
7
■
Connecting to the network
Install the adapter hardware and software, and then
connect your computer to your Ethernet network using
twisted pair Ethernet cable (category 3 or better) with a
RJ-45 connector.
8 Chapter 2
I
NSTALLING THE HARDWARE
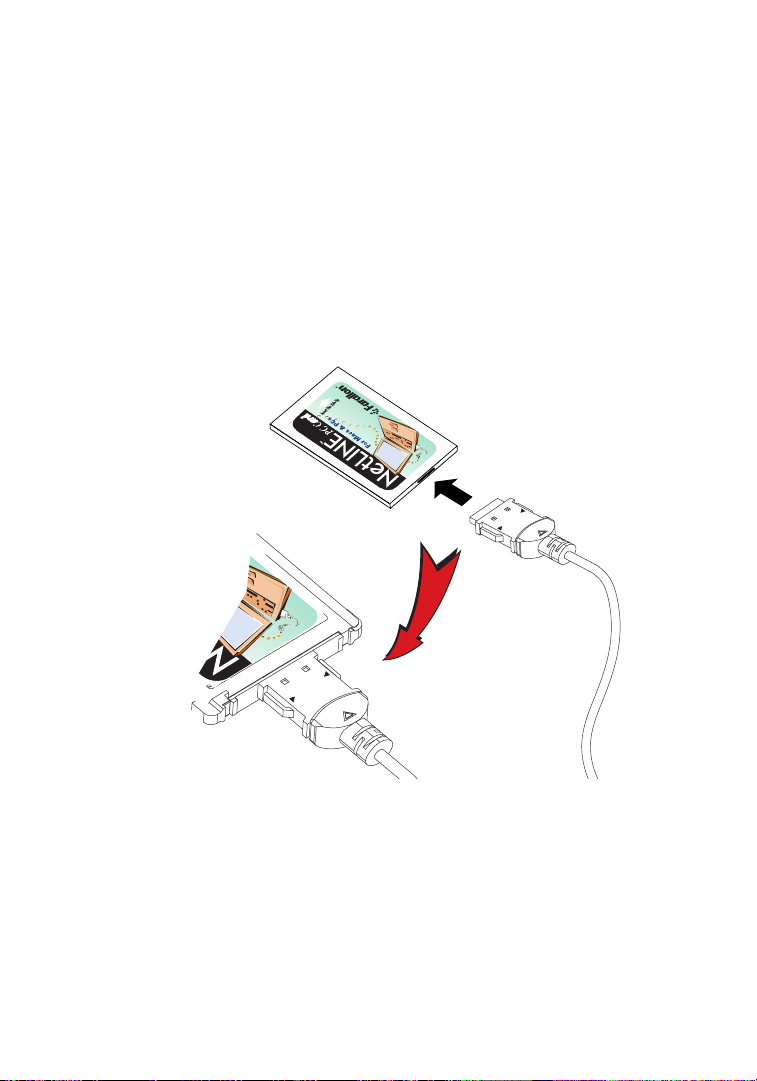
Begin installation by connecting the card. Then insert the
card in the computer’s PC card slot.
1. Hold the PC card and connector so that the arrow is
facing up.
2. Insert the flat end of the connector into the end of the
PC card until you hear a small click.
TOP
PRESS TO
RELEASE
CAUTION:
TOP
PRESS TO
RELEASE
Use care when detaching the connector from
the PC Card. Pulling the connector from the
card without squeezing the sides may cause
severe damage to the card and connector
and may void your warranty. Do not pull the
PC card out of the PC card slot by pulling on
the connector cable.
 Loading...