

Page 1

C60T379A2.qxd 14/3/07 16:10 Página 23
PPllaaccaa ddee ccoocccciióónn
CCooookkiinngg HHoobb
TTaabbllee ddee ccuuiissssoonn
KKoocchhffeelldd
PPllaaccaa ddee ccoozziinnhhaa
ES MANUAL DE UTILIZACIÓN
EN GUIDE TO INSTALLATION
FR GUIDE D'UTILISATION
DE BETRIEBSANLEITUNG
PT GUIA DE UTILIZAÇÃO
Page 2

C60T379A2.qxd 14/3/07 16:10 Página 23
Page 3

M
A
N
U
A
L
D
E
I
N
S
T
A
L
A
C
I
Ó
N
Y
U
S
O
D
E
L
A
P
A
R
A
T
O
C60T357A4.qxd 14/3/07 15:55 Página 1
Page 4
• Sólo el Servicio Técnico Autorizado puede reparar su placa en caso de
avería. De lo contrario, la garantía que posee quedará invalidada.
• En la placa de características figuran los datos técnicos y de identificación
del aparato.
• Este manual debe ser consultado antes de proceder a las conexiones
eléctricas.
• Las conexiones eléctricas deben ser efectuadas por un especialista
que esté al corriente de las disposiciones legales y de las exigencias
normativas reconocidas en cada país.
• Con la intención de mejorar constantemente nuestros productos, nos
reservamos el derecho de llevar a cabo modificaciones en sus características técnicas, funcionales o estéticas vinculadas a la evolución técnica.
ADVERTENCIA
Colaboramos en la defensa del Medio Ambiente.
Por esta razón, nuestros embalajes:
• Son 100% reciclables.
• Tienen la menor cantidad de piezas y material posible para facilitar
así el reciclado.
APUESTE CON NOSOTROS POR LA ECOLOGIA. RECICLE EL EMBALAJE
C60T357A4.qxd 14/3/07 15:55 Página 2
Page 5
PLACAS DE INDUCCIÓN
ÍNDICE
INSTALACIÓN 4
1. DESCRIPCIÓN DEL APARATO 4
2. DIMENSIONES DE ENCASTRE 4
3. FIJACIÓN DE LA ENCIMERA 6
4. LUGAR DE INSTALACIÓN 6
UTILIZACIÓN 7
1. TIPO DE APARATO 7
•Potencia de cada foco 7
2. DESCRIPCIÓN DE LOS MANDOS 8
•Mando con funciones especiales 8
-Funciones 8
•Funcionamiento 9
-Encendido de un foco 9
-Función temporizador 10
-Señal sonora 10
•Funciones Especiales 11
•Mando con funciones básicas 13
•Funcionamiento 13
-Encendido de un foco 13
-Funcionamiento temporizador 13
-Señal sonora 13
-Función P. (P punto)
Función de calentamiento rápido 13
•Mando compacto 14
•Funcionamiento 14
-Encendido de un foco 14
-Señal sonora 14
-Funcionamiento temporizador 14
3. SEGURIDAD 15
•Seguridad en el funcionamiento 16
4. RECIPIENTES 17
5. CUIDADO Y LIMPIEZA 18
6. CONEXIÓN ELECTRICA 19
QUÉ HACER SI... 21
C60T357A4.qxd 14/3/07 15:55 Página 3
Page 6
PLACAS DE INDUCCIÓN
INSTALACIÓN
1
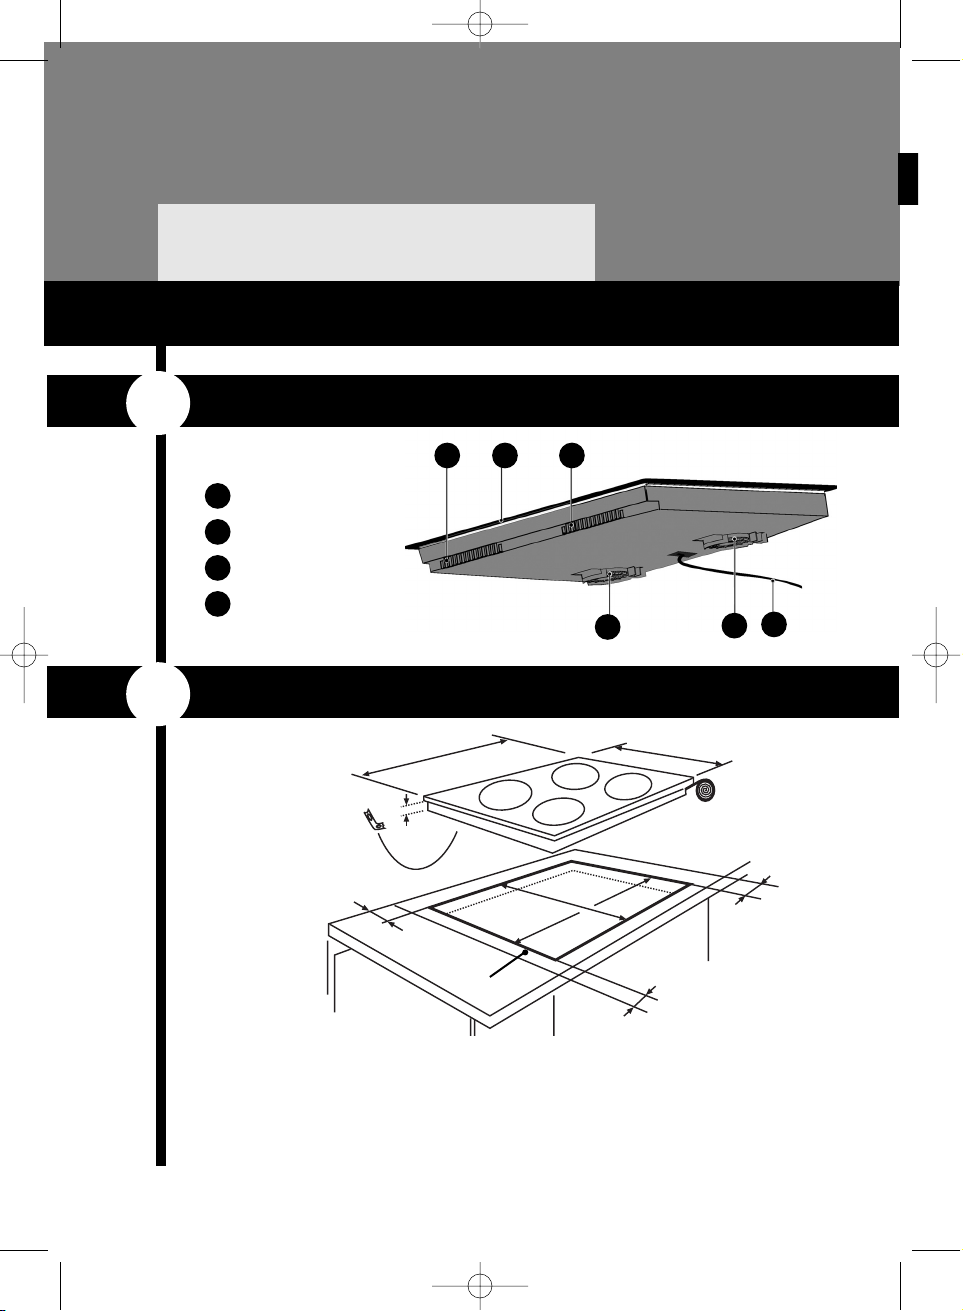
DESCRIPCIÓN DEL APARATO
2
DIMENSIONES DE ENCASTRE
Su aparato debe estar colocado de forma que la instalación a la red eléctrica esté accesible.
La distancia entre el borde de la placa y la pared (o tabique) lateral o trasera debe ser de al
menos 40 mm (zona A).
Pegue la junta de espuma debajo de la placa siguiendo el contorno de las superficies de
apoyo con su encimera. De este modo conseguirá una buena estanqueidad con la encimera.
Fije los enganches de la placa al mueble.
No utilizar materiales no removibles como la silicona.
4
A
A
A
B
B C B
C
D
D
Entrada de aire
580
490
64
40
40
40
A
560
510
Salida de aire
Vidrio vitrocerámico
Cable de alimentación
C60T357A4.qxd 14/3/07 15:55 Página 4
Page 7
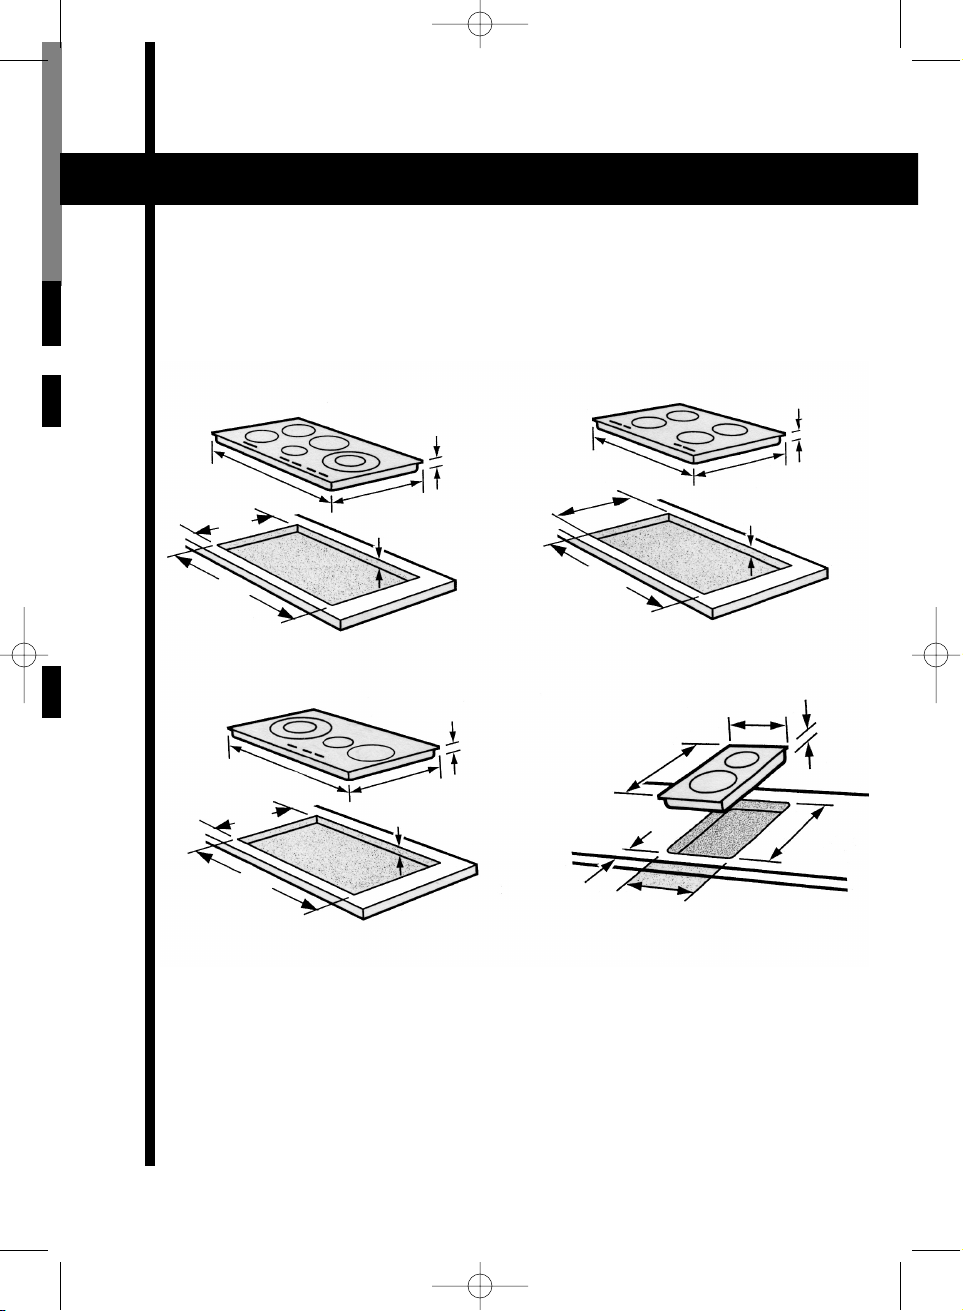
DIMENSIONES DE ENCASTRE
5
65
65
65
288
65
40 máx.
60 máx.
40 máx.
40 máx.
510
510
490
510
410
440
490
490
930
930
770
900
900
270
750
C60T357A4.qxd 14/3/07 15:55 Página 5
Page 8
Coloque la placa en el hueco del
mueble presionando bien para
que la junta de estanqueidad
haga buen cierre.
Amarre los cuatro enganches de
la placa por la parte inferior en las
esquinas del hueco.
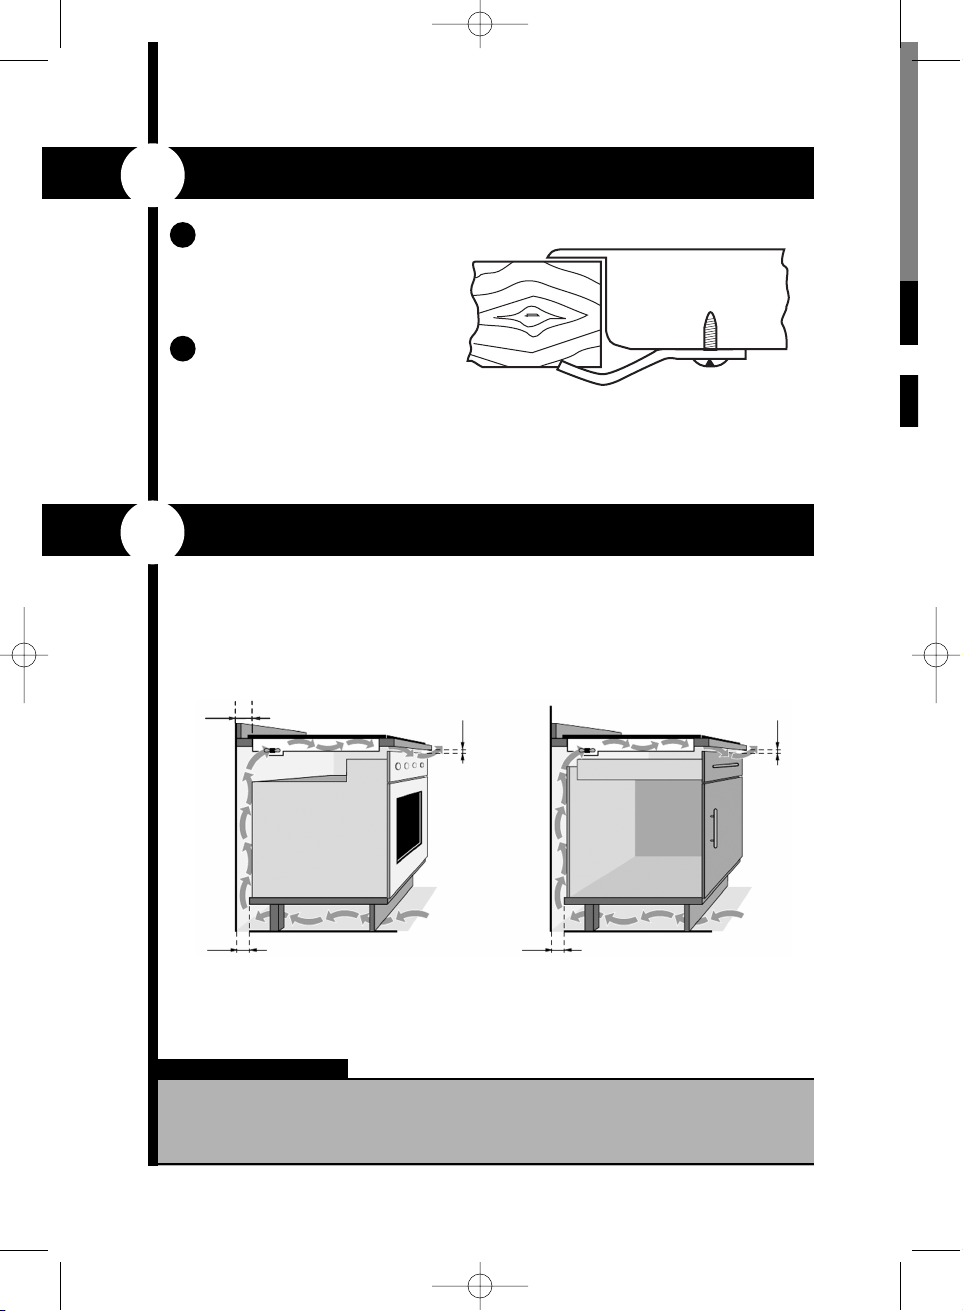
Los circuitos electrónicos de su placa de inducción deben enfriarse por una corriente
de aire fresco como se indica en el esquema.
40mm mínimo
50mm
Placa sobre Horno Placa sobre Mueble
50mm
5mm mínimo 5mm mínimo
6
IMPORTANTE
La instalación debe garantizar que llegue aire fresco por la parte trasera y que tenga una
salida en la parte delantera de al menos 5 mm.
3
FIJACIÓN EN LA ENCIMERA
4
LUGAR DE INSTALACIÓN
A
B
C60T357A4.qxd 14/3/07 15:55 Página 6
Page 9
7
UTILIZACIÓN PLACAS
DE INDUCCIÓN
UTILIZACIÓN
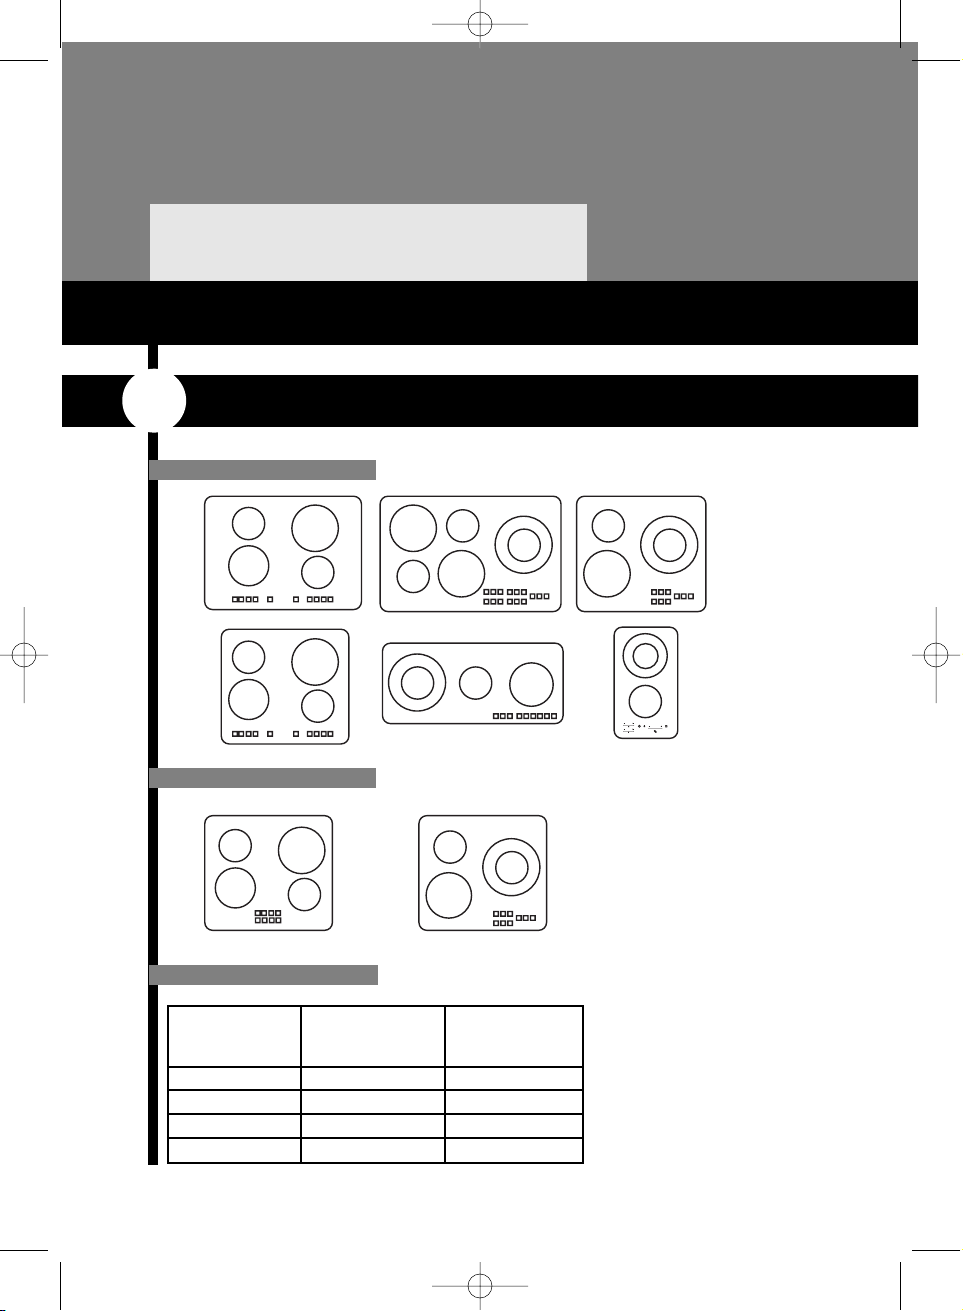
Tamaño foco Pot. Tipo “A” Pot.Tipo “B”
(cm)
16 2.200w 2.000w
18 2.800w 2.800w
21 3.100w 3.100w
28 3.600w 2.800w
TIPO A
TIPO B
POTENCIA DE CADA FOCO
TIPO DE APARATO
1
Los aparatos tipo
"A" llevan mandos
con funciones
especiales o con
funciones basicas
Los aparatos tipo
"B" llevan mandos
compactos
C60T357A4.qxd 14/3/07 15:55 Página 7
Page 10

8
2
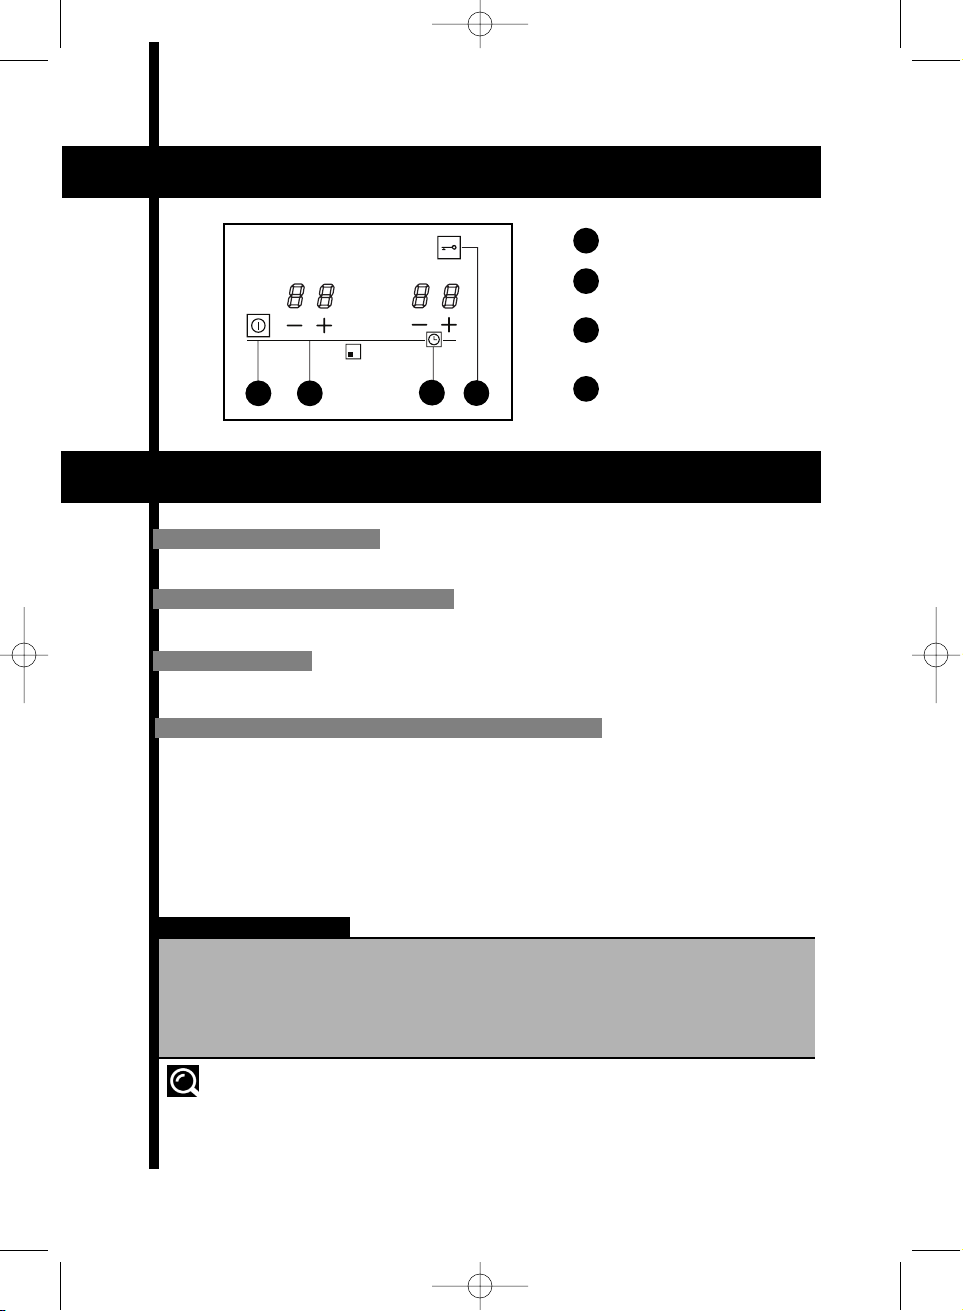
DESCRIPCIÓN DE LOS MANDOS
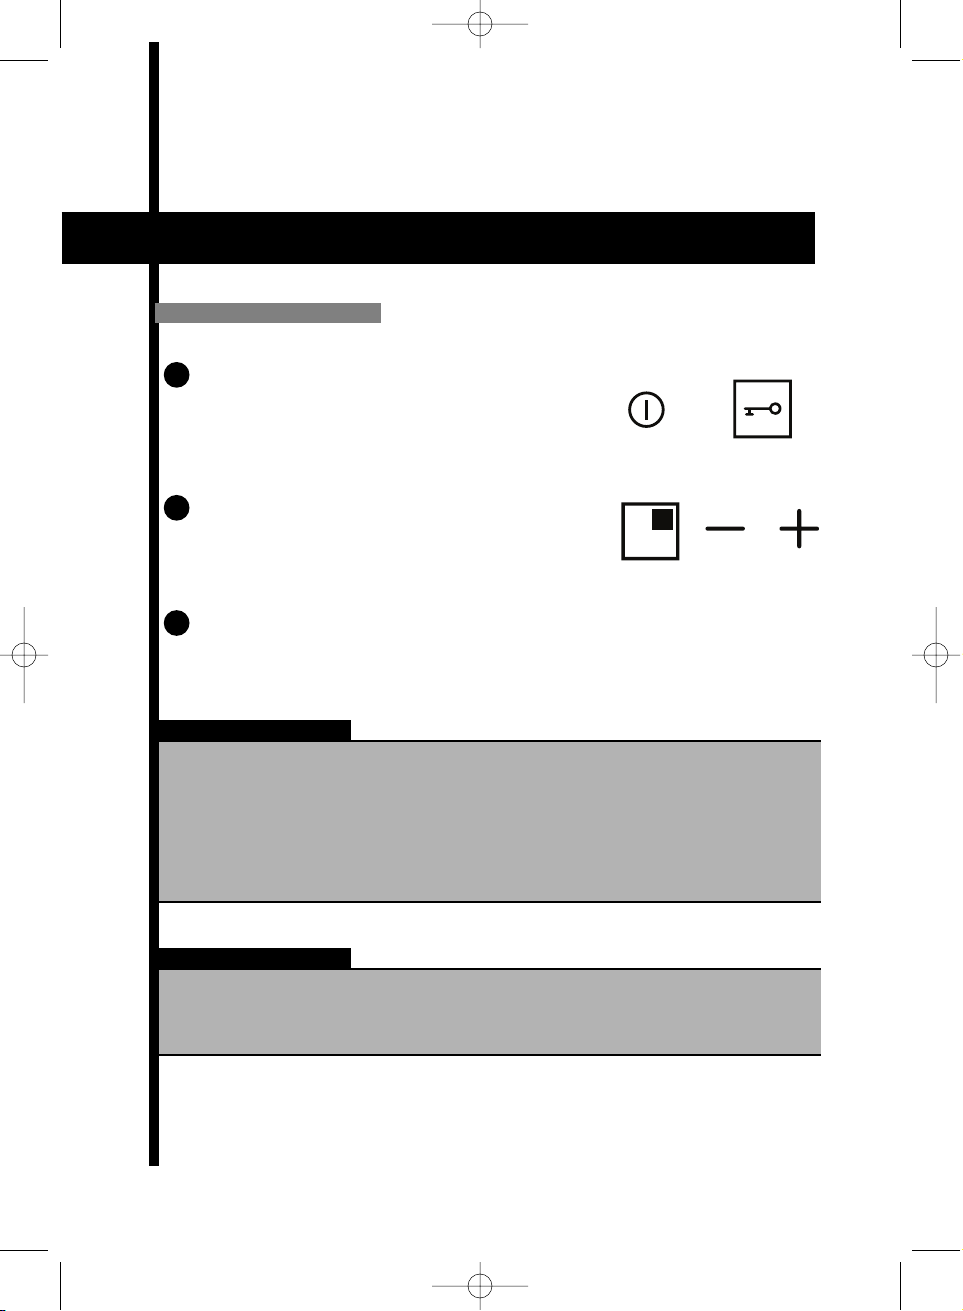
Sensor Encendido/Apagado.
Sensores y Visualizadores
de Potencia entre “0 y P.”
Indicador de Foco a utilizar.
Funciones Especiales.
Sensores y Visualizador
del Temporizador.
Sensor y Visualización de
Seguridad.
Permite el encendido o apagado de cada foco.
Al encender el foco se visualiza un “0” en el visualizador de potencia.
Busque el tipo de mando que corresponde al de su placa
. Mando con funciones especiales
. Mando con funciones básicas
. Mando compacto
Permite ver sobre la placa la situación de cada foco.
Permite bloquear los demás sensores para evitar que los niños puedan
jugar con los mismos.
Permite seleccionar el tiempo de cocción del foco elegido entre 0 y 99
minutos. Si pulsamos el “-” y el “+” al mismo tiempo, el temporizador se
pone a 0. Si se mantienen pulsados dichos botones la velocidad de
avance de los minutos aumenta.
Permite realizar funciones especiales.
Permite elegir la potencia de cualquiera de los focos eligiendo entre
el 0, 1, 2...11 y P.
FUNCIONES
MANDO CON FUNCIONES ESPECIALES
A
A B C D E F
B
C
D
E
F
C60T357A4.qxd 14/3/07 15:55 Página 8
Page 11
9
IMPORTANTE
Sitúe la yema del dedo encima del sensor de encendido/apagado.Tenga en cuenta que para evitar que los
niños puedan jugar con los mandos, existe el sensor de
seguridad, que se desactiva manteniendo el dedo encima
durante tres segundos.
Asegúrese de que el sensor que va a accionar corresponde al foco que quiere utilizar.
Sitúe la yema del dedo encima de los sensores
de potencia “-” ó “+”
Seleccione la potencia adecuada manteniendo el dedo
encima.
Al hervir líquidos, sobre todo en potencias altas, se oirá un zumbido debido al acoplamiento de las frecuencias de los focos.
IMPORTANTE
ENCENDIDO DE UN FOCO
· Siempre que desee podrá activar el sensor de seguridad manteniendo el dedo encima
durante tres segundos.
· Si deja algún objeto encima de los sensores, la placa emitirá unos pitidos y se apagará.
· La placa se apaga automáticamente después de un tiempo estimado de seguridad,
que varía según la potencia seleccionada. ( Desde 1 hora en potencia “P” o “9”, hasta
10 horas en la potencia “1” ).
FUNCIONAMIENTO
A
B
C
C60T357A4.qxd 14/3/07 15:55 Página 9
Page 12
10
Encender un foco. Para encender el foco, pulse el
botón de dicho foco. A continuación seleccione la
potencia deseada con los botones “+” ó “-” de los
sensores de potencia.
Asignar el tiempo al temporizador. Para ello, pulse los
botones “+”ó “-” del temporizador, con ello se visualiza
el tiempo en minutos.
Si se comienza con el “+” se visualiza inicialmente “00”
minutos.
Si se comienza con el “-” se visualiza inicialmente “99”
minutos.
Dicho tiempo se irá descontando hasta llegar a cero y
entonces el foco se apaga.
Pasos a seguir para temporizar un foco:
Existe la posibilidad de silenciar el aparato, esto es, desactivar las señales sonoras.
Sólo se podrá activar o desactivar cuando la placa está apagada.
• Para desactivar la señal sonora, pulse simultaneamente los mandos “+”
de potencia y “+” del temporizador en la placa de mandos de la zona de
cocción derecha o trasera derecha (según modelos) hasta que aparezca
el símbolo “bE Ep”, tenga pulsado hasta que desaparezcan los dígitos.
• Para activar la señal sonora pulse simultáneamente los mandos “+” de
potencia y “+” del temporizador en la placa de mandos de la zona de
cocción derecha o trasera derecha (según modelos) hasta que aparezca
el símbolo “bE Ep” y una señal sonora, a continuación deje de pulsar los
botones.
IMPORTANTE
Si no selecciona tiempo, y en el visualizador indica 00 se apaga el temporizador,
y si el mismo indica 99, toma como tiempo de temporización 99 minutos.
SEÑAL SONORA
FUNCIÓN TEMPORIZADOR
A
B
C
C60T357A4.qxd 14/3/07 15:55 Página 10
Page 13

11
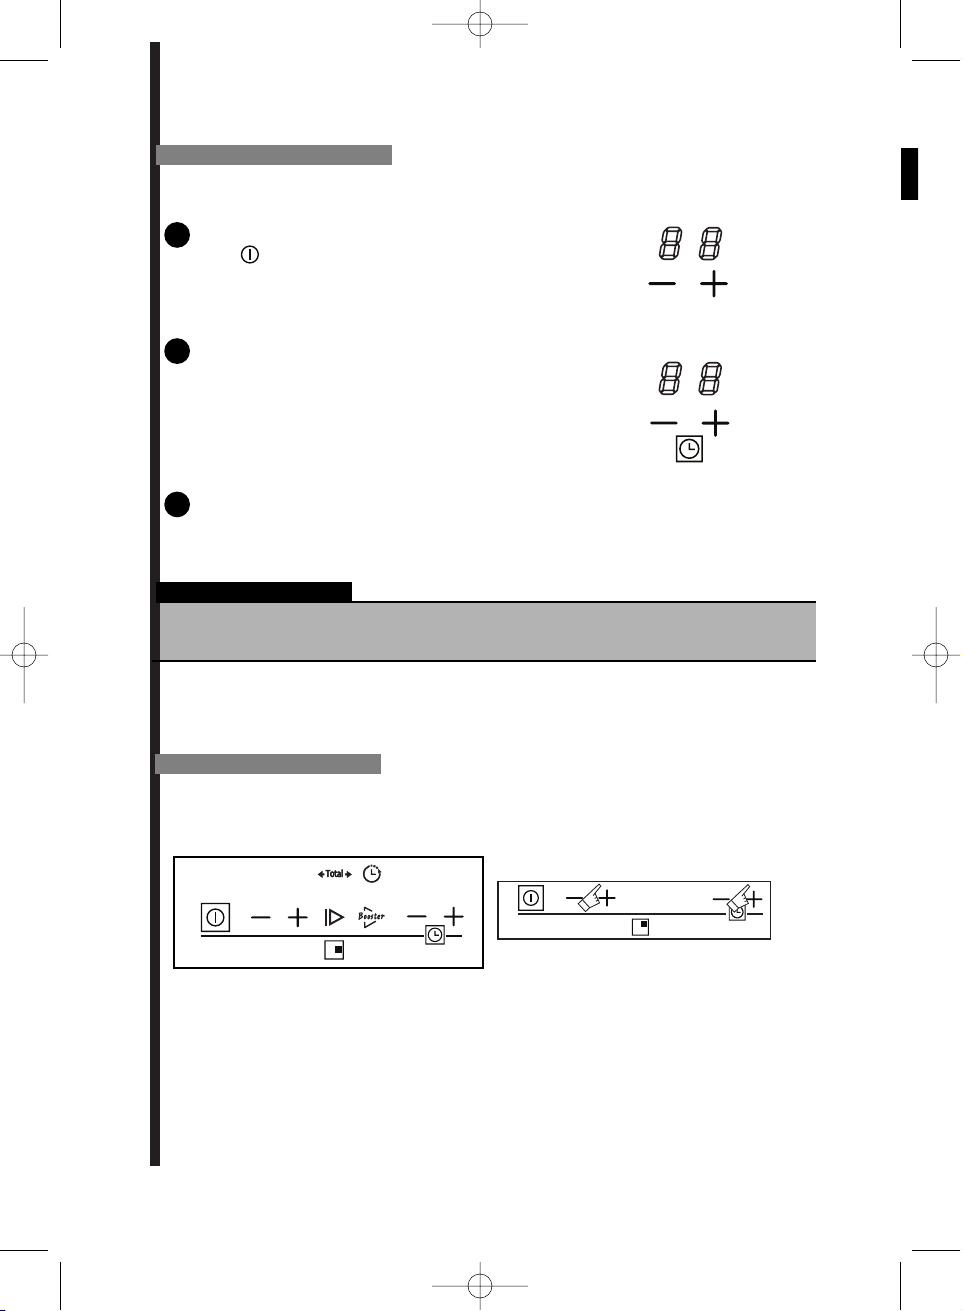
TOTAL
Permite introducir en cualquier momento un salto de potencia durante un tiempo
determinado. Esto supone total flexibilidad para el usuario.
1. Partimos de la placa encendida y a una potencia determinada.
2. Pulsamos el botón y a continuación se puede introducir la
nueva potencia y el tiempo en el que va a estar activo.
La potencia se ajusta con los botones “-” y “+” de la zona (B) y la
duración se ajusta con los botones “-” y “+” de la zona (E).
3.A continuación validar pulsando el botón
4.Se visualiza la nueva potencia con un punto.
5.Una vez transcurrido el tiempo, vuelve a la posición inicial y el punto
desaparece.
ACCESO DIRECTO
Permite acceder en cualquier momento a una potencia determinada
Pulse el botón y la placa se pondrá a una potencia determinada
(La potencia definida por el fabricante es la 8), pero el usuario podrá
cambiar el valor de esa potencia siguiendo los siguientes pasos.
Modificación de la potencia del acceso directo
(Estando el foco apagado)
1. Mantener pulsado el botón hasta que suena un bip.
2. Se visualiza la potencia definida de forma intermitente.
3. Modificar la potencia con los botones “-” y “+” de potencia (B).
4. Volver a pulsar el botón para validar la operación.
5. Apagar el foco.
BOOSTER
Las zonas de cocción están dotadas de función “BOOSTER”. Esta función
supone alcanzar rápidamente la temperatura máxima.
1.Pulse el botón
El visualizador de potencia del foco mostrará (bo) y el foco
comenzará a dar la potencia máxima.
2.Una vez calentado el foco, seleccione la potencia deseada pulsando
el botón “-” de la zona “B”.
La función “BOOSTER” quedará anulada pulsando cualquier otro sensor de
potencia asociado al foco, o con el sensor encendido/apagado.
IMPORTANTE
Al utilizar la función “BOOSTER” si se enciende el otro foco del mismo lado de la placa, la
máxima potencia que se podrá utilizar será la 6. Esto es debido a que en dicha función el
aparato toma potencia del foco contiguo.
FUNCIONES ESPECIALES
C60T357A4.qxd 14/3/07 15:55 Página 11
Page 14
12
PROGRAMACIÓN DIFERIDA
Permite ajustar la hora de finalización y la duración de dicho cocinado.
1. Encender el foco deseado, con el botón .
2. Pulsar el botón y se visualiza la hora actual. Si la hora es
correcta pasar al punto 4, y si no, hay que ajustar la hora.
3. AJUSTE DE HORA ACTUAL: Usar los botones “-” y “+” de la
potencia zona (B) para ajustar la hora actual y usar los botones
“-” y “+” del temporizador (E) para ajustar los minutos.
4. Validar la hora pulsando el botón (a continuación parpadearán
los dígitos).
5. Ajustar la hora en que se quiere que se acabe de cocinar con los
botones “ -” y “+” de las zonas (B) y (E).
6. Validar pulsando el botón
7. Ajustar la duración del cocinado con los botones “-” y “+” de la
zona(E).
8. Validar pulsando el botón
9. Definir la potencia deseada para el cocinado con los botones
“-” y “+” de la zona (B).
10. Validar la potencia pulsando el botón .
11. Una vez programado, se visualiza (Au to) y a continuación los
dígitos se apagarán y solamente quedará encendido un punto
rojo.
IMPORTANTE
La programación diferida no se podrá utilizar al mismo tiempo en más de un foco.
Los valores de finalización, duración y potencia deseados se deben ir ajustando mientras
los dígitos están intermitente.
C60T357A4.qxd 14/3/07 15:55 Página 12
Page 15
13
MANDO CON FUNCIONES BÁSICAS
FUNCIONAMIENTO
Sensor Encendido/Apagado.
Sensores y Visualizadores de
Potencia entre 0 y P.
Sensores y Visualizadores
del Temporizador.
Sensor y Visualización
de Seguridad.
Esta función permite obtener una mayor potencia durante un tiempo determinado.
•La función “P.” (P punto) se obtiene presionando el botón “+” hasta la posición
“P”, suelte el mando y la “P” parpadeará, pulse de nuevo el mando y se pondrá
en la posición “P.” (P punto) máxima potencia a continuación pulse el mando “-”
y ponga en la potencia deseada de cocción, seguidamente se visualiza
“P.”(P punto).
Al cabo de un tiempo cuando haya pasado el tiempo pertinente vuelve a la
potencia seleccionada por el usuario.
FUNCIÓN P. (P punto) (Función de calentamiento rápido)
CONSEJO
Preferentemente utilice las zonas de cocción situadas en lados diferentes. Si se eligen
en el mismo lado, la utilización de una zona de cocción a máxima potencia provoca
una autolimitación de la otra zona de cocción, situadad en el mismo lado visible en los
indicadores de potencia.
IMPORTANTE
Después de seleccionar la potencia "P." (P punto) si no se elige la potencia de trabajo
final, la potencia del foco se mantendrá en "P"
Mientras se visualiza "P." (P punto) cualquier acción en los mandos de potencia
anularán la “función calentamiento rápido” y volverá al modo clásico de regulación de la
potencia
El funcionamiento es igual que el descrito en los mandos con funciones especiales.
ENCENDIDO DE UN FOCO
El funcionamiento es igual que el descrito en los mandos con funciones especiales.
FUNCIONAMIENTO TEMPORIZADOR
El funcionamiento es igual que el descrito en los mandos con funciones especiales.
SEÑAL SONORA
A
A
D
B
C
B
C
D
C60T357A4.qxd 14/3/07 15:55 Página 13
Page 16
14
IMPORTANTE
Solamente se puede temporizar un foco cada vez. Para parar una temporización, pulsar el
botón . El foco que está temporizado muestra alternativamente la potencia de trabajo y
una “t”.
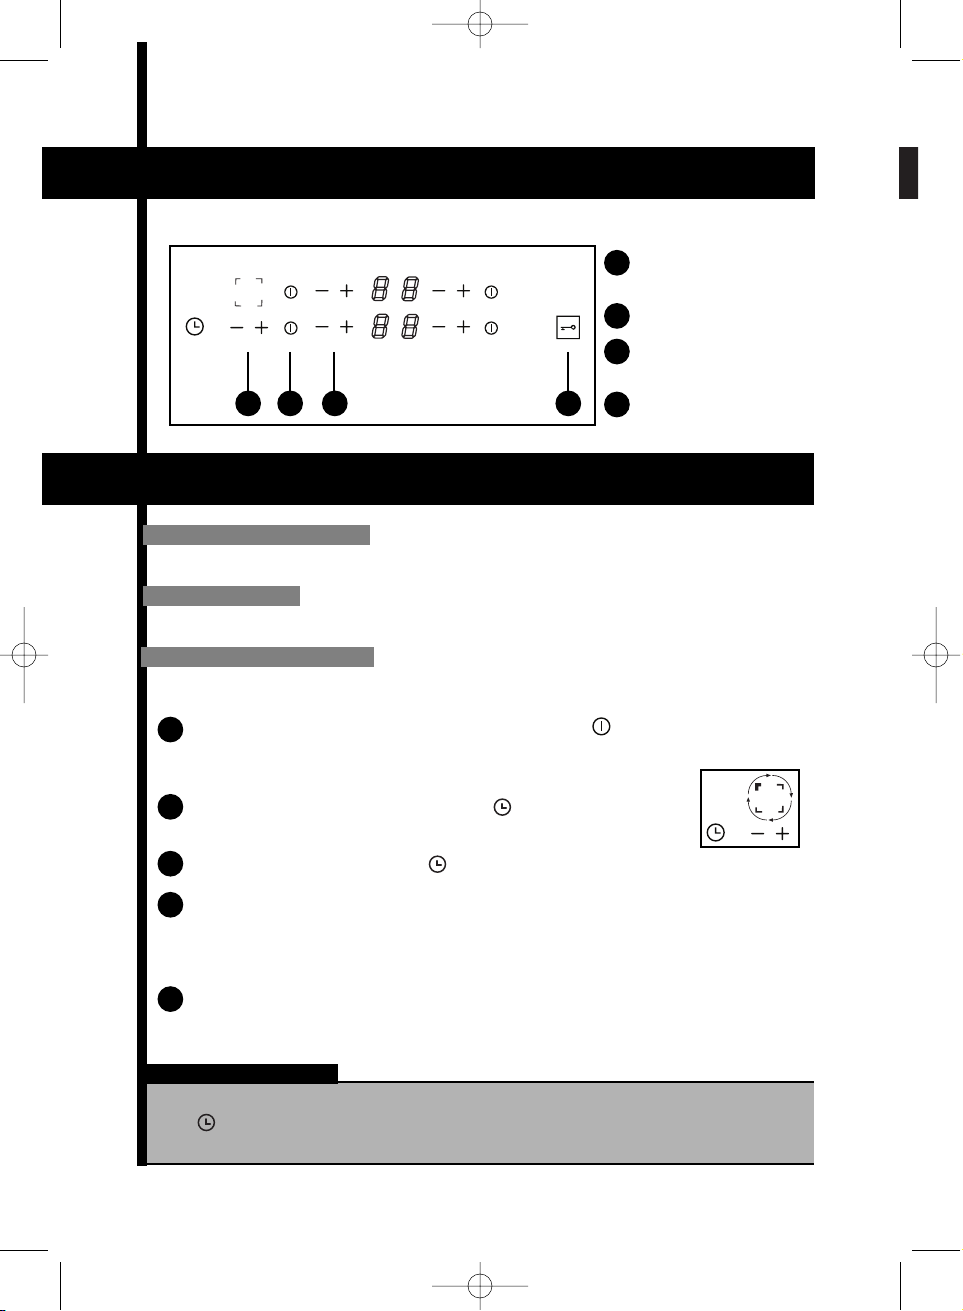
Sensores y Visualizador
del Temporizador
Sensor Encendido/Apagado
Sensores y Visualizadores
de potencia entre “0” y “9”
Sensor y Visualizador de
Seguridad
FUNCIÓN TEMPORIZADOR
MANDO COMPACTO
A
B
C
D
A B C D
FUNCIONAMIENTO
El funcionamiento es igual que el descrito en los mandos con funciones especiales.
Pasos a seguir para temporizar un foco:
ENCENDIDO DE UN FOCO
El funcionamiento es igual que el descrito en los mandos con funciones especiales.
SEÑAL SONORA
Encender un foco. Para encender el foco, pulse el botón de dicho foco. A continuación seleccionar la potencia deseada con los botones “+” ó “-” de los sensores de
potencia.
Encender el temporizador. Para ello pulsar . Se visualiza
la zona que se quiere temporizar por medio de estos símbolos.
Pulsando repetidamente el botón , la posición del foco a temporizar va rotando.
Una vez seleccionado el foco a temporizar, se asigna el tiempo con los botones
“+” ó “-” del temporizador. Con ello se visualiza el tiempo en minutos.
Si se comienza con el”+” se visualiza inicialmente “00” minutos.
Si se comienza con el “-”se visualiza inicialmente “99” minutos.
Dicho tiempo se irá descontando hasta llegar a cero y entonces el foco se apagará.
A
B
C
D
E
C60T357A4.qxd 14/3/07 15:55 Página 14
Page 17
15
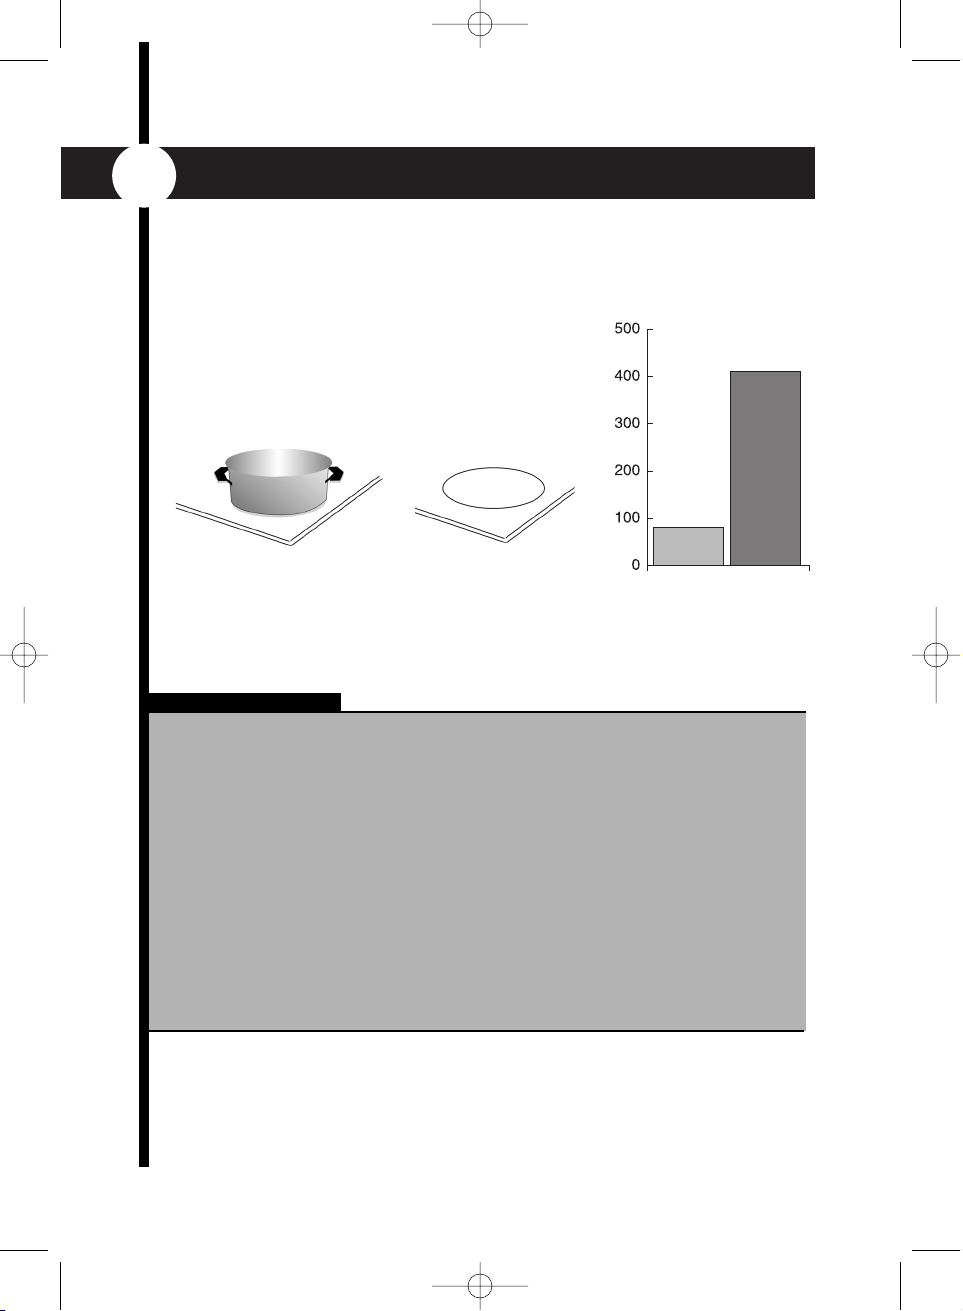
El peligro de quemarse por la temperatura del vidrio es
mínimo. Al producirse el calor en el propio recipiente, el
vidrio se calienta muy poco.
Los focos de inducción disponen de un sistema de
detección del recipiente. Es decir, el foco no funcionará
a menos que haya un recipiente adecuado encima.
calienta
no calienta
IMPORTANTE
A LA ATENCIÓN DE USUARIOS DE ESTIMULADORES CARDIACOS E IMPLANTES
ACTIVOS:
El funcionamiento de la encimera es conforme a las normas de perturbaciones electromagnéticas en vigor.
Su placa de cocción por inducción responde perfectamente a las exigencias legales (directivas 89/336/CEE). Ha sido diseñada para no interferir en el funcionamiento de los demás
aparatos eléctricos en la medida en que éstos respeten esta misma normativa.
SU PLACA DE INDUCCIÓN GENERA CAMPOS MAGNÉTICOS EN SU ENTORNO MÁS
CERCANO.
Para que no haya interferencias entre su encimera de cocción y un estimulador cardiaco,
es necesario que este último haya sido diseñado de conformidad con la normativa que lo
contempla. Por lo que se refiere a la conformidad del estimulador cardiaco o a eventuales
incompatibilidades, puede consultar a su fabricante o a su médico.
410ºC
agua en ebullición
temperatura
vidrio
inducción
vitrocerámica
radiante o
halógena
81ºC
3
SEGURIDAD
C60T357A4.qxd 14/3/07 15:55 Página 15
Page 18

16
CALOR RESIDUAL
Después de una utilización intensa, la zona de cocción que acaba de utilizar
puede continuar estando caliente unos minutos.
Aparecerá una “H” intermitente mientras está caliente.
Evite tocar esas zonas.
PROTECCIÓN EN CASO DE DESBORDAMIENTO
En caso de desbordamiento, la placa se para y se visualiza un símbolo como en
la (Fig. A), y una señal sonora (según modelo) se puede activar en alguno de los
siguientes tres casos.
1.Desbordamiento que cubra las teclas del mando.
2.Trapo mojado colocado sobre las teclas.
3.Objeto metálico colocado sobre las teclas de mando.
Limpie o retire el objeto y vuelva a poner en marcha
la cocción.
AUTO-STOP SYSTEM
Si se olvida de apagar un foco, su placa está equipada con una función de
seguridad AUTO-STOP SYSTEM que cortará automáticamente la zona de
cocción después de un tiempo ya fijado (entre 1 y 10 horas según la potencia
empleada).
En caso de que se active esta seguridad, el corte de la zona de cocción queda
señalado con la información “AS” o “A” en la zona de mandos y se emite una
señal sonora durante unos minutos. Sólo tendrá que pulsar alguna tecla de los
mandos para que deje de sonar. Un doble pitido confirmará la maniobra.
SEGURIDAD EN EL FUNCIONAMIENTO
(Fig.A)
C60T357A4.qxd 14/3/07 15:55 Página 16
BIP-BIP
Page 19
17
Zona de cocción* Recipiente a utilizar
16 cm 10...18 cm
18 cm 12...22 cm
21 cm 18...24 cm
28 cm 12...32 cm
El calor por inducción se
genera con gran rapidez
y en la propia base del
recipiente. Por eso no se
debe poner nunca a
calentar un recipiente
vacío.
Dentro de los recipientes
válidos para inducción, es
preferible utilizar los de
fondo más grueso. El
reparto y aprovechamiento
del calor será mejor.
Si el recipiente no es adecuado lo sabrá porque la potencia del indicador parpadeará.
Únicamente el vidrio, el barro, el aluminio sin fondo especial, el cobre y algunos aceros
inoxidables no magnéticos no son aptos para la cocción por inducción.
4
RECIPIENTES
¿QUÉ ZONA DE COCCIÓN UTILIZAR
EN FUNCIÓN DEL RECIPIENTE?
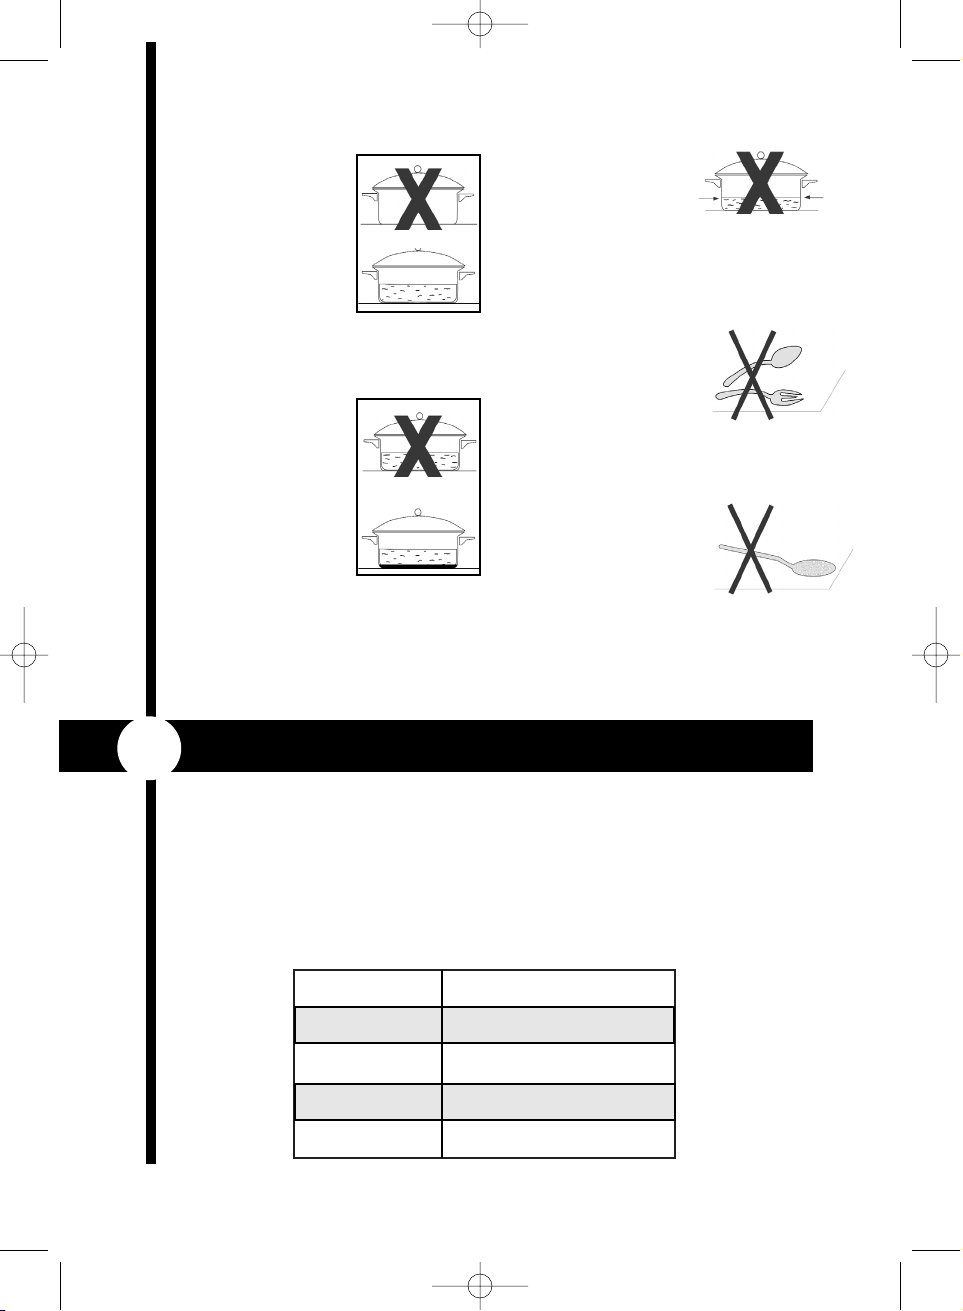
Procurar no mover los recipientes rozando el vidrio de
la placa. Levántelos para
desplazarlos.
No deje utensilios sobre la
placa en marcha. Podría
detectarlos como si fueran
recipientes y calentarse.
Normalmente una cuchara o
tenedor no serán detectados,
pero si un utensilio mayor.
*Según modelo
C60T357A4.qxd 14/3/07 15:55 Página 17
Page 20
18
Al calentarse el vidrio
mucho menos, se evita
que las salpicaduras o
derrames se endurezcan
sobre la placa. Así, la limpieza es más fácil.
No obstante, tanto en la
vitrocerámica como en
los focos de inducción,
limpie lo antes posible los
derrames y salpicaduras.
5
CUIDADO Y LIMPIEZA
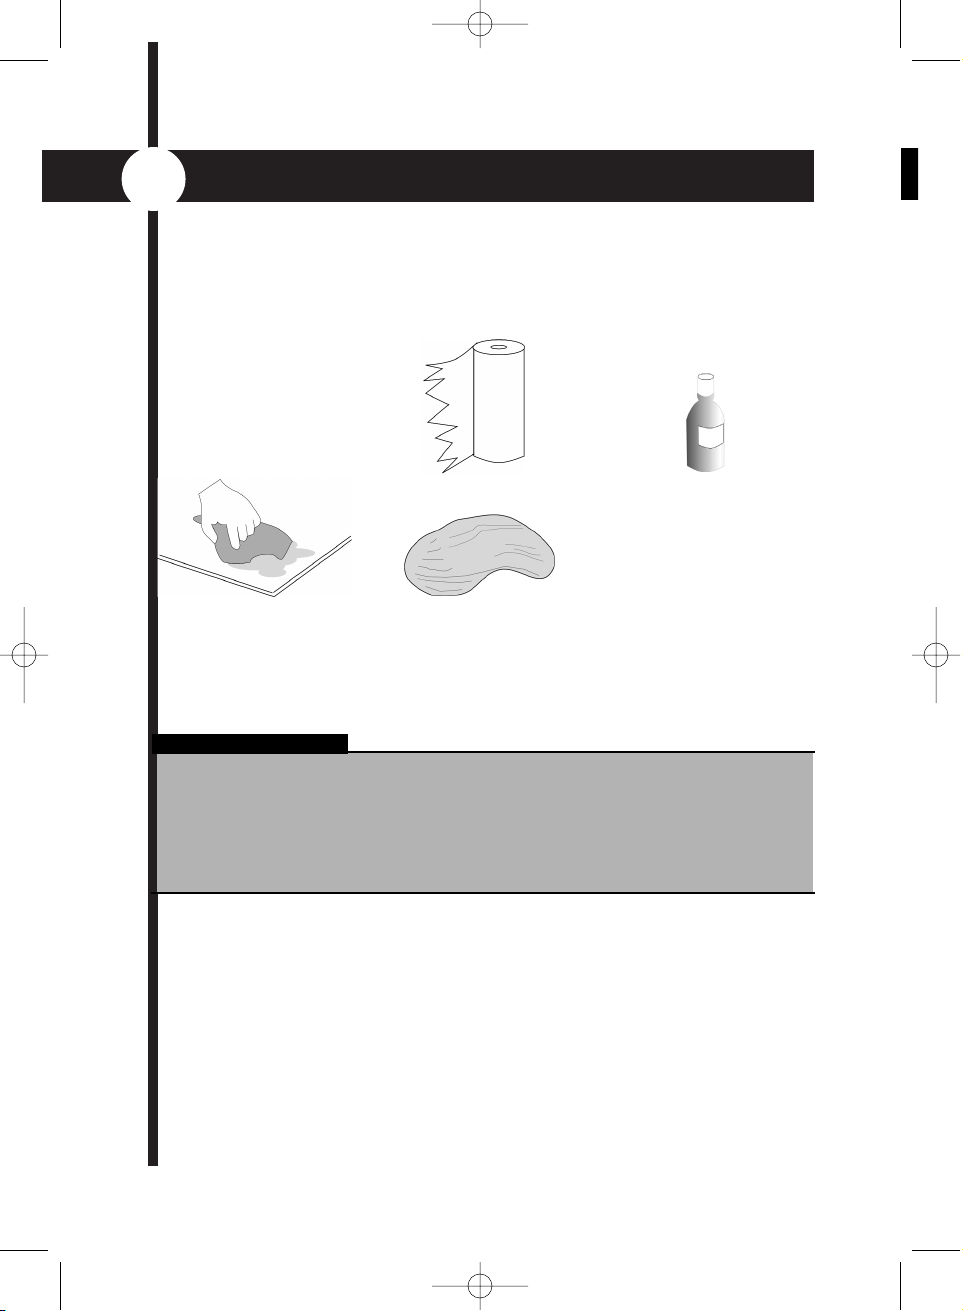
Las suciedades más ligeras
se quitan simplemente con
un trapo de papel laminado
o con un paño.
Para las suciedades más
resistentes, utilice productos
específicos para vidrios
vitrocerá-micos. Utilícelos
siguiendo las instrucciones
que los acompañan.
IMPORTANTE
· No utilice productos abrasivos o polvos de fregar. Se puede rayar la placa.
· No utilizar un limpiador de vapor.
· Si apareciera una fisura en la superficie del vidrio, desconecte inmediatamente
el aparato de la fuente de alimentación eléctrica. No utilice ninguna parte de la placa
antes de que se instale un nuevo vidrio vitrocerámico.
C60T357A4.qxd 14/3/07 15:55 Página 18
Page 21
19
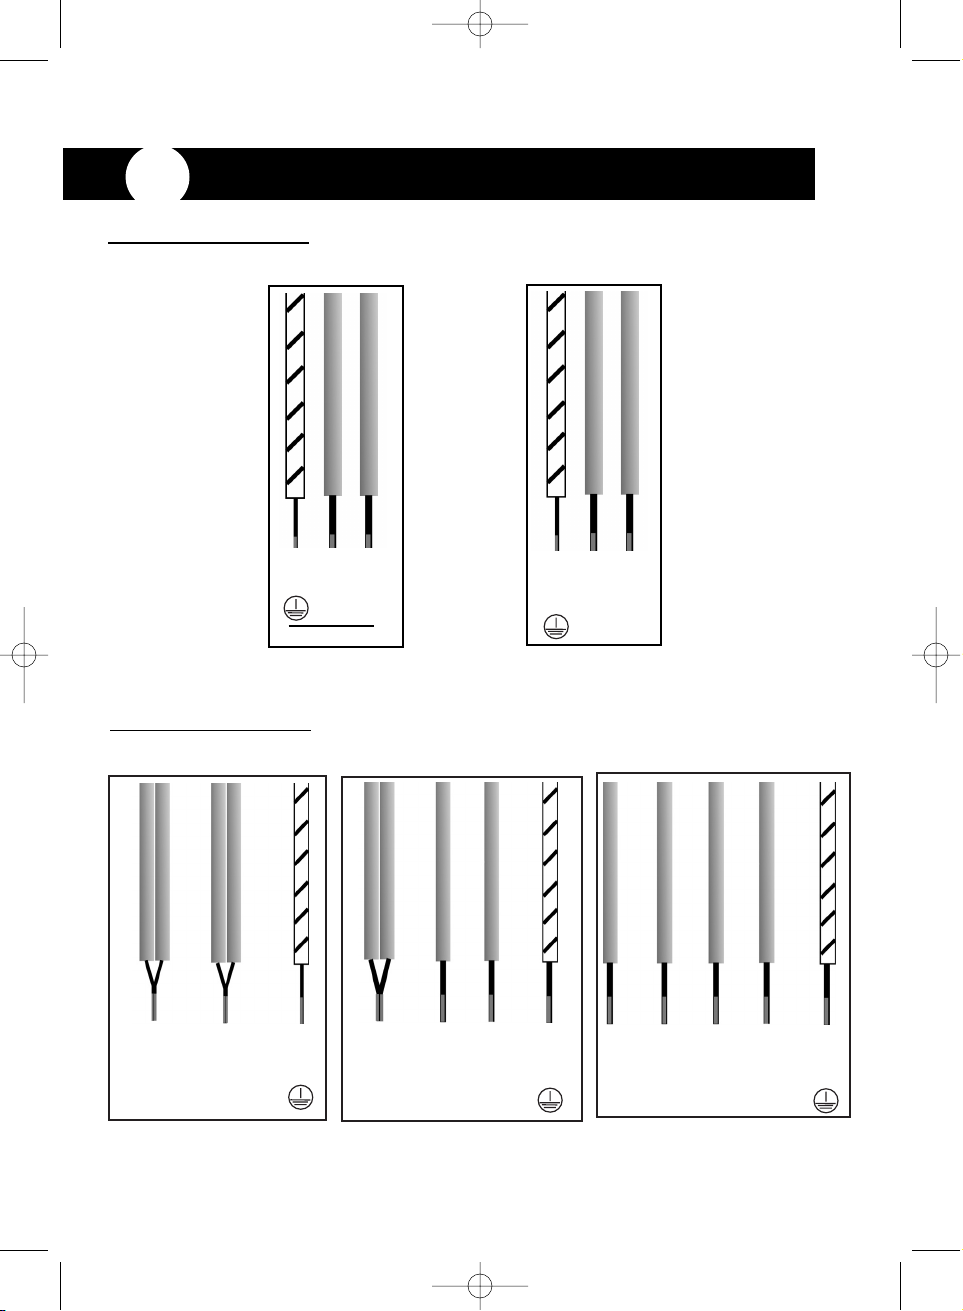
220-240 V monofásica
Fusible 32 amperios
Neutro
N
Marrón
Verde/Amarillo
Azul
Negro o gris
Marrón
Verde/Amarillo
Azul
Negro o gris
Marrón
Verde/Amarillo
Azul
Negro
Gris
Fase
L
Tierra
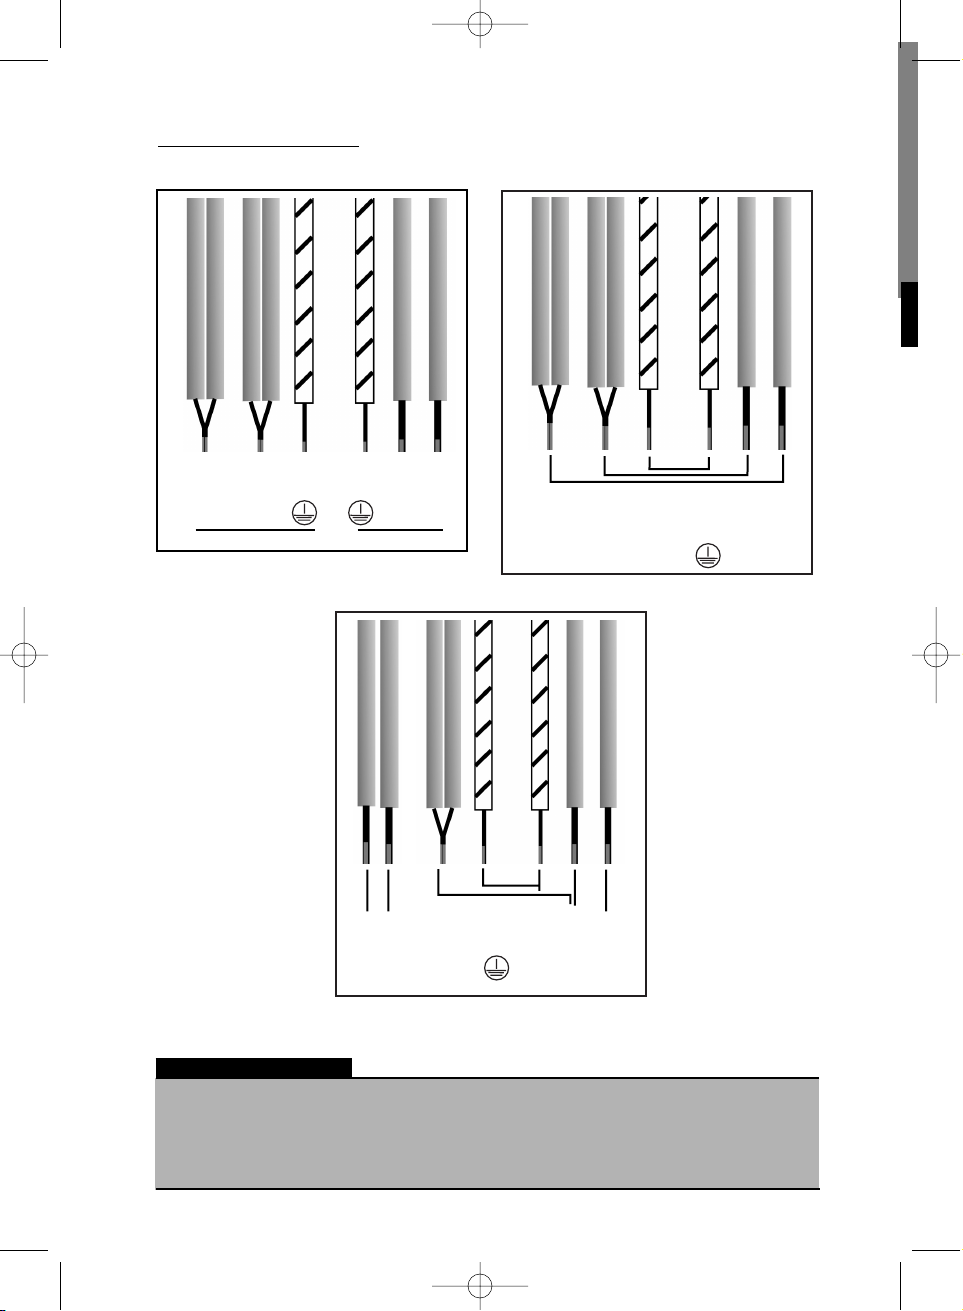
400 V 2N trifásica
Fusible 16 amperios
2 x 230 V trifásico
Separe los 2 cables de fase L1,L2
antes de efectuar la conexión.
Separe los 2 cables de fase L1,L2
y Neutro N1 N2 antes de efectuar
la conexión.
Neutro
N
Fase1L1Fase2
L2
Tierra
Neutro 1
Neutro 2
N1 N2
Fase1L1Fase2
L2
Tierra
CONEXIÓN ELÉCTRICA
CABLES DE 3 HILOS
CABLES DE 5 HILOS
6
400 V 3N trifásica
Fusible 16 amperios
Neutro
N
Fase
L1
Tierra
Marrón
Verde/Amarillo
Azul
220-240 V monofásica
Fusible 16 amperios
16A
Verde/Amarillo
Azul
Neutro
N
Tierra
Marrón
Fase
L
C60T357A4.qxd 14/3/07 15:56 Página 19
Page 22
20
400 V 3N trifásica
Fusible 16 amperios
220-240 V monofásica
Separe los 2 cables de fase L1,L2
antes de efectuar la conexión.
Neutro
N
Fase
L
Tierra
Neutro
N
Fase
L3
Fase
L1
Fase
L2
Tierra
Marrón
Verde/Amarillo
Azul
Negro o gris
Marrón
Verde/Amarillo
Azul
Marrón
Verde/Amarillo
Azul
Negro o gris
Marrón
Verde/Amarillo
Azul
IMPORTANTE
La placa se suministra con cable de alimentación. Si el cable de alimentación está dañado
debe ser sustituido por el fabricante, servicio postventa o personal autorizado con el fin de
evitar un peligro.
Al poner la placa bajo tensión o después de un corte de corriente prolongado aparecerá
un código luminoso en el panel de mandos.
220-240 V monofásica
Fusible 16 y 32 amperios
32A 16A
Neutro
N
Marrón
Verde/Amarillo
Azul
Negro o gris
Verde/Amarillo
Azul
Fase
L
Tierra
Neutro
N
Tierra
Marrón
Fase
L
CABLES DE 8 HILOS
C60T357A4.qxd 14/3/07 15:56 Página 20
Page 23
21
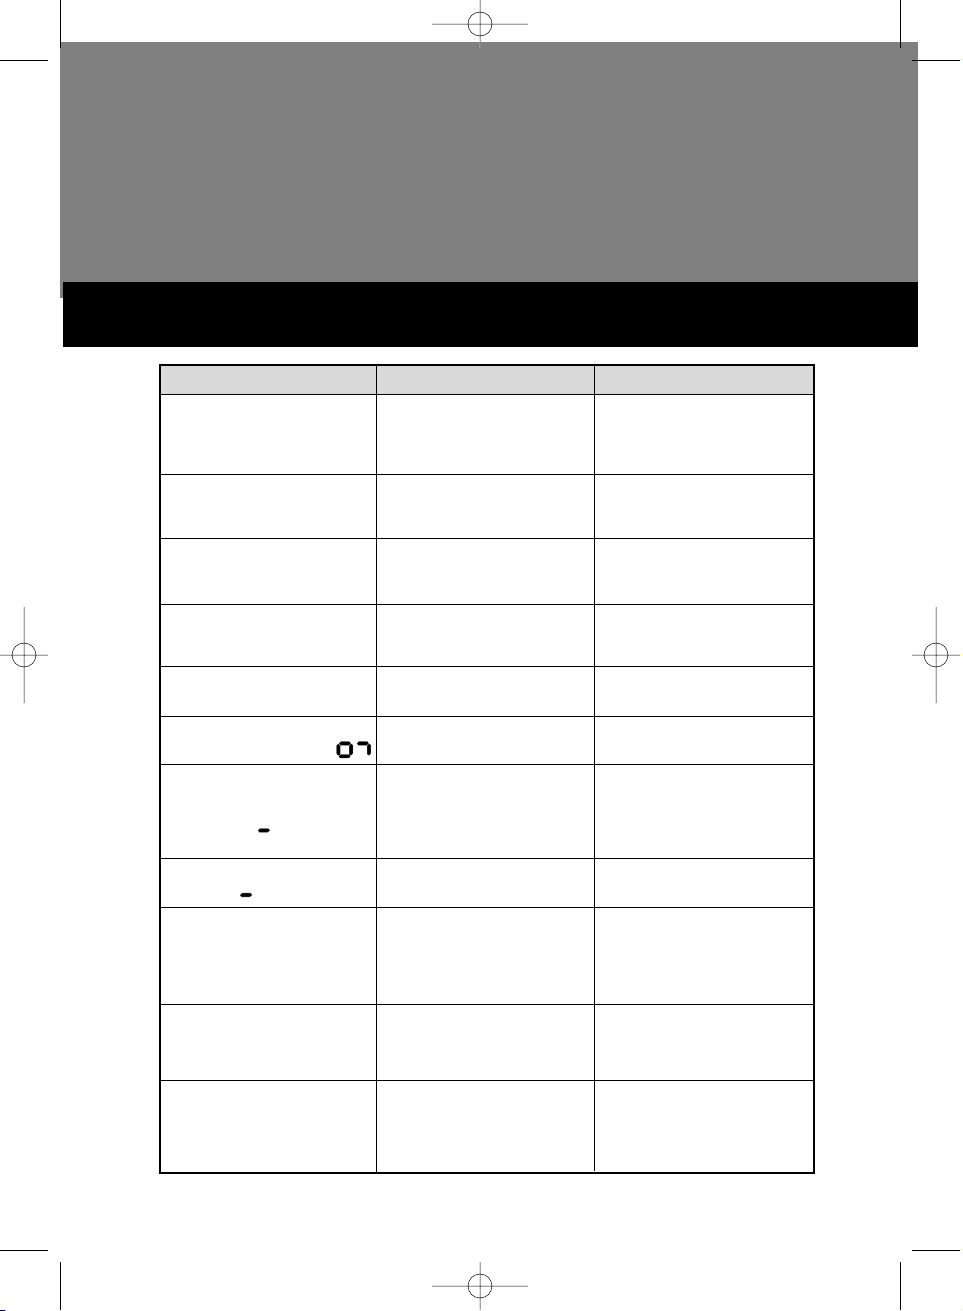
QUÉ HACER SI...
UD. ADVIERTE QUE
La placa de inducción no
funciona. Los indicadores
luminosos del teclado
están apagados.
Los diferenciales de su
instalación saltan al
ponerla en servicio.
Al conectar el aparato a la
red aparece una señal
luminosa.
La placa emana un olor en
las primeras cocciones.
La placa no funciona y
aparece un mensaje.
La placa no funciona y
aparece la información
La placa deja de funcionar,
emite una señal sonora
cada 10 segundos y
aparece un o F7 en la
pantalla.
Aparece un símbolo de
este tipo o F7.
Despues de poner en funcionamiento una zona de
calor, los pilotos luminosos
del teclado continúan
parpadeando.
Las cacerolas hacen ruido
durante la cocción. La
placa emite chasquidos
durante la cocción.
La ventilación continúa
durante unos minutos
después de haber detenido la placa.
POSIBLES CAUSAS
El aparato no está alimentado. La alimentación o
conexión es defectuosa.
La conexión de su placa
es defectuosa.
Funcionamiento normal.
Aparato nuevo.
El circuito electrónico
funciona mal.
La placa está bloqueada.
Se ha producido un desbordamiento o un objeto
ostruye el panel de mandos.
Los circuitos electrónicos
se han recalentado.
El recipiente utilizado no
es apto para la inducción o
tiene un diámetro interior a
12 cm (10 cm en foco de
16 cm).
Normal con ciertos tipos
de recipientes. Se debe al
paso de la energía de la
placa al recipiente.
Enfriamiento de la
electrónica.
Funcionamiento
normal.
QUÉ HACER
Verifique el estado de la
instalación eléctrica.
Compruebe los fusibles
y los diferenciales.
Verifique la conformidad
de la conexión.
Nada, el mensaje desaparecerá al cabo de 30
segundos.
Caliente una cazuela llena
de agua en cada zona
durante 1/2 hora.
Llame al Servicio Técnico.
Ver capítulo utilización
seguridad niños.
Limpie o retire el objeto y
vuelva a poner en marcha
la cocción.
Ver capítulo
encastramiento.
Ver capítulo de recipientes
para la inducción.
Nada. No existe ningún
riesgo para la placa ni
para el recipiente.
Nada.
C60T357A4.qxd 14/3/07 15:56 Página 21
Page 24

ADVERTENCIAS SOBRE EL MEDIO AMBIENTE
Con objeto de preservar el medio ambiente entregue su aparato usado en un centro
oficial de recogida o recuperación de materiales reciclables.
Antes de deshacerse de su aparato usado inutilícelo, cortando el cable de conexión
con el enchufe.
22
C60T357A4.qxd 14/3/07 15:56 Página 22
Page 25

23
C60T357A4.qxd 14/3/07 15:56 Página 23
Page 26

03-07 C60T357A4
Impreso en papel reciclado
C60T357A4.qxd 14/3/07 15:56 Página 24
Page 27

C60T379A2.qxd 14/3/07 16:10 Página 23
Page 28

C60T379A2.qxd 14/3/07 16:10 Página 23
Page 29

A
P
P
L
I
A
N
C
E
I
N
S
T
A
L
L
A
T
I
O
N
A
N
D
U
S
A
G
E
M
A
N
U
A
L
C60T376A8.qxd 14/3/07 16:21 Página 1
Page 30

• Only the Authorised Technical Service can replace your hob plate if it breaks
down. Otherwise your guarantee will not be valid.
• The nameplate features the technical and identification data for the appliance.
• This manual must be consulted before making any electrical connections.
• The electrical connections must be made by a specialist who is aware of the
legal procedures and the standard requirements in each country.
• In order to constantly improve our products, we reserve the right to make technical evolution modifications to their technical, functional or aesthetic features.
WARNING
We work to protect the Environment.
For this reason, our packaging:
• Is 100% recyclable.
• Has the smallest possible amount of parts and material to make
recycling easier.
COMMIT TO ECOLOGY, RECYCLING AND PACKAGING WITH US
C60T376A8.qxd 14/3/07 16:21 Página 2
Page 31

INDUCTION HOBS
INDEX
INSTALLATION 4
1. DESCRIPTION OF THE APPLIANCE 4
2. FRAME DIMENSIONS 4
3. FASTENING THE WORKTOP 6
4. INSTALLATION POSITION 6
USE 7
1. TYPE OF APPLIANCE 7
•Power of each hob 7
2. DESCRIPTION OF THE COMMANDS 8
•Command with special functions 8
-Funciones 8
•Operation 9
-Switching on a hob 9
-Timer function 10
-Acoustic signal 10
•Special Functions 11
•Command with basic functions 13
•Operation 13
-Switching on a hob 13
-Timer function 13
-Acoustic signal 13
-P. function (P point)
Fast heating function 13
•Compact command 14
•Operation 14
-Switching on a hob 14
-Acoustic signal 14
-Timer function 14
3. SAFETY 15
•Safety in operation 16
4. CONTAINERS 17
5. CARE AND CLEANING 18
6. ELECTRICAL CONNECTION 19
TROUBLESHOOTING 21
C60T376A8.qxd 14/3/07 16:21 Página 3
Page 32

INDUCTION HOBS
INSTALLATION
1
DESCRIPTION OF THE APPLIANCE
2
FRAME DIMENSIONS
You appliance must be positioned so that the electricity network installation is accessible.
The distance between the edge of the hob plate and the side or rear wall (or panel) must be
at least 40 mm (zone A).
Glue the foam joint underneath the hob plate following the outline of the support surfaces with
your worktop. In this way you will get good sealing against the worktop. Fix the hob plate’s
hooks to the unit.
Do not use material which cannot be removed such as silicon.
4
A
A
A
B
B C B
C
D
D
Air inlet
580
490
64
40
40
40
A
560
510
Air outlet
Vitroceramic glass
Power cable
C60T376A8.qxd 14/3/07 16:21 Página 4
Page 33

FRAME DIMENSIONS
5
65
65
65
288
65
40 máx.
60 máx.
40 máx.
40 máx.
510
510
490
510
410
440
490
490
930
930
770
900
900
270
750
C60T376A8.qxd 14/3/07 16:21 Página 5
Page 34

Fit the hob into the space in the
unit pressing down well to close
the seal properly.
Fix the four hob plate hooks
underneath in the unit space corners.
There must be a current of fresh air to cool your induction hob’s electronics circuits as
shown in the diagram.
40mm minimum
50mm
Hob on oven Hob on unit
50mm
5mm minimum 5mm minimum
6
IMPORTANT
Installation must guarantee that fresh air can come from the rear and that a vent measuring at least 5 mm allows the air to escape in the front part.
3
FASTENING TO THE WORKTOP
4
INSTALLATION POSITION
A
B
C60T376A8.qxd 14/3/07 16:21 Página 6
Page 35

7
USING INDUCTION HOBS
USE
Hob size Type “A” power Type “B” power
(cm)
16 2.200w 2.000w
18 2.800w 2.800w
21 3.100w 3.100w
28 3.600w 2.800w
TYPE A
TYPE B
POWER OF EACH HOB
TYPE OF APPLIANCE
1
Type “A” appliances
have commands with
special functions or
with basic functions
Type "B" appliances have
compact commands
C60T376A8.qxd 14/3/07 16:21 Página 7
Page 36

8
2
DESCRIPTION OF THE COMMANDS
On/Off Sensor
Power sensors and displays
between “0 and P.”
Indicator of Hob to use.
Special functions.
Timer sensors and display
Safety sensor and display.
Switches each hob on or off.
When the hob is switched on “0” appears on the power display.
Find the type of command which corresponds to your hob
. Command with special functions
. Command with basic functions
. Compact command
Allows you to see the situation of each hob on the top.
Allows the other sensors to be blocked to prevent children playing with
them.
Allows you to select the cooking time for the chosen hob between 0 and
99 minutes. If we press “-” and “+” at the same time, the timer is set to 0.
If these buttons are held down the minutes increase at a faster rate.
Allows you to carry out special functions.
Allows you to choose the power for any of the hobs from
0, 1, 2...11 and P.
FUNCTIONS
COMMAND WITH SPECIAL FUNCTIONS
A
A B C D E F
B
C
D
E
F
C60T376A8.qxd 14/3/07 16:21 Página 8
Page 37

9
IMPORTANT
Put your fingertip over the on/off sensor. Remember
that there is a safety sensor to prevent children playing
with the controls, which is deactivated by holding your
finger on the sensor for three seconds.
Make sure that the sensor you are going to activate
corresponds to the hob that you wish to use.
Put your fingertip on the “-” or “+” power
sensors.
Select the appropriate power level by holding your
finger down.
When boiling liquids, particularly using high power levels, you will hear a buzzing sound
due to the hob frequency coupling.
IMPORTANT
SWITCHING ON A HOB
• Whenever you wish you can activate the safety sensor by holding your finger over it for
three seconds.
• If you leave an object on top of the sensors, the hob top will beep and switch off.
• The hob top switches off automatically after an estimated safety time, which varies
according to the power level you have selected. (From 1 hour at power level “P” or “9”, up
to 10 hours at power level “1”).
OPERATION
A
B
C
C60T376A8.qxd 14/3/07 16:21 Página 9
Page 38

10
Switch on a hob. To switch on the hob, press the
button on this hob. Then select the power
you wish with the “+” or “-” buttons for the power
sensors.
Assign a time to the timer. To do this, press the “+”or “-”
button on the timer, and it shows the time in minutes.
If you start with “+” it will initially display “00” minutes.
If you start with “-” it will initially display “99” minutes.
This time will count down until it reaches zero and then
the hob will switch off.
Steps to set a hob timer:
It is possible to silence the appliance, or deactivate the acoustic signals.
They can only be activated or deactivated when the hob top is switched off.
• In order to deactivate the acoustic signal, press simultaneously on the
“+”power commands and “+” for the timer commands on the keypad for
the right or rear right cooking zone (depending on the model) until the
“bE Ep” symbol appears, keep pressing until the digits disappear.
• In order to activate the acoustic signal, press simultaneously on the “+”
power commands and “+” timer commands on the keypad for the right
or rear right cooking zone (depending on the model) until the “bE Ep”
symbol appears, and an acoustic signal sounds, then stop pressing the
buttons.
IMPORTANT
If no time is selected and the display shows 00, the timer will switch off, and if it indicates 99,
it will take 99 minutes as its timer time.
ACOUSTIC SIGNAL
TIMER FUNCTION
A
B
C
C60T376A8.qxd 14/3/07 16:21 Página 10
Page 39

SPECIAL FUNCTIONS
C60T376A8.qxd 14/3/07 16:21 Página 11
DIRECT ACCESS
Allows you to access a determined power level at any moment
Modification of the direct access power
(With the hob switched off)
TOTAL
This allows you to always be able to trip the power for a certain time. This gives
the user total flexibility.
BOOSTER
The cooking areas are equipped with a “BOOSTER” function.This function
means that the maximum temperature can be obtained quickly.
The “BOOSTER” function will be cancelled by pressing any other power
sensor associated with the hob, or with the on/off sensor.
Press the button and the hob will heat up to a determined
power level (The power level defined by the manufacturer is 8), but the
user can change the value of this power level by following these
steps.
1. Keep the button pressed down until a beep sounds.
2. The power level which has been defined will flash on the display.
3. Modify the power level with the “-” and “+” power buttons (B).
4. Press the button again to validate the operation.
5. Switch off the hob.
1. Start with the hob switched on and a determined power level.
2. Press the button and then you can enter the new power
level and the time which it is going to be active.
The power level is adjusted with the “-” and “+” buttons in zone (B)
and the duration is adjusted using the “-” and “+” buttons in zone (E).
3.Then validate by pressing the button
4.The new power level is displayed with a dot.
5.Once the time has passed, return to the initial position and the dot will
disappear.
1.Press the button
The hob power display will display (bo) and the hob will start to give
maximum power.
2.Once the hob has heated up, select the chosen power level by
pressing the “-” button in zone “B”.
IMPORTANT
By using the “BOOSTER” function, if the other hob is switched on the same side of the
hobplate, the maximum power level which can be used is 6. This is due to the fact that in
this function the appliance takes power from the adjacent hob.
11
Page 40

12
OFFSET PROGRAMMING
This allows you to adjust the finishing time and the duration of this cooking session.
1. Switch on the hob of your choice, using the button.
2. Press the button and it will display the current time. If the time
is correct, go to point 4, and if not, adjust the time.
3. ADJUSTING THE CURRENT TIME: Use the “-” and “+” power
buttons in zone (B) to change the hour and use the “-” and “+”
timer buttons (E) to adjust the minutes.
4. Validate the time by pressing the button (the digits will then flash).
5. Adjust the time to when you wish cooking to finish with the “ -” and
“+” buttons from zones (B) and (E).
6. Validate by pressing the button.
7. Adjust the cooking time using the “-” and “+” buttons in zone (E).
8. Validate by pressing the button
9. Define the chosen power level for cooking with the
“-” and “+” buttons from zone (B).
10. Validate the power by pressing the button.
11. Once programmed, it displays (Auto) and then the digits go off
and only a red dot remains lit.
IMPORTANT
Offset programming cannot be used at the same time on more than one hob.
The chosen finishing, duration and power values must be changed whilst the digits are
flashing.
C60T376A8.qxd 14/3/07 16:21 Página 12
Page 41

13
COMMAND WITH BASIC FUNCTIONS
OPERATION
On/Off sensor.
Power sensors and displays
between 0 and P.
Timer sensors and
displays.
Safety sensor and
display.
This function allows greater power to be obtained during a certain time.
•The “P.” function (P point) is obtained by pressing the “+” button as far as the “P.”
position, release the command and the “P.” will flash, press the command again
and it will be put in the maximum power “P.” position (P point) then press the “-”
command and enter in the chosen cooking time. It will then display “P.” (P point).
When the relevant time has passed, the power selected by the user will return.
P. FUNCTION (P point) (Fast heating function)
WARNING
Preferably use cooking zones situated on different sides. If you choose them on the
same side, using the cooking zone at maximum power limits the other cooking zone,
situated on the same side which is visible in the power indicators.
IMPORTANT
After selecting the power "P." (P point), if you do not choose the final working power, the
hob power will be maintained at "P."
Whilst "P." is displayed (P point) any action on the power commands will cancel the “fast
heating function” and it will return to the classic power regulation mode
The operation is the same as described for the commands with special functions.
SWITCHING ON A HOB
The operation is the same as described for the commands with special functions.
TIMER OPERATION
The operation is the same as described for the commands with special functions.
ACOUSTIC SIGNAL
A
A
D
B
C
B
C
D
C60T376A8.qxd 14/3/07 16:21 Página 13
Page 42

14
IMPORTANTE
Only one hob can be timed at once. To stop timing, press the button .The hob
which is timed will alternately display the working power and a “t”.
Timer sensors and display
On/Off sensor
Power sensors and
displays from “0” to “9”
Safety sensor and display
TIMER FUNCTION
COMPACT COMMAND
A
B
C
D
A B C D
OPERATION
The operation is the same as described for the commands with special functions.
Steps to follow to time a hob:
SWITCHING ON A HOB
The operation is the same as described for the commands with special functions.
ACOUSTIC SIGNAL
Switch on a hob. In order to switch the hob on, press the button for this hob.
Then select the chosen power level using the “+” or “-” buttons on the power
sensors.
Switch on the timer. For this purpose, press . The zone you wish
to time is displayed using these symbols.
If you press repeatedly on , the hob position will rotate.
Once the hob to time has been selected, the time is assigned using the “+” or “-” timer
buttons. This will display the time in minutes. If you start with ”+” the display will initially
read “00” minutes. If you start with “-”the display will initially read “99” minutes.
This time will count down until it reaches zero and then the hob will switch off.
A
B
C
D
E
C60T376A8.qxd 14/3/07 16:21 Página 14
Page 43

15
The danger of burning yourself due to the temperature of
the glass is minimal. As the heat is produced in the
recipient itself, the glass does not heat up very much.
Induction hobs have a recipient detection system. This
means that the hob will not work unless there is an
appropriate recipient on it.
heats
does not heat
IMPORTANT
WARNING FOR USERS WITH PACEMAKERS AND ACTIVE IMPLANTS:
The worktop operation complies with standards in force regarding electromagnetic
perturbations.
Your induction cooking hob plate completely meets the legal requirements (directives
89/336/CEE). It has been designed not to interfere in the operation of other electrical
appliances in so far as they also meet the same standard.
YOUR INDUCTION HOB GENERATES MAGNETIC FIELDS CLOSE BY.
So that there is no interference between your cooking worktop and a pacemaker, it is
necessary for the pacemaker to be designed in compliance with the relevant standard. As
far as the compliance of the pacemaker is concerned, or possible incompatibilities, you can
consult its manufacturer or your doctor.
410ºC
Boiling water
glass
temperature
vitroceramic
induction
(radiant or
halogen)
81ºC
3
SAFETY
C60T376A8.qxd 14/3/07 16:21 Página 15
Page 44

16
RESIDUAL HEAT
After intense use, the cooking area which you have just used can continue to
be hot for a few minutes.
A flashing “H” will appear whilst it is hot. Do not touch these areas.
PROTECTION IN THE EVENT OF SPILLAGE
In the event of overflow, the hob with stop and a symbol will appear as shown in
(Fig. A), and a warning beep (depending on the model) can be activated in any
of the following three cases.
1.Spillage covering the command keypad.
2.Wet clothe over the keypad .
3.Metal object on the command keypad.
Clean or remove the object and start cooking again.
AUTO-STOP SYSTEM
If you forget to switch off a hob, your hob plate is equipped wi th an
AUTO-STOP SYSTEM safety funct ion which wi l l automat ical ly cut off
the cook ing area after a set t ime (between 1 and 10 hours depending
on the power being used).
In the event that this safety function is activated, the power cut off in the
cooking zone will be indicated by “AS” or “A” displayed in the command area
and a warning beep will sound for a few minutes. Press any key on the
command pad to stop the warning sound. A double beep will confirm this
command.
OPERATION SAFETY
(Fig.A)
C60T376A8.qxd 14/3/07 16:21 Página 16
BIP-BIP
Page 45

17
Cooking area* Recipient to use
16 cm 10...18 cm
18 cm 12...22 cm
21 cm 18...24 cm
28 cm 12...32 cm
Induction heat is generated very quickly and on the
base of the recipient itself.
For this reason, an empty
recipient should never be
heated on the hob.
Among recipients which
are valid for induction, it is
preferable to use thick
based pans as they
distribute and use the heat
better.
If the recipient is not appropriate, the power indicator will flash. Only glass, clay, aluminium
without a special base, copper and some non magnetic stainless steels are not suitable for
induction cooking.
4
RECIPIENTS
WHICH COOKING AREA SHOULD I
USE FOR EACH RECIPIENT?
Try not to move the recipients
by pulling them over the glass
on the plate. Lift them to
move them.
Do not leave utensils on the
hob when it is on. It can
detect them as recipients and
heat them.
Normally, a spoon or fork will
not be detected but a larger
utensil will be.
*Depending on the model
C60T376A8.qxd 14/3/07 16:21 Página 17
Page 46

18
As the glass heats up
much less, this means that
the splashes or spills do
not harden on the hob
plate. So cleaning is much
easier.
However, both vitrocermic
and induction hobs should
be cleaned as quickly as
possible after splashes and
spills.
5
CARE AND CLEANING
Lighter dirt can be removed simply with kitchen
paper or a cloth.
For more resistant dirt, use
specific products for vitroceramic glass.
Follow each product’s
instructions .
IMPORTANT
· Do not use abrasive products or scrubbing powder. You could scratch the plate.
· Do not use a steam cleaner .
· If a crack appears on the surface of the glass, disconnect the appliance
immediately from the electrical power source. Do not use any part of the plate before
installing a new vitroceramic glass plate.
C60T376A8.qxd 14/3/07 16:21 Página 18
Page 47

19
220-240 V single phase
32 amp fuse
Neutral
N
Brown
Green/Yellow
Blue
Black or grey
Brown
Green/Yellow
Blue
Black or grey
Brown
Green/Yellow
Blue
Black
Grey
Live
L
Earth
400 V 2N 3-phase
16 amp fuse
2 x 230 V three phase
Separates the 2 live cables L1, L2
before making the connection.
Separates the 2 live cables L1, L2
and Neutral N1 N2 before making
the connection.
Neutral
N
Live1L1Live2
L2
Earth
Neutral 1
Neutral 2
N1 N2
Live1L1Live2
L2
Earth
ELECTRICAL CONNECTION
3 WIRE CABLES
5 WIRE CABLES
6
400 V 3N three phase
16 amp fuse
Neutral
N
Live
L1
Earth
Brown
Green/Yellow
Blue
220-240 V single phase
16 amp fuse
16A
Green/Yellow
Blue
Neutral
N
Earth
Brown
Live
L
C60T376A8.qxd 14/3/07 16:21 Página 19
Page 48

20
400 V 3N 3-phase
16 amp fuse
220-240 V single phase
Separates the 2 live cables L1, L2
before making the connection.
Neutral
N
Live
L
Earth
Neutral
N
Live
L3
Live
L1
Live
L2
Earth
Brown
Green/Yellow
Blue
Black or grey
Brown
Green/Yellow
Blue
Brown
Green/Yellow
Blue
Black or grey
Brown
Green/Yellow
Blue
IMPORTANT
The hob plate is provided with a power cable. If the power cable is damaged it must be
replaced by the manufacturer, after sales service or authorised personnel in order to avoid
danger.
When switching the hob plate on for the first time or after a long time without use, a code
will light up on the command panel.
220-240 V single phase
16 and 32 amp fuses
32A 16A
Neutral
N
Brown
Green/Yellow
Blue
Black or grey
Verde/Amarillo
Blue
Live
L
Earth
Neutral
N
Earth
Brown
Live
L
CABLES DE 8 HILOS
C60T376A8.qxd 14/3/07 16:21 Página 20
Page 49

21
TROUBLESHOOTING
YOU FIND THAT
The induction plate does
not work. The lights on the
keypad are off.
Trip switches are activated
when you switch it on.
When you connect the
appliance to the network a
light appears.
The plate gives off a smell
when you cook on it for the
first few times.
The plate does not
work and a message
appears.
The plate does not work
and this information
appears
The plate stops working, it
beeps every 10 seconds
and or F7 appears on
screen.
This type of symbol or
F7 appears.
After switching on a hob,
the keypad lights continue
to flash.
Pans make a noise during
cooking. The hob plate
makes crackling noises
during cooking.
The ventilation continues
for a few minutes after
switching off the hob
plate.
POSSIBLE CAUSES
The appliance is not
receiving any power. The
power supply or
connection is faulty.
Connection to your hob
plate is faulty.
Normal operation.
New appliance
The electronics circuit
does not work properly.
The plate is locked.
There has been an
overflow or an object is
obstructing the command
panel.
The electronic circuits
have overheated.
The recipient used is not
suitable for induction or its
diameter is less than
12 cm (10 cm on
16 cm hob).
Normal with some types of
recipients. This is due the
energy passing from the
plate to the recipient.
Cooling the
electronics.
Normal operation.
WHAT TO DO
Check the electrical
installation.
Check fuses and trip
switches.
Check connection
conformity.
Nothing, the message will
disappear after 30
seconds.
Heat a pan of water on
each hob for 1/2 hour.
Ring the Technical Service.
See child safety chapter.
Clean or remove the
object and start cooking
again.
See framing chapter.
See chapter on recipients
for induction.
Nothing. There is no
risk for the plate or the
recipient.
Nothing.
C60T376A8.qxd 14/3/07 16:21 Página 21
Page 50

ENVIRONMENTAL WARNINGS
In order to look after the environment, hand in your used appliance to an official
collection centre or a recycling centre.
Before throwing away your used appliance make it unusable by cutting off the
connection cable with the plug.
22
C60T376A8.qxd 14/3/07 16:21 Página 22
Page 51

23
C60T376A8.qxd 14/3/07 16:21 Página 23
Page 52

03-07 C60T376A8
Printed on recycled paper
C60T376A8.qxd 14/3/07 16:21 Página 24
Page 53

C60T379A2.qxd 14/3/07 16:10 Página 23
Page 54

C60T379A2.qxd 14/3/07 16:10 Página 23
Page 55

N
O
T
I
C
E
D
’
I
N
S
T
A
L
L
A
T
I
O
N
E
T
D
’
U
T
I
L
I
S
A
T
I
O
N
D
E
L
’
A
P
P
A
R
E
I
L
C60T377A6.qxd 14/3/07 16:27 Página 1
Page 56

· Seul un Service Technique Agréé est autorisé à réaliser des réparations sur
votre table de cuisson en cas de panne.Tout agissement à l’encontre de
cette disposition annule la garantie.
· Les informations techniques et d’identification de l’appareil figurent sur la
plaque signalétique de l’appareil.
· Veuillez consulter cette Notice avant de procéder au raccordement électrique
de l’appareil.
· Le raccordement électrique doit être réalisé par un spécialiste au courant
des réglementations et des dispositions légales en vigueur dans chaque
pays.
· Dans un souci constant d’amélioration de nos produits, nous nous réservons le droit de modifier leurs caractéristiques techniques, fonctionnelles ou
esthétiques, conformément à l’évolution technique.
AVERTISSEMENT
Nous défendons la préservation de l’Environnement.
Raison pour laquelle nos emballages :
• Sont 100% recyclables.
• Sont munis de la moindre quantité de pièces et de matériel
possible, afin de faciliter le recyclage.
MISEZ AVEC NOUS SUR L’ECOLOGIE. RECYCLEZ L’EMBALLAGE.
C60T377A6.qxd 14/3/07 16:27 Página 2
Page 57

PLAQUES À INDUCTION
SOMMAIRE
INSTALLATION 4
1. DESCRIPTION DE L’APPAREIL 4
2. DIMENSIONS ENCASTREMENT 4
3. FIXATION AU PLAN 6
4. EMPLACEMENT D’INSTALLATION 6
UTILISATION 7
1. TYPE D’APPAREIL 7
•Puissance de chaque foyer 7
2. DESCRIPTION DES COMMANDES 8
•Bandeau de commandes à fonctions spéciales 8
-Fonctions 8
•Fonctionnement 9
-Allumage d’un foyer 9
-Fonction minuterie 10
-Avertissement sonore 10
•Fonctions Spéciales 11
•Bandeau de commandes à fonctions de base 13
•Fonctionnement 13
-Allumage d’un foyer 13
-Fonctionnement minuterie 13
-Avertissement sonore 13
-Fonction P. (P point)
Fonction échauffement rapide 13
•Bandeau de commandes compact 14
•Fonctionnement 14
-Allumage d’un foyer 14
-Avertissement sonore 14
-Fonctionnement minuterie 14
3. SÉCURITÉ 15
•Sécurité fonctionnement 16
4. RÉCIPIENTS 17
5. ENTRETIEN ET NETTOYAGE 18
6. RACCORDEMENT ÉLECTRIQUE 19
QUE FAIRE SI… 21
C60T377A6.qxd 14/3/07 16:27 Página 3
Page 58

PLAQUES À INDUCTION
INSTALLATION
1
DESCRIPTION DE L’APPAREIL
2
DIMENSIONS ENCASTREMENT
La table de cuisson doit être installée de manière à pouvoir accéder aisément au secteur.
Veillez à respecter une distance d’au moins 40 mm (zone A), entre le bord de la plaque et le
mur (ou paroi) latéral ou arrière.
Collez le joint d’étanchéité sous la plaque, sur tout le pourtour de la surface d’appui du plan,
pour assurer la parfaite étanchéité du joint.
Fixez les supports de la plaque au meuble.
Ne pas utiliser de matériaux non-amovibles, comme de la silicone.
4
A
A
A
B
B C B
C
D
D
Entrée d’air
580
490
64
40
40
40
A
560
510
Sortie d’air
Verre vitrocéramique
Cordon d’alimentation
C60T377A6.qxd 14/3/07 16:27 Página 4
Page 59

DIMENSIONS ENCASTREMENT
5
65
65
65
288
65
40 máx.
60 máx.
40 máx.
40 máx.
510
510
490
510
410
440
490
490
930
930
770
900
900
270
750
C60T377A6.qxd 14/3/07 16:27 Página 5
Page 60

Placer la plaque dans le creux
du meuble, en faisant pression
pour que le joint d’étanchéité
réalise une bonne fermeture.
Monter les quatre fixations de la
plaque par le bas aux angles du
creux.
Les circuits électroniques de la plaque à induction doivent être refroidis par un courant
d’air frais, comme indiqué sur le croquis.
40mm minimum
50mm
Plaque sur Four Plaque sur Meuble
50mm
5mm minimum 5mm minimum
6
IMPORTANT
Veillez à ce que l’installation permette l’entrée d’air à l’arrière et la sortie d’air à l’avant,
en laissant une distance d’au moins 5mm entre le meuble et le mur ou paroi.
3
FIXATION AU PLAN
4
EMPLACEMENT D’INSTALLATION
A
B
C60T377A6.qxd 14/3/07 16:27 Página 6
Page 61

7
UTILISATION DES
PLAQUES À INDUCTION
MODE D’EMPLOI
Dimension foyer Pot. Type “A” Pot. Type “B”
(cm)
16 2.200w 2.000w
18 2.800w 2.800w
21 3.100w 3.100w
28 3.600w 2.800w
TYPE A
TYPE B
PUISSANCE DE CHAQUE FOYER
TYPE D’APPAREIL
1
Les appareils de type
« A » sont munis de
commandes aux
fonctions spéciales
ou aux fonctions de
base.
Les appareils
de type « B »
sont munis
de commandes
compactes.
C60T377A6.qxd 14/3/07 16:27 Página 7
Page 62

8
2
DESCRIPTION DES COMMANDES
Touche Sensitive Allumage/Arrêt.
Touches Sensitives et Afficheurs
de Puissance, entre «0» et «P».
Indicateur du Foyer à utiliser.
Fonctions Spéciales.
Touches Sensitives et Afficheur
de Minuterie.
Touche Sensitive et Afficheur
de Sécurité.
Permet d’allumer ou d’éteindre chaque foyer.
Lorsque le foyer est allumé, l’afficheur de puissance affiche «0».
Cherchez le type de commandes qui correspondent à votre table de cuisson :
•Commandes à fonctions spéciales
•Commandes à fonctions de base
•Commandes compactes
Permet de voir sur la plaque la situation de chaque foyer.
Permet de verrouiller les autres touches sensitives, pour éviter leur
manipulation par les enfants.
Permet de sélectionner le temps de cuisson sur le foyer sélectionné,
entre 0 et 99 minutes. Pour mettre la minuterie à zéro, enfoncer à la fois
la touche « - » et « + ». Si ces touches restent enfoncées, la vitesse
d’avance des minutes augmente.
Permet de réaliser des fonctions spéciales.
Permet de choisir la puissance de chacun des foyers,
entre 0, 1, 2…11 et P.
FONCTIONS
BANDEAU DE COMMANDES À FONCTIONS SPÉCIALES
A
A B C D E F
B
C
D
E
F
C60T377A6.qxd 14/3/07 16:27 Página 8
Page 63

9
IMPORTANT
Placez le doigt sur la touche d’allumage /arrêt en tenant
compte du fait que pour éviter que les enfants puissent
jouer avec les commandes, il existe une touche de
sécurité qui se désactive en maintenant la pression
pendant trois secondes.
Assurez-vous que la touche que vous allez sélectionner
correspond au foyer que vous voulez utiliser.
Posez le doigt sur – ou + pour allumer le foyer.
Sélectionnez la puissance adéquate en maintenant
enfoncée la touche.
L’arrivée à ébullition des liquides, surtout à des puissances élevées, entraîne un bourdonnement lié au couplage des fréquences des foyers.
IMPORTANT
ALLUMAGE D’UN FOYER
• Vous pouvez, à tout moment, activer la touche de sécurité. Il suffit, pour ce faire, de main
tenir enfoncée la touche durant trois secondes.
• Si vous laissez un objet sur les touches, la plaque fera entendre quelques bip et
s’éteindra.
• La plaque s’éteint automatiquement après un temps de sécurité donné, qui varie en
fonction de la puissance sélectionnée (de 1 heure avec la puissance “P” ou “9” à 10
heures avec la puissance “1”).
FONCTIONNEMENT
A
B
C
C60T377A6.qxd 14/3/07 16:27 Página 9
Page 64

10
FONCTION MINUTERIE
C60T377A6.qxd 14/3/07 16:27 Página 10
Démarche à suivre pour activer la minuterie sur un foyer :
A
Allumez le foyer. Pour ce faire, appuyez sur la
touche du dit foyer. Sélectionnez ensuite la
puissance souhaitée à l’aide des touches « + »
ou « - » des touches de puissance.
B
Assignez alors le temps sur la minuterie. Pour ce faire,
appuyez sur les touches « + » ou « - » de la minuterie,
pour visualiser le temps en minutes.
Si vous commencez par « + », l’indicateur affichera ini-
tialement « 00 » minutes.
Si vous commencez par «- », l’indicateur affichera ini-
tialement « 99 » minutes.
C
La minuterie comptera à rebours le temps restant pour
arriver à zéro et éteindre le foyer.
IMPORTANT
Si aucun temps n’est sélectionné et si l’afficheur indique 00, la minuterie s’éteindra.
Si l’afficheur indique 99, la durée prise en compte sera 99 minutes.
AVERTISSEMENT SONORE
Vous pouvez, si vous le souhaitez, désactiver les avertissements sonores de l’appareil.
Cette fonction ne peut être activée ou désactivée que si la table de cuisson est éteinte.
• Pour désactiver l’avertissement sonore, appuyez simultanément sur les
touches « + » de puissance et « + » de la minuterie sur le bandeau de
commandes de la zone de cuisson droite ou arrière droite (selon les
modèles), jusqu’à l’affichage du symbole « bE Ep », accompagné d’un
avertissement sonore. Lâchez alors les touches.
• Pour activer l’avertissement sonore, appuyez simultanément sur les
touches « + » de puissance et « + » de la minuterie sur le bandeau de
commandes de la zone de cuisson droite ou arrière droite (selon les
modèles), jusqu’à l’affichage du symbole « bE Ep », accompagné d’un
avertissement sonore. Lâchez alors les touches.
Page 65

11
TOTAL
Permet d’introduire à tout moment un saut de puissance durant une durée déterminée.
Offrant ainsi flexibilité totale à l’usager.
1. Commencez par allumer la plaque à une puissance déterminée.
2. Appuyez sur la touche et introduisez la nouvelle puissance et le temps
qu’elle doit être active.
Réglez la puissance à l’aide des touches « - » et « + » de la zone (B) et
la durée à l’aide des touches « - » et « + » de la zone (E).
3. Validez en appuyant sur la touche .
4. La nouvelle puissance est affichée accompagnée d’un point.
5. Le temps une fois écoulé, la plaque revient à la position initiale et le point
disparaît.
ACCÈS DIRECT
Permet d’accéder à tout moment à une puissance déterminée.
Appuyez sur la touche et la plaque atteindra la puissance sélectionnée.
La puissance définie par défaut par le fabriquant est 8, mais l’usager
pourra en modifier la valeur comme suit :
Modification de la puissance d’accès direct :
(Le foyer éteint, au départ)
1. Maintenez enfoncée la touche , jusqu’à ce qu’un bip se fasse entendre.
2. La puissance définie commencera à clignoter sur l’afficheur.
3. Modifiez la puissance, à l’aide des touches « - » et « + » de puissance (B).
4. Appuyez à nouveau sur la touche , pour valider l’opération.
5. Éteignez le foyer.
BOOSTER
Les zones de cuisson sont munies de la fonction « BOOSTER ». Cette fonction permet d’atteindre rapidement la température maximale.
1. Appuyez sur la touche .
L’indicateur de puissance affichera (bo) et le foyer commencera à
s’échauffer pour atteindre la puissance maximale.
2. Une fois la température maximale du foyer atteinte, sélectionnez la
puissance souhaitée, à l’aide de la touche « - » de la zone « B ».
Pour annuler la fonction « BOOSTER », appuyez sur une touche quel
conque de puissance associée au foyer, ou sur la touche Allumage/Arrêt.
IMPORTANT
Lorsque vous utilisez la fonction « BOOSTER », si vous allumez l’autre foyer qui se trouve
du même côté sur la plaque, la puissance maximale qui pourra être utilisée est 6. Car
cette fonction absorbe une partie de la puissance du foyer contigu.
FONCTIONS SPÉCIALES
C60T377A6.qxd 14/3/07 16:27 Página 11
Page 66

12
PROGRAMMATION DIFFÉRÉE
Permet de régler la fin et la durée de la cuisson.
1. Allumez le foyer souhaité, à l’aide de la touche .
2. Appuyez sur la touche et l’indicateur affichera l’heure actuelle. Si
l’heure est correcte, passez au point 4. Sinon, réglez l’heure.
3. RÉGLAGE DE L’HEURE ACTUELLE : Utilisez les touches « - » et
« + » de puissance de la zone (B) pour régler les heures et les touches
« - » et « + » de la minuterie (E) pour régler les minutes.
4. Validez l’heure en appuyant sur la touche (les chiffes commenceront à
clignoter).
5. Régler l’heure de fin de cuisson souhaitée, à l’aide des touches « - » et
« + » des zones (B) et (E).
6. Validez en appuyant sur la touche .
7. Réglez la durée de cuisson, à l’aide des touches « - » et « + »
de la zone (E).
8. Validez en appuyant sur la touche .
9. Définissez la puissance de cuisson souhaitée, à l’aide des touches « - »
et « + » de la zone (B).
10. Validez la puissance en appuyant sur la touche .
11. La programmation une fois achevée, l’indicateur affichera (Au to)
et les chiffres s’éteindront. Seul un point rouge restera allumé.
IMPORTANT
La programmation différée ne peut être utilisée à la fois sur plus d’un foyer.
Les valeurs de fin, durée et puissance de cuisson doivent être réglées pendant que les
chiffres clignotent.
C60T377A6.qxd 14/3/07 16:27 Página 12
Page 67

13
BANDEAU DE COMMANDES À FONCTIONS DE BASE
FONCTIONNEMENT
Touche Sensitive Allumage/Arrêt.
Touches Sensitives et Afficheurs de
Puissance, entre « 0 » et « P ».
Touches Sensitives et Afficheurs de
Minuterie.
Touche Sensitive et Afficheur de
Sécurité.
Cette fonction permet d’obtenir une plus grande puissance durant une période de temps
déterminée.
• Pour activer la fonction « P. » (P point), appuyez sur la touche « + » jusqu’à la
position « P ». Lâchez la commande et le « P » commencera à clignoter. Appuyez à
nouveau sur la touche pour activer la position « P. » (P point), puissance maximale.
Appuyez ensuite sur la touche « - » et sélectionnez la puissance de cuisson souhaitée.
L’indicateur affichera « P. » (P point).
Après un certain temps, la plaque retournera à la puissance sélectionnée par l’usager.
FONCTION P. (P point) (Fonction d’échauffement rapide)
CONSEIL
Utilisez de préférence, pour la cuisson, des foyers situés dans des zones différentes,
étant donné que l’utilisation de la puissance maximale sur un foyer autolimite la
puissance du foyer contigu, situé sur la même zone affichée sur les indicateurs de
puissance.
IMPORTANT
Après avoir sélectionne la puissance «P. » (P. point), si vous ne sélectionnez pas la puissance finale de travail, la puissance du foyer restera sur « P ».
Durant la visualisation sur l’afficheur de « P. » (P point) toute action sur les commandes de
puissance annulera la « Fonction Échauffement Rapide » et la plaque retournera au mode
classique de réglage de la puissance.
Fonctionnement identique à celui décrit dans le chapitre « Bandeau de Commandes à
Fonctions Spéciales ».
ALLUMAGE D’UN FOYER
Fonctionnement identique à celui décrit dans le chapitre « Bandeau de Commandes à
Fonctions Spéciales ».
FONCTIONNEMENT DE LA MINUTERIE
Fonctionnement identique à celui décrit dans le chapitre « Bandeau de Commandes à
Fonctions Spéciales ».
AVERTISSEMENT SONORE
A
A
D
B
C
B
C
D
C60T377A6.qxd 14/3/07 16:27 Página 13
Page 68

14
IMPORTANT
Il n’est possible d’activer la minuterie que sur un foyer à la fois. Pour annuler la minuterie,
appuyez sur la touche . L’indicateur du foyer temporisé affichera alternativement la
puissance de travail et un « t ».
Touches Sensitives et
Afficheurs de Minuterie.
Touche Sensitive
Allumage/Arrêt.
Touches Sensitives et
Afficheurs de Puissance,
entre « 0 » et « 9 ».
Touche Sensitive et
Afficheur de Sécurité.
FONCTIONNEMENT MINUTERIE
BANDEAU DE COMMANDES COMPACT
A
B
C
D
A B C D
FONCTIONNEMENT
Fonctionnement identique à celui décrit dans le chapitre « Bandeau de Commandes à
Fonctions Spéciales ».
Démarche à suivre pour activer la minuterie sur un foyer :
ALLUMAGE D’UN FOYER
Fonctionnement identique à celui décrit dans le chapitre « Bandeau de Commandes à
Fonctions Spéciales ».
AVERTISSEMENT SONORE
Allumez un foyer. Pour ce faire, appuyez sur la touche du dit foyer. Sélectionnez
ensuite la puissance souhaitée, à l’aide des touches « + » ou « - » de puissance.
Allumez la minuterie. Pour ce faire, appuyez sur la touche .
L’indicateur affichera la zone à temporiser à l’aide des symboles suivants.
Appuyez à plusieurs reprises sur la touche jusqu’à ce que l’indicateur affiche le
foyer que vous souhaitez temporiser.
Après avoir sélectionné le foyer à temporiser, il vous faudra assigner le temps, à l’aide
des touches « + » ou « - » de la minuterie. L’indicateur affichera le temps en minutes.
Si vous commencez par « + », l’indicateur affichera initialement « 00 » minutes.
Si vous commencez par « - », l’indicateur affichera initialement « 99 » minutes.
La minuterie comptera à rebours le temps restant pour arriver à zéro et éteindre le
foyer.
A
B
C
D
E
C60T377A6.qxd 14/3/07 16:27 Página 14
Page 69

15
Le risque de se brûler au contact du verre est minime.
Étant donné que la chaleur se produit à l’intérieur du
récipient, le verre ne s’échauffe que très peu.
Les foyers à induction sont munis d’un système de
détection du récipient. Autrement dit, le foyer ne
fonctionne que s’il détecte la présence d’un récipient
adapté.
il chauffe il ne chauffe pas
IMPORTANT
À L’ATTENTION DES PORTEURS DE STIMULATEURS CARDIAQUES ET
D’IMPLANTS ACTIFS :
Le fonctionnement de la table de cuisson est conforme aux normes de perturbations
électromagnétiques en vigueur.
Votre table de cuisson à induction répond parfaitement aux exigences légales (Directives
89/336/CEE) et a été conçue de façon à ne pas gêner le fonctionnement des autres
appareils électriques, à condition que ceux-ci soient également conformes à la même
réglementation.
VOTRE TABLE DE CUISSON À INDUCTION GÉNÈRE DES CHAMPS MAGNÉTIQUES
DANS SON ENVIRONNEMENT PROCHE.
Pour éviter toute interférence entre votre table de cuisson et un stimulateur cardiaque, il
est obligatoire que ce dernier soit conforme à la réglementation. Pour vérifier la conformité
du stimulateur cardiaque ou d’éventuelles incompatibilités, consultez le fabricant ou votre
médecin.
410ºC
eau en ébullition
température
verre
induction
vitrocéramique
radiante ou
halogène
81ºC
3
SÉCURITÉ
C60T377A6.qxd 14/3/07 16:27 Página 15
Page 70

16
CHALEUR RÉSIDUELLE
Après une utilisation intense, la zone de cuisson peut rester chaude durant
quelques minutes.
Un « H » clignotera sur l’afficheur, tant que la zone sera chaude.
Évitez de toucher les zones chaudes.
PROTECTION EN CAS DE DÉBORDEMENT
En cas de débordement, la plaque s’éteindra automatiquement. L’indicateur affichera
un symbole comme celui de la Fig. A et un avertissement sonore (selon modèle)
retentira, dans l’un des trois cas suivants:
1. Débordement couvrant les touches du bandeau de
commandes.
2. Chiffon mouillé déposé sur les touches.
3. Objet métallique déposé sur les touches du bandeau
de commandes.
Nettoyez la plaque ou le bandeau de commandes ou retirez l’objet et remettez en
marche la plaque de cuisson.
AUTO-STOP SYSTEM
Si vous oubliez d’éteindre un foyer, sachez que votre table de cuisson est équipée
d’une fonction de sécurité AUTO-STOP SYSTEM, qui met automatiquement horscircuit la zone de cuisson après un temps déterminé (entre 1 et 10 heures, selon la
puissance utilisée).
Si cette sécurité est activée, l’indicateur affichera l’information « AS » ou « A » sur
le bandeau de commandes et un avertissement sonore retentira durant quelques
minutes. Pour interrompre le signal sonore, il suffit d’appuyer sur une touche
quelconque. Un double « bip » confirmera l’annulation.
SÉCURITÉ DE FONCTIONNEMENT
(Fig.A)
C60T377A6.qxd 14/3/07 16:27 Página 16
BIP-BIP
Page 71

17
Zone de cuisson* Récipient à utiliser*
16 cm 10...18 cm
18 cm 12...22 cm
21 cm 18...24 cm
28 cm 12...32 cm
La chaleur par induction
se génère très rapidement
et à la base même du récipient. Ne jamais mettre à
chauffer un récipient vide.
Parmi les récipients aptes
à l’induction, ceux à fond
épais sont préférables,
car ils gaspillent moins
l’énergie.
Si un récipient n’est pas apte, vous le saurez, car l’indicateur commencera à clignoter.
Seuls le verre, la terre cuite, l’aluminium sans fond spécial, le cuivre et certains aciers
inoxydables, non-magnétiques, ne sont pas aptes pour la cuisson à induction.
4
RÉCIPIENTS
QUELLE ZONE DE CUISSON UTILISER
EN FONCTION DU RÉCIPIENT ?
Ne pas déplacer les récipients en les faisant glisser
sur le verre de la plaque.
Les soulever pour les déplacer.
Ne pas laisser d’ustensiles
sur la plaque en marche.
Elle risque de les détecter
comme des récipients
et de les chauffer.
Normalement une cuillère
ou une fourchette ne sont
pas détectées mais un
ustensile plus grand peut
l’être.
*Selon modèle
C60T377A6.qxd 14/3/07 16:27 Página 17
Page 72

18
En chauffant moins le
verre, on évite que les
projections ou les débordements ne durcissent sur la
plaque. Le nettoyage est
ainsi facilité.
Il est conseillé toutefois de
nettoyer aussitôt que possible la vitrocéramique ou les
foyers de tout débordement
ou projection.
5
ENTRETIEN ET NETTOYAGE
Les taches légères se
nettoient simplement
avec un chiffon ou un
morceau de papier de
cuisine.
Pour les taches plus
résistantes, utiliser des
produits spécifiques
pour vitrocéramique.
Suivre les conseils du
fabriquant pour leur
application.
IMPORTANT
- Ne pas utiliser de produits abrasifs ou de poudre à récurer, qui risquent de rayer la
plaque.
- Ne pas utiliser de machine à nettoyer à vapeur.
- Si une fissure apparaît sur la surface du verre, débrancher immédiatement l’appareil
de la source d’alimentation électrique. N’utiliser aucune zone de la plaque avant
d’installer un nouveau verre vitrocéramique.
C60T377A6.qxd 14/3/07 16:27 Página 18
Page 73

19
220-240 V Monophasé
Fusible 32 Ampères
Neutre
N
Brun
Vert/Jaune
Bleu
Noir ou Gris
Brun
Vert/Jaune
Bleu
Noir ou Gris
Brun
Vert/Jaune
Bleu
Noir
Gris
Phase
L
Terre
400 V 2 N Triphasé
Fusible 16 Ampères
2 x 230 V Triphasé
Séparez les 2 câbles de phase
L1, L2,avant de procéder au
raccordement.
Séparez les 2 câbles de phase
L1, L2 et neutre, avant de procéder
au raccordement.
Neutre
N
Phase1L1Phase2
L2
Terre
Neutre 1
Neutre 2
N1 N2
Phase1L1Phase2
L2
Terre
RACCORDEMENT ÉLECTRIQUE
CÂBLES À 3 FILS
CÂBLES À 5 FILS
6
400 V Triphasé
Fusible 16 Ampères
Neutre
N
Phase
L1
Terre
Brun
Vert/Jaune
Bleu
220-240 V Monophasé
Fusible 16 Ampères
16A
Vert/Jaune
Bleu
Neutre
N
Terre
Brun
Phase
L
C60T377A6.qxd 14/3/07 16:27 Página 19
Page 74

20
400 V 3N Triphasé
Fusible 16 Ampères
220-240 V Monophasé
Séparez les 2 câbles de phase L1, L2,
avant de procéder au raccordement.
Neutre
N
Phase
L
Terre
Neutre
N
Phase
L3
Phase
L1
Phase
L2
Terre
Brun
Vert/Jaune
Bleu
Noir ou Gris
Brun
Vert/Jaune
Bleu
Brun
Vert/Jaune
Bleu
Noir ou Gris
Brun
Vert/Jaune
Bleu
IMPORTANT
La plaque vitrocéramique est fournie avec son câble d’alimentation. Si le câble est endommagé, il doit être remplacé par le fabricant, le Service Après-Vente ou un technicien agréé,
afin d’éviter tout danger.
Lors de la mise sous tension de la plaque ou après une panne de courant prolongée, un
code lumineux apparaîtra sur le bandeau de commandes.
220-240 V Monophasé
Fusible 16 et 32 Ampères
32A 16A
Neutre
N
Brun
Vert/Jaune
Bleu
Noir ou Gris
Vert/Jaune
Bleu
Phase
L
Terre
Neutre
N
Terre
Brun
Phase
L
CÂBLES À 8 FILS
C60T377A6.qxd 14/3/07 16:27 Página 20
Page 75

21
QUE FAIRE SI…
VOUS OBSERVEZ QUE
La plaque à induction ne
fonctionne pas. Les
témoinslumineux du clavier
sont éteints.
Les disjoncteurs de votre
installation sautent à la
mise en marche.
Lors du raccordement de
l’appareil au secteur, un
signal lumineux apparaît.
La plaque émane une
odeur lors des premières
cuissons.
La plaque ne fonctionne
pas et un message appraît.
La plaque ne fonctionne pas
et l’information apparaît.
La plaque s’est éteinte durant
son utilisation, elle émet
un avertissement sonore
toutes les 10 secondes et
l’écran affiche ou F7.
L’écran affiche un symbole
de ce genre ou F7.
Après avoir mis une zone
de chaleur en fonctionnement, les témoins lumineux
du clavier continuent à
clignoter.
Les casseroles font du
bruit durant la cuisson. La
plaque émet des craquements, durant la cuisson.
La ventilation persiste
pendant quelques minutes
après l’arrêt de la plaque.
CAUSES POSSIBLES
L’appareil n’est pas alimenté.L’alimentation ou le
branchement est défectueux.
Mauvais branchement de
la plaque.
C’est le fonctionnement
normal.
Appareil neuf.
Le circuit électronique
fonctionne mal.
La plaque est verrouillée.
Un débordement hors d’un
récipient s’est produit ou il
y a un objet sur le bandeau de commandes.
Les circuits électroniques
ont trop chauffé.
Le récipient utilisé ne convient pas à la cuisson par
induction ou son diamètre
est inférieur à 12 cm (10
cm sur un foyer de 16 cm).
C’est normal avec certains
récipients. C’est le passage de l’énergie de la
plaque au récipient qui
provoque ce bruit.
C’est normal, pour refroidir
l’électronique.
QUE FAIRE
Vérifiez l’état de l’installation
électrique. Vérifier les
fusibles et les disjoncteurs.
Vérifiez si le branchement
est correct.
Rien. Le signal lumineux
disparaîtra au bout de 30
secondes.
Faites chauffer une casserole avec de l’eau sur chaque
zone pendant _ heure.
Contactez le Service
Après-Vente.
Voir chapitre Sécurité
Enfants.
Nettoyez la plaque ou
enlevez l’objet et remettez
la plaque en fonctionnement.
Voir chapitre Ecastrement.
Voir chapitre Récipients
pour Induction.
Rien. Il n’existe aucun
risque, ni pour la plaque
ni pour le récipient.
Rien.
C60T377A6.qxd 14/3/07 16:27 Página 21
Page 76

RECOMMANDATIONS ENVIRONNEMENTALES
Afin de contribuer à la protection de l’environnement, portez votre ancien appareil à
une déchetterie ou un centre de recyclage.
Avant de vous débarrasser de votre vieil appareil, rendez-le inutile en coupant le
câble d’alimentation avec la prise.
22
C60T377A6.qxd 14/3/07 16:27 Página 22
Page 77

23
C60T377A6.qxd 14/3/07 16:27 Página 23
Page 78

03-07 C60T377A6
Imprimé sur du papier recyclé
C60T377A6.qxd 14/3/07 16:27 Página 24
Page 79

C60T379A2.qxd 14/3/07 16:10 Página 23
Page 80

C60T379A2.qxd 14/3/07 16:10 Página 23
Page 81

H
A
N
D
B
U
C
H
Z
U
R
I
N
S
T
A
L
L
A
T
I
O
N
U
N
D
Z
U
R
B
E
D
I
E
N
U
N
G
D
E
S
G
E
R
Ä
T
S
C60T378A4.qxd 14/3/07 16:33 Página 1
Page 82

• Nur ein autorisierter Technischer Kundendienst darf ihre Kochplatten im
Fall einer Störung reparieren. Im gegenteiligen Fall geht die Garantie
verloren, die Sie für das Gerät besitzen.
• Auf dem Typenschild werden die technischen Eigenschaften und die
Identifikation des Geräts aufgeführt.
• Dieses Handbuch muss durchgelesen werden, bevor damit begonnen wird,
die elektrischen Anschlüssen vorzunehmen.
• Die elektrischen Anschlüsse müssen von einem Spezialisten durchgeführt
werden, der die gesetzlichen Normen und Vorschriften im jeweiligen Land
kennt.
• Mit dem Ziel unsere Produkte ständig zu verbessern, behalten wir uns das
Recht vor, Modifikationen an ihren Charakteristiken, Funktionen oder der
Ästhetik vorzunehmen, die mit der technischen Entwicklung verbunden sind
HINWEIS
Wir nehmen am Schutz der Umwelt teil.
Aus diesem Grund sind unsere Verpackungen:
• zu 100% recycelbar.
• Haben den kleinstmöglichen Anteil an Teilen und Materialien, um so
das Recycling zu fördern.
SETZEN SIE MIT AUF DEN SCHUTZ DER UMWELT. RECYCELN SIE DIE
VERPACKUNG
C60T378A4.qxd 14/3/07 16:33 Página 2
Page 83

INDUKTIONSPLATTEN
INHALT
INSTALLATION 4
1. BESCHREIBUNG DES GERÄTS 4
2. MASSE FÜR EINBAU 4
3. BEFESTIGUNG IN DER ARBEITSPLATTE 6
4. ORT DER INSTALLATION 6
BENUTZUNG 7
1. TYP DES APPARATS 7
•Leistung jeder Kochzone 7
2. BESCHREIBUNG DER STEUERUNGEN 8
•Steuerung mit speziellen Funktionen 8
-Funktionen 8
•Funktionsweise 9
-Einschalten von einem Kochfeld 9
-Funktion Zeitschaltuhr 10
-Akustisches Signal 10
•Spezielle Funktionen 11
•Steuerung mit den Basisfunktionen 13
•Funktionsweise 13
-Einschalten von einem Kochfeld 13
-Funktionsweise Zeitschaltuhr 13
-Akustisches Signal 13
-Funktion P. (Punkt P)
Funktion Schnellerhitzung 13
•Kompakte Steuerung 14
•Funktionsweise 14
-Einschalten von einem Kochfeld 14
-Akustisches Signal 14
-Funktionsweise Zeitschaltuhr 14
3. SICHERHEIT 15
•Sicherheit beim Betrieb 16
4. KOCHTÖPFE 17
5. INSTANDHALTUNG UND REINIGUNG 18
6. ELEKTRISCHE ANSCHLÜSSE 19
WAS TUN WENN... 21
C60T378A4.qxd 14/3/07 16:33 Página 3
Page 84

INDUKTIONSPLATTEN
INSTALLATION
1
BESCHREIBUNG DES GERÄTS
2
MASSE ZUM EINBAU
Ihr Gerät muss so aufgestellt werden, dass der Zugang zu den elektrischen Anschlüssen
gewährleistet ist.
Der Abstand zwischen dem Rand der Platte und der seitlichen oder hinteren Wand muss
wenigstens 40 mm betragen (Zone A).
Kleben Sie die Schaumdichtung unter die Platte und folgen Sie dabei dem Umriss der
Auflage auf ihrer Küchenplatte. So erreichen Sie eine gute Dichtheit mit der Küchenplatte.
Befestigen Sie Halter der Platte an dem Möbelstück.
Benutzen Sie kein Material, dass nicht wieder abnehmbar ist, wie Silikon.
4
A
A
A
B
B C B
C
D
D
Eintrittsöffnung für Luft
580
490
64
40
40
40
A
560
510
Austrittsöffnung für Luft
Glaskeramik
Kabel zur Stromversorgung
C60T378A4.qxd 14/3/07 16:33 Página 4
Page 85

MASSE ZUM EINBAU
5
65
65
65
288
65
40 máx.
60 máx.
40 máx.
40 máx.
510
510
490
510
410
440
490
490
930
930
770
900
900
270
750
C60T378A4.qxd 14/3/07 16:33 Página 5
Page 86

Setzen Sie die Platte in die Öffnung des Möbels ein und drücken
Sie sie gut auf, damit die Dichtung
gut schließt. Befestigen Sie die
vier Halter der Platte am unteren
Teil an den Ecken der Öffnung.
Die elektrischen Teile der
Induktionsplatte müssen sich
über einen Strom kühler Luft
abkühlen können, wie es in dem
Schema gezeigt wird.
Los circuitos electrónicos de su placa de inducción deben enfriarse por una corriente
de aire fresco como se indica en el esquema.
40mm Minimum
50mm
Platte über dem Ofen Platte über dem Ofen
50mm
5mm Minimum 5mm Minimum
6
WICHTIG
Die Installation muss gewährleisten, dass frische Luft über den hinteren Teil zuströmen
kann, und im vorderen Teil einen Ausgang von mindestens 5 mm offen bleibt.
3
BEFESTIGUNG AN DER KÜCHENPLATTE
4
LUGAR DE INSTALACIÓN
A
B
C60T378A4.qxd 14/3/07 16:33 Página 6
Page 87

7
BENUTZUNG DER
INDUKTIONSPLATTEN
BENUTZUNG
Größe des Kochfelds Leistung Typ "A" Leistung Typ "B"
(cm)
16 2.200w 2.000w
18 2.800w 2.800w
21 3.100w 3.100w
28 3.600w 2.800w
TYP “A”
TYP B
LEISTUNG DES JEWEILIGEN KOCHFELDS
TYP DES GERÄTS
1
Die Geräte vom
Typ "A" verfügen
über Steuerungen
mit speziellen
Funktionen
oder mit
Basisfunktionen
Die Geräte vom
Typ "B" verfügen
über kompakte
Steuerungen.
C60T378A4.qxd 14/3/07 16:33 Página 7
Page 88

8
2
BESCHREIBUNG DER STEUERUNGEN
Sensor Einschalten / Ausschalten.
Sensoren und Anzeige der Leistung
zwischen “0 und P.”
Anzeige des zu benutzenden Kochfelds.
Spezielle Funktionen.
Sensoren und Anzeige der Zeitschaltuhr.
Sensor und Anzeige zur Sicherheit.
Erlaubt das Anschalten oder Ausschalten von jedem Kochfeld.
Wenn ein Kochfeld eingeschaltet wird, wird auf der Anzeige eine “0” für
die Leistung angezeigt.
Suchen Sie den Typ der Steuerung heraus, die zu Ihrer Platte gehört
. Steuerung mit speziellen Funktionen
. Steuerung mit Basisfunktionen
. Kompakte Steuerung
Erlaubt es, auf der Platte die Situation von jedem Kochfeld zu sehen.
Erlaubt es, die übrigen Sensoren zu blockieren, um zu vermeiden, dass
Kinder mit ihnen spielen können.
Erlaubt es, die jeweilige Kochzeit des ausgewählten Kochfelds zwischen
0 und 99 Minuten zu wählen. Wenn Sie “-” und “+” zur gleichen Zeit
drücken, wird die Zeitschaltuhr auf 0 zurückgesetzt. Wenn Sie die
Sensoren länger gedrückt halten, erhöht sich die Geschwindigkeit in der
die Minutenzahl erhöht wird.
Erlaubt es, die speziellen Funktionen zu nutzen.
Erlaubt es, die Leistung von jedem der Kochfelder zu wählen, indem zwischen
0, 1, 2...11 und P angewählt wird.
FUNKTIONEN
STEUERUNG FÜR DIE SPEZIELLEN FUNKTIONEN
A
A B C D E F
B
C
D
E
F
C60T378A4.qxd 14/3/07 16:33 Página 8
Page 89

9
WICHTIG
Drücken Sie mit der Fläche des Fingers auf den Sensor
zum Einschalten / Ausschalten. Achten Sie darauf, dass
der Sensor für die Sicherheit existiert, der es verhindert,
dass Kinder mit der Steuerung spielen können. Er wird
deaktiviert, wenn Sie ihn für drei Sekunden drücken.
Versichern Sie sich, dass der Sensor den Sie betätigen
wollen, zu dem Kochfeld gehört, dass Sie benutzen
wollen. Drücken Sie mit der Fläche des Fingers auf die
Sensoren für die Leistung “-” oder “+”.
Wählen Sie die adäquate Leistung aus, indem Sie den
Finger auf ihm halten.
Wenn Sie Flüssigkeiten kochen, vor allem mit hoher Leistung, hören Sie einen Summton
wegen der Rückkopplung der Frequenzen in den Kochfeldern.
WICHTIG
EINSCHALTEN EINES KOCHFELDS
· Sie können stets den Sensor zur Sicherheit aktivieren, indem Sie den Finger drei
Sekunden auf ihn halten.
· Wenn Sie ein Objekt auf den Sensoren stehen haben, wird die Platte einige Piepstöne
aussenden und sie wird danach abgeschaltet.
· Die Platte wird automatisch nach einer bestimmten Zeit aus Gründen der Sicherheit
abgeschaltet. Die Zeit hängt von der ausgewählten Leistung ab. ( Von einer Stunde mit
der Leistung “P” oder “9”, bis zu zehn Stunden bei der Leistung “1” ).
FUNKTION
A
B
C
C60T378A4.qxd 14/3/07 16:33 Página 9
Page 90

10
Schalten Sie ein Kochfeld ein. Um ein Kochfeld
einzuschalten, drücken Sie den Knopf des
entsprechenden Kochfelds. Wählen Sie die
gewünschte Leistung mit den Knöpfen “+” oder “-”
mit den Sensoren für die Leistung aus.
Weisen Sie eine Zeitspanne der Zeitschaltuhr zu, drücken Sie dafür die Knöpfe “+”oder “-” der Zeitschaltuhr,
damit wird Ihnen die Zeit in Minuten angezeigt.
Wenn Sie mit dem “+” beginnen, werden zu Beginn “00”
Minuten angezeigt.
Wenn Sie mit dem “-” beginnen, werden zu Beginn “99”
Minuten angezeigt.
Diese ausgewählte Zeit wird sich vermindern, bis die
Anzeige wieder 0 erreicht hat und dann schaltet sich
das Kochfeld ab.
Durchzuführende Schritte, um ein Kochfeld über eine bestimmte Zeitspanne zu steuern:
Es besteht die Möglichkeit, dass das Gerät keine Töne abgibt, indem die akustischen
Signale abschaltet werden.
Sie können die Deaktivierung oder Reaktivierung aber nur vornehmen, wenn die Platte
abgeschaltet ist.
• Um das akustische Signal zu deaktivieren, drücken Sie gleichzeitig die
Knöpfe “+” für die Leistung und “+” für die Zeitschaltuhr an der Platte der
Steuerung der Kochzone rechts oder hinten rechts (je nach Modell), bis
das Symbol “bE Ep” erscheint. Halten Sie die Sensoren gedrückt, bis die
das Symbol verschwindet.
• Um das akustische Signal zu aktivieren, drücken Sie gleichzeitig die Knöpfe “+”
für die Leistung und “+” für die Zeitschaltuhr an der Platte der Steuerung der
Kochzone rechts oder hinten rechts (je nach Modell), bis das Symbol “bE Ep”
und ein akustische Signal ertönt. Lassen Sie dann die Sensoren los.
botones.
WICHTIG
Wenn Sie keine Zeit auswählen und die Anzeige zeigt 00 an, wird die Zeitschaltuhr abgeschaltet und wenn diese 99 anzeigt, wird die Zeit von 99 Minuten angenommen.
AKUSTISCHES SIGNAL
FUNKTION DER ZEITSCHALTUHR
A
B
C
C60T378A4.qxd 14/3/07 16:33 Página 10
Page 91

11
TOTAL
Erlaubt es Ihnen in jedem Augenblick die Leistung sprunghaft für eine bestimmte Zeit zu
erhöhen. Das bringt für den Bediener eine vollständige Flexibilität.
1. Gehen wir von einer eingeschalteten Platte bei einer bestimmten Leistung aus.
2. Drücken Sie den Knopf und dann können Sie die neue
Leistung und die Zeit eingeben, in der die aktiv sein soll.
Die Leistung wird mit den Knöpfen “-” und “+” der Zone (B) und die
Dauer wird mit den Knöpfen “-” und “+” der Zone (E) eingestellt.
3. Drücken Sie erneut den Knopf , um die Operation zu bestätigen
4. Die Leistung wird mit einem Punkt angezeigt.
5. Wenn die eingestellte Zeitspanne verstrichen ist, kehrt das Kochfeld wieder
zur ursprünglichen Leistung zurück und der Punkt verschwindet.
DIREKTER ZUGANG
Erlaubt es Ihnen in jedem Augenblick eine bestimmte Leistung zu erreichen.
Drücken Sie den Knopf und die Platte erreicht eine bestimmte Leistung.
(Die Leistung wurde vom Werk ab auf 8 eingestellt, aber der Benutzer kann diese
Einstellung ändern, wenn er den folgenden Schritten folgt).
Modifikation der Leistung für den direkten Zugang
(Das Kochfeld muss abgeschaltet sein)
1. Halten Sie den Knopf gedrückt, bis ein Piepston ertönt.
2. Die definierte Leistung wird in blinkender Form angezeigt.
3. Modifizieren Sie die Leistung mit den Knöpfen “-” und “+” der Leistung (B).
4. Drücken Sie erneut den Knopf , um die Operation zu bestätigen.
5. Schalten Sie das Kochfeld ab.
BOOSTER
Die Kochzonen sind mit der Funktion “BOOSTER” ausgestattet. Diese Funktion
ermöglicht es Ihnen schnell die Platte auf die maximale Temperatur zu erhöhen.
1. Drücken Sie el Knopf "Booster" .
Die Anzeige der Leistung des Kochfelds wird (bo) anzeigen und
das Kochfeld wird mit maximaler Leistung betrieben.
2. Wenn das Kochfeld heiß ist, wählen Sie die gewünschte Leistung
aus, indem Sie den Knopf “-” der Zone “B” drücken.
Die Funktion “BOOSTER” wird dann aufgehoben, wenn irgendeiner
der anderen Sensoren für die Leistung des Kochfelds gedrückt wird
oder wenn der Sensor Einschalten / Abschalten gedrückt wird.
WICHTIG
Wenn die Funktion “BOOSTER” gedrückt wird, kann das andere Kochfeld der gleichen
Seite der Platte nur maximal mit der Leistung 6 betrieben werden, weil diese Funktion
einen Teil der Leistung des Nachbarfelds aufnimmt.
SPEZIELLE FUNKTIONEN
C60T378A4.qxd 14/3/07 16:33 Página 11
Page 92

12
VERZÖGERTE PROGRAMMIERUNG
Erlaubt es die Zeit einzustellen, wann der Kochvorgang beendet wird und seine
Dauer.
1. Schalten Sie das gewünschte Kochfeld, mit el Knopf ein.
2. Drücken Sie den Knopf und es wird Ihnen die aktuelle Uhrzeit ange
zeigt.Wenn die Uhrzeit korrekt ist, gehen Sie zum Punkt 4 über, wenn nicht,
stellen Sie die Uhrzeit ein.
3. EINSTELLUNG DER AKTUELLEN UHRZEIT: Benutzen Sie die Knöpfe
“-” und “+” für die Leistung in der Zone (B) um die aktuelle Stunde einzus
tellen und benutzen Sie die Knöpfe “-” und “+” der Zeitschaltuhr (E) um die
Minuten einzustellen.
4. Bestätigen Sie die Uhrzeit indem Sie den Knopf drücken (in der
Folge blinken die Ziffern).
5. Stellen Sie die Zeit ein, zu der Sie wünschen, dass der Kochvorgang been
det wird. Benutzen Sie dafür die Knöpfe “ -” und “+” der Zonen (B) und (E).
6. Bestätigen Sie, durch das Drücken des Knopfs .
7. Die Einstellung der Kochzeit wird mit den Knöpfen “-” und “+” in der Zone
(E) durchgeführt.
8. Bestätigen Sie, durch das Drücken des Knopfs .
9. Definieren Sie die gewünschte Leistung für den Kochvorgang mit den
Knöpfen “-” und “+” der Zone (B).
10. Bestätigen Sie die Leistung, durch das Drücken des Knopfs .
11. Wenn Sie das programmiert haben, wird (Auto) angezeigt und danach wer
den die Ziffern erlöschen und nur ein roter Punkt bleibt erleuchtet.
WICHTIG
Die verzögerte Programmierung kann nicht gleichzeitig bei einem weiteren Kochfeld eingesetzt werden. Die gewünschten Werte zur Beendigung, Dauer und Leistung müssen angepasst werden, solange die Ziffern am blinken sind.
C60T378A4.qxd 14/3/07 16:33 Página 12
Page 93

13
STEUERUNG MIT BASISFUNKTIONEN
FUNKTIONSWEISE
Sensor Einschalten /Ausschalten.
Sensoren und Anzeige der
Leistung zwischen 0 und P.
Sensoren und Anzeigen der
Zeitschaltuhr.
Sensor und Anzeige der Sicherheit.
Diese Funktion erlaubt es Ihnen eine höhere Leistung für eine bestimmte Zeit.
• Die Funktion “P.” (P Punkt) wird aktiviert, wenn Sie den Knopf “+” drücken, bis
die Position “P” erreicht ist. Lassen Sie ihn nun los und nun blinkt “P”. Drücken
Sie nun die die Steuerung erneut und sie befinden sich nun in der Position “P.” (P Punkt)
für maximale Leistung. Drücken Sie nun die Steuerung “-” und stellen Sie die gewünschte
Leistung für das Kochen ein. Danach wird “P.” (P Punkt) angezeigt.
Nach einer bestimmten Zeit, wenn die zugehörige Zeit verstrichen ist, wird zu der vom
Benutzer eingestellten Leistung zurückgekehrt.
FUNKTION P. (P Punkt) (Funktion zur schnellen Erhitzung)
RATSCHLAG
Benutzen Sie am besten stets die Kochstellen auf verschiedenen Seiten. Wenn sie die
der gleichen Seite benutzten, wird die Anwahl für das Kochen mit maximaler Leistung
eines Kochfelds die Leistung des anderen Felds automatisch begrenzen, dass sich auf
der gleichen Seite der Anzeige für die Leistung befindet.
WICHTIG
Nachdem die Leistung "P." (P Punkt) ausgewählt wurde, aber Sie keine andere Leistung
eingeben, bleibt die Leistung des Kochfelds auf "P" eingestellt.
Während "P." (P Punkt) angezeigt wird, wird jede Betätigung der Steuerung für die
Leistung die “Funktion schnelle Erhitzung" ausschalten und in den normalen Modus zur
Regulierung der Leistung zurückkehren.
Die Funktionsweise ist gleich zu der, wie sie für die speziellen Funktionen beschrieben wurde.
EINSCHALTEN VON EINEM KOCHFELD
Die Funktionsweise ist gleich zu der, wie sie für die speziellen Funktionen beschrieben wurde.
FUNKTIONSWEISE DER ZEITSCHALTUHR
Die Funktionsweise ist gleich zu der, wie sie für die speziellen Funktionen beschrieben wurde.
AKUSTISCHES SIGNAL
A
A
D
B
C
B
C
D
C60T378A4.qxd 14/3/07 16:33 Página 13
Page 94

14
WICHTIG
Es kann immer nur ein Kochfeld zeitgesteuert werden. Um eine Zeitsteuerung zu unterbrechen, drücken Sie den Knopf . Das zeitgesteuerte Kochfeld zeigt alternativ die
Leistung zum Kochen und ein "t" an.
Sensoren und Anzeigen der
Zeitschaltuhr.
Sensor Einschalten /
Ausschalten
Sensoren und Anzeige der
Leistung zwischen 0 und 9.
Sensor und Anzeige der
Sicherheit.
FUNKTIONSWEISE DER ZEITSCHALTUHR
KOMPAKTE STEUERUNG
A
B
C
D
A B C D
FUNKTIONSWEISE
Die Funktionsweise ist gleich zu der, wie sie für die speziellen Funktionen beschrieben wurde.
Durchzuführende Schritte, um ein Kochfeld über eine Zeitspanne zu steuern:
EINSCHALTEN VON EINEM KOCHFELD
Die Funktionsweise ist gleich zu der, wie sie für die speziellen Funktionen beschrieben wurde.
AKUSTISCHES SIGNAL
Schalten Sie ein Kochfeld ein. Um ein Kochfeld einzuschalten, drücken Sie den
Knopf des entsprechenden Kochfelds. Wählen Sie die gewünschte Leistung mit
den Knöpfen “+” oder “-” mit den Sensoren für die Leistung aus.
Schalten Sie die Zeitschaltuhr ein. Drücken Sie dazu den Knopf
Die Zone die über eine Zeitspanne gesteuert werden soll, wird über
diese Symbole angezeigt.
Wenn Sie wiederholt den Knopf drücken, rotiert das mit einer Zeitspanne zu
steuernde Kochfeld.
Wenn Sie ein Kochfeld zur Zeitsteuerung gewählt haben, wird eine Zeitspanne mit den
Knöpfen "+" und "-" der Zeitschaltuhr eingestellt. Damit wird die Zeitspanne in Minuten
angezeigt. Wenn Sie mit dem “+” beginnen, werden zu Beginn “00” Minuten angezeigt.
Wenn Sie mit dem “-” beginnen, werden zu Beginn “99” Minuten angezeigt
Diese ausgewählte Zeit wird sich vermindern, bis wieder 0 erreicht ist und dann schaltet sich das Kochfeld ab.
A
B
C
D
E
C60T378A4.qxd 14/3/07 16:33 Página 14
Page 95

15
Die Gefahr sich über die Temperatur des Glases zu verbrennen ist minimal. Da die Hitze im Kochtopf selbst
erzeugt wird, wird das Glas nur sehr gering erhitzt.
Die Kochfelder mit Induktion verfügen über ein System
zur Feststellung eines Topfs. Das bedeutet, das Kochfeld
arbeitet nicht, wenn sich auf ihm nicht ein adäquates
Behältnis befindet
Erhitzt
Erhitzt nicht
WICHTIG
ZUR BEACHTUNG VON PATIENTEN MIT HERZSCHRITTMACHERN UND AKTIVEN
IMPLANTATEN:
Die Funktionsweise der Küchenplatte ist konform zu den gültigen Normen über elektromagnetische Beeinträchtigungen. Ihre Induktionskochplatten erfüllen vollständig die legalen
Anforderungen (Direktiven 89/336/CEE). Sie wurden so entwickelt, dass sie nicht die
Funktionsweise anderer elektrischer Geräte beeinflussen, wenn diese ebenfalls diese
Normen erfüllen.
IHRE INDUKTIONSPLATTE SCHAFFT IN IHREM DIREKTEN UMFELD MAGNETISCHE
FELDER.
Damit es zu keinen Beeinflussungen zwischen ihrer Kochplatte und dem
Herzschrittmacher kommen kann, ist es notwendig, dass auch er nach der entsprechenden
Norm hergestellt wurde. Für Fragen über die Konformität des Herzschrittmachen oder über
möglichen Unverträglichkeiten wenden Sie sich an den Hersteller oder ihren Arzt.
410ºC
Kochendes Wasser
Temperatur
des Glases
Induktion
Glaskeramik
oder
Halogen
81ºC
3
SICHERHEIT
C60T378A4.qxd 14/3/07 16:33 Página 15
Page 96

16
RESTWÄRME
Nach einer intensiven Nutzung kann die entsprechende Kochzone noch
einige Minuten heiß sein. Es erscheint ein blinkendes “H” solange sie noch
heiß ist. Vermeiden Sie Berührungen dieser Zonen.
SCHUTZ IM FALL DES ÜBERKOCHENS
Für den Fall das etwas überkocht, wird die Platte abgestellt und es wird das
Symbol wie in der Abbildung A angezeigt und ein akustisches Signal (je nach
Modell) wird ertönen, wenn einer der folgenden drei Fälle eintritt:
1. Ein Überkochen, das auch die
Steuerungstasten erreicht.
2. Ein feuchter Lappen, der auf die
Tasten gelegt wurde.
3. Ein Objekt aus Metall, das sich über
den Tasten zur Steuerung
befindet.
Reinigen Sie die Tasten oder entfernen Sie das Objekt und
beginnen Sie wieder mit dem Kochvorgang.
AUTO-STOPP SYSTEM
Falls Sie es vergessen sollten, ein Kochfeld abzuschalten, ist ihre
Kochplatte mit einer Sicherheitsfunktion ausgestattet. Das AUTO-STOPP
SYSTEM wird automatisch die Kochzone nach einer voreingestellten Zeit
abschalten (zwischen 1 und 10 Stunden, je nach eingesetzter Leistung).
Wenn dieses System zur Sicherheit aktiviert worden ist, wird die
Unterbrechung des Kochvorgangs in der Kochzone mit der Information “AS”
oder “A” in der Steuerzone angezeigt und es wird ein akustisches Signal
während einiger Minuten ertönen. Sie müssen nur irgendeine Taste der
Steuerung drücken, damit das akustische abgestellt wird. Ein doppelter
Piepston bestätigt den Vorgang.
SICHERHEIT BEI DER FUNKTION
(Abb. A)
C60T378A4.qxd 14/3/07 16:33 Página 16
BIP-BIP
Page 97

17
Zone zum Kochen* Zu benutzender Kochtopf
16 cm 10...18 cm
18 cm 12...22 cm
21 cm 18...24 cm
28 cm 12...32 cm
Die Hitze wird über die
Induktion sehr schnell
und in dem Boden des
Behälters erzeugt.
Deshalb dürfen Sie nie
ein leeres Behältnis
erhitzen.
Innerhalb der
Kochutensilien, die für
die Induktion geeignet
sind, sollten die bevorzugt verwendet werden, die einen etwas
dickeren Boden haben.
Die Verteilung und die
Ausnutzung der Hitze
sind mit ihnen besser.
Wenn der Kochtopf nicht geeignet, wird Ihnen das angezeigt, die Anzeige für die Leistung
wird blinken. Nur Glas, Ton, Aluminium ohne speziellen Boden, Kupfer und einige nicht magnetischen Edelstahle sind für das Kochen über Induktion ungeeignet.
4
KOCHTÖPFE
WELCHE KOCHZONE SOLLTE IN BEZUG AUF
DEN KOCHTOPF BENUTZT WERDEN?
Vermeiden Sie es, die
Kochtöpfe über die
Glasplatte zur ziehen oder
auf ihr zu bewegen. Heben
Sie sie an, um sie umzusetzen.
Lassen Sie keine
Kochutensilien auf der in
Betrieb befindlichen Platte
liegen. Diese könnten als
Kochtöpfe aufgefasst und
erhitzt werden.
Normalerweise wird ein
Löffel oder eine Gabel
nicht als solches identifiziert, allerdings ein größeres Utensil schon.
*Je nach Modell
C60T378A4.qxd 14/3/07 16:33 Página 17
Page 98

18
Da das Glas wesentlich
weniger erwärmt, wird
vermieden, dass Spritzer
und Reste auf der Platte
ankleben. Deshalb ist die
Reinigung einfacher.
Trotz allem, bei der
Glaskeramik wie bei der
Induktion, sollten Sie die
Kochstellen so schnell
wie möglich von
Spritzern und
Rückständen reinigen.
5
INSTANDHALTUNG UND REINIGUNG
Die leichten Verunreinigungen
werden schlicht mit einem
verstärken Papiertuch oder
einem Lappen beseitigt.
Für die schwereren
Verschmutzungen, benutzen
Sie die Spezialreiniger für
Glaskeramik. Benutzen Sie
diese entsprechend der beiliegenden Anweisungen.
WICHTIG
· Benutzen Sie niemals kratzende Reiniger, denn Sie können die Platte verkratzen.
· Benutzen Sie keine Dampfreiniger.
· Falls ein Riss in der Oberfläche des Glases auftauchen sollte, schalten Sie das Gerät
sofort ab und trennen Sie es von der Netzspannung. Benutzen Sie keinen Teil der Platte,
bevor nicht ein neues Glas aus Glaskeramik installiert worden ist.
C60T378A4.qxd 14/3/07 16:33 Página 18
Page 99

19
220-240 V einphasig
Sicherung 32 Ampere
Schutzleiter
N
Braun
Grün / Gelb
Blau
Schwarz oder Grau
Braun
Grün / Gelb
Blau
Schwarz oder Grau
Braun
Grün / Gelb
Blau
Schwarz
Grau
Phase
L
Erde
400 V 2N dreiphasig
Sicherung 16 Ampere
2 x 230 V dreiphasig
Trennen Sie die beiden Kabelantes
der Phasen L1, L2 bevor Sie
den Anschluss durchführen.
Trennen Sie die beiden Kabel
der Phasen L1, L2 und Neutro
N1, N2 bevor Sie
den Anschluss durchführen.
Schutzleiter
N
Phase1
L1
Phase2
L2
Erde
Schutzleiter1
Schutzleiter2
N1 N2
Phase1L1Phase2
L2
Erde
ELEKTRISCHE ANSCHLÜSSE
KABEL MIT DREI DRÄHTEN
KABEL MIT FÜNF DRÄHTEN
6
400 V 3N dreiphasig
Sicherung 16 Ampere
Neutro
N
Fase
L1
Tierra
Braun
Grün / Gelb
Blau
220-240 V einphasig
Sicherung 16 Ampere
16A
Grün / Gelb
Blau
Schutzleiter
N
Erde
Braun
Phase
L
C60T378A4.qxd 14/3/07 16:33 Página 19
Page 100

20
400 V 3N dreiphasig
Sicherung 16 Ampere
220-240 V einphasig
Trennen Sie die beiden Kabel der Phasen L1, L2
bevor Sie den Anschluss durchführen.
Schutzleiter
N
Phase
L
Erde
Schutzleiter
N
Phase
L3
Phase
L1
Phase
L2
Erde
Braun
Grün / Gelb
Blau
Schwarz oder Grau
Braun
Grün / Gelb
Blau
Braun
Grün / Gelb
Blau
Schwarz oder Grau
Braun
Grün / Gelb
Blau
WICHTIG
Die Platte wird mit einem Kabel zur Stromzuführung geliefert. Wenn dieses Kabel beschädigt ist, muss es durch den Hersteller, dem Technischen Kundendienst oder von autorisiertem Personal ausgetauscht werden, damit Gefahren vermieden werden.
Nach dem Anschließen der Platte oder nach einem längeren Stromausfall erscheint ein
Leuchtsignal auf dem Steuerpanel.
220-240 V einphasig
Sicherung 16 und 32 Ampere
32A 16A
Schutzleiter
N
Braun
Grün / Gelb
Blau
Schwarz oder Grau
Grün / Gelb
Blau
Phase
L
Schutzleiter
N
Erde
Braun
Phase
L
KABEL MIT DREI DRÄHTEN
Erde
C60T378A4.qxd 14/3/07 16:33 Página 20
 Loading...