

Fagor IF-64R User Manual

EN GUIDE TO INSTALLATION AND USE
Cooking hob

EN
2
TABLE OF CONTENTS
We are constantly improving our products; for this reason we reserve the right to make all
modifications to their technical, functional or aesthetic characteristics, originating from technical developments.
Warning
BBeeffoorree iinnssttaalllliinngg aanndd uussiinngg yyoouurr aapppplliiaannccee pplleeaassee rreeaadd tthhiiss iinnssttaallllaattiioonn aanndd uussee gguuiiddee
ccaarreeffuullllyy -- i
itt wwiillll hheellpp yyoouu ffaammiilliiaarriissee yyoouurrsseellff vveerryy rraappiiddllyy wwiitthh iittss ooppeerraattiioonn..
• Safety Instructions ____________________________________________________ 03
• Care for the environment_______________________________________________ 03
• After-Sales Service____________________________________________________ 04
• Description of your appliance ___________________________________________ 04
1 / INSTALLING YOUR APPLIANCE
• Choice of location ____________________________________________________ 05
• Build-in _____________________________________________________________ 05
• Connection __________________________________________________________ 06
2 / USING YOUR APPLIANCE
• Description of the worktop _____________________________________________ 07
• Cookware for induction ________________________________________________ 08
• Which cooking zone to use depending on your cookware ___________________ 08
• Description of the controls _____________________________________________ 09
• Switching on _________________________________________________________ 09
• Stop ________________________________________________________________ 09
• Adjusting the power level ______________________________________________ 09
• Setting the timer______________________________________________________ 09
• Using the “child safety device” __________________________________________ 10
• Safety measures during operation _______________________________________ 11
3 / MAINTAINING YOUR APPLIANCE
• Caring for your appliance ______________________________________________ 12
• Maintaining your appliance ____________________________________________
12
4 / SPECIAL MESSAGES, INCIDENTS
• When using for the first time____________________________________________ 13
• When switching on____________________________________________________ 13
• During use __________________________________________________________ 13
5 / COOKING CHART
• Cooking chart according to dish ________________________________________ 14

EN
3
SAFETY INSTRUCTIONS
We have designed this cooking hob for use by
private individuals in their homes.
These cooking hobs are intended exclusively
for cooking beverages and foodstuffs and do
not contain any asbestos-based materials.
This appliance is not intended to be used by
persons (including children) with reduced physical, sensory or mental abilities, or persons
lacking experience or awareness, unless using
it with the help of a person reponsible for their
safety, or under supervision and with prior
instruction in its use. Children should be supervised to ensure that they do not play with the
appliance.
••
Residual heat
A cooking zone can remain hot for several
minutes after use.
An “HH“ is displayed during this period.
Avoid touching the hot areas during this time.
••
Child safety
Your hob has a child safety feature which
locks it when it is off or during cooking (see
section: use of child safety).
Do not forget to unlock before using again.
••
For users with heart pacemakers
and active implants
.
The functioning of the hob conforms to current electromagnetic interference standards
and thus is in total compliance with legal
requirements (89/335/EEC directives).
In order to avoid interference between your
cooking hob and a pacemaker, your pacemaker must be designed and programmed in
compliance with the regulations that apply to
it.
Consequently, we can only guarantee that our
own product is compliant.
With regard to the compliance of the pacemaker or any potential incompatibility, you
can obtain information from the manufacturer
or your attending physician.
Electrical Danger
Ensure that the power cable of a connected
electrical appliance near the hob is not in
contact with the cooking zones.
If a crack appears in the surface of the
glass, disconnect your appliance immediately to prevent a risk of electric shock.
To do this, remove the fuses or use the circuit breaker.
Do not use your hob until you have
replaced the glass worktop
.
••
CARE FOR THE ENVIRONMENT
••
— This appliance’s packing materials are recyclable. Recycle them and play a role in protecting the environment by depositing them
in municipal containers provided for this purpose.
— Your appliance also contains
many recyclable materials. It is
therefore marked with this logo to
indicate that used appliances must
not be mixed with other waste.
Recycling of the appliances organised by your manufacturer will thus
be undertaken in optimum conditions, in accordance with European directive
EC/2002/96 relating to electrical and electronic equipment waste. Consult your local
authority or your retailer to find the drop-off
points for used appliances that is nearest to
your home.
— We thank you for your help in protecting the
environment.
EN
4
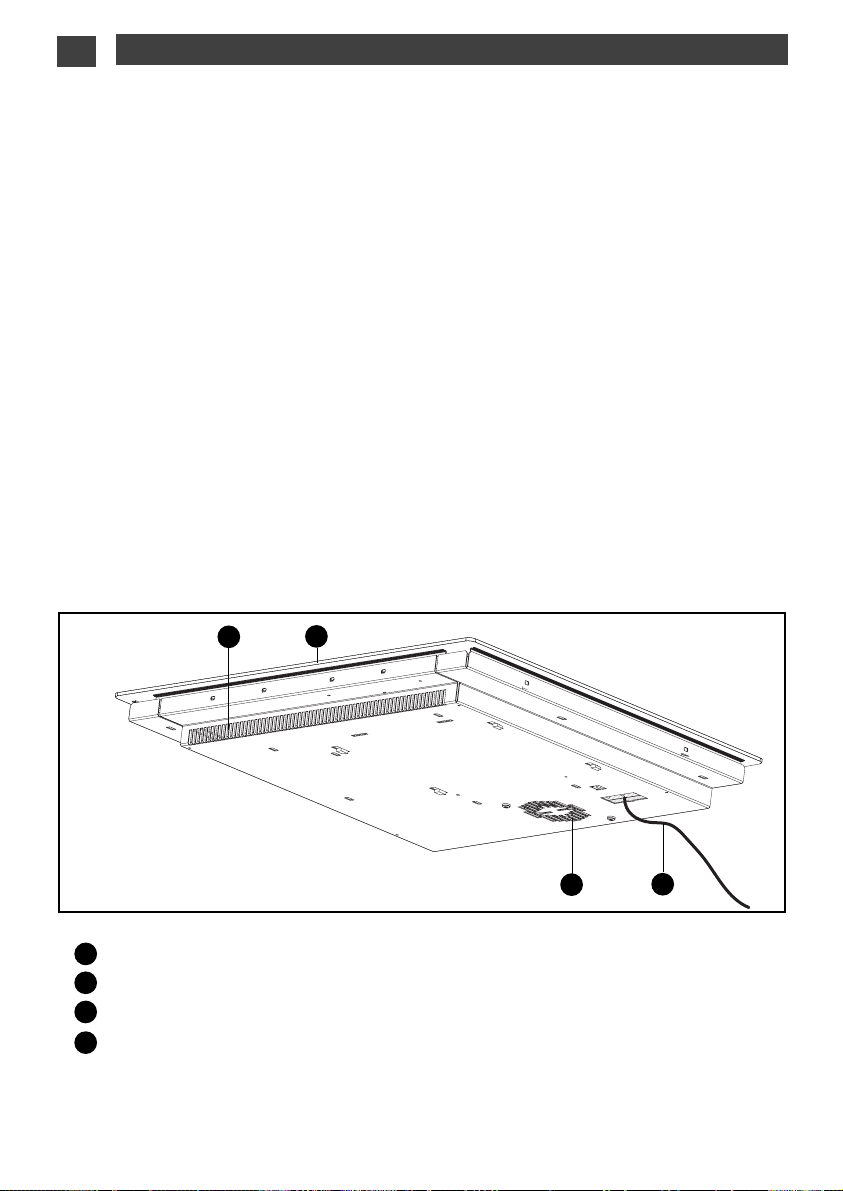
DESCRIPTION OF YOUR APPLIANCE
Air intake
Air outlet
Vitroceramic glass
Power cord
A
B
C
••
D
AFTER-SALES SERVICE
A
D
B
C
In the unlikely event of there being a problem with your appliances please call the number below
quoting the model number of your appliance - this can be found on the rating plate. Our trained
staff are available to advise or book a service call with one of our authorized service agents.
EEnnqquuiirriieess ffoorr ::
- for in-warranty service – telephone
00887700--006600--33223300
- cforontact details of local repair agents for out-of
-warranty service – telephone
00887700--006600--33223300
- to buy replacement spare parts – telephone
00887700--444433--11889999
.
- for extended warranty (and for all other general and promotion information)
–
wwwwww..ffaaggoorr..ccoomm//uukk
EN
5
11
/ INSTALLING YOUR APPLIANCE
••
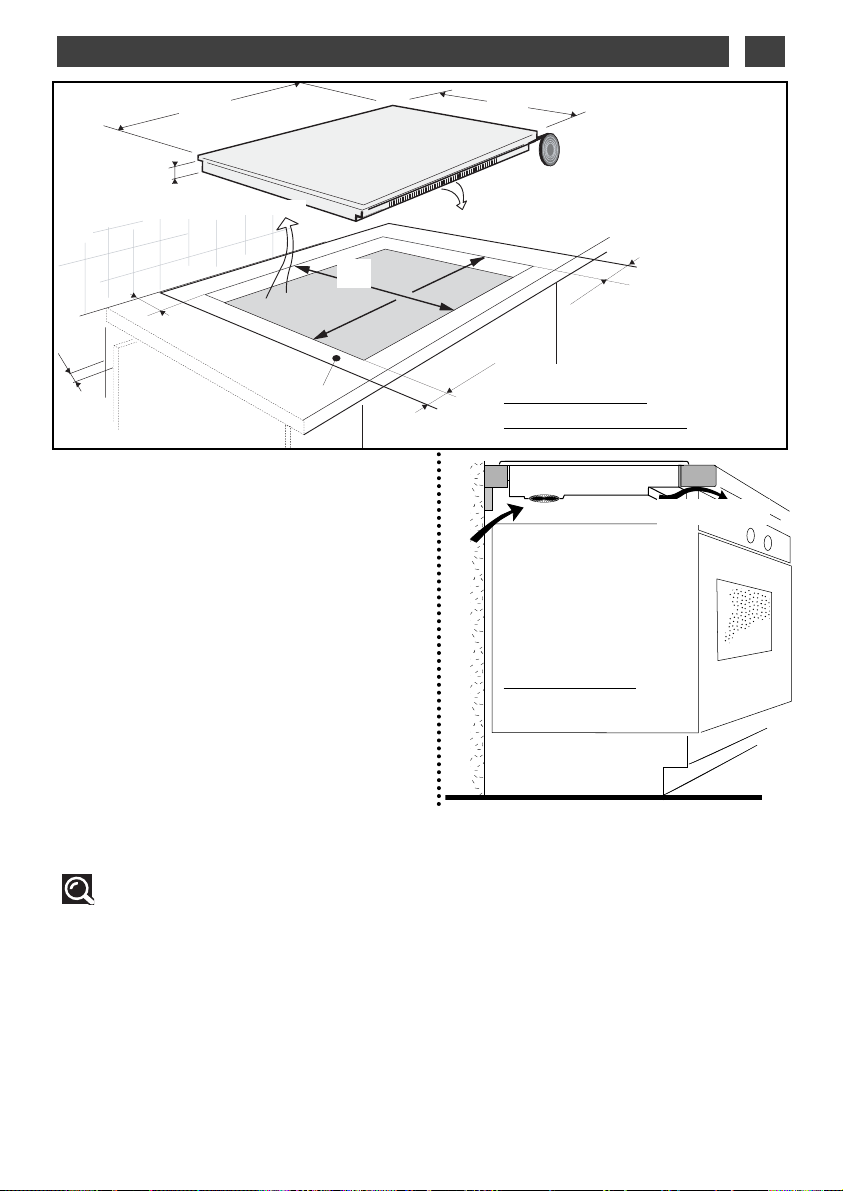
CHOOSING THE POSITION
The distance between the edge of your appliance
and the side and rear walls (or partitions) must be
at least four centimetres (zone A).
YYoouurr aapppplliiaannccee mmaayy bbee bbuuiilltt iinn wwiitthhoouutt aannyy rreessttrriicc--
ttiioonn.. CChheecckk,, hhoowweevveerr,, tthhaatt tthhee aaiirr iinnttaakkee aanndd
oouutt--
lleett aarree ffrreeee ooff oobbssttrruuccttiioonn ((sseeee ““ddeessccrriippttiioonn ooff
yyoouurr aapppplliiaannccee”” cchhaapptteerr))..
The building-in method opposite is recommended
for use above an oven or a built-in appliance.
BUILDING-IN
Follow the diagram above.
Glue the foam seal underneath your appliance, following the perimeter of the hole in the worktop,
upon which your appliance will rest. This will
ensure a good seal against the worktop.
Attach the clips to the hob
(depending on the
model
).
4
vveennttiillaattiioonn ssppaaccee
5511
••
5588
4499
5566
66,,44
AAbboovvee aann oovveenn
MIN 4 mm
AAbboovvee aa ccaabbiinneett
wwiitthh aa ddoooorr oorr ddrraawweerr
Tip
If your hob is located above your oven, the hob’s thermal safety devices can impede the
simultaneous use of the hob and the oven’s pyrolysis program.
Your hob is equipped with an anti-overheating safety system.
This safety device can trigger, for example, when the hob is installed over an oven that is not sufficiently insulated. If this occurs, a series of small lines appears on the control panel. In such circumstances we recommend that you increase the hob’s ventilation by creating an opening in the
side of the cabinet, (8 x 5 cm), and/or installing an oven insulation kit available from the after-sales
department.
Air outlet
Air intake
Entrée d'air
cm
4 cm
A
Sortie d'air
4 cm
4 cm
 Loading...