

Page 1

Need an exploded view diagram/closeup
diagram of the plate, transformer, back of
the speaker, etc. here, calling out parts.
Point out the cover plate, the hole to pass
wires through, the screws to be loosened
in step 3, etc.
Show relation to whole speaker. Show both
top and bottom of plate.
IMPORTANT:
Refer to www.extron.com for the complete
user guide, installation instructions, and
specifications before connecting the
FF 220T • Setup Guide
product to the power source.
This setup guide contains installation information about the Extron FF 220T Flat Field® speaker. This speaker is designed for use
in plenum rated ceiling spaces and can be dropped into a standard square (2-foot by 2-foot or 600 mm by 600 mm) or rectangular
(2-foot by 4-foot or 600 mm by 1200 mm with supplied cross bars) false ceiling tile space on a T-bar grid.
WARNING: May result in serious injury. Installation and service must be performed by authorized personnel only.
NOTE: The FF 220T comes in two ceiling tile configurations depending on the tile unit of measurement:
• US version (part #42-141-03) — Drops into 2' x 2' (61 cm x 61 cm) or 2' x 4' (61 cm x 122 cm)
suspended tile ceilings
• Metric version (part #42-141-23)
— Drops into 600 mm x 600 mm or 600 mm x 1200 mm suspended tile
ceilings
Be sure to order the correct part number as the two configurations are not interchangeable and will not
fit correctly.
Factors to Consider Before Installation
z Installation of conduit and conduit adapters must conform to all applicable
building codes and local ordinances.
z Installation in a plenum-rated environment requires a wire gauge of
12 AWG to 18 AWG, as shown on the right. Conduit may be required.
z If using secondary support cables, the installer provides the cables.
8Ω
Configuration
70 V/100 V
Configuration
Wire Gauge Table
Number of Wires
per Connection Point
1 12 AWG
2 14 AWG
1 14 AWG
2 16 AWG
Installation
1. Disconnect power — Power down all attached devices before proceeding.
2. Remove and cut ceiling tile — Remove the square ceiling tile where the FF 220T will be installed. If the ceiling has
rectangular tiles, cut the tile in half, as shown below.
Cut Material
Draw Line At
Halfway Point
3. Install the T-rail in a rectangular tile — When the ceiling uses rectangular
tiles, install the T-rail crosspiece into the ceiling opening up against the
cut tile, as shown on the right.
4. Transformer cover plate — Loosen, but do
not remove, the two screws on the top of
the transformer cover plate, as shown on
the right. Next, slide and remove the
transformer cover plate, which is installed
with the transformer side down.
Rectangular Ceiling Tile
Transformer Cover Plate
Loosen, but do not remove
the 2 transformer cover plate
screws in the 2 keyhole slots.
Ceiling Tile
T- rail
Crosspiece
(supplied)
Maximum
Wire Gauge
1
Page 2
FF 220T Setup Guide (Continued)
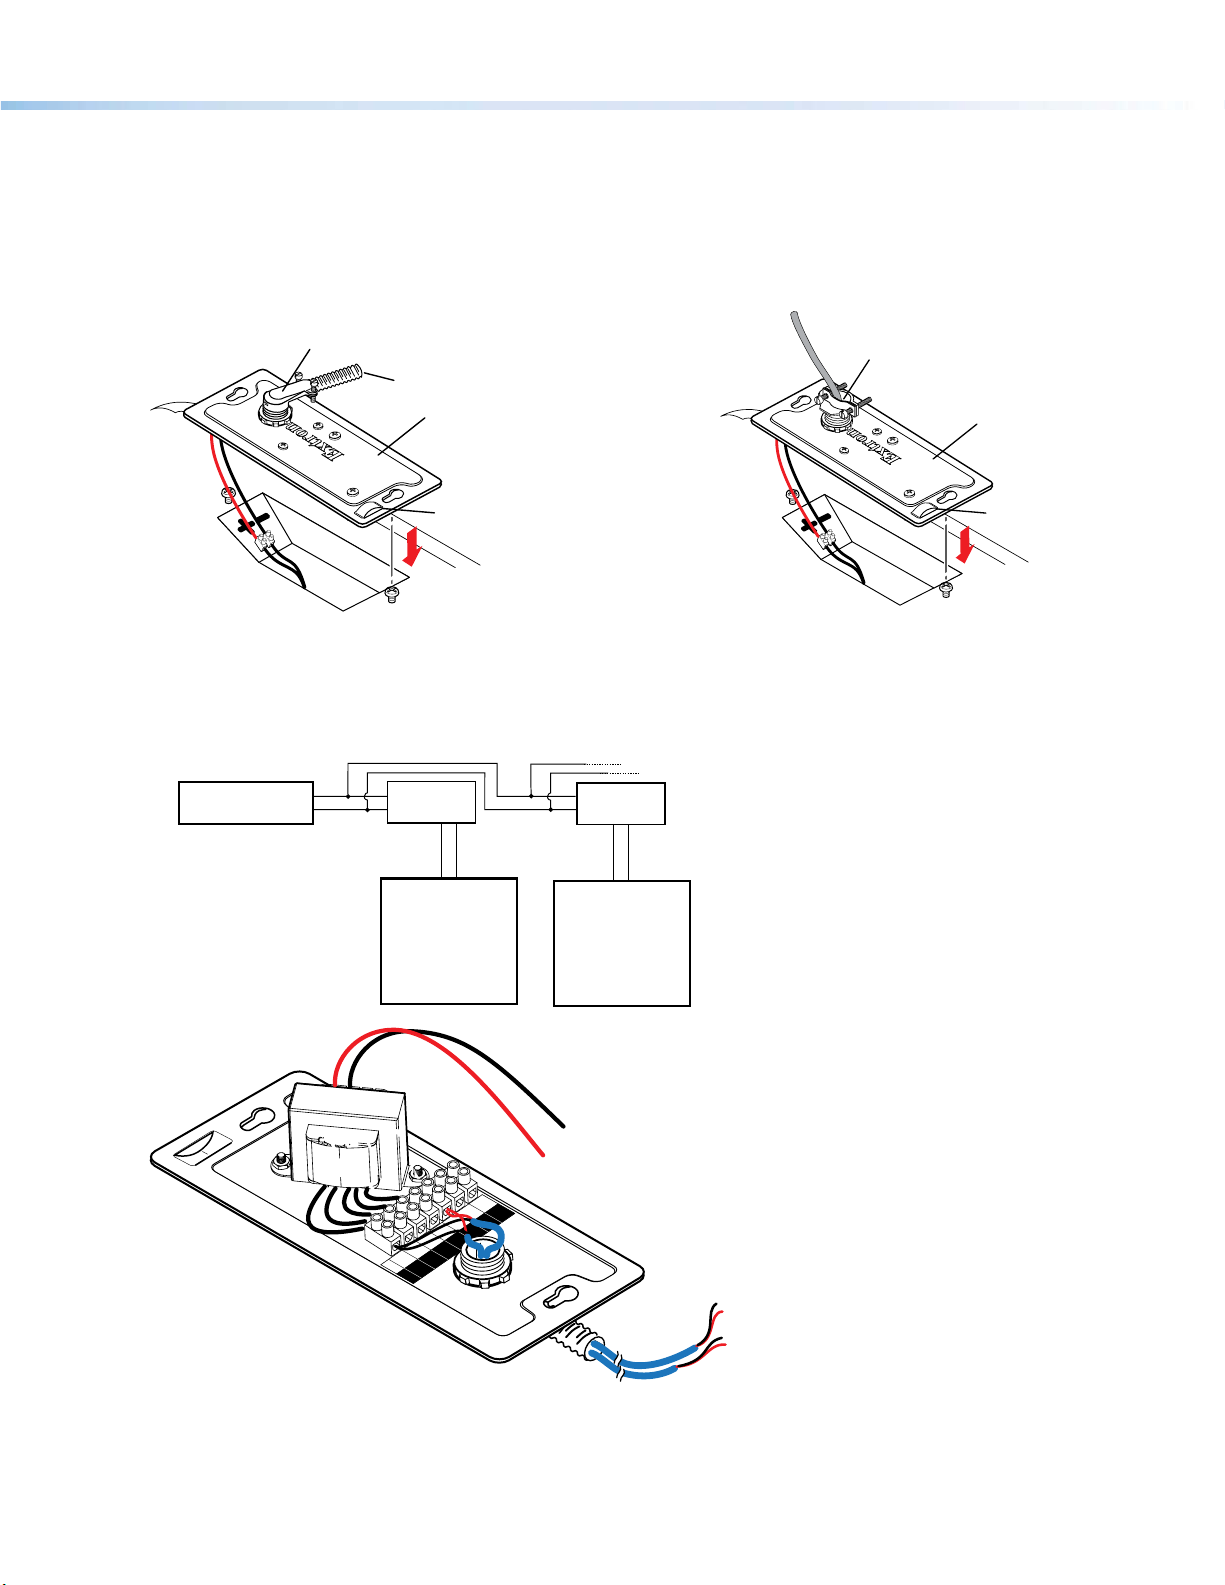
5. Route the cables through the cover plate —
Using a flexible conduit:
a. Route the wires through the conduit.
b. Insert the conduit into the cover plate opening
using an appropriate conduit adapter, and secure
the conduit to the plate, as shown below.
Using apeaker wires without a conduit:
a. Secure the cable clamp adapter (included) to
the cover plate.
b. Insert the wires through the cable clamp and
cover plate, as shown below.
c. Tighten the clamp screws.
c. Pull the wires out of the conduit and through the
cover plate.
Flexible Conduit Adapter
Flexible Conduit
Transformer Cover Plate
Cable Clamp Adapter
Transformer Cover Plate
Secondary Attachment
Point
Secondary Attachment
Point
Rear of Speaker
Rear of Speaker
6. Distributed audio system (70 V or 100 V) or direct connection —
• if wiring a 70 V or 100 V distributed system and using the transformer, proceed to step 7.
• if bypassing the transformer and wiring directly from the amplier, proceed to step 9.
7. For 70 V or 100 V distributed audio systems, connect cables from the amplier to the transformer on the FF 220T transformer
cover plate.
Amplifier
70 V or 100 V Distribution System
(through the transformer)
Transformer
FF 220T
70 V
COM NC 16 W 8 W 4 W 2 W 1 W
100 V
Transformer
Additional FF 220Ts
can be attached to
to the tap connector.
See step 7f.
FF 220T
(Black) To Speaker - Te rminal
(Red) To Speaker + Te rminal
NC
1 W
2 W4 W8 W16 WCOM
Black (-)
To Second
Speaker
Red (+)
Black (-)
Red (+)
From Amplifier
(70V/100V)
a. Pull the wires from the amplier through and out of the conduit, if a conduit is used.
b. Route the two wires from the amplier through the cover plate hole to the transformer side. See the wire gauge table on
page 1 for maximum speaker wire sizes.
2
Page 3

FF 220T Setup Guide (Continued)
c. Strip 3/16” (5 mm) from the wire ends and keep the wire end strands together by twisting them. Do not tin the wires.
d. Secure the wires to the appropriate taps on the captive screw
connectors of the 7-connector terminal block (on the transformer
side of the cover plate) as indicated on the tap label. See the note
below. The black, negative (-) wire attaches to the “COM” terminal,
and the red, positive (+) wire attaches to the desired terminal tap.
See the diagram at right.
NOTE: Observe the 70 V or 100 V system
designation as indicated on the tap label.
1 W
70 V
COM NC 16 W8 W4 W2 W1 W
100 V
2 W4 W8 W16 WCOM
e. Use a small at blade screwdriver to tighten the
terminal block screws.
f. To wire additional speakers, route speaker wires
from the second speaker through the cover plate
hole to the transformer side, and twist the black
negative (-) wires together and twist the red
positive (+) wires together before inserting them into
the terminal block. Additional speakers can be daisy
chained this way, as shown at right.
8. Connect wires from the transformer to the speaker.
a. Keep the wire strands together by twisting them (do not tin the wires).
b. Connect the red positive (+) wire to the + speaker terminal and connect the black negative (-) wire to the - speaker
terminal as shown below.
c. Proceed to step 10.
9. For direct speaker connection, see the block diagram below.
a. Route the wires from the amplier to the speaker using the same procedure for routing speaker wire (and conduit if
applicable) through the transformer cover plate as described in steps 4 through 7b (see the wire gauge table on
page 1 for maximum speaker wire sizes). Strip 3/16 inch (5 mm) from the ends of the two speaker wire leads (+ and -)
coming from the amplier. Keep the wire strands together by twisting them (do not tin the wires), and secure the wires to
the input terminals of the speaker while observing the correct polarity.
NC
70 V
8 W
COM NC 16 W
100 V
8 W
70 V
COM NC 16 W
100 V
NC
1 W
2 W4 W16 WCOM
4 W 2 W 1 W
8 W
Black Wires
NC
1 W
2 W4 W16 WCOM
4 W 2 W 1 W
8 W
Wiring to a Single Speaker
Red Wires
From Amplifier (+)
To Next Speaker (tap)
From Amplifier (-)
To Next Speaker (com)
Amplifier
Direct Connection
(bypassing the transformer)
Transformer
FF 220T
b. Connect the red positive (+) wire to the + speaker terminal and connect the black negative (-) wire to the - speaker
terminal depending on whether one or two speakers are being connected, as shown below.
Red Wire
From Amplifier
To Second Speaker
From Amplifier
To Second Speaker
Black Wire
One Speaker
Red Wire
From Amplifier
Black Wire
Two Speakers
3
Page 4

FF 220T Setup Guide (Continued)
10. Replace the transformer cover plate and tighten the two cover plate screws that were loosened in step 4.
11. Set the speaker on top of a T-rail making sure to hide the edges behind the grid rail.
Extron
FF 220T
Two-way Ceiling
Speakers
Ceiling Tile
Existing
Ceiling Tile
Rails
12. If secondary support cables are being used, install them. See the illustration below.
ATTENTION: DO NOT allow any slack in these support cables.
T- rail
Crosspiece
(supplied)
NOTE: Observe all applicable building codes and local ordinances when installing the speaker.
Anchor this end to a
suitable secure point.
Route the secondary support
line through the line retainer
and bendout tab.
Seismic
Safety
Cable
NOTE: Repeated bending of the tab
Bend Up Tab
may cause it to break off.
a. Temporarily remove a ceiling tile adjacent to the speaker and set it aside.
b. Connect a secondary support cable through the secondary attachment point, and attach it to one of the bendout tabs
located on either side of the speaker.
c. Attach the other end of the cable to a sturdy part of the building (studs, roof struts, and so forth).
d. For additional secondary support cables repeat as needed. Refer to the FF220T User Guide for further details.
e. Replace all ceiling tiles.
13. Check all wiring before powering up the amplier.
Extron Headquarters
+800.633.9876 Inside USA/Canada Only
Extron USA - West Extron USA - East
+1.714.491.1500 +1.919.850.1000
+1.714.491.1517 FAX +1.919.850.1001 FAX
© 2013 Extron Electronics All rights reserved. All trademarks mentioned are the property of their respective owners. www.extron.com
Extron Europe
+800.3987.6673
Inside Europe Only
+31.33.453.4040
+31.33.453.4050 FAX
Extron Asia
+65.6383.4400
+65.6383.4664 FAX
Extron Japan
+81.3.3511.7655
+81.3.3511.7656 FAX
Extron China
+86.21.3760.1568
+86.21.3760.1566 FAX
Extron Middle East
+971.4.299.1800
+971.4.299.1880 FAX
Extron Korea
+82.2.3444.1571
+82.2.3444.1575 FAX
Extron India
1800.3070.3777
(Inside India Only)
+91.80.3055.3777
+91.80.3055.3737 FAX
68-1683-50 Rev. C
08 13
4
 Loading...