

Getting started
Summit WM200/2000 Controller Installation Instructions
Step 2 – Connect to a power supply
Configure Management interface
Configure your system
These instructions provide installation technicians with a highlevel overview for installing the Summit
®
WM200/2000
Controller.
Unpack the controller:
1 Lift the controller, in its protective foam casing, straight up
and out of the carton.
2 Lay the controller on a flat surface and slide off the foam
casing.
3 Confirm that your carton contains all of the appropriate
content.
Carton contents:
● One controller
● Two mounting brackets
● Eight M3x6 lens head machine screws
● Four self-adhesive rubber feet
● One crossover RJ45 Ethernet cable (for installation)
● Summit WM200/2000 Controller Installation Instructions (English
and German)
● Summit WM User Guide (CD)
● Summit WM Getting Started Guide
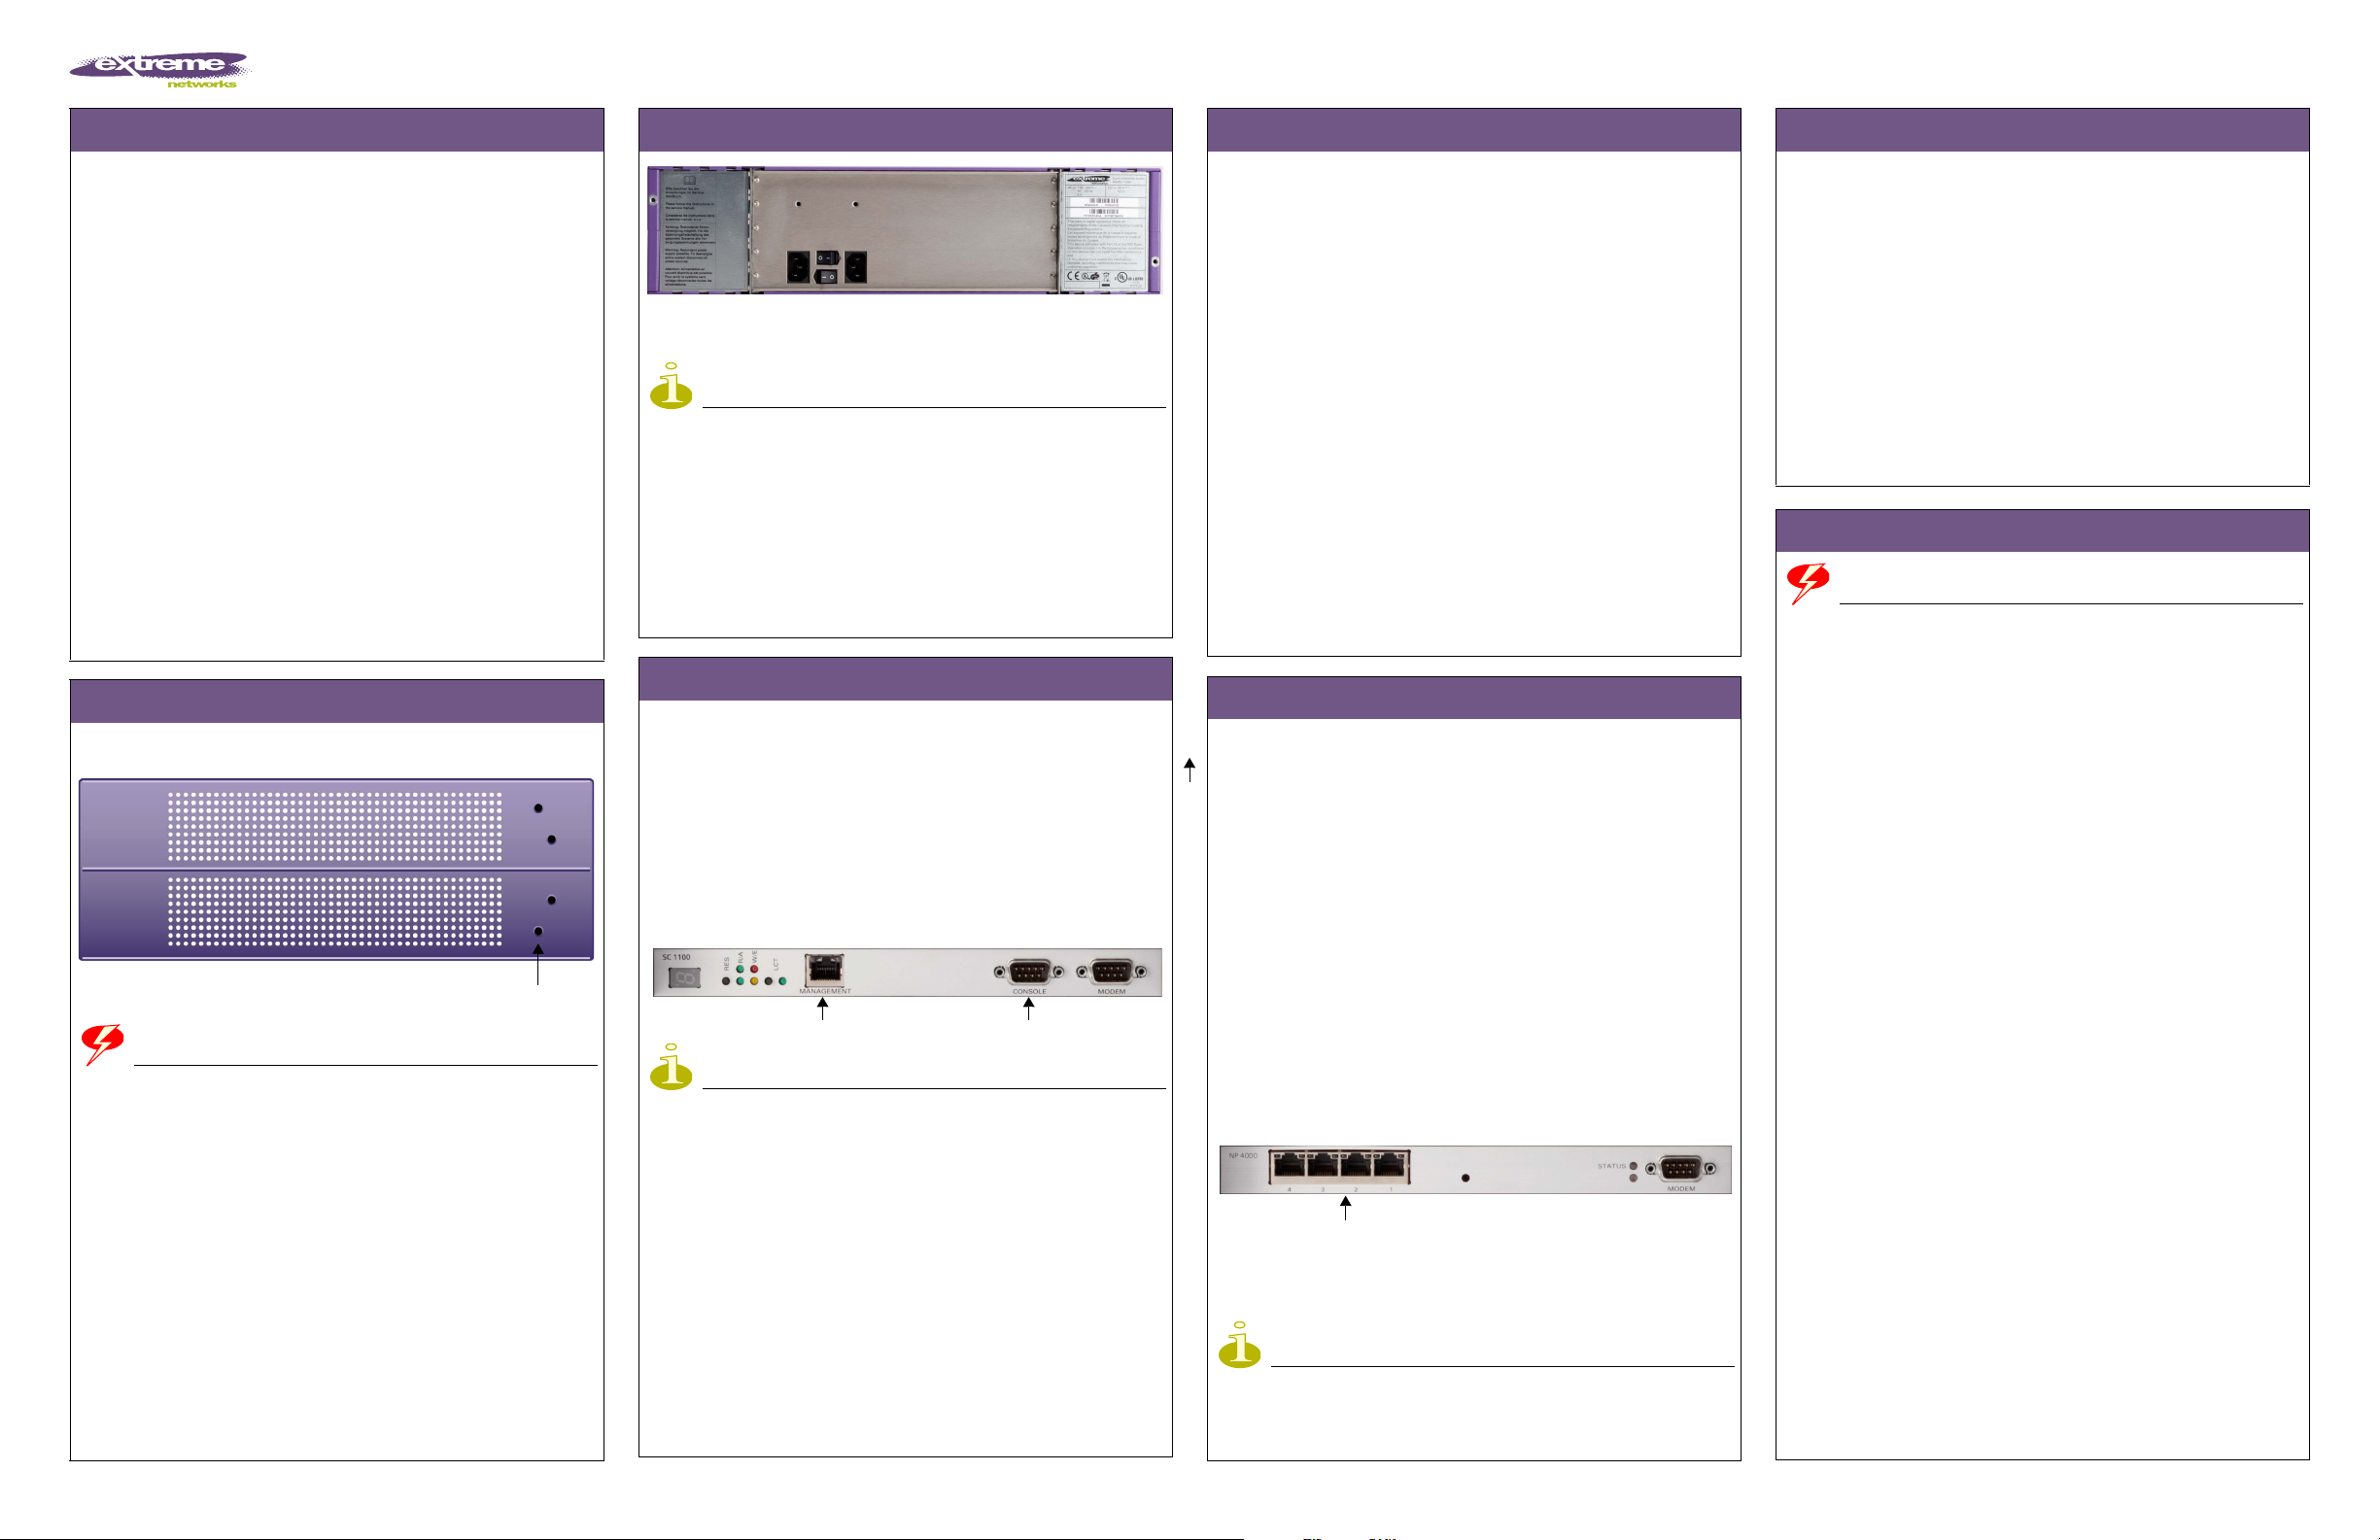
Step 1 – Mount
Mounting holes
WARNING!
Do not obstruct the ventilation grills of the controller.
Two mounting options are available, rack and table.
Rack mounting:
1 Attach the mounting brackets to the controller mounting
holes.
2 Attach the brackets to the rack.
Table mounting:
3 Ensure at least 2 inches of clearance on all sides of the
controller for proper ventilation.
Glue the four rubber feet to the stamped positions on the
bottom of the controller.
Connect the two power cords to the controller.
NOTE
If only one power cord is connected, the disconnected power supply LED
is illuminated red.
Power off the controller:
● If necessary, to power off the controller first use the
Command Line Interface (CLI) commands or the Summit WM
Graphical User Interface (GUI). This operation halts the
operation of the controller software.
To complete powering off the controller, a manual power reset on
the controller box is required to cycle the hardware.
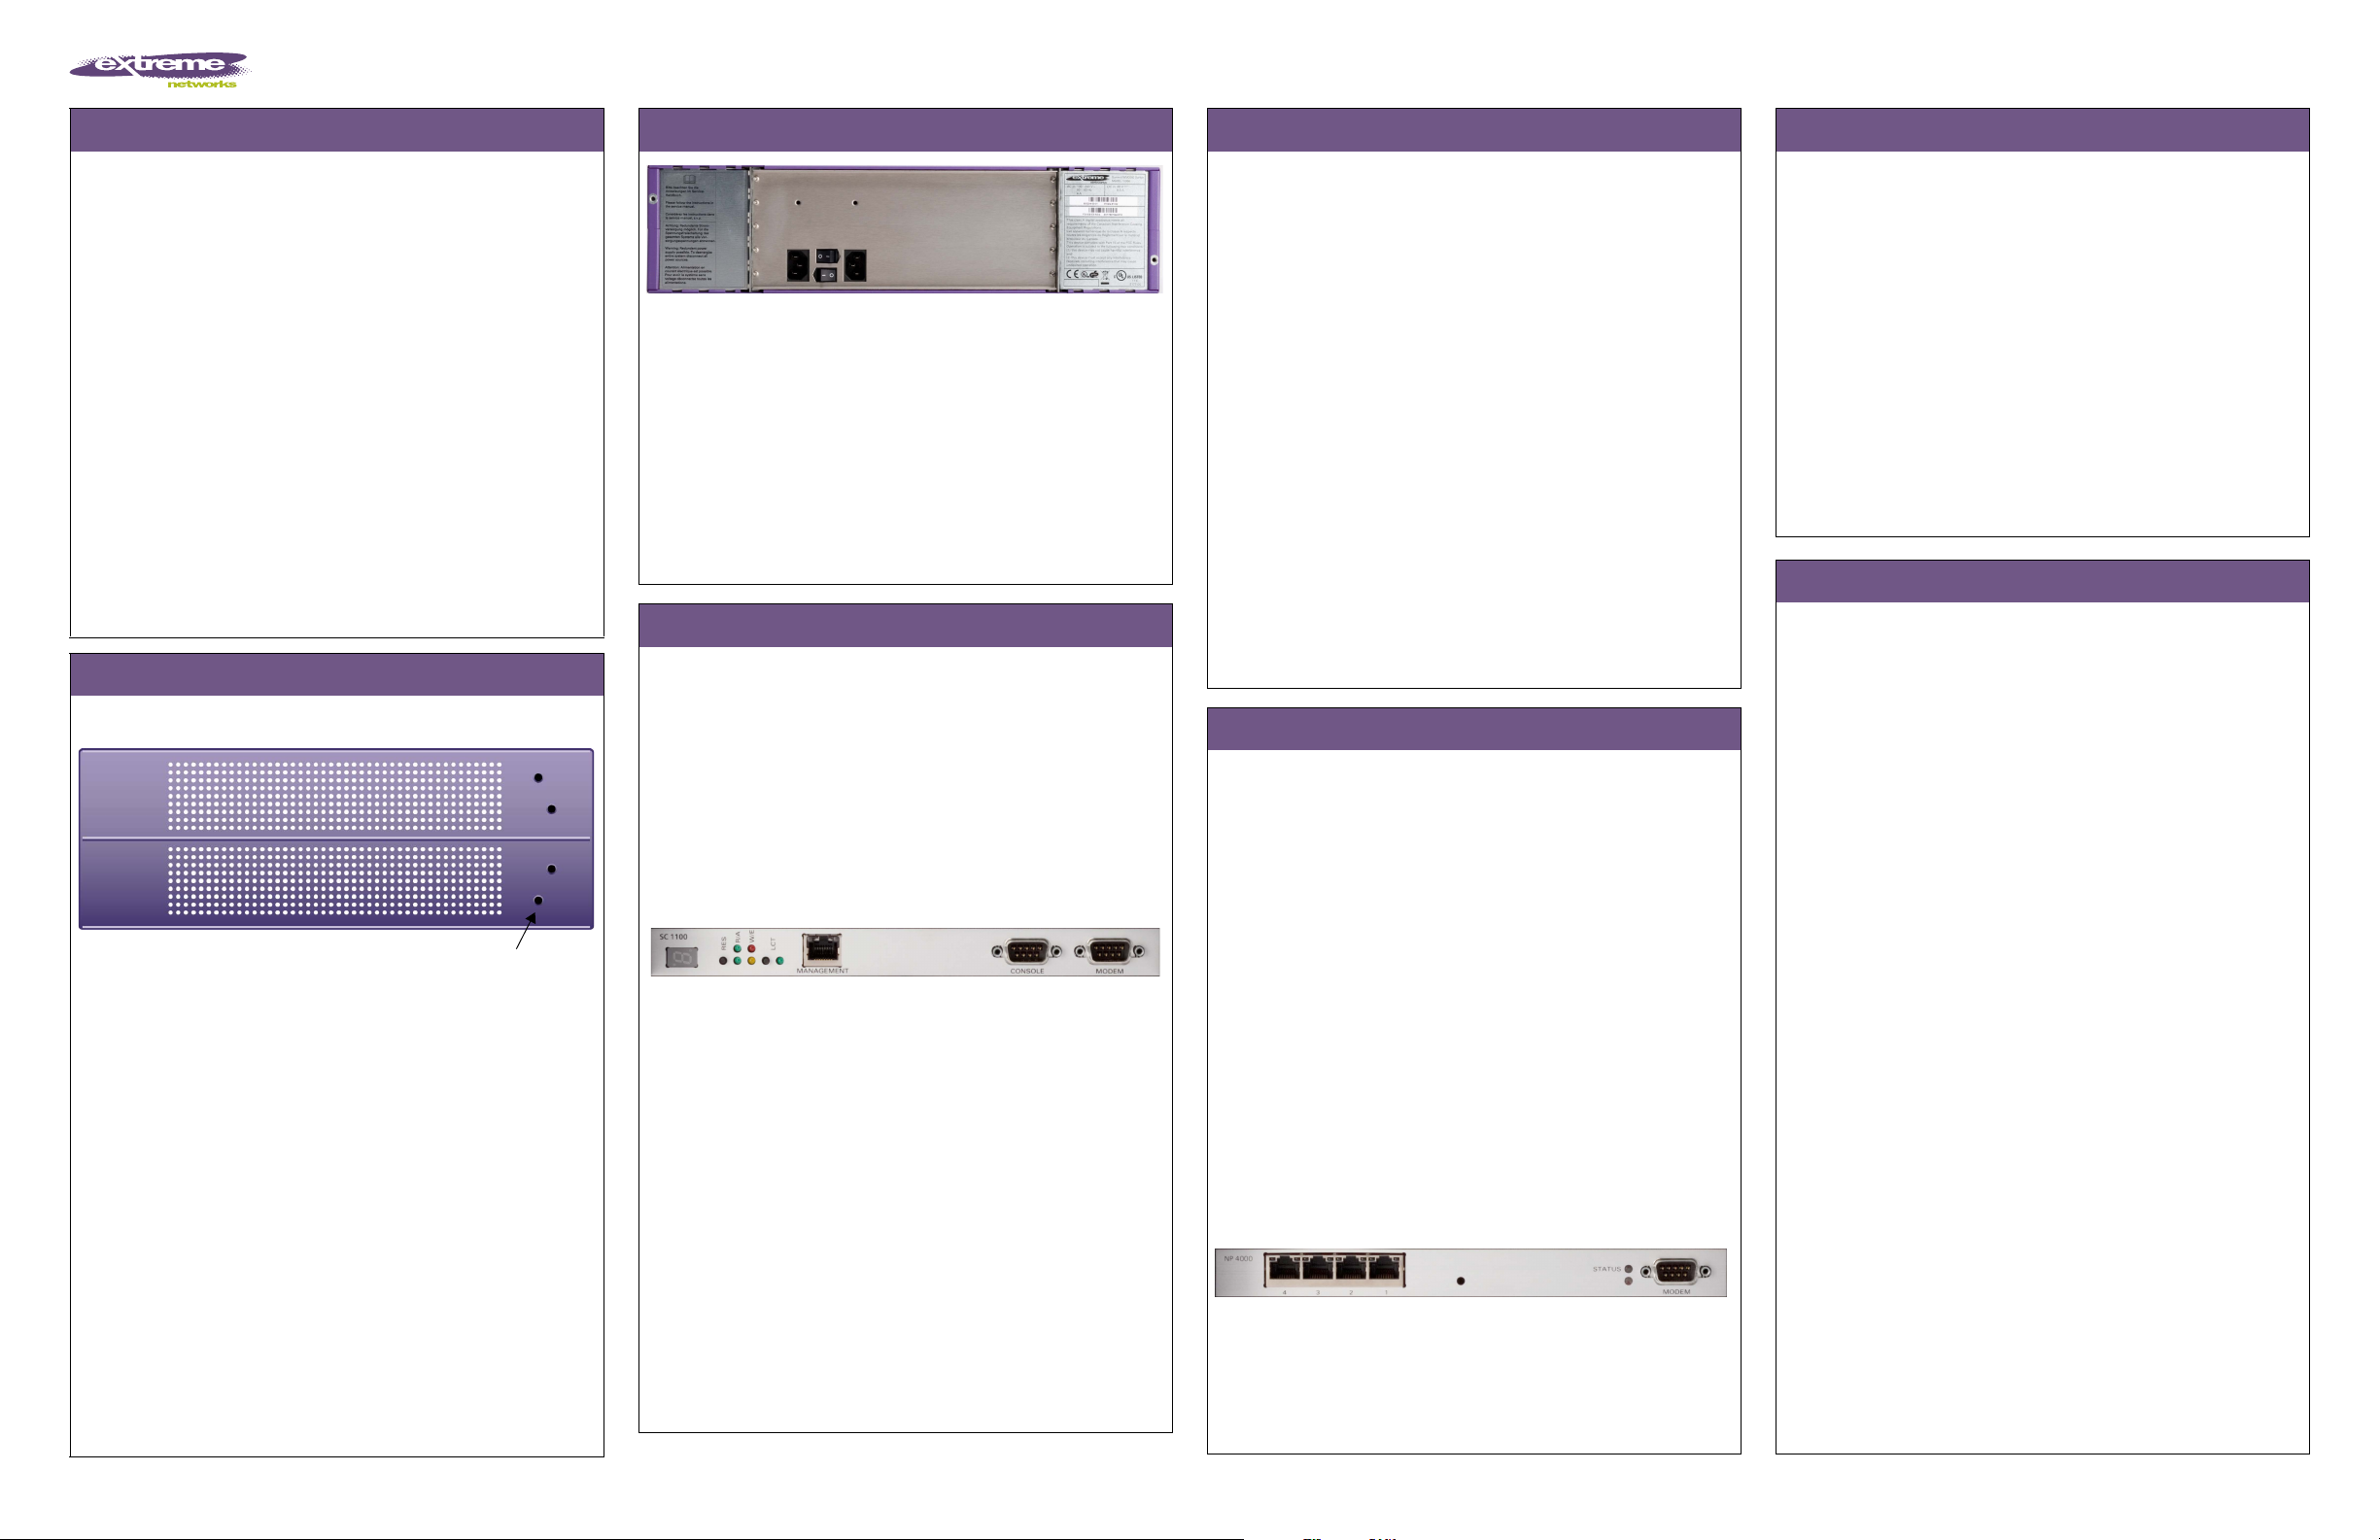
Step 3 – Configure Management interface
This step is optional. You can retain the default IP address of the
controller Management port if you do not intend on connecting
the controller to your enterprise network.
Before you connect the controller to the enterprise network,
change the IP address of the controller Management port from its
factory defaults to the IP address suitable for the enterprise
network. To access the controller, use a laptop computer with a
browser. Connect the crossover Ethernet cable between the laptop
and Management Ethernet port of the controller. Follow the steps
below.
Management Port Console Port
NOTE
To use the flash memory card capabilities of the controller, remove the
cover of the flash memory card from the controller and then insert a flash
memory card. Always wear an ESD wristband when inserting or removing a
flash memory card. A flash memory card is not shipped with your
controller.
1 Statically assign an unused IP address in the 192.168.10.0/24
subnet for the Ethernet port of the laptop.
2 Launch your Web browser, and in the browser address bar,
type
https://192.168.10.1:5825. This launches the Summit
WM GUI. The logon screen appears.
3 In the User Name box, type
type
abc123.
4 Click Login.
5 From the main menu, click WM-AD Configuration.
6 In the left pane, click IP Addresses.
7 In the Management Port Settings section, click Modify.
admin, and in the Password box,
8 Type the following information:
● Hostname – The name of the controller
● Domain – The IP domain name of the enterprise network
● Management IP Address – The new IP address for the
controller’s Management port. Change this as appropriate
for the enterprise network.
● Subnet mask – The appropriate subnet mask for the IP
address to separate the network portion from the host
portion of the address (typically 255.255.255.0)
● Management Gateway – The default gateway of the
network
● Primary DNS – The primary DNS server used by the
network
● Secondary DNS – The secondary DNS server used by the
network
9 To save your changes and disconnect the Web connection
between the laptop and the controller, click Ok.
The IP addresses are now set to the network you defined.
10 Disconnect your laptop from the controller Management port.
11 Connect the controller Management port to the enterprise
Ethernet LAN. The controller resets automatically.
12 Log on to the Summit WM GUI. The system is visible to the
enterprise network.
Step 4 – Configure your system
These seven steps provide a high-level overview for configuring
your system. For more detailed information on each
configuration step, see the Summit WM User Guide (CD).
1 – Before you begin configuration:
Research the type of WLAN deployment that is required. For
example, SSIDs, security requirements, and filter policies.
2 – Prepare the network:
Ensure relevant DHCP servers and RADIUS servers (if
applicable) are available and configured.
3 – Configure the physical port IP:
● Enable the interface. To manage the controller though the
interface, enable Allow management.
● Configure the default IP address to be the relevant subnet
point of attachment to the existing network, and setup the
routing protocol and table. The default IP address is
10.0.#.1.
● To configure a physical port to attach to a VLAN, define
the VLAN as part of the IP address assignment.
Data Ports
4 – Select the country and time zone:
Log on to the Summit WM GUI and select the country and time
zone, and then restart the controller.
NOTE
The controller’s clock settings are lost if the controller is powered down
for more than 72 hours.
5 – Install the controller license:
Install the license and confirm the latest firmware version is
loaded.
6 – Configure the WM-AD:
Research and configure the traffic topologies the network will
support.
7 – Install, register, and assign APs to the WM-AD:
● Confirm the latest firmware version is loaded.
● Deploy APs to their corresponding network locations. If
applicable, configure a default AP template for common radio
and WM-AD assignment.
● For information on installing and powering the wireless APs,
see the Altitude AP Installation Instructions.
Safety Information
WARNING!
Warnings identify information that is essential. Ignoring a warning can
adversely affect the operation of your equipment or software.
● Only authorized Extreme Networks
permitted to service the system.
● The controller is shipped with a hardware serial shunt
between its two cards. For technical support reasons, this
shunt should not be removed.
● Ensure that your system is grounded according to your
country’s electrical grounding code requirements.
● Use only original accessories or components approved for the
system. Failure to observe these instructions may damage the
equipment or even violate safety and EMC regulations.
● This device must not be connected to a LAN segment with
outdoor wiring.
● To avoid electrical shock, disconnect all power supply cords
before servicing. In the case of unit failure of one of the
power supply modules, the module can be replaced without
interruption of power to the controller. However, this
procedure must be carried out with caution. Wear gloves to
avoid contact with the module, which will be extremely hot.
● Disconnect all power before working near power supplies
unless otherwise instructed by a maintenance procedure.
● Do not power off the controller using the power button.
Instead, to power off the controller use the Command Line
Interface (CLI) commands or the Summit WM GUI.
● Exercise caution when servicing hot swappable controller
components: power supplies or fans. Rotating fans can cause
serious personal injury.
● Check the nominal voltage set for the equipment (operating
instructions and type plate). High voltages capable of causing
shock are used in this equipment. Exercise caution when
measuring high voltages and when servicing cards, panels,
and boards while the system is powered on.
● To protect electrostatic sensitive devices, wear a wristband
before carrying out any work on hardware.
● For system regulatory information, see the Summit WM User
Guide (CD).
®
service personnel are
© 2007-2008 Extreme Networks, Inc. All rights reserved. Part number: 120389-00 Rev 02
Summit WM200/2000 Controller Installationsanleitung
Erste Schritte
Diese Anleitung bietet Installationstechnikern einen allgemeinen
Überblick zur Installation des Summit WM200/2000 Controller.
Packen Sie den Controller aus:
1 Nehmen Sie dazu den Controller mit der Styroporverpackung
gerade nach oben aus dem Karton.
2 Legen Sie den Controller auf eine flache Oberfläche und
entfernen Sie die Styroporverpackung.
3 Überprüfen Sie den Inhalt des Kartons auf Vollständigkeit.
Inhalt des Kartons:
● ein Controller
● zwei Halteklammern
● acht M3x6 Linsenkopf-Maschinenschrauben
● vier selbstklebende Gummifüße
● ein Crossover-RJ45-Ethernet-Kabel (für Installation)
● Summit WM200/2000 Controller Installationsanleitung (Englisch
und Deutsch)
● Summit WM Benutzerhandbuch (CD)
● Summit WM Erste Schritte
Schritt 1 – Montage
Befestigungslöcher
Warnung: Decken Sie nicht die Lüftungsgitter des Controllers ab.
Es stehen zwei Montagemöglichkeiten zur Verfügung: Gestell-
und Tischmontage.
Gestellmontage (Rack):
1 Bringen Sie die Halteklammern an den Befestigungslöchern
des Controllers an.
2 Bringen Sie die Klammern am Rack an.
Tischmontage:
1 Achten Sie darauf, an allen Seiten des Controllers mindestens
5 cm Abstand zu halten, um eine ausreichende Belüftung zu
gewährleisten.
Kleben Sie die Gummifüße an die eingeprägten Stellen auf
der Unterseite des Controllers.
Schritt 2 – Anschluss an die Stromversorgung
Schließen Sie die beiden Netzkabel an den Controller an.
Hinweis: Wenn nur ein Netzkabel angeschlossen ist, leuchtet die
LED der nicht angeschlossenen Stromversorgung rot.
Ausschalten des Controllers:
● Um den Controller bei Bedarf auszuschalten, verwenden Sie
zuerst die Befehle der Befehlszeilen-Schnittstelle (CLI) oder
den Summit WM GUI. Dies unterbricht die Ausführung der
Controller-Software.
Um den Controller vollständig auszuschalten, müssen Sie am
Controller einen manuellen Reset durchführen, damit die
Hardware aus- und wieder eingeschaltet wird.
Schritt- 3 – Konfigurieren der Management-Schnittstelle
Dieser Schritt ist optional. Sie können die Standard-IP-Adresse
des Controller-Management-Ports beibehalten, wenn Sie nicht
beabsichtigen, den Controller mit dem Firmennetzwerk zu
verbinden.
Bevor Sie den Controller mit dem Firmennetzwerk verbinden
können, müssen Sie die IP-Adresse des Controller-ManagementPorts von der werkseitig eingestellten Standardadresse auf die
für das Firmennetzwerk geeignete IP-Adresse ändern. Verwenden
Sie für den Zugriff auf den Controller einen Laptop-Computer
mit einem Webbrowser. Verbinden Sie den Laptop über das
Crossover-Ethernet-Kabel mit dem Management-Ethernet-Port
des Controllers. Gehen Sie nach den folgenden Schritten vor.
Hinweis: Wenn Sie eine Flash-Speicherkarte mit dem Controller
verwenden möchten, öffnen Sie die Abdeckung für den
Karteneinschub am Controller, und legen Sie eine FlashSpeicherkarte ein. Tragen Sie beim Einlegen oder Entnehmen
einer Flash-Speicherkarte stets ein ESD-Armband. Eine FlashSpeicherkarte gehört nicht zum Lieferumfang des Controllers.
1 Weisen Sie (statisch) dem Ethernet-Port des Laptop-
Computers eine freie IP-Adresse im Subnetz 192.168.10.0/24
zu.
2 Starten Sie Ihren Webbrowser und geben Sie in die
Adresszeile des Browsers https://192.168.10.1:5825
ein. Dadurch wird der Summit WM GUI gestartet. Das
Fenster Anmelden wird angezeigt.
3 Geben Sie im Feld User Name den Benutzernamen admin
und im Feld Password das Kennwort abc123 ein.
4 Klicken Sie auf Login.
5 Klicken Sie im Hauptmenü auf WM-AD Configuration.
6 Klicken Sie im linken Teilfenster auf IP Addresses.
7 Klicken Sie im Abschnitt Management Port Settings auf
Modify.
Konfigurieren der Management-Schnittstelle
8 Geben Sie die folgenden Daten ein:
● Hostname – Name des Controllers
● Domain – IP-Domänenname des Firmennetzwerks
● Management IP Address – Neue IP-Adresse für den
Management-Port des Controllers. Passen Sie diese an das
Firmennetzwerk an.
● Subnet mask – Die entsprechende Subnetzmaske für die
IP-Adresse, um den Netzwerkabschnitt vom Hostabschnitt
der Adresse zu trennen (normalerweise 255.255.255.0).
● Management Gateway – Standard-Gateway des
Netzwerks
● Primary DNS – Primärer DNS-Server, der vom Netzwerk
verwendet wird
● Secondary DNS – Sekundärer DNS-Server, der vom
Netzwerk verwendet wird
9 Um die Änderungen zu speichern und die Webverbindung
zwischen Ihrem Laptop und dem Controller zu trennen,
klicken Sie auf OK. Die IP-Adressen werden nun an das von
Ihnen definierte Netzwerk angepasst.
10 Trennen Sie Ihren Laptop vom Management-Port des
Controllers.
11 Verbinden Sie den Management-Port des Controllers mit dem
Firmen-Ethernet-LAN. Der Controller wird automatisch
zurückgesetzt.
12 Melden Sie sich bei Summit WM GUI an. Das System ist für
das Firmennetzwerk sichtbar.
Schritt 4 – Konfigurieren Ihres Systems
Diese sieben Schritte bieten einen allgemeinen Überblick zur
Konfiguration Ihres Systems. Ausführlichere Informationen zu
jedem Konfigurationsschritt finden Sie im Summit WM
Benutzerhandbuch (CD).
1 – Bevor Sie mit der Konfiguration beginnen:
Überprüfen Sie, welche Einstellungen für das WLAN erforderlich
sind, zum Beispiel SSID, Sicherheitsanforderungen und FilterRichtlininen.
2 – Vorbereiten des Netzwerks:
Stellen Sie sicher, dass DHCP-Server und RADIUS-Server (wenn
zutreffend) verfügbar und konfiguriert sind.
3 – Konfigurieren der IP-Adresse des physikalischen Ports:
● Aktivieren Sie die Schnittstelle. Um den Controller über
die Schnittstelle zu verwalten, aktivieren Sie die Option
Allow management.
● Konfigurieren Sie die Standard-IP-Adresse so, dass sie den
relevanten Subnetz-Zugangspunkt für das bestehende
Netzwerk darstellt, und richten Sie das Routingprotokoll
und die Routingtabelle ein. Die Standard-IP-Adresse ist
10.0.#.1.
● Um den physikalischen Port für eine Verbindung mit
einem VLAN zu konfigurieren, definieren Sie das VLAN
als Teil der IP-Adresszuweisung.
4 – Auswählen des Landes und der Zeitzone:
Melden Sie sich bei Summit WM GUI an, wählen Sie das Land
und die Zeitzone aus und starten Sie den Controller neu.
Hinweis: Die Uhrzeiteinstellungen des Controllers gehen
verloren, wenn der Controller länger als 72 Stunden von der
Stromversorgung getrennt ist.
Konfigurieren Ihres Systems
5 – Installieren der Controller-Lizenz:
Installieren Sie die Lizenz und stellen Sie sicher, dass die aktuelle
Firmware-Version geladen ist.
6 – Konfigurieren des WM-AD:
Untersuchen Sie, welche Verkehrstopologien vom Netzwerk
unterstützt werden, und konfigurieren Sie sie.
7 – Installieren, Registrieren und Zuweisen von APs zum
WM-AD:
● Stellen Sie sicher, dass die aktuelle Firmware-Version geladen
ist.
● Installieren Sie die APs an den jeweiligen
Netzwerkstandorten. Wenn zutreffend, konfigurieren Sie eine
Standard-AP-Vorlage für häufige Funk- und WM-ADZuweisungen.
● Informationen zu Installation und Stromversorgung des
drahtlosen APs finden Sie in der Altitude AP
Installationsanleitung.
Sicherheitshinweise
War nh inwe is e
Warnungen enthalten wichtige Informationen. Das Ignorieren
einer Warnung kann sich negativ auf den Betrieb Ihrer
Ausrüstung oder Software auswirken.
Das System darf nur von autorisiertem Extreme NetworksServicepersonal gewartet werden.
● Der Controller wird mit einem seriellen Hardware-Nebenschluss
zwischen den beiden Baugruppen geliefert. Dieser Nebenschluss
sollte nicht entfernt werden, da er für den technischen
Kundendienst benötigt wird.
● Stellen Sie sicher, dass Ihr System gemäß den Vorschriften zur
elektrischen Erdung in Ihrem Land geerdet ist.
● Verwenden Sie ausschließlich Originalzubehör oder
systemspezifisch zugelassene Komponenten. Die Nichtbeachtung
dieser Hinweise kann zur Beschädigung der Ausrüstung oder zur
Verletzung von Sicherheits- und EMV-Vorschriften führen.
● Dieses Gerät darf nicht über Außenverdrahtung an ein LAN-
Segment angeschlossen werden.
● Um die Gefahr eines elektrischen Schlages zu vermeiden, sollten
Sie vor Durchführung von Servicearbeiten alle Netzkabel trennen.
Falls eines der Stromversorgungsmodule ausfällt, kann es
ausgetauscht werden, ohne die Stromversorgung zum Controller
zu unterbrechen. Bei dieser Prozedur ist jedoch mit Vorsicht
vorzugehen. Das Modul kann extrem heiß sein. Tragen Sie
Handschuhe, um Verbrennungen zu vermeiden.
● Trennen Sie alle Stromverbindungen, bevor Sie Arbeiten im
Bereich der Stromversorgung vornehmen, sofern dies nicht für
eine Wartungsprozedur anders verlangt wird.
● Schalten Sie den Controller nicht mithilfe des Netzschalters aus.
Verwenden Sie stattdessen zum Ausschalten des Controllers die
Befehle der Befehlszeilen-Schnittstelle (CLI) oder den Summit
WM GUI.
● Gehen Sie vorsichtig vor, wenn Sie an Hotswap-fähigen
Controller-Komponenten (Stromversorgungen oder Lüftern)
Servicearbeiten durchführen. Rotierende Lüfter können ernsthafte
Verletzungen verursachen.
● Überprüfen Sie die für die Ausrüstung festgelegte
Nennspannung (Bedienungsanleitung und Typenschild). Diese
Ausrüstung arbeitet mit Hochspannung, die mit der Gefahr eines
elektrischen Schlages verbunden ist. Gehen Sie mit großer
Vorsicht vor, wenn Sie bei eingeschaltetem System
Hochspannungen messen oder Karten, Schalttafeln und
Baugruppen warten.
● Tragen Sie bei Arbeiten an Hardwarekomponenten ein Armband,
um elektrostatisch gefährdete Bauelemente vor Beschädigungen
zu schützen.
● Die Systemrichtlinien finden Sie im Summit WM
Benutzerhandbuch (CD).
© 2007-2008 Extreme Networks, Inc. All rights reserved. Part number: 120389-00 Rev 02
 Loading...