

Extreme Networks Summit2, Summit3, Summit4, Summit48, Summit4/FX Installation And User Manual

Summit.bk : FRONTMTR.FM Page i Thursday, June 18, 1998 9:27 AM
Summit Switch
Installation and User
Guide
Extreme Networks, Inc.
10460 Bandley Drive
Cupertino, California 95014
(888) 257-3000
http://www.extremenetworks.com
Published: June 1998
Part number : 100000-0 0 rev.B

Summit.bk : FRONTMTR.FM Page ii Thursday, June 18, 1998 9:27 AM
Copyright © Extreme Networks, Inc., 1998. All rights reserved. No part of this documentation may be
reproduced in any form or by any means or used to make any derivative work (such as translation,
transformation, or adaptation) without permission from Extreme Networks, Inc.
Extreme Networks, ExtremeWare, Summit, SummitLink, ExtremeWare Vista,Summit Virtual Chassis,
and the Extreme Networks logo are trademarks of Extreme Networks.
PACE is a trademark of 3Com Corporation. 3Com is a registered trademark of 3Com Corporation. All
other brand and product names are registered trademarks or trademarks of their respective holders.
ii

Summit.bk : SUMMIT.TOC Page iii Thursday, June 18, 1998 9:27 AM
Contents
Introduction xvii
Terminology xviii
Conventions xviii
Related Publications xix
1S
UMMIT OVERVIEW
About the Summit Family of Switches 1-1
Summit Switch Models 1-2
Summary of Fe atures 1-2
Port Connections 1-3
Media Types and Dista nces 1-4
Full-Duplex 1-5
Port Redundancy 1-5
Load Sharing 1-6
Virtual LANs (VLANs) 1-6
Spanning Tree Protocol (STP) 1-6
Quality of Service (QoS) 1-7
IP Unicast Routin g 1-7
IP Multicast Routing 1-7
Network Configuration Exa mple 1-8
Summit1 Front View 1-10
Summit2 Front View 1-11
Summit3 Front View 1-12
Summit4 Front View 1-13
Summit4/FX Front View 1-14
iii

Summit.bk : SUMMIT.TOC Page iv Thursday, June 18, 1998 9:27 AM
Summit48 Front View 1-15
LEDs 1-16
Summit Rear View 1-17
Power Socket 1-17
Serial Number 1-17
Console Port 1-17
Redundant Power Supply Port 1-17
MAC Address 1-18
Factory Defaults 1-18
NSTALLATION AND SETUP
2I
Following Safety I nformation 2-1
Determining the Switch Location 2-1
Media Types and Dista nces 2-2
Installing the Sum mit 2-3
Rack Mounting 2-3
Free-Standing 2-4
Stacking the Switch and Other Devices 2-4
Connecting Equipment to the Console Port 2-4
Powering On the Switch 2-6
Checking the Installation 2-6
Logging In for the First Time 2-6
3A
CCESSING THE SWITCH
Understanding the Command Syntax 3-2
Syntax Helper 3-2
Command Completion with Syntax Helper 3-2
Abbreviated Syntax 3-3
Command Shortcuts 3-3
Numerical Ranges 3-3
Names 3-3
Symbols 3-4
Line-Editing Keys 3-5
Command History 3-5
Common Commands 3-6
iv

Summit.bk : SUMMIT.TOC Page v Thursday, June 18, 1998 9:27 AM
Configuring Management Access 3-8
Default Accounts 3-9
Changing the Default Password 3-9
Creating a Management Account 3-10
Viewing Switch Accoun ts 3-10
Deleting a Switch Account 3-11
Methods of Managin g the Summit 3-11
Using the Console Interface 3-11
Using Telnet 3-12
Connecting to Another Host Using Telnet 3-12
Configuring Switch IP Parameters 3-12
Using a BOOTP Server 3-12
Manually Configuring the IP Settings 3-13
Disconnecting a Telnet Session 3-15
Disabling Telnet Access 3-15
IP Host Configuration Commands 3-16
Using ExtremeWare Vista 3-17
Disabling Web Access 3-17
Using SNMP 3-18
Accessing Switch Agen ts 3-18
Supported MIBs 3-18
Configuring SNMP Settings 3-19
Displaying SNMP Se ttings 3-21
Resetting and Disa bling SNMP 3-21
Checking Basic Connectivity 3-22
Ping 3-22
Traceroute 3-22
Mtrace 3-23
v

Summit.bk : SUMMIT.TOC Page vi Thursday, June 18, 1998 9:27 AM
4C
ONFIGURING PORTS
Enabling and Disabling Ports 4-1
Configuring Port Speed and Duplex Setting 4-2
Turning Off Autonegotiation for a Gigabit Ethernet Port 4-2
Port Commands 4-3
Load Sharing 4-5
Configuring Load Sharing 4-6
Verifying the Lo ad Sharing Configurati on 4-8
Port-Mirroring 4-8
Port-Mirroring Commands 4-9
Port-Mirroring Example 4-9
Summit Virtual Chassis 4-10
Summit Switch Port Connections 4-10
Extreme Discovery Protocol 4-11
Summit Virtual Chassis Commands 4-12
Configuring the Summit for User with the Summit Virtual
Chassis 4-12
VLANs and Summit Switches U sing the Virtual Chassis 4-13
5V
IRTUAL
Overview of Virtual LANs 5-1
Benefits 5 -1
Types of VLANs 5-2
Port-Based VLANs 5-2
Tagged VLANs 5-5
Generic VLAN Registration Protocol 5-8
Protocol-Based VLANs 5-11
Precedence of Tagged Packets Over Protocol Filters 5-13
LANS (VLANS)
Spanning Switches with Port-Based VLANs 5-3
Uses of Tagged VLANs 5-6
Assigning a VLAN Tag 5-6
Mixing Port-Based and Tagged VLANs 5-8
GVRP Commands 5-10
Predefined Protocol Filters 5-12
Defining Protocol Fil ters 5-12
Deleting a Protocol Filter 5-13
vi

Summit.bk : SUMMIT.TOC Page vii Thursday, June 18, 1998 9:27 AM
VLAN Names 5-13
Default VLAN 5-14
Configuring VLANs on the Sum mit 5-14
VLAN Configuration Examples 5-16
Displaying VLAN Settings 5-1 7
Deleting VLANs 5-1 8
6S
7S
WITCH FORWARDING DATABASE
Overview of the FDB 6-1
FDB Cont ents 6-1
FDB Entry Typ es 6-1
How FDB Entries Get Added 6-2
Associating a QoS Profile with a n FDB Entry 6-3
Configuring FDB Entries 6-3
FDB Configuration Exam ples 6-4
Displaying FDB Entries 6-5
Removing FDB Entries 6-6
PANNING TREE PROTOCOL
Overview of the Spanning Tree Protocol 7-1
Spanning Tree Domains 7-1
Defaults 7-2
STP Configurations 7-2
Configuring STP on the Summ it 7-5
Configuration Example 7-7
Displaying STP Settin gs 7-8
Disabling and Resetting STP 7-9
(STP)
(FDB)
vii

Summit.bk : SUMMIT.TOC Page viii Thursday, June 18, 1998 9:27 AM
8Q
UALITY OF SERVICE
Overview of Quality of Service 8-1
Building Blocks 8-1
QoS Mode 8-2
Default QoS Profiles 8-2
Tr affic Groupings 8-3
Ingress Traffic Groupings 8-3
Egress Traffic Groupings 8-5
Precedence 8-5
Prioritization 8-6
Creating and Configuring a QoS P rofile 8-6
Assigning a QoS Profile 8-6
Port Queue Monitor 8-7
Configuring QoS 8-8
Sample Ingress Mode QoS Conf iguration 8-9
Sample Egress Mode QoS Conf iguration 8-9
Displaying QoS Inform ation 8-10
Resetting QoS 8-10
(QOS)
9IP U
NICAST ROUTING
Overview of IP Unicast Routing 9-1
Router Interfaces 9-2
Populating the Routing Table 9-3
Dynamic Routes 9-3
Static Routes 9-3
Multiple Routes 9-4
Proxy ARP 9-4
ARP-Incapable Devices 9-4
Proxy ARP Between Subnets 9-5
IP Multinetting 9-5
IP Multinetting Operation 9-6
IP Multinetting Examples 9-7
Configuring IP Unicast R outing 9-9
Verifying the IP U nicast Routing Configuration 9-1 0
Configuring DHCP/BOOTP R elay 9-10
Verifying the DHCP /BOOTP Relay Configuratio n 9-11
Routing Configuration Exam ple 9-15
viii

Summit.bk : SUMMIT.TOC Page ix Thursday, June 18, 1998 9:27 AM
Displaying Router Se ttings 9-17
Resetting and Disablin g Router Settings 9-18
10 R
Overview 10-1
Overview of RIP 1 0-3
Overview of OSPF 10-5
Configuring RIP 10-8
RIP Configuration Example 10-10
Displaying RIP Settin gs 10-12
Resetting and Disa bling RIP 10-13
Configuring OSPF 10-14
OSPF Configuration Example 10-16
Displaying OSPF Se ttings 10-18
Resetting and Disa bling OSPF Settings 10-1 9
OUTING PROTOCOLS
RIP Versus OSPF 10-2
Routing Table 10-3
Split Horizon 10-3
Poison Reverse 10-3
Triggered Updates 10-4
Route Advertisement of VLANs 10-4
RIP Version 1 versus RIP Version 2 10-4
Link State Database 10-5
Areas 10-5
Area 0 10-6
Stub Areas 10 -6
Vi r t u a l Li n ks 10- 7
Configuration for ABR1 10-17
Configuration for IR1 10-18
ix

Summit.bk : SUMMIT.TOC Page x Thursday, June 18, 1998 9:27 AM
11 IP M
Overview 11-1
DVMRP Overview 11-2
IGMP Overview 11-2
Configuring IP Multicasti ng Routing 11-2
Configuration Example 11-6
Configuration for IR1 11-7
Displaying IP Multica st Routing Settings 11-7
Deleting and Resetting IP Multicast Setting s 11-8
12 S
TATUS MONITORING AND STATISTICS
Status Mon itoring 12-1
Port Statistics 12-7
Port Errors 12-8
Port Monitoring Displa y Keys 12-9
Switch Logging 12-1 0
Local Logging 12-11
Remote Logging 12-12
Logging Commands 12-12
RMON 12-14
About RMON 12-14
RMON Features of the Switch 12-15
RMON and th e Switch 12-16
Event Actions 12-17
ULTICAST ROUTING
IGMP Snooping 11-2
Real-time Display 12-11
Statistics 12- 15
History 12-15
Alarms 12-16
Events 12-16
x

Summit.bk : SUMMIT.TOC Page xi Thursday, June 18, 1998 9:27 AM
13 U
Enabling and Disabling Web Access 13-1
Setting Up Yo ur Browser 13 -2
Accessing ExtremeWare Vista 13- 3
Navigating ExtremeWare Vista 13-3
Saving Changes 13-5
Do a GET When Co nfiguring a VLAN 13 -6
Sending Screen Output to Extreme Networks 13-6
14 S
Downloading a New Im age 14-1
Saving Configur ation Changes 14- 3
Using TFTP to Upload the Con figuration 14-4
Using TFTP to Download the Con figuration 14-4
Boot Option Commands 14-5
SING EXTREMEWARE VISTA
Task Frame 13-4
Content Frame 13-4
Browser Controls 13-4
Status Messages 13 -5
Standalone Buttons 13-5
OFTWARE UPGRADE AND BOOT OPTIONS
Rebooting the Switch 14-2
Returning to Factory Defaul ts 14-3
AS
Important Safety Information A-1
BT
AFETY INFORMATION
Power A-1
Power Cord A-2
Fuse A-3
Connections A-3
Lithium Battery A-4
ECHNICAL SPECIFICATIONS
xi

Summit.bk : SUMMIT.TOC Page xii Thursday, June 18, 1998 9:27 AM
CT
ROUBLESHOOTING
LEDs C-1
Using the Command-Line Interface C-2
VLANs C-4
STP C-5
NDEX
I
NDEX OF COMMANDS
I
xii

Summit.bk : SUMMIT.LOF Page xiii Thursday, June 18, 1998 9:27 AM
Figures
1-1 Dual-homing config uration 1-5
1-2 Network configuration using the Summit fa mily of
switches 1-8
1-3 Summit1 front view 1-10
1-4 Summit2 front vie w 1-11
1-5 Summit3 front view 1-12
1-6 Summit4 front view 1-13
1-7 Summit4/FX front view 1-14
1-8 Summit48 front view 1-15
1-9 Summit rear view 1-17
2-1 Fitting the mounting bracket 2-3
2-2 Null-modem cable pin-outs 2-5
2-3 PC-AT serial null-modem cable pin-outs 2-5
5-1 Example of a port-based VLAN 5-3
5-2 Single port-based VLAN spanning two switches 5-4
5-3 Two port-based VLANs spanning two Switches 5-5
5-4 Physical diagram of tagged and untag ged traffic 5-7
5-5 Logical diagram of tagged and untagged traffic 5-7
5-6 Network example using G VRP 5-9
5-7 Protocol-based VLANs 5-11
7-1 Multiple Spanning Tree Domains 7-3
7-2 Tag-based S TP configuration 7-4
9-1 Routing between VLANs 9-2
9-2 Unicast routing configuration example 9-16
10-1 Stub area 10-6
10-2 Virtual link for stub area 10-7
xiii

Summit.bk : SUMMIT.LOF Page xiv Thursday, June 18, 1998 9:27 AM
10-3 Virtual link providing redundancy 10-7
10-4 RIP configuration example 10-11
10-5 OSPF configuration example 10-16
11-1 IP multicast routing configuration example 11-6
xiv

Summit.bk : SUMMIT.LOT Page xv Thursday, June 18, 1998 9:27 AM
Tables
1 Notice Icons xviii
2 Text Conventions xviii
1-1 Summit Switch Port Co nfigurations 1-3
1-2 Media Types and Dista nces 1-4
1-3 Summit LEDs 1-16
1-4 Summit Factory Defa ults 1-18
2-1 Media Types and Dista nces 2-2
2-2 Console Connector Pin-Outs 2-5
3-1 Command Syntax Symbols 3-4
3-2 Line-Editing Keys 3-5
3-3 Common Commands 3-6
3-4 Default Accounts 3-9
3-5 IP Host Configuration Commands 3-16
3-6 Supported MIBs 3-18
3-7 SNMP Configur ation Comman ds 3-20
3-8 SNMP Reset and Disable Commands 3-21
3-9 Ping Command Parameters 3-22
4-1 Port Commands 4-3
4-2 Port Combinations for the Summit1 4-6
4-3 Port Combinations for the Summit2 4-6
4-4 Port Combinations for the Summit3 4-6
4-5 Port Combinations for the Summit4 and Su mmit4/FX 4-7
4-6 Port Combinations for th e Summit48 4-7
4-7 Port-Mirroring Configuration Comman ds 4-9
4-8 Summit Ports to Use to Connect to the Summit Virtual
Chassis 4-10
xv

Summit.bk : SUMMIT.LOT Page xvi Thursday, June 18, 1998 9:27 AM
4-9 Summit Virtual Chassis Commands 4-12
5-1 GVRP Commands 5-10
5-2 VLAN Configuration Commands 5-14
5-3 VLAN Delete and Reset Commands 5-18
6-1 FDB Configuration Com mands 6-3
6-2 Removing FDB Entry Commands 6-6
7-1 STP Configuration Comm ands 7-6
7-2 STP Disable and Reset Commands 7-9
8-1 Default QoS Profiles 8-3
8-2 802.1p Values and Associated QoS Profiles 8-4
8-3 PQM Commands 8-7
8-4 QoS Configuration Commands 8-8
9-1 Basic IP Commands 9-11
9-2 Route Table Configuration Commands 9-13
9-3 ICMP Configuration Commands 9-14
9-4 Router Show Commands 9-17
9-5 Router Reset and Disable Commands 9 -18
10-1 RIP Configuration Commands 10-8
10-2 RIP Show Commands 10-12
10-3 RIP Reset and Disable Commands 10-13
10-4 OSPF Configuration Comm ands 10-14
10-5 OSPF Show Com mands 10-18
10-6 OSPF Reset and Disable Commands 10-19
11-1 IP Multicast Routing Conf iguration Commands 11-3
11-2 IGMP Configuration Commands 11-4
11-3 IP Multicast Routing Sh ow Commands 11-7
11-4 IP Multicast Routing Reset a nd Disable Commands 11-8
12-1 Switch Monitoring Commands 12-1
12-2 Port Monitoring D isplay Keys 12-9
12-3 Fault Levels Assigned by the Switch 12-10
12-4 Fault Log Subsystems 12-10
12-5 Logging Commands 12 -13
12-6 Event Actions 12-17
13-1 Multi-Select List Box Key Definitions 13-4
14-1 Boot Option Commands 14-5
xvi

Summit.bk : PREFACE.FM Page xvii Thursday, June 18, 1998 9:27 AM
Preface
This Preface provides an overview of this guide, describes guide conventions, and lists
other publications that may be useful.
NTRODUCTION
I
This guide provides the required information to install and configure the Summit
Family of Gigabit Ethernet Switches.
This guide is intended for use by network administrators who are responsible for
installing and setting up network equipment. It assumes a basic worki ng knowledge of
• Local Area Networks (LANs)
• Ethernet concepts
• Ethernet switching and bridging concepts
• Routing concepts
• Simple Network Management Protocol (SNMP)
If the information in the Release Notes shi pped with your switch differs from the
information in this guide, follow the Release Notes.
UMMIT SWITCH INSTALLATION AND USER GUIDE XVII
S

Summit.bk : PREFACE.FM Page xviii Thursday, June 18, 1998 9:27 AM
REFACE
P
ERMINOLOGY
T
When features, functionality, or operation is specific to a particular model of the
Summit family, the model name is used (for example, Summit1 or Summit4).
Explanations about features and operations that are the same among all members of the
Summit family simply refer to the product as the Summit.
ONVENTIONS
C
Table 1 an d Table 2 list con ventions that are used throughout this guide.
Table 1:
Icon Notice Type Alerts you to...
Table 2:
Convention Description
Screen displays
The words “enter”
and “type”
[Key] names Key names appear in text in one of two ways:
Notice Icons
Note Important features or instructions.
Caution Risk of personal injury, system damage,
or loss of d ata.
Warning Risk of severe personal injury.
Text Conventions
This typeface represents information as it appears on the screen
When you se e the word “ enter” in th is guide, you must ty pe
something, and then press the Return or Enter key. Do not press the
Return or Ent er key when an i nstruction simply says “type.”
■
Referred to by their labels, such as “the Return key” or “the
Escape key”
■
Written with brackets, such as [Return] or [Esc]
If you must press two or more keys simultaneously, the key names
are linked with a plus sign (+). Example:
Press [Ctrl]+[Alt]+[Del].
.
XVIII
UMMIT SWITCH INSTALLATION AND USER GUIDE
S

Summit.bk : PREFACE.FM Page xix Thursday, June 18, 1998 9:27 AM
ELATED PUBLICATIONS
R
Table 2:
Convention Description
Words in
Text Conventions (continued)
italicized
type Italics emphasize a point or denote new terms at the place where
they are defined in the text.
The command syntax is explained in Chapter 3.
ELATED PUBLICATIONS
R
The Summit documentation s et includes the following:
• Summit Quick Refe rence Guide
• Summit Release Not es
You ma y find the following Web site of interest:
• Extreme Networks Home Page: http://www.extremenetworks.com/
UMMIT SWITCH INSTALLATION AND USER GUIDE XIX
S

Summit.bk : PREFACE.FM Page xx Thursday, June 18, 1998 9:27 AM
REFACE
P
XX
UMMIT SWITCH INSTALLATION AND USER GUIDE
S

Summit.bk : 1OVRVW.FM Page 1 Thursday, June 18, 1998 9:27 AM
1
Summit Overview
This chapter describes the following:
• Summit switch models
• Summit feat ures
• How to use the Summit f amily of switches in your network configuration
• Summit front view s
• Summit rear view
• Summit LEDs
• Factory default settings
BOUT THE SUMMIT FAMILY OF SWITCHES
A
Network managers are currently faced with the challenge of creating networks that can
provide ultra-fast speed and high performance to serve the needs of today’s network
users, while simultaneously preserving the investment they have made in Ethernet and
Fast Ethernet tec hnology.
By addressing the entire spectrum of Ethernet data rates (10/100/1000 Mbps), the
Summit family of LAN switches enables you to introduce high-speed Gigabit Ethernet
backbones into your existing networ k, while maintaining established con nections to the
10 Mbps and 100 Mbps segments that already exist.
UMMIT SWITCH INSTALLATION AND USER GUIDE
S
1-1

Summit.bk : 1OVRVW.FM Page 2 Thursday, June 18, 1998 9:27 AM
UMMIT OVERVIEW
S
UMMIT SWITCH
S
The Summit family of swi tches is comprised of six models, as fo llows:
• Summit1
• Summit2
• Summit3
• Summit4
• Summit4/FX
• Summit48
UMMARY OF FEATURES
S
Summit switches support th e following features:
• Fully nonblocking operation
— All ports transmit and receive packets at wire speed
• Optional redundant power supply
M
ODELS
• 128K addresses in the switch forwarding database in bridging mode
• Redundant physical Gigabit Ethernet backbone connection
• Autonegotiation for half- or full-duplex operation (Fast Ethernet ports, only)
• Load-sharing on multiple ports
• Virtual local area networks (VLANs) including support for 802.1Q
• Spanning Tree Protocol (STP) (IEEE 802.1D) with multiple STP domains
• Policy-based Quality of Service (QoS)
• Wire-speed Internet P rotocol (IP) routing
• IP Multinetting using the Intern et Group Multicast Protocol (IGMP)
• DHCP/BOOTP Relay
• Routing Information Protocol (RIP) version 1 and RIP version 2
• Open Shortest Path First (OSPF) routing protocol
• Wire-speed IP multicast routing support
• IGMP snooping to control IP multicast traffic
1-2 S
UMMIT SWITCH INSTALLATION AND USER GUIDE

Summit.bk : 1OVRVW.FM Page 3 Thursday, June 18, 1998 9:27 AM
• Distance Vector Multicast Routing Protocol (DVMRP)
• Console command line interface (CLI) connection
• Telnet CLI connection
™
• ExtremeWare
• Simple Network Management Protocol (SNMP) support
ORT CONNECTIONS
P
The major difference between the models of the Summit switch is the port
configurations on each switch model. Summit switches use a combination of the
following types of ports:
Vi s t a™ Web-based management interface
UMMARY OF FEATURES
S
• Fixed 1000BASE-SX ports using 850nm duplex SC connectors
• Modular 1000BASE-LX and 1000BASE-LX10 using Gigabit Interface Connectors
(GBICs)
• 10BASE-T/100BASE-TX ports using standard RJ-45 connectors
• 100BASE-FX ports using st andard SC connectors
Table 1-1 describes port configurations available on the different Summit switch models.
Table 1-1:
Switch Model
Summit1 6 2
Summit2 2 1 16
Summit3 1 1 24
Summit4 6 16
Summit4/FX 6 16
Summit48 2 2 48
Summit Switch Port Configurations
Gigabit Ethernet Ports
Fixed
1000BASE-SX GBIC
Redundant
GBIC
10BASE-T/
100BASE-TX 100BASE-FX
UMMIT SWITCH INSTALLATION AND USER GUIDE
S
1-3

Summit.bk : 1OVRVW.FM Page 4 Thursday, June 18, 1998 9:27 AM
UMMIT OVERVIEW
S
M
EDIA TYPES AND DISTANCES
Table 1-2 describes the media types and distances for the different types of Summit
ports.
Table 1-2:
Standard Media Type
1000BASE-SX 50/125um Multimode Fiber
1000BASE-LX 50/125um Multimode Fiber
Media Types and Distances
50/125um Multimode Fiber
62.5/125um Multimode Fiber
62.5/125um Multimode Fiber
50/125um Multimode Fiber
62.5/125um Multimode Fiber
10u Single-mode Fiber
Mhz/Km
Rating
400
500
160
200
400
500
500
Maximum
Distance
500 Meters
550 Meters
220 Meters
275 Meters
550 Meters
550 Meters
550 Meters
5,000 Me ters
1000BASE-LX10* 10u Single-mode Fiber 10,000 Meters
100BASE-FX 50/125um Multimode Fiber
400 Meters
(half-duplex operation
50/125um Multimode Fiber
2000 Meters
(full-duplex operation)
62.5/125um Multimode Fiber
400 Meters
(half-duplex operation)
52.5/125um Multimode Fiber
2000 Meters
(full-duplex operation)
100BASE-TX
10BASE-T
Category 5 UTP Cable (100Mbps)
Category 3 UTP Cable (10Mbps)
100 Meters
100 Meters
XTREME NETWORKS PROPRIETARY
*E
OF
5,000 M
ETERS
.
. CAN BE
CONNECTED TO
For more information on 10 00BASE-SX and 1000B ASE-LX link character istics,
refer to IEEE Draft P802.3z/D4.2, Table 38-2 and Table 38-6.
1-4 S
1000BASE-LX ON
SINGLE-MODE FIBER USING A MAXIMUM DISTANCE
UMMIT SWITCH INSTALLATION AND USER GUIDE
Summit.bk : 1OVRVW.FM Page 5 Thursday, June 18, 1998 9:27 AM
ULL-DUPLEX
F
The Summit switch provides full-duplex support for all ports. Fu ll-duplex allows
frames to be transmitted and received simultaneously and, in effect, doubles the
bandwidth a vailable on a link. All 10 /100 Mbps ports on the S ummit auton egotiate f or
half- or full-duplex operation.
ORT REDUNDANCY
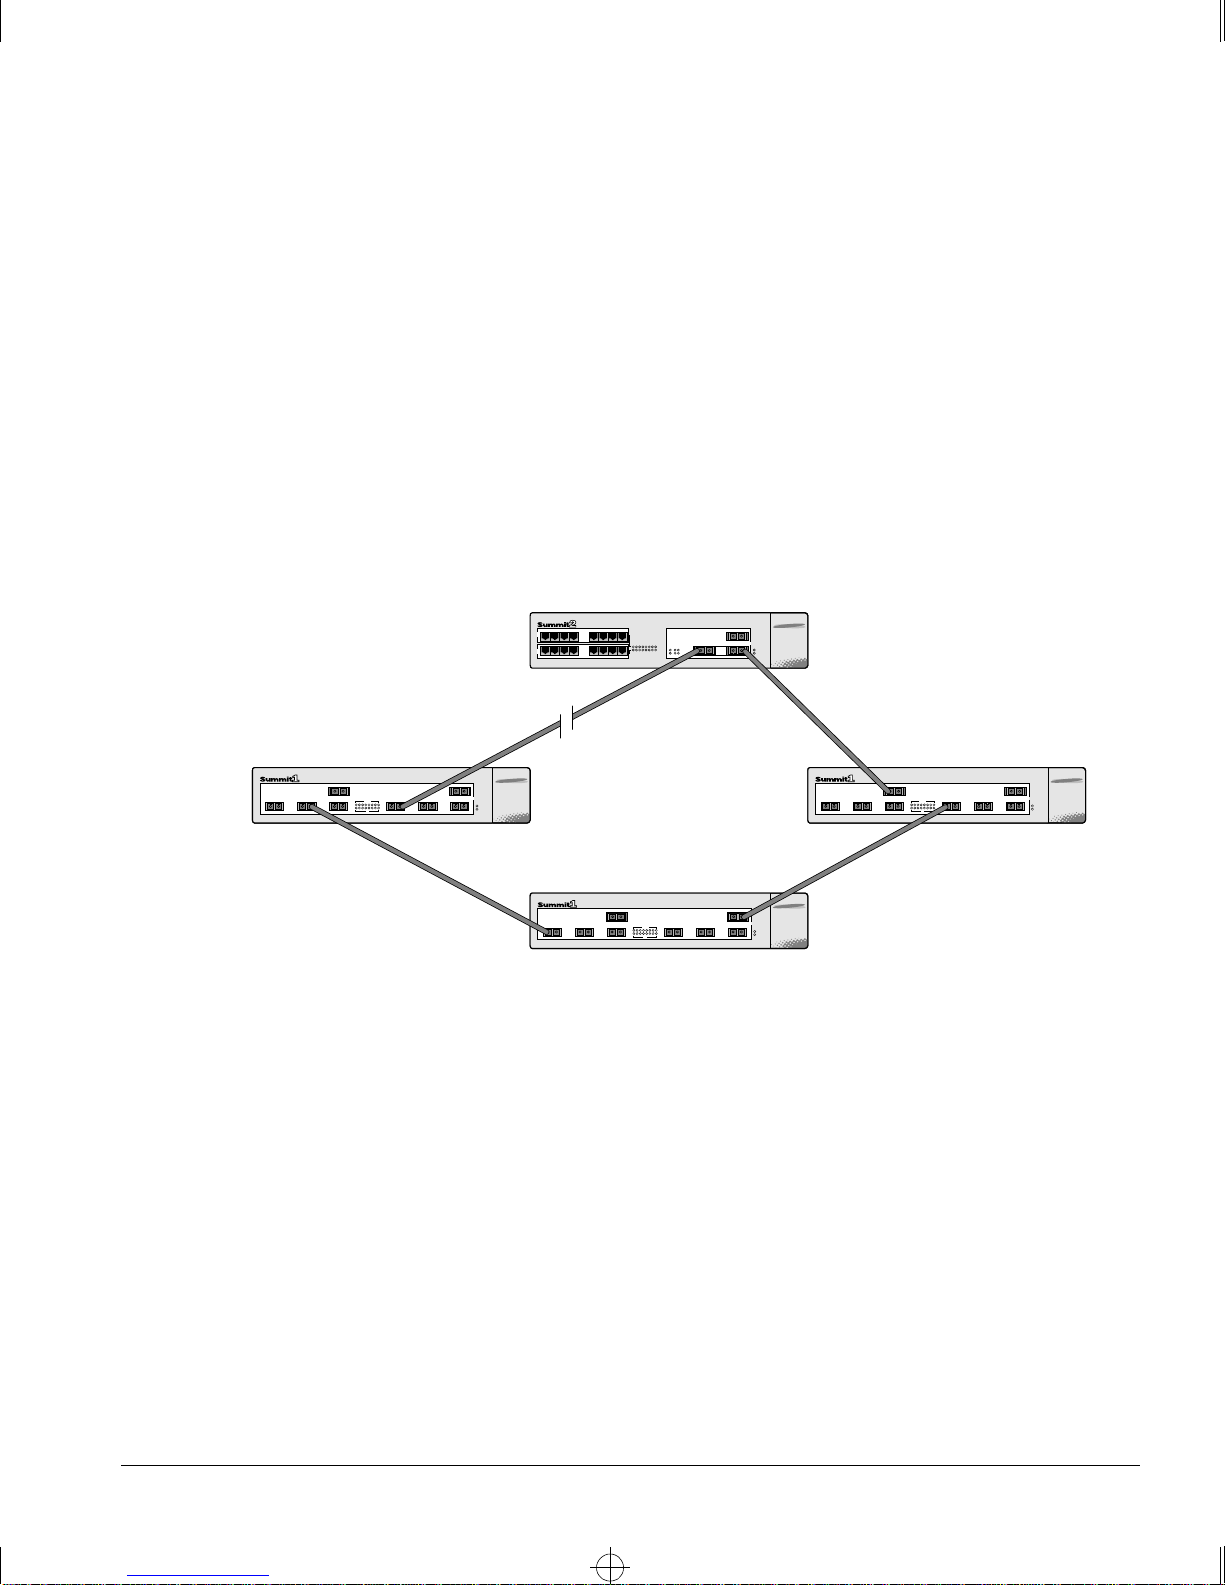
P
The Summit2, Summit3, and Summit48 have an optional redundant Gigabit Ethernet
port. Using the redundant port, you can dual-home these models to one or two
switches. Figure 1-1 illustrates a Summit2 dual-homed to two different switches.
UMMARY OF FEATURES
S
Dual-homed
Backup
Figure 1-1:
Dual-homing confi guration
In the event that the active port fails or loses link status, the redundant port is
automatically activated. When the primary port resumes operation, the redundant port
becomes inactive. This feature can be disabled.
The redundant port cannot be used for load sharing when the primary port is active. If
the primary port becomes inactive, the redundant port is activated in the load sharing
configuration.
Active
UMMIT SWITCH INSTALLATION AND USER GUIDE
S
1-5

Summit.bk : 1OVRVW.FM Page 6 Thursday, June 18, 1998 9:27 AM
UMMIT OVERVIEW
S
OAD SHARING
L
Load sharing with Summi t switches allows the user to increase bandwidth and
resilience between switches by using a group of ports to carry tra ffic in parallel between
switches. The sharing algorith m allows the switch to u se multiple ports as a sing le
logical port. For example, VLANs see the load-sharing group as a single virtual port.
The algorithm also guarantees packet sequencing between clients.
For information on load sh aring, refer to Chapter 4.
IRTUAL
V
LANS (VLANS)
The Summit has a VLAN feature that enables you to const ruct your broadcast domains
without being restricted by physical co nnections. Up to 255 VLANs can be defined on
the Summit. A VLAN is a group of location- and topology-independent devices that
communicate as if they were on the same ph ysical local area network (LAN).
Implementing VL ANs on your netw ork has the follo wing three advantag es:
• It helps to control broadcast traffic. If a device in VLAN marketing transmits a
broadcast frame, only VLAN marketing devices receive the frame.
• It provides extra security. Devices in VLAN marketing can only communic ate with
devices on VLAN sales using a device that provides routing services.
• It eases the change and movement of devices on networks. If a device in VLAN
marketing is moved to a port in another part of the network, all you must do is
specify that the new port belongs to VLAN marketing.
For more information on VLANs, refer to Chapter 5.
PANNING TREE PROTOCOL
S
(STP)
The Summit supports the IEEE 802.1D Spanning Tree Protocol (STP), which is a
bridge-based mechanism for providing fault tolerance o n networks. STP enables you to
implement parallel paths fo r network traffic, and ensure the following:
• Redundant paths are disabled when the main paths are operational.
• Redundant paths are enabled if the main traffic paths fail.
1-6 S
UMMIT SWITCH INSTALLATION AND USER GUIDE
Summit.bk : 1OVRVW.FM Page 7 Thursday, June 18, 1998 9:27 AM
The Summit supports up to 64 Spa nning Tree Domains (STPDs).
For more information on STP, refer to Chapter 7.
UALITY OF SERVICE
Q
The Summit has policy-based Qu ality of Service (QoS) features that enable yo u to
specify service levels for different traffic groups. By default, all traffic is assigned with
the “normal” QoS policy profile. If needed, you can create other QoS policies and apply
them to different traffic types so that they have different guaranteed minimum
bandwidth, maximum bandwidth, and priority.
(QOS)
UMMARY OF FEATURES
S
For more information on Qual ity of Ser vice, refer to Chapter 8.
NICAST ROUTING
IP U
The Summit can route IP traffic between the VLANs that are configured as virtual
router interfaces. Both dynamic and static IP routes are maintained in the routing table.
The following routing protocols are supported:
• RIP version 1
• RIP version 2
• OSPF
For more information on IP uni cast routing, refer to Chapter 9.
IP M
ULTICAST ROUTING
The Summit can use IP multica sting to allow a single IP h ost to transmit a packet to a
group of IP hosts. The Summit supports statically configured IP multicas t routes, and
multicast routes that are learned by way of the D istance Vector Mu lticast Routing
Protocol (DVMRP).
For more information on IP multicast r outing, refer to Chapter 11.
UMMIT SWITCH INSTALLATION AND USER GUIDE
S
1-7
Summit.bk : 1OVRVW.FM Page 8 Thursday, June 18, 1998 9:27 AM
UMMIT OVERVIEW
S
ETWORK
N
ONFIGURATION EXAMPLE
C
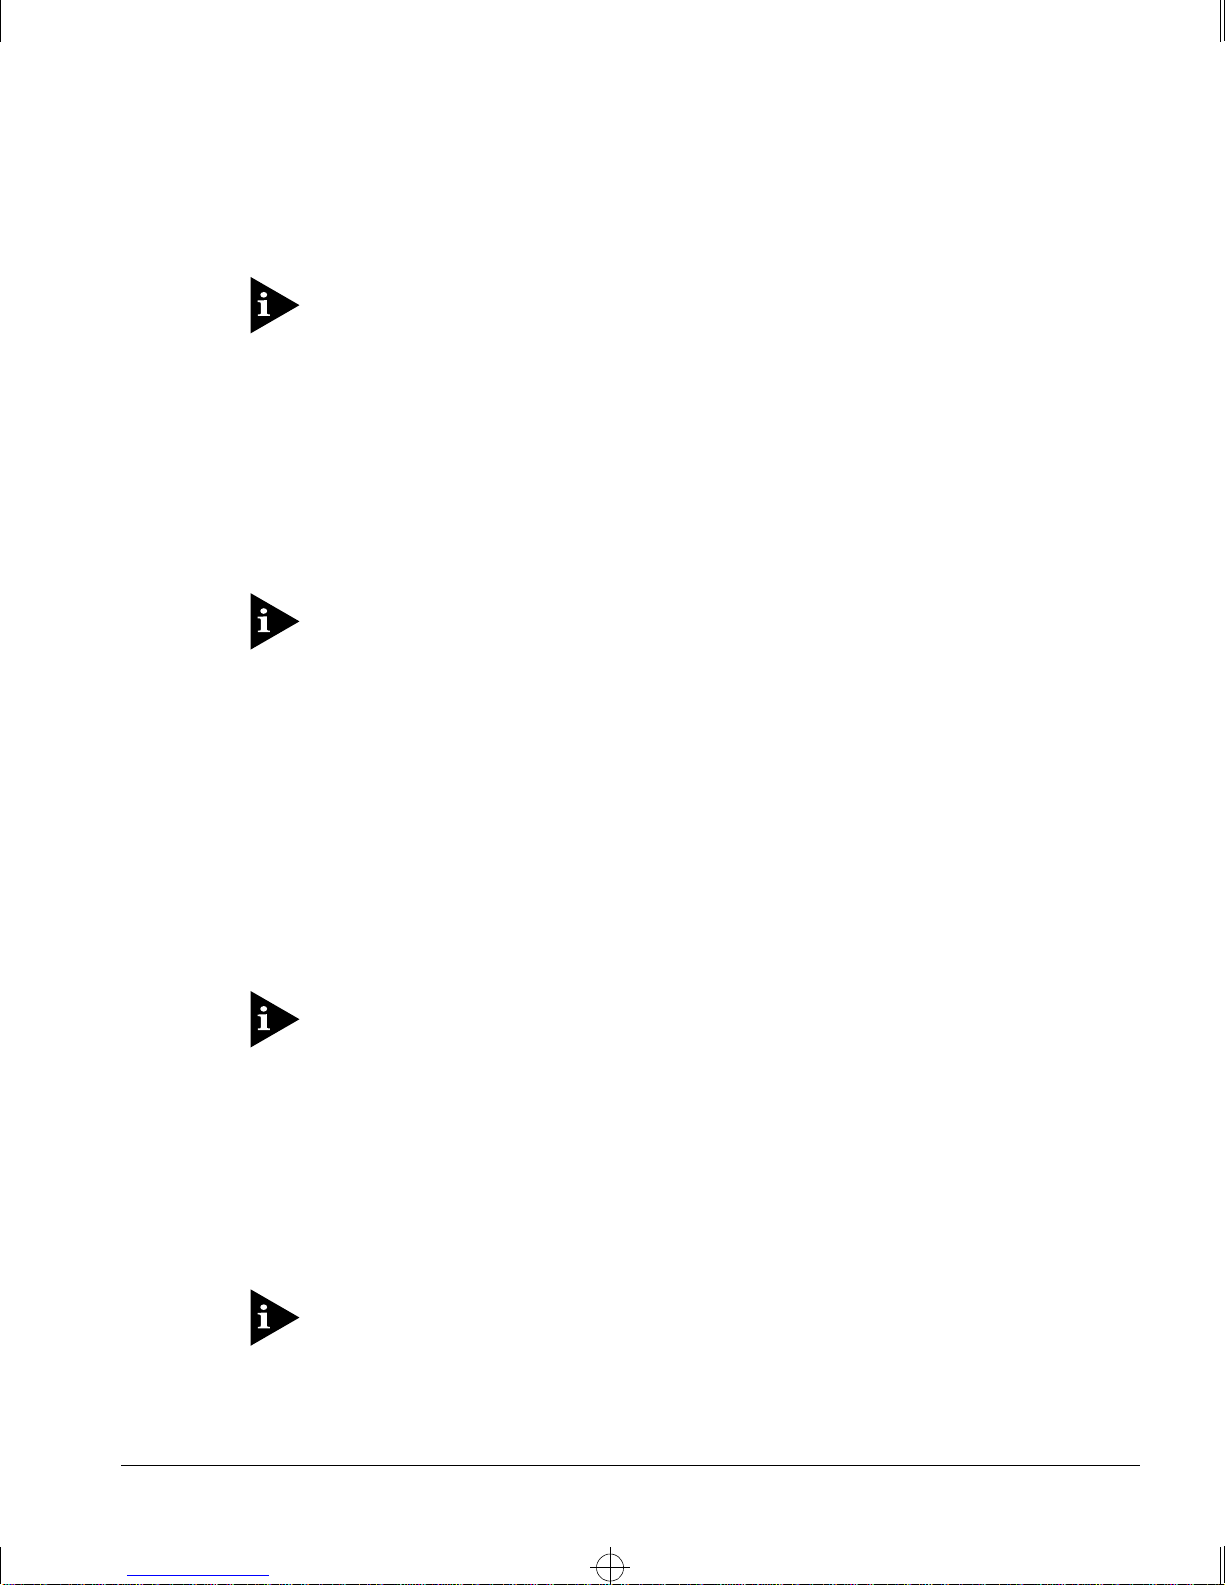
As shown in Fig ure 1-2, the family of Summit switches offer a unique end-to-end LAN
system solution. From the desktop, to the gigabit core, to the data center/server farm,
there are Summit switches with an optimized hardware configuration to match the
requirements. ExtremeWare software is common to all Summit switches, and allows for
the same services to operate across the entire product family. All Summit switches
deliver wire-speed throughput and end-to-end policy based Quality of Service.
Intranet Switching Architecture
Desktop switches
Desktop switches
Segment switches
Routers
Data Center
Integrated Server switch
Gigabit
10/100 Mbps
Figure 1-2:
1-8 S
Network configuration u sing the Summit family of switches
L2/L3
UMMIT SWITCH INSTALLATION AND USER GUIDE

Summit.bk : 1OVRVW.FM Page 9 Thursday, June 18, 1998 9:27 AM
In the gigabit core of the network, the Sum mit1 and Summit2 act a s aggregators of
Gigabit Ethernet links from the edge and data center switches, as well as Ethernet and
Fast Ethernet links from legacy routers and hubs. In the core of the network, the
Summit1 and Summit2 can scale in port density and perfo rmance by connecting to a
Summit Virtual Chassis to support up to 32 no n-blocking Gigabit Ethernet po rts at 48
million packets per second (pps), or 128 non-blocking 10/100BASE-TX ports at 19
million pps.
In the data center or server farm, the Summit4 offers the right mix of ports and features
for servers. Data centers and server farms require integrated wire-speed routing to
eliminate the performance penalty associated with legacy routers when servers had to
be separated into different subnets. In addition, the Summit4 supports trunking of
either Ethernet, Fast Ethernet, or Gigabit Ethernet ports to match the performance of the
LAN connection to the performance of the server. The goal is to only buy t he amount of
bandwidth that is needed and can be used. This is ideal for servers that can drive 400
Mbps on trunk Fast Ethernet ports, but would not be capable of more than 400 Mbps
performance on a Gigabit Ethernet port. The port density and performance of the
Summit4 can be scaled with the Summit Virtual Chassis to 16 Gigabit Ethernet ports,
and 128 10/100BAS E-TX ports at 43 milli on pps.
ETWORK CONFIGURATION EXAMPLE
N
At the edge of the network, higher-performance desktops need dedicated throughput,
while other devices can use small, shared segments. For higher-performance
connections, use the Summit3 and Summit48 switches (which offer 24 10/100BASE-TX
ports) and a single Gigabit Ethernet port, or 48 10/100BASE-TX ports and two Gigabit
Ethernet ports, respectively. For shared desktop segments, the Summit2 offers 16
10/100BASE-TX ports and two Gigabit Ethernet ports. Combining the Summit3 and the
Summit48 with the Summi t Virtual Chassis, desktop switch ing port densities can scale
to 192 10/100BASE-TX ports at 2 8 million pps, and 384 10/100BASE-TX ports at 28
million p ps, respe ctively.
UMMIT SWITCH INSTALLATION AND USER GUIDE
S
1-9
Summit.bk : 1OVRVW.FM Page 10 Thursday, June 18, 1998 9:27 AM
UMMIT OVERVIEW
S
UMMIT
S
RONT VIEW
1 F
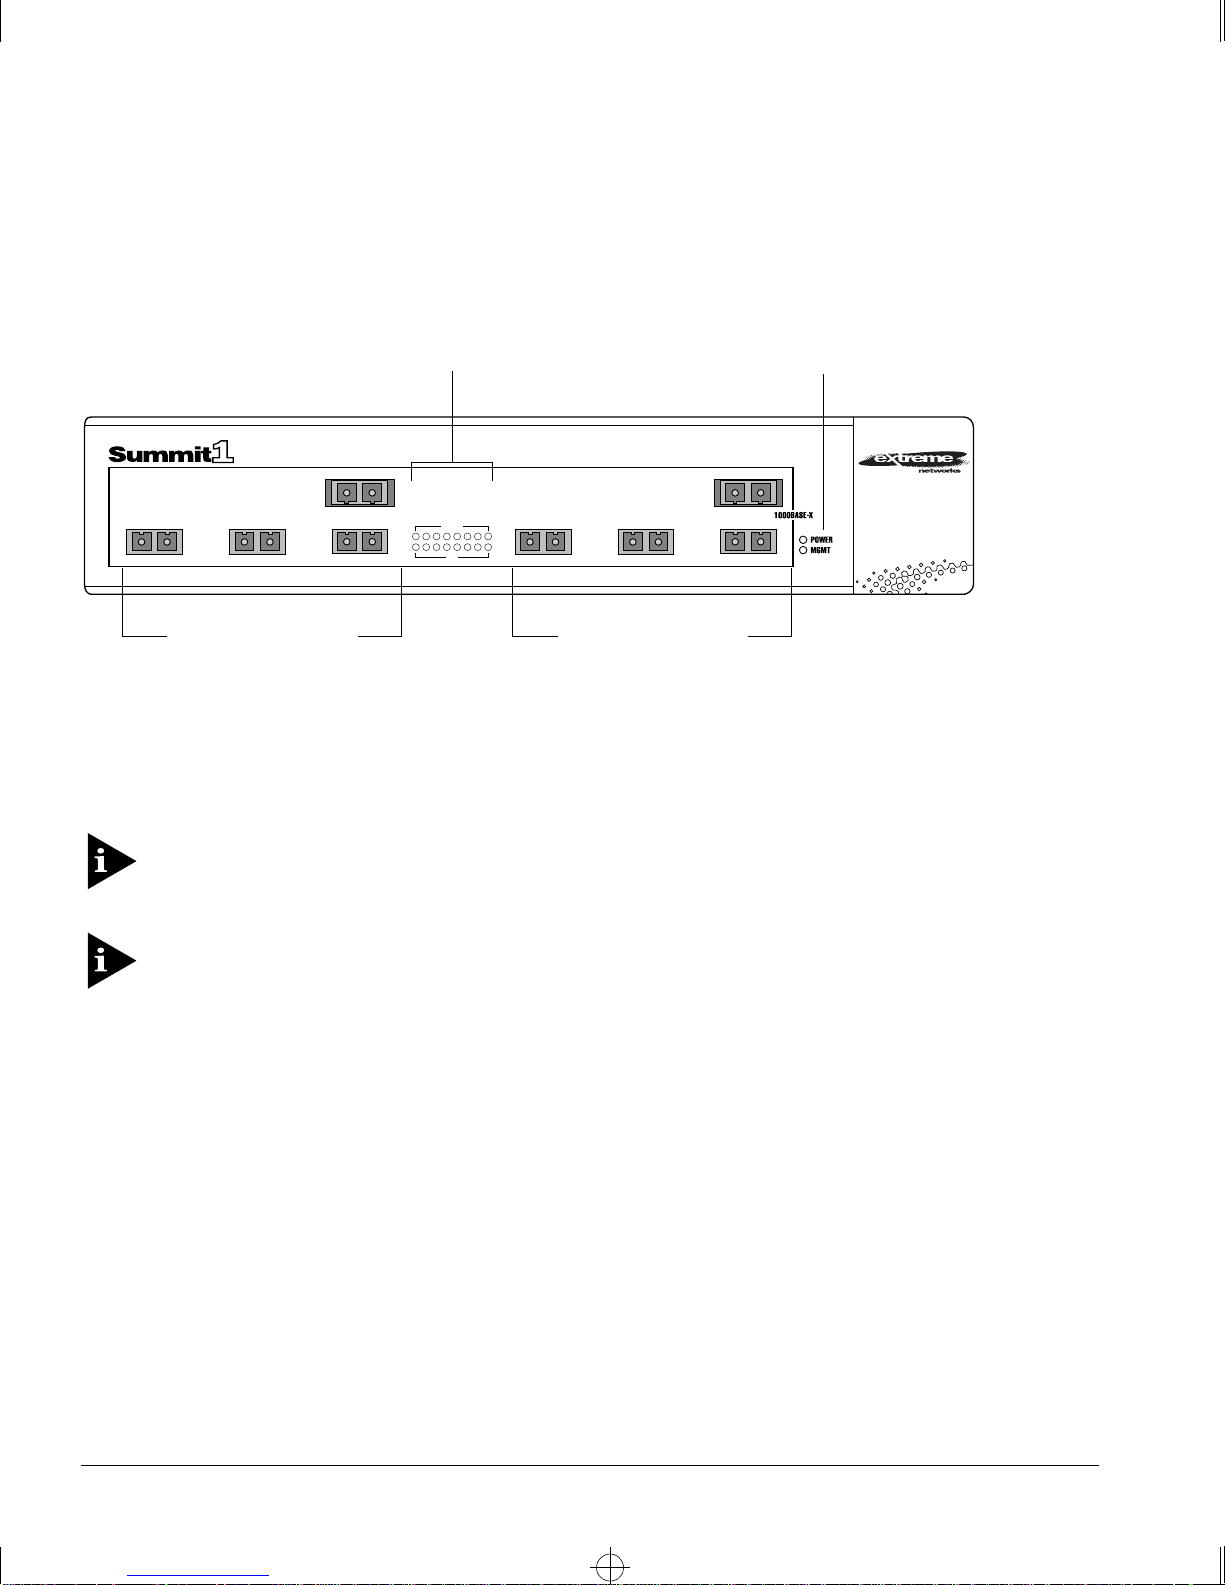
Figure 1-3 shows the Summit1 front view.
Gigabit Ethernet ports
Figure 1-3:
Port status LEDs
1
32
4
Summit1 front view
AMBER
=
ACTIVITY
GREEN
=
LINK OK
FLASHING GREEN
=
DISABLED
ACTIVITY
12345678
910111213141516
LINK
65
Gigabit Ethernet ports
Unit status LEDs
8
7
The Summit1 has eight Gigabit Ethernet ports. Six of the ports use SC connectors and
support 1000BASE-SX over multimode fiber-optic cable. Ports 1 and 8 use modular
GBIC connectors.
For information on suppor ted media type s and distances, refer to Table 1-2.
For information on Summit LEDs, refer to “LEDs,” on page 1-16.
1-10 S
UMMIT SWITCH INSTALLATION AND USER GUIDE
 Loading...