

Page 1
User's Guide
Model RPM10
Laser Photo / Contact Tachometer
with IR Thermometer
Patented
Page 2
Introduction
Congratulations on your purchase of Extech's Laser Photo/Contact Tachometer with NonContact IR Thermometer, Model RPM10. This Tachometer provides contact RPM and
Linear Surface Speed measurements, non-contact RPM measurements and IR
temperature measurements. The laser pointer beam provides accurate long distance
measurements for photo tachometer measurements and also identifies the measurement
spot for the non-contact temperature tests. This meter, with proper care, will provide years
of safe reliable service.
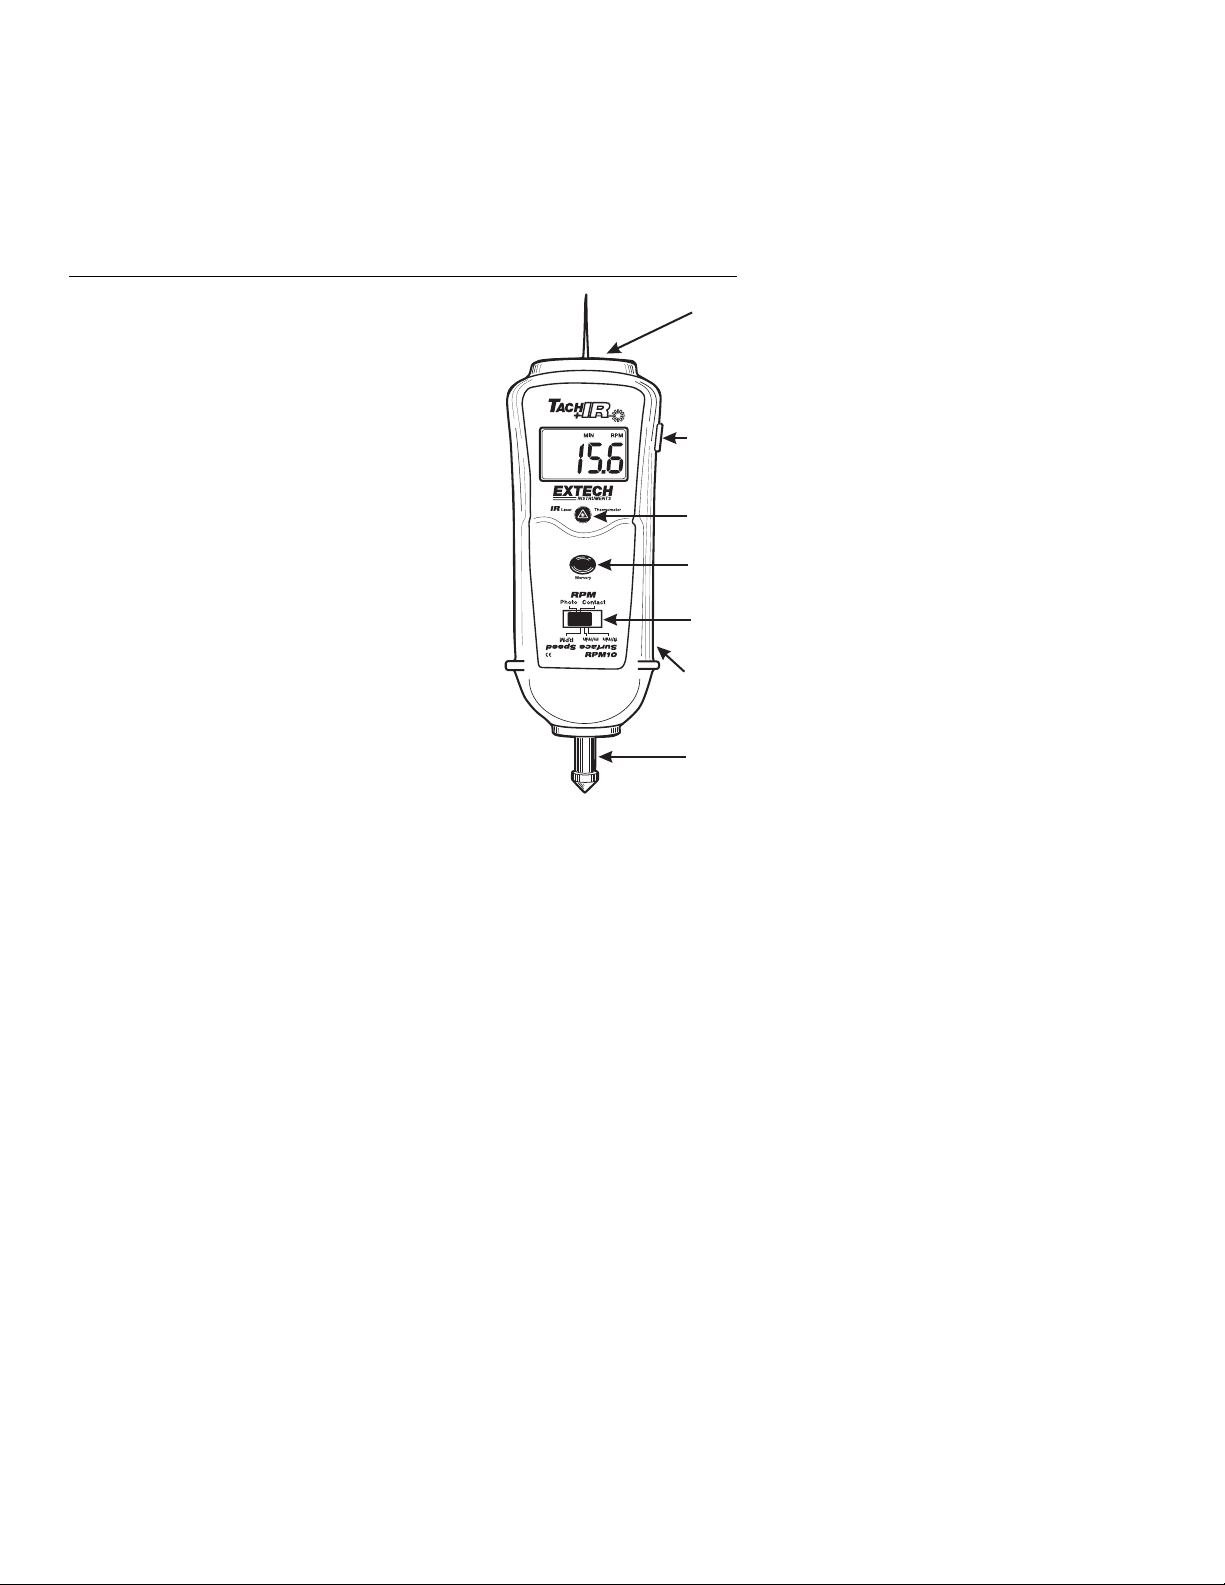
Meter Description
1. Photo Tachometer sensor, IR Thermometer
sensor and laser source
2. MEASURE button
1
3. IR Thermometer button
4. Memory button
5. Function Switch
6. Battery compartment (rear)
7. Contact Tachometer shaft
2
3
4
5
6
7
2
RPM10 V1.4 8/07
Page 3
Meter Operation
Reversible LCD Display
The meter display indicates Photo Tachometer and IR thermometer measurements in one
direction and Contact measurements in the opposite direction. This permits the user to
easily read the measurement digits in both measurement modes with the meter held in
either direction.
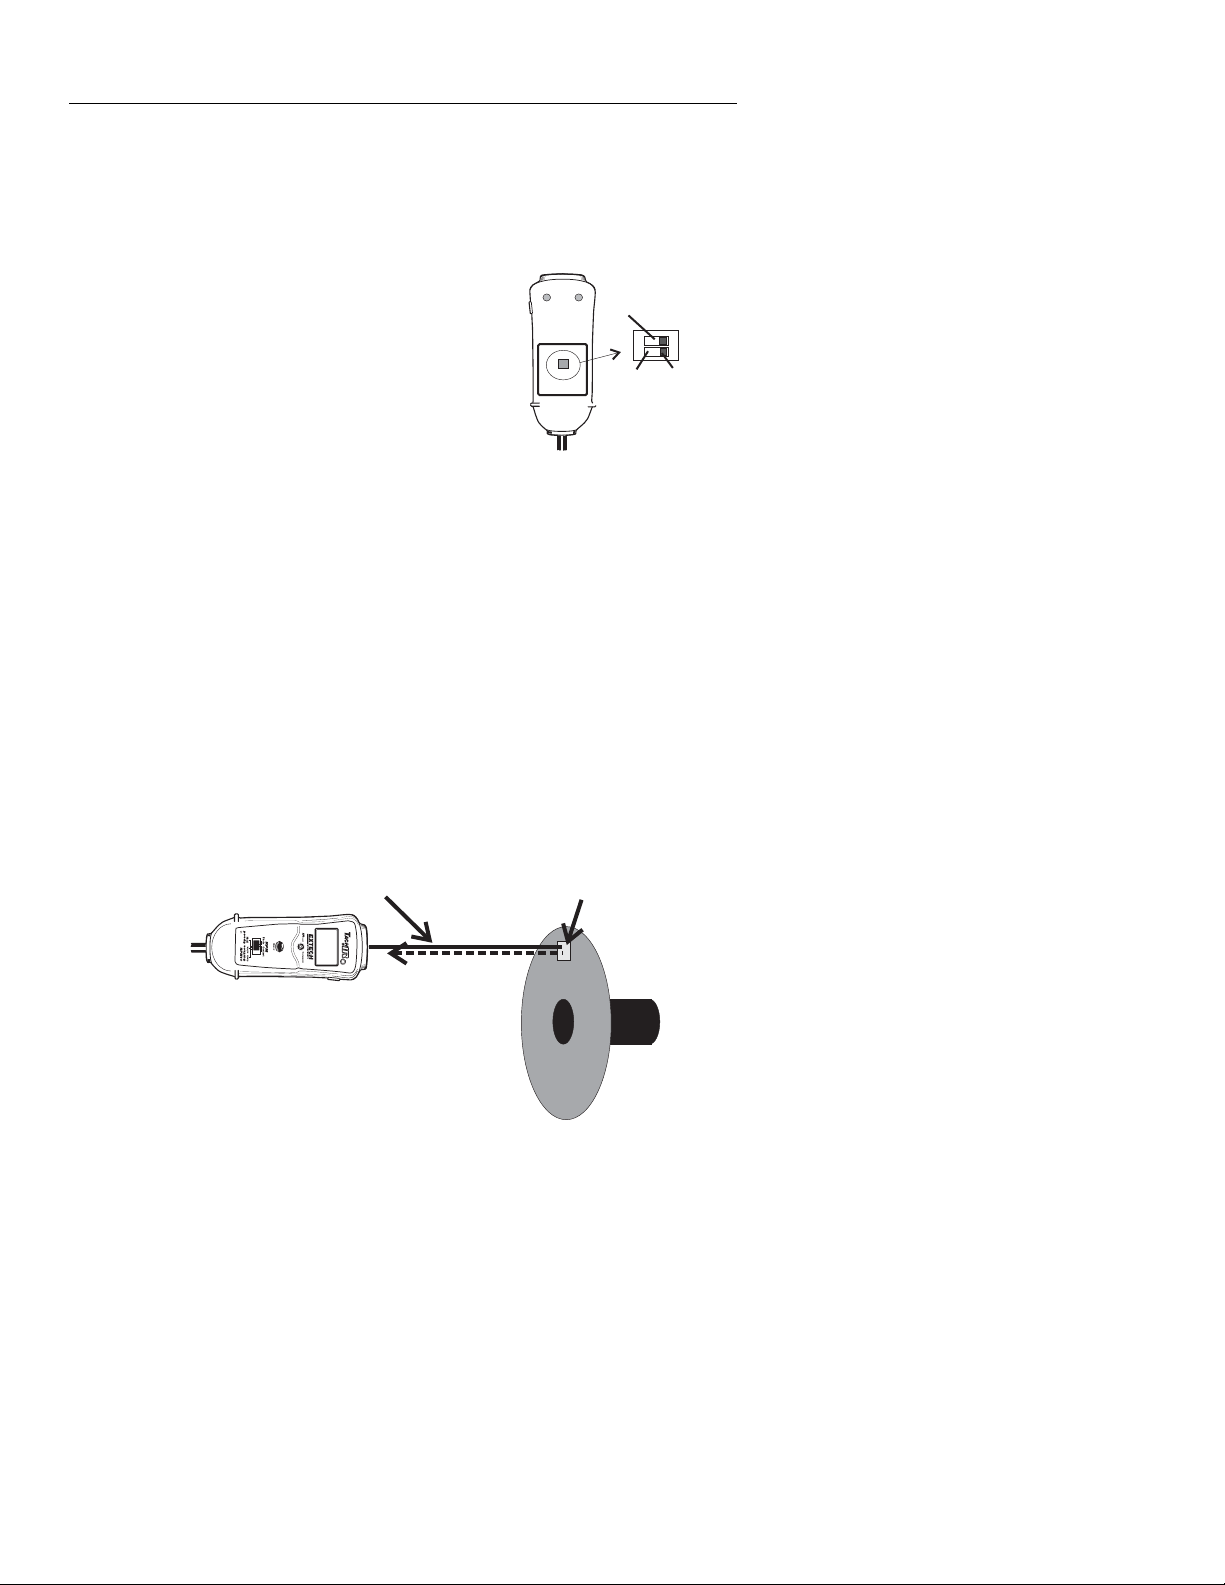
Temperature Units Selection
The displayed temperature units are selected via a slide
switch located in the battery compartment. To select the
units (ºF/ºC), open the battery compartment and remove
the batteries, then set the switch for the desired units.
Cal switch,
Do not move
NON-CONTACT PHOTO TACHOMETER MEASUREMENTS
1. Apply an appropriately sized square piece of reflective tape to the surface of the object
under test.
2. Move the Function switch to the PHOTO position.
3. Point the laser pointer end of the meter toward the device under test at a distance of 2"
to 79" (50 to 2000mm).
4. Press the Measure button (located on the right side of the meter) and align the laser
pointer beam with the reflective tape.
5. Verify that the ((●)) Monitor Indicator appears on the LCD when the object under test
passes through the light beam.
6. Release the Measure button when the RPM reading stabilizes on the LCD.
7. If the rpm is under 50, apply additional squares of reflective tape. Divide the reading
shown on the display by the number of pieces of reflective tape squares to calculate
the actual rpm.
NOTE: Bright ambient light may interfere with the reflected light beam. Shading the target
area may be necessary in some cases.
CAUTION: Rotating objects can be dangerous. Use extreme care.
Laser beam
Reflective Tape
Units switch
C
F
3
RPM10 V1.4 8/07
Page 4

CONTACT TACHOMETER RPM MEASUREMENTS
1. Install one of the RPM contact tips on the contact shaft.
2. Move the Function switch to the CONTACT position.
3. Press the Measure button while lightly pressing the contact tip
against the center of a rotating shaft.
4. Release the Measure button when the display stabilizes
(approx. 2 seconds).
CONTACT LINEAR SURFACE SPEED (ft/min or m/min) MEASUREMENTS
RPM Contact
Tips
1. Install the Linear speed wheel on the contact shaft.
2. Slide the Function Switch to SURFACE SPEED “ft/min" or
"m/min" position.
3. Press the Measure button and hold the surface speed wheel
against the moving surface being measured.
4. Release the Measure button when the display stabilizes
(approx. 2 seconds).
4
Linear Speed
Wheel
RPM10 V1.4 8/07
Page 5

NON-CONTACT TEMPERATURE MEASUREMENTS
1. Point the meter at the surface to be measured.
2. Press the red IR thermometer button.
3. Use the laser pointer to identify the exact spot to be measured.
4. The area of the surface to be measured must be larger than the spot size as
determined by the distance to spot size specification.
5. Read the temperature in the display.
WARNING: Do not directly view or direct the laser pointer at an eye. Low power
visible lasers do not normally present a hazard, but may present some potential for
hazard if viewed directly for extended periods of time.
Diameter of spot
0.5”
1”
4”
3”
6”
24”
Distance to object
MIN/MAX and Last Reading Memory Recall
The meter will record Maximum, Minimum, and Last Reading for the period of time the
Measure button is held. These stored values can then be recalled directly on the meter's
display. The readings will remain in the display for approximately four seconds after a
button press.
1. Press the Memory key once: The “Last” icon appears with the stored last reading.
2. Press the Memory key again. The “MAX” icon appears with stored maximum reading
3. Press the Memory key again. The “MIN” icon appears with stored minimum reading
5
RPM10 V1.4 8/07
Page 6

Specifications
Time base
Display
Laser light source
Detecting Distance
Memory
Operating Conditions
Power Supply
Power Consumption
Weight
Size
Accessories
Patent Notice
Range Specifications
Range Resolution Accuracy (%rdg)
Photo
Tachometer
Contact
Tachometer
Surface
Speed
Surface
Speed
Photo
Tachometer
Detecting
Distance
IR Thermometer Specifications
Range / Resolution -4 to 600oF (-20 to 315oC) 1oC/F
Accuracy ± 3% of reading or ± 6oF (3oC) whichever is greater.
Emissivity 0.95 fixed value
Field of View D/S = Approx. 6:1 ratio (D = distance, S = spot)
Laser power Less than 1mW
Spectral response 6 to 14 μm (wavelength)
10 to 99,999 rpm
0.5 to 19,999 rpm
0.2 to 6560 ft/min
0.05 to 1999.9 m/min
2 to 79” (50 to 2,000mm) typical*
* specified using a 10mm square of reflecting tape at 1,800rpm. The max
and min detecting distance will change with environmental conditions,
reflecting tape, or speeds above 1800rpm.
Quartz crystal 4.9152 MHz
Reversible 5 digit 0.6" (16mm) LCD display
Less than 1mW; Class 2 red laser diode (645nm approx.)
2 to 79" (50 to 2000 mm) depending on ambient light and RPM
Last reading and MIN/MAX readings
32 °F to 122 °F (0 °C to 50 °C); RH 80% Max
4 x 1.5 V AA batteries
24mA DC approx. (>100hrs continuous use)
10.6oz. (300g) including battery)
8.3 x 3.1 x 2.0" (210 x 80 x 50 mm)
(4) 1.5V batteries, reflective tape 24" [600mm], (1) surface speed
and (2) rpm rotating attachments, and carrying case
U.S. Patent 7,111,981
0.1 rpm (<1000rpm)
1 rpm (>1000 rpm)
0.1 rpm (<1000rpm)
1 rpm (>1000 rpm)
0.1 ft/min (<1000ft/min)
1 ft/min (>1000ft/min)
0.01 m/min (<100m/min)
0.1 m/min (>100 m/min)
Note: Accuracy is specified for the following ambient
temperature range: 64 to 82°F (18 to 28°C)
± (0.05% + 1d)
± (1% + 1d)
6
RPM10 V1.4 8/07
Page 7

Battery Replacement
The low battery indication appears as “ " on the display. To replace the batteries,
loosen the two Philips head screws securing the rear battery cover and lift the cover off.
Replace the four 1.5V AA batteries, and replace cover.
Calibration and Repair Services
Extech offers complete repair and calibration services for all of the products we sell.
For periodic calibration, NIST certification or repair of any Extech product, call customer
service for details on services available. Extech recommends that calibration be performed
on an annual basis to ensure calibration integrity.
Warranty
EXTECH INSTRUMENTS CORPORATION warrants this instrument to be free of defects in
parts and workmanship for one year from date of shipment (a six month limited warranty
applies to sensors and cables). If it should become necessary to return the instrument for
service during or beyond the warranty period, contact the Customer Service Department at
(781) 890-7440 ext. 210 for authorization or visit our website www.extech.com for contact
information. A Return Authorization (RA) number must be issued before any product is
returned to Extech. The sender is responsible for shipping charges, freight, insurance and
proper packaging to prevent damage in transit. This warranty does not apply to defects
resulting from action of the user such as misuse, improper wiring, operation outside of
specification, improper maintenance or repair, or unauthorized modification. Extech
specifically disclaims any implied warranties or merchantability or fitness for a specific
purpose and will not be liable for any direct, indirect, incidental or consequential damages.
Extech's total liability is limited to repair or replacement of the product. The warranty set
forth above is inclusive and no other warranty, whether written or oral, is expressed or
implied.
Copyright © 2007 Extech Instruments Corporation. All rights reserved
including the right of reproduction in whole or in part in any form.
Support line (781) 890-7440
Technical support: Extension 200; E-mail: support@extech.com
Repair & Returns: Extension 210; E-mail: repair@extech.com
Product specifications subject to change without notice
For the latest version of this User’s Guide, Software updates, and other up-to-the-
minute product information, visit our website: www.extech.com
7
RPM10 V1.4 8/07
Page 8

8
RPM10 V1.4 8/07
 Loading...