

Page 1
User Guide
TM
ExStik
Model RE300
Waterproof ORP Pen
Patent Pending
Page 2
ExStikTM Description
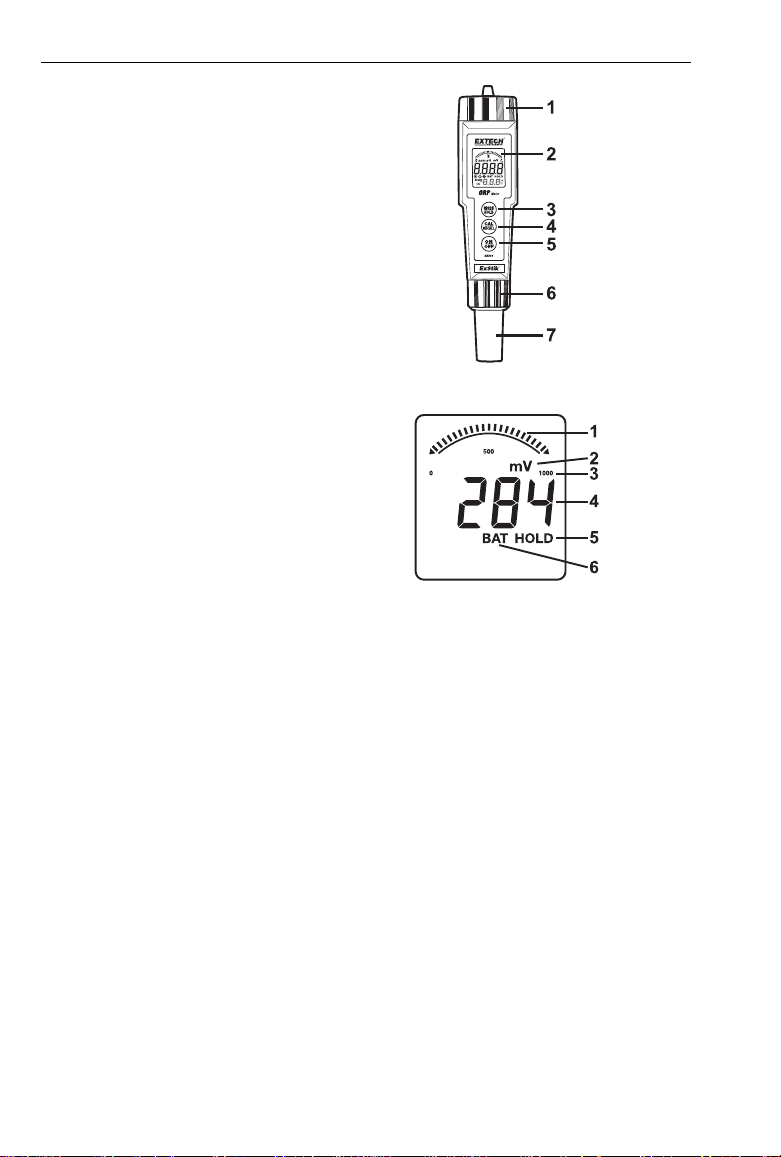
Front Panel Controls
1. Battery compartment cap
2. LCD Display
3. MODE button
4. CAL button (unused on RE300)
5. ON/OFF button
6. Electrode collar
7. Electrode
(Electrode cap is not shown)
Display Description
1. Bargraph
2. Units
3. Scale
4. Reading
5. Data Hold
6. Low Battery
CAUTIONS
• This device is not a toy and must not reach children’s hands. It contains hazardous
objects as well as small parts that the children could swallow. In case a child
swallows any of them, please contact a physician immediately
• Do not leave batteries and packing material lying around unattended; they can be
dangerous for children if they use them as toys
• In case the device is going to be unused for an extended period of time, remove the
batteries to prevent them from training
• Expired or damaged batteries can cause cauterization on contact with the skin.
Always, therefore, use suitable hand gloves in such cases
• See that the batteries are not short-circuited. Do not throw batteries into the fire.
2
ExStikTM RE300-EU_ENG V2.2 02/08
Page 3

Operation
Getting Started
Battery Activation: An insulating tab is located in the battery compartment and prevents
battery drain during storage. It must be removed before use.
White KCL crystals may be present in the cap. These crystals will dissolve in the soak or
they can be simply rinsed with tap water
When the RE300 is turned on, it enters the Automatic Calibration mode. ‘SELF’ and ‘CAL’
will appear on the LCD while calibration is in progress. After the calibration is complete,
‘SELF’ and ‘CAL’ will extinguish and both the main display and bargraph will read ORP in
mV units. The bargraph reads 0mV (far left), 500mV (center), and 1000mV (far right).
ORP Testing
1. Remove cap from the electrode and press the ON/OFF button to switch the RE300
on.
2. Dip the electrode1/2” to 1” into the test solution. Stir once and let the reading stabilize
for 1 to 3 minutes.
3. Note the ORP or press MODE to freeze the reading The HOLD display icon will
appear along with the held reading. The held reading will be stored in the next 15reading storage location (see below). Press the MODE key to return to normal
operation.
4. Press the ON/OFF button to turn the RE300 off. If you do not press a button for 10
minutes the RE300 shuts off automatically.
Data Hold
Press the MODE button to freeze the current reading. The HOLD display icon will appear
along with the held reading. The held reading will be stored in the next 15-reading storage
location (see below). Press the MODE key to return to normal operation.
15-Reading Measurement Storage
1. Press the MODE button to store a reading. The LCD will briefly display the memory
location number and then the value stored (Data Hold will activate).
2. Press MODE again to return to normal
operation. Repeat step 1 above to store
the next reading and so on.
3. If an attempt is made to store more than
15 readings, the stored readings (starting
with the first reading) will be overwritten.
Recalling Stored Readings
Note: First ensure that the HOLD symbol is not displayed. If it is, exit the HOLD function by
pressing the MODE button.
1. Press the CAL button once and then press the MODE button immediately
displayed; the location number (1 through 15) will flash. If the CAL mode is
accidentally accessed (display flashing), press the CAL button again to exit.
2. The last stored reading taken will be displayed first. To advance through the stored
readings, press the MODE button. The location number is displayed first, followed by
the reading stored in that location.
3. To exit the storage mode, press the CAL button and the ExStik
operation.
TM
after CAL is
will return to normal
3
ExStikTM RE300-EU_ENG V2.2 02/08
Page 4

Measurement and Display Considerations
• If the unit appears to be locked (display frozen). It is possible that the Data Hold mode
has been inadvertently accessed by pressing the MODE button. Simply press the
MODE button again or turn the meter off and restart if the display appears frozen.
• If the meter does latch up and no button presses revive it, remove the batteries and
restart.
• Note that if the batteries are removed, any stored readings will be discarded. Factory
calibration data for all models will be retained, however.
Replacing Electrodes
To preserve Electrode life keep the sponge in the protective cap soaked
with tap water. When not in use (store vertically).
DO NOT USE DE-IONIZED WATER.
1. To remove an electrode, unscrew and completely remove the electrode collar (turn
the collar counter-clockwise to remove).
2. Gently rock the electrode from side to side, pulling it downwards, until it disconnects
from the meter.
3. To attach an electrode, carefully plug the electrode into the meter socket (note that
the electrode connector is keyed, ensuring proper connection).
4. Tighten the electrode collar firmly enough to make a good seal (a rubber gasket seals
the electrode with the meter).
4
ExStikTM RE300-EU_ENG V2.2 02/08
Page 5

Battery Replacement
1. Twist off the battery compartment cap
2. Replace the four (4) CR2032 batteries
observing polarity.
3. Replace the battery compartment cap
You, as the end user, are legally bound (Battery ordinance) to return all used
batteries and accumulators; disposal in the household garbage is prohibited!
You can hand over your used batteries / accumulators, gratuitously, at the
collection points for our branches in your community or wherever batteries /
accumulators are sold!
Disposal
Follow the valid legal stipulations in respect of the disposal of the device at the
end of its lifecycle
Specifications
Display Multifunction LCD with Bargraph
Operating conditions 0 to 50
ORP Range / Accuracy ± 999mV / ± 4mV
Measurement storage 15 tagged (numbered) readings
Power Four (4) CR2032 button batteries
Low battery indication ‘BAT’ appears on the LCD
Auto power off After 10 minutes of inactivity
Dimensions 35.6x172.7x40.6mm (1.4x6.8x1.6”); 110g (3.85oz)
All rights reserved including the right of reproduction in whole or in part in any form.
Copyright © 2008 Extech Instruments Corporation.
o
C (32 to 122oF) / < 80% RH
www.extech.com
5
ExStikTM RE300-EU_ENG V2.2 02/08
 Loading...