

Page 1

User's Guide
ExStik® DO600
Dissolved Oxygen Meter
II
RECALL
Dissolved Oxygen
DO600
Page 2
Introduction
Congratulations on your purchase of the ExStik® DO600 dissolved oxygen / temperature
meter which simultaneously displays dissolved oxygen and temperature. Units of measure
are % saturation, mg/l or ppm for dissolved oxygen, and °C or °F for temperature. Advanced
features include Data Hold, 25 points memory, auto power off, automatic temperature
compensation, salinity and altitude compensation. Careful use and maintenance will provide
years of reliable service.
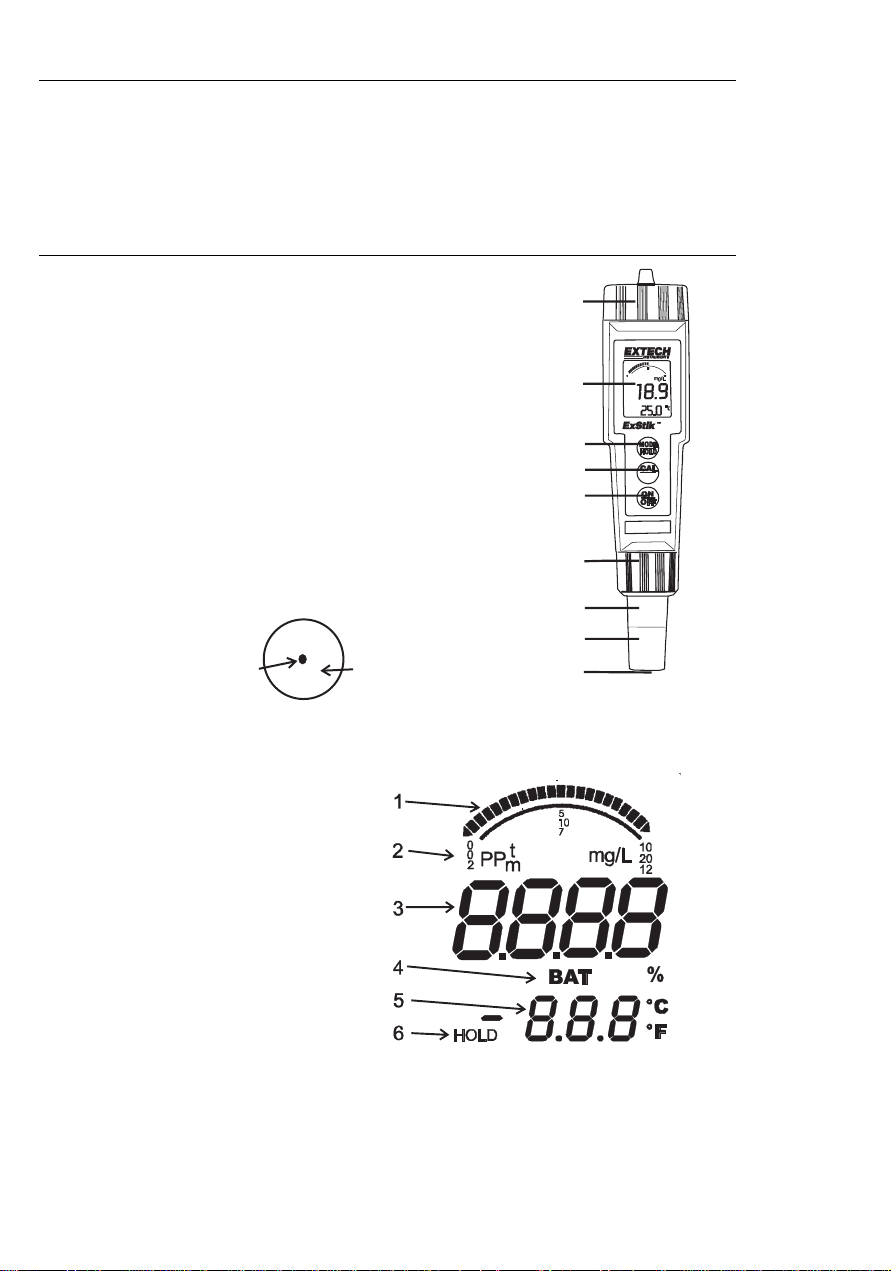
Meter Description
Front Panel Description
1. Battery compartment cover
2. LCD Display
3. MODE/HOLD button
4. CAL/RECALL button
5. ON/OFF button
6. Electrode Retaining Collar
7. Dissolved Oxygen Sensor
8. Bonded Membrane Cap assembly
9. Membrane & Cathode
(Note: The Electrode storage cap is not shown)
Electrode Bottom View
LCD Display
1. Bargraph display
2. Measurement units
3. Main display
4. Low Battery indicator
5. Temperature display
6. Reading hold indicator
Cathode
Membrane
1
2
II
3
4
RECALL
5
DissolvedOxygen
DO600
6
7
8
9
2
DO600 - Version 5.0 8/05
Page 3

Operation®
Powering the ExStik®
The ExStik® uses four (4) CR2032 Lithium Ion Batteries. Press the ON/OFF button to turn
the meter on or off. If the batteries are weak, the ‘BAT’ indicator appears on the LCD. The
auto power off feature shuts the ExStik
inactivity. The auto power off feature may be temporarily disabled for convenience or for
extended polarization time.
Turn-On Diagnostics
1. When the meter is turned ON, the LCD displays “SELF” and “CAL” and the meter enters
into a diagnostics mode.
2. During this time the meter is recalling the User Calibration data, performing self
diagnostics & initializing the circuitry.
3. After this function is complete, the meter proceeds to the normal measurement mode.
Measurements
1. Cover the electrode with the electrode cap. The sponge contained in the cap should be
moistened (not soaked) with DI (distilled water) or clean tap water.
2. Pressing the ON/OFF button turns the meter ON or OFF. When turned ON, the meter’s
display switches on and the Self Calibration utility runs (see below). The unit of measure
selected when the meter was last turned OFF will be remain on the display.
3. Wait 10 minutes to 2 hours for the probe to polarize (disable auto-power off). The reading
should be approx. 101.7% (saturation) after the electrode has completely polarized.
Percent (%) Saturation is one of the meter’s three units of measure. If the meter is not in
this display mode, press and hold the MODE/HOLD button until % is displayed on the
LCD, release the button. The electrode is fully polarized when the readings stop drifting
and settle down. If the unit does not read 101.7% then recalibration is necessary
4. Select the desired units of measure by pressing and holding the MODE/HOLD button until
the proper units are shown in the display. Remove the electrode cover and place the
electrode in the sample to be measured. Stir the electrode in the sample to remove any
trapped air bubbles from the membrane surface. Do not submerse the electrode to the
point that the sample liquid reaches the meter’s electrode collar.
5. Allow the meter time to settle to the final measurement value.
Note: The larger the difference in temperature between the electrode and the solution the
longer it will take for the reading to stabilize. Stabilization time can vary from ten (10)
seconds to five (5) minutes.
®
off automatically after approximately 10 minutes of
3
DO600 - Version 5.0 8/05
Page 4

Calibration
1. Calibration should be performed on a daily basis.
2. Turn the meter ON
3. Press and hold the MODE/HOLD button until % is displayed on the LCD.
4. Allow the electrode to fully polarize. (readings are stable)
5. Place the electrode cap onto the electrode. The sponge contained in the cap should be
moistened (not soaked) with DI (distilled water) or clean tap water. Be sure that the
electrode membrane is clean and dry
membrane, as skin oil will affect the electrode response.
6. Wait until the reading stabilizes then press and hold the CAL/RECALL button until CAL is
shown in the lower display. The readings will blink “101.7” and “SA” will appear.
7. When the calibration is complete “End” will appear and then the meter will return to the
normal measurement mode.
Note: The “SA” will not appear if the calibration fails.
8. Optional ’zero oxygen’ calibration: (improves measurement accuracy for very low or very
high DO measurements)
Place the electrode in a zero oxygen calibration solution, such as 5% sodium sulfite, wait
for stability and press the CAL/RECALL button until CAL is shown in the in the lower
display. Stability in a zero solution may take many minutes, depending on electrode
history.
Note : Sodium Sulfite can become deposited on the electrode and on the “coined” surface
of the electrode retaining collar. The presence of the Sodium Sulfite will negatively affect
future DO measurements until such a time where ALL of it is removed from the electrode.
or the calibration will be incorrect. Never touch the
Measurement Units
The meter can be set to measure % saturation, dissolved oxygen in mg/l, and dissolved
oxygen in parts per million (ppm). To change the mode:
1. Press and hold the MODE/HOLD button for 2 seconds and the display will begin to scroll
through the different units of measure :
% saturation; D.O. in mg/l; D.O. in ppm (parts per million)
2. When the desired units are displayed, release the MODE/HOLD button and the unit will
return to normal operating mode.
Note: The “HOLD” function cannot be on when changing the measurement function. If “HOLD”
is displayed in the lower left corner of the display, briefly press the MODE/HOLD button to turn
it off.
Temperature Units (ºF / ºC)
1. With the unit OFF, press and hold the CAL/RECALL button.
2. With the CAL/RECALL button depressed, momentarily press the ON/OFF button to turn
the unit ON.
3. The CAL/RECALL button can be released when ‘Self Cal’ is shown in the display.
Salinity Compensation
1. With the unit ON, momentarily press the CAL/RECALL button twice in quick succession
(‘SAL’ is shown in the lower temperature display).
2. Momentary press the MODE/HOLD button. Each press of the MODE/HOLD button
increases the compensation by 1ppt (part per thousand); the available range is 0 to 50ppt.
3. Momentarily press the CAL/RECALL button to save the compensation setting and return
to the normal measurement mode.
4
DO600 - Version 5.0 8/05
Page 5

Altitude Compensation
1. With the unit ON, momentarily press the CAL/RECALL button twice in quick succession
(‘SAL’ is shown in the lower temperature display.
2. Press and hold CAL/RECALL again for 2 seconds to enter the Altitude Mode (‘Ald’ will be
shown in the lower temperature display).
3. The factory default value is sea level. Each press of the MODE/HOLD button increases
the compensation by 1000ft. The maximum value is 20 presses (20,000ft above sea
level).
4. Momentarily press the CAL/RECALL button to save the compensation setting and return
to the normal measurement mode.
Auto-Power OFF Feature
The auto power off feature automatically shuts the meter off 10 minutes after the most recent
button press. To disable this feature, refer to the Disable Auto-Power OFF section.
Disable Auto-Power OFF Feature
With the unit ON, momentarily press the CAL/RECALL button, then quickly press and hold
both the MODE/HOLD and ON/OFF buttons until ‘oFF’ is displayed. To restore the Auto Power
Off Feature (auto power OFF enable) simply turn the meter off and on again using the ON/OFF
button.
Low Battery Indication
When the battery voltage falls below the operating threshold, ‘BAT’ will appear on the display.
Refer to the Maintenance section for battery replacement information.
Storing Readings
1. Press the MODE/HOLD button to store a reading. The storage location number will be
displayed on the lower display, while the main display shows the stored reading. The
meter will enter the HOLD mode and the “HOLD” indicator will appear on the LCD.
2. Press the MODE/HOLD button again to exit the HOLD mode and return to normal
operation. The next time MODE/HOLD is momentarily pressed another reading is stored
and so on.
3. If more than 25 readings are stored, previously stored readings (starting with reading
number 1) are overwritten.
Recalling Stored Readings
1. Momentarily press the CAL/RECALL button and then with in 4 seconds momentarily
press the MODE/HOLD. The last stored data point location will be displayed (1 to 25).
Each time the MODE/HOLD button is momentarily pressed the next most recently stored
data point will be displayed.
2. After the last data point stored is displayed, pressing the MODE/HOLD button again
returns the display to the beginning of the list.
3. Pressing the CAL/RECALL button at anytime stops the data retrieval process and returns
the meter to the normal measurement mode.
Clearing Stored Readings
1. With the unit ON press and hold the ON/OFF button for 4 seconds
2. When “clr” is shown in the main display the memory is cleared.
5
DO600 - Version 5.0 8/05
Page 6

Measurement and Display Considerations
• The DO600 uses a polarographic sensor, which consumes oxygen at the sensing surface.
This requires a constant movement of the sample across the membrane to maintain a
constant dissolved oxygen level. It is recommended that the probe be moved in the
sample as the measurement is made, or if in a laboratory environment, the sample be
stirred using a stir plate.
• If the unit appears to be locked (display frozen). It is possible that the Data Hold mode
has been inadvertently accessed by a press of the MODE/HOLD button (HOLD will be
displayed in the bottom left of the LCD). Simply press the MODE/HOLD button again or
turn the meter off and back on again.
• If the meter does latch up and no button presses revive it, remove the batteries and
restart.
• For maximum accuracy, allow sufficient time for the temperature of the probe to reach the
temperature of the sample before taking a reading. This will be indicated by a stable
temperature reading on the display.
Maintenance
Battery Replacement
1. Twist off the battery compartment cover.
2. Holding the battery housing in place with a finger, pull out the battery carrier using the two
small tabs.
3. Replace the four (4) CR2032 batteries observing proper polarity.
4. Replace the battery carrier, reattach the battery compartment cap and tighten securely.
Electrode Replacement
1. To remove the electrode, first turn the instrument OFF and then unscrew and remove the
electrode retaining collar. (turn the collar counter-clockwise to remove).
2. Gently rock the electrode from side to side, pulling it away from the meter until it
disconnects.
3. To attach an electrode, align the positioning “keys” on the electrode and the main body
housing and then carefully push the electrode into the meter socket until it is fully seated.
4. Tighten the electrode retaining collar firmly enough to seal the electrode with the meter.
6
DO600 - Version 5.0 8/05
Page 7

DO Bonded Membrane Cap replacement
Important Note : Do not touch the membrane as skin oils will interfere with the oxygen
permeability rate of the membrane. Use caution when replacing the bonded cap.
1. It is recommended that the electrode remain attached to the meter during this
replacement process.
2. To remove the bonded cap from the electrode, unscrew the cap firmly and carefully
counter-clockwise from the electrode (see diagram below).
3. Discard the used cap. Please Note
membrane to be tightly streched over the cathode. Once a bonded cap is removed
reinstallation is not possible as the membrane will no longer be properly streched over the
cathode.
4. Rinse the old electrolyte solution from the Cathode and Anode before continuing.
5. Use the supplied Polishing Strips to clean, polish, shine, and/or remove scratches from
the cathode. Be sure to moisten the cloth before polishing the cathode. Do not over-polish
the sensitive gold cathode.
6. Set the new replacement bonded cap on a flat surface. Leave the cap in this position
throughout the replacement process.
7. Fill the bonded cap with the electrolyte solution up to the bottom of the threads on the
inside of the cap.
8. Tap the side of the bonded cap to help jar free any trapped air bubbles from the
electrolyte solution.
9. Keeping the cap in a fixed position on a flat surface, carefully insert the electrode into the
new bonded cap by first dipping and removing the electrode several times from the cap.
With each dip, push the electrode progressively deeper into the bonded cap. Finally,
screw the electrode slowly onto the bonded cap (clockwise) until fully
dipping and removal technique minimizes the introduction of air bubbles into the
electrolyte solution. Air bubbles in the electrolyte can compromise measurements.
10. During the tightening of the bonded cap, excess electrolyte solution will leak out, this is
normal and desireable since it minimizes the introduction of air pockets. Clean off the
excess electrolyte before use.
: The installation of a bonded cap causes the
tightened. The
Electrode
BONDED CAP
Anode
Cathode
Clockwise to tighten
Counter-clockwise to loosen
Bonded Cap
Air Vents
7
DO600 - Version 5.0 8/05
Page 8

Specifications
Display 2000 count, Dual function 3 ½ digit LCD with Bargraph,
Display size: 24 mm x 20 mm
Sensor Polarographic type
Membrane Bonded membrane cap with threaded fitting
Operating Temp. Range 0 to 50°C (32 to 122°F)
ATC Range 0 to 50°C (32 to 122°F)
Salinity Compensation 0 to 50 ppt in 1 ppt (part per thousand) increments
Altitude compensation 0 to 20,000 ft (in 1000 ft increments)
Measurement Storage 25 tagged (numbered) data sets with recall
Battery Power Four (4) CR2032 button batteries
Low Battery Indication ‘BAT’ appears on the LCD
Auto Power Off After 10 minutes of inactivity (APO override available)
Dimensions/Weight 36 x 173 x 41mm (1.4 x 6.8 x 1.6”); 110g (3.8 oz)
Measurement Range Resolution Accuracy
% Saturation 0 to 200.0% 0.1% ±2.0% FS (full scale)
Concentration
0 to 20.00 mg/l 0.01 mg/l ±2% FS Dissolved Oxygen
0 to 20.00 ppm 0.01 ppm ±2% FS
0 to 50 °C 0.1 °C ±1.0 °C Temperature
32 to 122°F 0.1 °F (0 to 99ºF);
1.0 °F (>100°F)
±1.8°F
8
DO600 - Version 5.0 8/05
Page 9

Appendices
Troubleshooting Guide
Symptom Possible Causes Action
Unit will not power on -Batteries not in place
“BAT” indicator shown on display -Batteries are weak -Replace Batteries
Unstable Readings -Insuff i cient electrolyt e in probe (Air
Readings drift down -Insufficient stirring (the probe
Slow Response -Dirty or damaged membrane -Replace electrolyte and
Electrode cannot be calibrated -Depleted electrolyte
Electrode cannot be calibrated
after replacing the electrolyte and
membrane cap
Sample reading is frozen -Unit is in “HOLD” mode
-Dead batteries
-Battery polarity incorrect
bubbles present when probe is
inverted.)
-Electrolyte is depleted
consumes oxygen at the measuring
surface, requiring constant sample
movement across membrane)
-Dirty or damaged membrane
-Dirty probe (Cathode is not a shiny
gold color)
-Unit is locked
-Replace Batteries
-Replace Batteries
-Reorient/Replace Batteries
-Replace electrolyte, and
membrane cap assembly.
-Move probe in sample or stir
sample
membrane cap
-Replace electrolyte and
membrane cap
-Clean cathode with cleaning
paper
-Release HOLD (momentarilly
press Mode/Hold button)
-Remove batteries, press
ON/OFF button, replace batteries
and restart
9
DO600 - Version 5.0 8/05
Page 10
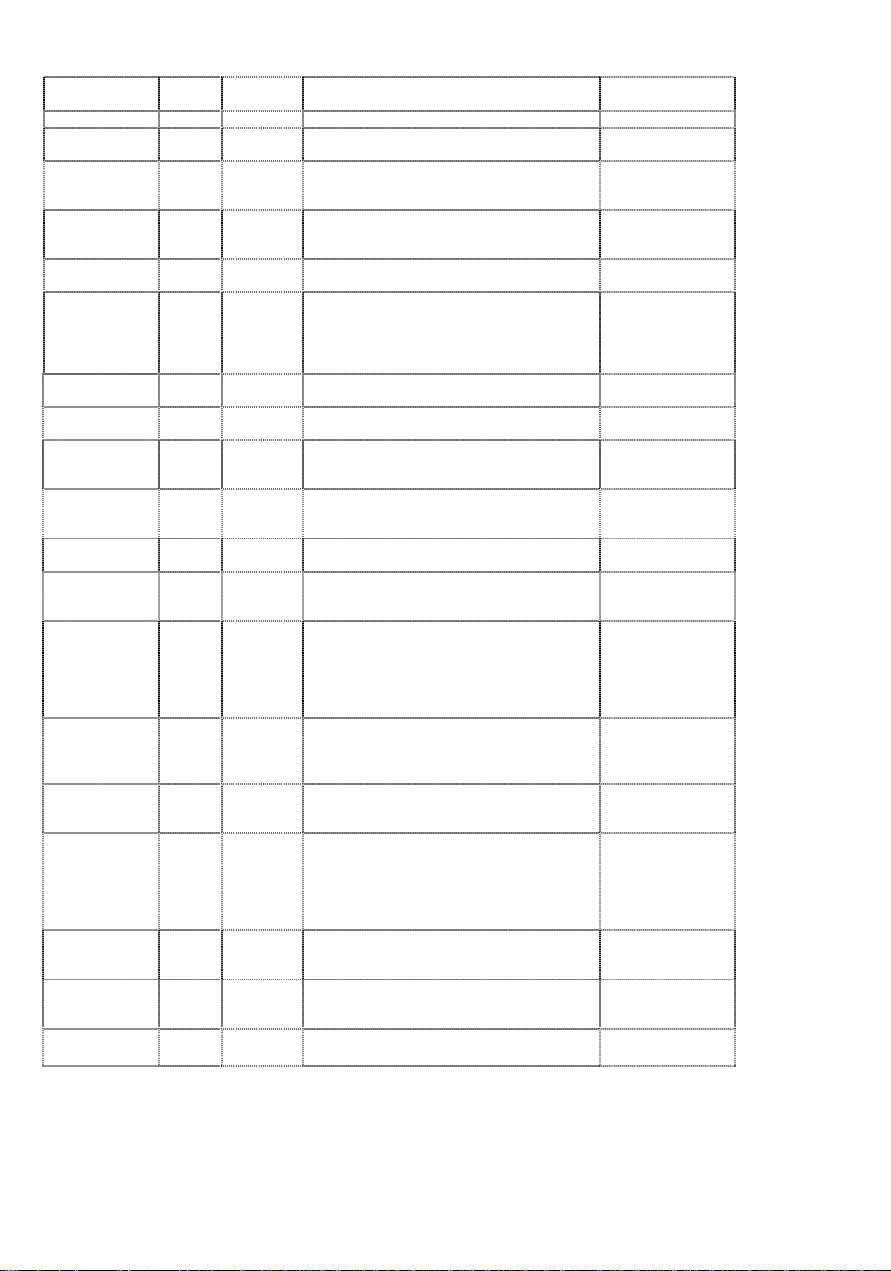
Operational Matrix for the Model DO600
Function /
Resulting Action
On/Off Any Any Momentary press of the ON/OFF button
Water Saturated
Air Calibration
Zero Calibration
Store Reading
Hold Release
Enter Memory
Retrieval
Scroll Stored
Readings
Exit Memory
Retrieval
Clear Stored
Memory On
Change
Measurement
Mode
Enter Salinity
Compensation
Changing Salinity
Compensation On SAL
Exit Salinity
Compensation
Enter Altitude
Compensation
Changing Altitude
Compensation On Ald
Exit Altitude
Compensation
Change
Temperature
Units
Override
Autopower Off
Default Reset
Power
Status
On Any Place Electrode in Calibration Cap
On Any
On Any Momentary press of the MODE/HOLD button
On
On Any
On
On
On Any
On Any
On SAL
On Any or SAL
On Ald
Off
On Any
Off
Mode
Setting
While In
Hold Mode
Memory
Recall
Memory
Recall
Any
Measure-
ment Mode
n/a (off
mode)
n/a (off
mode)
Required Button Press Sequence Comments
Press & hold CAL/RECALL button for 2 seconds
Place Electrode in Zero Solution, wait for stability
Press & hold CAL/RECALL button for 2 seconds
Momentary press of the MODE/HOLD button
Momentary press of the Cal button followed by a
momentary press of the MODE/HOLD button (w/in 4
seconds)
Momentary press of the MODE/HOLD button
Momentary press of the CAL/RECALL
Press and hold the ON/OFF button for 4 seconds “clr” is displayed.
Press and hold the MODE/HOLD button for at least
two seconds (the modes will scroll until the button is
released)
Press and release the CAL/RECALL button twice
(momentary) in succession (Displays SAL)
Momentary press of the MODE/HOLD button (each
button press increases the ratio by 1 ppt (part per
thousand), the value cycles from 0 to 50)
Press and release CAL/RECALL button for 2 seconds
to enter Altitude Compensation, Or
Press and release Cal Button one more time to enter
measurement mode
Press CAL/RECALL twice (momentary). Unit enters
Salinity Mode. Press CAL/RECALL for 2 seconds to
enter Altitude Compensation Mode. (Displays Ald)
Momentary press of the MODE/HOLD button(each
button-press increases altitude by 1,000ft, the value
cycles from 0 to 20)
Momentary press CAL/RECALL button to exit and
save changes.
Press and hold the CAL/RECALL button then
momentarily press the ON/OFF button. Release the
CAL/RECALL button after the "SELF CAL" lights
Press CAL/RECALL button (momentary) then
simultaneously press and hold the MODE/HOLD and
ON/OFF buttons for for 2 seconds.
Simultaneously press ON/OFF, CAL/RECALL and
MODE/HOLD momentarily. “dFLt” will be displayed.
Also works with probe
removed
(Cal at zero current)
Stores and holds
reading “HOLD”
displayed
If no data is stored in
memory, “End” is
displayed briefly, and
then returns to last
mode.
It is necessary to
press the
CAL/RECALL button
to save changes. If
the unit times out, no
changes are saved.
Unit times out in 5
seconds if no button
is pressed, reverts to
previous mode.
It is necessary to
press the
CAL/RECALL button
to save changes. If
the unit times out, no
changes are saved.
10
DO600 - Version 5.0 8/05
Page 11
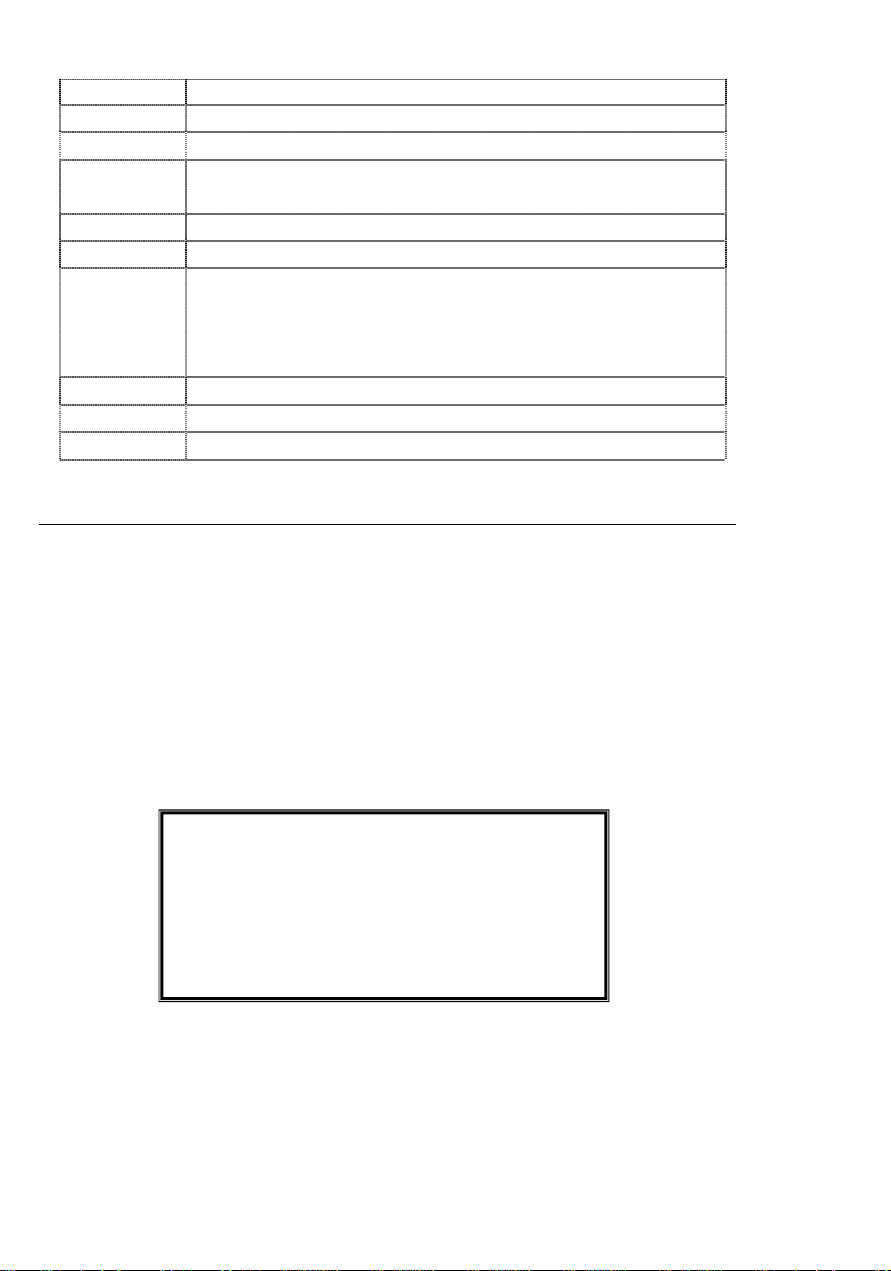
Re-order and Accessory Information
Part Number Description
DO600 ExStik II Dissolved Oxygen Meter
DO605 Replacement Probe, ExStik II Dissolved Oxygen Meter
DO603 Membrane Kit for DO600
Contains: 6 Membrane Caps, 15 mL Filling Solution, Polishing Paper
EX010 Extension Cable 3 feet (1 Meter) & Probe Weight
EX050 Extension Cable 16 feet (5 Meter) & Probe Weight
DO610 ExStik II DO/pH/Conductivity Meter Kit
Contains: EC500 pH/Conductivity/Salinity/TDS ExStik II Meter, DO600
Dissolved Oxygen ExStik II Meter, Single use pH buffer pouches 4, 7,
and 10pH, Sample Cups with Cap, Weighted Base for Sample Cups, and
Batteries, all packed in a Carrying Case
CA903 Large Carrying Case for Meter & Accessories
CA895 Small Soft Vinyl Pouch with Belt Loop for ExStik and ExStik II
EX015 Weighted guard for probe
Warranty
EXTECH INSTRUMENTS CORPORATION warrants this instrument to be free of defects in
parts and workmanship for one year from date of shipment (a six month limited warranty
applies to sensors and cables). If it should become necessary to return the instrument for
service during or beyond the warranty period, contact the Customer Service Department at
(781) 890-7440 ext. 210 for authorization or visit our website www.extech.com for contact
information. A Return Authorization (RA) number must be issued before any product is
returned to Extech. The sender is responsible for shipping charges, freight, insurance and
proper packaging to prevent damage in transit. This warranty does not apply to defects
resulting from action of the user such as misuse, improper wiring, operation outside of
specification, improper maintenance or repair, or unauthorized modification. Extech specifically
disclaims any implied warranties or merchantability or fitness for a specific purpose and will not
be liable for any direct, indirect, incidental or consequential damages. Extech's total liability is
limited to repair or replacement of the product. The warranty set forth above is inclusive and no
other warranty, whether written or oral, is expressed or implied.
Technical support: Extension 200; E-mail: support@extech.com
Repair & Returns: Extension 210; E-mail: repair@extech.com
Product specifications subject to change without notice
For the latest version of this User’s Guide, Software updates, and other
up-to-the-minute product information, visit our website: www.extech.com
Extech Instruments Corporation, 285 Bear Hill Rd., Waltham, MA 02451
All rights reserved including the right of reproduction in whole or in part in any form.
Support line (781) 890-7440
Copyright © 2005 Extech Instruments Corporation.
11
DO600 - Version 5.0 8/05
 Loading...