

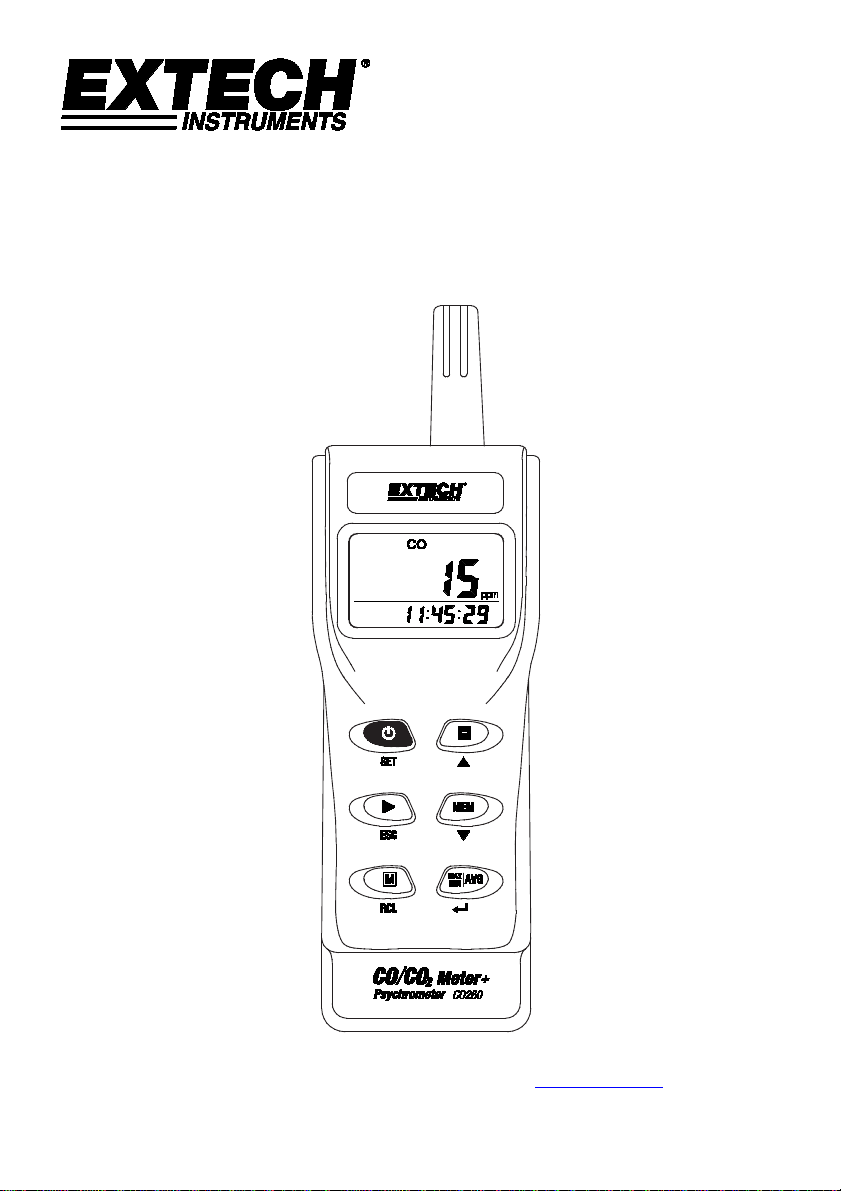
User Manual
Carbon Monoxide (CO) and Carbon Dioxide (CO2) Meter
With Air Temp/RH Measurements and Dew Point/Wet Bulb calculations
Model CO260
Additional User Manual Translations available at www.extech.com

2
Introduction
Thank you for selecting the Extech CO260 Meter. The CO260 measures CO2 (Carbon Dioxide)
levels, CO (Carbon Monoxide) levels, air temperature, and relative humidity. The CO260 also
displays dew point and wet bulb temperatures, generated from calculations performed on
temperature and humidity measurements. The CO260 is an ideal instrument for indoor air
quality (IAQ) analysis.
This device is shipped fully tested and calibrated and, with proper use, will provide years of
reliable service. Please visit our website (www.extech.com) to check for the latest version and
translations of this User Manual, Product Updates, and Customer Support.
Features
• Adjustable carbon monoxide warning level
• Designed with NDIR (non-dispersive infrared)
• Long life electrochemical sensor
• Audible and visual alarm
• Backlit LCD for easy viewing in dimly lit areas
• Low battery indicator
• Auto power off
• Mini USB connector
• Manual and automatic recording
Safety Information
IMPORTANT CARBON MONOXIDE (CO) SAFETY NOTES
• The CO260 Carbon Monoxide Monitor is intended for general purpose Air Quality monitoring
only, and has not been certified for use pursuant to any state or city safety Carbon Monoxide
Alarm or Monitoring requirements.
• The CO260 Carbon Monoxide Monitor has not been tested by an independent lab to comply
with the UL 2034 or IAS 6-96 standard.
• It is the responsibility of the customer to obtain and apply current local, state, and national
regulations with regard to CO alarms, monitoring and testing.
• Electromagnetic (EMI) interference my cause erratic meter readings; do not place meter near
areas of high EMI when taking CO measurements.
• Recovery time is required after the meter has been exposed to high levels of CO; the longer
the exposure, the longer the recovery time.
Carbon monoxide is life threatening even at relatively low concentrations; learn
and recognize the effects of CO poisoning (see Table below). Do not use this
meter as a personal safety-monitoring device.
CO260-en-GB_v1.0 8/17
3
Effects of Carbon Monoxide (CO) poisoning
Warning: Ensure that the meter is powered, at room temperature, and in an area free of
Carbon Monoxide (CO) before starting measurements. If not, the meter will read
incorrectly when subsequently measuring CO.
0-1 PPM Normal background levels
9 PPM Maximum allowable short term exposure
50 PPM
200 PPM Mild headache, fatigue, nausea and dizziness after 2-3 hours
400 PPM Frontal headache with 1-2 hours, life threatening after 3 hours
800 PPM
1600 PPM
3200 PPM
6400 PPM
12800 PPM DEATH WITHIN 1 TO 3 MINUTES
Maximum allowable continuous exposure level in any 8-hour
period, according to OSHA
Dizziness, nausea, convulsions within 45 minutes. Unconsciousness
within 2 hours. DEATH WITHIN 2 TO 3 HOURS
Headache, dizziness, nausea within 20 minutes, DEATH WITHIN 1
HOUR
Headache, dizziness, nausea within 5-10 minutes. DEATH WITHIN
25-30 MINUTES
Headache, dizziness, nausea within 1-2 minutes. DEATH WITHIN
10-15 MINUTES
Regulatory exposure limits for Carbon Dioxide (CO2)
ASHRAE Standard 62-1989: 1000ppm: CO2 concentration in occupied building should not
exceed 1000ppm.
OSHA: 5000ppm: Time weighted average over five 8-hour workday should not exceed
5000ppm.
Building bulletin 101 (BB101): 1500ppm. UK standards for schools state that CO
over the whole day (i.e. 9:00am to 3:30 pm) should not exceed 1500ppm.
Germany, Japan, Australia, UK: 5000ppm, 8 hours weighted average in occupational exposure
limit is 5000ppm.
EPA Taiwan (Type 1): Indoor areas such as department stores, theaters, restaurants, libraries
have acceptable CO
EPA Taiwan (Type 2): Indoor areas with special requirements for good air quality such as
schools, hospitals, and day care centers have suggested CO2 level of 600ppm.
concentration of 1000ppm over an 8-hour average period.
2
averaged
2
CO260-en-GB_v1.0 8/17
4
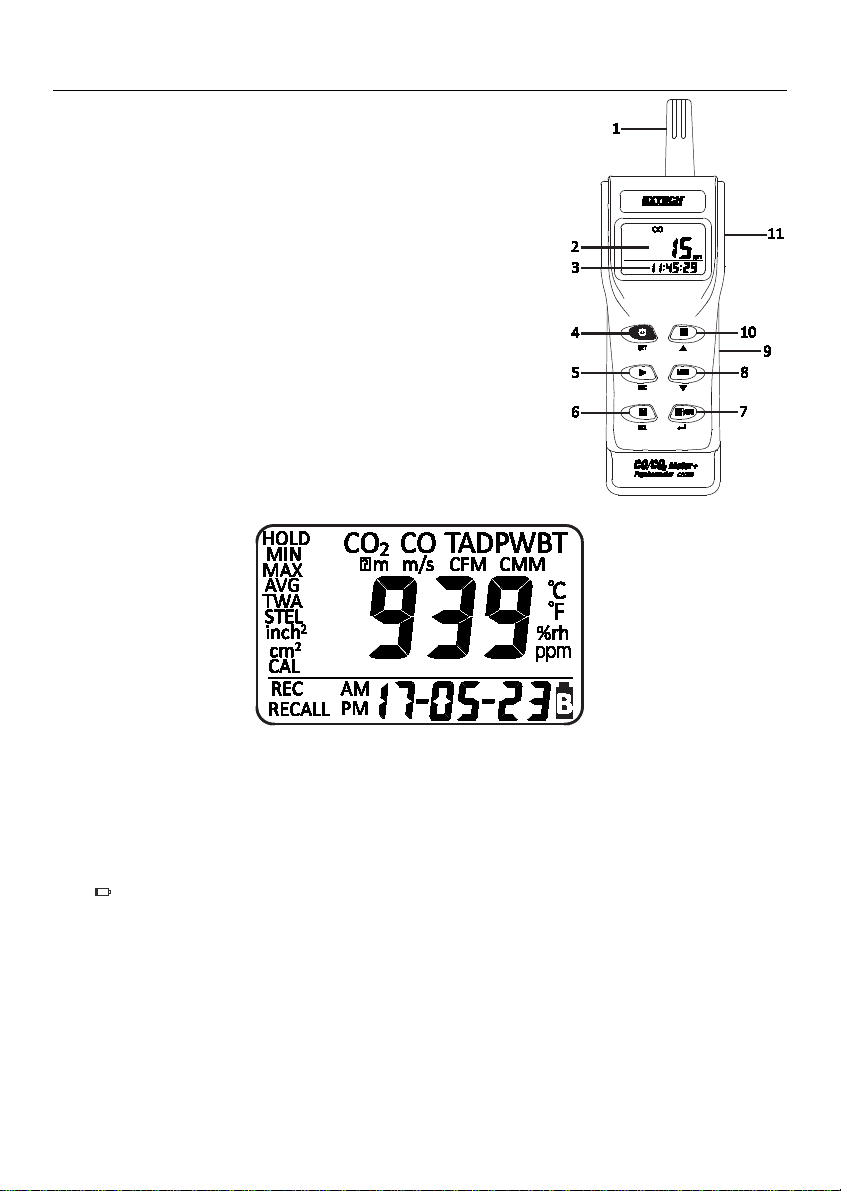
Descriptions
METER
1. Temperature and Humidity sensor
2. Primary display
3. Secondary display
4. Power and Set button
5. Start and Escape button
6. Mode and Recall button
7. Min-Max-Avg and Enter button
8. Memory and Down button
9. CO and CO
10. Hold and Up button
11. AC Adaptor and Micro USB ports
Battery compartment on rear of meter
LCD DISPLAY
sensors (on rear of meter)
2
LCD SYMBOLS
CO
2
Carbon dioxide
CO Carbon monoxide
TWA Time weighted average (8 hours)
STEL Short-term exposure limit (15 minutes weighted average)
HOLD Freezes current reading on display
MIN/MAX Minimum/Maximum readings
Low battery indicator
DP Dew point temperature
TA Air temperature
WBT Wet bulb temperature
%RH Relative humidity
C or F Celsius/Fahrenheit
CAL Calibration Mode
REC Manual/automatic data logging
RECALL View manually logged data
CO260-en-GB_v1.0 8/17

5
KEYPAD
POWER ON/OFF, SET
START/ESCAPE
MODE/RECALL
HOLD/UP ARROW
MEMORY/DOWN ARROW
MIN/MAX/AVG/TWA/STEL, SAVE
Short press to power the Meter ON or OFF
With the meter OFF, long press to enter setup mode
Long press /SET and H/ to enable or disable APO mode
Short press to exit setup mode
Long press to begin data logging
Short press to change the display modes
Long press to recall manually stored readings
Short press to freeze or unfreeze reading on the display
Short press while in setup mode to select units or increase the
value
Long press
/SET and H/ to enable or disable APO mode
Short press to save readings into memory
Short press in setup mode to select units or decrease the
value
Battery Installation
• Four (4) ‘AA’ batteries or an AC/DC adaptor powers the meter.
• Install the batteries into the rear battery compartment observing correct polarity.
• When the adaptor is used, the batteries are disconnected from the meter circuitry. The
adaptor cannot be used to charge rechargeable batteries.
• When battery voltage is low, the battery symbol (
promptly.
Never dispose of used batteries or rechargeable batteries in household waste.
As consumers, users are legally required to take used batteries to appropriate collection sites, the
retail store where the batteries were purchased, or wherever batteries are sold.
Disposal: Do not dispose of this instrument in household waste. The user is obligated to take endof-life devices to a designated collection point for the disposal of electrical and electronic
equipment.
Short press to select MIN, MAX, TWA, STEL function
Short press in setup mode to save settings
) appears. Replace the batteries
CO260-en-GB_v1.0 8/17

6
Powering the Meter
Short press the /SET button to turn the meter ON or OFF. At power up, the meter emits a
short beep and performs a 30-second warmup before entering normal operating mode. After
the countdown, the primary LCD will display the current readings. The secondary display will
alternate between the current date and time.
Taking Measurements
The meter begins measuring in the selected mode, when powered on, and the sensor responds
every 1 second. If the operating environment changes (example: from high to low temperature),
it requires 30 seconds for the CO2 sensor to respond and up to 30 minutes for the relative
humidity sensor to respond.
Measuring Carbon Dioxide (CO2)
1. Short press the M/REL button to change the mode to CO
2. To take a measurement, trace the CO260 around the area of the suspected leak.
3. The meter indicates the presence of carbon dioxide (CO
secondary display indicates the current date and time alternately.
NOTE: Do not hold the meter close to your mouth or any other source of CO
Measuring Carbon Monoxide (CO)
1. Short press the M/REL button to change the mode to CO, if necessary.
2. To take a measurement, trace the CO260 around the area of the suspected leak.
3. The meter indicates the presence of carbon monoxide (CO) in ppm in the primary display.
The secondary display indicates the current date and time alternately.
4. The display will flash and an audible beeper sounds at 25 ppm alerting the user to
dangerous CO levels. The higher the concentration of CO, the faster the beeper will sound.
The display will stop flashing once the measured CO is below the alarm limit value.
Measuring Air Temperature and Calculating Dew point and Wet bulb
1. Short press the M/REL button to change the mode to air, dew point, or wet bulb
temperature.
2. To take a measurement, trace the CO260 in the testing area.
3. The primary display indicates the air temperature, dew point, or wet bulb temperature
depending on the selected mode. The secondary display indicates the current date and time
alternately.
4. Note that Dew Point and Wet Bulb Temperature displays are calculations made from Air
Temperature and Relative Humidity measurements.
Measuring Relative Humidity %
1. Short press the M/REL button, if necessary, to change the mode to Relative Humidity.
2. To take a measurement, place the CO260 in the testing area.
3. The primary display indicates the relative humidity measurement and the secondary display
indicates the current date and time alternately.
if necessary.
2
) in ppm in the primary display. The
2
.
2
CO260-en-GB_v1.0 8/17

7
Advanced Functions
Data Hold
Short press the H/ button to freeze the readings on the display. The "HOLD” icon flashes in the
top left of the display. Short press the H/
Note: the HOLD function is not operational in Min/Max/Avg mode.
Display Backlight
The meter is equipped with a backlight for easy viewing in dimly lit areas. The backlight will
activate for 10 seconds by pressing any button.
MIN, MAX, STEL, TWA Recording
In normal operating mode, short press the MXMN/AV/ button to view the minimum,
maximum, weighted average, and current readings. With each short press of the MXMN/AV/
button, the meter displays the MIN, MAX, STEL, TWA, or current value along with elapsed timer,
in sequence. Short press the /ESC button to return to normal operating mode.
In MIN and MAX modes, the meter shows the lowest (minimum) or highest (maximum) reading
in the primary display.
In STEL and TWA modes, the main display shows the weighted average of readings for the past
15 minutes (STEL) or 8 hours (TWA). TWA and STEL mode are only operational in CO2 mode.
In CURRENT mode, the primary display shows the current readings. The secondary display shows
the elapsed timer. Press the /ESC button to exit and return to normal operating mode.
NOTES:
1. If the meter is ON for < 15 minutes, the STEL value will be the weighted average of
readings taken since power on. Similarly, for the TWA mode when the meter has been
ON for < 8 hours, the display only shows a weighted average of the readings up to the
moment.
2. The CO260 requires at least 5 minutes calculating STEL and TWA. The display shows “----”
during the first 5 minutes from power ON.
3. While in HOLD mode, the STEL and TWA values will continue to update every 5 minutes.
4. Hold, Record, and Recall functions are not operational while in Min/Max/Avg mode.
5. TWA and STEL will function only in CO
6. The unit of measure can be changed while in Min/Max mode.
Manual Data Recording
The CO260 has 99 memory locations for which to store readings one at a time.
1. While in normal operating mode or hold mode, short press the MEM/ button to store
a reading. The REC icon flashes on the display for approximately 3 seconds. The primary
display briefly shows the memory location.
2. Each measurement parameter is saved, not just the currently displayed parameter. (For
example, when recording CO readings, the CO2, %RH, and air temperature will also be
recorded).
3. Short press the H/ button to freeze the readings on the display before recording the
data if the readings change too quickly.
button again to unfreeze the readings on the display.
mode
2
CO260-en-GB_v1.0 8/17

8
Note: The manual recording mode is not operational in Min/Max mode.
Recalling Manually Stored Readings
The meter can recall up to 99 previously saved readings.
1. While in normal operating mode, long press the M/RCL button until ‘Recall’ flashes on
the display.
2. Short press the H/ or MEM/ buttons to scroll through the memory locations. The
selected memory location will flash for approximately 3 seconds and then the stored
reading will display on the screen.
3. Short press the M/RCL button to change the displayed measurement parameter.
4. The secondary display shows the time and date the data was recorded into memory.
5. To exit memory recall mode, short press the /ESC button.
Automatic Datalogging
The CO260 automatically records CO2, CO, Temperature, or RH readings and can store up to
32,000 records. The sample rate can be set from 1 second to 4 hours 59 minutes and 59 seconds.
See ‘Setup Mode’ for information on setting the sample rate.
1. After the sample rate is selected, long press the /ESC button to begin logging. The ‘rec’
icon flashes and the primary display shows the real time value. The secondary display
shows the current time and date alternately.
2. Short press the M/RCL button to select a different measurement mode to record.
3. To exit the datalogger mode, long press the /ESC button. The ‘rec’ icon stops flashing.
Notes:
Previous records are overwritten any time logging is started.
The M/RCL
button is the only button that is operational while in datalogging mode.
CO Alarm
The meter features an audible alarm (80db beep) that warns when CO concentration exceeds
the set limit. The beeper stops when the readings fall below the limit. The meter beeps again if
the value exceeds the limit. See the section ‘Setup Mode’ for more information.
Auto Power OFF
The meter turns off automatically after 20 minutes of inactivity. To override the function, long
press both the /SET and H/ buttons while powering ON the meter until “n” appears in the
display.
NOTE: Auto power off is not operational while in calibration mode.
CO260-en-GB_v1.0 8/17

9
Setup Mode
While the meter is OFF, long press the /SET button to enter the setup mode.
To exit the setup mode, short press the /ESC button at any time during setup.
P10 Clearing the Manual Recording Memory
Clearing the memory will erase ALL the manually stored records.
1. Upon entering setup mode, P10 and “CLr” display on the LCD.
2. Short press the MXMN/AV/ button to advance to P11 and make a selection.
3. Short press the H/ or MEM/ button to select YES or NO. ‘YES’ will erase all the
manually stored records.
4. Short press the MXMN/AV/ button to save the selection and return to P10.
5. Short press the /ESC button to exit without saving.
6. Short press the H/ button to advance to the next step.
P20 Setting the CO Alarm
1. When in alarm setup mode, P20 and “ALAr” are displayed. Short press the H/ button
to advance to P20 if necessary.
2. Short press the MXMN/AV/ button to advance to P21 and set the CO alarm threshold.
The current set value will blink on the display.
3. Short press the H/ button to increase or the MEM/ button to decrease the value.
The alarm range is from 15 to 200ppm and each press of the buttons will advance 5ppm.
4. Short press the MXMN/AV/ button to save the selection and return to P20.
5. Short press the /ESC button to exit without saving.
6. Short press the H/ button to advance to the next step.
P30 Changing the Temperature Units
1. When in temperature setup mode, P30 and “unit” display on the LCD. Short press the
H/ button to advance to P30 if necessary.
2. Short press the MXMN/AV/ button to advance to P31 and change the temperature
units. The current temperature unit displays on the LCD.
3. Short press the H/ or MEM/ button to toggle between °C and °F.
4. Short press the MXMN/AV/ button to save the setting and return to P30.
5. Short press the /ESC button to exit without saving.
6. Short press the H/ button to advance to the next step.
P40 Setting the Datalogging Sampling Rate
1. When in datalogging setup mode, P40 and “rAtE” display on the LCD. Short press the
H/ button to advance to P40 if necessary.
2. Short press the MXMN/AV/ button to advance to set the sampling rate for datalogging.
The hour digit will blink in the secondary display.
3. Short press the H/ button to increase the time or short press the MEM/ button to
decrease the time.
4. Short press the MXMN/AV/ button to save the setting and advance to the minute
setup.
5. Short press the H/ button to increase the time or short press the MEM/ button to
decrease the time.
CO260-en-GB_v1.0 8/17

10
6. Short press the MXMN/AV/ button to save the setting and advance to the second
setup.
7. Short press the MXMN/AV/ button to save the settings and return to P40.
8. Short press the /ESC button to exit without saving.
9. Short press the H/ button to advance to the next step.
Note: The datalogging sampling range is from 1 second to 4 hours 59 minutes 59 seconds.
P50 Changing the Barometric Pressure Compensation
1. When in pressure setup mode, P50 and “PrES” display on the LCD. Short press the H/
button to advance to P50 if necessary.
2. Short press the MXMN/AV/ button to set the pressure compensation value for the CO
measurement. The current pressure compensation value in hPa will flash on the LCD.
3. Short press the H/ or MEM/ button to adjust the barometric pressure value. The
pressure compensation range is from 70 to 199 hPA.
4. Short press the MXMN/AV/ button to save the setting and return to P50.
5. Short press the /ESC button to exit without saving.
6. Short press the H/ button to advance to the next step.
P60 Setting the Real-Time Clock
1. When in Real-Time Clock mode, P60 and “rtC” display on the LCD. Short press the H/
button to advance to P60 if necessary.
2. Short press the MXMN/AV/ button to advance to P61 and set the time as 12-hour or
24-hour format. The current time format will flash on the LCD.
3. Short press the H/ or MEM/ button to change the format between 12-hour and 24-
hour.
4. Short press the MXMN/AV/ button to save the setting and advance.
5. The year will flash in the secondary display. Short press the H/ or MEM/ button to
change the value.
6. Short press the MXMN/AV/ button to save the setting and advance to the month
setup.
7. Short press the H/ or MEM/ button to change the value.
8. Short press the MXMN/AV/ button to save the setting and advance to the next step.
9. Repeat the above steps to complete the setup for the month/day/hour/minute/second
settings.
10. Short press the MXMN/AV/ button to save the selection and return to P60.
11. Short press the /ESC button to exit setup mode.
Calibration
2
RH CALIBRATION
The meter is calibrated to a standard 33% and 75% salt solution bottle. Calibration must be
performed in a controlled temperature environment of 25°C.
CAUTION: Do not calibrate the humidity without the default calibration salts. The meter will lose
its current calibration data and will become inoperable. Contact Extech to order calibration salts
or to inquire about calibration services.
CO260-en-GB_v1.0 8/17

11
33% Calibration
1. Plug the sensor probe into the 33% salt bottle.
2. Long press the /ESC, MEM/ and /SET buttons simultaneously to enter calibration
mode.
3. In calibration mode, “CAL” and the current value (32.8% if at 25°C) will blink on the LCD.
4. The meter is now calibrating, and will finish in about 60 minutes, when the current value
stops blinking. “CAL” will continue to blink on the display.
5. To abort the calibration, power the meter OFF at any time.
75% calibration
1. After the 33% calibration, plug the sensor probe into a 75% salt bottle.
2. Long press the MXMN/AV/ button to enter 75% calibration.
3. “CAL” and current value (75.3% if at 25°C) will blink on the LCD.
4. The meter is now calibrating. The calibration is complete in about 60 minutes. The values
will stop flashing and the meter powers OFF automatically when calibration is complete.
5. To abort the calibration, power OFF the meter at any time.
PC Interface
This meter has the capability to connect to and communicate with a PC. To install and use the software, please refer to the instructions provided on the supplied CD-ROM and/or the instructions provided in the HELP Utility within the software program.
Check the software download page of the website www.extech.com for the latest version of the
PC software and its operating system compatibility.
CO260-en-GB_v1.0 8/17

12
Specifications
Function
Range
Resolution
Accuracy
0 to 5000ppm
1 ppm
±(5%rdg + 30ppm)
5001 to 9999ppm
1 ppm
Not specified
Pressure dependence: +1.6% of reading per kPa deviation from
normal pressure (100kPa)
<100 ppm
1 ppm
±(10ppm)
101 to 500 ppm
1 ppm
±(10%rdg)
501 to 1000 ppm
1 ppm
±(20%rdg)
-20 to 60°C
0.1°
±0.6°C
-5 to 140°F
0.1°
±0.9°F
±3%(10 to 90%) @25°C
±5%(all other ranges)@25°C
-5 to 59.9°C
23 to 140°F
-20 to 59.9°C
-4 to 140°F
CO2
CO
Temperature
Humidity 0.1 to 99.9% 0.1%RH
Wet Bulb
Dew Point
0.1°
0.1°
Calculated from RH and
Temperature
Display LCD with backlight
Display size 26 x 44 mm (1.0 x 1.7”)
Warm-up period 30 seconds
Response Time CO
: <30 seconds (90% step change)
2
CO: <60 seconds (90% step change)
Tair: <2 minutes (90% step change)
RH: <10 minutes (90% step change)
Sensor Type CO2: NDIR (non-dispersive infrared) technology
Humidity: Capacitance sensor
Temperature (air): Thermistor
o
Operating Conditions -20 to 50
C (-4 to 122oF) CO2 sensor
0 to 50oC (32 to 122oF) CO sensor
o
-20 to 50
Storage Conditions -20 to 60
C all other parameters
o
C (-4 to 140oF); 10 to 90% RH non-condensing
Power Supply 4 x 1.5V ‘AA’ batteries or AC adaptor (9V)
Battery Life approx. 24 hours (alkaline batteries)
Dimensions / Weight 205 x 70 x 56mm (8.1 x 2.8 x 2.2“) / 200g (7.1 oz.)
CO260-en-GB_v1.0 8/17

13
Troubleshooting
Error
Problem
Solution
Press and hold power button to retry
Open the battery compartment and
reset button
Check to see if data hold function is
activated. Press hold to deactivate.
Check for air flow blockage to
sensors
E01/E33
CO2 sensor is not working
Replace the battery
E02
Measurement is below the range of the meter
Check readings in a different area
E03
Measurement is above the range of the meter
Check readings in a different area
E04
Data error
Contact Extech for service
E11
Humidity calibration Error
Retry humidity calibration
E16
CO calibration error
Contact Extech for service
E31
A/D or temperature sensor failure
Contact Extech for service
E32
Memory failure
Contact Extech for service
E33
A/D or humidity sensor failure
Contact Extech for service
E33
Measurement circuit failure
Contact Extech for service
Ensure that batteries are properly
installed with correct polarity
Display No display when pressing power button
Display Readings frozen on display
Display Slow Response
Replace batteries
using a small metal tip, press the
Maintenance
CLEANING AND STORAGE
1. Clean the meter with a damp cloth and mild detergent when necessary. Do not use solvents
or abrasives.
2. Store the meter in an area with moderate temperature and humidity (refer to the operating
and storage temperature ranges in the specifications section).
Copyright © 2017 FLIR Systems, Inc.
All rights reserved including the right of reproduction in whole or in part in any form
ISO-9001 Certified
www.extech.com
CO260-en-GB_v1.0 8/17
 Loading...