

Page 1
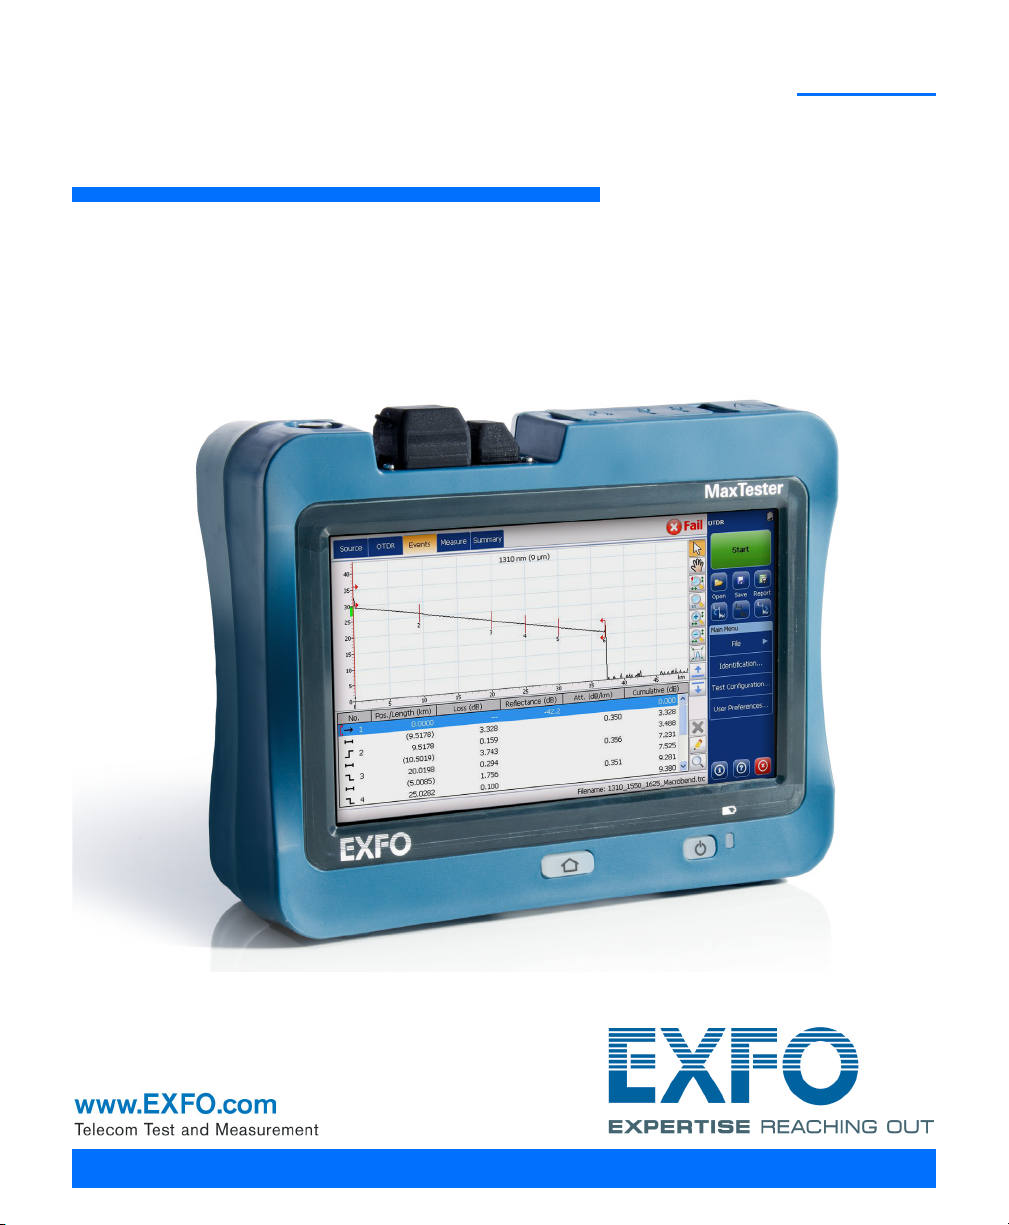
MaxTester Series
User Guide
Page 2

Copyright © 2013–2014 EXFO Inc. All rights reserved. No part of this
publication may be reproduced, stored in a retrieval system or transmitted
in any form, be it electronically, mechanically, or by any other means such
as photocopying, recording or otherwise, without the prior written
permission of EXFO Inc. (EXFO).
Information provided by EXFO is believed to be accurate and reliable.
However, no responsibility is assumed by EXFO for its use nor for any
infringements of patents or other rights of third parties that may result from
its use. No license is granted by implication or otherwise under any patent
rights of EXFO.
EXFO’s Commerce And Government Entities (CAGE) code under the North
Atlantic Treaty Organization (NATO) is 0L8C3.
The information contained in this publication is subject to change without
notice.
Trademarks
EXFO’s trademarks have been identified as such. However, the presence
or absence of such identification does not affect the legal status of any
trademark.
Units of Measurement
Units of measurement in this publication conform to SI standards and
practices.
Patents
The design patent is pending for this product.
Version number: 1.0.2
ii MaxTester Series
Page 3

End-User License Agreement
You have acquired a device ("DEVICE") that includes software licensed by EXFO Inc. (EXFO) from an affiliate of Microsoft
Corporation ("MS"). Those installed software products of MS origin, as well as associated media, printed materials, and
"online" or electronic documentation ("SOFTWARE") are protected by international intellectual property laws and treaties.
Manufacturer, MS and its suppliers (including Microsoft Corporation) own the title, copyright, and other intellectual property
rights in the SOFTWARE. The SOFTWARE is licensed, not sold. All rights reserved.
This EULA is valid and grants the end-user rights ONLY if the SOFTWARE is genuine and a genuine Certificate of Authenticity
for the SOFTWARE is included. For more information on identifying whether your software is genuine, please see
http://www.microsoft.com/piracy/howtotell.
IF YOU DO NOT AGREE TO THIS END USER LICENSE AGREEMENT ("EULA"), DO NOT USE THE DEVICE OR COPY THE
SOFTWARE. INSTEAD, PROMPTLY CONTACT EXFO FOR INSTRUCTIONS ON RETURN OF THE UNUSED DEVICE(S) FOR A
REFUND. ANY USE OF THE SOFTWARE, INCLUDING BUT NOT LIMITED TO USE ON THE DEVICE, WILL CONSTITUTE
YOUR AGREEMENT TO THIS EULA (OR RATIFICATION OF ANY PREVIOUS CONSENT).
GRANT OF SOFTWARE LICENSE. This EULA grants you the following license:
You may use the SOFTWARE only on the DEVICE.
Restricted Functionality. You are licensed to use the SOFTWARE to provide only the limited functionality (specific tasks
or processes) for which the DEVICE has been designed and marketed by EXFO. This license specifically prohibits any
other use of the software programs or functions, or inclusion of additional software programs or functions that do not
directly support the limited functionality on the DEVICE. Notwithstanding the foregoing, you may install or enable on a
DEVICE, systems utilities, resource management or similar software solely for the purpose of administration,
performance enhancement and/or preventive maintenance of the DEVICE.
If you use the DEVICE to access or utilize the services or functionality of Microsoft Windows Server products (such as
Microsoft Windows Server 2003), or use the DEVICE to permit workstation or computing devices to access or utilize the
services or functionality of Microsoft Windows Server products, you may be required to obtain a Client Access License for
the DEVICE and/or each such workstation or computing device. Please refer to the end user license agreement for your
Microsoft Windows Server product for additional information.
NOT FAULT TOLERANT. THE SOFTWARE IS NOT FAULT TOLERANT. EXFO HAS INDEPENDENTLY DETERMINED HOW TO
USE THE SOFTWARE IN THE DEVICE, AND MS HAS RELIED UPON EXFO TO CONDUCT SUFFICIENT TESTING TO
DETERMINE THAT THE SOFTWARE IS SUITABLE FOR SUCH USE.
NO WARRANTIES FOR THE SOFTWARE. THE SOFTWARE is provided "AS IS" and with all faults. THE ENTIRE RISK AS TO
SATISFACTORY QUALITY, PERFORMANCE, ACCURACY, AND EFFORT (INCLUDING LACK OF NEGLIGENCE) IS WITH YOU.
ALSO, THERE IS NO WARRANTY AGAINST INTERFERENCE WITH YOUR ENJOYMENT OF THE SOFTWARE OR AGAINST
INFRINGEMENT. IF YOU HAVE RECEIVED ANY WARRANTIES REGARDING THE DEVICE OR THE SOFTWARE, THOSE
WARRANTIES DO NOT ORIGINATE FROM, AND ARE NOT BINDING ON, MS.
No Liability for Certain Damages. EXCEPT AS PROHIBITED BY LAW, MS SHALL HAVE NO LIABILITY FOR ANY
INDIRECT, SPECIAL, CONSEQUENTIAL OR INCIDENTAL DAMAGES ARISING FROM OR IN CONNECTION WITH THE
USE OR PERFORMANCE OF THE SOFTWARE. THIS LIMITATION SHALL APPLY EVEN IF ANY REMEDY FAILS OF ITS
ESSENTIAL PURPOSE. IN NO EVENT SHALL MS BE LIABLE FOR ANY AMOUNT IN EXCESS OF U.S. TWO HUNDRED
FIFTY DOLLARS (U.S.$250.00).
Restricted Uses. The SOFTWARE is not designed or intended for use or resale in hazardous environments requiring
fail-safe performance, such as in the operation of nuclear facilities, aircraft navigation or communication systems, air
traffic control, or other devices or systems in which a malfunction of the SOFTWARE would result in foreseeable risk of
injury or death to the operator of the device or system, or to others.
Limitations on Reverse Engineering, Decompilation, and Disassembly. You may not reverse engineer, decompile, or
disassemble the SOFTWARE, except and only to the extent that such activity is expressly permitted by applicable law
notwithstanding this limitation.
SOFTWARE as a Component of the DEVICE - Transfer. This license may not be shared, transferred to or used
concurrently on different computers. The SOFTWARE is licensed with the DEVICE as a single integrated product and may
only be used with the DEVICE. If the SOFTWARE is not accompanied by a DEVICE, you may not use the SOFTWARE. You
may permanently transfer all of your rights under this EULA only as part of a permanent sale or transfer of the DEVICE,
provided you retain no copies of the SOFTWARE. If the SOF TWARE is an upgrade, any transfer must also include all prior
versions of the SOFTWARE. This transfer must also include the Certificate of Authenticity label. The transfer may not be
an indirect transfer, such as a consignment. Prior to the transfer, the end user receiving the SOFTWARE must agree to all
the EULA terms.
Consent to Use of Data. You agree that MS, Microsoft Corporation and their affiliates may collect and use technical
information gathered in any manner as part of product support services related to the SOFTWARE. MS, Microsoft
Corporation and their affiliates may use this information solely to improve their products or to provide customized
services or technologies to you. MS, Microsoft Corporation and their affiliates may disclose this information to others, but
not in a form that personally identifies you.
MaxTester Series iii
Page 4

Internet Gaming/Update Features. If the SOFTWARE provides, and you choose to utilize, the Internet gaming or update
features within the SOFTWARE, it is necessary to use certain computer system, hardware, and software information to
implement the features. By using these features, you explicitly authorize MS, Microsoft Corporation and/or their
designated agent to use this information solely to improve their products or to provide customized services or
technologies to you. MS or Microsoft Corporation may disclose this information to others, but not in a form that personally
identifies you.
Internet-Based Services Components. The SOFTWARE may contain components that enable and facilitate the use of
certain Internet-based services. You acknowledge and agree that MS, Microsoft Corporation or their affiliates may
automatically check the version of the SOFTWARE and/or its components that you are utilizing and may provide
upgrades or supplements to the SOFTWARE that may be automatically downloaded to your DEVICE. Microsoft
Corporation or their affiliates do not use these features to collect any information that will be used to identify you or
contact you. For more information about these features, please see the privacy statement at
http://go.microsoft.com/fwlink/?LinkId=25243.
Links to Third Party Sites. You may link to third party sites through the use of the SOFTWARE. The third party sites are
not under the control of MS or Microsoft Corporation, and MS or Microsoft are not responsible for the contents of any third
party sites, any links contained in third party sites, or any changes or updates to third party sites. MS or Microsoft
Corporation is not responsible for webcasting or any other form of transmission received from any third party sites. MS or
Microsoft Corporation are providing these links to third party sites to you only as a convenience, and the inclusion of any
link does not imply an endorsement by MS or Microsoft Corporation of the third party site.
Notice Regarding Security. To help protect against breaches of security and malicious software, periodically back up
your data and system information, use security features such as firewalls, and install and use security updates.
No Rental/Commercial Hosting. You may not rent, lease, lend or provide commercial hosting services with the
SOFTWARE to others.
Separation of Components. The SOFTWARE is licensed as a single product. Its component parts may not be separated
for use on more than one computer.
Additional Software/Services. This EULA applies to updates, supplements, add-on components, product support
services, or Internet-based ser vices components ("Supplemental Components"), of the SOFTWARE that you may obtain
from EXFO, MS, Microsoft Corporation or their subsidiaries after the date you obtain your initial copy of the SOFTWARE,
unless you accept updated terms or another agreement governs. If other terms are not provided along with such
Supplemental Components and the Supplemental Components are provided to you by MS, Microsoft Corporation or their
subsidiaries then you will be licensed by such entity under the same terms and conditions of this EULA, except that (i)
MS, Microsoft Corporation or their subsidiaries providing the Supplemental Components will be the licensor with respect
to such Supplemental Components in lieu of the "COMPANY" for the purposes of the EULA, and (ii) TO THE MAXIMUM
EXTENT PERMITTED BY APPLICABLE LAW, THE SUPPLEMENTAL COMPONENTS AND ANY (IF ANY) SUPPORT SERVICES
RELATED TO THE SUPPLEMENTAL COMPONENTS ARE PROVIDED AS IS AND WITH ALL FAULTS. ALL OTHER
DISCLAIMERS, LIMITATION OF DAMAGES, AND SPECIAL PROVISIONS PROVIDED BELOW AND/OR OTHERWISE WITH
THE SOFTWARE SHALL APPLY TO SUCH SUPPLEMENTAL COMPONENTS. MS, Microsoft Corporation or their subsidiaries
reserve the right to discontinue any Internet-based services provided to you or made available to you through the use of
the SOFTWARE.
Recovery Media. If SOFTWARE is provided by EXFO on separate media and labeled "Recovery Media" you may use the
Recovery Media solely to restore or reinstall the SOFTWARE originally installed on the DEVICE.
Backup Copy. You may make one (1) backup copy of the SOFTWARE. You may use this backup copy solely for your
archival purposes and to reinstall the SOFTWARE on the DEVICE. Except as expressly provided in this EULA or by local
law, you may not otherwise make copies of the SOFTWARE, including the printed materials accompanying the
SOFTWARE. You may not loan, rent, lend or otherwise transfer the backup copy to another user.
End User Proof of License. If you acquired the SOFTWARE on a DEVICE, or on a compact disc or other media, a genuine
Microsoft "Proof of License"/Certificate of Authenticity label with a genuine copy of the SOFTWARE identifies a licensed
copy of the SOFTWARE. To be valid, the label must be affixed to the DEVICE, or appear on [COMPANY's] software
packaging. If you receive the label separately other than from EXFO, it is invalid. You should keep the label on the DEVICE
or packaging to prove that you are licensed to use the SOFTWARE.
Product Support. Product support for the SOFTWARE is not provided by MS, Microsoft Corporation, or their affiliates or
subsidiaries. For product support, please refer to EXFO support number provided in the documentation for the DEVICE.
Should you have any questions concerning this EUL A, or if you desire to contact EXFO for any other reason, please refer
to the address provided in the documentation for the DEVICE.
Ter m in at io n. Without prejudice to any other rights, EXFO may terminate this EULA if you fail to comply with the terms
and conditions of this EULA. In such event, you must destroy all copies of the SOFTWARE and all of its component parts.
EXPORT RESTRICTIONS. You acknowledge that SOFTWARE is subject to U.S. and European Union export jurisdiction.
You agree to comply with all applicable international and national laws that apply to the SOFTWARE, including the U.S.
Export Administration Regulations, as well as end-user, end-use and destination restrictions issued by U.S. and other
governments. For additional information see http://www.microsoft.com/exporting/.
iv MaxTester Series
Page 5

Contents
Contents
Certification Information ..................................................................................................... viii
1 Introducing the MaxTester Series Unit ....................................................... 1
Main Features .........................................................................................................................1
LED Indicator Description .......................................................................................................5
Function Buttons Description ..................................................................................................6
Power Sources ........................................................................................................................7
Conventions ............................................................................................................................8
2 Safety Information ....................................................................................... 9
Other Safety Symbols on Your Unit .......................................................................................10
Laser Safety Information .......................................................................................................11
Electrical Safety Information .................................................................................................12
3 Getting Started with Your Unit ................................................................. 17
Installing and Using the Optional Stand ...............................................................................17
Turning On or Off the Unit ....................................................................................................21
Configuring Your Unit At First Startup ..................................................................................23
Navigating Through the Applications ...................................................................................26
Using the On-Screen (Virtual) Keyboard ................................................................................28
Installing or Upgrading the Applications ..............................................................................29
Activating Software Options .................................................................................................34
Using a Keyboard, Mouse or Other USB Devices ...................................................................37
4 Setting Up Your Unit .................................................................................. 39
Adjusting Brightness .............................................................................................................39
Adjusting the Date, Time and Time Zone ..............................................................................41
Selecting the Language of Operation ...................................................................................42
Selecting the Layout of the On-Screen Keyboard ..................................................................44
Selecting the Global Language Format (Locale) ....................................................................46
Setting Date and Time Formats .............................................................................................48
Setting the Decimal Separator ..............................................................................................49
Changing the Background Picture ........................................................................................50
Configuring the Power Management Options ......................................................................54
Configuring the Internet Options .........................................................................................56
Recalibrating the Touchscreen ..............................................................................................57
Selecting the Startup Application .........................................................................................59
Configuring the Network Settings ........................................................................................61
MaxTester Series v
Page 6

Contents
5 Working with Your Unit ..............................................................................63
Accessing the Online Documentation ...................................................................................63
Taking Screen Captures ........................................................................................................68
Setting Storage Parameters for Screen Captures ..................................................................70
Browsing the Web ................................................................................................................74
6 Using the Optional Built-In Power Meter and VFL ....................................77
7 Inspecting Fibers with a Probe ..................................................................79
8 Managing Data ...........................................................................................81
Viewing Disk Space and Managing Files ...............................................................................82
Transferring Data via Bluetooth ............................................................................................83
Connecting to a Wireless Network ........................................................................................93
Enabling or Disabling the Wi-Fi and Bluetooth Module ........................................................99
Managing Security Certificates ...........................................................................................102
Transferring Files with the Data Mover Application ............................................................103
9 Accessing Your Unit Remotely ..................................................................109
Configuring the VNC Server ................................................................................................111
Installing the TightVNC Viewer on a Client Computer ........................................................115
Connecting to Your Unit with TightVNC .............................................................................116
Configuring VNC Server to Start Automatically ...................................................................119
10 Maintenance ..............................................................................................121
Cleaning Detector Ports ......................................................................................................122
Cleaning VFL-Type Connectors ............................................................................................123
Cleaning the Touchscreen of Your Unit ...............................................................................124
Recharging the Battery .......................................................................................................124
Replacing Batteries .............................................................................................................126
Installing or Removing the Power Meter and VFL ...............................................................127
Recalibrating the Unit .........................................................................................................134
Recycling and Disposal (Applies to European Union Only) ..................................................135
11 Troubleshooting ........................................................................................137
Solving Common Problems .................................................................................................137
Restoring Your Unit to Normal Operation ..........................................................................142
Contacting the Technical Support Group ............................................................................145
Viewing System Information ...............................................................................................146
Transportation ....................................................................................................................149
vi MaxTester Series
Page 7

Contents
12 Warranty ................................................................................................... 151
General Information ...........................................................................................................151
Liability ...............................................................................................................................152
Exclusions ...........................................................................................................................152
Certification ........................................................................................................................152
Service and Repairs .............................................................................................................153
EXFO Service Centers Worldwide ........................................................................................154
A Technical Specifications ........................................................................... 155
Index .............................................................................................................. 157
MaxTester Series vii
Page 8

Certification Information
Certification Information
North America Regulatory Statement
This unit was certified by an agency approved in both Canada and the
United States of America. It has been evaluated according to applicable
North American approved standards for product safety for use in Canada
and the United States.
Electronic test and measurement equipment is exempt from FCC part 15,
subpart B compliance in the United States of America and from ICES-003
compliance in Canada. However, EXFO Inc. makes reasonable efforts to
ensure compliance to the applicable standards.
The limits set by these standards are designed to provide reasonable
protection against harmful interference when the equipment is operated in
a commercial environment. This equipment generates, uses, and can
radiate radio frequency energy and, if not installed and used in accordance
with the user guide, may cause harmful interference to radio
communications. Operation of this equipment in a residential area is likely
to cause harmful interference in which case the user will be required to
correct the interference at his own expense.
Modifications not expressly approved by the manufacturer could void the
user's authority to operate the equipment.
Note: The compliance to EN 55022 has been achieved by using a Laird
Technology ferrite (number 28A2736-0A2) on the Ethernet cable.
viii MaxTester Series
Page 9

Certification Information
If you purchased the Wi-Fi and Bluetooth option, your unit comes with an
internal wireless module and antenna for which the following information
applies:
This equipment has been tested and found to comply with the limits
for a Class A digital device, pursuant to Part 15 of the FCC Rules.
Operation is subject to the following two conditions: (1) This device
may not cause harmful interference, and (2) this device must accept
any interference received, including interference that may cause
undesired operation.
FCC Radiation Exposure Statement: This equipment complies with
FCC radiation exposure limits set forth for an uncontrolled
environment.
This device complies with Industry Canada license-exempt RSS
standard(s). Operation is subject to the following two conditions: (1)
this device may not cause interference, and (2) this device must
accept any interference, including interference that may cause
undesired operation of the device.
European Community Declaration of Conformity
An electronic version of the declaration of conformity for your product is
available on our website at www.exfo.com. Refer to the product’s page on
the Web site for details.
MaxTester Series ix
Page 10

Page 11

1 Introducing the MaxTester
Series Unit
Note: The appearance of your applications and tools may vary from the ones
presented in this documentation, depending on the unit model and the
options that you have purchased.
Note: In this documentation, the words “tap” and “double-tap” (related to the
use of a touchscreen) replace the words “click” and “double-click”.
Main Features
Your MaxTester Series unit includes the following:
Seven-inch color touchscreen
Two USB 2.0 ports (host)
Ethernet port (10/100 Base-T)
Optional internal Wi-Fi and Bluetooth module
Windows Embedded Compact operating system
Optional built-in power meter and VFL
Battery autonomy of 12 hours
Multitasking possibilities
Remote access to your unit (via VNC)
Direct Web access from your unit
Possibility to take screen captures
PDF file viewer available from your unit
Easy transfer of files and folders to an external storage device
Easy software updates
MaxTester Series 1
Page 12
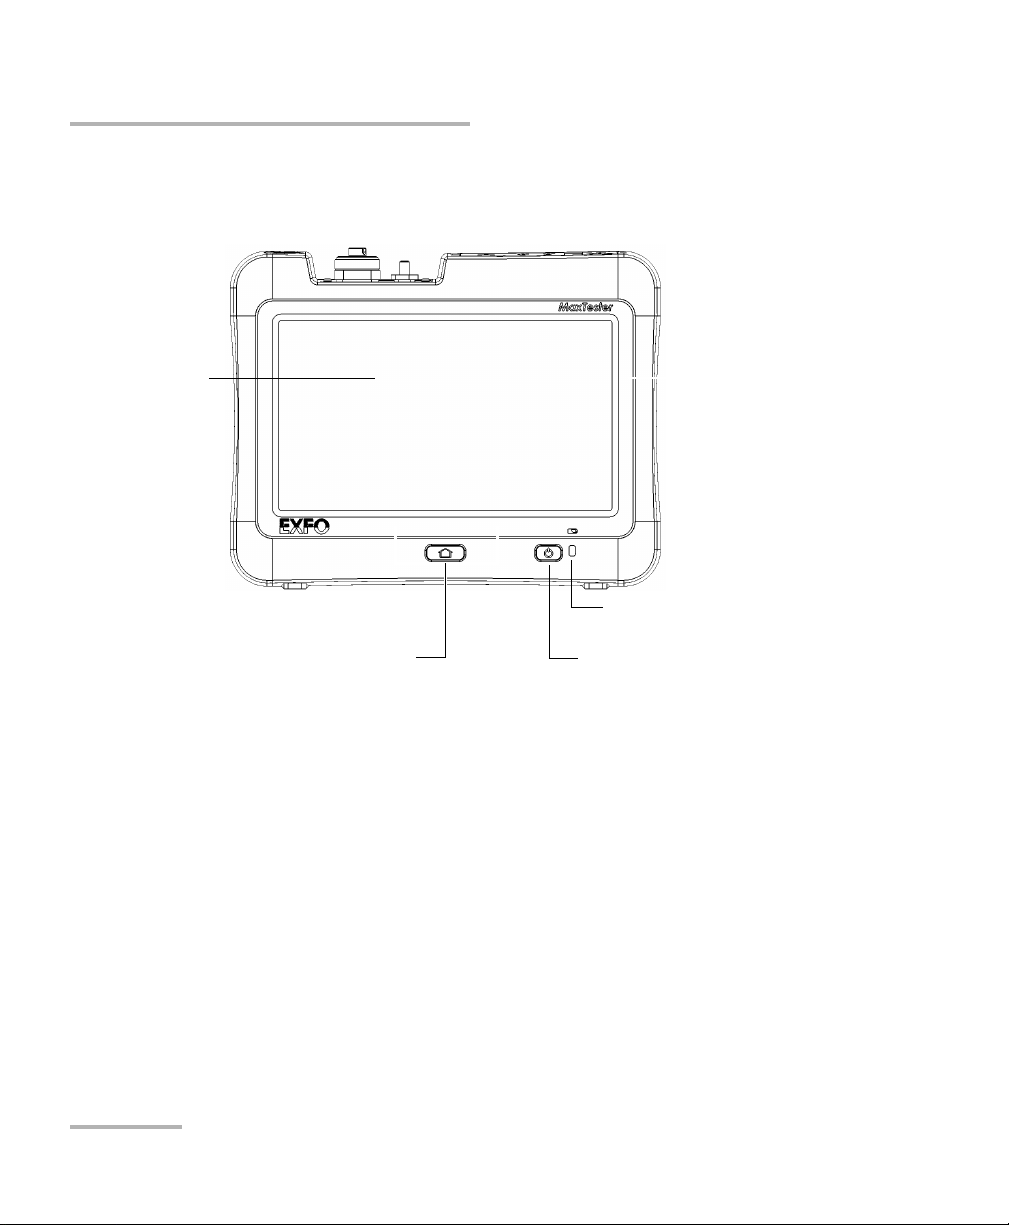
Introducing the MaxTester Series Unit
Battery LED
Touchscreen
Front
On/Off buttonHome button
Main Features
2 MaxTester Series
Page 13
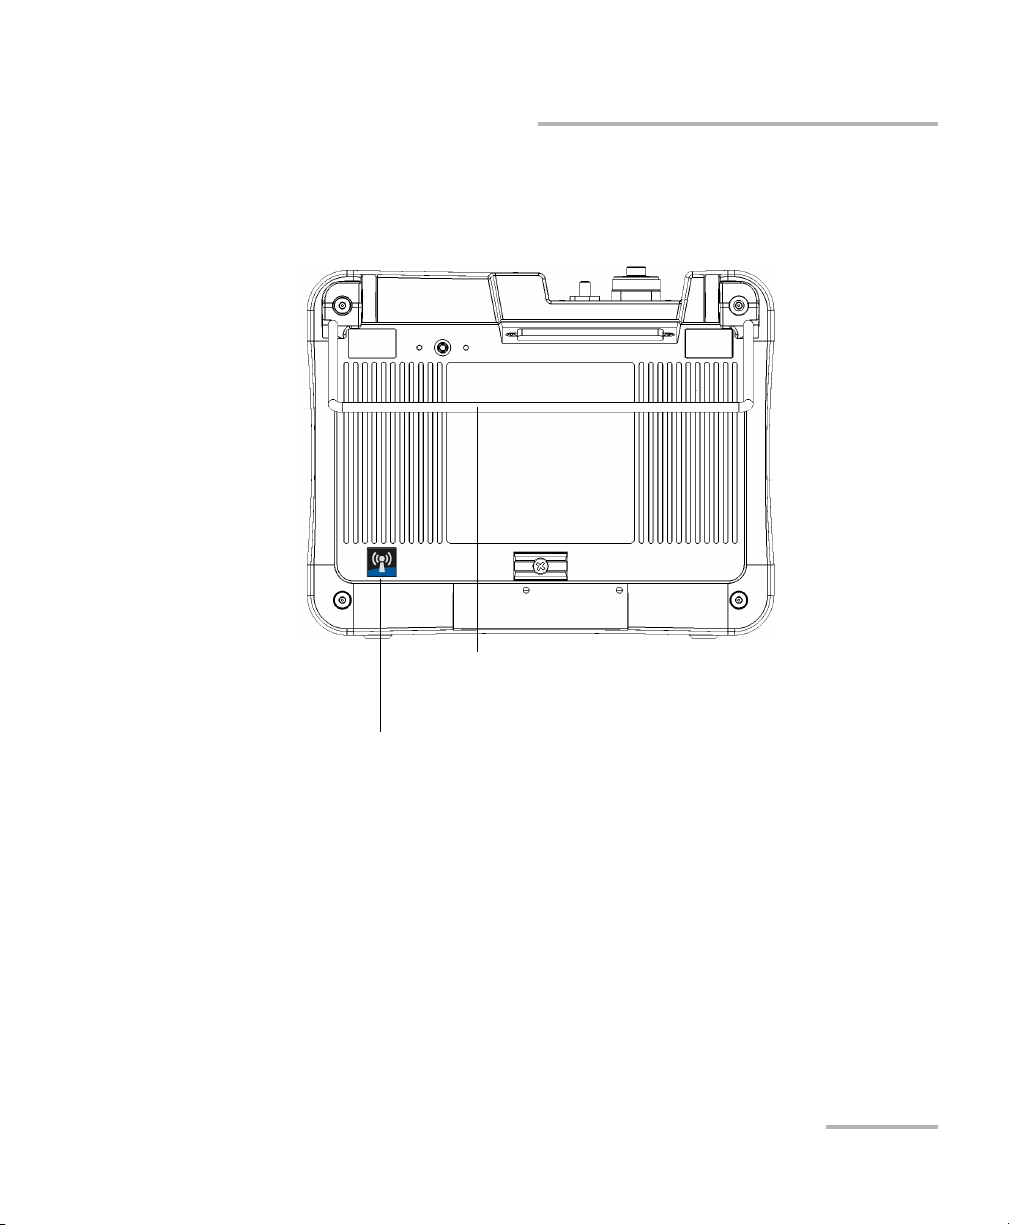
Back
Optional stand (to modify the position of the unit);
not assembled on the unit at time of shipment
Internal Wi-Fi and Bluetooth module
(optional; sticker indicates that module is present)
Introducing the MaxTester Series Unit
Main Features
MaxTester Series 3
Page 14
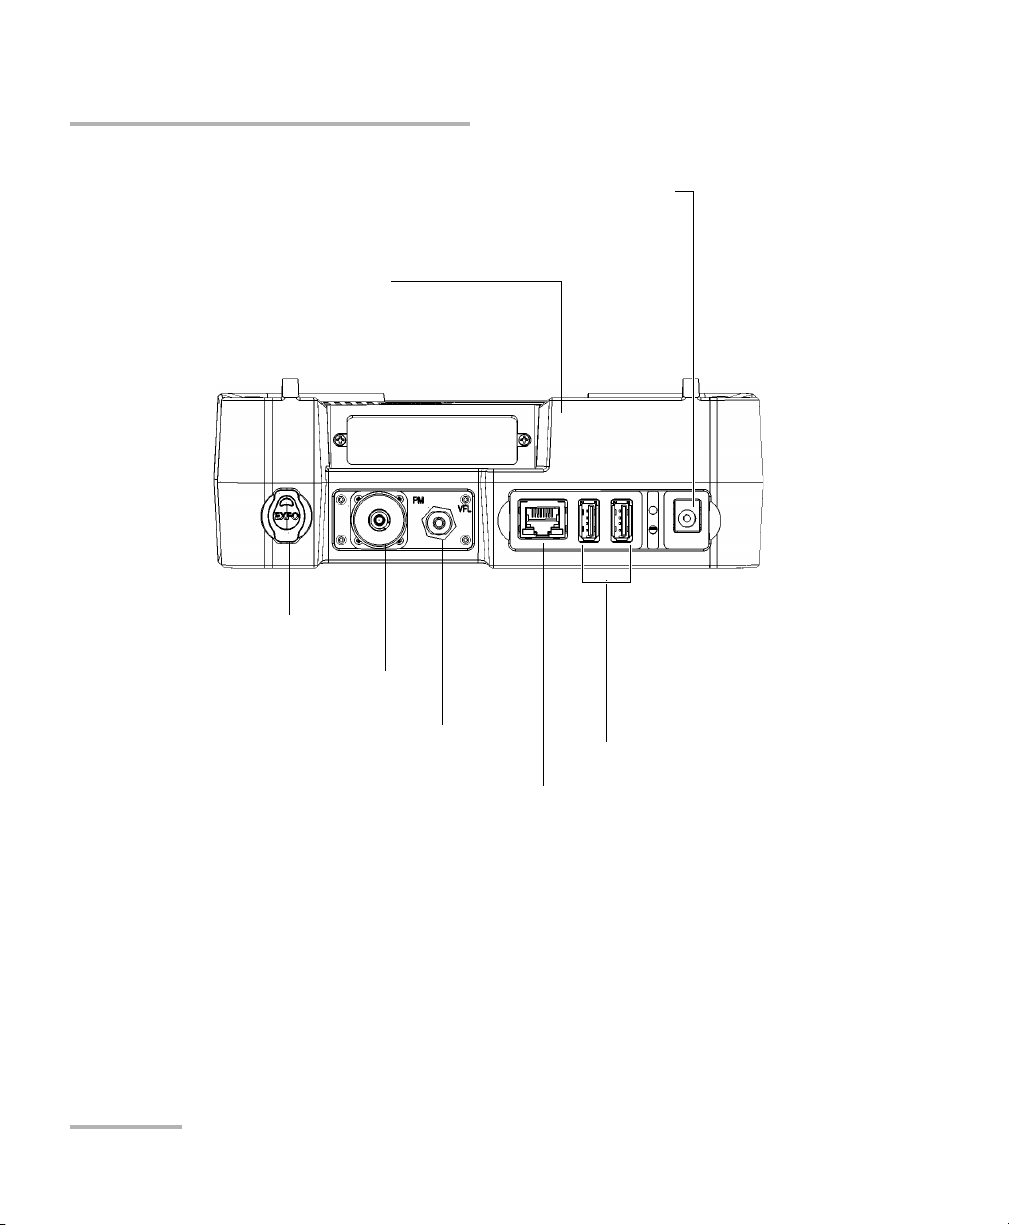
Introducing the MaxTester Series Unit
Top
Test instrument; some models only
(refer to the user guide of the
instrument for details)
USB host ports
DC input connector
(for AC adapter/charger
or car outlet adapter)
RJ-45 port
Stylus
Built-in power meter
(optional)
VFL (optional)
Main Features
4 MaxTester Series
Page 15
Introducing the MaxTester Series Unit
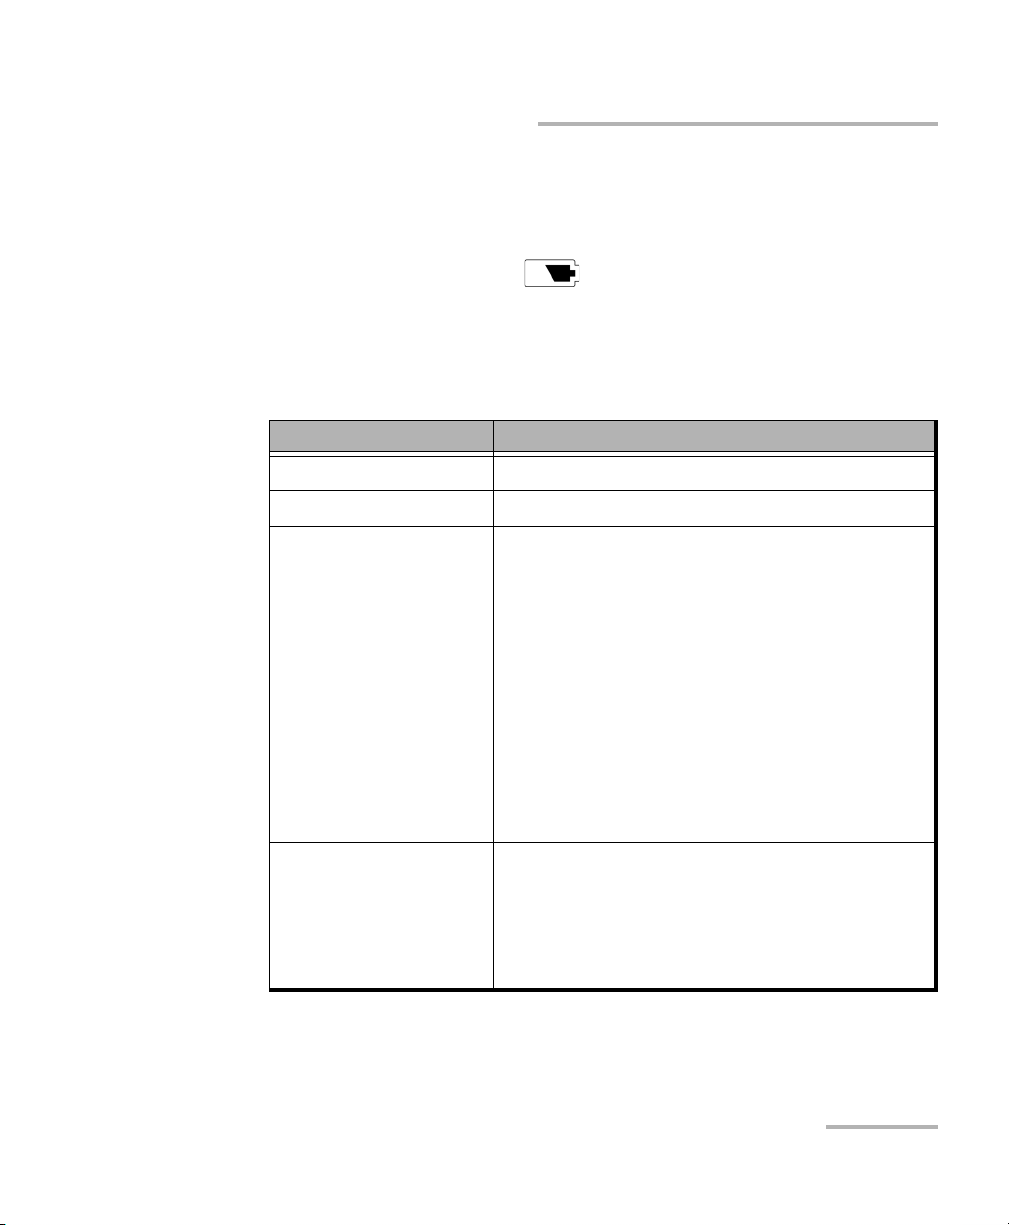
LED Indicator Description
LED Indicator Description
There is one LED indicator located on the front panel of your unit, providing
you with information about the battery.
This LED is identified by the symbol.
The LED blinks when the battery is charging and its color changes
according to the charge level of the battery, as explained in the table
below.
Color of the LED Meaning
Green Battery level is between 25 % and 100 %.
Yellow Battery level is between 10 % and 24 %.
Red Battery level is low (less than 10 %).
A rapid blinking LED indicates that the unit’s
temperature is out of the operating
specifications, or that the battery has
reached a critically low level and needs to
be recharged.
A slow blinking LED indicates that the
adapter/charger in use has the wrong
voltage for your unit. Ensure that you use the
adapter/charger provided with your unit
(see Electrical Safety Information on page 12
for more information).
None (LED is off)
Unit is powered by battery and the unit is in
Suspend mode.
Unit is off.
Unit is powered by battery and the battery is
empty.
MaxTester Series 5
Page 16
Introducing the MaxTester Series Unit
Function Buttons Description
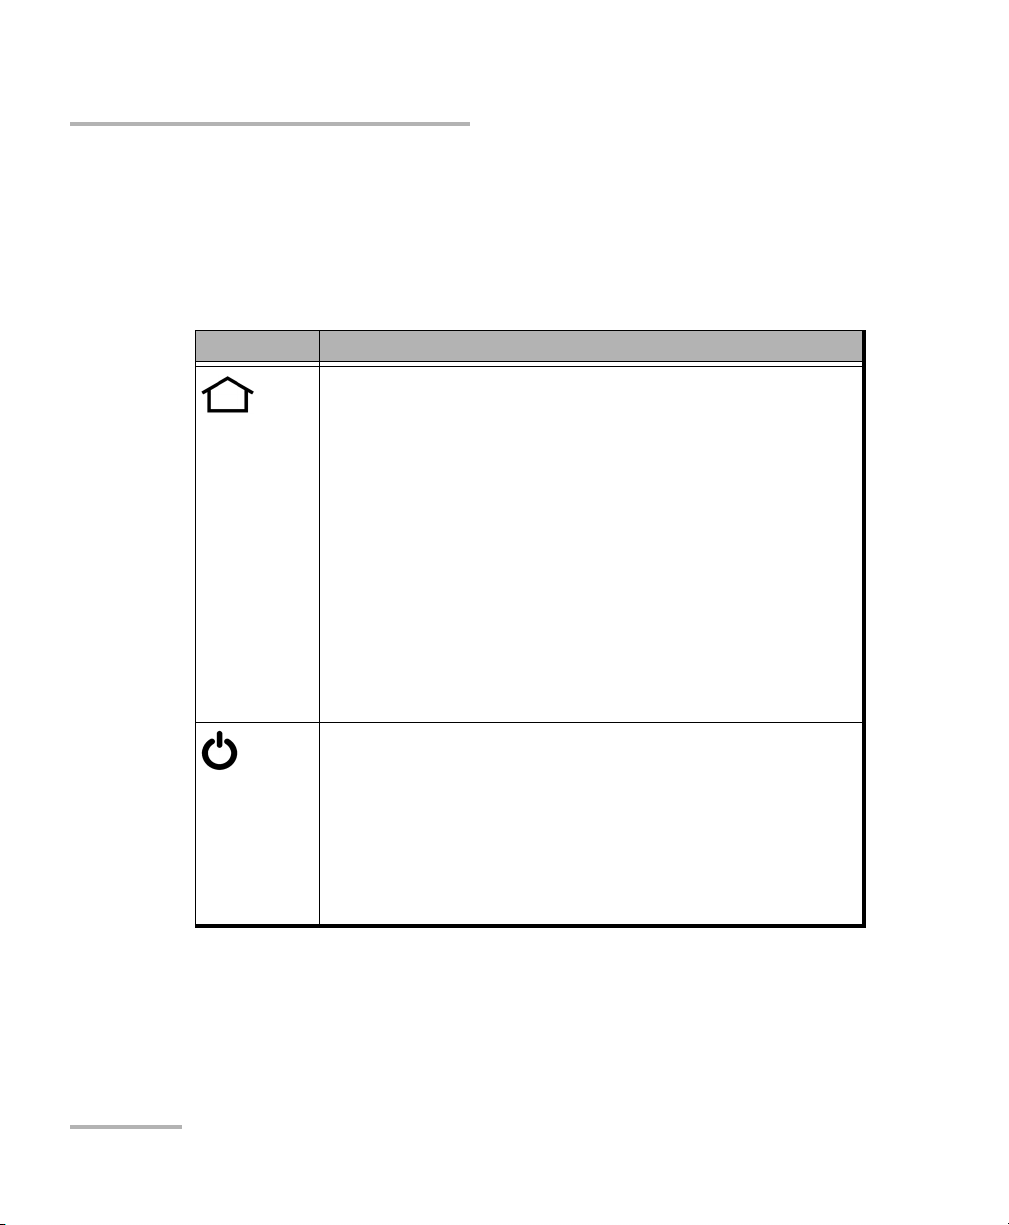
Function Buttons Description
Your unit is equipped with function buttons which give you access to
various tools at all times.
The table below shows an overview of their purpose.
Button Meaning
Press the button to switch between the Home screen
and the last used application.
Note: If a keyboard is connected to your unit, or if
Press and hold the button to display a shortcut from
which you can take a screen capture, or adjust
brightness to the medium or maximum level.
Note: If a keyboard is connected to your unit, or if
you are controlling your unit remotely via VNC,
you can also press CTRL + HOME.
you are controlling your unit remotely via VNC,
you can also press CTRL + ALT + HOME.
Turns your unit on and off:
Suspend: Press the button. The unit’s backlight will turn
off.
Shutdown: Press and hold the button a few seconds
until the unit beeps once.
For more information on the various ways to turn on and off
your unit, see Turning On or Off the Unit on page 21.
Note: When you are connected via VNC, due to the normal remote control delays,
it may take a few seconds before the unit processes the combination of
keys.
6 MaxTester Series
Page 17

Introducing the MaxTester Series Unit
Power Sources
Power Sources
Your unit operates with the following power sources:
AC adapter/charger (connected to standard power outlet—indoor use
only). Compatible car outlet adapter available upon request.
One lithium-polymer rechargeable battery (automatically takes over if
you disconnect the unit from its external power source).
Possible to switch from an external power source to battery power
or vice versa without affecting operation.
The battery recharges automatically when the unit is connected to
an external power source (with the AC adapter/charger or car
outlet adapter).
Note: The battery will not recharge when the ambient temperature is below 5 °C
(41 °F) or above 40 °C (104 °F).
Note: When the unit is powered by battery and the battery level becomes
critically low, the unit will be shut down and unsaved data will be lost.
For more information, see Electrical Safety Information on page 12.
MaxTester Series 7
Page 18

Introducing the MaxTester Series Unit
Conventions
Conventions
Before using the product described in this guide, you should understand
the following conventions:
Indicates a potentially hazardous situation which, if not avoided,
could result in death or serious injury. Do not proceed unless you
understand and meet the required conditions.
Indicates a potentially hazardous situation which, if not avoided,
may result in minor or moderate injury. Do not proceed unless you
understand and meet the required conditions.
Indicates a potentially hazardous situation which, if not avoided,
may result in component damage. Do not proceed unless you
understand and meet the required conditions.
WARNING
CAUTION
CAUTION
IMPORTANT
Refers to information about this product you should not overlook.
8 MaxTester Series
Page 19
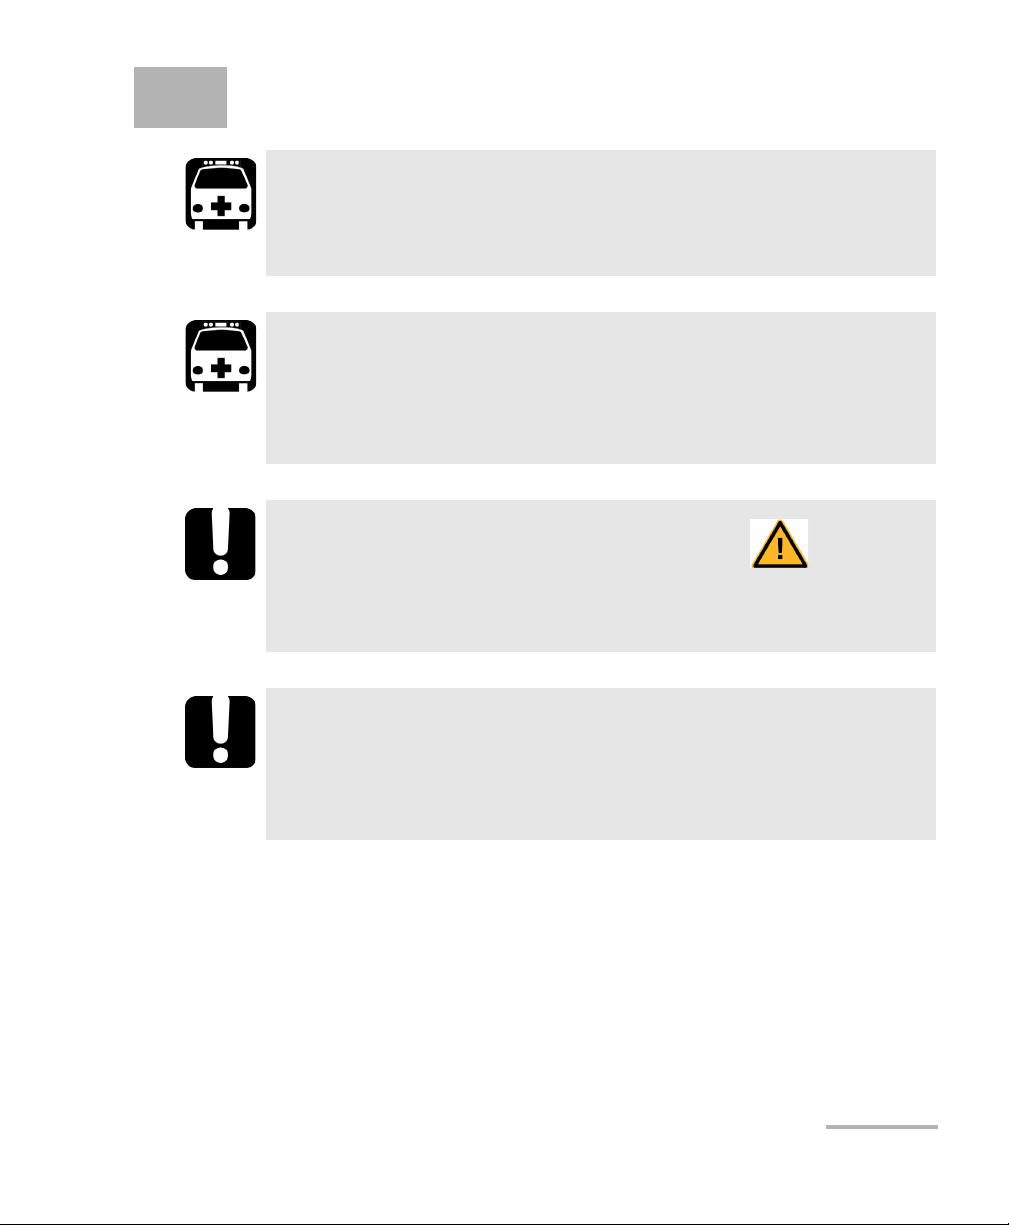
2 Safety Information
WARNING
Do not install or terminate fibers while a light source is active.
Never look directly into a live fiber and ensure that your eyes are
protected at all times.
WARNING
The use of controls, adjustments and procedures, namely for
operation and maintenance, other than those specified herein may
result in hazardous radiation exposure or impair the protection
provided by this unit.
IMPORTANT
When you see the following symbol on your unit , make sure
that you refer to the instructions provided in your user
documentation. Ensure that you understand and meet the required
conditions before using your product.
IMPORTANT
Other safety instructions relevant for your product are located
throughout this documentation, depending on the action to
perform. Make sure to read them carefully when they apply to your
situation.
MaxTester Series 9
Page 20
Safety Information
Other Safety Symbols on Your Unit
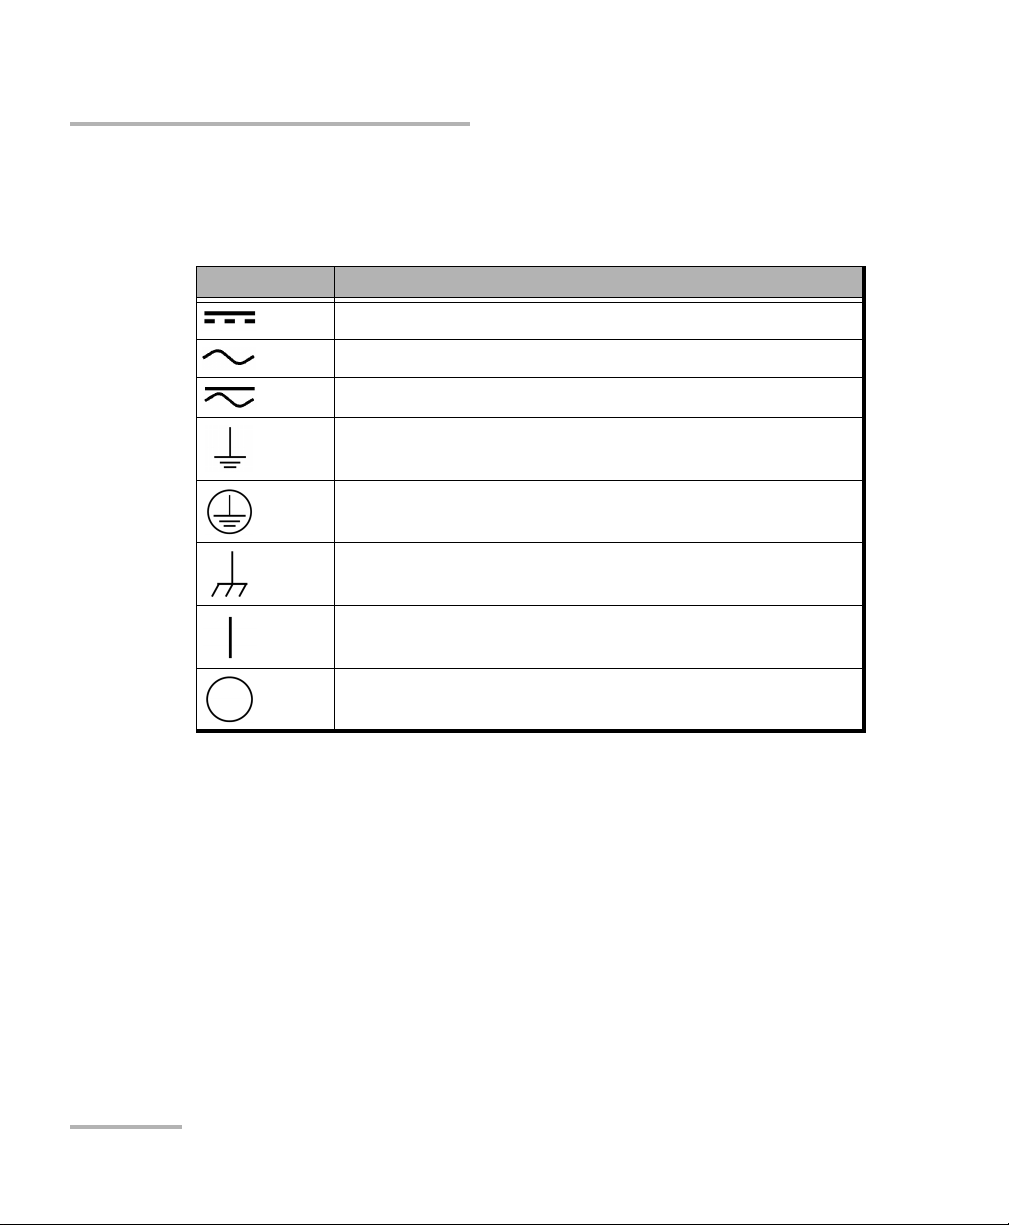
Other Safety Symbols on Your Unit
One or more of the following symbols may also appear on your unit.
Symbol Meaning
Direct current
Alternating current
Both direct and alternating current
The unit is equipped with an earth (ground) terminal.
The unit is equipped with a protective conductor terminal.
The unit is equipped with a frame or chassis terminal.
On (Power)
Off (Power)
10 MaxTester Series
Page 21

Safety Information
Laser information of the test instrument.
Always refer to the user guide of the
instrument for the exact information.
Units with test instrument
Laser information of the VFL
Units without test instrument
Laser Safety Information
Laser Safety Information
Units with Built-In VFL
Your instrument is a Class 2 laser product in compliance with standards
IEC 60825-1: 2007 and 21 CFR 1040.10, except for deviations pursuant to
Laser Notice No. 50, dated June 24, 2007. Laser radiation is emitted at the
output port.
The following label(s) indicate that the product contains a Class 2 source:
Note: The label is affixed to the back panel of the unit.
MaxTester Series 11
Page 22

Safety Information
Electrical Safety Information
Units without Built-In VFL
If your unit is not equipped with a VFL, refer to the user guide of the test
instrument (when applicable) for further laser safety details and
instructions.
Electrical Safety Information
If you need to ensure that the unit is completely turned off, disconnect the
power cable and remove the battery.
Note: There is no need to remove the battery before inserting or removing a
power meter or a VFL, but you need to follow the instructions provided in
the user documentation carefully.
12 MaxTester Series
Page 23

Safety Information
Electrical Safety Information
WARNING
Use the external power supply indoors only.
Position the unit so that the air can circulate freely around it.
Operation of any electrical instrument around flammable gases
or fumes constitutes a major safety hazard.
To avoid electrical shock, do not operate the unit if any part of
the outer surface (covers, panels, etc.) is damaged.
Only authorized personnel should carry out adjustments,
maintenance or repair of opened units under voltage. A person
qualified in first aid must also be present. Do not replace any
components while power cable and battery are connected.
There is no need to remove the battery before inserting or
removing a power meter or a VFL, but you need to follow the
instructions provided in the user documentation carefully.
Unless otherwise specified, all interfaces are intended for
connection to Safety Extra Low Voltage (SELV) circuits only.
Capacitors inside the unit may be charged even if the unit has
been disconnected from its electrical supply.
MaxTester Series 13
Page 24
Safety Information
Electrical Safety Information
Use only the listed and certified AC adapter/charger provided by
EXFO with your unit. It provides reinforced insulation between
primary and secondary, and is suitably rated for the country
where the unit is sold.
Use only accessories (such as the car outlet adapter, batteries,
and fiber inspection probe) designed for your unit and
approved by EXFO. The car outlet adapter contains a
replaceable fuse. Replace the damaged fuse ONLY with a fuse of
the same type: 3AG certified, 16 VDC, 3 A, with an I
40 A
available for your unit, refer to its technical specifications.
When you use the unit outdoors, ensure that it is protected
from liquids, dust, direct sunlight, precipitation, and full wind
pressure.
WARNING
2
2
sec and 80 A2sec. For a complete list of accessories
t between
Equipment Ratings
Tem pe ra tu re
Operation
Storage
Relative humidity
c
Maximum operation altitude
unit: –10 °C to 50 °C
AC adapter: 5 °C to 40 °C (41 °F to 104 °F)
–20 °C to 60 °C
unit: 95 % non-condensing
AC adapter: 10 % to 80 % non-condensing
2000 m (6562 ft) (unit connected to external power
a
(14 °F to 122 °F)
b
(–4 °F to 140 °F)
supply)
5000 m (16405 ft) (unit operated from battery)
14 MaxTester Series
Page 25
Safety Information
Electrical Safety Information
Equipment Ratings
Pollution degree 2 (unit connected to external power supply)
3 (unit operated from battery)
d
Overvoltage category I
Input power
e
unit: 8-16V;2A
AC adapter: 100 - 240 V; 50/60 Hz; 0.7 A
a. The battery will not recharge when the ambient temperature is below 5 °C (41 °F) or above 40 °C (104 °F).
b. To optimize the performance of the battery, you should store the unit in a cool dry place.
c. Measured in 0 °C to 31 °C (32 °F to 87.8 °F) range, decreasing linearly to 50 % at 40 °C (104 °F).
d. Equipment must be normally protected against exposure to direct sunlight, precipitation and full wind
pressure.
e. Not exceeding ± 10 % of the nominal voltage.
CAUTION
Use of voltages higher than those indicated on the label affixed to
your unit may damage the unit.
IMPORTANT
The operation and storage temperatures of some modules may
differ from the temperatures specified for your platform. In this
case, always ensure that you comply with the most restrictive
conditions (either module or platform).
MaxTester Series 15
Page 26

Page 27
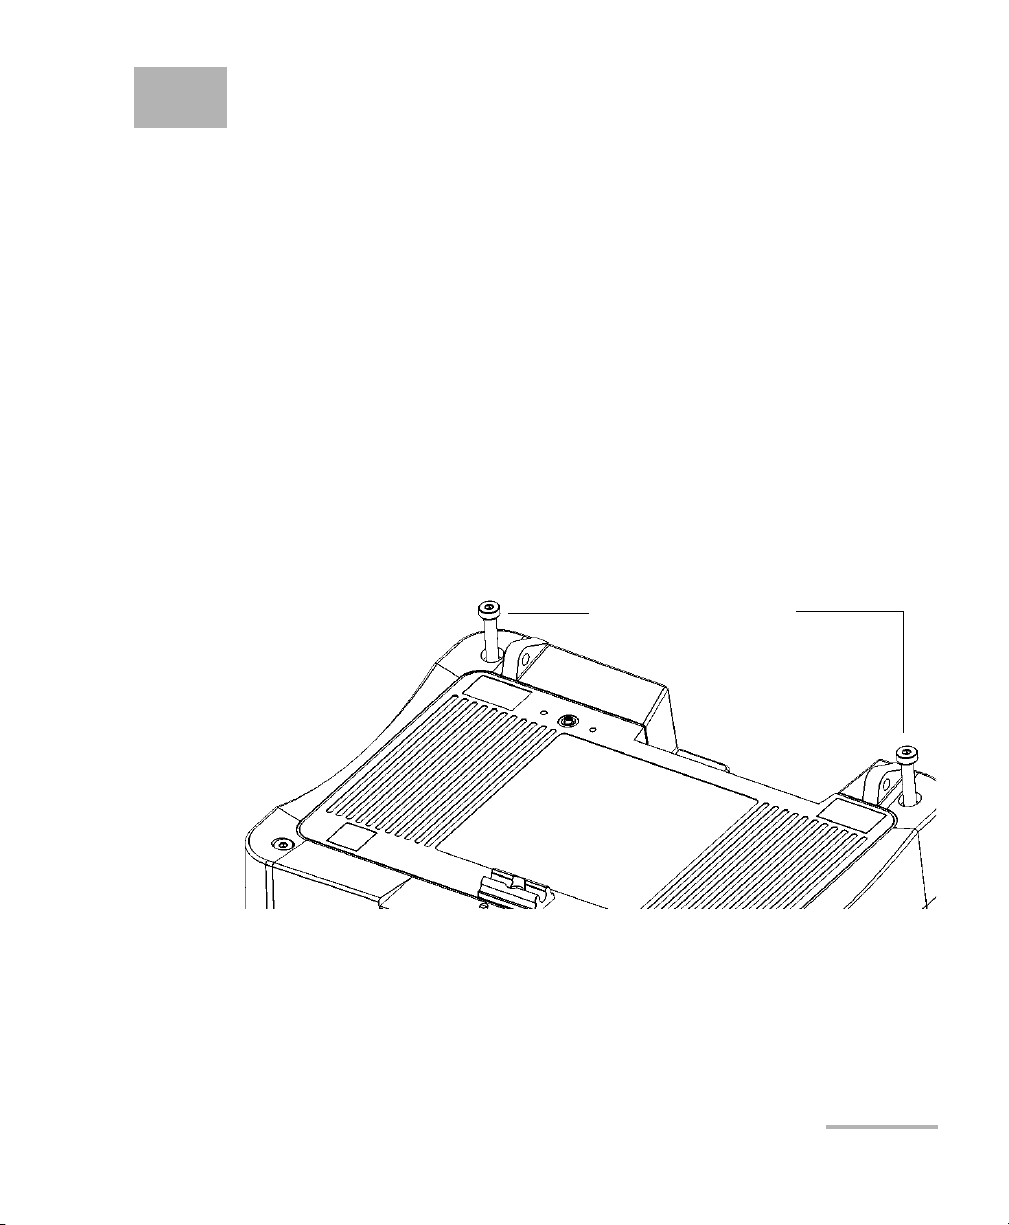
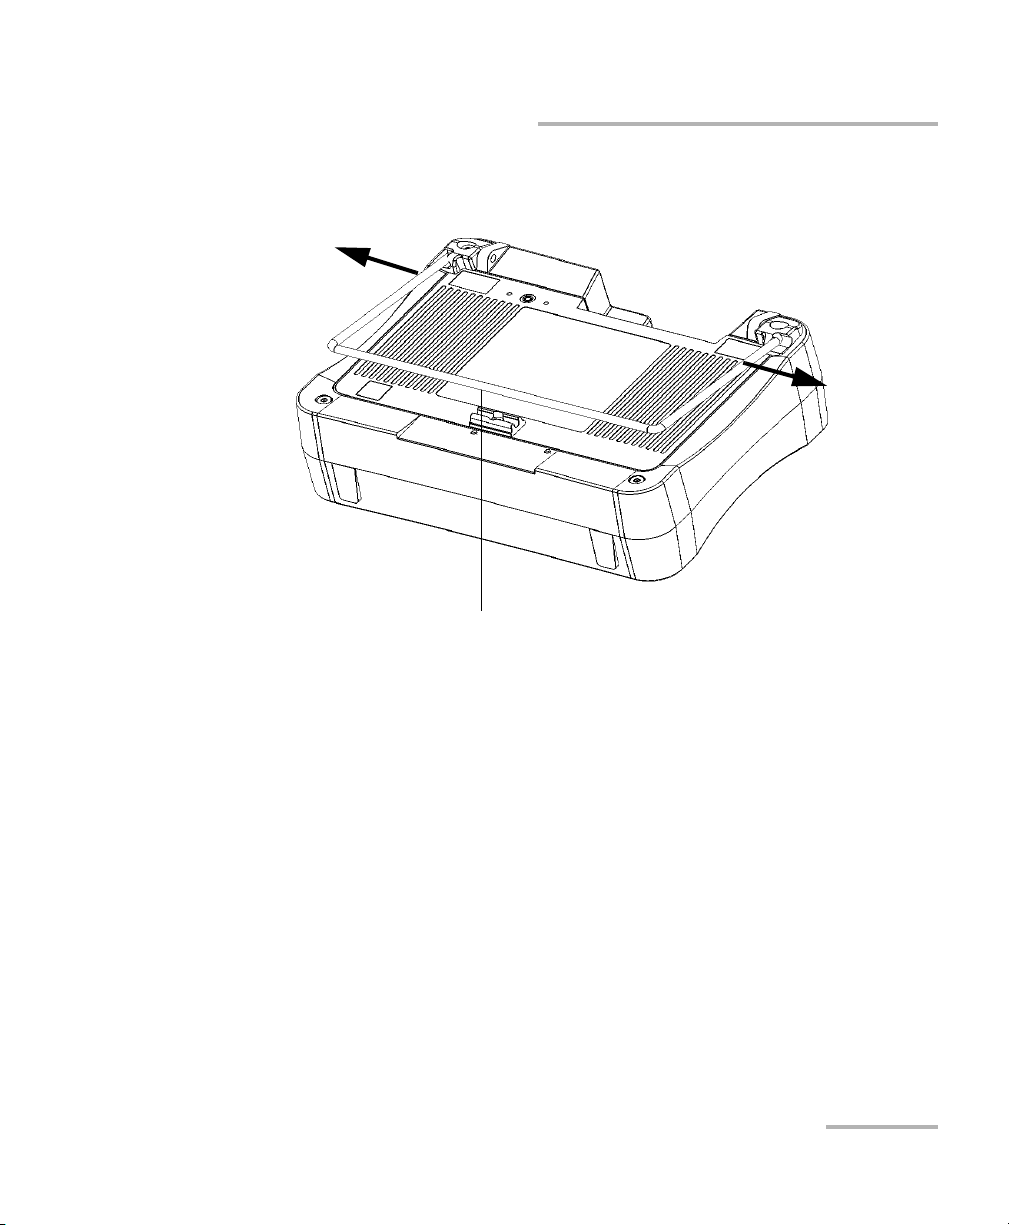
3 Getting Started with Your Unit
Top screws securing the
back of the unit
Installing and Using the Optional Stand
Your unit has been designed to be positioned either vertically (with the
screen facing you), or at an angle, using the optional stand (or the optional
utility glove).
Note: The stand ensures optimum stability to the unit during your tests.
The stand is not assembled on your unit at time of shipment. You must
install it when you receive your unit.
To install the stand on your unit:
1. Position the unit so that its front panel rests on a flat surface such as a
table.
2. Using the provided hex key (“Allen” key), remove the two top screws
that secure the back of the unit in place.
MaxTester Series 17
Page 28
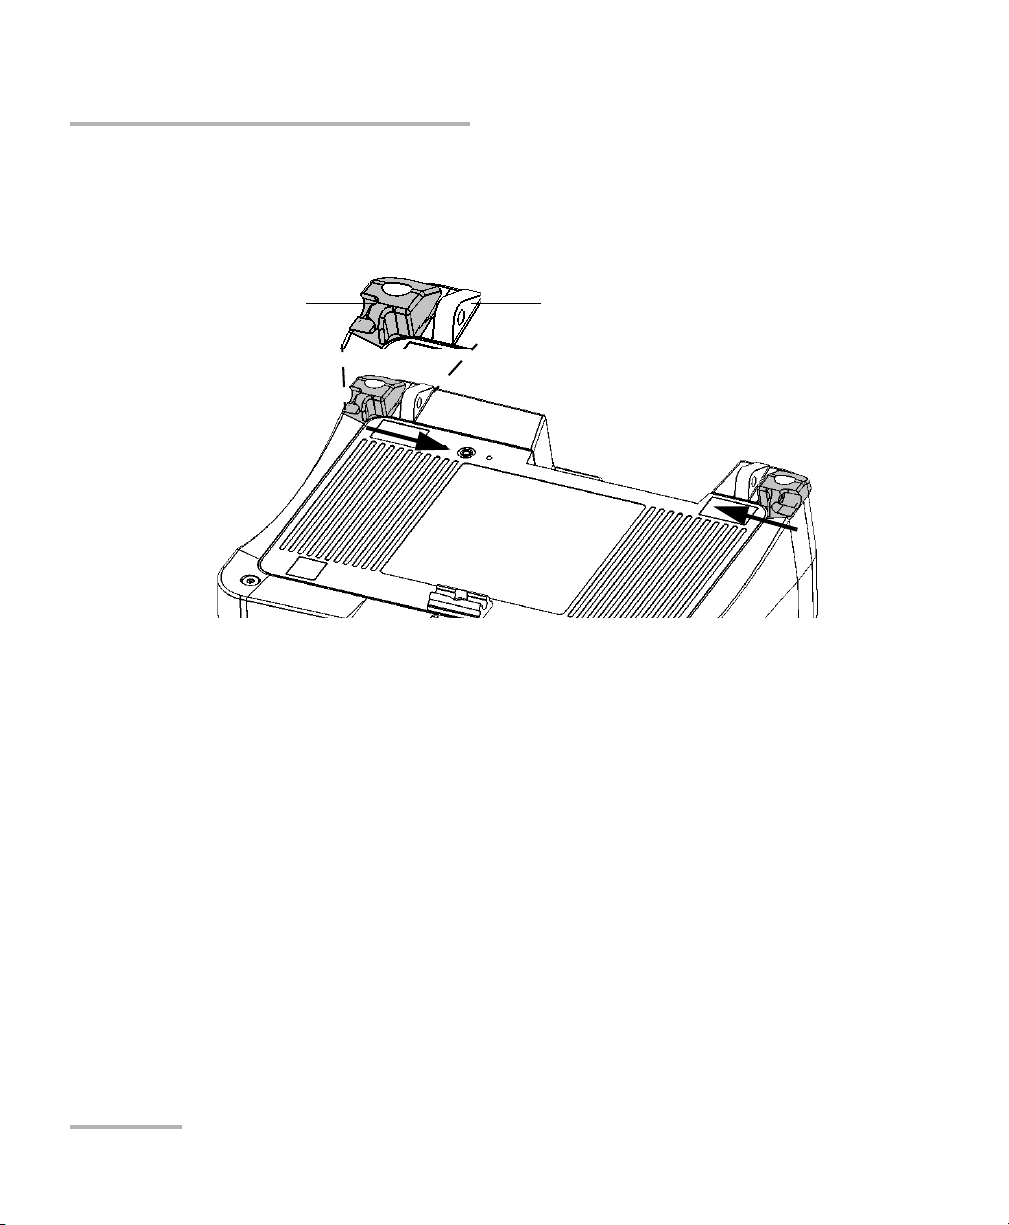
Getting Started with Your Unit
Stand blocker
(shown in grey)
Anchor eyelet
Installing and Using the Optional Stand
3. Align the side of the stand blockers with the side of the anchor eyelets,
and then slide the blockers towards the eyelets until they stop. There
should be no gap between the blockers and the eyelets.
4. Using the provided hex key (“Allen” key), put the two top screws back
in place (in the center of the blockers).
18 MaxTester Series
Page 29
Getting Started with Your Unit
Stand’s retaining clip
Installing and Using the Optional Stand
5. Hold the stand by its sides, and then slightly widen it to be able to insert
it into the blockers.
6. Release the stand as soon as it is properly inserted into the blockers.
7. If desired, secure the stand in its retaining clip by pushing it
downwards.
MaxTester Series 19
Page 30
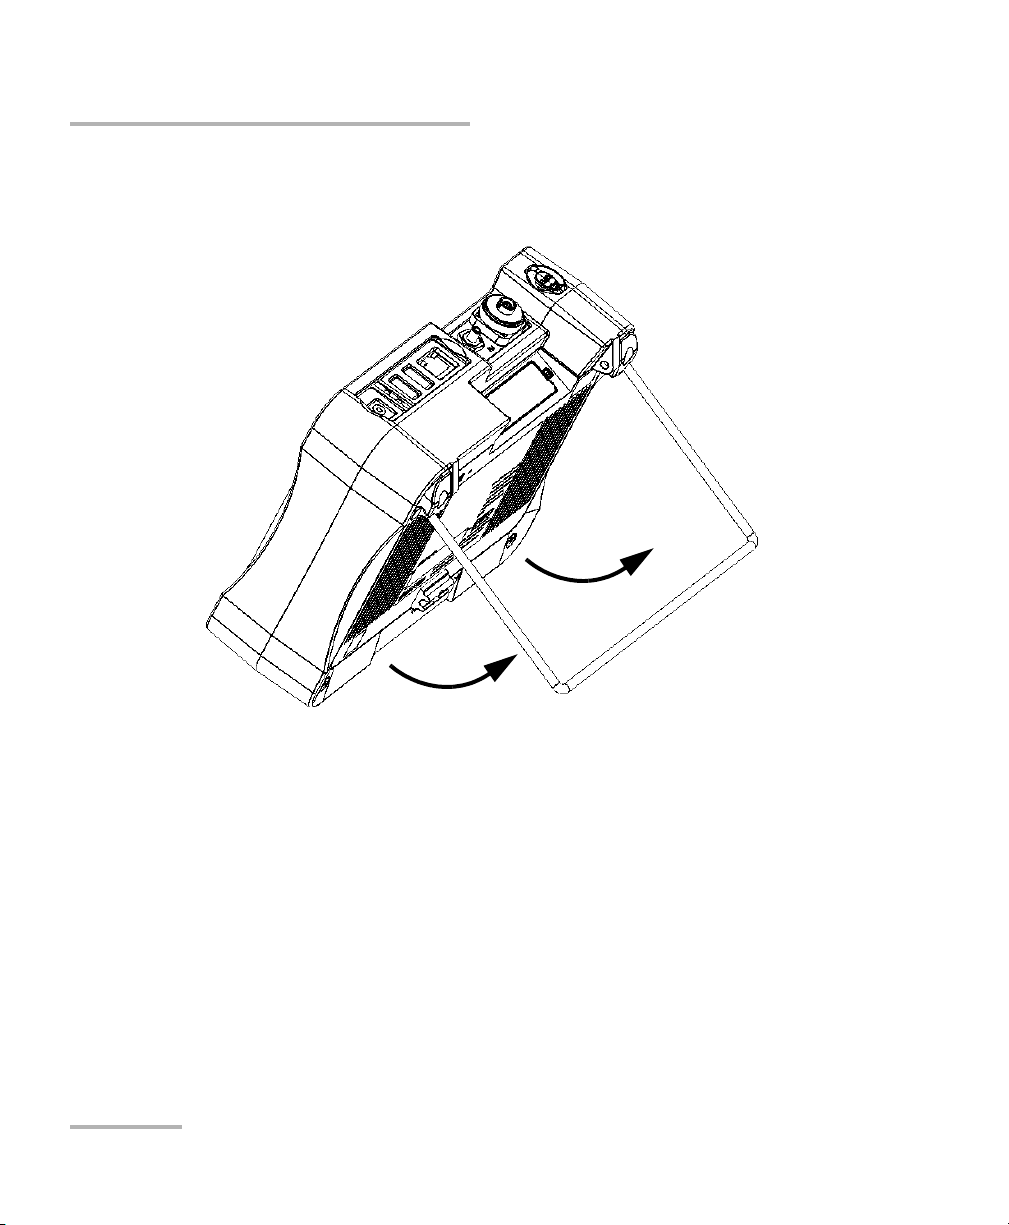
Getting Started with Your Unit
Installing and Using the Optional Stand
To change the orientation of the unit using the stand:
Pull out the stand.
20 MaxTester Series
Page 31

Getting Started with Your Unit
Turning On or Off the Unit
Turning On or Off the Unit
There are several ways to turn off the unit, including the following:
Suspend: keeps the unit’s status information in memory (RAM). The
next time you turn your unit on, you will quickly return to your work
environment (running applications will still be running). This mode will
take more battery power while the unit is off.
When powered by battery, the unit will be shut down automatically
after four hours in suspend mode.
Shutdown: completely cuts power to the test instruments and unit; the
unit will perform a complete restart routine the next time you use it.
You should perform a shutdown if you do not intend to use your unit for
a day or more.
After a shutdown, the unit will start in the Home screen or in the
application you defined as the startup application.
Note: Should the unit ever stop responding, you can force a hardware reset by
pressing and holding down the power button for at least 12 seconds. To
restart your unit, release the power button, and then press it again as you
would normally do to start your unit.
When a power outage occurs while the unit is connected to the AC power,
the unit will restart automatically when the AC power comes back.
When the unit is in suspend mode and is powered by battery, the unit will
remain in suspend mode if you connect the AC power, but the battery LED
will light up.
MaxTester Series 21
Page 32

Getting Started with Your Unit
Turning On or Off the Unit
To turn on the unit:
Press the On/Off button. The unit will beep once.
Note: If you turn on the unit for the very first time, a configuration wizard will be
displayed (see the corresponding section for more information).
To enter the suspend mode:
Press the On/Off button. The unit’s backlight will turn off.
To exit the suspend mode and resume your work:
Press the On/Off button.
To perform a shutdown:
Press and hold the On/Off button a few seconds until the unit beeps once.
22 MaxTester Series
Page 33

Getting Started with Your Unit
Configuring Your Unit At First Startup
Configuring Your Unit At First Startup
The first time you turn on the unit, a configuration wizard is displayed,
enabling you to set all the regional and language settings such as the date,
time, and operation language. If you modify the operation language, the
wizard will prompt you to restart the unit (changes will be effective at next
startup). Once the unit will have restarted, the configuration wizard will be
displayed in the selected language.
During the configuration process, you will also be asked to read and accept
the end-user license agreement (EULA), and to read the user
documentation for important safety information.
Finally, you will have the possibility to browse the EXFO Web site, and to
register your new product online (provided that to you have access to an
Internet connection and that the Internet options by default are compatible
with your network configuration).
Note: The acceptance of the EULA and the acknowledgment of the security
information are mandatory to be able to work with the unit. However, you
can modify the regional and language settings, or register your new product
online later if you prefer.
MaxTester Series 23
Page 34

Getting Started with Your Unit
See Selecting the Layout of the On-Screen Keyboard on page 44.
See Selecting the Language of Operation on page 42.
See Selecting the Global
Language Format (Locale) on
page 46.
See Setting Date and Time
Formats on page 48.
See Setting the Decimal
Separator on page 49.
See Adjusting the Date, Time
and Time Zone on page 41.
Configuring Your Unit At First Startup
To configure your unit at the first startup:
1. If it is not already done, turn on the unit (see Turning On or Off the Unit
on page 21).
2. When the wizard is displayed, set the parameters according to your
needs.
Note: The images above show the default values for each setting.
24 MaxTester Series
Page 35

3. Continue with the remaining steps.
See Accessing the
Online
Documentation on
page 63.
Getting Started with Your Unit
Configuring Your Unit At First Startup
4. When the configuration is complete, tap Finish. The Web browser will
be launched automatically if you selected the check box.
MaxTester Series 25
Page 36

Getting Started with Your Unit
Available applications
and tools
Date and time
(according to defined format)
Quick information zone
To view information at a glance about specific
applications (here, VNC Server is running)
AC power and battery level indicators
(a lightning icon indicates battery is charging)
Navigating Through the Applications
Navigating Through the Applications
The central point on your unit is the Home screen. From there, you can
access all the available applications and tools.
Several applications can run simultaneously on your unit, but only one
instance of a specific application at a time. You can switch to the last used
application, or to the application of your choice easily, without having to
close the applications each time.
To start an application:
From the Home screen, tap the icon corresponding to the desired
application or tool.
26 MaxTester Series
Page 37

Getting Started with Your Unit
Navigating Through the Applications
To switch from Home to the last used application (and vice versa):
From the unit’s front panel, press the button.
Note: If a keyboard is connected to your unit, or if you are controlling your unit
remotely via VNC, you can also press CTRL + HOME.
Note: You cannot switch back to the Configuration window using this button. If
you wish to access the Configuration window again, tap the corresponding
icon from the Home screen.
To switch to the application of your choice:
1. From the unit’s front panel, press the button to return to the
Home screen.
2. Tap the icon corresponding to the desired application or tool.
To close an application:
Tap the X button.
Note: Some windows and tools do not have a close button. In this case, simply
press the button to exit the application or tool, and go back to the last
used application.
MaxTester Series 27
Page 38

Getting Started with Your Unit
Using the On-Screen (Virtual) Keyboard
Using the On-Screen (Virtual) Keyboard
Your unit is equipped with an on-screen keyboard that is displayed
automatically when you select any location where data entry is possible.
Note: You can close the keyboard temporarily with the button (located in
the lower-right corner of the virtual keyboard). Next time you select a
location where data entry is possible, the keyboard will be displayed again
automatically.
By default, the keyboard layout is set to QWERTY, but you can select any of
the provided layouts. You can also hide the virtual keyboard so that it is not
displayed when you select a location where data entry is possible. This
could be particularly useful when you connect a hardware keyboard to
your unit. For more information about the choice of another keyboard
layout, or the way to hide the keyboard, see Selecting the Layout of the
On-Screen Keyboard on page 44.
To use the on-screen keyboard:
1. Select the location where you want to enter text.
2. Enter the data as required.
3. Exit the location when you have finished entering data.
28 MaxTester Series
Page 39

Getting Started with Your Unit
Installing or Upgrading the Applications
Installing or Upgrading the Applications
All the necessary applications have been preinstalled and configured at the
factory. However, you may have to upgrade the applications when new
versions become available. You can either install all the applications at a
time using a single system image file, or install specific products using their
individual upgrade files.
When updates are available, you can download the new installation files
(system image file or specific products) from the EXFO Web site to a
computer. You can then transfer the files to your unit with a USB memory
key.
You can install new versions of system images or products, or revert to
previous ones, but you cannot reinstall versions that are currently installed
on your unit.
At the end of the upgrade process, you will be presented with the
configuration wizard. By default, the regional and language settings that
were in use before the update will be kept, but you can modify them if you
prefer.
MaxTester Series 29
Page 40

Getting Started with Your Unit
Installing or Upgrading the Applications
To install or upgrade the applications:
1. Using your computer, if necessary, retrieve the desired system image
file or product upgrade files from the EXFO Web site.
If you want to upgrade specific products, ensure that you retrieve
both the .bin and .xlm files. Otherwise, the application will not be
able to upgrade the product.
2. From your computer, copy the installation files to the root of a USB
memory key.
The application only takes into account the upgrade files
(system images or products) that are not already installed on
your unit. The other upgrade files will be ignored.
System image files have precedence over product’s upgrade
files. This means that if there is a system image (not currently
installed on your unit) at the root of the USB key, the
application will ignore the upgrade files that may be present for
specific products. If you want to upgrade specific products,
ensure that there is no system image file at the root of the USB
key that could prevent the upgrade.
IMPORTANT
IMPORTANT
3. Ensure that your unit will remain powered on during the operation by
connecting it to a power outlet using the provided AC adapter/charger.
4. From your unit, exit all the running applications.
5. Connect the USB memory key to one of the USB ports of your unit.
6. From the Home screen, on your unit, tap Configuration.
30 MaxTester Series
Page 41

Getting Started with Your Unit
Installing or Upgrading the Applications
7. Ta p Software Updates.
8. Ta p Check for Updates.
Note: If no appropriate system image file or product upgrade files are found on
the USB memory key, the application will prompt you to browse for a folder
containing upgrade files.
Note: If several versions of the system image or of the products are found, the
application will install the most recent version.
MaxTester Series 31
Page 42

Getting Started with Your Unit
Installing or Upgrading the Applications
9. When the application prompts you to confirm the replacement of the
current system image or products with new ones, tap Yes (system
image) or Update (products) to start the process.
10. Read the end-user license agreement (EULA), and if you agree with
the terms, tap Accept.
Note: The acceptance of the license agreement is mandatory to be able to
proceed with the upgrade.
Note: The installation process may take a few minutes.
32 MaxTester Series
Page 43

Getting Started with Your Unit
Installing or Upgrading the Applications
11. When the application prompts you to restart the unit, tap OK.
CAUTION
It is normal that your unit restarts a few times during the upgrade
process.
To avoid causing irreparable damage to your unit, do not turn off
your unit or force a power reset during the upgrade process. You
will know that the upgrade is over when the configuration wizard is
displayed.
12. When the configuration wizard is displayed, follow the on-screen
instructions (see Configuring Your Unit At First Startup on page 23).
Note: At this point, if you have used a USB memory key to update your unit, you
can remove it.
MaxTester Series 33
Page 44

Getting Started with Your Unit
Activating Software Options
Activating Software Options
The software options purchased at the same time as your unit have been
activated for you already. However, if you purchase options afterwards, you
will have to activate them yourself.
Before being able to activate options, you need to contact EXFO with the
following information:
Purchase order number of the newly purchased options
Unit serial number
Customer's name
Customer’s company name
Customer’s phone number
Customer’s e-mail address
Unit on which the option will be installed
You will receive a single key (.key) file with which you will be able to
unlock all the new options that you have purchased.
If you have several units for which you need to activate options, you can
copy all the key files (one file per unit) to the root of a USB memory key
and use this USB key with all your units, in turn. If the appropriate key file is
present on the USB key, the application will retrieve it, activate the options
and then remove the file from the USB key automatically. This enables you
to manage the options of all units without having to match the right key file
with the current unit.
Note: If you prefer that the key files remain on the USB memory key after the
activation of the options, you have to change the attribute of the file to
read-only before starting to activate the options.
34 MaxTester Series
Page 45

Getting Started with Your Unit
Activating Software Options
To activate the options for your unit:
1. From your computer, copy the key file to the root of a USB memory
key.
2. Connect the USB memory key to one of the USB ports of your unit.
3. From the Home screen, tap Configuration.
4. Ta p Software Options.
5. Ta p Check for Updates.
When the operation is successful, the option indicator will turn into a
green check mark to confirm that the option is now active.
Note: If no appropriate key file is found on the USB key, the application will
prompt you to browse for a folder containing a key file.
MaxTester Series 35
Page 46

Getting Started with Your Unit
Activating Software Options
6. When the application prompts you to restart the unit, tap OK to close
the message.
Note: At this point, if you have used a USB key to copy your key file, you can
remove it as it is not required to use your new options.
IMPORTANT
Before restarting your unit, you may wish to browse through the
running applications and save any data that you want to keep.
7. Restart your unit to complete the activation process:
7a. Press and hold the On/Off button a few seconds until the unit
beeps once.
7b. Turn the unit on again.
36 MaxTester Series
Page 47

Getting Started with Your Unit
Using a Keyboard, Mouse or Other USB Devices
Using a Keyboard, Mouse or Other USB Devices
Your unit supports many USB devices. The table below lists the supported
USB devices.
Device Details
Memory key For data transfer between your unit and a computer
when you do not have access to a network. If you
need information on how to transfer data using a
memory key, see Managing Data on page 81.
Keyboard When you are required to enter alphanumeric data,
an on-screen (virtual) keyboard is displayed. However,
if you prefer, you can use a hardware keyboard.
Note: Even if a keyboard is connected, the
on-screen keyboard will still be
displayed when you work with the
various applications on your unit, unless
you hide it (see Selecting the Layout of
the On-Screen Keyboard on page 44).
Mouse If your prefer to use a mouse instead of the
touchscreen, you can connect one.
Composite device You can use composite devices, that is devices that
input information to your unit using more than one
mean (for example, combinations of keyboard and
mouse).
Hub This device will be particularly useful to you if you
need extra USB ports.
EXFO fiber
inspection probe
MaxTester Series 37
Only the probes of the FIP-400B series are supported
on your unit. For more information on how to start the
probe application, see Inspecting Fibers with a Probe
on page 79.
Page 48

Getting Started with Your Unit
Using a Keyboard, Mouse or Other USB Devices
You can connect several devices at the same time.
Your unit does not support USB printers. If you want to print
documents, you must transfer your files to a computer
(see Managing Data on page 81) that has access to a network
printer.
To use a USB device with your unit:
Connect the USB device to any of the USB ports (located on top of the
unit).
IMPORTANT
Note: It is not necessary to turn off the unit before connecting the USB device. The
software will automatically detect its presence.
You r dev ice i s a u tom ati cally recognized and immediately usable (provided
that it uses the drivers already available on your unit).
38 MaxTester Series
Page 49

4 Setting Up Your Unit
To help you view the changes in brightness in
real time
Adjusting Brightness
To fit your work environment, you may adjust the LCD brightness. You can
adjust brightness with a slider for more accuracy, or with shortcuts to go to
the medium (50 %) or maximum brightness level quickly. Values are kept
in memory even when you turn the unit off.
If you want to set the delay after which the display is dimmed to save
power, see Configuring the Power Management Options on page 54.
To adjust the display brightness:
1. From the Home screen, tap Configuration.
2. Ta p Brightness.
3. Move the slider until the screen appearance is to your liking.
The new brightness value is taken into account immediately.
4. From the unit’s front panel, press the button to return to the
Home screen.
MaxTester Series 39
Page 50

Setting Up Your Unit
Adjusting Brightness
To quickly set the brightness to the medium or maximum level:
1. From the unit’s front panel, press the button for two seconds.
Note: Once you have press the button, the brightness is set to the maximum value
temporarily to ensure optimal readability.
2. From the shortcut toolbar, tap the button corresponding to the desired
brightness level.
The new brightness value is taken into account immediately.
40 MaxTester Series
Page 51

Setting Up Your Unit
Adjusting the Date, Time and Time Zone
Adjusting the Date, Time and Time Zone
The current date and time are displayed at the top of the Home screen.
When saving results, the unit also saves the corresponding date and time.
For information on how to modify the format in which the date and time
are displayed, see Setting Date and Time Formats on page 48.
To adjust the date, time or time zone:
1. From the Home screen, tap Configuration.
2. Ta p Date and Time.
3. Modify the settings according to your needs.
4. From the unit’s front panel, press the button to return to the
Home screen.
The new values are taken into account immediately.
MaxTester Series 41
Page 52

Setting Up Your Unit
Selecting the Language of Operation
Selecting the Language of Operation
You may display the user interface in one of the available languages
(default is English). The value is kept in memory even when you turn the
unit off.
Note: Certain applications or tools may not be offered in all languages.
Note: Changing the interface language has no effect on the keyboard layout. This
means that you may have to change the layout manually if it no longer
suits your needs (see Selecting the Layout of the On-Screen Keyboard on
page 44).
To select a new interface language:
1. From the Home screen, tap Configuration.
2. Ta p Region and Language.
42 MaxTester Series
Page 53

Setting Up Your Unit
Selecting the Language of Operation
3. From the Display language list, select the desired language.
4. When the application prompts you to restart the unit, tap OK to
confirm.
The new interface language will become available at the next startup.
MaxTester Series 43
Page 54

Setting Up Your Unit
To switch between English and Chinese
(input language)
To switch between half-width and
full-width characters
To switch between English and
Chinese punctuation
To access other properties
Selecting the Layout of the On-Screen Keyboard
Selecting the Layout of the On-Screen
Keyboard
You can select the layout of the on-screen keyboard. By default, the
keyboard layout is set to QWERTY, but you can select any of the provided
layouts.
If you prefer, you can also hide the virtual keyboard so that it is not
displayed when you select a location where data entry is possible. This
could be particularly useful if you do not wish to view the on-screen
keyboard when you connect a hardware keyboard to your unit, or when
you access your unit remotely via VNC.
If you select the QWERTY (Pinyin) layout, in addition to the virtual
keyboard, the following floating toolbar is displayed.
Note: If the pinyin toolbar is not visible, it could be hidden under the virtual
keyboard. In this case, simply move the virtual keyboard until you can see
the toolbar. Once the toolbar is visible, you can move it to a location of your
choice on the screen.
44 MaxTester Series
Page 55

Setting Up Your Unit
Selecting the Layout of the On-Screen Keyboard
To select the layout of the on-screen keyboard:
1. From the Home screen, tap Configuration.
2. Ta p Region and Language.
3. From the Keyboard layout list, select the desired layout.
Note: If you want to hide the keyboard, select None. If you want to display it
again, select any other layout.
Note: Switching from a given keyboard layout to a QWERTY (Pinyin) layout (or
vice versa) requires that you restart your unit manually.
4. From the unit’s front panel, press the button to return to the
Home screen.
The on-screen keyboard will use the new layout next time you need to
enter data.
MaxTester Series 45
Page 56

Setting Up Your Unit
Selecting the Global Language Format (Locale)
Selecting the Global Language Format (Locale)
By default, the dates (short and long), time and decimal separator are
displayed in the formats associated with the global language format
(locale). This means that by selecting the global language format, you can
quickly define date, time and decimal separator formats.
For information on how to refine the date, time or decimal separator
formats, see Setting Date and Time Formats on page 48 and Setting the
Decimal Separator on page 49.
To set the global language format:
1. From the Home screen, tap Configuration.
2. Ta p Region and Language.
46 MaxTester Series
Page 57

Setting Up Your Unit
Selecting the Global Language Format (Locale)
3. From the Format list, select the desired global language (locale). This
will determine the date formats available for the dates, time and
decimal separator.
4. From the unit’s front panel, press the button to return to the
Home screen.
The new values are taken into account immediately.
MaxTester Series 47
Page 58

Setting Up Your Unit
Setting Date and Time Formats
Setting Date and Time Formats
By default, the dates (short and long) and time are displayed in the formats
associated with the global language format (locale). The time can be
expressed with a 12- or a 24-hour notation. You can modify the way dates
and time are displayed if the default values do not suit your needs.
For information on how to adjust the date, the time, and the time zone,
see Adjusting the Date, Time and Time Zone on page 41.
To set date and time formats:
1. From the Home screen, tap Configuration.
2. Ta p Region and Language.
3. Refine the settings according to your needs.
4. From the unit’s front panel, press the button to return to the
Home screen.
The new values are taken into account immediately.
48 MaxTester Series
Page 59

Setting Up Your Unit
Setting the Decimal Separator
Setting the Decimal Separator
By default, the decimal separator used in numeric values corresponds to
the one associated with the global language format (locale). However, you
can select another decimal separator if you prefer.
To set the decimal separator:
1. From the Home screen, tap Configuration.
2. Ta p Region and Language.
3. From the Decimal separator list, select the desired separator.
4. From the unit’s front panel, press the button to return to the
Home screen.
The new value is taken into account immediately.
MaxTester Series 49
Page 60

Setting Up Your Unit
Changing the Background Picture
Changing the Background Picture
The Home screen comes with a default background picture. However, you
can change it by either selecting another image from those provided with
your unit, or by adding one of your own images.
For an optimum display, the size of the images must be 800 pixels x
480 pixels. The images that are smaller will be ignored (not visible on the
list of possible background images). The images exceeding the optimum
dimensions will be truncated to the right dimensions automatically at time
of display.
You can use images in .bmp, .jpg, or .png format. Your background images
are kept in the following folder:
DATA\Home screen\Backgrounds.
The unit takes into account only a limited number of the most
recent images whose sizes are 800 pixels x 480 pixels or more.
Adding a large number of images to your unit will have an impact
on the loading time of the background images list.
IMPORTANT
50 MaxTester Series
Page 61

Setting Up Your Unit
Changing the Background Picture
To add your own background pictures:
1. Transfer the images that you want to use to a USB memory key.
2. Connect the USB memory key to one of the USB ports on your unit.
3. From the Home screen, tap File Manager.
4. Tap the parent folder button once.
5. Localize your USB memory key (identified by “Removable Disk” or
“Removable Disk 2”).
MaxTester Series 51
Page 62

Setting Up Your Unit
Changing the Background Picture
6. Double-tap the USB memory key identifier to access the key contents.
7. Copy the image that you need:
7a. Select the desired file.
Note: If you want to copy all files at the same time, from the Edit menu, select
Select All.
7b. From the Edit menu, select Copy.
8. Tap the parent folder button once to exit the USB memory key.
9. Double-tap DATA, then Home screen > Backgrounds.
10. From the Edit menu, select Paste.
11. If necessary, repeat steps 6 to 10 with all the images that you want to
transfer to your unit.
12. Disconnect the USB memory key.
Your new images are now available on your unit.
52 MaxTester Series
Page 63

Setting Up Your Unit
Changing the Background Picture
To change the background picture:
1. From the Home screen, tap Configuration.
2. Ta p Display.
3. Tap the image that you want to select as the new background image.
The edge of the selected image will be highlighted and a check mark
will appear, confirming your selection.
4. From the unit’s front panel, press the button to return to the
Home screen.
The background image is refreshed immediately.
MaxTester Series 53
Page 64

Setting Up Your Unit
Configuring the Power Management Options
Configuring the Power Management Options
When you do not use the unit for a while, the display may be dimmed to
save power. You can also configure the unit to go into suspend (sleep)
mode after the specified duration has expired (see Turning On or Off the
Unit on page 21).
For these actions, you can set idle durations for AC adapter/charger and
battery operation. The values that you set are kept in memory even when
you turn the unit off.
The sleep delay (time before the unit switches to suspend mode)
will only be taken into account once the dim delay (time before the
display is dimmed) has expired. For example, if the dim delay is set
to 5 minutes and the sleep delay is set to 10 minutes, the unit will
switch to suspend mode (sleep) after 15 minutes. If you set the dim
delay to Never, the sleep delay will also be set to Never
automatically.
IMPORTANT
Note: When the unit is in suspend mode and powered by battery, to save battery
power, the unit will switch from suspend to shutdown automatically after
four hours.
Note: When the backlight is dimmed, the unit operation is not interrupted. Touch
anywhere on the screen to return to normal operation.
54 MaxTester Series
Page 65

Configuring the Power Management Options
To configure the power management options:
1. From the Home screen, tap Configuration.
2. Ta p Power Options.
3. Modify the settings according to your needs.
Setting Up Your Unit
4. From the unit’s front panel, press the button to return to the
Home screen.
The new values are taken into account immediately.
MaxTester Series 55
Page 66

Setting Up Your Unit
Configuring the Internet Options
Configuring the Internet Options
You can browse the Web directly from your unit, provided that you have
access to an Internet connection and that the Internet options are
configured properly.
If you are not sure about how to configure your Internet access, contact
your network administrator.
To configure the Internet options:
1. From the Home screen, tap Configuration.
2. Ta p Devices and Utilities.
3. Ta p Internet Options.
4. Go to the Connection tab.
5. Modify the settings using the information provided by your network
administrator.
6. From the unit’s front panel, press the button to return to the
Home screen.
The new values are taken into account immediately.
56 MaxTester Series
Page 67

Setting Up Your Unit
Recalibrating the Touchscreen
Recalibrating the Touchscreen
If you notice the touchscreen does not behave in the way it used to
(for example, it is now difficult to select items) it probably needs a
recalibration. The calibration method is performed using five points.
You can stop the calibration process at any time, but the touchscreen will
still need calibration. The parameters are taken into account only when the
process is complete.
Note: If a keyboard is connected to your unit, you can start the calibration
application directly by pressing CTRL + ALT + T.
To recalibrate the touchscreen:
1. If you have started the calibration application already, go directly to
step 4. Otherwise, from the Home screen, tap Configuration.
2. Ta p Devices and Utilities.
3. Ta p Touchscreen Calibration.
MaxTester Series 57
Page 68

Setting Up Your Unit
Recalibrating the Touchscreen
4. Using the stylus (or any blunt pointing device), simply press the center
of the different targets that appear on the screen.
Note: If you want to stop the calibration process, from the unit’s front panel, press
the button. The application will close automatically after a few
seconds.
5. When the calibration is complete, you will return to the Configuration
window automatically.
6. Press the button to close the Configuration window and return to
the Home screen.
58 MaxTester Series
Page 69

Setting Up Your Unit
Selecting the Startup Application
Selecting the Startup Application
The first time you start your unit, the Home screen is displayed. However,
you can configure your unit to automatically start in any of the available
applications.
You can also configure your unit to start services such as the VNC server
(for remote control). For more information on remote control with VNC,
see Accessing Your Unit Remotely on page 109.
The selected application and service will start automatically the next time
you turn on your unit after a shutdown (not after resuming from the
suspend mode, and not after updating the applications). For more
information, see Turning On or Off the Unit on page 21.
To select a startup application:
1. From the Home screen, tap Configuration.
2. Ta p Startup Application.
MaxTester Series 59
Page 70

Setting Up Your Unit
Selecting the Startup Application
3. Select the application and/or the service you want to start
automatically when you turn on your unit.
Note: You can select only one application at a time.
4. From the unit’s front panel, press the button to return to the
Home screen.
Your selection will be taken into account next time you restart the unit.
60 MaxTester Series
Page 71

Setting Up Your Unit
Configuring the Network Settings
Configuring the Network Settings
You can configure the various network settings that your unit uses to
connect to the network or to the Internet. By default, the IP address of the
unit is assigned dynamically (automatically) by a DHCP server on your
network. However, if you prefer, you can define your own static IP address.
Note: If you are not sure on how to proceed or need more information about the
configuration, contact your network administrator.
To configure the network settings:
1. From the Home screen, tap Configuration.
2. Ta p Devices and Utilities.
3. Ta p Network Connections.
MaxTester Series 61
Page 72

Setting Up Your Unit
Configuring the Network Settings
4. Double-tap FEC1.
5. Go to the IP Address tab.
6. Modify the settings using the information provided by your network
administrator.
7. Ta p OK to confirm the changes.
8. Close the window to return to the Configuration window.
9. From the unit’s front panel, press the button to return to the
Home screen.
The new values are taken into account immediately.
62 MaxTester Series
Page 73

5Working with Your Unit
Accessing the Online Documentation
You can access the user documentation as well as the license agreements
at all times from your unit. When you open user documentation from the
Home screen (or the configuration wizard), the PDF files are displayed
automatically in the PDF reader.
If you want to print the user documentation, from a computer having
access to the Internet, you can go to the My EXFO section of the EXFO Web
site (www.exfo.com) and download it directly. You can also retrieve the
user documentation from your unit and transfer the PDF file to a USB
memory key.
To access the online documentation:
1. From the Home screen, tap Documentation.
2. Tap the desired document.
Note: The available documents depend on your unit’s configuration.
MaxTester Series 63
Page 74

Working with Your Unit
Accessing the Online Documentation
3. If you wish to access navigation tools, tap anywhere on the screen to
display the tools icon.
64 MaxTester Series
Page 75

Working with Your Unit
To close the PDF reader
To access sections of the user documentation directly
Current page/ total number of pages.
Tap to go to a specific page
Zoom
Display mode
(Fit page width/view page in whole/full screen)
To close the
Bookmarks and
Tools tabs
Accessing the Online Documentation
4. Tap the icon to display the Tool s and Bookmarks tabs.
Note: As soon as you switch to full screen mode, only the content of the file
remains displayed (all the other elements are hidden). For this reason, to
close the PDF reader, you need to go back to the Too ls tab (steps 3 and 4
explained above), and then exit the full screen mode with the button.
You will then be able to close the reader as usual with the button.
MaxTester Series 65
Page 76

Working with Your Unit
Accessing the Online Documentation
To transfer the user documentation to a USB memory key:
1. Connect a USB memory key to one of the USB ports of the unit.
2. From the Home screen, tap File Manager.
3. In the Address bar, type \Program Files\Metrino\, and press ENTER.
4. Double-tap the folder corresponding to the application for which you
want to retrieve the documentation.
5. Locate the desired PDF file. The English version is available directly at
the root of the folder. For the other languages, double-tap the folder
corresponding to the desired language.
Note: The user documentation may not be available in all of the listed languages.
66 MaxTester Series
Page 77

Working with Your Unit
Accessing the Online Documentation
6. From the Edit menu, select Copy.
7. Tap the parent folder button several times until you can see your USB
memory key (identified by “Removable Disk” or “Removable Disk 2”).
8. Double-tap the USB memory key identifier to access the key contents.
9. From the Edit menu, select Paste.
10. Disconnect your USB memory key.
MaxTester Series 67
Page 78

Working with Your Unit
Takin g S c reen Ca p t ur es
Taking Screen Captures
You can take captures of what is displayed on your screen, directly from
your unit. This could be useful for troubleshooting when you need another
person to have a look at a specific configuration or problem. You could also
use this tool for training purposes.
For more information on how to modify the default file format and
destination folder, see Setting Storage Parameters for Screen Captures on
page 70.
Images are saved using the defined file format. By default, images are
created in .jpg format, but you can modify this parameter.
By default, they are kept in the following folder:
\DATA\My Documents\Screenshots
It is possible to modify the folder in which images are automatically
saved.
By default, the application generates file names as follows:
IMG_<Selected_date_format>_<Selected_time_format>.jpg
where
Selected_date_format corresponds to the short date format defined in
the Configuration > Region and Language window.
Selected_time_format corresponds to the time format defined in the
Configuration > Region and Language window.
68 MaxTester Series
Page 79

Working with Your Unit
Taking Screen Captures
Examples:
For a screen capture taken on August 20, 2013, the file name could be:
Short Date
Format
Time Format File Name
MM/dd/yy 12 hours IMG_08_20_13_4_23_10_PM.jpg
yyyy-MM-dd 12 hours IMG_2013_08_20_4_23_10_PM.jpg
yyyy-MM-dd 24 hours IMG_2013_08_20_16_23_10.jpg
To take a screen capture:
1. From the unit’s front panel, press the button for two seconds.
2. From the shortcut toolbar, tap the button.
The screen capture is automatically taken (a visual effect typical of a
camera taking a picture indicates that the capture is complete).
Note: The shortcut toolbar will not appear in the screen capture.
MaxTester Series 69
Page 80

Working with Your Unit
Setting Storage Parameters for Screen Captures
Setting Storage Parameters for Screen
Captures
You can modify the file format of the screen captures as well as the
destination folder, that is the folder to which the captures will be sent.
By default, images are saved in .jpg format, but you can configure the
application to save them in .png or .bmp format.
By default, images are kept in the following folder:
\DATA\My Documents\Screenshots
You can select any other folder as the destination either locally on your
unit, on a USB memory key. If you wish to create your own folders on
the unit, use the File Manager from the Home screen.
Note: If the specified folder is no longer available (folder name has been
modified, folder has been deleted), the screen captures will be sent to a
new folder whose name and path correspond to those of the specified
folder. However, if you have defined a destination folder on a USB key and
this key is not connected to your unit when you take screen captures, the
latter will be sent to the default folder.
70 MaxTester Series
Page 81

Setting Storage Parameters for Screen Captures
To set the default image format:
1. From the Home screen, tap Configuration.
2. Ta p Devices and Utilities.
3. Ta p Screenshot Configuration.
Working with Your Unit
4. Under Image format, select the option corresponding to the desired
format.
5. Ta p OK to confirm the changes and close the window.
MaxTester Series 71
Page 82

Working with Your Unit
Setting Storage Parameters for Screen Captures
To modify the destination folder:
1. From the Home screen, tap Configuration.
2. Ta p Devices and Utilities.
3. Ta p Screenshot Configuration.
4. Under Destination folder, tap Browse.
72 MaxTester Series
Page 83

Working with Your Unit
Setting Storage Parameters for Screen Captures
5. From the Browse for Folder window, select the folder that you want to
use to store the screen captures.
6. When your selection is made, tap OK.
7. Ta p OK to confirm the changes and close the window.
MaxTester Series 73
Page 84

Working with Your Unit
Browsing the Web
Browsing the Web
You can browse the Web directly from your unit, provided that you have
access to an Internet connection.
If you need to modify the Internet options, see Configuring the Internet
Options on page 56.
To browse the Web:
1. From the Home screen, tap the Internet Explorer icon to open the
browser.
74 MaxTester Series
Page 85

Working with Your Unit
Browsing the Web
2. Enter the desired Web address in the address bar and tap the ENTER
key from the on-screen keyboard to start browsing.
3. Press the button or close the window to return to the Home
screen.
MaxTester Series 75
Page 86

Page 87

6 Using the Optional Built-In
Power Meter and VFL
You unit can be equipped with an optical power meter to measure
absolute power (dBm or W) or insertion loss (dB). The power meter can
detect modulated signals (1 kHz, 2 kHz, 270 Hz, and 330 Hz).
Your unit can also include a visual fault locator (VFL) to inspect or identify
fibers.
For more information on how to use the power meter or the VFL, refer to
the power meter online help. You can access this online help directly from
the Home screen (see Accessing the Online Documentation on page 63),
or by tapping the button from the power meter application.
Note: The appearance of your application may vary depending on the options
that you have purchased. The illustrations presented hereafter show the
application as it appears when the unit is equipped with a built-in power
meter and a VFL.
To access the built-in power meter or the VFL:
From the Home screen, tap the Power Meter - VFL icon to open the
application.
MaxTester Series 77
Page 88

Page 89

7 Inspecting Fibers with a Probe
The fiber inspection probe (FIP) is used to find dirty or damaged
connectors by displaying an enlarged view of the connector surface. You
can connect an FIP to your unit to view fiber ends.
IMPORTANT
Only the probes of the FIP-400B series are supported on your unit.
Fiber inspections are made using the ConnectorMax2 application. For
more information, refer to the ConnectorMax2 online help. You can access
this online help directly from the Home screen (see Accessing the Online
Documentation on page 63), or by tapping the button from the
ConnectorMax2 application.
To inspect fibers with a probe:
1. Connect the probe to one of the USB ports on the top panel of your
unit.
2. From the Home screen, tap the ConnectorMax2 icon to open the
application.
MaxTester Series 79
Page 90

Page 91

8 Managing Data
You can copy, move, rename, delete files and folders directly on your unit.
You can transfer files from your unit to a USB memory key or a computer.
You can also transfer data from a storage device or a computer to your unit.
Your unit is equipped with the following ports and devices for data transfer:
Two USB 2.0 ports to connect a memory key
an Ethernet port to connect to a network (for transfer via VNC -
see Accessing Your Unit Remotely on page 109)
internal Wi-Fi and Bluetooth module (optional) to connect to a
wireless network or transfer data via Bluetooth
MaxTester Series 81
Page 92

Managing Data
Viewing Disk Space and Managing Files
Viewing Disk Space and Managing Files
To help you manage the data that is stored on your unit, you can easily view
the remaining disk space. You can also copy, move, rename, delete files
and folders directly on your unit.
To view the free disk space on your unit (DATA partition):
1. From the Home screen, tap Configuration.
2. Ta p System Information > Capacity.
The free disk space is displayed under Data (\ Data) space used.
3. From the unit’s front panel, press the button to return to the
Home screen.
To manage files or folders on your unit only:
From the Home screen, select File Manager.
To transfer files or folders between your unit and a USB memory
key:
Use the Data Mover application to easily transfer files and folders to a USB
memory key (see Transferring Files with the Data Mover Application on
page 103).
82 MaxTester Series
Page 93

Managing Data
Transferring Data via Bluetooth
Transferring Data via Bluetooth
If your unit is equipped with the optional wireless module (internal), you
can transfer data between your unit and a computer using the Bluetooth
technology. By default, the Wi-Fi and Bluetooth module is enabled, but not
connected to a network or a device.
If you have disabled the module, you must enable it before trying to
transfer data via Bluetooth (see Enabling or Disabling the Wi-Fi and
Bluetooth Module on page 99).
The computer that you use must run Windows, be equipped with a
Bluetooth module (or adapter), and be configured properly.
Your unit must be located within a 9-meter area from your computer
(limitation of the Bluetooth technology).
If you need to transfer large files (more than 100 MB), use a USB key, or
connect to a Wi-Fi or an Ethernet network.
MaxTester Series 83
Page 94

Managing Data
Transferring Data via Bluetooth
Configuring the Computer
To communicate via Bluetooth, your unit uses mobile device services,
which means that Mobile Device Center (Windows Vista, Windows 7, and
Windows 8), or ActiveSync (Windows XP) must be installed on your
computer.
You can download and install the required application from the Microsoft
Web site:
ActiveSync for Windows XP:
http://www.microsoft.com/en-us/download/details.aspx?id=15
Mobile Device Center for Windows Vista 32 bits, Windows 7 32 bits, or
Window 8 32 bits:
http://www.microsoft.com/en-us/download/details.aspx?id=14
Mobile Device Center for Windows Vista 64 bits, Windows 7 64 bits,
Windows 8 64 bits:
http://www.microsoft.com/en-ca/download/details.aspx?id=3182
To configure the computer:
1. If necessary, download and install Mobile Device Center (or ActiveSync
for Windows XP) on your computer.
2. Configure the Bluetooth settings as follows:
2a. On the computer, from the taskbar, click the Bluetooth icon.
2b. Select Open Settings.
2c. Ensure that the option allowing Bluetooth devices to find the
computer is selected.
2d. Click OK to confirm.
84 MaxTester Series
Page 95

Managing Data
Transferring Data via Bluetooth
Pairing Devices with Your Unit
After the computer that you intend to use has been properly configured,
you can pair (associate) it with your unit.
Once a device has been paired successfully with your unit, it remains
paired (that is, ready for data transfer) as long as you do not remove the
pairing yourself. Each time you turn on your unit, or resume your work after
the unit has switched to suspend mode, the unit will try to establish a
connection with the paired devices automatically.
The next time you open the Bluetooth configuration window, only the
devices that have already been paired will be shown by default. However,
if you prefer, you can scan for all of the devices available in the area (paired
and not paired).
If no Bluetooth devices have been paired yet (or if all pairings have been
removed), you will see an empty list when you open the configuration
window. You can also scan for all available devices.
MaxTester Series 85
Page 96

Managing Data
Transferring Data via Bluetooth
The icon, displayed in the title bar, indicates the status of the Bluetooth
connection. The following table shows the possibilities:
Grey The Wi-Fi and Bluetooth module is
Blue At least one Bluetooth device has been
Icon Meaning
enabled, but no pairing and no choice of
mobile service has been made.
paired successfully with your unit.
Not visible
Unit is not equipped with Wi-Fi and
Bluetooth option.
Wi-Fi and Bluetooth are not supported
on this model.
Wi-Fi and Bluetooth module is
disabled (see Enabling or Disabling
the Wi-Fi and Bluetooth Module on
page 99).
Once the communication is established between your unit and the
computer, you are ready to transfer data.
86 MaxTester Series
Page 97

Managing Data
Transferring Data via Bluetooth
IMPORTANT
To avoid problems, always initiate the pairing from your unit (not
from the Bluetooth devices).
To pair devices with your unit:
1. On your unit, from the Home screen, tap Configuration.
2. Ta p Devices and Utilities.
3. Ta p Bluetooth Configuration.
Note: The Bluetooth Configuration icon is only visible on units that support
wireless communication, and that are equipped with the optional wireless
module.
4. Ensure that the Enable Wi-Fi and Bluetooth check box is selected.
MaxTester Series 87
Page 98

Managing Data
Transferring Data via Bluetooth
5. Ta p Find Devices if you want to scan for all the Bluetooth devices that
are available within your unit’s range.
Note: If you do not scan for all the available devices, the application will either
show you the list of paired devices, or an empty list if no pairing exist.
6. Tap the row corresponding to your computer.
7. Ta p Connect.
Note: Depending on the computer that you are using, the application will either
provide you with a passkey, or prompt you to confirm that the displayed
passkey matches the passkey used on the computer.
8. If necessary, write down the passkey displayed on screen.
88 MaxTester Series
Page 99

Managing Data
Transferring Data via Bluetooth
9. On the computer, when the application prompts you, click the
Bluetooth icon (located on the taskbar) to display the wizard allowing
you to add a Bluetooth device.
10. Follow the on-screen instructions. Enter the passkey that you wrote
down earlier, or confirm the correspondence between the two
passkeys.
Note: On your unit, if necessary, tap Yes to close the passkey window.
Note: Once you have established a secured connection using a passkey, this
passkey is kept in memory both on your unit and on the computer until you
remove this connection from your unit (Configuration > Devices and
Utilities > Bluetooth Configuration > Disconnect).
11. Ensure that the row corresponding to your paired computer is
selected, and then tap Settings to activate the desired mobile service.
MaxTester Series 89
Page 100

Managing Data
Transferring Data via Bluetooth
12. Select Windows Mobile, and then tap OK.
The unit tries to establish communication with the computer. Mobile
Device Center starts automatically (on the computer).
13. On your unit, tap Close to close the Bluetooth configuration window.
You are now ready to start transferring files.
The unit will try to establish a connection with the paired devices
automatically next at the next startup, or return from the suspend mode (a
connection window will appear briefly).
90 MaxTester Series
 Loading...