

Page 1

CADIZ M
R
UK - As with all portable heating appliances: This product is suitable only for well insulated spaces or occasional use.
FR - Comme dans le cas de tous les appareils de chauffage portatifs, ce produit convient seulement dans des espaces bien isolés et
pour un usage occasionnel.
08/54300/0 Issue 1
The product complies with the European Safety Standards EN60335:2-30 and the European Standard Electromagnetic Compatibility (EMC) EN55014:1,
EN55014:2, EN61000:3-2 and EN61000:3-3 which cover the essential requirements of EMC Directive 2014/30/EU and the LVD Directive 2014/35/EU.
[c] Glen Dimplex
All rights reserved. Material contained in this publication may not be reproduced in whole or in part, without prior permission in writing of Glen Dimplex.
Page 2
605
614
250
13 : 17
1
13 : 17
ON
OFF
ADVANCE
AUTO
P1
MANUAL ON
x
T
Y
x
o
XYX
2
3
4
Page 3
Cadiz Eco
THESE INSTRUCTIONS SHOULD BE READ CAREFULLY AND RETAINED FOR FUTURE REFERENCE
Model Description Watts
CADIZ M Switch, Thermostat & Digital Timer Control 2000
IMPORTANT SAFETY ADVICE
If the appliance is damaged, check immediately
with the supplier before installation and operation.
WARNING: This appliance must not be used in
a bathroom.
WARNING: Do not use in areas where petrol,
paint or ammable liquids are used or stored.
DO NOT put objects through the openings of the
appliance. This could lead to functional faults,
possibly to the ignition of the object.
If the mains lead is damaged, it must be replaced
by the manufacturer or its service agent or a
similarly qualied person in order to avoid a
hazard.
Unplug the heater when not required for long
periods.
WARNING: Do not use this heater in the
immediate surroundings of a bath, a shower or
a swimming pool.
WARNING: This heater must not be located
immediately below a xed socket outlet.
The heater carries a warning symbol to
alert the user to the risk of re that exists
if the heater is accidentally covered.
WARNING: In order to avoid a hazard due to
inadvertent resetting of the thermal cut-out,
this appliance must not be supplied through an
external switching device, such as a timer, or
connected to a circuit that is regularly switched
on and off by the utility.
This appliance can be used by children aged from
8 years and above and persons with reduced
physical, sensory or mental capabilities or lack of
experience or knowledge if they have been given
supervision or instruction concerning the use of
the appliance in a safe way and understand the
hazards involved. Children shall not play with the
appliance. Cleaning and user maintenance shall
not be made by children without supervision.
Children of less than 3 years should be kept away
unless continuously supervised. Children aged
from 3 years and less than 8 years shall only
switch on/off the appliance provided that it has
been placed or installed in its intended normal
operating position and they have been given
supervision or instruction concerning the use of
the appliance in a safe way and understand the
hazards involved. Children aged from 3 years and
less than 8 years shall not plug in, regulate and
clean the appliance or perform user maintenance.
CAUTION: Some parts of this product can
become very hot and cause burns. Particular
attention has to be given where children and
vulnerable people are present.
If the mains lead is damaged, it must be replaced
by the manufacturer or its service agent or a
similarly qualied person in order to avoid a
hazard.
GENERAL NOTES
The heater is designed for operation on an AC electricity supply, and is
suitable for use in domestic dwellings and similar indoor locations.
Always ensure that the appliance is stood on a rm, level base near to, but
not directly beneath, a suitable xed socket outlet.
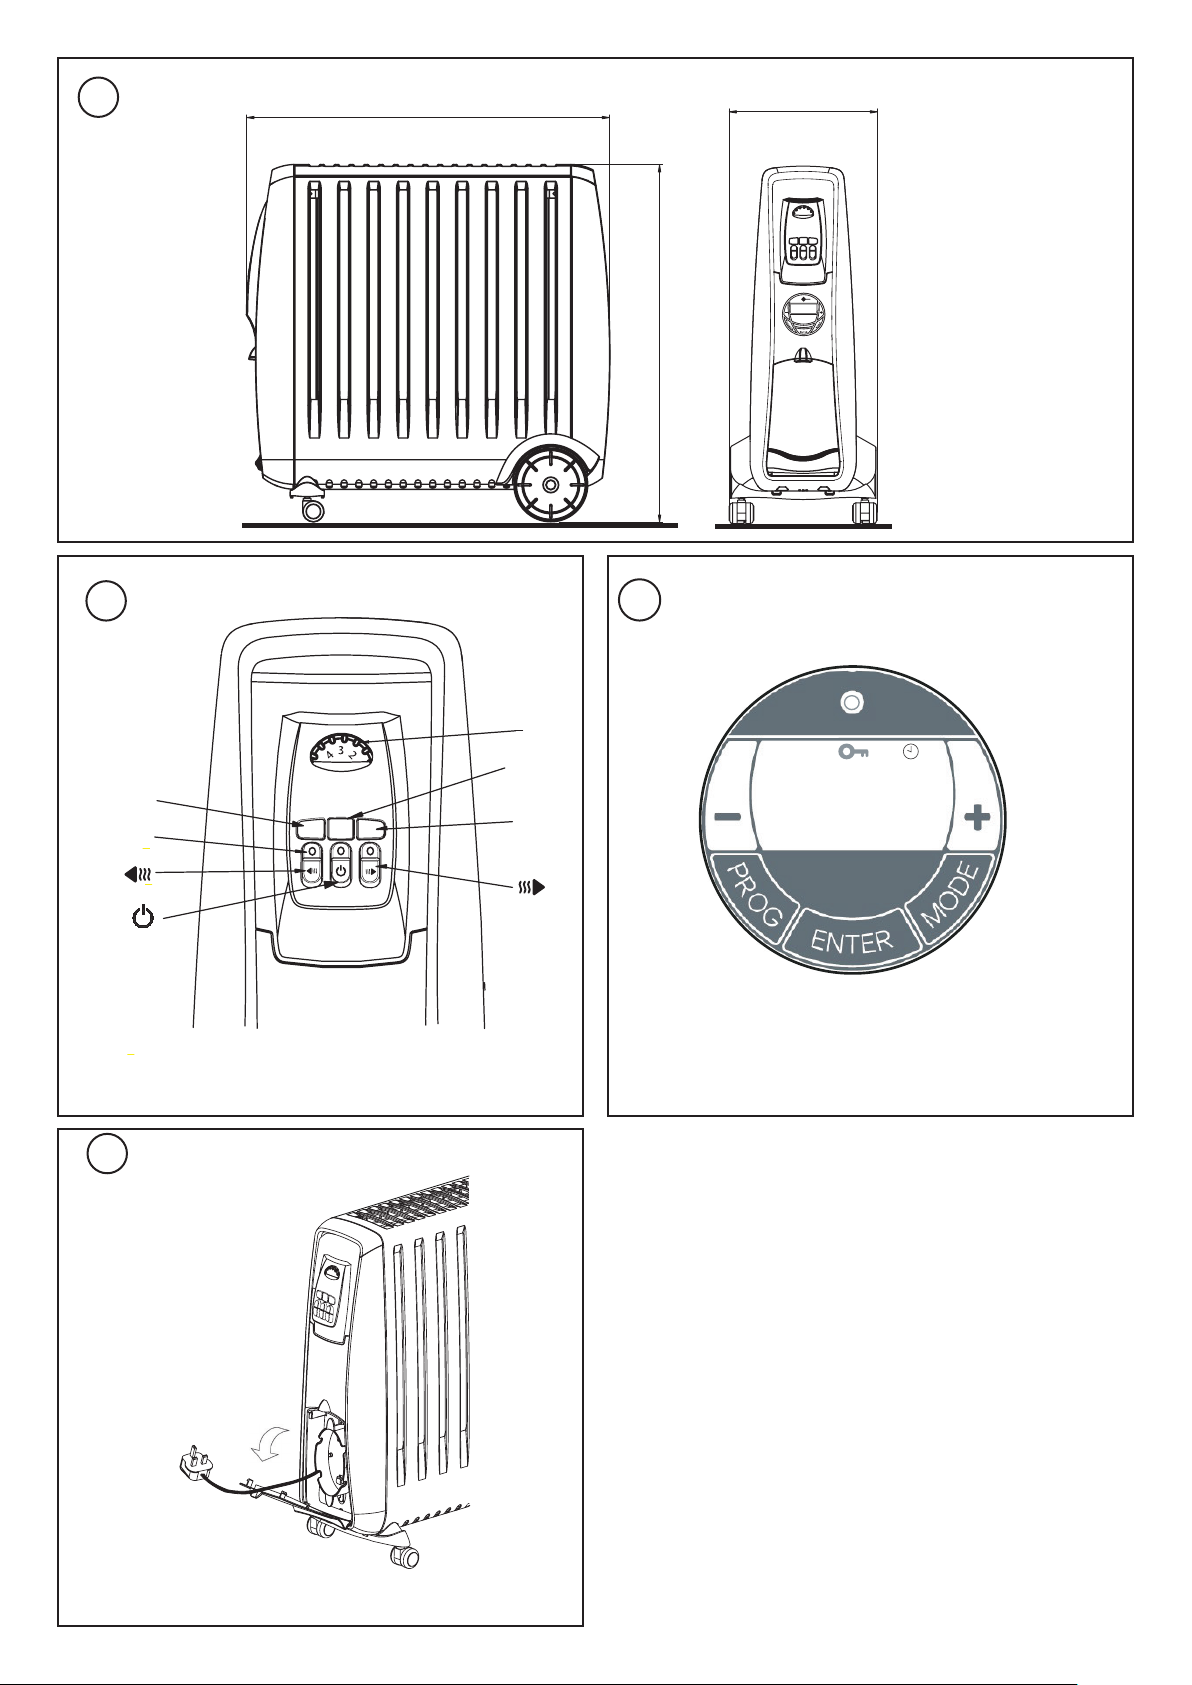
The heater is tted with wheels, castors and a handle for ease of movement.
Selector switches provide a choice of heat output and an adjustable
thermostat enables the room temperature to be controlled accordingly. It
is supplied with a cord and plug ready for use.
The supply cord should be uncoiled before use (see ‘Storage’).
DO NOT pull the heater along by the mains lead.
Important - The heater must only be operated with the wheels and castors
tted and in the upright position as shown in Fig. 1.
Warning – The heater complies with stringent safety standards but to ensure
efcient operation surfaces of the heater will become hot and contact with
these areas should be avoided, particularly between the air outlet slots on
the top and sides.
The control panel area is designed to be at a far lower temperature to allow
the safe operation of the controls at any time. Momentary contact with any
part of the heater should not cause injury. However aged, inrm persons or
young children should not be left unsupervised in the vicinity of the heater.
Please Note – After switching the heater on for the rst time and after an
extended period of non-use a smell may be noticed, this is quite normal –
the fumes are non-toxic and will quickly disappear. We recommend that you
open a window to ventilate the room when using the heater during this time.
Used in an environment where background noise is very low, it may be
possible to hear a sound which is related to the element. This is normal
and should not be a cause for concern.
Positioning the Heater
Select the position for the heater ensuring there is clearance from any
furniture and ttings of at least 300mm above the heater and 150mm
each side. The appliance should only be operated on a at stable surface.
Operation
Important: Objects or clothing must not be placed on this heater. Before
using the heater ensure that all warnings and instructions have been read
carefully.
To bring the heater into use plug it in. Neon indicating lights located at the
controls area will glow when the appliance is actually heating.
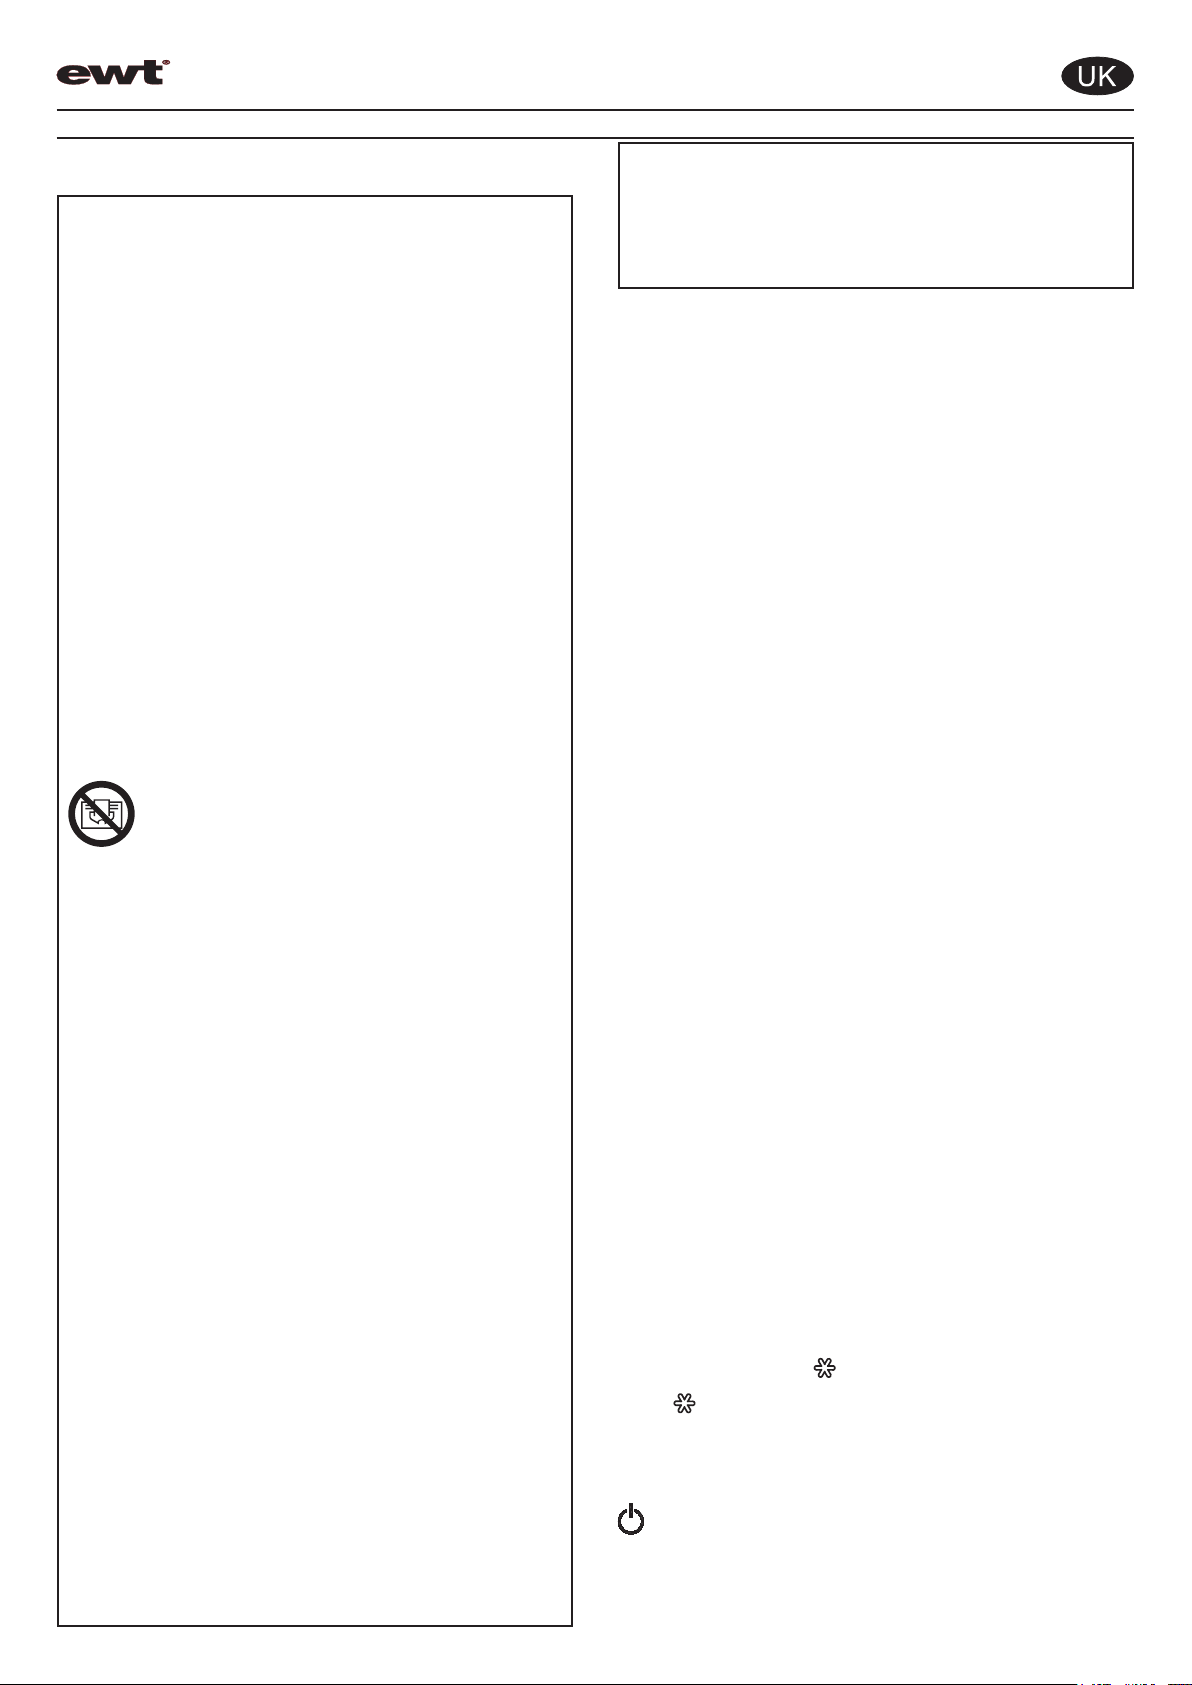
CONTROLS
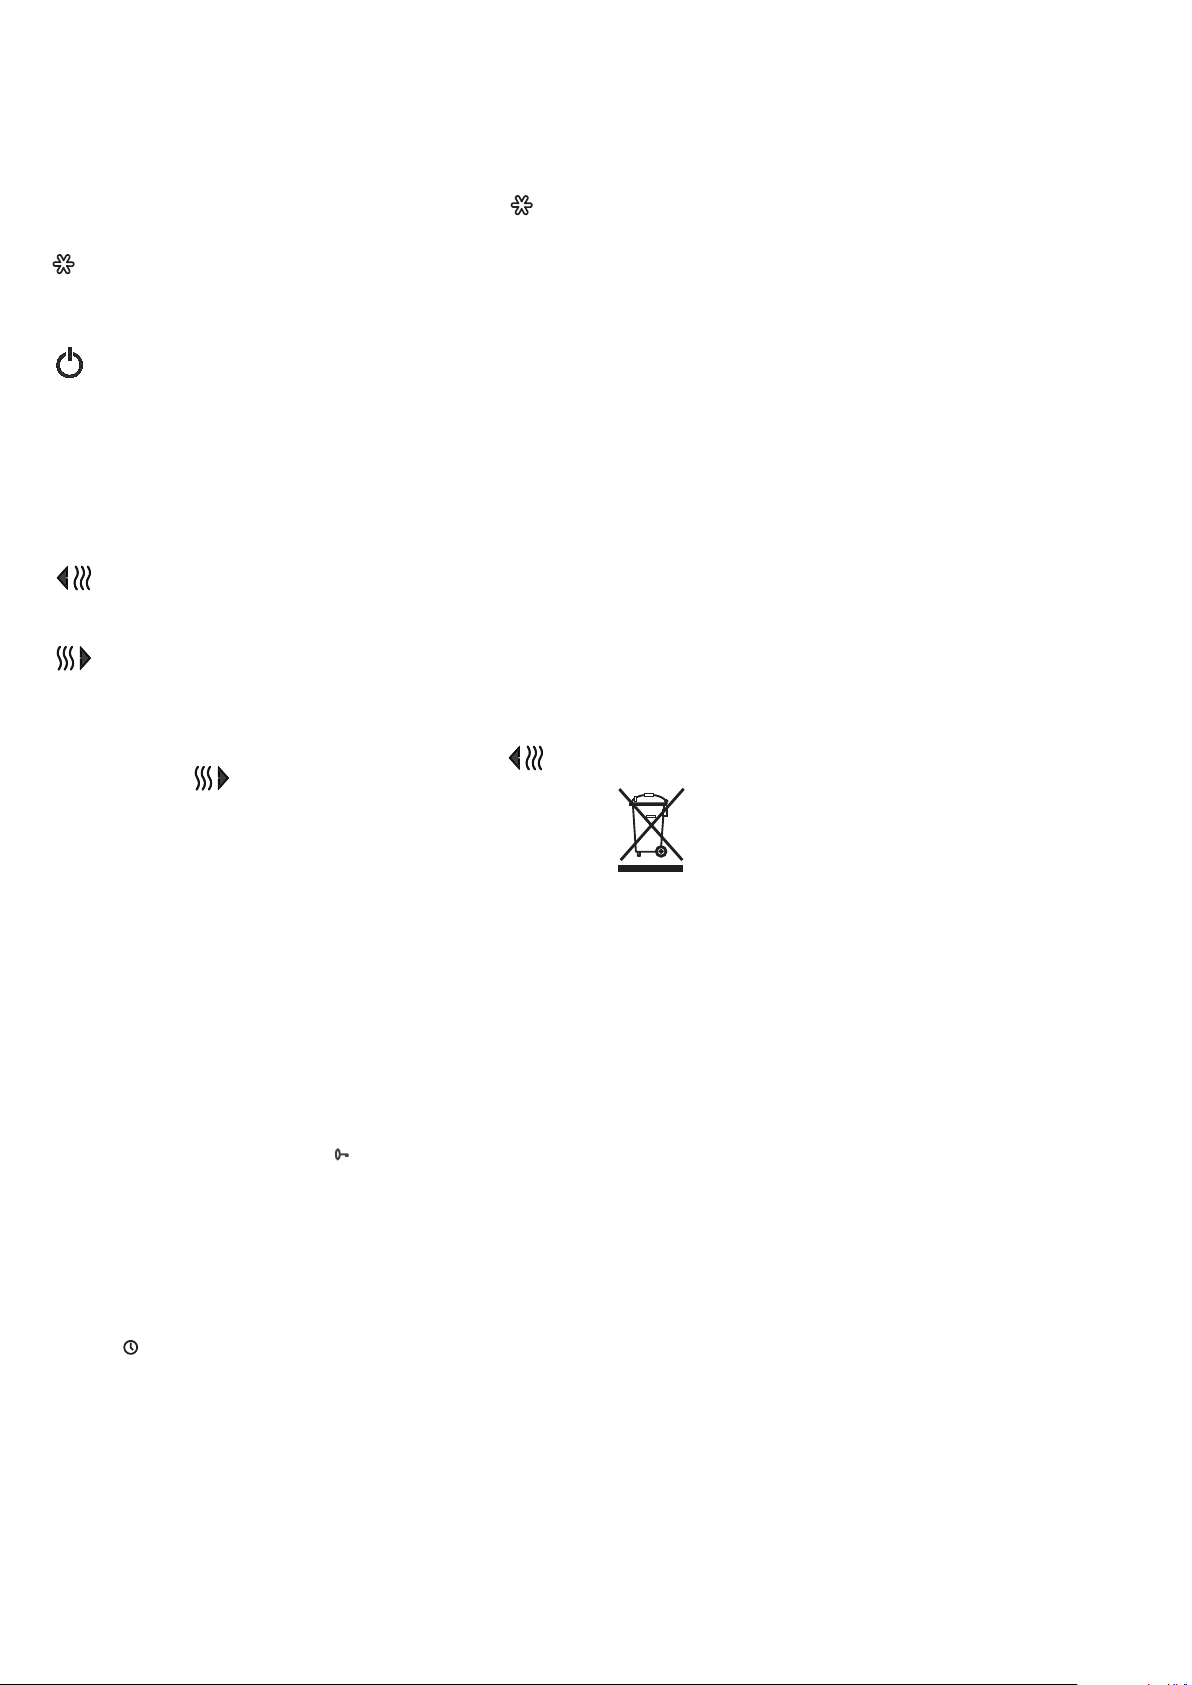
Thermostat
The Thermostat (see ‘T’ in Fig. 2) controls the heat output according to
the room temperature. This ensures that the heater will not produce heat
unnecessarily when the room is warm. To set the temperature you require,
turn the thermostat knob clockwise until the required setting is reached.
Alternatively to heat a cold room quickly, turn the thermostat knob up fully.
When the room has reached the desired temperature, turn the thermostat
knob anti-clockwise until the thermostat just clicks off. The heater will now
automatically operate at this temperature. The thermostat also has a frost
protection setting marked ‘ ‘. This setting is useful in areas such as
garages, to prevent frost damage. If the thermostat is set to its minimum
setting ‘ ’, the heater will cycle on and off to maintain a temperature of
approximately 5° to help protect against frost.
Note – Should the heater fail to come on when the thermostat is at a low
setting, this may be due to the room temperature being higher than the
thermostat setting.
On/Off button
This button controls the electricity supply to the elements. When the On/
Off button is activated a neon light ‘Y’ illuminates above the control button.
To turn off press the button ‘O’ located directly above the On/Off button.
- 1 -
Page 4
Mono and Dual Panel Heat Selection
Selector switches located on the control panel provide a choice of Half
Heat or Full Heat output to suit varying conditions and for economy of
operation as follows:
Half Heat Setting - left hand side - This switch as shown in Fig. 2
provides half heat output when activated. When it is activated a neon light ‘x’
illuminates above the control button and the left hand side element turns on.
Half Heat Setting - right hand side - This switch as shown in Fig.
2 provides a half heat output when activated. When it is activated a neon
light ‘x’ illuminates above the control button and the right hand side element
turns on.
Maximum Heat Setting
Maximum output is achieved with both left and right hand side switches on
and all neons illuminated.
Note that the product wil only operate with the On/Off button in the ‘On’
position and all neons illuminated.
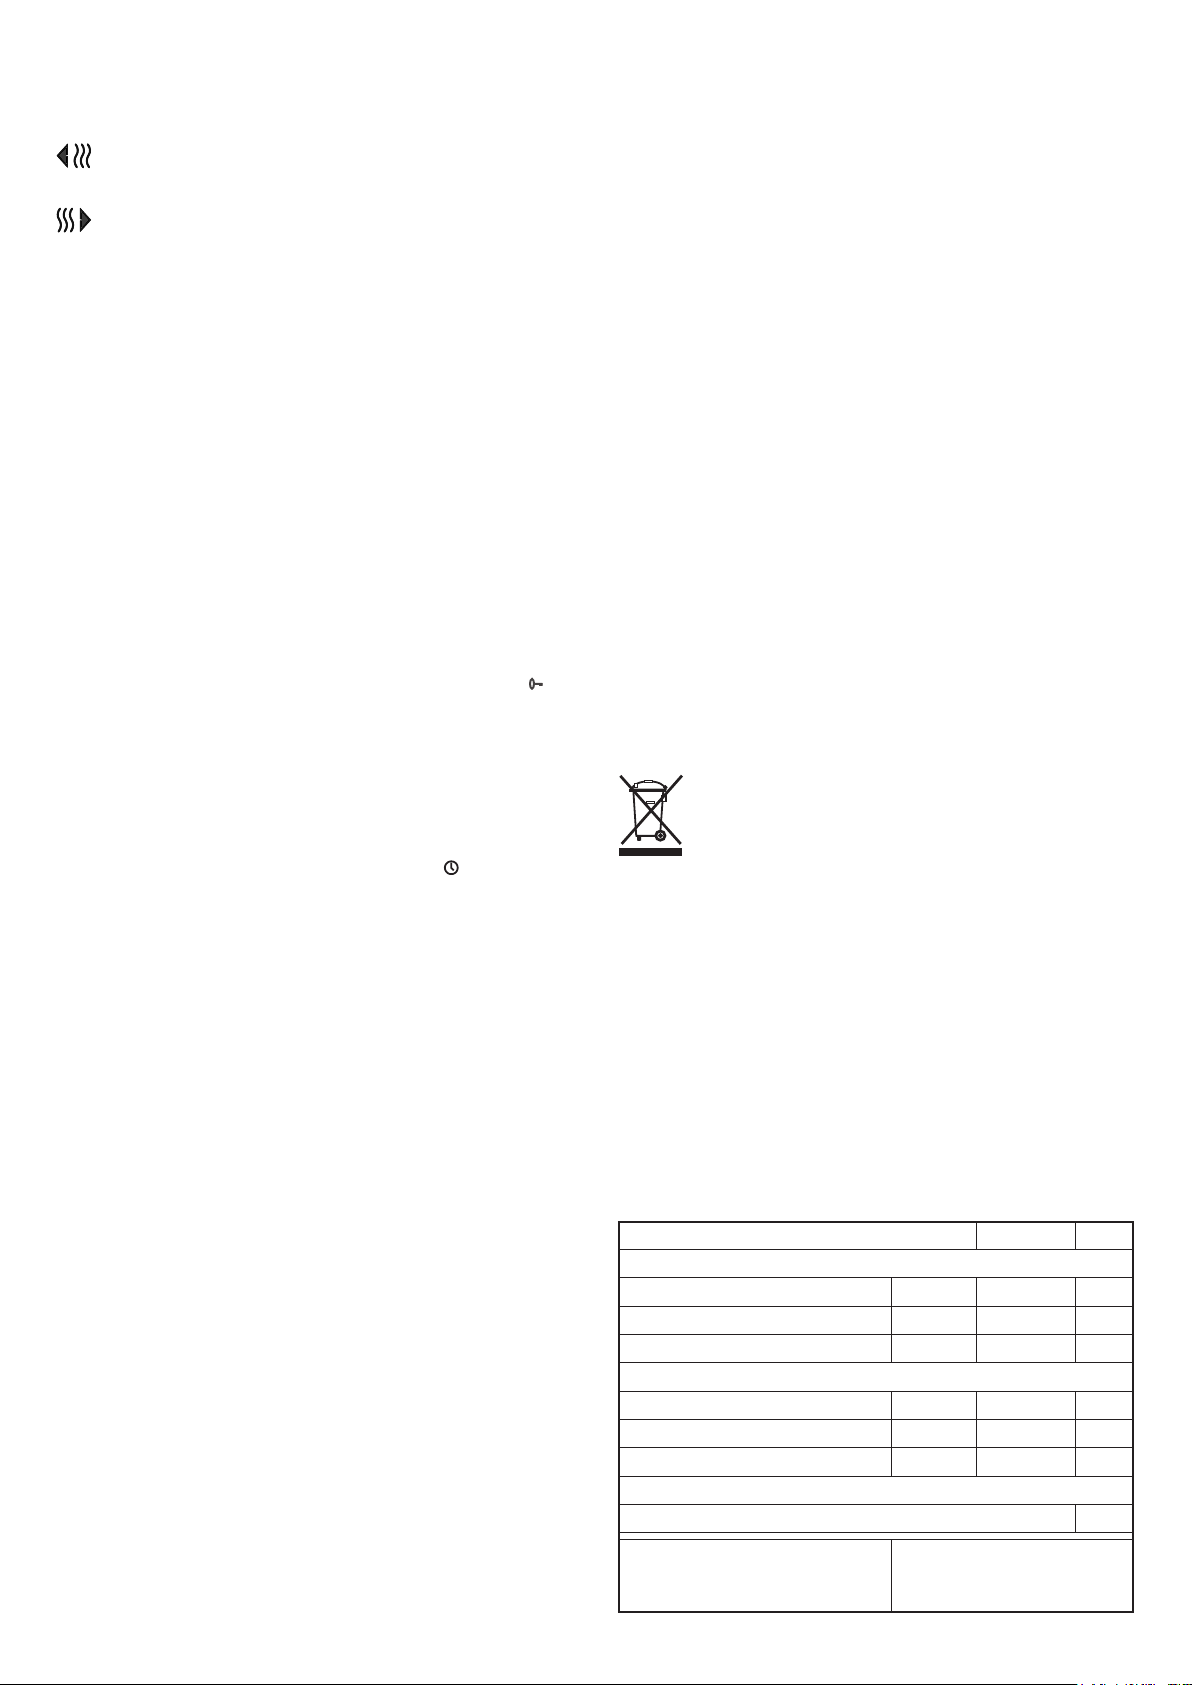
DIGITAL TIMER OPERATION
(Fig. 3)
IMPORTANT: Remember to observe all safety warnings when operating
the heater on auto setting, either attended or unattended.
The timer allows you to select ‘AUTO’ or ‘MAN ON’ by pressing the ‘MODE’
button until the required MODE appears at the bottom of the timer display.
‘AUTO’ MODE allows the heater to switch ON and OFF according to a set
24 Hour program period (see ‘Setting Programs’ section below).
‘MAN ON’ MODE allows power to the heater uninterrupted by the program
settings.
Key Lock:
If ‘ENTER’ and ‘MODE’ are pressed within 1 second, the keys will be
locked. The user will know the keys are locked as the lock symbol ‘ ’ will
be displayed on the top left hand corner of the screen. To unlock the keypad,
press ‘ENTER’ and then ‘MODE’ within 1 second.
Initial Operation
For initial use, plug the heater into a regular household power point and
turn the power on. The timer is now ready to be set up for use.
Setting Current Time
1. Hold the ‘PROGRAM’ button until the clock symbol appears on the
screen. The user can now set the clock.
2. The hour digit will ash. To adjust the hour use the ‘-’ & ‘+’ buttons.
Conrm the hour digit by pressing ‘ENTER’.
3. Once ‘ENTER’ has been pressed the minutes will ash. To adjust the
minutes use the ‘-’ & ‘+’ buttons. Conrm the minute digit by pressing
‘ENTER’.
4. The timer now returns to the default display.
5. To reset incorrect time, repeat previous steps.
Once the correct time is set, a total of four ON/OFF time programs can be
set for operation.
Setting Programmes
Press the ‘PROGRAM’ key to set the programs.
You are now setting the programs starting with P1 ‘ON’.
SETTING P1 ON TIME:
1. To set the hour use the ‘-’ & ‘+’ buttons. Conrm the hour digit by pressing
‘ENTER’.
2. To set the minutes use the ‘-’ & ‘+’ buttons. Conrm the minute digit by
pressing ‘ENTER’.
Note: The minutes can only be set in 10 minute blocks in programme
‘MODE’.
SETTING P1 OFF TIME:
3. To set the hour use the ‘-’ & ‘+’ buttons. Conrm the hour digit by pressing
‘ENTER’.
4. To set the minutes use the ‘-’ & ‘+’ buttons. Conrm the minute digit by
pressing ‘ENTER’.
Repeat steps 1 to 4 to programme P2, P3 & P4. After programming P4
‘OFF’ you automatically exit to the default display.
At any time while programming the timer you can press the ‘PROGRAM’
button to exit to the default display.
Note: If the ‘ON’ time is the same as the ‘OFF’ time the appliance will
ignore the program.
The Advance Function
When in ‘AUTO’ MODE, if the ‘+’ button is pressed for longer than 2
seconds the programme will ADVANCE to the next setting programmed
and will only revert back to the program when the subsequent programme
time is reached. When the ‘ADVANCE’ function is running the ‘ADVANCE’
segment will be displayed on the LCD screen. If the ‘-’ button is pressed
when the ‘ADVANCE’ programme is running the ‘ADVANCE’ feature will
be automatically cancelled and the programme will run as normal.
Note - Timer Memory Back Up Batteries - Once the heater has been
left plugged in with the socket switched on for at least 72 hours the timer’s
memory back up batteries will be fully charged.
Once the timer batteries are fully charged, if there is a power cut or if the
heater is disconnected from the mains for less than six months, then the
timer will continue to keep time & the settings in the memory will remain
intact.
If however the timer back up batteries have not been charged fully, or if the
heater is deprived of power for longer than six months, then the time and
the programme settings are likely to be lost and you may therefore need
to reset the time and the programme before using the AUTO MODE again.
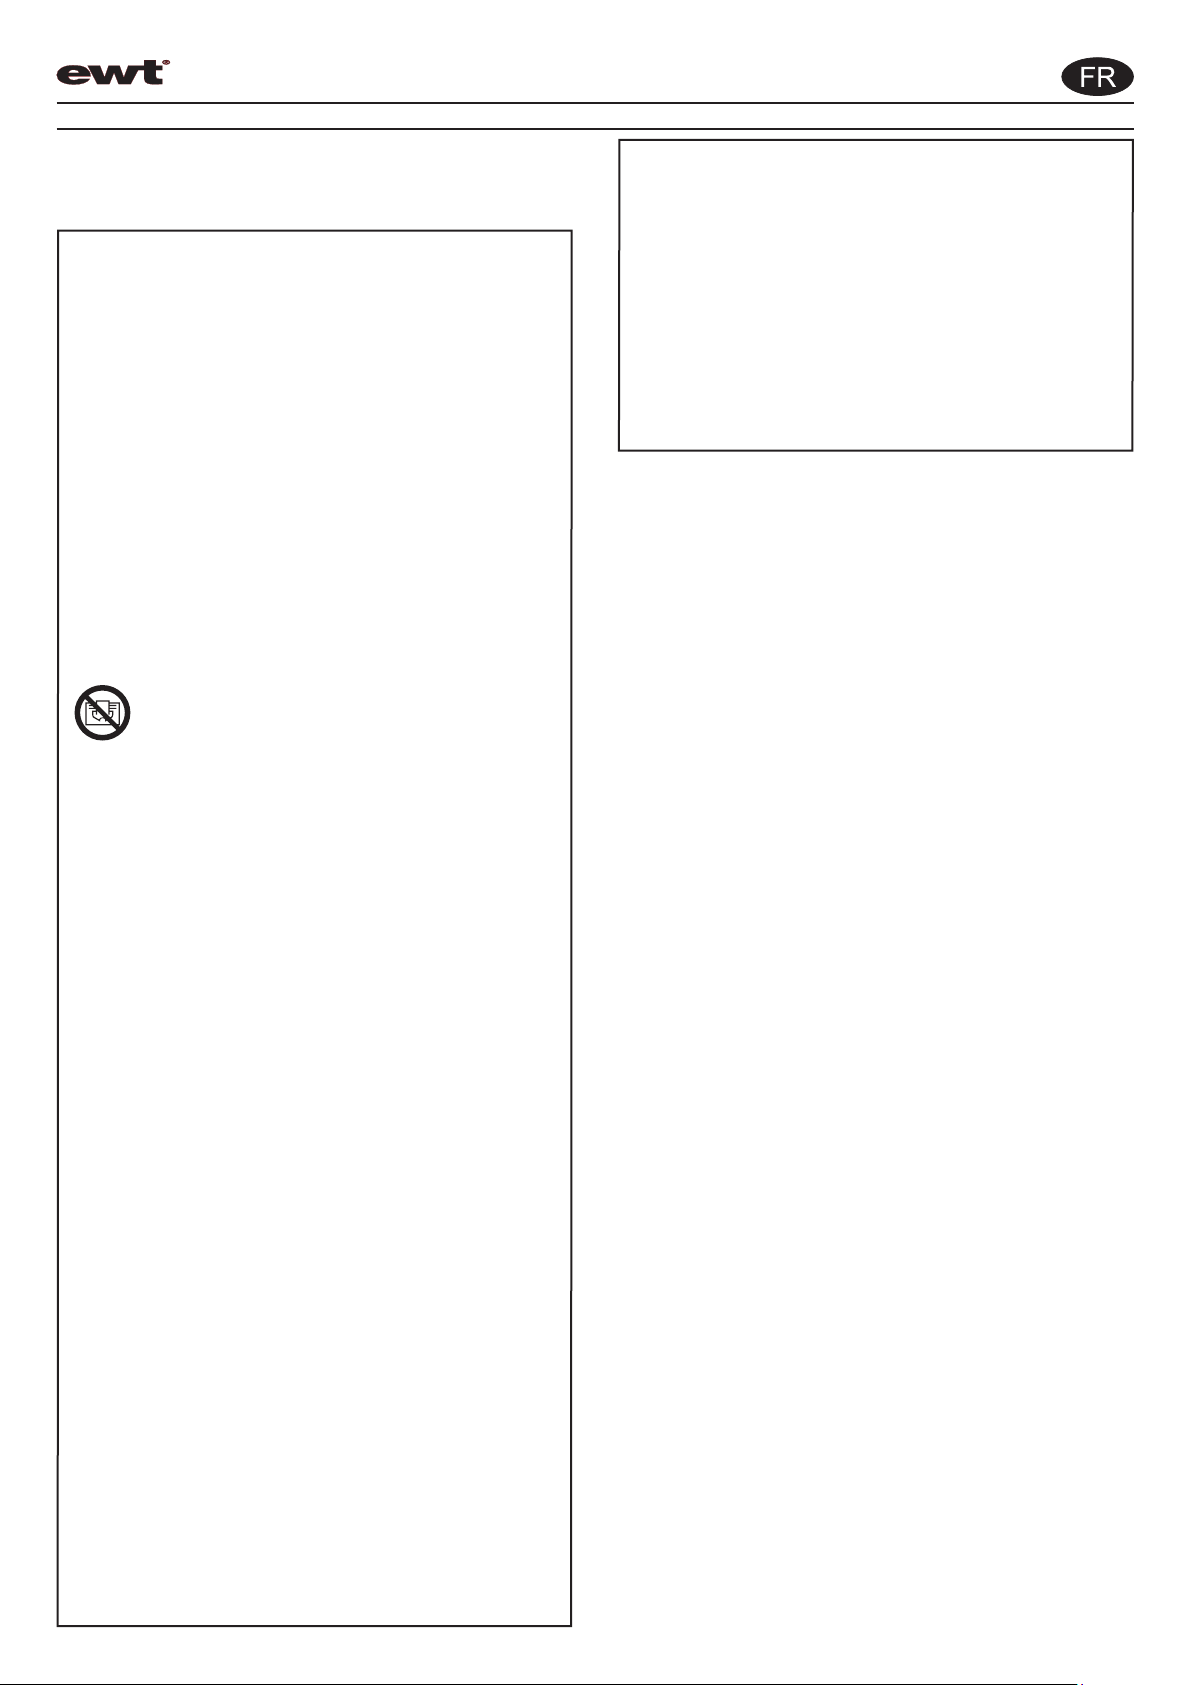
Storage
If the radiator is not required for long periods, for example during the
summer, it should be stored in a dry place and preferably covered to
prevent the accumulation of dirt and dust. The plug and cord can be stored
in the storage area provided – see Fig. 4 The cord should be neatly coiled
around the hooks provided and the plug inserted into the pin-hole in the
central compartment.
Safety Overheat Protection
For your safety this appliance is tted with a thermal cut-out. In the event
that the product overheats for some reason, the cut-out prevents excessive
temperatures on the product by cutting the power to the
heater has cooled down, it will reset automatically, it
and off automatically until the reason for overheating is removed.
heater. Once the
will continue to cycle on
Recycling
For electrical products sold within the European Community.
At the end of the electrical products useful life it should not be
disposed of with household waste. Please recycle where facilities
exist. Check with your Local Authority or retailer for recycling
advice in your country.
Cleaning
WARNING - ALWAYS DISCONNECT THE POWER SUPPLY BEFORE
CLEANING THE HEATER.
Do not use detergents, abrasive cleaning powder or polish of any kind on
the body of the heater.
Allow the heater to cool, then wipe with a dry cloth to remove dust and a
damp cloth (not wet) to clean off stains. Be careful not to allow moisture
in to the heater.
After Sales Service
Should you require after sales service or should you need to purchase any
spares, please contact the retailer from whom the appliance was purchased
or contact the service number relevant to your country on the warranty card.
Please do not return a faulty product to us in the rst instance as this may
result in loss or damage and delay in providing you with a satisfactory
service.
Please retain your receipt as proof of purchase.
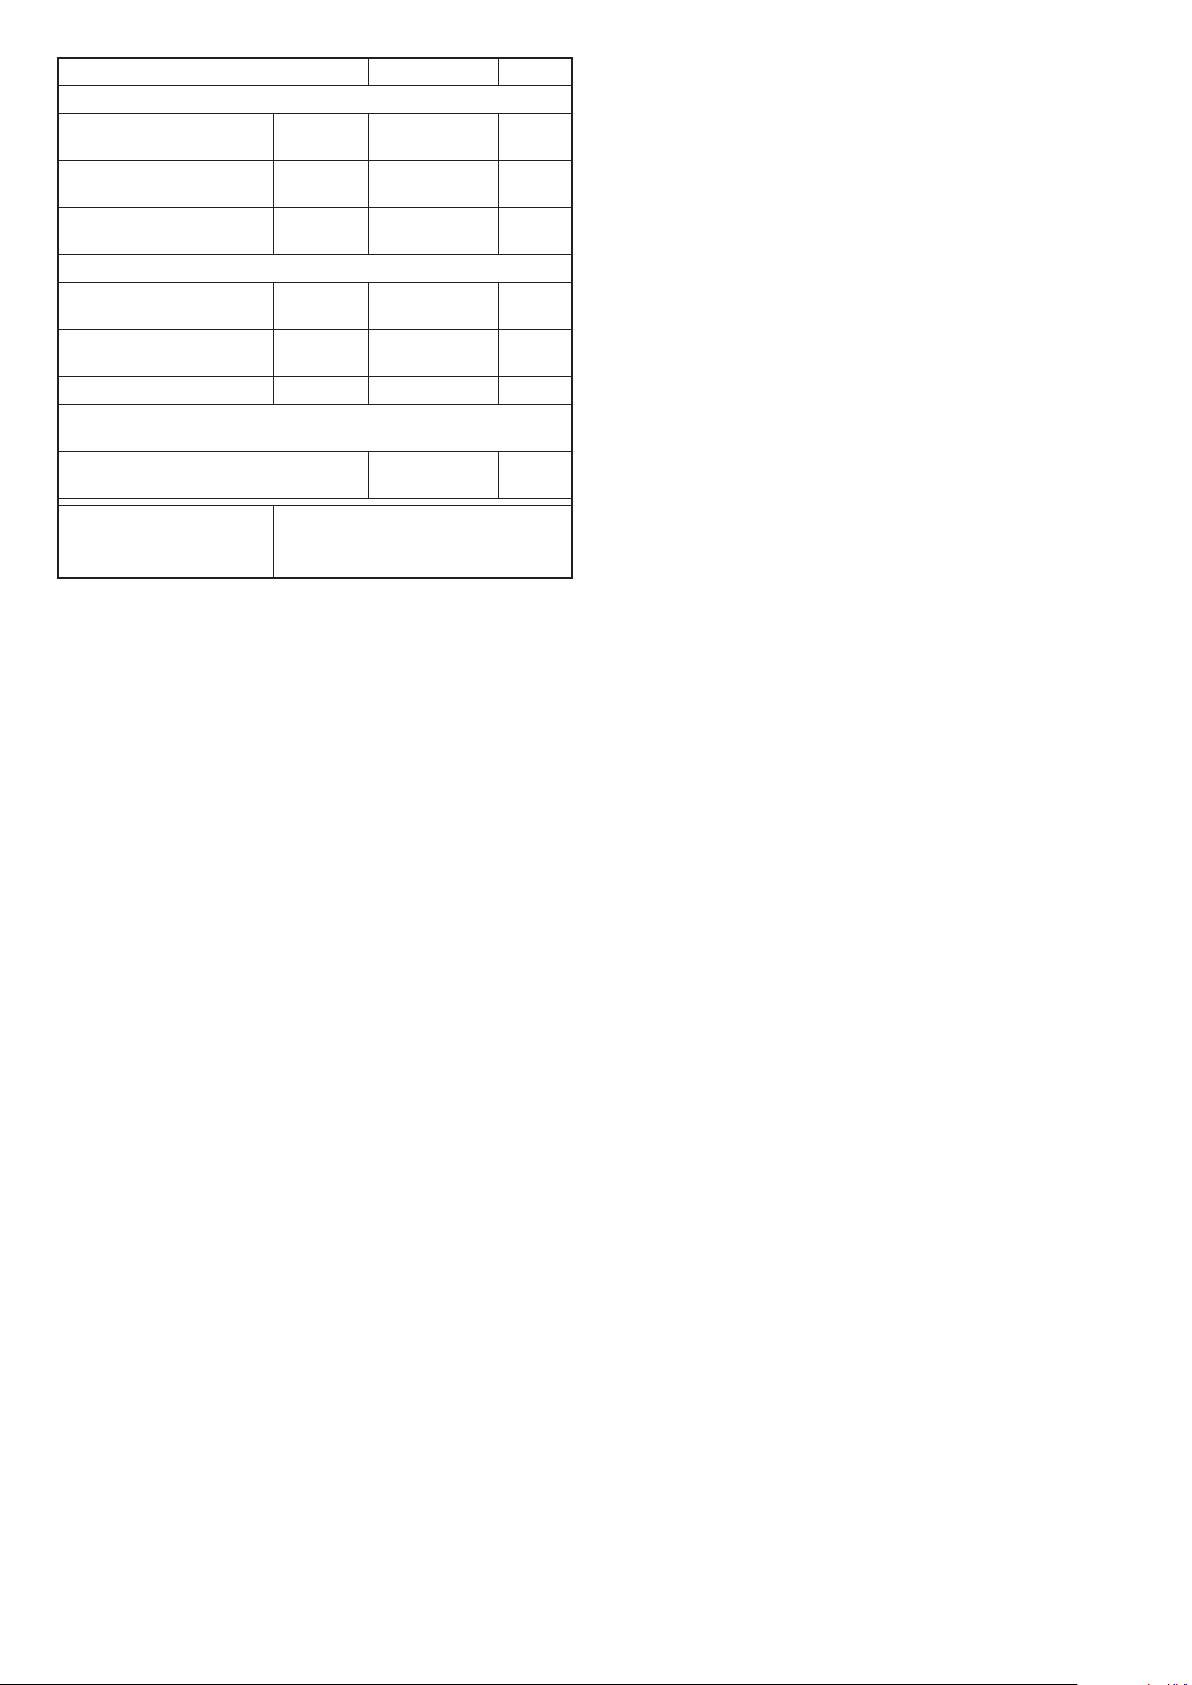
Model Identier(s): Cadiz M
Heat output
Nominal heat output Pnom 2.0 kW
Minimum heat output (indicative) Pmin 1.0 kW
Maximum continuous heat output Pmax,c 2.0 kW
Auxiliary electricity Consumption
At nominal heat output elmax 0.0 kW
At minimum heat output elmin 0.0 kW
In standby mode elSB 0.0 kW
Type of heat output/ room temperature control
With mechanical thermostat room temperature control Yes
Contact details
GLEN DIMPLEX FRANCE
12 Boulevard du Mont d’Est - 7/10 Porte Neuilly
Maille Nord III, Hall A
93160 NOISY-LE-GRAND - France
- 2 -
Page 5
Cadiz Eco
LIRE ATTENTIVEMENT CES INSTRUCTIONS ET LES CONSERVER SOIGNEUSEMENT POUR RÉFÉRENCE ULTÉRIEURE
Modèle Description Watts
CDE2ECC
CDE3ECC
Radiateur écologique 2000
Radiateur écologique 3000
Conseils de sécurité importants
Si l’appareil est endommagé, consultez
immédiatement le fournisseur avant
l’installation et l’utilisation.
Avertissement - cet appareil ne doit pas être
utilisé dans une salle de bain.
Avertissement - Ne pas utiliser le radiateur
électrique à proximité immédiate d'une
baignoire, douche ou piscine.
Avertissement - L’appareil de chauffage ne
doit pas être placé directement sous une prise
de courant xe.
Avertissement - Ne l’utilisez pas dans des
endroits où de l’essence, de la peinture
ou des liquides inammables sont utilisés ou
entreposés.
Le radiateur électrique comporte un symbole
d'avertissement afin d'alerter
l'utilisateur de l'existence d'un risque
d'incendie lorsque le radiateur est
accidentellement couvert.
AVERTISSEMENT : CET APPAREIL DOIT
ÊTRE MIS À LA TERRE
AVERTISSEMENT : An d’éviter tout danger
lié à une réinitialisation accidentelle du coupecircuit thermique, cet appareil ne doit pas être
alimenté par un dispositif de commutation
externe tel qu’un un minuteur par exemple, ou
raccordé à un circuit qui est allumé et éteint
régulièrement par le service.
Cet appareil peut être utilisé par les enfants
d’au moins 8 ans et par les personnes ayant
des capacités physiques, sensorielles ou
mentales réduites ou faisant preuve d’un
manque d’expérience et de connaissances
uniquement si celles-ci font l’objet d’une
surveillance ou ont reçu des instructions
concernant l’utilisation sûre de cet appareil,
et si elles comprennent les dangers que cela
implique. Les enfants ne doivent pas jouer
avec l’appareil. Le nettoyage et l’entretien
ne doivent pas être effectués par des enfants
sans surveillance.
Les enfants de moins de 3 ans doivent être
tenus éloignés, à moins d’être continuellement
supervisés. Les enfants âgés entre 3 et 8 ans
ne doivent allumer / éteindre l’appareil que
si celui-ci a été placé ou installé dans une
position de fonctionnement normal et que
ces enfants font l’objet d’une surveillance
ou ont reçu des instructions concernant
l’utilisation sûre de l’appareil, et comprennent
les dangers que cela implique. Les enfants
âgés entre 3 et 8 ans ne doivent ni brancher,
régler ni nettoyer l’appareil ou effectuer son
entretien.
ATTENTION : Certains éléments de ce produit
peuvent devenir très chauds et provoquer
des brûlures. Il faut payer une attention
particulière lorsque des enfants et personnes
vulnérables sont présentes.
Si le câble d’alimentation de l’appareil est
endommagé, celui-ci doit être remplacé par
le fabricant ou par le prestataire de service,
ou par toute autre personne qualiée an
d’éviter tout danger.
GÉNÉRALITÉS
L’appareil est conçu pour fonctionner sur une alimentation en courant
alternatif et convient pour une utilisation dans des habitations
domestiques et des emplacements intérieurs similaires. Assurez-vous
que l’appareil est toujours posé sur une base solide et plane à proximité
d’une prise de courant fixe appropriée, mais pas directement sous celleci.
L’appareil est équipé de roues, de roulettes et d’une poignée pour faciliter
le déplacement du chauffage. Les sélecteurs offrent un choix de
chaleur du côté gauche ou droit et un thermostat réglable permet de
contrôler la température ambiante. Il est fourni avec un cordon et une
prise prêts à l’emploi. Le cordon d’alimentation doit être déroulé
avant utilisation (voir « Stockage »).
NE PAS tirer l’appareil par le cordon d’alimentation.
Important - L’appareil doit uniquement être utilisé avec les roues et les
roulettes montées et en position verticale comme indiqué dans la Fig.
1).
Avertissement - l’appareil satisfait à des normes de sécurité strictes
mais pour assurer un fonctionnement efficace LES SURFACES DE
L’APPAREIL DEVIENNENT CHAUDES ET LE CONTACT AVEC
CES ZONES DEVRAIT ÊTRE ÉVITÉ, en particulier entre les fentes de
sortie d’air au dessus et sur les côtés du chauffage. La zone du panneau
de commande est conçue pour être à une température beaucoup plus
basse pour permettre le fonctionnement toute en sécurité des
commandes à tout moment. Un contact momentané avec une partie
quelconque de l’appareil ne devrait pas causer de blessures.
Cependant, les personnes âgées, les personnes infirmes ou les jeunes
enfants ne doivent pas être laissés sans surveillance à proximité de
l’appareil.
Notes - Après la mise en marche de l’appareil pour la première fois
et après une
remarquée, cce qui est est tout à fait normal ; les fumées sont non
toxiques et disparaîtront rapidement. Nous vous recommandons d’ouvrir
une fenêtre pour aérer la pièce lorsque vous utilisez l’appareil pendant cette
période.
Utilisé dans un environnement où le bruit de fond est très faible, il peut
être possible d’entendre un son lié au chauffage. C’est normal et cela ne
doit pas susciter d’inquiétudes.
période prolongée de non-utilisation, une odeur peut être
Positionnement du chauffage
Sélectionnez la position de l’appareil en vous assurant qu’il y ait un
dégagement de tous les meubles et raccords d’au moins 30 cm audessus du radiateur et de 15 cm de chaque côté. L’appareil doit
toujours être utilisé sur une surface plate et stable.
Utilisation
Important - Des objets ou des vêtements ne doivent pas être placés sur le
radiateur. Avant d’utiliser l’appareil, assurez-vous que tous les
avertissements et instructions d'utilisation ont été lus attentivement.
Pour mettre l’appareil en service, branchez-le. Les voyants d’indication
néons situés dans la zone des commandes s’allumeront lorsque l’appareil
chauffera.
COMMANDES
Thermostat
Le thermostat (voir ‘T’ Fig.2
fonction de la température de la pièce. Cela permet que
- 6 -
) contrôle la puissance calorifique en
Page 6
l’appareil ne génère pas inutilement de chaleur si la pièce est déjà
chauffée. Tourner le bouton du thermostat dans le sens des aiguilles
d’une montre pour sélectionner la température de fonctionnement désirée.
Il est possible de tourner
chauffer rapidement une pièce froide. Lorsque la pièce a atteint la
température désirée, tourner le bouton du thermostat dans le sens inverse
des aiguilles d’une montre jusqu’à ce que le thermostat émette un déclic.
Le radiateur fonctionne automatiquement à cette température. Le
thermostat est aussi doté d’une position hors gel repérée par ’. Ce
réglage peut s’avérer utile dans des endroits comme les garages afin
de prévenir tout risque de gel. Si le thermostat est réglé au minimum sur
le radiateur s’activera et se désactivera successivement
maintenir une température d’environ 5° pour contribuer à protéger la
pièce du gel. Remarque - Si l’appareil ne se déclenche pas lorsque
le thermostat est réglé à une température basse, cela peut signifier que
la température de la pièce est plus élevée que celle du thermostat.
au maximum le bouton du thermostat afin de
pour
Bouton marche/arrêt
Ce bouton commande l’alimentation électrique des résistances. Quand
le bouton marche/arrêt est activé, un voyant ‘Y’ s’allume au dessus
du bouton de commande.
Pour arrêter l’appareil, appuyer sur le bouton ‘O’ situé juste au dessus
du bouton marche/arrêt.
Sélection du chauffage panneau simple ou double
Les boutons de réglage situés sur le panneau de commande
permettent de choisir une puissance de Chauffe moyenne ou Chauffe
maximale en
économique, comme ceci :
Réglage de chauffe moyenne - panneau côté gauche
Ce bouton, illustré en Fig.2 permet d’obtenir une puissance de chauffe
moyenne lorsqu’il est action,né. Lorsqu’il est activé, un voyant ‘x’ s’allume
au dessus du bouton et le panneau de gauche se met en marche.
Réglage chauffe moyenne - panneau côté droit
Ce bouton illustré en Fig. 2 permet d’obtenir une puissance de chauffe
moyenne quand il est actionné. Le voyant ‘x’ s’allume alors au dessus
du bouton de commande et la résistance droite se met en marche.
Réglage de chaleur : puissance maximale
On obtient la puissance maximale quand le bouton de gauche et
le bouton de droite sont activés et que tous les voyants sont
allumés. Notez bien que l’appareil fonctionne uniquement quand le bouton
m
arche/arrêt en position ‘marche’ et que tous les voyants sont allumés.
fonction des conditions et pour une utilisation
FONCTIONNEMENT DE LA MINUTERIE NUMERIQUE
(Fig. 3)
IM
PORTANT : S’assurer que toutes les consignes de sécurité sont
respectées quand l’appareil est en fonctionnement automatique,
avec ou sans surveillance.
La minuterie vous permet de sélectionner ‘AUTO’ ou ‘Le mode MAN
ON’ en appuyant sur le bouton ‘MODE’ jusqu’à ce que le MODE requis
apparaisse en bas de l’afchage de la minuterie.
ʻAUTO’ permet à l’appareil de basculer sur ON (marche) et OFF (arrêt)
selon une période définie sur 24 heures (voir la section « Configuration
des programmations » ci-dessous).
ʻLe mode MAN ON’ permet à l’appareil de recevoir l’alimentation
électrique en continu suivant les paramètres du programme.
Verrouillage des touches:
Si ‘ENTER’ et ‘MODE’ sont actionnés dans un intervalle de 1 seconde,
les touches se verrouillent. L’utilisateur est averti que les touches sont
verrouillées car le symbole du verrou ‘ ’ apparaît en haut à gauche de
l’écran. Pour débloquer le clavier, appuyer sur ‘ENTER’ puis sur ‘MODE’
dans un délai d’une seconde.
Mise en service
Lors de la première utilisation, brancher l’appareil de chauffage sur une
prise électrique puis le mettre sous tension. Le réglage de la minuterie
est alors possible.
Réglage de l’heure actuelle
1. Maintenir le bouton ‘PROGRAM’ enfoncé jusqu’à ce que le symbole de
l’horloge apparaisse à l’écran. Le réglage de l’horloge est maintenant
possible.
2. Le nombre des heures clignote. Pour régler l’heure, utiliser les boutons
‘-’ & ‘+’. Pour valider le réglage de l’heure, appuyer sur ‘ENTER’.
3. Après avoir appuyé sur ‘ENTER’ les minutes se mettent à clignoter.
Pour régler les minutes, utiliser les boutons ‘-’ & ‘+’. Pour valider le réglage
des minutes, appuyer sur ‘ENTER’.
4. La minuterie retrouve ensuite son afchage par défaut.
5. Pour corriger une heure incorrecte, répéter les opérations précédentes.
Une fois l’heure correcte réglée, on peut dénir un total de quatre
programmes MARCHE/ARRÊT de fonctionnement sur minuterie.
Dé inition des plages horaires
Appuyer sur le bouton ‘PROGRAM’ pour définir les programmes
de plages horaires.
- 7 -
L’utilisateur peut maintenant procéder à la programmation, à commencer
par P1 ‘ON’.
RÉGLAGE DE L’HEURE DE MARCHE DE P1 :
1. Pour régler l’heure, utiliser les boutons ‘-’ & ‘+’. Pour valider le réglage
de l’heure, appuyer sur ‘ENTER’.
2. Pour régler les minutes, utiliser les boutons ‘-’ & ‘+’. Pour valider le
réglage des minutes, appuyer sur ‘ENTER’.
Remarque : Les minutes ne peuvent être réglées que par incréments de
10 minutes avec le programme ‘MODE’.
RÉGLAGE DE L’HEURE D’ARRÊT DE P1 :
3. Pour régler l’heure, utiliser les boutons ‘-’ & ‘+’. Pour valider le réglage
de l’heure, appuyer sur ‘ENTER’.
4. Pour régler les minutes, utiliser les boutons ‘-’ & ‘+’. Pour valider le
églage des minutes, appuyer sur ‘ENTER’.
r
Répéter les opérations de 1 à 4 pour les programmes de plages horaire
P2, P3 et P4. Une fois la programmation d’arrêt de P4, l’écran retrouve son
affichage par défaut. À tout moment pendant la programmation on peut
appuyer sur le bouton ‘PROGRAM’ pour revenir à l’affichage par défaut.
Remarque : Si le bouton ‘ON’ est identique l’heure ‘OFF’ l’appareil ne
tiendra pas compte du programme.
Rangement
Si le radiateur n’est pas utilisé pendant de longues périodes, par exemple
pendant l’été, il doit être entreposé dans un endroit sec et de préférence
recouvert pour éviter l’accumulation de saleté et de poussière. La che et
le cordon peuvent être stockés dans la zone de stockage prévue - voir la
Fig. 4. Le cordon doit être soigneusement enroulé autour des crochets
fournis et le bouchon doit être inséré dans le trou d’épingle du compartiment
central.
Protection contre la surchauffe de sécurité
Pour votre sécurité, cet appareil est équipé d'un disjoncteur thermique.
Dans le cas où le produit surchauffe pour une raison quelconque, le
disjoncteur empêche les températures excessives sur le produit en coupant
l’alimentation de
automatiquement, il
jusqu’à ce que la raison de la surchauffe soit supprimée.
l’appareil Une fois refroidi, il l’appareil se réinitialisera
continuera à s’allumer et à s’éteindre automatiquement
Recyclage
Les appareils électriques vendus au sein de la Communauté
Européenne ne doivent pas être mis au rebut avec les déchets
ménagers lorsqu’ils arrivent en n de vie. Veuillez recycler
dans les centres existants. Contacter les services publics ou le
fournisseur de l’appareil pour obtenir des conseils de recyclage
pertinents dans votre pays.
Nettoyage
AVERTISSEMENT-TOUJOURS COUPER L'ALIMENTATION
ÉLECTRIQUE AVANT DE NETTOYER L’APPAREIL.
Ne pas utiliser de produits détergents, de poudre à récurer abrasive ou
de produit de polissage de tout type sur le corps de l'appareil de
chauffage.
chiffon sec pour retirer la poussière et
pour éliminer les tâches. Faites attention à ne pas laisser de l'humidité
pénétrer dans l'appareil.
Laisser l'appareil de chauffage refroidir, puis essuyer avec un
un chiffon humide (pas trempé)
Service après-vente
Si vous avez besoin du service après-vente ou si vous souhaitez acheter
des pièces de rechange, veuillez contacter le fournisseur de l’appareil
ou appeler le numéro du service dans votre pays indiqué sur la carte
de la garantie.
Pour éviter des risques de perte ou de détérioration et ne pas retarder
le service, veuillez ne pas nous renvoyer votre appareil défectueux.
Veuillez conserver votre reçu comme preuve d’achat.
Page 7
Référence(s) de modèle : Cadiz M
Puissance calorique
Puissance calorique
nominale
Puissance calorique
minimale (indicatif)
Puissance maximale
de chaleur continue
Pnom
Pmin
Pmax,c
2,00
1,00
2,00
Consommation d'électricité auxiliaire
À la puissance calorique
nominale
À la puissance calorique
minimale
En mode veille
elmax
elmin
elSB
0,00
0,00
0,00
Type de rendement calorique / contrôle de température
ambiante
Avec thermostat mécanique de la
température ambiante
Coordonnées
GLEN DIMPLEX FRANCE
12 Boulevard du Mont d’Est - 7/10 Porte Neuilly
Maille Nord III, Hall A
93160 NOISY-LE-GRAND - France
Oui
kW
kW
kW
kW
kW
kW
- 8 -
Page 8

 Loading...