

Page 1

Date Published: 01 / 03 / 2016Written in UK English
Original Instructions
EN
EN
FR
DE
NL
JP
Page 2

2
www.evolutionpowertools.com
TABLE OF CONTENTS
INTRODUCTION Page 03
Guarantee Page 03
Machine Specification Page 04
Labels and Symbols Page 06
Vibration Page 05
Intended use of this Power Tool Page 06
Prohibited use of this Power Tool Page 06
SAFETY PRECAUTIONS Page 07
Electrical Safety Page 06
Outdoor Use Page 07
General Power Tool Safety Instructions Page 07
Additional Safety Instructions Page 09
GETTING STARTED Page 14
Unpacking Page 11
Machine Overview Page 12
Assembly and Preparation Page 14
Operating Instructions Page 17
MAINTENANCE Page 18
Environmental Protection Page 19
Service Parts Diagram Page 13
DECLARATION OF CONFORMITY Page 20
English Page 02
Deutsch Seite 22
Français Page 46
日本語 ページ 70
Nederlands Pagina 92
Page 3

3
www.evolutionpowertools.com
EN
EN
FR
DE
NL
JP
(1.3)
IMPORTANT
Please read these operating and safety
instructions carefully and completely.
For your own safety, if you are uncertain
about any aspect of using this equipment
please access the relevant Technical Helpline,
the number of which can be found on the
Evolution Power Tools website. We operate
several Helplines throughout our worldwide
organization, but Technical help is also
available from your supplier.
WEB www.evolutionpowertools.com/register
HELPLINE
UK: 0870 609 2297
Email: info@evolutionpowertools.com
(1.4)
Congratulations on your purchase of an
Evolution Power Tools Machine. Please
complete your product registration ‘online’
as explained in the A4 online guarantee
registration leaflet included with this
machine. You can also scan the QR code
found on the A4 leaflet with a Smart
Phone. This will enable you to validate your
machine’s guarantee period via Evolutions
website by entering your details and thus
ensure prompt service if ever needed. We
sincerely thank you for selecting a product
from Evolution Power Tools.
EVOLUTION LIMITED GUARANTEE.
Evolution Power Tools reserves the right to
make improvements and modifications to
the product design without prior notice.
Please refer to the guarantee registration
leaflet and/or the packaging for details of
the terms and conditions of the guarantee.
(1.5)
Evolution Power Tools will, within the
guarantee period, and from the original date of
purchase, repair or replace any goods found to
be defective in materials or workmanship. This
guarantee is void if the tool being returned
has been used beyond the recommendations
in the Instruction Manual or if the machine
has been damaged by accident, neglect, or
improper service.
This guarantee does not apply to machines
and / or components which have been altered,
changed, or modified in any way, or subjected
to use beyond recommended capacities
and specifications. Electrical components
are subject to respective manufacturers’
warranties. All goods returned defective shall
be returned prepaid freight to Evolution Power
Tools. Evolution Power Tools reserves the right
to optionally repair or replace it with the same
or equivalent item.
There is no warranty – written or verbal – for
consumable accessories such as (following list
not exhaustive) blades, cutters, drills, chisels
or paddles etc. In no event shall Evolution
Power Tools be liable for loss or damage
resulting directly or indirectly from the use
of our merchandise or from any other cause.
Evolution Power Tools is not liable for any
costs incurred on such goods or consequential
damages. No officer, employee or agent of
Evolution Power Tools is authorized to make
oral representations of fitness or to waive any
of the foregoing terms of sale and none shall
be binding on Evolution Power Tools.
Questions relating to this limited guarantee
should be directed to the company’s head
office, or call the appropriate Helpline number.
Page 4

4
www.evolutionpowertools.com
SPECIFICATIONS
CUTTING CAPACITY METRIC IMPERIAL
Mild Steel Plate (Optimal Cutting Thickness) 3mm 1/8”
Square Tube at 90° (Mild Steel) 120 x 120mm 4-3/4 x 4-3/4”
Square Tube at 45° (Mild Steel) 89 x 89mm 3-1/2 x 3-1/2”
Rectangle Tube at 90° (Mild Steel) 95 x 180mm 3-3/4 x 7-1/8”
Rectangle Tube at 45° (Mild Steel) 75 x 195mm 3 x 7-3/4”
Round Tube Capacity at 90° (Mild Steel) 130mm 5-1/4”
Round Tube Capacity at 45° (Mild Steel) 105mm 4-1/8”
MACHINE
Motor (UK/EU) 230V-240V ~ 50/60Hz 2200W 10A
Motor (UK) 110V ~ 50/60Hz 1800W 16A
Motor (USA) 120V 1800W 15A
Motor (Japan) 100V 1450W 15A
Speed (No Load) 1500min
-1
1500rpm
Weight (With Blade) 25kg 55lb
BLADE
Diameter 355mm 14”
Bore 25.4mm 1”
Number of Teeth 36 36
Kerf 2.2mm .086”
NOISE & VIBRATION DATA
Sound Pressure Level 108dB(A) K=3dB(A)
Vibration Level 1.39 m/s2 K = 1.5 m/s
2
MODEL PART NUMBERS
UK 230V: 082-0001 110V: 082-0002
USA 082-0004
Europe 082-0003
Japan 082-0005
Page 5

5
www.evolutionpowertools.com
EN
EN
FR
DE
NL
JP
(1.6)
Note: The vibration measurement was made
under standard conditions in accordance with:
BS EN 61029-1:2009
The declared vibration total value has been
measured in accordance with a standard test
method and may be used for comparing one
tool with another.
The declared vibration total value may also be
used in a preliminary assessment of exposure.
(1.7)
VIBRATION
WARNING: When using this machine the
operator can be exposed to high levels of
vibration transmitted to the hand and arm. It
is possible that the operator could develop
“Vibration white finger disease” (Raynaud
syndrome). This condition can reduce the
sensitivity of the hand to temperature as well
as producing general numbness. Prolonged
or regular users of this machine should
monitor the condition of their hands and
fingers closely. If any of the symptoms become
evident, seek immediate medical advice.
• The measurement and assessment of
human exposure to hand-transmitted
vibration in the workplace is given in: BS EN
ISO 5349-1:2001 and BS EN ISO 5349-2:2002
• Many factors can influence the actual
vibration level during operation e.g. the
work surfaces condition and orientation
and the type and condition of the machine
being used. Before each use, such factors
should be assessed, and where possible
appropriate working practices adopted.
Managing these factors can help reduce the
effects of vibration:
Handling
• Handle the machine with care, allowing the
machine to do the work.
• Avoid using excessive physical effort on any
of the machines controls.
• Consider your security and stability, and the
orientation of the machine during use.
Work Surface
• Consider the work surface material; its
condition, density, strength, rigidity and
orientation.
WARNING: The vibration emission during
actual use of the power tool can differ from the
declared total value depending on the ways
in which the tool is used. The need to identify
safety measures and to protect the operator
are based on an estimation of exposure in the
actual conditions of use (taking account of all
parts of the operating cycle, such as the times
the tool is switched off, when it is running idle,
in addition to trigger time).
(1.8)
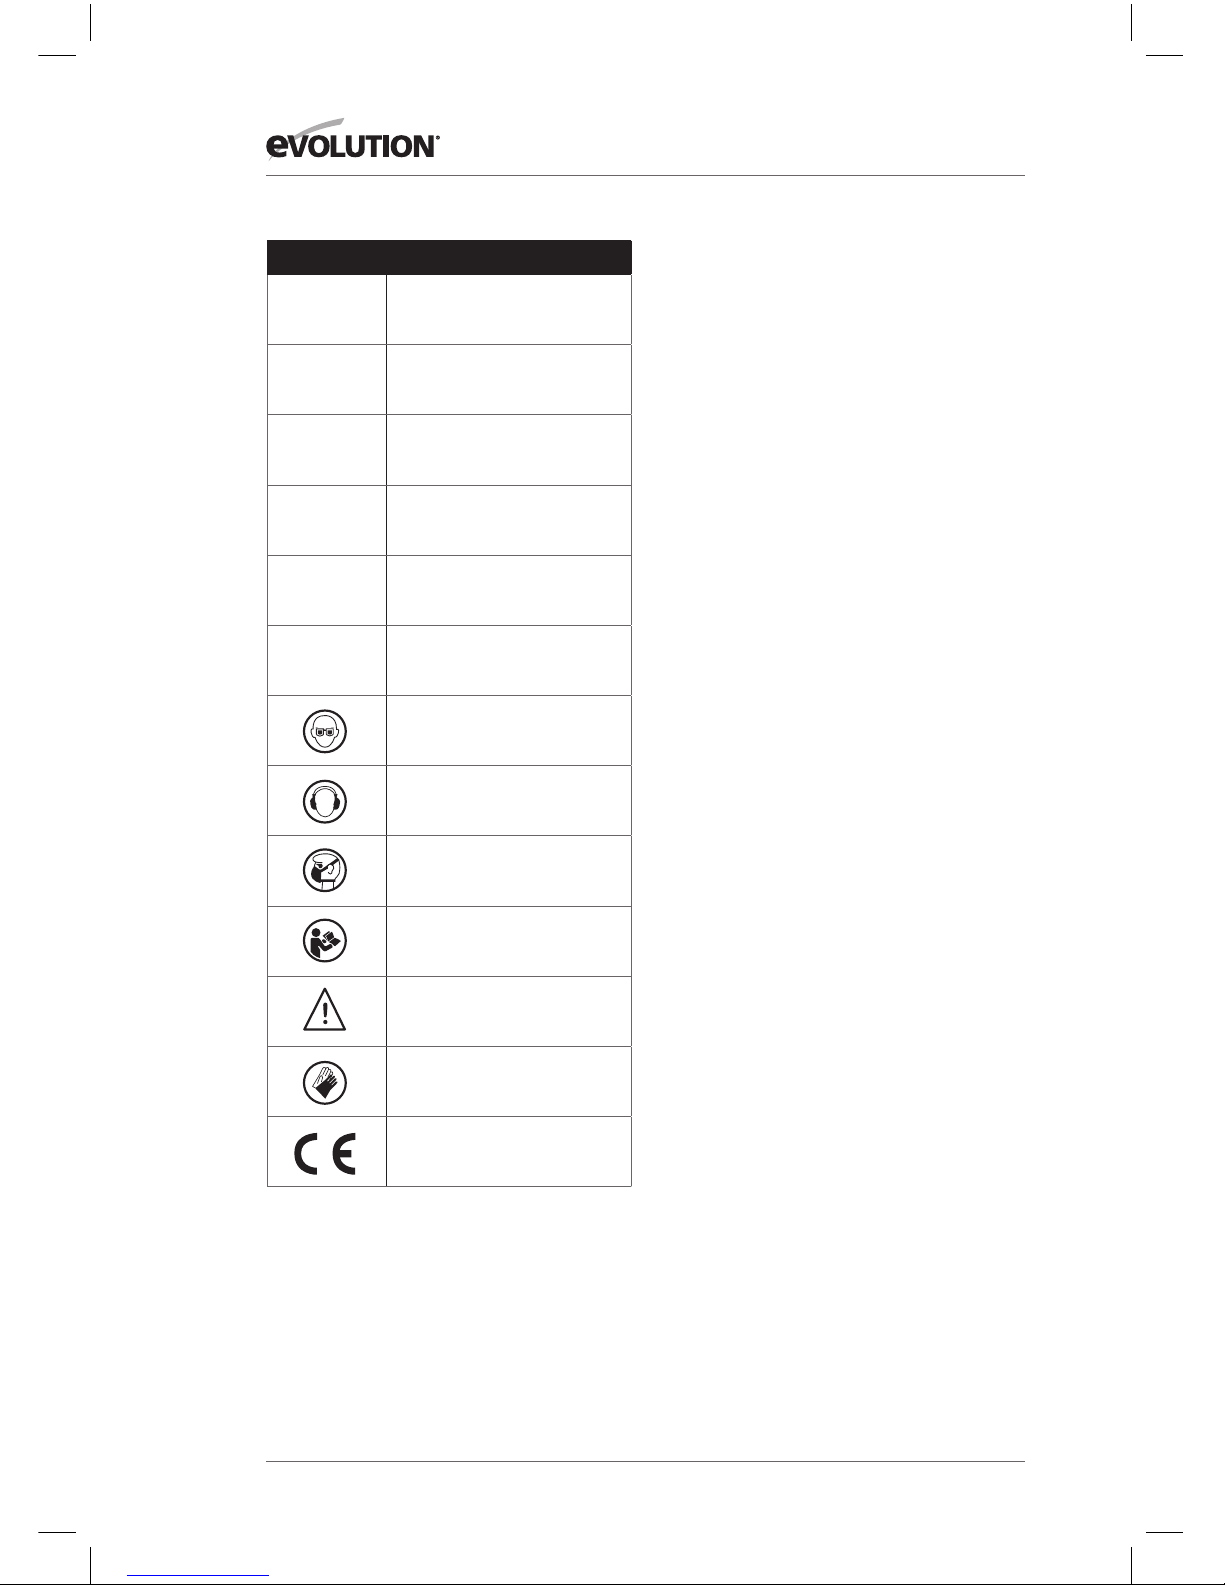
LABELS & SYMBOLS
WARNING: Do not operate this machine if
warning and/or instruction labels are missing
or damaged. Contact Evolution Power Tools for
replacement labels.
Note: All or some of the following symbols
may appear in the manual or on the product.
Page 6

6
www.evolutionpowertools.com
LABELS & SYMBOLS
(1.10)
INTENDED USE OF THIS POWER TOOL
WARNING: This product is a Steel Cutting
Hand Operated Chop Saw and has been
designed to be used with special Evolution
blades. Only use accessories designed for use
in this machine and/or those recommended
specifically by Evolution Power Tools Ltd.
When fitted with an appropriate blade this
machine can be used to cut:
Mild Steel
Aluminium
(1.11)
PROHIBITED USE OF THIS POWER TOOL
WARNING: This product is a Steel Cutting
Hand Operated Chop Saw and must only be
used as such. It must not be modified in any
way, or used to power any other equipment or
drive any other accessories other than those
mentioned in this Instruction Manual.
(1.13)
WARNING: This machine is not intended
for use by persons (including children)
with reduced physical, sensory or mental
capabilities, or lack of experience and
knowledge, unless they have been given
supervision or instruction concerning the safe
use of the machine by a person responsible for
their safety and who is competent in its safe
use. Children should be supervised to ensure
that they do not have access to, and are not
allowed to play with, this machine.
(1.14)
ELECTRICAL SAFETY
This machine is fitted with the correct moulded
plug and mains lead for the designated market.
If the supply cord is damaged, it must be
replaced by a special cord or assembly available
from the manufacturers or its service agent.
Symbol Description
V
Volts
A
Amperes
Hz
Hertz
Min
-1
Speed
~
Alternating Current
n
o
No Load Speed
Wear Safety Goggles
Wear Ear Protection
Wear Dust Protection
Read Instructions
Warning
Wear Gloves
C E certified
Page 7

7
www.evolutionpowertools.com
EN
EN
FR
DE
NL
JP
(1.15)
OUTDOOR USE
WARNING: For your protection if this tool is
to be used outdoors it should not be exposed
to rain, or used in damp locations. Do not place
the tool on damp surfaces. Use a clean, dry
workbench if available. For added protection
use a residual current device (R.C.D.) that will
interrupt the supply if the leakage current to
earth exceeds 30mA for 30ms. Always check
the operation of the residual current device
(R.C.D.) before using the machine.
If an extension cable is required it must be a
suitable type for use outdoors and so labelled.
The manufacturers instructions should be
followed when using an extension cable.
(2.1)
POWER TOOL GENERAL SAFETY
INSTRUCTIONS
(These General Power Tool Safety Instructions
are as specified in BS EN 60745-1:2009 & EN
61029-1:2009)
WARNING: Read all safety warnings and
instructions. Failure to follow the warnings
and instructions may result in electric shock,
fire and/ or serious injury.
Save all warnings and instructions for
future reference. The term “power tool” in
the warnings refers to your mains-operated
(corded) power tool or battery-operated
(cordless) power tool.
(2.2)
1) General Power Tool Safety Warnings
[Work area safety]
a) Keep work area clean and well lit.
Cluttered or dark areas invite accidents.
b) Do not operate power tools in explosive
atmospheres, such as in the presence of
flammable liquids, gasses or dust. Power tools
create sparks which may ignite the dust or fumes.
c) Keep children and bystanders away
while operating power tool. Distractions can
cause you to lose control.
(2.3)
2) General Power Tool Safety Warnings
[Electrical Safety]
a) Power tool plugs must match the outlet.
Never modify the plug in any way. Do
not use any adapter plugs with earthed
(grounded) power tools. Unmodified plugs
and matching outlets will reduce the risk of
electric shock.
b) Avoid body contact with earthed or
grounded surfaces, such as pipes,
radiators, ranges and refrigerators. There is
an increased risk of electric shock if your body
is earthed or grounded.
c) Do not expose power tools to rain or wet
conditions. Water entering a power tool will
increase the risk of electric shock.
d) Do not abuse the cord. Never use the
cord for carrying, pulling or unplugging
the power tool. Keep cord away from heat,
oil, sharp edges or moving parts. Damaged or
entangled cords increase the risk of electric shock.
e) When operating a power tool outdoors,
use an extension cord suitable for outdoor
use. Use of a cord suitable for outdoor use
reduces the risk of electric shock.
f) If operating a power tool in a damp
location is unavoidable, use a residual
current device (RCD) protected supply. Use
of an RCD reduces the risk of electric shock.
(2.4)
3) General Power Tool Safety Warnings
[Personal Safety].
a) Stay alert, watch what you are doing
and use common sense when operating
a power tool. Do not use a power tool
while you are tired or under the influence of
drugs, alcohol or medication. A moment of
inattention while operating power tools may
result in serious personal injury.
b) Use personal protective equipment.
Always wear eye protection. Protective
equipment such as dust masks, non-skid safety
shoes, hard hat or hearing protection used for
appropriate conditions will reduce personal injuries.
Page 8

8
www.evolutionpowertools.com
c) Prevent unintentional starting. Ensure
the switch is in the off-position before
connecting to power source and or battery
pack, picking up or carrying the tool.
Carrying power tools with your finger on the
switch or energising the power tools that have
the switch on invites accidents.
d) Remove any adjusting key or wrench
before turning the power tool on. A wrench
or key left attached to a rotating part of a
power tool may result in personal injury.
e) Do not overreach. Keep proper footing
and balance at all times. This enables better
control of the power tool in unexpected situations.
f) Dress properly. Do not wear loose clothing
or jewellery. Keep your hair, clothing and
gloves away from moving parts. Loose
clothes, jewellery or long hair can be caught in
moving parts.
g) If devices are provided for the connection of
dust extraction and collection facilities, ensure
that these are connected and properly used.
Use of dust collection can reduce dust-related hazards.
(2.5)
4) General Power Tool Safety Warnings
[Power tool use and care].
a) Do not force the power tool. Use the
correct power tool for your application. The
correct power tool will do the job better and
safer at a rate for which it was designed.
b) Do not use the power tool if the switch
does not turn it on or off. Any power tool
that cannot be controlled with the switch is
dangerous and must be repaired.
c) Disconnect the power tool from the
power source and/or battery pack from
the power tool before making any
adjustments, changing accessories, or
storing power tools. Such preventative safety
measures reduce the risk of starting the power
tool accidentally.
d) Store idle power tools out of the reach of
children and do not allow persons unfamiliar
with the power tool or these Instructions
to operate the power tool. Power tools are
dangerous in the hands of untrained users.
e) Maintain power tools. Check for
misalignment or binding of moving parts,
breakage of moving parts and any other
condition that may affect the power tools
operation. If damaged, have the power
tool repaired before use. Many accidents are
caused by poorly maintained power tools.
f) Keep cutting tools sharp and clean. Properly
maintained cutting tools with sharp cutting edges
are less likely to bind and are easier to control.
g) Use the power tool, accessories and
tool bits etc. in accordance with these
instructions, taking into account the
working conditions and the work to
be performed. Use of the power tool for
operations different from those intended could
result in a hazardous situation.
(2.6)
5) General Power Tool Safety Warnings
[Service]
a) Have your power tool serviced by
a qualified repair person using only
identical replacement parts. This will ensure
that the safety of the power tool is maintained.
(2.7)
HEALTH ADVICE
WARNING: When using this machine, dust
particles may be produced. In some instances,
depending on the materials you are working
with, this dust can be particularly harmful.
If you suspect that paint on the surface of
material you wish to cut contains lead, seek
professional advice. Lead based paints should
only be removed by a professional and you
should not attempt to remove it yourself. Once
the dust has been deposited on surfaces, hand
to mouth contact can result in the ingestion of
lead. Exposure to even low levels of lead can
cause irreversible brain and nervous system
damage. The young and unborn children are
particularly vulnerable. You are advised to
consider the risks associated with the materials
you are working with and to reduce the risk
of exposure. As some materials can produce
Page 9

9
www.evolutionpowertools.com
EN
EN
FR
DE
NL
JP
dust that may be hazardous to your health,
we recommend the use of an approved face
mask with replaceable filters when using this
machine.
You should always:
• Work in a well-ventilated area.
• Work with approved safety equipment, such
as dust masks that are specially designed to
filter microscopic particles.
(2.8)
WARNING: the operation of any power tool
can result in foreign objects being thrown
towards your eyes, which could result in severe
eye damage. Before beginning power tool
operation, always wear safety goggles or safety
glasses with side shield or a full face shield
where necessary.
(3.0)
ADDITIONAL SAFETY INSTRUCTIONS
(3.1)
a) DANGER: Keep hands away from
cutting area and the blade. Keep your
second hand on auxiliary handle, or motor
housing. If both hands are holding the saw,
they cannot be cut by the blade.
b) Do not reach underneath the workpiece.
The guard cannot protect you from the blade
below the workpiece.
c) Adjust the cutting depth to the thickness
of the workpiece. Less than a full tooth of
the blade teeth should be visible below the
workpiece.
d) Never hold piece being cut in your hands
or across your leg. Secure the workpiece to
a stable platform. It is important to support
the work properly to minimize body exposure,
blade binding, or loss of control.
e) Hold power tool by insulated gripping
surfaces when performing an operation
where the cutting tool may contact hidden
wiring or its own cord. Contact with a “live”
wire will also make exposed metal parts of
the power tool “live” and shock the operator.
f) When ripping always use a rip fence
or straight edge guide. This improves the
accuracy of cut and reduces the chance of
blade binding.
g) Always use blades with correct size and
shape (diamond versus round) of arbor
holes. Blades that do not match the mounting
hardware of the saw will run eccentrically,
causing loss of control.
h) Never use damaged or incorrect blade
washers or bolt. The blade washers and
bolt were specially designed for your saw, for
optimum performance and safety of operation.
i) Do not use High Speed Steel (HSS) saw
blades.
j) Inspect the machine and the blade
before each use. Do not use deformed,
cracked, worn or otherwise damaged blades.
k) Never use the saw without the original
guard protection system. Do not lock the
moving guard in the open position. Ensure that
the guard operates freely without jamming.
l) Only use blades that comply with the
characteristics specified in this manual.
Before using accessories, always compare the
maximum allowed RPM of the accessory with
the RPM of the machine.
(3.2)
Causes and operator
prevention of kickback:
Kickback is a sudden reaction to a pinched,
bound or misaligned saw blade, causing an
uncontrolled saw to lift up and out of the
workpiece toward the operator:
1. When the blade is pinched or bound tightly
by the kerf closing down, the blade stalls and
the motor reaction drives the unit rapidly back
toward the operator;
2. If the blade becomes twisted or misaligned
in the cut, the teeth at the back edge of the
blade can dig into the top surface of the
workpiece causing the blade to climb out of
the kerf and jump back towards the operator.
Page 10

10
www.evolutionpowertools.com
h) Check lower guard for proper closing
before each use. Do not operate the saw
if lower guard does not move freely and
close instantly. Never clamp or tie the
lower guard into the open position. If saw
is accidentally dropped, lower guard may be
bent. Raise the lower guard with the retracting
handle and make sure it moves freely and does
not touch the blade or any other part, in all
angles and depths of cut.
i) Check the operation of the lower guard
spring. If the guard and the spring are not
operating properly, they must be serviced
before use. Lower guard may operate
sluggishly due to damaged parts, gummy
deposits, or a build-up of debris.
j) Lower guard may be retracted manually
only for special cuts such as “plunge cuts”
and “compound cuts.” Raise lower guard by
retracting handle and as soon as blade enters
the material, the lower guard must be released.
For all other sawing, the lower guard should
operate automatically.
k) Always observe that the lower guard
is covering the blade before placing
saw down on a bench or the floor. An
unprotected, coasting blade will cause the saw
to walk backwards, cutting whatever is in its
path. Be aware of the time it takes for the blade
to stop after switch is released.
(3.4)
WARNING: If any parts are missing, do not
operate your machine until the missing parts
are replaced. Failure to follow this rule could
result in serious personal injury.
(3.3)
Kickback is the result of saw misuse and/
or incorrect operating procedures or
conditions and can be avoided by taking
proper precautions as given below.
a) Maintain a firm grip with both hands
on the saw and position your arms to
resist kickback forces. Position your body
to either side of the blade, but not in line
with the blade. Kickback could cause the
saw to jump backwards, but kickback forces
can be controlled by the operator, if proper
precautions are taken.
b) If the blades are binding, or when
interrupting a cut for any reason, release
the trigger and hold the saw motionless
in the material until the blades come to a
complete stop. Never attempt to remove the
saw from the work or pull the saw backward
while the blades are in motion or kickback may
occur. Investigate and take corrective actions
to eliminate the cause of blade binding.
c) When restarting a saw in the workpiece,
centre the saw blade in the kerf and check
that saw teeth are not engaged into the
material. If saw blade is binding, it may walk up or
kickback from the workpiece as the saw is restarted.
d) Support large panels to minimise the
risk of blade pinching and kickback. Large
panels tend to sag under their own weight.
Supports must be placed under the panel on
both sides, near the line of cut and near the
edge of the panel.
e) Blade depth and bevel adjusting locking
levers must be tight and secure before
making a cut. If the blade adjustment shifts
while cutting it may cause binding and kickback.
f) Do not use dull or damaged blades.
Unsharpened or improperly set blades
produce a narrow kerf causing excessive
friction, blade binding and kickback.
g) Use extra caution when making a
“plunge cut” into existing walls or other
blind areas. The protruding blade may cut
objects that can cause kickback.
Page 11

11
www.evolutionpowertools.com
EN
EN
FR
DE
NL
JP
(4.1)
GETTING STARTED - UNPACKING
Caution: This packaging contains sharp
objects. Take care when unpacking. Remove
the machine, together with the accessories
supplied from the packaging. Check carefully
to ensure that the machine is in good
condition and account for all the accessories
listed in this manual. Also make sure that all
the accessories are complete. If any parts
are found to be missing, the machine and its
accessories should be returned together in
their original packaging to the retailer. Do
not throw the packaging away; keep it safe
throughout the guarantee period. Dispose
of the packaging in an environmentally
responsible manner. Recycle if possible. Do
not let children play with empty plastic bags
due to the risk of suffocation.
(4.2)
(4.3)
Additional Accessories
In addition to the standard items supplied with
this machine the following accessories are also
available from the Evolution online shop at
www.evolutionpowertools.com or from your
local retailer.
(4.4)
ITEMS SUPPLIED
Description Quantity
Instruction Manual 1
Multipurpose Blade 1
Hex Key 8mm
(Blade Change)
1
Carbon Brush Set 1
Description Part No
355mm (14”)
Diamond Blade
DIAMOND355
Page 12
12
www.evolutionpowertools.com
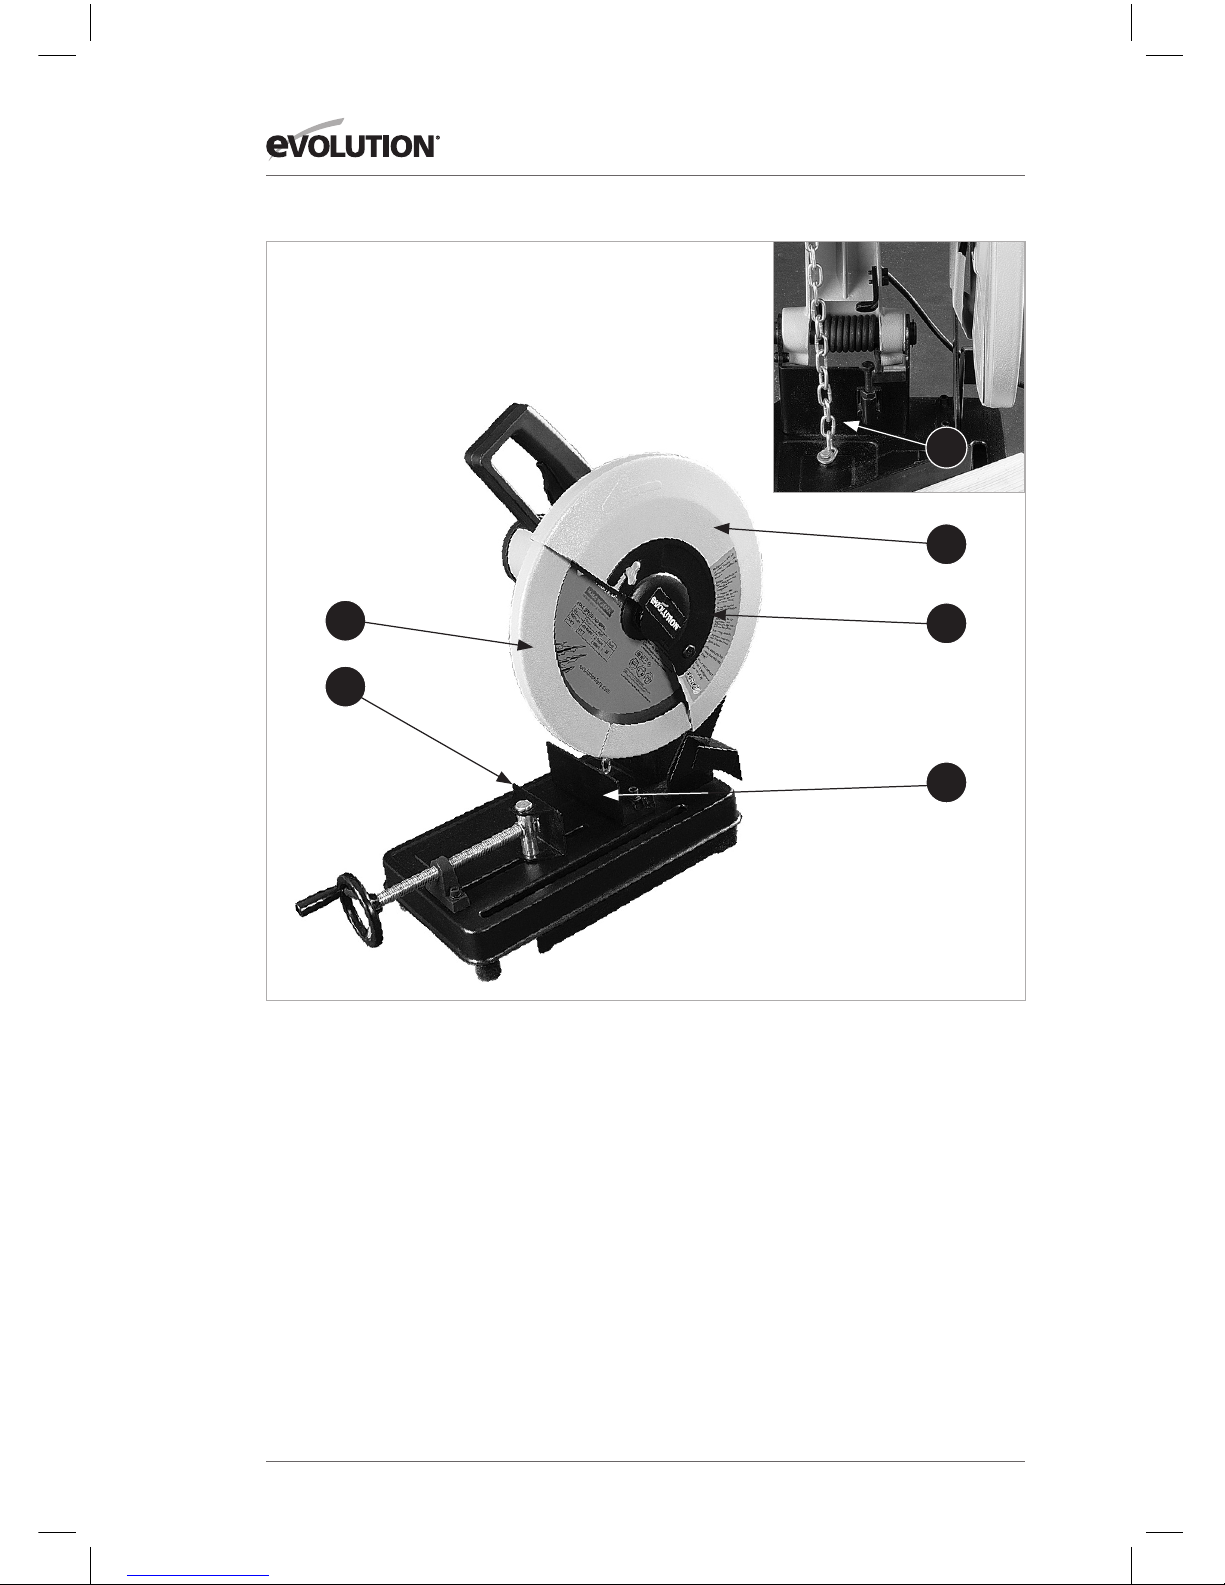
MACHINE OVERVIEW OF FURY2 355mm (14”) CUT OFF SAW
1. Lower Blade Guards
2. Front Swiveling Vice Jaw
3. Lock Down Chain
4. Upper Blade Guard
5. Arbor Guard
6. Repositionable Rear Vice Jaw
6
5
4
2
1
3
Page 13
13
www.evolutionpowertools.com
EN
EN
FR
DE
NL
JP
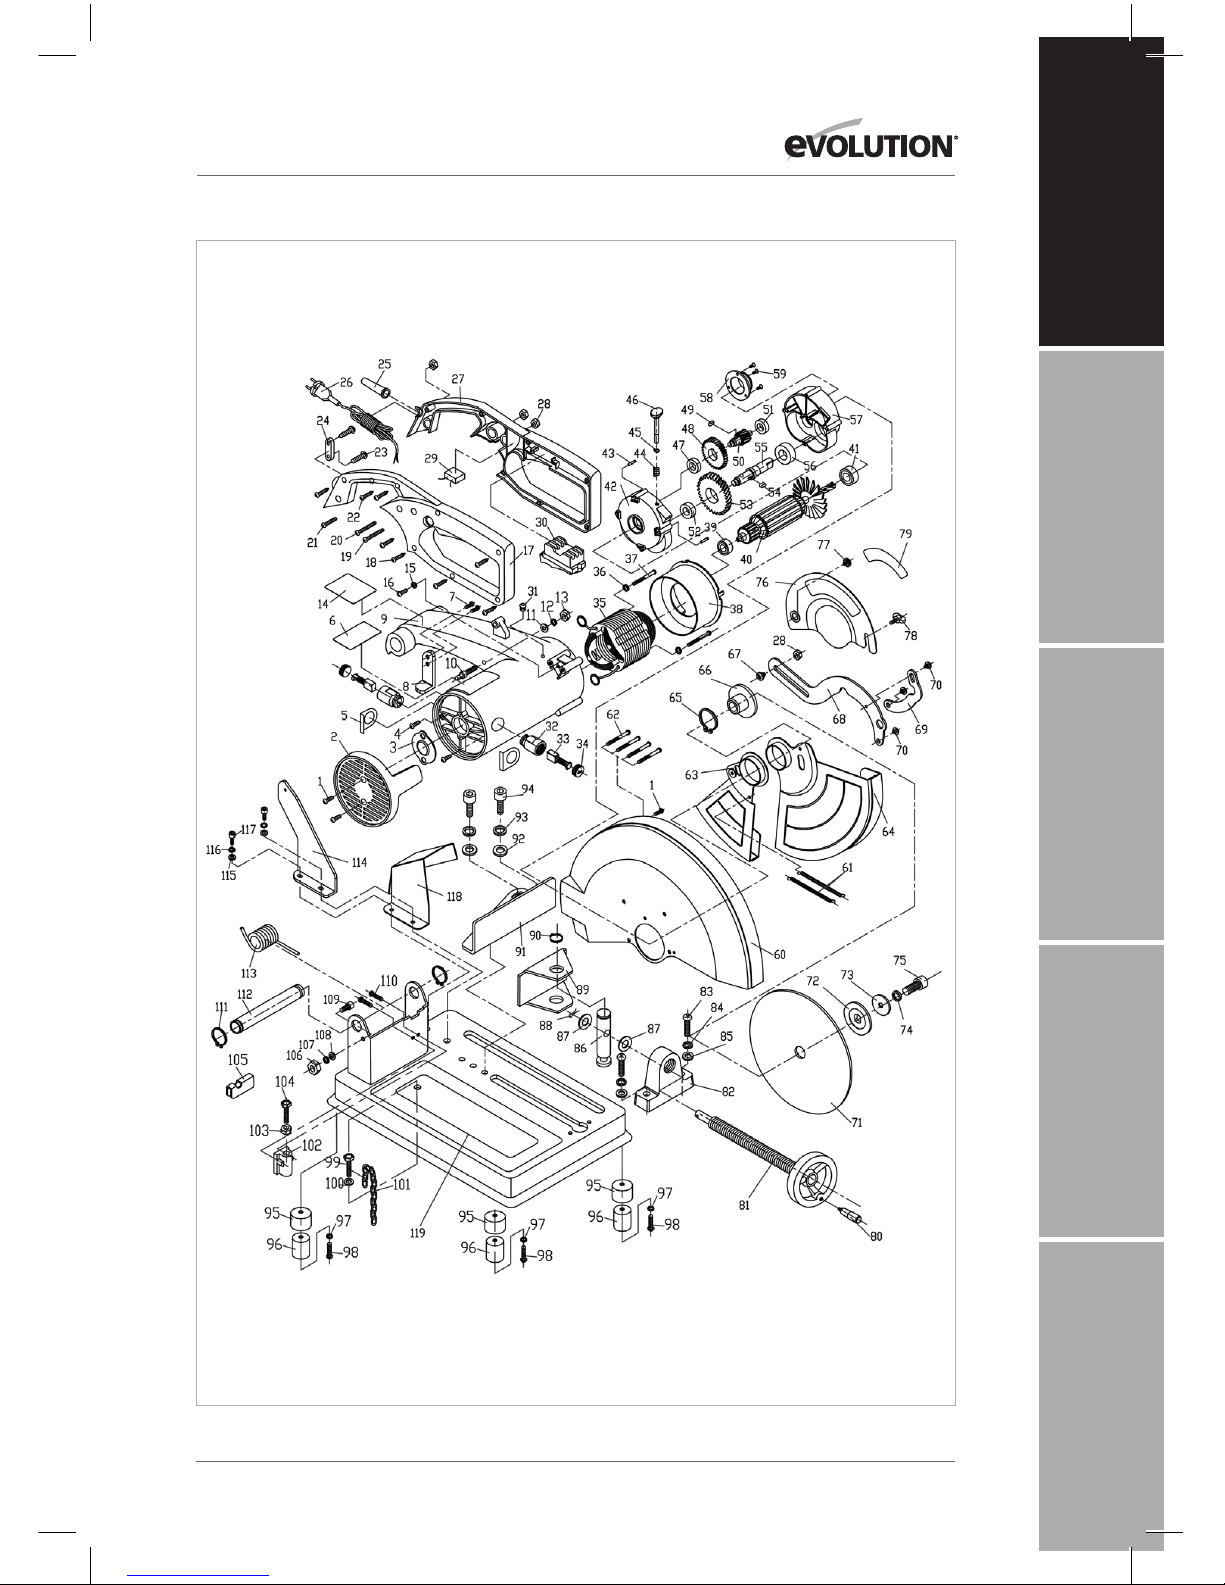
PARTS DIAGRAM Parts Diagrams can also be downloaded from www.evolutionpowertools.com
Page 14
14
www.evolutionpowertools.com
GETTING STARTED - PREPARATION
WARNING: ALWAYS DISCONNECT THE MACHINE FROM THE
POWER SUPPLY BEFORE MAKING ADJUSTMENTS.
WARNING: After installing a new blade, always run the
machine, without load, for a couple of minutes. Stand away
from the blade. If the blade were to contain an undetected flaw,
it could shatter during this trial run.
Note: This saw is equipped with an approved cord and plug for its
intended Country of use. Do not alter or modify the power cord.
(<5.1)
INSTALLING or REMOVING a BLADE
WARNING: Only use genuine Evolution blades, or Evolution
approved blades which are designed for this machine. Ensure that
the maximum speed of the blade is compatible with the machine.
WARNING: Only perform this operation with the machine
disconnected from the power supply.
Note: It is recommended that the operator considers wearing
protective gloves when handling the blade during installation
or when changing the machines blade. (5.1>)
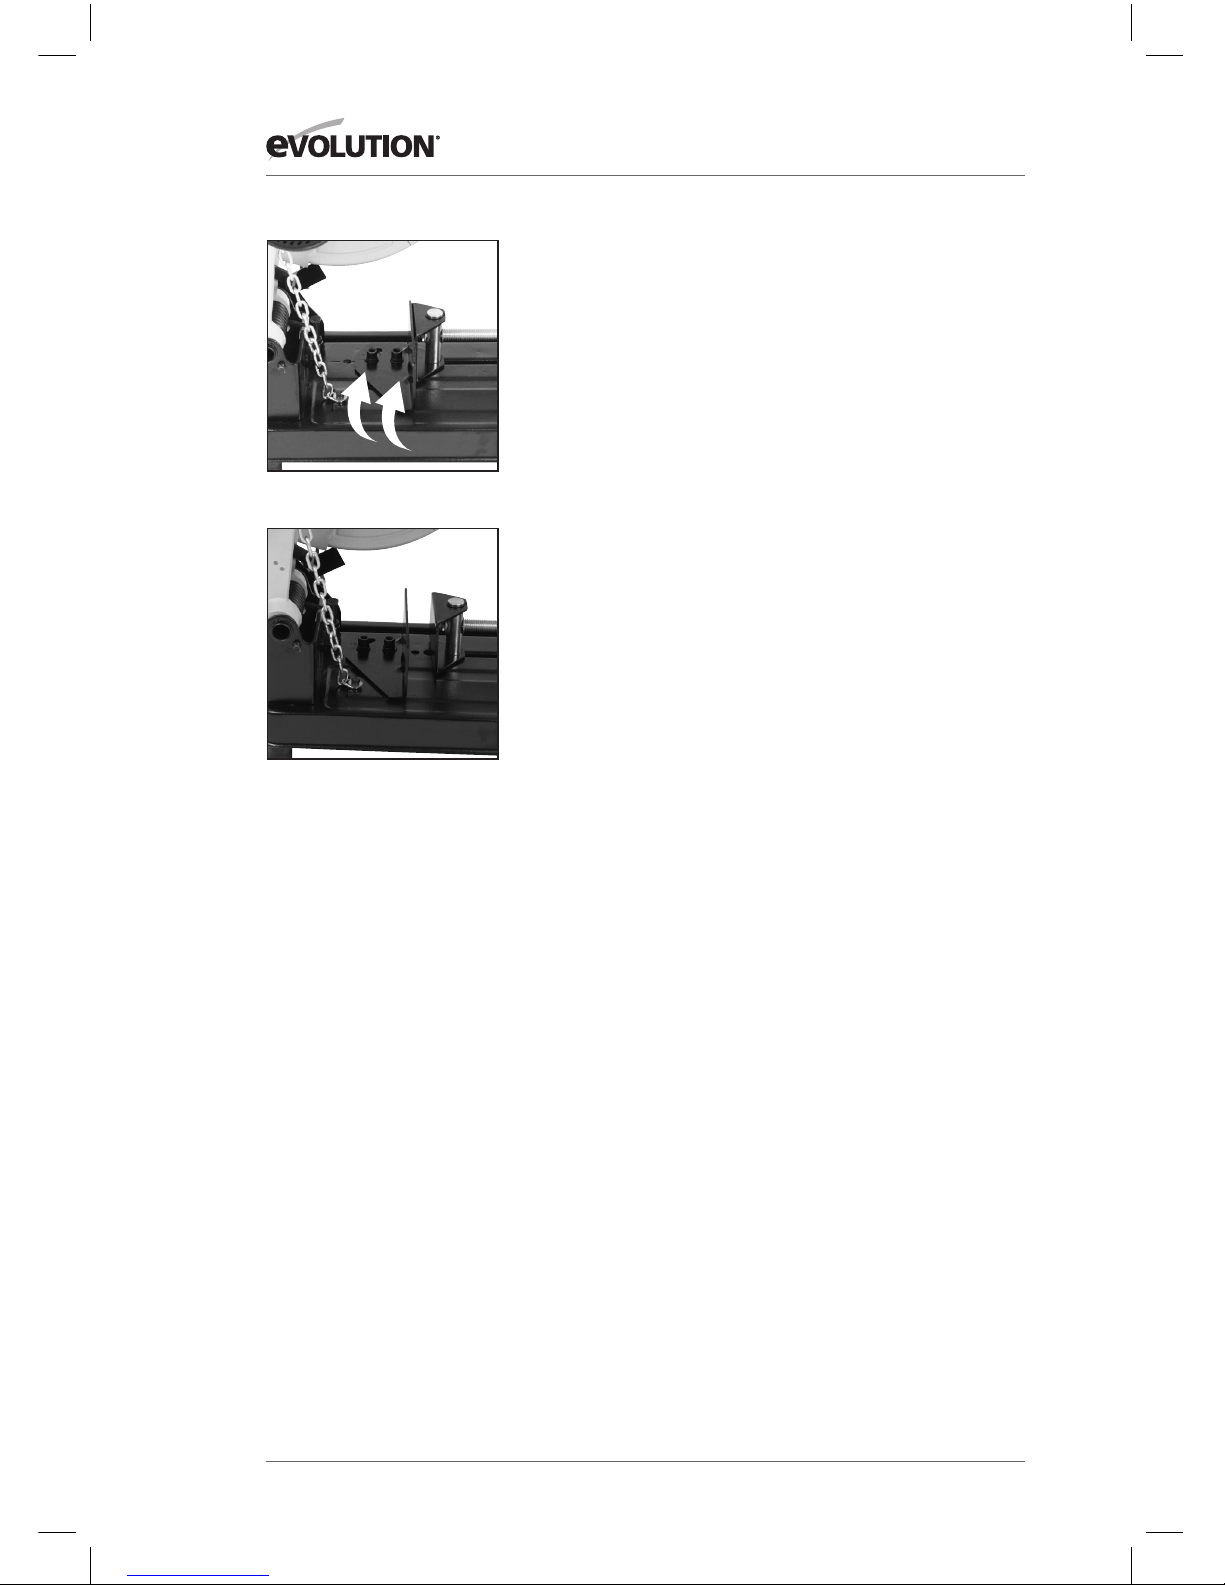
RELEASING the CUTTING HEAD
The Cutting Head will automatically rise to the upper position
once it is released from the locked down position.
To Release the Cutting Head from the Locked Down position:
• Gently press down on the Cutting Handle.
• Unhook the Lock Down Chain from
the Lock Down Pin. (Refer to Fig. 9).
Allow the Cutting Head to rise to its upper position.
Note: We recommend that when the machine is not in use the
Cutting Head is locked in its down position with the Lock Down
Chain engaged onto the Lock Down Pin.
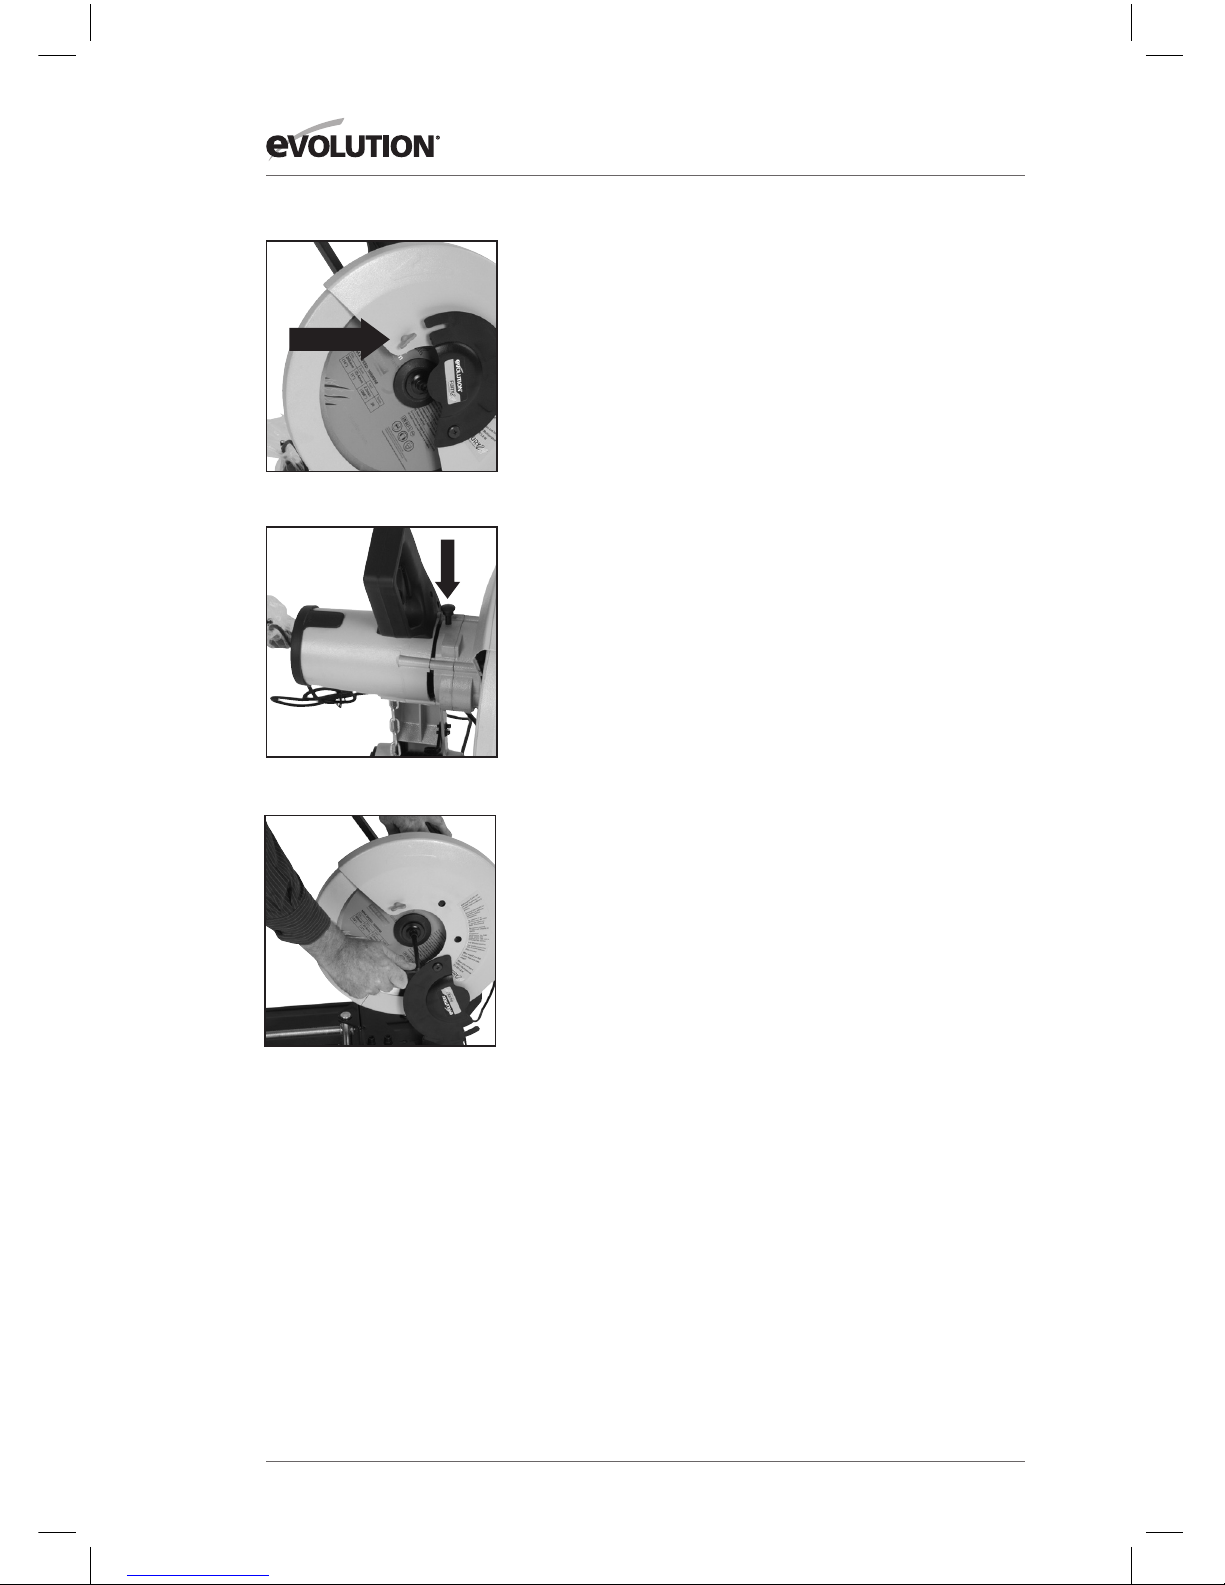
BLADE INSTALLATION:
• Ensure that the Cutting Head is in its upper position.
• Loosen the wing screw securing the arbor guard and rotate
the guard upwards to reveal the machines arbor. (Fig. 1)
• Engage the arbor lock by pressing the arbor lock button. (Fig. 2)
• Use the supplied Hex Key to loosen the arbor screw. (Fig. 3)
ASSEMBLY
FIG. 1
FIG. 2
FIG. 3
Page 15

15
www.evolutionpowertools.com
EN
EN
FR
DE
NL
JP
FIG. 4
Note: The arbor screw has a Right Hand thread. Turn clockwise
to tighten. Turn counterclockwise to loosen.
• Remove the arbor screw, washer and outer blade flange and
store safely for future installation.
• Retract the lower blade guards up into the upper blade guard
by rotating them by hand. (Fig. 4)
• Remove the blade, leaving the inner blade flange in its
service position.
Reinstalling a Blade:
• Ensure that all components are free from dirt and debris.
• Install the blade onto the inner blade flange and arbor,
ensuring that the direction and rotation arrow on the
blade matches the direction of arrow rotation found on the
machines upper blade guard. (Fig. 5)
• Reinstall the outer blade flange, washer and arbor screw.
• Lock the arbor by pressing the arbor lock button.
• Tighten the arbor screw using the 8mm Hex Key.
• Return the arbor guard to its service position and tighten the
wing nut.
• Check that the arbor lock has been released by rotating the
blade by hand.
• Ensure that the Hex Key is removed from the arbor screw and
is safely stored for future use.
• Check the installation and particularly the operation of the
retractable lower blade guards by lowering and raising the
Cutting Head a few times.
CUTTING HEAD TRAVEL
Cutting Head Downward Travel Adjustment
To prevent the blade from contacting any part of the machines metal
base the downward travel of the Cutting Head can be adjusted.
Lower the Cutting Head and check for any blade contact with
the machines base. If the downward travel of the Cutting Head
needs to be adjusted:
• Loosen the locknut on the downward travel stop screw.
(Fig. 6)
• Turn the adjusting screw out (counter-clockwise) to decrease
the downwards travel of the Cutting Head.
• Turn the adjusting screw in (clockwise) to increase the
downwards travel of the Cutting Head.
FIG. 6
FIG. 5
Page 16
16
www.evolutionpowertools.com
• Tighten the adjustment screw locknut when satisfactory
downward travel of the Cutting Head is achieved.
CUTTING ANGLE ADJUSTMENT
Note: The rear vice jaw can be turned through 450.
The rear vice jaw is factory set at 00 (at 900 to the blade) so that
the blade cuts squarely across material positioned in the vice.
For angled cuts, the rear vice jaw can be swung through (up to)
450, with a protractor scale being included on the vice jaw for
ease and accuracy of setting.
To angle the rear vice jaw:
• Loosen the two (2) M10 socket headed screws (Fig. 7)
• Turn the rear vice jaw to the required angle.
• Tighten the socket headed screws securely using the
supplied hex key.
REPOSITIONING THE REAR VICE JAW
The rear vice jaw can be removed from the machines base and
repositioned. (Fig.8)
To reposition:
• Remove the two (2) M10 socket headed screws and any
associated washers.
• Reposition the rear vice jaw; there are two (2) possible
positions available because of the three (3) threaded holes in
the machines base.
• Replace socket headed screws into their new service
positions. Ensure that all plain and locking washers are
correctly positioned .
Repositioning the rear vice jaw to the rearmost position will
enable wider pieces of material to be cut than is possible with
the rear vice jaw in the forward position.
ASSEMBLY
FIG. 8
FIG. 7
Page 17

17
www.evolutionpowertools.com
EN
EN
FR
DE
NL
JP
(5.2)
OPERATING INSTRUCTIONS
PREPARING TO MAKE A CUT
Do not overreach. Keep good footing and balance. Stand to one side
so that your face and body are out of line of a possible kickback.
WARNING: Freehand cutting is a major cause of accidents
and should not be attempted.
• Ensure that the workpiece is firmly secured in the vice.
• The machines base should be clean and free from any swarf or
sawdust etc. before the workpiece is clamped into position.
• Ensure that the ‘cut-off’ material is free
• to move sideways away from the blade when the cut is
completed. Ensure that the ‘cut-off’ piece cannot become
‘jammed’ in any other part of the machine.
• Do not use this saw to cut small pieces. If the workpiece
being cut would cause your hand or fingers to be within
150mm of the sawblade, the workpiece is too small.
• Angles should be clamped in an inverted position so that the
point of the section is uppermost.
(5.3)
MAKING A CUT
• With the Cutting Head in the upper position, switch on the
motor and allow it to reach full operational speed.
• Gently lower the Cutting Head.
• Introduce the blade into the material slowly, using light
pressure at first to keep the blade from grabbing.
• Gradually increase the pressure as a blade enters the
workpiece. Do not ‘force’ the machine. Let the saw blade do
the work.
Note: Cutting performance will not improve by applying undue
pressure on the machine, and doing so may cause blade and
motor life to be reduced.
• Reduce the pressure as the blade begins to exit the material.
• On completion of a cut allow the Cutting Head to return to its
upper position, and turn off the motor.
• Only remove your hands, or the workpiece from the machine,
after the motor has completely stopped and the stationary
blade is covered by the lower blade guards.
Page 18

18
www.evolutionpowertools.com
(6.1)
Note: Any maintenance must be carried out with the machine
switched off and disconnected from the mains/battery power supply.
Check that all safety features and guards are operating correctly
on a regular basis. Only use this machine if all guards/safety
features are fully operational.
All motor bearings in this machine are lubricated for life. No
further lubrication is required.
Use a clean, slightly damp cloth to clean the plastic parts of the
machine. Do not use solvents or similar products which could
damage the plastic parts.
WARNING: Do not attempt to clean by inserting pointed
objects through openings in the machines casings etc. The
machines air vents should be cleaned using compressed dry air.
(6.2)
Excessive sparking may indicate the presence of dirt in the
motor or worn out carbon brushes.
(6.3)
BRUSH CHECKING AND/OR REPLACEMENT
• Disconnect the machine from the power supply.
• Place the machine on a level, secure surface.
• Unscrew and remove the two (2) brush retaining cap screws
from the motor housing.
• Withdraw the brushes.
Note: If the Carbon brush is less than 6mm (¼”) long, or if there
are signs of burning or damage, replace the brushes.
• Fit the new brushes.
• Refit the brush retaining cap screws
• Run the machine without load for several minutes after brush
replacement. This will aid the ‘bedding in’ process.
Note: If, upon checking the brushes are found to be still
serviceable, they can be returned to their original position. It is
important that they are replaced in the same position and the
same way round as they were removed from the machine.
MAINTENANCE
Page 19
19
www.evolutionpowertools.com
EN
EN
FR
DE
NL
JP
TRANSPORTATION/STORAGE
For ease and convenience, when transporting or storing the
machine, the Cutting Head can be held in the ‘down’ position.
To hold the Cutting Head down:
• Lower the Cutting Head to its lowest position.
• Hook the requisite link of the Lock Down Chain over the
Lock Down Pin. (Fig. 9).
(6.4)
ENVIRONMENTAL PROTECTION
Waste electrical products should not be disposed of with
household waste. Please recycle where facilities exist. Check
with your Local Authority or retailer for recycling advice.
FIG. 9
Page 20
20
www.evolutionpowertools.com
EC DECLARATION OF CONFORMITY
The manufacturer of the product covered by this Declaration is. Evolution Power Tools Ltd.
Venture 0ne, Longacre Close, Holbrook Industrial Estate, Sheffield S20 3FR, UK
The manufacturer hereby declares that the machine as detailed in this declaration fulfils all the
relevant provisions of the Machinery Directive and other appropriate directives as detailed below.
The manufacture further declares that the machine as detailed in this declaration, where
applicable, fulfils the relevant provisions of the Essential Health and Safety requirements.
The Directives covered by this Declaration are as detailed below
And is in conformity with the applicable requirements of the following documents
Product Details:
Description: FURY 2 355mm (14”) TCT Multipurpose Cut Off Saw
Evolution Model No: 0820001 / 0820002 / 0820003 / 0820004 / 0820005
Brand Name: Evolution
Voltage: 230-240V~ 50Hz
The technical documentation required to demonstrate that the product meets the requirements
of directive has been compiled and is available for inspection by the relevant enforcement
authorities, and verifies that our technical file contains the documents listed above.
Name and address of technical documentation holder. All standards listed above have been met
and relevant documentation held by Evolution Power Tools
Signed: Print: Matthew Gavins - Group Chief Executive
Date: 01/03/16
2006/42/EC Machinery Directive
2004/108/EC (valid until Apr 19th 2016) Electromagnetic Compatibility Directive
2014/30/EU (effective from Apr 20th 2016) Electromagnetic Compatibility Directive
2011/65/EU The Restriction of the Use of certain Hazardous
Substances in Electrical Equipment (RoHS) Directive
2002/96/EC The Waste Electrical and Electronic Equipment (WEEE) Directive
as amended
by 2003/108/EC
EN13898/A1:2009 • EN60204-1/A1:2009 • EN55014-1/A1:2009
EN55014-2/A2:2008 • EN 61000-3-2/A2:2009 • EN61000-3-11:2000
Page 21

21
www.evolutionpowertools.com
EN
EN
FR
DE
NL
JP
NOTES
Page 22

®
Page 23

EN
EN
FR
DE
NL
JP
DEUTSCH
Übersetzung Original Bedienungsanleitungen
Page 24

24
www.evolutionpowertools.com
TABLE OF CONTENTS
EINFÜHRUNG Page 25
Garantie Page 25
Aufkleber und Symbole Page 28
Bestimmungsgemäße Verwendung dieses Elektrowerkzeugs Page 28
Verwendung im Freien Page 26
Allgemeine Sicherheitshinweise für Elektrowerkzeuge Page 28
Zusätzliche Sicherheitshinweise Page 27
ERSTE SCHRITTE Page 29
Auspacken Page 28
MASCHINENÜBERSICHT Page 29
Montage und Vorbereitung Page 29
Bedienungsanleitung Page 31
WARTUNG Page 42
Umweltschutz Page 33
Serviceteilzeichnung Page 33
KONFORMITÄTSERKLÄRUNG Page 38
Assembly and Preparation Page 38
Operating Instructions Page 40
MAINTENANCE Page 42
Umweltschutz Page 43
Service Parts Diagram Page 37
DECLARATION OF CONFORMITY Page 44
DE
English Page 02
Deutsch Seite 22
Français Page 46
日本語 ページ 70
Nederlands Pagina 92
Page 25

25
www.evolutionpowertools.com
EN
EN
FR
DE
NL
JP
(1.2)
Diese Bedienungsanleitung wurde
ursprünglich in Englisch verfasst
(1.3)
WICHTIG
Bitte lesen Sie die folgende Bedienungsanleitung
und die Sicherheitshinweise vollständig durch.
Wenden Sie sich zu Ihrer eigenen Sicherheit an
die entsprechende Technische Helpline, deren
Nummer Sie auf der Webseite von Evolution Power
Tools finden, wenn Sie über irgendeinen Aspekt bei
der Verwendung dieses Geräts unsicher sind. Wir
betreiben mehrere Helplines in unserer weltweiten
Organisation, aber sie erhalten Technische Hilfe
auch von Ihrem Lieferanten.
WEB www.evolutionpowertools.com/register
(1.4)
Glückwunsch zum Kauf einer Maschine
von Evolution Power Tools. Bitte füllen
Sie Ihre Produktregistrierung ‘online’
wie es in der A4-Broschüre zur OnlineGarantieregistrierung erklärt ist, die dieser
Maschine beiliegt. Sie können auch den
QR-Code, der sich auf der A4-Broschüre
befindet, mit einem Smartphone scannen.
Damit können Sie die Garantielaufzeit Ihrer
Maschine über die Webseite von Evolution
validieren, indem Sie Ihre Angaben
eingeben und somit einen umgehenden
Service sicherstellen, falls dieser einmal
notwendig werden sollte. Wir danken Ihnen
sehr, dass Sie sich für ein Produkt von
Evolution Power Tools entschieden haben.
EVOLUTION BESCHRÄNKTE GARANTIE.
Evolution Power Tools behält sich
das Recht vor, Verbesserungen und
Veränderungen am Produktdesign ohne
Vorankündigung vorzunehmen.
Sehen Sie in die
Produktregistrierungsbroschüre und/oder
auf die Verpackung für Einzelheiten der
Garantiebedingungen.
Evolution Power Tools repariert oder ersetzt
innerhalb der Garantielaufzeit und ab
Originalkaufdatum alle Waren, die Materialoder Verarbeitungsmängel aufweisen. Diese
Garantie ist ungültig, wenn das zurückgeschickte
Werkzeug zum Schneiden von Werkstoffen
verwendet wurde, die außerhalb der in dieser
Betriebsanleitung enthaltenen Empfehlungen
liegen, oder wenn die Maschine aufgrund
eines Unfalls, durch Nachlässigkeit oder durch
falsche Wartung beschädigt wurde. Diese
Garantie gilt nicht bei Maschinen und/oder
Teilen, die in irgendeiner Weise verändert oder
jenseits der empfohlenen Kapazitäten und
Spezifikationen verwendet wurden. Elektroteile
unterliegen den Garantien der jeweiligen
Hersteller. Alle als schadhaft zurückzugebenden
Waren sind frachtfrei an Evolution Power Tools
zu retournieren. Evolution Power Tools behält
sich das Recht vor, sie nach eigenem Ermessen
zu reparieren oder durch identische oder
gleichwertige Artikel zu ersetzen. Es besteht
weder eine schriftliche noch eine mündliche
Garantie für Verbrauchsmaterialien, wie
(folgende Liste ist nicht vollständig) Sägeblätter,
Schneiden, Bohrer, Meißel oder Schaufeln, etc.
In keine Fall ist Evolution Power Tools haftbar
für Verluste oder Beschädigungen, die direkt
oder indirekt durch die Verwendung unserer
Waren oder aus irgendeinem anderen Grund
entstehen. Evolution Power Tools haftet für keine
bei derartigen Waren entstandenen Kosten oder
Folgeschäden. Kein Bediensteter, Mitarbeiter
oder Vertreter von Evolution Power Tools ist
befugt, mündliche Erklärungen zur Eignung
abzugeben oder auf jedwede der vorgenannten
Verkaufsbedingungen zu verzichten, und für
Evolution Power Tools sind keine bindend.
Fragen zu dieser beschränkten Garantie
richten Sie bitte an die Zentrale des
Unternehmens, oder rufen Sie die
entsprechende Helpline-Nummer an.
Page 26

26
www.evolutionpowertools.com
SPECIFICATIONS
SCHNITTLEISTUNG METRISCH IMPERIAL
Mild Stahlplatte (Optimal Schnittstärke) 3mm 1/8”
Square Tube bei 90° (Stahl) 120 x 120mm 4-3/4 x 4-3/4”
Square Tube bei 45° (Stahl) 89 x 89mm 3-1/2 x 3-1/2”
Rechteck-Rohr bei 90° (Stahl) 95 x 180mm 3-3/4 x 7-1/8”
Rechteck-Rohr bei 45° (Stahl) 75 x 195mm 3 x 7-3/4”
Rundrohr-Kapazität bei 90° (Stahl) 130mm 5-1/4”
Rundrohr-Kapazität bei 45° (Stahl) 105mm 4-1/8”
MACHINE
Motor (UK / EU) 230V-240V ~ 50/60Hz 2200W 10A
Motor (UK) 110V ~ 50/60Hz 1800W 16A
Motor (USA) 120 V 1800W 15A
Motor (Japan) 100V 1450W 15A
Geschwindigkeit (No Load) 1500min
-1
1500rpm
Gewicht (mit Klinge) 25kg 55lb
BLADE
Durchmesser 355mm 14”
Bore 25.4mm 1”
Zähnezahl 36 36
Kerf 2.2mm .086”
NOISE & VIBRATION DATEN
Schalldruckpegel 108dB(A) K=3dB(A)
Vibrationsniveau 1.39 m/s2 K = 1.5 m/s
2
MODELL NUMMERN
UK 230V: 082-0001 110V: 082-0002
USA 082-0004
Europa 082-0003
Japan 082-0005
Page 27

27
www.evolutionpowertools.com
EN
EN
FR
DE
NL
JP
(1.6)
Hinweis: Die Vibrationsmessung erfolgte
unter Standardbedingungen gemäß:
BS EN 61029-1:2009
Der erklärte Vibrationsgesamtwert wurde im
Einklang mit einem Standard-Prüfverfahren
gemessen und kann für den Vergleich eines
Werkzeugs mit einem anderen benutzt
werden.
Der erklärte Vibrationsgesamtwert kann auch
bei einer vorläufigen Expositionsbeurteilung
benutzt werden.
(1.7)
VIBRATION
WARNUNG: Beim Verwenden dieser
Maschine kann der Bediener starken
Vibrationen ausgesetzt sein, die auf die
Hand und den Arm übertragen werden.
Es ist möglich, dass der Bediener die
“Vibrations-Weißfingerkrankheit” (RaynaudSyndrom) bekommt. Dieser Zustand kann
die Temperaturempfindlichkeit der Hand
herabsetzen sowie eine allgemeine Taubheit
erzeugen. Längere oder regelmäßige
Anwender dieser Maschine sollten den
Zustand ihrer Hände und Finger genau
überwachen. Suchen Sie sofort einen Arzt auf,
wenn eines der Symptome auftaucht.
• Die Messung und Beurteilung der
Aussetzung eines Menschen gegenüber
handübertragenen Vibrationen am
Arbeitsplatz ist geregelt in: BS EN ISO 53491:2001 und BS EN ISO 5349-2:2002
• Viele Faktoren können das tatsächliche
Vibrationsniveau beeinflussen, z.B.
der Zustand und die Orientierung der
Bearbeitungsflächen und die Art und der
Zustand der verwendeten Maschine. Solche
Faktoren können vor jeder Verwendung
beurteilt werden und wenn erforderlich
können entsprechende Arbeitsrichtlinien
umgesetzt werden. Eine Kontrolle dieser
Faktoren kann dabei helfen, die Auswirkungen
der Vibrationen zu reduzieren.
Handhabung
• Gehen Sie mit der Maschine vorsichtig
um und lassen Sie die Maschine die Arbeit
machen.
• Üben Sie keine übermäßige körperliche
Kraft auf irgendwelche Bedienelemente der
Maschine aus.
• Berücksichtigen Sie Ihre Sicherheit und
Standfestigkeit sowie die Ausrichtung der
Maschine während der Verwendung.
Bearbeitungsfläche
• Berücksichtigen Sie das Material der
Bearbeitungsfläche, ihren Zustand, Dichte,
Festigkeit, Steifigkeit und Ausrichtung.
WARNUNG: Die Vibrationsemission
während der eigentlichen Verwendung des
Elektrowerkzeugs kann sich vom erklärten
Gesamtwert unterscheiden – je nachdem, auf
welche Weise das Werkzeug benutzt wird. Die
Notwendigkeit, Sicherheitsmaßnahmen zu
identifizieren und den Bediener zu schützen,
beruht auf einer Schätzung der Exposition
bei den eigentlichen Nutzungsbedingungen
(unter Berücksichtigung aller Teile des
Betriebszyklus wie z. B. Abschaltzeiten des
Werkzeugs, wenn es leer läuft, zusätzlich zur
Auslösezeit).
(1.8)
AUFKLEBER UND SYMBOLE
WARNUNG: Bedienen Sie diese
Maschine nicht, wenn Warn- und/oder
Hinweisschilder fehlen oder beschädigt sind.
Für Ersatzaufkleber wenden Sie sich bitte
an Evolution Power Tools. Hinweis: Alle oder
einige der folgenden Symbole können im
Handbuch oder auf dem Produkt erscheinen.
Page 28
28
www.evolutionpowertools.com
LABELS & SYMBOLS
Symbol Description
V
Volts
A
Ampere
Hz
Hertz
Min
-1
Drehzahl
~
Wechselstrom
n
o
Leerlaufdrehzahl
Schutzbrille
Gehörschutz tragen
Tragen Staubschutz
Lesen Sie die Anweisungen
Warnung
tragen Sie Handschuhe
C E certified
(1.10)
BESTIMMUNGSGEMÄSSE VERWENDUNG
DIESES ELEKTROWERKZEUGS
WARNUNG: Dieses Produkt ist eine manuell
bediente Kappsäge zum Schneiden von
Stahl und sie wurde für die Verwendung
mit speziellen Sägeblättern von Evolution
entwickelt. Verwenden Sie nur Zubehör, das für
die Verwendung in dieser Maschine entwickelt
wurde und/oder solches, das speziell dafür
empfohlen wird von Evolution Power Tools Ltd.
Wenn diese Maschine mit einem geeigneten
Sägeblatt ausgerüstet ist, kann diese Maschine
verwendet werden zum Schneiden von:
Baustahl
Aluminium
(1.11)
VERBOTENE VERWENDUNG DIESES
ELEKTROWERKZEUGS
WARNUNG: Dieses Produkt ist eine manuell
bediente Kappsäge zum Schneiden von Stahl
und darf nur als solche verwendet werden.
Sie darf in keinster Weise modifiziert oder
zum Antrieb anderer Geräte verwendet
werden oder irgendwelches anderes
Zubehör antreiben, als solches, das in dieser
Bedienungsanleitung erwähnt ist.
(1.13)
WARNUNG: Dieses Gerät ist nicht dafür
geeignet, dass es von Personen (einschließlich
Kindern) mit eingeschränkten körperlichen,
sensorischen oder geistigen Fähigkeiten bzw.
Personen, die unerfahren sind und nicht über
die hierfür nötigen Kenntnisse verfügen,
verwendet wird, es sei denn, diese werden
zuvor in der sicheren Benutzung des Geräts
von einer Person betreut oder angeleitet, die
für ihre Sicherheit verantwortlich ist und für
ihre sichere Verwendung fachkundig ist.
Kinder sollten beaufsichtigt werden, um zu
gewährleisten, dass sie zu dem Gerät keinen
Zugang haben; ihnen darf auf keinen Fall
erlaubt werden, mit dem Gerät zu spielen.
Page 29

29
www.evolutionpowertools.com
EN
EN
FR
DE
NL
JP
(1.14)
ELEKTRISCHE SICHERHEIT
Diese Maschine ist mit dem für den
ausgewiesenen Markt passenden angeformten
Stecker und Netzkabel ausgerüstet. Wenn das
Netzkabel beschädigt ist, muss es durch ein
spezielles Kabel oder Montage beim Hersteller
oder seinen Kundendienst ersetzt werden.
(1.15)
VERWENDUNG IM FREIEN
WARNUNG: Bei einer Verwendung im
Freien sollte dieses Werkzeug zu Ihrem Schutz
nicht Regen ausgesetzt oder an feuchten Orten
verwendet werden. Stellen Sie das Werkzeug nicht
auf feuchte Flächen. Verwenden Sie wenn möglich
eine saubere, trockene Werkbank. Verwenden Sie
für einen zusätzlichen Schutz eine FehlerstromSchutzeinrichtung (RCD), welche die Versorgung
unterbricht, wenn der Fehlerstrom gegen Erde
30 mA für 30 ms übersteigt. Prüfen Sie immer die
Funktion der Fehlerstrom-Schutzeinrichtung (RCD)
bevor Sie die Maschine verwenden.
Wenn ein Verlängerungskabel erforderlich ist, muss
es für die Verwendung im Freien geeignet und so
gekennzeichnet sein.
Die Anweisungen des Herstellers sind bei
Verwendung eines Verlängerungskabels zu
befolgen.
(2.1)
ALLGEMEINE SICHERHEITSHINWEISE FÜR
ELEKTROWERKZEUGE
(Diese Allgemeinen Sicherheitshinweise für
Elektrowerkzeuge sind angegeben in der BS EN
60745-1:2009 & EN 61029-1:2009)
WARNUNG: Lesen Sie alle
Sicherheitshinweise und Anweisungen.
Wenn die Warnungen und Anweisungen nicht
befolgt werden, so kann dies Stromschlag,
Feuer und/oder schwere Verletzungen zur
Folge haben.
Heben Sie alle Warnungen und
Anweisungen für eine spätere
Einsichtnahme auf.
Der in den Warnungen enthaltene Begriff
„Elektrowerkzeug“ bezieht sich auf Ihr
netzbetriebenes Elektrowerkzeug (mit Kabel)
oder Ihr batteriebetriebenes (schnurloses)
Elektrowerkzeug.
(2.2)
1) Allgemeine Warnungen für
Elektrowerkzeuge
[Arbeitsbereichs-Sicherheit]
a) Halten Sie Ihren Arbeitsbereich sauber
und gut beleuchtet. Unordnung und
unbeleuchtete Arbeitsbereiche können zu
Unfällen führen.
b) Betreiben Sie keine Elektrowerkzeuge in
explosiven Atmosphären, wie im
Vorhandensein von entflammbaren
Flüssigkeiten, Gasen oder Staub.
Elektrowerkzeuge erzeugen Funken, die Staub
oder Dunst entzünden können.
c) Halten Sie Kinder und andere
Personen während der Benutzung eines
Elektrowerkzeugs fern.
Bei Ablenkung können Sie die Kontrolle über
das Gerät verlieren.
(2.3)
2) Allgemeine Warnungen für
Elektrowerkzeuge
[Elektrische Sicherheit]
a) Der Anschlussstecker des Geräts muss
in die Steckdose passen. Der Stecker darf in
keiner Weise verändert werden.
Verwenden Sie bei schutzgeerdeten
Elektrowerkzeugen keine Adapterstecker.
Unveränderte Stecker und passende Steckdosen
verringern das Risiko eines Stromschlags.
b) Vermeiden Sie direkten Körperkontakt
mit geerdeten Oberflächen, wie z.B. Rohren,
Heizungen, Herden und Kühlschränken. Das
Risiko für einen Stromschlag ist erhöht, wenn Ihr
Körper geerdet ist.
Page 30

30
www.evolutionpowertools.com
c) Halten Sie Elektrowerkzeuge von
Regen oder Nässe fern. Wasser, das in ein
Elektrowerkzeug eindringt, erhöht das Risiko
eines Stromschlags.
d) Zweckentfremden Sie das Netzkabel
nicht. Verwenden Sie niemals das Kabel
zum Tragen, Ziehen oder Ausstecken
des Elektrowerkzeugs. Halten Sie das
Kabel von Hitze, Öl, scharfen Kanten oder
bewegten Teilen fern. Beschädigte oder
verwickelte Kabel erhöhen das Risiko eines
Stromschlags.
e) Wenn Sie mit einem Elektrowerkzeug
im Freien arbeiten, verwenden Sie nur
Verlängerungskabel, die auch für den
Außenbereich zugelassen sind. Die
Verwendung eines für den Außenbereich
geeigneten Verlängerungskabels verringert
das Risiko eines. Stromschlags.
f) Wenn der Betrieb eines
Elektrowerkzeugs an einem feuchten
Ort nicht vermieden werden kann,
verwenden Sie eine Versorgung, die mit
einer Fehlerstrom-Schutzeinrichtung
(RCD) gesichert ist. Durch Einsatz einer
Fehlerstromschutzeinrichtung wird das
Risiko eines Stromschlags verringert.
(2.4)
3) Allgemeine Warnungen für
Elektrowerkzeuge
[Persönliche Sicherheit].
a) Seien Sie wachsam, achten Sie darauf,
was Sie tun, und gebrauchen Sie Ihren
gesunden Menschenverstand, wenn Sie
mit einem Elektrowerkzeug arbeiten.
Verwenden Sie kein Elektrowerkzeug, wenn
Sie müde sind oder unter dem Einfluss
von Drogen, Alkohol oder Medikamenten
stehen. Ein Moment der Unachtsamkeit beim
Gebrauch eines Elektrowerkzeugs kann zu
schweren Verletzungen führen.
b) Tragen Sie persönliche
Schutzausrüstung. Verwenden Sie
immer eine Schutzbrille. Schutzausrüstung
wie z.B. Staubschutzmasken, rutschfeste
Sicherheitsschuhe, Helme oder Gehörschutz,
die bei entsprechenden Bedingungen
verwendet wird, verringert Personenschäden.
c) Vermeiden Sie eine unbeabsichtigte
Inbetriebnahme. Stellen Sie sicher, dass sich
der Schalter in der Stellung AUS befindet,
bevor Sie das Werkzeug an eine Stromquelle
und/oder ein Akkupack anschließen,
es anheben oder es tragen. Tragen von
Elektrowerkzeugen mit Ihrem Finger
auf dem Schalter oder Einstecken von
Elektrowerkzeugen, bei denen der Schalter
eingeschaltet ist, beschwört Unfälle herauf.
d) Entfernen Sie Einstellwerkzeuge
oder Schraubenschlüssel, bevor Sie das
Werkzeug einschalten. Ein Handwerkzeug
oder Schlüssel, das bzw. der sich in einem
drehenden Geräteteil befindet, kann zu
Personenschäden führen.
e) Sorgen Sie für einen festen Stand.
Achten Sie auf jederzeit sicheren Stand und
gutes Gleichgewicht. Dadurch können Sie das
Elektrowerkzeug in unerwarteten Situationen
besser kontrollieren.
f) Tragen Sie geeignete Kleidung. Tragen Sie
keine lockere Kleidung oder Schmuck. Halten
Sie Ihre Haare, Kleidung und Handschuhe von
sich bewegenden Teilen fern. Lose Kleidung,
Schmuck oderlange Haare können sich in sich
bewegenden Teilen fangen.
g) Wenn Geräte für den Anschluss von
Staubabsaug- und Sammelvorrichtungen
zur Verfügung stehen, stellen Sie sicher,
dass diese angeschlossen und korrekt
verwendet werden.
Das Verwenden dieser Einrichtungen
verringert Gefährdungen durch Staub.
(2.5)
4) Allgemeine Warnungen für
Elektrowerkzeuge
[Einsatz und Pflege von
Elektrowerkzeugen]
a) Überlasten Sie das Elektrowerkzeug nicht.
Verwenden Sie das richtige Elektrowerkzeug für
Ihre Anwendung. Das richtige Elektrowerkzeug
verrichtet die Arbeit besser und sicherer mit der
Geschwindigkeit, für die es ausgelegt ist.
Page 31

31
www.evolutionpowertools.com
EN
EN
FR
DE
NL
JP
b) Benutzen Sie kein Elektrowerkzeug,
dessen Ein/Aus-Schalter defekt ist. Ein
Elektrowerkzeug, das sich nicht mehr ein- oder
ausschalten lässt, ist gefährlich und muss
repariert werden.
c) Trennen Sie das Elektrowerkzeug von
der Stromquelle und/oder das Akkupack
vom Elektrowerkzeug bevor Sie
irgendwelche Einstellungen vornehmen,
Zubehör wechseln oder Elektrowerkzeuge
lagern. Solche vorbeugenden
Sicherheitsvorkehrungen reduzieren das
Risiko, das Elektrowerkzeug aus Versehen
zu starten.
d) Lagern Sie nicht in Betrieb befindliche
Elektrowerkzeuge außerhalb des
Zugriffsbereichs von Kindern und erlauben
Sie keinen Personen, die nicht mit dem
Elektrowerkzeug oder diesen Hinweisen
vertrat sind, das Elektrowerkzeug zu
bedienen. Elektrowerkzeuge sind gefährlich,
wenn sie von unerfahrenen Personen benutzt
werden.
e) Pflegen Sie das Elektrowerkzeug. Prüfen
Sie auf falsche Ausrichtung oder Festsitzen
beweglicher Teile, Bruch beweglicher Teile
und alle anderen Zustände, die den Betrieb
des Elektrowerkzeugs beeinträchtigen
können. Lassen Sie beschädigte Teile vor
dem Einsatz des Elektrowerkzeugs reparieren.
Viele Unfälle haben ihre Ursache in schlecht
gewarteten Elektrowerkzeugen.
f) Halten Sie Schneidwerkzeuge scharf und
sauber. Richtig gewartete Schneidwerkzeuge
mit scharfen Schnittkanten fressen sich nicht
so leicht und sind einfacher zu kontrollieren.
g) Verwenden Sie das reparieren., Zubehör
und Werkzeugeinsätze, etc. gemäß
diesen Anweisungen, berücksichtigen
Sie die Arbeitsbedingungen und die
auszuführende Arbeit. Eine Verwendung des
Elektrowerkzeugs für andere Tätigkeiten als
die beabsichtigten kann eine gefährliche
Situation hervorrufen.
(2.6)
5) Allgemeine Warnungen für
Elektrowerkzeuge [Kundendienst]
a) Lassen Sie Ihr Elektrowerkzeug von
einem qualifizierten Techniker warten,
der nur identische Ersatzteile verwendet.
Dies stellt sicher, dass die Sicherheit des
Elektrowerkzeugs aufrecht erhalten wird.
(2.7)
HINWEISE ZUM GESUNDHEITSSCHUTZ
WARNUNG: Bei der Verwendung dieser
Maschine können Staubpartikel entstehen.
Manchmal kann dieser Staub, je nach
bearbeitetem Material, besonders schädlich
sein. Wenn Sie den Verdacht haben, dass Farbe
auf der Oberfläche eines Materials, das Sie
schneiden möchten, Blei enthält, ersuchen
Sie um fachkundigen Rat. Farbe auf Bleibasis
sollte nur von einem Fachmann entfernt
werden uns Sie sollten nicht versuchen, sie
selbst zu entfernen. Sobald sich der Staub auf
Oberflächen abgesetzt hat, kann ein Kontakt
von der Hand zum Mund zur Aufnahme
von Blei führen. Schon die Aufnahme
von geringen Mengen Blei kann zu einer
irreversiblen Schädigung des Gehirns und des
Nervensystems führen. Kleine und ungeborene
Kinder sind besonders gefährdet.
Es ist empfehlenswert, dass Sie die Risiken
im Zusammenhang mit den Materialien,
die Sie bearbeiten, berücksichtigen und
das Risiko einer Aussetzung reduzieren. Da
einige Materialien gesundheutsgefährdenden
Staub erzeugen können, empfehlen wir
die Verwendung einer zugelassenen
Gesichtsmaske mit austauschbaren Filtern,
wenn Sie diese Maschine einsetzen.
Sie sollten immer:
• In einem gut belüfteten Bereich arbeiten.
• Mit zugelassener Schutzausrüstung wie z. B.
Staubschutzmasken arbeiten, die besonders
für das Herausfiltern mikroskopischer
Partikel konstruiert sind.
Page 32

32
www.evolutionpowertools.com
immer einen Anschlag oder eine
gerade Kantenführung. Dadurch wird
die Schnittgenauigkeit verbessert und die
Wahrscheinlichkeit verringert, dass das
Sägeblatt klemmt.
g) Verwenden Sie nur Sägeblätter in
der richtigen Größe und mit passender
Aufnahmebohrung (rautenförmig im
Gegensatz zu rund). Sägeblätter, die nicht
zu den Montageteilen der Säge passen, laufen
unrund und verursachen, dass man leicht die
Kontrolle über das Gerät verliert.
h) Verwenden Sie nie beschädigte oder
falsche Sägeblatt-Unterlegscheiben oder
-Schrauben. Die Sägeblatt-Unterlegscheiben
und -Schrauben wurden speziell für Ihre Säge
konstruiert und sorgen für optimale Leistung
und Betriebssicherheit.
i) Verwenden Sie keine Sägeblätter aus
Schnellarbeitsstahl (HSS).
j) Kontrollieren Sie die Maschine und
das Sägeblatt vor jeder Verwendung.
Verwenden Sie keine verformten,
gesprungenen, verschlissenen oder
anderweitig beschädigte Sägeblätter.
k) Arbeiten Sie mit der Säge niemals ohne
die originalen Schutzvorrichtungen. Die
Pendelschutzhaube darf nicht in geöffnetem
Zustand arretiert werden. Stellen Sie sicher,
dass die Schutzhaube sich frei bewegen kann,
ohne festzuklemmen.
l) Verwenden Sie nur Sägeblätter, die
den in diesem Handbuch angegebenen
Kenndaten entsprechen. Vergewissern Sie
sich vor dem Verwenden von Zubehörteilen,
dass das Zubehör für die maximale Drehzahl
der Maschine geeignet ist.
(3.2)
Ursachen und Vermeidung von
Rückschlägen:
Ein Rückschlag ist die plötzliche Reaktion
aufgrund eines hakenden, klemmenden oder
falsch ausgerichteten Sägeblatts, wodurch
verursacht wird, dass die Säge unkontrolliert
abhebt und aus dem Werkstück heraus hin zur
Bedienperson schlägt.
(2.8)
WARNUNG: Der Betrieb jeder Gehrungssäge
kann zur Folge haben, dass Fremdkörper in
Ihre Augen geschleudert werden; dies kann
in schweren Augenschäden resultieren. Vor
Beginn der Arbeit mit Elektrowerkzeugen:
legen Sie stets eine Schutzbrille bzw. eine
Schutzbrille mit Seitenschutz oder eine
Vollmaske an, falls erforderlich.
(3.0)
ZUSÄTZLICHE SICHERHEITSHINWEISE
(3.1)
a) GEFAHR: Kommen Sie mit Ihren Händen
nicht in den Sägebereich bzw. in die Nähe
des Sägeblatts. Halten Sie mit Ihrer zweiten
Hand den Hilfsgriff oder das Motorgehäuse.
Wenn Sie die Säge mit beiden Händen halten,
können sie nicht vom Sägeblatt verletzt
werden.
b) Greifen Sie nicht unter das Werkstück.
Unter dem Werkstück kann die Schutzhaube
Sie nämlich nicht vor dem Sägeblatt schützen.
c) Passen Sie die Schnitttiefe an die Dicke
des Werkstücks an. Unter dem Werkstück
sollte weniger als eine volle Zahnhöhe der
Sägeblattzähne zu sehen sein.
d) Halten Sie das zu sägende Werkstück
niemals in der Hand oder über dem Bein fest.
Befestigen Sie das Werkstück auf einer stabilen
Abstützvorrichtung. Es ist wichtig, dass das
Werkstück gut abgestützt wird, um die Gefahr
von Körperkontakt, eines Klemmens des
Sägeblatts oder des Verlusts der Kontrolle zu
minimieren.
e) Halten Sie das Elektrowerkzeug nur
an den isolierten Griffflächen fest,
wenn Sie Arbeiten ausführen, bei denen
das Schneidewerkzeug verborgene
Stromleitungen oder sein eigenes Netzkabel
treffen könnte. Die Kontakt mit einer
spannungsführenden Leitung setzt auch
die freiliegenden metallenen Teile des
Elektrowerkzeugs unter Spannung und kann
somit einen Stromschlag versetzen.
f) Verwenden Sie beim Längsschneiden
Page 33

33
www.evolutionpowertools.com
EN
EN
FR
DE
NL
JP
c) Wenn Sie eine Säge, die im Werkstück
steckt, wieder anschalten wollen, richten
Sie das Sägeblatt in der Schnittfuge
mittig aus und vergewissern sich, dass die
Sägezähne nicht im Werkstück verhakt
sind. Wenn das Sägeblatt klemmt, kann es
sich vom Werkstück aus emporerheben oder
zurückschlagen, sobald die Säge wieder
angeschaltet wird.
d) Große Platten müssen gut abgestützt
werden, um das Risiko zu verringern, das
durch ein klemmendes Sägeblatt oder
einen Rückschlag verursacht wird. Denn
große Platten tendieren dazu, sich unter
ihrem Eigengewicht durchzubiegen. Platten
müssen auf beiden Seiten abgestützt werden,
sowohl in der Nähe des Sägespalts als auch in
der Nähe der Plattenkante.
e) Die Hebel für die Schnitttiefen- und
Schnittwinkeleinstellungen müssen vor
dem Sägen gut festgezogen werden. Wenn
sich während des Sägens die SägeblattEinstellungen verändern, kann sich das
Sägeblatt verklemmen und ein Rückschlag
auftreten.
f) Verwenden Sie keine stumpfen oder
beschädigten Sägeblätter. Sägeblätter mit
stumpfen oder falsch ausgerichteten Zähnen
bewirken durch einen zu schmalen Sägespalt
übermäßige Reibung, das Klemmen des
Sägeblatts und den Rückschlageffekt.
g) Seien Sie besonders vorsichtig bei
„Tauchschnitten“ in bestehende Wände
oder andere nicht einsehbare Bereiche.
Das eintauchende Sägeblatt kann beim Sägen
in verborgene Objekte blockieren und einen
Rückschlag verursachen.
h) Überprüfen Sie vor jedem Gebrauch, ob
sich die untere Schutzhaube einwandfrei
schließen lässt. Verwenden Sie die Säge
nicht, wenn die untere Schutzhaube nicht
frei beweglich ist und sich nicht sofort
schließt. Klemmen oder binden Sie die untere
Schutzhaube niemals in geöffneter Position
fest. Sollte die Säge unbeabsichtigt zu Boden
fallen, könnte die untere Schutzhaube
verbogen werden. Öffnen Sie die untere
1. Wenn sich das Sägeblatt in dem sich
schließenden Sägespalt stark verhakt oder
verklemmt, blockiert es, und die Motorkraft
schlägt die Säge zur Bedienperson hin zurück.
2. Wenn sich das Sägeblatt verzieht oder
sich im Schnitt falsch ausrichtet, können die
Zähne an der Hinterkante des Sägeblatts in
die Oberseite des Werkstücks graben, wodurch
das Blatt aus dem Sägespalt klettert und in
Richtung des Bedieners zurückspringt.
(3.3)
Der Rückschlageffekt tritt infolge
eines fehlerhaften Gebrauchs der Säge
und/oder falscher Betriebsverfahren
oder -bedingungen auf; er lässt sich
vermeiden, indem man vorschriftsgemäße
Sicherheitsmaßnahmen ergreift, wie unten
beschrieben.
a) Halten Sie die Säge mit beiden Händen
gut fest und bringen Ihre Arme in eine
Position, in der Sie die Rückschlagkräfte
abfangen können. Halten Sie sich
mit Ihrem Körper immer seitlich des
Sägeblatts; niemals sollten Sie das
Sägeblatt in eine Linie mit Ihrem Körper
bringen. Ein Rückschlag könnte bewirken,
dass die Säge rückwärts springt; jedoch lassen
sich Rückschlagkräfte von der Bedienperson
kontrollieren, wenn vorschriftsgemäße
Sicherheitsmaßnahmen ergriffen werden.
b) Wenn sich die Sägeblätter verklemmen
oder ein Sägevorgang aus irgendeinem
Grund unterbrochen wird, schalten Sie
die Säge aus und halten sie im Werkstück
so lange ruhig, bis die Sägeblätter
vollkommen zum Stillstand gekommen
sind. Versuchen Sie nie, die Säge aus dem
Werkstück zu entfernen oder rückwärts
zu ziehen, solange die Sägeblätter noch
in Bewegung sind, da in diesem Fall ein
Rückschlag erfolgen könnte. Erwägen und
ergreifen Sie Abhilfemaßnahmen, um die
Ursachen für das Verklemmen des Sägeblatts
zu beheben.
Page 34

34
www.evolutionpowertools.com
(3.4)
WARNUNG: Wenn irgendwelche Teile
fehlen, bedienen Sie Ihre Maschine erst, wenn
die fehlenden Teile wieder angebracht sind.
Wird diese Vorschrift nicht beachtet, könnte dies
schwere Körperverletzung zur Folge haben.
Schutzhaube mit dem Rückziehhebel und
vergewissern Sie sich, dass sie frei beweglich
ist und bei allen Schnittwinkeln und -tiefen
weder das Sägeblatt noch andere Teile berührt.
i) Überprüfen Sie die Funktion der
Feder für die untere Schutzhaube. Falls
die Schutzhaube und die Feder nicht
einwandfrei arbeiten, müssen sie vor dem
Gebrauch gewartet werden. Wenn Teile
beschädigt wurden, klebrige Ablagerungen
vorhanden sind oder sich Späne angesammelt
haben, arbeitet die untere Schutzhaube
langsamer als vorgesehen.
j) Die untere Schutzhaube lässt sich von
Hand nur bei besonderen Schnitten wie
„Tauch- und Compoundschnitten“ öffnen.
Öffnen Sie die untere Schutzhaube mit dem
Rückziehhebel und lassen ihn los, sobald das
Sägeblatt in das Werkstück eingetaucht ist. Bei
allen anderen Sägearbeiten sollte die untere
Schutzhaube automatisch arbeiten.
k) Achten Sie stets darauf, dass die untere
Schutzhaube das Sägeblatt bedeckt, bevor
Sie die Säge auf einer Werkbank oder
dem Boden ablegen. Ein ungeschütztes,
nachlaufendes Sägeblatt bewegt die Säge
entgegen der Schnittrichtung und sägt,
was ihm im Weg ist. Beachten Sie dabei die
Nachlaufzeit der Säge.
Page 35

35
www.evolutionpowertools.com
EN
EN
FR
DE
NL
JP
(4.1)
ERSTE SCHRITTE - AUSPACKEN
Vorsicht: Diese Verpackung enthält scharfe
Objekte. Packen Sie sie vorsichtig aus.
Nehmen Sie die Maschine zusammen mit dem
mitgelieferten Zubehör aus der Verpackung
heraus. Prüfen Sie die Maschine sorgfältig,
um sicherzustellen, dass die Maschine in
gutem Zustand ist und berücksichtigen Sie
dabei alle in diesem Handbuch aufgeführten
Zubehörteile. Vergewissern Sie sich auch, dass
das gesamte Zubehör vollständig ist. Sollten
irgendwelche Teile fehlen, ist die Maschine
und ihr Zubehör in der Originalverpackung
an den Händler zurückzugeben. Werfen Sie
die Verpackung nicht weg; heben Sie sie
während der Garantiedauer gut auf. Entsorgen
Sie die Verpackung auf unweltfreundliche
Weise. Führen Sie sie wenn möglich der
Wiederverwertung zu. Lassen Sie auf Grund
der Erstickungsgefahr keine Kinder mit leeren
Plastikbeuteln spülen.
(4.2)
(4.3)
Weiteres Zubehör
Zusätzlich zu den mit dieser Maschine
mitgelieferten Standardpositionen sind auch
folgende Zubehörteile im Evolution OnlineShop unter www.evolutionpowertools.com
oder von Ihrem Händler vor Ort erhältlich.
MITGELIEFERTE POSITIONEN
Beschreibung Anzahl
Bedienungsanleitung 1
Stahlsägeblatt 1
Sechskantschlüssel 8
mm (Sägeblattwechsel)
1
Kohlebürstensatz 1
Beschreibung TEILE-Nr.
355mm (14”)
Diamond Blade
DIAMOND355
Page 36

36
www.evolutionpowertools.com
ÜBERSICHT ÜBER DIE FURY 2 14” (355 mm) KAPPSÄGE
1. Unterer Sägeblattschutz
2. Vordere schwenkbare Spannbacke
3. Niederhaltekette
4. Oberer Sägeblattschutz
5. Nabenschutz
6. Umstellbare hintere Spannbacke
6
5
4
2
1
3
Page 37

37
www.evolutionpowertools.com
EN
EN
FR
DE
NL
JP
PARTS DIAGRAM Parts Diagrams can also be downloaded from www.evolutionpowertools.com
Page 38

38
www.evolutionpowertools.com
ERSTE SCHRITTE - VORBEREITUNG
WARNUNG: TRENNEN SIE DIE MASCHINE STETS VON DER
STROMVERSORGUNG, BEVOR SIE EINSTELLUNGEN VORNEHMEN.
WARNUNG: Betreiben Sie die Maschine nach dem Einbau eines
neuen Sägeblatts immer für einige Minuten ohne Last. Bleiben
Sie vom Sägeblatt weg. Wenn das Sägeblatt einen unentdeckten
Fehler hat, könnte es bei diesem Probelauf zerbrechen.
Hinweis: Kabel und Gerätestecker dieser Säge sind für
das Bestimmungsland zugelassen. Verändern oder
modifizieren Sie das Netzkabel nicht.
(<5.1)
MONTIEREN ODER DEMONTIEREN EINES SÄGEBLATTS
WARNUNG: Verwenden Sie ausschließlich originale
Evolution-Sägeblätter oder Sägeblätter, die von Evolution
zugelassen sind, die für diese Maschine entwickelt wurden.
Achten Sie darauf, dass die Höchstdrehzahl des Sägeblatts mit
der Maschine kompatibel ist.
WARNUNG: Führen Sie diese Tätigkeit nur durch, wenn die
Maschine von der Stromversorgung getrennt ist.
Hinweis: Es wird empfohlen, dass die Bedienperson beim
Umgang mit dem Sägeblatt während der Montage oder beim
Auswechseln des Sägeblatts Schutzhandschuhe trägt. (5.1>)
LÖSEN des SCHNEIDKOPFS
Der Schneidkopf hebt sich automatisch in die obere Position
sobald er von der niedergehaltenen Position gelöst wird.
Zum Lösen des Schneidkopfs aus der niedergehaltenen Position:
• Drücken Sie vorsichtig auf den Sägegriff.
• Haken Sie die Niederhaltekette aus dem Niederhaltestift aus.
(Siehe Abb. 9). Lassen Sie den Schneidkopf in seine obere
Position steigen.
Hinweis: Wir empfehlen, dass bei nicht verwendeter Maschine
der Schneidkopf in seiner unteren Position niedergehalten wird
mit der Niederhaltekette am Niederhaltestift eingehakt.
MONTAGE
Page 39

39
www.evolutionpowertools.com
EN
EN
FR
DE
NL
JP
ABB. 1
ABB. 2
SÄGEBLATTMONTAGE:
• Stellen Sie sicher, dass sich der Schneidkopf in seiner oberen
Position befindet.
• Lösen Sie die Flügelschraube, die den Nabenschutz sichert,
und drehen sie den Schutz nach oben, um die Nabe der
Maschine offenzulegen. (Abb. 1)
• Drücken Sie den Nabenarretierknopf, um die Nabe zu
arretieren. (Abb. 2)
• Lösen Sie die Nabenschraube mit dem mitgelieferten
Sechskantschlüssel. (Abb. 3)
Hinweis: Die Nabenschraube hat ein Linksgewinde. Drehen Sie
sie zum Anziehen im Uhrzeigersinn. Drehen Sie sie zum Lösen
gegen den Uhrzeigersinn.
• Entfernen Sie Nabenschraube, Unterlegscheibe und äußeren
Sägeblattflansch und heben Sie sie für die spätere Montage sicher auf.
• Bewegen Sie den unteren Sägeblattschutz nach oben in den
oberen Sägeblattschutz, indem Sie ihn mit der Hand drehen.
(Abb. 4)
• Entfernen Sie das Sägeblatt und lassen Sie den inneren
Sägeblattflansch in seiner Betriebsposition.
Wiedereinbau eines Sägeblatts:
• Stellen Sie sicher, dass alle Komponenten frei von
Verunreinigungen und Fremdkörpern sind.
• Montieren Sie das Sägeblatt auf den inneren
Sägeblattflansch und die Nabe und stellen Sie dabei sicher,
dass der Drehrichtungspfeil auf dem Sägeblatt und der
Drehrichtungspfeil auf dem oberen Sägeblattschutz der
Maschine zueinander passen. (Abb. 5)
• Montieren Sie äußeren Sägeblattflansch, Unterlegscheibe und
die Nabenschraube wieder.
• Drücken Sie den Nabenarretierknopf, um die Nabe zu arretieren.
• Ziehen Sie die Nabenschraube mit dem 8 mm-
Sechskantschlüssel an.
• Bringen Sie den Nabenschutz wieder in seine Betriebsposition
und ziehen Sie die Flügelmutter an.
• Prüfen Sie, ob die Nabenarretierung gelöst wurde, indem Sie das
Sägeblatt mit der Hand drehen.
• Stellen Sie sicher, dass der Sechskantschlüssel aus der
Nabenschraube entfernt wurde wurde und für eine spätere
Verwendung sicher aufgehoben wird.
• Prüfen Sie die Montage und besonders die Funktion des
einschiebbaren unteren Sägeblattschutzes, indem Sie den
Schneidkopf mehrmals heben und senken.
ABB. 3
ABB. 4
Page 40

40
www.evolutionpowertools.com
SCHNEIDKOPFWEG
Einstellung des Schneidkopfwegs nach unten
Um zu verhindern, dass das Sägeblatt mit irgendeinem Teil
des Metallsockels der Maschine in Kontakt kommt, kann der
Verfahrweg nach unten des Schneidkopfs eingestellt werden.
Senken Sie den Schneidkopf und prüfen Sie auf möglichen
Kontakt des Sägeblatts mit dem Maschinensockel.
Wenn der Verfahrweg nach unten des Schneidkopfs
eingestellt werden muss:
• Lösen Sie die Sicherungsmutter an der Anschlagschraube für
den Verfahrweg nach unten. (Abb. 6)
• Drehen Sie die Einstellschraube nach außen (gegen den
Uhrzeigersinn), um den Verfahrweg nach unten des
Schneidkopfs zu verringern.
• Drehen Sie die Einstellschraube nach innen (im
Uhrzeigersinn), um den Verfahrweg nach unten des
Schneidkopfs zu erhöhen.
• Ziehen Sie die Sicherungsmutter der Einstellschraube wieder
an, wenn ein zufriedenstellender Verfahrweg nach unten des
Schneidkopfs erreicht wurde.
EINSTELLUNG DES SCHNEIDWINKELS
Hinweis: Die hintere Spannbacke kann um 45° gedreht werden.
Die hintere Spannbacke ist vom Werk aus eingestellt auf 0° (bei
90° zum Sägeblatt), so dass das Sägeblatt das im Schraubstock
positionierte Material im rechten Winkel schneidet.
Für Winkelschnitte kann die hintere Spannbacke um (bis zu)
45° geschwenkt werden. Dabei hat die Spannbacke einen
Winkelmesser für eine einfache und genaue Einstellung.
Zum Einstellen der hinteren Spannbacke auf einen Winkel:
• Lösen Sie die zwei (2) M10 Innensechskantschrauben.
(Abb. 7)
• Drehen Sie die hintere Spannbacke in den erforderlichen
Winkel.
• Ziehen Sie die Innensechskantschrauben mit dem
mitgelieferten Sechskantschlüssel fest an.
MONTAGE
ABB. 7
ABB. 6
ABB. 5
Page 41

41
www.evolutionpowertools.com
EN
EN
FR
DE
NL
JP
UMSETZEN DER HINTEREN SPANNBACKE
Die hintere Spannbacke kann vom Maschinensockel entfernt
und umgesetzt werden. (Abb. 8)
Zum Umsetzen:
• Entfernen Sie die zwei (2) M10 Innensechskantschrauben und
die zugehörigen Unterlegscheiben.
• Umsetzen der hinteren Spannbacke gibt es zwei (2) mögliche
Positionen auf Grund der drei (3) Gewindebohrungen im
Maschinensockel.
• Setzen Sie die Innensechskantschrauben in ihre neuen
Betriebspositionen ein. Stellen Sie sicher, dass alle Unterlegund Sicherungsscheiben richtig angeordnet sind.
Ein Umsetzen der hinteren Spannbacke in die hinterste Position
ermöglicht das Schneiden breiterer Materialstücke als es
möglich ist, wenn sich die hintere Spannbacke in der vorderen
Position befindet.
(5.2)
BEDIENUNGSANLEITUNG
SCHNITTVORBEREITUNG
Sorgen Sie für einen festen Stand. Achten Sie auf sicheren Stand
und gutes Gleichgewicht. Stellen Sie sich auf eine Seite, so
dass sich Kopf und Körper außerhalb der Linie eines möglichen
Rückschlags befinden.
WARNUNG: Freihand-Schneiden ist eine Hauptursache von
Unfällen und sollte nicht versucht werden.
• Stellen Sie sicher, dass sich das Werkstück fest im
Schraubstock befindet.
• Der Maschinensockel sollte sauber und frei von Spänen oder
Sägestaub, etc. sein, bevor das Werkstück festgeklemmt wird.
• Stellen Sie sicher, dass sich das ‘abgeschnittene’ Material frei
• zur Seite weg vom Sägeblatt bewegen kann, wenn der
Schnitt beendet wird. Stellen Sie sicher, dass sich das
‘abgeschnittene’ Stück nicht in einem anderen Teil der
Maschine ‘verklemmen’ k ann.
• Verwenden Sie diese Säge nicht zum Schneiden kleiner
Stücke. Wenn sich durch das zu schneidende Werkstück Ihre
Hand oder Finger innerhalb von 150 mm vom Sägeblatt
befinden würden, ist das Werkstück zu klein.
ABB. 8
Page 42

42
www.evolutionpowertools.com
• Winkel sollten umgedreht eingeklemmt werden, so dass die
Spitze des Querschnitts ganz oben ist.
(5.3)
SCHNEIDEN
• Schalten Sie den Motor ein, wenn sich der Schneidkopf in der oberen
Position befindet, und lassen Sie ihn die volle Drehzahl erreichen.
• Senken Sie vorsichtig den Schneidkopf.
• Führen Sie das Sägeblatt langsam in das Material und verwenden Sie
dabei zuerst einen leichten Druck , damit das Sägeblatt nicht rupft.
• Erhöhen Sie nach und nach den Druck wenn das Sägeblatt in
das Werkstück eindringt. Überlasten Sie die Maschine nicht.
Lassen Sie das Sägeblatt die Arbeit verrichten.
Hinweis: Die Schneidleistung wird sich nicht verbessern, wenn
Sie übermäßigen Druck auf die Maschine ausüben, es kann
aber dazu führen, dass sich die Lebensdauer von Sägeblatt und
Motor verringert.
• Reduzieren Sie den Druck wenn das Sägeblatt beginnt, aus dem
Material auszutreten.
• Lassen Sie am Ende des Schnitts den Schneidkopf in seine obere
Position zurückkehren und schalten Sie den Motor ab.
• Entfernen Sie Ihre Hände oder das Werkstück nur dann von
der Maschine, wenn der Motor vollständig stillsteht und das
stehende Sägeblatt vom unteren Sägeblattschutz abgedeckt ist.
WARTUNG
(6.1)
Hinweis: Jegliche Wartung muss bei abgeschalteter und von der
Netz-/Batterieversorgung getrennter Maschine erfolgen.
Überprüfen Sie die vorschriftsmäßige Funktion aller
Sicherheitsmerkmale und Schutzvorrichtungen auf
regelmäßiger Basis. Benutzen Sie diese Maschine nur, wenn alle
Schutzvorrichtungen/Sicherheitsmerkmale voll funktionsfähig sind.
Alle Motorlager in diesem Gerät weisen eine Dauerschmierung
auf. Daher ist keine weitere Schmierung erforderlich.
Reinigen Sie die Plastikteile des Geräts unter Verwendung
eines sauberen, leicht feuchten Tuchs. Verwenden Sie keine
Lösungsmittel oder ähnlichen Produkte, die die Plastikteile
beschädigen könnten.
MAINTENANCE
Page 43

43
www.evolutionpowertools.com
EN
EN
FR
DE
NL
JP
WARNUNG: Versuchen Sie nicht zu reinigen, indem Sie
spitze Gegenstände durch die Öffnungen in den Gehäuseteilen
etc. des Geräts stecken. Die Belüftungsöffnungen des Geräts
sollten mit trockener Pressluft gereinigt werden.
(6.2) Bei übermäßigem Funkenflug kann sich Schmutz im Motor
angesammelt haben oder sind die Kohlebürsten verschlissen.
(6.3) PRÜFEN UND/ODER
AUSTAUSCHEN DER KOHLEBÜRSTE
• Trennen Sie die Maschine von der Stromversorgung.
• Stellen Sie die Maschine auf eine ebene, sichere Oberfläche.
• Lösen und entfernen Sie die zwei (2) Bürstenhalteschrauben,
vom Motorgehäuse.
• Ziehen Sie die Kohlebürsten heraus.
Hinweis: Wenn die Kohlebürste weniger als 6 mm (¼”) lang
ist oder wenn Anzeichen von Abbrand oder Beschädigungen
vorhanden sind, ersetzen Sie die Kohlebürsten.
• Setzen Sie die neuen Kohlebürsten ein.
• Bringen Sie die Bürstenhalteschrauben wider an.
• Lassen Sie nach dem Austausch der Kohlebürsten die Maschine für
einige Minuten ohne Last laufen. Dies unterstützt den Einlaufprozess.
Hinweis: Wenn nach dem Prüfen festgestellt wird, dass die
Kohlebürsten weiter verwendet werden können, können Sie wieder in
ihre ursprüngliche Position gebracht werden. Es ist wichtig, dass sie in
derselben Position und so herum wieder eingesetzt werden, in der sie
auch aus der Maschine entfernt wurden.
TRANSPORT/LAGERUNG
Um Transport oder Lagerung der Maschine einfacher und
bequemer zu machen, kann der Schneidkopf in der Position
‘unten’ festgehalten werden.
Um den Schneidkopf unten zu halten:
• Senken Sie den Schneidkopf in seine unterste Position ab.
• Haken Sie das erforderliche Glied der Niederhaltekette über
dem Niederhaltestift ein. (Abb. 9).
(6.4) MWELTSCHUTZ
Elektroabfälle sollten nicht mit dem normalen Hausmüll
entsorgt werden. Bitte recyclen Sie, wenn die entsprechenden
Recyclingeinrichtungen bei Ihnen vor Ort vorhanden sind.
Klären Sie dies mit Ihrer lokalen Behörde oder.
ABB. 9
Page 44

44
www.evolutionpowertools.com
EG-KONFORMITÄTSERKLÄRUNG
Der Hersteller des von dieser Erklärung behandelten Produkts ist: Evolution Power Tools Ltd.
Venture One, Longacre Close, Holbrook Industrial Estate, Sheffield S20 3FR, UK
Der Hersteller erklärt hiermit, dass die Maschine wie in dieser Erklärung angegeben alle
relevanten Bestimmungen der Maschinenrichtlinie und andere einschlägige Richtlinien wie
unten angegeben erfüllt. Der Hersteller erklärt weiter, dass die Maschine wie in dieser Erklärung
angegeben wenn zutreffend die relevanten Bestimmungen der grundlegenden Gesundheits- und
Sicherheitsanforderungen erfüllt.
Die von dieser Erklärung betroffenen Richtlinien sind wie unten ausgeführt:
Und entspricht den zutreffenden Anforderungen der folgenden Dokumente:
Produktangaben:
Beschreibung: FURY2 355 mm (14 “) TCT Mehrzweck Cut Off Saw
Evolution-Modell-Nr: 0820001 / 0820002 / 0820003 / 0820004 / 0820005
Markenname: Evolution
Netzspannung: 230-240V~ 50Hz
Die technischen Unterlagen, die erforderlich sind, um zu belegen, dass das Produkt die Anforderungen der
Richtlinie erfüllt, wurden zusammengestellt und stehen den entsprechenden Verfolgungsbehörden zur
Verfügung; sie belegen, dass unsere technische Dokumentation oben angeführte Dokumente enthält.
Name und Adresse des Eigentümers der technischen Dokumentation. Alle oben aufgeführten Normen
wurden erfüllt und die entsprechenden Unterlagen sind im Besitz von Evolution Power Tools
Unterzeichnet: Print: Matthew Gavins: Group Chief Executive
Date: 01/03/2016
2006/42/EC Maschinenrichtlinie
2004/108/EC (valid until Apr 19th 2016) EMV-Richtlinie
2014/30/EU (effective from Apr 20th 2016) EMV-Richtlinie
2011/65/EU Die Richtlinie (RoHS) zur Beschränkung der Verwendung bestimmter
gefährlicher Stoffe in Elektro- und Elektronikgeräten
Die WEEERichtlinie 2002/96/EC
über Elektro- und Elektronik-Altgeräte.
EN13898/A1:2009 • EN60204-1/A1:2009 • EN55014-1/A1:2009
EN55014-2/A2:2008 • EN 61000-3-2/A2:2009 • EN61000-3-11:2000
Page 45

45
www.evolutionpowertools.com
EN
EN
FR
DE
NL
JP
NOTES
Page 46

®
Page 47

EN
EN
FR
DE
NL
JP
FRANÇAIS
Traduction de manuels d’instruction d’origine
Page 48

48
www.evolutionpowertools.com
TABLE DES MATIERES
INTRODUCTION Page 49
Garantie Page 49
Etiquettes et symboles Page 52
Utilisations normales de cet outil électrique Page 52
PRECAUTIONS DE SECURITE Page 50
Sécurité électrique Page 53
Utilisation extérieure Page 53
Instructions de sécurités générales pour les outils électriques Page 53
Instructions de sécurité supplémentaires Page 55
POUR DEMARRER Page 58
Déballage Page 58
PRÉSENTATION DE L'OUTIL Page 58
Assemblage et préparation Page 62
Instructions d'utilisation Page 62
ENTRETIEN Page 66
Protection de l'environnement Page 67
Schéma des pièces détachées Page 67
DECLARATION DE CONFORMITE Page 68
Assembly and Preparation Page 62
Operating Instructions Page 62
MAINTENANCE Page 66
Environmental Protection Page 67
Service Parts Diagram Page 61
DECLARATION OF CONFORMITY Page 68
English Page 02
Deutsch Seite 22
Français Page 46
日本語 ページ 70
Nederlands Pagina 92
Page 49

49
www.evolutionpowertools.com
EN
EN
FR
DE
NL
JP
(1.2)
Ce manuel a été écrit avec l’anglais comme
langue d’origine.
(1.3)
IMPORTANT
Merci de lire ces instructions d’utilisation et de
sécurité avec attention et complètement.
Pour votre sécurité personnelle et si vous n’êtes
pas certain d’avoir bien compris un aspect de
l’utilisation de cet outil, merci de vous adresser à
votre service d’assistance, dont le numéro peut
être trouvé sur le site de Evolution Power Tools.
Nous disposons de plusieurs services d’assistance
à travers le monde, mais une assistance est
également disponible auprès de votre fournisseur.
SITE WEB:
www.evolutionpowertools.com/register
(1.4)
Félicitations pour votre achat d’un outil
Evolution Power Tools. Merci de remplir
votre formulaire d’enregistrement en
ligne selon les instructions données dans la
brochure A4 d’enregistrement de garantie
en ligne fournie avec cet outil. Vous pouvez
également scanner avec un Smart Phone le
code QR que vous trouverez sur la brochure
A4. Ceci vous permettra de valider votre
période de garantie pour cet outil depuis
le site web d’Evolution, en saisissant vos
coordonnées et nous permettra de vous
garantir un service rapide en cas de besoin.
Nous vous remercions sincèrement d’avoir
choisi un produit Evolution Power Tools.
GARANTIE LIMITEE EVOLUTION. Evolution
Power Tools se réserve le droit d’apporter
des améliorations ou des modifications à
la conception du produit sans notification
préalable.
Merci de vous reporter à la brochure
d’enregistrement de garantie et/ou à
l’emballage pour plus de détails sur les
conditions de la garantie.
(1.5)
Lors de la période de garantie et à partir
de la date d’achat, Evolution Power Tools
réparera ou remplacera tout outil défectueux,
que ce soit en termes de matériels ou de
fabrication. Cette garantie est nulle si le
produit qui nous est renvoyé a été utilisé
hors du contexte des recommandations
qui se trouvent dans le manuel d’utilisation
ou si l’outil a été endommagé par accident,
négligence ou utilisation inadaptée. La
garantie ne s’applique pas aux outils ou aux
éléments qui ont été modifiés d’une façon
ou d’une autre, ou assujettis à une utilisation
dépassant les capacités annoncées et les
spécifications de l’outil. Les composants
électriques sont couverts par les garanties
de leurs constructeurs respectifs. Tout outil
défectueux renvoyé le sera frais de port payé à
Evolution Power Tools. Evolution Power Tools
se réserve le droit de réparer ou de remplacer
l’outil par le même outil ou un outil équivalent.
Il n’existe aucune garantie, écrite ou verbale,
pour les accessoires consommables tels que
les lames, les cutters, les mèches, les burins ou
les ciseaux, sans que cette liste soit exhaustive.
Evolution Power Tools ne pourra en aucun cas
être tenu pour responsable de la perte u des
dégâts causés directement ou indirectement
par l’utilisation de nos produits ou par toute
autre cause. Evolution Power Tools ne peut être
tenu pour responsable des coûts supportés
sur ces outils ni des dégâts qui pourraient en
être la conséquence. Aucun cadre, employé ou
agent d’Evolution Power Tools n’est autorisé à
prendre d’engagement verbal ou à renoncer à
l’une quelconque des conditions de vente qui
précèdent et aucun de ces engagements ne
sera opposable à Evolution Power Tools.
Les questions relatives à ces limites de
garanties devront être adressées directement
au siège de la société, ou en appelant le
numéro d’assistance approprié.
Page 50

50
www.evolutionpowertools.com
CARACTÉRISTIQUES
CAPACITÉ DE COUPE MÉTRIQUE IMPÉRIALE
Acier doux Plaque (épaisseur de coupe optimale) 3mm 1/8”
Tube carré à 90° (en acier doux) 120 x 120mm 4-3/4 x 4-3/4”
Tube carré à 45° (en acier doux) 89 x 89mm 3-1/2 x 3-1/2”
Rectangle Tube à 90° (en acier doux) 95 x 180mm 3-3/4 x 7-1/8”
Rectangle Tube à 45° (en acier doux) 75 x 195mm 3 x 7-3/4”
Round Capacité de métro à 90° (en acier doux) 130mm 5-1/4”
Round Capacité de métro à 45° (en acier doux) 105mm 4-1/8”
MACHINE
Motor (UK / EU) 230V-240V ~ 50/60Hz 2200W 10A
Motor (Royaume-Uni) 110V ~ 50/60Hz 1800W 16A
Motor (USA) 120V 1800W 15A
Motor (Japon) 100V 1450W 15A
Vitesse (sans charge) 1500min
-1
1500rpm
Poids (avec lame) 25kg 55lb
LAME
Diamètre 355mm 14”
Bore 25.4mm 1”
Nombre De Dents 36 36
Trait 2.2mm .086”
NOISE & VIBRATION DONNÉES
Niveau de pression sonore 108dB(A) K=3dB(A)
Niveau de vibration 1.39 m/s2 K = 1.5 m/s
2
NOMBRES MODÈLE PARTIE
UK 230V: 082-0001 110V: 082-0002
USA 082-0004
Europe 082-0003
Japan 082-0005
Page 51

51
www.evolutionpowertools.com
EN
EN
FR
DE
NL
JP
(1.6)
Note : les mesures de vibrations ont été
effectuées dans des conditions normales
d’utilisation selon la norme :
BS EN 61029-1:2009
Le niveau total des vibrations annoncée a été
mesurée selon la procédure d’un test standard
et peut être utilisé en tant que comparaison
avec d’autres outils.
Le niveau total de vibrations peut également
être utilisé en tant qu’évaluation préliminaire
de l’exposition.
(1.7)
VIBRATIONS
ATTENTION : Lors de l’utilisation de cet
outil, l’utilisateur peut être soumis à de forts
niveaux de vibrations transmises par les mains et
par les bras. Il est possible que l’utilisateur développe
un syndrome de Raynaud qui se manifeste par un
blanchissement des doigts dû aux vibrations. Cet état
est susceptible de réduire la sensibilité des mains à la
température et de créer des engourdissements. Les
utilisateurs réguliers et sur de longues périodes de
cet outil doivent contrôler l’état de leurs mains et de
leurs doigts régulièrement. En cas d’apparition de tels
symptômes, consultez immédiatement un médecin.
• La mesure et l’évaluation de l’exposition
humaine aux vibrations transmises par les
mains est donnée par les documents de
référence suivants :: BS EN ISO 5349-1:2001
et BS EN ISO 5349-2:2002
• De nombreux facteurs peuvent influencer
le niveau réel de vibrations pendant
l’utilisation tel que l’état des surfaces usinés,
l’orientation et le type ou l’état de l’outil
utilisé. Ces facteurs doivent être évalués
avant utilisation de bonnes pratiques de
travail doivent être adoptées à chaque
fois que possible. Une bonne gestion des
facteurs suivants peut aider à réduire les
effets des vibrations.
Manutention
• Utilisez l’outil avec précaution en le laissant
effectuer le travail.
• Evitez d’utiliser trop de force sur l’un
quelconque des contrôles de l’outil.
• Pensez à votre stabilité et à votre sécurité
ainsi qu’à l’orientation de l’outil pendant
l’utilisation.
Surface usinée
Prenez en considération la surface du
matériau : son état, sa densité, sa force, sa
rigidité et son orientation.
ATTENTION : Le niveau de vibrations
lors de l’utilisation peut s’écarter de la valeur
totale déclarée selon le mode d’utilisation de
l’outil. Les mesures de sécurité qu’il convient
d’estimer et le besoin de protéger l’utilisateur
se basent sur une estimation de l’exposition
aux vibrations dans des conditions normales
d’utilisation (en prenant en considération
le cycle complet d’utilisation, depuis le
démarrage jusqu’à l’arrêt complet, y compris
lorsque l’outil est en attente d’utilisation).
(1.8)
ETIQUETTES & SYMBOLES
ATTENTION : N’utilisez pas cet outil si les
étiquettes de signalisation et/ou d’instructions
manquent ou sont endommagées. Contactez
Evolution Power Tools pour recevoir des
étiquettes de remplacement.
Note : Tous ou certains des symboles suivants
sont susceptibles d’apparaître dans le manuel
ou sur le produit.
Page 52

52
www.evolutionpowertools.com
LABELS & SYMBOLS
(1.10)
UTILISATION NORMALE DE
CET OUTIL ELECTRIQUE
ATTENTION : Cet outil est une
tronçonneuse manuelle pour l’acier conçue
pour une utilisation avec des lames Evolution.
N’utilisez que des accessoires conçus pour
cet outil et/ou des accessoires recommandés
spécifiquement par Evolution Power Tools Ltd.
Equipé d’une lame appropriée, cet outil
peut être utilisé pour couper :
Acier doux
Aluminium
(1.11)
UTILISATION INTERDITE DE CET OUTIL
ATTENTION : et outil est une tronçonneuse
manuelle pour l’acier qui ne doit être utilisé
qu’à cet effet. IL ne doit être modifié en aucune
façon ni utilisé pour entrainer un autre outil ou
un accessoire autre que ceux mentionnés dans
le présent manuel d’instruction.
(1.13)
ATTENTION : Cette machine n’est pas
conçue pour une utilisation par des personnes
aux capacités physiques, sensorielles ou
intellectuelles réduites, y compris les enfants,
ni par des personés manquant d’expérience
ou de connaissance de l’outil, à moins qu’ils
n’aient été formés et qu’ils soient supervisés
quant à l’utilisation sécurisée de l’outil par
une personne responsable de leur sécurité et
compétente en la matière.
Les enfants doivent être surveillés afin de
garantir qu’ils n’aient pas accès ou la possibilité
de jouer avec cet outil.
Symbol Description
V
Volts
a
Ampères
hz
Hertz
min
-1
Accélérer
~
Courant alternatif
n
o
Vitesse à vide
Portez des lunettes de sécurité
Portez des protections auditives
Protection contre l'usure
de la poussière
Lisez les instructions
Avertissement
Porter des gants
C E certified
Page 53

53
www.evolutionpowertools.com
EN
EN
FR
DE
NL
JP
(1.14)
SECURITE ELECTRIQUE
Cette machine est équipée de la fiche moulée
et du câble électrique adéquats pour le
marché désigné. Si le cordon d’alimentation
est endommagé, il doit être remplacé par un
cordon ou d’assemblage disponible auprès du
fabricant ou de son agent de service spécial.
(1.15)
UTILISATION EXTERIEURE
ATTENTION : Dans le cas où cet outil serait
utilisé en extérieur et pour votre protection,
il ne doit pas être exposé à la pluie ni utilisé
dans un environnement humide. Ne placez
pas l’outil sur une surface humide. Utilisez
si possible un établi propre et sec. Pour
une protection supplémentaire, utilisez
un disjoncteur différentiel qui coupera
l’alimentation si la fuite vers la terre dépasse
30mA pour 30ms. Vérifiez toujours le bon
fonctionnement du disjoncteur différentiel
avant d’utiliser cet outil.
Si une rallonge est nécessaire, elle doit être
d’un modèle adapté pour une utilisation
extérieure et marquée comme telle. Les
instructions des fabricants doivent être
respectées lors de l’utilisation d’une rallonge.
(2.1)
INSTRUCTIONS GENERALES DE SECURITE
POUR LES OUTILS ELECTRIQUES
(Ces instructions générales de sécurité pour
outils électriques sont celles décrites dans les
documents BS EN 60745-1:2009 & EN 610291:2009)
ATTENTION : Lisez tous les avertissements
et toutes les instructions de sécurité. Le fait de ne
pas suivre les avertissements et les instructions
de sécurité peut avoir pour conséquence une
décharge électrique, un incendie et/ou des
blessures graves.
Gardez tous les avertissements et toutes les
instructions de sécurité pour pouvoir vous y
reporter.
Le terme “Outil électrique” mentionné dans les
avertissements concerne vos outils branchés
sur secteur (câblés) ou fonctionnant sur piles
(non câblés).
(2.2)
1) Avertissements de sécurité générale
[Sécurité de la zone de travail]
a) Travaillez dans un espace de travail propre
et bien éclairé.
Les zones de travail encombrées ou sombres
attirent les accidents.
b) N’utilisez pas d’outil électrique dans un
environnement explosif tels qu’en présence
de liquides, de gaz ou de poussières
inflammables.
Les outils électriques sont susceptibles de
créer des étincelles qui peuvent enflammer la
poussières ou les fumées.
c) Eloignez les enfants et les spectateurs lors de
l’utilisation d’un outil électrique.
Une distraction peut vous faire perdre le
contrôle de l’outil.
(2.3)
2) Avertissements de sécurité générale
[Sécurité électrique]
a) Les fiches électriques doivent
correspondre aux prises murales. Ne
modifiez jamais la fiche en aucune façon.
N’utilisez pas d’adaptateur de prise avec des
outils mis à la terre.
Des fiches non modifiées sur des prises
correspondantes minimisent les risques de
décharge électrique.
b) Evitez de toucher les surfaces mises à la
terre, telles que les tuyaux, les radiateurs,
les cuisinières et les réfrigérateurs.
Le risque de décharge électrique augmente si
votre corps est relié à la terre.
c) N’exposez pas les outils électriques à la
pluie ou à l’humidité.
Page 54

54
www.evolutionpowertools.com
L’eau qui pénètre dans un outil électrique
augmente le risque de décharge électrique.
d) Ne maltraitez pas le câble électrique.
N’utilisez jamais le câble électrique pour
transporter, tirer ou débrancher l’outil.
Eloignez le câble des sources de chaleur, des
graisses, des bords tranchants et des parties
mobiles. Un câble endommagé ou emmêlé
augmente le risque de décharge électrique.
e) Lors de l’utilisation d’un outil électrique
en extérieur, utilisez une rallonge adaptée
à une utilisation extérieure. L’utilisation
d’un câble adapté à une utilisation extérieure
diminue le risque de décharge électrique.
f) Lors de l’utilisation d’un outil électrique
dans un environnement humide, si cela
est inévitable, utilisez un disjoncteur
différentiel. L’utilisation d’un disjoncteur
différentiel réduit le risque de décharge
électrique.
(2.4)
3) Avertissements de sécurité générale
[Sécurité personnelle].
a) Restez éveillé, regardez ce que vous
faites et utilisez votre bon sens lors de
l’utilisation d’un outil électrique. N’utilisez
pas d’outil électrique lorsque vous êtes
fatigué ou sous l’influence de drogues,
d’alcool ou de médicaments.
Un moment d’inattention lors de l’utilisation
d’un outil électrique peut être la cause de
blessures graves.
b) Utilisez des équipements de protection
individuelle. Portez toujours des lunettes
de protection.
Un équipement de protection personnelle tel
qu’un masque anti poussières, des chaussures
de sécurité antidérapantes, un casque ou une
protection auditive utilisé dans les bonnes
conditions réduit les risques de blessures.
c) Evitez les démarrages intempestifs.
Assurez-vous que l’interrupteur est bien
sur la position arrêt avant de brancher
l’outil au secteur et/ou à une batterie, et
avant de soulever ou de transporter l’outil.
Le fait de porter l’outil avec un doigt sur
l’interrupteur ou de brancher un outil
électrique dont l’interrupteur est sur la position
marche est susceptible de provoquer des
accidents.
d) Retirez toutes les clés et clés de réglage
avant d’allumer l’outil électrique/
Une clé ou une clé de réglage fixée à une
partie mobile d’un outil électrique peut
être la cause de blessures.
e) Ne vous penchez pas trop. Gardez
une bonne position des pieds et un bon
équilibre à tout moment.
Ceci permet un meilleur contrôle de l’outil
électrique en cas de situation inattendue.
f) Habillez-vous avec des vêtements
adéquats. Ne portez pas de vêtements
lâches ou de bijoux. Eloignez vos cheveux,
vos vêtements et vos gants des parties
mobiles. Les vêtements lâches, les bijoux et
les cheveux longs peuvent être pris dans les
parties mobiles.
g) Si des équipements sont fournis pour
le branchement de systèmes d’extraction
et de ramassage des poussières, faites
en sorte qu’ils soient branchés et utilisés
correctement.
L’utilisation de collecteurs de poussières réduit
les risques liés aux poussières.
(2.5)
4) Avertissements de sécurité générale
[Utilisation et soin de l’outil électrique].
a) Ne forcez pas l’outil électrique. Utilisez
l’outil électrique adapté à votre utilisation.
L’outil électrique adapté fera un meilleur travail
dans de meilleures conditions de sécurité à la
puissance pour laquelle il a été conçu.
b) N’utilisez pas l’outil électrique si
l’interrupteur ne l’allume ou ne l’éteint
pas. Tout outil électrique qui ne peut être
contrôlé au niveau de l’interrupteur est
dangereux et doit être réparé.
c) Débranchez l’outil électrique du secteur
ou de la batterie avant d’effectuer un
réglage, de changer un accessoire ou de
ranger l’outil.
Page 55

55
www.evolutionpowertools.com
EN
EN
FR
DE
NL
JP
De telles mesures de sécurité préventives
réduisent le risque d’un démarrage intempestif
de l’outil.
d) Rangez les outils électriques que vous
n’utilisez pas hors de portée des enfants
et ne permettez pas aux personnes qui ne
sont pas familiarisées avec ces outils de les
utiliser. Les outils électriques sont des outils
dangereux entre les mains d’utilisateurs non
avertis.
e) Prenez soin de vos outils électriques.
Vérifiez les alignements des parties
mobiles, le fait qu’elles ne soient pas
cassées et toute autre situation qui
pourrait en altérer l’utilisation. En cas de
dégâts, faites réparer l’outil électrique avant de
l’utiliser. De nombreux accidents sont causés
par des outils électriques mal entretenus.
f) Gardez les outils de coupe propres et
bien aiguisés.
Des outils de coupe bien entretenus et bien
aiguisés sont moins susceptibles de se tordre
et sont plus faciles à contrôler.
g) Utilisez l’outil électrique, les accessoires
et les éléments de l’outil en respectant ces
instructions d’utilisation et en prenant
en considération les conditions de travail
ainsi que le travail à effectuer.
Le fait d’utiliser un outil électrique dans
un cadre pour lequel il n’a pas été conçu
pourrait avoir pour conséquence une situation
dangereuse.
(2.6)
5) Avertissements de sécurité générale
[Entretien]
a) Faites entretenir votre outil électrique
par un réparateur qualifié et n’utilisez que
des pièces identiques aux pièces d’origine.
Ceci garantira que l’outil électrique est
correctement entretenu.
(2.7)
CONSEIL CONCERNANT LA SANTE
ATTENTION : Des particules de poussières
peuvent être émises lors de l’utilisation de
cet outil. Selon le matériau que vous usinez et
dans certains cas, ces poussières peuvent être
extrêmement dangereuses. Si vous suspectez
que la peinture présente peinture sur la surface
du matériau que vous désirez couper contient
du plomb, demandez l’avis d’un professionnel.
Les peintures à base de plomb ne doivent être
retirées que par un professionnel et vous ne
devez pas essayer de les retirer vous-mêmes.
Une fois la poussière déposée sur les surfaces,
un contact entre les mains et la bouche peut
résulter en une ingestion de plomb. Une
exposition au plomb, même à de faibles taux,
peut être la cause de dommages irréversibles
au cerveau et au système nerveux. Les enfants
en bas âge et les enfants à naître y sont
particulièrement sensibles.
Nous vous conseillons de prendre en
considération les risques associés aux
matériaux que vous utilisez et à réduire
le risque d’exposition. Etant donné que
certains matériaux peuvent produire des
poussières dangereuses pour la santé, nous
vous recommandons d’utiliser un masque
homologué équipé de filtres remplaçables lors
de l’utilisation de cet outil.
VOUS DEVEZ TOUJOURS :
• Travaillez dans un endroit bien ventilé.
• Travaillez avec un équipement de sécurité
homologué, tel qu’un masque anti
poussières spécialement conçu pour les
particules microscopiques.
Page 56

56
www.evolutionpowertools.com
g) Utilisez toujours des lames de la
bonne dimension et de la bonne forme
d’alésage (diamant ou rond). Les lames
qui ne correspondent pas à l’équipement sur
lequel elles sont montées tourneront de façon
excentrée, conduisant à une perte de contrôle.
h) N’utilisez jamais de joints ou de boulons
endommagés ou inadaptés. Les joints et
les boulons de la lame ont été spécialement
conçus pour votre scie, afin d’assurer des
performances et une sécurité optimales.
i) N’utilisez pas de lames en acier rapide (AR).
j) Inspectez l’outil et la lame avant chaque
utilisation. N’utilisez pas de lames
déformées, fendues, usées ou endommagées
d’une facon quelconque.
k) N’utilisez jamais la scie sans son système
de protection d’origine. Ne bloquez pas
la protection amovible en position ouverte.
Assurez-vous que la protection fonctionne
librement, sans se bloquer.
l) N’utilisez que des lames qui
correspondent aux caractéristiques
indiquées dans ce manuel. Avant d’utiliser
un accessoire, vérifiez toujours le nombre de
tours maximum autorisé pour cet accessoire et
comparez-le avec celui de l’outil.
(3.2)
Causes et prévention des retours
de lame par l’utilisateur :
Un retour de lame est une réaction soudaine
au pincement, au blocage ou au mauvais
alignement de la lame, provoquant un bond
non contrôlé de la scie hors de la pièce à usiner
et en direction de l’utilisateur.
1. Lorsque la lame est pincée ou bloquée par
la fermeture de la saignée, la lame cale et la
réaction du moteur renvoie rapidement l’outil
en direction de l’utilisateur ;
2. Si la lame se tord ou perd son alignement avec
la saignée, les dents qui se situent au dos de la
lame peuvent creuser la partie supérieure de la
pièce à usiner et provoquer le saut de la lame
hors de la saignée en direction de l’utilisateur.
(2.8)
ATTENTION : L’utilisation de n’importe
quel outil électrique peut projeter des objets
étrangers vers vos yeux, ce qui pourrait avoir
pour conséquence des accidents oculaires
graves. Avant de commencer à utiliser un
outil électrique, assurez-vous que vous portez
des lunettes de sécurité avec des protections
latérales, ou bien un casque intégral, si
nécessaire.
(3.0)
CONSEILS DE SECURITE SUPPLEMENTAIRES
(3.1)
a) DANGER : Eloignez vos mains de la zone de
coupe et de la lame. Gardez votre deuxième
main sur la poignée ou sur le boîtier du
moteur. Si les deux mains tiennent la scie, la
lame ne peut pas les couper.
b) Ne vous penchez pas sous la pièce à
usiner. La protection ne peut vous protéger de
la lame en dessous de la pièce à usiner.
c) Ajuster la profondeur de coupe à
l’épaisseur de la pièce à usiner. Moins d’une
dent de lame doit être visible de dessous la
pièce à usiner.
d) Ne tenez jamais la pièce à usiner dans
vos mains ou entre vos jambes. Fixez la
pièce à une plateforme stable.
Il est important de soutenir la pièce correctement
afin de minimiser les risques corporels, le blocage
de la lame ou la perte de contrôle.
e) Tenez l’outil électrique par ses surfaces
de prise isolées lorsque vous réalisez
une opération pendant laquelle l’outil de
coupe peut entrer en contact avec un câble
électrique caché ou avec son propre câble.
Un contact avec un câble alimenté alimentera
également les parties métalliques exposées
de l’outil électrique et peut provoquer une
décharge pour l’utilisateur.
f) Lors du déplacement de l’outil, utilisez
toujours un guide à refendre ou une règle.
Ceci améliore la précision de la coupe et limite
les risques de blocage de la lame.
Page 57

57
www.evolutionpowertools.com
EN
EN
FR
DE
NL
JP
Si les réglages de la lame changent pendant
une coupe, la lame peut se bloquer et un
retour de lame peut se produire.
f) N’utilisez pas de lames émoussées ou
endommagées. Les lames mal aiguisées ou
en mauvais état produisent une saignée étroite
résultant en une friction excessive, en un
blocage de la lame et en un retour de lame.
g) Faites particulièrement attention
lorsque vous réalisez une saignée dans un
mur ou dans un endroit aveugle. La partie
de la lame qui dépasse peut couper des objets
qui peuvent causer des retours de lame.
h) Vérifiez le blocage de la protection
inférieure avant chaque utilisation.
N’utilisez pas la scie si la protection inférieure
ne bouge pas librement et ne se referme
pas immédiatement. Ne bloquez jamais la
protection inférieure en position ouverte. Si
vous laissez tomber la scie par accident, la
protection inférieure peut se tordre. Relevez
la protection inférieure avec la poignée
rétractable et vérifiez qu’elle bouge librement
sans toucher la lame ou une autre partie de
la scie, à tous les angles et pour toutes les
profondeurs de coupe.
i) Vérifiez le bon fonctionnement du
ressort de la protection inférieure. Si
la garde ou le ressort ne fonctionnent pas
correctement, ils doivent être réparés avant
utilisation. La protection inférieure peut être
molle en raison d’éléments endommagés, de
dépôts collants ou d’un bourrage de débris.
j) La protection inférieure ne peut être
rétractée manuellement que dans le cas
de coupes spéciales telles que les coupes
“en plongée” ou les coupes “combinées”.
Soulevez la protection inférieure en rétractant
la poignée et, dès que la scie pénètre dans le
matériau, relâchez la protection. Pour toutes
les autres coupes, la protection inférieure doit
fonctionner automatiquement.
k) Vérifiez toujours que la protection
inférieure recouvre bien la lame avant
de placer la scie sur l’établi ou sur le sol.
(3.3)
Le retour de lame est la conséquence d’une
mauvaise utilisation de la scie et/ou d’une
mauvaise procédure d’utilisation et/ou de
mauvaises conditions d’utilisation et peut être
évité en prenant les précautions nécessaires
décrites ci-dessous :
a) Maintenez une bonne prise des deux
mains sur la scie et positionnez vos bras
pour pouvoir résister à la force d’un retour
de lame. Positionnez votre corps des deux
côtés de la lame et non en alignement avec
la lame. Un retour de lame peut provoquer
un saut de la lame vers l’arrière, mais les forces
en présence dans un retour de lame peuvent
être maitrisées par l’utilisateur si les bonnes
précautions sont prises.
b) En cas de blocage de la lame, ou lors
de l’arrêt d’une coupe pour une raison
quelconque, relâchez la gâchette et ne
bougez pas la lame dans le matériau avant
que la lame ne soit complètement arrêtée.
Ne tentez jamais de retirer la lame de la pièce à
usiner ou de tirez la lame vers l’arrière lorsque
la lame est en mouvement ou qu’elle n’est pas
engagée dans le matériau, un retour de lame
pourrait intervenir. Recherchez et éliminez la
cause du blocage de la lame.
c) Lors du redémarrage de la scie dans
la pièce à usiner, centrez la lame dans la
saignée et vérifiez que les dents de la scie
ne sont pas engagées dans le matériau. Si la
lame de la scie se bloque, elle peut ressortir de la
pièce à usiner lors du redémarrage de la scie.
d) Soutenez les grands panneaux pour
limiter le risque de pincement de la lame
et de retour de lame. Les grands panneaux
ont tendance à plier sous leur propre
poids. Un support doit être placé des deux
côtés sous le panneau, près de la ligne de
coupe, et proche du bord du panneau.
e) Les leviers de réglage de profondeur de
lame et de biseau doivent être serrés et
bloqués avant de réaliser une coupe.
Page 58

58
www.evolutionpowertools.com
Une lame non protégée et en roue libre
déplacera la scie vers l’arrière, coupant tout
sur son passage. Prenez conscience du temps
d’arrêt complet de la lame après que le bouton
de marche ait été relâché.
(3.4)
ATTENTION : Si un élément est manquant,
n’utilisez pas l’outil avant que les éléments
manquants aient été remplacés.
(4.1)
DEMARRAGE - DEBALLAGE
Attention : Ce colis contient des objets
coupants. Faites attention lors du déballage.
Retirez l’outil et les accessoires fournis dans
le colis. Vérifiez soigneusement que l’outil
est en bon état et vérifiez l’état de tous les
accessoires listé dans ce manuel. Vérifiez
également qu’ils sont tous bien présents. Si
un ou plusieurs éléments sont manquants,
l’outil est ses accessoires doivent être renvoyés
au fournisseur dans leur carton d’origine. Ne
jetez pas le carton, gardez le à l’abri pendant
toute la période de garantie. Jetez le carton
en respectant l’environnement. Recyclez si
possible. Ne laissez pas les enfants jouer avec
les sacs en plastique vides pour éviter les
risques d’asphyxie.
Page 59

59
www.evolutionpowertools.com
EN
EN
FR
DE
NL
JP
Accessoires supplémentaires
En plus des éléments standards fournis
avec cet outil, les accessoires suivants
sont disponibles auprès de la boutique
en ligne d’Evolution à l’adresse suivante :
www.evolutionpowertools.com ou auprès
de votre distributeur.
(4.4)
(4.2)
MITGELIEFERTE POSITIONEN
Description Quantite
Manuel d'utilisation 1
Lame pour découpe
d'acier
1
Clé hexagonale de 8mm
(changement de lame)
1
Jeu de balais carbone 1
Description N° de réference
355mm (14”)
Diamond Blade
DIAMOND355
Page 60

60
www.evolutionpowertools.com
VUE D’ENSEMBLE DE LA SCIE CIRCULAIRE 355mm (14”) FURY 2
1. Protection de lame inférieure
2. Pince étau pivotante avant
3. Chaîne de verrouillage
4. Protection de lame supérieure
5. Protection de mandrin
6. Pince étau mobile arrière
6
5
4
2
1
3
Page 61

61
www.evolutionpowertools.com
EN
EN
FR
DE
NL
JP
PARTS DIAGRAM Parts Diagrams can also be downloaded from www.evolutionpowertools.com
Page 62

62
www.evolutionpowertools.com
DEMARRAGE - PREPARATION
ATTENTION : DEBRANCHEZ TOUJOURS L’OUTIL DU SECTEUR
AVANT D’EFFECTUER UN REGLAGE.
ATTENTION : Après avoir installé une nouvelle lame, faites
toujours tourner l’outil hors charge pendant quelques minutes.
Eloignez-vous de la lame. S’il arrivait que la lame ait un défaut
non détecté, elle pourrait se briser lors de cet essai.
Note: Cette scie est équipée d’un câble d’alimentation et d’une
prise homologués dans le pays d’utilisation. Ne changez pas ou
ne modifiez pas le câble d’alimentation.
(<5.1)
INSTALLATION ou RETRAIT D’UNE LAME.
ATTENTION : N’utilisez que des lames Evolution d’origine ou
des lames approuvées par Evolution et conçues pour cet outil.
Assurez-vous que la vitesse maximum de la lame est compatible
avec celle de l’outil.
ATTENTION : Ne réalisez cette opération qu’une fois l’outil
débranché du secteur.
Note: Le port de gants protecteurs est recommandé lors
de la manutention de la lame et pendant l’installation ou le
changement de lame. (5.1>)
LIBERATION de la TETE DE COUPE
La tête de coupe se met automatiquement en position
haute lorsqu’elle est libérée.
Pour libérer la tête de coupe :
• Appuyez doucement sur la poignée de coupe.
• Décrochez la chaine de verrouillage de la broche de
verrouillage (Voir Fig. 9). Laissez la tête de coupe remonter
en position haute.
Note: Nous vous recommandons de bloquer la tête de coupe
en position basse lorsque l’outil n’est pas en cours d’utilisation, la
chaine de verrouillage engagée dans la broche de verrouillage.
MONTAGE
Page 63

63
www.evolutionpowertools.com
EN
EN
FR
DE
NL
JP
FIG. 1
FIG. 2
FIG. 4
FIG. 3
INSTALLATION DE LA LAME :
• Assurez-vous que la tête de coupe est en position haute.
• Relâchez les vis à ailettes qui maintiennent la protection du
mandrin et tournez la protection vers le haut pour laisser
apparaitre le mandrin. (Fig. 1)
• Engagez le verrou du mandrin en appuyant sur le bouton de
verrouillage du mandrin. (Fig. 2)
• Utilisez la clé hexagonale fournie pour desserrer la vis du
mandrin. (Fig. 3)
Note : La vis du mandrin est filetée à droite. Tournez dans le
sens des aiguilles d’une montre pour serrer et dans le sens
contraire pour desserrer.
• Retirez la vis du mandrin, le joint et l’embase extérieure de
lame et rangez-les pour utilisation ultérieure.
• Rétractez les protections inférieures de lame dans la
protection supérieure en les faisant tourner avec la main.
(Fig. 4)
• Retirez la lame en laissant l’embase intérieure de lame en
position d’utilisation.
• Réinstallation d’une lame :
• Assurez-vous que tous les éléments sont propres et sans
poussières ou débris.
• Installez la lame dans l’embase intérieure et le mandrin, en
vous assurant que la flèche de direction indiquée sur la lame
est la même que celle présente sur la protection supérieure
de la lame. (Fig. 5)
• Réinstallez l’embase extérieure, le joint et la vis de mandrin.
• Bloquez le mandrin en appuyant sur le bouton de blocage de
mandrin.
• Resserrez la vis de mandrin en utilisant la clé hexagonale de
8mm.
• Remettez la protection de mandrin en position d’utilisation
et resserrez la vis à ailettes.
• Vérifiez que le verrou du mandrin est bien libéré en faisant
tourner la lame à la main.
• Assurez-vous que la clé hexagonale est bien retirée de la vis
de mandrin et rangez-la pour une utilisation ultérieure.
• Vérifiez l’installation et en particulier le fonctionnement des
protections rétractables inférieures en abaissant puis en
relevant la tête de coupe plusieurs fois.
Page 64

64
www.evolutionpowertools.com
PARCOURS DE LA TÊTE DE COUPE
Réglage du parcours vers le bas de la tête de coupe
Afin d’empêcher que la lame entre en contact avec un élément
quelconque de la base métallique de l’outil, le parcours de la
tête de coupe vers le bas put être ajusté.
Abaissez la tête de coupe et vérifiez qu’aucun contact n’existe
entre la tête de coupe et la base de l’outil.
Si le parcours de la tête de coupe vers le bas doit être ajusté :
• Desserrez le contre-écrou de la butée basse du parcours de la
tête. (Fig. 6)
• Faites pivoter la vis de réglage (dans les sens contraire des
aiguilles d’une montre) pour réduire le parcours vers le bas
de la tête de coupe.
• Faites pivoter la vis de réglage (dans les sens des aiguilles
d’une montre) pour augmenter le parcours vers le bas de la
tête de coupe.
• Resserrez le contre-écrou de la vis de réglage lorsque le bon
parcours de la tête de coupe est atteint.
REGLAGE DE L’ANGLE DE COUPE
Note : La pince étau arrière peut être tournée sur 45°.
La pince étau arrière est réglée en usine à 0° (90° de la lame) de
telle façon que la lame coupe à l’équerre le matériau positionné
sur l’étau.
Pour les coupes en biseau, la pince étau arrière peut être
basculée jusqu’à un angle de 45°. Le rapporteur monté sur la
pince permet un réglage pratique et précis.
Pour régler l’angle de la pince étau arrière :
• Desserrez les deux (2) vis à tête creuse M10 (Fig. 7)
• Faites pivoter la pince étau jusqu’à l’angle requis.
• Resserrez les vis à tête creuse en utilisant la clé hexagonale
fournie.
FIG. 7
FIG. 6
MONTAGE
FIG. 5
Page 65

65
www.evolutionpowertools.com
EN
EN
FR
DE
NL
JP
REPOSITIONNEMENT DE LA PINCE ETAU ARRIERE
La pince étau arrière peut être retirée de la base de l’outil et
repositionnée. (Fig.8)
Pour la repositionner :
• Retirez les deux (2) vis à tête creuse M10 et les joints associés.
• Repositionnez la pince étau arrière ; deux (2) positions sont
possibles grâce aux trois (3) trous filetés situés sur la base de
l’outil.
• Replacez les vis à tête creuse dans leur nouvelle position
d’utilisation. Assurez-vous que les joints et les rondelles de
verrouillage sont en place.
Le repositionnement de la pince étau arrière à la position la plus
reculée permet de couper des matériaux plus épais qu’avec la
pince étau en position avancée. (Fig. 8)
Vue de détail de la pince étau en dans une autre position.
Alignez la flèche ou l’étiquette avec les trous situés à la base
de l’outil.
(5.2)
MODE D’EMPLOI PREPARATION D’UNE COUPE
Ne soyez pas trop penché. Maintenez une bonne position des
pieds et une bonne balance. Tenez-vous sur le côté de telle
façon que votre visage et votre corps ne soient pas dans la
trajectoire d’un retour de lame.
ATTENTION : Les coupes à main levée sont une cause
fréquente d’accidents et ne doivent jamais être pratiquées.
• Assurez-vous que la pièce à usiner est correctement fixée
sur l’étau.
• La base de l’outil doit être propre et libre de tout copeau ou
de toute sciure avant de fixer la pièce à usiner en place.
• Assurez-vous que la chute de la pièce à usiner peut librement
s’éloigner de la lame lors de la coupe. Assurez-vous que la
chute ne peut pas se coincer dans une autre partie de l’outil.
• N’utilisez pas cette scie pour couper de petite pièces. Si la taille
de la pièce à usiner vous oblige à placer vos mains ou vos doigts
à moins de 150mm de la lame, la pièce est trop petite.
• Les angles doivent être fixés en position inversée de telle
façon que le point de la section soit située en haut.
FIG. 8
Page 66

66
www.evolutionpowertools.com
(5.3)
REALISATION D’UNE COUPE
• La tête de coupe en position haute, démarrez l’outil et laissez-
le atteindre sa vitesse maximale.
• Baissez lentement la tête de coupe.
• Introduisez doucement la lame dans le matériau, en
appuyant doucement au début pour empêcher la lame de
s’accrocher.
• Augmentez progressivement la pression pendant que la
lame pénètre dans la pièce à usiner. Ne forcez pas la machine.
Laissez la lame de la scie faire le travail.
Note : Les performances de coupe n’augmenteront pas en
exerçant une pression trop forte et une telle pression peut
endommager la lame et réduire la durée de vie du moteur.
• Réduisez la pression lorsque la lame commence à sortir du
matériau.
• A la fin d’une coupe, laissez la tête de coupe revenir en
position haute et éteignez le moteur.
• Ne retirez vos mains de l’outil, ou de la pièce à usiner, que
lorsque le moteur est complètement arrêté et que la lame au
repos est recouverte par les protection de lame inférieures.
ENTRETIEN
(6.1)
Note : Tout entretien doit être réalisé machine éteinte et
débranchée du secteur ou de la batterie.
Vérifiez régulièrement que tous les équipements de sécurité
et toutes les protections fonctionnent correctement. N’utilisez
cet outil que si les protections et les équipements de sécurité
fonctionnent correctement.
Tous les roulements du moteur de cet outil sont lubrifiés à vie.
Aucune lubrification supplémentaire n’est nécessaire.
Utilisez un chiffon propre et légèrement humide pour nettoyer
les éléments en plastique de l’outil. N’utilisez pas de solvants ou
de produits similaires, qui pourraient endommager les parties
en plastique.
ATTENTION : N’essayez pas de nettoyer l’outil en y insérant
des objets pointus à travers les fentes du boîtier. Les prises d’air
de l’outil doivent être nettoyées avec du gaz sec sous pression.
ENTRETIEN
Page 67

67
www.evolutionpowertools.com
EN
EN
FR
DE
NL
JP
(6.2)
Un trop grand nombre d’étincelles peut être une indication de la
présence de poussières dans le moteur ou d’usure des balais carbone.
(6.3)
VERIFICATION ET REMPLACEMENT DES BALAIS CARBONE
• Débranchez l’outil du secteur.
• Placez l’outil sur une surface plate et stable.
• Dévissez et retirez les deux (2) vis de retenue des capuchons
de balais du boitier du moteur.
• Retirez les balais.
Note : Si l’épaisseur du balai carbone est inférieure à 6mm (¼”), ou
s’il existe des signes de brulure ou de dégâts, remplacez les balais.
• Placez les nouveaux balais.
• Replacez les vis des capuchons de retenue des balais
• Faites fonctionner l’outil hors charge pendant quelques
minutes après le remplacement des balais. Ceci facilitera
le processus d’ajustement.
Note : Si, après vérification, les balais apparaissent comme en
bon état, ils peuvent être replacés dans leur position d’origine.
Il est important de les replacer dans la même position et dans le
même sens qu’à l’origine.
TRANSPORT & RANGEMENT
Pour faciliter le transport et le rendre plus pratique, il est
possible de maintenir la tête de coupe en position basse.
Pour maintenir la tête de coupe en position basse :
• Abaissez la tête de coupe jusqu’à sa position la plus basse..
• Accrochez le lien de la chaine de position basse sur la
broche de position basse. (Fig. 9).
(6.4)
PROTECTION DE L’ENVIRONNEMENT
Les déchets de produits électriques ne doivent pas être jetés
avec les déchets ménagers. Merci de recycler lorsqu’un centre
de recyclage existe. Vérifiez auprès de vos autorités locales.
FIG. 9
Page 68

68
www.evolutionpowertools.com
DECLARATION DE CONFORMITE CE
Le fabricant du produit décrit dans la présente Déclaration est:
Evolution Power Tools Ltd. Venture One, Longacre Close, Holbrook Industrial Estate, Sheffield S20 3FR.
Le fabricant déclare par les présentes que l’outil décrit dans la présente déclaration répond aux
dispositions de la Directive relative au machines et autres directives appropriées, telles que décrites
ci-dessous. Le fabricant déclare également que l’outil décrit dans la présente déclaration répond,
lorsque nécessaire, aux dispositions pertinentes des Exigences essentielles de santé et de sécurité.
Les directives couvertes par la présente déclaration sont les suivantes
Et qu’il est en accord avec les exigences nécessaires des documents suivants
Détails du produit :
Description : FURY2 355mm (14”) Scie Circulaire Tct Multi Usage
Nom du modèle Evolution : 0820001 / 0820002 / 0820003 / 0820004 / 0820005
Marque : Evolution
Voltage : 230-240V~50Hz
La documentation technique nécessaire pour démontrer que le produit répond aux directives a
été rassemblée et reste disponible pour inspection par les autorités concernées. Elle confirme que
notre dossier technique contient l’ensemble des documents listés ci-dessus.
Nom et adresse du détenteur de l’information technique. L’ensemble des normes listées ci-dessus
sont remplies et la documentation pertinente est détenue par Evolution Power Tools
Signed: Print: Matthew Gavins: Directeur Général du Groupe.
Date: 01/03/16
2006/42/CE Directive sur les machines.
2004/108/EC (valid until Apr 19th 2016) Directive sur la compatibilité électromagnétique.
2014/30/EU (effective from Apr 20th 2016) Directive sur la compatibilité électromagnétique.
2011/65/EU Directive relative à la limitation de certaines substances
dangereuses dans les équipements électriques et électroniques.
2002/96/CE Directive relative aux déchets d’équipements électriques et électroniques
(DEEE)
modifiée
2003/108/CE Directive relative aux déchets d’équipements électriques et électroniques (DEEE).
EN13898/A1:2009 • EN60204-1/A1:2009 • EN55014-1/A1:2009
EN55014-2/A2:2008 • EN 61000-3-2/A2:2009 • EN61000-3-11:2000
Page 69

69
www.evolutionpowertools.com
EN
EN
FR
DE
NL
JP
NOTES
Page 70

®
Page 71

EN
EN
FR
DE
NL
JP
日本語
取扱説明書
Page 72

72
www.evolutionpowertools.com
目次
はじめに
Page 73
メーカー保証
Seite 73
仕様詳細
Page 76
表示・図記号
Pagina 76
振動
Page 73
用途
Page 73
禁止用途
Page 74
本製品を安全に正しくお使いいただくために
Page76
電気的安全性
Page75
屋外で使用するとき
Page 76
一般安全規則
Page 76
本製品の使用上のご注意
Page 77
さあ、はじめよう (??基本操作&クリックガイド)
Page 76
開梱
Page 77
各部の名称
Page 77
組立と準備
Page 79
操作方法
Page 84
保守と点検
Page 81
環境負荷軽減のために
Page 82
分解図
Page 84
English Page 02
Deutsch Seite 22
Français Page 46
日本語 ページ 70
Nederlands Pagina 92
NL
Page 73

73
www.evolutionpowertools.com
EN
EN
FR
DE
NL
JP
Page 74

74
www.evolutionpowertools.com
仕様
項目
スチール板(軟鋼)– 推奨板厚
3mm
正方形角材(ノコ刃角度90度)
120 x 120mm
正方形角材(ノコ刃角度45度)
89 x 89mm
長方形角材(ノコ刃角度90度)
95 x 180mm
長方形角材(ノコ刃角度45度)
89 x 110mm
丸パイプ(ノコ刃角度90度)
130mm
丸パイプ(ノコ刃角度45度)
105mm
切断能力/モーター
モーター消費電力(100V 50/60Hz)
1450W
無負荷速度
1450min
-1
質量
25kg
万能切断チップソー寸法
外径
355mm
穴径
25.4mm
歯数
36
刃厚
2.2mm
騒音および振動データ
音圧 LPA
108dB(A) K=3dB(A)
振動レベル
1.39 m/s2 K = 1.5 m/s
2
Page 75

75
www.evolutionpowertools.com
EN
EN
FR
DE
NL
JP
(1.3)
重要
このたびは、エボリューション万能切断機
をお買い求めいただき、誠にありがとうご
ざいます。安全に能率よくお使いいただく
ために、ご使用前に、この取扱説明書を
最後までお読みください。使用上の注意
事項、本機の性能、使用方法など十分に
ご理解のうえで、正しくご使 用くださいま
すようお 願い いたしま す。
正常に動作しない場合、部品ご入用、その
他取扱い上ご不明な点がございましたら、
ご遠慮なくお買い上げの販売店または、直
接当社までお問い合わせください。
WEB
www.evolutionpowertools.com/
register
フリーコール: 0120‐05‐1415
受付時間 平日 9:00~18:00
(日・祝日、夏期休暇、年末年始を除く)
www.evolutionpowertools.com/
jp/contact/
(1. 4)
本製品にはメーカー保証 が付いていま
す。 エボリューションパワーツールの迅
速な保証サービスを確実にうけていただ
けるよう、お求めいただきました製品の保
証登録を行ってください。オンライン登録
およびお電話による登録については、製品
に同梱されておりますA4 版別紙リーフレ
ットをご 覧くださ い 。 この リーフレット に
はQRコードが掲載されています。読み取
り機能のついたカメラつきケータイで撮
影すれば、簡単に登録ページにアクセスす
ることができます。
メーカー保証
製品の仕様および外観は、改良のためお断
りなく変更することがあります。 メーカー
保証適用の条件および登録方法について
は、別紙リーフレットをご参照ください。
(1.5)
エ ボ リ ュ ー シ ョ ン パ ワ ー ツ ー ル は 、ご 購 入
いた だきました製 品に工 場 製 造 上の 欠陥
または材質の欠陥が認められた場合は、ご
購入日より保証期間満了時まで、無償でそ
の部品の交換または修理を行います。 取
扱説明書に従わない、不注意な操作や取
扱いによる故障および損傷、ならびに必要
なお手入れ を怠ったことによって生じた故
障および損傷は、保証の適用外とさせてい
ただきます。また、使用上の誤り、または当
社指定サービス業者以外による修理や改
造、部品交換に起因する故障は、保証の適
用外とさせていただきます。 電気部品に
ついては、それぞれの製造元が提供する保
証の対 象となります。 エ ボリューションパ
ワーツールに修理・交換のために当該の製
品をお送りいた だくときには 、当社 が集 配
を手配いたします。 当社は、同等の機能
を有する新品または使用可能な再生部品
と交 換 する 権 利 を有します。
チ ッ プ ソ ー 、ダ イ ヤ モ ン ド ホ イ ー ル 、ド リ
ル、チゼル、ヘラなど消耗品である交換部
品やアクセサリーは、書面または口頭にお
いても保証は適 用されません。
当社は 、いかなる場 合 においても、当社 製
品の使用もしく は他の原因によって直接ま
たは間接的に生じる損失または損害を賠
償する責任を負いません。当社は、当該の
商品もしくは派生的な損害に関わる費用に
対して一切責任を負いません。 当社の役
員 、従 業 員 及 び 代 理 人 は い ず れ も 、適 合 性
に つ い て 口 頭 で 意 思 表 示 を 行 う 、も し く は
前述の売買条件を撤回する権限を有せず、
当社に拘束力を持たないものとします。
Page 76

76
www.evolutionpowertools.com
表 示・図 記 号
警 告: 銘 板 ラ ベ ル が 読 み にくく な っ た り 剥
がれている電動工具は使用しないでくださ
い。 交換用ラベルが必要な場合は、当社
窓口までご連 絡ください。
注) 取扱説明書または銘板ラベルには、
一般的に下記の表示・図記号が使用され
ていま す。
(1.10)
本機の用途
警 告: 本 機 は 、高 速 切 断 機 で す。エ ボ リ ュ
ー シ ョ ン 純 正 刃 物( 専 用 チ ップ ソ ー )を お 使
いください。
専用ダイヤモンドホイール(別売)に刃を付
け替えていた だくと、タイル材・石材などの
切 断も 行えま す。
適用部材
軟鋼
アルミ
(1.11)
禁止用途
警 告:本機を、指定された用途以外に使用
しないでください。 本製品の改造や本説
明書に記載されていない取扱いは絶対しな
いでください 。
(1.13)
警 告: この製品は、肉体的、感覚的、また
は 精 神 的 な 能 力 が 低 下 し て い る 方( お 子
様を含む)、もしくは、安全管理責任者に
よる機器の使用に関して監督が行われな
い限り、経験や知識が不足している方によ
る使用は意図されておりません。 子供の
手 の 届くところに 本 製 品 を置 かな い でくだ
さい。
(1.14)
電気的安全性
本機には、販売される国内での使用に適合
するプラグと電源コードが使われています。
電 源 コ ー ド や プ ラ グ の 修 理 ・ 交 換 は 、お 買
い上げの販売店にご相談ください。
シンボル 説明
V
電 圧( ボ ル ト )
a
電 流( ア ン ペ ア )
hz
周 波 数( ヘ ル ツ )
min
-1
回転速度
~
交流電流
n
o
無負荷速度
保 護メガ ネを 着 用 すること
防音用保護具を着用すること
防 塵マスクを 着 用すること
使用前に取扱い説明書を読むこと
警告
保護手袋を使用すること
CE認証
Page 77

77
www.evolutionpowertools.com
EN
EN
FR
DE
NL
JP
(1.15)
屋外で使用時のご注意
警 告: 電 動 工 具 は 、雨 の 中 で 使 用 し た
り 、湿 っ た 、ま た は 、ぬ れ た 場 所 で 使 用 し
ないでください。 電動工具を湿気の多い
場所に置かないでください。 明るく清潔
で、乾いた場所で作業してください。 湿
った場所で電動工具を使用する場合は、
定格感度電流 30 mA 以下の漏電遮断器
(RCD) で保護された電源を使用してくださ
い。RCDを使用すると、感電の危険が減少
します。
屋外でのご使用には、用途に適した延長コ
ードをご 使 用ください 。
キャブタイヤコード、またはキャブタイヤケ
ーブルの延長コードを使用 してください。
(2.1)
電動工具全般
安全上のご注意
警 告: ご 使 用 の 前 に 、必 ず 全 て の 注 意 事 項
および 操 作 方 法 をよく読 み 理 解してくださ
い。 火災、感電、けがなどの事故を未然に
防ぐため、次に述べる「安 全上のご注意」
を必ず守ってくだ さい。
お読みになった後は、いつでも見られるよ
うお手元に大切に保管してください。 次
に 示 す 安 全 上 の 注 意 事 項 に お け る「 電 動 工
具 」と い う 用 語 は 、電 源 式( コ ー ド 付 き )電
動工具または電池式(コードレス)電動工
具を示 します。
(2.2)
1.一般安全規則[作業場]
a. 作業場は整理整頓して、十分な照明を
確保 してくだ さ い。 散らかった 暗い場 所
は事 故を招く恐れがあります。
b. 爆発を誘発することがある可 燃性 液
体、ガスまたは粉じんのあるところでは、
電動工具を使用しないでください。 電
動工具は、粉じんまたはヒュームを発 火さ
せることがある火花を発生する場合があ
ります。
c. 電動工具の使用中は、子どもおよび第
三者を近づけないでください。 注意が散
漫になって、操作に集中できなくなる場合
が あります。
(2.3)
2.一般安全規則[電気的安全性]
a. 電動工具の電源プラグは、コンセント
に合ったもの を使 用してください 。 電源
プラグを改造しないでください。 アダプタ
プラグを接地した電動工具と一緒に使用し
ないでください。 改造していない電源プラ
グおよびそれに対応するコンセントを使用
すれば、感電のリスクは軽減されます。
b. パイプ、暖房器具、電子レンジ、冷蔵庫
などの接地(アース)されたものと身体の
接触をさけてください。 身体が接地され
た場合は、感電のリスクが増 大しま す。
c. 電動工具は、雨または湿気がある状態
にさらさないでください。 電動工具に水
が入ると、感電のリスクが増大します。
d. コードを乱暴に扱わないでください。
電動 工具を移 動させ たり、引っ張ったり、ま
たは 電源プラグを抜くためにコードを利用
しないでください。 コードは、熱、油、角
のとがったところ、または動くものから離し
ておいてください。 コードが損傷すると、
感電のリスクが増大します。
e. 電動工具を屋外で使用するときは、屋
外の使用に適した延長コードを使用してく
Page 78

78
www.evolutionpowertools.com
ださい。 屋外の使用に適したコードを使
用すれば、感電のリスクが低減されます。
f. 湿った場所で電動工具を使用する場合
は、漏電遮断器 (RCD) で保護された電
源を 使用してくださ い。 RCDを使用する
と、感電の危険が減少します。
(2.4)
3. 一般安全規則 [人的安全性]
a. 電動工具の使用中は、油断せず、いま
自分が何をしているのかに注意し、常識を
働かせてください。 疲れていたり、アルコ
ー ル ま た は 医 薬 品 を 飲 ん で い る と き は 、電
動工具を使 用しないでください。 一瞬の
不注 意が 重 大な 人 身事 故 につな がりま す。
b. 安全保護具を使用してください。
常時、保護メガネを装着してください。 適
切 な 状 態 で 防 じ んマ ス ク 、滑 り 防 止 安 全
靴 、ヘ ル メ ッ ト ま た は 耳 栓 な ど の 安 全 保 護
具 を 使 用 す る こ と で 、人 身 事 故 が 低 減 さ
れま す。
c.不意な始動は避けてください。 電源プ
ラ グ を 差 し 込 む 前 に 、ス イ ッ チ が オ フ の 位
置に あ ることを 確 認 してくださ い 。
指をスイッチにかけて電動工具を運んだ
り、またはスイッチの位置がオンになってい
る電動工具のプラグを電源コンセントに差
し 込 む と 、事 故 を 招 く お そ れ が あ り ま す 。
d. 電動工具の電源を入れる前に、調整キ
ーまたはレンチ をはず してくだ さ い。 電
動工具の回転部分にレンチまたはキーをつ
け た ま ま に し て お く と 、人 身 事 故 を 招 く お そ
れが ありま す。
e. 無理な姿勢で作業しないでください。
常に 適切 な 足場と バランスを維 持してく
ださい。 こ れ に よ っ て 、予 期 し な い 状 況 で
も電動工具をより適切に操作することがで
きま す。
f. きちんとした 服装で 作業してください。
だぶだぶの衣服や装飾品は身につけない
でください。 髪、服および手袋を回転部に
近づけないでください。 だぶだぶの服、装
飾品または長髪は、回転部に巻き込まれる
場 合 が あります。
g. 集じん装置が接続できるものは、適
切に使 用されていることを確 認してくだ
さい。これら の 装 置を 使 用 することによっ
て、粉じん関連の危険を低減することがで
きま す。
(2.5)
4. 一般安全規則
[電動工具の使用および手入れ]
a. 電動工具を無理に使用しないでくださ
い。 用途に合った 正しい電 動工 具を 使 用
してください。 より安全かつ快適に作業が
できます。
b.スイッチで始動および停止操作のできな
い場合、その電動工具は使用しないでくだ
さい。 スイッチで制御できない電動工具は
危 険 で す の で 、修 理 を 依 頼 し て く だ さ い 。
c. 調整を行う前、付属品を交換する前、ま
たは電動工具を保管する前には、電源プ
ラグをコンセントからぬくか、電動工具か
らバッテリーをはずしてください。 このよ
うな予防的安全手段によって、電動工具を
不意に始動させるリスクが低減されます。
d. 使用しない電動工具は、子どもの手の
届かないところに保管し、電動工具に不慣
れな人や取扱説明書を読んでいない人に
は電動工具を使用させないでください。
電動工具を扱いなれていない人に渡すと
危 険 です。
e. 電動工具の保守・点検を行ってくださ
い。 電動工具の動作に影 響のある可動 部
分の芯ずれや癒着、部品の破損およびその
他の状態を点検してください。 異常がある
場合は、使用する前に修理を受けてくださ
い。 電動工具の保守が不十分であること
が 、多 く の 事 故 の 原 因 と な り ま す 。
f. 刃物類は、鋭利かつ清潔に保ってくださ
い。 刃物類を適切に手入れして切れ味を
Page 79

79
www.evolutionpowertools.com
EN
EN
FR
DE
NL
JP
よ く し て お け ば 、作 業 の 円 滑 さ を 失 う こ と な
く 、操 作 も 容 易 に な り ま す 。
g. 電動工具、付属品、アタッチメント、先
端 工 具 、刃 物 類 な ど は 、作 業 条 件 お よ び
実 施 す る 作 業 内 容 を 考 慮 し て 、そ れ ら の 取
扱説明書に従って、使用する電動工具に
合うように 使 用してくださ い。 意図され
た作業と異なることに電動工 具を使 用する
と、危険を招く恐れがあります。
(2.6)
5. 一般安全規則
[整備]
a. 電動工具の整備は、資格をもつ修理要
員が適切な交換部品だけを用いて行って
ください 。 電 動工具の安全 性を維 持する
ことが で きます。
(2.7)
健康被害に関するご注意
警 告: 本機を使う切断作業では粉塵が
でます。 切断する材料によっては、有害
性の粉塵が発生することがあります。作業
時 に は 、集 じ ん 機 の 使 用 お よ び フィル タ 交
換可能のフェイスマスク着用をおすすめし
ます。
家屋の壁面などに使われている塗料に鉛が
含 ま れ て い る 懸 念 が あ る 場 合 は 、自 分 で 剥
がそうとせずに、専門家に依頼してくださ
い。 塗料の粉じんが手や衣服に付着した
場合に、誤って鉛成分が口から体内に入る
恐れがあります。 たとえ少量であっても神
経障害の原因となることがあります。 小さ
な子どもや胎児は特に影響を受けやすいの
で十分注意が必要です。
有毒な化学物質にさらされないようにす
るには
• 十分に換気した作業場で作業してくだ
さい。
• 微細粒子を通さないように設計された防
じ ん マ ス ク な ど 、認 定 を 受 け た 保 護 具 を
着 用してくださ い 。
(2.8)
警 告:作 業 中 は 、切 断 片 な ど の 異 物 か ら 眼
を守るために、必ず保護メガネまたはフェ
イスシールドを使 用してください。
(3.0)
本製品の使用上のご注意
(3.1)
先に電動工具として共通の注意事項を述べ
ましたが、高速切 断機として、さらに次に述
べる注意事項を守ってください。
危 険: ノコ刃 や 切 断してい る周 辺 に は手 や
顔を近づけないでください。 切断作業は、
一方の 手 はハ ンドルを、もう一方の 手はモ
ーターカバー 部 に置くなどして、両手で保
持しながら操作してください。 本機を両手
で保持することで、ノコ刃で手を切る恐れ
が 軽 減 され ます。
b) 切断する材料の下には手を入れないで
ください 。
材料の下は安全カバーで保護されないた
め 、け が の 原 因 に な り ま す 。
c) 使用前に切り込み深さを材料にあわ
せて 調 整してくださ い。 材料の下から刃
底 が 見 え な い よ う に( 材 料 の 下 か ら 刃 先 が
見えるが、刃がすべてむき出しではない状
態 、3 m m 程 度 )調 整 して く だ さ い 。
d) 切断する材料は必ず安定性のよい台に
固定してください 。 材料を手で 持ったり足
で押さえたりしないでください。 刃物への
手足の露出や、材料に刃が挟まって強い反
発力(キックバック)を防ぐには 、材 料 を適
切に 固 定 することが 大 切 です。
e) 絶縁されたハンドルだけを握ってくだ
さい。切断部分の近くに隠れた電気配線な
Page 80

80
www.evolutionpowertools.com
に向かってくる現象をさします。
1. ノコ刃が、切断している材料の切り溝に
挟 ま っ て 動 か な く な り 、モ ー タ - の 反 動 に よ
って 本 機 が 作 業 者 に 向 か って 急 激 に 押し 返
され ま す。
2. 切断中に、ノコ刃がひねられたり偏心す
る(回転が斜めにぶれる)と、ノコ刃後端
の歯が材料の表面上部に食い込んで、ノコ
刃が不意に切り溝か飛び出して作業者に向
かって は ね 上 が ってき ま す。
h)毎回使用前に、安全カバーが正常どお
り閉じることを 確認してください。 安全
カバーが円滑に動かない、または瞬間に閉
まらないときは、本機を使用しないでくだ
さ い 。本 機 を 誤 っ て 落 と し た り 、ぶ つ け た と
きには、安全カバーに破損、変形などがな
い か 点 検 して く だ さ い 。使 用 前 に 切 り 込 み
深さ、傾斜角度を調 整し、固定レバーを確
実に締めてください。調整後に、刃に触れ
ないように気をつけな がら手で 安全 カバー
を開け閉めして、安全カバーが本機部品の
一部 に 接 触することなく正常かつ円滑 に 動
くことを 確 か めてく ださ い 。
i) 安全カバーのバネの動きを点検してく
ださい。 もし安全カバーとバネが正しく動
作しないときは、ご使 用前に修 理をお申し
付けください。 部品の損傷や粘着物、切り
くずの体積などが原因で、安全カバーの動
きが 悪くなることが あります。
d) 安全カバーは、プランジカットや複合
切断など特定の切断を行うとき以外は、
手動で操作しないでください。 材料との
位置関係で安 全カバーが自動的に開かな
い場合だけ、安全カバーを開くレバーを使
って最小限引き上げてください。
ノコ刃が材料に入ったらすぐにレバーを放
し て く だ さ い 。そ れ 以 外 の 作 業 で は 安 全 カ
バ ー を 手 動 で 操 作 し な い こ と で 、ノ コ 刃 へ
の 接 触の 恐 れを 低 減 で きま す。
ど が あ る と き は 、刃 が 配 線 に 接 触 し な い よ
うに十分気をつけてください。 作業中はノ
コ刃 で 電 源コードを損傷 することがないよ
うに、常にコードの位置に注意してくださ
い。本機の金属部に通電して感電する恐れ
が あり危 険 で す。
f) 縦に切断(縦引き、縦切り)するときに
は、平行定 規(リップフェンス)を使用して
ください 。 精 度 が 向 上 し 、ノ コ 刃 の 噛 む こ
とが 低 減 され ま す。
g) サイズ・取付け穴の形状が本機に合う
指定 専 用ノコ刃を 使 用してくだ さい。 本
機 の 取 付 金 具 に 合 わ な い ノ コ 刃 は 、偏 心(
回転軸のぶ れ)による制御 不 能を招く恐れ
が あります。
h) ノコ刃の取り付けは、指定の部品(指
定 の フ ラ ン ジ 、ワ ッ シ ャ ー や ボ ル ト )を 用
いて 確 実に 取り 付けてください 。 損傷の
ない正しい部品は、本機の性能や安全を引
き 出 すよ う 、最 適 に 設 計 さ れ て い ま す 。
i) 高速鋼(HSS、ハイス)ノコ刃は使用し
ないでください。
j)使用前に本機およびノコ刃の状態を点検
してください 。 変 形 、亀 裂 、磨 耗 、損 傷 箇
所のあるノコ刃は使 用しないでください。
k ) 安 全 カ バ ー が 適 切 に 閉 じ な い 、あ る い
は円滑に動かないマルノコは絶対に使用
しないでください 。 安 全カバーを開けた
位置で固定しないでください。
l)ノコ刃は本書 指定範囲のノコ刃を使 用し
て下さい。
ノコ刃は本機の最高回転数を満たす性能
をもち、かつ切断する材料に適合したもの
を必ず 使 用して 下さい 。
(3.2)
キックバックの原因と対策
キックバックとは、ノコ刃が 加工材料に噛
んだり偏 心したときに、突然ノコ刃が材 料
からはじかれて本機がせり上がり、作業者
Page 81

81
www.evolutionpowertools.com
EN
EN
FR
DE
NL
JP
c) ノコ刃が材料の中にある状態から再始
動するときには、ノコ刃が材料と噛みあっ
てい ないことを確 認してください。 ノコ
刃が噛みあっていると、本機を再始動した
ときにキックバックがおこります。
d) 幅広材を切断するときは、材料が安定
するように支持して固定することで、ノコ
刃が 挟まったり、キックバックが発生する
危険 性 を抑 えること ができます。面積の広
い材料は自重でたわみやすいため、材料の
両 端 と 切 断 部 分 を 支 え る こ と で 、キ ッ ク バ ッ
ク発 生を 防ぎ ます。
e)切断前に、切り込深さ調整ボルトおよび
ノコ刃傾 斜角度調 整レバーが 確実に締 め
られていることを確認してください。 切
断中にノコ刃にずれが 生じると、ノコ刃が
材料にはさまれ、キックバックを招きます。
f) 損傷や磨耗の激しいノコ刃は使用しな
いでください。 切れ味の悪い刃や確実に
取り付けられていない刃をつかうと、切り口
( 切 り 溝 )が 狭 く な り 、摩 擦 でノ コ 刃 が 材 料
にはさまれ、キックバックを招きます。
g) 壁のように裏側がみえない箇所などに
プランジカット(ノコ刃を押し下げながら
板の途中から切断する方法)を行うとき
は 、特 に 注 意 し て く だ さ い 。(FURY2に該
当するかどうか) 裏 側に突き出たノコ刃
が、キックバックを招くものに触れる恐れが
あります。
(4 .1)
さあ、始めよう – 開梱
注 意: 部品の中には尖った形状のものが
あります。 開梱時にはけがをしないよう
にご注意ください。 開梱後に部品数量を
確認してください。 付属品がすべてそろっ
ていることを確認してください。 商品に破
損や異常がないことを点検してください。
万一 不 足してい る 物 や 損 傷して いるも のが
ありましたら、お買い求めの販売店にご連
絡ください。 梱包箱は捨てずに、メーカー
e) 丸ノコを作業台や床面などに置くとき
に は 、ノ コ 刃 が 停 止 し て 安 全 カ バ ー で 覆 わ
れていることを確認してください。
スイッチを切った後もノコ刃は惰性でし
ばらく回り続けます。 確認を怠ると、惰 性
で回転するむき出しの刃が丸ノコを動か
し、本機は後ろに走り、途中にあるものす
べて を切 断 する恐 れ が あります。
(3.4)
警 告: 本機の部品が損傷、不足している場
合 は 、必ず修 理・交 換 して から使 用して 下
さい。 整備や修理を怠った場合は、重傷
を招く恐れがあります。
(3.3)
キックバックは、高速切 断機を誤った手順
や条件で使用した場合に発生します。以下
は、キックバックによるリスクを最小 限にす
るため の 注 意 事 項 です。
a) 使用時は本機を両手でしっかりと保持
し、キックバック(反発力)に耐えるよう
に腕 を構 えてください 。 ま た 、切 断 線 と
身体の位置が一直線にならないように左
右とぢらかによけて位置してください。 キ
ックバックはマルノコが 後方に跳 ね返って
く る こ と が あ る 危 険 な 現 象 で す が 、作 業 者
が注 意事項を守ることで制 御することがで
きま す。
b) ノコ刃が切り溝にはさまったり何らか
の理由のノコ刃が止まった場合、スイッチ
を切ってノコ刃の回転が完全に停止するま
で本 機 を動 かさな いで 保持してください 。
ノコ刃 がまだ回転している間 は 、ノコ刃を
切 り 溝 か ら は ず し た り 、本 機 を 後 ろ に 引 い た
りしないでください。 ノコ刃が動いている
間に切断方向以外に本機を動かすと、キッ
ク バ ッ ク が 起 こ る 恐 れ が あ り ま す。ノ コ 刃 が
完 全 に 停 止 し て か ら 、ノ コ 刃 が は さ ま っ た 原
因 の 確 認 と 対処 をしてください 。
Page 82

82
www.evolutionpowertools.com
別 売 部 品 ・ア ク セ サ リ ー
付属品 数量
355mm
ダイヤモンドホイ
ール
DIAMOND355
保証有効期間中は搬送時に備えて保管して
おいてください。 リサイクルを促進するた
め、開梱後の梱包・包装資材は分別処理し
てください。 窒息の危険をさけるため、ビ
ニール 袋は子 供 の 手 の届か ないところに置
いてくだ さい 。
(4.3)
別 売 部 品 ・ア ク セ サ リ ー ご 案 内
別売部品・アクセサリーの詳細につきまし
ては、お買い上げの販売店もしくは当社窓
口までお問い合わせください。 当社Web
サイト:www.elovutionpowertools.com
(4.4)
標準付属品
付属品 数量
取扱説明書
1
万 能 切 断 チップ ソー
六角レンチ 8mm
(ノコ刃交 換 用)
1
カーボンブラシ
セット
1
Page 83

83
www.evolutionpowertools.com
EN
EN
FR
DE
NL
JP
各部の名称 FURY2 355mm 万能切断機
1. 安全カバー
2. フロントバイスジョー(回転)
3. チェーン
4. ブレードガード
5. 軸ガード
6. リアバイスジョー(位置調整可)
6
5
4
2
1
3
Page 84

84
www.evolutionpowertools.com
さ あ 、は じ め よ う - 準 備
警 告: 調整作業を行う前には、必ず電源プラグをコンセン
トか ら 抜 い てくだ さい 。
警 告: ノコ 刃 を 交 換 し た あ と は 、無 負 荷 状 態 で 数 分 回 転 さ
せ 、本 機 の 振 動 やノ コ 刃 の 揺 れ な ど の 異 常 が な い こ と を 確
認してくだ さ い 。 試 運 転 中は ノコ 刃 から 離 れてくださ い 。
万一、ノコ刃にヒビ、割れなどの異常があった場合に、欠け
た 刃 が 飛 んで 怪 我 を 負う恐 れが ありま す。
注記: 本機には、販売される国内での使用に適合するプラ
グと電源コードが使われています。 電源コードやプラグを
改 造しないでください。
(< 5.1)
ノコ刃の取り付け・取り外し
警 告: エボリューションパワーツール 純正刃をご使 用くだ
さい。 ノコ刃の最高回転数が本機の無負荷回転数を上回
っているか 確認してください。指定以外のノコ刃を使用す
ると、本機の性能が十分にひきだせないだけでなく、事故
やけ が の原 因 になりま す。
警 告: 万 一 の 事 故 を 防 止 す る た め に 、必 ず 電 源 プ ラ グ を コ
ンセントから抜いて作業してください。
注) ノ コ 刃 の 取 付 け・ 取 り 外 し を 行 う と き は 、保 護 手 袋 を
着 用 し て く だ さ い 。切 断 中 に 刃 が 熱 く な って い る こ と が あ り
ますので注意してください。 (5.1>)
交換手順
ヘッド部 の 固 定を 解除 する
ヘッド部はチェーンで固定されています。この固定を解除す
る と 、ヘ ッ ド 部 は 自 動 的 に 上 限 ま で 上 が り ま す 。
固 定 解 除 の 手 順 は 、以 下 の 通 り で す 。
• ハンドルを少しさげ ます。
• ヘッド固定ピンからチェーンを外すと固定が解除されま
す。 (図9参照)
Page 85

85
www.evolutionpowertools.com
EN
EN
FR
DE
NL
JP
ヘッドは 上限 まで上 がります。
注) 本機を使用しないときは、ヘッド部を下限までさげ、
チェ ーン で 固 定して おくことを 推 奨しま す。
《取り外し》
• ヘッド部の固定を解除し、上限位置まで上げます。
• 蝶ネジをゆるめ、 軸ガードを持ち上げて開いてくださ
い。 (図2)
• シャフトロックボタンを押し込み 、軸が 回 転しないよう
にロックをか けま す。 (図4)
• 付属の六角レンチで中穴ネジをゆるめます。 (図5)
注) 中穴ネジは、右ネジです。 右回り(時計回り)に回す
と締まり、 左回り(反時計回り)に回すとゆるみます。
• 中穴ネジ、ワッシャー、アウターフランジを取り外します。
部品を失くさないように気をつけてください。
• 安全カバーを上げ て、ブレードガードの中に格 納しま
す。 (図3)
• ノコ刃を外します。ノコ刃を外すとインナーフランジが見
えますが、これは取り外さないでください。
《取り付け》
• シャフト(軸)、フランジ、ワッシャーなどについている切
り屑 をきれ い に 取り除 きます。
• 取り付けは取り外しの逆の要領で行います。インナーフ
ランジの上 に 新しいノコ刃を取り付けます。ノコ刃 面に
表示されている矢印がブレードカバー面の矢印と同じ向
きであるように取り付けます。 (図
• アウターフランジ、ワッシャー、中穴ネジの順で戻します。
• 軸が 回転しないように、シャフトロックボタンを押し込
みながら、六角レンチで中穴ネジを締めます。
• ノコ刃交換後は、軸ガードを戻し、蝶ネジで確実に固定
してください 。
• ノコ刃を手で回して、シャフトロックボタンが完全に解除
されてい ることを 確 認します。
• 六角レンチを外し、失くさないように保管しておきます。
• ハンドルを 数回 上下させて、安 全 カバー が円 滑に 動くこ
とを確認します。
ポ イ ント:ノ コ 刃 交 換 時 は 、3 分 以 上 の 試 運 転 を し て く だ さ
い。試運転をせずに
(図 4)
(図 3)
(図 2)
(図 1)
Page 86

86
www.evolutionpowertools.com
ヘッド部 可 動 範 囲
ヘッド部下限位置を調整する
ハンドル を下げ たときに 、ノコ刃 が 本 体ベース部に 接触 す
ることがないように 、ヘッド部下 限位 置を調 整することが
できます。
ハンドル を下 限まで下げ、ノコ刃が ベース部 に 触れること
がないかどうか点検します。 調整が必要なときは、次の手
順 に従 ってください 。
• 下限位置ネジの止めナットをゆるめます。 (図 6)
• 調整ネジを回して、下限位置を調整します。下限位置を上
げるには、調整ネジを左(反時計回り)に回します。
• 下限位置を下げるには、調整ネジを右(時計回り)に回
しま す。
• 調整ネジをまわして下限位置を正したのち、固定ナット
を締めつけて確実に固定します。
切断角度を調整する
注) リアバイスジョーは、角度を45度まで変えることが
できます。
工場 出荷時 は、リアバイスジョーは0 度(ノコ刃に対して垂
直 )に 設 定 さ れ て い ま す 。こ の 位 置 で は 、ノ コ 刃 は 材 料 を 直
角に切 断 しま す。
リ ア バ イ ス ジ ョ ー の 位 置 を 変 え て 、切 断 角 度 を 4 5 度 ま で 調
整することが できます。角度目盛(刻 印 )を目安にしてくだ
さい。
リアバイスジョーの角度を調整するには
• M10ボルト(2本)をゆるめます。 (図7)
• リアバイスジョーを希望の角度まで動かします。
• 角度設定後、付属の六角レンチでM10ボルト(2本)を確
実に締め付けてください。
(図 5)
(図 6)
(図 7)
Page 87

87
www.evolutionpowertools.com
EN
EN
FR
DE
NL
JP
リアバイスジョーの位置を変える
リアバイスジョーは、本体ベースから一旦取り外し、位置を
ずらして取り付けることができます。 (図8)
位置を変えるには
• M10ボルトとワッシャーを取り外します。
• 本体ベースには、リアバイスジョーを取り付けるためのネ
ジ穴が3箇所ありますので、位置を前後に動かすことが
できます。
• 位置を決めたら、M10ボルト(2本)を取り付けます。
ワッシ ャー を 正しく取り 付け てくださ い 。
リアバイスジャーを手前から後方に動かすと、切断可能寸
法 が広 がります。
(5.2)
操作方法
安全上のご注意
無理な姿勢で作業しないでください。 常に足元をしっか
りさせ、バランスを 保つようにしてください 。 万一キックバ
ッ ク( 反 発 )が 起 こ る 場 合 に 備 え て 、顔 や 身 体 が 切 断 線 と
一直 線にならないように身体を左右どちらかによけて構え
てくだ さい 。
警 告: 切断 の 際は、材料をしっかりバイスで固 定しない
と、キックバックなどで思わぬ 怪我をする危険 があります。
材料を手だけで押さえて作業することは厳禁です。
• 材料をバイスで固定する前に、本体ベースに付いている
切削粉やごみを拭き取ってください。
• 1回の切り込みまたは 切断が終わるごとに、切り落とした
材料がノコ刃が進むライン上にないことを確認してくだ
さい。ノコ刃と接触すると飛散することがあり、けがの
原因になります。
• 小さな材料の切断には、本機を使用しないでください。
ノコ刃から15センチ以内まで手を近づけることになる程
の 寸 法 の 材 料 は 、け が の 原 因 に な り ま す 。
(図 8)
Page 88

88
www.evolutionpowertools.com
• アングル鋼を切断するときには、角(かど)を上にして置
いて、バイスで 確 実 に 固 定してください 。面 を下にして L
字状に置いて固定すると、材料が動き、切断精度が悪く
なることが あります。
(5.3)
切断作業
• スイッチを入れ、フル回転になってから静かにノコ刃を
切断材に当てて切断しはじめます。
• 切り込む時、ハンドル に力を入れすぎても早く切 れ ませ
ん。
• 刃が材料に入ったら、適度に力を加えます。
注) 力を入れすぎるとモーターに負担をかけ能率も悪くな
ります。ノコ刃 の寿 命 を縮 め る原 因にも なります。
• 刃が材 料を 突き抜けるところで、ハンドル を下に 押す力
をゆる めます。
• 切断 が 終わったところで、ハ ンドル を持ち上げ、スイッチ
を切ります。
• ノ コ 刃 の 回 転 が 完 全 に 停 止 し 、安 全 カ バ ー が 戻 っ て 、安
全にノコ刃を被ってからハ ンドルか ら 手を放し、材料 を
外しま す。
(6.1)
注) 点 検・ 整 備 を 行 う と き は 、ス イ ッ チ を 切 り 、差 込 プ ラ
グを電源コンセントから抜いてください。
各 部 取 り 付 け ネ ジ で ゆ る ん で い る と こ ろ が な い か 、コ ー ド
に損傷がないか、安全カバーは正常に機能するか、破損し
ている部品はないか、その他運転に影響を及ぼすすべて
の 箇 所 に 異 常 が な い か 、定 期 的 に 安 全 点 検 を し てく だ さ
い。 何らかの異常がある状態のままで、本 機を使用しな
いでください 。
モーター軸受部には工場出荷時にグリースが適量塗られて
います。 グリースを追加する必要はありません。
本機のお手入れは、乾いた布か石けん水をつけた布できれ
いに拭いてください。 プラスチック部分を掃除するときに、
シンナーなどの有機溶 剤は絶対に使用しないでください。
ASSEMBLY
Page 89

89
www.evolutionpowertools.com
EN
EN
FR
DE
NL
JP
警 告: 本機のすき間に先の尖ったものを差し込んで汚れ
を取ろうとしないでください。 定期的にブロア(圧縮空
気)でモーター周辺( 換 気口)をきれいにしてください 。
(6.2)
モーター 部から余分な火花が発 生するときは、モーター内
が汚れているかカーボンブラシが摩耗していることが考え
られ ます。
(6.3)
カーボンブラシの点検・交換
• 点検・手入れの際は、必ずスイッチを切り、電源プラグを
コンセントから抜いてください。
• 本機 を 平 らで 安定 した 場 所 に 置 いてください 。
• カーボンブラシは、モーター部のブラシキャップ(2箇
所 )ゆ る め て 外 す と 、取 り 出 せ ま す。
注) カーボンブラシが残り6mm程度まで磨耗していた
ら、新しいカーボンブラシと交換してください。
• カ ー ボ ン ブ ラ シ は 2 個 1 セ ッ トで す。交 換 す る と き に は 指
定のカーボンブラシを使 用してください。
• 左右両方とも同時に交換し、ブラシキャップを戻してくだ
さい。
• カ ー ボ ン ブ ラ シ を 交 換 し た 後 は 、負 荷 を か け な い 状 態
で 、数 分 間 試 運 転 を 行 っ て く だ さ い 。
注) 状態を点検したときに 、カーボンブラシの磨 耗具合 が
まだ 限 界に 達して いな い 場 合 は 、再び 元 の 状 態に 戻して引
き続き使 用できます。 カーボンブラシを交換するときや、
一旦取り出して戻すときには、向きを間違えないように気を
つけて取り付け、ホルダ内でカーボンブラシがスムーズに
動くこ と を 確 認 してくだ さ い 。
本機の移動/保管
本 機には 運 搬 、収納 時に 、ハンドル(ヘッド部 )を最も低 い
位置にして、固定するためのチェーンがついています。
(図 9)
Page 90

90
www.evolutionpowertools.com
手 順:
• ハンドルを少し下げ、フックからチェーンを外すと固 定 が
解 除さ れま す。
• ハンドルを固 定するときは 、チェーンをフック(ピン)に
引っ掛 け てくださ い 。 (図9)
(6.4)
環境負荷軽減のために
本機を廃棄する際は、家庭ごみとして捨てないでくださ
い。リサイクルについては、各自治 体または販売店にお問い
合わせください。
Page 91

91
www.evolutionpowertools.com
EN
EN
FR
DE
NL
JP
NOTES
Page 92

®
Page 93

EN
EN
FR
DE
NL
JP
NEDERLANDS
Vertaling van de originele gebruiksaanwijzing
Page 94

94
www.evolutionpowertools.com
INHOUDSOPGAVE
INLEIDING
Page 95
Garantie Seite 95
Labels en symbolen Page 96
Beoogd gebruik van dit elektrisch gereedschap Pagina 96
VEILIGHEIDSVOORZORGEN Page 99
Elektrische veiligheid Page 99
Gebruik buitenshuis Page 99
Algemene veiligheidsinstructies voor elektrisch gereedschap Page 99
Aanvullende veiligheidsinstructies Page 102
VOORDAT U BEGINT Page 104
Uitpakken Page 104
MACHINEOVERZICHT Page 106
Schema van service-onderdelen Page 107
Montage en voorbereiding Page 108
Instructies voor de bediening Page 111
ONDERHOUD Page 112
Milieubescherming Page 113
EGCONFORMITEITSVERKLARING Page 114
NL
English Page 02
Deutsch Seite 22
Français Page 46
日本語 ページ 70
Nederlands Pagina 92
Page 95

95
www.evolutionpowertools.com
EN
EN
FR
DE
NL
JP
(1.2)
Deze handleiding werd oorspronkelijk in
het Engels geschreven.
(1.3)
BELANGRIJK
Lees deze instructies voor de bediening en
veiligheid zorgvuldig en volledig.
Voor uw eigen veiligheid, als u twijfelt over
enig aspect met betrekking tot het gebruik van
deze apparatuur, ga dan naar de Technische
Hulplijn, het nummer is te vinden op de
website van Evolution Power Tools. In onze
wereldwijde organisatie hebben wij diverse
Hulplijnen, maar technische hulp is ook
verkrijgbaar bij uw leverancier.
WEB www.evolutionpowertools.com/register
(1.4)
Gefeliciteerd met uw aankoop van een
machine van Evolution Power Tools. Vul uw
productregistratie ‘online’ in zoals beschreven
in de A4 online garantieregistratiefolder bij
deze machine. U kunt ook de QR-code in de
A4-folder met een Smart Phone scannen.
Hierdoor kunt u de garantieperiode van
uw machine valideren via de website van
Evolution door uw gegevens in te voeren en
op deze manier service activeren wanneer dat
ooit nodig zal zijn. Wij danken u van harte voor
het selecteren van een product van Evolution
Power Tools.
GARANTIE VAN EVOLUTION LIMITED.
Evolution Power Tools behoudt zich het recht
voor om zonder bericht vooraf verbeteringen
en aanpassingen aan het productontwerp aan
te brengen.
Raadpleeg de garantieregistratiefolder en/of
de verpakking voor bijzonderheden over de
voorwaarden van de garantie.
(1.5)
Evolution Power Tools zal, binnen de
garantieperiode en vanaf de oorspronkelijke
datum van aankoop, alle goederen die defect
blijken te zijn in materiaal of afwerking, repareren
of vervangen. Deze garantie is ongeldig wanneer
het teruggestuurde gereedschap anders is
gebruikt dan volgens de aanbevelingen in de
instructiehandleiding of wanneer de machine
per ongeluk, door verwaarlozing of verkeerde
service is beschadigd. Deze garantie is niet van
toepassing op machines en / of componenten
die op enige wijze zijn gewijzigd, veranderd
of aangepast of zijn onderworpen aan
gebruik buiten de aanbevolen capaciteiten en
specificaties. Elektrische componenten vallen
onder respectievelijke garanties van fabrikanten.
Alle geretourneerde defecte goederen
moeten via vooruitbetaalde vracht worden
teruggestuurd naar Evolution Power Tools.
Evolution Power Tools behoudt zich het recht
voor het optioneel te repareren of vervangen
door hetzelfde of een soortgelijk artikel. Er is
geen garantie - schriftelijk of mondeling - voor
verbruikstoebehoren zoals (de volgende lijst is
niet volledig) bladen, cutters, boren, beitels of
peddels enz. Evolution Power Tools zal in geen
geval aansprakelijk zijn voor verlies of schade
als direct of indirect gevolg van het gebruik van
onze goederen of van enige andere oorzaak.
Evolution Power Tools is niet aansprakelijk
voor mogelijke kosten die zijn ontstaan over
dergelijke goederen of gevolgschade. Geen
functionaris, werknemer of agent van Evolution
Power Tools is geautoriseerd voor het geven
van mondelinge geschiktheidsverklaringen of
om af te zien van een van de eerder genoemde
verkoopvoorwaarden en geen ervan zal bindend
zijn voor Evolution Power Tools.
Vragen met betrekking tot deze beperkte
garantie dienen te worden gericht aan het
hoofdkantoor van de onderneming, of u
kunt het van toepassing zijnde Hulplijnnummer bellen.
Page 96

96
www.evolutionpowertools.com
GEGEVENS
ZAAGCAPACITEIT METRIC IMPERIAL
Mild Steel Plate (Optimal Cutting dikte) 3mm 1/8”
Vierkante buis op 90° (zacht staal) 120 x 120mm 4-3/4 x 4-3/4”
Vierkante buis op 45° (zacht staal) 89 x 89mm 3-1/2 x 3-1/2”
Rechthoek buis op 90° (zacht staal) 95 x 180mm 3-3/4 x 7-1/8”
Rechthoek buis op 45° (zacht staal) 75 x 195mm 3 x 7-3/4”
Ronde buis bij 90° (zacht staal) 130mm 5-1/4”
Ronde buis bij 45° (zacht staal) 105mm 4-1/8”
MACHINE
Motor (UK/EU) 230V-240V ~ 50/60Hz 2200W 10A
Motor (UK) 110V ~ 50/60Hz 1800W 16A
Motor (USA) 120V 1800W 15A
Motor (Japan) 100V 1450W 15A
Snelheid (onbelast) 1500min
-1
1500rpm
Gewicht (Met Blade) 25kg 55lb
BLADE
Diameter 355mm 14”
Boorgat 25.4mm 1”
Aantal tanden 36 36
Zaagsnede 2.2mm .086”
NOISE & VIBRATION GEGEVENS
Sound Pressure Level 108dB(A) K=3dB(A)
Trillingsniveau 1.39 m/s2 K = 1.5 m/s
2
MODEL ONDERDEELNUMMERS
UK 230V: 082-0001 110V: 082-0002
USA 082-0004
Europe 082-0003
Japan 082-0005
Page 97

97
www.evolutionpowertools.com
EN
EN
FR
DE
NL
JP
(1.6)
N.B.: De vibratiemeting is onder standaard
omstandigheden gemaakt conform:
BS EN 61029-1:2009
De aangegeven totale vibratiewaarde is
gemeten conform een standaard testmethode
en kan worden gebruikt om het ene
gereedschap te vergelijken met een ander.
De aangegeven totale vibratiewaarde kan
ook worden gebruikt in een voorlopige
blootstellingsbepaling.
(1.7)
VIBRATIE
WAARSCHUWING: Bij gebruik van deze
machine kan de operator worden blootgesteld
aan hoge vibratieniveaus overgebracht op
hand en arm. Het is mogelijk dat de operator
“witte vibratievingerziekte” (syndroom van
Raynaud) zou kunnen ontwikkelen. Deze
aandoening kan de gevoeligheid van de
hand voor temperatuur verminderen evenals
een algemene gevoelloosheid produceren.
Langdurige of regelmatige gebruikers van deze
machine dienen de conditie van hun handen
nauwlettend te controleren. Wanneer een
van de symptomen merkbaar wordt dient u
onmiddellijk de hulp van een arts in te roepen.
• De meting en beoordeling van blootstelling
van mensen aan via de hand doorgegeven
vibratie in de werkplaats wordt gegeven in: BS
EN ISO 5349-1:2001 en BS EN ISO 5349-2:2002
• Veel factoren kunnen het actuele
vibratieniveau tijdens bediening
beïnvloeden bijv. de conditie en oriëntatie
van werkoppervlakken en het type en de
conditie van de gebruikte machine. Vóór
elk gebruik dienen dergelijke factoren
te worden beoordeeld en waar mogelijk
dienen passende werkpraktijken te worden
toegepast. Het onder controle houden van
deze factoren kan helpen de effecten van
vibratie te verminderen:
Hantering
• Hanteer de machine voorzichtig, laat de
machine het werk doen.
• Vermijd het gebruik van excessieve
lichamelijke inspanning op ongeacht welk
van de machinebesturingen.
• Denk aan uw veiligheid en stabiliteit en de
oriëntatie van de machine tijdens gebruik.
Werkoppervlak
Denk aan het materiaal van het werkoppervlak;
de conditie, dichtheid, sterkte, starheid en
oriëntatie ervan.
WAARSCHUWING: De vibratie-emissie
tijdens werkelijk gebruik van het elektrische
gereedschap kan verschillen met de vermelde
totaalwaarde, afhankelijk van de manieren
waarop het gereedschap wordt gebruikt.
De noodzaak veiligheidsmaatregelen te
identificeren en de operator te beschermen is
gebaseerd op een schatting van blootstelling
onder de werkelijke gebruiksomstandigheden
(waarbij rekening wordt gehouden met
alle onderdelen van de bedrijfscyclus,
zoals de tijden waarin het gereedschap is
uitgeschakeld, wanneer het stationair draait,
naast de activeringstijd).
(1.8)
LABELS & SYMBOLEN
WAARSCHUWING: Deze machine niet
bedienen wanneer waarschuwings- en / of
instructielabels ontbreken of beschadigd zijn.
Neem contact op met Evolution Power Tools
voor vervangende labels.
N.B.: Alle of sommige van de volgende
symbolen kunnen in de handleiding of op het
product verschijnen.
Page 98

98
www.evolutionpowertools.com
LABELS & SYMBOLS
(1.10)
BEOOGD GEBRUIK VAN DIT
ELEKTRISCH GEREEDSCHAP
WAARSCHUWING: Dit product is een
handbediende staalsnijdende hakzaag en
is ontworpen voor gebruik met speciale
Evolution bladen. Gebruik alleen accessoires
die zijn ontworpen voor gebruik in deze
machine en/of die die specifiek worden
aanbevolen door Evolution Power Tools Ltd.
Indien voorzien van een geschikt blad kan
deze machine worden gebruikt voor het
zagen van:
Zacht staal
Aluminium
(1.11)
VERBODEN GEBRUIK VAN DIT
ELEKTRISCH GEREEDSCHAP
WAARSCHUWING: Dit product is een
handbediende staalzagende hakzaag
en mag uitsluitend als zodanig worden
gebruikt. Het mag op geen enkele wijze
worden aangepast of worden gebruikt voor
het bekrachtigen van andere apparatuur of
andere accessoires aandrijven dan de in deze
instructiehandleiding vermelde.
(1.13)
WAARSCHUWING: Deze machine is
niet bedoeld voor gebruik door personen
(met inbegrip van kinderen) met beperkte
lichamelijke of verstandelijke vermogens of
een gebrek aan ervaring en kennis, tenzij
zij toezicht of instructies met betrekking tot
het veilige gebruik van de machine krijgen
door een voor hun veiligheid verantwoordelijke
persoon en die competent is in het veilige gebruik
ervan. Kinderen dienen onder toezicht te blijven
om zeker te stellen dat zij geen toegang krijgen tot
en niet met deze machine mogen spelen.
Symbol Description
V
Volt
a
Ampère
hz
Hertz
min
-1
Snelheid
~
Wisselstroom
n
o
Onbelast toerental
Draag een veiligheidsbril
Draag gehoorbescherming
Dragen dust protection
Lees de instructies
Waarschuwing
Draag handschoenen
C E certified
Page 99

99
www.evolutionpowertools.com
EN
EN
FR
DE
NL
JP
(1.14)
ELEKTRISCHE VEILIGHEID
Deze machine is voorzien van een correct
aangegoten stekker en netsnoer voor
de aangegeven markt. Als het snoer
beschadigd is, moet het worden vervangen
door een speciale kabel of set beschikbaar bij
de fabrikant of zijn vertegenwoordiger.
(1.15)
GEBRUIK BUITENSHUIS
WAARSCHUWING: Wanneer dit
gereedschap buitenshuis wordt gebruikt
dient het voor uw veiligheid niet te worden
blootgesteld aan regen of op vochtige plekken
te worden gebruikt. Plaats het gereedschap
niet op vochtige oppervlakken. Gebruik een
schone, droge werkbank. Gebruik voor extra
bescherming een reststroomapparaat (R.C.D.)
dat de voeding zal onderbreken wanneer de
lekstroom naar aarde de 30 mA gedurende 30
ms overschrijdt. Controleer altijd de werking van
het reststroomapparaat (R.C.D.) voordat u de
machine gebruikt.
Wanneer een verlengsnoer nodig is, moet het
geschikt zijn voor gebruik buitenshuis en moet
dit met een label worden aangegeven.
Bij gebruik van een verlengsnoer dient men zich
te houden aan de instructies van de fabrikant.
(2.1)
ALGEMENE VEILIGHEIDSINSTRUCTIES
VOOR ELEKTRISCH GEREEDSCHAP
(Deze algemene veiligheidsinstructies voor
elektrisch gereedschap wordt gespecificeerd in
BS EN 60745-1:2009 & EN 61029-1:2009)
WAARSCHUWING: Lees alle
veiligheidswaarschuwingen en instructies.
Wanneer u zich niet aan alle hieronder
vermelde waarschuwingen en instructies
houdt, kan dit resulteren in elektrische schok,
brand en / of ernstig letsel.
Bewaar alle waarschuwingen en instructies
voor toekomstig gebruik.
De term “elektrisch gereedschap” in de
waarschuwingen heeft betrekking op uw
op stroom werkende (met snoer) elektrische
gereedschap of op accu werkende (zonder
snoer) elektrische gereedschap.
(2.2)
1) Veiligheidswaarschuwingen voor
algemeen elektrisch gereedschap
[Veiligheid van werkgebied]
a) Houd de werkplek schoon en goed
verlicht. Rommelige of donkere plaatsen
vragen om ongelukken.
b) Gebruik geen elektrisch gereedschap
in een explosieve omgeving, zoals in
aanwezigheid van brandbare vloeistoffen,
gassen of stof. Elektrisch gereedschap vormt
vonken die het stof of de dampen kunnen
doen ontbranden.
c) Houd kinderen en omstanders uit de
buurt tijdens het bedienen van elektrisch
gereedschap. Door afleiding kunt u de
controle verliezen.
(2.3)
2) Veiligheidswaarschuwingen voor
algemeen elektrisch gereedschap
[Elektrische veiligheid]
a) Stekkers voor elektrisch gereedschap
moeten overeenkomen met de contactdoos.
Pas de stekker op geen enkele manier aan
Gebruik geen adapterstekkers met geaard
elektrisch gereedschap.
Niet aangepaste stekkers en overeenkomende
contactdozen zullen het risico van elektrische
schok verminderen.
b) Vermijd contact van het lichaam met
geaarde oppervlakken zoals leidingen,
radiatoren, fornuizen en koelkasten.
Er bestaat een verhoogd risico van
elektrische schok wanneer uw lichaam
geaard wordt.
Page 100

100
www.evolutionpowertools.com
c) Elektrisch gereedschap niet blootstellen
aan regen of natte omstandigheden. Water
dat in elektrisch gereedschap komt zal het
risico van elektrische schok vergroten.
d) Het snoer niet verkeerd gebruiken.
Gebruik het snoer nooit voor het dragen,
trekken of om de stekker van het
elektrische gereedschap uit te contactdoos
te trekken. Houd het snoer uit de buurt van
hitte, olie, scherpe randen of bewegende
onderdelen. Beschadigde of verstrikte snoeren
verhogen het risico van elektrische schok.
e) Gebruik tijdens het buitenshuis
bedienen van elektrisch gereedschap een
verlengsnoer dat geschikt is voor gebruik
in de open lucht. Het gebruik van een snoer
dat geschikt is voor gebruik in de open lucht
vermindert het risico van elektrische schok.
f) Wanneer het bedienen van elektrisch
gereedschap in een vochtige omgeving
noodzakelijk is, gebruik dan een
hulpmiddel dat wordt beschermd door een
reststroomapparaat (RCD). Het gebruik van een
RCD vermindert het risico van elektrische schok.
(2.4)
3) Veiligheidswaarschuwingen voor
algemeen elektrisch gereedschap
[Persoonlijke veiligheid]
a) Blijf alert, let op wat u doet en gebruik
gezond verstand bij het bedienen van
elektrisch gereedschap. Gebruik geen
elektrisch gereedschap wanneer u moe
of onder invloed van drugs, alcohol of
geneesmiddelen bent. Een moment van
onoplettendheid tijdens het bedienen van
elektrisch gereedschap kan resulteren in
ernstig lichamelijk letsel.
b) Gebruik persoonlijke beschermende
uitrusting. Draag altijd oogbescherming.
Beschermende uitrusting zoals stofmaskers,
slipvaste veiligheidsschoenen, helm of
gehoorbescherming die wordt gebruikt onder
toepasselijke omstandigheden zal lichamelijk
letsel verminderen.
c) Voorkom onbedoeld starten.
Controleer of de schakelaar in de uitstand staat alvorens aan te sluiten op
stroomvoorziening en/of accupakket, het
oppakken of dragen van het gereedschap.
Het dragen van gereedschap met uw vinger
op de schakelaar of het activeren van het
elektrische gereedschap met de schakelaar aan
vraagt om ongelukken.
d) Verwijder elke stelschroef of sleutel
alvorens het elektrische gereedschap in
te schakelen. Een moersleutel of spie die
wordt achtergelaten in een draaiend deel
van elektrisch gereedschap kan resulteren
in lichamelijk letsel.
e) Reik niet te ver. Houd te allen tijde een
goede steun en een goed evenwicht. Hierdoor
kunt u het elektrische gereedschap in onverwachte
situaties beter onder controle houden.
f) Draag geschikte kleding. Draag geen
loszittende kleding of sieraden. Houd
uw haar, kleding en handschoenen uit
de buurt van bewegende onderdelen.
Loszittende kleding, sieraden of lang haar kan
tussen bewegende onderdelen terechtkomen.
g) Wanneer hulpmiddelen worden
geleverd voor het aansluiten van
stofafzuigings- en opvangfaciliteiten,
controleer dan of deze zijn aangesloten en
correct worden gebruikt.
Het gebruik van stofopvang kan gevaren die
verband houden met stof verminderen.
(2.5)
4) Veiligheidswaarschuwingen voor
algemeen elektrisch gereedschap
[Gebruik en verzorging van elektrisch
gereedschap]
a) Het elektrische gereedschap niet
forceren. Gebruik het correcte elektrische
gereedschap voor uw toepassing. Het correcte
elektrische gereedschap zal zijn werk beter
en veiliger doen in het toerental waarvoor het
werd ontworpen.
b) Gebruik het elektrische gereedschap
niet wanneer het niet wordt in- of
uitgeschakeld door de schakelaar.
 Loading...