

Page 1

Original
Instructions
Read instructions before operating this tool.
www.evolutionbuild.com
®
Page 2

2
www.evolutionbuild.com
TABLE OF CONTENTS
UK
EC - Declaration of Conformity 02
Important Information 04
12 Month Limited Warranty 04
Important Safety Instructions 04
General Safety Rules 05
Safety Rules for Belt Sanders 07
Symbols & Labels 07
Machine Overview 08
Specification 09
Operation 09
Maintenance 11
Environmental Protection 11
Service Parts Lists 15
EC - DECLARATION OF CONFORMITY
UK
We, manufacturer and importer
Evolution Power Tools Ltd.
Venture One
Sheffield
S20 3FR
Declare that the product
Part numbers: EVOMBS280
Evolution: Mini Belt Sander
Complies with the essential requirements of
the following European Directives:
2006/42/EC – Machine Directive
2006/95/EC – Low Voltage Directive
2004/108/EC – EMC Directive
2002/95/EC – Restriction of the use of
Certain Hazardous Substances in Electrical
and Electric equipment.
The following standards have been applied:
EN 61029-1:2000+A11 +A12
EN 60825
EN 61000-3-3:1995+A1+A2
EN 61000-3-2:2006
EN 60745-1:2009
EN 55014-2:1997+A1
EN 60745-2-4:2009
EN 55014-1:2006
EN 61029-2-9:2002
EN 55014-1:2000 +A1 +A2
All documentation is held on file at the
above address and is available, on request
for review.
Authorized Signatory
Date: 8/3/2011
Name: Mr Matthew J Gavins
Position: Managing Director
®
Page 3
3
www.evolutionbuild.com
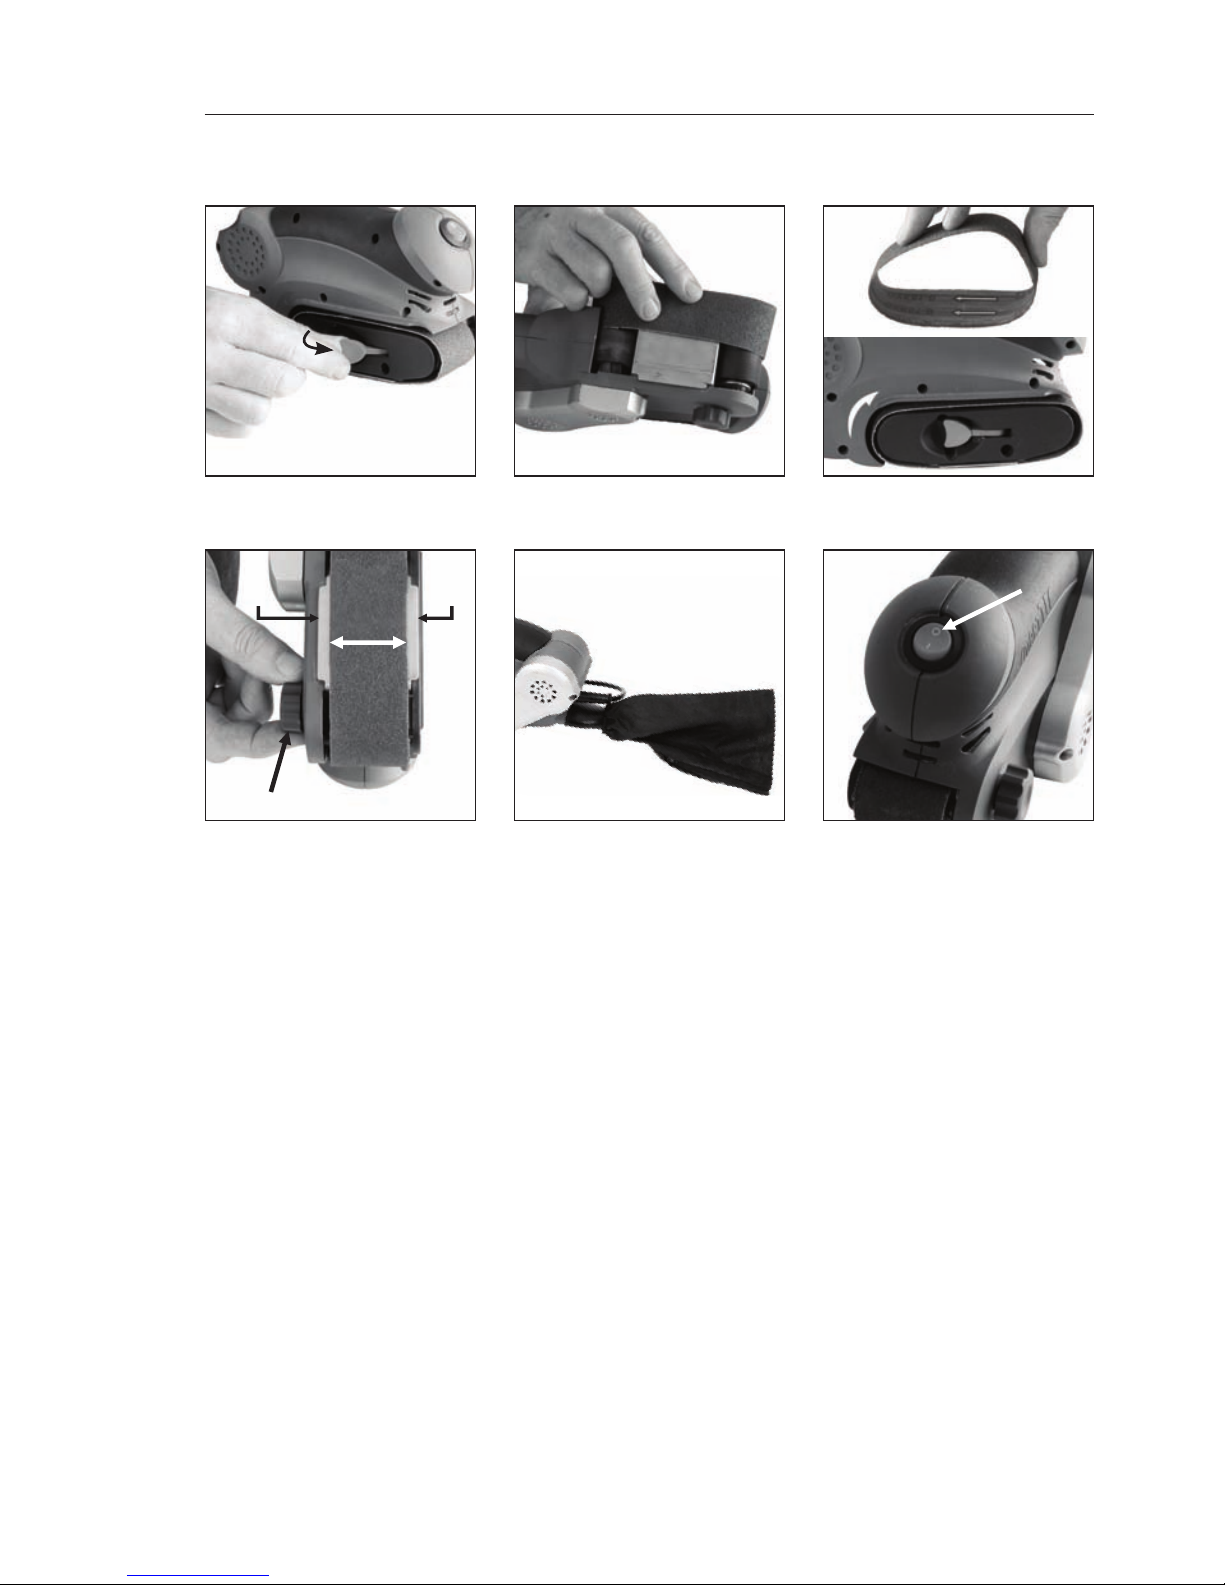
FIGURES
FIGURE 1 FIGURE 2
FIGURE 3
FIGURE 4 FIGURE 5
FIGURE 6
A
BB
Page 4

4
www.evolutionbuild.com
®
IMPORTANT INFORMATION
UK
Please read these operating and safety
instructions carefully and completely.
For your own safety, before using this
equipment check that the voltage is
correct and that all handles and parts are
firmly secured. If you are uncertain about
any aspect of using this equipment, please
contact our Technical Help Resource.
UK: 0870 609 2297
USA: 1-866-EVO-TOOL
info@evolutionpowertools.com
EVOLUTION MINI BELT SANDER
Congratulations on your purchase of an
Evolution Power Tools Mini Belt Sander.
Please complete your product registration
online to validate your machine’s
warranty period and ensure prompt
service if needed. We sincerely thank you
for selecting a product from Evolution
Power Tools.
12 MONTH WARRANTY
UK
Evolution Power Tools reserves the right to
make improvements and modifications to
design without prior notice.
Evolution Power Tools will, within twelve (12)
months from the original date of purchase,
repair or replace any goods found to be
defective in materials or workmanship. This
warranty is void if the tool being returned
has been used to cut materials beyond
the recommendations in the Instruction
Manual or if the saw has been damaged
by accident, neglect, or improper service.
This warranty does not apply to machines
and / or consumables which have been altered,
changed, or modified in any way, or subjected
to use beyond recommended capacities
and specifications. Electrical components
are subject to respective manufacturers’
warranties. All goods returned defective
shall be returned prepaid freight to Evolution
Power Tools. Evolution Power Tools reserves
the right to optionally repair or replace it with
the same or equivalent item.
There is no warranty – written or verbal
– for consummables. In no event shall
Evolution Power Tools be liable for loss or
damage resulting directly or indirectly from
the use of our merchandise or from any
other cause. Evolution Power Tools is not
liable for any costs incurred on such goods
or consequential damages. No officer,
employee or agent of Evolution Power Tools
is authorised to make oral representations of
fitness or to waive any of the foregoing terms
of sale and none shall be binding on Evolution
Power Tools. Questions relating to this
limited warranty should be directed to the
company’s head office, or call the appropriate
Helpline number.
IMPORTANT SAFETY INSTRUCTIONS
UK
To reduce the risk of electric shock, this
equipment is fitted with an approved cord
and plug for its intended country of use. Do
not change the cord or plug in any way.
Page 5

5
www.evolutionbuild.com
GENERAL SAFETY RULES
UK
Read and understand all instructions before
operating this product. Failure to follow all
instructions listed below may result in electric
shock, fire and / or serious personal injury.
SAVE THESE INSTRUCTIONS
FOR FUTURE REFERENCE.
WARNING: When using electric tools
basic safety precautions should always
be followed to reduce the risk of fire, electric
shock and personal injury including the
following:
Read all these instructions before
attempting to operate this product and
save these instructions.
The term “power tool” in the warnings refers
to your mains-operated (corded) power tool
or battery-operated (cordless) power tool.
1) Work Area Safety
a) Keep work area clean and well lit.
Cluttered or dark areas invite accidents.
b) Do not operate power tools in explosive
atmospheres, such as in the presence of
flammable liquids, gases or dust. Power
tools create sparks which may ignite the dust
or fumes.
c) Keep children and bystanders away
while operating a power tool. Distractions
can cause you to lose control.
d) Keep the floor area around the machine
level, well maintained and free of loose
materials e.g. chips and cut-offs.
2) Electrical Safety
a) Power tool plugs must match the outlet.
Never modify the plug in any way. Do not use
any adapter plugs with earthed (grounded)
power tools. Unmodified plugs and matching
outlets will reduce risk of electric shock.
b) Avoid body contact with earthed
or grounded surfaces, such as pipes,
radiators, ranges and refrigerators. There
is an increased risk of electric shock if your
body is earthed or grounded.
c) Do not expose power tools to rain or
wet conditions. Water entering a power tool
will increase the risk of electric shock.
d) Do not abuse the cord. Never use the cord
for carrying, pulling or unplugging the power
tool. Keep cord away from heat, oil, sharp
edges or moving parts. Damaged or entangled
cords increase the risk of electric shock.
e) When operating a power tool outdoors,
use an extension cord suitable for outdoor
use. Use of a cord suitable for outdoor use
reduces the risk of electric shock.
f) If operating a power tool in a damp
location is unavoidable, use a residual
current device (RCD) protected supply. Use
of an RCD reduces the risk of electric shock.
3) Personal Safety
a) Stay alert, watch what you are doing
and use common sense when operating
a power tool. Do not use a power tool
while you are tired or under the influence of
drugs, alcohol or medication. A moment of
inattention while operating power tools may
result in serious personal injury.
b) Use personal protective equipment.
Always wear eye protection. Protective
equipment such as dust mask, non-skid
safety shoes, hard hat, or hearing protection
used for appropriate conditions will reduce
the risk of personal injuries.
c) Prevent unintentional starting. Ensure
the machine switch is in the off-position
before connecting to power source and/or
battery pack, picking up or carrying the tool.
Carrying power tools with your finger on the
switch or energising power tools that have
the switch on invites accidents.
d) Remove any adjusting key or wrench
before turning the power tool on. A wrench
or a key left attached to a rotating part of the
power tool may result in personal injury.
e) Do not overreach. Keep proper footing and
balance at all times. This enables better control
of the power tool in unexpected situations.
f) Dress properly. Do not wear loose
clothing or jewellery. Keep your hair, clothing
and gloves away from moving parts. Loose
clothes, jewellery or long hair can be caught
in moving parts.
Page 6

6
www.evolutionbuild.com
®
g) If devices are provided for the connection
of dust extraction and collection facilities,
ensure these are connected and properly
used. Use of dust collection can reduce dust-
related hazards.
4) Power Tool Use & Care
a) Do not force the power tool. Use the
correct power tool for your application. The
correct power tool will do the job better and
safer if used at the rate for which it was
designed.
b) Do not use the power tool if the switch
does not turn it on and off. Any power tool
that cannot be controlled with the switch is
dangerous and must be repaired.
c) Disconnect the plug from the power
source and/or the battery pack from
the power tool before making any
adjustments, changing accessories, or
storing power tools. Such preventive safety
measures reduce the risk of starting the
power tool accidentally.
d) Store idle power tools out of the reach
of children and do not allow persons
unfamiliar with the power tool or these
instructions to operate the power tool.
Power tools are dangerous in the hands of
untrained users.
e) Maintain power tools. Check for
misalignment or binding of moving parts,
breakage of parts and any other condition
that may affect the power tool’s operation.
If damaged, have the power tool repaired
before use. Many accidents are caused by
poorly maintained power tools.
f) Keep cutting tools sharp and clean.
Properly maintained cutting tools with sharp
cutting edges are less likely to bind and are
easier to control.
g) Use the power tool, accessories and
tool bits etc. in accordance with these
instructions, taking into account the
working conditions and the work to
be performed. Use of the power tool for
operations different from those intended
could result in a hazardous situation.
5) Service
a) Have your power tool serviced by
a qualified repair person using only
identical replacement parts. This electric
tool complies with the relevant safety rules.
Repairs should only be carried out by qualified
persons using original spare parts, otherwise
considerable danger to the user may result.
b) When servicing a tool, use only genuine
Evolution replacement parts. Follow
instructions in the Maintenance section of
this manual. Use of unauthorized parts or
failure to follow Maintenance Instructions
may create a risk of electric shock or injury.
HEALTH ADVICE
WARNING: When drilling, sanding,
sawing or grinding, dust particles will
be produced. In some instances, depending
on the materials you are working with, this
dust can be harmful to your health. Some
examples could be:
• Lead from lead based paint.
• Arsenic and Chromium from chemically
treated timber.
• Crystalline silica from certain masonry
products (plaster, cement etc).
To reduce your exposure to such materials
you should:
a) Work in a well-ventilated area.
b) Work with approved safety equipment,
such as dust masks that are specially
designed to filter microscopic particles.
Page 7

7
www.evolutionbuild.com
SAFETY RULES FOR BELT SANDERS
UK
a) Always remove the plug from the
outlet socket before carrying out any
adjustments, maintenance or servicing.
b) A damaged supply cord must be
replaced by a qualified technician.
c) Do not use this sander for ‘wet sanding’.
There is a significant risk of electric shock if
this sander is used for ‘wet sanding’.
d) Wear appropriate PPE (Personal
Protection Equipment). A dust mask and
safety glasses should always be worn when
using this tool. Additional safety equipment
such as ear defenders, gloves, safety shoes
and overalls should employed as necessary.
e) Inspect the workpiece for screws and
nails etc. Remove these before operations
are attempted.
f) Only use sanding belts that are in good
condition. Do not use worn out, ripped or
damaged sanding belts.
g) Where-ever possible the workpiece should
be securely clamped to prevent movement.
h) The Mini Belt Sander is designed to be
held with one hand so that it can be run
over the workpiece in a linear fashion.
Do not attempt to clamp the Mini Sander to a
workbench or similar in an attempt to mimic
a fixed sanding machine.
i) Do not apply excessive force to the
machine in an attempt to slow it down
quickly after ‘switch off’. Allow the belt to
slow down and stop naturally.
j) Do not eat or drink in the work area. The
sanding process can create dust that may
remain within the work area for quite long
periods. Eating and drinking in such areas can
be harmful to health.
k) If possible seal off the work area so that
dust is contained within the area. Dust will
settle and can be removed at a later date.
l) People entering the work area should
wear the appropriate PPE. Do not allow
casual visitors to enter the work area.
LABELS & SYMBOLS
UK
WARNING: Do not operate machine
if warning and/or instruction labels
are missing or damaged. Contact Evolution
Power Tools for replacement labels.
Symbol Description
V Volts
A Amperes
Hz Hertz
Min
-1
Speed
~ Alternating Current
n
o
No Load Speed
Double Insulated
Wear Safety
Goggles
Wear Ear Protection
Page 8

8
www.evolutionbuild.com
®
1. ON/OFF SWITCH
2. SANDING BELT
3. SOFT GRIP AREA
4. BELT CENTRING CONTROL KNOB
5. DUST OUTLET
6. SANDING BELT RELEASE LEVER
7. DUST COLLECTION BAG
2
1
3
MACHINE OVERVIEW
UK
4
5
6 7
Page 9

9
www.evolutionbuild.com
SPECIFICATION
UK
EVOLUTION MINI BELT SANDER
Voltage: 230V 50Hz
No Load Speed: 380m/min
Motor: 280W
Belt Length: 303mm
Belt Width: 40mm
Recommended Max Duty Cycle: 30mins
Noise and Vibration Data
Sound Levels: LpA 87.3 dB(A) K=3dB
LwA 98.3 dB(A) K=3dB
Vibration: ah 4.410 m/s2 K=1.5 m/s
2
The declared vibration total value has
been measured in accordance with a
standard test method and may be used for
comparing one tool with another.
The declared vibration total value may also
be used in a preliminary assessment of
exposure.
WARNING: The vibration emission
during actual use of the power tool
can differ from the declared total value
depending on the ways in which the tool is
used. The need to identify safety measures
and to protect the operator are based on
an estimation of exposure in the actual
conditions of use (taking account of all
parts of the operating cycle, such as the
times the tool is switched off, when it is
running idle, in addition to trigger time)
Items Supplied
Instruction Manual................................... 1
Dust Collection Bag ................................ 1
Sanding Belts.......................................... 3
OPERATION
UK
1. Replacing/changing a Sanding Belt
WARNING: Always ensure that the
machine is disconnected from its
power source before attempting to change
or replace the sanding belt.
• Pull the belt release lever from the RH side
of the machine. (Fig. 1)
• Slide out the belt to be replaced.
• Ret the required belt over the two rollers.
(Fig. 2)
Note: Always ensure that the direction of
rotation arrows found on the inside of the
belt match the direction of rotation arrow
found on the body of the machine. (Fig. 3)
• Return the belt release lever to its original
position.
2. Centering the Sanding Belt
WARNING: Wear eye protection when
attempting to centre the sanding belt.
• Turn the machine upside down so that you
have a clear view of the belt.
• Start the motor and observe the position
the belt adopts after a few seconds of
running at full speed.
If the sanding belt is not running centrally
in the machine turn the belt tracking control
knob a little in either direction until central
tracking is achieved. (Fig. 4a)
Only turn the tracking control knob by a
few degrees at a time before observing the
position of the belt relative to the machines
sole plate. (Fig. 4b)
3. The Dust Collection Bag
A dust collection bag is provided with the machine
and must always be fitted to the dust extraction
port found at the rear of the machine. (Fig. 5)
The dust bag pushes onto the dust
extraction port.
Page 10

10
www.evolutionbuild.com
®
Note: To maintain efficient dust collection we
recommend that the dust collection bag be
emptied when approximately 60% full.
To empty the dust bag:
• Remove the bag from the machine by pulling it
away from the dust extraction port.
• Empty the bag by opening the zip on the dust bag.
Note: When emptying the dust collection bag
the operator should always wear a suitable dust
mask. Also the contents of the dust collection
bag should be disposed of in an environmentally
responsible way.
4. ON/OFF switch (Fig. 6)
The ‘ON/OFF’ rocker switch is located at the
top front of the machine.
• Press ‘I’ to start.
• Press ‘0’ to stop.
WARNING: Always ensure that the
machine is switched ‘off’ and the
belt is stationary before putting the machine
down onto a workbench or similar.
5. Hand Grip Area
The top surface of the machine is coated with
a soft grip area for enhanced operator control
and comfort. This machine can be used one
handedly.
6. Grit selection
Sanding belts are available in a variety of
grades depending upon the coarseness
(particle size) of the grit embedded in the
cloth.
As an approximate guide:
MATERIAL BELT GRIT
SOLID WOOD 80
CHIPBOARD 60/80
VENEERED WOOD 150
PLASTICS 100
PAINT REMOVAL 40/60
ACRYLICS 100
7. Using the machine
This is a compact but powerful machine and
should only be used by competent operators
who have read and understood the Instruction
Manual.
This mini sander is optimally suited for the
sanding of narrow workpieces, or for use in
confined areas where a full sized belt sander
would be difficult to manoeuvre.
Some general guidance:
• Always wear a dust mask and safety
glasses, and any other safety equipment as
necessary.
• Select the sanding belt carefully for the job
in hand.
• Be aware that the belt sander will ‘travel’ along
the workpiece. Hold the machine firmly and guide
it along the workpiece in a straight line.
• Light downwards pressure is all that is
necessary to achieve best results. There is no
need to press the machine into the workpiece
with any great force.
• Two, three or more passes over the same
track will achieve better results than trying to
remove all of the waste material in one pass.
Page 11

11
www.evolutionbuild.com
MAINTENANCE
UK
Note: Any maintenance must be carried
out with the machine switched off and
disconnected from the power supply.
There are no user serviceable parts in this
machine. If a fault is suspected the machine
should be returned to an authorised service
centre for checking and possible repair.
• All motor bearings in this machine are lubricated
for life. No further lubrication is required.
• Use a clean, slightly damp cloth to
clean the plastic parts of the machine.
Do not use solvents or similar products
which could damage the plastic parts.
• Keep all ventilation slots clean and free
from dust or debris build up.
WARNING: Do not attempt to clean by
inserting pointed objects through openings in
the machines casings etc. The machines air
vents should be cleaned using compressed
dry air.
ENVIRONMENTAL PROTECTION
UK
Waste electrical products should not be
disposed of with household waste. Please
recycle where facilities exist. Check with your
Local Authority or retailer for recycling advice.
Page 12

®
D 11 1 00
 Loading...