

Page 1

®
®
Manuel d’Instruction
Instruktionshandbuch
Manual de Instrucción
Handleiding
355mm (14”) TCT
STEEL CUTTING
SAW
STEEL
®
Page 2
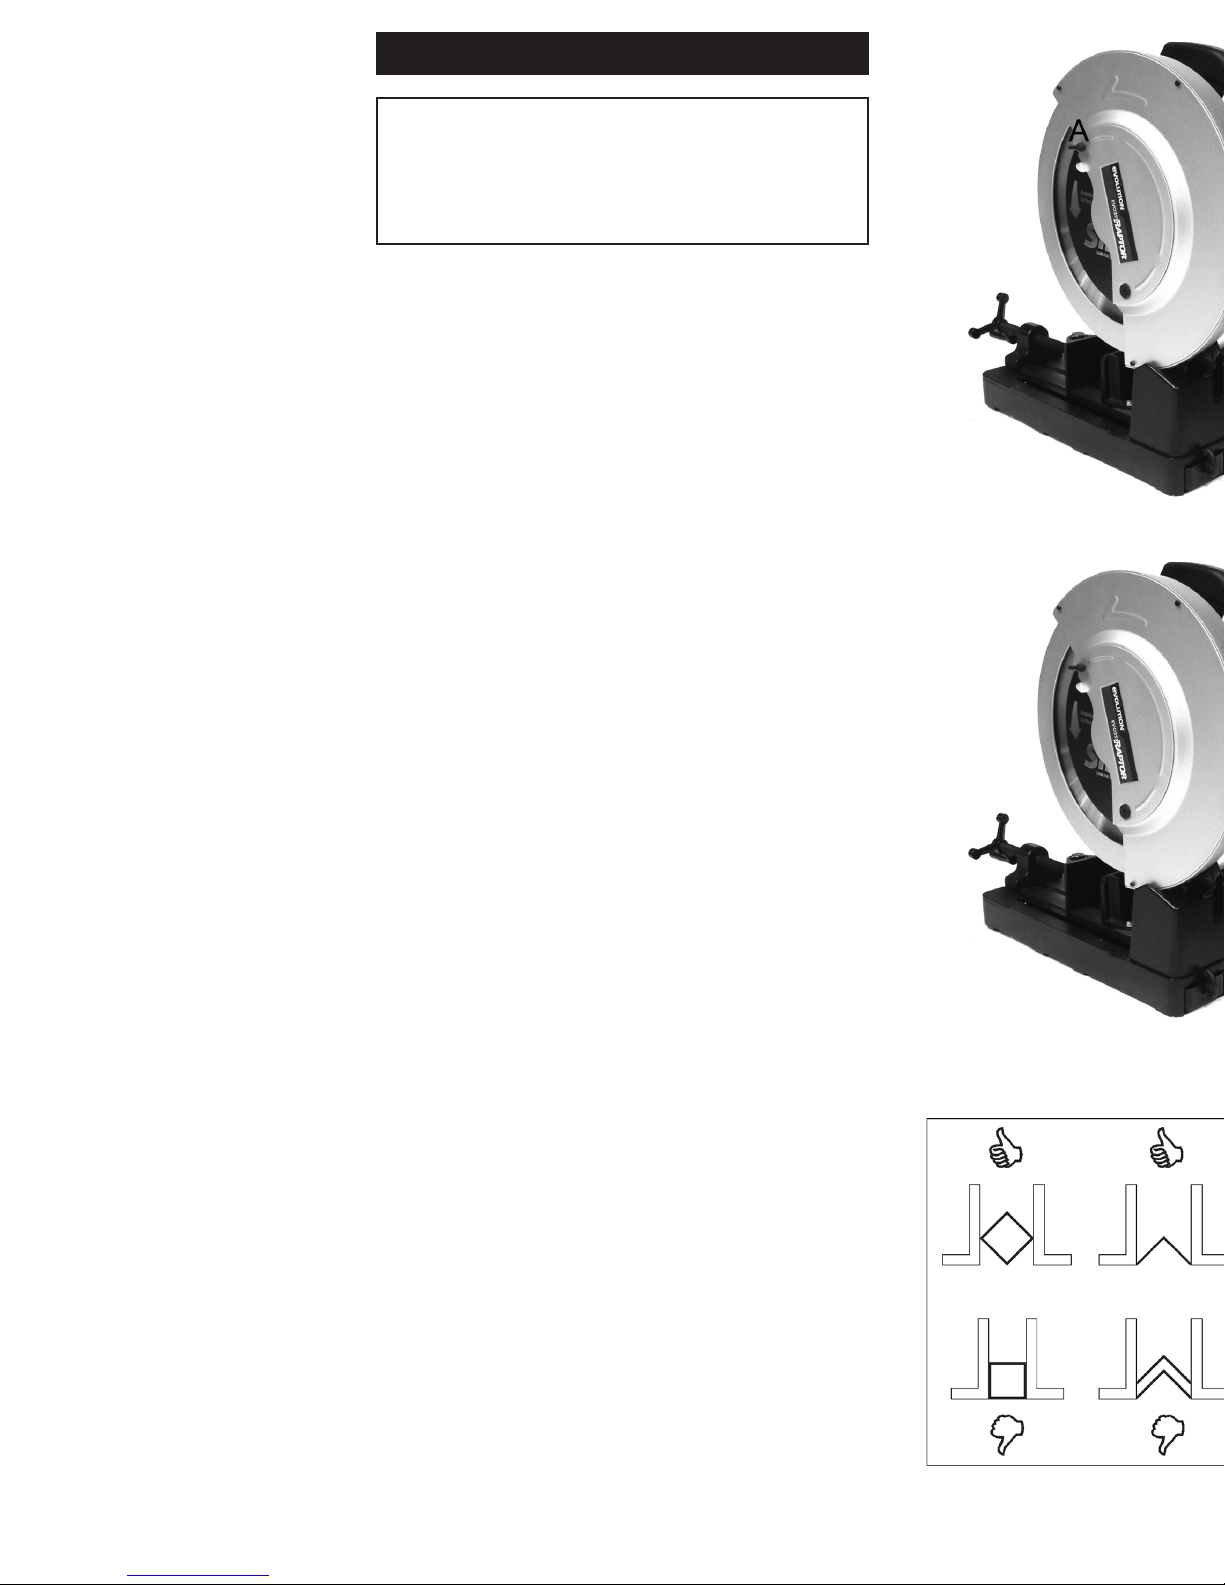
Fig. 1.
Fig. 2.
Fig. 3.
2 33
Operating Instructions
Important
Please read these operating and safety instructions carefully and
completely. For your own safety, before using this equipment
check that the voltage is correct and that all handles and parts are
rmly secured. If you are uncertain about any aspect of using this
equipment contact your distributor.
Please Keep These Instructions
Model EVO355 Raptor Specications
Motor (230v or 115v ~ 50/60 Hz) (Watts): 2200
RPM No Load (Speed 1) (min-1): 1450
Recommended Maximum Duty Cycle (Minutes): 30
Sound Power Level (Under Load) (dB(A)): 112.4
Vibration Level (No Load) (ms2) 1.39
Weight (Kg): 23
Max Dimensions (Raised) (mm): H 575 W 355 D 600
Maximum Box Cut Capacity 90
0
Square (mm): 120 x 120
Rectangle (mm): 95 x 180
Round (mm): 130
Wood (mm): 125 x 175
Maximum Box Cut Capacity 45
0
Square (mm): 89 x 89
Rectangle (mm): 78 x 110
Round (mm): 105
Wood (mm): 125 x 125
Blade Dimensions
Maximum Diameter (mm): 355
Bore Diameter (mm): 25.4
Thickness (mm): 2.4
Standard Equipment Supplied With Unit: 1 Jig Plate, 1 8mm Hex Wrench, 1
Operating Instructions.
Ear and Eye protection MUST be worn whilst operating this
equipment. Do NOT touch the blade whilst it is in motion. Always
follow the Personal Protection Equipment (PPE) recommendations
whilst operating this tool.
This machine is designed specically for cutting steel & other materials
using the appropriate TCT (Tungsten Carbide Tipped) blades. It should
NOT be modied and / or used for any application other than for which it
was intended, including powering other equipment.
Ensure that the total work area can be viewed from the operating position.
Use barriers to keep people away. Do not operate the tool in explosive
environments – power tools create sparks that may ignite ammable
materials or gases. Do not operate the tool in damp or wet conditions or
areas, as electric shocks may result. Always use both hands to operate
the tool. Always ensure that the material you are working on is securely
clamped.
• This tool is equipped with an approved cord and plug for its intended
Country of use. The green and yellow conductor in the cord is the
earth / ground wire, never connect this to a live terminal.
• Remove plug from power supply before replacement of the blade,
making adjustments or other maintenance work.
• We recommend the use of genuine Evolution brand blades.
• Inspect the machine and blade before each use and do not use
deformed, cracked, worn or otherwise damaged blades.
• Ensure the blade is correctly mounted and do not stop by hand.
• Only use blades rated at 1500rpm or higher.
• Always keep the power cord away from moving parts of the tool.
Page 3
EC – Declaration of
Conformity
We, Evolution Power Tools Limited
Venture One
Longacre Close
Shefeld
S20 3FR
as the supplier of the product listed below:-
RAPTOR 355mm TCT Steel/Metal
Cutting Chop Saw
Part Number: EVO3551/EVO3552/EVO3552EU
Voltage: 110/230v
Power: 2200W
Declare, under our sole responsibility that the equipment to which this
document relates, is in conformity with the following standards or other
normative documents:-
EN60335-1: 1994+A1+A2+A11-A16
EN55014-1: 2000+A1+A2
EN55014-2: 1997+A1
EN61000-3-2: 2000
EN61000-3-3: 1995+A1
EN61000-3-11: 2000
and thereby conforms to the protection requirements of Council Directive
73/23/EEC amended by 93/68/EEC relating to the Low Voltage
Directive, Council Directive 98/37/EEC relating to the Machine Directive
and Council Directive 89/336/EEC relating to the EMC Directive,
and is compliant with Council Directive 2002/95/EC in relation to the
Restriction of Hazardous Substances in electrical & electronic equipment
(RoHS). EU Directive 2002/95/EC restricts the use of the 6 substances
below in the manufacture of specic types of electrical equipment. Whilst
this restriction does not legally apply to components, it is recognized that
component ‘compliance’ is relevant to many customers.
Evolution Power Tools’ denition of RoHS Compliance:
• The product does not contain any restricted substances in
concentrations and applications banned by the directive
• and for components, the product is capable of being worked at
the higher temperatures required by lead-free soldering.
The restricted substances and maximum allowed concentrations in
homogenous materials are, by weight:
Lead – 0.1%
Mercury – 0.1%
PBB (Polybrominated Biphenyis) – 0.1%
PBDE (Polybrominated Diphenyl Ethers) – 0.1%
Hexavalent Chromium – 0.1%
Cadmium – 0.01%
Level of Sound pressure according to 86/188/EEC, 98/37/EEC &
2000/14/EC:-
Guaranteed Sound Power Level:
112.4 dB(A)
All Relevant technical documentation is held at Evolution Power Tools
Ltd, Shefeld (UK).
Authorised by:
Mr Matthew J Gavins
Managing Director
1st Feb 2008
32 3
Page 4

• When you put the tool away, switch off the motor and ensure that
all moving parts have come to a complete standstill.
• Ensure that moveable guards operate freely without jamming.
• Never use the tool without the original protection guard system.
Do not lock the moving guard in the open position.
• In case of jamming, immediately switch off the tool and disconnect
the plug.
• Ensure that the cutting depth adjustment, angle adjustment and
vice mechanisms are rmly xed whilst using the tool.
• Only use the anges and washers that are supplied with the tool,
and replace them if they become damaged or scored.
• Do not operate the tool under the inuence of drugs, alcohol or
medication. Keep loose items of clothing away from moving parts of
the saw. Keep hands away from blade whilst in motion.
• After installing a new blade, always run the machine for
approximately one minute before cutting. If the blade has a aw it
may shatter in this time, so stand away from the blade.
• Ensure that you use all necessary personal safety protection
equipment and follow all safety guidelines at all times.
Machine Set Up
Power Supply
It is recommended that the 355 Raptor should be used on a separate
power supply, and be protected by a Residual Current Device. Any
extension cable should be no longer than 15 Metres and should be
1.5mm2 for 240v and 2.5mm2 for 110v machines.
Changing Blades: Ensure the machine is unplugged. Undo the buttery
nut (g. 1. ref. A) and rotate the blade cover. Press in the spindle lock and
check that it is fully engaged by manually rotating the blade. Using the
supplied 8mm Hex wrench, undo the hex bolt that secures the blade by
turning it counter clockwise, and remove the bolt, washer, outside blade
ange and blade. Note: Do not remove inside blade ange. Press in
the spindle lock. Replace blade, making sure that the printed side of the
blade is facing you then ret the outside blade ange, washer, and hex
bolt. Turn the hex bolt clockwise to tighten. Note: Check that the spindle
lock is fully released by manually rotating the blade before use. Rotate
the blade cover back into position and tighten the buttery nut. Ret the
Hex wrench to the holder on the machine.
Adjustment Of The Cutting Depth Stop
The down stop (g. 2. ref. A) should be adjusted so that the maximum
cutting capacity is maintained without the blade hitting the base. Lower
the cutter head until the arm hits the down stop. If necessary adjust the
down stop screw and lock nut until the correct clearance is achieved.
Tighten the lock nut to lock in position.
Adjustment Of The Cutting Angle
The vice can be adjusted from 0 to 45 degrees. Loosen the lever on
the vice and adjust to the required cutting angle. Tighten lever to lock in
position.
Adjustment Of The Stationary Vice
The vice can be repositioned by removing the lever and Allen screw, and
then sliding the fence to the desired position. Replace and tighten the
lever and screw to lock in position.
Metal Cutting Saw Safety
Operating Advice
Always securely clamp the material to be cut in the vice. To start the tool,
you must depress the main trigger switch to power the motor. With the
motor head in the raised position, switch on the motor and allow to come
up to full speed. Lower the motor head to begin cutting. When starting
a cut take care to introduce the blade to the material slowly, using light
pressure at rst to keep blade from grabbing, and then continue with
κεφαλή του κινητήρα στην όρθια θέση και σβήστε τον κινητήρα.
Διατηρείτε το εργαλείο καθαρό από μεταλλικό ρινίσματα, και
άλλα θραύσματα και ρύπους.
Σταθεροποίηση του Υλικού Εργασίας
Τοποθετήστε το υλικό εργασίας στη μέγκενη έτσι ώστε εάν
προκύψει μια εμπλοκή, η λάμα να μην έχει την τάση να το
πετάξει από τη. Στερεώστε το καλά. Οι γωνίες θα πρέπει να είναι
σε ανάστροφη θέση έτσι ώστε το σημείο διατομής να είναι στην
υψηλότερη θέση. Το πριόνι κόβει πιο αποτελεσματικά εάν η λάμα
κόβει στο λεπτότερο τμήμα του υλικού (Εικόνα 3).
Συντήρηση και Μηχανικές Βλάβες
Διατηρείτε το εργαλείο και το καλώδιό του καθαρό. Με τακτική
αναρρόφηση η εμφύσηση αέρος να διατηρείτε το σύστημα
εξαερισμού του κινητήρα καθαρό και επίσης να ελέγχετε την
καλή λίπανση του μηχανήματος κάθε εβδομάδα. Αποφεύγετε
την χρήση καθαριστικών προϊόντων στα οποία περιλαμβάνονται
βενζίνη, τριχλωροαιθυλένιο, χλώριο και αμμωνία καθώς αυτά
μπορεί να προκαλέσουν ζημία στα πλαστικά μέρη. Σε περίπτωση
μηχανικής ή ηλεκτρικής δυσλειτουργίας σβήστε αμέσως το
εργαλείο και αποσυνδέστε το από το ρεύμα.
Καθαρισμός του Δίσκου Ρινισμάτων
Καθαρίζετε περιοδικά τον δίσκο ρινισμάτων αφαιρώντας τη βίδα
(Εικόνα 2, Παραπομπή Β) και βγάζοντας τον δίσκο. Αδειάστε
τον δίσκο σε ένα κατάλληλο δοχείο απόρριψης και στη συνέχεια
επαναπροσαρμόστε τον δίσκο και τη βίδα κρατήματος.
Επιθεώρηση Ψήκτρας (καρβουνάκι) και Αντικατάσταση
Υπερβολικοί σπινθήρες υποδεικνύουν συνήθως την παρουσία
ρύπων στον κινητήρα ή φθορά στα καρβουνάκια. Ελέγξατε
τη φθορά μετά τις πρώτες 50 ώρες χρήσης και στη συνέχεια
ανά διαλείμματα 10 ωρών χρήσης. Αντικαταστήστε τα όταν το
πάχος τους φθάσει τα 6mm. Οι υποδοχές για τα καρβουνάκια
βρίσκονται στο κάλυμμα του κινητήρα το ένα απέναντι στο άλλο
και το οποίο ξεβιδώνετε για να έχετε πρόσβαση σε αυτό. Για
οποιοδήποτε άλλο σέρβις και συντήρηση πηγαίνετε το μηχάνημα
σε ένα εξουσιοδοτημένο κέντρο σέρβις.
Λίπανση
Τα ρουλεμάν του κινητήρα του μηχανήματός σας έχουν λιπανθεί
στο εργοστάσιο με ικανή ποσότητα λιπαντικού ώστε να
διατηρηθεί για όλη τη διάρκεια ζωής του μηχανήματος, κάτω από
φυσιολογικές συνθήκες λειτουργίας. Άλλα κινητά μέρη μπορούν
να λιπανθούν με λεπτό μηχανικό λάδι όπως κρίνετε απαραίτητο,
Συνιστάται να πηγαίνετε το μηχάνημα στο πλησιέστερο
ΕΞΟΥΣΙΟΔΟΤΗΜΕΝΟ ΚΕΝΤΡΟ ΣΕΡΒΙΣ τουλάχιστον μια
φορά το χρόνο για ένα λεπτομερές καθάρισμα και λίπανση. Όλες
οι επισκευές και το σέρβις που γίνεται από αυτά τα κέντρα είναι
πλήρως εγγυημένα έναντι ελαττωματικών υλικών και εργασίας.
12 Μηνων Εγγυηση
12 ΠΕΡΙΟΡΙΣΜΕΝΗ ΕΓΓΥΗΣΗ ΕΝΟΣ ΜΗΝΟΣ Η EVOLUTION
POWER TOOLS ΔΙΑΤΗΡΕΙ ΤΟ ΔΙΚΑΙΩΜΑ ΝΑ ΚΑΝΕΙ ΒΕΛΤΙΩΣΕΙΣ
ΚΑΙ ΤΡΟΠΟΠΟΙΗΣΕΙΣ ΣΤΟ ΣΧΕΔΙΟ ΧΩΡΙΣ ΠΡΟΗΓΟΥΜΕΝΗ
ΠΡΟΕΙΔΟΠΟΙΗΣΗ.
Η Evolution Power Tools, εντός δώδεκα (12) μηνών από την
αρχική ημερομηνία αγοράς, θα επιδιορθώσει ή θα αντικαταστήσει
οποιαδήποτε προϊόντα διαπιστωθεί ότι είναι ελαττωματικά σε υλικά
και κατασκευή. Η εγγύηση αυτή είναι άκυρη εάν το εργαλείο που
επιστραφεί έχει χρησιμοποιηθεί για να κόψει υλικά πέρα από τα
υποδεικνυόμενα στο Εγχειρίδιο Οδηγιών ή εάν το πριόνι έχει υποστεί
βλάβη από ατύχημα, αμέλεια, ή μη σωστό σέρβις. Η εγγύηση αυτή δεν
4 31
Page 5

0
έως 450 . Χαλαρώστε
normal pressure. Do not force the tool – let the speed of the saw blade
do the work. Cutting performance will not improve by applying more
pressure on the tool, and blade and motor life will be reduced. Use less
pressure as the blade exits through the material. On completion of the
cut, return the motor head to its upright position and switch off the power.
Keep the tool clean of metal chips and other dirt and debris.
Work piece Clamping
Position the work piece in the vice so that if a jam occurs, the blade will
not tend to throw it from the vice. Clamp it securely. Angles should be in
an inverted position so that the point of the section is uppermost. The
saw cuts most efciently if the blade is cutting the thinnest section of the
material (g. 3).
Maintenance And Troubleshooting
Keep tool and cord clean. Regularly vacuum or blow out the motor unit to
keep its ventilation clear, also check that the machine is well lubricated.
Inspect weekly. Avoid using cleaning products, which include benzene,
trichloroethelene, chloride, and ammonia as these can damage plastic
parts. In case of electrical or mechanical malfunction, immediately switch
off the tool and disconnect the plug.
Cleaning Chipping Tray
Periodically clean out the chipping tray by removing the screw (g. 2.
ref. B) and removing the tray. Empty the tray into a suitable disposal
container then ret the tray and retaining screw.
Brush Inspection And Replacement
Excessive sparking may indicate the presence of dirt in the motor or
worn out carbon brushes. Check for wear after the rst 50 hours of use
and then at 10 hours use intervals. Replace when they reach 6mm. The
brush holders are located on the motor housing opposite each other
and unscrew to allow access to the brushes. For all other service and
maintenance, take the machine to an authorised service centre after
typically 60 cutting hours, dependent upon the type of workload it has
endured.
Lubrication
Your machines motor bearings are lubricated at the factory with sufcient
lubricant to last for the lifetime of the unit under normal operating
conditions. Other movable parts can be lubricated with light machine
oil as necessary. It is recommended that the machine be taken to the
nearest SERVICE CENTER or HiTech USA, Iowa, if in the USA, at least
once a year for a thorough cleaning and lubrication. All repairs and
servicing made by these centres are fully guaranteed against defective
materials and workmanship.
12 Months Warranty
12 MONTH LIMITED WARRANTY. EVOLUTION POWER TOOLS RESERVES
THE RIGHT TO MAKE IMPROVEMENTS AND MODIFICATIONS TO DESIGN
WITHOUT PRIOR NOTICE.
Evolution Power Tools will, within twelve (12) months from the original date
of purchase, repair or replace any goods found to be defective in materials
or workmanship, provided the product warranty registration card has been
returned to Evolution Power Tools. This warranty is void if the tool being
returned has been used to cut materials beyond the recommendations in
the Instruction Manual or if the saw has been damaged by accident, neglect,
or improper service. This warranty does not apply to machines and / or
components which have been altered, changed, or modied in any way,
or subjected to use beyond recommended capacities and specications.
Electrical components are subject to respective manufacturers’ warranties.
All goods returned defective shall be returned prepaid freight to Evolution
Power Tools. Evolution Power Tools reserves the right to optionally
repair or replace it with the same or equivalent item. There is no warranty
30 5
Page 6

– written or verbal – for saw blades. In no event shall Evolution Power
Tools be liable for loss or damage resulting directly or indirectly from the
use or merchandise or from any other cause. Evolution Power Tools is not
liable for any costs incurred on such goods or consequential damages. No
ofcer, employee or agent of Evolution Power Tools is authorised to make
oral representations of tness or to waive any of the foregoing terms of
sale and none shall be binding on Evolution Power Tools.
Questions relating to this limited warranty should be directed to the company’s
head ofce, or call the appropriate Helpline number.
Accessories – Genuine Evolution Technology Blades
66T 355mm TCT Mild Steel Blade
80T 355mm TCT Aluminium / Thin Mild Steel Blade
90T 355mm TCT Stainless Steel Capable Blade
Notice: Fair wear and tear and damage caused by misuse is not
covered under the 12-Month guarantee.
Gebruiksaanwijzing
Belangrijk
De gebruiksaanwijzing en veiligheidsvoorschriften aandachtig
doorlezen. Het voltage veriëren en controleren of alle handgrepen
en onderdelen stevig vastzitten met het oog op uw veiligheid. Neem
contact op met uw distributeur in geval van twijfel.
De gebruiksaanwijzing op een veilige plaats bewaren
Technische gegevens Evolution 355 Raptor model
Motor (230V ~ 50/60 Hz) (Watt): 2200
Onbelast toerental (snelheid 1) (min-1): 1450
Aanbevolen maximale inschakelduur (minuten): 30
Geluidsdrukniveau (belast) (dB(A)): 112.4
Trillingsniveau (m/s2): 1.39
Gewicht (kg): 23
Max. afmetingen (geheven stand) (mm): H 575 B 355 D 600
Maximaal kist zaagbereik 90
0
Vierkant (mm): 120 x 120
Rechthoekig (mm): 95 x 180
Rond (mm): 130
Hout (mm): 125 x 175
Maximaal kist zaagbereik 45
0
Vierkant (mm): 89 x 89
Rechthoekig (mm): 78 x 110
Rond (mm): 105
Zaagbladafmetingen
Maximumdiameter (mm): 355
Boordiameter (mm): 25.4
Dikte (mm): 2.4
Meegeleverde standaarduitrusting: 1 opspanplaat, 1 8mm zeskantsleutel, 1
gebruiksaanwijzing.
ALTIJD oorbeschermers en een beschermbril dragen tijdens het
gebruik van het gereedschap. De bewegende schijf NIET aanraken.
Altijd de veiligheidsvoorschriften inachtnemen tijdens het gebruik
van het gereedschap.
Het gereedschap is speciek ontworpen voor het zagen van metaal
en andere materialen met behulp van hardmetalen zaagbladen. Het
gereedschap mag NIET omgebouwd worden en/of gebruikt worden
voor andere dan de voorgeschreven doeleinden met inbegrip van het
aandrijven van ander gereedschap.
Ervoor zorgen dat de volledige werkruimte zichtbaar is vanaf de
μετάδοσης κίνησης σε άλλες συσκευές.
Βεβαιωθείτε ότι όλος ο χώρος εργασίας μπορεί να είναι ορατός
από την θέση του χειρισμού. Χρησιμοποιείτε περιοριστικούς
φραγμούς για να κρατάτε του μη έχοντες εργασία μακριά. Μην
λειτουργείτε το εργαλείο σε περιβάλλον με εκρηκτικά υλικά
–ηλεκτροκίνητα εργαλεία δημιουργούν σπινθήρες που μπορεί
να προκαλέσουν ανάφλεξη εύφλεκτων υλικών ή αερίων. Μην
λειτουργείτε το εργαλείο σε συνθήκες υγρές ή χώρους με αυξημένη
υγρασία καθώς μπορεί να προκληθούν ηλεκτροσόκ. Πάντοτε
να χειρίζεστε το εργαλείο και με τα δυο χέρα σας. Πάντοτε να
έχετε βεβαιωθεί ότι το υλικό επί του οποίου εργάζεστε είναι καλά
στερεωμένο.
• Το εργαλείο είναι εφοδιασμένο με ένα καλώδιο και φις
εγκεκριμένα από το κράτος όπου πρόκειται να χρησιμοποιηθεί.
Ο αγωγός με χρώμα πράσινο-κίτρινο στο καλώδιο αποτελεί
την γείωση/έδαφος, και ποτέ να μην τον συνδέετε με ένα
ηλεκτροφόρο ακροδέκτη.
• Να βγάλετε το φις από την πρίζα προτού αντικαταστήσετε
τη λάμα, κάνετε ρυθμίσεις ή για οποιαδήποτε άλλη εργασία
συντήρησης.
• Συνιστούμε να χρησιμοποιείτε τις γνήσιες λάμες
EVOLUTION.
• Επιθεωρήστε το μηχάνημα και τη λάμα πριν από κάθε χρήση
και να μην χρησιμοποιείτε τρυπάνια που έχουν στραβώσει.
έχουν ρωγμές, έχουν φθαρεί ή έχουν υποστεί άλλη βλάβη.
• Βεβαιωθείτε ότι η λάμα είναι σωστά προσαρτημένη και μην
την σταματάτε με το χέρι.
• Να χρησιμοποιείτε λάμες που είναι βαθμολογημένες από
1500rpm (περιστροφές ανά λεπτό) και πάνω.
• Πάντοτε να κρατάτε το καλώδιο μακριά από τα
μετακινούμενα μέρη του εργαλείου
• Όταν αφήνετε το εργαλείο, να σβήνετε τον κινητήρα και να
έχετε βεβαιωθεί ότι όλα τα εν κινήσει τμήματα έχουν τελείως
σταματήσει.
• Βεβαιωθείτε ότι οι κινούμενοι προφυλακτήρες λειτουργούν
ελεύθερα χωρίς «κολλήματα»
• Μην χρησιμοποιείτε ποτέ το μηχάνημα χωρίς το γνήσιο
προστατευτικό του σύστημα. Μην ασφαλίζετε τον κινούμενο
προφυλακτήρα στην ανοικτή θέση.
• Στην περίπτωση κολλήματος σβήστε αμέσως το εργαλείο και
αποσυνδέστε το από το ρεύμα.
• Βεβαιωθείτε ότι η ρύθμιση του βάθους κοπής, η ρύθμιση της
γωνίας και οι μηχανισμοί στερέωσης (μέγκενη) είναι καλά
σταθεροποιημένοι ενώ χρησιμοποιείτε το εργαλείο
• Να χρησιμοποιείτε μόνο τις φλάντζες και τις ροδέλες που
παρέχονται με το εργαλείο και να τις αντικαθιστάτε όταν
παθαίνουν βλάβη ή κάνουν εγκοπές.
• Μην λειτουργείτε το εργαλείο όταν είστε υπό την επήρεια
ναρκωτικών ουσιών, αλκοόλ ή φαρμάκων. Κρατάτε μακριά
τον χαλαρό ρουχισμό από τα κινούμενα μέρη του πριονιού.
Κρατάτε τα χέρια σας μακριά από την λάμα όταν αυτή
βρίσκεται σε κίνηση.
• Αφού τοποθετήσετε μια καινούργια λάμα, πάντοτε να
λειτουργείτε το μηχάνημα για περίπου ένα λεπτό πριν την
κοπή. Εάν η λάμα έχει κάποιο ελάττωμα, μπορεί σε αυτό το
διάστημα να σπάσει, γι’ αυτό το λόγο να στέκεστε μακριά
από τη λάμα.
• Βεβαιωθείτε ότι χρησιμοποιείτε όλο τον εξοπλισμό
προσωπικής προστασίας και ότι ακολουθείτε πάντοτε όλες
τις οδηγίες ασφαλείας.
Εγκατάσταση του μηχανήματος
Παροχή Ισχύος
Συνιστάται το 355 να λειτουργεί από μια ξεχωριστή ηλεκτρική,
6 29
Page 7

Σημαντικό
0
0
bedieningsplaats. Schermen installeren om personen uit de buurt te
houden. Het gereedschap niet in een explosieve ruimte gebruiken elektrisch gereedschap produceert vonken dat ontbrandbaar materiaal
of gas kan doen ontvlammen. Het gereedschap niet in een vochtige
of natte ruimte gebruiken om elektrische schokken te voorkomen. Het
gereedschap altijd met beide handen bedienen. Het werkstuk altijd
stevig vastklemmen.
• Het gereedschap is voorzien van een goedgekeurd snoer en stekker
voor het land van gebruik. De groene en gele stroomdraad van het
snoer is de aarddraad. De aarddraad nooit op een onder stroom
staande klem aansluiten.
• De stekker uit het stopcontact verwijderen voor de vervanging van
de schijf, de afstelling van het gereedschap of andere onderhouds
werkzaamheden.
• Wij raden het gebruik van originele EVOLUTION zaagbladen aan.
• Het gereedschap en het zaagblad voor elk gebruik inspecteren en
geen vervormde, gebarsten, versleten of beschadigde zaagbladen
gebruiken.
• Veriëren of het zaagblad naar behoren is gemonteerd en niet met
de hand stoppen.
• Uitsluitend zaagbladen met een snelheid van 1500 of meer
gebruiken.
• Het netsnoer altijd uit de buurt van de bewegende onderdelen van
het gereedschap houden.
• De zaag uitschakelen en veriëren of alle bewegende onderdelen
volledig stilstaan voordat u de zaag opbergt.
• Veriëren of de beweegbare beschermkappen ongehinderd kunnen
werken.
• Het gereedschap nooit zonder de originele beschermkap
gebruiken. De beweegbare beschermkap nooit in de geopende
stand vergrendelen.
• Het gereedschap onmiddellijk uitschakelen en de stekker uit het
stopcontact verwijderen indien het gereedschap vastloopt.
• Ervoor zorgen dat de zaagdiepte verstelknop, de schuininstelknop
en werkstukklemmen stevig vastzitten tijdens het gebruik van het
gereedschap.
• Uitsluitend de meegeleverde enzen en onderlegringen gebruiken
en deze vervangen zodra ze beschadigd of bekrast zijn.
• Het gereedschap niet onder invloed van drugs, alcohol of medicatie
gebruiken. Losse kleding uit de buurt van de bewegende onderdelen
van de zaag houden. Uw handen uit de buurt van de bewegende
schijf houden.
• De zaag altijd ongeveer 1 minuut na het installeren van een nieuw
zaagblad en voor het zagen laten draaien. Defecte zaagbladen
kunnen versplinteren. Blijf daarom uit de buurt van het zaagblad.
• Altijd alle veiligheidsuitrusting dragen en de veiligheidsvoorschriften
inachtnemen.
Installatie van de zaag
Voeding
Het is aanbevolen om de 355 op een aparte voeding van draad aan te
sluiten en door een reststroombeveiliging te beschermen. Verlengkabels
mogen niet langer zijn dan 15 meter en moeten 1,5 mm2 zijn.
Vervangen van zaagbladen: Verwijder de stekker van de zaag uit
het stopcontact. Schroef de vleugelmoer (g. 1. ref. A) los en draai
de bladbedekking. Druk op de asvergrendelknop en verieer of deze
volledig ingeschakeld is door het zaagblad met de hand te draaien.
Gebruik de meegeleverde sleutel om de bout los te draaien waarmee
het zaagblad vastzit en draai deze naar links en verwijder de bout, de
onderlegring, de buitenste ens van het zaagblad en het zaagblad. N.B.:
De binnenste ens van het zaagblad niet verwijderen. Verieer of de
oppervlakken van de binnenste en buitenste enzen van het zaagblad
schoon zijn en geen vuildeeltjes bevatten. Druk op de asvergrendelknop.
Vervang het zaagblad en monteer de buitenste ens van het zaagblad,
28 7
Page 8

8
de onderlegring en de bout. Draai de bout naar rechts om deze vast
te zetten. Belangrijk: De bout niet te stevig vastdraaien aangezien dit
het zaagblad kan beschadigen en de enzen van het zaagblad kan
doen barsten. N.B.: Controleer of de asvergrendelknop uitgeschakeld
is door het zaagblad voor het gebruik met de hand te draaien. Draai de
bladbedekking opnieuw in plaats en schroef de vleugelmoer vast. Plaats
de sleutel in de houder op de zaag terug.
Afstellen van zaagdiepte aanslag
De diepteaanslag (g. 2 ref. A) moet versteld worden om het maximale
zaagbereik te handhaven zonder dat de schijf de zool raakt. Laat de
zaagkop zakken totdat de arm tegen de diepteaanslag rust. Verstel de
schroef en borgmoer van de diepteaanslag indien nodig totdat de juiste
vrijloop is verkregen. Draai de borgmoer vast.
Schuininstelling
De spanklem kan van 0 tot 45 graden worden versteld. Maak de hendel
op de bankschroef los en stel hem bij voor de gewenste snijhoek. Zet de
hendel vast om hem in positie te vergrendelen.
Afstelling van stationaire bankschroef
De bankschroef kan verplaatst worden door de hendel en de Allen
schroef te verwijderen, en dan het hek te verschuiven tot de gewenste
positie. Plaats de hendel opnieuw op zijn plaats en schroef hem vast om
hem in positie te vergrendelen.
Metaalzaag veiligheidsvoorschriften
Het werkstuk altijd stevig vastklemmen. Het gereedschap starten
door op de centrale schakelaar te drukken. Start de zaag met de
motor in de geheven stand en laat de motor op volle toeren draaien.
Laat de zaagkop zakken om met zagen te beginnen. Bij het zagen
het zaagblad altijd langzaam in het materiaal introduceren en eerst
een lichte druk uitoefenen om te voorkomen dat het zaagblad in het
werkstuk vast komt te zitten en hierna met een normale druk door de
zaagsnede duwen. Het gereedschap niet forceren - laat de snelheid
van de zaagschijf het volledige werk doen. De zaagprestatie wordt niet
verbeterd door meer druk op het gereedschap uit te oefenen en de
levensduur van het zaagblad en de motor worden verkort. Oefen minder
druk uit wanneer het zaagblad uit het materiaal komt. Zet de zaagkop
na het zagen in de geheven stand en schakel de zaag uit. Verwijder de
metaalspanen en ander vuil en gruis van het gereedschap.
Werkstukklem
Plaats het werkstuk in de werkstukklem zodat het zaagblad het werkstuk
niet uit de klem gooit als de zaag vastloopt. Zet het werkstuk stevig vast.
De hoeken moeten in de omgekeerde stand staan zodat de punt van de
sectie naar boven wijst. De zaag zaagt het beste wanneer het zaagblad
door het dunste gedeelte van het materiaal zaagt (g. 3).
Onderhoud en foutopsporing
Het gereedschap en het netsnoer schoon houden. De motor regelmatig
uitzuigen of uitblazen om de ventilatie-opening vrij te houden en
controleren of de zaag goed gesmeerd is. De zaag wekelijks inspecteren.
Geen reinigingsmiddelen op basis van benzeen, trichloorethyleen,
chloride en ammoniak gebruiken aangezien deze plastic onderdelen
beschadigen. Het gereedschap onmiddellijk uitschakelen en de
stekker uit het stopcontact verwijderen in het geval van elektrische of
mechanische storing.
Legen van spaanafzuiger
De spaanafzuiger regelmatig legen door de schroef los te draaien (g. 2.
ref. B) en de bak te verwijderen. De bak in een geschikte afvalcontainer
legen en de bak hierna opnieuw monteren en de borgschroef
vastdraaien.
il taglio sollevare la testa riportandola nella sua posizione di partenza; quindi
spegnere la macchina. Curare sempre la pulizia dell’utensile liberandolo ogni
volta dagli sfridi metallici: il dispositivo Hitech Cyclone è lo strumento ideale a
questo scopo.
Posizionamento del pezzo nella morsa
Posizionare accuratamente il pezzo nella morsa in modo da evitare, in caso di
bloccaggio, che la lama possa espellerlo dalla morsa. Bloccare accuratamente
il pezzo in posizione di taglio. Gli angoli devono essere presentati in posizione
invertita come indicato in gura 3, in modo che la punta della sezione sia
posizionata verso l’alto:
Regolazione profondità di taglio
Il limitatore di corsa verso il basso in g. 2 deve essere regolato in modo che la
lama non tocchi mai la base di lavoro. Abbassare la testa della macchina no
a che il braccio tocchi il limitatore di corsa (stop). Se necessario, regolarne la
posizione allentando il bullone e successivamente bloccare la posizione serrando
il dado. La troncatrice taglia in modo molto più efcace se la lama lavora nella
sezione minore del pezzo.
Manutenzione e controlli di funzionamento
Curare la pulizia dell’elettroutensile e del cavo di alimentazione. Pulire
periodicamente il vano motore aspirando o sofando via la sporcizia e gli sfridi,
in modo da assicurare sempre una corretta ventilazione. Evitare l’uso di prodotti
detergenti che contengano benzene, tricloetilene, cloruri e ammoniaca, in quanto
potrebbero danneggiare le parti in plastica. In caso di malfunzionamenti elettrici o
meccanici spegnere immediatamente l’elettroutensile e scollegare la spina.
Pulizia del vano raccogli-sfridi
Pulire periodicamente il vano raccogli-sfridi svitando le viti indicate in g.2,
riferimento B. Rimuovere il contenitore, svuotarlo in modo appropriato e
rimontarlo nella sua posizione serrando le viti di bloccaggio.
Controllo e sostituzione dei carboncini
La produzione eccessiva di scintille può essere segno di sporcizia nel motore o di
carboncini consumati. Controllare lo stato dei carboncini dopo le prime 50 ore e
successivamente ogni 10 ore di funzionamento effettivo. I supporti dei carboncini
sono situati ai due lati della carrozzeria del motore. Per qualsiasi altro intervento
di manutenzione rivolgersi al Distributore per effettuare la manutenzione
preventiva tipicamente dopo 60 ore di funzionamento effettivo tenendo conto del
tipo di lavoro effettuato.
Lubricazione
I cuscinetto del vostro elettroutensile sono stati lubricati all’atto della produzione
e il lubricante è tale da garantirne l’uso per tutta la vita prevista dell’elettroutensile
in normali condizioni d’uso. Le altre parti mobili possono essere lubricate con
lubricante leggero qualora necessario. Si raccomanda di portare la macchina
ad un centro di riparazione autorizzato indicato dal distributore almeno una volta
l’anno per farne effettuare pulizia e lubricazione. Ogni intervento di manutenzione
effettuato da un centro autorizzato è coperto da garanzia per materiali difettosi
e manodopera.
Garanzia 12 Mesi
GARANZIA 12 MESI. EVOLUTION POWER TOOLS SI RISERVA IL DIRITTO DI
MIGLIORAMENTI E MODIFICHE SENZA PREAVVISO O SEGNALAZIONE.
Evolution Power Tools provvederà, nei dodici mesi di garanzia, a riparare
o sostituire qualsiasi attrezzo risultato difettoso. Questa garanzia decade
se l’attrezzo è stato usato per tagliare materiali diversi dalle istruzioni o
se ci sia stato danneggiamento per incidenti, negligenze e uso improprio.
Non si applica la garanzia ad attrezzi e componenti che siano stati alterati
o sostituiti o sottoposti a uso oltre le capacità e speciche raccomandate.
I componenti elettrici sono oggetto della garanzia dei rispettivi produttori.
Ogni attrezzo ritornato difettoso verrà inviato porto franco a Evolution
Power Tools. E’ discrezione di Evolution Power Tools di riparare oppure
sostituire ogni attrezzo a proprio giudizio. Sono escluse da garanzia – scritta
o verbale – le lame circolari. In nessun caso Evolution Power Tools può
essere responsabile per eventuali perdite o danni provocati direttamente
o indirettamente per l’uso o l’utilizzo o per qualsiasi altra causa. Evolution
Power Tools non è responsabile per nessun costo o nessun danno diretto
o indiretto. Nessun impiegato, agente o responsabile interno è autorizzato
27
Page 9

Inspectie en vervanging van koolborstels
Buitensporige vonkoverslag duidt op de aanwezigheid van vuil in de motor
of versleten koolborstels. De koolborstels na de eerste 50 bedrijfsuren en
hierna na elke 10 bedrijfsuren op slijtage controleren. De koolborstels
vervangen zodra deze 6 mm hoog zijn. De koolborstelhouders bevinden
zich op het motorhuis tegenover elkaar en moeten losgedraaid worden
voor toegang tot de koolborstels. De machine voor alle andere
reparaties en onderhoud naar een erkend servicecentrum brengen na
60 bedrijfsuren, afhankelijk van de werklast.
Smering
De motorlagers van de zaag werden in de fabriek gesmeerd met
voldoende smeermiddel voor de levensduur van de zaag in normale
gebruiksomstandigheden. Andere bewegende onderdelen kunnen
met lichte machineolie worden gesmeerd indien nodig. Het is
aanbevolen om de zaag tenminste één keer per jaar voor een grondige
schoonmaakbeurt en smeerbeurt naar het dichtstbijzijnde ERKENDE
SERVICECENTRUM te brengen. Op alle door deze centra uitgevoerde
reparaties en onderhoud wordt een volledige garantie tegen fabricageen materiaalfouten verstrekt.
12 Maanden Waarborg
12 MAANDEN BEPERKTE WAARBORG. EVOLUTION POWER TOOLS
BEHOUDEN ZICH HET RECHT VOOR VERBETERINGEN EN WIJZIGINGEN
AAN HET ONTWERP DOOR TE VOEREN ZONDER VOORAFGAAND
BERICHT.
Evolution Power Tools zullen binnen de twaalf (12) maanden na de
oorspronkelijke datum van aankoop alle producten herstellen of vervangen
die defecten vertonen in materiaal of vervaardiging. Deze waarborg is
ongeldig indien het teruggestuurde werktuig gebruikt werd voor het snijden
van materialen die buiten de aanbevelingen in de Gebruikshandleiding
vallen of indien de zaag beschadigd werd door ongeluk, verwaarlozing of
incorrect onderhoud. Deze waarborg is niet van toepassing op apparaten en/
of elementen die werden gewijzigd, veranderd of op enige wijze omgevormd,
of onderworpen aan gebruik dat aanbevolen vermogen en eigenschappen
overschrijdt. Elektrische componenten vallen onder hun respectieve
fabrikantenwaarborg. Alle defecte productendienen per voorbetaalde
verzending naar EvolutionPower Tools teruggestuurd te worden. Evolution
Power Tools behouden het recht om het te herstellen of het te vervangen
door hetzelfde of een gelijkaardig product.Er is geen waarborg -schriftelijk
of mondeling - voor zaagbladen. In geen geval zal Evolution Power Tools
aansprekelijk zijn voor verlies of schade die rechtstreeks of onrechtstreeks
het gevolg zijn van het gebruik van het product of enige andere reden.
Evolution Power Tools is niet aansprakelijk voor enige onkosten aan deze
producten of gevolgschade.Geen enkele werknemer, bediende of agent
van Evolution Power Tools heeft de toelating mondelinge uitdrukkingen
van geschiktheid te maken of afstand te doen van enige voorwaarde in de
huidige verkoopsvoorwaarden en Evolution Power Tools zou ten gevolge
hiervan in geen geval gebonden zijn.
Vragen over deze beperkte waarborg dienen geadresseerd te worden aan de
hoofdzetel van de maatschappij, of bel het toepasselijke Helplijnnummer.
Accessoires – Originele Evolution zaagbladen
66T 355 mm hardmetalen zaagblad voor vloeistaal
80T 355 mm hardmetalen zaag blad voor aluminium / dun vloeistaal
90T 355 mm hardmetalen zaagblad voor roestvrij staal
N.B.: Buitensporige slijtage en beschadiging veroorzaakt door
onoordeelkundig gebruik worden niet door de garantie van 12
maanden gedekt.
26 9
Page 10

Mode d’emploi
Important
Lire attentivement le mode d’emploi et les consignes de sécurité.
Pour des raisons de sécurité, vérier le voltage et la xation des
poignées et des pièces avant d’utiliser la scie. Contacter votre
distributeur en cas de doute.
Conserver ces instructions
Caractéristiques techniques du modèle Evolution 355 Raptor
Moteur (230V ~ 50/60 Hz) (Watt) : 2200
Trs/min. à vide (Vitesse 1) (min-1) : 1450
Cycle opératoire maximum conseillé (minutes) : 30
Intensité sonore (à charge normale) (dB(A)) : 112.4
Niveau de vibrations (m/s2): 1.39
Poids (Kg): 23
Dimensions maximales (position élevée) (mm) : H 575 L 355 P 600
Capacité boite maximale de coupe 90
0
Coupe quadrangulaire (mm) : 120 x 120
Coupe rectangulaire (mm) : 95 x 180
Coupe circulaire (mm) : 130
Bois (mm): 125 x 125
Capacité boite maximale de coupe 45
0
Coupe quadrangulaire (mm) : 89 x 89
Coupe rectangulaire (mm) : 78 x 110
Coupe circulaire (mm) : 105
Dimensions de la lame
Diamètre maximum (mm): 355
Diamètre d’alésage (mm): 25.4
Epaisseur (mm) : 2.4
La scie est livrée en standard avec : 1 plateau diviseur, 1 clé à six pans de 8 mm,
1 mode d’emploi.
Les protecteurs anti-bruit et les lunettes de protection DOIVENT
être portés lors de l’utilisation de la scie. NE PAS toucher la lame
en mouvement. Toujours suivre les consignes de protection
individuelle lors de l’utilisation de l’outil.
La scie a été conçue pour couper de l’acier et d’autres matériaux à
l’aide de lames en carbure. La scie NE PEUT être modiée et/ou utilisée
pour des applications autres que celles recommandées, y compris
l’alimentation d’autres outils.
S’assurer que la zone de travail est entièrement visible du côté opérateur.
Utiliser des écrans pour tenir les personnes à l’écart. Ne pas utiliser l’outil
dans un environnement explosif - les outils motorisés produisent des
étincelles qui peuvent allumer des substances ou des gaz inammables.
Ne pas utiliser l’outil dans un environnement humide puisque ceci peut
provoquer des chocs électriques. Toujours utiliser l’outil à deux mains.
Toujours s’assurer que la pièce à couper est bien serrée.
• Cet outil est équipé d’un câble d’alimentation et d’une che
approuvés pour le pays d’utilisation. Le conducteur vert et jaune du
câble est le conducteur de mise à la terre. Ne jamais brancher le
conducteur à une borne sous tension.
• Retirer la che de la prise de courant avant le remplacement de la
lame, le réglage ou d’autres travaux d’entretien.
• Nous recommandons l’utilisation des lames de marque
EVOLUTION.
• Inspecter la scie et la lame avant chaque utilisation et ne pas utiliser
des lames déformées, ssurées, usées ou endommagées.
• S’assurer que la lame est montée correctement et ne pas arrêter la
lame à la main.
• N’utiliser que des lames à une vitesse de 1500 trs/min. ou plus.
Conservare queste istruzioni d’uso
Caratteristiche Tecniche Evolution 355 Raptor
Tensione 220 Volt
Potenza assorbita 2200 Watt
Velocità a vuoto 1450 g/m
Duty Cycle: 30 min.
Pressione sonora: 112,4 DbA
Livello vibrazioni sotto carico 1.39 (m/s2)
Peso 23,0 kg
Dimensioni max (testa di taglio sollevata) 575x355x600
Capacità max taglio scatolato 90°
quadrato 120 x 120 mm
rettangolare 95 x 180 mm
tubolare (diam.) 130 mm
legno (mm): 125 x 125 mm
Capacità max taglio scatolato 45°
quadrato 89 x 89 mm
rettangolare 78 x 110 mm
tubolare (diam.) 105 mm
Dimensioni lama:
Diametro max: 355 mm
Diametro foro: 25,4 mm
Spessore: 2,4 mm
Dotazione standard: 1 piastra angolare per scatolati, 1 chiave a brugola 8mm, 1
manuale d'istruzioni.
Occhiali di protezione e tappi per le orecchie DEVONO essere
utilizzati lavorando con questo elettroutensile. NON TOCCARE la
lama quando è in movimento. Seguire scrupolosamente le norme
vigenti sulla sicurezza sul lavoro durante l’utilizzazione di questo
elettroutensile.
Questo elettroutensile è stato progettato per tagliare acciaio e altri metalli
utilizzando lame TCT, Tungsten Carbide Tipped (lame al Carburo di
Tungsteno con denti riportati). NON può essere modocato e/o utilizzato
per applicazioni diverse da quella per cui è stato progettato, ivi compreso
l’utilizzo con utensili diversi da quelli indicati.
Assicurarsi che l’area di lavoro sia completamente visibile dalla postazione
in cui si opera. Utilizzare opportuni sbarramenti per i non addetti ai
lavori. Non utilizzare l’elettroutensile in aree a rischio di esplosione: le
scintille generate potrebbero innescare incendi o esplosioni di sostanze
o gas inammabili. Non utilizzare l’elettroutensile in aree bagnate o in
condizioni di alta umidità per evitare il rischio di cortocircuiti. Utilizzare
l’elettroutensile operando sempre con entrambe le mani. Assicurarsi
sempre che il materiale da tagliare sia opportunamente ssato.
• Questo elettroutensile è equipaggiato con cavo di alimentazione e
spina adatti alle normative del vostro paese. Il conduttore giallo/
verde è il collegamento a terra: non collegare MAI questo conduttore
alla corrente.
• Staccare sempre la spina prima di cambiare la lama, effettuare
regolazioni o qualsiasi intervento di manutenzione.
• Utilizzare esclusivamente lame originali Evolution.
• Controllare l’elettroutensile e la lama prima di ogni lavoro e non
utilizzare lame deformate, crepate, consumate o in qualche modo
danneggiate.
• Utilizzare esclusivamente lame specicate per girare a velocità di
1500 g/m o superiori.
• Tenere il cavo di alimentazione lontano dalle parti in movimento
• Assicurarsi che le protezioni mobili operino correttamente senza
intoppi.
• Dopo il lavoro spegnere sempre la macchina prima di riporla.
• Non utilizzare mai l’elettroutensile senza i dispositivi di
protezione.
• Non bloccare le protezioni in posizione aperta.
• In caso di bloccaggio spegnere immediatamente la macchina e
10 25
Page 11

IMPORTANTE!!
• Toujours écarter la câble d’alimentation des pièces en mouvement
de l’outil.
• Mettre hors marche le moteur et s’assurer que toutes les pièces en
mouvement se sont arrêtées complètement avant de ranger l’outil.
• S’assurer que les carters mobiles peuvent fonctionner sans
bloquer.
• Ne jamais utiliser l’outil sans les carters de protection
d’origine. Ne pas verrouiller le carter mobile dans la position
ouverte.
• Mettre l’outil hors marche et débrancher la che en cas de
blocage.
• S’assurer que le levier de réglage de profondeur de coupe, le levier
de réglage d’angle et les étaux sont bien xés lors de l’utilisation de
l’outil.
• N’utiliser que les brides et les rondelles livrées avec l’outil et les
remplacer lorsqu’elles sont endommagées ou rainées.
• Ne pas utiliser l’outil sous l’inuence de la drogue, de l’alcool ou de
médicaments. Ecarter les vêtements amples des pièces en rotation
de la scie. Tenir les mains à l’écart de la scie lors de l’utilisation.
• Toujours faire fonctionner la scie pendant une minute après
l’installation d’une nouvelle lame et avant de commencer à couper.
Les lames qui présentent un défaut peuvent éclater, il est conseillé
de se tenir à l’écart de la lame.
• Toujours utiliser les dispositifs de protection personnelles et suivre
les consignes de sécurité.
Installation de la scie
Alimentation
Il est conseillé de brancher la 355 sur une alimentation séparée, et de
la protéger par un dispositif de courant résiduel. Toute rallonge ne peut
dépasser 15 mètres en longueur et doit être 1,5 mm2 pour des scies de
240V.
Remplacement de lames: S’assurer que la scie est débranchée.
Défaites l’écrou papillon (g.1. réf. A) puis tournez le couvercle de lame.
Appuyer sur le bouton de blocage d’arbre et vérier si le bouton est
enclenché en tournant la lame à la main. Desserrer le boulon à six pans
qui xe la lame à l’aide de la clé à six pans de 8 mm en la tournant dans
le sens des aiguilles d’une montre et retirer le boulon, la rondelle, la bride
extérieure de la lame et la lame. Nota : Ne pas retirer la bride intérieure
de la lame. Appuyer sur le bouton de blocage d’arbre. Replacer la lame
en s’assurant que le côté imprimé de la lame est visible et remonter la
bride extérieure de la lame, la rondelle et le boulon à six pans. Tourner le
boulon à six pans dans le sens des aiguilles d’une montre pour le serrer.
Nota : Vérier si le bouton de blocage d’arbre est déclenché en tournant
la lame avant l’utilisation de la scie. Tournez de nouveau en position le
couvercle de lame et resserrez l’écrou papillon. Replacer la clé à six
pans dans le porte-outils sur la scie.
Réglage de la butée de la profondeur de coupe
La butée du brin descendant (Fig. 2. réf. A) doit être réglée de sorte que
la capacité maximale de coupe soit conservée sans que la lame touche
à la semelle. Baisser la tête de coupe jusqu’à ce que le bras touche à la
butée du brin descendant. Ajuster la vis de la butée du brin descendant
et l’écrou de blocage jusqu’à un jeu approprié ait été obtenu. Serrer
l’écrou de blocage.
Réglage de l’angle de coupe
L’étau de serrage peut être réglé de 0 à 45 degrés. Relâchez la manette
sur l’étau et réglez à l’angle de coupe souhaité. Resserrez la manette
pour verrouiller en position.
Réglage de l’étau de serrage stationnaire
L’étau peut être repositionné en enlevant la manette et la vis Allen puis en
faisant glisser le guide sur la position souhaitée. Replacez et resserrez la
manette et la vis pour le verrouiller en position.
24 11
Page 12

Consignes d’utilisation de la scie à métaux
Toujours serrer la pièce à découper dans l’étau. Appuyer sur la gâchette
centrale pour mettre le moteur en marche. Mettre le moteur en marche
avec la tête du moteur en position levée et faire fonctionner à vitesse
maximale. Baisser la tête du moteur avant de commencer à couper.
Avant de couper, introduire la lame lentement dans le matériau en
exerçant une pression légère an d’éviter que la lame se pique et
ensuite continuer à une pression normale. Ne pas forcer l’outil – laisser
la vitesse de la lame de scie faire le travail. La performance de coupe
ne s’améliorera pas en exerçant plus de pression sur l’outil et réduira la
durée de vie de la lame et du moteur. Utiliser moins de pression lorsque
la lame sort du matériau. Retourner la tête du moteur à la position levée
après la coupe et mettre la scie hors tension. Enlever les copeaux de
métal et d’autres impuretés et débris de l’outil.
Serrage de la pièce à découper
Positionner la pièce à couper dans l’étau an d’éviter que la lame la
jette de l’étau en cas de blocage. Bien serrer la pièce à découper. Les
angles doivent être dans une position inversée de sorte que le point de
la section se trouve en haut. La scie coupe de façon optimale lorsque la
lame coupe la section la plus mince du matériau (Fig. 3).
Entretien et dépannage
Garder l’outil et le câble d’alimentation propres. Aspirer ou purger le moteur
régulièrement an de ne pas obstruer l’orice de ventilation et vérier si
la scie est sufsamment lubriée. Inspecter la scie chaque semaine. Ne
pas utiliser des nettoyants à base de benzène, trichloroéthylène, chloride
et ammoniac puisqu’ils peuvent endommager les pièces en plastique.
Mettre la scie immédiatement hors marche et hors tension en cas de
mauvais fonctionnement électrique ou mécanique.
Nettoyage du collecteur de copeaux
Nettoyer périodiquement le collecteur de copeaux en retirant la vis
(Fig. 2. réf. B) et le collecteur. Vider le collecteur dans un conteneur de
déchets et ensuite replacer le collecteur et la vis de retenue.
Inspection et remplacement des balais
Un jaillissement d’étincelles indique en général la présence d’impuretés
dans le moteur ou des balais de charbon usés. Vérier l’usure après les
premiers 50 heures de fonctionnement et ensuite après 10 heures de
fonctionnement. Remplacer les balais lorsqu’ils ont une épaisseur de 6
mm. Les portes-balais sont situés sur le carter du moteur face à face
et desserrer pour accéder aux balais. Apporter la scie à un centre de
service accrédité pour tout autre entretien ou réparation après 60 heures
de fonctionnement en fonction du type de charge de travail.
Lubrication
Les paliers du moteur de la scie ont été lubriés à l’usine avec
sufsamment de lubriant pour la durée de vie de la scie dans des
conditions d’utilisation normale. Les autres pièces en mouvement
peuvent être lubriées avec de l’huile légère pour mécanisme si
besoin. Il est recommandé d’apporter la scie au CENTRE DE SERVICE
ACCREDITE le plus proche au moins une fois par an pour un nettoyage
approfondie et une lubrication. Les réparations et l’entretien effectués
par ces centres sont entièrement garantis contre les vices de fabrication
et de matériaux.
Garantie à 12 Mois
GARANTIE LIMITÉE À 12 MOIS. EVOLUTION POWER TOOLS SE RESERVE LE DROIT
DE PROCÉDER À DES AMÉLIORATIONS ET DES CHANGEMENTS DE CONCEPTION
SANS AVIS PRÉALABLE.
Evolution Power Tools procédera, dans les douze (12) mois à compter
de la date d’achat originale, à la réparation ou au remplacement de tout
que a capacidade máxima de corte se mantenha sem que a lâmina
bata contra a base. Baixe a cabeça de corte até o braço bater no
travão descendente. Caso seja necessário, ajuste o parafuso do travão
descendente e a porca de travamento até conseguir o distanciamento
correcto. Aperte a porca de travamento para xar a posição.
Ajuste do Ângulo de Corte
O torno pode ser ajustado de 0 a 45 graus. Desaperte o manípulo da
prensa e ajuste de acordo com o ângulo desejado de corte. Aperte o
manípulo para xar a posição.
Ajuste do Torno Fixo
A prensa pode ser reposicionada removendo o manípulo e o parafuso
Allen, fazendo deslizar o rebordo para a posição desejada. Substitua e
aperte o manípulo e o parafuso para xar a posição.
Segurança no Corte de Metal
Conselhos sobre a utilização
Fixe sempre a peça em que vai trabalhar ao torno. Para ligar a
ferramenta, tem de premir o interruptor principal de corrente do motor.
Com a cabeça do motor levantada, ligue o motor e deixe que seja
alcançada a velocidade máxima. Baixe a cabeça do motor para iniciar o
corte. Quando iniciar o corte, tenha o cuidado de introduzir lentamente
a lâmina no material, aplicando uma ligeira pressão ao princípio para
impedir que a lâmina prenda e continue com a pressão normal. Não
force a ferramenta – deixe que a velocidade da lâmina de corte faça o
trabalho. O desempenho do corte não melhora através da aplicação
de pressão adicional sobre a ferramenta, sendo reduzida a duração da
lâmina. Vá diminuindo a pressão à medida que a lâmina sai do material.
Quando terminar o corte, volte a colocar a cabeça do motor na posição
vertical e desligue a corrente. Mantenha a ferramenta limpa e sem
chispas de metal, sujidade ou outros detritos.
Fixação da Peça de Trabalho
Posicione o trabalho sobre o torno para, no caso de ocorrer um
encravamento, a peça não ser projectada para fora do torno pela lâmina.
Aperte-o bem. Os ângulos deverão car em posição invertida de modo a
que o ponto de seccionamento seja o mais alto. A serra corta com mais
ecácia se a lâmina estiver a cortar a secção mais na do material (g. 3).
Manutenção e Determinação da Causa de Problemas
Mantenha a ferramenta e o cabo de ligação limpos. Aspire ou sopre
regularmente a unidade do motor de modo a manter a ventilação limpa,
verique também se a máquina se encontra lubricada. Inspeccione
semanalmente. Evite a utilização de produtos de limpeza, entre os
quais a benzina, tricloroetileno, cloreto e amónia já que estes produtos
danicam o plástico. No caso de haver uma avaria eléctrica ou mecânica,
desligue imediatamente a ferramenta e retire a cha da tomada.
Limpeza do Tabuleiro de Recolha de Aparas
Limpe periodicamente o tabuleiro de recolha de aparas desapertando
o parafuso (g. 2.ref. B) e removendo o tabuleiro. Esvazie o tabuleiro
para um recipiente adequado e volte a colocar o tabuleiro apertando o
parafuso de retenção.
Inspecção e Substituição da Escova
Demasiadas faúlhas podem indicar a presença de sujidade no motor
ou o desgaste das escovas de carbono. Verique se há desgaste após
as primeiras 50 horas de utilização, e em seguida em intervalos de
10 horas. Proceda à sua substituição quando alcançarem os 6mm.
Os suportes das escovas encontram-se na caixa do motor, em lados
opostos um ao outro e desapertam-se de forma a permitir acesso
às escovas. Para todos as outras reparações e manutenção, leve a
máquina a um centro de reparação autorizado, normalmente após 60
horas de corte, consoante o tipo de carga de trabalho a que foi sujeita.
12 23
Page 13

bien considéré comme défectueux sur les pièces où la main-d’oeuvre.
Cette garantie est rendue caduque si l’outil faisant l’objet d’un retour a
été utilisé pour couper des matériaux en dehors des recommandations du
mode d’emploi ou si la scie a été endommagée par accident, négligence ou
une mauvaise utilisation. Cette garantie ne s’applique pas aux machines
et/ou aux composants qui ont été altérés, modiés ou changés de quelque
façon que ce soit, ou sujet à une utilisation en dehors des capacités et
spécications recommandées. Les composants électriques sont soumis
aux garanties respectives des fabricants. Tous les biens défectueux
retournés doivent être renvoyés par colis prépayé à Evolution Power Tools.
Evolution Power Tools se réserve le droit de le réparer ou de le remplacer
par un élément identique ou équivalent. Il n’y a aucune garantie, écrite ou
verbale, concernant les lames de scie. En aucun cas Evolution Power Tools
ne peut être rendu responsable de la perte ou de l’endommagement résultant
directement ou indirectement de l’utilisation ou de la commercialisation ou
de tout autre cause. Evolution Power Tools n’est pas responsable de tous
frais encourus sur de tels biens ou de dommages conséquents. Aucun
directeur, employé ou agent de Evolution Power Tools n’est autorisé à
déclarer quelque aptitude ou à renoncer à toute conditions de vente de la
présente et Evolution Power Tools n’est nullement lié par ces dernières.
Les questions relatives à cette garantie limitée doivent être envoyées au siège
de la société, ou veuillez appeler le numéro de l’assistance approprié.
Accessoires – Lames de la marque Evolution
66T 355mm lame en carbure pour acier doux
80T 355mm lame en carbure pour aluminium / acier doux mince
90T 355mm lame en carbure pour acier inoxydable
Nota : L’usure excessive et les dommages provoqués par une
utilisation anormale ne sont pas couverts par la garantie de 12 mois.
Bedienungsanleitung
Wichtig
Bitte lesen Sie die Bedienungsanleitung und die Sicherheitshinweise
vollständig. Zu Ihrer Sicherheit, überprüfen Sie bitte vor jeder Benutzung,
dass die Spannung der Stromquelle mit den Angaben auf dem Typenschild
des Gerätes übereinstimmt, und dass alle Handgriffe und Geräteelemente
sicher montiert sind. Sollten Sie zu irgendeinem Aspekt der Bedienung
dieses Gerätes Fragen haben, wenden Sie sich bitte an Ihren Händler.
Diese Bedienungsanleitung bitte aufbewahren
Technische Daten, Modell Evolution 355 Raptor
Motor (230v ~ 50/60 Hz) (Watt): 2200
Leerlaufdrehzahl (Geschwindigkeit 1) (min-1): 1450
Empf. Höchstdauer für ununterbrochenen Betrieb (Minuten): 30
Schalldruckpegel (unter Last) (dB(A)): 112.4
Vibrationspegel (m/s2): 1.39
Gewicht (kg): 23
Maximale Abmessungen (angehoben) (mm): H 575 B 355 T 600
Maximale Kiste Schnittleistung 90
0
Quadratisch (mm): 120 x 120
Rechteckig (mm): 95 x 180
Rund (mm): 130
Holz (mm): 125 x 125
Maximale Kiste Schnittleistung 45
0
Quadratisch (mm): 89 x 89
Rechteckig (mm): 78 x 110
Rund
(mm): 105
Sägeblatt
Maximaler Durchmesser (mm): 355
Aufnahmebohrung (mm): 25.4
Dicke (mm): 2.4
Im Lieferumfang des Gerätes enthaltene Standardausrüstung: 1 Bohrplatte, 1
8mm Sechskantschlüssel, 1 Bedienungsanleitung.
22 13
Page 14

Beim Arbeiten mit diesem Gerät MÜSSEN ein Gehörschutz sowie
eine Schutzbrille getragen werden. NICHT mit dem rotierenden
Sägeblatt in Berührung kommen. Beachten Sie beim Arbeiten
mit diesem Gerät immer die Empfehlungen zum Schutz vor
Verletzungen.
Dieses Gerät ist bestimmt zum Schneiden von Stahl & anderen
Werkstoffen, unter Verwendung geeigneter wolframkarbidbestückter
Sägeblätter. Es darf NICHT modiziert und/oder für andere als den
beabsichtigten Zweck benutzt werden, einschließlich als Antrieb für
andere Geräte.
Stellen Sie sicher, dass der gesamte Arbeitsbereich von der
Bedienerposition aus eingesehen werden kann. Benutzen Sie
Absperrungen, um Personen vom Arbeitsbereich fernzuhalten.
Benutzen Sie das Gerät nicht in explosionsgefährdeten Bereichen –
Elektrowerkzeuge erzeugen Funken, die entammbare Werkstoffe oder
Gase in Brand setzen können. Benutzen Sie das Gerät nicht in feuchten
oder nassen Umgebungen bzw. Bereichen. Es besteht Gefahr eines
elektrischen Schlages. Beim Arbeiten das Gerät immer fest mit beiden
Händen halten. Kontrollieren Sie immer, dass das zu bearbeitende
Werkstück sicher eingespannt ist.
• Kabel und Gerätestecker dieses Gerätes sind für das
Bestimmungsland zugelassen. Die grüne und gelbe Ader
dieses Kabels ist der Erdungsleiter, diesen niemals an eine
stromdurchossene Klemme anschließen.
• Vor dem Wechseln des Sägeblatts, allen Einstellungen oder
anderen Wartungsarbeiten immer zuerst den Gerätestecker aus
der Netzsteckdose ziehen.
• Benutzen Sie nur Originalsägeblätter der Marke EVOLUTION.
• Kontrollieren Sie Gerät und Sägeblatt vor jeder Benutzung und
benutzen Sie keine verbogenen, rissigen, abgenutzten oder
anderweitig beschädigten Sägeblätter.
• Vergewissern Sie sich, dass das Sägeblatt korrekt montiert ist und
stoppen Sie es nicht mit der Hand.
• Benutzen Sie nur für 1500 U/min. oder höher ausgelegte
Sägeblätter.
•
Halten Sie das Netzkabel immer von den beweglichen Geräteteilen fern.
• Wenn Sie das Gerät wegstellen, schalten Sie den Motor aus und
vergewissern Sie sich, dass alle beweglichen Teile zum völligen
Stillstand gekommen sind.
• Stellen Sie sicher, dass die beweglichen Schutzvorrichtungen sich
frei bewegen können, ohne festzuklemmen.
• Niemals mit dem Gerät ohne die Originalschutzvorrichtunge
n arbeiten. Die Pendelschutzhaube darf nicht in geöffnetem
Zustand festgeklemmt werden.
• Wenn das Sägeblatt blockiert, Gerät sofort ausschalten und den
Gerätestecker aus der Netzsteckdose ziehen.
• Vergewissern Sie sich, dass beim Arbeiten mit dem Gerät
die Schnitttiefeneinstellung, die Winkeleinstellung und die
Schraubstockmechanismen ordnungsgemäß montiert sind.
• Verwenden Sie nur die mit dem Gerät gelieferten Flansche und
Unterlegscheiben und wechseln Sie diese aus, wenn sie beschädigt
oder abgenutzt sind.
• Bedienen Sie das Gerät nicht unter dem Einuss von Drogen,
Alkohol oder Arzneimitteln. Lose Kleidungsstücke von beweglichen
Teilen der Säge fernhalten. Hände vom sich drehenden Sägeblatt
fernhalten.
• Nach der Montage eines neuen Sägeblatts das Geräte immer zuerst
etwa eine Minute lang laufen lassen, bevor ein Schnitt ausgeführt
wird. Ein mangelhaftes Sägeblatt kann innerhalb dieses Zeitraums
zerspringen, deshalb nicht in der Nähe des Sägeblatts aufhalten.
• Vergewissern Sie sich, dass Sie alle für den Personenschutz
notwendige Schutzausrüstung tragen und beachten Sie immer alle
Sicherheitsvorschriften.
Aviso: El desgaste normal y los daños causados por uso
incorrecto NO los cubre la garantía de 12 meses.
Instruções de Operação
Importante
Por favor leia estas instruções de operação e segurança com
atenção e na sua totalidade. Para sua segurança, antes de utilizar
este equipamento, verique se a voltagem de corrente eléctrica é
a correcta e que todos os manípulos e peças estão devidamente
seguros. Se tiver alguma dúvida acerca de qualquer um dos aspectos
da utilização deste equipamento, contacte o seu distribuidor.
Por Favor Guarde Estas Instruções
Especicações do modelo Evolution 355 Raptor
Motor (230 ~ 50/60Hz)(Watts): 2200
RPM Sem Carga (Velocidade 1 ) (mín-1): 1450
Tempo máximo de serviço recomendado (minutos): 30
Nível de pressão sonora (Sob Carga) (db(A): 112.4
Nível de Vibração (m/s2): 1.39
Peso (Kg): 23
Dimensões Máximas (Levantado) (mm): A 575 L 355 P 600
Dimensões Máximas da caixa 90
o
Quadrado (mm): 120 x 120
Rectângulo (mm): 95 x 180
Círculo (mm): 130
Madeira (mm): 125 x 125
Dimensões Máximas da caixa 45
o
Quadrado (mm): 89 x 89
Rectângulo (mm): 78 x 110
Círculo (mm): 105
Dimensões da Lâmina
Diâmetro Máximo: 355mm
Diâmetro de Perfuração: 25.4mm
Espessura: 2.4mm
Equipamento standard Fornecido com a unidade: 1 Dispositivo de
Fixação da Peça, 1 Chave Sextavada de 8 mm, 1 Instruções de
Operação.
Durante o uso deste equipamento é OBRIGATÓRIA a utilização
de protecções para os olhos e os ouvidos. NÃO toque na lâmina
enquanto esta se encontrar em movimento. Durante o uso desta
ferramenta, siga sempre as recomendações do Equipamento para
Protecção Individual.
Esta máquina foi concebida especicamente para cortar aço e outros
materiais utilizando as lâminas estelitados (com carboneto de
tungsténio). NÃO deverá ser modicada e/ou utilizada de alguma outra
forma a não ser aquela para a qual foi concebida, incluindo fornecer
energia a outros equipamentos.
Assegure-se que pode ver na totalidade a área em que vai trabalhar
a partir do lugar onde se posiciona. Utilize barreiras para afastar as
pessoas. Não use esta ferramenta em ambientes onde existir o risco de
explosão - as ferramentas eléctricas podem produzir faúlhas que por sua
vez podem incendiar materiais ou gases inamáveis. Devido à possível
ocorrência de choques eléctricos, não use esta ferramenta em condições
ou áreas húmidas ou molhadas. Quando manusear esta ferramenta, use
sempre as duas mãos. Assegure-se sempre que o material em que está
a trabalhar se encontra devidamente seguro.
• Este aparelho vem equipado de um cabo eléctrico e cha adequados
14 21
Page 15

Gerät einstellen
Netzanschluss
Es wird empfohlen das Modell 355 an einen separeten Netzanschluss,
und mit einem Reststromgerät zu schützen. Verlängerungskabel sollten
nicht länger als 15 Meter sein und 1,5mm2 für 240V Geräte haben.
Sägblätter wechseln: Kontrollieren, dass der Gerätestecker aus
der Netzsteckdose gezogen wurde. Lösen Sie die Flügelmutter (Abb.
1. Ref. A) und drehen Sie die Sägeblattabdeckung. Drücken Sie
die Spindelarretierung hinein und kontrollieren Sie, dass diese voll
eingerastet ist, indem Sie das Sägeblatt von Hand drehen. Mithilfe des
mitgelieferten 8mm Sechskantschlüssels die Sechstkantschraube, mit
der das Sägeblatt befestigt ist durch Drehen entgegen dem Uhrzeigersinn
lösen und Schraube, Unterlegscheibe, äußeren Sägeblattansch und
Sägeblatt abnehmen. Hinweis: Den inneren Sägeblattansch nicht
abnehmen. Die Spindelarretierung hineindrücken. Das neue Sägeblatt
aufstecken und dabei darauf achten, dass die beschriftete. Seite des
Sägeblatts auf Sie zu zeigt. Danach den äußeren Sägeblattansch,
die Unterlegscheibe und die Sechskantschraube anbringen. Die
Sechskantschraube im Uhrzeigersinn festdrehen. Hinweis: Kontrollieren
Sie, dass die Spindelarretierung vollständig freigegeben ist, indem
Sie das Sägeblatt vor dem Gebrauch von Hand drehen. Drehen Sie
die Sägeblattabdeckung in ihre Position zurück und ziehen Sie die
Flügelmutter fest. Befestigen Sie den Sechskantschlüssel wieder in der
Halterung am Gerät.
Schnitttiefenanschlag einstellen
Der Schnitttiefenanschlag (Abb. 2 Bezug A) muss so eingestellt
werden, dass die maximale Schnittleistung erreicht wird, ohne dass das
Sägeblatt den Gerätefuß berührt. Den Schneidkopf absenken, bis der
Arm den Tiefenanschlag berührt. Falls erforderlich Schraube und Mutter
des Schnitttiefenanschlags neu einstellen, bis der korrekte Freiraum
erreicht ist. Anschließend die Mutter anziehen, um den Tiefenanschlag
in dieser Stellung zu verriegeln.
Schnittwinkel einstellen
Der Schraubstock kann zwischen 0 und 45 Grad eingestellt werden.
Lösen Sie den Hebel am Schraubstock und stellen Sie den erforderlichen
Schnittwinkel ein. Ziehen Sie den Hebel fest, um den Winkel in der
gewünschten Position zu verriegeln.
Stationären Schraubstock einstellen
Der Schraubstock kann neu positioniert werden, indem der Hebel und
die Inbusschraube entfernt werden und der Anschlag in die gewünschte
Position geschoben wird. Bringen Sie den Hebel und die Schraube
wieder an und befestigen Sie diese in ihrer Position.
Ratschläge für den sicheren Betrieb von Metallsägen
Spannen Sie das zu schneidende Werkstück immer fest in den
Schraubstock ein. Um das Elektrowerkzeug einzuschalten, auf den
Hauptschalter drücken, um den Motor zu starten. Mit dem Motorkopf in
angehobener Stellung den Motor einschalten und warten bis er seine
volle Geschwindigkeit erreicht hat. Jetzt den Motorkopf absenken und mit
dem Schnitt beginnen. Am Anfang des Schnitts das Sägeblatt langsam
in das Werkstück einführen. Dabei zuerst leichten Druck ausüben,
um ein Einhaken des Sägeblatts zu vermeiden und dann den Schnitt
mit normalem Druck ausführen. Üben Sie keinen übermäßigen Druck
auf das Gerät aus, lassen Sie das Sägeblatt die Arbeit erledigen. Die
Schnittleistung wird durch mehr Druck auf das Gerät nicht verbessert,
dies reduziert jedoch die Lebensdauer von Sägeblatt und Motor. Den
Druck reduzieren, wenn das Sägeblatt aus dem Werkstück heraus fährt.
Nach Beendigung des Schnitts den Motorkopf wieder nach oben drücken
und den Motor abschalten. Halten Sie das Gerät frei von Metallspänen
und anderem Schmutz und Dreck.
20 15
Page 16

Werkstück einspannen
Das Werkstück so in den Schraubstock einspannen, dass es bei einer
Blockierung nicht vom Sägeblatt aus dem Schraubstock gedrückt
wird. Das Werkstück sicher einspannen. Winkel sollten umgestülpt
eingespannt werden, damit der Punkt des Prols nach oben zeigt. Die
Säge schneidet am efzientesten, wenn das Sägeblatt den dünnsten Teil
des Werkstücks schneidet (Abb. 3).
Wartung und das Finden und Beseitigen von Störungen
Halten Sie das Elektrowerkzeug und das Kabel sauber. Den Motor
in regelmäßigen Abständen absaugen oder ausblasen, um die
Lüftungsschlitze frei zu halten und kontrollieren, dass die Maschine
gut geschmiert ist. Wöchentlich kontrollieren. Vermeiden Sie
Reinigungsmittel, die Benzol, Trichlorethylen, Chlorid und Ammoniak
enthalten, da diese Kunststoffteile beschädigen können. Im Falle einer
elektrischen oder mechanischen Störung das Gerät sofort ausschalten
und den Gerätestecker aus der Netzsteckdose ziehen.
Späneschale ausleeren
Leeren Sie die Späneschale in regelmäßigen Abständen aus. Hierzu die
Schraube (Abb. 2 Bezug B) lösen und die Schale abnehmen. Schütten
Sie den Schaleninhalt in einen geeigneten Entsorgungsbehälter und
bringen Sie dann die Schale und die Halteschraube wieder an.
Kohlebürsten kontrollieren und austauschen
Übermäßige Funkenbildung ist meist ein Anzeichen für Schmutz im Motor
oder abgenutzte Kohlebürsten. Nach den ersten 50 Betriebsstunden
auf Abnutzung kontrollieren und danach in Abständen von 10
Betriebsstunden erneut kontrollieren. Wenn sie auf 6mm abgenutzt sind
die Kohlebürsten austauschen. Die Kohlebürstenhalter benden sich
einander gegenüber auf dem Motorgehäuse und können abgeschraubt
werden, um Zugang zu den Kohlebürsten zu erhalten. Für alle anderen
Kundendienst- und Wartungsarbeiten sollte das Gerät gewöhnlich nach
60 Betriebsstunden, abhängig von der Belastung, der es ausgesetzt war,
in ein Vertragskundendienstzentrum gebracht werden.
Schmierung
Die Motorlager Ihres Gerätes wurden im Werk mit ausreichend
Schmiermittel für die gesamte Lebensdauer des Geräts unter
normalen Betriebsbedingungen geschmiert. Andere bewegliche Teile
können nach Bedarf mit einem leichten Maschinenöl geschmiert
werden. Es wird empfohlen das Gerät mindestens einmal im Jahr
für eine gründliche Reinigung und Schmierung ins nächstgelegene
KUNDENDIENSTZENTRUM zu bringen. Alle in diesen Zentren
vorgenommenen Reparaturen und Kundendienstarbeiten sind gegen
Materialmängel und fehlerhafte Ausführung.
12 Monate Garantie
12 MONATE BESCHRÄNKTE GARANTIE. EVOLUTION POWER
TOOLSBEHÄLT SICH DAS RECHT VOR, OHNE VORANKÜNDIGUNG
VERBESSERUNGEN UND MODIFIKATIONEN AM DESIGN VORZUNEHMEN.
Evolution Power Tools verpichtet sich, innerhalb von zwölf (12) Monaten
ab dem ursprünglichen Kaufdatum alle Produkte zu reparieren oder
auszuwechseln, die Material- oder Verarbeitungsdefekte aufweisen.
Diese Garantie ist ungültig, wenn das zurückgeschickte Werzeug zum
Schneiden von Materialien verwendet wurde, die außerhalb der in dieser
Betriebsanleitung enthaltenen Empfehlungen liegen, oder wenn die Säge auf
Grund eines Unfalls, durch Vernachlässigung oder durch unangemessenen
Betrieb/Wartung beschädigt wurde. Diese Garantie gilt nicht für Maschinen
und/oder Bauteile, die in irgendeiner Weise geändert oder modiziert oder
in einer Weise verwendet wurden, die über die empfohlenen Kapazitäten
und Spezikationen hinausgeht. Elektrische Bauteile unterliegen den
Garantien ihrer jeweiligen Hersteller. Alle fehlerhaften Waren werden
Fracht vorausbezahlt an EvolutionPower Tools zurückgeschickt. Evolution
Desenrosque la tuerca de mariposa (g. 1 ref. A) y gire la cubierta de la
hoja. Presione el bloqueo del husillo y asegure que esté encajado por
completo girando manualmente la cuchilla. Usando la llave hexagonal de
8mm incluida, aoje el perno hexagonal que sujeta la cuchilla girándolo
en sentido contrario a las agujas del reloj, y retire el perno, la arandela,
la brida de la cuchilla exterior y la cuchilla. Nota: No retire la brida de la
cuchilla interior. Presione el bloqueo del husillo. Recambie la cuchilla,
asegurando que el lado impreso quede expuesto y luego vuelva a instalar
la brida de la cuchilla exterior, la arandela y el perno hexagonal. Gire el
perno hexagonal en sentido de las agujas del reloj para apretarlo. Nota:
Asegure que el bloqueo del husillo esté totalmente liberado, girando
manualmente la cuchilla antes de usar. Vuelva a poner la cubierta de
la hoja en su lugar y ajuste la tuerca de mariposa. Reinstale la llave
hexagonal en su alojamiento en la máquina.
Ajuste del tope de la profundidad de corte
El tope de bajada (g. 2. ref. A) deberá ajustarse de modo que se
mantenga la máxima capacidad de corte sin que la cuchilla golpee
la base. Baje el cabezal portacuchillas hasta que el brazo entre en
contacto con el tope de bajada. Si es necesario ajuste el tornillo y
la contratuerca del tope de bajada hasta obtener el huelgo correcto.
Apriete la contratuerca para bloquear el tope en su sitio.
Ajuste del ángulo de corte
La mordaza puede ajustarse de 0 a 45 grados. Aoje la palanca sobre el
torno y ajuste al ángulo de corte necesario. Ajuste la palanca para jar
la posición.
Ajuste de la mordaza ja
El torno puede volver a colocarse aojando la palanca y el tornillo de
Allen y deslizando después la guía hacia la posición deseada. Vuelva a
posicionar y ajuste la palanca y el tornillo para jar la posición.
Seguridad para con la sierra de metales
Consejos operacionales
Sujete siempre con seguridad en la mordaza el material que va a cortar.
Para arrancar la herramienta deberá pulsar el interruptor de disparo
principal a n de energizar el motor. Con el cabezal del motor alzado,
conmute el motor y deje que alcance su velocidad de trabajo. Baje el
cabezal del motor para iniciar el corte. Al comenzar un corte, tenga
cuidado de introducir lentamente la cuchilla en el material, presionando
ligeramente al principio para evitar que se agarre la cuchilla, y luego
continúe con una presión normal. No fuerce la herramienta; deje que
el trabajo lo realice la velocidad de la cuchilla. La ecacia de corte no
mejorará aplicando más presión y se reducirá la vida útil de la cuchilla y
del motor. Reduzca la presión a medida que la cuchilla sale del material.
Al completar el corte, retorne el cabezal del motor a su posición alzada
y desconecte la energía. Mantenga la herramienta limpia de virutas
metálicas, suciedad y otros residuos.
Sujeción de la pieza de trabajo
Disponga la pieza de trabajo en la mordaza de modo que si se produce
un atasco, la cuchilla no tienda a sacarla de la mordaza. Sujete la pieza
con seguridad. Los ángulos deberán estar en la posición invertida, de
modo que la punta de la sección quede más alta. La sierra cortará
de manera más ecaz si la cuchilla corta la sección más delgada del
material (g. 3).
Mantenimiento y localización de averías
Mantenga limpios el cable y la herramienta. Use regularmente una
aspiradora o aire comprimido en el motor para mantener despejada su
ventilación, asegurando también que la máquina esté bien lubricada.
Inspeccione semanalmente. Evite usar productos de limpieza que
podrían incluir benceno, tricloroetileno y amoniaco ya que pueden
dañar las piezas de plástico. En caso de mal funcionamiento eléctrico o
16 19
Page 17

2
para los
Power Tools behält sich das Recht vor, fehlerhafte Produkte entweder
zu reparieren oder gegen einen entsprechenden Artikel zu ersetzen. Es
besteht weder eine schriftliche noch verbale Garantie für Sägeblätter. In
keinem Fall ist Evolution Power Tools für Verluste oder Schäden haftbar,
die direkt oder indirekt aus der Verwendung oder Vermarktung oder
irgendeiner anderen Ursache resultieren.Evolution Power Tools ist nicht
für mit dieser Ware verbundene Kosten oder Folgeschäden verantwortlich.
Kein leitender Angestellter, Mitarbeiter oder Vertreter von Evolution Power
Tools ist berechtigt, irgendeine der vorstehenden Verkaufsbedingungen
aufzuheben oder mündliche Versprechen zur Tauglichkeit abzugeben,
welche für Evolution Power Tools nicht bindend sind.
Bei Fragen bezüglich dieser beschränkten Garantie wenden Sie sich bitte
an den Hauptsitz des Unternehmens oder rufen Sie den entsprechenden
Informationsdienst an.
Zubehör – Originalsägeblätter der Marke EVOLUTION
66T 355mm wolframkarbidbestücktes Sägeblatt für Weichstahl
80T 355mm wolframkarbidbestücktes Sägeblatt für Aluminium /
dünnes Weichstahlblech
90T 355mm wolframkarbidbestücktes Sägeblatt für Edelstahl
Hinweis: Normaler Verschleiß und durch falsche Bedienung
verursachte Beschädigung fallen NICHT unter die 12-Monate-Garantie.
Instrucciones de funcionamiento
Importante
Por favor lea detenidamente todas estas instrucciones de
funcionamiento y seguridad. Para su propia seguridad, antes de usar
este equipo compruebe que el voltaje sea correcto y que todos los
asideros y componentes estén instalados con seguridad. Si no está
seguro sobre algún aspecto del funcionamiento de este equipo, por
favor póngase en contacto con su distribuidor.
Por favor guarde estas instrucciones en un sitio seguro
Modelo Evolution 355 Raptor Especicaciones
Motor (230v ~ 50/60 Hz) (vatios): 2200
R.p.m. sin carga (min-1): 1450
Régimen de trabajo máximo recomendado (minutos): 30
Nivel de presión acústica (bajo carga) (dB(A)): 112.4
Nivel de vibración (m/s2): 1.39
Peso (Kg): 23
Dimensiones máximas (alzado) (mm): A 575 An 355 P 600
Máxima caja capacidad de corte a 90
0
Cuadrado (mm): 120 x 120
Rectangular (mm): 95 x 180
Redondo (mm): 130
Madera (mm): 125 x 125
Máxima caja capacidad de corte a 45
0
Cuadrado (mm): 89 x 89
Rectangular (mm): 78 x 110
Redondo (mm): 105
Dimensiones de la cuchilla
Diámetro máximo (mm): 355
Diámetro interior (mm): 25.4
Espesor (mm): 2.4
Equipo standard incluido con la herramienta: 1 placa de plantilla, 1 llave
hexagonal de 8mm, e 1 Instrucciones de funcionamiento.
Al manejar esta herramienta DEBEN llevarse auriculares y gafas
de protección. NO tocar la cuchilla mientras está en marcha.
Al manejar esta herramienta deben observarse siempre las
recomendaciones aplicables a equipos de protección personal.
Esta máquina está diseñada especícamente para cortar acero y otros
18 17
Page 18

materiales usando las cuchillas con TCT (borde de carburo al tungsteno)
adecuadas. NO deberá ser modicada y / o usada para cualquier otra
aplicación que no sea la intencionada, incluido el accionamiento de otros
equipos.
Asegure que toda la zona de trabajo pueda verse desde el punto
de manejo. Use barreras para mantener alejada a la gente. No use
la herramienta en entornos de trabajo explosivos; las herramientas
motorizadas crean chispas que pueden provocar la ignición de gases
o materiales inamables. No maneje la herramienta en lugares o
condiciones mojadas o húmedas, ya que pueden sufrirse sacudidas
eléctricas. Use siempre ambas manos para manejar la herramienta.
Verique siempre que el material de trabajo haya sido sujetado con
seguridad.
• Esta herramienta incorpora un cable y enchufe aprobados para el
país de uso intencionado. El conductor verde y amarillo del cable es
el de puesta a tierra; no conecte nunca este conductor a un borne
activo.
• Retire el enchufe del suministro de la red antes de recambiar
la cuchilla, efectuar ajustes o cualquier otro trabajo de
mantenimiento.
• Recomendamos usar solamente cuchillas marca EVOLUTION
auténticas.
• Inspeccione la máquina y la cuchilla antes de cada uso y no utilice
cuchillas deformadas, agrietadas, gastadas o dañadas.
• Asegure que la cuchilla esté correctamente instalada y no la
detenga con la mano.
• Use solamente cuchillas con capacidad para 1500rpm o más.
• Mantenga siempre el cable eléctrico alejado de las piezas móviles
de la herramienta.
• Al guardar la herramienta, apague el motor y asegure que se han
parado por completo todas las piezas móviles.
• Asegure que las guardas móviles funcionen sin atascarse.
• No use nunca la herramienta sin el sistema de guarda
protectora original activado. No bloquee la guarda móvil en su
posición abierta.
• En caso de atasco, desactive inmediatamente la herramienta y
retire el enchufe.
• Asegure que el ajuste de profundidad de corte, ajuste del ángulo y
mecanismos de sujeción estén instalados con seguridad mientras
usa la herramienta.
• Use solamente las bridas y arandelas incluidas con la herramienta,
y recámbielas cuando estén dañadas o rayadas.
• No maneje la herramienta bajo la inuencia de drogas, alcohol o
medicación. Mantenga partes sueltas de las ropas alejadas de las
piezas móviles de la sierra. Mantenga las manos alejadas de la
cuchilla en movimiento.
• Después de instalar una nueva cuchilla, deje siempre que la
máquina funcione durante aproximadamente un minuto antes de
cortar. Si la cuchilla tiene algún defecto puede hacerse pedazos
durante este tiempo, de modo que permanezca alejado de la
cuchilla.
• Asegúrese de usar todos los equipos de protección personal
necesarios y observe en todo momento las directrices de seguridad
pertinentes.
Conguración de la máquina
Suministro eléctrico
Se recomienda usar el modeloRaptor con un suministro eléctrico
separado, y estar protegido mediante un dispositivo contra corriente
residual. La longitud de cualquier cable de prolongación no deberá
ser superior a 15 metros y deberá tener un corte de 1,5mm2 para los
modelos de 240v.
Recambio de cuchillas: Asegure que la máquina esté desenchufada.
Power Tools behält sich das Recht vor, fehlerhafte Produkte entweder
zu reparieren oder gegen einen entsprechenden Artikel zu ersetzen. Es
besteht weder eine schriftliche noch verbale Garantie für Sägeblätter. In
keinem Fall ist Evolution Power Tools für Verluste oder Schäden haftbar,
die direkt oder indirekt aus der Verwendung oder Vermarktung oder
irgendeiner anderen Ursache resultieren.Evolution Power Tools ist nicht
für mit dieser Ware verbundene Kosten oder Folgeschäden verantwortlich.
Kein leitender Angestellter, Mitarbeiter oder Vertreter von Evolution Power
Tools ist berechtigt, irgendeine der vorstehenden Verkaufsbedingungen
aufzuheben oder mündliche Versprechen zur Tauglichkeit abzugeben,
welche für Evolution Power Tools nicht bindend sind.
Bei Fragen bezüglich dieser beschränkten Garantie wenden Sie sich bitte
an den Hauptsitz des Unternehmens oder rufen Sie den entsprechenden
Informationsdienst an.
Zubehör – Originalsägeblätter der Marke EVOLUTION
66T 355mm wolframkarbidbestücktes Sägeblatt für Weichstahl
80T 355mm wolframkarbidbestücktes Sägeblatt für Aluminium /
dünnes Weichstahlblech
90T 355mm wolframkarbidbestücktes Sägeblatt für Edelstahl
Hinweis: Normaler Verschleiß und durch falsche Bedienung
verursachte Beschädigung fallen NICHT unter die 12-Monate-Garantie.
Instrucciones de funcionamiento
Importante
Por favor lea detenidamente todas estas instrucciones de
funcionamiento y seguridad. Para su propia seguridad, antes de usar
este equipo compruebe que el voltaje sea correcto y que todos los
asideros y componentes estén instalados con seguridad. Si no está
seguro sobre algún aspecto del funcionamiento de este equipo, por
favor póngase en contacto con su distribuidor.
Por favor guarde estas instrucciones en un sitio seguro
Modelo Evolution 355 Raptor Especicaciones
Motor (230v ~ 50/60 Hz) (vatios): 2200
R.p.m. sin carga (min-1): 1450
Régimen de trabajo máximo recomendado (minutos): 30
Nivel de presión acústica (bajo carga) (dB(A)): 112.4
Nivel de vibración (m/s2): 1.39
Peso (Kg): 23
Dimensiones máximas (alzado) (mm): A 575 An 355 P 600
Máxima caja capacidad de corte a 90
0
Cuadrado (mm): 120 x 120
Rectangular (mm): 95 x 180
Redondo (mm): 130
Madera (mm): 125 x 125
Máxima caja capacidad de corte a 45
0
Cuadrado (mm): 89 x 89
Rectangular (mm): 78 x 110
Redondo (mm): 105
Dimensiones de la cuchilla
Diámetro máximo (mm): 355
Diámetro interior (mm): 25.4
Espesor (mm): 2.4
Equipo standard incluido con la herramienta: 1 placa de plantilla, 1 llave
hexagonal de 8mm, e 1 Instrucciones de funcionamiento.
Al manejar esta herramienta DEBEN llevarse auriculares y gafas
de protección. NO tocar la cuchilla mientras está en marcha.
Al manejar esta herramienta deben observarse siempre las
recomendaciones aplicables a equipos de protección personal.
Esta máquina está diseñada especícamente para cortar acero y otros
18 17
Page 19

Desenrosque la tuerca de mariposa (g. 1 ref. A) y gire la cubierta de la
hoja. Presione el bloqueo del husillo y asegure que esté encajado por
completo girando manualmente la cuchilla. Usando la llave hexagonal de
8mm incluida, aoje el perno hexagonal que sujeta la cuchilla girándolo
en sentido contrario a las agujas del reloj, y retire el perno, la arandela,
la brida de la cuchilla exterior y la cuchilla. Nota: No retire la brida de la
cuchilla interior. Presione el bloqueo del husillo. Recambie la cuchilla,
asegurando que el lado impreso quede expuesto y luego vuelva a instalar
la brida de la cuchilla exterior, la arandela y el perno hexagonal. Gire el
perno hexagonal en sentido de las agujas del reloj para apretarlo. Nota:
Asegure que el bloqueo del husillo esté totalmente liberado, girando
manualmente la cuchilla antes de usar. Vuelva a poner la cubierta de
la hoja en su lugar y ajuste la tuerca de mariposa. Reinstale la llave
hexagonal en su alojamiento en la máquina.
Ajuste del tope de la profundidad de corte
El tope de bajada (g. 2. ref. A) deberá ajustarse de modo que se
mantenga la máxima capacidad de corte sin que la cuchilla golpee
la base. Baje el cabezal portacuchillas hasta que el brazo entre en
contacto con el tope de bajada. Si es necesario ajuste el tornillo y
la contratuerca del tope de bajada hasta obtener el huelgo correcto.
Apriete la contratuerca para bloquear el tope en su sitio.
Ajuste del ángulo de corte
La mordaza puede ajustarse de 0 a 45 grados. Aoje la palanca sobre el
torno y ajuste al ángulo de corte necesario. Ajuste la palanca para jar
la posición.
Ajuste de la mordaza ja
El torno puede volver a colocarse aojando la palanca y el tornillo de
Allen y deslizando después la guía hacia la posición deseada. Vuelva a
posicionar y ajuste la palanca y el tornillo para jar la posición.
Seguridad para con la sierra de metales
Consejos operacionales
Sujete siempre con seguridad en la mordaza el material que va a cortar.
Para arrancar la herramienta deberá pulsar el interruptor de disparo
principal a n de energizar el motor. Con el cabezal del motor alzado,
conmute el motor y deje que alcance su velocidad de trabajo. Baje el
cabezal del motor para iniciar el corte. Al comenzar un corte, tenga
cuidado de introducir lentamente la cuchilla en el material, presionando
ligeramente al principio para evitar que se agarre la cuchilla, y luego
continúe con una presión normal. No fuerce la herramienta; deje que
el trabajo lo realice la velocidad de la cuchilla. La ecacia de corte no
mejorará aplicando más presión y se reducirá la vida útil de la cuchilla y
del motor. Reduzca la presión a medida que la cuchilla sale del material.
Al completar el corte, retorne el cabezal del motor a su posición alzada
y desconecte la energía. Mantenga la herramienta limpia de virutas
metálicas, suciedad y otros residuos.
Sujeción de la pieza de trabajo
Disponga la pieza de trabajo en la mordaza de modo que si se produce
un atasco, la cuchilla no tienda a sacarla de la mordaza. Sujete la pieza
con seguridad. Los ángulos deberán estar en la posición invertida, de
modo que la punta de la sección quede más alta. La sierra cortará
de manera más ecaz si la cuchilla corta la sección más delgada del
material (g. 3).
Mantenimiento y localización de averías
Mantenga limpios el cable y la herramienta. Use regularmente una
aspiradora o aire comprimido en el motor para mantener despejada su
ventilación, asegurando también que la máquina esté bien lubricada.
Inspeccione semanalmente. Evite usar productos de limpieza que
podrían incluir benceno, tricloroetileno y amoniaco ya que pueden
dañar las piezas de plástico. En caso de mal funcionamiento eléctrico o
16 19
Page 20

mecánico, desactive inmediatamente la herramienta y retire el enchufe.
Limpieza de la bandeja de virutas
Limpie periódicamente la bandeja de virutas quitando el tornillo (g.
2. ref. B) y retirando la bandeja. Vacíe la bandeja en un contenedor
de desechos adecuado y vuelva a instalar la bandeja y el tornillo de
retención.
Inspección y recambio de escobillas
Un chisporroteo excesivo casi siempre indica la presencia de suciedad
en el motor o escobillas de carbón desgastadas. Verique si hay
desgaste después de las primeras 50 horas de utilización y luego a
intervalos de 10 horas. Recambie las escobillas cuando alcancen 6mm.
Los portaescobillas están ubicados en el alojamiento del motor enfrente
uno del otro y se desenroscan para ofrecer acceso a las escobillas.
Lleve la máquina a un centro de servicio autorizado para cualquier otro
mantenimiento y reparación después de normalmente 60 horas de corte,
dependiendo del tipo de carga de trabajo a que ha sido sometida.
Lubricación
Los cojinetes del motor de las máquinas se lubrican en fábrica para que
duren toda su vida útil en condiciones de funcionamiento normales. Otras
piezas móviles pueden lubricarse con aceite de máquinas ligero según
convenga. Se recomienda llevar la maquina al CENTRO DE SERVICIO
AUTORIZADO más cercano por lo menos una vez al año para ser
sometida a una minuciosa limpieza y lubricación. Todas las reparaciones
y los servicios realizados en estos centros están absolutamente
garantizados contra materiales y mano de obra defectuosos.
Garantía de 12 Meses
GARANTÍA LIMITADA DE 12 MESES. EVOLUTION POWER TOOLS SE
RESERVA EL DERECHO A REALIZAR MEJORAS Y MODIFICACIONES EN EL
DISEÑO SIN PREVIO AVISO.
Evolution Power Tools reparará o sustituirá, dentro de los doce (12) meses
a partir de la fecha original de compra, cualquier artículo en el que se
encuentre algún defecto en el material o en la fabricación. Esta garantía
será nula si la herramienta que va a devolver ha sido utilizada para cortar
materiales fuera de las recomendaciones en el manual de instrucciones
o si la sierra ha sufrido algún daño por accidente, negligencia o uso
inadecuado. Esta garantía no se aplica a la maquinaria y/o componentes
que ha sufrido alteración, cambio o modicación de alguna forma o esté
sujeto al uso fuera de las capacidades y especicaciones recomendadas.
Los componentes eléctricos están sujetos a las respectivas garantías de los
fabricantes. Todos los artículos devueltos por defectuosos se devolverán
con transporte pagado por adelantado a Evolution Power Tools. Evolution
Power Tools se reserva el derecho a reparar o sustituir opcionalmente
por un artículo igual o equivalente. No existe garantía, escrita o verbal,
sobre las hojas de la sierra. En ningún caso Evolution Power Tools será
responsable por la pérdida o daño resultante directa o indirectamente del
uso o comercialización o de cualquier otra causa. Evolution Power Tools
no será responsable por ningún coste incurrido sobre estos artículos o
daños consecuenciales. Ningún representante, empleado o agente de
Evolution Power Tools está autorizado a realizar representaciones orales
de idoneidad o a renunciar a cualquiera de los términos anteriores de la
venta y ninguno será vinculante a Evolution Power Tools.
Las preguntas relacionadas con esta garantía limitada deberían dirigirse a la
sede principal de la empresa o llame al número de asistencia adecuado.
Accesorios – Cuchillas marca Evolution auténticas
66T Cuchilla acero suave TCT de 355mm
80T Cuchilla acero suave no / aluminio TCT de 355mm
90T Cuchilla capaz acero inoxidable TCT de 355mm
Gerät einstellen
Netzanschluss
Es wird empfohlen das Modell 355 an einen separeten Netzanschluss,
und mit einem Reststromgerät zu schützen. Verlängerungskabel sollten
nicht länger als 15 Meter sein und 1,5mm2 für 240V Geräte haben.
Sägblätter wechseln: Kontrollieren, dass der Gerätestecker aus
der Netzsteckdose gezogen wurde. Lösen Sie die Flügelmutter (Abb.
1. Ref. A) und drehen Sie die Sägeblattabdeckung. Drücken Sie
die Spindelarretierung hinein und kontrollieren Sie, dass diese voll
eingerastet ist, indem Sie das Sägeblatt von Hand drehen. Mithilfe des
mitgelieferten 8mm Sechskantschlüssels die Sechstkantschraube, mit
der das Sägeblatt befestigt ist durch Drehen entgegen dem Uhrzeigersinn
lösen und Schraube, Unterlegscheibe, äußeren Sägeblattansch und
Sägeblatt abnehmen. Hinweis: Den inneren Sägeblattansch nicht
abnehmen. Die Spindelarretierung hineindrücken. Das neue Sägeblatt
aufstecken und dabei darauf achten, dass die beschriftete. Seite des
Sägeblatts auf Sie zu zeigt. Danach den äußeren Sägeblattansch,
die Unterlegscheibe und die Sechskantschraube anbringen. Die
Sechskantschraube im Uhrzeigersinn festdrehen. Hinweis: Kontrollieren
Sie, dass die Spindelarretierung vollständig freigegeben ist, indem
Sie das Sägeblatt vor dem Gebrauch von Hand drehen. Drehen Sie
die Sägeblattabdeckung in ihre Position zurück und ziehen Sie die
Flügelmutter fest. Befestigen Sie den Sechskantschlüssel wieder in der
Halterung am Gerät.
Schnitttiefenanschlag einstellen
Der Schnitttiefenanschlag (Abb. 2 Bezug A) muss so eingestellt
werden, dass die maximale Schnittleistung erreicht wird, ohne dass das
Sägeblatt den Gerätefuß berührt. Den Schneidkopf absenken, bis der
Arm den Tiefenanschlag berührt. Falls erforderlich Schraube und Mutter
des Schnitttiefenanschlags neu einstellen, bis der korrekte Freiraum
erreicht ist. Anschließend die Mutter anziehen, um den Tiefenanschlag
in dieser Stellung zu verriegeln.
Schnittwinkel einstellen
Der Schraubstock kann zwischen 0 und 45 Grad eingestellt werden.
Lösen Sie den Hebel am Schraubstock und stellen Sie den erforderlichen
Schnittwinkel ein. Ziehen Sie den Hebel fest, um den Winkel in der
gewünschten Position zu verriegeln.
Stationären Schraubstock einstellen
Der Schraubstock kann neu positioniert werden, indem der Hebel und
die Inbusschraube entfernt werden und der Anschlag in die gewünschte
Position geschoben wird. Bringen Sie den Hebel und die Schraube
wieder an und befestigen Sie diese in ihrer Position.
Ratschläge für den sicheren Betrieb von Metallsägen
Spannen Sie das zu schneidende Werkstück immer fest in den
Schraubstock ein. Um das Elektrowerkzeug einzuschalten, auf den
Hauptschalter drücken, um den Motor zu starten. Mit dem Motorkopf in
angehobener Stellung den Motor einschalten und warten bis er seine
volle Geschwindigkeit erreicht hat. Jetzt den Motorkopf absenken und mit
dem Schnitt beginnen. Am Anfang des Schnitts das Sägeblatt langsam
in das Werkstück einführen. Dabei zuerst leichten Druck ausüben,
um ein Einhaken des Sägeblatts zu vermeiden und dann den Schnitt
mit normalem Druck ausführen. Üben Sie keinen übermäßigen Druck
auf das Gerät aus, lassen Sie das Sägeblatt die Arbeit erledigen. Die
Schnittleistung wird durch mehr Druck auf das Gerät nicht verbessert,
dies reduziert jedoch die Lebensdauer von Sägeblatt und Motor. Den
Druck reduzieren, wenn das Sägeblatt aus dem Werkstück heraus fährt.
Nach Beendigung des Schnitts den Motorkopf wieder nach oben drücken
und den Motor abschalten. Halten Sie das Gerät frei von Metallspänen
und anderem Schmutz und Dreck.
20 15
Page 21

Verletzungen.
Aviso: El desgaste normal y los daños causados por uso
incorrecto NO los cubre la garantía de 12 meses.
Instruções de Operação
Importante
Por favor leia estas instruções de operação e segurança com
atenção e na sua totalidade. Para sua segurança, antes de utilizar
este equipamento, verique se a voltagem de corrente eléctrica é
a correcta e que todos os manípulos e peças estão devidamente
seguros. Se tiver alguma dúvida acerca de qualquer um dos aspectos
da utilização deste equipamento, contacte o seu distribuidor.
Por Favor Guarde Estas Instruções
Especicações do modelo Evolution 355 Raptor
Motor (230 ~ 50/60Hz)(Watts): 2200
RPM Sem Carga (Velocidade 1 ) (mín-1): 1450
Tempo máximo de serviço recomendado (minutos): 30
Nível de pressão sonora (Sob Carga) (db(A): 112.4
Nível de Vibração (m/s2): 1.39
Peso (Kg): 23
Dimensões Máximas (Levantado) (mm): A 575 L 355 P 600
Dimensões Máximas da caixa 90
o
Quadrado (mm): 120 x 120
Rectângulo (mm): 95 x 180
Círculo (mm): 130
Madeira (mm): 125 x 125
Dimensões Máximas da caixa 45
o
Quadrado (mm): 89 x 89
Rectângulo (mm): 78 x 110
Círculo (mm): 105
Dimensões da Lâmina
Diâmetro Máximo: 355mm
Diâmetro de Perfuração: 25.4mm
Espessura: 2.4mm
Equipamento standard Fornecido com a unidade: 1 Dispositivo de
Fixação da Peça, 1 Chave Sextavada de 8 mm, 1 Instruções de
Operação.
Durante o uso deste equipamento é OBRIGATÓRIA a utilização
de protecções para os olhos e os ouvidos. NÃO toque na lâmina
enquanto esta se encontrar em movimento. Durante o uso desta
ferramenta, siga sempre as recomendações do Equipamento para
Protecção Individual.
Esta máquina foi concebida especicamente para cortar aço e outros
materiais utilizando as lâminas estelitados (com carboneto de
tungsténio). NÃO deverá ser modicada e/ou utilizada de alguma outra
forma a não ser aquela para a qual foi concebida, incluindo fornecer
energia a outros equipamentos.
Assegure-se que pode ver na totalidade a área em que vai trabalhar
a partir do lugar onde se posiciona. Utilize barreiras para afastar as
pessoas. Não use esta ferramenta em ambientes onde existir o risco de
explosão - as ferramentas eléctricas podem produzir faúlhas que por sua
vez podem incendiar materiais ou gases inamáveis. Devido à possível
ocorrência de choques eléctricos, não use esta ferramenta em condições
ou áreas húmidas ou molhadas. Quando manusear esta ferramenta, use
sempre as duas mãos. Assegure-se sempre que o material em que está
a trabalhar se encontra devidamente seguro.
• Este aparelho vem equipado de um cabo eléctrico e cha adequados
14 21
Page 22

ao país de utilização. O o verde e amarelo do cabo é o o terra,
nunca o tente ligar a um terminal positivo.
• Retire a cha da tomada antes de efectuar a troca da lâmina, antes
de fazer alinhamentos ou outros serviços de reparação.
• Recomendamos o uso de lâminas genuínas da marca
EVOLUTION
• Inspeccione sempre a máquina e a lâmina antes de cada utilização,
e não use lâminas deformadas, com falhas, desgastadas ou
danicadas de qualquer outro modo.
• Assegure-se que a lâmina se encontra correctamente montada e
não a pare manualmente.
• Utilize apenas lâminas para 1500 rpm ou mais.
• Mantenha sempre o cabo eléctrico afastado das partes móveis da
ferramenta.
• Quando arrumar a ferramenta , desligue o motor e assegure-se que
todas as partes móveis se encontram completamente paradas.
• Assegure-se de que as protecções móveis funcionam livremente e
sem prender.
• Nunca utilize a ferramenta sem o sistema original de protecção.
Não tranque a protecção móvel na posição aberta.
• No caso de encravamento, desligue a ferramenta imediatamente e
retire a cha da tomada.
• Assegure-se que o mecanismo de ajuste de corte, o mecanismo de
ajuste de ângulo e o torno encontram rmemente xos enquanto
utilizar a ferramenta.
• Utilize apenas as anges e porcas fornecidas com a ferramenta, e
substitua-as caso sejam danicadas ou quem gastas.
• Não utilize esta ferramenta enquanto estiver sob o efeito de drogas,
álcool ou medicação. Mantenha itens de vestuário soltos longe
das partes móveis da serra. Mantenha as mãos longe da serra
enquanto esta se encontrar em movimento.
• Após ter instalado uma lâmina nova, ponha a máquina em
funcionamento durante aproximadamente um minuto antes
de iniciar o corte. Caso a lâmina tenha alguma falha, poderá
despedaçar-se nesta altura, por isso mantenha-se afastado da
lâmina.
• Assegure-se que usa todo o equipamento de segurança pessoal
necessário e que segue as regras de segurança em todas as
alturas.
Montagem da máquina
Alimentação de Corrente Eléctrica
Recomenda-se a utilização do 355 com uma fonte de alimentação
separada, e a protecção de um Dispositivo de Corrente Residual.
Qualquer cabo de extensão deverá ter no mínimo 15 Metros e deverá
ser de 1.5mm2 para máquinas de 240v.
Troca de Lâminas
Assegure-se que a cha da máquina se encontra desligada da
tomada. Desaperte a porca de orelhas (g. 1 ref. A) e faça rodar a
tampa da lâmina. Prima o fecho do eixo e verique se está a funcionar
correctamente fazendo rodar a lâmina manualmente. Utilizando a chave
sextavada de 8mm que foi fornecida, desaperte o parafuso sextavado
que prende a lâmina fazendo-o girar no sentido oposto ao dos ponteiros
do relógio e remova o parafuso, a porca, a ange exterior da lâmina e
a lâmina. Nota: Não remova a ange interior. Prima o fecho do eixo.
Substitua a lâmina, certicando-se que o lado impresso ca virado para
si, colocando depois a ange externa, a porca, e o parafuso sextavado.
Aperte o parafuso no sentido dos ponteiros do relógio. Nota: Assegurese que o fecho do eixo está completamente solto fazendo rodar a lâmina
manualmente antes do uso. Faça rodar a tampa da lâmina colocando-a
de novo na posição inicial e aperte a porca de orelhas. Volte a colocar
chave no suporte da máquina.
Ajuste do Limite de Profundidade de Corte
O travão descendente (g. 2. ref. A) deveria ser ajustado de modo a
bien considéré comme défectueux sur les pièces où la main-d’oeuvre.
Cette garantie est rendue caduque si l’outil faisant l’objet d’un retour a
été utilisé pour couper des matériaux en dehors des recommandations du
mode d’emploi ou si la scie a été endommagée par accident, négligence ou
une mauvaise utilisation. Cette garantie ne s’applique pas aux machines
et/ou aux composants qui ont été altérés, modiés ou changés de quelque
façon que ce soit, ou sujet à une utilisation en dehors des capacités et
spécications recommandées. Les composants électriques sont soumis
aux garanties respectives des fabricants. Tous les biens défectueux
retournés doivent être renvoyés par colis prépayé à Evolution Power Tools.
Evolution Power Tools se réserve le droit de le réparer ou de le remplacer
par un élément identique ou équivalent. Il n’y a aucune garantie, écrite ou
verbale, concernant les lames de scie. En aucun cas Evolution Power Tools
ne peut être rendu responsable de la perte ou de l’endommagement résultant
directement ou indirectement de l’utilisation ou de la commercialisation ou
de tout autre cause. Evolution Power Tools n’est pas responsable de tous
frais encourus sur de tels biens ou de dommages conséquents. Aucun
directeur, employé ou agent de Evolution Power Tools n’est autorisé à
déclarer quelque aptitude ou à renoncer à toute conditions de vente de la
présente et Evolution Power Tools n’est nullement lié par ces dernières.
Les questions relatives à cette garantie limitée doivent être envoyées au siège
de la société, ou veuillez appeler le numéro de l’assistance approprié.
Accessoires – Lames de la marque Evolution
66T 355mm lame en carbure pour acier doux
80T 355mm lame en carbure pour aluminium / acier doux mince
90T 355mm lame en carbure pour acier inoxydable
Nota : L’usure excessive et les dommages provoqués par une
utilisation anormale ne sont pas couverts par la garantie de 12 mois.
Bedienungsanleitung
Wichtig
Bitte lesen Sie die Bedienungsanleitung und die Sicherheitshinweise
vollständig. Zu Ihrer Sicherheit, überprüfen Sie bitte vor jeder Benutzung,
dass die Spannung der Stromquelle mit den Angaben auf dem Typenschild
des Gerätes übereinstimmt, und dass alle Handgriffe und Geräteelemente
sicher montiert sind. Sollten Sie zu irgendeinem Aspekt der Bedienung
dieses Gerätes Fragen haben, wenden Sie sich bitte an Ihren Händler.
Diese Bedienungsanleitung bitte aufbewahren
Technische Daten, Modell Evolution 355 Raptor
Motor (230v ~ 50/60 Hz) (Watt): 2200
Leerlaufdrehzahl (Geschwindigkeit 1) (min-1): 1450
Empf. Höchstdauer für ununterbrochenen Betrieb (Minuten): 30
Schalldruckpegel (unter Last) (dB(A)): 112.4
Vibrationspegel (m/s2): 1.39
Gewicht (kg): 23
Maximale Abmessungen (angehoben) (mm): H 575 B 355 T 600
Maximale Kiste Schnittleistung 90
0
Quadratisch (mm): 120 x 120
Rechteckig (mm): 95 x 180
Rund (mm): 130
Holz (mm): 125 x 125
Maximale Kiste Schnittleistung 45
0
Quadratisch (mm): 89 x 89
Rechteckig (mm): 78 x 110
Rund
(mm): 105
Sägeblatt
Maximaler Durchmesser (mm): 355
Aufnahmebohrung (mm): 25.4
Dicke (mm): 2.4
Im Lieferumfang des Gerätes enthaltene Standardausrüstung: 1 Bohrplatte, 1
8mm Sechskantschlüssel, 1 Bedienungsanleitung.
22 13
Page 23

que a capacidade máxima de corte se mantenha sem que a lâmina
bata contra a base. Baixe a cabeça de corte até o braço bater no
travão descendente. Caso seja necessário, ajuste o parafuso do travão
descendente e a porca de travamento até conseguir o distanciamento
correcto. Aperte a porca de travamento para xar a posição.
Ajuste do Ângulo de Corte
O torno pode ser ajustado de 0 a 45 graus. Desaperte o manípulo da
prensa e ajuste de acordo com o ângulo desejado de corte. Aperte o
manípulo para xar a posição.
Ajuste do Torno Fixo
A prensa pode ser reposicionada removendo o manípulo e o parafuso
Allen, fazendo deslizar o rebordo para a posição desejada. Substitua e
aperte o manípulo e o parafuso para xar a posição.
Segurança no Corte de Metal
Conselhos sobre a utilização
Fixe sempre a peça em que vai trabalhar ao torno. Para ligar a
ferramenta, tem de premir o interruptor principal de corrente do motor.
Com a cabeça do motor levantada, ligue o motor e deixe que seja
alcançada a velocidade máxima. Baixe a cabeça do motor para iniciar o
corte. Quando iniciar o corte, tenha o cuidado de introduzir lentamente
a lâmina no material, aplicando uma ligeira pressão ao princípio para
impedir que a lâmina prenda e continue com a pressão normal. Não
force a ferramenta – deixe que a velocidade da lâmina de corte faça o
trabalho. O desempenho do corte não melhora através da aplicação
de pressão adicional sobre a ferramenta, sendo reduzida a duração da
lâmina. Vá diminuindo a pressão à medida que a lâmina sai do material.
Quando terminar o corte, volte a colocar a cabeça do motor na posição
vertical e desligue a corrente. Mantenha a ferramenta limpa e sem
chispas de metal, sujidade ou outros detritos.
Fixação da Peça de Trabalho
Posicione o trabalho sobre o torno para, no caso de ocorrer um
encravamento, a peça não ser projectada para fora do torno pela lâmina.
Aperte-o bem. Os ângulos deverão car em posição invertida de modo a
que o ponto de seccionamento seja o mais alto. A serra corta com mais
ecácia se a lâmina estiver a cortar a secção mais na do material (g. 3).
Manutenção e Determinação da Causa de Problemas
Mantenha a ferramenta e o cabo de ligação limpos. Aspire ou sopre
regularmente a unidade do motor de modo a manter a ventilação limpa,
verique também se a máquina se encontra lubricada. Inspeccione
semanalmente. Evite a utilização de produtos de limpeza, entre os
quais a benzina, tricloroetileno, cloreto e amónia já que estes produtos
danicam o plástico. No caso de haver uma avaria eléctrica ou mecânica,
desligue imediatamente a ferramenta e retire a cha da tomada.
Limpeza do Tabuleiro de Recolha de Aparas
Limpe periodicamente o tabuleiro de recolha de aparas desapertando
o parafuso (g. 2.ref. B) e removendo o tabuleiro. Esvazie o tabuleiro
para um recipiente adequado e volte a colocar o tabuleiro apertando o
parafuso de retenção.
Inspecção e Substituição da Escova
Demasiadas faúlhas podem indicar a presença de sujidade no motor
ou o desgaste das escovas de carbono. Verique se há desgaste após
as primeiras 50 horas de utilização, e em seguida em intervalos de
10 horas. Proceda à sua substituição quando alcançarem os 6mm.
Os suportes das escovas encontram-se na caixa do motor, em lados
opostos um ao outro e desapertam-se de forma a permitir acesso
às escovas. Para todos as outras reparações e manutenção, leve a
máquina a um centro de reparação autorizado, normalmente após 60
horas de corte, consoante o tipo de carga de trabalho a que foi sujeita.
12 23
Page 24

Lubricação
Os rolamentos do motor da sua máquina já vêm lubricados de
fábrica com lubricante suciente para a duração total de utilização
da unidade em condições normais de operação. As outras peças
móveis podem ser lubricadas com óleo de máquina no conforme
necessário. Recomenda-se que a máquina seja levada ao CENTRO DE
SERVIÇO AUTORIZADO mais próximo pelo menos uma vez por ano
para uma limpeza e lubricação mais profundas.Todas as reparações
e manutenções efectuadas por estes serviços, são completamente
garantidas contra materiais e mão de obra defeituosos.
Garantia de 12 Meses
GARANTIA LIMITADA DE 12 MESES. A EVOLUTION POWER TOOLSRESERVASE AO DIREITO DE EFECTUAR MELHORIAS E ALTERAÇÕES AO DESIGN
SEM AVISO PRÉVIO.
A Evolution Power Tools, num espaço de doze (12) meses desde a data
de compra original, irá efectuar a reparação ou substituição de quaisquer
equipamentos que apresentem defeitos de materiais ou mão-de-obra.
Esta garantia ca sem efeito caso a ferramenta a ser devolvida tenha sido
usada para corte de materiais para além dos recomendados no Manual
de Instruções ou caso a serra tenha sido danicada acidentalmente, por
negligência ou através de uma manutenção inadequada. Esta garantia
não se aplica a quaisquer máquinas e/ou componentes que tenham
sido alterados, mudados ou modicados de qualquer forma, ou que
tenham sido sujeitos a uma utilização para além das suas capacidades e
especicações recomendadas. Os componentes eléctricos encontram-se
sujeitos às garantias dos respectivos fabricantes. Todos os equipamentos
a devolver com defeito deverão ser devolvidos com portes pagos à
Evolution Power Tools. A Evolution Power Tools reserva-se ao direito de
optar entre uma reparação ou uma substituição com equipamento igual
ou equivalente. Não existe qualquer garantia – escrita ou verbal – para as
lâminas da serra. A Evolution Power Ferramentas não pode em qualquer
altura ser responsabilizada por perdas ou danos resultantes directa ou
indirectamente da utilização, ou mercadoria ou por qualquer outra causa.A
Evolution Power Tools não é responsável por quaisquer custos incorridos
nesses equipamentos ou em danos consequenciais. Nenhum ocial,
empregado ou agente da Evolution Power Tools se encontra autorizado a
fazer representações verbais de aptidão ou a abdicar de quaisquer umas
das condições de venda acima mencionadas, sendo que a Evolution Power
Tools não cará comprometida em cumprir com nenhuma delas.
Quaisquer perguntas relativas a esta garantia limitada deverão ser dirigidas à
sede da empresa, ou deverá efectuar-se uma chamada para o número da Linha
de Apoio adequada.
Acessórios – Lâminas Genuínas da Marca Evolution
66T 355mm TCT Lâmina de Aço Macio
80T 355mm TCT Alumínio / Lâmina de Aço Macio Fina
90T 355mm TCT Lâmina de Capacidade para Aço Inoxidável
Note: Os estragos normais causados por uma utilização incorrecta
da ferramenta NÃO são cobertos pela garantia de 12 Meses.
Istruzioni d’uso
IMPORTANTE!!
Leggere attentamente e integralmente le istruzioni d’uso. Per la
vostra sicurezza, prima di iniziare ad operare controllare che la
tensione dell’eletttroutensile sia corretta e che manopole e comandi
siano integri. In caso di dubbio su ogni aspetto dell’uso di questo
elettroutensile contattare il distributore.
• Toujours écarter la câble d’alimentation des pièces en mouvement
de l’outil.
• Mettre hors marche le moteur et s’assurer que toutes les pièces en
mouvement se sont arrêtées complètement avant de ranger l’outil.
• S’assurer que les carters mobiles peuvent fonctionner sans
bloquer.
• Ne jamais utiliser l’outil sans les carters de protection
d’origine. Ne pas verrouiller le carter mobile dans la position
ouverte.
• Mettre l’outil hors marche et débrancher la che en cas de
blocage.
• S’assurer que le levier de réglage de profondeur de coupe, le levier
de réglage d’angle et les étaux sont bien xés lors de l’utilisation de
l’outil.
• N’utiliser que les brides et les rondelles livrées avec l’outil et les
remplacer lorsqu’elles sont endommagées ou rainées.
• Ne pas utiliser l’outil sous l’inuence de la drogue, de l’alcool ou de
médicaments. Ecarter les vêtements amples des pièces en rotation
de la scie. Tenir les mains à l’écart de la scie lors de l’utilisation.
• Toujours faire fonctionner la scie pendant une minute après
l’installation d’une nouvelle lame et avant de commencer à couper.
Les lames qui présentent un défaut peuvent éclater, il est conseillé
de se tenir à l’écart de la lame.
• Toujours utiliser les dispositifs de protection personnelles et suivre
les consignes de sécurité.
Installation de la scie
Alimentation
Il est conseillé de brancher la 355 sur une alimentation séparée, et de
la protéger par un dispositif de courant résiduel. Toute rallonge ne peut
dépasser 15 mètres en longueur et doit être 1,5 mm2 pour des scies de
240V.
Remplacement de lames: S’assurer que la scie est débranchée.
Défaites l’écrou papillon (g.1. réf. A) puis tournez le couvercle de lame.
Appuyer sur le bouton de blocage d’arbre et vérier si le bouton est
enclenché en tournant la lame à la main. Desserrer le boulon à six pans
qui xe la lame à l’aide de la clé à six pans de 8 mm en la tournant dans
le sens des aiguilles d’une montre et retirer le boulon, la rondelle, la bride
extérieure de la lame et la lame. Nota : Ne pas retirer la bride intérieure
de la lame. Appuyer sur le bouton de blocage d’arbre. Replacer la lame
en s’assurant que le côté imprimé de la lame est visible et remonter la
bride extérieure de la lame, la rondelle et le boulon à six pans. Tourner le
boulon à six pans dans le sens des aiguilles d’une montre pour le serrer.
Nota : Vérier si le bouton de blocage d’arbre est déclenché en tournant
la lame avant l’utilisation de la scie. Tournez de nouveau en position le
couvercle de lame et resserrez l’écrou papillon. Replacer la clé à six
pans dans le porte-outils sur la scie.
Réglage de la butée de la profondeur de coupe
La butée du brin descendant (Fig. 2. réf. A) doit être réglée de sorte que
la capacité maximale de coupe soit conservée sans que la lame touche
à la semelle. Baisser la tête de coupe jusqu’à ce que le bras touche à la
butée du brin descendant. Ajuster la vis de la butée du brin descendant
et l’écrou de blocage jusqu’à un jeu approprié ait été obtenu. Serrer
l’écrou de blocage.
Réglage de l’angle de coupe
L’étau de serrage peut être réglé de 0 à 45 degrés. Relâchez la manette
sur l’étau et réglez à l’angle de coupe souhaité. Resserrez la manette
pour verrouiller en position.
Réglage de l’étau de serrage stationnaire
L’étau peut être repositionné en enlevant la manette et la vis Allen puis en
faisant glisser le guide sur la position souhaitée. Replacez et resserrez la
manette et la vis pour le verrouiller en position.
24 11
Page 25

Important
0
0
Conservare queste istruzioni d’uso
Caratteristiche Tecniche Evolution 355 Raptor
Tensione 220 Volt
Potenza assorbita 2200 Watt
Velocità a vuoto 1450 g/m
Duty Cycle: 30 min.
Pressione sonora: 112,4 DbA
Livello vibrazioni sotto carico 1.39 (m/s2)
Peso 23,0 kg
Dimensioni max (testa di taglio sollevata) 575x355x600
Capacità max taglio scatolato 90°
quadrato 120 x 120 mm
rettangolare 95 x 180 mm
tubolare (diam.) 130 mm
legno (mm): 125 x 125 mm
Capacità max taglio scatolato 45°
quadrato 89 x 89 mm
rettangolare 78 x 110 mm
tubolare (diam.) 105 mm
Dimensioni lama:
Diametro max: 355 mm
Diametro foro: 25,4 mm
Spessore: 2,4 mm
Dotazione standard: 1 piastra angolare per scatolati, 1 chiave a brugola 8mm, 1
manuale d'istruzioni.
Occhiali di protezione e tappi per le orecchie DEVONO essere
utilizzati lavorando con questo elettroutensile. NON TOCCARE la
lama quando è in movimento. Seguire scrupolosamente le norme
vigenti sulla sicurezza sul lavoro durante l’utilizzazione di questo
elettroutensile.
Questo elettroutensile è stato progettato per tagliare acciaio e altri metalli
utilizzando lame TCT, Tungsten Carbide Tipped (lame al Carburo di
Tungsteno con denti riportati). NON può essere modocato e/o utilizzato
per applicazioni diverse da quella per cui è stato progettato, ivi compreso
l’utilizzo con utensili diversi da quelli indicati.
Assicurarsi che l’area di lavoro sia completamente visibile dalla postazione
in cui si opera. Utilizzare opportuni sbarramenti per i non addetti ai
lavori. Non utilizzare l’elettroutensile in aree a rischio di esplosione: le
scintille generate potrebbero innescare incendi o esplosioni di sostanze
o gas inammabili. Non utilizzare l’elettroutensile in aree bagnate o in
condizioni di alta umidità per evitare il rischio di cortocircuiti. Utilizzare
l’elettroutensile operando sempre con entrambe le mani. Assicurarsi
sempre che il materiale da tagliare sia opportunamente ssato.
• Questo elettroutensile è equipaggiato con cavo di alimentazione e
spina adatti alle normative del vostro paese. Il conduttore giallo/
verde è il collegamento a terra: non collegare MAI questo conduttore
alla corrente.
• Staccare sempre la spina prima di cambiare la lama, effettuare
regolazioni o qualsiasi intervento di manutenzione.
• Utilizzare esclusivamente lame originali Evolution.
• Controllare l’elettroutensile e la lama prima di ogni lavoro e non
utilizzare lame deformate, crepate, consumate o in qualche modo
danneggiate.
• Utilizzare esclusivamente lame specicate per girare a velocità di
1500 g/m o superiori.
• Tenere il cavo di alimentazione lontano dalle parti in movimento
• Assicurarsi che le protezioni mobili operino correttamente senza
intoppi.
• Dopo il lavoro spegnere sempre la macchina prima di riporla.
• Non utilizzare mai l’elettroutensile senza i dispositivi di
protezione.
• Non bloccare le protezioni in posizione aperta.
• In caso di bloccaggio spegnere immediatamente la macchina e
10 25
Page 26

staccare la spina.
• Assicurarsi sempre che i dispositivi regolazione profondità,
regolazione angolazione e la morsa siano serrati fermamente
durante l’uso della macchina .
• Utilizzare esclusivamente rondelle e ange originali fornite con
l’elettroutensile e sostituirle se danneggiate.
• Non utilizzare la macchina sotto l’inuenza di droghe, alcool o
medicine e tenere parti mobili di indumenti lontane dai dispositivi
in movimento della macchina. Tenere le mani lontane dalla lama
mentre lavora.
• Dopo aver installato una lama nuova far girare la macchina per circa
un minuto prima di effettuare un taglio. Una eventuale lama difettosa
potrebbe rompersi in questa fase, QUINDI STARE LONTANI.
• Utilizzare sempre le protezioni personali e seguire scrupolosamente
le norme di sicurezza in vigore.
MESSA IN FUNZIONE
Alimentazione
Si raccomanda di utilizzare la macchina collegandola ad una presa dedicata con
cavi non inferiori a 12 AWG e protetta da un dispositivo Residual Current Device.
Eventuali cavi di prolunga non devono più lunghi di 15 m e devono avere un
diametro minimo di 1,5 mm.
Cambio lama
Assicurarsi sempre che la spina sia staccata. Allentare il dado (g.1 rif.A) e
ruotare la copertura della lama. Azionare il dispositivo di bloccaggio lama e
assicurarsi che sia completamente inserito ruotando la lama manualmente.
Svitare completamente il bullone esagonale che blocca la lama utilizzando la
chiave in dotazione agendo in senso antiorario. Rimuovere bullone, rondella
angia esterna e lama. Attenzione: Non rimuovere la angia interna. Azionare il
dispositivo di bloccaggio. Montare la lama posizionandola con le scritte leggibili
da chi la sta montando, quindi rimontare la angia esterna, la rondella e il bullone
esagonale. Serrare a fondo il bullone di bloccaggio agendo in senso orario.
Attenzione: Vericare che il dispositivo di bloccaggio lama sia completamente
disinserito ruotando la lama manualmente. Ruotare la copertura della lama nella
posizione desiderata e stringere il dado. Riporre la chiave nel suo alloggiamento
sulla macchina.
Regolazione dello stop della profondità di taglio
Lo stop in basso (g.2 rif.A) dovrebbe essere sistemato in modo che la massima
capacità di taglio è mantenuta senza che la lama colpisca la base. Abbassare la
testa di taglio no a che il braccio arrivi allo stop. Se necessario regolare la vite
di fermo corsa e bloccarla nchè si ottenga la giusta posizione. Stringere la vite
di bloccaggio per chiudere in posizione.
Regolazione angolo di taglio
La morsa può essere da 0 a 45°. Allentare la leva del misuratore d’angolo e
sistemare l’angolo di taglio desiderato. Stringere la leva per bloccare nella
posizione desiderata.
Regolazione della posizione della morsa
Il misuratore d’angolo può essere riposizionato rimuovendo la leva e la vite
a brugola, facendo scivolare la guida nella posizione desiderata. Sostituire e
avvitare stringendo la leva per bloccare nella corretta posizione.
SICUREZZA NEL TAGLIO DEI METALLI
Norme di utilizzo importanti
Fissare sempre in modo sicuro nella morsa il pezzo da tagliare. Per mettere in
funzione la macchina premere l’interruttore principale per alimentare il motore.
Con la testa di taglio sollevata accendere il motore e attendere che raggiunga
il massimo regime. Abbassare la testa di taglio per iniziare il taglio. Il taglio va
iniziato avvicinando lentamente la lama al materiale da tagliare. Esercitare
all’inizio una pressione molto leggera per evitare impuntamenti della lama e
successivamente procedere con pressione normale.
IMPORTANTISSIMO: assolutamente non forzare l’elettroutensile in fase di
taglio: far lavorare la lama alla sua velocità naturale e lasciare che sia lei a
fare il lavoro! L’eccessiva pressione riduce la vita della lama e del motore e
NON migliora le prestazioni.
Diminuire la pressione non appena la lama fuoriesce dal pezzo. Completato
Inspectie en vervanging van koolborstels
Buitensporige vonkoverslag duidt op de aanwezigheid van vuil in de motor
of versleten koolborstels. De koolborstels na de eerste 50 bedrijfsuren en
hierna na elke 10 bedrijfsuren op slijtage controleren. De koolborstels
vervangen zodra deze 6 mm hoog zijn. De koolborstelhouders bevinden
zich op het motorhuis tegenover elkaar en moeten losgedraaid worden
voor toegang tot de koolborstels. De machine voor alle andere
reparaties en onderhoud naar een erkend servicecentrum brengen na
60 bedrijfsuren, afhankelijk van de werklast.
Smering
De motorlagers van de zaag werden in de fabriek gesmeerd met
voldoende smeermiddel voor de levensduur van de zaag in normale
gebruiksomstandigheden. Andere bewegende onderdelen kunnen
met lichte machineolie worden gesmeerd indien nodig. Het is
aanbevolen om de zaag tenminste één keer per jaar voor een grondige
schoonmaakbeurt en smeerbeurt naar het dichtstbijzijnde ERKENDE
SERVICECENTRUM te brengen. Op alle door deze centra uitgevoerde
reparaties en onderhoud wordt een volledige garantie tegen fabricage-
en materiaalfouten verstrekt.
12 Maanden Waarborg
12 MAANDEN BEPERKTE WAARBORG. EVOLUTION POWER TOOLS
BEHOUDEN ZICH HET RECHT VOOR VERBETERINGEN EN WIJZIGINGEN
AAN HET ONTWERP DOOR TE VOEREN ZONDER VOORAFGAAND
BERICHT.
Evolution Power Tools zullen binnen de twaalf (12) maanden na de
oorspronkelijke datum van aankoop alle producten herstellen of vervangen
die defecten vertonen in materiaal of vervaardiging. Deze waarborg is
ongeldig indien het teruggestuurde werktuig gebruikt werd voor het snijden
van materialen die buiten de aanbevelingen in de Gebruikshandleiding
vallen of indien de zaag beschadigd werd door ongeluk, verwaarlozing of
incorrect onderhoud. Deze waarborg is niet van toepassing op apparaten en/
of elementen die werden gewijzigd, veranderd of op enige wijze omgevormd,
of onderworpen aan gebruik dat aanbevolen vermogen en eigenschappen
overschrijdt. Elektrische componenten vallen onder hun respectieve
fabrikantenwaarborg. Alle defecte productendienen per voorbetaalde
verzending naar EvolutionPower Tools teruggestuurd te worden. Evolution
Power Tools behouden het recht om het te herstellen of het te vervangen
door hetzelfde of een gelijkaardig product.Er is geen waarborg -schriftelijk
of mondeling - voor zaagbladen. In geen geval zal Evolution Power Tools
aansprekelijk zijn voor verlies of schade die rechtstreeks of onrechtstreeks
het gevolg zijn van het gebruik van het product of enige andere reden.
Evolution Power Tools is niet aansprakelijk voor enige onkosten aan deze
producten of gevolgschade.Geen enkele werknemer, bediende of agent
van Evolution Power Tools heeft de toelating mondelinge uitdrukkingen
van geschiktheid te maken of afstand te doen van enige voorwaarde in de
huidige verkoopsvoorwaarden en Evolution Power Tools zou ten gevolge
hiervan in geen geval gebonden zijn.
Vragen over deze beperkte waarborg dienen geadresseerd te worden aan de
hoofdzetel van de maatschappij, of bel het toepasselijke Helplijnnummer.
Accessoires – Originele Evolution zaagbladen
66T 355 mm hardmetalen zaagblad voor vloeistaal
80T 355 mm hardmetalen zaag blad voor aluminium / dun vloeistaal
90T 355 mm hardmetalen zaagblad voor roestvrij staal
N.B.: Buitensporige slijtage en beschadiging veroorzaakt door
onoordeelkundig gebruik worden niet door de garantie van 12
maanden gedekt.
26 9
Page 27

8
il taglio sollevare la testa riportandola nella sua posizione di partenza; quindi
spegnere la macchina. Curare sempre la pulizia dell’utensile liberandolo ogni
volta dagli sfridi metallici: il dispositivo Hitech Cyclone è lo strumento ideale a
questo scopo.
Posizionamento del pezzo nella morsa
Posizionare accuratamente il pezzo nella morsa in modo da evitare, in caso di
bloccaggio, che la lama possa espellerlo dalla morsa. Bloccare accuratamente
il pezzo in posizione di taglio. Gli angoli devono essere presentati in posizione
invertita come indicato in gura 3, in modo che la punta della sezione sia
posizionata verso l’alto:
Regolazione profondità di taglio
Il limitatore di corsa verso il basso in g. 2 deve essere regolato in modo che la
lama non tocchi mai la base di lavoro. Abbassare la testa della macchina no
a che il braccio tocchi il limitatore di corsa (stop). Se necessario, regolarne la
posizione allentando il bullone e successivamente bloccare la posizione serrando
il dado. La troncatrice taglia in modo molto più efcace se la lama lavora nella
sezione minore del pezzo.
Manutenzione e controlli di funzionamento
Curare la pulizia dell’elettroutensile e del cavo di alimentazione. Pulire
periodicamente il vano motore aspirando o sofando via la sporcizia e gli sfridi,
in modo da assicurare sempre una corretta ventilazione. Evitare l’uso di prodotti
detergenti che contengano benzene, tricloetilene, cloruri e ammoniaca, in quanto
potrebbero danneggiare le parti in plastica. In caso di malfunzionamenti elettrici o
meccanici spegnere immediatamente l’elettroutensile e scollegare la spina.
Pulizia del vano raccogli-sfridi
Pulire periodicamente il vano raccogli-sfridi svitando le viti indicate in g.2,
riferimento B. Rimuovere il contenitore, svuotarlo in modo appropriato e
rimontarlo nella sua posizione serrando le viti di bloccaggio.
Controllo e sostituzione dei carboncini
La produzione eccessiva di scintille può essere segno di sporcizia nel motore o di
carboncini consumati. Controllare lo stato dei carboncini dopo le prime 50 ore e
successivamente ogni 10 ore di funzionamento effettivo. I supporti dei carboncini
sono situati ai due lati della carrozzeria del motore. Per qualsiasi altro intervento
di manutenzione rivolgersi al Distributore per effettuare la manutenzione
preventiva tipicamente dopo 60 ore di funzionamento effettivo tenendo conto del
tipo di lavoro effettuato.
Lubricazione
I cuscinetto del vostro elettroutensile sono stati lubricati all’atto della produzione
e il lubricante è tale da garantirne l’uso per tutta la vita prevista dell’elettroutensile
in normali condizioni d’uso. Le altre parti mobili possono essere lubricate con
lubricante leggero qualora necessario. Si raccomanda di portare la macchina
ad un centro di riparazione autorizzato indicato dal distributore almeno una volta
l’anno per farne effettuare pulizia e lubricazione. Ogni intervento di manutenzione
effettuato da un centro autorizzato è coperto da garanzia per materiali difettosi
e manodopera.
Garanzia 12 Mesi
GARANZIA 12 MESI. EVOLUTION POWER TOOLS SI RISERVA IL DIRITTO DI
MIGLIORAMENTI E MODIFICHE SENZA PREAVVISO O SEGNALAZIONE.
Evolution Power Tools provvederà, nei dodici mesi di garanzia, a riparare
o sostituire qualsiasi attrezzo risultato difettoso. Questa garanzia decade
se l’attrezzo è stato usato per tagliare materiali diversi dalle istruzioni o
se ci sia stato danneggiamento per incidenti, negligenze e uso improprio.
Non si applica la garanzia ad attrezzi e componenti che siano stati alterati
o sostituiti o sottoposti a uso oltre le capacità e speciche raccomandate.
I componenti elettrici sono oggetto della garanzia dei rispettivi produttori.
Ogni attrezzo ritornato difettoso verrà inviato porto franco a Evolution
Power Tools. E’ discrezione di Evolution Power Tools di riparare oppure
sostituire ogni attrezzo a proprio giudizio. Sono escluse da garanzia – scritta
o verbale – le lame circolari. In nessun caso Evolution Power Tools può
essere responsabile per eventuali perdite o danni provocati direttamente
o indirettamente per l’uso o l’utilizzo o per qualsiasi altra causa. Evolution
Power Tools non è responsabile per nessun costo o nessun danno diretto
o indiretto. Nessun impiegato, agente o responsabile interno è autorizzato
27
Page 28

a dare verbalmente istruzioni diverse o a rinunciare ad alcuno dei termini
precedenti e queste dichiarazioni, comunque, non saranno vincolanti per
Evolution Power Tools.
Qualsiasi domanda relativa a questa garanzia deve essere diretta alla sede
centrale di Evolution Power Tools oppure indirizzata presso la sede Evolution
Italia.
Accessori - Lame Evolution originali
66T 355mm Blu 66 denti Lama TCT acciaio
80T 355mm Verde 80 denti Lama TCT alluminio/lamiera acciaio
90T 355mm Gialla 90 denti Lama TCT Inox
Attenzione: L’usura normale, le rotture e i danni causati da utilizzo improprio
NON sono coperti dalla garanzia di 12 mesi.
ΟΔΗΓΙΕΣ ΧΡΗΣΕΩΣ
Σημαντικό
Παρακαλούμε διαβάστε αυτές τις οδηγίες χρήσεως και
ασφαλείας προσεκτικά και πλήρως. Για τη δική σας ασφάλεια,
προτού χρησιμοποιήσετε αυτή τη συσκευή ελέγξατε ότι η
ηλεκτρική τάση είναι η σωστή και ότι όλες οι χειρολαβές
και τα εξαρτήματα είναι στέρεα προσαρμοσμένα. Εάν δεν
είστε βέβαιοι για οποιοδήποτε τμήμα αυτής της συσκευής
απευθυνθείτε στον αντιπρόσωπό σας
Παρακαλούμε κρατήστε αυτές τις οδηγίες
Μοντέλο Evolution 355 Raptor Τεχνικά χαρακτηριστικά
Κινητήρας (230v ~ 50/60 Hz) (Watts): 2200
Στροφές ανά λεπτό χωρίς φορτίο (αχύτητα) (ελαχ-1) 1450
Συνιστώμενος Μέγιστος Κύκλος Λειτουργίας (Λεπτά): 30
Επίπεδο Θορύβου με πίεση (Υπό φορτίο) (dB(A)): 112.4
Επίπεδο Δόνησης (m/s2): 1.39
Βάρος (kg): 23
Μέγιστες Διαστάσεις (Ανυψωμένου) (mm): Y575 Π355 Β425
Μέγιστη Δυνατότητα Κοπής Κιβωτίου 90
0
Τετράγωνο (mm) 120 x 120
Ορθογώνιο (mm) 95 x 180
Κυκλικό (mm) 130
Ξύλο (mm) 125 x 125
Μέγιστη Δυνατότητα Κοπής Κιβωτίου 45
0
Τετράγωνο (mm) 89 x 89
Ορθογώνιο (mm) 78 x 110
Κυκλικό (mm) 105
Διαστάσεις Λάμας
Μέγιστη Διάμετρος (mm) 355
Διάμετρος Βάσης Υποδοχής (mm) 25.4
Πάχος (mm) 2.4
Στάνταρτ Εξοπλισμός που παρέχεται μαζί με το εργαλείο: 1 πλάκα
κοπής, 1 εξάγωνο γαλλικό κλειδί 8mm, 1 Εγχειρίδιο Οδηγιών
Χρήσης
Ωτασπίδες και προστατευτικά γυαλιά ΠΡΕΠΕΙ να
χρησιμοποιούνται όταν λειτουργείτε αυτή τη συσκευή. ΜΗΝ
ΑΓΓΙΖΕΤΕ τη λάμα όταν βρίσκεται σε κίνηση. Πάντοτε να
ακολουθείτε τις συστάσεις των Εξαρτημάτων Προσωπικής
Προστασίας (PPE) όταν λειτουργείτε αυτό το εργαλείο.
Αυτό το μηχάνημα είναι σχεδιασμένο ειδικά για την κοπή χάλυβα
και άλλων υλικών χρησιμοποιώντας τις κατάλληλες λάμες TCT
(Tungsten Carbide Tipped). ΔΕΝ θα πρέπει να τροποποιείται
και/ή να χρησιμοποιείται για οποιαδήποτε άλλη εφαρμογή εκτός
από αυτήν την οποία προορίζεται, συμπεριλαμβανομένης και της
bedieningsplaats. Schermen installeren om personen uit de buurt te
houden. Het gereedschap niet in een explosieve ruimte gebruiken -
elektrisch gereedschap produceert vonken dat ontbrandbaar materiaal
of gas kan doen ontvlammen. Het gereedschap niet in een vochtige
of natte ruimte gebruiken om elektrische schokken te voorkomen. Het
gereedschap altijd met beide handen bedienen. Het werkstuk altijd
stevig vastklemmen.
• Het gereedschap is voorzien van een goedgekeurd snoer en stekker
voor het land van gebruik. De groene en gele stroomdraad van het
snoer is de aarddraad. De aarddraad nooit op een onder stroom
staande klem aansluiten.
• De stekker uit het stopcontact verwijderen voor de vervanging van
de schijf, de afstelling van het gereedschap of andere onderhouds
werkzaamheden.
• Wij raden het gebruik van originele EVOLUTION zaagbladen aan.
• Het gereedschap en het zaagblad voor elk gebruik inspecteren en
geen vervormde, gebarsten, versleten of beschadigde zaagbladen
gebruiken.
• Veriëren of het zaagblad naar behoren is gemonteerd en niet met
de hand stoppen.
• Uitsluitend zaagbladen met een snelheid van 1500 of meer
gebruiken.
• Het netsnoer altijd uit de buurt van de bewegende onderdelen van
het gereedschap houden.
• De zaag uitschakelen en veriëren of alle bewegende onderdelen
volledig stilstaan voordat u de zaag opbergt.
• Veriëren of de beweegbare beschermkappen ongehinderd kunnen
werken.
• Het gereedschap nooit zonder de originele beschermkap
gebruiken. De beweegbare beschermkap nooit in de geopende
stand vergrendelen.
• Het gereedschap onmiddellijk uitschakelen en de stekker uit het
stopcontact verwijderen indien het gereedschap vastloopt.
• Ervoor zorgen dat de zaagdiepte verstelknop, de schuininstelknop
en werkstukklemmen stevig vastzitten tijdens het gebruik van het
gereedschap.
• Uitsluitend de meegeleverde enzen en onderlegringen gebruiken
en deze vervangen zodra ze beschadigd of bekrast zijn.
• Het gereedschap niet onder invloed van drugs, alcohol of medicatie
gebruiken. Losse kleding uit de buurt van de bewegende onderdelen
van de zaag houden. Uw handen uit de buurt van de bewegende
schijf houden.
• De zaag altijd ongeveer 1 minuut na het installeren van een nieuw
zaagblad en voor het zagen laten draaien. Defecte zaagbladen
kunnen versplinteren. Blijf daarom uit de buurt van het zaagblad.
• Altijd alle veiligheidsuitrusting dragen en de veiligheidsvoorschriften
inachtnemen.
Installatie van de zaag
Voeding
Het is aanbevolen om de 355 op een aparte voeding van draad aan te
sluiten en door een reststroombeveiliging te beschermen. Verlengkabels
mogen niet langer zijn dan 15 meter en moeten 1,5 mm2 zijn.
Vervangen van zaagbladen: Verwijder de stekker van de zaag uit
het stopcontact. Schroef de vleugelmoer (g. 1. ref. A) los en draai
de bladbedekking. Druk op de asvergrendelknop en verieer of deze
volledig ingeschakeld is door het zaagblad met de hand te draaien.
Gebruik de meegeleverde sleutel om de bout los te draaien waarmee
het zaagblad vastzit en draai deze naar links en verwijder de bout, de
onderlegring, de buitenste ens van het zaagblad en het zaagblad. N.B.:
De binnenste ens van het zaagblad niet verwijderen. Verieer of de
oppervlakken van de binnenste en buitenste enzen van het zaagblad
schoon zijn en geen vuildeeltjes bevatten. Druk op de asvergrendelknop.
Vervang het zaagblad en monteer de buitenste ens van het zaagblad,
28 7
Page 29

Belangrijk
0
0
μετάδοσης κίνησης σε άλλες συσκευές.
Βεβαιωθείτε ότι όλος ο χώρος εργασίας μπορεί να είναι ορατός
από την θέση του χειρισμού. Χρησιμοποιείτε περιοριστικούς
φραγμούς για να κρατάτε του μη έχοντες εργασία μακριά. Μην
λειτουργείτε το εργαλείο σε περιβάλλον με εκρηκτικά υλικά
–ηλεκτροκίνητα εργαλεία δημιουργούν σπινθήρες που μπορεί
να προκαλέσουν ανάφλεξη εύφλεκτων υλικών ή αερίων. Μην
λειτουργείτε το εργαλείο σε συνθήκες υγρές ή χώρους με αυξημένη
υγρασία καθώς μπορεί να προκληθούν ηλεκτροσόκ. Πάντοτε
να χειρίζεστε το εργαλείο και με τα δυο χέρα σας. Πάντοτε να
έχετε βεβαιωθεί ότι το υλικό επί του οποίου εργάζεστε είναι καλά
στερεωμένο.
• Το εργαλείο είναι εφοδιασμένο με ένα καλώδιο και φις
εγκεκριμένα από το κράτος όπου πρόκειται να χρησιμοποιηθεί.
Ο αγωγός με χρώμα πράσινο-κίτρινο στο καλώδιο αποτελεί
την γείωση/έδαφος, και ποτέ να μην τον συνδέετε με ένα
ηλεκτροφόρο ακροδέκτη.
• Να βγάλετε το φις από την πρίζα προτού αντικαταστήσετε
τη λάμα, κάνετε ρυθμίσεις ή για οποιαδήποτε άλλη εργασία
συντήρησης.
• Συνιστούμε να χρησιμοποιείτε τις γνήσιες λάμες
EVOLUTION.
• Επιθεωρήστε το μηχάνημα και τη λάμα πριν από κάθε χρήση
και να μην χρησιμοποιείτε τρυπάνια που έχουν στραβώσει.
έχουν ρωγμές, έχουν φθαρεί ή έχουν υποστεί άλλη βλάβη.
• Βεβαιωθείτε ότι η λάμα είναι σωστά προσαρτημένη και μην
την σταματάτε με το χέρι.
• Να χρησιμοποιείτε λάμες που είναι βαθμολογημένες από
1500rpm (περιστροφές ανά λεπτό) και πάνω.
• Πάντοτε να κρατάτε το καλώδιο μακριά από τα
μετακινούμενα μέρη του εργαλείου
• Όταν αφήνετε το εργαλείο, να σβήνετε τον κινητήρα και να
έχετε βεβαιωθεί ότι όλα τα εν κινήσει τμήματα έχουν τελείως
σταματήσει.
• Βεβαιωθείτε ότι οι κινούμενοι προφυλακτήρες λειτουργούν
ελεύθερα χωρίς «κολλήματα»
• Μην χρησιμοποιείτε ποτέ το μηχάνημα χωρίς το γνήσιο
προστατευτικό του σύστημα. Μην ασφαλίζετε τον κινούμενο
προφυλακτήρα στην ανοικτή θέση.
• Στην περίπτωση κολλήματος σβήστε αμέσως το εργαλείο και
αποσυνδέστε το από το ρεύμα.
• Βεβαιωθείτε ότι η ρύθμιση του βάθους κοπής, η ρύθμιση της
γωνίας και οι μηχανισμοί στερέωσης (μέγκενη) είναι καλά
σταθεροποιημένοι ενώ χρησιμοποιείτε το εργαλείο
• Να χρησιμοποιείτε μόνο τις φλάντζες και τις ροδέλες που
παρέχονται με το εργαλείο και να τις αντικαθιστάτε όταν
παθαίνουν βλάβη ή κάνουν εγκοπές.
• Μην λειτουργείτε το εργαλείο όταν είστε υπό την επήρεια
ναρκωτικών ουσιών, αλκοόλ ή φαρμάκων. Κρατάτε μακριά
τον χαλαρό ρουχισμό από τα κινούμενα μέρη του πριονιού.
Κρατάτε τα χέρια σας μακριά από την λάμα όταν αυτή
βρίσκεται σε κίνηση.
• Αφού τοποθετήσετε μια καινούργια λάμα, πάντοτε να
λειτουργείτε το μηχάνημα για περίπου ένα λεπτό πριν την
κοπή. Εάν η λάμα έχει κάποιο ελάττωμα, μπορεί σε αυτό το
διάστημα να σπάσει, γι’ αυτό το λόγο να στέκεστε μακριά
από τη λάμα.
• Βεβαιωθείτε ότι χρησιμοποιείτε όλο τον εξοπλισμό
προσωπικής προστασίας και ότι ακολουθείτε πάντοτε όλες
τις οδηγίες ασφαλείας.
Εγκατάσταση του μηχανήματος
Παροχή Ισχύος
Συνιστάται το 355 να λειτουργεί από μια ξεχωριστή ηλεκτρική,
6 29
Page 30

και να προστατεύεται από μια Συσκευή Διαφυγής (Ρελέ
Διαφυγής). Οποιοδήποτε καλώδιο επέκτασης δεν θα πρέπει να
είναι μεγαλύτερο των 15 μέτρων και θα πρέπει να είναι διατομής
2 Χ 1,5mm για 240V.
Αλλαγή Λαμών
Βεβαιωθείτε ότι ο ρευματολήπτης (φις) του μηχανήματος
είναι αποσυνδεδεμένος. Χαλαρώστε το φτερωτό περικόχλιο
(πεταλούδα) (σχήμα 1 αναφ. Α) και περιστρέψατε το κάλυμμα
λάμας. Πιέστε το ατρακτοειδές κλείστρο και ελέγξατε εάν
έχει εφαρμόσει πλήρως, περιστρέφοντας με το χέρι την λάμα.
Χρησιμοποιώντας το παρεχόμενο εξάγωνο γαλλικό κλειδί των
8mm ξεβιδώστε το εξάγωνο μπουλόνι (παξιμάδι) που στερεώνει
τη λάμα περιστρέφοντας αριστερόστροφα και αφαιρέστε το
μπουλόνι, τη ροδέλα, την εξωτερική φλάντζα της λάμας και τη
λάμα. Σημείωση: Μην αφαιρείτε την εσωτερική φλάντζα. Πιέστε
το ατρακτοειδές κλείστρο. Αντικαταστήστε τη λάμα, αφού πρώτα
βεβαιωθείτε ότι η τυπωμένη πλευρά της λάμας βλέπει προς εσάς,
και μετά επανατοποθετήστε την εξωτερική φλάντζα της λάμας,
την ροδέλα και το εξάγωνο μπουλόνι. Περιστρέφετε το εξάγωνο
μπουλόνι δεξιόστροφα για να σφίξει. Σημείωση: Ελέγξατε
ότι το ατρακτοειδές κλείστρο είναι τελείως απελευθερωμένο,
περιστρέφοντας με το χέρι τη λάμα πριν χρησιμοποιηθεί.
Περιστρέψτε το κάλυμμα λάμας πίσω στη θέση του και σφίξτε
την πεταλούδα. Επαναπροσαρμόστε το εξάγωνο γαλλικό κλειδί
στην υποδοχή του επί του μηχανήματος.
Ρύθμιση του Στοπ στο Βάθος Κοπής
Το καθοδικό στοπ (Εικόνα 2 Παραπομπή Α) θα πρέπει να
ρυθμίζεται έτσι ώστε η μέγιστη ικανότητα κοπής να διατηρείται
χωρίς η λάμα να χτυπά στη βάση. Χαμηλώστε την κεφαλή της
κοπής έως ότου ο βραχίονας χτυπήσει το καθοδικό στοπ. Εάν
είναι απαραίτητο, ρυθμίστε τη βίδα του καθοδικού στοπ και το
παξιμάδι έως ότου επιτευχθεί η σωστή απόσταση διαχωρισμού.
Σφίξτε το παξιμάδι για να σταθεροποιήσετε τη βίδα στη θέση
της.
Ρύθμιση της γωνίας κοπής
Η μέγκενη μπορεί να ρυθμιστεί από τις 00 έως 450 . Χαλαρώστε
την λαβή και ρυθμίστε στην επιθυμητή γωνία κοπής. Σφίξτε τη
λαβή για να κλειδώσει στη θέση της.
Ρύθμιση της Σταθερής Μέγκενης
Η μέγγενη μπορεί να επανατοποθετηθεί αφαιρώντας την λαβή και
τη βίδα, και στη συνέχεια ολισθαίνοντας το πλέγμα προστασίας
στην επιθυμητή θέση. Επανατοποθετήστε και σφίξτε τη λαβή και
βιδώστε για κλειδώσει στη θέση της.
Ασφάλεια του Πριονιού στη Μεταλλική Κοπή
Συμβουλές Χειρισμού
Πάντοτε να σταθεροποιείτε καλά το υλικό προς κοπή επί της
μέγκενης. Για να αρχίσετε τη λειτουργία του εργαλείου, θα
πρέπει να πιέσετε τον κύριο, δίκην σκανδάλης, διακόπτη για
να ενεργοποιήσετε τον κινητήρα. Με την κεφαλή του κινητήρα
στην ανυψωμένη θέση, ανάψτε τον κινητήρα και αφήστε τον να
αποκτήσει την μέγιστη ταχύτητά του. Κατεβάστε την κεφαλή
του κινητήρα για να αρχίσετε την κοπή. Όταν αρχίζετε μια
κοπή, φροντίστε να εισάγετε τη λάμα στο υλικό αργά, κάνοντας
χρήση ελαφράς πίεσης αρχικά, για να αποτρέψετε τη λάμα από
το να «αρπάξει» και μετά συνεχίστε με φυσιολογική πίεση.
Μην πιέζετε έντονα το εργαλείο –αφήστε την ταχύτητα της
λάμας του πριονιού να κάνει τη δουλειά. Η απόδοση κοπής δεν
θα βελτιωθεί με την εφαρμογή περισσότερης πίεσης επί του
εργαλείου, και η διάρκεια ζωής της λάμας και του κινητήρα θα
μειωθούν. Εφαρμόστε λιγότερη πίεση καθώς η λάμα εξέρχεται
μέσω του υλικού. Με την ολοκλήρωση της κοπής, επιστρέψτε την
normal pressure. Do not force the tool – let the speed of the saw blade
do the work. Cutting performance will not improve by applying more
pressure on the tool, and blade and motor life will be reduced. Use less
pressure as the blade exits through the material. On completion of the
cut, return the motor head to its upright position and switch off the power.
Keep the tool clean of metal chips and other dirt and debris.
Work piece Clamping
Position the work piece in the vice so that if a jam occurs, the blade will
not tend to throw it from the vice. Clamp it securely. Angles should be in
an inverted position so that the point of the section is uppermost. The
saw cuts most efciently if the blade is cutting the thinnest section of the
material (g. 3).
Maintenance And Troubleshooting
Keep tool and cord clean. Regularly vacuum or blow out the motor unit to
keep its ventilation clear, also check that the machine is well lubricated.
Inspect weekly. Avoid using cleaning products, which include benzene,
trichloroethelene, chloride, and ammonia as these can damage plastic
parts. In case of electrical or mechanical malfunction, immediately switch
off the tool and disconnect the plug.
Cleaning Chipping Tray
Periodically clean out the chipping tray by removing the screw (g. 2.
ref. B) and removing the tray. Empty the tray into a suitable disposal
container then ret the tray and retaining screw.
Brush Inspection And Replacement
Excessive sparking may indicate the presence of dirt in the motor or
worn out carbon brushes. Check for wear after the rst 50 hours of use
and then at 10 hours use intervals. Replace when they reach 6mm. The
brush holders are located on the motor housing opposite each other
and unscrew to allow access to the brushes. For all other service and
maintenance, take the machine to an authorised service centre after
typically 60 cutting hours, dependent upon the type of workload it has
endured.
Lubrication
Your machines motor bearings are lubricated at the factory with sufcient
lubricant to last for the lifetime of the unit under normal operating
conditions. Other movable parts can be lubricated with light machine
oil as necessary. It is recommended that the machine be taken to the
nearest SERVICE CENTER or HiTech USA, Iowa, if in the USA, at least
once a year for a thorough cleaning and lubrication. All repairs and
servicing made by these centres are fully guaranteed against defective
materials and workmanship.
12 Months Warranty
12 MONTH LIMITED WARRANTY. EVOLUTION POWER TOOLS RESERVES
THE RIGHT TO MAKE IMPROVEMENTS AND MODIFICATIONS TO DESIGN
WITHOUT PRIOR NOTICE.
Evolution Power Tools will, within twelve (12) months from the original date
of purchase, repair or replace any goods found to be defective in materials
or workmanship, provided the product warranty registration card has been
returned to Evolution Power Tools. This warranty is void if the tool being
returned has been used to cut materials beyond the recommendations in
the Instruction Manual or if the saw has been damaged by accident, neglect,
or improper service. This warranty does not apply to machines and / or
components which have been altered, changed, or modied in any way,
or subjected to use beyond recommended capacities and specications.
Electrical components are subject to respective manufacturers’ warranties.
All goods returned defective shall be returned prepaid freight to Evolution
Power Tools. Evolution Power Tools reserves the right to optionally
repair or replace it with the same or equivalent item. There is no warranty
30 5
Page 31

2
for 110v machines.
κεφαλή του κινητήρα στην όρθια θέση και σβήστε τον κινητήρα.
Διατηρείτε το εργαλείο καθαρό από μεταλλικό ρινίσματα, και
άλλα θραύσματα και ρύπους.
Σταθεροποίηση του Υλικού Εργασίας
Τοποθετήστε το υλικό εργασίας στη μέγκενη έτσι ώστε εάν
προκύψει μια εμπλοκή, η λάμα να μην έχει την τάση να το
πετάξει από τη. Στερεώστε το καλά. Οι γωνίες θα πρέπει να είναι
σε ανάστροφη θέση έτσι ώστε το σημείο διατομής να είναι στην
υψηλότερη θέση. Το πριόνι κόβει πιο αποτελεσματικά εάν η λάμα
κόβει στο λεπτότερο τμήμα του υλικού (Εικόνα 3).
Συντήρηση και Μηχανικές Βλάβες
Διατηρείτε το εργαλείο και το καλώδιό του καθαρό. Με τακτική
αναρρόφηση η εμφύσηση αέρος να διατηρείτε το σύστημα
εξαερισμού του κινητήρα καθαρό και επίσης να ελέγχετε την
καλή λίπανση του μηχανήματος κάθε εβδομάδα. Αποφεύγετε
την χρήση καθαριστικών προϊόντων στα οποία περιλαμβάνονται
βενζίνη, τριχλωροαιθυλένιο, χλώριο και αμμωνία καθώς αυτά
μπορεί να προκαλέσουν ζημία στα πλαστικά μέρη. Σε περίπτωση
μηχανικής ή ηλεκτρικής δυσλειτουργίας σβήστε αμέσως το
εργαλείο και αποσυνδέστε το από το ρεύμα.
Καθαρισμός του Δίσκου Ρινισμάτων
Καθαρίζετε περιοδικά τον δίσκο ρινισμάτων αφαιρώντας τη βίδα
(Εικόνα 2, Παραπομπή Β) και βγάζοντας τον δίσκο. Αδειάστε
τον δίσκο σε ένα κατάλληλο δοχείο απόρριψης και στη συνέχεια
επαναπροσαρμόστε τον δίσκο και τη βίδα κρατήματος.
Επιθεώρηση Ψήκτρας (καρβουνάκι) και Αντικατάσταση
Υπερβολικοί σπινθήρες υποδεικνύουν συνήθως την παρουσία
ρύπων στον κινητήρα ή φθορά στα καρβουνάκια. Ελέγξατε
τη φθορά μετά τις πρώτες 50 ώρες χρήσης και στη συνέχεια
ανά διαλείμματα 10 ωρών χρήσης. Αντικαταστήστε τα όταν το
πάχος τους φθάσει τα 6mm. Οι υποδοχές για τα καρβουνάκια
βρίσκονται στο κάλυμμα του κινητήρα το ένα απέναντι στο άλλο
και το οποίο ξεβιδώνετε για να έχετε πρόσβαση σε αυτό. Για
οποιοδήποτε άλλο σέρβις και συντήρηση πηγαίνετε το μηχάνημα
σε ένα εξουσιοδοτημένο κέντρο σέρβις.
Λίπανση
Τα ρουλεμάν του κινητήρα του μηχανήματός σας έχουν λιπανθεί
στο εργοστάσιο με ικανή ποσότητα λιπαντικού ώστε να
διατηρηθεί για όλη τη διάρκεια ζωής του μηχανήματος, κάτω από
φυσιολογικές συνθήκες λειτουργίας. Άλλα κινητά μέρη μπορούν
να λιπανθούν με λεπτό μηχανικό λάδι όπως κρίνετε απαραίτητο,
Συνιστάται να πηγαίνετε το μηχάνημα στο πλησιέστερο
ΕΞΟΥΣΙΟΔΟΤΗΜΕΝΟ ΚΕΝΤΡΟ ΣΕΡΒΙΣ τουλάχιστον μια
φορά το χρόνο για ένα λεπτομερές καθάρισμα και λίπανση. Όλες
οι επισκευές και το σέρβις που γίνεται από αυτά τα κέντρα είναι
πλήρως εγγυημένα έναντι ελαττωματικών υλικών και εργασίας.
12 Μηνων Εγγυηση
12 ΠΕΡΙΟΡΙΣΜΕΝΗ ΕΓΓΥΗΣΗ ΕΝΟΣ ΜΗΝΟΣ Η EVOLUTION
POWER TOOLS ΔΙΑΤΗΡΕΙ ΤΟ ΔΙΚΑΙΩΜΑ ΝΑ ΚΑΝΕΙ ΒΕΛΤΙΩΣΕΙΣ
ΚΑΙ ΤΡΟΠΟΠΟΙΗΣΕΙΣ ΣΤΟ ΣΧΕΔΙΟ ΧΩΡΙΣ ΠΡΟΗΓΟΥΜΕΝΗ
ΠΡΟΕΙΔΟΠΟΙΗΣΗ.
Η Evolution Power Tools, εντός δώδεκα (12) μηνών από την
αρχική ημερομηνία αγοράς, θα επιδιορθώσει ή θα αντικαταστήσει
οποιαδήποτε προϊόντα διαπιστωθεί ότι είναι ελαττωματικά σε υλικά
και κατασκευή. Η εγγύηση αυτή είναι άκυρη εάν το εργαλείο που
επιστραφεί έχει χρησιμοποιηθεί για να κόψει υλικά πέρα από τα
υποδεικνυόμενα στο Εγχειρίδιο Οδηγιών ή εάν το πριόνι έχει υποστεί
βλάβη από ατύχημα, αμέλεια, ή μη σωστό σέρβις. Η εγγύηση αυτή δεν
4 31
Page 32

ισχύει για μηχανήματα και/ή εξαρτήματα που έχουν υποστεί μεταβολή,
έχουν αλλαχτεί, ή τροποποιηθεί με οποιοδήποτε τρόπο, ή έχουν
γίνει αντικείμενο χρήσης πέρα από τις συνιστώμενες δυνατότητες
και προδιαγραφές. Τα ηλεκτρικά εξαρτήματα καλύπτονται από
αντίστοιχες εγγυήσεις κατασκευαστών. Όλα τα προϊόντα που
επιστρέφονται με ελάττωμα θα επιστραφούν με προπληρωμένη τη
μεταφορά στην Evolution Power Tools. Η Evolution Power Tools
επιφυλάσσεται του δικαιώματος να επιδιορθώσει κατ επιλογήν ή να
αντικαταστήσει το προϊόν με το ίδιο ή με αντίστοιχο. Δεν υπάρχει
καμία εγγύηση – γραπτή ή προφορική- Για λάμες πριονιού. Σε καμία
περίπτωση η Evolution Power Tools δεν θα είναι υπεύθυνη για την
απώλεια ή βλάβη που προκύπτει ως άμεσο ή έμμεσο αποτέλεσμα από
τη χρήση ή την εμπορική εκμετάλλευση ή από οποιαδήποτε άλλη
αιτία. Η Evolution Power Tools δεν είναι υπεύθυνη για οποιεσδήποτε
δαπάνες που θα επιβαρύνουν τέτοια προϊόντα ή συνακόλουθες βλάβες.
Κανένας υπεύθυνος, υπάλληλος ή αντιπρόσωπος της Evolution Power
Tools δεν είναι εξουσιοδοτημένος να κάνει προφορικές παραστάσεις
καταλληλότητας ή να παρακάμψει οποιουσδήποτε προηγούμενους
όρους πώλησης και κανείς δεν θα είναι δεσμευτικός για την Evolution
Power Tools.
Θα πρέπει να απευθύνετε τα ερωτήματά σας που συνδέονται με την
παρούσα περιορισμένη εγγύηση στα κεντρικά γραφεία της εταιρείας, ή
να τηλεφωνήσετε τον κατάλληλο αριθμό της Γραμμής Βοήθειας
Εξαρτήματα –Γνήσιες Λάμες “Evolution”
66Τ 355mm TCT Λάμα Μαλακού Χάλυβα
80Τ 355mm TCT Αλουμίνιο/Λάμα Λεπτού Μαλακού Χάλυβα
90Τ 355mm TCT Λάμα με Δυνατότητα Ανοξείδωτου Χάλυβα
Ειδοποίηση : Φυσιολογική φθορά και βλάβη που προκαλείται
από κακό χειρισμό δεν καλύπτεται από την εγγύηση των 12 μηνών
EC – Declaration of
Conformity
We, Evolution Power Tools Limited
Venture One
Longacre Close
Shefeld
S20 3FR
as the supplier of the product listed below:-
RAPTOR 355mm TCT Steel/Metal
Cutting Chop Saw
Part Number: EVO3551/EVO3552/EVO3552EU
Voltage: 110/230v
Power: 2200W
Declare, under our sole responsibility that the equipment to which this
document relates, is in conformity with the following standards or other
normative documents:-
EN60335-1: 1994+A1+A2+A11-A16
EN55014-1: 2000+A1+A2
EN55014-2: 1997+A1
EN61000-3-2: 2000
EN61000-3-3: 1995+A1
EN61000-3-11: 2000
and thereby conforms to the protection requirements of Council Directive
73/23/EEC amended by 93/68/EEC relating to the Low Voltage
Directive, Council Directive 98/37/EEC relating to the Machine Directive
and Council Directive 89/336/EEC relating to the EMC Directive,
and is compliant with Council Directive 2002/95/EC in relation to the
Restriction of Hazardous Substances in electrical & electronic equipment
(RoHS). EU Directive 2002/95/EC restricts the use of the 6 substances
below in the manufacture of specic types of electrical equipment. Whilst
this restriction does not legally apply to components, it is recognized that
component ‘compliance’ is relevant to many customers.
Evolution Power Tools’ denition of RoHS Compliance:
• The product does not contain any restricted substances in
concentrations and applications banned by the directive
• and for components, the product is capable of being worked at
the higher temperatures required by lead-free soldering.
The restricted substances and maximum allowed concentrations in
homogenous materials are, by weight:
Lead – 0.1%
Mercury – 0.1%
PBB (Polybrominated Biphenyis) – 0.1%
PBDE (Polybrominated Diphenyl Ethers) – 0.1%
Hexavalent Chromium – 0.1%
Cadmium – 0.01%
Level of Sound pressure according to 86/188/EEC, 98/37/EEC &
2000/14/EC:-
Guaranteed Sound Power Level:
112.4 dB(A)
All Relevant technical documentation is held at Evolution Power Tools
Ltd, Shefeld (UK).
Authorised by:
Mr Matthew J Gavins
Managing Director
1st Feb 2008
32 3
Page 33

Fig. 1.
Fig. 2.
Fig. 3.
2 33
Important
0
0
Page 34

T C T C u t o f f s a w
S e r v i c e P a r t s L i s t
355 Raptor
M1
M2
M3
REV.
2.00
®
Page 35

®
®
Manuel d’Instruction
Instruktionshandbuch
Manual de Instrucción
Handleiding
355mm (14”) TCT
STEEL CUTTING
SAW
STEEL
®
www.evolutionpowertools.com
B08200
 Loading...