


INSTALLATION, OPERATION & MAINTENANCE INSTRUCTIONS
FOR EVERDURE 68L 9 FUNCTION BUILT-IN ELECTRIC OVENS
Models Included:
OBES91
KIMBERLEY
INSTALLATION, OPERATION AND MAINTENANCE INSTRUCTIONS
DESIGNED TO PERFECTION

INSTALLATION, OPERATION AND MAINTENANCE INSTRUCTIONS FOR EVERDURE BUILT-IN ELECTRIC OVEN RANGE
OBES91 BUILT-IN ELECTRIC OVEN
CONGRATULATIONS
Welcome to the Everdure Kitchen Community and thank you for choosing one of our many fantastic built in ovens. We are confident that you will now be able to meet your cooking needs. Before you use the oven we strongly recommend that you read though the whole user manual which provides the description of this product and the proper use of its functions.
To avoid the ever-present risks involved with using electrical appliance it is vital that the oven is installed correctly and that you read the safety instructions carefully to avoid misuse and hazards. It is important that you retain these instructions and your proof of purchase along with any other important documents about this product for future reference.
CONTENTS
SECTION |
PAGE NO. |
Important Safety Instructions ………….. |
3 |
Appliance Details ………………………… |
4 |
Electrical Connections ………………..…. |
4-5 |
Installation ………………………………… |
6 |
Operating Instructions …………………… |
7-14 |
Cleaning ………………………………….. |
15 |
Recommended Cooking Times ..….……. |
16 |
Oven Cooking Guides …………………… |
17-18 |
DISPOSAL INFORMATION
•Most of the packing materials are recyclable. Please dispose of those materials through your local recycling depot or by placing them in appropriate collection containers.
•If you wish to discard this product, please contact your local authorities and ask for the correct method of disposal
|
|
|
2 |
DESIGNED TO PERFECTION |
|
|
|
|

IMPORTANT SAFETY INSTRUCTIONS
IMPORTANT: |
Read the assembly instruction section and safety precautions of this booklet carefully |
|
before removing the contents of this carton. |
1.This appliance is not intended for use by persons (including children) with reduced physical, sensory or mental capabilities, or lack of experience or knowledge, unless they have been given supervision or instruction concerning the use of the appliance by a person responsible for their safety. Children should be supervised to insure that they do not play with the appliance.
2.In certain circumstances electrical appliances may be a danger hazard.
3.Do not place heavy objects in this appliance or use for storage. This oven is designed for cooking food only.
4.This appliance is designed for domestic household use only and for the cooking of domestic food products. Use as a commercial appliance will void the warranty. It should not to be used in a marine environment or outdoors.
5.This appliance is supplied with a 15 amp plug. The plug has a large earth terminal that will not fit into a common electrical socket. To install the oven, a special socket is required to be installed by a licensed electrician (if it does not already exist at the point of installation).
6.If the electrical supply cord is damaged, either when being installed or after installation, it must be replaced by the manufacturer, its service centre or similarly qualified persons in order to prevent a hazard.
7.The electrical connection must be accessible after installation. The appliance must be electrically isolated before any maintenance can be performed, which includes changing a lamp.
8.Electrical connection must be made as per local wiring rules and regulations. Do not disconnect the appliance with wet hands or bare feet, and do not disconnect the power cord with extreme force.
9.Do not obstruct the ventilation or heat dissipation slots.
10.Always grasp the oven door in the centre because the ends may be hot due to the escape of hot air
11.Ensure that the kitchen is well ventilated or mechanical ventilation is in use while cooking in this appliance.
12.Do not store or use flammable materials or aerosols near the oven. Items made from aluminium, plastic or plastic film should also be kept away from the appliance, as they may fuse to the surface.
13.Never line the oven bottom with aluminium foil, as the consequent accumulation of heat could compromise the cooking and even damage the enamel.
14.WARNING - The oven will become hot during and directly after use. Do not touch any components during this time, as they may be hot and can cause burns. Do not touch the heating elements inside the oven to avoid burns. Children should be kept away. Use heat resistant cooking gloves where-ever possible when moving food and cooking utensils in and out of the oven.
15.Cleaning may only be commenced on the appliance once it has cooled down (best slightly warm). The appliance should be disconnected from the power outlet or turned off at your isolation switch before commencing any cleaning process. Do not use a steam jet or any other high pressure cleaning equipment to clean the appliance. Follow oven cleaner directions if these are being used.
16.Wash all accessories in hot soapy water or in a dishwasher, wipe dry with a paper or cloth towel. If you use your oven for an extended period of time, condensation may form. Dry it using a soft dry cloth.
17.When the appliance is not being used, the knobs must be kept in the ‘OFF’ position.
18.Where this appliance is installed in a caravan, it shall NOT be used as a space heater.
19.Do not modify this appliance.
20.There is a rubber seal surrounding the oven opening which reduces heat loss from the oven. Check the condition of this seal on a regular basis. If necessary, clean it and avoid using abrasive products or objects to do so. Should it become damaged or worn, please contact your nearest After-sales Service Centre. We recommend you avoid using the oven until it has been replaced.
21.Do not use harsh abrasive cleaners or sharp metal scrapers to clean the oven door glass as it can scratch the surface, which may result in the glass shattering. Clean the glass door using warm damp cloth and dry it with a soft cloth.
22.All cabinetry and materials used in the installation must be able to withstand a minimum temperature of 50°C above the ambient temperature of the room it is located in, whilst in use. Certain types of vinyl or laminate kitchen furniture are particularly prone to heat damage or discolouration at temperatures outside the guidelines given above. Any damage caused by the appliance being installed without adhering to the temperature limits set out above will be the liability of the owner.
23.This appliance must be correctly installed by a suitably qualified person, strictly in accordance with the manufacturer’s instructions. Please see the specific section of this booklet that refers to installation.
|
|
|
|
DESIGNED TO PERFECTION |
3 |
|
|
|
APPLIANCE DETAILS
ELECTRICAL DETAILS:
Rated Voltage: |
220 to 240 Vac 50 Hz |
Supply Connection: |
15 A plug |
Max Rated Inputs: |
2800 - 3400W |
This information can be found on the rating plate (data label) affixed to the inside of the door jamb.
OVEN SIZES:
|
Relevant Sizes: |
LENGTH (mm) |
WIDTH (mm) |
HEIGHT (mm) |
|
|
Internal Oven size |
|
380 |
580 |
330 |
|
|
||||
|
External Oven size |
|
525 |
895 |
475 |
|
|
||||
|
Cut-out size |
550 (min) |
860 |
472 |
|
ELECTRICAL CONNECTIONS
LOCAL AUTHORITY REQUIREMENTS
Installation is only permitted by a licensed electrician, and carried out according to instructions provided by the manufacturer. Incorrect installation might cause harm and damage which the manufacturer accepts no responsibility.
ELECTRICAL INSTALLATION FOR THE LICENSED ELECTRICIAN
This oven must be connected to a 220-240V 50Hz power supply. It is earthed via the cord and 15A plug.
Before carrying out the connection to the power supply, the voltage rating of the appliance (stamped on the appliance identification plate) must be checked for correspondence to the available mains supply voltage, and the mains electric wiring should be suitable for the oven’s power rating (also indicated on the appliance identification plate);
The switched outlet must be connected to a suitable earth wiring, in conformity to current safety regulations.
This appliance must be plugged into a 15A switched outlet. It should not be located above the appliance and no more than 1.25m away from it. The power supply cord must not touch against any hot surfaces and must be placed so that its temperature does not exceed 75°C at any point along its length.
After having installed the appliance, the switched outlet must always be in an accessible position.
NOTE: For connections to the mains power supply, never use adapters, reductions or multiple power points as these may overheat and catch fire.
The mains terminal block is located on the back of the oven and the terminals are accessible by opening the terminal block cover. Note: The terminal cover should not be opened when the mains power is still connected to the appliance and never by an unauthorized person.
The electrical safety of this appliance can only be guaranteed if the oven is correctly and efficiently earthed. The manufacturer declines all responsibility for damage resulting from an installation which has not been earthed correctly.
The use of adapters, multiple sockets and/or extensions, is not allowed.
DESIGNED TO PERFECTION
4
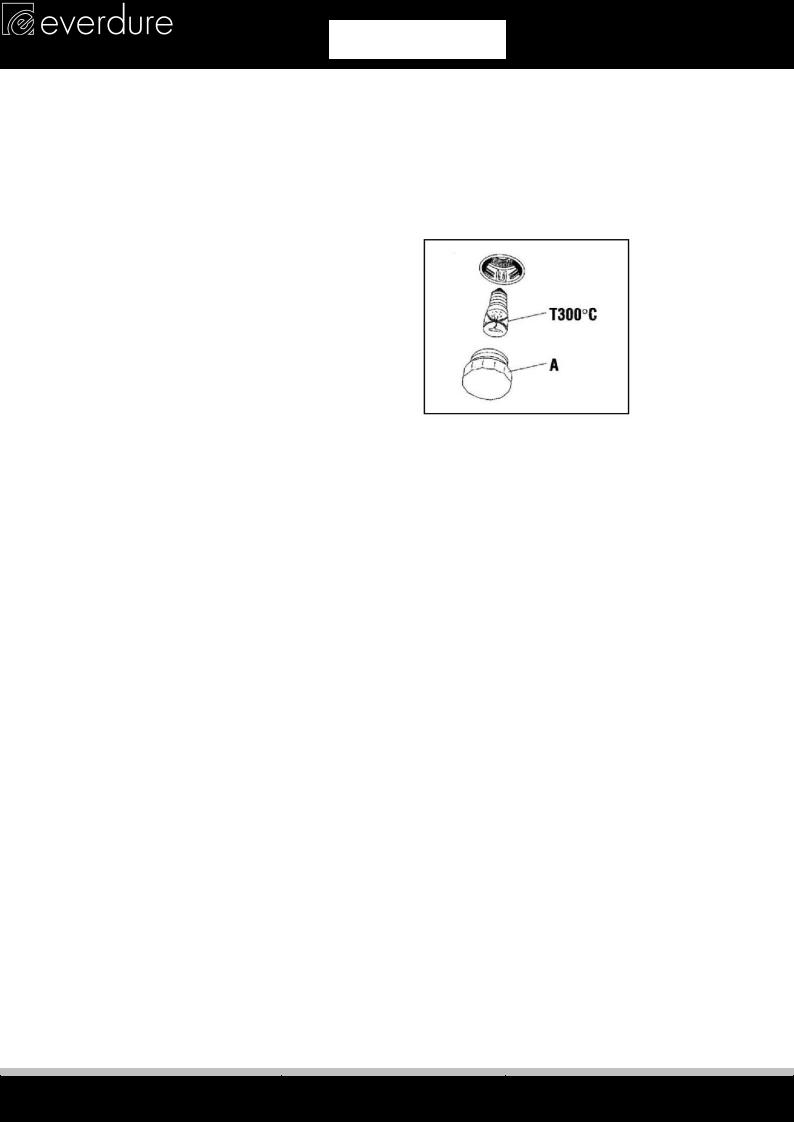
OVEN LAMP REPLACEMENT
•The appliance must first be disconnected from the power outlet or turned off at your isolation switch.
•Unscrew the glass cover attached to the lamp holder; anti-clockwise.
•Unscrew the lamp and replace it with another high-temperature lamp with the following characteristics:
Voltage: AC220V-240V Wattage: 15W
Socket: E 14
Temperature rating: 300°C
•Remount the glass cover and reconnect the appliance to the power supply
NOTE: Should you experience any difficulty please contact your nearest after-sales service centre.
5
DESIGNED TO PERFECTION
5
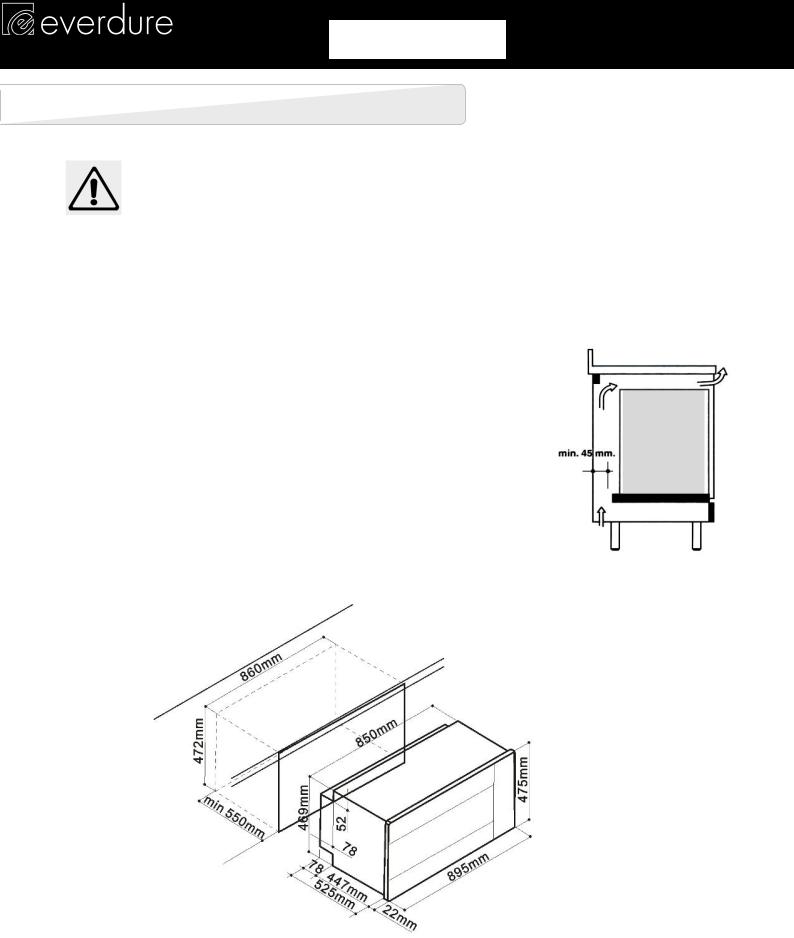
INSTALLATION
The adjacent furniture must be able to withstand a minimum temperature rise of 50°C above the ambient temperature of the room it is located in, during periods of use. The power supply to the appliance must be cut off before any adjustments or maintenance work is done on it.
INSTALLATION OF BUILT IN OVEN
To ensure the proper working order of the built-in appliance, the kitchen unit must be of a suitable size.
The sizes of the unit for installing the cooker under a worktop or in a column unit are shown in the next diagram.
To provide adequate ventilation, there must be appropriate ventilation openings in the front bottom and the top part of 200 cm2, and an exhaust opening on the bottom of at least 200 cm2, and an exhaust opening of at least 60 cm2.
The unit panels next to the cooker must be heat resistant. In the case of veneered wood units, glues must be resistant to a temperature of 120°C.
In accordance with safety standards, once the appliance has been mounted, there must be no possible contact with electrical parts. Any protective parts must be secured so that they can only be removed with the use of tools.
Insert the appliance into the compartment; open the oven door and fasten the oven to the cabinet using the four screws “A”, remembering to place the special spacers provided between the hole and the screw itself.
|
|
|
6 |
DESIGNED TO PERFECTION |
|
|
|
|
 Loading...