

Page 1
EUTECH INSTRUMENTS
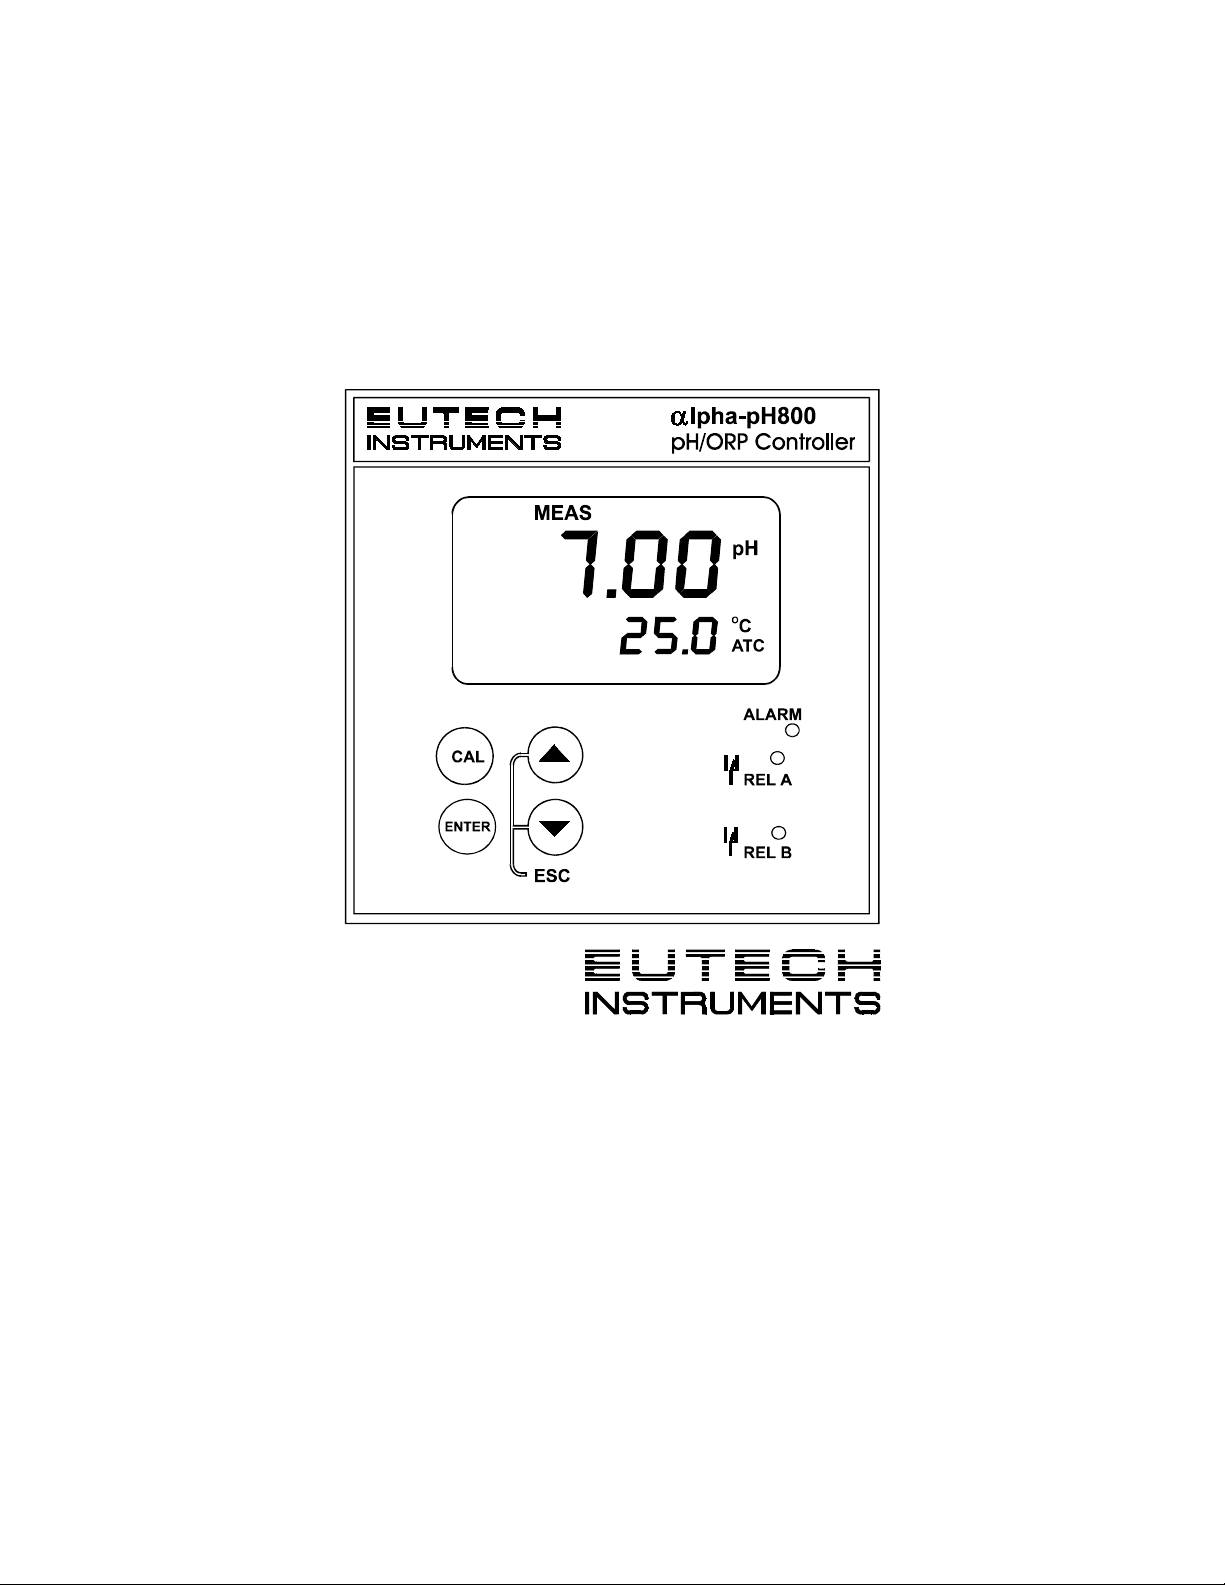
ααααlpha-pH800
pH and ORP Controller/Transmitter
Operating Instructions
68X216813
03/99
Page 2

Preface
Thank you for purchasing the αlpha-pH800 series pH/ORP
controller/transmitter.
This manual serves to explain the us e of th e αlpha-pH800 series pH/ORP
controller/transm itter. The manual functions in two ways, fir stly as a ste p
by step guide to help t he user op erate the instr um ent. Second l y, it serv es
as a handy referenc e guide. T his instr uctio n m anual is writ ten to c over as
many anticipated applications of the αlpha-pH800 pH/ORP
controller/transmitter. If you have doubts in the use of the instrument,
please do not hesitate to contact the nearest Eutech Instruments’
Authorised Distributor.
The information presented in this manual is subject to change without
notice as improvements are made, an d does not r eprese nt a com m itment
on part of Eutech Instruments Pte Ltd.
Eutech Instruments cannot accept any responsibility for damage or
malfunction of the unit due to improper use of the instrument.
Copyright 1999 Eutech Instruments Pte Ltd. Version 1.0. All
rights reserved.
Eutech Instruments Pte Ltd. Blk 55, Ayer Rajah Crescent #04-14/24,
Singapore 139 949. Tel: (65) 778 6876; Fax: (65) 773 0836; e-mail:
marketing@eutechinst.com; Home page: http://www.eutechinst.com
Page 3

TABLE OF CONTENTS
1 INTRODUCTION ................................................................................................ 1
1.1 Description of Unit.................................................................................... 1
1.2 Applications................................................................................................ 2
2 ASSEMBLY AND INSTALLATIONS............................................................. 3
2.1 Measurement and Control System........................................................ 3
2.2 Unit Dimensions.......................................................................................3
3 ELECTRICAL CONNECTIONS....................................................................... 4
3.1 Connection Diagram................................................................................ 4
3.2 Back Panel................................................................................................ 6
4 OVERVIEW....................................................................................................... 8
4.1 Keypad and Display................................................................................. 8
Function Groups................................................................................................... 9
4.2 Control Concept ....................................................................................... 9
5 MEASUREMENT............................................................................................ 10
5.1 Display in Measurem ent m ode ............................................................ 10
6 CALIBRATION............................................................................................... 11
6.1 pH Calibration......................................................................................... 11
6.2 ORP – mV Calibration........................................................................... 13
7 ADVANCED SET UP MODE......................................................................... 14
7.1 Electrode Offset (OFS) sub-function................................................... 14
7.2 Setting temperature (Set
7.3 Control Relay A/Control Relay B (SP1/SP2) sub-function............... 18
7.4 Configuration (ConF) sub-function ...................................................... 22
7.5 Calibration (CAL) sub-function............................................................. 23
8 TECHNICAL SPECIFICATIONS................................................................... 24
9 ACCESSORIES ............................................................................................... 25
10 GENERAL INFORMATION....................................................................... 25
10.1 Warranty.................................................................................................. 25
10.2 Packaging ............................................................................................... 25
10.3 Return of Goods..................................................................................... 26
10.4 Guidelines for Returning Unit for Repair ............................................ 26
11 APPENDICES.............................................................................................. 27
11.1 Appendix 1.............................................................................................. 27
11.2 Appendix 2.............................................................................................. 28
11.3 Appendix 3.............................................................................................. 29
o
C) sub-function ......................................... 15
Page 4

Page 5

1 INTRODUCTION
1.1 Description of Unit
Thank you for purchasing Eutech’s ¼ DIN alpha-800 series pH/ORP
process controllers. This unit is used for measuring either pH or ORP
parameter one at a time, and the oper atio nal m ode is switc hab le fr om the
menu. You can use this unit to measure pH or ORP with limit control.
This controller has many user-friendly and safety features which include:
• Menu-driven program that simplifies set-up
• Built-in non-volatile memory backup to ensure that calibr ation and
other information are not erased if power supply fails
• Push-button two-point calibration and electrode offset
adjustment from the keypad
• Automatic temperature compensation (ATC)
• Manual temperature comp ensation setting without the ATC probe,
with independent setting for calibration and process temperature
• 0 to 2000 second time delay adjustment on all relays – minimise
false alarms
• Separately adjustable high and low set point hysteresis (dead
bands) prevent chattering of relays around the set points
• Asymmetrical/symmetrical input for pH/ORP operation
• Large dual display LCD for easy reading with clear multiple
annunciators, alarm status, operational and error messages
• Two switching contacts as set-point triggering relays
• Hold function freezes output current (4/20mA) and control relays
• LED indicators signal control activities to monitor controller status
from a distance
• Protection against electromagnetic interference – Input and
output are free from external inference
1
Page 6

1.2 Applications
Use this controller in panel mounted enc losures for applica tions such as
water treatment and monitoring, galvanic-decontamination, chemical
processing food processing, clean or waste water control and
neutralisation process
.
2
Page 7
2 ASSEMBLY AND INSTALLATIONS
(
)
(
r
)
y
p
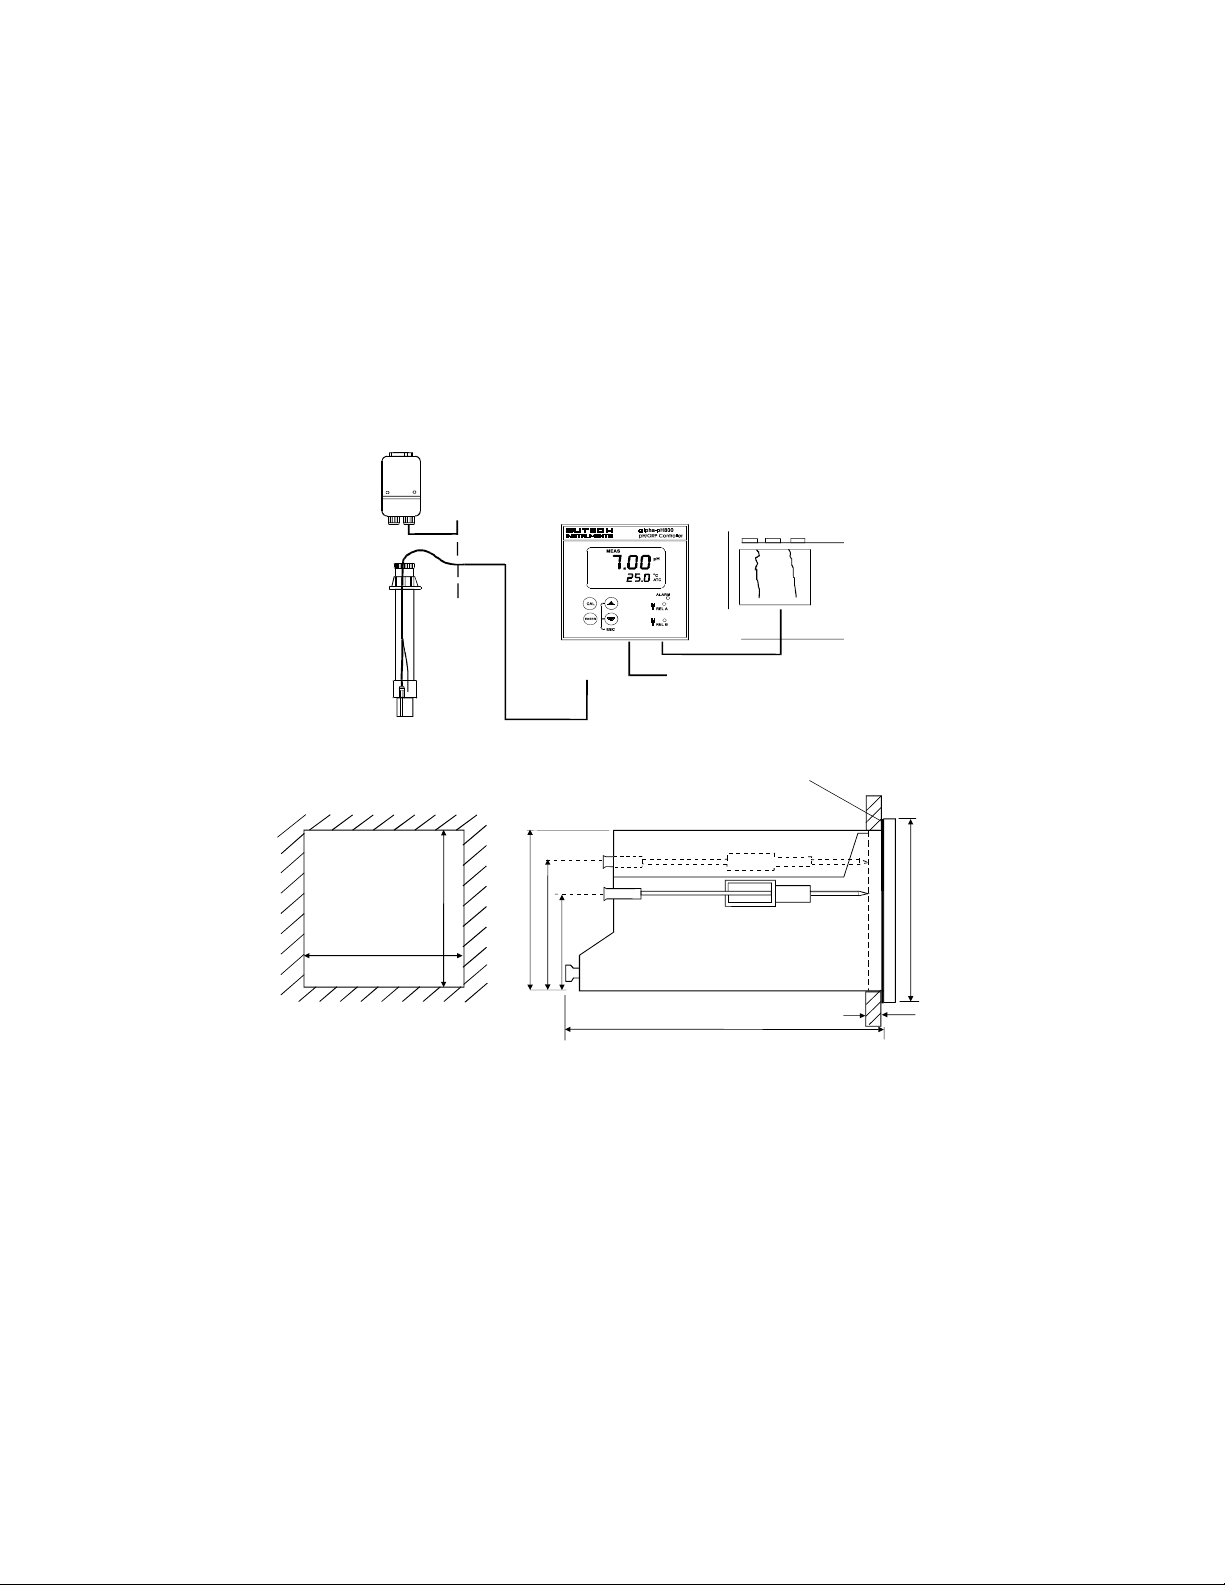
2.1 Measurement and Control System
A typical measurement system consists of:
• a pH/ORP process controller
• a pH/ORP combination electrode with integrated or separate
temperature sensor Pt 100/1000,
• an immersion, flow or pr ocess assembly with or without a potential
matching pin (PMP)
• a final control element such as pump or valve
• a recorder
Flow Assemb
l
Measurement Cable
H Contr oller
Power Mains
Chart Record
er
2.2 Unit Dimensions
max. 175
1mm
max. 45
Flat Gasket
To be Inserted ByCustome
Note: The Taped Corners Have to Be On Top
92 + 0.5
92 + 0.5
MountingCut-Out
92
56
32
The field-tested control panel housing is 96 x 96 mm; with protection class IP 54 (front).
96
3
Page 8

3 ELECTRICAL CONNECTIONS
w
A
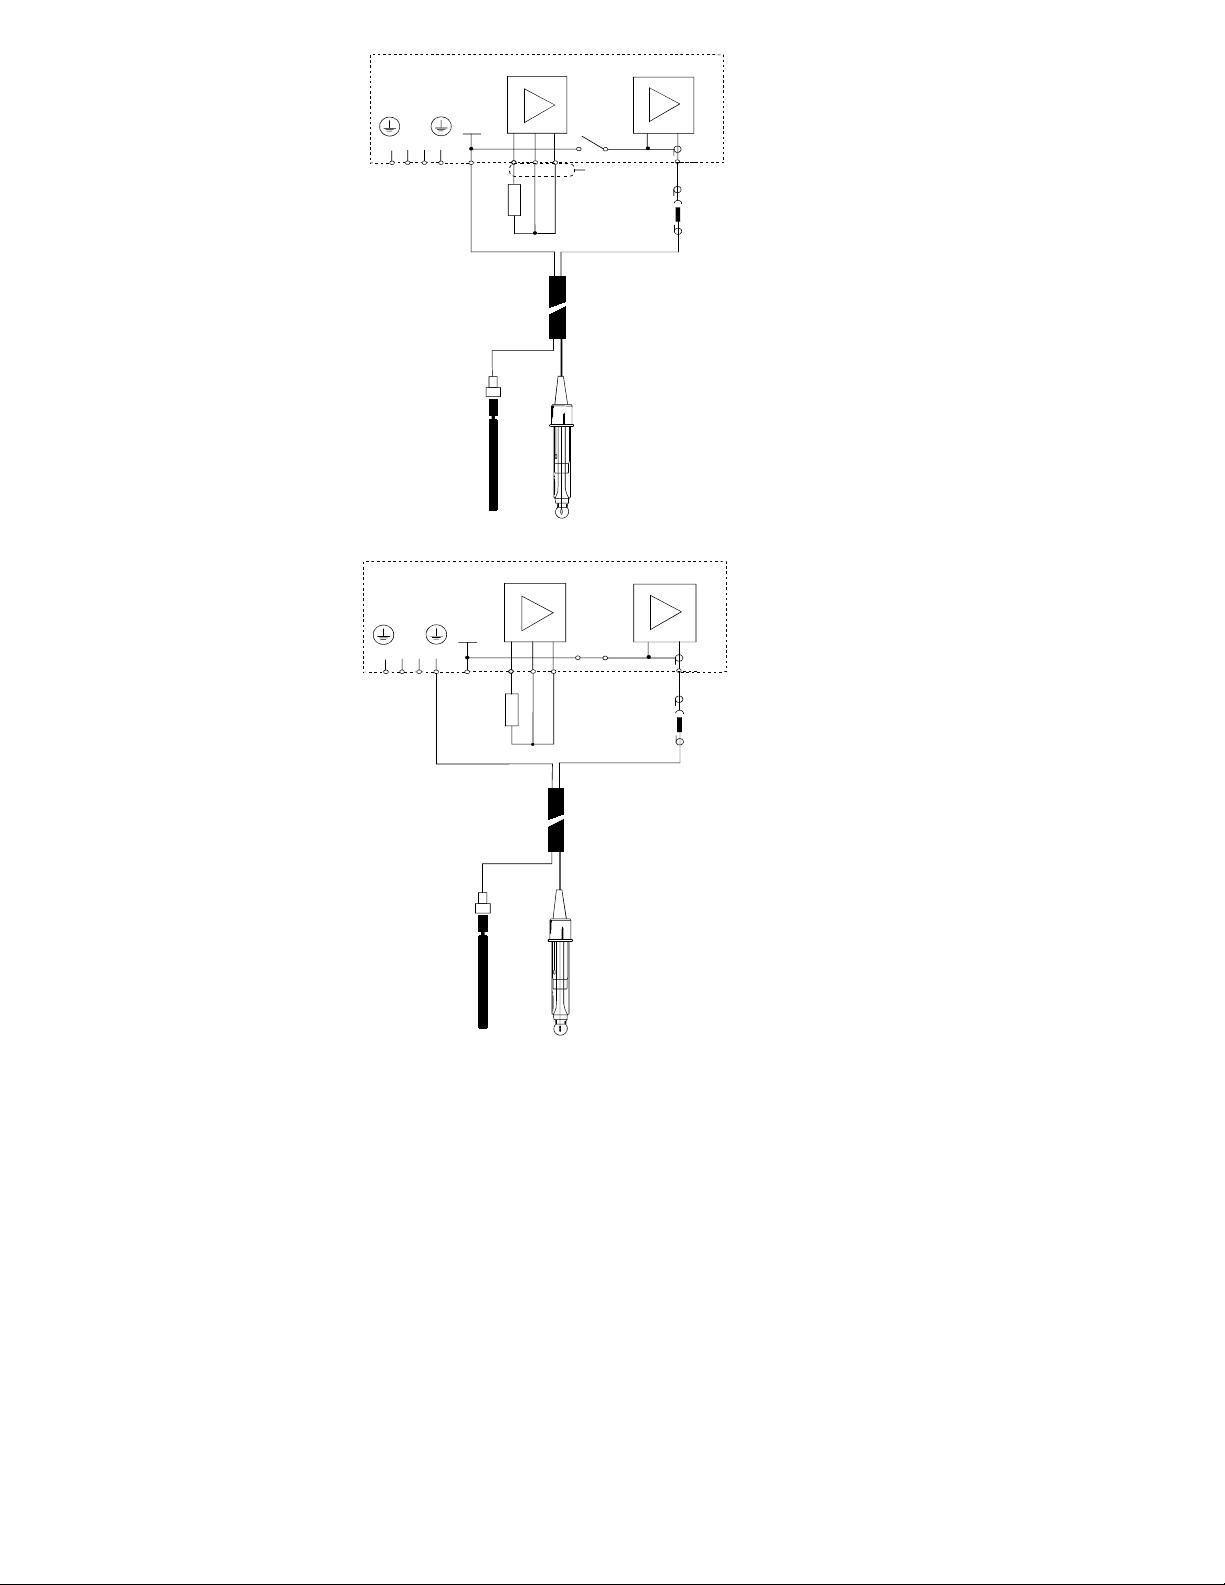
3.1 Connection Diagram
S/
V
S/S/
pH
AC:
Po
er Mains
1
18 19 20 21 22
Pt 100
Relay A
2
36
PE
NL
5
4
* ) indicated contact positionsare for currentlessc onditions
PE/S
Potential M atching Pin (PMP)
RelayB
78 9
SignalInput pH/ORP
10
11
BNC
12 13
Signal OutputHold Input
pH
m
+
-
16
151715
14
PE/S
4
Page 9
PENL
Temp.
S
0/PA
20
21
123
22
19 18
S
pH
BNC
Symmetrical high-impedance
connections
Measuring Cable
Potential
Matching Pin (PM)
N
LS
PE
22
123
Potential
Matching Pin (PM)
0/PA
21
pH Combination
Electrode
Tem p .
20
19 18
pH
BNC
Asymmetrical connections
Measuring Cable
pH Combination
Electrode
5
Page 10

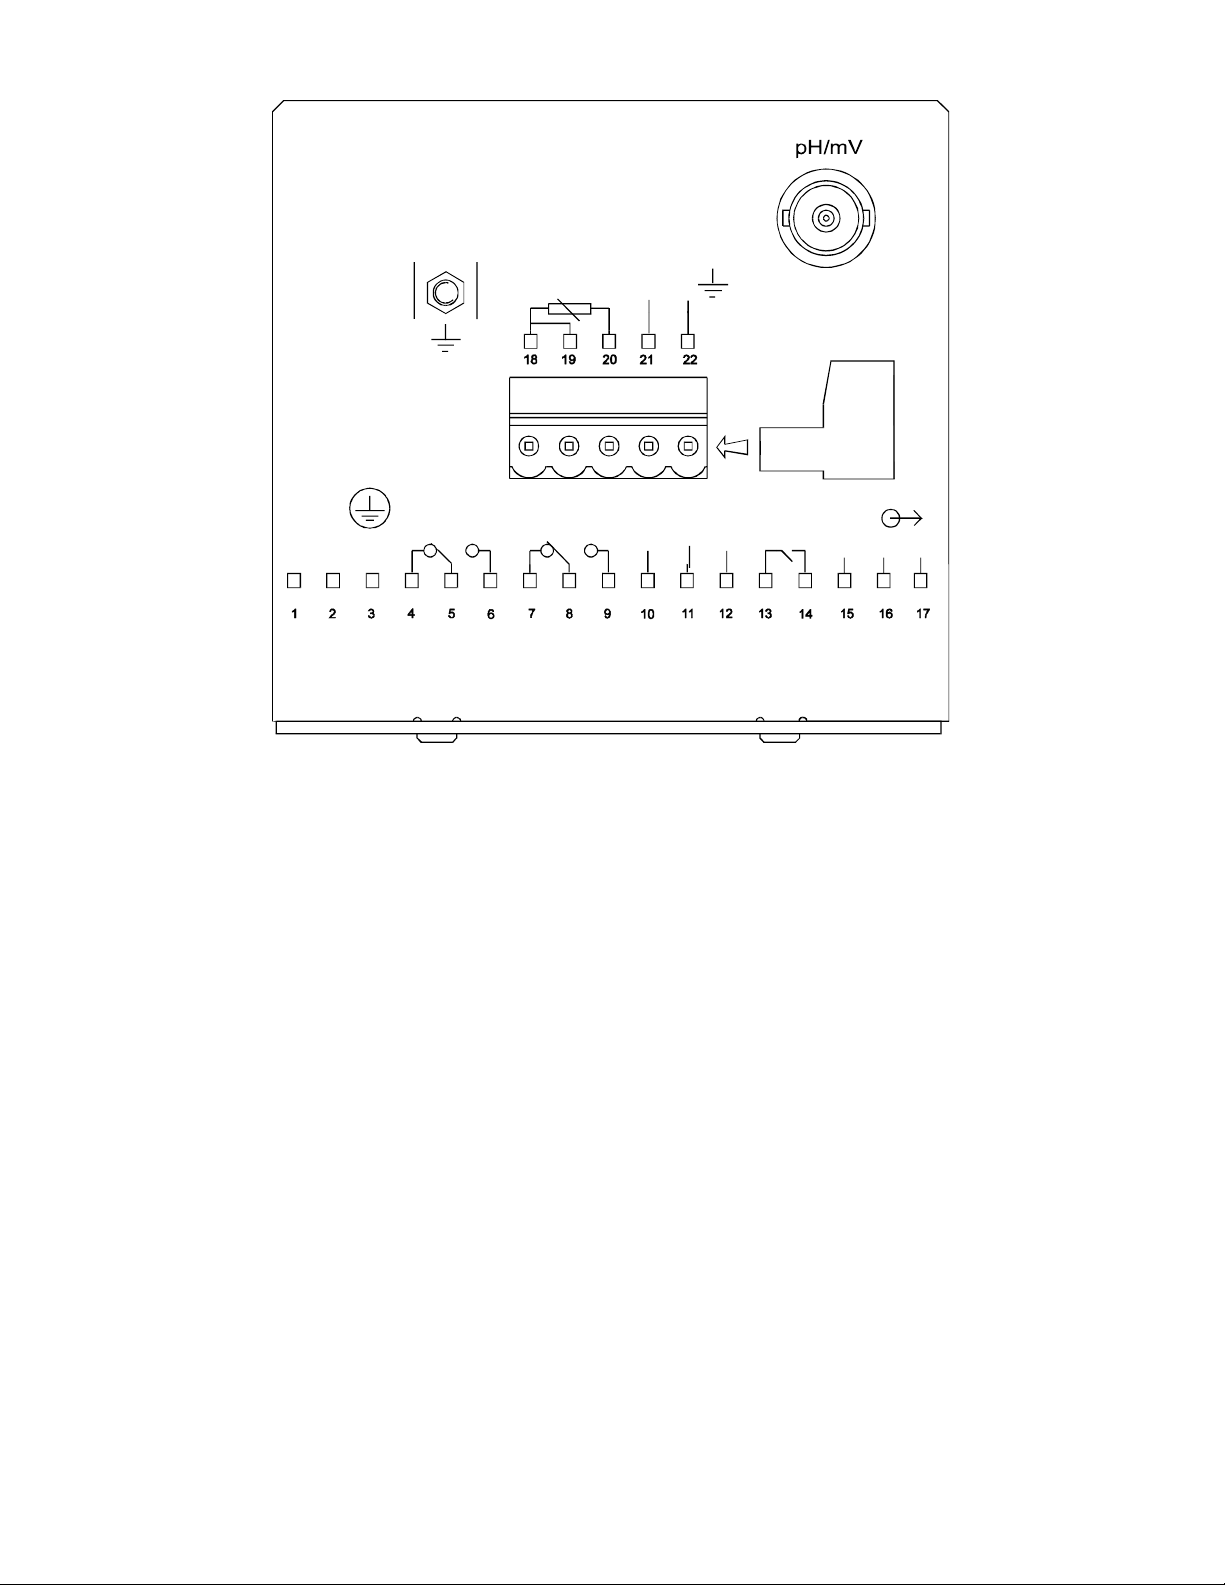
3.2 Back Panel
The back panel consists of two conn ectors . The f irs t connector is the 17-wa y
PCB edge connector and the other is the 5-way connector.
Connection for the 17-way screw terminals (from left to right):
1.AC mains live wire 10.No connection
2.AC mains neutral wire 11.No connection
3.AC mains protective earth wire 12.No connection
4.Low set relay resting position (NC) 13.Hold function switch terminal 1
5.Low set relay common 14.Hold function switch terminal 2
6.Low set relay working position (NO) 15.No connection
7.High set relay resting position (NC) 16.4 - 20 mA for -ve connection
8.High set relay common 17.4 - 20 mA for +ve connection
9.High set relay working position (NO)
Connections for the 5-way screw terminals:
18. Pt100/Pt1000 lead 1 terminal
19. Pt100/Pt1000 sense lead terminal
20. Pt100/Pt1000 lead 2 terminal
Note: If using a two-wire RTD, short terminal 19 to terminal 18.
Pt 100/Pt 1000 is s electable via an internal jum per. Fac tory def ault is Pt1 00.
See Appendix 1 for directions on switching the RTD type.
21. pH/ORP (potential matching pin)
21. pH/ORP (shield)
6
Page 11
/
Pt100
/
/
Pt1000
0V
PAL
S
FUSE 250VAC
(F)
100mA
LNPE
RELAY A
RELAY B
NC NCNC
HOLD
NC
+
-
7
Page 12

4 OVERVIEW
4.1 Keypad and Display
4.1.1 Keypad
• Perform rapid 2-point calibration and view electrode status
• Allows entry to Set up mode
• Selec t individual functions with in the function group of Set up
mode
• Store input data in the Set up mode
• Start calibration in the calibration mode
• Select various function groups in the Set up mode.
• Set parameters and n umerical values in sub functions of Set
up mode
If pressed continuously, the setting speed increases
• Return to th e Meas urem ent m ode when bo th k eys are pr ess ed
together
4.1.2 Display
The LCD display features two numerical displa ys t hat sh ow status messages
and measured values for easy, quick reference. The dis play provides shor ttext information for setting parameters and configuration.
SETUP
READY
HOLD
MEAS
CAL
7.00
25.0 ATC
CON
pH
o
C
•••• MEAS: Measurement mode
•••• SETUP: Set-up mode of function groups
•••• CAL: Calibration mode of pH/ORP
•••• READY: Comes on after a successful
calibration
•••• HOLD: Relay position and c urrent output
are frozen
•••• ATC: Comes on in the ATC mode.
Disappears in the Manual temperature
Compensation mode.
“ATC” flashes if the temperature probe is
faulty in its ATC mode
• Display for RELAY A/B. Green LED indicates measured
value within lim it while RED LED in dicates measured value
outside limit.
• Alarm display if limit value overshoot or the ATC probe fails.
8
Page 13

Function Groups
The main function an d sub-function gr oups are orga nised in a matrix format
for configuration and selection of parameters. The main function groups are:
1) Offset adjustment (OFS)
2) Temperature Measurement / compensation settings (Set
3) Control relay 1 configuration (SP1)
4) Control relay 2 configuration (SP2)
5) Configuration (ConF)
6) Calibration (CAL pH)
o
C)
4.2 Control Concept
The main function an d sub-function gr oups are orga nised in a matrix format
as shown below. These functions can be access ed via the front keypad for
configuration and selection of parameters.
9
Page 14

5 MEASUREMENT
5.1 Display in Measurement mode
When the controller is initially powered on, it automatically enters into the
Measurement mode after the large dual LCD displays all segments briefly.
The upper display s hows the measured pH or ORP valu e, while the lower
display shows either the temperature value if the controller is set for pH
measurement or “OrP” if it is set for ORP measurement.
Annunciators at the r ight s ide of the disp la y indicate whether the contr ol ler is
set for pH or mV measurement..
Similarly annunc iat or s or ic o ns at th e t op or lef t side of the disp lay shows the
current status of contro ller, e.g. “MEAS”, “S ETUP”, “CAL”, “READ Y”, etc. In
addition, error messages also guide the user i n time of any fau lty conditions
as indicated by “ERR” or icons flashing.
5.1.1 Check electrode performance
To read current electrode slope and offset values:
1) Press the CAL key followed by the ENTER key. The upper display
shows electrode slop e. T he lower d ispla y read ing s hows t he p H r eadin g at 0
mV.
2) Press the ∆
∆ and ∇∇∇∇ keys to return to Measurement mode.
∆∆
10
Page 15

6 CALIBRATION
Direct Calibration from the Measurement m ode is possible via the CAL key.
The Calibration procedure c an also be accessed from the Advanced Setup
mode.
6.1 pH Calibration
This unit features f ive preset buffer values (1.00, 4.00, 6.86 or 7.00, 9.00,
9.18 and 10.00) for qu ick, two-point auto calibratio n. When calibrating this
instrument, standard pH buffer solutions must be used.
1) Enter Calibration mode. While in the
Measurement mode, push the CAL key. The upper
and lower display reads “CAL” & “pH”. Push the
ENTER or CAL key again. The controller displays
the electrode status based on the previous
calibration. Electrode s lope and offset information is
displayed.
NOTE: If the display reads “CAL OrP”, see section
7.4 for procedures on how to switc h from ORP to p H
readings.
2) Press the ENTER key again to begin
calibration. The “CA L” indicator a ppears at th e top of
display and the buffer ind icator app ear s in the bottom
left corner of the dis p lay. The upper dis p lay is the online pH value as measured by the electrode. The
lower display indicates the first compulsory
calibration value, pH 7.00 (or 6.86).
3) Immerse the clean e lectr ode in th e buffer solution.
In ATC, the temperature probe must also be
SETUP
HOLD
READY
HOLD
HOLD
SETUP
HOLD
READY
HOLD
CAL
PH
CAL
57.2 mV
6.88
CAL
6.96
7.00
CAL
4.02
4.00
CAL
59.0 mV
7.00
pH
pH
pH
pH
pH
pH
immersed in the buffer solution. Likewise for
11
Page 16

symmetrical mode, immerse the potential matching pin in the buffer.
4) Press the ENTER key to start the ca libration at pH 7 (or pH 6. 86). The
electrode indicator and CAL indica tor both f lash. T he controller automatic all y
adjusts the reading to match the buffer value.
5) The lower dis play will now show its nex t lower ‘pH’ buf fer. Use ∆∆∆∆ and ∇∇∇∇
keys to select the sec ond buffer f rom one of the 5 remaining preset va lues.
Remove the electrode f rom the first buf fer, wash and then imm erse into the
second buffer, Once the upper d isplay stab ilises pre ss the ENTER key, the
electrode and CAL indicat or will flash. The controll er adjusts the reading to
the buffer.
6) After calibrating to a second buffer value, the controller automatically
displays electrode slope and offset. The zero point and slope are redetermined after each calibration.
7) Press the ENTER key. If the calibrat ion mode was access ed using the
CAL key, the controller will return to the Measurement mode. If the
calibration mode was accessed from the Advanced Set-up mode, the
controller will return to the sub-function menu.
Note: If there is a calibration error, the controller displays “ERR”. If this
happens, push both and (escape) to restart the calibration beginning from
step 1.
Note: When calibrating with manual temperature compensation, the
controller automatic ally changes from the preset process temperature to the
calibration temperature. After leaving the Calibration mode, the controller
switches back to proces s temperature (for settin g th e c al ibra tio n temperature
and the process temperature, see section 7.2.3).
12
Page 17

6.2 ORP – mV Calibration
This mode allows one-point calibration.
1) Enter Calibration mode. While in Measurement
mode, push the CAL key. Press the ENTER key.
The upper and lower display reads “CAL OrP”.
Note: If the upper and lo wer display read “ CAL PH”,
see section 7.4 for procedur es on ho w to s witch f rom
SETUP
HOLD
CAL
OrP
pH to ORP mV readings.
2) Place sensor in the ORP solution.
3) Press the ENTER key to begin calibration. The
“CAL” indicator appears on the display. The upper
display shows the current m V output of the electrode
without any offset adjustment.
4) Press the ∆∆∆∆ and ∇∇∇∇ keys to adjust the m V value to that of the standard
solution.
5) To confirm, press the ENTER key. The controller calculates the
correction factor and returns to the Measurement mode.
HOLD
CAL
226
mV
13
Page 18

7 ADVANCED SET UP MODE
7.1 Electrode Offset (OFS) sub-function
This option is available only in the pH mode. An allowance of ±120mV is
allowed to correct for electrode deviations. This feature is useful for
prolonged on-line applications.
The controller will add or subtract the value from the measured pH and
display the correct value. Should the offset value be too high, consider
performing maintenance on the electrode followed by calibration. If the
calibration is unsuccessful, please replace the electrode.
SETUP
HOLD
SETUP
HOLD
Ofs
Ofs
OfsOfs
-0.05
-0.05
-0.05-0.05
7.00
5) Press the ENTER key. The SETUP annunciator appears at the top of the
display. The lower displa y shows the on-l ine meas ured pH value. T he upper
display shows the current offset value.
6) Press the ∆∆∆∆ or ∇∇∇∇ keys until the pH val ue coincides with the correc t pH
value noted in Step 2. As the ∆∆∆∆ or ∇∇∇∇ keys is pressed to adjust th e pH valu e,
the ‘offset’ value in the upper display also changes.
7) Press the ENTER key to enter the offset value.
Note: The offset value is reset during full calibration . See section 6 for full
calibration instructions.
1) Tak e a sample from the system and note t he pH
reading displayed on the control ler .
2) Measure the pH of the sa mple using a calibrated
pH tester, hand-held meter, or bench m eter. Record
the correct pH value.
3) Enter Advanced set-up mode. Press ENTER.
4) Press the ∆∆∆∆ or ∇∇∇∇ keys to scroll until the upper
display shows OFS.
Note: The offset parameter is blanked out during ORP operation.
14
Page 19

7.2 Setting temperature (Set oC) sub-function
7.2.1 Selecting automatic or manual temperature compensation
1) Enter Advanced Set-up mode by pressing the ENTER key.
2) Press the ∆∆∆∆ or ∇∇∇∇ keys to scroll until the
display shows “Set
3) Press the ENTER key. The lower display
shows “Atc”; the upper display shows “on” or
“oFF” depending on whether or not ATC is
selected.
4) Press the ∆∆∆∆ or ∇∇∇∇ keys to toggle between
ATC on and off.
5) Proceed with additional Advanced Set-up
procedures (press ENTER again) or return to
Measurement mode by pressing the ∆∆∆∆ and ∇∇∇∇
keys (escape) simultaneously.
o
C”.
SETUP
HOLD
SETUP
HOLD
SETUP
HOLD
7.2.2 Temperature calibration (ATC mode only)
1) Select “ATC on” as described above in
Section 7.2.1.
2) Press the ENTER key. The upper display
SETUP
HOLD
SEt
SEt
SEtSEt
oooo
on
on
onon
Atc
oFF
oFF
oFFoFF
Atc
on
on
onon
indicates the current temperature offset. The
current measured temperature is shown in the
lower displa y.
3) Compar e the current m easured tem perature
on the controller display to a thermometer
known to be accurate. Note down the correct
temperature value.
15
SETUP
HOLD
0.0
0.0
0.00.0
25.0
ATC
o
C
Page 20

4) Press the ∆∆∆∆ or ∇∇∇∇ keys to scroll the lower display to match the correct
value. The upper display will now show the offset value. You can offset
o
temperature up to ± 5
5) Press the ENTER key to confirm your selection.
6) Continue with additional Advanced Set-up procedures, or return to the
Measurement mode by pressing the ∆∆∆∆ and ∇∇∇∇ keys (escape) simultaneously.
C.
7.2.3 Setting manual temperature compensation
Note: This option is not available when the controller is set for ATC
SETUP
oFF
oFF
HOLD
oFFoFF
Atc
SETUP
25.0
25.0
HOLD
25.025.0
P.C
SETUP
25.0
25.0
HOLD
25.025.0
C.C
shows the current proces s temperature and the lo wer display shows “P.
to indicate process temperature.
3) Press the ∆∆∆∆ or ∇∇∇∇ keys to adjust the process temperature value, bet ween
–9.9 and 125
o
C.
operation.
For manual temperature compensation, two
different temperatures: process and
calibration, can be input independently. This
allows calibration at a temperature other than
the process temperature. Example: setting a
calibration temperature of 25
calibration using standard buffer solutions at
o
25
C, even if the process temperature is
different.
1) Select “ATC oFF” as described above in
section 7.2.1
2) Press the ENTER key. The upp er disp la y
o
C allows
o
C”
4) Af ter settin g the pr ocess tem perature valu e, pr ess the ENTER ke y. The
upper display shows the current calibration temperature and the lower
display shows “C.
o
C”.
16
Page 21

5) Press the ∆∆∆∆ or ∇∇∇∇ keys to adjust the calibration temperature value,
between –9.9 and 125
o
C.
6) Press the ENTER key to confirm.
7) Continue with additional Advanced Set-up procedures, or return to
Measurement mode by pressing the ∆∆∆∆ and ∇∇∇∇ keys (escape) simultaneously.
17
Page 22

7.3 Control Relay A/Control Relay B (SP1/SP2) subfunction
The SP1 option sets th e operating parameters for Relay A; the SP2 option
sets the operating parameters for relay B. Since these groups have the
same set-up parameters, they are described together.
7.3.1 Entering the Set point 1 (Set point 2) sub-function
SETUP
HOLD
SETUP
HOLD
SETUP
HOLD
2) Press the ENTER key. The upper display shows the curr ent set point
value and the lower display shows SP1 (SP2).
3) Press the ∆∆∆∆ or ∇∇∇∇ keys to enter the value for Set point 1 (Set point 2).
4) Press the ENTER key to confirm.
5) Proc eed to 7.3.3 step 3, or r eturn t o Meas urem ent m ode b y pressing th e
∆∆∆∆ and ∇∇∇∇ keys simultaneously (escape).
SP1
SP1
SP1SP1
4.00
SP1
Lo
SP1
pH
1) Enter Advanced Set-up mode. Push the
ENTER key.
2) Press the ∆∆∆∆ or ∇∇∇∇ keys to scroll until the
upper display shows SP1 (S P2).
7.3.2 Selecting the set point values
This lets you choos e the value that will cause
your controller to activate the respective relays.
1) Follow directions in 7.3.1 to enter Control
Relay mode. If you are in this mode, skip to
step 2.
7.3.3 Choosing High or Low set points
Select a “lo” to activate relay wh en the pH/ORP value undersho ots the set
point; select a “Hi” to activat e rela y when th e va lue ov ershoots the s et po int.
Using both SP1 and S P2, the following configurati on for the set points can
be selected: lo/lo, lo/hi, hi/lo, or hi/hi.
18
Page 23

1) Follow directions in 7.3.1 to enter Control Relay mode.
2) Press the ENTER key until the upper disp lay shows Lo or Hi and the
lower display shows SP1 (SP2).
3) Press the ∆∆∆∆ or ∇∇∇∇ keys to select l ow (lo) or high (hi) set point for SP1
(SP2).
4) Press the ENTER key to confirm.
5) Proceed to 7.3.4 step 3, or retur n Measurement mode b y pressing the
∆∆∆∆ and ∇∇∇∇ keys simultaneously (escape).
7.3.4 Selecting a hysteresis (dead band) value
Hysteresis prevents rapid co ntact switching if your value is fluctuati ng near
the set point. It does this by overshooting the set po int value to a specified
hysteresis valu e. You can set the h ysteresis va lue from 0.1 to 1.0 pH, 10 to
100mV.
Example: You have set your high set point at pH 9.0 and your hysteresis
limit value at pH 0.5. If your m easured value overshoots the high s et point
pH 9.0, the controller’s relay activates, which in turn activates external
devices such as a pump or valve. The actions of the external device will
cause the solution’s pH to drop. W hen the pH drops to 8.5 pH, t he rela y and
hence the pump will switch off.
1) Follow directions in 7.3.1 to enter Control
Relay mode.
2) Press the ENTER key. Scroll with the ∆∆∆∆ or ∇∇∇∇
SETUP
HOLD
0.50
pH
keys until the upper display shows the h ysteresis
(dead band) value and the lower display shows
“HYS”.
3) Press the ∆∆∆∆ or ∇∇∇∇ keys to enter your hysteresis value for Set point 1 (S et
point 2). Your controller will acti vate at the valu e you selec t.
4) Press the ENTER key to confirm your selection.
19
Page 24

5) Proceed to 7.3.5 step 3, or return to Measurement mode by press ing
the ∆∆∆∆ and ∇∇∇∇ keys simultaneously (escape).
NOTE: Please refer to Appendix 3 for a graphical representation of the
Hysteresis.
7.3.5 Setting an on-delay time lag
You can set as time delay for each relay, which stops the relay from
switching on the moment the set p oint is exceeded. This c ontroller lets you
set a 0 to 2000 second time delay before the relay activates.
SETUP
HOLD
0
On.d
1) Follow directions in 7.3.1 to enter Control
Relay mode.
2) Press the ENTER key. Scroll with the ∆∆∆∆ or ∇∇∇∇
keys until the upper displ ay shows “on delay” tim e
and the lower display shows “On.d”.
3) Press the ∆∆∆∆ and ∇∇∇∇ keys to enter o n-dela y tim e for Set p oin t 1 (Set point
2). The controller wil l delay activat ion for the n umber of seconds ( 0 to 2000)
you select.
4) Press the ENTER key to confirm your selection.
5) Proceed to 7.3.6 step 3, or return to Measurement mode by press ing
the ∆∆∆∆ and ∇∇∇∇ keys simultaneously (escape).
7.3.6 Setting an off-delay time lag
You can set a time delay for each relay, which delays the relay from
switching off the moment the val ue re ac hes th e set point and hysteres is . T he
controller allows a timer delay from 0 to 2000 seconds time delay before
deactivating.
SETUP
HOLD
0
OF.d
1) Follow directions in 7.3.1 to enter Control
Relay mode.
2) Press the ENTER key. Scroll with the ∆∆∆∆ or ∇∇∇∇
keys until the upper displa y shows “of f delay” tim e
and the lower display shows “OF.d”.
20
Page 25

3) Press the ∆∆∆∆ or ∇∇∇∇ keys to enter of f-delay time for Set point 1 (Set point
2). The controller wil l delay activat ion for the n umber of seconds ( 0 to 2000)
you select.
4) Press the ENTER key to confirm your selection.
5) Continue with Advanced Set-up mode procedures, or return to
Measurement mode by pressing the ∆∆∆∆ and ∇∇∇∇ keys simultaneously (escape).
21
Page 26

7.4 Configuration (ConF) sub-function
The options available in this sub-function allows the controller to be
configured as a pH or ORP controller.
7.4.1 Entering the Configuration sub-function
1) Enter Advanced Set-up mode. Press the ENTER key.
2) Press the ∆∆∆∆ or ∇∇∇∇ keys to scroll until the upper display shows “ConF”.
7.4.2 Selecting pH or ORP mV measurement
SETUP
ConF
HOLD
SETUP
HOLD
SETUP
HOLD
PH
SY
PH
ASY
SETUP
HOLD
SETUP
HOLD
OrP
SY
OrP
ASY
mV
mV
Besides selecting the contro ll er to f unc tion as a pH or ORP ( mV) controller, it
also allows the selection of the type of input: symmetric al or asymmetrical.
Symmetrical m ode is used in conjunction with a potential matching pi n – in
an electrically noisy environment. Please refer to section 3, page 6 for a
graphical representation.
1) Follow directions in 7.4.1 to enter Configuration mode.
2) Press the ENT ER ke y. Scroll with the ∆∆∆∆ or ∇∇∇∇ keys until th e upper displa y
shows the mode of op eration (pH or ORP mV and the lower displa y shows
symmetrical (SY) or asymmetrical (ASY) input type.
3) Proceed to 7.4.3, or return to Measurement mode by pressing the ∆∆∆∆ and
∇∇∇∇ keys simultaneously (escape).
22
Page 27

7.4.3 Reverting to factory default settings
Use this parameter to r es et all s ett ings t o f ac tory default. Changing f r om “ no”
to “YES” and pressing the ENTER key resets all settings to factory default.
WARNING: If “Yes” is selected, all settings input
will be overwritten!
1) Follow directions in 7.4.1 to enter Configuration
mode.
2) Press the ENTER key. Scroll with the ∆∆∆∆ or ∇∇∇∇ keys until the upper
display shows “no” or” YES”, and the lower display shows “deF” (default).
3) Press the ∆∆∆∆ or ∇∇∇∇ keys to select no or yes. Selecting “YES” a nd pres s ing
the ENTER key will overwrite all user-settings and automatically return to
Measurement mode.
4) Press the ENTER key to confirm your select ion and r eturn to Ad vanced
Set-up mode, or return to Measur ement m ode by press ing the ∆∆∆∆ and ∇∇∇∇ keys
simultaneously (escape).
SETUP
HOLD
no
dEF
7.5 Calibration (CAL) sub-function
The calibration procedure in Advanced Set-up mode is identical to the
procedure in the Calibration m ode. The only difference is that the control ler
will revert back to Set-up mode (instead of Measurement mode) after
calibration is com pleted.
7.5.1 Entering Calibration mode from Advanced Set-up mode
1) Enter Advanced Set-up mode. Press the ENTER key.
2) Press the ∆∆∆∆ or ∇∇∇∇ keys to scroll until the upper display shows “CAL”.
3) See section 6 for complete calibration procedures.
23
Page 28

8 TECHNICAL SPECIFICATIONS
pH Range -2.00 to 16.00 pH
Resolution 0.01 pH
Relative Accuracy
mV Range - 1000 to +1000 mV
Resolution 1 mV
Relative Accuracy
Temperature - 9.9 to + 125.0 oC
Resolution 0.1 oC
Relative Accuracy
Sensor Pt 100 /Pt 1000 (jumper selectable)
Temperature Compensation Auto / manual (reference at 25.0 oC)
Set-point and Controller Functions
Function (switchable) Set-point controller
Controller charac teristics Limit controller
Pickup / Dropout delay 0 to 2000 sec.
Switching pH hysteresis 0.1 to 1 pH
Switching ORP hysteresis 10 to 100 mV
Contact outputs, controller 2 potential-free change-over contacts
Switching voltage max. 250 VAC
Switching current max. 3A
Switching power max. 600 VA
Electrical Data and Connections
Power Requirements 110 / 220 VAC (jumper selectable)
Frequency 48 to 62 Hz
Signal Output 4 to 20 mA, galvanically isolated
Load
pH / ORP input BNC
Connection terminal Terminal blocks 5-pole / 17-pole, removable
Mains fuse / fine wire fuse slow-blow 250 V / 100 mA
EMC Specifications
Emissions According to EN 50081-1
Susceptibility According to EN 50082-1
Environmental Conditions
Ambient temp. operating range 0 to +50 oC
Relative humidity 10 to 95%, non-condensing
Mechanical Specifications
Dimensions (control panel housing - L x H x W) 175 x 96 x 96 mm
Weights (control panel housing) max. 0.7 kg
Material ABS with polycarbonate (front housing)
Insulation (Front / Housing) IP 54 / IP 40
± 0.01 pH
± 1 mV
± 0.5 oC
max. 500 Ω
24
Page 29

9 ACCESSORIES
Product Description Code no.
Ryton-body pH combination elec tr ode withou t AT C,
without potential matching pin
Ryton-body pH combination elec tr ode withou t AT C,
without potential matching pin, high temperature
and pressure rating
Ryton-body pH combination elec tr ode withou t AT C,
with potential matching pin
Ryton-body pH com bination electr ode with ATC (Pt
100), with potential matc hing pin
Ryton-body ORP Gold com bination electrode with
potential matching pin
Ryton-body ORP Platnium combination electrode
with potential matching pin
Note: Above pH/ORP electrodes can withstand a pressure up to 6 bar
(except for ECARHTTSO05B – 9 bar). These electrodes have
integral 5 meter measuring cable. Please ask your authorised
distributor or dealer for the prices, extension cables, tee joints,
electrode assembly and buffer solutions.
EC-ARTSO05B
EC-ARHTTSO05B
EC-ARGTSO05B
EC-100GTSO05B
EC-HTAUTSO05B
EC-HTPTTSO05B
10 GENERAL INFORMATION
10.1 Warranty
Eutech Instruments warrants this product to be free from significant
deviations in material and workmanship for a period of one year
from the date of purchase. If repair is necessary and has not been
the result of abuse or misuse within the warranty period, please
return by freight pre-paid. Eutech Instruments’ Customer Service
Dept. will determine if problem is due to deviations or customer
abuse. Out of warranty products will be repaired on a charge basis.
10.2 Packaging
The instrument is packaged in a corrugated box with a warranty
card, instruction manual and the following accessories:
• 17-way and 5-way (right-angled) terminal block [1 unit each]
• side threaded rod with catch [2 units]
• receptacle cable lug [1 unit]
• rubber gasket [1 unit]
25
Page 30

10.3 Return of Goods
Authorisation must be obtained from Eutech Instruments’
Customer Service Dept. to issue a RGA (Return of Goods
Authorisation) number before returning items for any reason. When
applying for authorisation, please include data requiring t he reason
of return. Items must be carefully packed to prevent damage in
shipment and insured against possible damage or loss. Eutech
Instruments will not be responsible for any damage resulting from
careless or insufficient packing.
Warning: Shipping damage as a result of inadequate packaging is
the user/distributor’s responsibility, whoever applicable.
Please follow the guidelines below before shipment.
10.4 Guidelines for Returning Unit for Repair
Use the original packaging material, if possible when shipping the unit
for repair. Otherwise wrap it with bubble pack and use a corrugated
box for better protection. Include a brief description of any faults
suspected for the convenience of Customer Service Dept., if possible.
26
Page 31

11 APPENDICES
11.1 Appendix 1
Jumper Positions - Internal to the controller
JP 1 Selects the input voltage 220 VAC.
JP 2 Selects the input voltage 110 VAC.
JP 3 Solder bridge selects between Pt100 and Pt1000.
Fuse Note that there is a fuse (slow-blow 100mA) internal
to the controller. Before opening the unit, ENSURE
that the power cable is physically separated from the
power supply. Replace fuse with the recommended
type only.
27
Page 32

11.2 Appendix 2
The following table shows the various pH values at different
temperature of the solution during calibration.
Temperature
o
C)
(
0 1.67 4.01 6.98 7.12 9.47 10.32
5 1.67 4.01 6.95 7.09 9.38 10.25
10 1.67 4.00 6.92 7.06 9.32 10.18
15 1.67 4.00 6.90 7.04 9.27 10.12
20 1.68 4.00 6.88 7.02 9.22 10.06
25 1.68 4.01 6.86 7.00 9.18 10.01
30 1.69 4.01 6.85 6.99 9.14 9.97
35 1.69 4.02 6.84 6.98 9.10 9.93
40 1.70 4.03 6.84 6.97 9.07 9.89
45 1.70 4.04 6.83 6.97 9.04 9.86
50 1.71 4.06 6.83 6.97 9.01 9.83
55 1.72 4.08 6.83 6.97 8.99 9.81
60 1.73 4.10 6.84 6.98 8.96 9.79
70 1.74 4.12 6.85 6.99 8.92 9.76
80 1.77 4.16 6.86 7.00 8.89 9.74
90 1.80 4.20 6.88 7.02 8.85 9.73
pH 1.68
(oxalate)
pH 4.01
(phthalate)
pH 6.86
(tetraoxalate)
pH 7.00
(neutral
phosphate)
pH 9.18
(tetra borate )
pH 10.01
(carbonate)
28
Page 33

11.3 Appendix 3
Simple Explanation on the Function of Hysteresis
SP1 Set to LO
SP2 Set to HI
4.0 4.5 9.5 10.0
SP1
FORWARD DIRECTION
REVERSE DIRECTION
The controller relay activates when the set-point is reached. In the
reverse direction, it does not de-activate when the value reaches the
set-point. Instead, it continues to be active till the value reaches the
amount set by the Hysteresis band.
RELAY ON
RELAY OFF
7.0
SP2
HYSTERESIS BAND
(DEFAULT = 0.5 pH)
29
Page 34

CALIBRATION RECORD
Calibration Date Electrode Slope Electrode Offset
 Loading...