

Page 1

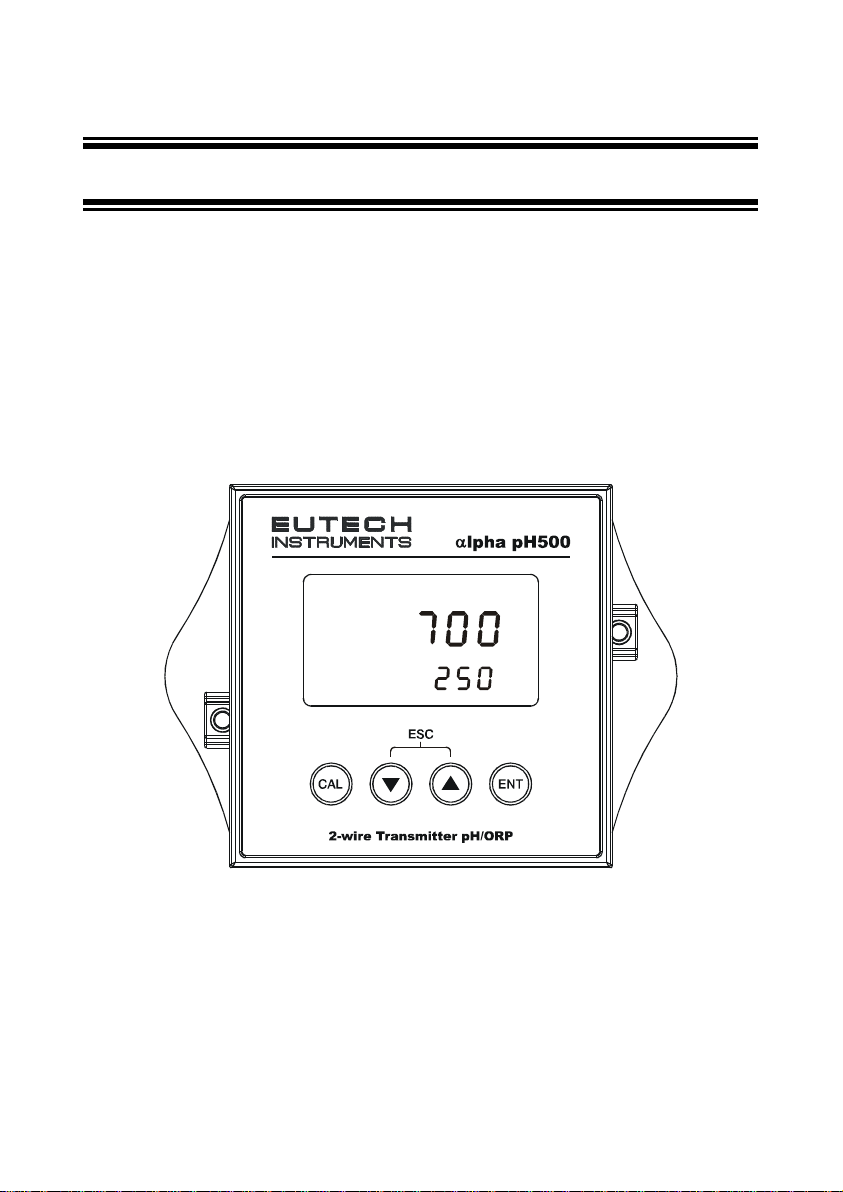
Alpha pH 500
2-Wire Transmitter
pH / ORP
Page 2

ROSS and the COIL trade dress are trademarks of Thermo Fisher Scientific Inc.
U.S. patent 6,793,787.
AQUAfast, Cahn, ionplus, KNIpHE, No Cal, ORION, perpHect, PerpHecT,
PerpHecTion, pHISA, pHuture, Pure Water, Sage, Sensing the Future, SensorLink,
ROSS, ROSS Ultra, Sure-Flow, Titrator PLUS and TURBO2 are registered
trademarks of Thermo Fisher.
1-888-pHAX-ION, A+, All in One, Aplus, AQUAsnap, AssuredAccuracy, AUTOBAR, AUTO-CAL, AUTO DISPENSER, Auto-ID, AUTO-LOG, AUTO-READ, AUTOSTIR, Auto-Test, BOD AutoEZ, Cable-Free, CERTI-CAL, CISA, DataCOLLECT,
DataPLUS, digital LogR, DirectCal, DuraProbe, Environmental Product Authority,
Extra Easy/Extra Value, FAST QC, GAP, GLPcal, GLPcheck, GLPdoc, ISEasy,
KAP, LabConnect, LogR, Low Maintenance Triode, Minimum Stir Requirement,
MSR, NISS, One-Touch, One-Touch Calibration, One-Touch Measurement,
Optimum Results, Orion Star, Pentrode, pHuture MMS, pHuture Pentrode, pHuture
Quatrode, pHuture Triode, Quatrode, QuiKcheK, rf link, ROSS Resolution, SAOB,
SMART AVERAGING, Smart CheK, SMART STABILITY, Stacked, Star Navigator
21, Stat Face, The Enhanced Lab, ThermaSense, Triode, TRIUMpH, Unbreakable
pH, Universal Access are trademarks of Thermo Fisher.
Guaranteed Success and The Technical Edge are service marks of Thermo Fisher.
PerpHecT meters are protected by U.S. patent 6,168,707. PerpHecT ROSS
electrodes are protected by U.S. patent 6,168,707. ORION Series A meters and
900A printer are protected by U.S. patents 5,198,093, D334,208 and
D346,753.ionplus electrodes and Optimum Results solutions are protected by U.S.
patent 5,830,338.ROSS Ultra electrodes are protected by U.S. patent
6,793,787.ORP standard is protected by U.S. patent 6,350,367. No Cal electrodes
are protected by U.S. patent 7,276,142.© 2009 Thermo Fisher Scientific Inc. All
rights reserved. All trademarks are the property of Thermo Fisher Scientific Inc. and
its subsidiaries.The specifications, descriptions, drawings, ordering informa t ion and
part numbers within this document are subject to change without notice.This
publication supersedes all previous publications on this subject.
Page 3

Preface
This manual serves to explain the use of the Alpha pH 500 transmitter. It functions
in two ways, firstly as a step by step guide to help you to oper ate the transmitter.
Secondly, it serves as a handy reference guide. It is written to cover as many
anticipated applications of the transmitter as possible. If there are doubts in the use
of the transmitter, please do not hesitate to contact the nearest Authorized
Distributor.
Thermo Scientific will not accept any responsibilit y for damage or malfunction to th e
transmitter caused by improper use of the instrument.
Remember to fill in the guarantee card and mail it back to your authorized
distributor.
The information presented in this manual is subject to change without notice as
improvements are made, and does not represent a commitment on the part of
Thermo Scientific.
Copyright © 2009
All rights reserved
Page 4

TABLE OF CONTENTS
1 INTRODUCTION 1
2 PREPARATION 2
2.1 Power Supply Requirements (SL2 Position) 3
2.2 Connecting the Electrode & Temperature Probe (SL1 Position) 3
3 INSTALLATION 5
3.1 Wall Mount 5
3.2 Panel Mount 6
4 DISPLAY AND KEYPAD FUNCTIONS 7
4.1 Display 7
4.2 Keypad 8
5 CALIBRATION 9
5.1 Preparing the Transmitter for Calibration 9
5.2 pH Calibration 10
5.3 Relative mV Calibration 11
5.4 Temperature Calibration 11
6 ADVANCED SETUP FUNCTIONS 12
6.1 Offset Setting (Unavailable in ORP mode) 12
6.2 Output Range Setting 13
6.3 Temperature Compensation Setting (Unavailable in ORP mode) 14
6.4 HOLD Current Setting 17
6.5 Out-of-Range Current Setting 17
6.6 Configuration 18
7 PROBE CARE AND MAINTENANCE 20
8 TROUBLE SHOOTING GUIDE 22
9 SPECIFICATIONS 23
10 TECHNICAL DIMENSIONS 24
11 ACCESSORIES 25
12 WARRANTY 27
13 RETURN OF ITEMS 27
Page 5
A
1 INTRODUCTION
Thank you for selecting an Alpha pH 50 0 pH/ORP Transmitter. This transmitter is a
microprocessor-based instrument that is designed to be sturdy and user-f riendly. It
is capable of measuring pH, mV and temperature.
This transmitter has many user-friendly features – all of which are completely
accessible through the water-resistant membrane keypad. Your transmitter includes
an instruction manual and a warranty card.
Please read this manual thoroughly before operating your transmitter.
MEAS
READY
pH
.
°C
.
TC
Page 6
2 PREPARATION
Remove screws from the four corners at the back of the Transmitter, and remove
back cover.
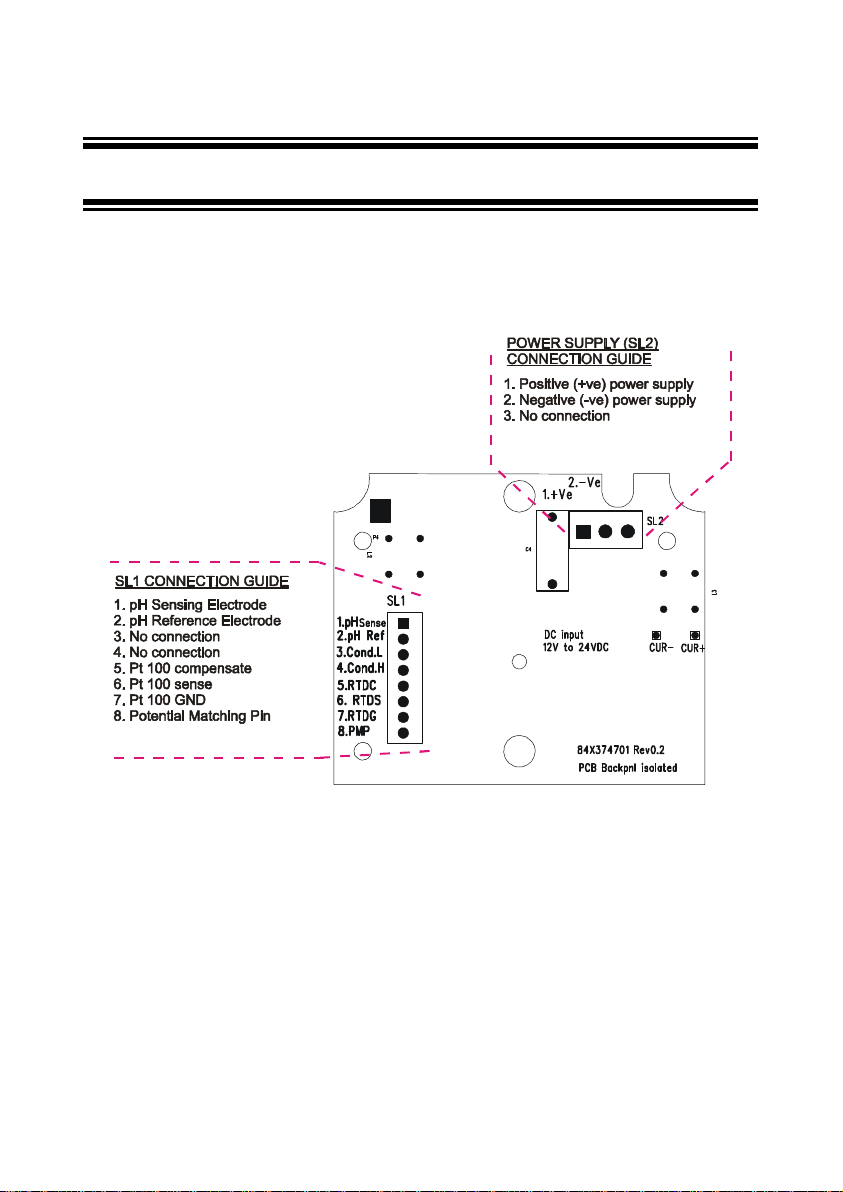
Connectors should be exposed as follows:
Figure 1 – Connection Guide
All wiring is done on 2 detachable connectors: –
1. 9-pin connector (located on SL1 position) for pH electrode, temperature
sensor and potential matching pin (PMP); &
2. 3-pin connector (located on SL2 position) for power supply.
Using a suitable screwdriver, loosen screws from top of connector.
When inserting the wires, always hold connector with top screws facing up.
Page 7
2.1 Pow er Supply Requirements (SL2 Position)
This transmitter requires a 12 to 24V DC power supply. Other Transmitters and/or a
chart recorder may be connected in series.
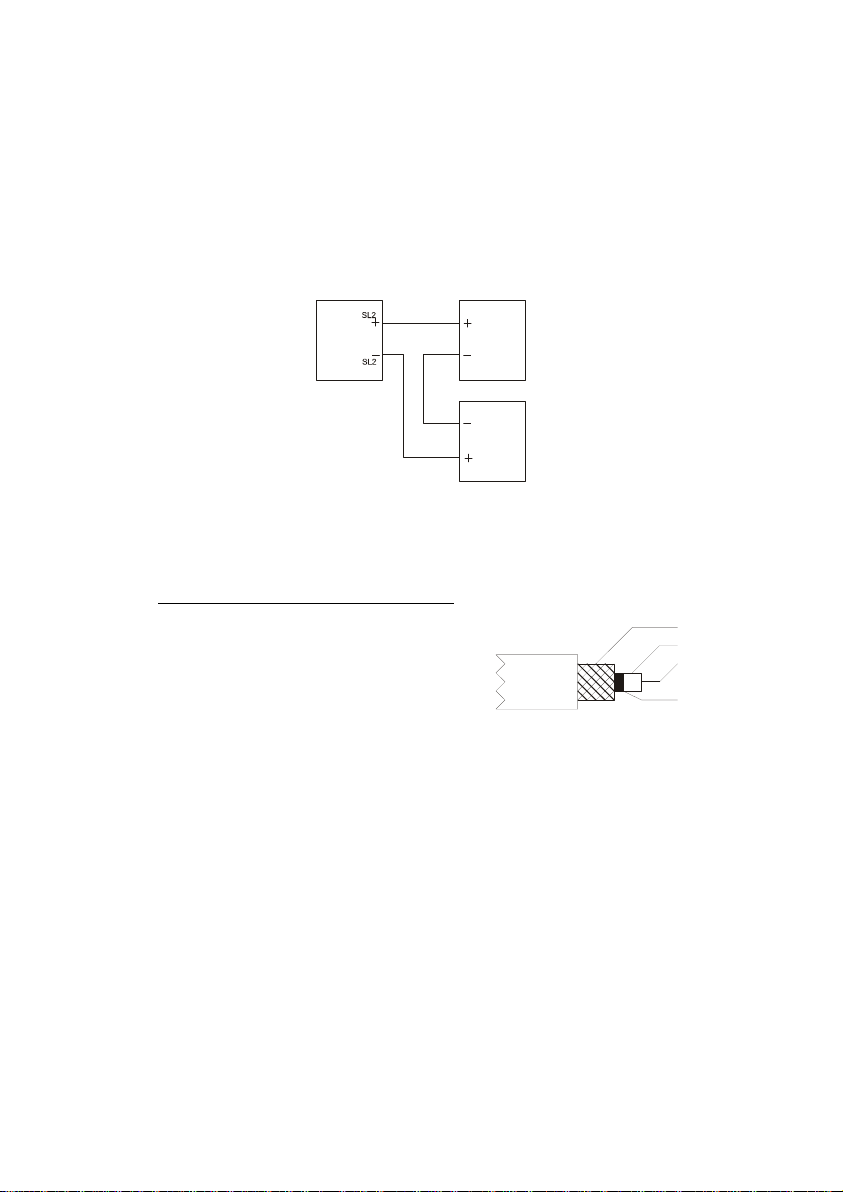
1. Insert positive loop wire from power supply to pin 1, tighten screw.
2. Insert negative loop wire to pin 2, tighten screw. This wire may be linked to
a chart recorder or to negative terminal of power supply.
Alpha pH500
1
2
Power Supply
Chart recorde r
2.2 Connecting the Electrode and Temperature Probe (SL1 Position)
2.2.1 To connect the pH or ORP electrode:
The pH transmitter accepts any combination
electrode for pH or ORP measurements
1. Remove BNC connector from cable.
Two wires will be exposed.
Insulation
pH reference
Clear sheath
pH sensing
Screen
2. Strip insulation, just enough to expose bare wires.
IMPORTANT: For pH/ORP sensing cable, remember to strip the inner black
layer (screen) and expose the clear plastic sheath.
1. Insert pH sensing cable into pin 1 of connector. Tighten screw.
2. Insert pH reference cable into pin 2 of connector. Tighten screw.
NOTE: Instead of removing the BNC connection, Eutech offers an optional
adapter (part number 05994-90 BNC to Spade Lug adapter) that ca n be
used.
Page 8

2.2.2 To connect temperature probe:
For Automatic Temperature Compensated (ATC) pH readings, a 100Ω Pt RTD
temperature probes can be used. Industrial pH electrodes are often offered with
ATC, which will typically be bare wires.
3-wire probe
1. Insert Pt 100 sense wire to pin 5 of connector. Tighten screw.
2. Insert Pt 100 input wire to pin 6 of connector. Tighten screw.
3. Insert Pt 100 return wire to pin 7 of connector. Tighten screw.
2-wire probe:
1. T ake a small length of wire and short pins 5 and 6 of connector. Insert Pt
2. Insert Pt 100 return wire to pin 7 of connector. Tighten screw.
IMPORTANT: Temperature probe should always be together with pH probe,
even during calibration. Make sure no bare wires are expo sed and all screws
are tightened for proper contact.
100 sense wire into pin 6 of connector and tighten screws.
2.2.3 To connect Potential Matching Pin (Liquid electrical interferences):
Connect the additional wire from the electrode to pin 8. Transmitter must be
configured to ‘Symmetrical mode of operation’ - Pleas e refer to ‘Advanced Setup
Functions’, Section 6.6.2 – Selecting Asymmetrical or Symmetrical Mode of
Operation.
Page 9
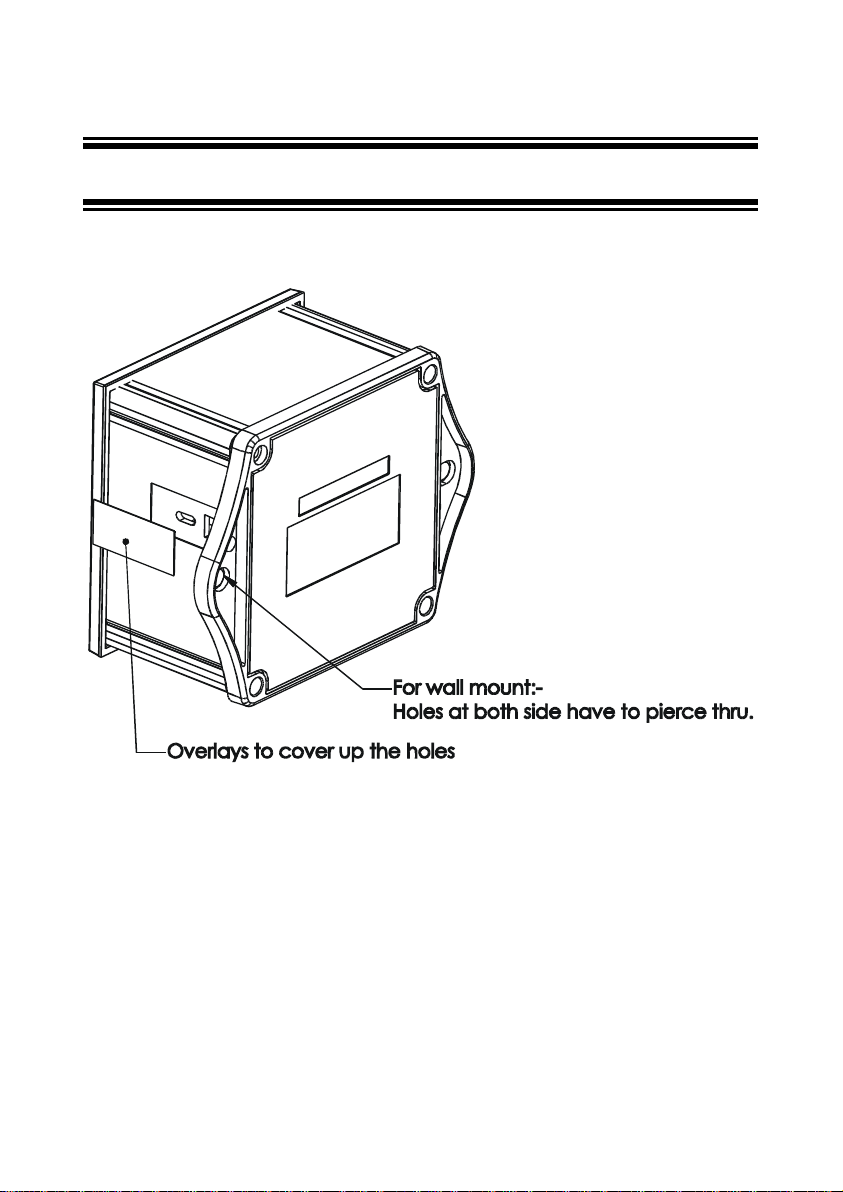
3 INSTALLATION
3.1 Wall Moun t
Page 10
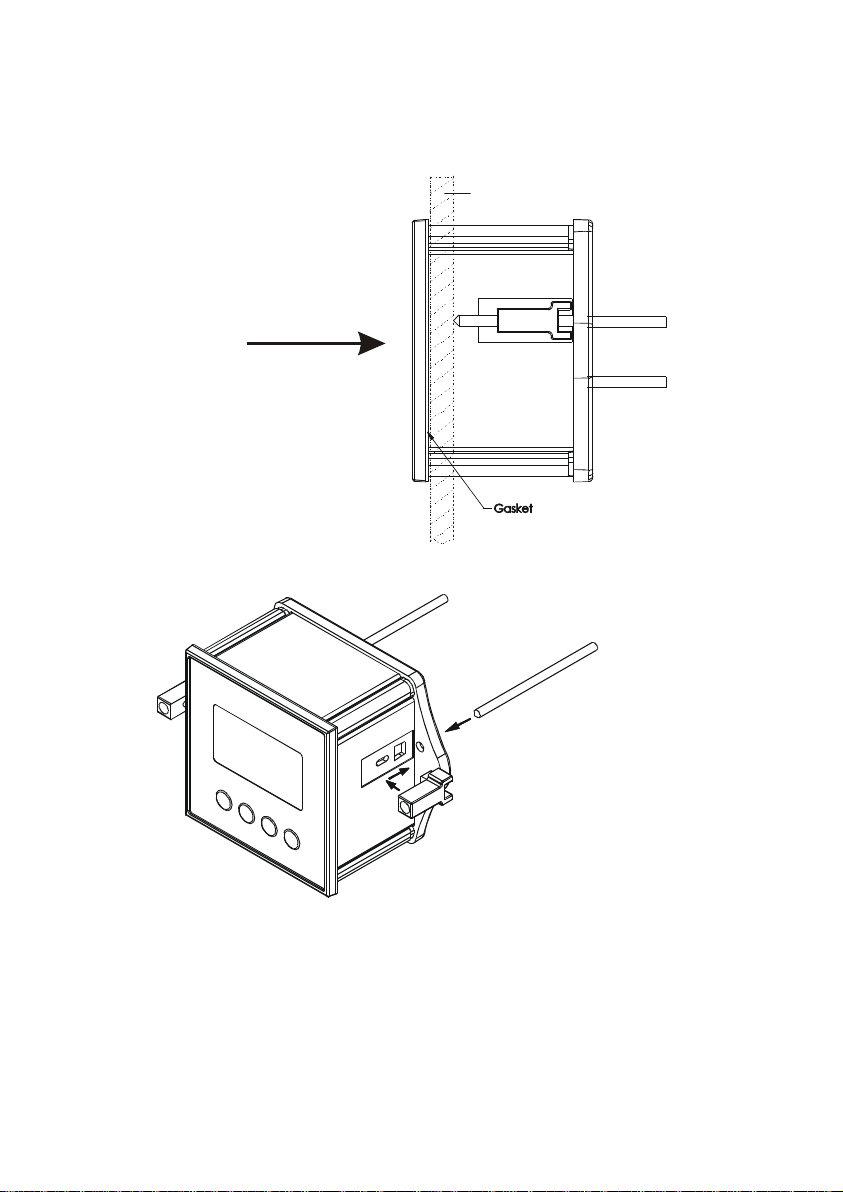
3.2 Panel Moun t
1. Prepare panel cut-out of
92.0 mm by 92.0 mm
2. Remove back cover of
transmitter and slide it
through panel cut-out
Panel (side)
4. Thread rods through
lugs until transmitter
is held in place against
panel
3. Atta
ch lugs to either
side
of transmitter
Page 11

4 DISPLAY AND KEYPAD FUNCTIONS
4.1 Disp lay
The LCD has a primary and secondary display.
• The primary display shows the measured pH, mV or Relative mV value.
• The secondary display shows the measured temperature. In Calibration
mode, pH buffer values are displayed here; while measured mV values are
displayed in the ORP Calibration mode.
1. SETup mode indicator 6. Primary display
2. MEASurement mode
indicator
3. CALibration indicator 8. pH buffer selection indicator
4. mV indicator
5. pH indicator 10. Secondary display
7. Temperature indicator
9. Automatic Temperature
Compensation indicator
11. ERRor
indicator
12. Probe
indicator
13. Buffer
indicator
14. HOLD
indicator
15. READY
indicator
Page 12

4.2 Ke ypad
The four-button keypad allows easy and quick operations of the Transmitter.
Key Function
CAL Brings you directly into the Calibration mode.
If you were in pH Measurement mode, press CAL to enter pH Calibration
mode.
If you were in mV Measurement mode, press CAL to enter mV Calibration
mode.
▲ / ▼ To scroll through the various submenus
To increment/decrement values or toggle between options (in the
SETUP/CAL modes)
When pressed together, serves as escape function to return to MEAS mode
from any point (CAL or SETUP modes).
ENT To confirm your calibration values in Calibration mode.
To confirm selections in SETUP mode.
While in MEAS mode, pressing ENT takes you directly to SETUP submenu
Page 13

5 CALIBRATION
5.1 Prep aring the Transmitter for Calibration
Before starting calibration, make sure you are in the correct measurement mode.
When you switch on the transmitter, the transmitter starts up in the units last used.
For example, if you shut the transmitter off in “mV” units, the transmitter will read
“mV” units when you switch the transmitter on.
Be sure to remove the protective electrode storage bottle or rubber cap of the
electrode before calibration or measurement. If the electrode has been stored dry,
wet the electrode in tap water for 10 minutes before calibrating or taking readings to
saturate the pH electrode surface and minimize drift.
Wash your electrode in deionized water after use, and store in el ectrode storage
solution. If storage solution is not available, use pH 4.01 or 7.00 buffer solution.
Do not reuse buffer solutions after calibration. Contaminants in the solution can
affect the calibration, and eventually the accuracy of the measurements.
The transmitter features two internationally recognized buffer standards. Select the
buffer standard you require in the CAL mode Select from the following buffer
options:
• First-point: pH 7.00 (USA buffer) or pH 6.86 (NIST buffer).
• Second point: pH 4.01, 9.18, or 10.1.
NOTE: When transmitter is entered into the CAL mode, the 4/20 mA output
current will be automatically held. ‘HOLD’ will be displayed on LCD. After
Calibration and transmitter is returned to MEAS mode, the ‘HOLD’ is
automatically released. Please refer to page 17, section 6.4 for more details.
Page 14

5.2 pH Calib ration
A complete 2-point CAL is required for this Transmitter. If Calibration is aborted
after 1st calibration point, transmitter reverts to previous Calibration data.
1. Rinse probe thoroughly with de-ionized water or a
READY
HOLD
CAL
pH
.
pH
.
rinse solution. Blot excess liquid.
2. Dip probe into calibration buffer. End of probe
must be completely immersed into buffer. Stir
probe gently to create a homogeneous sample.
3. From pH MEAS mode, press CAL to enter pH
calibration mode. CAL indicator will be shown.
Primary display will show measured reading while
secondary display will indicate the pH standard
buffer solution.
READY
HOLD
CAL
pH
.
pH
.
4. Press ▲ or ▼ keys to select either pH 7.00 (USA)
or pH 6.86 (NIST) standard buffers. This is the first point, Offset
calibration.
5. Wait for measured pH value to stabilize. Press
ENTER to confirm calibration. Transmitter is now
calibrated to current buffer.
6. Rinse probe with de-ionized water or rinse
solution, and place in next pH buffer (pH 4.01,
READY
HOLD
CAL
pH
.
pH
.
pH 9.18 or pH 10.01).
7. Repeat steps 5 and 6.
8. Upon successful Calibration, transmitter displays
Slope (primary display, in mV) and Offset
(secondary display, in pH) of electrode.
9. Press ENTER to return to MEAS mode.
Transmitter has been calibrated. Rinse electrode
CAL
HOLD
mV
.
pH
.
and proceed with measurements.
NOTES:
To exit from pH calibration mode without confirming calibration, press ▲ and ▼
keys together.
If selected buffer value is not within ±1.0 pH from measured pH value: electrode
and buffer icon blink and ERR annunciator appears in lower left corner of display.
Page 15

5.3 Rel ative mV Calibration
1. From the ORP MEAS mode, press CAL key.
CAL indicator appears at top of LCD. Primary
display shows relative mV reading and
READY
HOLD
CAL
R.mV
secondary display shows absolute mV value.
2. NOTE: If you have never calibrated relative mV
or if the transmitter has been reset, the value
shown in the primary display is the same as the
absolute mV value.
READY
HOLD
CAL
R.mV
3. Press ▲ or ▼ keys to enter the relative mV
value that matches your desired reading (only
the readings in the primary display changes).
4. Press ENTER key to confirm. Transmitter will
R.mV
now display the offset in the readings.
5. Press ENTER key to return to MEAS mode.
READY
HOLD
CAL
5.4 Te mperature Calibration
Temperature calibration is available onl y in the pH measurement mode and when
ATC probe is available.
Calibrate temperature probe only if temperature value displayed on transmitter is
different from that of a calibrated thermometer. Please refer to section 6.3.1 for
further information.
Page 16

6 ADVANCED SETUP FUNCTIONS
The advanced setup mode lets you customize your transmitter’s preferences and
defaults. This transmitter features different sub groups that organize all setup
parameters.
The sub-groups are:
6.1 Offset Setting (Una vailable in ORP mode)
As a result of the continuous measurement and the ap plication concerned, it may
not be convenient to remove the electrode for cali bration. In such cases, an on-line
Offset adjustment is offered.
SETUP
HOLD
SETUP
READY
HOLD
pH
.
pH
.
1. Press ENT key. Transmitter displays ‘OFS’. Press
ENT again. Upper display shows amount of
offset, in terms of pH; lower display shows current
measured pH value.
2. Use ▲ or ▼ keys to introduce offset to pH
readings. As the lower measured reading
changes, upper display records the amount of
offset. Maximum of ± 2.00 pH offset is allowed.
3. Press both ▲ or ▼ keys together to return to ‘
MEAS ‘ mode.
Page 17

6.2 Output Ran ge Setting
Output of pH 500 transmitter is via the 2-wire power supply
loop. Both the 4 mA and 20 mA output can be assigned to
specific pH or ORP values, for a more refined output.
1. Press ENT key and use ▲ or ▼ keys to scroll till LCD
displays ‘r n g ’. Press ENT again. Upper display
shows pH value, ‘0.00 pH’ (or – 1000 mV) while lower
display shows ‘r 4.0’. This is the set up page for the
pH or ORP output range setting for the 4mA output
current.
2. Assign pH or ORP value to 4 mA output current. Use
▲ or ▼ keys to change pH or ORP value. Press ENT
to accept value.
3. Upper display shows pH value,’14.00 pH’ (or 1000 mV) while lower display
shows ‘r 20.0’. This is the set up page for the pH or ORP output range
setting for the 20mA output current.
4. Assign pH or ORP value to 20 mA output current. Use ▲ or ▼ keys to
change pH or ORP value. Press ENT to accept value.
5. Press both ▲ or ▼ keys together to return to ‘ MEAS ‘ mode.
SETUP
HOLD
Page 18

6.3 Temperature Compensation Setting
(Unavailable in ORP mode)
pH values other than pH 7.00 are affected by temperature. Under varying
temperature conditions, use ATC to compensate pH values. If temperature of bath
is constant, and a temperature probe is not available, Manual Temperature
Compensation can be utilized.
6.3.1 Automatic Temperature Compensation
For automatic temperature compensation (ATC), connect ATC probe to transmitter,
as described in Section 2.2.2.
1. Press ENT key to enter SETUP mode. Press ▲ or ▼ keys to scroll
through sub-menus till LCD displays ‘
2. Display shows ‘
’, and press ENT.
On
3. Dip ATC probe into a solution of known temperature (i.e. a temperature
bath). Allow time for temperature probe to acclimatize with surrounding
bath temperature. If temperature readings are inaccurate, calibrate
temperature probe as described in steps 4 and 5.
If temperature readings are correct, press ENT key and go to step 6.
4. Use S or T keys to adjust correct temperature value (i.e. temp. of temp.
bath). Readings can be adjusted in increments of 0.1 °C. Maximum
adjustments allowed is ± 5
5. Once you have adjusted the correct temperature, press ENT key.
6. Press S and T keys together, to return to MEAS mode.
The ATC indicator will light up on the LCD.
NOTE: If you are using a temperature probe, the probe must be submersed in th e
liquid you are measuring.
ATC On’ or ‘ATC Off’. Use S or T keys to select ‘ATC
o
C.
SET oC’. Press ENT.
6.3.2 Manual Temperature Compensation
1. Make sure the transmitter is on. Press ENT key and use ▲ or ▼ keys to
SET oC’.
select ‘
Page 19

2. Press ENT key. Primary display shows ‘ATC’ and secondary display
shows ‘On’ or ‘OFF’. Use ▲ or ▼ keys to select ‘ATC Off’. Press ENT.
3. Primary display shows temperature (default is 25.0), and secondary
display shows ‘P °C’’. This is the set up page for setting the temperature of
your transmitter to the temperature of your process or sam ple by using an
accurate thermometer as reference.
4. Use ▲ or ▼ keys to set the transmitter to the temperature of your process
or sample. Press ENT key.
5. Primary display shows temperature (default is 25.0), and secondary
display shows ‘C °C’. This is the set up page to input to your transmitter
the temperature of your calibration solutions.
6. Use ▲ or ▼ keys to set the transmitter to the temperature of your
calibration solutions. Press ENT key.
7. Press S and T keys together, to return to MEAS mode.
The transmitter will now compensate pH readings for the manually set temperature
(values taken from P °C’).
Page 20

SETUP
HOLD
SETUP
HOLD
SETUP
HOLD
.
°C
.
ATC
SETUP
LDHO
SEHOTUP
LD
SEHOTUP
LD
.
.
Temperature Compensation Setting Chart – alpha pH 500 Transmitter
Page 21

6.4 HOLD Current Setting
When Transmitter is in CAL or SETUP modes, it automatically
goes into a ‘HOLD’ mode.
To indicate Transmitter is in ‘HOLD’ mode, output current can be
set to 22 mA output by activating the ‘HLD On’.
1. Press ENT key and use ▲ or ▼ keys to scroll till LCD
displays ‘SEt’ in the upper display; and ‘HLd’ in the
lower display. Press ENT again.
2. Upper display now shows ‘HLd’. Lower display will
show either ‘OFF’ or ‘On’. Use ▲ or ▼ keys to toggle
between ‘On’ of ‘OFF’. Press ENT to accept selection.
3. Press S and T keys together, to return to MEAS
mode.
NOTE: If ‘HLd’ is set to ‘OFF’, then current output will be
equivalent to last measured value.
6.5 Out-of-Range Current Setting
SETUP
HOLD
SETUP
HOLD
SETUP
HOLD
If pH or ORP readings exceed the scale, LCD displays ‘Or’ (overrange), or ‘Ur’ (under-range). Transmitter current output can be
set to 3.8 mA to indicate Out-of Range situation.
1. Press ENT key and us e ▲ or ▼ keys to scroll till LCD
displays ‘SEt’ in the upper display; and ‘org’ in the lo wer
display. Press ENT again.
2. Upper display now shows ‘org’. Lower display will show
either ‘OFF’ or ‘On’. Use ▲ or ▼ keys to toggle
between ‘On’ of ‘OFF’. Press ENT to accept selection.
3. Press S and T keys together, to return to MEAS mode.
NOTE: If ‘org’ is set to ‘OFF’, under-range will be set at 4 mA,
while over-range will be set at 20 mA.
SETUP
HOLD
SETUP
HOLD
SETUP
HOLD
Page 22

6.6 Configuration
6.6.1 Selecting pH or ORP Mode of Operation
SETUP
HOLD
SETUP
HOLD
SETUP
HOLD
5. If the readings on the Transmitter is fluctuating wildly, please proceed to
Section 6.6.2, for a possible solution.
The alpha pH 500 transmitter is not only a pH transmitter, but
also an ORP transmitter. When configured to measure ORP,
electrode must be changed and calibrated (see Section 5.3 for
calibration procedure). ORP values are measured and
displayed in mV only.
1. Press ENT key and use ▲ or ▼ keys to scroll till LCD
displays ‘
COF’ (Configuration). Press ENT again.
2. LCD displays ‘PH’. Transmitter is set to op erate as a pH
Transmitter. Use ▲ or ▼ keys to change from ‘
‘
ORP’, if this Transmitter is to operate as an ORP
PH’ to
Transmitter.
3. Press the ENT key to accept selection.
4. Press S and T keys together, to return to MEAS mode.
6.6.2 Selecting Asymmetrical or Symmetric al Mo de of Operation
In some applications, there may be some electrical interference in the sample,
where the electrode is installed. The sensit ive electrode picks up th e signal and the
effect is displayed on the LCD.
If the electrical interference is from an AC source, the readings on the LCD
fluctuates wildly. If the source is DC, then readings will be stable, but at a wrong
value.
In such cases, switch the Transmitter to the Symmetrical mode as below:
SETUP
HOLD
1. Press ENT key and use ▲ or ▼ keys to scroll till LCD
displays ‘COF’ (Configuration). Press ENT again.
2. LCD displays either ‘
PH’ or ‘ORP’ depending on
requirement. Press ENT key.
SETUP
HOLD
Page 23

3. LCD displays ‘ASY’ (asymmetrical operation). Use ▲ or ▼ keys to select
for ‘
SYS’ (symmetrical mode of operation). Press ENT key again.
4. Press S and T keys together, to return to MEAS mode.
Page 24

7 PROBE CARE AND MAINTENANCE
Since your pH electrode is susceptible to dirt and contamination, cl ean it every one
to three months depending on the extent and condition of use.
NOTE: For specialty electrode care, consult the instruction manual included with
your electrode.
pH electrode storage
For best results, always keep the pH bulb wet. Use the protective electrode storage
bottle or rubber cap filled with electrode storage solution to store your electrode.
Also, you can store in a pH 4 buffer with 1/100 part of saturated KCl. Other pH
buffers are OK for storage, but NEVER use distilled water for storage.
After measuring
1. Rinse the pH electrode and reference junction in de-ionized water.
2. Store the electrode as recommended above in “pH electrode storage,” or
as recommended by the manufacturer.
3. Prior to next use, rinse the liquid junction with de-ionized water and tap dr y
– never wipe electrode.
NOTE: If this does not restore electrode to normal response, see “Reactivating the
pH electrode” section below.
pH electrode cleaning
• Salt deposits: Dissolve the deposits by immersing the electrode in tap
water for ten to fifteen minutes. Then thoroughly rinse with distilled water.
• Oil/Grease film: wash electrode pH bulb gently in some detergent and
water. Rinse electrode tip with distilled water or use a general purpose
electrode cleaner (see ordering information).
• Clogged reference junction: Heat a diluted KCl solution to 60 to 80 °C.
Place the sensing part of the electrode into the heat ed solution for about
10 minutes. Allow the electrode to cool in some unheated KCl solution.
• Protein deposits: Prepare a 1% pepsin solution in 0.1 M of HCl. Set the
electrode in the solution for five to ten minutes. Rinse the electrode with
distilled water.
Page 25

Reactivating the pH electrode
If stored and cleaned properly, your pH electrode should be ready for immediate
use. However, a dehydrated bulb may cause slu ggish response. To rehydrate the
bulb, immerse electrode in a pH 4 buffer solution for 10 to 30 minutes. If this fails,
the electrode requires activation.
pH electrode activation (for glass body electrodes only)
WARNING: Only qualified persons proficient with the safe handling of dangerous
chemicals should perform the procedure below. Provide proper containers, fume
hoods, ventilation, and waste disposal. Safety goggles and protective c lothing must
be worn while performing this procedure.
1. Dip or stir the pH electrode in alcohol for 5 minutes.
2. Leave the electrode in tap water for 15 minutes.
3. Dip and stir the electrode in concentrate acid (such as HCL or H2SO4) for
five minutes.
4. Repeat Step 2.
5. Dip and stir in strong base (NaOH) for five minutes.
6. Leave for 15 minutes in tap water.
7. Now test with standard calibration buffer solutions to see if electrode yields
acceptable results. You may repeat step 3 through 6 up to three times for
better response. If response does not improve, then your electrode is no
longer functioning. Replace with new electrode – call your distributor for
information.
Page 26

8 TROUBLE SHOOTING GUIDE
Problem Cause Solution
Power on but no
display
Unstable readings a). Air bubbles in probe.
Slow response a). Dirty / Oily probe. a). Clean probe. See “Probe Care
a). Loose connections
b). Cables not in correct
polarity (+ and – position).
b). Dirty probe.
c). Probe not deep enough in
sample.
d). External noise pickup or
induction caused by nearby
electric motor.
e). Severe Reference junction
fouling.
a). Check cables are making good
contact.
b). Re-wire loop cables with
correct polarity.
a). Tap probe to remove bubbles.
b). Clean the probe and re-
calibrate.
c). Make sure sample entirely
covers the probe sensors.
d). Switch to Symmetrical mode
and connect PMP.
e). Replace probe.
& Maintenance”, Section 7.
Page 27

9 SPECIFICATIONS
SPECIFICATIONS DESCRIPTIONS
pH Range 0.00 to 14.00 pH
Resolution / Accuracy
Temperature Range
Resolution / Accuracy
Millivolt Range -1000 to +1000 mV
Resolution / Accuracy
Temperature Compensation
Number of calibration points 2
Number of calibration buffers USA: 4.01, 7.00, 10.01; NIST: 4.01, 6.86, 9.18
Inputs Asymmetrical / Symmetrical
Output 4.0 to 20.0 mA (Galvanically Isolated)
Over- / Under range current output
‘ON’ Select 3.8 mA
‘OFF’ Select 4 mA (under-range) & 20 mA (over-range)
HOLD current output
‘ON’ Select 22 mA
‘OFF’ Select Last measured current value
Display Custom Dual LCD
Power Requirements 12 to 24 VDC
Load Resistance Max. 600 Ω
Dimension / Weight 96 x 96 x 66 mm / 210 g
0.01 pH / ± 0.01 pH
-10.0 to 110.0 °C
0.1 °C / ± 0.5 for °C
1 mV / ± 2 mV
Auto (Pt 100) / Manual (from 0 to 100 °C)
Page 28

10 TECHNICAL DIMENSIONS
Page 29

11 ACCESSORIES
THERMO SCIENTIFIC
Replacement Transmitter and Transmitter accessories
Ordering Code No. Item
TSPHCTP0500 Alpha pH/ORP 2-wire LCD Transmitter
ECARTSO05B Combination pH electrode with 5m cable
ECARGTSO05B Combination pH electrode with PMP and 5m cable
EC100GTSO05B Combination pH electrode with PT 100, PMP and 5m cable
ECDA9350605B Combination pH electrode, submersible, with 5m cable
ECHTAUTSO05B Combination Gold ORP electrode with PMP and 5m cable
ECHTPTTSO05B Combination Platinum ORP electrode with PMP and 5m cable
Calibration Solutions
Ordering Code No. Item
ECBU4BT pH 4.01 buffer solution, 480 ml bottle
ECBU7BT pH 7.00 buffer solution, 480 ml bottle
ECBU10BT pH 10.01 buffer solution, 480 ml bottle
ECBU4BS pH 4.01 buffer sachets, 20 ml x 20 pcs.
ECBU7BS pH 7.00 buffer sachets, 20 ml x 20 pcs.
ECBU10BS pH 10.01 buffer sachets, 20 ml x 20 pcs.
ECRINWT pH De-ionized water rinse sachets, 20 ml x 20 pcs
ECASTPK pH sachet assortment pack – 5 each of pH 4.01, pH 7.00, pH
ECDPCBT Protein cleaning solution for pH electrode
ECRE005 Storage solution for pH electrode
Note: pH buffer solutions (480-ml bottle) have ±0.01 pH accuracy at 25 °C.
Sachets are individually sealed, single use pouch containing 20 ml of fresh,
contamination free calibration solution. pH buffer sachets have ±0.01 pH accuracy
at 25°C and conductivity sachets have ±1% accuracy at 25°C.
10.01 and de-ionized water sachets per box.
Page 30

EUTECH INSTRUMENTS
Replacement Transmitter and Transmitter accessories
Ordering Code No. Item
56717-20 pH 500 pH/ORP 2-wire LCD Transmitter with display
35807-20 pH/Temp electrode with PMP and 10-ft cable
35801-21 Platinum ORP electrode with 10-ft cable
05994-90 BNC to spade lug adapter
Calibration Solutions
Ordering Code No. Item
00654-00 pH 4.01 calibration buffer, 1 pint
00654-04 pH 7.01 calibration buffer, 1 pint
00654-08 pH 10.01 calibration buffer, 1 pint
35653-01 pH 4.01 calibration buffer solution pouches, 20/box
35653-02 pH 7.00 calibration buffer solution pouches, 20/box
35653-03 pH 10.00 calibration buffer solution pouches, 20/box
35653-00 rinse water solution pouches, 20/box
35653-04
00653-06 Electrode cleaning solution
00653-04 Electrode storage solution
Assortment pack – 5 each of pH 4.01, pH 7.00 and pH 10.00
solution pouches.
To order Eutech accessories, contact your OAKTON distributor.
Page 31

12 WARRANTY
This transmitter is supplied with a one-year warrant y against significant deviations
in material and workmanship from date of purchase and a six-month warranty for
probe. Each instrument will have a warranty card with a specific ser ial nu mber. T he
warranty card must be endorsed by the Authorized Distributor at the point of sale.
If repair or adjustment is necessary and has not been the result of ab use or misuse
within the designated period, please return – freight pre-paid – and c orrection will
be made without charge. Thermo Scientific/ Eutech will determine if the product
problem is due to deviations or customer misuse.
Out of warranty products will be repaired on a charged basis.
Exclusions
The warranty on your instrument shall not apply to defects resulting from:
• Improper or inadequate maintenance by customer
• Unauthorized modification or misuse
• Operation outside of the environment specifications of the products
13 RETURN OF ITEMS
Authorization must be obtained from our Customer Service Department or
authorized distributor before returning items for any reason. A “Return Goods
Authorization” (RGA) form is available through our authorized distributor. Please
include data regarding the reason the items are to be returned. For your protection,
items must be carefully packed to prevent damage in shipm ent and insured against
possible damage or loss. Thermo Scientific will not be responsible for damage
resulting from careless or insufficient packing. A restocking charge will be ma de on
all unauthorized returns.
NOTE: Thermo Scientific reserves the right to make improvements in design,
construction, and appearance of products without notice.
Page 32

Water Analysis Instruments
North America
166 Cummings Center
Beverly, MA 01915 USA
Toll Free: 1-800-225-1480
Tel: 1-978-232-6000
Dom. Fax: 1-978-232-6015
Int’l Fax: 978-232-6031
Europe
P.O. Box 254, 3860 AG Nijkerk
Wallerstraat 125K, 3862 CN Nijkerk,
Netherlands
Tel: (31) 033-2463887
Fax: (31) 033-2460832
Asia Pacific
Blk 55, Ayer Rajah Crescent
#04-16/24, Singapore 139949
Tel: 65-6778-6876
Fax: 65-6773-0836
www.thermo.com/process
© 2009 Thermo Fisher Scientific Inc.
All rights reserved. Thermo Fisher Scientific Inc.
68X216829 Rev 5
 Loading...