

ETS IR Dome Network Camera Series Operation Manual

alarm shop
IR DOME
NETWORK CAMERA SERIES
OPERATION GUIDE
Please read instructions thoroughly before operation and retain it for future reference.
m428a_328a_328b_operation_V1.5

IMPORTANT SAFEGUARD
alarm shop
All lead-free products offered by the company comply with the requirements of the
European law on the Restriction of Hazardous Substances (RoHS) directive, which means
our manufacture processes and products are strictly “lead-free” and without the hazardous
substances cited in the directive.
The crossed-out wheeled bin mark symbolizes that within the European Union the product
must be collected separately at the product end-of-life. This applies to your product and
Federal Communications Commission Interference Statement
This equipment has been tested and found to comply with the limits for a Class A digital device, pursuant to
Part 15 of the FCC Rules. These limits are designed to provide reasonable protection against harmful
interference when the equipment is operated in a commercial environment. This equipment generates, uses,
and can radiate radio frequency energy and, if not installed and used in accordance with the instruction
manual, may cause harmful interference to radio communications. Operation of this equipment in a residential
area is likely to cause harmful interference in which case the user will be required to correct the interference at
his own expense.
any peripherals marked with this symbol. Do not dispose of these products as unsorted
municipal waste. Contact your local dealer for procedures for recycling this equipment.
This is a class A product. In a domestic environment this product may cause radio
interference in which case the user may be required to take adequate measures.
This device complies with Part 15 of the FCC Rules. Operation is subject to the following two conditions:
(1) This device mat not cause harmful interference, and
(2) This device must accept any interference received, including interference that may cause undesired
operation.
Trademark Acknowledgements
iPad® & iPhone® are the registered trademarks of Apple Inc.
Android™ is a trademark of Google Inc. Use of this trademark is subject to Google Permissions.
Microsoft®, Windows® & Internet Explorer® are registered trademarks of Microsoft Corporation in the United
States and/or other countries.
Disclaimer
We reserve the right to revise or remove any content in this manual at any time. We do not warrant or assume
any legal liability or responsibility for the accuracy, completeness, or usefulness of this manual. The content of
this manual is subject to change without notice.
This product doesn’t have a standby / off mode.

alarm shop
MPEG4 Licensing
THIS PRODUCT IS LICENSED UNDER THE MPEG4 VISUAL PATENT PORTFOLIO LICENSE FOR THE
PERSONAL AND NON-COMMERCIAL USE OF A CONSUMER FOR (i) ENCODING VIDEO IN
COMPLIANCE WITH THE MPEG4 VISUAL STANDARD (“MPEG-4 VIDEO”) AND/OR (ii) DECODING
MPEG4 VIDEO THAT WAS ENCODED BY A CONSUMER ENGAGED IN A PERSONAL AND
NON-COMMERCIAL ACTIVITY AND/OR WAS OBTAINED FROM A VIDEO PROVIDER LICENSED BY
MPEG LA TO PROVIDE MPEG4 VIDEO. NO LICENSE IS GRANTED OR SHALL BE IMPLIED FOR ANY
OTHER USE. ADDITIONAL INFORMATION INCLUDING THAT RELATING TO PROMOTIONAL INTERNAL
AND COMMERCIAL USES AND LICENSING MAY BE OBTAINED FROM MPEG LA, LLC. SEE
HTTP://WWW.MPEGLA.COM.
GPL Licensing
This product contains codes which are developed by Third-Party-Companies and which
are subject to the GNU General Public License (“GPL”) or the GNU Lesser Public License
(“LGPL”).
The GPL Code used in this product is released without warranty and is subject to the
copyright of the corresponding author.
Further source codes which are subject to the GPL-licenses are available upon request.
We are pleased to provide our modifications to the Linux Kernel, as well as a few new
commands, and some tools to get you into the code. The codes are provided on the FTP
site, and please download them from the following site or you can refer to your distributor:
http://download.dvrtw.com.tw/GPL/076D_Series/arm-linux-2.6.tar.gz

TABLE OF CONTENTS
alarm shop
1. OVERVIEW......................................................................................................................................... 1
1.1 Product Features....................................................................................................................................... 1
1.2 Package Content....................................................................................................................................... 1
1.3 Product Overview...................................................................................................................................... 1
1.4 Connectors................................................................................................................................................ 1
1.5 External I/O Port........................................................................................................................................ 2
1.6 Status Indicator..........................................................................................................................................2
2. CAMERA ACCESS WITH INTERNET EXPLORER............................................................................ 3
2.1 Camera Login............................................................................................................................................ 3
2.2 Control Panel Overview ............................................................................................................................ 3
2.3 Digital PTZ (DPTZ) Operations ................................................................................................................. 5
2.4 Event Record Search & Playback ............................................................................................................. 6
3. CAMERA CONFIGURATIONS............................................................................................................ 7
3.1 System configuration menu....................................................................................................................... 7
3.2 Network ..................................................................................................................................................... 8
3.2.1 Network ............................................................................................................................................................8
3.2.2 QoS ..................................................................................................................................................................8
3.2.3 DDNS ...............................................................................................................................................................8
3.2.4 SNTP................................................................................................................................................................9
3.2.5 FTP...................................................................................................................................................................9
3.2.6 MAIL .................................................................................................................................................................9
3.2.7 SMS................................................................................................................................................................10
3.2.8 Filter ...............................................................................................................................................................11
3.2.9 UPnP / Bonjour...............................................................................................................................................11
3.2.10 RTP ..............................................................................................................................................................12
3.3 Camera ................................................................................................................................................... 13
3.3.1 Camera...........................................................................................................................................................13
3.3.2 Video ..............................................................................................................................................................13
3.3.3 Color...............................................................................................................................................................14
3.3.4 Audio ..............................................................................................................................................................14
3.3.5 Advance..........................................................................................................................................................14
3.4 Record..................................................................................................................................................... 15
3.4.1 Record............................................................................................................................................................15
3.4.2 Record Timer..................................................................................................................................................15
3.5 Storage.................................................................................................................................................... 15
3.5.1 Memory ..........................................................................................................................................................15
3.6 Trigger..................................................................................................................................................... 16
3.6.1 Trigger ............................................................................................................................................................16
3.7 General ................................................................................................................................................... 17
3.7.1 General...........................................................................................................................................................17
3.7.2 Time................................................................................................................................................................18
3.7.3 Server Log......................................................................................................................................................18
3.7.4 Online .............................................................................................................................................................19
3.7.5 Account...........................................................................................................................................................19
3.7.6 Google Maps..................................................................................................................................................20
3.7.7 Maintenance...................................................................................................................................................20
APPENDIX 1 PRODUCT SPECIFICATIONS........................................................................................ 22
APPENDIX 2 BIT RATE TABLE FOR REFERENCE ............................................................................ 23
APPENDIX 3 POE CONNECTION .......................................................................................................25
APPENDIX 4 API ID APPLICATION FOR SMS MESSAGING.............................................................. 26
APPENDIX 5 Q&A ................................................................................................................................ 28
APPENDIX 6 RECORDING TIME TABLE ............................................................................................ 29
1. OVERVIEW
alarm shop
1.1 Product Features
Easy network setup with your iPhone / iPad
1.3 Megapixel SONY sensor with HDTV 720p quality, allowing users to notice minor details more easily
POE (Power-over-Ethernet) support to eliminate the use of power cables and reduce installation costs
ONVIF standard supported to simplify system integration
External alarm I/O device connection
3-axis mechanism for flexible ceiling and wall-mount installation
Supports external microphone & speaker connection for audio transmission
Remote Surveillance
--
Fully compatibility on iPhone & iPad, and Internet Explorer® on Windows® operating system
1.2 Package Content
□ Network camera □ Screws & Wall Plugs □ 3-pin Terminal
□ Quick Setup with iPhone / iPad □ Adapter (Optional)
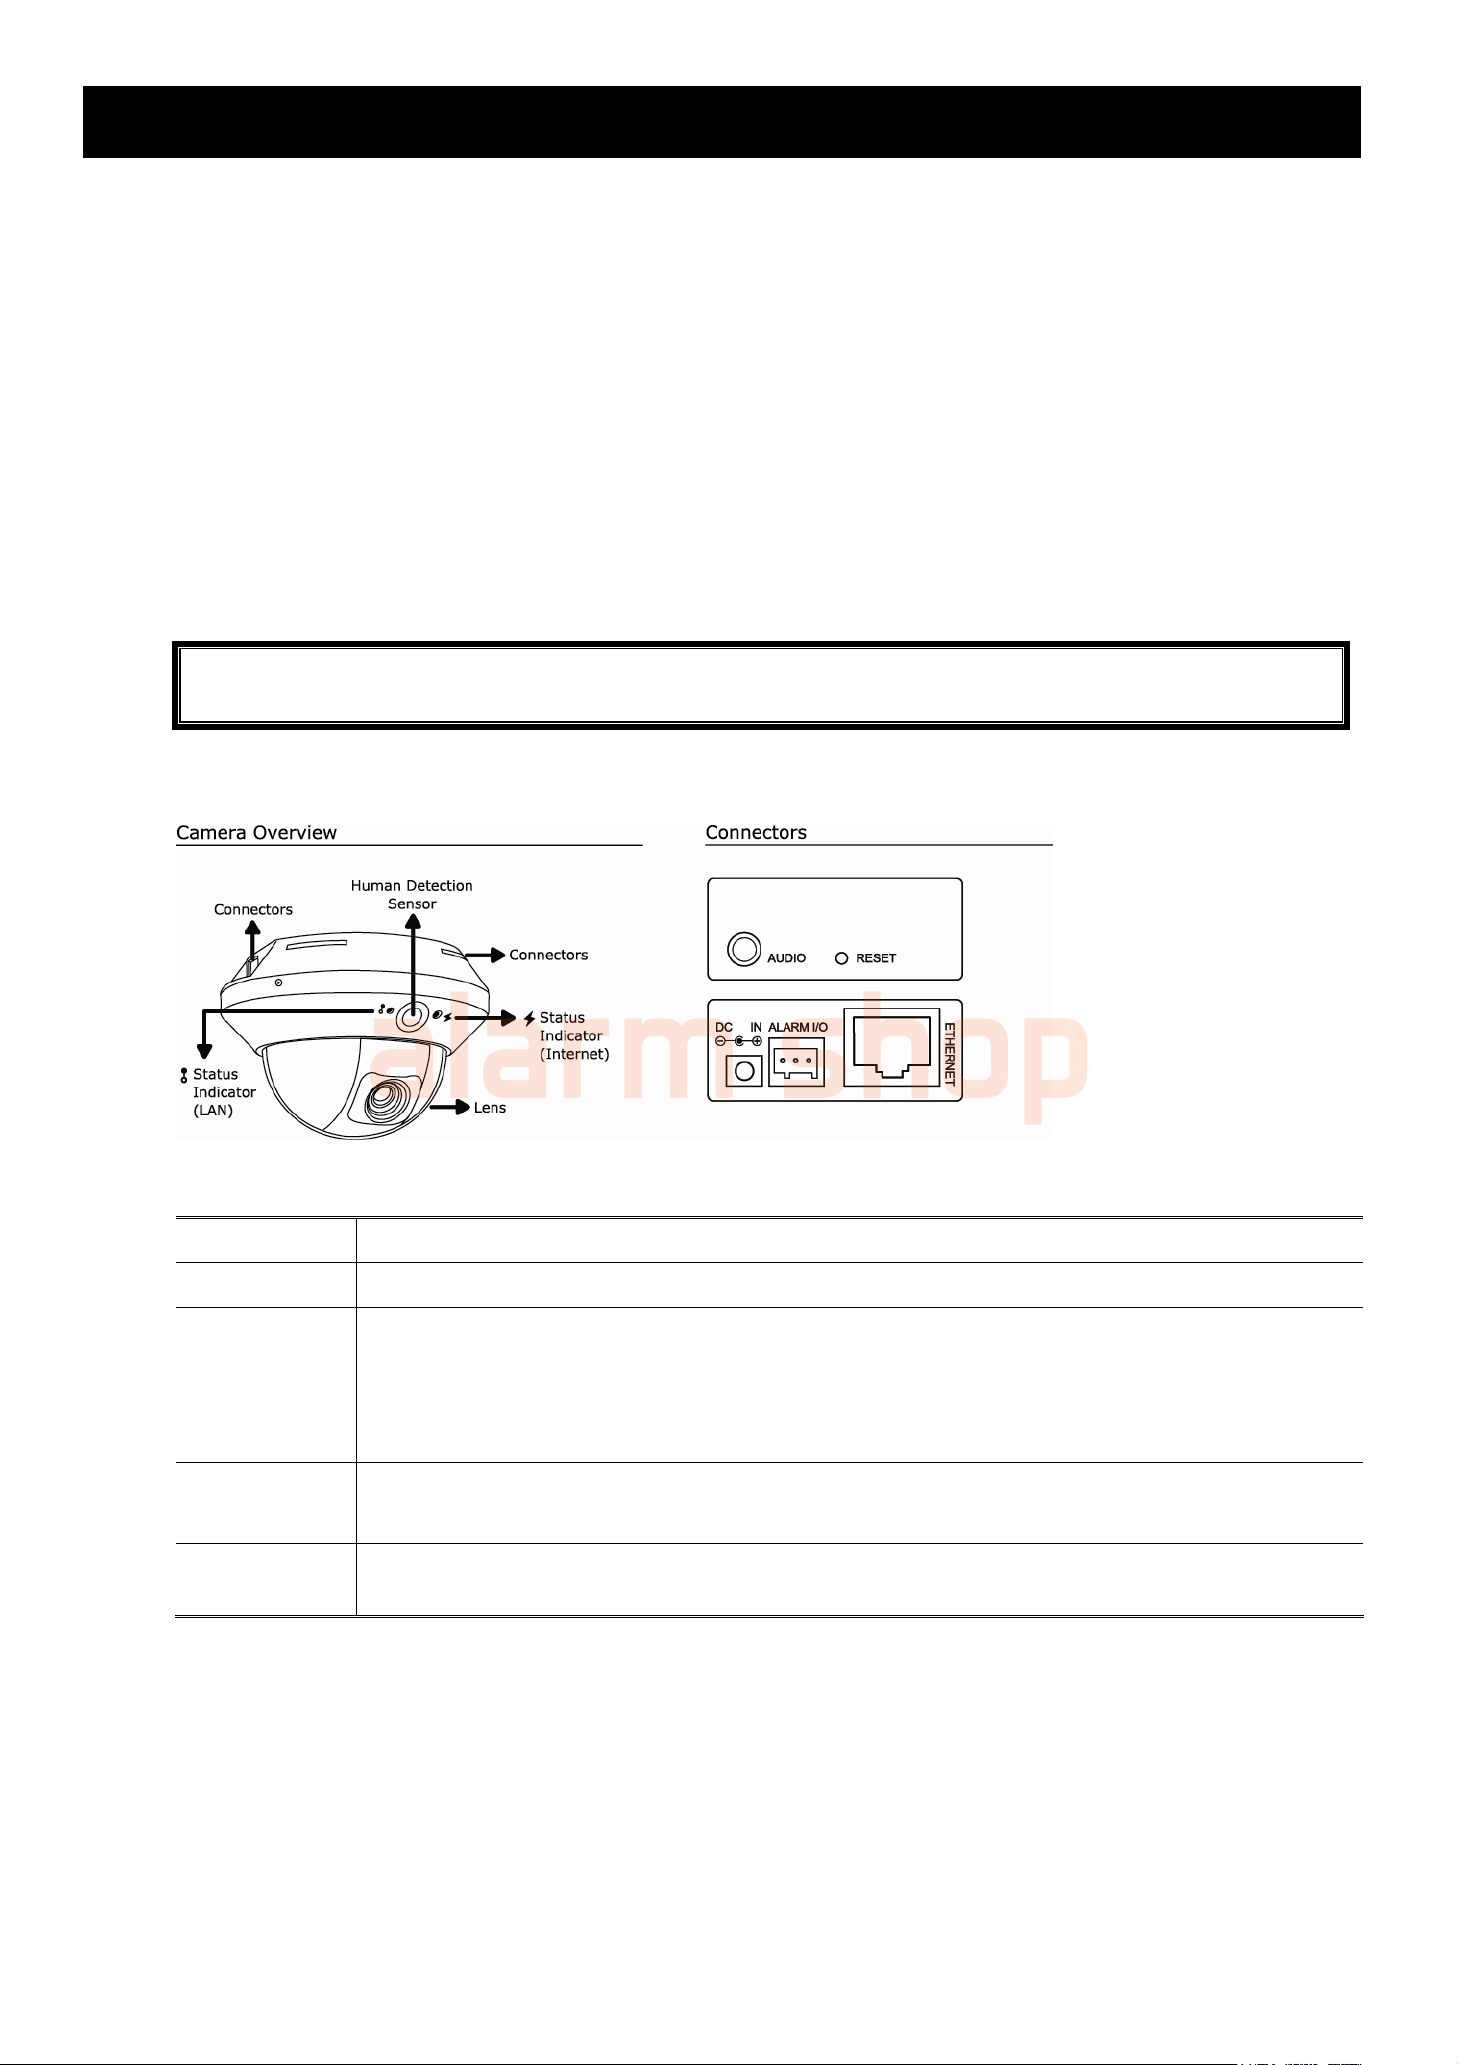
1.3 Product Overview
1.4 Connectors
Ethernet: Connect a RJ45 network cable.
□ Audio Cable
DC IN: Connect the regulated power supply, DC 5V or 12V depending on the model you have.
RESET: With the power connected, press to reset all parameters, including the IP address to factory default
settings.
The camera will reboot after default reset. Please do not disconnect your camera during the reset
process.
Alarm I/O: A 3-pin I/O terminal is supplied with the camera for external alarm device connection. For details,
please refer to “1.5 External I/O Port” at page 2.
AUDIO: Plug in the supplied audio cable for speaker and microphone connection.
* The speaker and microphone are not supplied with the sales package and should be purchased separately.
1
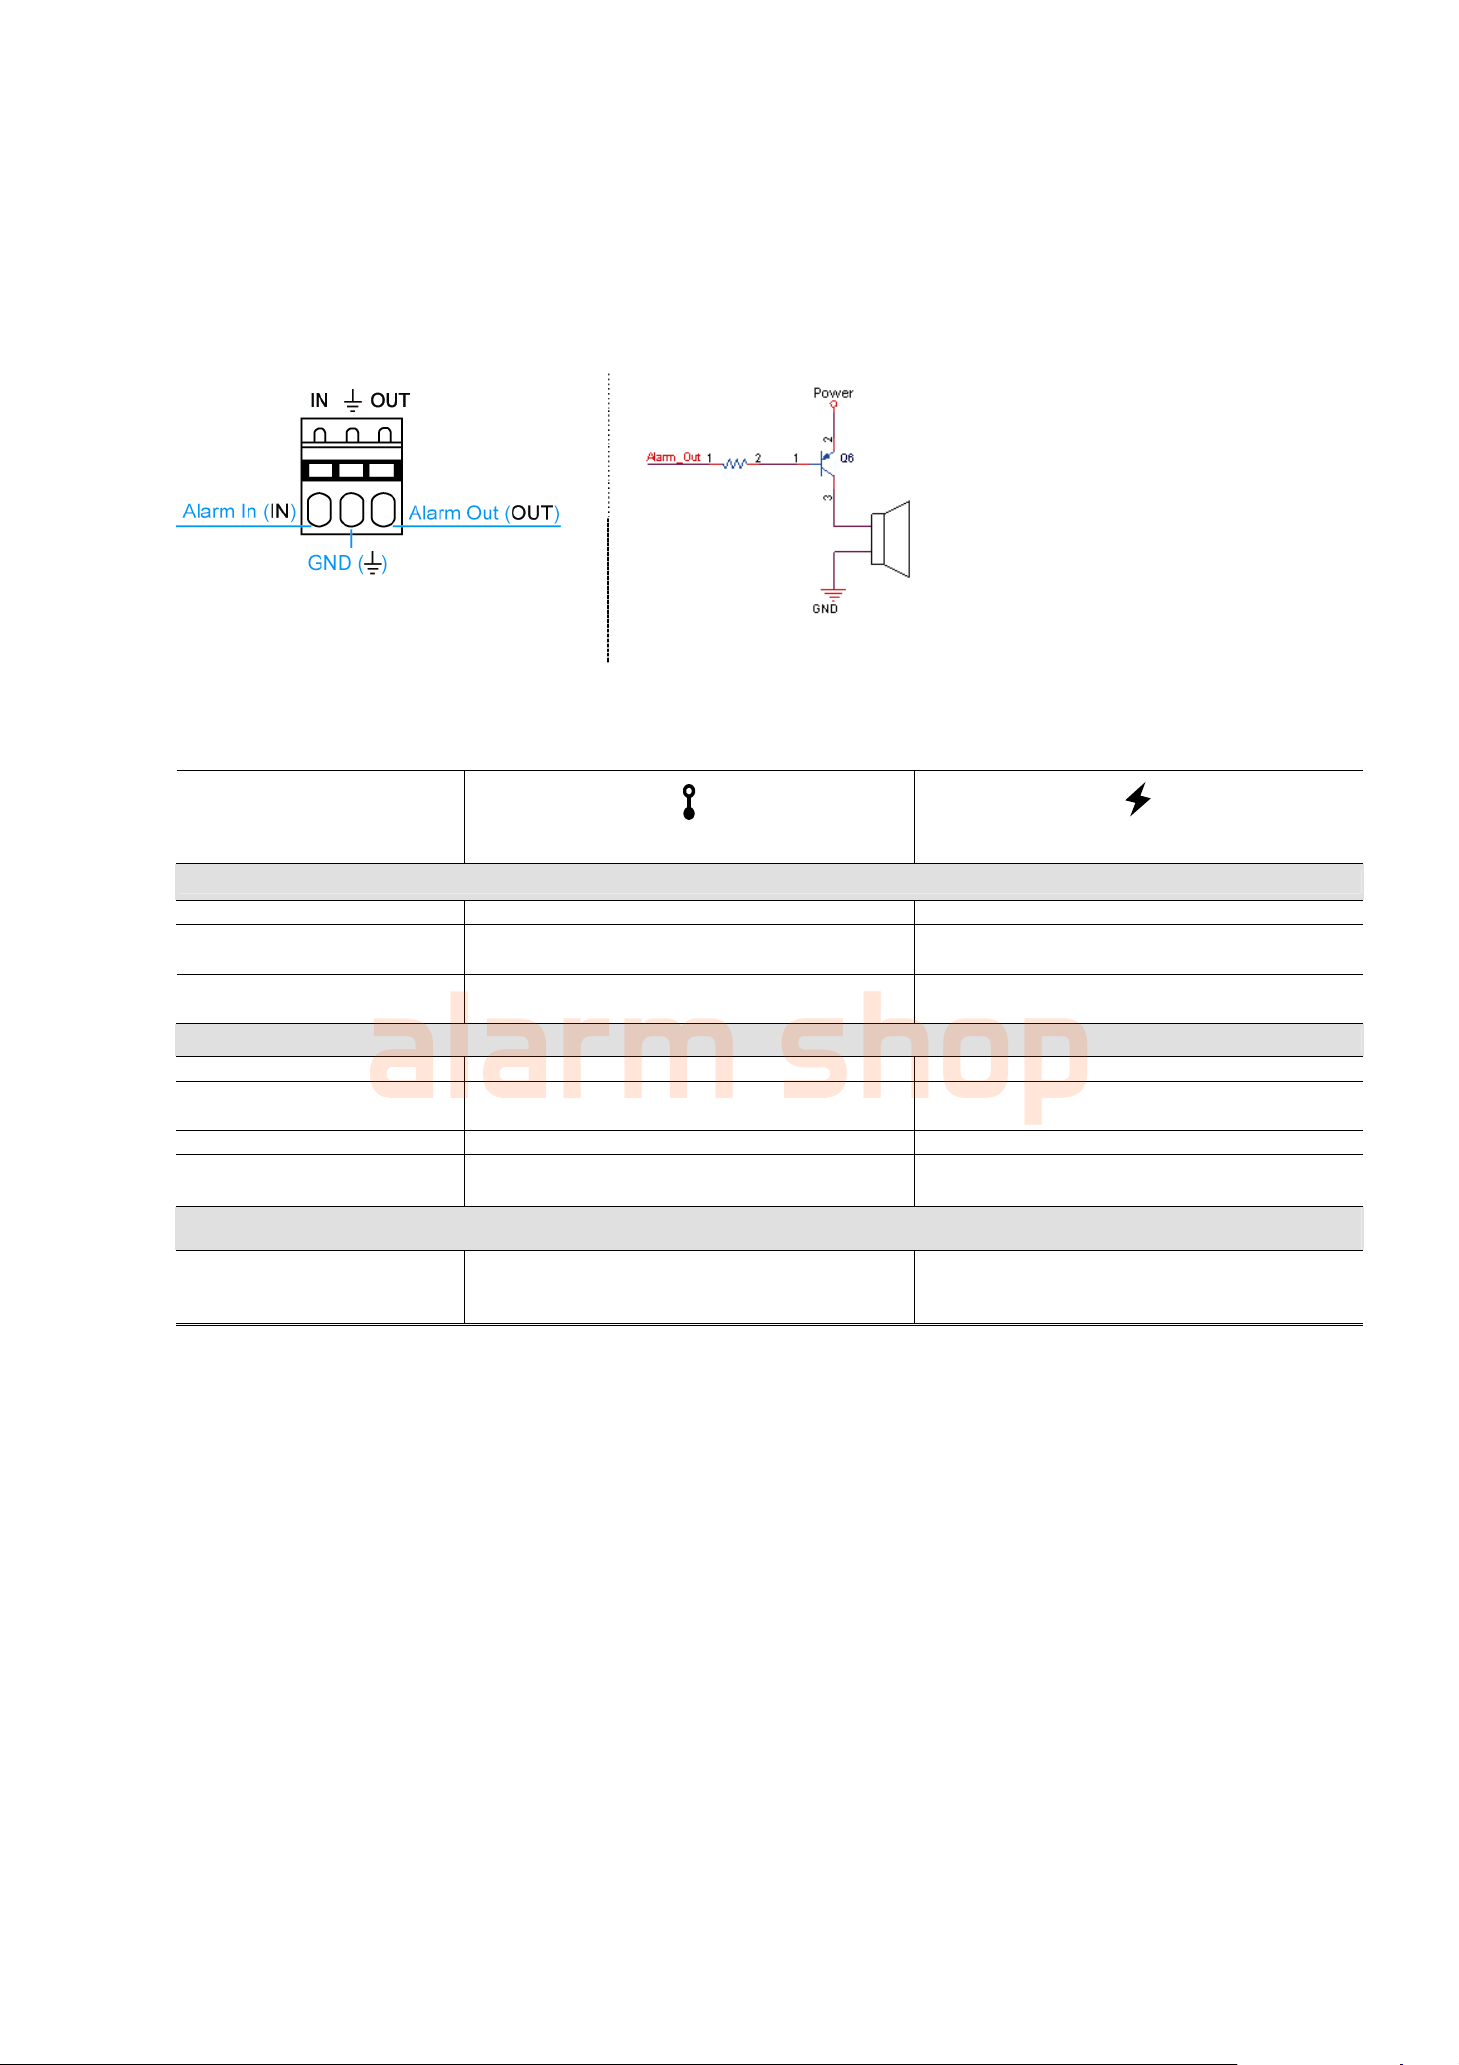
1.5 External I/O Port
alarm shop
This camera supports external I/O device connection, and a 3-pin I/O terminal is supplied with this camera for
easy connection.
Below shows which input on the I/O terminal you should use for wiring when you want to connect an external
device to this camera.
3-pin I/O Terminal Alarm Out Connection
1.6 Status Indicator
ICON
System Status
During powering on Always on Always on
Reset default
Upgrade
Connection Status
LAN connected Always on --
LAN disconnected
Internet connected -- Always on
Internet disconnected --
3G Connection Error on
iPhone / iPad / Android Mobile Device
3G Connection Setting
Uncompleted
* LED blinking frequency - LED on / LED off
LAN connection status Internet connection status
Blinking (on 250 ms, off 250 ms) Always off
Blinking (on 250 ms, off 250 ms) Blinking (on 250 ms, off 250 ms)
Blinking (on 100 ms, off 500 ms) --
Blinking (on 100 ms, off 500 ms)
--
--
(on 5 sec, off 0.5 sec, on 0.5 sec, off 0.5 sec, on 5 sec)
Blinking
2
2. CAMERA ACCESS WITH INTERNET EXPLORER
alarm shop
This network camera can be accessed via Microsoft® Internet Explorer® and iPhone / iPad / Android mobile devices
with our self-developed program “EagleEyes” installed depending on different using situations.
Note: For details about accessing network cameras via iPhone / iPad / Android mobile devices, please
refer to http://www.eagleeyescctv.com.
Before using the camera, make sure you have configured the network settings, and the network connection is fine.
For network configurations, please refer to:
“Quick Setup With iPhone / iPad” supplied with your camera if you’re using iPhone / iPad, and your network
environment is wireless.
“ADVANCED NETWORK SETUP” downloadable from www.surveillance-download.com/user/m328a.swf
network environment is not wireless.
if your
2.1 Camera Login
Step1: Open your web browser, and key in http://ipaddress:portnum in the URL address box.
For example, for the IP address 60.121.46.236 and port No. 888, please key in ”http://60.121.46.236:888” into
the URL address box, and press “Enter”.
Step2: In the login page, key in the user name and password, and enter the security code from the image below if any.
Then, click “LOGIN”.
Step3: The wizard is then started.
‧ To skip the wizard and directly access the camera live view, click “Close”.
‧ To directly access the camera live view without starting the wizard for the login next time, check “Do not start wizard at login”.
Note: If you’re prompted to install “VLC player”, “Software” or “H264 Streaming Viewer”, please agree
to proceed the installation. Or, you might not be able to see the live view properly.
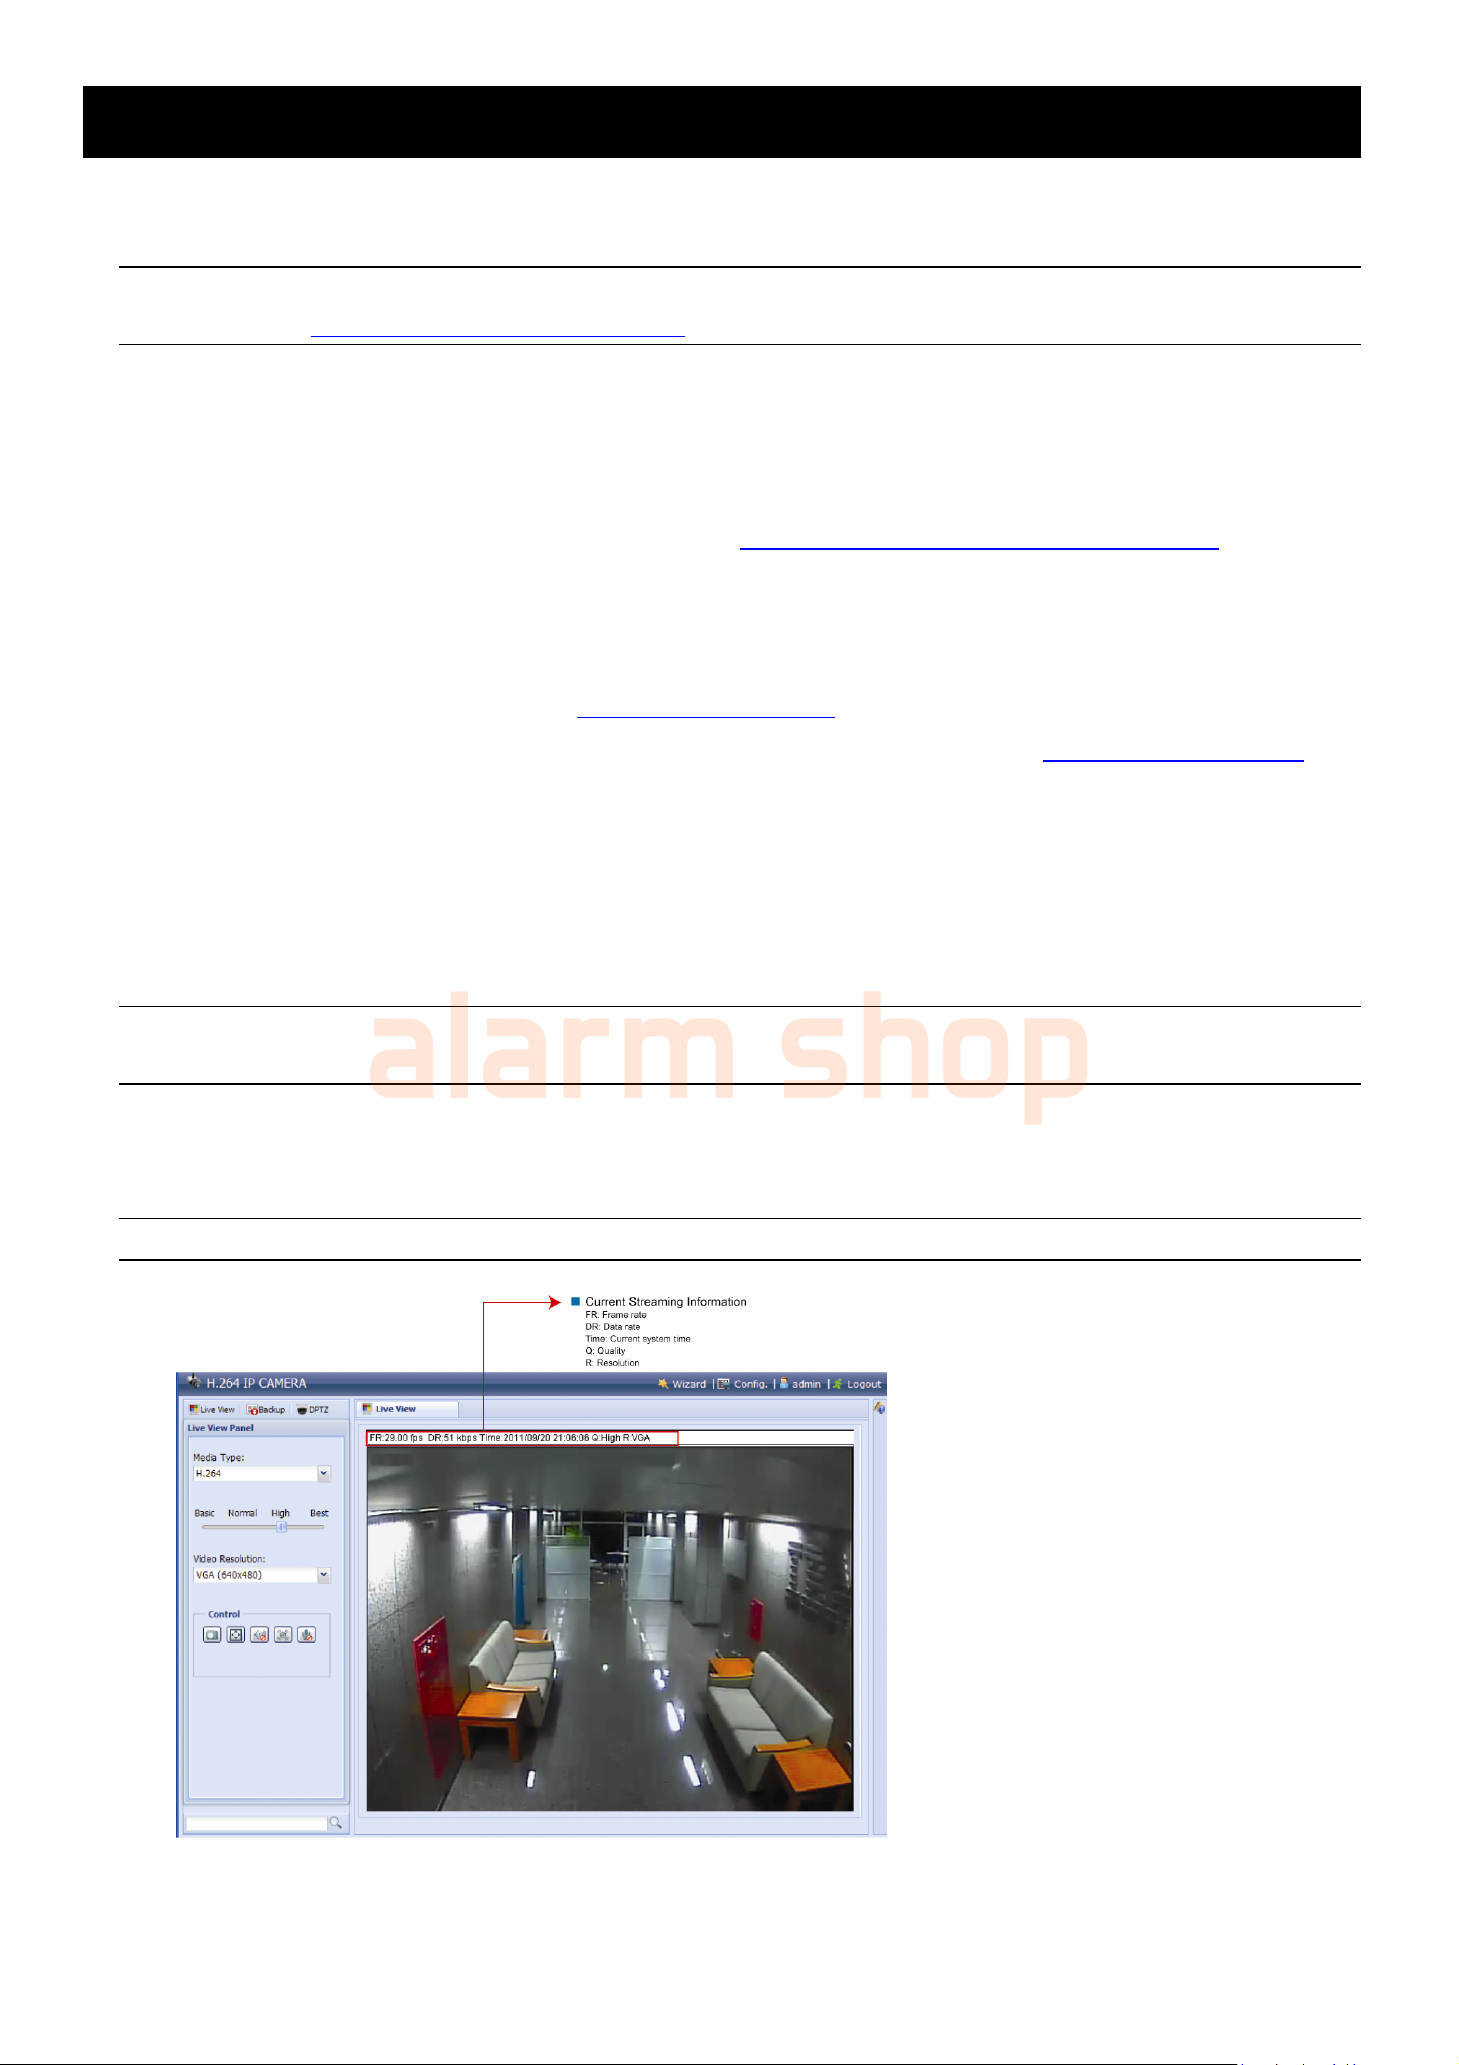
Step4: When the login is successful, the live view is shown.
2.2 Control Panel Overview
Note: The buttons available depend on the model number used and the user level used to log in.
3
Function Icon User Level Description
alarm shop
Live
Backup
Supervisor / Power User
/ Normal User / Guest
Supervisor / Power User
Switch to the live view page.
Enter the event record list for video playback.
For details, please refer to “2.4 Event Record Search & Playback’ at page
6.
DPTZ*
Config.
Quality -- Supervisor / Power User
Video Resolution -- Supervisor / Power User
Live View Size:
Supervisor / Power User
/ Normal User
/ Normal User / Guest
/ Normal User
/ Normal User
Supervisor / Power User
/ Normal User
Supervisor
Switch to the DPTZ configuration page.
For details, please refer to “2.3 Digital PTZ (DPTZ) Operations” at page
5.
Switch to the system configuration page, and the functions available for
“Supervisor” and “Power User” are different.
For details, please refer to “3.1 System configuration menu” at page 7.
Select the image player from the drop-down list: Media Type -- Supervisor / Power User
H.264 / MPEG-4 / Motion JPEG
QuickTime
QuickTime is Apple Inc.’s multimedia software. You need to have
QuickTime installed in your operating system before selecting “QuickTime”.
When it is selected, you will be promoted to enter the user name and
password to access the camera.
VLC
Click & drag the slider to select the video quality:
Basic / Normal / High / Best.
Select the image resolution from the drop list:
2 megapixel model 1.3 megapixel model
HD1080P (1920 x 1080) SXGA (1280 x 1024)
HD720P (1280 x 720) HD720P (1280 x 720)
VGA (640 x 480) VGA (640 x 480)
QVGA (320 x 240) QVGA (320 x 240)
Full Screen
Double size
Normal Size
Fit to screen
No Scale
Snapshot
Audio On / Off
Alarm Out
/
Supervisor / Power User
/ Normal User
Supervisor / Power User
/ Normal User
Supervisor / Power User
/ Normal User
Click to display the image in full screen.
To exit the full screen mode, press “Esc” on your keyboard.
This icon appears only when the selected resolution is HD1080P, SXGA or
HD720P & VGA.
The QVGA resolution is resized to fit into the current live view size.
This icon appears only when the selected resolution is QVGA.
The current live view size is the same as the selected resolution.
This icon appear only when the selected resolution is SXGA or HD720P or
HD1080P.
The selected resolution is resized to fit into the current live view size.
This icon appear only when the selected resolution is SXGA or HD720P or
HD1080P.
Click and hold the movable square on the left bottom corner of the live
view to move
This icon appear only when the selected resolution is SXGA or HD720P or
HD1080P.
Click to take a snapshot of the current view on a new window. Right
click on the picture and re-save it to the location you want.
Click to switch the audio-in on / off.
This function is available only when a microphone is connected.
Click to force your alarm-out device to work. For example, when your
alarm device is a buzzer, click this button and your buzzer will start to
sound even if there’s no alarm event.
Microphone
/
Supervisor
Click to switch the audio-out on / off.
This function is available only when a speaker is connected.
4
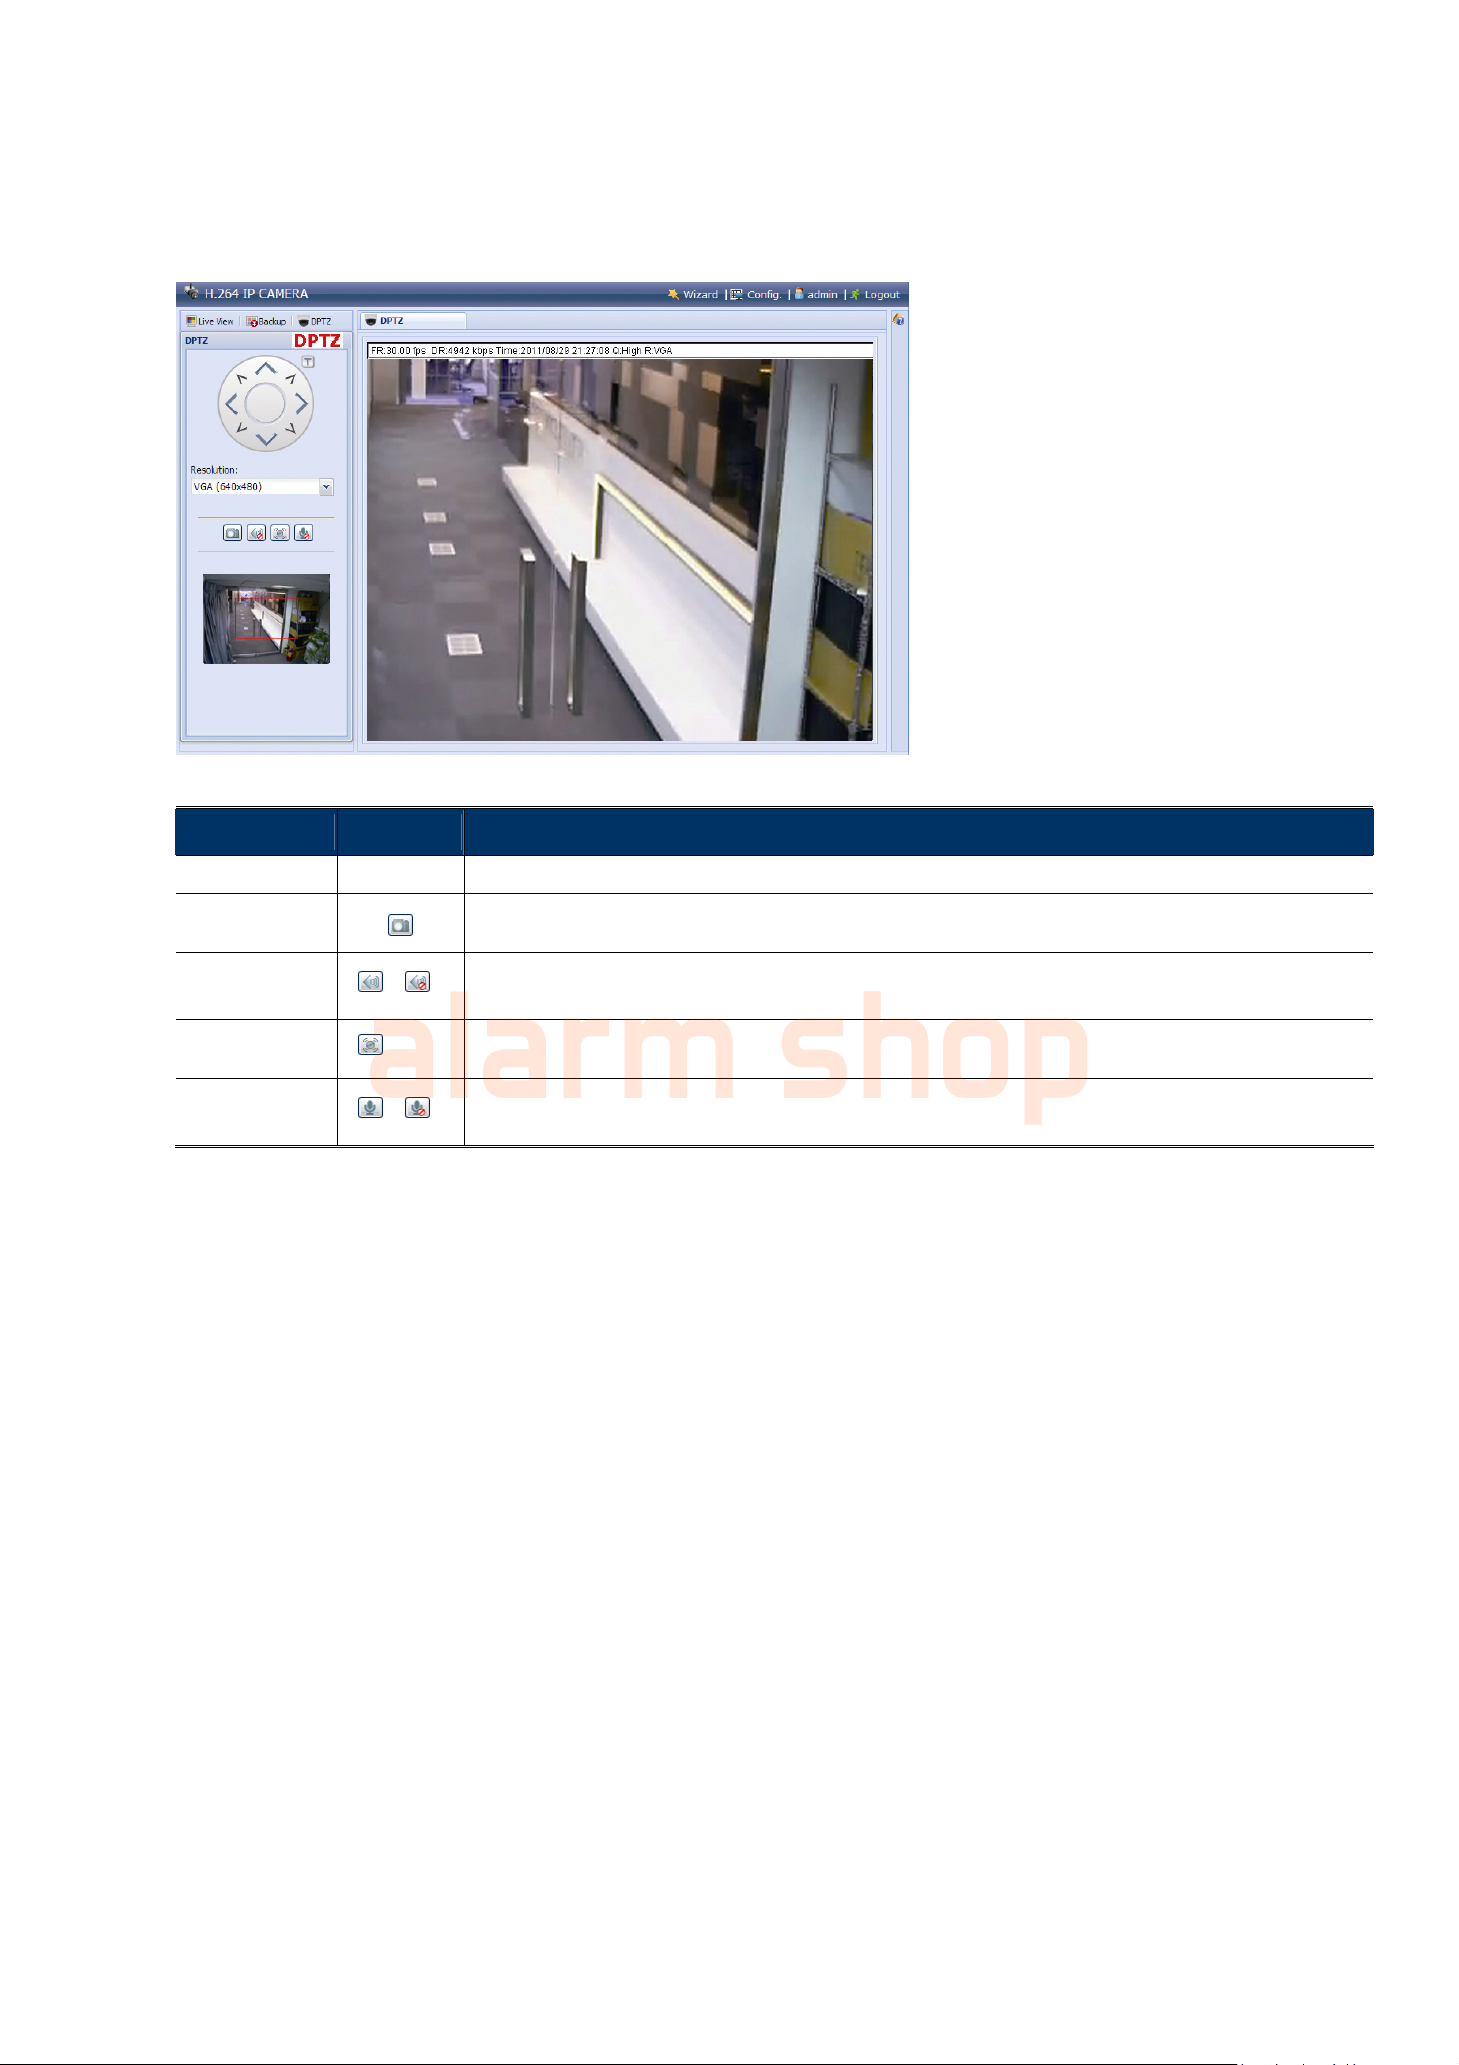
2.3 Digital PTZ (DPTZ) Operations
alarm shop
This camera has PTZ capability, i.e. digital PTZ (hereafter called “DPTZ”), for wide area monitoring.
STEP1: Click “DPTZ” to show the DPTZ control panel.
STEP2: Select the functions when needed:
FUNCTION ICON DESCRIPTION
Resolution
Take snapshots
Audio On / Off /
Alarm Out
Microphone /
--
Select the video resolution for the DPTZ function. Only “VGA” and “QVGA” are available.
Click to take a snapshot of the current view on a new window. Right click on the picture and re-save it to the
location you want.
Click to switch the audio-in on / off.
This function is available only when a speaker is connected.
Click to force your alarm-out device to work. For example, when your alarm device is a buzzer, click this button
and your buzzer will start to sound even if there’s no alarm event.
Click to switch the audio-out on / off.
This function is available only when a speaker is connected, and when you’re a “Supervisor”.
5

2.4 Event Record Search & Playback
alarm shop
Note: To save more recorded data, it’s recommended to use this camera with the compatible NVR.
/
Previous / Next Hour
Fast Forward Increase the speed for fast forward. Click to get 2X, 4X, 8X & 16X speed forward eventually.
Fast Rewind Increase the speed for fast rewind. Click to get 2X, 4X, 8X & 16X speed rewind eventually.
Play
Pause
Stop
Step
Audio
Download
Click to jump to the next / previous time interval in an hour, for example, 11:00 ~ 12:00 or 14:00
~ 15:00, and start playing the earliest event video clip recorded during this whole hour.
Click to play the current video clip.
Click to pause the video playback.
Click to stop the video playback.
In the pause mode, click to get one frame forward.
Click to mute the playback if necessary, and click again to restore.
This function is available only when a speaker is connected during recording.
Click to download the current video clip to the specified path in your PC.
The downloaded video can only be opened by our own video player. Please go to “General” → “Maintenance” to
download the video player, or get the player from the CD supplied with the sales package.
6
 Loading...