

Page 1

Handleiding
Notice d’utilisation
Anleitung
Manual
ECM163RVS
88020783
Houd, wanneer u contact opneemt met de serviceafdeling, de productiecode (PCODE)
en het volledige itemnummer (ITEMNR) bij de hand.
En cas de contact avec le service après-vente, ayez auprès de vous
le code de production (PCODE) et le numéro complet de l'article (ITEMNR).
Halten Sie den Produktionscode (PCODE) und die vollständige Itemnummer (ITEMNR)
bereit, wenn Sie mit der Kundendienstabteilung Kontakt aufnehmen.
When contacting the service department, have the production code (PCODE)
and complete item number (ITEMNR) to hand.
Adressen en telefoonnummers van de serviceorganisatie vindt u op de garantiekaart.
Les adresses et les numéros de téléphone du service après-vente se trouvent sur la carte de garantie.
Adressen und Telefonnummern der Kundendienstorganisation finden Sie auf der Garantiekarte.
You will find the addresses and phone numbers of the service organisation on the guarantee card.
Page 2

INHOUD
NL 3
Inhoud
■ Uw combi-magnetron . . . . . . . . . . . . . . . . . . . 4
Beschrijving . . . . . . . . . . . . . . . . . . . . . . . . . . . . 4
Inleiding . . . . . . . . . . . . . . . . . . . . . . . . . . . . . . . 5
Algemeen . . . . . . . . . . . . . . . . . . . . . . . . . . . . . . 6
■ Veiligheid . . . . . . . . . . . . . . . . . . . . . . . . . . . 7 - 9
Waar u op moet letten . . . . . . . . . . . . . . . . . . . 7
■ Bediening . . . . . . . . . . . . . . . . . . . . . . . . . 10 - 22
Ingebruikname . . . . . . . . . . . . . . . . . . . . . . . . 10
Klok instellen . . . . . . . . . . . . . . . . . . . . . . . . . . 11
Koken met de magnetron . . . . . . . . . . . . . . . 12
Hetelucht koken . . . . . . . . . . . . . . . . . . . . . . . 13
Koken met de grill . . . . . . . . . . . . . . . . . . . . . . 15
Combinatie koken . . . . . . . . . . . . . . . . . . . . . . 16
Ontdooien . . . . . . . . . . . . . . . . . . . . . . . . . . . . . 17
Koken in meerdere fasen . . . . . . . . . . . . . . . 18
Voorinstelfunctie . . . . . . . . . . . . . . . . . . . . . . . 19
Auto menu . . . . . . . . . . . . . . . . . . . . . . . . . . . . 20
Kooktabel auto menu . . . . . . . . . . . . . . . . . . . 21
Controlefunctie . . . . . . . . . . . . . . . . . . . . . . . . 22
Kinderslot . . . . . . . . . . . . . . . . . . . . . . . . . . . . . 22
■ Onderhoud . . . . . . . . . . . . . . . . . . . . . . . . . . . . 23
Reinigen . . . . . . . . . . . . . . . . . . . . . . . . . . . . . . 23
■ Storingen . . . . . . . . . . . . . . . . . . . . . . . . . . . . . 24
Wat te doen als . . . . . . . . . . . . . . . . . . . . . . . . 24
Algemeen . . . . . . . . . . . . . . . . . . . . . . . . . . . . . 24
■ Milieuaspecten . . . . . . . . . . . . . . . . . . . . . . . 25
Verpakking en toestel afvoeren . . . . . . . . . . 25
■ Algemeen . . . . . . . . . . . . . . . . . . . . . . . . . . . . . 26
Technische gegevens . . . . . . . . . . . . . . . . . . 26
Nederlands . . . . . . . . . . . . . . . . . . . . . . . . . . . . . . . . . . . . . . . . . . . . . . . . . . . . . . . NL 3 – NL 26
English . . . . . . . . . . . . . . . . . . . . . . . . . . . . . . . . . . . . . . . . . . . . . . . . . . . . . . . . . . . GB 3 – GB 26
Français . . . . . . . . . . . . . . . . . . . . . . . . . . . . . . . . . . . . . . . . . . . . . . . . . . . . . . . . . . FR 3 – FR 26
Deutsch . . . . . . . . . . . . . . . . . . . . . . . . . . . . . . . . . . . . . . . . . . . . . . . . . . . . . . . . . . DE 3 – DE 26
Page 3

UW COMBI-MAGNETRONNL 4
UW COMBI-MAGNETRON
NL 5
Inleiding
U heeft gekozen voor een combi-magnetron
van Etna.
Optimaal gebruikscomfort en een eenvoudige
bediening stonden voorop bij de ontwikkeling
van dit product.
De combi-magnetron verenigt de eigenschappen van een magnetron met die van een
traditionele oven.
De uitgebreide instelmogelijkheden maken het
mogelijk exact die bereidingswijze te kiezen
die u voor ogen staat. De bediening is
niettemin eenvoudig.
De functies zijn overzichtelijk op het
bedieningspaneel ondergebracht. Iedere
functie heeft zijn eigen toets. De display
informeert en helpt u bij het instellen.
De bediening van deze combi-magnetron is
eenvoudig. Met deze handleiding willen we
vooral inzicht geven in alle mogelijkheden van
dit toestel.
In het hoofdstuk bediening zijn de verschillende functies overzichtelijk gerangschikt. Er
zijn ook tips opgenomen waarmee u uw
voordeel kunt doen.
Bewaar deze handleiding zorgvuldig zodat
een eventuele volgende gebruiker er ook zijn
voordeel mee kan doen.
Veel kookplezier!
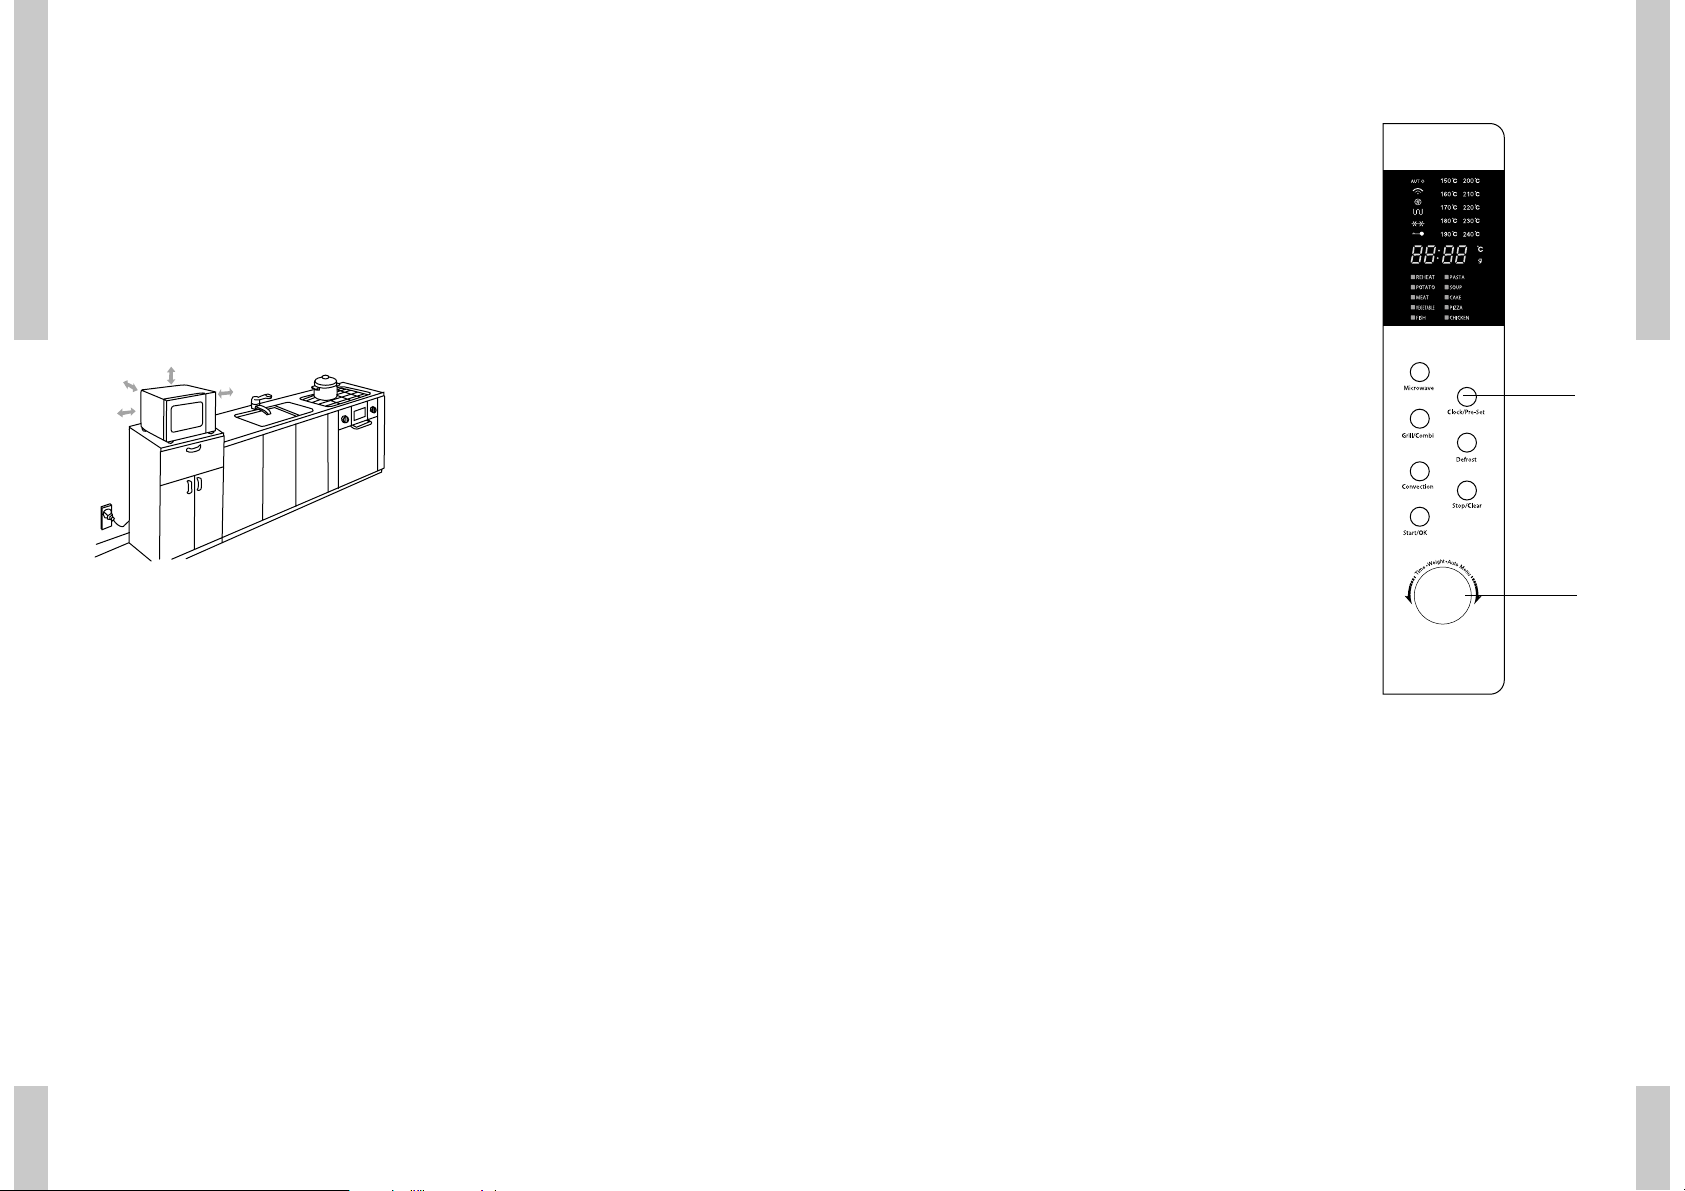
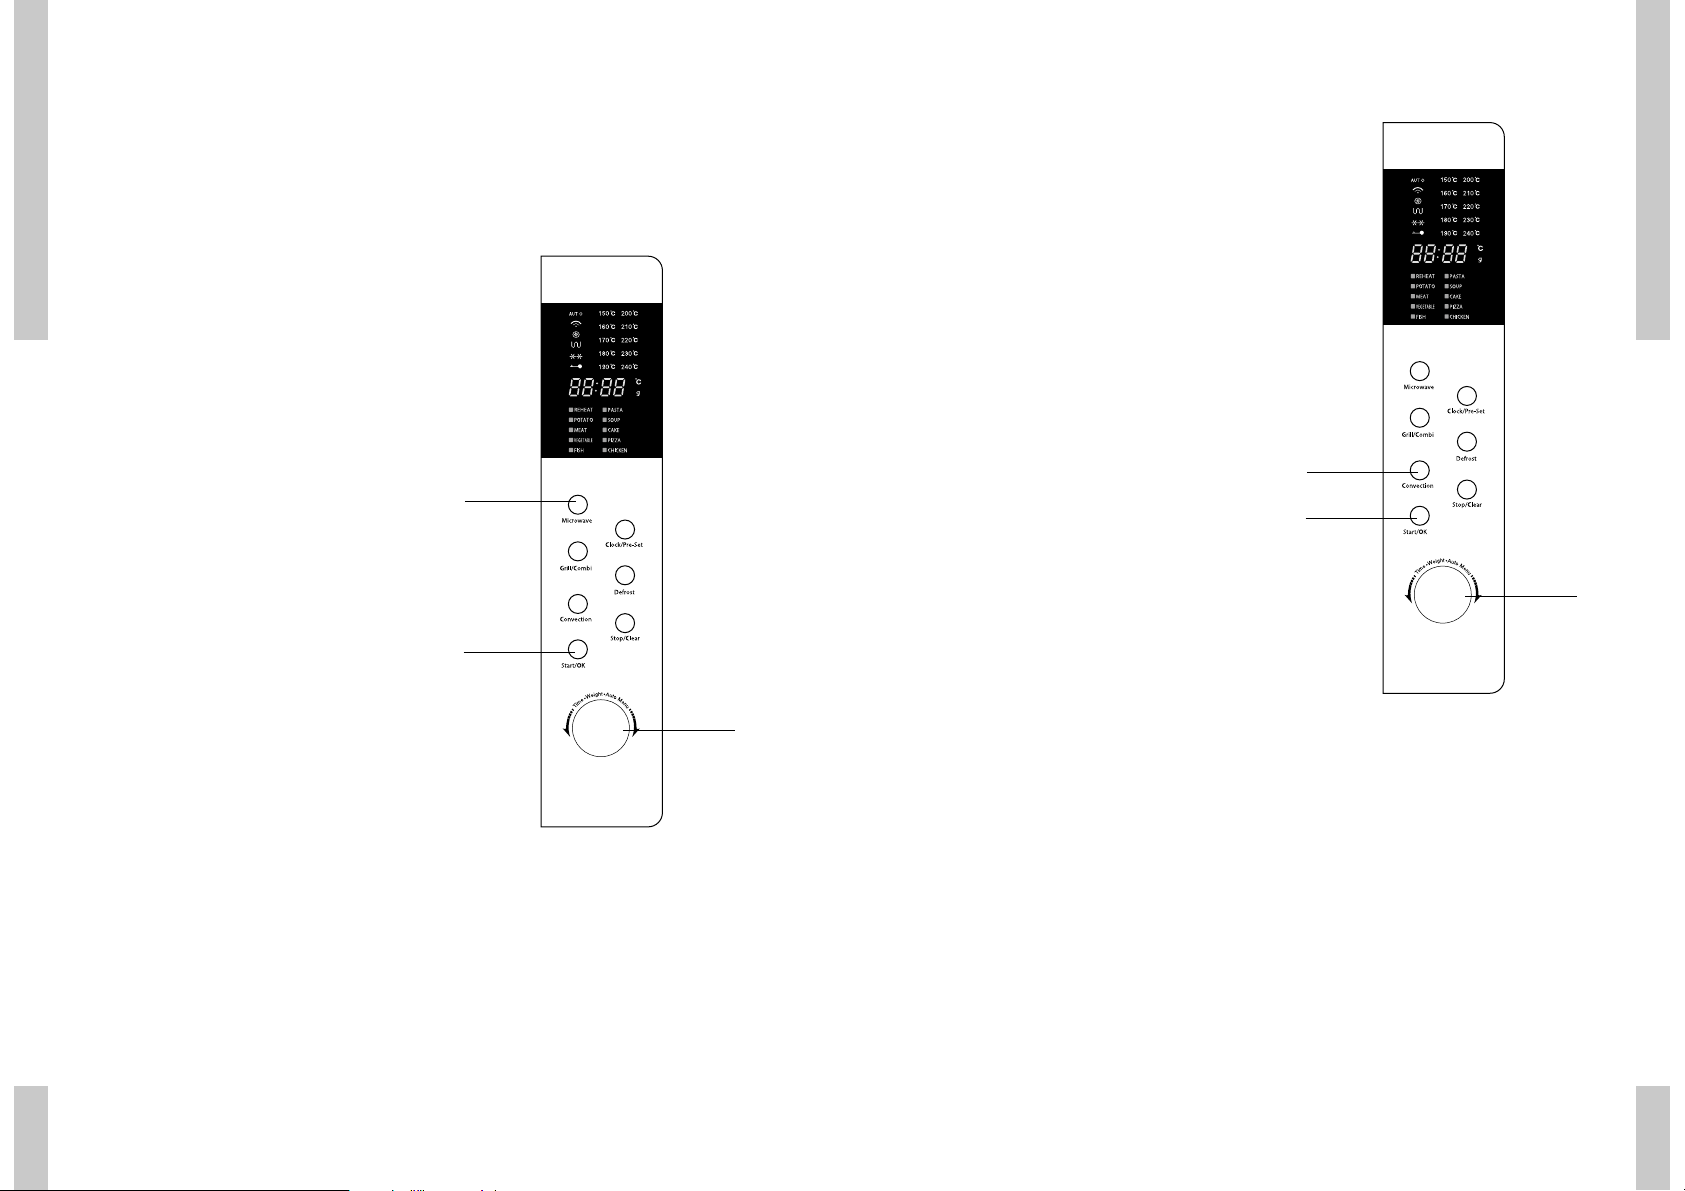
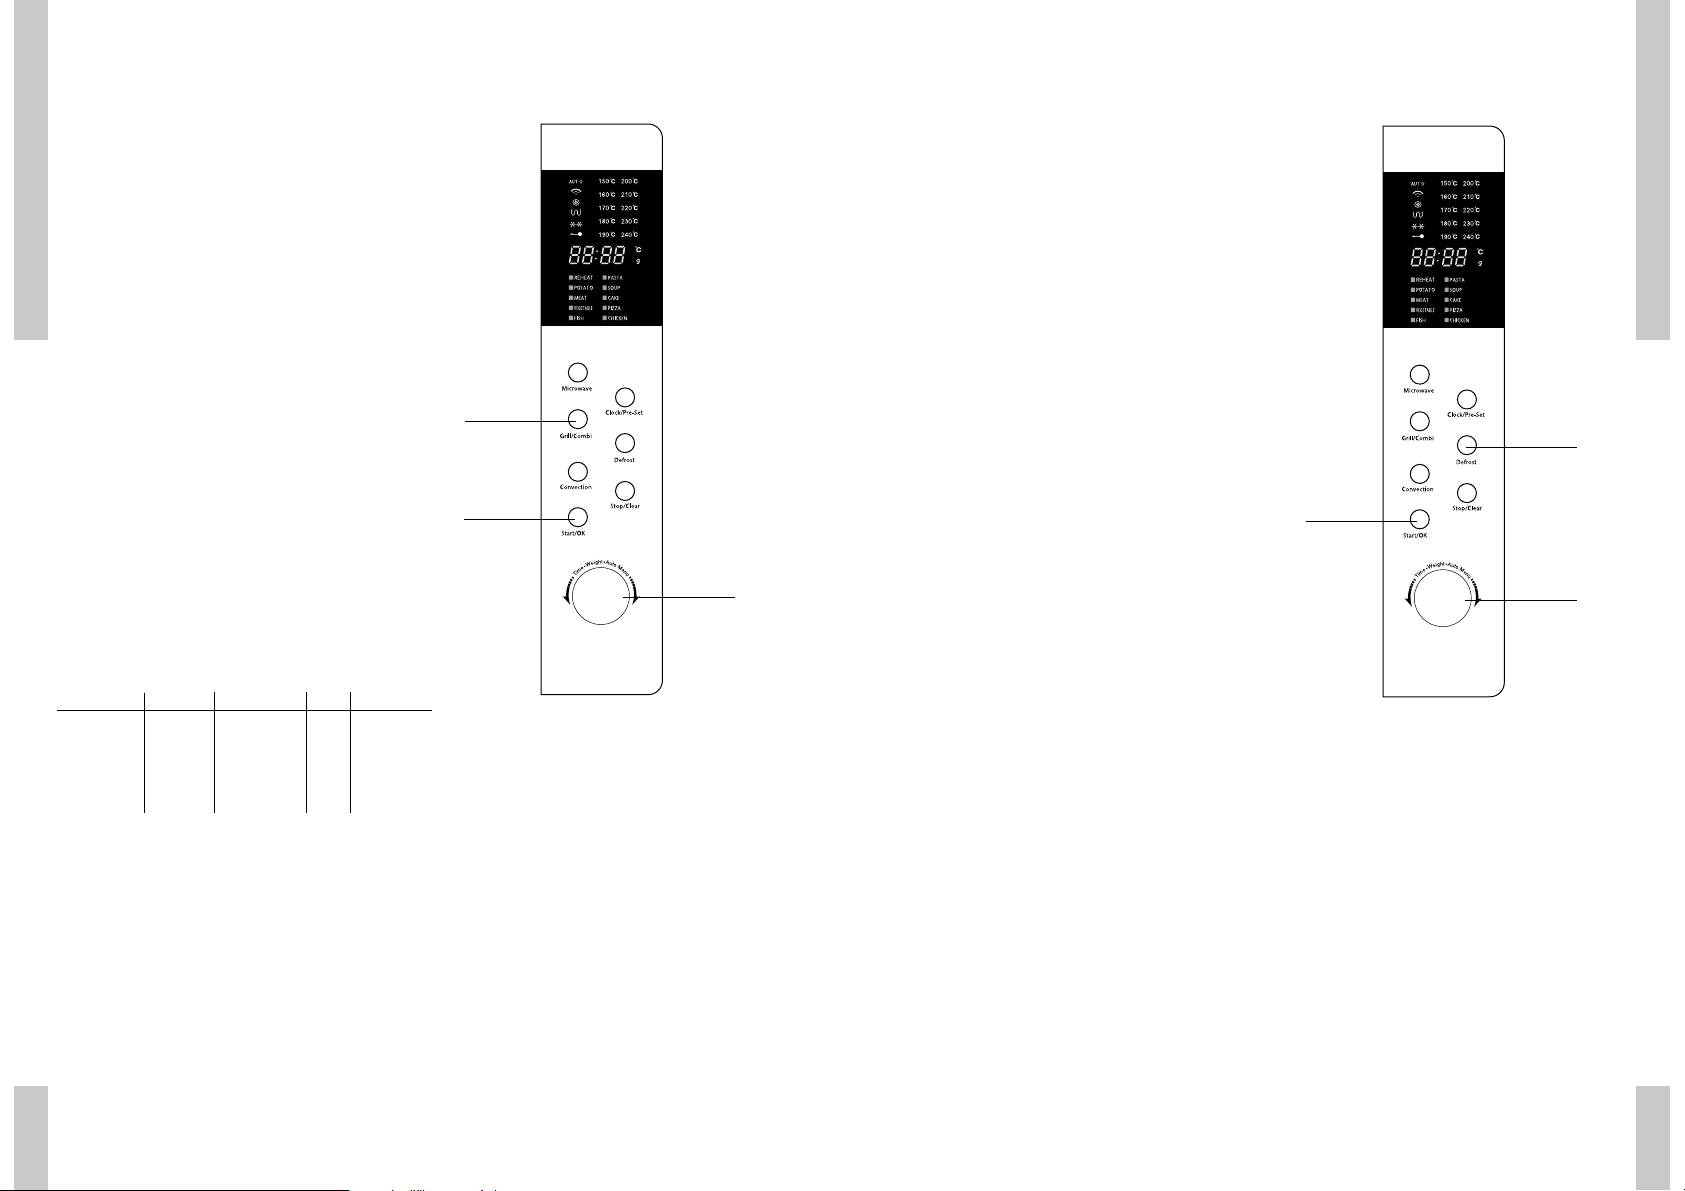
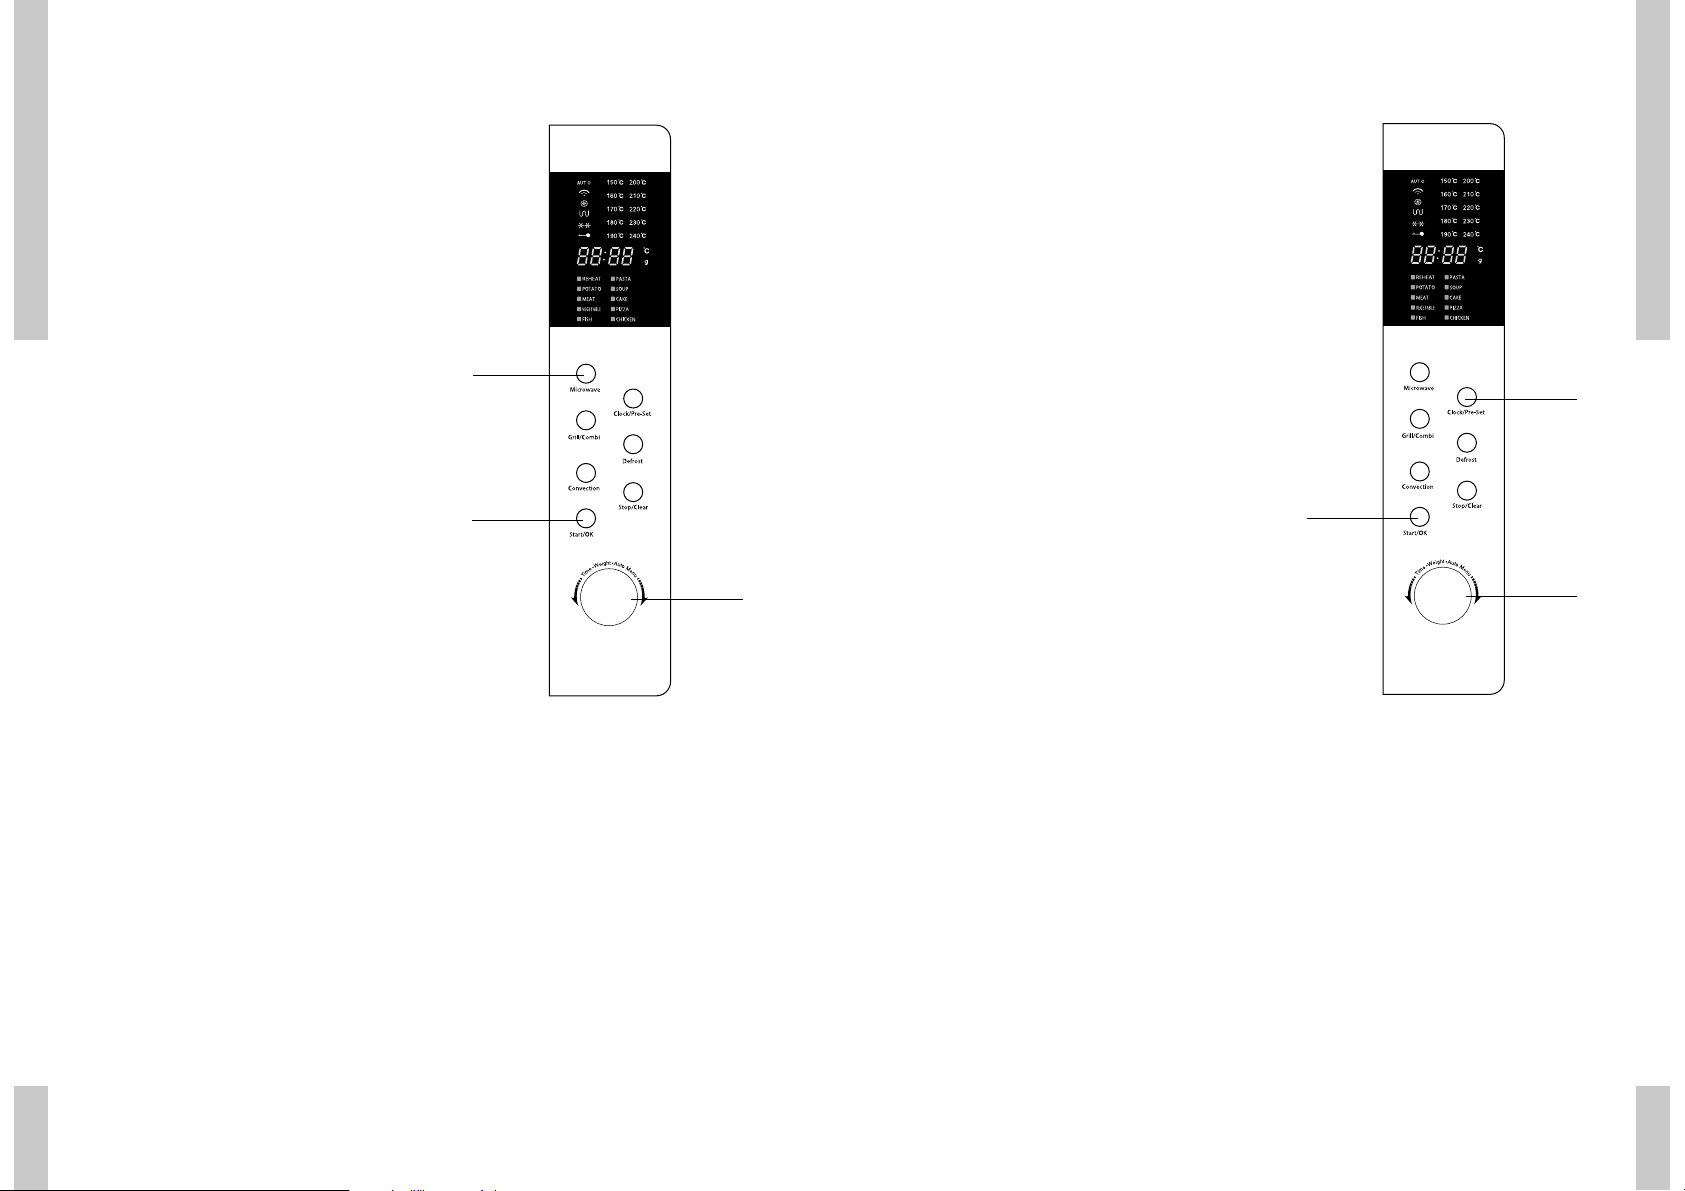
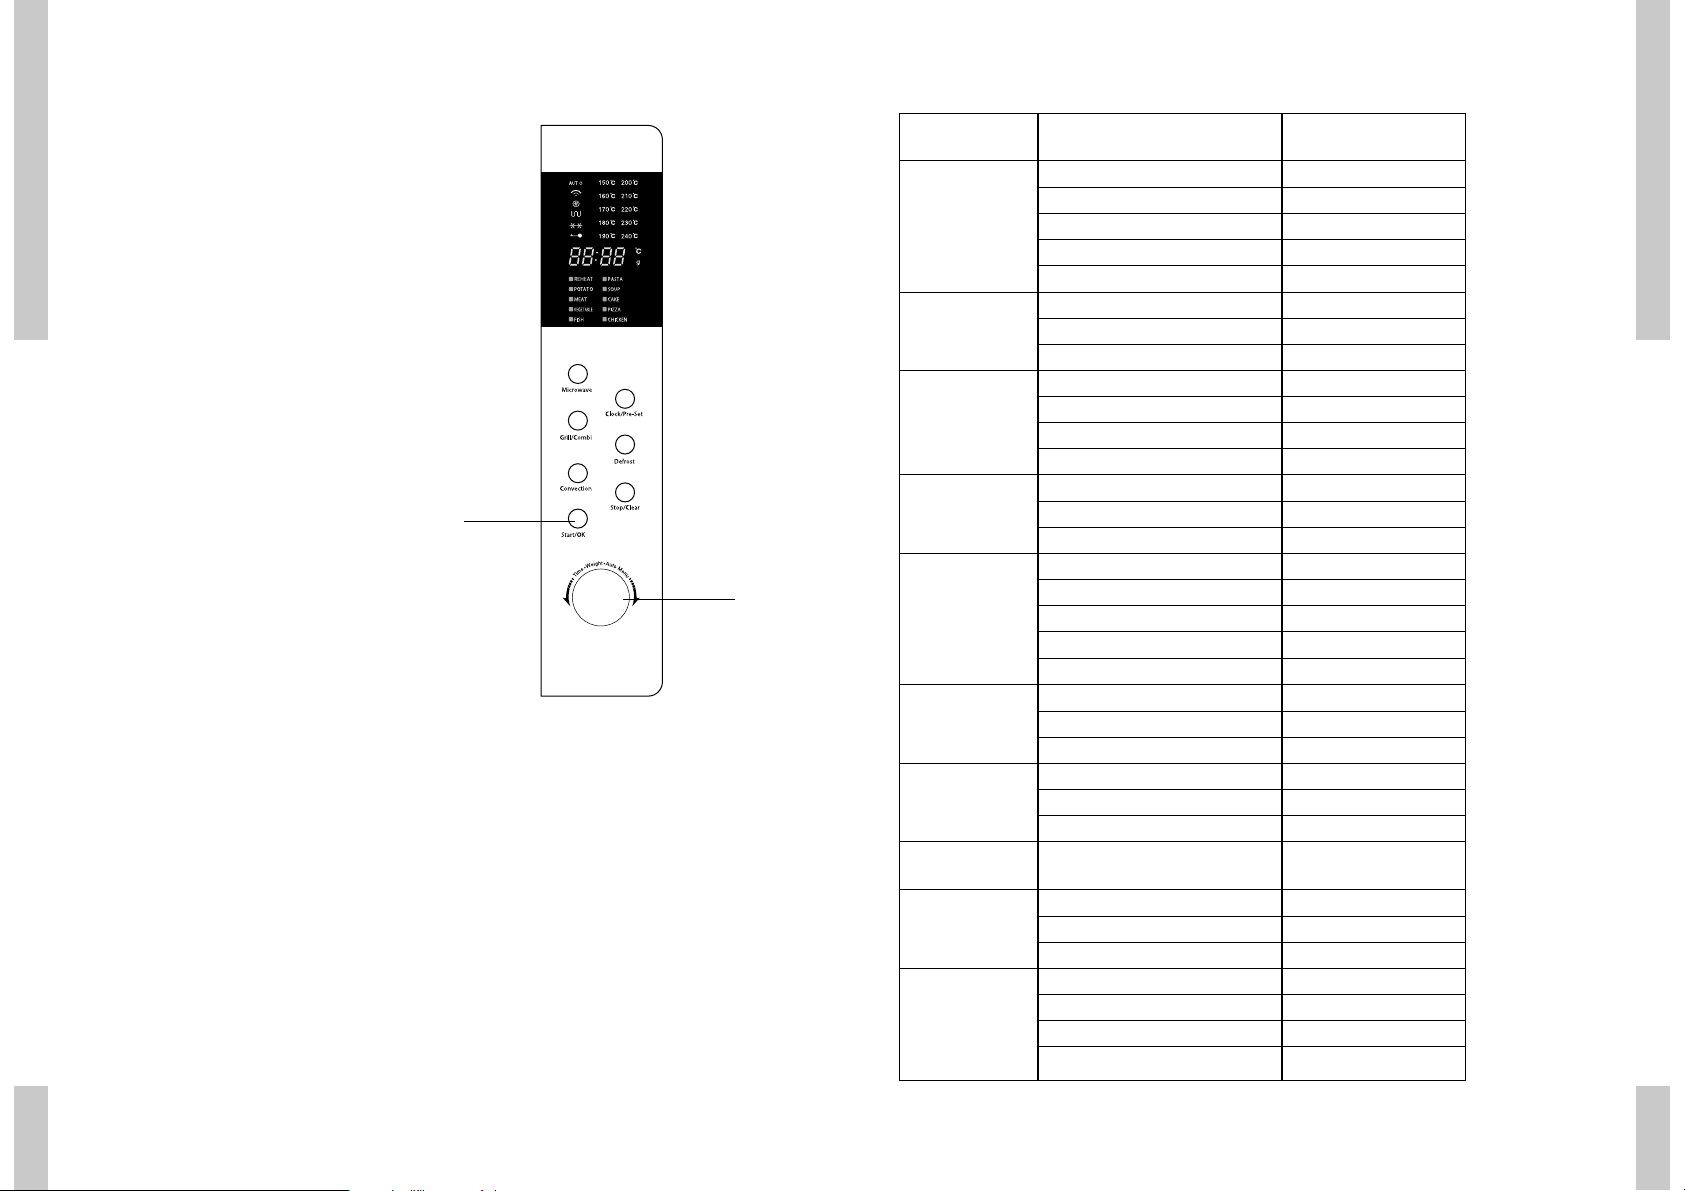
Beschrijving
Bedieningspaneel
Tijd/gewicht/auto-menu
hoog rooster
Aandrijving
Display
Toebehoren
draaiplateau ring voor draaiplateau
Start/OK
Hetelucht
Grill/combinatie
Magnetron
Klok
Ontdooien
Stop
Bedieningspaneel
nokje voor draaiplateau
Page 4

UW COMBI-MAGNETRON
VEILIGHEID
NL 6
NL 7
Algemeen
Deze combi-magnetron is uiterst veilig. Toch
is er, net als bij elk product, een aantal zaken
waar u op moet letten.
Reparaties mogen alleen door een bevoegd
servicemonteur worden uitgevoerd.
Het is gevaarlijk voor onbevoegden om
reparaties uit te voeren waarbij het nodig is
dat de behuizing van het toestel geopend
wordt. De behuizing beschermt tegen het
vrijkomen van micro-energie.
Gebruik het toestel niet als het beschadigd is.
Indien het snoer beschadigd is, moet deze
vervangen worden door de fabrikant, een
servicemonteur of een bevoegd persoon. Dit
om gevaarlijke situaties te voorkomen.
Bij reparatie moet het toestel spanningsloos
gemaakt worden. Neem de stekker uit de
contactdoos of draai de schakelaar in de
meterkast op nul.
In verband met de elektrische veiligheid mag
het toestel niet met hogedrukreinigers of
stoomreinigers schoongemaakt worden.
Deze combi-magnetron is ontworpen voor
huishoudelijk gebruik. Gebruik hem alleen
voor het bereiden van gerechten.
Waar u op moet letten
tijdens het grillen of bakken
De oven is geïsoleerd. Desondanks vindt er
altijd enige warmte-overdracht plaats, waarbij
de buitenzijde van het toestel opwarmt. Deze
opwarming valt ruimschoots binnen de normen.
Het toestel wordt heet tijdens het gebruik.
Wees voorzichtig. Raak de verwarmingselementen in de oven niet aan.
Bij het bereiden van gerechten die alcohol
bevatten kan de alcohol door de hoge
temperaturen verdampen. De damp kan vlam
vatten als het in aanraking komt met een heet
verwarmingselement.
Gebruik de combi-magnetron niet voor het
opbergen van brandgevaarlijke of licht vervormbare materialen.
Zorg ervoor dat gerechten altijd voldoende
verhit worden. De tijd die daarvoor nodig is,
hangt van vele factoren af, zoals de hoeveelheid en het soort gerecht. De eventueel in het
voedsel aanwezige bacteriën worden alleen
gedood als het voedsel minimaal 10 minuten
bij een temperatuur hoger dan 70 °C verhit
wordt. Laat het voedsel wat langer garen als u
niet zeker weet of het voedsel genoeg verhit is.
Verwarm nooit gesloten conservenblikken. Er
ontstaat een overdruk in het blik, waardoor
het kan exploderen.
Sta kinderen het gebruik van de oven zonder
toezicht van volwassenen alleen toe, indien
ze voldoende instructies hebben gekregen,
zodat ze in staat zijn om op een veilige manier
met de oven om te gaan en de gevaren inzien
van onjuist gebruik van de oven.
Page 5

VEILIGHEID
VEILIGHEID
NL 8
NL 9
tijdens het gebruik van de magnetron
Zet een kunststof lepeltje in het kopje als u
vloeistof (bijvoorbeeld water) wilt koken. Het
kan namelijk gebeuren dat de vloeistof kookt
zonder dat u belletjes ziet. Zodra u het kopje
uit de oven neemt, kan de vloeistof opeens
heftig gaan koken en uit het kopje spatten,
met het risico dat u zich brandt.
De inhoud van zuigflessen en potjes
babyvoeding moet geschud en geroerd
worden. Controleer de temperatuur voor
consumptie om verbranding te voorkomen.
Een magnetron is alleen veilig als de deur
goed sluit!
Plaats nooit een voorwerp tussen de deur van
de combi-oven en zorg dat de deur en de
afdichting altijd schoon zijn.
Wanneer de deur of de afdichting beschadigd
is, mag de oven niet gebruikt worden totdat
de oven gerepareerd is door een hiertoe
bevoegd persoon.
Gebruik de magnetron alleen voor het
ontdooien en bereiden van voedsel en niet
voor bijvoorbeeld het drogen van kleding of
papier. Deze stoffen kunnen vlamvatten.
Als u kleine hoeveelheden droge of
poedervormige producten in de magnetron
verwarmt (zoals bij het drogen van kruiden)
bestaat de kans op zelfontbranding.
Schakel de magnetron uit en neem de stekker
uit het stopcontact indien iets in de combioven vlam vat. Houd de ovendeur dicht.
Schakel de magnetron niet in als de combioven leeg is. De oven kan beschadigd raken.
Een magnetron is niet geschikt voor:
■ inmaken van voedsel;
■ eieren in de schaal koken, deze spatten uit
elkaar door de druktoename;
■ verhitten van frituurolie.
Verwijder metalen sluitstrips van plastic
zakken en gebruik schalen en schotels die
geschikt zijn voor de magnetron.
Vloeistoffen in luchtdichte verpakking mag u
alleen opwarmen indien u een paar gaatjes in
de verpakking prikt. Dit in verband met
toename van de druk tijdens het opwarmen.
Verwarm nooit langer dan noodzakelijk is,
houdt rekening met het “nagaren”.
Prik met een vork of ander puntig voorwerp
even in het vel van vlees, kip of vis. Hiermee
voorkomt u dat deze gerechten gaan
spetteren.
Als de magnetron ingeschakeld is, mag de
deur geopend worden; de magnetron schakelt
automatisch uit en de ingestelde tijd wordt
stilgezet.
Niet alle materialen kunnen in de combimagnetron. In de onderstaande tabel is
aangegeven welke materialen u wel en niet
kunt gebruiken.
Materiaal Magnetron Hetelucht Combinatie Grill
papier ja* nee nee nee
aluminiumfolie ja** ja ja** ja
huishoudfolie ja nee nee nee
aluminium bakjes nee ja nee ja
diepvries / magnetron servies ja nee nee nee
hittebestendig plastic ja nee nee nee
ongeglazuurd aardewerk nee ja nee ja
metalen kookgerei nee ja nee ja
normaal glas ja nee nee nee
Pyrex, ander ovenvast glas
en keramiek ja ja ja ja
borden met metaalhoudende sierrand nee ja nee ja
metalen sluitstrip nee ja nee nvt
kwikthermometer nee ja nee ja
afgesloten pot nee nvt nvt nvt
fles met een nauwe hals nee nvt nvt nvt
braadzakken ja ja ja nee
* Gebruik niet-gedecoreerd keukenpapier voor het afdekken van een schaal of onder brood bij het ontdooien.
** Door dunnere gedeelten van gerechten (zoals kippenpoten) af te dekken, voorkomt u dat ze te snel garen.
Page 6
Klok instellen
1 Druk toets ‘CLOCK/PRE-SET’.
Kies tussen 12-uurs of 24-uurs aanduiding.
2 Draai regelknop ‘TIMER/WEIGHT’. Stel de
uren in (tussen 0-23 bij 24 uurs instelling/
tussen 1-12 bij 12 uurs instelling).
3 Druk toets ‘CLOCK/PRE-SET’.
De minuten-aanduiding gaat knipperen.
4 Draai regelknop ‘TIMER/WEIGHT’. Stel de
minuten in (tussen 0-59).
5 Druk toets ‘CLOCK/PRE-SET’.
De ingestelde tijd verschijnt (“:” knippert).
Indien u tijdens het instellen van de klok op
‘STOP/CLEAR’ drukt verschijnt de vorige
klok-instelling.
opmerking
Wanneer het toestel elektrisch wordt
aangesloten, geeft de display “0:00” weer.
BEDIENING
NL 11
BEDIENINGNL 10
Ingebruikname
plaatsen
Plaats de magnetron op een stevige en vlakke
ondergrond.
Zorg voor voldoende ventilatie rondom de
magnetron. Houd aan de bovenzijde 30 cm
ruimte vrij. Houd aan de achterzijde en
zijkanten minimaal 7,5 cm ruimte vrij.
Dek de ventilatieopeningen niet af.
De stelvoetjes mogen niet verwijderd worden.
Plaats de magnetron niet in de buurt van
warmtebronnen.
Zend- en ontvangstapparatuur zoals radio’s
en televisietoestellen kunnen de werking van
de magnetron beïnvloeden.
magnetron en toebehoren reinigen
Neem het toebehoren uit de combi-magnetron
en reinig het met een mild reinigingsmiddel.
Schakel de hetelucht-functie één uur lang in
op 230 °C (zie pagina 13). Tijdens de fabricage
gebruikte beschermingsvetten worden dan
verwijderd.
opmerking
Als de oven voor de eerste maal sterk verhit
wordt, zult u een “nieuwigheidsluchtje”
ruiken. Dit is normaal. Schakel eventueel de
wasemkap in of open een raam.
Na het afkoelen de oven met warm water
reinigen.
■ Druk toets ‘START/OK’ om het
kookprogramma opnieuw te starten na het
openen van de deur.
■ Indien na het selecteren van een kookpro-
gramma niet binnen 5 minuten toets
‘START/OK’ wordt ingedrukt zal het
programma niet starten.
■ Een pieptoon klinkt bij het bedienen van
een toets. Klinkt er geen pieptoon dan is
de toets niet goed ingeduwd.
■ Na het beeindigen van een kook-
programma klinkt er 5x een pieptoon.
1/3/5
2/4
30 cm
7.5 cm
7.5 cm
7.5 cm
Page 7
BEDIENING
NL 13
Hetelucht koken
met voorverwarmfunctie
1 Druk 1x toets ‘CONVECTION. Op het
display verschijnt ‘140’.
2 Draai regelknop ‘TIMER/WEIGHT’. Stel de
gewenste temperatuur in (de temperatuur
is instelbaar van 140 tot 230 °C).
3 Druk toets ‘START/OK’ om de ingestelde
temperatuur te bevestigen.
4 Druk toets ‘START/OK’ om het ingestelde
programma te starten.
Er klinken 2 pieptonen wanneer de
voorverwarm-temperatuur is bereikt. De
temperatuur is zichtbaar in de display en
knippert.
5 Plaats het gerecht in de oven en sluit de
deur. Draai regelknop ‘TIMER/WEIGHT’.
Stel de kooktijd in (maximale kooktijd
95 minuten).
6 Druk toets ‘START/OK’ om het ingestelde
programma te starten.
BEDIENINGNL 12
Koken met de magnetron
1 Druk toets ‘MICROWAVE’ om de
magnetronfunctie te selecteren. Op het
display verschijnt ‘P100’.
2 Druk herhaaldelijk op ‘MICROWAVE’ of
draai regelknop ‘TIMER/WEIGHT’ om het
magnetronvermogen aan te passen
3 Druk toets ‘START/OK’ om het
magnetronvermogen te bevestigen.
4 Draai regelknop ‘TIMER/WEIGHT’. Stel de
kooktijd in (de maximale kooktijd is 95
minuten).
5 Druk toets ‘START/OK’ om het ingestelde
programma te starten.
voorbeeld:
U wilt 80% magnetronvermogen met een
kookduur van 20 minuten.
1 Druk 1x toets ‘MICROWAVE’.
In de display verschijnt “P100”.
Druk nogmaals toets ‘MICROWAVE’ om
80% vermogen in te stellen. In de display
verschijnt “P80”.
2 Druk toets ‘START/OK’.
3 Draai regelknop ‘TIMER/WEIGHT’ totdat in
de display “20:00” verschijnt (de maximale
kooktijd is 95 minuten).
4 Druk toets ‘START/OK’ om het ingestelde
programma te starten.
tabel magnetronvermogen
Vermogen Druk toets ‘MICROWAVE’
100% (P100) 1x
80% (P80) 2x
50% (P50) 3x
30% (P30) 4x
10% (P10) 5x
Snel koken
1 Druk toets ‘START/OK’.
U kookt nu 30 seconden met 100%
magnetronvermogen.
Elke volgende bediening van de
‘START/OK’ toets verlengt het kookproces
met 30 seconden. De maximale kooktijd is
95 minuten.
1
3
2/4
1
2/5
3/4/6
Page 8

NL 15
BEDIENINGNL 14
Hetelucht koken
zonder voorverwarmfunctie
1 Druk 1x toets ‘CONVECTION. Op het
display verschijnt ‘140’.
2 Draai regelknop ‘TIMER/WEIGHT’. Stel de
gewenste temperatuur in (de temperatuur
is instelbaar van 140 tot 230 °C).
3 Druk toets ‘START/OK’ om de ingestelde
temperatuur te bevestigen.
4 Draai regelknop ‘TIMER/WEIGHT’.
Stel de kooktijd in (maximale kooktijd
95 minuten).
5 Druk toets ‘START/OK’ om het ingestelde
programma te starten.
BEDIENING
Koken met de grill
1 Druk 1x toets ‘GRILL/COMBI’.
G-1 knippert.
2 Druk toets ‘START/OK’ om het ingestelde
programma te selecteren.
3 Draai regelknop ‘TIMER/WEIGHT’.
Stel de kooktijd in (de maximale kooktijd is
95 minuten).
4 Druk toets ‘START/OK’ om het ingestelde
programma te starten.
Er klinken 2 pieptonen als de helft van de
grilltijd verstreken is. Voor een beter grillresultaat is het aan te bevelen het gerecht op
dit moment om te draaien.
Druk opnieuw ‘START/OK’ om het grillen te
hervatten.
1
3
2/4
1
2/4
3/5
Page 9
NL 16
BEDIENING
NL 17
BEDIENING
Combinatie koken
1 Druk 1x toets ‘GRILL/COMBI’.
G-1 knippert.
2 Draai regelknop ‘TIMER/WEIGHT’.
Stel het gewenste combinatie-programma
in (C-1, C-2, C-3 of C-4).
3 Druk toets ‘START/OK’ om het ingestelde
programma te selecteren.
4 Draai regelknop ‘TIMER/WEIGHT’.
Stel de kooktijd in (maximale kooktijd
95 minuten).
5 Druk toets ‘START/OK’ om het ingestelde
programma te starten.
tabel combinaties
Instructies Display Magnetron Grill Hetelucht
1 C-1
■■
2 C-2 ■■
3 C-3 ■■
4 C-4 ■■■
1
2/4
3/5
Ontdooien
met ingesteld gewicht
1 Druk 1x toets ‘DEFROST’. In de display
verschijnt “dEF1”.
2 Draai regelknop ‘TIMER/WEIGHT’.
Stel het gewenste gewicht in (tussen 100
en 2000 gram).
3 Druk toets ‘START/OK’ om het ingestelde
programma te starten.
met ingestelde tijd
1 Druk 2x toets ‘DEFROST’. In de display
verschijnt “dEF2”.
2 Draai regelknop ‘TIMER/WEIGHT’.
Stel de gewenste kooktijd in (de maximaal
in te stellen tijd is 95 minuten).
3 Druk toets ‘START/OK’ om het ingestelde
programma te starten.
1
2
3
Page 10
Voorinstelfunctie
stel eerst de tijdklok in (zie hoofdstuk “Klok
instellen”)
1 Stel een kookfunctie in. Maximaal kunnen
3 functies worden ingesteld (met uitzondering van de ontdooistand). Bij “Auto
menu” kunt u maximaal 1 functie instellen.
2 Druk toets ‘CLOCK/PRE-SET’. In de display
verschijnt de huidige tijd. De uuraanduiding knippert.
3 Draai regelknop ‘TIMER/WEIGHT’.
Stel de gewenste uren in.
4 Druk toets ‘CLOCK/PRE-SET’. De minuten-
aanduiding knippert.
5 Draai regelknop ‘TIMER/WEIGHT’.
Stel de gewenste minuten in.
6 Druk toets ‘START/OK’ om het ingestelde
programma te selecteren. Wanneer de
ingestelde tijd is bereikt klinken er 2
pieptonen en start het kookprogramma.
BEDIENING
NL 19
BEDIENINGNL 18
Koken in meerdere fasen
U kunt maximaal 3 kookfasen instellen. Stel
de ontdooifunctie (indien van toepassing) als
eerste fase in. Na elke fase klinkt een
pieptoon en begint de volgende fase.
Auto-menu kan in deze stand niet worden
gebruikt.
voorbeeld
U wilt 10 minuten 100% magnetronvermogen
en 5 minuten 80% magnetronvermogen.
1 Druk 1x toets ‘MICROWAVE’ voor stand
100% magnetronvermogen.
2 Druk toets ‘START/OK’ om het ingestelde
vermogen te bevestigen.
3 Draai regelknop ‘TIMER/WEIGHT’.
Stel de kooktijd in op 10 minuten.
4 Druk 2x toets ‘MICROWAVE’ voor stand
80% magnetronvermogen.
5 Druk toets ‘START/OK’ om het ingestelde
vermogen te bevestigen.
6 Draai regelknop ‘TIMER/WEIGHT’.
Stel de kooktijd in op 5 minuten.
7 Druk toets ‘START/OK’ om het ingestelde
programma te starten.
1/4
3/6
2/5/7
6
2/4
3/5
Page 11
BEDIENING
NL 21
BEDIENINGNL 20
Auto menu
1 Draai regelknop ‘TIMER/WEIGHT’
rechtsom. Stel het gewenste programma
in (A1, A2...A10).
2 Druk toets ‘START/OK’ om het ingestelde
programma te selecteren.
3 Draai regelknop ‘TIMER/WEIGHT’. Stel het
gewenste gewicht of hoeveelheid in.
4 Druk toets ‘START/OK’ om het ingestelde
programma te starten.
1/3
2/4
Kooktabel auto menu
Menu Gewicht/Hoeveelheid Display
A1
opwarmen
150 g 150
250 g 250
350 g 350
450 g 450
600 g 600
A2
aardappel
230 g 1
460 g 2
690 g 3
A3
vlees
150 g 150
300 g 300
450 g 450
600 g 600
A4
groente
150 g 150
350 g 350
500 g 500
A5
vis
150 g 150
250 g 250
350 g 350
450 g 450
650 g 650
A6
pasta
50 g (met koud water 450 g) 50
100 g (met koud water 800 g) 100
150 g (met koud water 1200 g) 150
A7
soep
200 ml 200
400 ml 400
600 ml 600
A8
cake
475 g 475
A9
pizza
200 g 200
300 g 300
400 g 400
A10
kip
500 g 500
750 g 750
1000 g 1000
1200 g 1200
Page 12

ONDERHOUD
NL 23
BEDIENINGNL 22
Controle functie
■ Druk tijdens het koken toets ‘GRILL/CONV.’
of ’COMBI.’.
Het ingestelde vermogen wordt 2-3 sec.
weergegeven in de display.
■ Druk in de voorinstel functie toets
‘CLOCK/PRE-SET’.
De actuele auto-starttijd wordt 2-3 sec.
weergegeven in de display.
■ Druk tijdens het koken toets
‘CLOCK/PRE-SET’.
De dagtijd wordt 2-3 sec. weergegeven in
de display.
Kinderslot functie
kinderslot inschakelen
■ Druk 3 seconden toets ‘STOP/CLEAR’.
Een ‘lange’ pieptoon klinkt. In de display
verschijnt “0:00”.
kinderslot uitschakelen
■ Druk 3 seconden toets ‘STOP/CLEAR’.
Een ‘lange’ pieptoon klinkt.
Reinigen
■ Maak de binnenzijde direct na gebruik
schoon. Gebruik een vochtige doek om
condens, overgekookt vocht en
voedselresten te verwijderen.
Achtergebleven kruimels en vocht
absorberen magnetronenergie en
verlengen de kooktijden.
■ Reinig de binnen- en buitenzijde
regelmatig; gebruik een sopje van
afwasmiddel en maak de oven met een
droge doek goed droog.
■ Zorg dat de afdekking van de microgolf-
verdeler schoon is. Vervuiling van de
afdekking kan leiden tot vonkvorming.
■ Reinig het toebehoren regelmatig; gebruik
een sopje van afwasmiddel met een
borstel en maak het toebehoren met een
droge doek goed droog. Het toebehoren
mag ook afgewassen worden in de
vaatwasmachine.
■ Geurtjes verdwijnen als u een glas azijn of
water met citroen in de ovenruimte zet.
Schakel de magnetron gedurende twee
minuten in op vol vermogen. Daarna
afnemen met een vochtige doek.
■ Controleer de deursluiting en het
deurrubber regelmatig op beschadigingen.
■ Gebruik de combi-magnetron niet wanneer
de deur of deursluiting beschadigd zijn.
Page 13

STORINGENNL 24
MILIEUASPECTEN
NL 25
Wat te doen als...
Wanneer het toestel niet goed werkt,
betekent dit niet altijd dat het defect is.
Probeer het euvel eerst zelf als volgt te
verhelpen. Bel de servicedienst indien
onderstaande adviezen niet helpen.
■ Zit de stekker in het stopcontact?
■ Is de deur goed gesloten?
■ Is de zekering in de meterkast defect?
■ Zijn het vermogen en de bereidingstijd
goed ingesteld?
■ Staan er voorwerpen in de magnetron die
er niet thuishoren?
■ Heeft u het juiste keukengerei gebruikt?
■ Zijn de ventilatieopeningen geblokkeerd?
■ Is het voedsel voldoende ontdooid?
■ Heeft u het voedsel tijdens de bereiding
gekeerd of geroerd?
Algemeen
Raadpleeg bij storingen het telefoonnummer
van de servicedienst. Zie hiervoor de
bijgeleverde garantiekaart of raadpleeg de
internet site www.hps.nl. Op deze site zijn
ook schoonmaak- en gebruikerstips te vinden.
Er zijn ook diverse schoonmaakmiddelen via
deze site te verkrijgen.
Verpakking en toestel afvoeren
De verpakking van het toestel is recyclebaar.
Gebruikt kunnen zijn:
■ karton;
■ polyethyleenfolie (PE);
■ CFK- vrij polystyreen (PS- hardschuim).
Deze materialen op verantwoorde wijze en
conform de overheidsbepalingen afvoeren.
Op het typeplaatje is het symbool van een
doorgekruiste vuilnisbak aangebracht:
Dit betekent dat het apparaat aan het einde
van zijn levensduur niet bij het gewone
huisvuil mag worden gevoegd, maar naar een
speciaal centrum voor gescheiden
afvalinzameling van de gemeente moet
worden gebracht of naar een verkooppunt dat
deze service verschaft.
Het apart verwerken van een huishoudelijk
apparaat zoals dit toestel, voorkomt mogelijk
negatieve gevolgen voor het milieu en de
gezondheid, die door een ongeschikte
verwerking ontstaat, en zorgt ervoor dat de
materialen waaruit het apparaat bestaat
teruggewonnen kunnen worden om een
aanmerkelijke besparing van energie en
grondstoffen te verkrijgen.
Om op de verplichting tot gescheiden
verwerking van elektrische huishoudelijke
apparatuur te wijzen, is op het product het
symbool van een doorgekruiste vuilnisbak
aangebracht.
Page 14

YOUR COMBI-MICROWAVE OVENGB 3
Contents
■ Your combi-microwave oven . . . . . . . . . . . . . 4
Description . . . . . . . . . . . . . . . . . . . . . . . . . . . . 4
Introduction . . . . . . . . . . . . . . . . . . . . . . . . . . . . 5
General . . . . . . . . . . . . . . . . . . . . . . . . . . . . . . . . 6
■ Safety . . . . . . . . . . . . . . . . . . . . . . . . . . . . . . 7 - 9
What you should pay attention to . . . . . . . . . 7
■ Operation . . . . . . . . . . . . . . . . . . . . . . . . . 10 - 22
Bringing the oven into operation . . . . . . . . . 10
Setting the clock . . . . . . . . . . . . . . . . . . . . . . . 11
Cooking using the microwave . . . . . . . . . . . 12
Hot-air cooking . . . . . . . . . . . . . . . . . . . . . . . . 13
Cooking using the grill . . . . . . . . . . . . . . . . . . 15
Combination cooking . . . . . . . . . . . . . . . . . . . 16
Defrosting . . . . . . . . . . . . . . . . . . . . . . . . . . . . 17
Multistage cooking . . . . . . . . . . . . . . . . . . . . . 18
Pre-set function . . . . . . . . . . . . . . . . . . . . . . . 19
Auto menu . . . . . . . . . . . . . . . . . . . . . . . . . . . . 20
Cooking table auto menu . . . . . . . . . . . . . . . 21
Checking the settings . . . . . . . . . . . . . . . . . . 22
Childproof lock . . . . . . . . . . . . . . . . . . . . . . . . 22
■ Maintenance . . . . . . . . . . . . . . . . . . . . . . . . . . 23
Cleaning . . . . . . . . . . . . . . . . . . . . . . . . . . . . . . 23
■ Faults . . . . . . . . . . . . . . . . . . . . . . . . . . . . . . . . 24
What should I do if… . . . . . . . . . . . . . . . . . . . 24
General . . . . . . . . . . . . . . . . . . . . . . . . . . . . . . . 24
■ Environmental aspects . . . . . . . . . . . . . . . . . 25
Disposal of packaging and appliance . . . . . 25
■ General . . . . . . . . . . . . . . . . . . . . . . . . . . . . . . . 26
Technical information . . . . . . . . . . . . . . . . . . 26
ALGEMEENNL 26
Technische gegevens
Voeding 230 V 50 Hz
Aansluitwaarde 2500 W
Magnetronvermogen 900 W
Grillvermogen 1100 W
Heteluchtvermogen 2500 W
Oveninhoud 30 l
Gewicht 20 kg
Afmetingen (bxhxd) 520 x 335 x 510 mm
Page 15

YOUR COMBI-MICROWAVE OVENGB 5
Introduction
You have chosen an Etna combi-microwave
oven.
Optimum ease of use and simple operation
were the most important factors in the
development of this product.
The combi-microwave oven combines the
characteristics of a microwave oven with
those of a traditional oven.
The extensive range of settings available
enables you to select the exact method of
cooking that you have in mind. The design
ensures easy to use, controls.
The functions are arranged conveniently on
the control panel. Every function has its own
button. The display provides information and
helps you choose the settings.
The controls for this oven are very easy. What
we particularly want to do in this manual is
give you an idea of all the possibilities this
appliance offers.
The various functions are arranged for easyreference in the operation section. You will
also find some useful tips.
Separate installation instructions have been
enclosed for installing the appliance.
Please keep this manual carefully, since any
subsequent user will also find it very useful.
We wish you much pleasure with your combimicrowave oven!
YOUR COMBI-MICROWAVE OVEN
GB 4
Description
Control panel
Time/weight/auto-menu
High rack
Drive
Display
Toebehoren
Turntable Roller stay
Start/OK
Hot air
Grill/combi
Microwave
Clock
Defrost
Stop
Bedieningspaneel
Cam for turntable
Page 16

SAFETY
GB 7
What you should pay attention to
when using the grill or backing function
The oven is insulated. Despite this, there is
always some transfer of heat, as a result of
which the outside of the oven heats up. This
heating falls well within the acceptable limits.
During use, the appliance becomes hot. Care
should be taken to avoid touching heating
elements inside the oven.
When cooking dishes that contain alcohol, the
alcohol may evaporate due to the high
temperature. The vapour could catch fire if it
comes into contact with a hot heating
element.
Do not use the combi-microwave oven for
storing flammable or easily deformable
materials.
Make sure that the food is always heated
sufficiently. The time required for this
depends on various factors, such as the
quantity and type of food. Any bacteria in the
food will only be killed if the food is heated to
a temperature greater than 70 °C for at least
10 minutes. Allow the food to cook for a bit
longer if you are not sure whether the food
has been heated sufficiently.
Never heat food in sealed containers.
Pressure will build up inside the container
and may cause it to explode.
Only allow children to use the oven without
supervision when adequate instructions have
been given so that the child is able to use the
oven in a safe way and understands the
hazards of improper use.
YOUR COMBI-MICROWAVE OVENGB 6
General
This combi-microwave oven is extremely safe.
As with all products, however, there are a
number of things you need to bear in mind.
Repairs must only be carried out by an
authorised service engineer.
It is hazardous for anyone other than a
trained person to carry out any service or
repair operation which involves the removal
of any cover which gives protection against
exposure to microwave energy.
Do not use the appliance if it is damaged. If
the supply cord is damaged, it must be
replaced by the manufacturer or its service
agent or a similary qualified person in order to
avoid a hazard.
The appliance should be disconnected from
the mains before being repaired or cleaned.
Remove the plug from the socket or turn the
switch in the meter cupboard to zero.
For electrical safety reasons, the appliance
must not be cleaned using high-pressure
cleaners or steam cleaners.
This combi-microwave oven has been
designed for domestic use. Use the appliance
only for cooking food and only if it has been
built in according to the regulations.
Page 17

SAFETY
GB 9
Remove metal twists from plastic bags and
use dishes and plates that are suitable for the
microwave oven.
You should only heat liquids in airtight
packaging after first pricking a few holes in
the packaging. This is because of the
increase in pressure during heating.
Do not heat food for longer than is necessary;
allow for the 'continued cooking'.
Prick the skin of meat, chicken and fish with a
fork or other pointed object. This prevents
these foods spattering.
You can open the door when the microwave
function is switched on; the microwave
function then switches off automatically and
the time set is stopped.
Not all materials can be used in the combimicrowave oven. The table below shows
which materials can be used and which
materials cannot be used.
Material Microwave Hot air Combi Grill
paper yes* no no no
aluminium foil yes** yes yes** yes
cling film yes no no no
aluminium trays no yes no yes
freezer/microwave oven dishes yes no no no
heatproof plastic yes no no no
unglazed earthenware no yes no yes
metal cooking utensils no yes no yes
normal glass yes no no no
ovenproof glass and
ceramics yes yes yes yes
metallic decoration no yes no yes
metallic twists no yes no n/a
mercury thermometer no yes no yes
bottle with narrow neck no n/a n/a n/a
roasting bags yes yes yes no
* Use undecorated kitchen paper to cover a dish or to place under bread when defrosting.
** By covering thinner parts of foods (such as chicken legs), you prevent them from cooking too quickly.
SAFETYGB 8
when using the microwave function
Place a plastic spoon in the cup if you want to
boil a liquid (water, for example). The liquid
may boil without you seeing any bubbles. As
soon as you take the cup out of the oven, the
liquid may suddenly start to boil violently and
splash out of the cup, with the risk of you
getting scalded.
The content of feeding bottles and baby food
jars are to be stirred or shaken and the
temperature is to be checked before
consumption, in order to avoid burns.
Your microwave oven is safe only if the door
is closing properly!
Never put anything between the oven door
and make sure that the door and seal are
always clean.
If the door or door seals are damaged, the
oven must not be operated until it has been
repaired by a trained person.
You should only use the microwave oven for
defrosting and cooking food and not, for
example, for drying clothes or paper. Clothes
or paper could catch fire.
If you heat small quantities of dry or powdery
products in the microwave oven (when drying
herbs, for example), there is a chance that
they will spontaneously combust.
If something in the combi-oven catches fire,
switch the microwave oven off and take the
plug out of the socket. Keep the oven door
closed.
Do not switch the microwave function on if
the combi-oven is empty. The oven could be
damaged.
A microwave oven is not suitable for:
■ preserving food;
■ cooking eggs in their shells, because they
will burst due to the increase in pressure;
■ heating oil for deep frying.
Page 18

Setting the clock
1 Press the ‘CLOCK/PRE-SET’ button. Select
either 12-hour or 24-hour notation.
2 Turn the ‘TIMER/WEIGHT’ control knob. Set
the hours (between 0 and 23 for 24-hour
notation / between 1-12 for 12-hour
notation).
3 Press the ‘CLOCK/PRE-SET’ button. The
minutes-display starts to flash.
4 Turn the ‘TIMER/WEIGHT’ control knob. Set
the minutes (from 0-59).
5 Press the ‘CLOCK/PRE-SET’ button.
The time that you have set is displayed
(“:” flashes). If you press ‘STOP/CLEAR’
while setting the clock the previous clock
setting will be displayed.
remarks
When the microwave is connected to the
electricity supply the display will show “0:00”.
OPERATION
GB 11
OPERATIONGB 10
Bringing the oven into operation
positioning
Place the microwave oven on a firm, flat
surface.
Make sure that there is sufficient ventilation
around the microwave oven. Keep a 30 cm
space free at the top. At the rear and sides
keep at least 7.5 cm free.
Do not cover the air vents.
The adjustable feet should not be removed.
Do not place the microwave oven near a heat
source.
Transmitting and receiving equipment such
as radios and televisions can affect the
operation of the microwave oven.
cleaning the microwave oven and
accessories
Remove the accessories from the combimicrowave oven and clean the oven with a
mild cleaning agent.
Switch the hot-air function on for one hour at
230 °C (see page 13). Protective greases used
during manufacture will then be removed.
remark
When the oven is heated strongly for the first
time, it will have a 'new' smell. This is normal.
Switch the extractor hood on if necessary or
open a window.
After the oven has cooled down, clean it with
warm water.
■ Press the ‘START/OK’ button to restart the
cooking programme after the door has
been opened.
■ If the ‘START/OK’ button is not pressed
within 5 minutes of selecting a cooking
programme the programme will not start.
■ A beep sounds when a button is pressed.
If no beep is heard then the button has not
been pressed firmly enough.
■ Five beeps will sound when a cooking
programme finishes.
1/3/5
2/4
30 cm
7.5 cm
7.5 cm
7.5 cm
Page 19

OPERATION
GB 13
OPERATIONGB 12
Cooking using the microwave
1 Press the ‘MICROWAVE’ button to select
the microwave function. The display
shows “P100”.
2 Press the ‘MICROWAVE’ button repeatedly
or turn the ‘TIMER/WEIGHT’ control knob
to adjust the microwave power.
3 Press the ‘START/OK’ button to confirm the
microwave power.
4 Turn the ‘TIMER/WEIGHT’ control knob.
Set the cooking time (the maximum
cooking time is 95 minutes).
5 Press the ‘START/OK’ button to start the
set programme
example:
You want to cook the dish at 80% of the
microwave power level for 20 minutes.
1 Press the ‘MICROWAVE’ button once. The
display shows “P100”. Press the
‘MICROWAVE’ button again to set the
power level to 80%. The display shows
“P80”.
2 Press the ‘START/OK’ button.
3 Turn the ‘TIMER/WEIGHT’ control knob
until the display shows “20:00” (the
maximum cooking time is 95 minutes).
4 Press the ‘START/OK’ button to start the
set programme.
microwave power level table
Power level Press the ‘MICROWAVE’ button
100% (P100) 1x
80% (P80) 2x
50% (P50) 3x
30% (P30) 4x
10% (P10) 5x
Instant cooking
1 Press the ‘START/OK’ button. Cooking will
now be for 30 seconds at a microwave
power level of 100%.
Each subsequent time you press the
‘START/OK’ button the cooking process is
extended by 30 seconds. The maximum
cooking time is 95 minutes.
1
3
2/4
Hot-air cooking
using the pre-heating function
1 Press the ‘CONVECTION’ button once. The
display shows “140”.
2 Turn the ‘TIMER/WEIGHT’. Set the desired
temperature (the temperature can be set
between 140 and 230 °C).
3 Press the ‘START/OK’ button to confirm the
temperature setting.
4 Press the ‘START/OK’ button to start the
set programme.
Two beeps will sound when the preheating temperature is achieved. The
temperature can be seen flashing in the
display.
5 Place the meal in the oven and close the
door. Turn the ‘TIMER/WEIGHT’ control
knob. Set the cooking time (the maximum
cooking time is 95 minutes).
6 Press the ‘START/OK’ button to start the
set programme.
1
2/5
3/4/6
Page 20

OPERATION
GB 15
OPERATIONGB 14
Cooking using the grill
1 Press the ‘GRILL/COMBI’ button once.
G-1 flashes.
2 Press the ‘START/OK’ button to confirm the
set programme.
3 Turn the ‘TIMER/WEIGHT’ control knob.
Set the cooking time (the maximum
cooking time is 95 minutes).
4 Press the ‘START/OK’ button to start the
set programme.
Two beeps will sound when the grilling time
reaches the halfway point. We recommend
turning the dish at this time to achieve a
better result.
Press the ‘START/OK’ button again to resume
grilling.
Hot-air cooking
without using the pre-heating function
1 Press the ‘CONVECTION’ button once. The
display shows “140”.
2 Turn the ‘TIMER/WEIGHT’ control knob.
Set the desired temperature (the
temperature can be set between 140 and
230 °C).
3 Press the ‘START/OK’ button to confirm the
temperature setting.
4 Turn the ‘TIMER/WEIGHT’ control knob.
Set the cooking time (the maximum
cooking time is 95 minutes).
5 Press the ‘START/OK’ button to start the
set programme.
1
2/5
3/4/6
1
3
2/4
Page 21

OPERATION
GB 17
OPERATIONGB 16
Combination cooking
1 Press the ‘GRILL/COMBI’ button once.
G-1 flashes.
2 Turn the ‘TIMER/WEIGHT’ control knob.
Select the desired combination
programme (C-1, C-2, C-3 or C-4).
3 Press the ‘START/OK’ button to confirm the
set programme.
4 Turn the ‘TIMER/WEIGHT’ control knob.
Set the cooking time (the maximum
cooking time is 95 minutes).
5 Press the ‘START/OK’ button to start the
set programme.
table of combinations
Instructions Display Microwave Grill Hot-air
1 C-1
■■
2 C-2 ■■
3 C-3 ■■
4 C-4 ■■■
1
3
2/4
Defrosting
by setting the weight
1 Press the ‘DEFROST’ button once. The
display shows “dEF1”.
2 Turn the ‘TIMER/WEIGHT’ control knob.
Set the desired weight (between 100 and
2,000 grams).
3 Press the ‘START/OK’ button to start the
set programme.
by setting a time
1 Press the ‘DEFROST’ button twice. The
display shows “dEF2”.
2 Turn the ‘TIMER/WEIGHT’ control knob.
Set the desired cooking time (the max.
time that you can set is 95 minutes).
3 Press the ‘START/OK’ button to start the
set programme.
1
2
3
Page 22

OPERATION
GB 19
Pre-set function
first set the clock (see the chapter entitled
“Setting the clock”)
1 Set a cooking function. A maximum of
3 functions can be set (apart from the
defrost function). When using the “Auto
menu”, only one function can be set.
2 Press the ‘CLOCK/PRE-SET’ button. The
current time is shown in the display. The
hours flash.
3 Turn the ‘TIMER/WEIGHT’ control knob.
Set the desired hours.
4 Press the ‘CLOCK/PRE-SET’ button. The
minutes flash.
5 Turn the ‘TIMER/WEIGHT’ control knob.
Set the desired minutes.
6 Press the ‘START/OK’ button to confirm the
set programme. When the set time arrives
two beeps will sound and the cooking
programme will start.
OPERATIONGB 18
Multistage cooking
You can set a maximum of 2 cooking stages.
Set the defrost function (if applicable) as the
first stage. A beep sounds after the end of
each stage and the next stage will start.
The Auto-menu cannot be used with this
mode.
example
You want to cook for 10 minutes at a
microwave power level of 100% and 5 minutes
at a microwave power level of 80%.
1 Press the ‘MICROWAVE’ button once for a
microwave power level of 100%.
2 Press the ‘START/OK’ button to confirm the
microwave power.
3 Turn the ‘TIMER/WEIGHT’ control knob.
Set the cooking time to 10 minutes.
4 Press the ‘MICROWAVE’ button twice for a
microwave power level of 80%.
5 Press the ‘START/OK’ button to confirm the
microwave power.
6 Turn the ‘TIMER/WEIGHT’ control knob.
Set the cooking time to 5 minutes.
7 Press the ‘START/OK’ button to start the
set programme.
1/4
3/6
2/5/7
6
2/4
3/5
Page 23

OPERATION
GB 21
OPERATIONGB 20
Auto menu
1 Turn the ‘TIMER/WEIGHT’ control knob.
Set the desired programme (A1, A2...A10).
2 Press the ‘START/OK’ button to confirm the
set programme.
3 Turn the ‘TIMER/WEIGHT’ control knob.
Set the desired weight or quantity.
4 Press the ‘START/OK’ button to start the
set programme.
1/3
2/4
Cooking table auto menu
Menu Weight/Quantity Display
A1
reheat
150 g 150
250 g 250
350 g 350
450 g 450
600 g 600
A2
potato
230 g 1
460 g 2
690 g 3
A3
meat
150 g 150
300 g 300
450 g 450
600 g 600
A4
vegetables
150 g 150
350 g 350
500 g 500
A5
fish
150 g 150
250 g 250
350 g 350
450 g 450
650 g 650
A6
pasta
50 g (with cold water 450 g) 50
100 g (with cold water 800 g) 100
150 g (with cold water 1200 g) 150
A7
soup
200 ml 200
400 ml 400
600 ml 600
A8
cake
475 g 475
A9
pizza
200 g 200
300 g 300
400 g 400
A10
chicken
500 g 500
750 g 750
1000 g 1000
1200 g 1200
Page 24

MAINTENANCE
GB 23
Cleaning
■ Clean the inside immediately after use.
Use a damp cloth to remove any
condensation, liquid that has boiled over
and food remains. Crumbs and liquid that
remain behind absorb microwave energy
and lengthen cooking times.
■ Clean the inside and outside of the oven
regularly using soapy water and dry it
thoroughly with a dry cloth.
■ Make sure that the microwave distributer
cover (inside the oven on the right) is
clean. A cover which is not clean may
cause sparking.
■ Clean the accessories regularly; use soapy
water and a brush and dry the accessories
thoroughly with a dry cloth. The
accessories may also be washed in a
dishwasher.
■ Odours will disappear if you put a glass of
vinegar or water with lemon juice added in
the oven space. Switch the microwave on
for two minutes on full power. Then wipe
with a damp cloth.
■ Check the door catch and the door seal
regularly for damage.
■ Do not use the combi-microwave oven if
the door or door catch are damaged.
Checking the settings
■ Press the ‘GRILL/CONV.’ or ’COMBI’ button
during cooking. The set power level is
shown on the display for 2-3 sec.
■ Press the ‘CLOCK/PRE-SET’ button while
using the pre-set function. The current
auto-start time is shown on the display for
2-3 sec.
■ Press the ‘CLOCK/PRE-SET’ button during
cooking. The time is shown on the display
for 2-3 sec.
Childproof lock
turn the childproof lock on
■ Press the ‘STOP/CLEAR’ button for
3 seconds. A “long” beep will sound. The
display shows ‘0:00’.
turn the childproof lock off
■ Press the ‘STOP/CLEAR’ button for
3 seconds. A “long” beep will sound.
OPERATIONGB 22
Page 25

ENVIRONMENTAL ASPECTSGB 25
FAULTSGB 24
Disposal of packaging and
appliance
The appliance packaging is recyclable.
The following may have been used:
■ cardboard;
■ polythene film (PE);
■ CFC-free polystyrene (PS hard foam).
Dispose of these materials responsibly and in
accordance with government regulations.
On the data plate is put the symbol of a
crossed-out wheeled dustbin:
This means that at the end of its working life,
the product must not be disposed of as urban
waste. It must be taken to a special local
authority differentiated waste collection
centre or to a dealer providing this service.
Disposing of a household appliance
separately avoids possible negative
consequences for the environment and health
deriving from inappropriate disposal and
enables the constituent materials to be
recovered to obtain significant savings in
energy and resources.
As a reminder of the need to dispose of
household appliances separately, the product
is marked with a crossed-out wheeled
dustbin.
What should I do if…
If the appliance does not work properly, this
does not always mean that it is defective. Try
to deal with the problem yourself first. Phone
the service department if the advice given
below does not help.
■ Is the plug in the socket?
■ Is the door closed properly?
■ Is the fuse in the meter cupboard
defective?
■ Have the power level and cooking time
been set properly?
■ Is there anything in the microwave oven
that should not be there?
■ Have you used the correct utensils?
■ Are the ventilation openings blocked?
■ Is the food sufficiently defrosted?
■ Did you turn or stir the food during
cooking?
General
In case of faults phone the service
department. See the guarantee certificate or
consult the internet site www.hps.nl. This
site also contains tips on how to use and
clean your microwave. You can also purchase
various cleaning products on this site.
Page 26

VOTRE MICRO-ONDES COMBINÉFR 3
Table des matières
■ Votre micro-ondes combiné . . . . . . . . . . . . . . 4
Description . . . . . . . . . . . . . . . . . . . . . . . . . . . . 4
Introduction . . . . . . . . . . . . . . . . . . . . . . . . . . . . 5
Généralités . . . . . . . . . . . . . . . . . . . . . . . . . . . . 6
■ Sécurité . . . . . . . . . . . . . . . . . . . . . . . . . . . . 7 - 9
Les points qui méritent votre attention . . . . . 7
■ Commande . . . . . . . . . . . . . . . . . . . . . . . . 10 - 22
Mise en service . . . . . . . . . . . . . . . . . . . . . . . 10
Réglage de l’heure . . . . . . . . . . . . . . . . . . . . . 11
Cuisson dans les micro-ondes . . . . . . . . . . . 12
Cuisson à air chaud . . . . . . . . . . . . . . . . . . . . 13
Cuisson au grill . . . . . . . . . . . . . . . . . . . . . . . . 15
Cuisson combinée . . . . . . . . . . . . . . . . . . . . . 16
Décongélation . . . . . . . . . . . . . . . . . . . . . . . . . 17
Cuisson en plusieurs étapes . . . . . . . . . . . . 18
Préprogrammation . . . . . . . . . . . . . . . . . . . . . 19
Menu auto . . . . . . . . . . . . . . . . . . . . . . . . . . . . 20
Tableau de cuisson pour la menu auto . . . 21
Fonction de contrôle . . . . . . . . . . . . . . . . . . . 22
Sécurité enfant . . . . . . . . . . . . . . . . . . . . . . . . 22
■ Entretien . . . . . . . . . . . . . . . . . . . . . . . . . . . . . . 23
Nettoyer . . . . . . . . . . . . . . . . . . . . . . . . . . . . . . 23
■ Pannes . . . . . . . . . . . . . . . . . . . . . . . . . . . . . . . 24
Que faire si… . . . . . . . . . . . . . . . . . . . . . . . . . 24
Généralités . . . . . . . . . . . . . . . . . . . . . . . . . . . 24
■ Environnement . . . . . . . . . . . . . . . . . . . . . . . . 25
Que faire de l'emballage et de l'appareil . . 25
■ Généralités . . . . . . . . . . . . . . . . . . . . . . . . . . . 26
Données techniques . . . . . . . . . . . . . . . . . . . 26
GENERALGB 26
Technical information
Power supply 230 V 50 Hz
Connected load 2500 W
Power microwave 900 W
Power grill 1100 W
Power hot air 2500 W
Volume oven 30 L
Weight 20 kg
Dimensions (wxhxd) 520 x 335 x 510 mm
Page 27

VOTRE MICRO-ONDES COMBINÉFR 5
Introduction
Vous avez choisi un micro-ondes combiné
Etna.
Lors de la conception, l'attention s'est surtout
portée à créer un confort d'utilisation optimal
et une commande simple.
Le four à micro-ondes réunit les propriétés
d'un micro-ondes et celles d'un four
traditionnel.
Les nombreuses possibilités de réglage
permettent de choisir avec exactitude le
mode de cuisson souhaité. La commande ne
présente pas de difficultés.
Les fonctions ont été disposées avec clarté
sur le tableau de commande. Chaque fonction
a sa propre touche. L'écran donne des
informations et vous aide à programmer.
La commande de cet appareil est simple. A
l'aide de ce mode d'emploi, nous souhaitons
donner un aperçu de toutes les possibilités de
cet appareil.
Dans le chapitre 'commande', les diverses
fonctions sont classées avec clarté. Vous y
trouverez également des conseils intéressants.
Conservez soigneusement ce mode d'emploi
pour le successeur éventuel de cet appareil.
Nous vous souhaitons bien du plaisir en
utilisant cet appareil.
VOTRE MICRO-ONDES COMBINÉFR 4
Description
tableau de
commande
temps/poids/auto-menu
grille haute
moteur
écran
Accessoires
plateau tournant support de guidage
start/OK
air chaud
grill/combination
micro-ondes
réglage de l’heure
décongélation
stop
Tableau de commande
came pour plateau
tournant
Page 28

SÉCURITÉ
FR 7
Les points qui méritent votre
attention
si vous faites cuire des grillades ou des
gâteaux
Le four est isolé de façon. Un transfert de
chaleur se produit toujours malgré tout,
chauffant ainsi le côté externe de l'appareil.
Cet échauffement est répond bien aux
exigences normes.
Lorsque qu’il fonctionne, l’appareil est
brûlant. Faites attention, ne touchez pas les
éléments chauffants.
Lors de la préparation des plats contenant de
l'alcool, l'alcool peut s'évaporer en raison des
températures élevées. La vapeur peut prendre
feu en entrant en contact avec la résistance
qui est alors chaude.
N'utilisez pas l'appareil pour ranger des
matériaux inflammables ou risquant de se
déformer un petit peu.
Veillez à ce que les mets soient toujours
suffisamment chauds. Le temps qui y est
nécessaire dépend de nombreux facteurs
comme de la quantité et de la sorte de mets.
Les bactéries qui sont éventuellement
présentes dans l'aliment ne seront éliminées
que si l'aliment est soumis pendant
10 minutes environ à une température
supérieure à 70 °C. Si vous pensez que
l'aliment n'a pas été suffisamment chauffé,
faites cuire un peu plus longtemps l'aliment.
Ne réchauffez jamais des récipients fermés.
En raison de la surpression qui se présente
dans la boîte, celle-ci risque d'exploser.
N’autorisez les enfants à utiliser le four sans
la surveillance d’un adulte que s’ils ont reçu
suffisamment de recommandations pour se
servir du four sans danger, et s’ils sont
conscients des risques encourus lors d’une
utilisation incorrecte du four.
VOTRE MICRO-ONDES COMBINÉFR 6
Généralités
Cet appareil est tout à fait sûr. Toutefois
comme pour tout produit, il y a un certain
nombre de points qui méritent votre attention.
Les réparations ne doivent être exécutées
que par un technicien compétent.
Il est dangereux pour des personnes non
qualifiées d’effectuer des réparations
nécessitant l’ouverture du boîtier de
l’appareil. Le boîtier protège contre
l'émanation de micro-énergie.
N'utilisez pas l'appareil s'il est abîmé. Si le fil
électrique est abîmé, il doit être remplacé par
le fabricant, le réparateur ou une personne
qualifiée afin d’éviter des situations
dangereuses.
En cas de réparations ou de nettoyages,
mettez l'appareil hors tension. Débranchez
l'appareil ou mettez l'interrupteur qui se
trouve sur le placard à compteurs sur zéro.
En rapport avec la sécurité électrique, ne
nettoyez pas l'appareil avec des nettoyeurs
haute pression ni avec des nettoyeurs à
vapeur.
Cet appareil a été conçu pour un usage
ménager. Ne l'utilisez que pour préparer des
mets et seulement si l'appareil a été encastré
conformément aux prescriptions.
Page 29

SÉCURITÉ
FR 9
Enlevez les accessoires de fermeture en
métal des sacs en plastique et utilisez les
plats qui sont appropriés pour le four à microondes.
Vous pouvez réchauffer des produits liquides
qui se trouvent sous des emballages
hermétiques après avoir piqué quelques petits
trous dans l'emballage. Ceci en rapport avec
l'augmentation de la pression pendant le
réchauffement.
Ne réchauffez pas plus que ce n'est
nécessaire, tenez compte du fait que la
cuisson se poursuit après arrêt de l'appareil.
Piquez un peu avec une fourchette ou autre
objet pointu dans la peau de la viande, du
poulet ou du poisson. Vous évitez ainsi
l'éclatement de ces produits.
Vous pouvez ouvrir la porte du four à microondes même s'il fonctionne. Le four va
s'arrêter de fonctionner automatiquement et
le temps programmé va s'arrêter.
Certains matériaux ne sont pas acceptables
dans le micro-ondes combiné. Le tableau cidessous vous indique les matériaux que vous
pouvez ou non utiliser.
Matériel Micro-ondes Chaleur pulsée Combination Gril
papier oui* non non non
papier d’alu oui** oui oui** oui
film étirable oui non non non
bacs en aluminium non oui non oui
service congélation/micro-ondes oui non non non
plastique résistant à la chaleur oui non non non
poterie brute non oui non oui
ustensiles de cuisine en métal non oui non oui
verre normal oui non non non
verre et céramique résistant à la
chaleur oui oui oui oui
bord décoratif métallique non oui non oui
accessoire de fermeture en métal non oui non thermomètre à mercure non oui non oui
bouteille avec goulot fin non - - sachets four oui oui oui non
* Lors de la décongélation, n'utilisez pas d'essuie-tout décoré pour couvrir un plat ou sous un pain.
** En couvrant les parties plus fines des mets (comme les cuisses de poulet), vous leur évitez de cuire trop rapidement
SÉCURITÉFR 8
pendant l'emploi du four à micro-ondes
Mettez une cuillère en plastique dans la tasse
si vous voulez porter un liquide à ébullition
(par exemple de l'eau). Le liquide peut bouillir
sans faire de bulles. Au moment où vous
sortez la tasse du four, il se peut que le
liquide se mette à bouillir fortement et
déborde de la tasse, risquant ainsi de vous
brûler.
Il faut secouer et mélanger le contenu des
biberons et des petits pots pour bébés.
Contrôlez la température avant consommation
pour éviter les brûlures.
Un four à micro-ondes n'est sûr que si la
porte se ferme bien !
Ne placez jamais d'objet entre la porte et
l'appareil. Veillez à ce que la porte et le joint
soient toujours bien propres.
Si la porte est endommagée ou si vous
détectez des détériorations au joint, il faut
attendre qu’une personne qualifiée ait réparé
le four pour l’utiliser à nouveau.
Utilisez seulement le micro-ondes pour
décongeler et préparer des aliments et non
pour sécher des vêtements ou du papier.
Ceux-ci peuvent prendre feu.
Si vous chauffez dans l'appareil des petites
quantités de produits secs ou sous forme de
poudre (sécher des épices par ex.), un risque
d'auto-inflammation peut se présenter.
En cas de flammes dans l'appareil, arrêtez le
fonctionnement de l'appareil et débranchezle. N'ouvrez pas la porte !
Ne faites pas fonctionner l'appareil à l'état
vide. Vous risquez d'abîmer le four.
N'utilisez pas l'appareil pour :
■ faire des conserves ;
■ cuire des oeufs durs ; ceux-ci éclatent en
raison de l'augmentation de la pression ;
■ chauffer de l'huile pour friture.
Page 30

Réglage de l’heure
1 Appuyez sur la touche ‘CLOCK/PRE-SET’.
Sélectionner l’affichage de 12 heures ou
de 24 heures.
2 Tournez le bouton ‘TIMER/WEIGHT’. Réglez
l’heure (entre 0-23 pour l’affichage de
24 heures/ entre 1-12 pour l’affichage de
12 heures).
3 Appuyez sur la touche ‘CLOCK/PRE-SET’.
L’affichage des minutes clignote.
4 Tournez le bouton ‘TIMER/WEIGHT’. Réglez
les minutes (entre 0-59).
5 Appuyez sur la touche ‘CLOCK/PRE-SET’.
L’heure réglée s’affiche (“:” clignote). Le
dernier horaire saisi s’affiche lorsque vous
appuyez sur ‘STOP/CLEAR’ pendant le
réglage de l’heure.
remarque
“0:00” s’affiche sur l’écran lorsque vous
branchez la fiche de l’appareil dans une prise.
COMMANDE
FR 11
COMMANDEFR 10
Mise en service
emplacement
Mettez le four micro-ondes sur une surface
solide et plate.
Veillez à une aération suffisante autour du
four à micro-ondes. Observez un espace de
30 cm en hauteur et de 7,5 cm à l'arrière et
sur les côtés.
Ne couvrez pas les volets d'aération.
Les pieds de réglage ne doivent pas être
enlevés.
Ne mettez pas le four micro-ondes à proximité
de sources de chaleur.
Des émetteurs ou des récepteurs tels que
radios et téléviseurs peuvent influencer le
fonctionnement du four micro-ondes.
nettoyer l'appareil et les accessoires
Enlevez les accessoires de l'appareil et
nettoyez avec un produit d'entretien doux.
Enclenchez la fonction 'chaleur pulsée' sur
230 °C. Laissez fonctionner pendant une
heure (voir page 13). Pendant la fabrication,
les graisses de protection utilisées seront
alors éliminées.
remarque
Lors de la première mise en marche de
l'appareil, vous remarquerez une 'odeur de
neuf'. C'est normal. Enclenchez
éventuellement la hotte aspirante ou ouvrez
une fenêtre.
Après refroidissement, nettoyez le four avec
de l'eau chaude.
■ Appuyez sur la touche ‘START/OK’ pour
redémarrer le programme de cuisson
après l’ouverture de la porte.
■ Appuyez sur la touche ‘START/OK’ au
cours des 5 minutes suivant la sélection du
programme de cuisson pour que le
programme démarre.
■ Un signal sonore retentit à chaque fois que
vous actionnez une touche. Si aucun signal
sonore ne retentit, c’est que vous n’avez
pas suffisamment appuyé sur la touche.
■ Un signal sonore retentit 5x lorsque le
programme de cuisson est terminé.
1/3/5
2/4
30 cm
7.5 cm
7.5 cm
7.5 cm
Page 31

COMMANDE
FR 13
COMMANDEFR 12
Cuisson dans les micro-ondes
1 Appuyez sur la touche ‘MICROWAVE’ pour
activer les micro-ondes. “P100” s’affiche
sur l’écran.
2 Appuyez de nouveau sur la touche
‘MICROWAVE’ ou tournez le bouton
‘TIMER/WEIGHT’. Programmez le niveau
de puissance.
3 Appuyez sur la touche ‘START/OK’ pour
confirmer le niveau de puissance.
4 Tournez le bouton ‘TIMER/WEIGHT’. Réglez
le temps de cuisson (le temps de cuisson
maximal est de 95 minutes).
5 Appuyez sur la touche ‘START/OK’ pour
démarrer le programme sélectionné.
exemple : Vous souhaitez utiliser un niveau
de puissance de 80% pour un temps de
cuisson de 20 minutes.
1 Appuyez 1x sur la touche ‘MICROWAVE’.
“P100” s’affiche sur l’écran. Appuyez une
nouvelle fois sur la touche ‘MICROWAVE’
pour programmer un niveau de puissance
de 80%. “P80” s’affiche sur l’écran.
2 Appuyez sur la touche ‘START/OK’
3 Tournez le bouton ‘TIMER/WEIGHT’ jusqu’à
ce que “20:00” s’affiche sur l’écran (le temps
de cuisson maximal est de 95 minutes).
4 Appuyez sur la touche ‘START/OK’ pour
démarrer le programme sélectionné.
tableau : réglage du niveau de puissance
Puissance Mode de pression de la
touche ‘MICROWAVE’
100% (P100) 1x
80% (P80) 2x
50% (P50) 3x
30% (P30) 4x
10% (P10) 5x
Cuisson rapide
1 Appuyez sur la touche ‘START/OK’. La
cuisson dure 30 secondes à un niveau de
puissance de 100%.
Appuyez de nouveau sur la touche
‘START/OK’ pour prolonger le processus
de cuisson de 30 secondes et répétez
l’opération si vous le souhaitez. Le temps
de cuisson maximal est de 95 minutes.
1
3
2/4
Cuisson à air chaud
avec préchauffage
1 Appuyez 1x sur la touche ‘CONVECTION’.
“140” s’affiche sur l’écran.
2 Tournez le bouton ‘TIMER/WEIGHT’.
Réglez la température souhaitée (la
température peut être réglée de 140 à
230 °C).
3 Appuyez sur la touche ‘START/OK’ pour
confirmer la température réglée.
4 Appuyez sur la touche ‘START/OK’ pour
démarrer le programme sélectionné.
Deux signaux indiquent que la
température de préchauffage a été
atteinte. La température s’affiche sur
l’écran.
5 Placer le plat dans le four et fermer la
porte. Tournez le bouton ‘TIMER/WEIGHT’.
Réglez le temps de cuisson (le temps de
cuisson maximal est de 95 minutes).
6 Appuyez sur la touche ‘START/OK’ pour
démarrer le programme sélectionné.
1
2/5
3/4/6
Page 32

COMMANDE
FR 15
COMMANDEFR 14
Cuisson à air chaud
sans préchauffage
1 Appuyez 1x sur la touche ‘CONVECTION’.
“140” s’affiche sur l’écran.
2 Tournez le bouton ‘TIMER/WEIGHT’ vers la
droite. Sélectionnez la fonction air chaud.
Réglez la température souhaitée (la
température peut être réglée de 140 à
230 °C).
3 Appuyez sur la touche ‘START/OK’ pour
confirmer la température réglée.
4 Tournez le bouton ‘TIMER/WEIGHT’. Réglez
le temps de cuisson (le temps de cuisson
maximal est de 95 minutes).
5 Appuyez sur la touche ‘START/OK’ pour
démarrer le programme sélectionné.
1
2/4
3/5
Cuisson au grill
1 Appuyez 1x sur la touche ‘GRILL/COMBI’.
G-1 clignote.
2 Appuyez sur la touche ‘START/OK’ pour
confirmer le programme sélectionné.
3 Tournez le bouton ‘TIMER/WEIGHT’. Réglez
le temps de cuisson (le temps de cuisson
maximal est de 95 minutes).
4 Appuyez sur la touche ‘START/OK’ pour
démarrer le programme sélectionné.
2 signaux retentissent lorsque la moitié du
temps de cuisson au grill s’est écoulée. Il est
conseillé de tourner le plat afin d'obtenir une
cuisson au grill optimale.
Appuyez sur la touche ‘START/OK’ pour
redémarrer le programme de cuisson au grill.
1
3
2/4
Page 33

COMMANDE
FR 17
COMMANDEFR 16
Cuisson combinée
1 Appuyez 1x sur la touche ‘GRILL/COMBI’.
G-1 clignote.
2 Tournez le bouton ‘TIMER/WEIGHT’.
Sélectionnez le programme combiné
souhaité (C-1, C-2, C-3 ou C-4).
3 Appuyez sur la touche ‘START/OK’ pour
confirmer le programme sélectionné.
4 Tournez le bouton ‘TIMER/WEIGHT’. Réglez
le temps de cuisson (le temps de cuisson
maximal est de 95 minutes).
5 Appuyez sur la touche ‘START/OK’ pour
démarrer le programme sélectionné.
tableau : cuisson combinée
I
nstruction Affichage Micro-ondes Gril Air chaud
1 C-1 ■■
2 C-2 ■■
3 C-3 ■■
4 C-4 ■■■
1
2/4
3/5
Décongélation
avec précision du poids
1 Appuyez 1x sur la touche ‘DEFROST’.
“dEF1” s’affiche sur l’écran.
2 Tournez le bouton ‘TIMER/WEIGHT’. Réglez
le temps de cuisson souhaité (entre 100 et
2000 g).
3 Appuyez sur la touche ‘START/OK’ pour
démarrer le programme sélectionné.
avec précision de la durée
1 Appuyez 2x sur la touche ‘DEFROST’.
“dEF2” s’affiche sur l’écran.
2 Tournez le bouton ‘TIMER/WEIGHT’. Réglez
le temps de cuisson (le temps de cuisson
maximal est de 95 minutes).
3 Appuyez sur la touche ‘START/OK’ pour
démarrer le programme sélectionné.
1
2
3
Page 34

COMMANDE
FR 19
Préprogrammation
réglez tout d’abord l’heure (voir le chapitre
“Réglage de l’heure”)
1 Sélectionnez une fonction de cuisson.
Vous pouvez programmer jusqu’à
3 fonctions (à l’exception de la fonction
décongélation). Menu auto permet de
programmer 1 fonction maximum.
2 Appuyez sur la touche ‘CLOCK/PRE-SET’.
L’heure actuelle s’affiche. L’affichage de
l’heure clignote.
3 Tournez le bouton ‘TIMER/WEIGHT’.
Sélectionnez les heures souhaitées.
4 Appuyez sur la touche ‘CLOCK/PRE-SET’.
L’affichage des minutes clignote.
5 Tournez le bouton ‘TIMER/WEIGHT’.
Sélectionnez les minutes souhaitées.
6 Appuyez sur la touche ‘START/OK’ pour
confirmer le programme sélectionné. Le
signal sonore retentit deux fois dès que
l’horaire programmé est atteint et le
programme de cuisson démarre.
COMMANDEFR 18
Cuisson en plusieurs étapes
Vous pouvez programmer au maximum
3 étapes de cuisson. L’étape 1 est la fonction
décongélation (dans le cas correspondant).
Un signal sonore retentit à la fin de chaque
étape et l’étape suivante commence.
Menu auto ne peut pas être utilisé pour cette
étape.
exemple
Vous souhaitez un niveau de puissance de
100% pendant 10 minutes et un niveau de
puissance de 80% pendant 5 minutes.
1 Appuyez 1x sur la touche ‘MICROWAVE’
pour un niveau de puissance de 100%.
2 Appuyez sur la touche ‘START/OK’ pour
confirmer le niveau de puissance.
3 Tournez le bouton ‘TIMER/WEIGHT’.Réglez
le temps de cuisson sur 10 minutes.
4 Appuyez 2x sur la touche ‘MICROWAVE’
pour un niveau de puissance de 80%.
5 Appuyez sur la touche ‘START/OK’ pour
confirmer le niveau de puissance.
6 Tournez le bouton ‘TIMER/WEIGHT’. Réglez
le temps de cuisson sur 5 minutes.
7 Appuyez sur la touche ‘START/OK’ pour
démarrer le programme sélectionné.
1/4
3/6
2/5/7
6
2/4
3/5
Page 35

COMMANDE
FR 21
Menu auto
1 Tournez le bouton ‘TIMER/WEIGHT’. Réglez
le programme souhaité (A1, A2...A10).
2 Appuyez sur la touche ‘START/OK’ pour
confirmer le programme sélectionné.
3 Tournez le bouton ‘TIMER/WEIGHT’. Réglez
le poids souhaité ou la quantité souhaitée.
4 Appuyez sur la touche ‘START/OK’ pour
démarrer le programme sélectionné.
COMMANDEFR 20
1/3
2/4
Tableau de cuisson pour la menu auto
Menu Poids/Quantité Écran
A1
réchauffage
150 g 150
250 g 250
350 g 350
450 g 450
600 g 600
A2
pommes de terre
230 g 1
460 g 2
690 g 3
A3
viande
150 g 150
300 g 300
450 g 450
600 g 600
A4
légumes
150 g 150
350 g 350
500 g 500
A5
poisson
150 g 150
250 g 250
350 g 350
450 g 450
650 g 650
A6
pâtes
50 g (avec de l’eau froide 450 g) 50
100 g (avec de l’eau froide 800 g) 100
150 g (avec de l’eau froide 1200 g) 150
A7
soupe
200 ml 200
400 ml 400
600 ml 600
A8
gâteau
475 g 475
A9
pizza
200 g 200
300 g 300
400 g 400
A10
poulet
500 g 500
750 g 750
1000 g 1000
1200 g 1200
Page 36

ENTRETIEN
FR 23
COMMANDEFR 22
Nettoyer
■ Nettoyez directement l'intérieur après
usage. Utilisez un chiffon humide pour
éliminer la condensation, le liquide qui a
débordé et les restes d'aliments.
Les miettes et le liquide restant absorbent
l'énergie du micro-ondes et prolongent les
temps de cuisson. Le gril peut se rabattre
ce qui vous permet de nettoyer aussi bien
le plafond que le dessus de l'élément gril.
■ Nettoyez régulièrement les faces
intérieures et extérieures ; utilisez de l'eau
mélangée à un produit de vaisselle.
Séchez ensuite correctement le four avec
un torchon sec.
■ Le recouvrement du distributeur à micro-
ondes doit être propre. Vérifiez son état de
propreté (à droite de l'enceinte du four).
Un risque d'étincelles peut se présenter
en cas d'encrassement du recouvrement.
■ Nettoyez régulièrement les accessoires ;
utilisez une brosse avec de l'eau
mélangée à un produit de vaisselle.
Séchez ensuite correctement les
accessoires avec un chiffon sec.
■ Les odeurs vont disparaître si vous mettez
un verre de vinaigre ou d'eau avec du
citron dans l'enceinte du four. Enclenchez
le four pendant 2 minutes à pleine
puissance. Essuyez ensuite à l'aide d'un
chiffon humide.
■ Contrôlez régulièrement l'état de la
fermeture de la porte et le joint de la
porte.
■ N'utilisez pas l'appareil si ces parties ne
sont pas en parfait état.
Fonction de contrôle
■ Appuyez sur la touche ‘GRILL/CONV.’ ou
’COMBI’ pendant le processus de cuisson.
Le niveau de puissance réglé s’affiche
pendant 2-3 secondes sur l’écran.
■ Appuyez sur la touche de
préprogrammation ‘CLOCK/PRE-SET’. Le
niveau de puissance réglé s’affiche
pendant 2-3 secondes sur l’écran.
■ Appuyez sur la touche ‘CLOCK/PRE-SET’
pendant le processus de cuisson. Le
niveau de puissance réglé s’affiche
pendant 2-3 secondes sur l’écran.
Sécurité enfant
activer la sécurité enfant
■ Appuyez pendant 3 secondes sur la touche
‘STOP/CLEAR’. Un ‘long’ signal sonore
retentit. “0:00” s’affiche sur l’écran.
désactiver la sécurité enfant
■ Appuyez pendant 3 secondes sur la touche
‘STOP/CLEAR’. Un ‘long’ signal sonore
retentit.
Page 37

ENVIRONNEMENT
FR 25
PANNESFR 24
Que faire de l'emballage et de
l'appareil
L'emballage de l'appareil est recyclable.
Peuvent être
utilisés :
■ le carton ;
■ le feuil de polyéthylène (PE) ;
■ le polystyrène sans CFC (polystyrène-PS).
Evacuez ces matériaux en bonne et due
forme et conformément aux dispositions
légales.
Sur la plaque signalétique porte le symbole
d'un caisson à ordures barré.
Au terme de son utilisation, le produit ne doit
pas être éliminé avec les déchets urbains.
Le produit doit être remis à l'un des centres
de collecte sélective prévus par
l'administration communale ou auprès des
revendeurs assurant ce service.
Éliminer séparément un appareil
électroménager permet d'éviter les
retombées négatives pour l'environnement et
la santé dérivant d'une élimination
incorrecte, et permet de récupérer les
matériaux qui le composent dans le but d'une
économie importante en termes d'énergie et
de ressources.
Pour rappeler l'obligation d'éliminer
séparément les appareils électroménagers, le
produit porte le symbole d'un caisson à
ordures barré.
Que faire si…
Si l'appareil ne fonctionne pas bien, ceci ne
veut pas dire forcément qu'il est en panne.
Essayez de résoudre d'abord le problème
vous-même comme suit. Appelez le service
après-vente si les conseils ci-dessous ne
vous aident pas.
■ Est-ce que l'appareil est branché ?
■ Est-ce que la porte est bien fermée ?
■ Est-ce que le fusible dans le placard à
compteurs est en panne ?
■ Est-ce que la puissance et le temps de
préparation sont bien programmés ?
■ Est-ce qu'il y a des objets dans le four à
micro-ondes qui ne doivent pas s'y
trouver ?
■ Utilisez-vous les ustensiles de cuisine
corrects ?
■ Est-ce que les ouies de ventilation sont
obstruées ?
■ Est-ce que l'aliment est suffisamment
décongelé ?
■ Avez-vous retourné ou mélangé l'aliment
pendant la préparation ?
Généralités
Les adresses et les numéros de téléphone du
service après-vente se trouvent sur la carte
de garantie. Ou consultez le site Internet
www.hps.nl. Vous trouverez également sur
ce site des astuces concernant le nettoyage
et l’utilisation. Vous pouvez aussi y
commander divers produits nettoyants.
Page 38

IHR KOMBI-MIKROWELLENGERÄTDE 3
Inhalt
■ Ihr Kombi-Mikrowellengerät . . . . . . . . . . . . . 4
Beschreibung . . . . . . . . . . . . . . . . . . . . . . . . . . 4
Einleitung . . . . . . . . . . . . . . . . . . . . . . . . . . . . . . 5
Allgemein . . . . . . . . . . . . . . . . . . . . . . . . . . . . . . 6
■ Sicherheit . . . . . . . . . . . . . . . . . . . . . . . . . . . 7 - 9
Worauf Sie achten müssen . . . . . . . . . . . . . . 7
■ Bedienung . . . . . . . . . . . . . . . . . . . . . . . . 10 - 22
Inbetriebnahme . . . . . . . . . . . . . . . . . . . . . . . . 10
Uhrzeit einstellen . . . . . . . . . . . . . . . . . . . . . . 11
Kochen in der Mikrowelle . . . . . . . . . . . . . . . 12
Kochen mit Heißluft . . . . . . . . . . . . . . . . . . . . 13
Garen mit Grill . . . . . . . . . . . . . . . . . . . . . . . . . 15
Combi-Kochen . . . . . . . . . . . . . . . . . . . . . . . . . 16
Auftauen . . . . . . . . . . . . . . . . . . . . . . . . . . . . . . 17
Garen in mehreren Stufen . . . . . . . . . . . . . . 18
Vorprogrammieren . . . . . . . . . . . . . . . . . . . . . 19
Auto-Menü . . . . . . . . . . . . . . . . . . . . . . . . . . . . 20
Gartabelle Auto-Menü . . . . . . . . . . . . . . . . . . 21
Kontrollfunktion . . . . . . . . . . . . . . . . . . . . . . . . 22
Kindersicherung . . . . . . . . . . . . . . . . . . . . . . . 22
■ Pflege . . . . . . . . . . . . . . . . . . . . . . . . . . . . . . . . 23
Reinigen . . . . . . . . . . . . . . . . . . . . . . . . . . . . . . 23
■ Störungen . . . . . . . . . . . . . . . . . . . . . . . . . . . . 24
Was ist, wenn… . . . . . . . . . . . . . . . . . . . . . . . 24
Algemein . . . . . . . . . . . . . . . . . . . . . . . . . . . . . 24
■ Umweltaspekte . . . . . . . . . . . . . . . . . . . . . . . 25
Entsorgen von Verpackung und Gerät . . . . 25
■ Allgemein . . . . . . . . . . . . . . . . . . . . . . . . . . . . 26
Technische Daten . . . . . . . . . . . . . . . . . . . . . . 26
GÉNÉRALITÉSFR 26
Données techniques
Alimentation 230 V 50 Hz
Puissance 2500 W
Puissance micro-ondes 900 W
Puissance gril 1100 W
Puissance four à air chaud 2500 W
Contenance du four 30 L
Poids 20 kg
Dimensions (lxhxp) 520 x 335 x 510 mm
Page 39

IHR KOMBI-MIKROWELLENGERÄTDE 5
Einleitung
Ihre Wahl ist auf ein Mikrowellengerät von
Etna gefallen. Optimaler Gebrauchskomfort
und einfache Bedienung hatten bei der
Entwicklung dieses Produktes Priorität.
Das Kombi-Mikrowellengerät vereinigt die
Eigenschaften eines Mikrowellengerätes mit
denen eines traditionellen Backofens.
Mit den umfassenden Einstellmöglichkeiten
kann die gewünschte Zubereitungsweise
gewählt werden. Die Bedienung ist trotzdem
einfach.
Die Funktionen sind in logischer Reihenfolge
auf der Bedienungsblende untergebracht.
Jede Funktion hat ihre eigene Taste. Das
Display informiert Sie und hilft Ihnen bei der
Einstellung.
Die Bedienung dieses Mikrowellengerätes ist
einfach. Mit dieser Anleitung möchten wir vor
allem Einblick in alle Möglichkeiten dieses
Gerätes bieten.
Im Kapitel Bedienung sind die jeweiligen
Funktionen übersichtlich angeordnet. Auch
nützliche Tips finden Sie dort.
Heben Sie diese Anleitung sorgfältig auf.
Auch für einen Nachbenutzer des Gerätes
kann sie von Nutzen sein.
Viel Spaß beim Kochen!
IHR KOMBI-MIKROWELLENGERÄTDE 4
Beschreibung
Bedienungsblende
Zeit/Gewicht/Auto-Menü
Hoher Rost
Antrieb
Display
Zubehör
Drehteller Führungsring
Start/OK
Heißluft
Grill/Combi
Mikrowelle
Uhr
Auftauen
Stop
Bedienungsblende
Nocken für Drehteller
Page 40

SICHERHEIT
DE 7
Worauf Sie achten müssen
beim Grillen oder Backen
Das Gerät ist isoliert. Trotzdem findet immer
Wärmeübertragung statt, bei der die
Außenseite des Gerätes warm wird. Diese
Erwärmung entspricht den Normen.
Das Gerät wird bei der Benutzung heiß. Seien
Sie vorsichtig und berühren Sie nicht die
Heizelemente.
Bei der Zubereitung von Speisen mit
alkoholischen Getränken kann der Alkohol
durch die hohen Temperaturen verdampfen.
Der Dampf kann sich bei Kontakt mit einem
Heizelement entzünden.
Benutzen Sie das Kombi-Mikrowellengerät
nicht zum Lagern von brennbaren oder leicht
verformbaren Materialien.
Sorgen Sie dafür, daß die Speisen immer
ausreichend erhitzt werden. Die dafür
erforderliche Zeit hängt von vielen Faktoren
ab, wie Menge und Art der Speisen. Die
eventuell in den Speisen vorhandenen Keime
werden nur abgetötet, wenn die Speise bei
einer Temperatur oberhalb 70 °C mindestens
10 Minuten erhitzt wird. Wenn Sie nicht sicher
sind, ob die Speise genügend erhitzt wurde,
lassen Sie sie vorsichtshalber etwas länger
garen.
Erwärmen Sie nie geschlossene
Konservendosen. In der Dose entsteht ein
Überdruck, wodurch sie platzen kann.
Kindern darf die Benutzung des Gerätes
unbeaufsichtigt nur überlassen werden, wenn
sie die Anweisungen für die richtige
Benutzung und die Gefahren bei
unsachgemäßer Benutzung des Gerätes
kennen.
IHR KOMBI-MIKROWELLENGERÄT
DE 6
Allgemein
Dieses Kombi-Mikrowellengerät ist äußerst
sicher. Doch ist wie bei jedem Produkt einiges
zu beachten.
Reparaturen dürfen nur von einem
autorisierten Kundendienst-Techniker
durchgeführt werden.
Es ist gefährlich für Unbefugte, Reparaturen
am Gerät durchzuführen, bei denen das
Gehäuse geöffnet werden muss. Das Gehäuse
schützt vor frei werdender Mikroenergie.
Nehmen Sie das Gerät bei Beschädigung
nicht in Betrieb. Ein beschädigtes Kabel ist
vom Hersteller, Kundendiensttechniker oder
einer befugten Person auszutauschen. Damit
werden Gefahren ausgeschlossen.
Das Gerät ist bei Reparaturen oder zu
Reinigungszwecken spannungslos zu machen.
Ziehen Sie hierzu den Stecker aus der
Steckdose oder stellen Sie den Schalter im
Sicherungskasten auf Null.
Im Zusammenhang mit der elektrischen
Sicherheit ist die Verwendung von
Hochdruckreinigern oder Dampfstrahlreinigern untersagt.
Dieses Kombi-Mikrowellengerät ist für den
gedachten Zweck zu benutzen, und zwar zum
Zubereiten und Erwärmen von Speisen und
nur dann, wenn es vorschriftsmäßig
eingebaut ist.
Page 41

SICHERHEIT
DE 9
Entfernen Sie Metallverschlüsse von
Plastikbeuteln und benutzen Sie Schalen und
Schüsseln, die für Mikrowellengeräte
geeignet sind.
Flüssigkeit in Vakuumpackung darf nur
aufgewärmt werden, wenn die Packung an
mehreren Stellen eingestochen wird. Der
Druck nimmt nämlich beim Erwärmen zu.
Erwärmen Sie nie länger als unbedingt nötig.
Berücksichtigen Sie eine Nachgarzeit.
Mit einer Gabel oder einem anderen spitzen
Gegenstand kurz in die Haut von Fleisch,
Geflügel oder Fisch stechen, um zu
vermeiden, dass Saft aus dem Gericht spritzt.
Wenn die Tür bei eingeschaltetem
Mikrowellengerät geöffnet wird, schaltet sich
das Gerät automatisch aus und die
eingestellte Zeit wird unterbrochen.
Nicht jedes Material ist für die Mikrowelle
geeignet. In nachstehender Tabelle ist
angegeben, welche Materialien benutzt und
welche nicht benutzt werden können.
Material Mikrowelle Heißluft Kombi Grill
Papier ja* nein nein nein
Alufolie ja** ja ja** ja
Haushaltsfolie ja nein nein nein
Alubehälter nein ja nein ja
Tiefkühl-/Mikrowellen-Geschirr ja nein nein nein
Hitzebeständiger Kunststoff ja nein nein nein
unglasierte Keramik nein ja nein ja
Metallkochgerät nein ja nein ja
Normalglas ja nein nein nein
Feuerfestes Glas und
Keramik ja ja ja ja
Metallhaltiger Zierrand nein ja nein ja
Metall-Verschlüsse nein ja nein n.z.
Quecksilber-Thermometer nein ja nein ja
Flasche mit schmalem Hals nein n.z. n.z. n.z.
Bratbeutel ja ja ja nein
* Benutzen Sie zum Bedecken einer Schale oder unter Brot beim Auftauen kein Haushaltspapier mit Dekor.
** Wenn Sie dünnere Teile von Speisen (z.B. Hähnchenkeulen) abdecken, wird ein zu schnelles Garen vermieden.
SICHERHEITDE 8
bei Betrieb des Mikrowellengerätes
Zum Kochen von Flüssigkeit (Wasser z.B.)
einen Plastiklöffel in die Tasse geben.
Flüssigkeiten, die im Mikrowellengerät zum
Kochen gebracht werden, können den
Siedepunkt ohne sichtbare Luftbläschen in
der Flüssigkeit erreichen. Dies kann zur Folge
haben, daß die Flüssigkeit beim
Herausnehmen aus dem Mikrowellengerät
plötzlich überkocht, so daß Verbrennungsgefahr besteht.
Der Inhalt von Saugflaschen und
Babynahrungstöpfchen muss geschüttelt und
umgerührt werden. Kontrollieren Sie die
Verzehrtemperatur, um Verbrennungen zu
vermeiden.
Ein Mikrowellengerät ist nur bei gut
schließender Tür sicher!
Legen Sie niemals einen Gegenstand
zwischen die Tür des Kombi-Mikrowellengerätes. Und sorgen Sie dafür, daß Tür und
Dichtung immer sauber sind.
Bei beschädigter Tür oder bei
Beschädigungen an der Dichtung darf das
Gerät nicht benutzt werden. Sie muss erst von
einer befugten Person repariert werden.
Benutzen Sie das Gerät nur zum Auftauen und
Zubereiten von Speisen und nicht
beispielsweise zum Trocknen von Kleidung
oder Papier. Sie können sich entzünden.
Wenn Sie kleine Mengen trockner oder
pulverförmiger Produkte im Gerät erhitzen
(Trocknen von Gewürzen), so besteht die
Gefahr der Selbstentzündung.
Schalten Sie das Gerät aus und ziehen Sie
den Stecker, wenn das Gerät Feuer fängt. Die
Tür muss dann geschlossen bleiben.
Schalten Sie das Mikrowellengerät nicht ein,
wenn es leer ist. Dies kann zu
Beschädigungen des Gerätes führen.
Das Mikrowellengerät ist nicht geeignet zum:
■ Einmachen;
■ Kochen von Eiern in der Schale, da diese
durch die Druckzunahme platzen;
■ Erhitzen von Fritieröl.
Page 42

Uhrzeit einstellen
1 Die Taste ‘CLOCK/PRE-SET’ drücken.
Zwischen 12-/24-Tageszeituhr wählen.
2 Das Drehrad ‘TIMER/WEIGHT’ drehen. Die
Stunden einstellen (zwischen 0-23 bei
24-Stundenanzeige/ zwischen 1-12 bei
12-Stundenanzeige).
3 Die Taste ‘CLOCK/PRE-SET’ drücken. Die
Minutenanzeige blinkt.
4 Das Drehrad ‘TIMER/WEIGHT’ drehen. Die
Minuten einstellen (zwischen 0-59).
5 Die Taste ‘CLOCK/PRE-SET’ drücken. Die
eingestellte Zeit wird wiedergegeben
(“:” blinkt). Wenn Sie während des Stellens
der Uhrzeit auf ‘STOP/CLEAR’ drücken,
wird die zuletzt eingegebene Uhrzeit
angezeigt.
Bemerkung
Wenn der Stecker vom Gerät in die Steckdose
gesteckt wird, erscheint auf dem Display
“0:00”.
BEDIENUNG
DE 11
BEDIENUNGDE 10
Inbetriebnahme
Aufstellung
Stellen Sie das Mikrowellengerät auf einem
stabilen und flachen Untergrund auf.
Sorgen Sie für ausreichende Lüftung rund um
das Mikrowellengerät. Oben ist für 30 cm
Freiraum zu sorgen. Das Gerät muß an der
Rückwand und an den Seiten mindestens
7,5 cm Freiraum haben.
Decken Sie die Lüftungsschlitze nicht ab.
Die Stellfüße dürfen nicht entfernt werden.
Stellen Sie das Gerät nicht in der Nähe von
Wärmequellen auf.
Sender und Empfänger wie Radios und
Fernseher können die Funktion des Gerätes
beeinflussen.
Mikrowellengerät und Zubehör reinigen
Nehmen Sie das Zubehör aus dem Backofen
heraus und reinigen Sie es mit einem milden
Reinigungsmittel.
Schalten Sie jetzt bei 230 °C (siehe S. 13)
1 Stunde die Heißluftfunktion ein. Bei der
Herstellung benutzte Schutzfette werden dann
entfernt.
Hinweis
Bei erstmaliger starker Erhitzung des Gerätes
tritt Geruchsentwicklung auf ('Neugeruch').
Das ist normal. Schalten Sie eventuell die
Dunstabzugshaube ein oder öffnen Sie ein
Fenster.
Säubern Sie das Gerät nach dem Abkühlen
mit warmem Wasser.
■ Die Taste ‘START/OK’ drücken, um das
Kochprogramm nach dem Öffnen der Tür
wiederum zu starten.
■ Wenn ein Kochprogramm gewählt wurde,
muss die Taste ‘START/OK’ innerhalb von 5
Minuten betätigt werden, andernfalls
startet das Programm nicht.
■ Wenn eine Taste bedient wird, erklingt ein
Signalton. Erklingt kein Signalton, dann ist
die Taste nicht kräftig genug gedrückt
worden.
■ Wenn das Kochprogramm beendet ist,
erklingt 5x ein Signalton.
1/3/5
2/4
30 cm
7.5 cm
7.5 cm
7.5 cm
Page 43

BEDIENUNG
DE 13
BEDIENUNGDE 12
Kochen in der Mikrowelle
1 Die Taste ‘MICROWAVE’ drücken, um die
Mikrowelle zu aktivieren. Im Display
erscheint “P100”.
2 Die Taste ‘MICROWAVE’ nacheinander
drücken oder das Drehrad
‘TIMER/WEIGHT’ drehen. Die
Mikrowellenleistung einstellen.
3 Die Taste ‘START/OK’ drücken, um die
eingestellte Mikrowellenleistung zu
bestätigen.
4 Das Drehrad ‘TIMER/WEIGHT’ drehen.Die
Garzeit einstellen (die maximale Garzeit ist
95 Minuten).
5 Die Taste ‘START/OK’ drücken, um das
eingestellte Programm zu starten.
Beispiel:
Sie wollen 80% der Mikrowellenleistung und
eine Garzeit von 20 Minuten.
1 1x auf die Taste ‘MICROWAVE’ drücken. Im
Display erscheint “P100”. Nochmals die
Taste ‘MICROWAVE’ drücken, um 80% der
Leistung einzustellen. Im Display erscheint
“P80”.
2 Die Taste ‘START/OK’ drücken,
3 Das Drehrad ‘TIMER/WEIGHT’ drehen, bis
auf dem Display “20:00” erscheint (die
maximale Garzeit ist 95 Minuten).
4 Die Taste ‘START/OK’ drücken, um das
eingestellte Programm zu starten.
Tabelle Leistungsstufe Mikrowelle einstellen
Leistung Druckbedienung der Taste
‘MICROWAVE’
100%(P1OO) 1x
80% (P80) 2x
50% (P50) 3x
30% (P30) 4x
10% (P10) 5x
Schnellkochen
1 Die Taste ‘START/OK’ drücken. Sie kochen
30 Sekunden mit 100%
Mikrowellenleistung.
Mit jedem weiteren Druck auf die Taste
‘START/OK’ wird der Garvorgang um 30
Sekunden verlängert. Die maximale
Garzeit beträgt 95 Minuten.
1
3
2/4
Kochen mit Heißluft
mit Vorwärmen
1 1x auf die Taste ‘CONVECTION’ drücken.
Im Display erscheint “140”.
2 Das Drehrad ‘TIMER/WEIGHT’ nach rechts
drehen. Die Heißluftfunktion wählen. Die
gewünschte Temperatur einstellen (die
Temperatur kann von 140 bis 230 °C
eingestellt werden).
3 Die Taste ‘START/OK’ drücken, um die
eingestellte Temperatur zu wählen.
4 Die Taste ‘START/OK’ drücken, um das
eingestellte Programm zu starten.
Zwei Signaltöne geben an, dass die
Vorwärmtemperatur erreicht ist. Die
Temperatur leuchtet im Display auf.
5 Das Gericht in den Ofen stellen und die
Tür schließen. Das Drehrad
‘TIMER/WEIGHT’ drehen. Die Garzeit
einstellen (die maximale Garzeit ist
95 Minuten).
6 Die Taste ‘START/OK’ drücken, um das
eingestellte Programm zu starten.
1
2/5
3/4/6
Page 44

BEDIENUNG
DE 15
BEDIENUNGDE 14
Garen mit Grill
1 1x auf die Taste ‘GRILL/COMBI’ drücken.
G-1 blinkt.
2 Die Taste ‘START/OK’ drücken, um das
eingestellte Programm zu wählen.
3 Das Drehrad ‘TIMER/WEIGHT’ drehen. Die
Garzeit einstellen (die maximale Garzeit ist
95 Minuten).
4 Die Taste ‘START/OK’ drücken, um das
eingestellte Programm zu starten.
Wenn die halbe Grillzeit vorbei ist, erklingen
2 Signaltöne. Für ein optimales Grillergebnis
sollte das Gericht nun umgedreht werden.
Die Taste ‘START/OK’ drücken, um das Grillen
wiederum zu starten.
Kochen mit Heißluft
ohne Vorwärmen
1 1x auf die Taste ‘CONVECTION’ drücken.
Im Display erscheint “140”.
2 Das Drehrad ‘TIMER/WEIGHT’ nach rechts
drehen. Die Heißluftfunktion wählen. Die
gewünschte Temperatur einstellen (die
Temperatur kann von 140 bis 230 °C
eingestellt werden).
3 Die Taste ‘START/OK’ drücken, um die
eingestellte Temperatur zu wählen.
4 Das Drehrad ‘TIMER/WEIGHT’ drehen. Die
Garzeit einstellen (die maximale Garzeit ist
95 Minuten).
5 Die Taste ‘START/OK’ drücken, um das
eingestellte Programm zu starten.
1
2/4
3/5
1
3
2/4
Page 45

BEDIENUNG
DE 17
BEDIENUNGDE 16
Kombi-Kochen
1 1x auf die Taste ‘GRILL/COMBI’ drücken.
G-1 blinkt.
2 Das Drehrad ‘TIMER/WEIGHT’. Das
gewünschte Kombi-Programm einstellen
(C-1, C-2, C-3 oder C-4).
3 Die Taste ‘START/OK’ drücken, um das
eingestellte Programm zu wählen.
4 Das Drehrad ‘TIMER/WEIGHT’ drehen. Die
Garzeit einstellen (die maximale Garzeit ist
95 Minuten).
5 Die Taste ‘START/OK’ drücken, um das
eingestellte Programm zu starten.
Tabelle für Kombi-Kochen
Anweisung Anzeige Mikrowelle Grill Heißluft
1 C-1
■■
2 C-2 ■■
3 C-3 ■■
4 C-4 ■■■
1
2/4
3/5
Auftauen
mit Gewichtsvorgabe
1 1x auf die Taste ‘DEFROST’ drücken. Im
Display erscheint “dEF1”.
2 Das Drehrad ‘TIMER/WEIGHT’ drehen. Das
gewünschte Gewicht einstellen (zwischen
100 und 2000 g).
3 Die Taste ‘START/OK’ drücken, um das
eingestellte Programm zu starten.
mit Zeitvorgabe
1 2x auf die Taste ‘DEFROST’ drücken. Im
Display erscheint “dEF2”.
2 Das Drehrad ‘TIMER/WEIGHT’ drehen. Die
gewünschte Garzeit einstellen (maximale
Garzeit 95 Minuten).
3 Die Taste ‘START/OK’ drücken, um das
eingestellte Programm zu starten.
1
2
3
Page 46

BEDIENUNG
DE 19
Vorprogrammieren
erst die Schaltuhr einstellen (siehe Kapitel
“Uhrzeit einstellen”)
1 Eine Garfunktion wählen. Es können bis zu
3 Funktionen eingestellt werden (mit
Ausnahme der Auftaustufe). Bei “AutoMenü” kann maximal 1 Funktion eingestellt
werden.
2 Die Taste ‘CLOCK/PRE-SET’ drücken. Die
aktuelle Uhrzeit wird angezeigt. Die
Uhrzeitangabe blinkt.
3 Das Drehrad ‘TIMER/WEIGHT’ drehen. Die
gewünschten Stunden einstellen.
4 Die Taste ‘CLOCK/PRE-SET’ drücken. Die
Minutenanzeige blinkt.
5 Das Drehrad ‘TIMER/WEIGHT’ drehen. Die
gewünschten Minuten einstellen.
6 Die Taste ‘START/OK’ drücken, um das
eingestellte Programm zu wählen. Sobald
die eingestellte Zeit erreicht ist, ertönt
zweimal der Signalton und startet das
Garprogramm.
BEDIENUNGDE 18
Garen in mehreren Stufen
Sie können maximal 3 Garstufen einstellen.
Stufe 1 ist die Auftaufunktion (sofern
zutreffend). Nach jeder Stufe erklingt ein
Signalton und fängt die nächste Stufe an.
Auto-Menü kann in dieser Stufe nicht
verwendet werden.
Beispiel
Sie wollen 10 Minuten 100% Mikrowellenleistung und 5 Minuten 80% Mikrowellenleistung.
1 1x die Taste ‘MICROWAVE’ drücken für
100% Mikrowellenleistung.
2 Die Taste ‘START/OK’ drücken, um die
eingestellte Mikrowellenleistung zu
bestätigen.
3 Das Drehrad ‘TIMER/WEIGHT’ drehen. Die
Garzeit auf 10 Minuten einstellen.
4 2x die Taste ‘MICROWAVE’ drücken für
80% Mikrowellenleistung.
5 Die Taste ‘START/OK’ drücken, um die
eingestellte Mikrowellenleistung zu
bestätigen.
6 Das Drehrad ‘TIMER/WEIGHT’ drehen. Die
Garzeit auf 5 Minuten einstellen.
7 Die Taste ‘START/OK’ drücken, um das
eingestellte Programm zu starten.
1/4
3/6
2/5/7
6
2/4
3/5
Page 47

BEDIENUNG
DE 21
Auto-Menü
1 Das Drehrad ‘TIMER/WEIGHT’ nach rechts
drehen. Das gewünschte Programm
einstellen (A1, A2...A10).
2 Die Taste ‘START/OK’ drücken, um das
eingestellte Programm zu wählen.
3 Das Drehrad ‘TIMER/WEIGHT’ drehen. Das
gewünschte Gewicht oder die gewünschte
Menge einstellen.
4 Die Taste ‘START/OK’ drücken, um das
eingestellte Programm zu starten.
BEDIENUNGDE 20
1/3
2/4
Gartabelle Auto-Menü
Menu Gewicht/Menge Display
A1
Aufwärmen
150 g 150
250 g 250
350 g 350
450 g 450
600 g 600
A2
Kartoffeln
230 g 1
460 g 2
690 g 3
A3
Fleisch
150 g 150
300 g 300
450 g 450
600 g 600
A4
Gemüse
150 g 150
350 g 350
500 g 500
A5
Fisch
150 g 150
250 g 250
350 g 350
450 g 450
650 g 650
A6
Teigwaren
50 g (mit kaltem Wasser 450 g) 50
100 g (mit kaltem Wasser 800 g) 100
150 g (mit kaltem Wasser 1200 g) 150
A7
Suppe
200 ml 200
400 ml 400
600 ml 600
A8
Kuchen
475 g 475
A9
Pizza
200 g 200
300 g 300
400 g 400
A10
Geflügel
500 g 500
750 g 750
1000 g 1000
1200 g 1200
Page 48

PFLEGE
DE 23
Reinigen
■ Reinigen Sie die Innenseite gleich nach
Gebrauch. Benutzen Sie dazu ein feuchtes
Tuch, um Kondenswasser, übergekochte
Feuchtigkeit und Lebensmittelreste zu
entfernen. Zurückgebliebene Krümel und
Feuchtigkeit absorbieren Mikrowellenenergie und verlängern die Garzeiten.
■ Reinigen Sie die Innen- und Außenseite
regelmäßig mit Wasser und etwas
Spülmittel. Trocknen Sie den Innenraum
mit einem trocknen Tuch gut aus.
■ Sorgen Sie dafür, daß die Abdeckung des
Mikrowellenverteilers (im Garraum rechts)
sauber ist. Eine Verschmutzung der
Abdeckung kann zu Funkenbildung führen.
■ Reinigen Sie das Zubehör regelmäßig.
Benutzen Sie dazu Wasser mit etwas
Spülmittel und eine Bürste. Trocknen Sie
das Zubehör mit einem trocknen Tuch gut
ab. Das Zubehör kann auch im
Geschirrspüler gereinigt werden.
■ Gerüche verschwinden, wenn Sie ein Glas
Essig oder Wasser mit Zitrone in den
Garraum stellen. Schalten Sie das
Mikrowellengerät zwei Minuten bei voller
Leistung ein. Dann mit einem feuchten
Tuch abwischen.
■ Kontrollieren Sie den Türverschluß und die
Türgummidichtung regelmäßig auf
Beschädigungen.
■ Benutzen Sie das Kombi-Mikrowellengerät
nicht, wenn die Tür oder der Türverschluß
beschädigt sind.
Kontrollfunktion
■ Während des Garvorgangs auf die Taste
‘GRILL/CONV.’ oder ’COMBI’ drücken. Die
eingestellte Leistungsstufe erscheint
2-3 Sekunden im Display.
■ Die Vorprogrammiertaste ‘CLOCK/PRE-SET’
drücken. Die eingestellte Leistungsstufe
erscheint 2-3 Sekunden im Display.
■ Während des gar Vorgangs die Taste
‘CLOCK/PRE-SET’ drücken.Die eingestellte
Leistungsstufe erscheint 2-3 Sekunden im
Display.
Kindersicherung
Kindersicherung einschalten
■ 3 Sekunden die Taste ‘STOP/CLEAR’
drücken. Ein ‘langer’ Signalton erklingt. Im
Display erscheint “0:00”.
Kindersicherung ausschalten
■ 3 Sekunden die Taste ‘STOP/CLEAR’
drücken. Ein ‘langer’ Signalton erklingt.
BEDIENUNGDE 22
Page 49

UMWELTASPEKTE
DE 25
STÖRUNGENDE 24
Entsorgen von Verpackung und
Gerät
Die Verpackung des Gerätes ist wiederverwertbar. Folgendes kann benutzt worden
sein:
■ Pappe;
■ Polyethylenfolie (PE);
■ FKW-freies Polystyrol (PS-Hartschaum).
Diese Materialien sind umweltgerecht und nach
den geltenden behördlichen Vorschriften zu
entsorgen.
Das Typenschild ist gekennzeichnet mit einer
Mülltonne, die durchgestrichen ist.
Dies bedeutet das am Ende seiner Nutzzeit das
Produkt NICHT zusammen mit dem
Siedlungsabfall beseitigt werden darf. Es kann
zu den eigens von den städtischen Behörden
eingerichteten Sammelstellen oder zu den
Fachhändlern, die einen Rücknahmeservice
anbieten, gebracht werden.
Die getrennte Entsorgung eines
Haushaltsgerätes vermeidet mögliche negative
Auswirkungen auf die Umwelt und die
menschliche Gesundheit, die durch eine nicht
vorschriftsmäßige Entsorgung bedingt sind.
Zudem ermöglicht wird die Wiederverwertung
der Materialien, aus denen sich das Gerät
zusammensetzt, was wiederum eine
bedeutende Einsparung an Energie und
Ressourcen mit sich bringt.
Zur Erinnerung an die Verpflichtung, die
Elektrohaushaltsgeräte getrennt zu beseitigen,
ist das Produkt mit einer Mülltonne, die
durchgestrichen ist, gekennzeichnet.
Was ist, wenn…
Wenn das Geräte nicht einwandfrei
funktioniert, bedeutet dies nicht immer, daß
es defekt ist. Versuchen Sie die Störung erst
selbst zu beheben. Rufen Sie den Kundendienst, wenn folgende Hinweise keine Abhilfe
schaffen.
■ Ist der Stecker in der Steckdose?
■ Ist die Tür gut geschlossen?
■ Ist die Sicherung im Sicherungsschrank
defekt?
■ Sind Leistungsstufe und Zubereitungszeit
gut eingestellt?
■ Sind Gegenstände im Gerät, die dort nicht
hingehören?
■ Haben Sie das richtige Küchengerät
benutzt?
■ Sind die Lüftungsschlitze verstopft?
■ Ist die Speise genug aufgetaut?
■ Haben Sie die Speise während der
Zubereitung gewendet oder umgerührt?
Algemein
Ziehen Sie zu Rate bei den Kundendienst.
Siehe dazu mitgelieferte Garantieschein oder
die Internetseite www.hps.nl. Auf dieser
Seite sind auch Reinigungs- und Benutzertipps zu finden Über diese Site können Sie
auch verschiedene Reinigungsmittel bestellen.
Page 50

DE 27
ALLGEMEINDE 26
Technische Daten
Netzspannung 230 V 50 Hz
Anschlußwert 2500 W
Mikrowellenleistung 900 W
Leistung Grill 1100 W
Leistung Heißluft 2500 W
Inhalt Ofen 30 L
Gewicht 20 kg
Abmessungen (BxHxT) 520 x 335 x 510 mm
 Loading...