

Page 1

Lighting Playback Controller
QuickGuide
Version 3.1
Page 2

ii
Page 3

Contents
Introduction
Introduction . . . . . . . . . . . . . . . . . . . . . . . . . . . . . . . . . . . . . . . . . . . . . . . . . . .1
IntroductionIntroduction
Getting started
Getting started. . . . . . . . . . . . . . . . . . . . . . . . . . . . . . . . . . . . . . . . . . . . . . . . .2
Getting startedGetting started
Mounting the LPC
Mounting the LPC . . . . . . . . . . . . . . . . . . . . . . . . . . . . . . . . . . . . . . . . . . . . . .2
Mounting the LPCMounting the LPC
Rack mounting . . . . . . . . . . . . . . . . . . . . . . . . . . . . . . . . . . . . . . . . . . . . . . . .3
Mount on a horizontal or along a vertical surface . . . . . . . . . . . . . . . . . . . . . .4
Mounting beneath a horizontal surface . . . . . . . . . . . . . . . . . . . . . . . . . . . . .4
Cabling . . . . . . . . . . . . . . . . . . . . . . . . . . . . . . . . . . . . . . . . . . . . . . . . . . . . . .5
Power supply . . . . . . . . . . . . . . . . . . . . . . . . . . . . . . . . . . . . . . . . . . . . . . . . .5
Dimmers . . . . . . . . . . . . . . . . . . . . . . . . . . . . . . . . . . . . . . . . . . . . . . . . . . . .5
Accessories . . . . . . . . . . . . . . . . . . . . . . . . . . . . . . . . . . . . . . . . . . . . . . . . . .5
Express
Lighting Playback Controller
QuickGuide
Version 3.1
Front panel
Front panel . . . . . . . . . . . . . . . . . . . . . . . . . . . . . . . . . . . . . . . . . . . . . . . . . . . .6
Front panelFront panel
Features . . . . . . . . . . . . . . . . . . . . . . . . . . . . . . . . . . . . . . . . . . . . . . . . . . . . .6
Producing shows for the Express LPC
Producing shows for the Express LPC . . . . . . . . . . . . . . . . . . . . . . . . . .6
Producing shows for the Express LPCProducing shows for the Express LPC
LPC operation
LPC operation . . . . . . . . . . . . . . . . . . . . . . . . . . . . . . . . . . . . . . . . . . . . . . . . .7
LPC operationLPC operation
Reading a showfile . . . . . . . . . . . . . . . . . . . . . . . . . . . . . . . . . . . . . . . . . . . . .7
Macro control . . . . . . . . . . . . . . . . . . . . . . . . . . . . . . . . . . . . . . . . . . . . . . . . .7
Autocontrols . . . . . . . . . . . . . . . . . . . . . . . . . . . . . . . . . . . . . . . . . . . . . . . . . .8
Interfacing with external devices
Interfacing with external devices . . . . . . . . . . . . . . . . . . . . . . . . . . . . . .9
Interfacing with external devicesInterfacing with external devices
ETCNet . . . . . . . . . . . . . . . . . . . . . . . . . . . . . . . . . . . . . . . . . . . . . . . . . . . . . .9
Remote Trigger . . . . . . . . . . . . . . . . . . . . . . . . . . . . . . . . . . . . . . . . . . . . . . .9
MIDI Show Control / ETC MIDI . . . . . . . . . . . . . . . . . . . . . . . . . . . . . . . . . . .9
MIDI time code programs . . . . . . . . . . . . . . . . . . . . . . . . . . . . . . . . . . . . . .10
Printer . . . . . . . . . . . . . . . . . . . . . . . . . . . . . . . . . . . . . . . . . . . . . . . . . . . . . .10
Serial interface . . . . . . . . . . . . . . . . . . . . . . . . . . . . . . . . . . . . . . . . . . . . . .10
Setting the clock
Setting the clock. . . . . . . . . . . . . . . . . . . . . . . . . . . . . . . . . . . . . . . . . . . . . .11
Setting the clockSetting the clock
Using an RFU . . . . . . . . . . . . . . . . . . . . . . . . . . . . . . . . . . . . . . . . . . . . . . . .12
Using autocontrols . . . . . . . . . . . . . . . . . . . . . . . . . . . . . . . . . . . . . . . . . . . .12
Expression Off-Line
Expression Off-Line . . . . . . . . . . . . . . . . . . . . . . . . . . . . . . . . . . . . . . . . . . .13
Expression Off-LineExpression Off-Line
Upgrading software
Upgrading software. . . . . . . . . . . . . . . . . . . . . . . . . . . . . . . . . . . . . . . . . . .13
Upgrading softwareUpgrading software
Upgrading the LPC . . . . . . . . . . . . . . . . . . . . . . . . . . . . . . . . . . . . . . . . . . . .13
Upgrading remote interface devices . . . . . . . . . . . . . . . . . . . . . . . . . . . . . .14
Express LPC QuickGuide, v.3.1 iii
Page 4

Appendix A
Appendix A
Appendix A Appendix A
Specifications
Specifications . . . . . . . . . . . . . . . . . . . . . . . . . . . . . . . . . . . . . . . . . . . . . . . .15
SpecificationsSpecifications
Appendix B
Appendix B
Appendix B Appendix B
Limited Warranty
Limited Warranty
Limited WarrantyLimited Warranty
Appendix C
Appendix C
Appendix CAppendix C
Declaration of Conformity
Declaration of Conformity . . . . . . . . . . . . . . . . . . . . . . . . . . . . . . . . . . . . .23
Declaration of ConformityDeclaration of Conformity
. . . . . . . . . . . . . . . . . . . . . . . . . . . . . . . . . . . . . . . . . . . . .19
iv
Page 5

Introduction
The ETC Express Lighting Playback Controller (LPC) is a playback system
that provides complete, hands-off control of area lighting. It is ideal for
environments where simplified control of lighting sequences and effects
is needed. If more control capability is needed, the power of the Express
LPC can be expanded by using it in a network or connecting it to external
devices. For example:
• MIDI Show Control (MSC) ~ Send and receive show control
information using the MIDI Show Control protocol.
• ETC MIDI ~ Control shows using this subset of MIDI.
• MIDI Time Code (MTC) ~ Synchronize your show with external
devices using the MIDI time code protocol.
• ETCNet ~ Connect the LPC to an ETC network so that you can control
or view remotely using remote interface devices.
• Remote Macros ~ Start, stop and control shows with up to four
external switches, for example on a door frame or operated by hand.
• Remote Trigger ~ Provide switched control to an external device
during LPC show operation.
The LPC uses the proven design of the Express lighting console, a fullfeatured lighting controller used in thousands of educational and live
performance centers. Working for you is the same complex show
technology that made Express so popular, but in a simplified package. In
fact, a show created for any console in the Expression line of consoles will
run on the Express LPC. What you surrender in show creation, editing and
control capabilities, you gain in ease of operation and simplicity.
Express LPC QuickGuide, v.3.1 1
Page 6

Getting started
To use your Express LPC successfully, please follow the installation and
operation instructions contained in this QuickGuide. In many places, these
instructions rely upon additional information in the Express User Manual,
which is supplied with the LPC. Shows to run in the Express LPC may be
created in the console or in Expression Off-Line, a software program that
emulates the programming capabilities of Expression-family consoles
Following are the items contained in an LPC shipping package. The items
marked with an asterisk (*) are not needed for all mounting positions. If
anything is missing, or if you have questions about the installation or
operation of the Express LPC, please call your dealer or ETC Technical
Services at one of the offices listed on the back page of this document.
• The LPC unit
• LPC power supply and separate power cord
• Two convertible front mounting brackets *
• Two sliders and rear mounting brackets for a 19” rack *
• Four rubber feet *
• Mounting fasteners
• This Express LPC QuickGuide, version 3.1
• Express User Manual, version 3.1
Mounting the LPC
The LPC may be used without brackets securing it if the surface is
sufficiently level and steady. All you need to do is attach the four rubber
feet with the 4-40 x 3/8” screws, all provided with the LPC.
Do not locate the LPC closer than six feet to dimmers or high-current AC
lines to avoid electromagnetic interference.
If you need to mount the LPC for stability or for operating convenience,
hardware is supplied for each of the four mounting orientations listed
below. The procedure to use for each mounting orientation is given next.
• In a 19” rack
• Secured below a horizontal surface, such as a desk or shelf
• Secured to the top of a horizontal surface
• Secured to a vertical surface
2 Getting started
Page 7
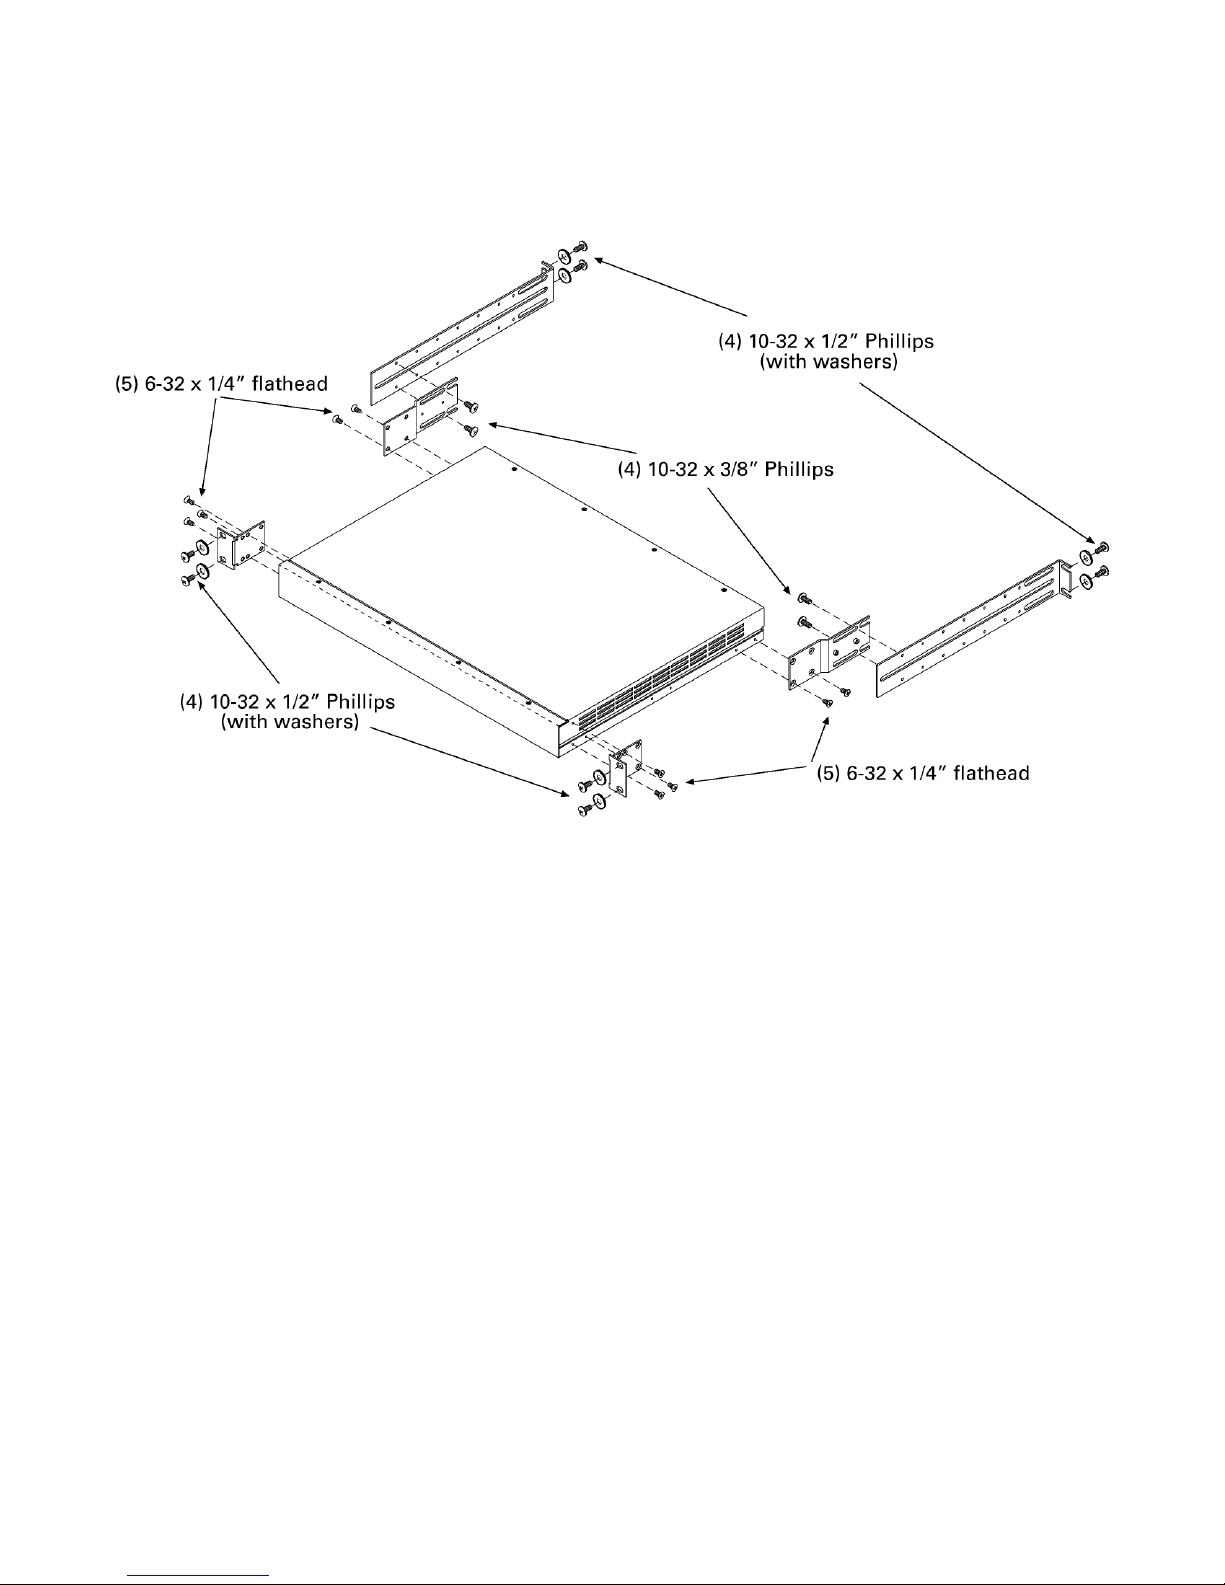
Rack mounting
To mount the LPC in a 19” rack, follow the illustrated procedure below:
1. Remove all mounting hardware from the plastic bag.
2. Place one black washer on each of the eight 10-32 x 1/2” screws.
3. Attach the two L-brackets to the side panels of the LPC using three
6-32 x 1/4” flathead screws each. Choose the bracket holes that
position the bracket flush with the front panel.
4. Secure the two rear brackets to the side panels of the LPC using two
6-32 x 1/4” flathead screws each, orienting the brackets as shown.
5. Fit the LPC through the front of the rack and position over the
mounting holes. The L-brackets should be on the outside of the rack.
6. Secure the LPC to the front of the rack using four 10-32 x 1/2” screws
and washers as shown. If the rack holes are not threaded, small black
clips are provided for that purpose. Slide the black clips over the rack
mounting holes and thread the screws into them. Caution: Keep the
rear of the LPC supported to avoid bending the front brackets.
7. Using four 10-32 x 1/2” bolts (and threaded clips if necessary), attach
the two slider brackets to rear holes in the rack that are opposite those
holes used to mount the front of the LPC. Do not secure yet.
8. Line up the slider brackets with the rear brackets on each side of the
LPC. The threaded studs on the rear bracket should fit into slider
bracket slots. Attach each rear bracket to a slider using two 10-32 x
3/8” screws each. The screws go through slots in the brackets and
into threaded slider bracket holes.
9. Secure all bolts so that the assembly is level and tight.
Express LPC QuickGuide, v.3.1 3
Page 8

Mount on a horizontal or along a vertical surface
To mount the LPC either to the top of a horizontal surface or along a
vertical surface, follow the illustrated procedure below:
1. Remove all mounting hardware from the plastic bag.
2. Securely attach the four rubber bumpers to threaded holes in the
bottom of the LPC using 4-40 x 3/8” screws.
3. Securely attach the two L-brackets to the side panels of the LPC as
shown, using two 6-32 x 1/4” flathead screws each. Choose the
bracket holes closest to its bend.
4. Place the LPC on the surface where you want it. Mark the surface
through the mounting holes in each bracket. Remove the LPC.
5. Drill holes at the marks. You will be providing the mounting screws
(and anchors if necessary), so choose a drill bit accordingly.
6. Securely attach the LPC to the mounting surface.
Mounting beneath a horizontal surface
To mount the LPC to the bottom of a horizontal surface, follow the
procedure below, with general reference to the illustration for top and
vertical mounting above:
1. Remove all mounting hardware from the plastic bag.
2. Fasten the four rubber bumpers to the top surface of the LPC with
double-sided tape (not included with LPC).
3. Securely attach the two L-brackets to the side panels of the LPC. The
brackets should be flipped 180
the illustration above, with the mounting flange facing the top. Choose
the bracket holes farthest from its bend.
4. Place the LPC on the surface where you want it. Mark the surface
through the mounting holes in each bracket. Remove the LPC.
5. Drill holes at the marks. You will be providing the mounting screws
(and anchors if necessary), so choose a drill bit accordingly.
6. Securely attach the LPC to the mounting surface.
4 Mounting the LPC
o
from the bracket position shown in
Page 9
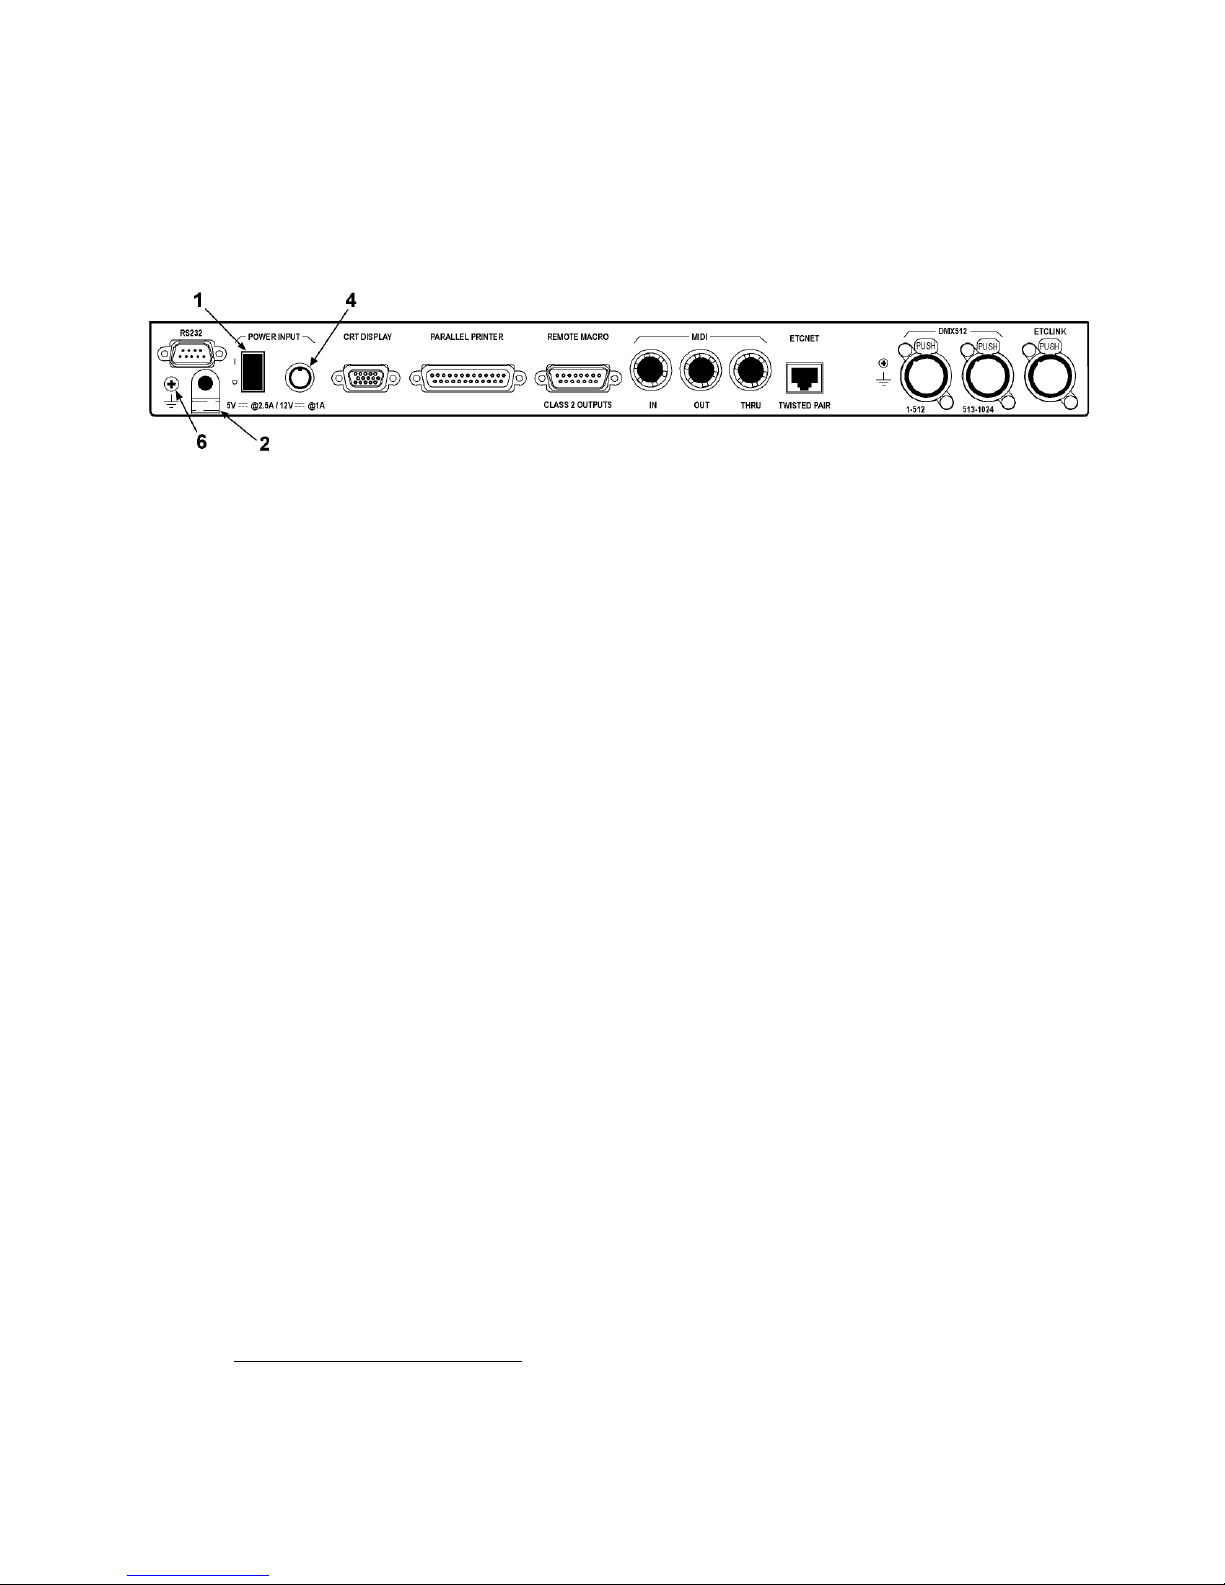
Cabling
All connections to the LPC, except for the optional RFU, are made to the
LPC’s rear panel. The numbers in the figure refer to items under Power
Supply, below.
Power supply
1. Push the LPC’s power switch to the off position (“O” symbol).
2. Remove the thumb screw to free the cable clamp from the rear panel.
3. The power supply has a cable attached to it. Clip the cable clamp over
the cable near the 8-pin male connector.
4. Plug the connector into the LPC rear panel receptacle.
5. Adjust the cable clamp so that you can re-attach it to the LPC.
6. Plug one end of the furnished power cord into the power supply and
the other end into a grounded power outlet.
1
Dimmers
Connect the dimmers as explained in the installation sections of your
Express User Manual (Appendix A).
Accessories
If you are using a monitor, a Remote Focus Unit, a printer, ETCNet, MIDI
or remote macros with your LPC, or if your show performs remote
triggering, connect and install as explained in the installation sections of
your Express User Manual (Appendix A).
1.
The chassis may also be grounded, if needed, by placing a ground wire under this
Phillips-head screw.
Express LPC QuickGuide, v.3.1 5
Page 10

Front panel
The LPC’s front panel is shown in the illustration below. The numbers are
keyed to the explanations of features below.
Features
The features of the LPC front panel are, from left to right:
1. The power-on indicator glows when the LPC is powered on.
2. Seven macro control buttons. Use these to control the LPC and the
show.
3. Read From Disk button. Use this to read the show into the LPC.
4. Disk drive.
5. The fuse holder protects the LPC from an excessive power drain by
the RFU, if attached.
6. RFU connector.
Producing shows for the Express LPC
Shows that run in the Express LPC may be produced in a couple of ways.
One way is to develop the show in an ETC console that runs the same
version of software as the LPC, such as an Express, Expression or Insight
console. If the show is created in a console that has features not available
in the LPC, such as a higher channel or dimmer count, the LPC responds
only within the limits of its capabilities and ignores everything else.
Another way to create a show for an Express LPC with ETC’s console
emulator, Expression Off-Line, which runs on a pc-type computer. With
Expression Off-Line you can produce a complete show that is tailored
exactly for your particular LPC model.
2.
See Expression Off-Line, page 13, for information about using Off-Line to create
or edit LPC showfiles.
2
6 Front panel
Page 11

LPC operation
You need two things to run a show in an Express LPC: a diskette
containing the show in console-ready form, and instructions about which
macros available to the LPC were programmed into the show. The LPC
clock may also be used in addition to macros to control the show, but
clock control is not required.
Reading a showfile
Read showfiles by inserting a diskette in the LPC disk drive and pressing
the Read From Disk button on the LPC’s front panel. If the showfile was
prepared using system software older than version 3.03, everything in the
showfile will be transferred at once to the LPC memory. If, however, the
showfile was prepared with version 3.03 or later software, only the show
components of the showfile will be transferred into memory. For those
later showfiles, if you want to transfer the system configuration
components into the LPC memory, press M7 on the LPC’s front panel
while pressing the Read From Disk button.
See the Showfile appendix in your Express User Manual for a breakdown
of showfiles into show and system configuration components.
Macro control
Macros can control the LPC in three ways. Push button switches M1
through M7 on the LPC’s front panel can be used to activate macros 1 - 7.
Up to four switches can be wired to a rear panel connector and used to
activate macros 1901 - 1904. Used that way, those macros are known as
Remote Macros. Finally, the LPC may be set to respond automatically to
what is known as a Powerup Macro when the LPC is turned on. Any of
the 2,000 macros possible can function as the Powerup Macro.
3
For information about programming macros, including the Powerup
macro, see the Macros chapter of your Express User Manual.
about programming remote macros in the Remote Interfaces chapter of
your Express User Manual. For information about wiring the rear panel
Remote Macro connector, see the Installation appendix of your Express
User Manual.
3.
See Setting the clock, page 11, for information about preparing the LPC for real
time programs by setting the real time clock.
4.
See your user manual for information about programming and setup operations.
Express LPC QuickGuide, v.3.1 7
4
Learn
Page 12

Autocontrols
The front panel buttons, M1–M7 have programmable as well as fixed
functions. Each can operate a macro in your show, as explained under
Macro control, page 7. They may also be used in combinations to give you
access to software displays and to make settings.
When panel buttons, including the Read From Disk button, are used in
non-programmable combinations, they are called autocontrols. Execute an
autocontrol using the following 4-step procedure.
1. Press M7 and hold.
2. Press the additional button or buttons and hold.
3. Release M7.
4. Release the additional button or buttons.
An Express LPC with version 3.1 system software contains the following
autocontrols.
Autocontrol buttons Function
M7 / M1 Stage display
M7 / (M1 and M2) Plus
M7 / M3 Patch display
M7 / (M1 and M3) Enter
M7 / (M2 and M3) Minus
M7 / (M1 and M2 and M3) Clear
M7 / M4 Setup display
M7 / (M1 and M5) Reboot
M7 / (M5 and M6) Nothing
M7 / (M1 and M6) Softkey [S1]
M7 / (M2 and M6) Softkey [S2]
M7 / (M3 and M6) Softkey [S3]
M7 / (M4 and M6) Softkey [S4]
M7 / (M1 and M5 and M6) Softkey [S5]
M7 / (M2 and M5 and M6) Softkey [S6]
M7 / (M3 and M5 and M6) Softkey [S7]
M7 / (M4 and M5 and M6) Softkey [S8]
M7 / (M1 and M2 and M3 and
M7 / Read From Disk
M4 and M5 and M6)
a
b
Record
Read system
configuration
8 LPC operation
a) Use this autocontrol to back out of an autocontrol
operation without changing anything.
b) The softkeys apply to the existing display, as viewed
on your video monitor.
Page 13

Interfacing with external devices
You can do more with your LPC if you use it to control or be controlled by
external devices. Following are the ways you can operate the LPC with
external devices and how you would go about implementing them.
ETCNet
The Express LPC supports ETCNet, a proprietary ETC network operating
with Ethernet protocols, that allows you to operate a wide variety of ETC
devices together. These devices can include ETC’s Remote Interface
Units (RIU) or Remote Video Interface (RVI) devices. You can also use
ETC’s newer interface devices, such as the ETCNet2 DMX Node or the
ETCNet2 Video Node. Network interface devices can provide DMX512
outputs that mirror those of the LPC. They can also support remote
monitors and alphanumeric keyboards that mimic those at the console
and Remote Focus Units (RFUs) for remote control.
Information about installing an RIU or RVI is available in the Reference
appendix of your Express User Manual. Information about installing the
newer ETCNet2 devices is given in their respective QuickGuides. To use
ETCNet2 interface devices with an Express LPC, you must set the device
to operate on ETCNet. See the Upgrade Software section in the Appendix
of your Express User Manual for that procedure. Use unshielded twisted
pair wiring (UTP) when making network connections between any
interface device or network hub and the Express LPC.
5
Remote Trigger
If you are operating an external device that may be controlled by a switch
closure, you can control that device with the LPC Remote Trigger feature.
See the Installation appendix of your Express User Manual for an
explanation about how to wire the LPC’s Remote Macro port for this
purpose. Information about programming the Remote Trigger is found in
the Control Interfaces chapter of your Express User Manual.
MIDI Show Control / ETC MIDI
See Chapter 24 Interfaces of your Express User Manual for information
about using MSC and ETC MIDI.
Connect the external MIDI device, such as a MIDI Sequencer, to the
LPC’s MIDI “In” port. If any other device should receive the MIDI signal,
connect the LPC’s MIDI “Thru” port to the “In” port of the second
receiving device. If MIDI information will be generated within the LPC,
such as to control the external MIDI device, run a cable from the LPC’s
“Out” port to the “In” port of the external MIDI device.
5.
Older Express LPC models also supported thinnet wiring, which is compatible only
with RIU and RVI interface devices. If using an older Express LPC and thinnet, see
the Installation Appendix of your Express User Manual for special information and
information.
Express LPC QuickGuide, v.3.1 9
Page 14

MIDI time code programs
The LPC can run programs that are timed according to the Musical
Instrument Digital Interface protocol (MIDI). MIDI shows consist of a
series of events containing cues, submasters or macros that play back at
times determined by an external or an internal clock. To run a time code
program in the LPC, load it in, connect a time code source and start the
time code running.
Refer to the Control interfaces chapter of your console user manual for
detailed instructions about how to create and edit time code programs.
The chapter also includes information about changing program loop time,
frame rate and playing back a program by various means. To connect an
external MIDI source, see Appendix A of your console user manual.
Printer
See Appendix A of your console user manual for information about
attaching a printer to your LPC. Connect the printer to the LPC port labeled
Parallel Printer. Information about printouts available from the Express
LPC can be found in the Printing chapter of the Express User Manual.
Serial interface
On the rear panel of your LPC is a RS232 connector. This is reserved for a
serial interface function that may be implemented later. It is not
operational at this time. Please disregard option 13, Serial Protocol Baud
Rate, on the Options Settings menu as well as the associated softkey,
[S2], ESP Baud Rate, in that menu. The Options Settings menu is a choice
on the Setup menu, which you may reach with autocontrol M7 / M4.
10 Interfacing with external devices
Page 15

Setting the clock
If you plan to run real time programs from your LPC, you must first set the
time and date configuration of its real time clock. If your real time program
references sunrise or sunset, you must also set the astronomic functions
of your real time clock (the astronomic clock). Latitude, longitude and time
zone values for cities located around the globe are given in the Time and
location appendix of the Express User Manual.
You can set the time and date configuration of the LPC’s real time clock
in either of two ways, both of which require you to attach a video monitor
to the LPC. One way is to attach a Remote Focus Unit to the LPC. The
second way is to take advantage of the LPC autocontrols. You can also set
the astronomic clock when using an RFU, but not when using the LPC
autocontrols. Astronomic clock settings, however, are needed only if your
real time programs reference sunrise or sunset.
If you need to set the LPC astronomic clock, you can perform those
settings in either an Express console or in Expression Off-Line. They
become part of the system configuration components which can then be
read into the LPC from a showfile. See Reading a showfile, page 7, for
information about reading a showfile’s system configuration components.
: Clock settings are retained in LPC memory even if the power is
NOTE
temporarily removed. Once set, you should not need to reset the clock,
but you may need to revise the setup later if, for example, power is
removed for a long time or you need to set the astronomic clock.
Express LPC QuickGuide, v.3.1 11
Page 16

Using an RFU
If attaching an RFU to your LPC to set the real time clock, follow the
procedure below.
1. Connect the RFU and a video monitor to the respective ports on the
LPC.
2. Use the M7/M4 autocontrol to go to the Setup display.
3. Follow the procedure called Setting the Clock in the System settings
chapter of your console user manual.
Using autocontrols
6
The LPC’s autocontrols allow you to perform all the configuration settings
for the real time clock except provide data for the astronomical clock.
general, follow the procedures given under Setting the Clock in the
System settings chapter of your console user manual except where
required to choose from the Clock Functions menu. To make that choice,
in the Express LPC, use the Plus or Minus autocontrols to move through
menu selections. Use the Enter autocontrol to confirm your selection.
For example, set the time and date in your LPC as follows:
1. Connect a video monitor to the LPC.
2. Use the M7/M4 autocontrol to go to the Setup display.
3. Press M7/M1 and M2 to step to selection #2 on the Clock Functions
menu. You will see the following Time/Date display.
: For any operations requiring the Plus or Minus autocontrol, you can
NOTE
repeat the function after first activating it by tapping the M7 key as many
times as needed.
6
In
4. The time will be highlighted when you enter the display. To change it,
press the Plus or Minus autocontrols to increment or decrement the
time. When the minutes move past 60 or before 0, the hours
increment or decrement, respectively.
5. Press the Enter autocontrol to move to the AM/PM field. Change by
using the Plus or Minus autocontrols.
6. Continue with the rest of the settings in the Time/Date display using
the Enter, Plus and Minus autocontrols as above.
7. When you are satisfied with the settings, press the Record
autocontrol to start the clock.
6.
For a list of autocontrols, see Autocontrols, page 8.
12 Setting the clock
Page 17

Expression Off-Line
Shows for the Express LPC are often created in the same type of console
for which the LPC is designed as a playback device. But you can also use
ETC’s console emulator, Expression Off-Line, which runs on an IBMequivalent personal computer. Expression Off-Line reproduces virtually all
of the functions of the LPC software using simulations of the same keys,
controls and displays that you find on the console itself.
When you create shows in Expression Off-Line, you are not constrained
by the lack of a label key and alphanumeric keyboard as is true for an
Express console. Not only can you create shows in Off-Line but you can
also use Off-Line to label things, such as real time programs, cues, groups
and channels. Labels attached in Off-Line stay with the show when
transferred to the Express LPC, where you can view them with an
attached video monitor. Instructions for labeling in Expression Off-Line are
given in the Expression Off-Line QuickGuide.
Off-Line and its QuickGuide may be obtained without charge from your
dealer, from the ETC website at www.etcconnect.com or from ETC
Technical Services. Information about reaching ETC Technical Services at
several sites around the world is given on the back page of this document.
Upgrading software
Upgrading software in your Express LPC is analogous to upgrading
software in an Express console. You can also use the LPC to upgrade the
software of any remote interface devices connected to the LPC and set
its network configuration.
The procedure for upgrading software in your LPC is the same procedure
given under Upgrading software in Appendix A of your console user
manual, with a few exceptions. These are noted below.
Upgrading the LPC
• Setup display ~ Step 5 of the procedure recommends that you verify
the upgrade in the Setup display. In the LPC, execute the autocontrol
for the Setup display (M7 / M4).
• Reset System ~ Step 6 requires you to reset the system after the
upgrade. To reset the system in the LPC, follow the procedure below.
1. Go to the LPC Setup display if you’re not already there (see
above).
2. Activate the Plus autocontrol (M7 / (M1 and M2)). Tap M7 three
more times to get to the Clear Functions choice on the Setup
menu.
3. In the Clear Functions display, execute the autocontrol for softkey
S1 (M7 / (M1 and M6)).
4. Confirm the reset by executing the autocontrol for Enter (M7 /
(M1 and M3)).
Express LPC QuickGuide, v.3.1 13
Page 18

Upgrading remote interface devices
• Crossed wiring ~ Sometimes when you’re using twisted pair wiring,
a remote interface device does not appear on the Remote Units list.
The cause could be crossed wiring. This problem is covered in the
Upgrade software section of the console user manual under Devices
missing from the list. To swap the wiring in the LPC, execute the
autocontrol for softkey S6 (M7 / (M2 and M5 and M6)).
• Setting the configuration ~ You may be unable to communicate
with one or more ETCNet 2 remote interface devices because they
are configured for an ETCNet2 network. This problem is covered in
the Upgrade software section of the console user manual under
Devices missing from the Remote Units list. To set the network
configuration in all ETCNet2 remote interface devices to ETCNet,
execute the autocontrol for softkey S5 (M7 / (M1 and M5 and M6)).
• Upgrade all units ~ To upgrade all remote interface devices at once,
execute the autocontrol for softkey S1 (M7 / (M1 and M6)).
• Upgrade some units ~ To upgrade some units, follow the procedure
below:
1. Use the Plus or Minus autocontrols to move forward or backward
through the Remote Units list.
2. While highlighting a unit you wish to upgrade, execute the
autocontrol for softkey S8 (M7 / (M1 and M6)) to mark the unit.
3. Repeat step 2 to mark as many units as you wish.
4. After marking, execute the autocontrol for softkey S2 (M7 / (M2
and M6)) to upgrade the marked units.
• Upgrade only one unit ~ Follow the procedure below:
1. Use the Plus or Minus autocontrols to move forward or backward
through the Remote Units list.
2. While highlighting the unit you wish to upgrade, execute the
autocontrol for softkey S3 (M7 / (M3 and M6)) to upgrade the unit.
14 Upgrading software
Page 19

Appendix A
Specifications
Electrical
• Voltage input 100-240 VAC, 50-60 Hz
• Maximum current 0.8 amps
Built-in interfaces
• 1,024 DMX512 outputs
• Parallel printer
• RS-232C serial port
• Remote Focus Unit
• Supports CE dimming systems
• Remote Macro control
• Remote Trigger option
• MIDI time code control
• ETCLink
System capacity
• 600 cues per show
• 96, 192 or 250 control channels
• Proportional patching of up to 1,024 DMX512 dimmers
• Eight-part multipart cues
• Thirty-three dimmer profiles, all but one of which are editable
• 500 groups
• 99 focus points
• 2,000 macros
• 24 overlapping submasters
• Ten pages of submaster memory
Playback controls
• Seven front panel push-buttons
Timed control
• Internal or external clock
• 12-hour or 24-hour timing
• References sunrise and sunset with astronomical clock
• Up to 500 user-created, Real Time Programs
Display functions
• VGA video output
•Stage
•Blind
• Fader
•Effects
• Spreadsheets: Cues, Submasters, Groups and Focus Points
•Patch
•Park
• Setup
• Flexichannel (displays only recorded channels)
• Channel attributes
Express LPC QuickGuide, v.3.1 15
Page 20

Submaster functions
• Ten pages of 24 recorded submasters each
• Fully overlapping channel assignments
• Proportional channel levels
• Programmable fade and wait times
• Live and programmed rate control
• Submasters either overlapping pile-on or inhibitive
• All submasters programmable with effects
• Update function
• Control keypad features
• Spreadsheet editing
• Submaster list
Channel functions
• 8-bit and 16-bit data types
• Both highest level (Highest Takes Precedence) and last action (Latest
Takes Precedence) channel types
• Group function to allow channels to be manipulated as proportionally
balanced groups
• [And], [Except], [Only], and [Thru] functions to select
• [Full] function
• [Level] sets a channel to a user-selectable default value
• Independent channels
• Flip channel
Moving light functions
• Fixture personalities load from diskette
• Patch fixtures by assigning personalities, starting channels, starting
DMX512 address, remote dimmer, swap focus, pan or tilt flip
• Five attribute categories
• Fixture box level adjustment
• Fixture focus with Solo
Cue functions
• Up to 600 cues in the range 0.1 to 999.9
• Discrete upfade and downfade times (00:00-99:59) for each cue
• Linked cue sequences
• Effect cues
• Split wait times
• Follow time
• Link to cue or macro
• Eight-part multipart cues
• Selective cue recording
• Update cue command
• Attribute range editing
• Subroutines, with cue or style steps
• Spreadsheet editing
•Cue list
Group functions
• Up to 500 groups
• Any cue or submaster may be accessed as a group
• Spreadsheet editing
• Group list
16 Appendix A Specifications
Page 21

Focus point functions
• up to 99 preset focus points
• Update cues and submasters when focus point changes
• Record level of focus point without link
• Available in effects
• Printout available
• Spreadsheet editing
• Focus point list
Diskette functions
• 3.5-inch high-density diskette drive for show storage
• One show per disk
• Software updates installed through diskette drive
• Retrieve show and configuration contents separately or together
Macro functions
• Seven front panel push-button macro controls
• Up to 2,000 macro selections for programming
• Macros may activate any control sequence
• Live Learn mode
• Macro editing
• Macros programmable for Macro wait
• Can include in real time programs
• Can include in time code events
• Four macros operated by remote switches
• Powerup macro
• Remote Trigger function
Effects functions
• Effects may be recorded as cues or submasters
• Up to 100 steps each
• Live effects recording
• Spreadsheet editing
• 8-bit and 16-bit data types
• Variability of rate during playback
•Step times
• In/Dwell/Out Step fade times
• High/Low Levels
• In/Dwell/Out Effect fade times
• Range editing of effect attributes and step values
Profile functions
• Profiles may be assigned to dimmers
• Ten preset profiles, nine of which are editable
• Twenty-three additional profiles that may be programmed
Options
• Parallel printer
• Remote Focus Unit
• Remote Macro controls
• Remote interface devices
Express LPC QuickGuide, v.3.1 17
Page 22

18 Appendix A Specifications
Page 23

Appendix B
Limited Warranty
Electronic Theatre Controls, Inc. (ETC™)
warrants to the original owner or retail
customer (Customer) that during the
warranty period ETC will repair or replace
its products that are defective in materials
or workmanship under normal use and
service, subject to the terms of this limited
warranty. The warranty period shall begin
on the date of delivery of a portable system
or on the date of energization of a
permanently installed system, and shall
continue for the following periods: (a) one
year, for all Irideon products, and (b) two
years, for all other ETC products. Warranty
is limited to (60) days from shipment for
purchase of demo or loaner products.
Warranty does not cover any product or
part of a product subject to accident,
negligence, alteration, abuse or misuse, or
any accessories or parts not supplied by
ETC. Warranty does not cover
“consumable” parts such as fuses, lamps,
color media or components warranted
directly to the owner by the original
manufacturer. ETC’s warranty does not
extend to items not manufactured by us.
Freight terms on warranty repairs are FOB
ETC factory or designated repair facility.
Collect shipments or freight allowances
will not be accepted.
ETC’s sole responsibility under this
warranty shall be to repair or replace at
ETC’s option such parts as shall be
determined to be defective on ETC’s
inspection. ETC will not assume any
responsibility for any labor expended or
materials used to repair any equipment
without ETC’s prior written authorization.
ETC SHALL NOT BE RESPONSIBLE FOR
ANY INCIDENTAL, GENERAL OR
CONSEQUENTIAL DAMAGES, DAMAGES
TO PROPERTY, DAMAGES FOR LOSS OF
USE, TIME, PROFITS OR INCOME, OR
ANY OTHER DAMAGES.
The customer’s obligations during the
warranty period under this warranty are to
notify ETC at ETC’s address within one
week of any suspected defect, and to
return the goods prepaid to ETC at their
factory or authorized service center.
THIS WARRANTY IS CONTINGENT ON
THE CUSTOMER’S FULL AND TIMELY
COMPLIANCE WITH THE TERMS OF
PAYMENT SET FORTH IN THE “TERMS
AND CONDITIONS.” THIS WARRANTY IS
EXPRESSLY IN LIEU OF ANY AND ALL
OTHER WARRANTIES EXPRESSED OR
IMPLIED, INCLUDING THE WARRANTIES
OF MERCHANTABILITY AND FITNESS
FOR A PARTICULAR PURPOSE AND OF
OTHER OBLIGATIONS AND LIABILITIES
ON OUR PART. THE CUSTOMER
ACKNOWLEDGES THAT NO OTHER
REPRESENTATIONS WERE MADE TO
HIM OR RELIED UPON BY HIM WITH
RESPECT TO THE QUALITY AND
FUNCTION OF THE GOODS SOLD.
This written warranty is intended as a
complete and exclusive statement of the
terms thereof. Prior dealings or trade
usage shall not be relevant to modify,
explain or vary this warranty. Acceptance
of, or acquiescing in, a course of
performance under this warranty shall not
modify the meaning of this agreement
even though either party has knowledge of
the performance and a chance to object.
Terms and Conditions
The following terms and conditions, and
those on the face hereof, shall control as to
any order accepted by Electronic Theatre
Controls, Inc. (ETC), notwithstanding any
terms and conditions that may be
contained in any purchase order or other
document of Customer, and ETC’s
acceptance of any order is expressly made
conditional on Customer’s assent to such
terms and conditions. Such terms and
conditions will constitute the entire
agreement between the parties as to any
order and will supersede any prior
understandings, agreements,
representations, or warranties. Such terms
and conditions will not be modified, added
to, superseded or otherwise altered except
by written document signed by an
authorized representative of ETC,
notwithstanding any terms and conditions
contained in the purchase order or other
document of Customer. ETC’s
commencement of performance and/or
delivery shall not constitute a waiver of
these terms and conditions or any
acceptance of any terms and conditions
contained in the Customer’s order or other
Express LPC QuickGuide, v.3.1 19
Page 24

documents. Acceptance of any product or
service by the Customer will be construed
as acceptance of ETC’s terms and
conditions. Any dispute or questions of
construction with respect to any order
placed with ETC shall be governed by the
laws of the State of Wisconsin.
All prices are in US Dollars, FOB ETC’s
factory or warehouse. Prices, models and
specifications are subject to change
without notice. Orders must be in writing.
Phone orders will be accepted from
established accounts when followed by
written confirmation. The acceptance of
any order does not imply conformance
with plans and specifications unless the
plans and specifications accompany the
order and are accepted as binding by ETC.
Equipment ordered which differs in any
way from our standard catalog items will
require drawings approved in writing by the
Customer. When drawings are approved,
they shall take precedence over all other
written or verbal instructions. Orders are
effective only when accepted and
acknowledged by the factory. Minimum
order is $25.00 net, exclusive of freight.
Price protection will be given on orders
entered for immediate shipment and for
project orders entered before the effective
date of a price increase. All other orders
will be billed at the current price at time of
shipment. Quotations for custom products
are valid for thirty (30) days.
ETC will attempt to ship goods for delivery
on or about the times stated on the reverse
side hereof, although time shall not be the
essence in this contract. ETC will attempt
to follow customer’s written instructions
as to mode and routing of shipments. In
absence of such instructions, ETC shall
have absolute discretion as to mode and
routing of shipments, including express or
parcel post for small shipments. Where the
customer has requested expedited freight,
the customer will be responsible for the
incurred additional charges.
ETC shall not be liable for late delivery and/
or inability to perform due to unforeseen
circumstances or conditions, including our
ability to obtain supplies and raw materials,
government regulations, labor stoppages,
casualties, fire, and other causes beyond
our control. When such circumstances or
conditions have been remedied, ETC will
make and Customer will accept delivery/
performance. Equipment is shipped at the
Customer’s risk and our obligation to
deliver equipment is discharged upon their
delivery in good condition to the carrier.
Shipments are FOB ETC factory or
warehouse. ETC will prepay and bill freight
on UPS shipments. Freight and air are sent
collect unless specifically quoted
otherwise. Unless specifically prohibited,
partial shipments will be made. Federal,
state and/or local taxes, duties and other
charges are the responsibility of the
purchaser.
Any changes in engineering drawings,
specifications, or in other terms of
manufacture, assembly or shipment,
requested by customer, must be in writing
and approved by ETC. If any such change
by Customer causes an increase in the cost
of, or in the time required for performance
of, any part of the contract, then ETC shall
make a reasonable adjustment to the price
of the goods.
If purchaser cancels any portion of a
Purchase Order prior to shipment,
Purchaser shall be liable to ETC for a
cancellation charge equal to ETC’s actual
costs incurred in connection with that
portion of the Purchase Order that is
cancelled, including, without limitation,
labor and materials. Customer represents
that it is solvent. ETC retains a security
interest in the goods to secure payment of
the purchase price and all other
indebtedness now or hereafter owed by
the customer to ETC. At ETC’s request,
customer will execute a financing
statement or statements evidencing such
security interest and will take any other
action necessary to perfect the same.
Payment terms are net 30 days after date
of invoice. If ETC in good faith doubts
customers ability or willingness to pay,
ETC may in its discretion complete its
performance of this contract upon a cash in
advance basis or make deliveries only upon
a C.O.D. basis or file a UCC filing or
suspend all or part of its performance here
under. All payments are applied to the
oldest outstanding invoice. Accounts over
thirty (30) days are subject to a 1 1/2% (one
and one-half percent) per month late
payment penalty. ETC will have the option
20 Appendix B Limited Warranty
Page 25

of withholding performance under any and
all orders from the Customer if an invoice
remains unpaid after 30 days. All disputes
otherwise unresolved between ETC and
Customer shall be resolved in a court of
competent jurisdiction in the location of
ETC’s offices, Dane County, Wisconsin. If
suit or action is instituted by ETC to enforce
payment or performance by the Customer,
the Customer agrees to pay all costs and
attorney’s fees incurred.
Claims for shortage or damaged goods
must be made within ten (10) days.
Equipment is carefully packed and
delivered in good condition to the carrier.
All claims for loss or damage in transit must
be made by the consignee directly to the
carrier. ETC will render every aid and
assistance in the presentation and
enforcement of such claims without
waiver of our rights to have compliance
with the terms of payment of our invoices.
Equipment returned without ETC’s written
permission will not be accepted.
Equipment returned for credit must be in
accordance with established RMA
procedures. Equipment must be unused, in
original cartons and in saleable condition,
subject to ETC’s quality control and test
inspection. Restocking charges of $25.00
or 25% of invoice (whichever is greater)
plus any repacking or reconditioning costs
will be deducted from the credit. Returns
for warranty work will be via warranty
procedures. In no case will permission be
granted to return specially-modified or
custom equipment, or merchandise
invoiced more than six (6) months prior to
date of Customer’s return request.
No failure of ETC to insist upon or compel
compliance by the customer with any of
these terms and conditions shall be
constructed as a waiver by ETC of its right
to insist upon compliance. No waiver by
ETC of any breach by customer shall be
effective unless in writing signed by ETC,
and no waiver by ETC of any breach by
customer shall be deemed a waiver of any
other breach.
If ETC shall fail to repair or replace
defective goods within a reasonable time
after they are returned to ETC, or if ETC
shall wrongfully fail to make delivery or
shall wrongfully repudiate this contract,
then customer shall be entitled to recover
from ETC such part of the purchase price
as has been paid by customer to ETC. The
remedy stated in the preceding sentence
shall be customer’s exclusive remedy for
any breach, non delivery, or repudiation by
ETC or for any other liability of ETC to
customer. This exclusive remedy shall not
be deemed to have failed its essential
purpose so long as ETC is willing and able
to repair or replace defective parts in the
prescribed manner.
Express LPC QuickGuide, v.3.1 21
Page 26

22 Appendix B Limited Warranty
Page 27

Appendix C
Declaration of Conformity
Express LPC QuickGuide, v.3.1 23
Page 28

Americas Middleton, Wisconsin • USA • Tel: (+1) 608 831 4116 • Fax: (+1) 608 836 1736 • (+1) 800 775 4382 • service@etcconnect.com
Europe London • England • Tel: +44 (0)20 8896 1000 • Fax: +44 (0)20 8896 2000 • service@etceurope.com
Asia Hong Kong • Tel: (+852) 2799 1220 • Fax: (+852) 2799 9325 • service@etcasia.com
International 3030 Laura Lane • Middleton, Wisconsin 53562 • Tel: (+1) 608 831 4116 • Fax: (+1) 608 836 1736 • www.etcconnect.com
4110M1011 • Rev B • Released 6/01
Copyright © 2001 Electronic Theatre Controls, Inc. All Rights Reserved. Product information and specifications subject to change.
 Loading...