

Page 1
ETC Installation Guide
ColorSource® Linear v1.5
Corporate Headquarters Middleton, Wisconsin, USA Tel +608 831 4116
Service (Americas) [email protected]
London, UK Tel +44 (0)20 8896 1000 Service: (UK) [email protected]
Rome, IT Tel +39 (06) 32 111 683 Service: (UK) [email protected]
Holzkirchen, DE Tel +49 (80 24) 47 00-0 Service: (DE) [email protected]
Hong Kong Tel +852 2799 1220 Service: (Asia) [email protected]
Web: etcconnect.com
© 2017 Electronic Theatre Controls, Inc.
Product information and
specifications subject to change.
ETC intends this document to be provided in its entirety.
7414M2100-1.5 Rev A Released 2017-01
Overview
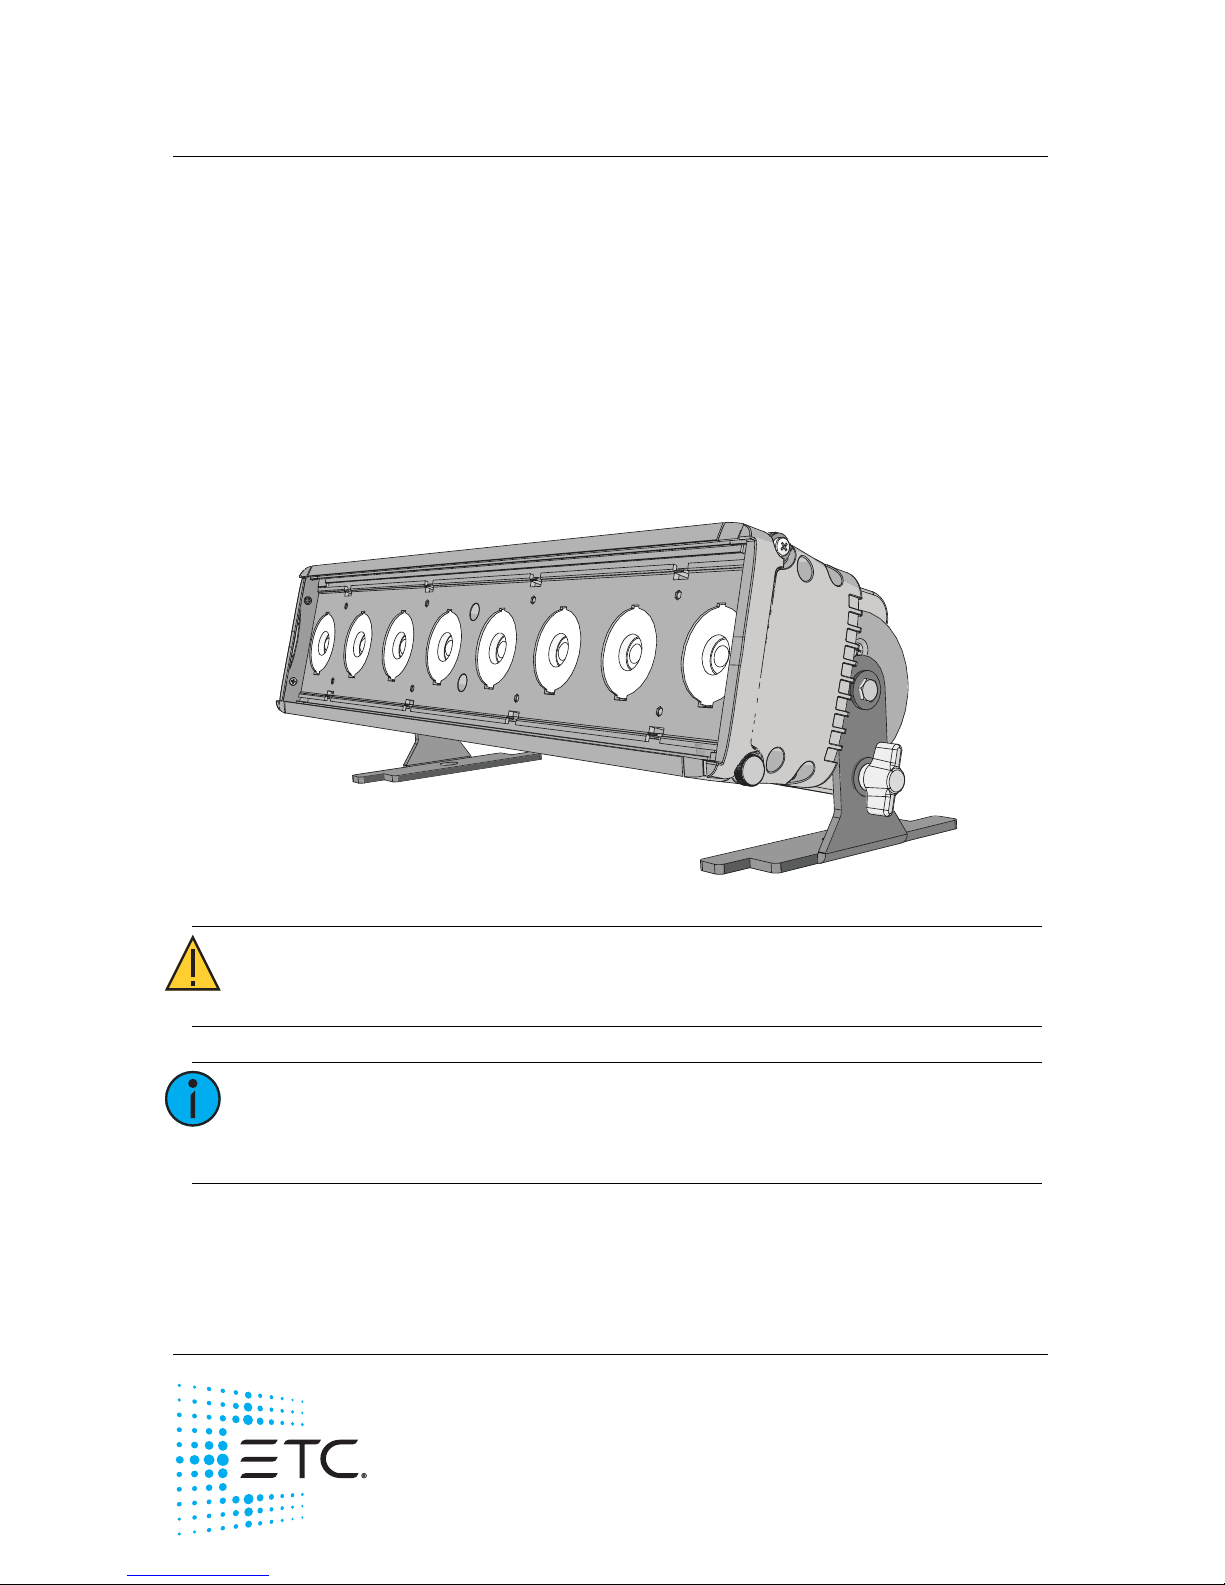
The ColorSource Linear is an affordable LED fixture that uses the RGB-L (red,
green, blue, and lime) color system to provide a rich, bright light. The fixture
is available in three lengths:
• ColorSource Linear 1 (0.5 meter)
• ColorSource Linear 2 (1 meter)
• ColorSource Linear 4 (2 meter)
All models are available in both original and Deep Blue variants. For more
information on the differences between these two variants, see the ETC
website at etcconnect.com.
CAUTION:
• Risk of eye injury. Do not stare directly into the light.
• Do not operate in proximity to flammable materials.
Note:
Features described in this document require the latest
version of software. For information on updating fixture
software, see Updating the fixture software on page 13.
ColorSource Linear 1
Page 2
ETC Installation Guide
ColorSource Linear v1.5
ColorSource Linear v1.5 Page 2 of 16 ETC
Environment
The ColorSource Linear operates in ambient temperatures of 0°C–40°C and
comes with a variable-speed fan.
Electrical
• Operates between 100V and 240VAC at a frequency of 50/60Hz.
• Maximum power consumption:
- Linear 1: 120W
- Linear 2: 240W
- Linear 4: 480W
• Maximum number of fixtures to be linked via power thru connector
when used with an R20 relay module or Unison Echo
®
Relay Panel:
- Linear 1: 9 luminaires (10 luminaires total per circuit)
- Linear 2: 7 luminaires (8 luminaires total per circuit)
- Linear 4: 3 luminaires (4 luminaires total per circuit)
Consult breaker trip curves when used with other equipment.
Requires power from a non-dimmable source.
Note:
The ColorSource Linear is for indoor use only.
Note:
• Maximum recommended ambient operating
temperature: Ta = 40°C (104°F)
• Maximum anticipated external surface temperature
at 40°C ambient: Tmax = 80°C (176°F)
• External temperatures after 5 minutes of fullbrightness operation at 25°C (77°F) ambient:
36°C (97°F)
• External temperature (steady state achieved) at
25°C (77°F): 48°C (118°F)
WARNING:
Disconnect the fixture from power and DMX and allow
it to cool before performing any cleaning and
maintenance.
Page 3

ETC Installation Guide
ColorSource Linear v1.5
ColorSource Linear v1.5 Page 3 of 16 ETC
Typical power consumption
Accessories
You can use several half-meter optional accessories with ColorSource Linear
fixtures, including:
• Secondary lenses (horizontal, vertical, and round)
• Barn doors (7414K1020)
• Louver (7414K1019)
For information on installing secondary lenses, see
Installing secondary lenses
on
page 14
.
Accessories for Linear 2 and Linear 4
For the Linear 2 and Linear 4 fixtures, order one accessory for each 0.5 meter
segment (cell) of the fixture. For example, for a Linear 2 fixture, order two
barn door accessory kits to fit the full length of the fixture.
Spacers for secondary lenses are included with the fixture. Use these spacers
to hold the accessories in position when multiple lenses are used in the
Linear 2 and Linear 4 fixtures. The spacers are positioned between the
0.5 meter lenses.
Contact your local dealer for more information.
Linear 1 100V 120V 230V
Idle Power/Current
1.63W/0.03A 1.55W/0.03A 1.43W/0.03A
Direct at Full/Current
107W/1.07A 105W/0.88A 104W/0.46A
Linear 2 100V 120V 230V
Idle Power/Current
2.86W/.06A 2.98W/.06A 2.56W/.06A
Direct at Full/Current
210.83W/2.12A 208.67W/1.75A 204.5W/.91A
Linear 4 100V 120V 230V
Idle Power/Current
5.28W/.11A 5.24W/.11A 4.65W/.12A
Direct at Full/Current
424.17W/4.27A 419.33W/3.52A 409.17W/1.82A
Page 4
ETC Installation Guide
ColorSource Linear v1.5
ColorSource Linear v1.5 Page 4 of 16 ETC
Installation
Mounting
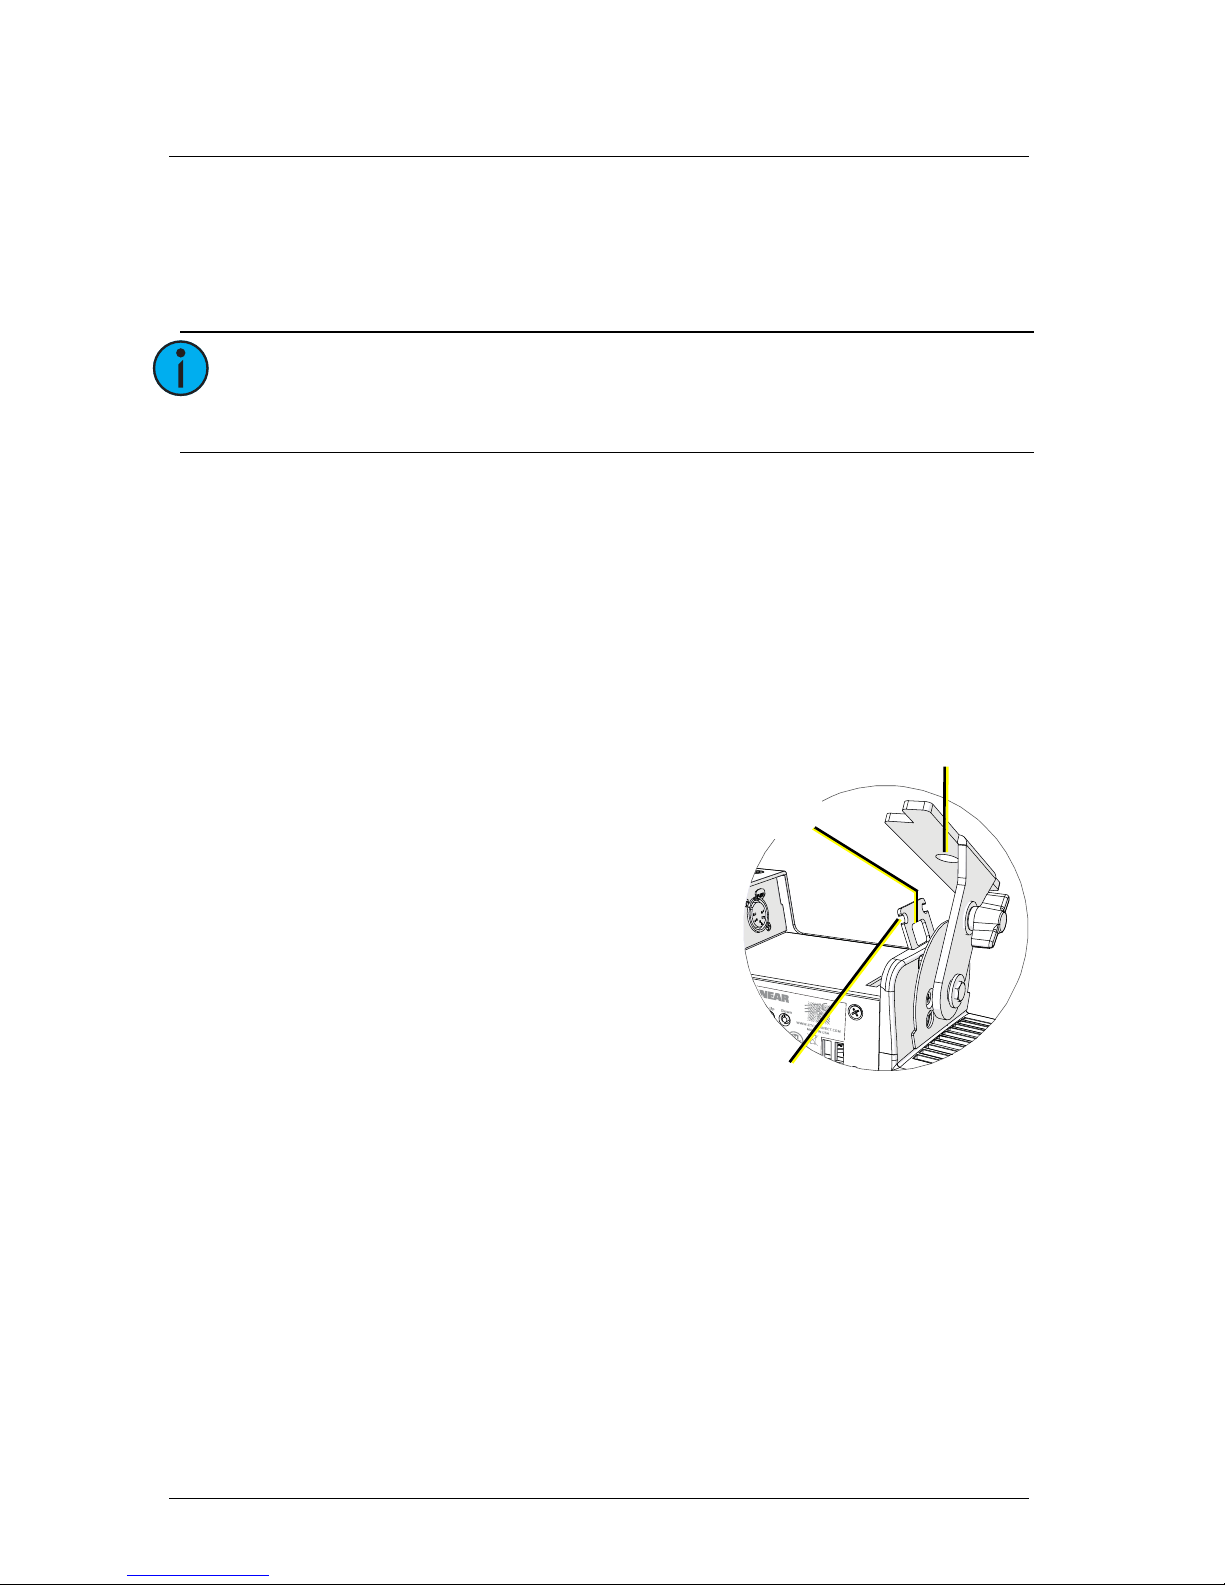
The ColorSource Linear ships with a pair of floor trunnions for mounting.
You also have the option of using C-clamps with the trunnions to hang the
fixture. Attach the C-clamps to the holes in the trunnion feet (see figure
below).
The ColorSource Linear 1 has two additional mounting options. Contact your
local dealer for more information.
• Yoke with C-clamp (7414K1017)
• Double yoke with C-clamp for mounting two fixtures (7414K1018)
Safety cable
The safety cable (or other approved
safety device) must be attached to the
fixture. Two safety cable anchor
points are provided on the fixture
housing.
The anchor points also include two
cutouts that can be used for cable
strain relief.
Connectors
• Power: Two powerCON®
connectors for power in and
thru
• Data (DMX512/RDM): Two
five-pin XLR connectors
OR
two RJ45 connectors for data in and thru
Conversion cables are available from ETC. Please contact your ETC customer
service representative and request part number W6538 for RJ45 to female
XLR or part number W6539 for RJ45 to male XLR.
Connector locations
• Linear 1: Power connectors on one side of the fixture and data
connectors on the other
• Linear 2 and Linear 4: Power and data connectors on each end (to
facilitate daisy-chaining)
Note:
Ensure that the trunnions are installed with the feet
inward so that fixtures can be lined up end-to-end, if
needed.
Safety cable
anchor point
C-clamp
attachment
point
Cutout for
cable strain relief
Page 5
ETC Installation Guide
ColorSource Linear v1.5
ColorSource Linear v1.5 Page 5 of 16 ETC
Setting up the fixture
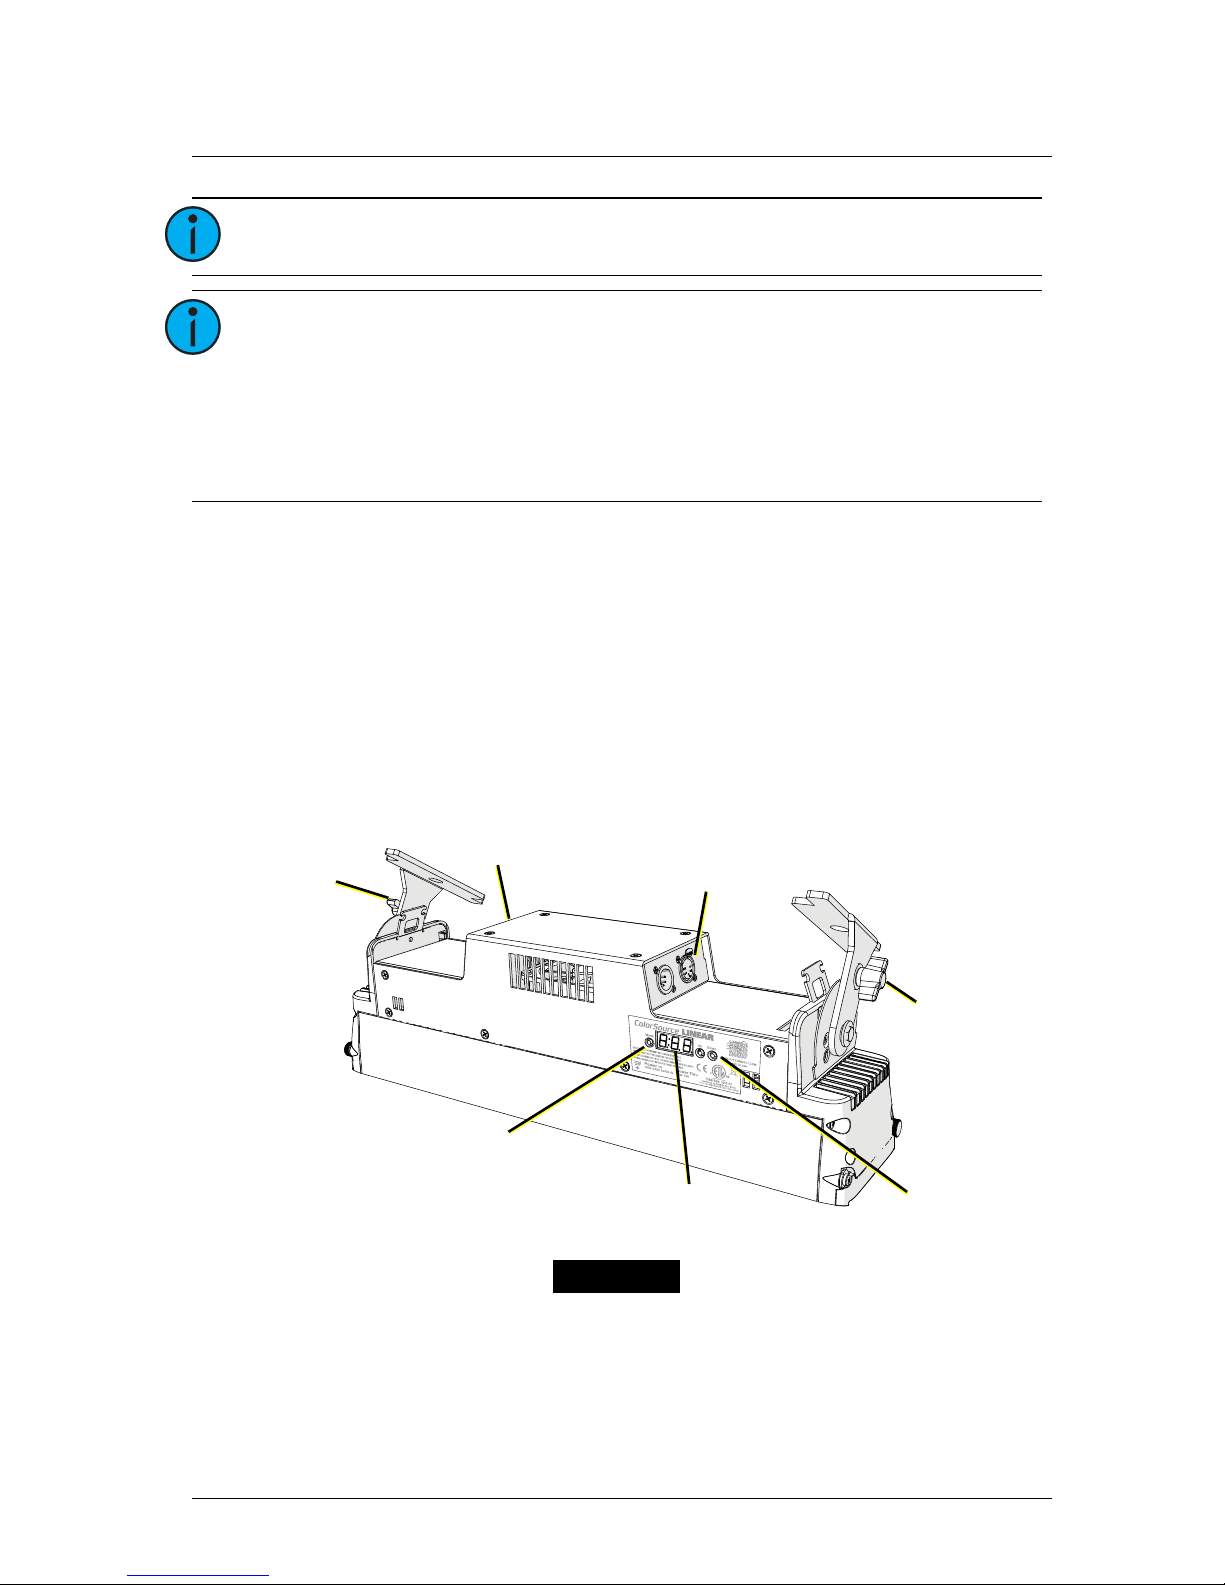
See the fixture illustrations below and on the following page for reference.
1: Plug power cord into the powerCON In connector on the rear of the
fixture.
2: Make any power-thru cable connections prior to applying a power
source.
3: Plug power cord into power source.
Note:
This fixture is not Ethernet/data network compatible.
Note:
The ColorSource Linear is not self terminating. You must
terminate the last fixture in line with a 120 ohm resistor.
XLR terminators are not available from ETC.
To purchase an RJ45 terminator, please contact your ETC
customer service representative and request part
number N4086.
Data in
and thru
connectors
User interface
(display)
Power in
and thru
connectors
Mode button
Up and
Down
buttons
Trunnion
locking
knob
Trunnion
locking knob
Linear 1
Mode button
Page 6
ETC Installation Guide
ColorSource Linear v1.5
ColorSource Linear v1.5 Page 6 of 16 ETC
Powering up
1: Press the Mode button once to wake the display. The display shows
the DMX address.
2: Press the Mode button a second time to access the Presets/Sequences
menu.
Adjusting the tilt
The fixture can be tilted up and down as needed.
1: Loosen, but do not remove the two trunnion locking knobs.
2: Tilt the fixture to the desired angle.
3: Tighten the trunnion locking knobs.
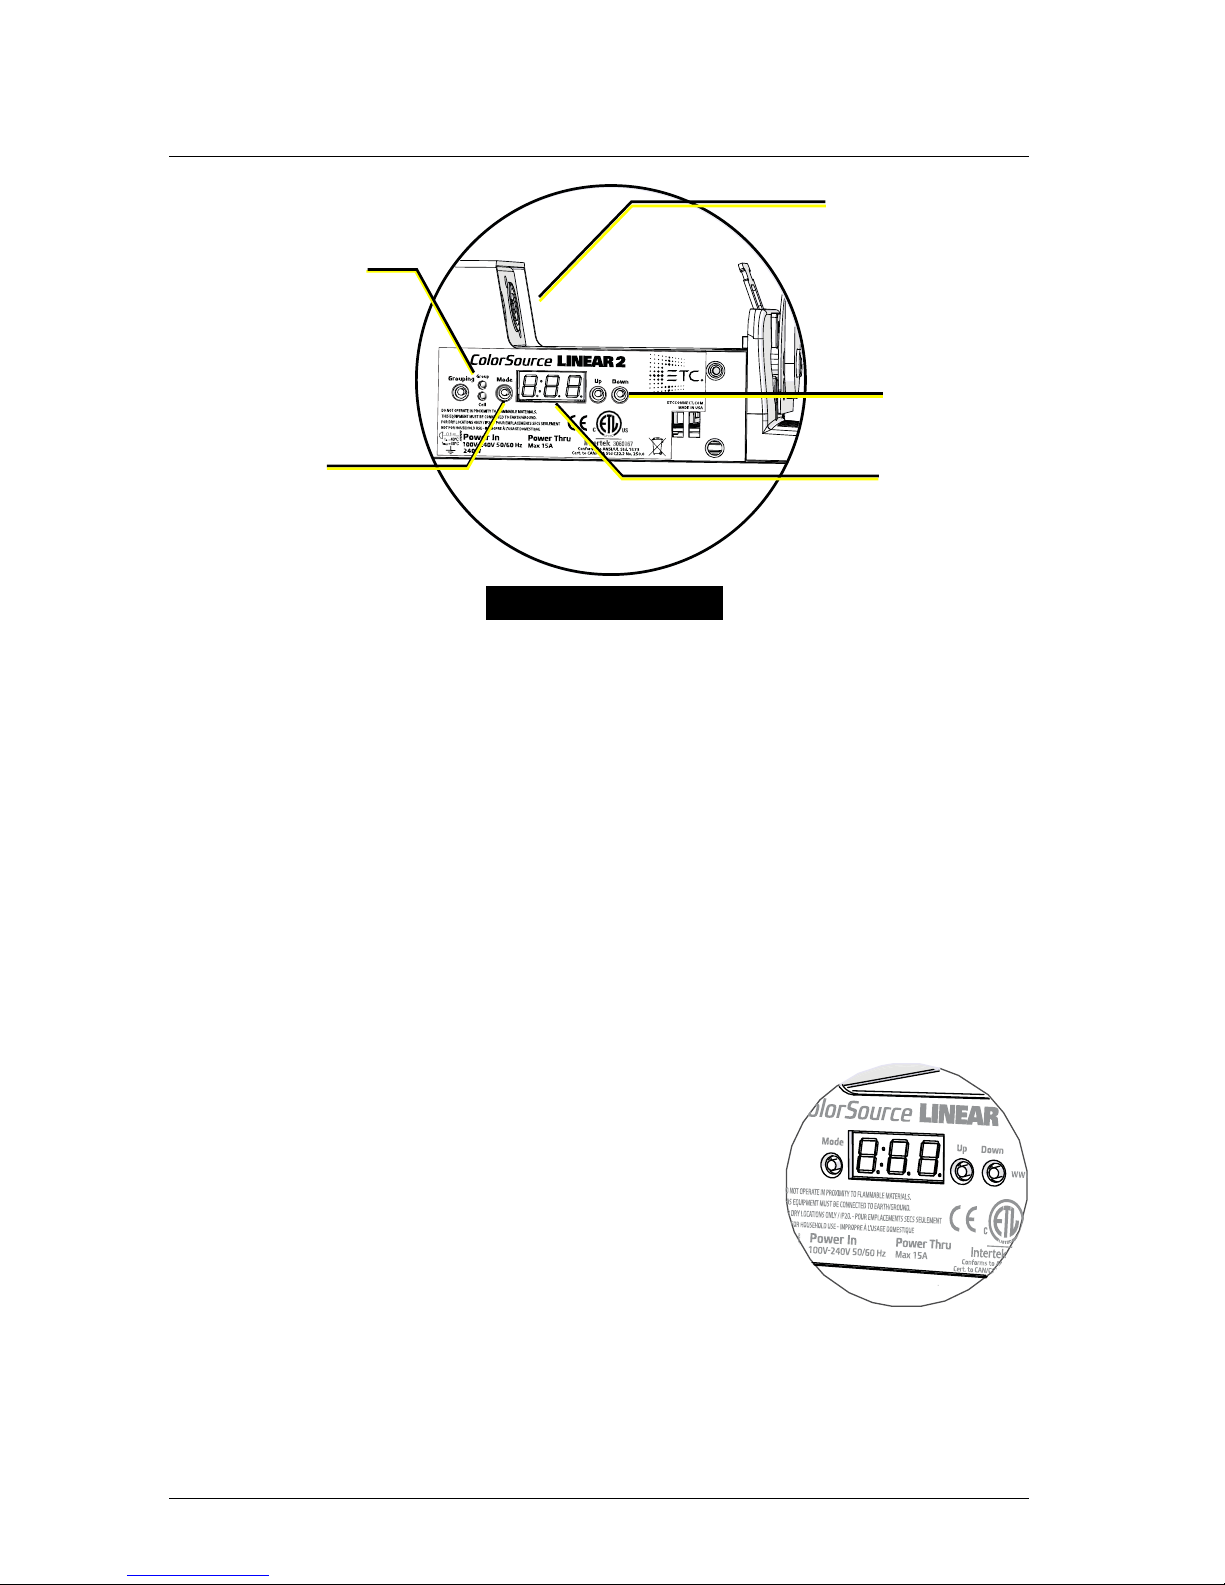
User interface
The user interface allows you to set the start
address of the fixture, access the stand-alone
presets and sequences, set the DMX control
mode, and set the Grouping mode (Linear 2 and
Linear 4 fixtures only).
• The DMX address will blink when no DMX
is present and a preset or sequence is not
active. The inactivity time-out is disabled
while in a data loss state.
• After 5 seconds of inactivity when DMX is
present, the display goes dark.
Power and data
connectors are
paired on each
side to facilitate
daisy-chaining
Up and Down
buttons
User interface
(display)
Mode button
Grouping button
and LED indicators
Linear 2 and Linear 4
Linear 1
shown
Page 7

ETC Installation Guide
ColorSource Linear v1.5
ColorSource Linear v1.5 Page 7 of 16 ETC
Mode button
Pressing the Mode button activates the Preset/Sequence menu; the last active
preset or sequence plays automatically. Pressing the Mode button a second
time deactivates the selected preset or sequence. The display will revert to
show the DMX start address.
• If DMX data is present, the current preset or sequence plays in the
background and DMX data continues to take priority.
• If DMX data is lost and a preset is active in the background, the last
selected preset or sequence automatically plays.
Setting the DMX address
1: Press the Mode button until the DMX address is displayed.
2: Use the Up and Down buttons to select the DMX address for the
fixture.
You can also use RDM for DMX addressing. See
Using RDM
on
page 16
.
Setting presets and sequences
There are twelve factory-configured presets followed by five factoryconfigured sequences built into the fixture. From the Preset/Sequence menu,
press the Up and Down buttons to scroll through the list. The sequence or
preset plays immediately upon selection. All presets and sequences can be rerecorded through an RDM device.
When a Linear 2 or Linear 4 fixture is in Cell mode, you can re-record a preset
with each cell having a distinct set of values. See
Setting the Grouping mode
on
page 9
.
Re-recording a preset
1: Using DMX or RDM, set the desired levels.
2: Press the Mode button to access the Preset/Sequence menu.
3: Using the Up and Down buttons, navigate to the preset number that
you want to re-record.
4: Hold the Mode button for 3 seconds to confirm the preset selection.
The user interface will show a 3-second countdown. The preset
number blinks once to confirm that the preset has been recorded.
Note:
When the fixture is in Direct mode (
) or 1-channel
mode (
), you cannot re-record presets.
When you re-record presets with the fixture in RGB
mode (
), the intensity is set to full and the strobe is
turned off.
See Changing the DMX control mode on page 9.
Page 8
ETC Installation Guide
ColorSource Linear v1.5
ColorSource Linear v1.5 Page 8 of 16 ETC
It is possible to activate a known preset or sequence from a connected fixture
when DMX is not present. If a connected fixture activates a preset or
sequence that is not recognized by the Linear fixture, the Linear fixture will
hold its last look. When DMX is restored, the DMX takes priority.
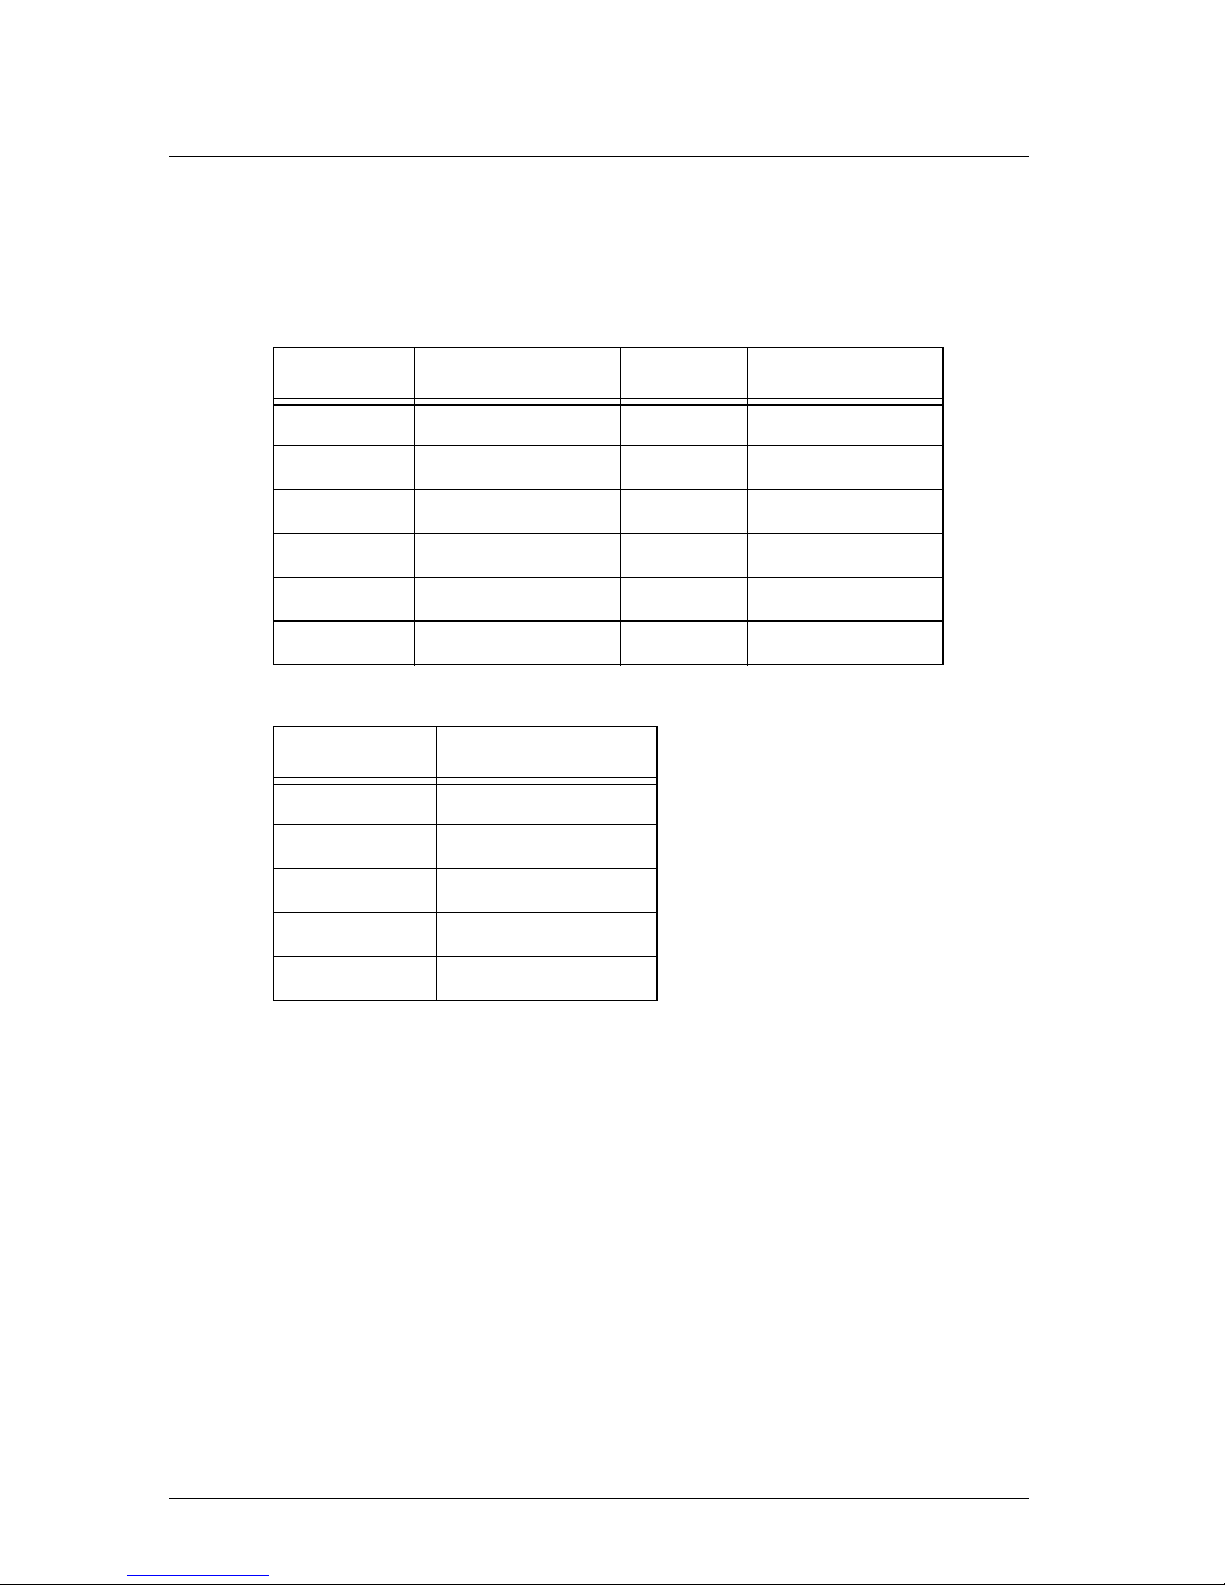
Pre-configured presets
Pre-configured sequences
Adjusting the intensity of presets
1: Ensure that DMX data is not present.
2: Press the Mode button to access the Preset/Sequence menu, and then
press the Up and Down buttons to select the preset that you want to
edit.
3: Hold the Mode button for 3 seconds. The display shows
: ## where
the number is an intensity level from , or .
4: Press the Up and Down buttons to change the intensity level of the
preset in real time.
5: Press the Mode button to confirm your selection and return to the
Preset/Sequence menu.
The display will automatically return to the Preset/Sequence menu after
10 seconds of inactivity, and edits to the preset intensity will not be saved.
Preset Name Preset Name
1 3200K White 7 Magenta
2 5600K White 8 Yellow
3 Red 9 Orange
4 Green 10 Light Yellow
5 Blue 11 Light Blue
6 Cyan 12 Light Pink
Sequence Name
1 Rainbow Fast
2 Rainbow Slow
3 Warm Colors Fast
4 Cool Colors Fast
5 Random
Page 9
ETC Installation Guide
ColorSource Linear v1.5
ColorSource Linear v1.5 Page 9 of 16 ETC
Changing the DMX control mode
You can set the DMX control mode for the fixture to one of four available
mode options.
1: Press the Mode button until the DMX address is displayed.
2: Hold the Mode button for 3 seconds. The display shows the current
DMX control mode.
3: Press the Up and Down buttons to change the DMX control mode.
• : 5-channel mode (intensity, red, green, blue, and strobe)
•
: Direct emitter control (intensity, red, green, blue, lime, and
strobe)
• : 1-channel mode controls the intensity of preset 1 (defaults to
3200K White)
•
: RGB mode (red, green, and blue)
4: Press the Mode button to confirm your selection.
The display will automatically return to the DMX address after 10 seconds of
inactivity, and edits to the DMX control mode will not be saved. This cancels
unsaved changes.
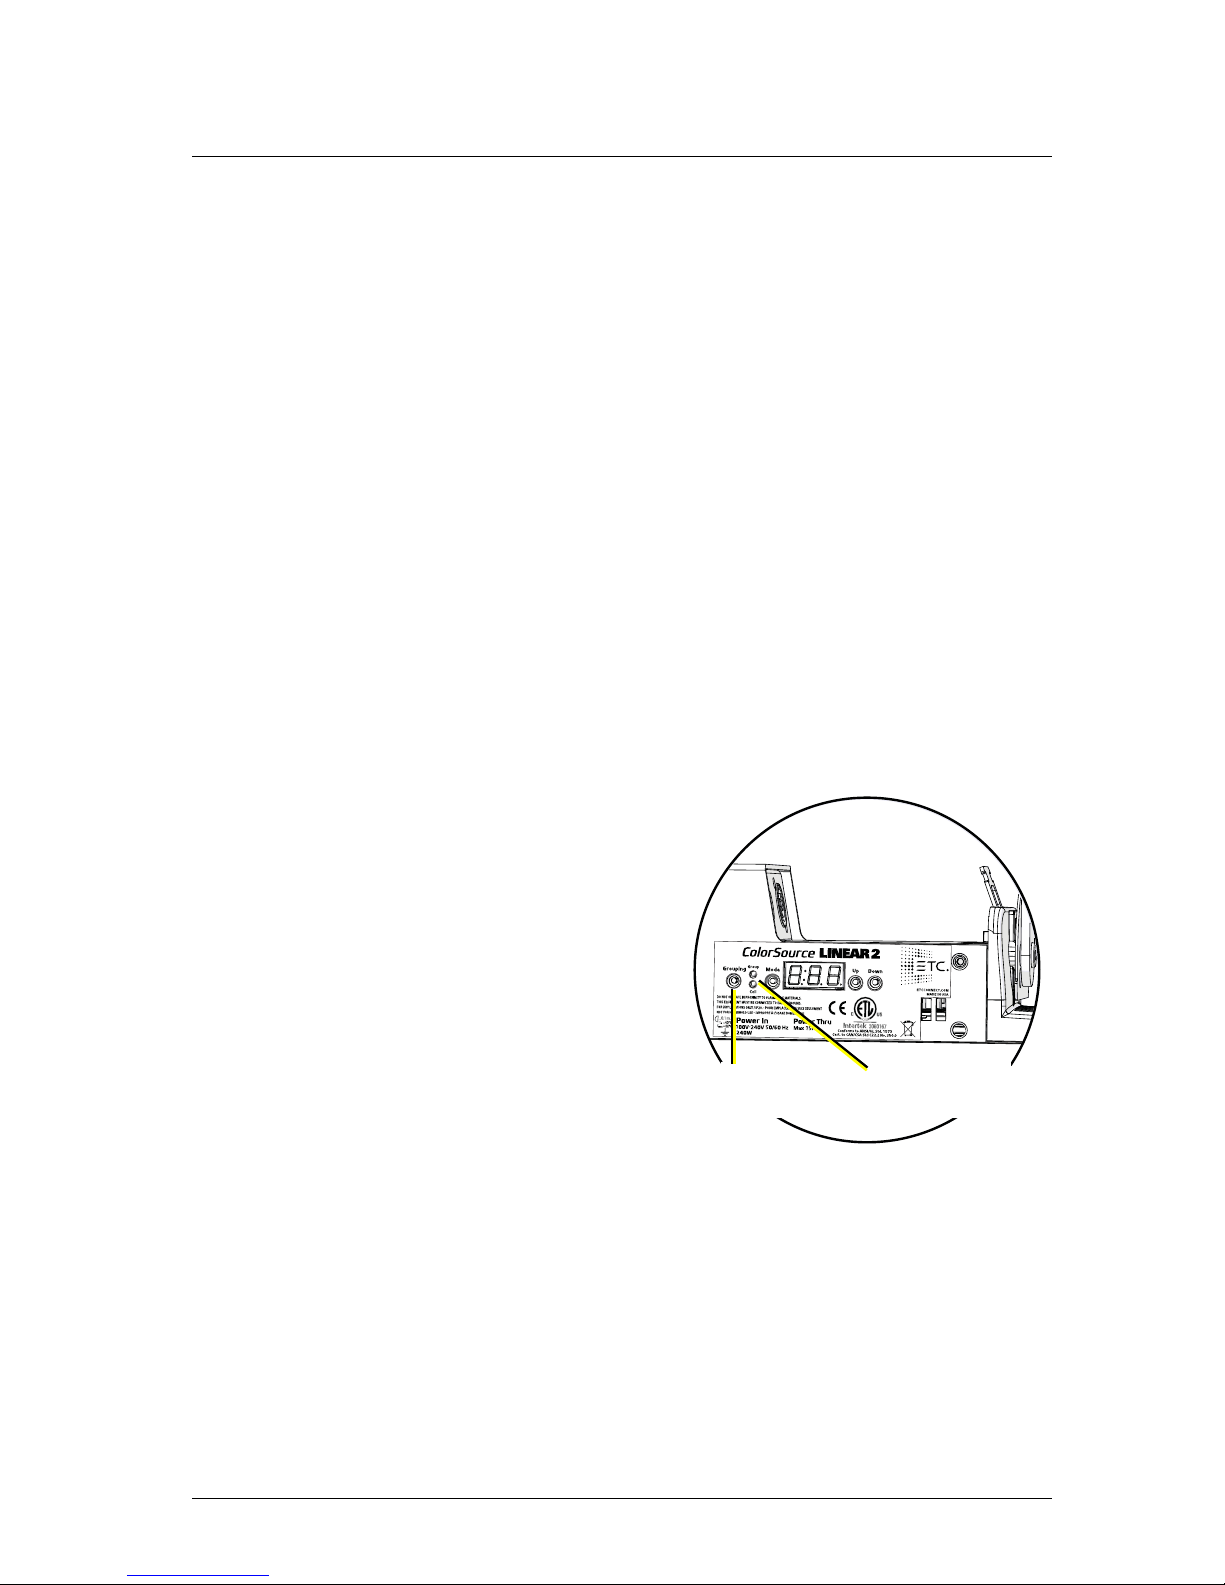
Setting the Grouping mode
The ColorSource Linear 2 and the
ColorSource Linear 4 fixtures have
two Grouping modes:
• Group: Entire array functions as
a single fixture.
• Cell: Each 0.5 m segment (or
“cell”) of the array functions as
a distinct fixture with a
separate DMX start address.
To set the Grouping mode, press the
Grouping button until the LED
indicator for the chosen mode
illuminates.
In Cell mode, each cell is assigned a DMX address based on the DMX address
of the fixture (see
Setting the DMX address
on
page 7
) and the current DMX
control mode (see
Changing the DMX control mode
on
page 9
). For example,
if you set the DMX address on the fixture to 100, set the DMX mode to
5-channel, and set the Grouping mode to Cell, the starting DMX address of
the first cell will be 100 and the starting DMX address of the second cell will
be 105.
Group and Cell
LED indicators
Grouping
button
Page 10
ETC Installation Guide
ColorSource Linear v1.5
ColorSource Linear v1.5 Page 10 of 16 ETC
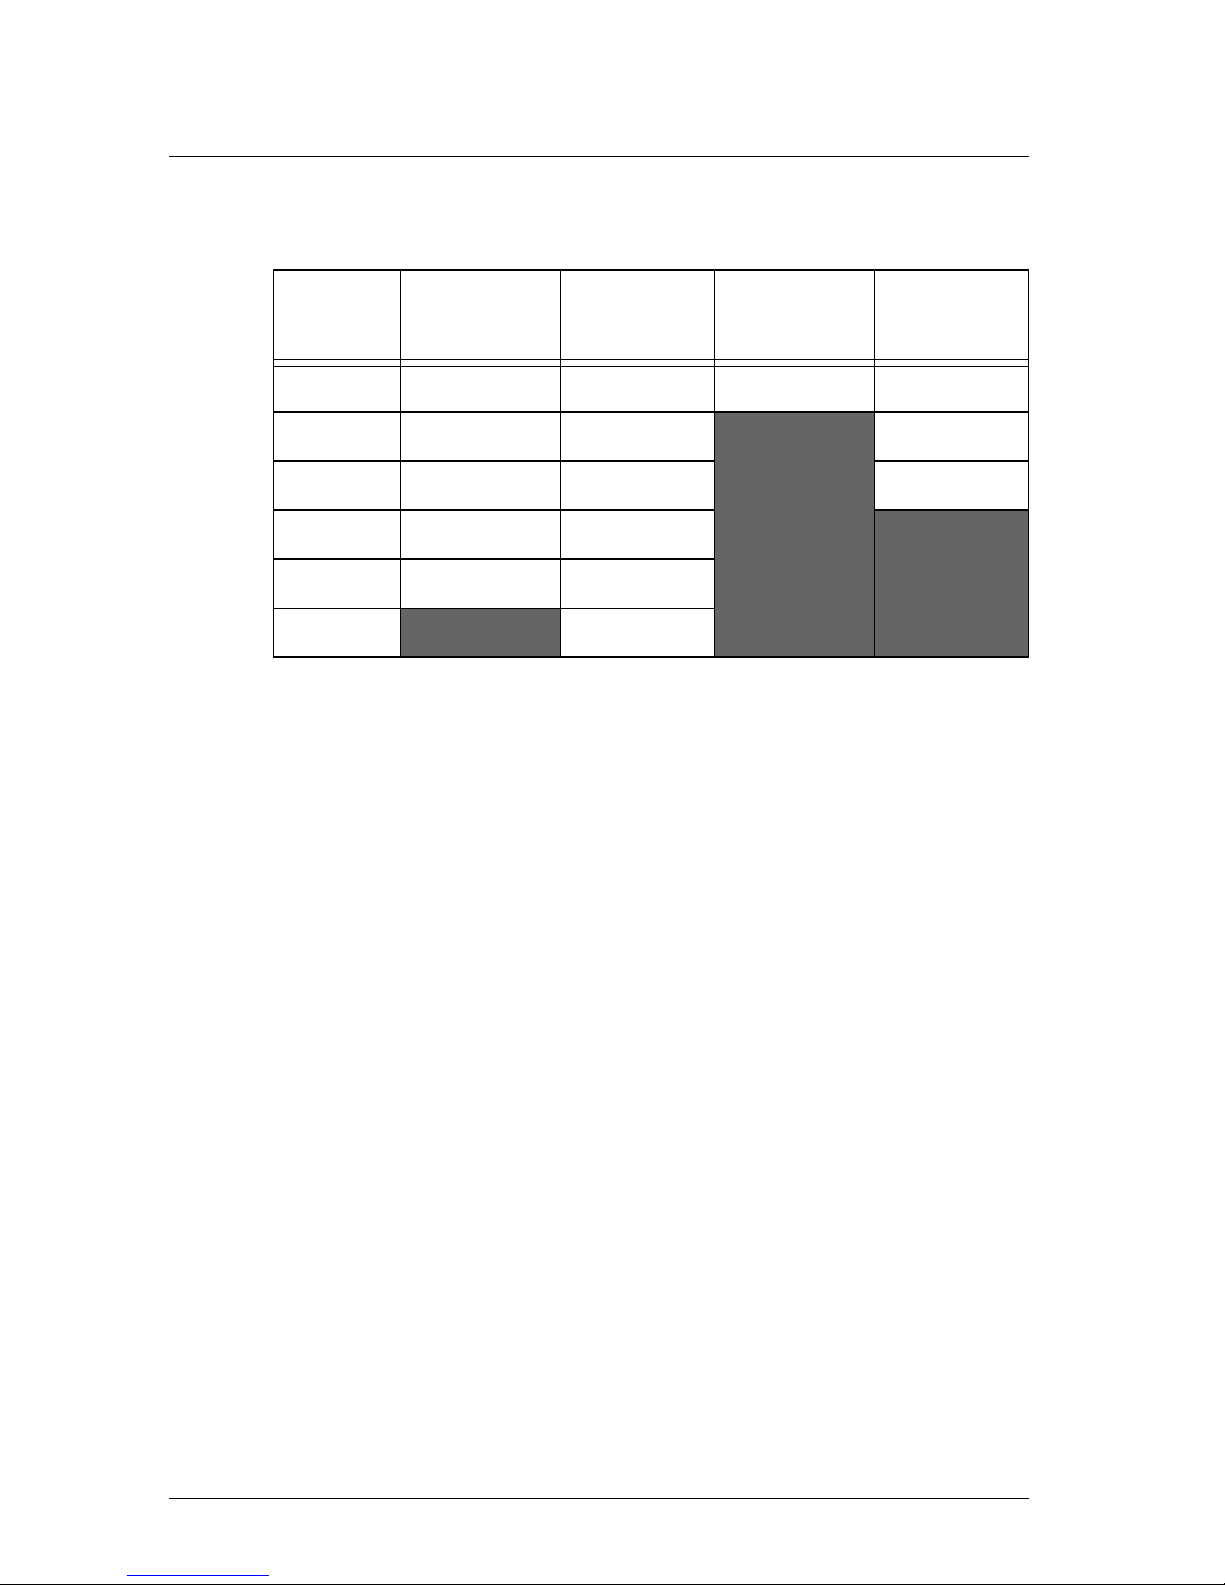
DMX control channels
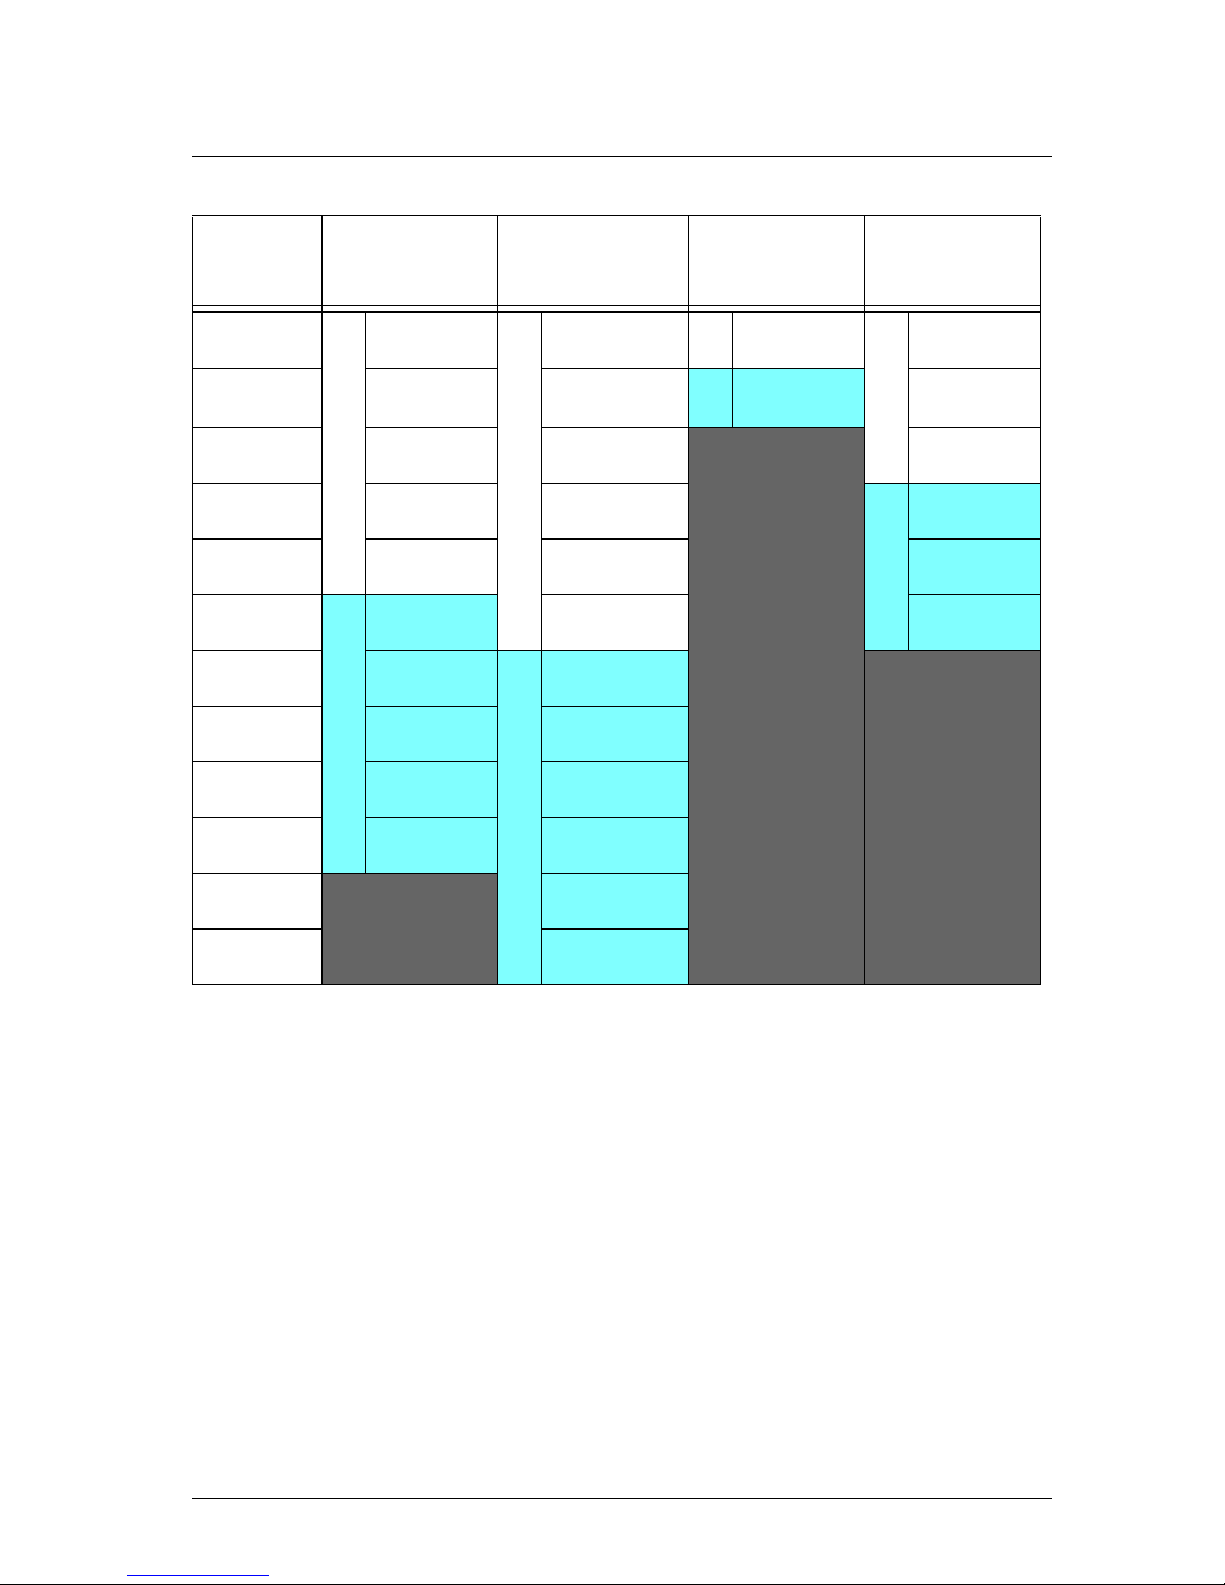
Linear 1 and Linear 2/Linear 4 in Group mode
*Original ColorSource Linear fixture uses blue in channel 4; Deep Blue
ColorSource Linear fixture uses indigo in channel 4.
DMX
Channel
(5 Channel)
dir
(Direct)
1ch
(1 Channel)
rgb
(RGB)
1 Intensity Intensity Intensity Red
2 Red Red Green
3 Green Green Blue
4Blue
Blue/Indigo*
5 Strobe Lime
6
Strobe
Page 11
ETC Installation Guide
ColorSource Linear v1.5
ColorSource Linear v1.5 Page 11 of 16 ETC
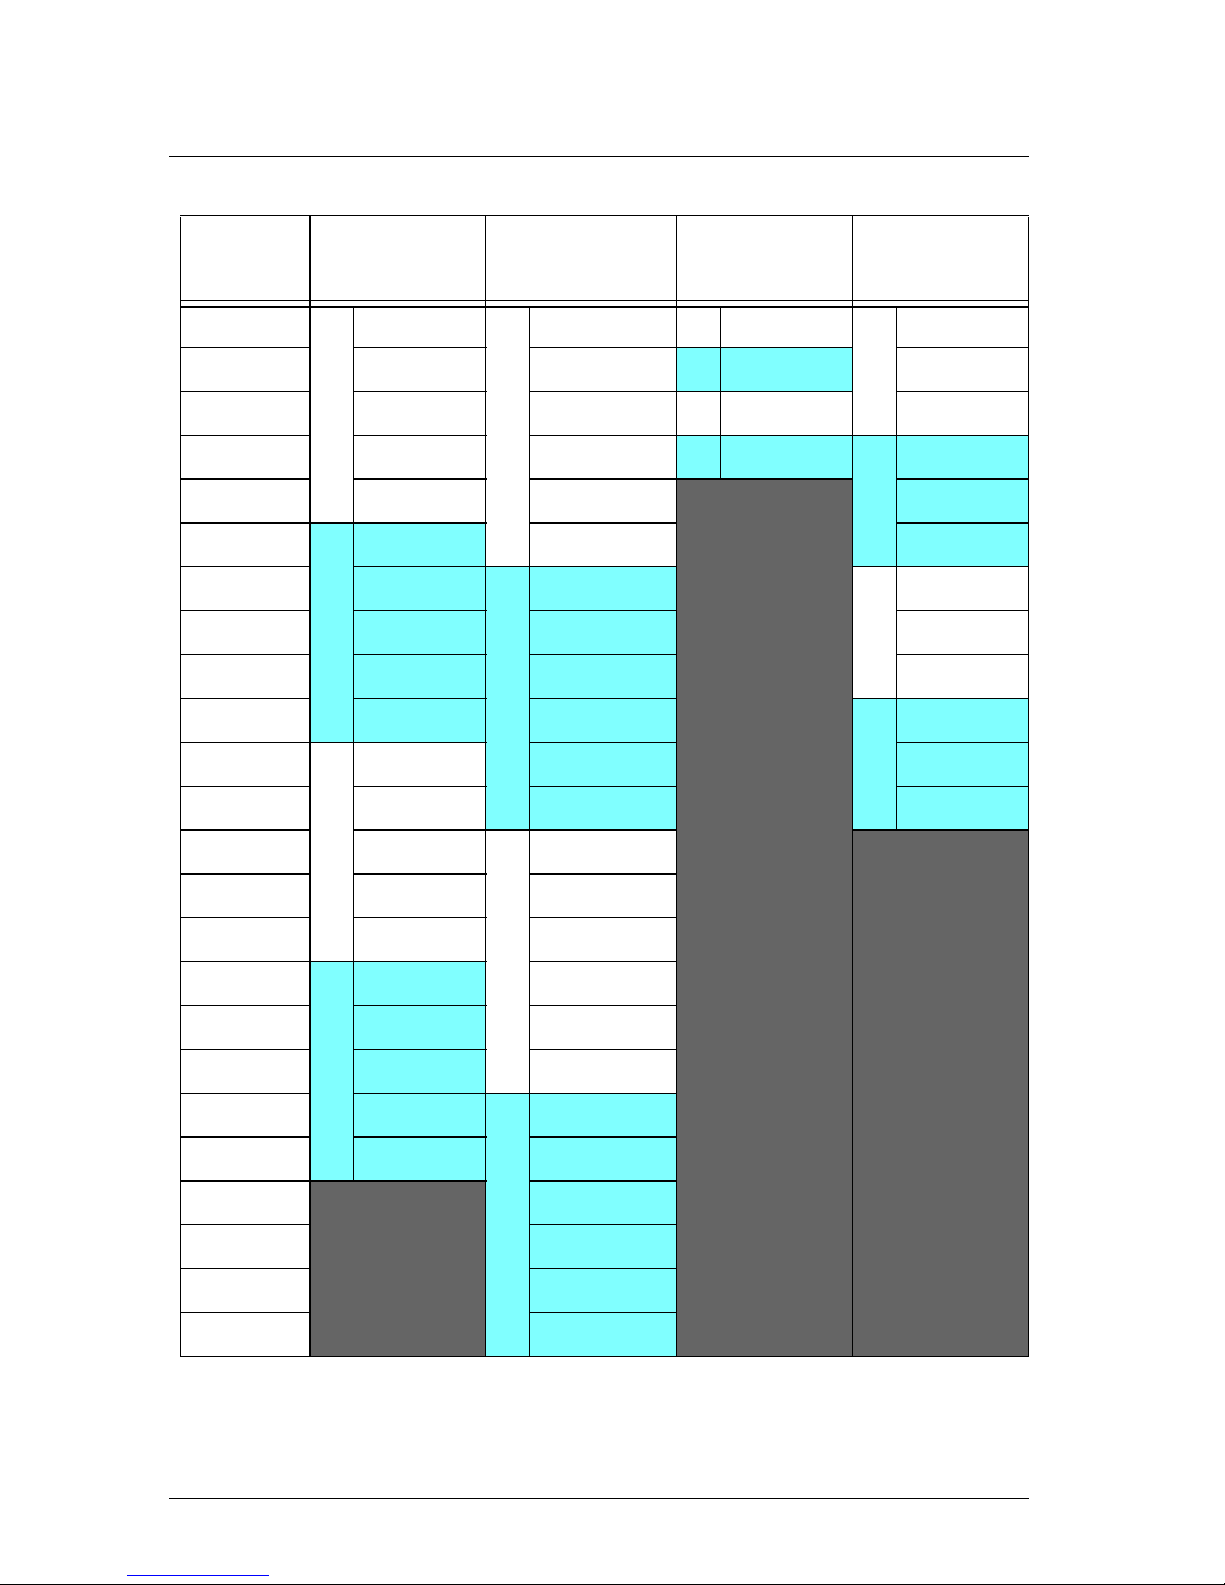
Linear 2 in Cell mode
*Original ColorSource Linear fixture uses blue; Deep Blue ColorSource Linear
fixture uses indigo.
DMX
Channel
(5 Channel)
(Direct)
(1 Channel)
(RGB)
1
Cell 1
Intensity
Cell 1
Intensity
C1
Intensity
Cell 1
Red
2 Red Red
C2
Intensity Green
3 Green Green Blue
4Blue
Blue/Indigo*
Cell 2
Red
5 Strobe Lime Green
6
Cell 2
Intensity Strobe Blue
7 Red
Cell 2
Intensity
8 Green Red
9 Blue Green
10 Strobe
Blue/Indigo*
11 Lime
12 Strobe
Page 12
ETC Installation Guide
ColorSource Linear v1.5
ColorSource Linear v1.5 Page 12 of 16 ETC
Linear 4 in Cell mode
*Original ColorSource Linear fixture uses blue; Deep Blue ColorSource Linear
fixture uses indigo.
DMX
Channel
(5 Channel)
(Direct)
(1 Channel)
(RGB)
1
Cell 1
Intensity
Cell 1
Intensity
C1
Intensity
Cell 1
Red
2 Red Red
C2
Intensity Green
3 Green Green
C3
Intensity Blue
4 Blue Blue/Indigo*
C4
Intensity
Cell 2
Red
5 Strobe Lime
Green
6
Cell 2
Intensity Strobe Blue
7
Red
Cell 2
Intensity
Cell 3
Red
8
Green Red Green
9
Blue Green Blue
10
Strobe Blue/Indigo*
Cell 4
Red
11
Cell 3
Intensity Lime Green
12 Red
Strobe Blue
13 Green
Cell 3
Intensity
14 Blue Red
15 Strobe Green
16
Cell 4
Intensity Blue/Indigo*
17
Red Lime
18
Green Strobe
19
Blue
Cell 4
Intensity
20
Strobe Red
21
Green
22
Blue/Indigo*
23
Lime
24
Strobe
Page 13

ETC Installation Guide
ColorSource Linear v1.5
ColorSource Linear v1.5 Page 13 of 16 ETC
Locking the user interface
After you have set up the fixture, you can lock the user interface to prevent
additional changes.
1: Hold the Up and Down buttons simultaneously for 3 seconds. The
display will show
to indicate that the user interface is locked.
2: To unlock the user interface, hold the Up and Down buttons
simultaneously for 3 seconds.
Updating the fixture software
ETC recommends using UpdaterAtor software to manage software updates.
For more information on UpdaterAtor, see the
UpdaterAtor Software Quick
Guide,
which you can download for free from etcconnect.com.
When you add a ColorSource fixture running a newer software version or
update a ColorSource fixture to a newer software version using UpdaterAtor,
you can use that fixture to push the newer software version to all connected
ColorSource fixtures.
You can push newer software versions from a connected fixture only on
ColorSource fixtures running software v1.3.0 or newer. Use UpdaterAtor to
update individual fixtures running versions older than v1.3.0.
1: Remove power and DMX from the master fixture that is running the
software version that you want to push to other fixtures.
2: Hold the Up and Down buttons simultaneously while restoring power.
3: The display will show
to indicate the update mode is
selected.
4: Press the Mode button to start the update process.
• The display will alternate between
and the percentage
complete while updating.
• The master fixture will reboot once the update is complete.
Page 14
ETC Installation Guide
ColorSource Linear v1.5
ColorSource Linear v1.5 Page 14 of 16 ETC
Installing secondary lenses
You can use several
optional accessories with
the ColorSource Linear,
including secondary
lenses (horizontal,
vertical, and round). You
can use either a single
lens or two lenses
simultaneously, and you
can install them from
either end of the fixture.
For the Linear 2 and
Linear 4 fixtures, order
one accessory for each
0.5 meter segment (cell)
of the fixture.
Spacers for secondary lenses are included with the fixture.
Use these spacers to hold the accessories in position when
multiple lenses are used in the Linear 2 and Linear 4
fixtures.
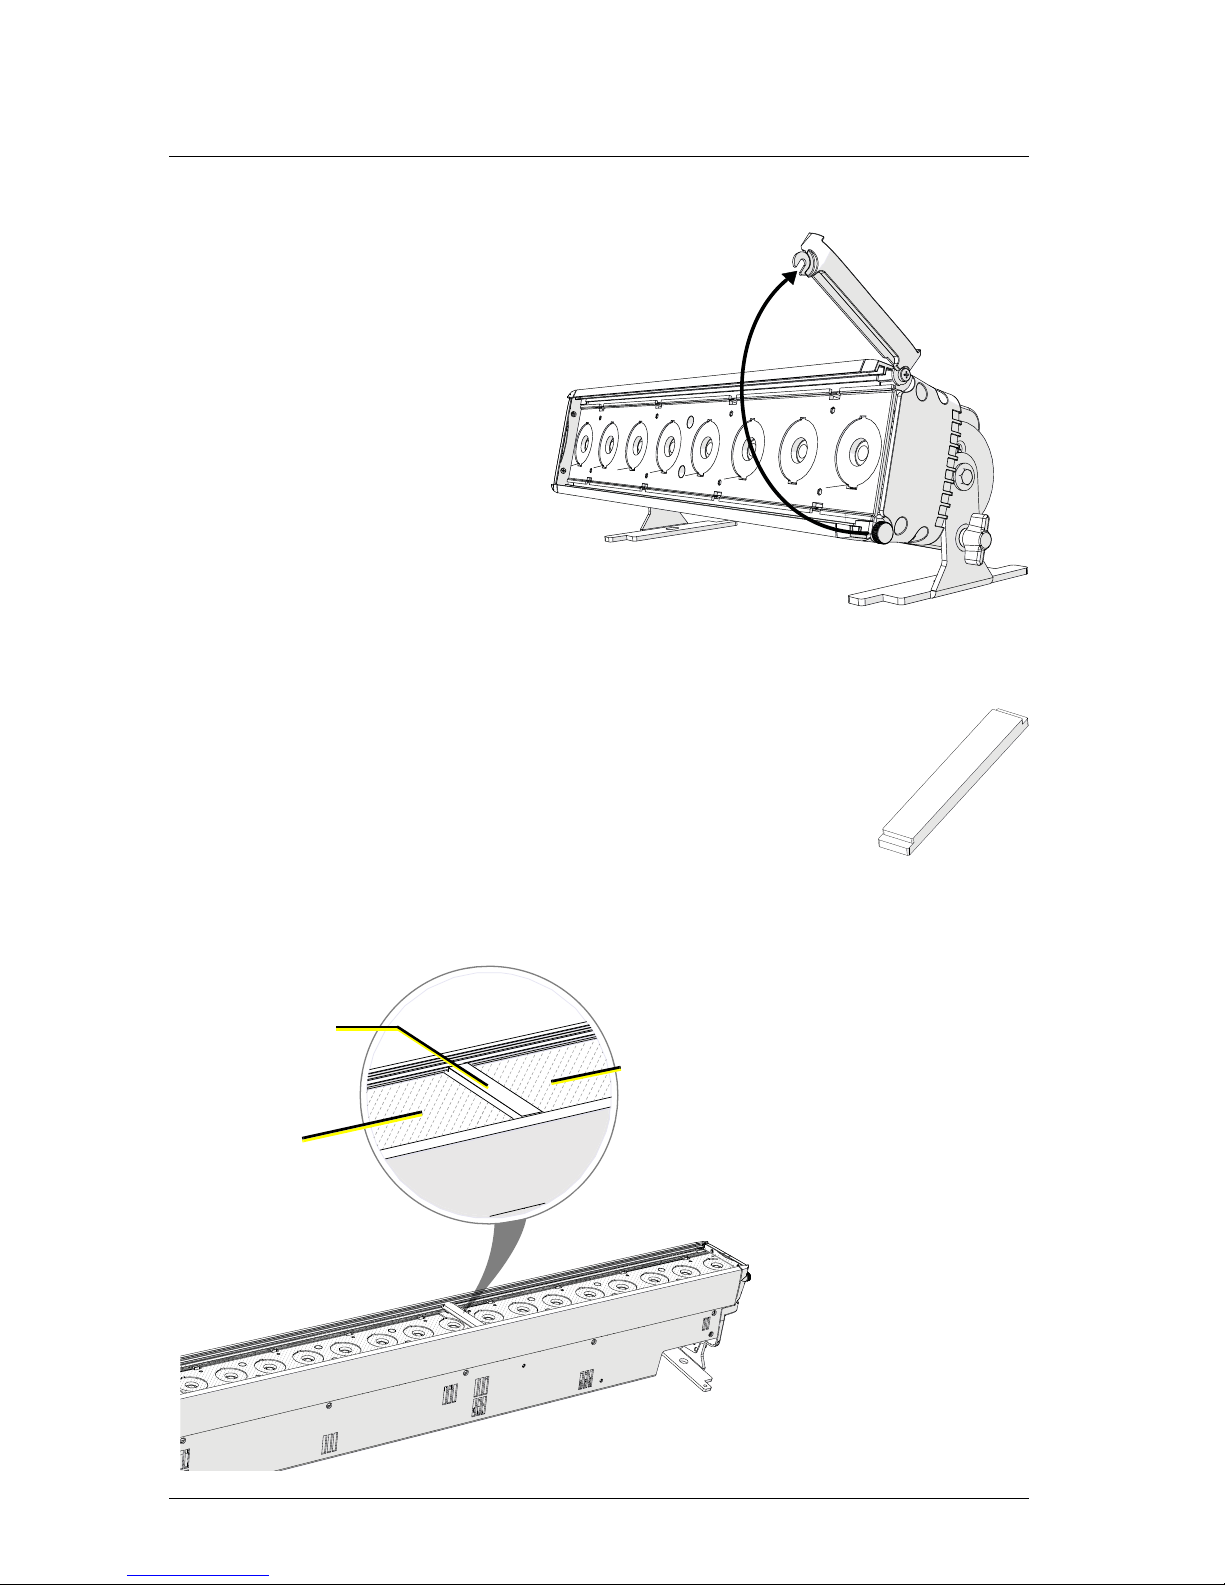
1: Loosen the thumbscrew on the access panel on
either end of the fixture.
2: Pivot the access panel until you can access the slots
above the LEDs.
1: Loosen
2: Pivot
(ColorSource Linear 1 shown)
Spacer
3: Slide the secondary
lens (or lenses) into
either of the slots
above the LEDs.
For the Linear 2 and
Linear 4 fixtures,
position spacers
between the lenses
for the cells (in the
same slot as the
lenses). See image at
left.
4: Pivot the access panel
back into place and
tighten the
thumbscrew.
Secondary
Lens
Secondary
Lens
Spacer
Page 15

ETC Installation Guide
ColorSource Linear v1.5
ColorSource Linear v1.5 Page 15 of 16 ETC
Restoring factory defaults
Press and hold the Mode, Up, and Down buttons simultaneously for
5 seconds. The DMX start address will blink once to confirm that defaults
have been restored.
Error codes
There are three error codes that may be shown on the user interface.
• : Screen toggles between and to indicate a problem
with the color calibration. The fixture will need to be returned to the
ETC factory; contact your local dealer to set up a repair.
•
: Screen toggles between and to indicate that the
fixture has gone into over-temperature protection mode to avoid
damaging the fixture. Once the fixture has self-cooled, the error will
automatically clear.
•
: Screen toggles between and to indicate that the
upgraded fixtures have a software issue. Reload software to clear the
error. If the error persists, contact ETC.
Page 16
ETC Installation Guide
ColorSource Linear v1.5
ColorSource Linear v1.5 Page 16 of 16 ETC
Using RDM
RDM and Grouping modes
Linear 2 and Linear 4 fixtures in Cell mode contain 2 sub-devices (Linear 2) or
4 sub-devices (Linear 4). Use DMX_BLOCK_ADDRESS to set the DMX address
of the first cell, and the remaining cells will be numbered sequentially from
that starting value.
RDM also allows you to use nonsequential DMX addresses, if desired. The
fixture displays “---” for the DMX address to indicate nonsequential DMX
addressing. If you set up nonsequential DMX addresses and then change the
DMX address at the fixture, however, the fixture will return to sequential
DMX addressing.
Linear 2 and Linear 4 fixtures in Group mode do not use sub-devices.
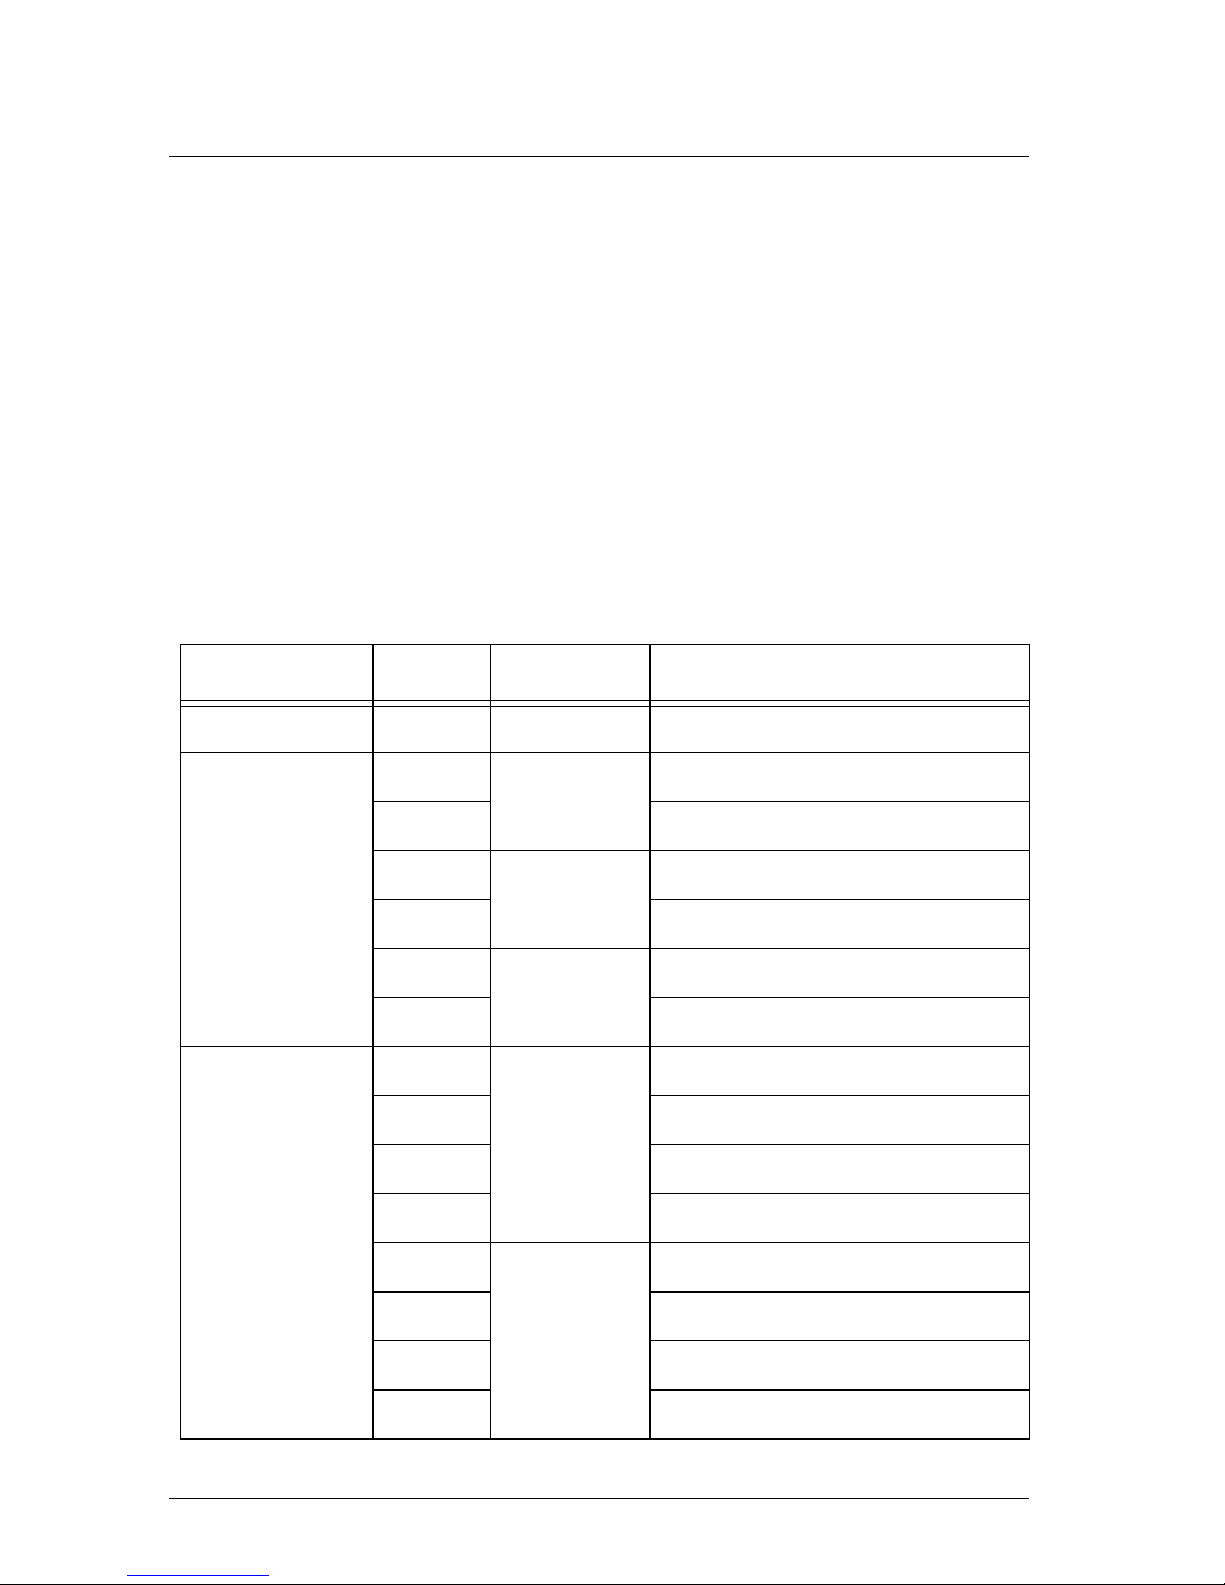
RDM Values
Parameter Value Fixture Description
Manufacturer ID 0x6574 All
Electronic Theatre Controls
Model ID
0x0209
Linear 1
ETC ColorSource Linear 1
0x020A
ETC ColorSource Linear 1 Deep Blue
0x020D
Linear 2
ETC ColorSource Linear 2
0x020E
ETC ColorSource Linear 2 Deep Blue
0x0211
Linear 4
ETC ColorSource Linear 4
0x0212
ETC ColorSource Linear 4 Deep Blue
Personality ID
1
Linear 1;
Linear 2 and
Linear 4 in
Group mode
5 Channel
2
Direct
3
1 Channel
4
RGB
5
Linear 2 and
Linear 4 in
Cell mode
5 Channel
6
Direct
7
1 Channel
8
RGB
 Loading...