


1 |
|
|
- |
. |
|
|
|
|
|
R |
|
|
|
|
|
V1 |
|
‘S H |
|
ER |
L |
||
|
C |
||
N |
A |
||
W |
NU |
|
|
O A |
|
|
|
M |
|
|
|
VNC730 FI-DUCATO VN730 FI-DUCATO

INTRODUCTION
Always follow the instructions in this manual before using the device. Please keep this manual easily accessible in the vehicle for future reference.
Features
•iGo Primo, 3D Navisoftware on 8GB SD card, 46 countries including Turkey with Points of Interests display and search function,
3D building views, TTS voice output, warnings, over 25 system and prompt languagesLatest Map Guarantee (30 days) after activation via www.naviextras.com. The model VNC730 FI-DUCATO has a special navigation software extension for Trucks & Camper with camping POI‘s and editable vehicle parameters
•Integrated TMCpro Transmitter to avoid traffic jams and disabilities (dynamic route guidance)
•High-resolution 17.8 cm (7“) LCD touchscreen display with 800 x 480 pixels
•Advanced i20 operating system based on Microsoft Windows CE 6
•MTK Dual Core Cortex A9+A11 800 MHz CPU, 256MB DDR3 RAM, 256MB NAND Flash RAM
•Audio amplifier with 4 x 50 Watts max.
•Pre-amplifier outputs Subwoofer/Center/2 x Front/2 x Rear
•DSP-Audioprocessor with 10-Band-Equalizer and 5.1 Surround-Sound
•Bluetooth™ handsfree, phone book synchronization and A2DP audio streaming
•Media playback (MP3/WMA/MPEG4/MPEG1/2/WMV/AVI/DivX/FLAC etc.), supports FullHD 1080p (1920 x 1080) playback
•Quick-Boot (approx. 10 seconds)
•Support ACC Logic: the device can be operated up to 30 minutes without ignition
•DVD-Player (DVD, DVD-R/RW, DVD+R/RW, VCD, CD, CD-Text, CD-R/RW, MP3)
•Radio AM/FM with RDS function (supports Europe, North America, Asia)
•Virtual Disk to convert audio CDs into MP3 format
•E-LINK mirror function with compatible Android smart phones
•Quick Charge USB function with up to 2.1A charge current
•Voice control (except navigation)
•Custom design function (wallpaper, startup logo, menu)Several design themes (skins) for customizing the user interface
•Individually adjustable pre-channel volume for each application
•File manager with an open file structure, photo slideshow
•MicroSD card slot and USB port with copy function
•Integration of external applications (Compatible with Windows CE 6)
•Date/time function, 12/24 hrs. display
•3 x Audio/Video output
•2 x Audio/Video input
•Front and rear camera inputs
•Supports CANBUS functions (Model Type 290)
•Supports analog steering wheel remote control
•Supports 2D-/3D navigation maps with TMCpro function
•Supports external TV or radio receivers (DVB-T, DAB, etc.)
•Supports iPod / iPhone™ with ID3 tag display via USB (compatible with iPhone 5/6), with media library, cover display and ID3 Tag display
•Supports Multifunction Display (Model Type 290)
Compatibility (Status March 2016)
Fiat Ducato III, Citroen Jumper II and Peugeot Boxer II (Type 250, since 2006*) Fiat Ducato IV, Citroen Jumper III and Peugeot Boxer III (Type 290, since 2015*)
*possibly with restrictions on OEM radio/navigation and increased installation efforts
Note:
Plug and Play installation on the models Type 250/290 with radio preparation.
Requires additional efforts and installation materials for models with CANBUS/OEM radio work - Refer to the installation guide.
Windows is a registered trademark of Microsoft Corporation in the United States and other countries. iPod and iPhone are trademarks of Apple Inc.. The Bluetooth word mark is registered trademark owned by Bluetooth SIG, Inc. Other trademarks, trade names or brands are the property of their respective owners.
2

INDEX
Safety Information................................................................................................................................... |
4 |
Basic functions......................................................................................................................................... |
6 |
Operating elements.................................................................................................................................................................. |
6 |
Main menu............................................................................................................................................................................... |
7 |
Navigation................................................................................................................................................................................ |
8 |
Multimedia Player.................................................................................................................................................................... |
9 |
Radio..................................................................................................................................................................................... |
11 |
Bluetooth™........................................................................................................................................................................... |
15 |
Apps...................................................................................................................................................................................... |
17 |
– DVD (DVD/CD-Player).......................................................................................................................................................... |
18 |
– LinkPod............................................................................................................................................................................... |
19 |
– AV/TV.................................................................................................................................................................................. |
20 |
– A2DP.................................................................................................................................................................................. |
21 |
– Audio.................................................................................................................................................................................. |
22 |
– Files.................................................................................................................................................................................... |
25 |
– Virtual Disk......................................................................................................................................................................... |
26 |
– E-Link................................................................................................................................................................................. |
28 |
– Quick Charge...................................................................................................................................................................... |
29 |
– Options............................................................................................................................................................................... |
30 |
Custom settings..................................................................................................................................... |
36 |
Menu assignments................................................................................................................................................................. |
36 |
Wallpaper.............................................................................................................................................................................. |
37 |
Start logo............................................................................................................................................................................... |
38 |
Additional functions............................................................................................................................... |
39 |
Infrared remote control.......................................................................................................................................................... |
39 |
Multifunction steering wheel.................................................................................................................................................. |
40 |
Limited media playback......................................................................................................................................................... |
41 |
Optional rearview camera (OPS)............................................................................................................................................. |
41 |
Troubleshooting...................................................................................................................................... |
42 |
General notes......................................................................................................................................... |
46 |
3

SAFETY INFORMATION
•In general, the assembly and installation of the device must be performed by a trained and technically skilled specialists, as the installation and connection of the device requires complex knowledge.
•This device is only suitable for the operation in a vehicle with an on-board voltage of 12 volts, negative ground.
•Improper installation or use may void the warranty.
•Note any time the traffic regulations of the country in which the device is operated.
•Please ensure, that with the engine turned off the vehicle‘s battery does not discharge fully. The device is another electrical consumer which must be operated with the engine running, other-wise the vehicle‘s battery will be discharged and the vehicle can not be started.
•Set the volume of the device only as loud, that you are still be able to hear warning signals (e.g. police sirens) and traffic noise inside the vehicle.
•Operate the device as driver only if it‘s absolutely necessary and in the driving safety is not compromised. The same stands for looking at the screen. If necessary, better park your vehicle at a safe and appropriate location.
•The traffic rules of the EU prohibit to view moving pictures or movies while driving, if the screen of the device is installed within sight of the driver, as he may be distracted. View the screen as driver only for the navigation function, and then only briefly that you will not be distracted. Note at any time the local traffic regulations. In an accident, regress claims could be made by the car insurance company.
•This device is not a substitute for your personal judgment or perception. All suggested routes from the navigation system should never be taken as a reason to disregard the local traffic rules. Your personal assessment of traffic or your knowledge of safe driving practices is paramount. Always match your driving with the current traffic situation.
•Do not follow the suggested routes, if the navigation system instructs you to take an unsafe or illegal way, puts you in an unsafe situation, or directs you into an area which you consider unsafe.
•If problems occur while driving, park the vehicle in a safe and appropriate place to continue before you operate.
4

SAFETY INFORMATION
•The device supports only DVD/CD standard disk size of diameter with 12 cm. Do not attempt to insert disks with a different size or any other object into the disk slot. Be sure to load only one disk at the same time.
•Please use only the included original accessories. Ensure a sufficient mounting of the device by using the included installation accessories, as in the event of an accident enormous accelerations may occur. Poorly installed devices and equipment in accidents could represent a severe risk to the driver and the other passengers of the vehicle.
•Note under all circumstances the regulations and advice of the vehicle manufacturer and do not make any modifications to the vehicle, which could interfere with safe driving. Please treat all parts of the device and the components of your vehicle always with caution.
•Please avoid short circuits and make sure that no metal objects can get inside the device. Also make sure that all connections are properly connected and avoid the interchanging of the polarity of all connections. Complete the installation only while the ignition is turned off.
•In the event of a defect or malfunction, do not attempt to repair it by yourself or open the device, this is dangerous and could cause injury or damage to the equipment or vehicle. A repair should be done by trained and authorized personnel only. The device uses a Class 1 laser to read the disk. Eye contact with a laser is very dangerous to the human eye.
•If you connect an external device, you should first read the instruction manual of the external device and make sure that it is compatible. Avoid connecting an incompatible external device.
•If you install external applications onto the operating system of the device or operate files, make sure that they are „virus free“ and compatible with Windows CE 6. Otherwise there is a risk that the operating system no longer works properly and must be reinstalled.
•Do not damage or scratch the screen with sharp objects. Do not operate the screen with hard objects.
•Please refer the notes in chapter GENERAL NOTES on page 46
This symbol indicates important information and instructions in this manual, which serve to improve traffic safety and operability of the device.
5
BASIC FUNCTIONS
 OPERATING ELEMENTS
1 |
2 |
3 |
|
|
|
|
|
|
4 |
|
|
|
|||||
5 |
|
|
|
|
|
|
6 |
|
|
|
|
|
|
||
7 |
|
|
|
|
|
|
8 |
|
|
|
|
|
|
||
9 |
|
|
|
|
|
10 |
|
|
|
|
|
|
|||
11 |
|
|
|
|
|
12 |
|
|
|
|
|
|
|||
13 |
14 |
|
|
||||
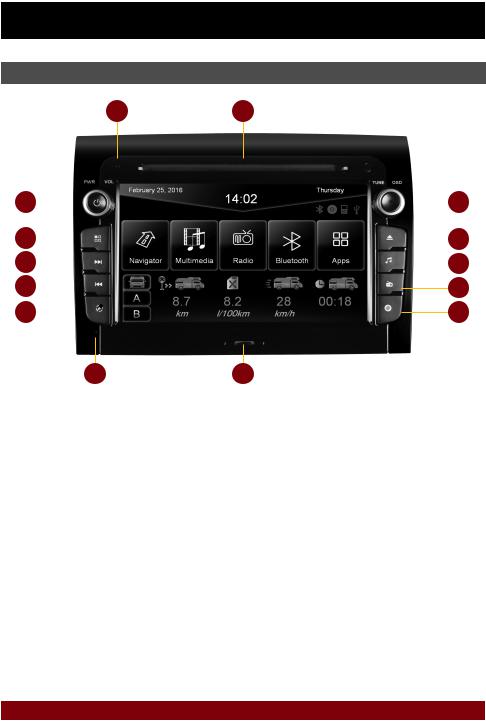
1.Internal Bluetooth microphone.
2.Slot for CD/DVD disks (Ø 12 cm).
3.Mute (short push) or the device switches to stand-by (push and hold - no audio, display darkens, running navigation stops, Bluetooth connection interrupts).
Volume controller (rotate).
4.Controller knob for selecting or switching in the user menus.
Push knob to open the audio settings
To display the rear view cam (if connected, push on the knob shortly.
When ignition is off, press and hold: Device turns on for 30 minutes.
5.Open the main menu (short push). Open Voice Control (push and hold)
6.Eject the inserted CD/DVD.
7.Skip to the next track/title/station/chapter.
8.Start the USB media playback
9.Skip to the previous track/title/station/chapter.
10.Open the radio mode (short push) or open the DAB+ radio if connected (push and hold).
11.Open the navigation system.
12.Start the DVD/CD player
13.Reset button
14.MicroSD card slot.
6

BASIC FUNCTIONS
 MAIN MENU
After power on, the device starts with the main menu. By pressing the „
 “
“ button on the device, you can always get to the main menu too.
1
2
3
4
1.Depending on the selected design theme (Skin), the current date and time will be displayed here.
2.The four function icons are (depending on the skin) is highlighted in white and thus activated when the corresponding function is in use, such as „Bluetooth connection“, „CD / DVD in the drive“, „iPod connection“ or „USB connection“.
3.The main menu displays four to eight key panels, which start the selected application or lead to the regarding sub menu. In chapter „CUSTOM SETTINGS“, section „Menu assignments“ (Pg. 29) shows how to customize and arrange the key panels.
4.Here the driving data from the onboard computer (Trip Manager) like traveled distance or average fuel consumption will be displayed. Under A and B you can choose between two profiles. This feature is only available on the model Type 290 and a connected CANBUS - refer to the installation guide.
Basically, the device can operate several applications simultaneously. But if too many extensive applications running at the same time, it can slow the operation (not responding to your input) or even crash the system.
7

BASIC FUNCTIONS
 NAVIGATION
Open the navigation application by tapping „Navigator“ in the main menu or by pressing the „ “ button on the device.
Please refer to the separate manual for the navigation software.
The device provides the ability to use any navigation software (Windows CE 6.0 compatible). Patch the navigation software (on MicroSD card) with the device as follows:
Tap on „Option“. |
Tap on „System“. |
Tap on „Browse“. |
Tap on „SD“ and then select the software on the Mi- |
|
croSD card with a double click. This navigation software |
|
is starting as soon as you tap on „Navigation“ in the main |
|
or push the „NAVI“ buttons on the device. |
|
Note: If you have accidentally changed the path and |
|
want to use the original ESX iGO software, the path must |
|
be always „\Storage Card\NaviOne\Navione.exe“. |
The unit receives GPS satellite signals automatically. In poor weather conditions or for example while passing a tunnel, these signals may be disturbed. This could lead to a malfunction of the GPS positioning.
8

BASIC FUNCTIONS
 MULTIMEDIA-PLAYER
By tapping on „Multimedia“ in the main menu, the source selection USB or SD opens for playing audio and movie files. Push the „ “ button on the device and USB playback opens directly. Refer to page 14 for CD Audio playback.
1 |
2 |
3 |
4 |
5 |
|
|
|
6 |
|
|
7 |
|
|
|
|
|
|
|
8 |
|
|
|
|
|
|
|
||
|
|
|
|
|
|
|
|
|
|
|
|
|
|
|
|
|
|
9 |
10 |
11 |
12 |
13 |
|
|
||
1.Tap here to enter the main menu without interrupting the playback of the current title.
2.Current time.
3.Information about the current audio file.
4.Tap here to exit the application, the playback will be interrupted.
5.ID3-Tag album cover of the current audio file.
6.Title/artist/album information of the current audio file.
7.Progress bar of the currently playing audio file. With the displacement of the knob you can jump to another point in the track.
8.Elapsed time and the total time of the track.
9.Tap here to open folder list or to change the play mode (music or video).
10.Playback controls for audio player
-Play previous track
-Start or pause playback
-Play next track
11.Repeat function
-Repeat all titles
-Repeat only the current folder
-Repeat single track
12.Tap here to start random playback
13.Tap on „Audio“ to open the audio settings.
9

BASIC FUNCTIONS
FOLDER PLAYBACK
Tap the folder icon in the multimedia menu at the bottom left (See page 9, # 9) and the currently played folder
Is displayed. You can now scroll through the list (move the list down / up with your finger, or scroll the page side by side with the arrows).
Tap a track to select it directly. Tap „go back“ to go up one directory level and select another folder.
Tap a folder to open it to play another song.
Tap the bar in the upper left to return to playback or „X“ in the top right to close the multimedia player and pause playback.
REPEAT FUNCTION
Symbol 1: When the last song has been played within a folder, the playback will continue to the next folder. After the last song, playback starts again from the beginning.
Symbol 2: The current folder is repeated Symbol 3: A single track is repeated
RANDOM PLAY
To shuffle all tracks or all tracks within a folder (if a folder was previously selected).
MOVIE PLAYBACK
Select the folder icon and then „Movie“ on the bottom right. Now all movie files of the connected media are displayed. Are these located in several folders, you can switch to a different directory with „go back“ like in the music player.The „Repeat Function“ and „Random Play“ have the same function as in the music player. Tap during the full screen playback shortly at any point on the screen to open playback options.
Note: The playback of a movie file is only possible if the hand brake is closed.
If the playback does not start (a USB stick can not be detected or the source selection is not working as expected) close the multimedia player with „X“ top right (page 9, # 4) and restart it.
10
BASIC FUNCTIONS
 RADIO
RADIO
Open the radio application by tapping on „Radio“ in the main menu or by pressing the „ “ button on the device.
1 |
2 |
3 |
4 |
5 |
6 |
|
|
|
|
||||
7 |
|
|
|
|
|
|
|
|
|
|
|
|
|
|
|
|
|
|
|
|
|
|
|
|
|
|
|
8 |
|
|
|
|
|
|
|
|
|
|
|
|
9 |
|
|
|
|
|
|
|
|
|
|
|
|
||
10 |
|
|
|
|
|
|
|
|
|
|
|
|
|
|
|
|
|
|
|
|
|
|
|
|
|
|
|
|
|
|
|
|
|
|
|
12 |
|||||
|
|
|
|
|
|
|
|
||||||
11 |
|
|
|
|
|
|
|
|
|||||
|
|
|
|
|
|
|
|
|
|
|
|
|
|
|
|
|
|
|
|
|
|
|
|
|
|
|
|
13 |
14 |
15 |
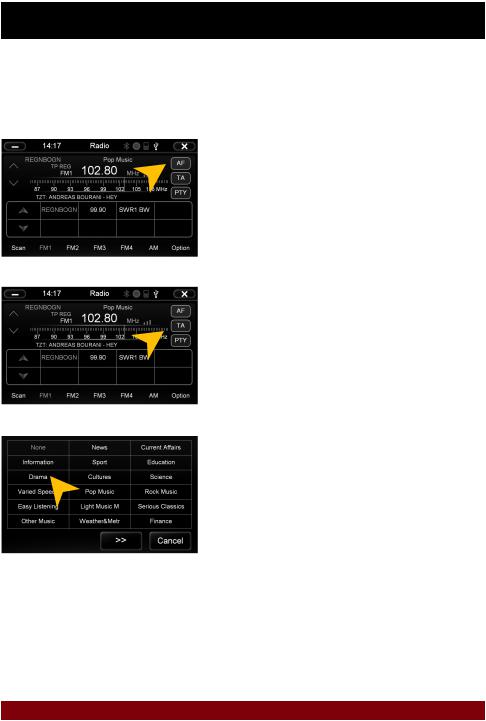
1.Tap here to enter the main menu without interrupting the radio playback.
2.Current time.
3.Displays the current frequency band and the current station frequency, tap here for directly quick tuning.
4.PTY category of the current station.
5.Signal strength of the current station.
6.Tap here to exit the application, the playback will be interrupted.
7.Signal strength of the current station.
8.Fine adjustment of the frequency, Arrow left for downward, arrow right upwards.
9.RDS (AF, TA, PTY) features.
10.RDS information of the current station.
11.With the arrows you can quick-start the search for a station from the current frequency up or down.
12.Station presets.
13.Press „Scan“ about 2 seconds to start the automatic radio station search. Then up to 32 currently available stations will be stored in all four the station presets.
Note: All previously stored stations will be erased and overwrote.
A quick tap on the icon enables a jump to the next available station.
14.Tap here to the open the different preset pages, with 8 station presets each.
15.Tap here to open the settings.
11

BASIC FUNCTIONS
Settings and station presets
Tap on the „gear“ icon to open the settings and then: „Rename Station“ to rename the current radio station.
„Delete Station“ to delete the current radio station from the presets.
„Delete All Stations“ to delete all radio stations from the presets.
„Local Setting“ to open the settings for the local radio frequency standards.
„Audio“ to open the audio settings. Refer to the instructions in section „Audio“ in the „APPS“ menu.
REG OFF and REG ON switches the RDS function „REGIONAL“ on or off. If the menu shows „REG OFF“, the regional function is activated.
“EON ON” or “EON OFF” to switch the “Enhanced Other Networks (EON)” on or off. This feature allows you to receive traffic information (TA), even if the currently selected channel does not have a TA program.
„Mono“, to switch off the „stereo“-mode manually on weak radio stations.
Rename Station:
Tap on the white input box to change the radio station name by using the screen keyboard.
Tap on „Name as freq.“ to set the frequency as radio station name.
Confirm your entry with „OK“ or tap „Cancel“ to exit the menu without changes.
Local Setting:
Choose e.g. EUROPE from the list of local radio frequency standards.
Confirm your entry with „OK“ or tap „Cancel“ to exit the menu without changes.
After you change the settings, restart the radio application.
12
BASIC FUNCTIONS
RDS functions
This device supports RDS (Radio Data System) in the frequency range 87.5 - 107.9 MHz FM. The following RDS functions are only available if they are supported by the selected radio station.
AF (Alternative Frequency)
The AF function enables the automatic switching of the receiving frequency when leaving the reception range of a transmitter. The device then checks the reception quality and automatically switches to a different frequency, when the same program in another reception area is also available. This is done automatically, without the user is notice anything.
Tap on „AF“.
Tap on „TA“.
Select one of the categories after you tapped on „PTY“.
TA (Traffic Announcement)
The TA function enables the interruption of the media playback (audio player, CD, DVD, etc.) for traffic announcements. After the announcement, the previous media playback starts again.
PTY (Program Type)
The PTY function is a classification of radio stations in different categories. Each program of a RDS radio station is classified categorically.
After you have selected a category, the unit automatically searches for the next matching radio station in this category. During the „Automatic scan“ only programs will be found, that match to the chosen category. If you no longer want this function, select the category „None“.
13

BASIC FUNCTIONS
 BLUETOOTH™
Open the Bluetooth™ application by tapping on „Bluetooth™“ in the main menu.
PAIRING
At first pair the devices, if necessary refer to the manual of your mobile phone. Open the „Settings“ menu on your mobile phone and open the Bluetooth settings.
Turn on Bluetooth and then search for compatible devices. The
Bluetooth name of the device will be displayed.
Select your device from the device list in the phone and enter the PIN code 1234. Alternatively, you can also search your mobile phone under „Devices“ and connect to the device. Once you have connected your phone to the device, the pairing starts automatically as soon as the two devices are within range. Leave Bluetooth activated on the mobile phone. If a mobile phone has already been added to the list of Bluetooth devices, you can also manually pair the devices. The range for a satisfactory connection is about 10 m.
DISCONNECT
To disconnect the two Bluetooth devices, tap on „Devices“.
Choose the mobile phone from the list and tap „Disconnect“ or quit the Bluetooth connection on your phone.
Alternatively, the phone can also be deleted from the list, but after that, the automatic pairing is disabled and the mobile phone must be re-paired with the device. To delete the mobile phone from the list, select the name and press „Delete“. This is only possible if the devices are not currently paired.
The paired mobile phone has always priority and a phone call mutes always the currently playback of media (navigation, radio, audio, DVD, etc.). This applies both for incoming calls as well as outgoing calls.
14

BASIC FUNCTIONS
CONTACTS AND CALL HISTORY
Once your mobile phone has been connected via Bluetooth to the device, the synchronization of your contacts and call history starts automatically.
Tap on „Contacts“. |
Tap a name, and then tap the green handset |
|
to start a call. You can scroll through your |
|
phone book by swiping up / down or by tap- |
|
ping the arrows. |
Tap on the white search field to search for |
Tap on „History“. |
a contact, by typing its name on the screen |
|
keyboard. |
|
Tap on „Missed“ to display the missed |
Tap on „Received“ to display the already re- |
phone calls. |
ceived phone calls. |
15
 Loading...