

Page 1
20
READ AND SAVE THESE INSTRUCTIONS
APARTMENT,
Tower Style
Evaporative Humidifier
OWNERS
CARE
&
USE
MANUAL
MODEL:
D46 720 – Multi-Room
4 Speed Digital Controls
With Removable Bottles
5800 Murray St.
Little Rock, AR 72209
1-800-547-3888
• Automatic Humidistat
• Automatic Shutoff
• Quiet Setting for Nighttime
SAVE THE ENVIRONMENT
RECYCLE APPROPRIATE MATERIALS
To order parts and accessories call 1-800-547-3888
This product uses
2 wicks #1040.
1B71759 05/07
Page 2

IMPORTANT SAFEGUARDS
READ BEFORE USING YOUR HUMIDIFIER
1) This is an electrical appliance and requires attention when in use.
The length of cord used on this appliance was selected to reduce
the hazards of becoming tangled in, or tripping over a longer cord. If
a longer cord is necessary an approved extension cord may be
used. The electrical rating of the extension cord must be equal to or
greater than the rating of the humidifier. Care must be taken to
arrange the extension cord so that it will not drape over the counter
top or tabletop where it can be pulled on by children or accidentally
tripped over.
2) Do not place the cord under rugs, near loose drapes, in traffic areas,
nor near heat sources or combustible materials.
3) Do not use the humidifier if the cord is damaged.
4) Always unplug the power cord before filling, cleaning,
servicing, or when the unit is not in use.
5) This humidifier is UL listed with Essick Air brand evaporative wicks
in place. To maintain your UL rating, see your service center for all
repairs.
6) Regular cleaning is recommended. Refer to the CARE &
MAINTENANCE section in the manual.
INTRODUCTION
Your Essick Air evaporative humidifier adds invisible moisture to
your home by moving dry inlet air through a saturated wick. As air
moves through the wick, the water evaporates into the air, leaving behind
any white dust, minerals, or dissolved and suspended solids. Because
the water is evaporated, there is just clean and invisible moist air.
As the evaporative wick traps accumulated minerals from the water,
its ability to absorb and evaporate water decreases. We recommend
changing the wick at the beginning of every season. In hard water
areas, more frequent replacement may be necessary to maintain your
humidifier’s efficiency.
Use only Essick Air brand replacement wicks and chemicals. To
order parts, wicks and chemicals call 1-800-547-3888. The D46 Series
humidifier uses (2) Essick Air wicks # 1040. Only the Essick Air
evaporative wick guarantees the certified output of your humidifier. Use
of wicks other than Essick Air brand will void your warranty as well as the
certification of output and may reduce the output of your humidifier.
Dry air is drawn into the humidifier through the back and moisturized as it
passes through the evaporative wick. It is then fanned out into the room.
CAUTION: Do NOT position the unit directly in front of a hot air duct
or radiator. Do NOT place on soft carpet.
2
DÉSINFECTION DE L’APPAREIL
6) Remplissez de moitié les récipients et la base avec de l’eau et
rajoutez 1c. d’eau de javel dans chacun des deux. Mouillez toutes
les surfaces du boîtier, ensuite laissez agir la solution pendant 20
minutes puis rincez avec de l’eau jusqu’à ce que l’odeur de javel soit
partie. Séchez avec un chiffon doux. Vous pouvez essuyer les
parois extérieures de l’appareil à l’aide d’un chiffon doux mouillé
avec de l’eau fraîche.
7) Remplissez l’appareil et remontez-le selon les directives de
l’ASSEMBLAGE.
ENTREPOSAGE L’ÉTÉ
1) Nettoyez l’appareil tel qu’indiqué dans le chapitre portant sur les
« Soins et l’entretien ».
2) Jetez le filtre à mèche usé et toute l’eau qui serait restée dans la
base. Laissez le boîtier sécher complètement avant de le ranger.
N’entreposez pas l’appareil avec de l’eau dans les récipients ou
dans le réservoir.
3) N’entreposez pas l’appareil dans un grenier ou dans un endroit où la
température est élevée.
4) Installez de nouveaux filtres à mèche avant le début de la saison.
DIVISION CONFORT MAISON
GARANTIE LIMITÉE À UN AN
La garantie de l'humidificateur Essick Air couvre les défauts de matériel et de
fabrication pour une période d’un an à compter de la date d’achat. Cette
garantie s’applique uniquement à l’acheteur original du produit.
Dans les 12 mois suivant la date d’achat, Essick Air réparera ou remplacera, à
sa discrétion, toute pièce défectueuse de l'humidificateur couverte par cette
garantie.
Cette garantie vous donne des droits légaux spécifiques, et vous pouvez
aussi avoir d’autres droits qui variant selon l’état ou la province.
Cette garantie ne couvre pas les dommages résultant d’un mauvais usage ou
abus de l’humidificateur, accidents ou modifications du produit, usage
commercial ou dommage pendant le transport. Un mauvais usage comprend
les défaillances causées par négligence lors du nettoyage ou les pièces
souillées par des dépôts minéraux dûs à des conditions d'eau dure. Des
modifications du produit comprennent le remplacement de composants de
marques autres que Essick Air, y compris, mais non limités à, les filtres à
mèche.
Si vous avez besoin de nos services, apportez ou envoyez votre produit dans
un service après-vente Essick Air. Pour trouver un service après-vente dans
votre region, appelez 1-800-547-3888.
19
Page 3
4) Pour profiter de l’humiditéstat digital, appuyez sur le bouton de
vitesse pour tout réglage autre que OFF
d’humidité en utilisant les boutons up et down. L’humidité
augmentera de 5%. Lorsque le niveau d’humidité de la pièce
dépasse le réglage d’humidité, l’humidificateur s’arrêtera. Lorsque
le niveau d’humidité tombe sous le réglage d’humidité,
l’humidificateur s’allumera automatiquement.
5) Le témoin lumineux de remplissage indique lorsque l’appareil est
complètement vide. Le moteur s’arrête aussi. Pour remplir,
reportez-vous à l’Etape 4 - Information Importante de
Remplissage.
NOTA : En cas de condensation importante, un réglage sur une moindre
vitesse est recommandé.
MISE EN GARDE : Débranchez l’appareil avant le remplissage, le
nettoyage et l’entretien. Maintenez toujours la grille sèche.
SOINS ET ENTRETIEN
Le fait de nettoyer régulièrement votre humidificateur aide à
éliminer les odeurs et la croissance de bactérie et de fongus.
Normalement, l’eau de javel est un bon désinfectant et peut être utilisée
pour nettoyer la base de l’humidificateur après le nettoyage.
Nous vous recommandons de nettoyer l’humidificateur au moins
une fois toutes les deux semaines pour le maintien des meilleures
conditions environnementales de votre intérieur.
Nous recommandons, également, l’utilisation du traitement
Bacteriostat Essick Air à chaque remplissage du récipient d ’eau
afin d’éliminer la croissance éventuelle des bactéries. Ajoutez le
bactériostat selon les directives inscrites sur le récipient d’eau. Veuillez
composer le 1-800-547-3888 afin de passer commande du traitement
Bacteriostat portant la référence numéro 1970.
1) Éteignez l’appareil complètement et débranchez-le.
2) Mettez la base et les récipients dans l’évier et enlevez les récipients.
3) Soulevez le filtre à mèche de la base en laissant l’eau s’écouler.
Rincez les filtres à mèche sous de l’eau fraîche uniquement.
N’utilisez pas de savon, de détergent ni d’autres nettoyeurs sur le
filtre à mèche. Laissez-le s’égoutter dans l’évier.
DÉTARTRAGE
4) Videz l’eau contenue dans la base et les récipients d’eau.
Remplissez les récipients et la base à moitié avec de l’eau et
rajoutez 1 tasse de vinaigre non dilué. Laissez agir pendant 20
minutes. Videz la solution.
5) Mouillez un chiffon doux avec du vinaigre blanc pur et essuyez la
base pour enlever les dépôts. Rincez abondamment la base avec
de l’eau fraîche pour enlever les dépôts et la solution nettoyante
avant de désinfecter.
18
. Ensuite ajustez le réglage
ASSEMBLY, CONTROLS & OPERATION
1) Remove all packaging materials before operation.
2) The humidifier should be placed at least FOUR inches away from
any walls and away from heat registers. Unrestricted airflow into the
unit will result in the best efficiency and performance.
3) Remove the evaporative wicks and all of the remaining packaging
materials from the cabinet. Check to see that you have all of the
items removed from the box before discarding the packaging.
IMPORTANT FILLING INFORMATION
4) Fill by taking the tank/container to
your sink and fill with cool tap water,
or bottled distilled water. Do not use
warm water as this might cause
damage and leaking to the unit.
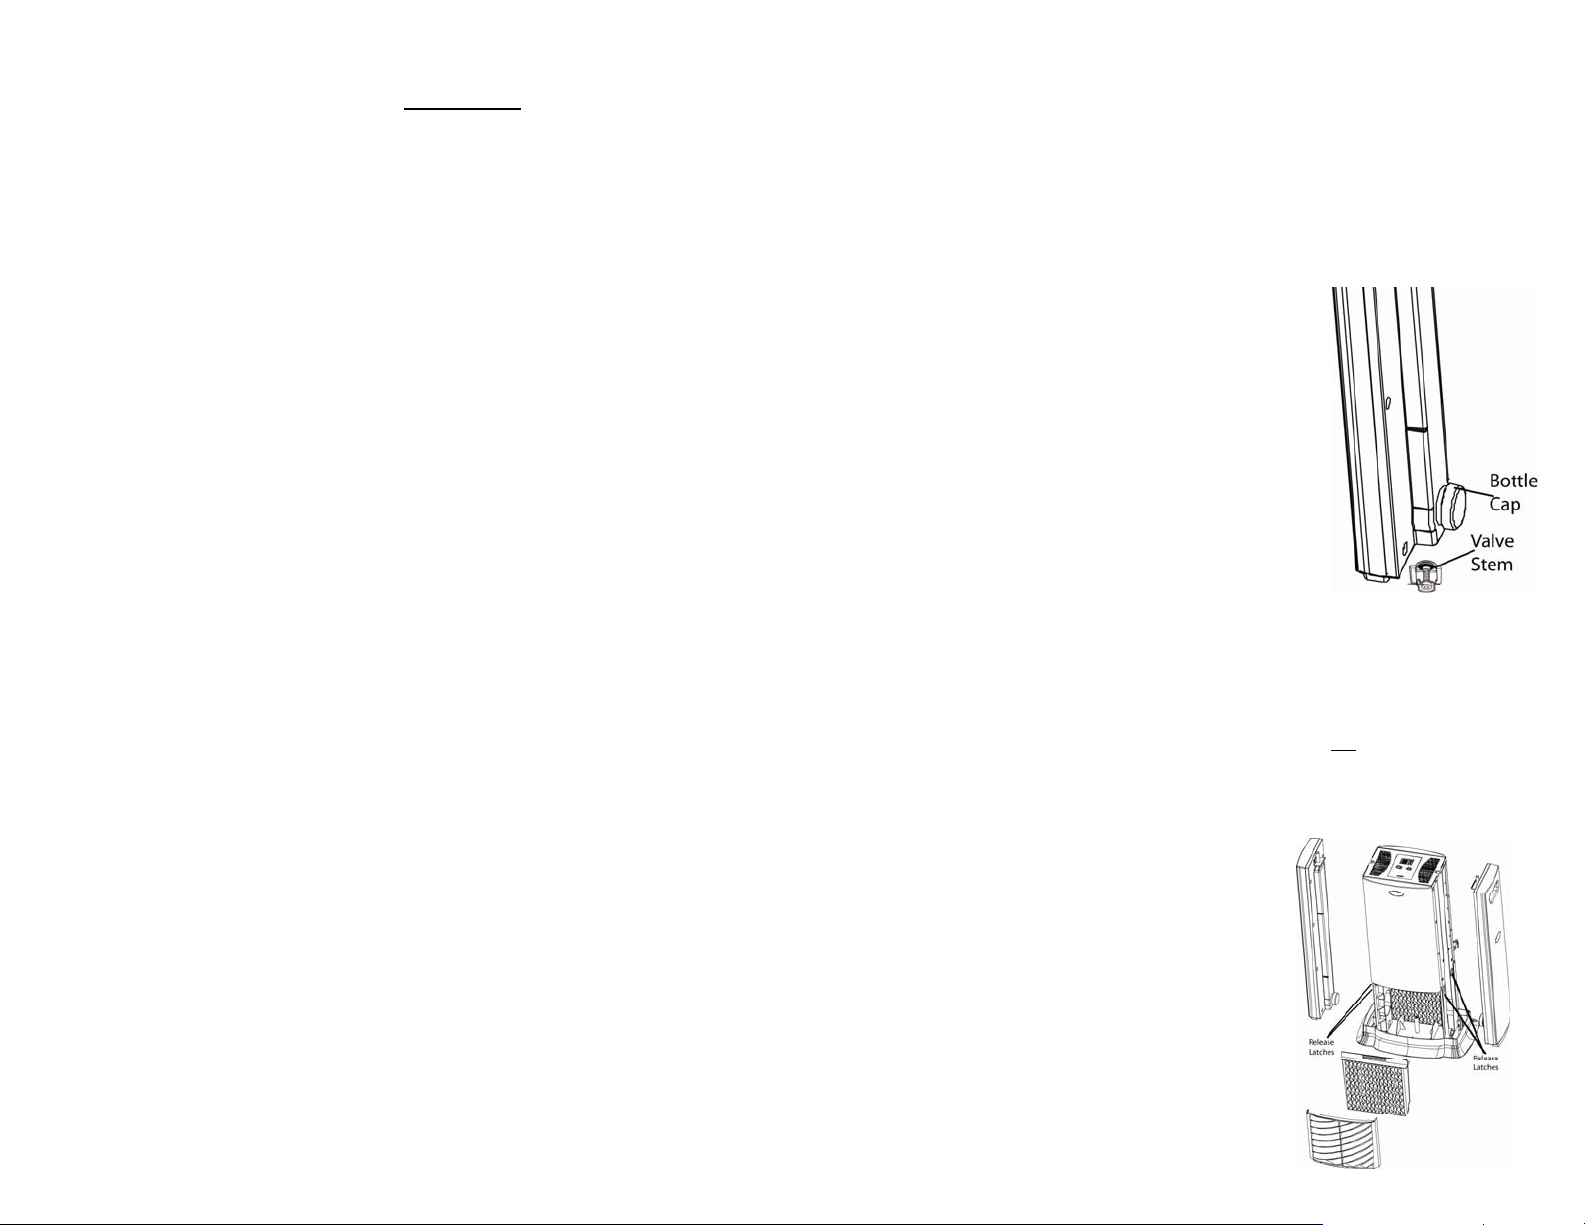
5) Remove the water bottle, observe the
water bottle cap, and locate the
valve stem mechanism (Figure A).
The cap may be removed for filling
and to provide easy access for
cleaning with a long soft brush. The
valve supplies a regulated amount of
water to the channel and wick. Do not
attempt to increase water flow by
modifying this valve or adding
additional holes to the bottle. Doing
so will invalidate your warranty and
may cause water damage to your home. NOTE: The water level
can be easily observed through the tinted water bottle. It is time to
refill the bottle when the refill light is on.
6) Fill the tanks with water. If you only have softened water available in
your home, you can use it, but you will notice a buildup of minerals
on the wick much sooner. The tanks hold 1.5
filling, be careful not to overfill.
7) When the tank is filled for the first time and the wick is still dry, it will
take approximately 30 minutes for the wick to absorb the water from
the base. After this initial
saturation, the tank should be
refilled again to obtain maximum
running time.
REPLACING EVAPORATIVE WICKS
8) Remove both bottles.
9) Depress both latches to remove
grille and wicks.
10) Replace wicks and grille, latches
will snap in place.
11) Replace bottles to original
position (See Figure B).
Figure A
gallons each. When
3
Figure B
Page 4

NOTE: Overfilling will result in water damage.
OPERATION
1) Plug cord into wall
receptacle. Your
humidifier is now
ready for use.
2) The digital control
allows you to use the
low setting for the
quietest operation or
a high setting for
maximum output.
3) For initial operation,
push the speed
button to 1 for the
sleep setting and
continuously press the button to increase desired speed. TO STOP
the unit, press the speed button for two seconds, or keep pressing
button until display turns OFF.
4) To take advantage of the digital humidistat, press the speed button
to any setting other than OFF
the up and down buttons. Humidity will increase in increments of
10%. When the room humidity level rises above the set humidity,
the humidifier will stop. When the humidity level drops below the set
humidity, the humidifier will turn on automatically.
5) The refill light will indicate when the unit is completely out of water in
both bottles. The motor will also shut off. To refill, refer back to
Step 4 – Important Filling Information.
NOTE: When excessive condensation exists, a lower speed setting i s
recommended.
CAUTION: Disconnect power before filling, cleaning or servicing
unit. Keep grille dry at all times.
CARE AND MAINTENANCE
Cleaning your humidifier regularly helps eliminate odors and
bacterial and fungal growth. Ordinary household bleach is a good
disinfectant and can be used to wipe out the humidifier base after
cleaning.
We recommend cleaning your humidifier at least once every two
weeks to maintain optimum environmental conditions for your home.
We also recommend using Essick Air Bacteriostatic Treatment each
time you refill your humidifier to eliminate bacterial growth. Add
bacteriostatic treatment according to the instructions on the bottle.
Please call 1-800-547-3888 to order Bacteriostatic Treatment reference
part#1970.
4
. Then adjust the set humidity by using
litres (1,5 gallons). En remplissant, faites attention à ne pas faire
déborder le réservoir.
7) Au premier remplissage du récipient d’eau, la mèche est sèche ;
cela prend environ 30 minutes pour que la mèche absorbe l’eau de
la base. Après la saturation initiale, le réservoir devra être rempli à
nouveau pour obtenir une durée
de fonctionnement maximale.
REMPLACEMENT DES FILTRES Á
EVAPORATION
8) Enlevez les deux récipients.
9) Appuyez sur les deux loquets
pour enlever la grille et les filtres.
10) Remettez les filtres et la grille en
place, les loquets
s’enclencheront.
11) Remettez les recipients en
position originale (Voir Figure
B).
NOTA : Nous recommandons
l’utilisation du traitement Bacteriostat
Bernis by Essick numéro 1970 à
chaque remplissage du récipient
d’eau afin d’éliminer la croissance des
bactéries. Ajoutez le bactériostat selon les directives inscrites sur le
récipient puis serrez bien le capuchon sur le récipient.
NOTA : Un débordement résultera en dommage d’eau.
FONCTIONNEMENT
1) Branchez le cordon
d’alimentation sur la
prise murale. Votre
humidificateur est
maintenant prêt à être
utilisé.
2) La commande digitale
vous permet de régler
l’appareil à une
vitesse basse pour un
fonctionnement
silencieux et à une
vitesse plus élevée
afin d’obtenir un rendement maximum.
3) Pour le fonctionnement initial, mettez le bouton de vitesse sur 1
pour le réglage sommeil et appuyez continuellement sur le bouton
pour augmenter la vitesse désirée. POUR ARRETER l’unité,
appuyez sur le bouton de vitesse pendant deux secondes, ou
maintenez le bouton jusqu'à ce que OFF s’affiche.
Figure B
17
Page 5

garantissent le rendement certifié à la sortie de votre humidificateur.
L’utilisation de filtres à mèche autres que la marque Essick Air annule la
garantie, la certification de la valeur à la sortie et peut réduire la sortie de
votre humidificateur.
L’air sec est tiré à l’intérieur de l’humidificateur en passant par l’arrière. Il
est humidifié au fur et à mesure qu’il passe à travers du filtre à mèche
d’évaporation. Il est ensuite poussé à l’extérieur dans la pièce.
MISE EN GARDE : Ne placez PAS l’humidificateur directement
devant une bouche d’air chaud ou d’un radiateur. Ne le placez pas
sur de la moquette ou des tapis mous.
ASSEMBLAGE, RÉGLAGE ET FONCTIONNEMENT
1) Retirez tous les matériels d’emballage avant d’utiliser l’appareil.
2) L’humidificateur doit être placé à au moins DIX centimètres (4 po)
de tout mur et loin de toute bouche d’air chaud. Un débit d’air libre
qui entre dans l’appareil assure une meilleure efficacité de
rendement.
3) Sortez les filtres à mèche d’évaporation et tout le matériel restant du
boîtier. Assurez-vous d'avoir sorti toutes les pièces de la boîte
avant de jeter l'emballage.
RENSEIGNEMENTS IMPORTANTS SUR LE REMPLISSAGE
4) Mettez le réservoir/récipient dans
l’évier et remplissez-le d’eau froide du
robinet, ou d’eau boullie distillée.
N’utilisez pas d’eau chaude car elle
pourrait causer des dommages et des
fuites à l’unité.
5) Enlevez le récipient à eau, observez
le bouchon récipient, et placez le
mécanisme de la tige à robinet
(Figure A). Le bouchon peut être
enlevé pour le remplissage et pour
fournir un accès aisé pour le
nettoyage avec une brosse longue et
souple. Le robinet fournit une
quantité d’eau réglée au canal et au
filtre à mèche. N’essayez pas
d'augmenter le flux de l'eau en modifiant ce robinet ou en rajoutant
des trous supplémentaires au récipient. En agissant ainsi vous
annulerez votre garantie et causerez des dommages d’eau à votre
maison. NOTA : Le niveau d’eau peut être aisément observé à
travers le récipient d'eau teinté. Il est temps de remplir le récipient
lorsque le voyant de remplissage est allumé.
6) Remplissez le réservoir avec de l’eau. Si vous n’avez que de l’eau
adoucie de disponible chez vous, vous pouvez l’utiliser mais
l’accumulation de minéraux sur le filtre à mèche d’évaporation se
formera plus rapidement. Les réservoirs contiennent chacun 9,5
16
Figure A
1) Turn off unit completely and unplug from outlet.
2) Carry base and bottles to cleaning basin and remove bottles.
3) Lift wick from the base allowing the water to drain. Rinse wicks
under freshwater only. Do not use soap, detergent, or any other
cleaners on the wick. Leave in sink to drain.
REMOVING SCALE
4) Empty the water from the base and bottles. Fill bottles and base ½
full with water and add 8 oz. (1 cup) of undiluted vinegar to each.
Let stand 20 minutes. Then empty solution.
5) Dampen a soft cloth with undiluted white vinegar and wipe out base
to remove scale. Rinse the base thoroughly with fresh water to
remove scale and cleaning solution before disinfecting.
DISINFECTING UNIT
6) Fill the bottles and base ½ full with water and add 1 teaspoon of
bleach to each container. Wet all surfaces on cabinet, then let
solution stay for 20 minutes then rinse with water until bleach smell
is gone. Dry with clean cloth. The outside of the unit may be wiped
down with a soft cloth dampened with fresh water.
7) Refill unit and re-assemble per ASSEMBLY instructions.
SUMMER STORAGE
1) Clean unit as outlined in Care & Maintenance section.
2) Discard used wick and any water in the base and allow unit to dry
thoroughly before storage. Do not store with water inside bottles or
reservoir.
3) Do not store unit in an attic or other high-temperature area.
4) Install new filters at beginning of season.
5
Page 6

The Essick Air humidifier warranty covers defects in materials and workmanship for a
period of one year from date of retail purchase. This warranty applies only to the original
purchaser of the product.
Within the first 12 months from the date of purchase. Essick Air will repair or replace, at
its discretion, any defective part of the humidifier covered by this warranty.
This warranty gives you specific legal rights, and you may also have other rights which
vary from state to state or province to province.
This warranty does not cover damage resulting from misuse or abuse of the humidifier,
accidents or alterations to the product, commercial use or damage during shipment.
Misuse includes malfunctions caused by negligence in cleaning or parts fouled with mineral
deposits due to hard-water conditions. Alterations to the product include the substitution of
non-Essick Air brand components including, but not limited to, wicks.
If service becomes necessary, take or send the product to any Essick Air service center in
your area. To locate one call 1-800-547-3888.
HOME COMFORT DIVISION
ONE-YEAR LIMITED WARRANTY
6
MESURES DE SÉCURITÉ IMPORTANTES
À LIRE AVANT D’UTILISER VOTRE HUMIDIFICATEUR
1) Ceci est un appareil électrique et demande de l’attention lors de son
utilisation. La longeur du cordon utilisé sur cet appareil a été choisi
pour réduire les risques d'enchevêtrement ou de trébuchage avec
un cordon plus long. Si un cordon plus long est nécessaire, il faut
utiliser une rallonge agréée. La puissance électrique de la rallonge
doit être égale ou supérieure à celle de l’humidificateur. Il faut faire
attention en installant la rallonge pour qu’elle ne recouvre pas le
plan de travail ou le dessus de table où elle risque d'être tirée par un
enfant ou sur laquelle on peut trébucher accidentellement.
2) Ne placez pas le cordon d’alimentation sous un tapis, près de
rideaux longs, dans un endroit à passage important ou près d’une
source de chaleur ou de matières combustibles.
3) N’utilisez pas l’humidificateur si le cordon d’alimentation est
abîmé.
4) Débranchez toujours le cordon d’alimentation avant de remplir,
de nettoyer ou d’entretenir l’appareil ou lorsque vous ne
l’utilisez pas.
5) Cet humidificateur est approuvé par le UL avec les filtres à mèche
d’évaporation de marque Essick Air en place. Afin de maintenir
votre classification UL, reportez-vous à votre centre de service
clientèle pour toutes les réparations.
6) Un nettoyage régulier est recommandé. Reportez-vous au
paragraphe ENTRETIEN et MAINTENANCE de ce manuel.
INTRODUCTION
L’humidificateur évaporateur d’Essick Air ajoute une humidité
invisible dans la maison en faisant passer de l’air sec à travers un filtre à
mèche saturé d’eau. Au fur et à mesure que l’air passe au travers du
filtre à mèche, l’eau s’évapore dans l’air en laissant derrière toutes
poussières blanches, minéraux et solides dissous ou en suspension.
Étant donné que de l’eau est évaporée, il n’y a que de l’air humidifié,
propre et invisible.
Au fur et à mesure que la mèche d’évaporation emprisonne et
accumule les minéraux contenus dans l’eau, sa capacité d’absorption et
d’évaporation d’eau diminue. Nous recommandons de changer le filtre à
mèche au début de chaque saison d’humidification. Dans les régions où
l’eau est dure, un remplacement plus fréquent peut être nécessaire afin
de maintenir l’efficacité de votre humidificateur.
N’utilisez que les produits chimiques et les filtres à mèche de
marque Essick Air en remplacement. Pour commander des pièces,
filtres à mèches et produits chimiques appelez le 1-800-547-3888. Les
filtres à mèches de numéro 1040 conviennent à tous les humidificateurs
de Série D46. Seuls les filtres à mèche d'évaporation d’Essick Air
1B71759 05/07
15
Page 7

LISEZ ET GARDEZ CES INSTRUCTIONS
Humidificateur Tour à
Evaporation,
APPARTEMENT
LEER Y GUARDAR ESTAS INSTRUCCIONES
Humidificador Vaporizador
Tipo Torre
Para APARTAMENTOS
MANUAL DE
GUIDES
D’UTILISATION
& D’ENTRETIEN
DU
PROPRIÉTAIRE
MODELE:
D46 720 – Multi-Pièces
4 Contrôles Numériques de Vitesse
Avec Récipients Démontables
• Humidistat automatique
• Arrêt automatique
• Réglage Silencieux pour Utilisation
Nocturne
14
SAVE THE ENVIRONMENT
RECYCLE APPROPRIATE MATERIALS
To order parts and accessories call 1-800-547-3888
Ce produit utilise 2
filtres à mèche
numéro1040.
CUIDADOS Y
USO DEL
PROPIETARIO
MODELO:
D46 720 - Multiambientes
4 controles digitales de velocidad
Con botellas removibles
• Humidistato Automático
• Apagado automático
• Funcionamiento silencioso para
uso nocturno
CUIDE EL MEDIOAMBIENTE
RECICLE LOS MATERIALES APROPIADOS
Para encomendar piezas y accesorios,
llame al 1-800-547-3888
Este producto
utiliza dos mechas
Nº 1040.
1B71759 05/07
7
Page 8

PAUTAS IMPORTANTES DE SEGURIDAD
LEER ANTES DE USAR SU HUMIDIFICADOR
1) Este es un aparato eléctrico que requiere atención al usarlo. El
largo del cable usado en este aparato fue elegido par reducir los
peligros de que se enrosque o se confunda con un cable más largo.
En caso de necesitarse un cable más largo, se puede usar una
extensión aprobada. El voltaje de la extensión debe ser igual o
superior al del humidificador. Se debe tener cuidado para ubicar la
extensión de forma que no quede doblada sobre el mostrador o
mesa donde un niño la pueda enganchar o desenchufarla
accidentalmente.
2) No dejar el cable bajo alfombras, cerca de cortinas, en áreas de
tránsito o cerca de fuentes de calor o materiales combustibles.
3) No utilizar el humidificador si el cable está dañado.
4) Antes de llenar, limpiar, efectuar reparaciones o cuando la
unidad no esté en uso, siempre desenchufar el cable.
5) Este humidificador está registrado en UL con filtros/mecha
evaporadoras marca Essick Air ya instalados. Para mantener la
clasificación de UL, consulte su centro de asistencia técnica para
cualquier reparación.
6) Se recomienda efectuar limpiezas regularmente. Ver la sección de
CUIDADOS Y MANTENIMIENTO de este manual.
INTRODUCCIÓN
Su humidificador vaporizador Essick Air agrega una humedad
invisible a su hogar moviendo el aire seco que entra a través de un
filtro/mecha saturado. A medida que el aire pasa a través del
filtro/mecha, el agua se evapora en el aire, dejando atrás cualquier polvo
blanco, minerales o sólidos disueltos y suspendidos. Como el agua se
evapora, queda solamente aire húmedo limpio e invisible.
A medida que el filtro/mecha atrapa los minerales acumulados del
agua, su capacidad de absorber y evaporar el agua se reduce.
Recomendamos cambiar el filtro/mecha al comienzo de cada
temporada. En áreas con agua dura, pueden ser necesarios cambios
más frecuentes para mantener la eficiencia del humidificador.
Usar solamente repuestos para filtros/mecha y productos químicos
marca Essick Air. Para encomendar piezas, mechas y productos
químicos, llame al 1-800-547-3888. El humidificador Serie D46 utiliza 2
mechas Essick Air Nº 1040. Solamente las mechas evaporadoras
Essick Air garantizan el rendimiento certificado de su humidificador. El
uso de filtros/mecha que no sean marca Essick Air invalidará su
garantía, así como la certificación del rendimiento y puede reducir el
rendimiento de su humidificador.
El aire seco entra al humidificador por la parte trasera y se humidifica a
medida que pasa por el filtro/mecha evaporador. Después se expulsa al
ambiente por medio del ventilador.
8
13
Page 9

ALMACENAMIENTO DURANTE EL VERANO
5) Limpiar la unidad como se describe en la sección Cuidados y
Mantenimiento.
6) Desechar el filtro/mecha usado y el agua de la base y dejar secar
bien el gabinete antes de guardarlo. No guardarlo con agua dentro
de las botellas o del depósito.
7) No almacenar la unidad en sótanos o áreas con alta temperatura.
8) Instalar nuevos filtros al comienzo de la temporada.
DIVISIÓN DE CONFORT PARA EL HOGAR
GARANTÍA LIMITADA DE UN AÑO
La garantía del humidificador Essick Air cubre defectos de materiales y mano de obra
durante un período de un año a partir de la fecha de la compra al por menor. Esta garantía
se aplica solamente al comprador original del producto.
En los primeros 12 meses después de la fecha de compra, Essick Air reparará o
cambiará, a su criterio, cualquier pieza defectuosa del humidificador cubierta por esta
garantía.
Esta garantía le otorga derechos legales específicos y Usted también puede tener otros
derechos que varían de un estado a otro o de una provincia a otra.
Esta garantía no cubre daños provocados por uso incorrecto o abuso del humidificador,
accidentes o alteraciones del producto, uso comercial o daños durante el envío. El uso
incorrecto incluye fallas de funcionamiento por negligencia en la limpieza o piezas
obstruidas con depósitos minerales debido a condiciones causadas por agua dura. Las
alteraciones del producto incluyen el cambio de componentes que no sean marca y Essick
Air, no limitándose a los filtros.
Si es necesario hacer alguna reparación, lleve o envíe el producto a una asistencia
técnica Essick Air. Para ubicar un centro de asistencia, llame al 1-800-547-3888.
12
PRECAUCIÓN: NO dejar la unidad directamente en frente a tuberías
de aire caliente o radiadores. NO ubicarlo sobre moquettes blandas.
ENSAMBLAJE, MANDOS Y OPERACIÓN
1) Sacar todos los materiales de embalaje antes de la operación.
2) El humidificador debe ubicarse a por lo menos CUATRO pulgadas
de las paredes y lejos de fuentes de calor. El flujo de aire irrestricto
en la unidad mejora su eficiencia y el desempeño.
3) Sacar las mechas evaporadoras y todos los demás materiales de
embalaje del gabinete. Verificar si se sacaron todos los ítems de la
caja antes de desechar el embalaje.
INFORMACIONES IMPORTANTES PARA EL LLENADO
4) Para llenar, llevar el tanque/recipiente
a la pileta y llenar con agua fría del
grifo o agua destilada embotellada.
No use agua caliente porque esto
puede causarle daños a la unidad y
pérdidas.
5) Sacar la botella de agua, observar la
tapa de la botella de agua y ubicar el
mecanismo del eje de la válvula
(Figura A) La tapa se puede sacar
para el llenado y para permitir fácil
acceso para limpieza con un pincel
blando largo. La válvula le suministra
una cantidad regulada de agua al
canal y a la mecha. No tratar de
aumentar el flujo de agua modificando
este valor o agregándole agujeros a
la botella. Al hacer esto, se invalidará la garantía y pueden haber
daños en su hogar. OBSERVACIÓN: El nivel de agua se puede
observar fácilmente a través de la botella de agua teñida. Cuando la
luz de rellenado se prende, hay que reabastecer la botella con
agua.
6) Llenar los tanques con agua. Si
sólo tiene agua blanda en su
casa, puede usarla, pero notará
una acumulación más rápida de
minerales en las mecha
vaporizadora. El tanque tiene
capacidad para 1.5
llenarlo, tenga cuidado para no
desbordarlo.
7) Cuando se llene el tanque por
primera vez y el filtro/mecha
todavía esté seco, llevará cerca
de 30 minutos para que el
filtro/mecha absorba el agua de
galones. Al
Figura A
9
Figura B
Page 10

la base. Después de la saturación inicial, el tanque debe volverse a
llenar para obtenerse el tiempo máximo de funcionamiento.
SUBSTITUCIÓN DE MECHAS EVAPORADORAS
8) Sacar las dos botellas.
9) Apretar las dos trabas para sacar la rejilla y las mechas.
10) Reinstale las mechas y la rejilla, las trabas vuelven a su lugar.
11) Reinstale las botellas en su lugar original (Ver Figura B).
OBSERVACIÓN: Recomendamos usar el Tratamiento Bactericida
Essick Air Nº 1970 siempre que rellene la botella de agua para eliminar
el crecimiento de bacterias. Añadir el bactericida de acuerdo a las
instrucciones de la botella y después apretar bien la tapa.
OBSERVACIÓN: El desbordamiento provocará daños por el agua.
OPERACIÓN
1) Enchufar el cable al
receptáculo de la
pared. Su
humidificador está
listo para usar. El
humidificador debe
ubicarse a por lo
menos CUATRO
pulgadas de las
paredes y lejos de
fuentes de calor. El
flujo de aire irrestricto
en la unidad mejora
su eficiencia y el desempeño.
2) El control digital le permite usar la velocidad más baja para un
funcionamiento más lento o la más alta para el máximo rendimiento.
3) Para la operación inicial, apriete el botón de velocidades una vez
para la configuración de espera y apriételo constantemente para
aumentar la velocidad deseada. PARA PARAR la unidad, apriete
el botón de velocidades durante dos segundos o manténgalo
apretado hasta que aparezca OFF en el visor.
4) Para sacar provecho del humidistato digital, apriete el botón de
velocidades hasta que quede en cualquiera menos en OFF
Después ajuste la humedad usando los botones de arriba y de
abajo. La humedad aumentara de 5 en 5%. Cuando en nivel de
humedad del ambiente aumente más que la humedad determinada,
el humidificador se parará. Cuando el nivel de humedad c aiga
abajo de la humedad establecida, el humidificador se prenderá
automáticamente.
5) La luz de rellenado indicará cuando la unidad esté completamente
sin agua. El motor también se apagará. Para rellenar, ver el
Punto 4 anterior – Informaciones Importantes de Llenado.
10
OBSERVACIÓN: Cuando haya condensación excesiva, se recomienda usar
una velocidad más baja.
PRECAUCIÓN: Desenchufar la unidad antes de llenarla, limpiarla o
efectuar reparaciones en ella. Siempre mantener la rejilla seca.
CUIDADOS Y MANTENIMIENTO
Limpiar su humidificador regularmente ayuda a eliminar olores
y el crecimiento de bacterias y hongos. El blanqueador doméstico
común es un buen desinfectante y se puede usar para repasar la base
del humidificador después de limpiarla.
Recomendamos limpiar su humidificador por lo menos una vez cada
dos semanas para mantener las condiciones ambientales ideales de su
hogar.
.
También recomendamos usar el Tratamiento Bactericida Essick Air
cada vez que rellene su humidificador para eliminar el crecimiento
bacteriano. Añadir el bactericida de acuerdo a las instrucciones del
embalaje. Para encomendar el Tratamiento Bactericida, llame al 1-800547-3888.
1) Apague la unidad completamente y desenchúfela del tomacorriente.
2) Lleve la base y las botellas para limpiarlas en la pileta y saque las
3) Levante la mecha de la base dejando salir el agua. Enjuagar las
REMOCIÓN DE SARRO
4) Vaciar el agua de la base y de las botellas. Llenar las botellas y la
5) Humedecer un paño suave con vinagre blanco sin diluir y frotar la
DESINFECCIÓN DE LA UNIDAD
6) Llenar las botellas y la base con agua hasta la mitad y agregarle
7) Rellenar la unidad y reensamblarla de acuerdo a las instrucciones
botellas.
mechas solamente con agua limpia. No usar jabón, detergente o
cualquier otro producto de limpieza en la mecha. Dejarla escurrir en
la pileta.
base hasta la mitad con agua y añadirle 8 Oz. (1 taza) de vinagre
sin diluir a cada uno. Dejar reposar durante 20 minutos. Después
vaciarlo.
base para retirar el sarro. Enjuagar la base cuidadosamente con
agua limpia para remover el sarro y la solución de limpieza antes de
desinfectarlo.
una cucharadita de té de blanqueador a cada recipiente.
Humedecer todas las superficies del gabinete, después dejar
descansar la solución durante 20 minutos y enjuagar con agua
hasta que desaparezca el olor a blanqueador. Secar con un paño
limpio. Se puede repasar la parte de afuera de la unidad con un
paño humedecido en agua limpia.
de ENSAMBLAJE.
11
 Loading...